- Manuals
- Brands
- flsun Manuals
- 3D Printers
- Instruction manual
-
Contents
Table of Contents -
Bookmarks
Quick Links
FLSUN-QQ
Instruction Manual
(QQ-S)
VK-3D
Facebook-Flsun
принтер Flsun
3D Printer
Zhengzhou Chaokuo Electronic Technology Co., Ltd.
Related Manuals for flsun QQ
Summary of Contents for flsun QQ
-
Page 1
FLSUN-QQ Instruction Manual (QQ-S) VK-3D Facebook-Flsun принтер Flsun 3D Printer Zhengzhou Chaokuo Electronic Technology Co., Ltd. -
Page 2: Table Of Contents
B-1. Assembly Instructions — — — — — — — — — — — — — — — Thank you for choosing the FLSUN 3D Printer.For your con- A-2. 3D Printer Parameters — — — — — — — — — — — B-2.
-
Page 3: A-1. Equipment Introduction
Equipment Introduction 3D Printer Parameters Basic Part Basic Part Molding technology ENV TEMP 5-40℃ Filament Temperature Belt fixing nut Filament frame Nozzle TEMP Print size φ255×360mm 0-260℃ parameter Shell screws Hot bed TEMP Print accuracy 0.05-0.3mm 0-110℃ Extruder Slider Parallel arm Positional accuracy XYZ 0.01mm Slicing software…
-
Page 4: A-4. Packing List
Cautions Packing List Basic Part Basic Part 220V 110V 1. The printer default selection voltage is ,if you need to use ,please change it before using. SD card 2. The assemble and user manual,software and other files are in the with printer.
-
Page 5: B-1. Assembly Instructions
3.Install top shell Assembly instructions Use Part 1.Preparation Logo and touch screen Align all axis with seat Upper shell completed holes then press to bottom are at the same direction Open package All the components All screws and wrenches 4.Assembly belt for assembly for assembly 2.Install optical axis…
-
Page 6
7.Install the side shell and bracket 5.Connection limit switch and Titan extruder Put side shell from top Tighten fixing screw of Filament holder mounted Connect the set of Connect others in the Untie the wire Install the Titan extruder then insert to bottom shell the side shell on the upper shell connectors… -
Page 7
B-2-1 Auto Leveling Use Part 1.Install leveling Sensor 2.Leveling Click TOOLS→Autolevel Click LEVEL →Autolevel Connecting magnet Connecting the autolevel After autoleveling, remove Ready autolevel sensor sensor (When autoleveling, In order to ensure the leveling sensor the accuracy of data ,the nozzle moves very slowly)… -
Page 8
B-2-2 Adjust Z0 before printing Use Part Make sure the leveling sensor has been removed before adjusting Z0 ‘+’ nozzle move up After auto leveling, put Move the A4 paper to test Click ‘Save’ Click ‘Adjust Z’ Click ‘Move Z0’ an A4 paper and adjust ‘-’… -
Page 9: B2-3. Filaments Installation
B-2-3 Filaments Installation Use Part 1.Install filaments 2.Automatic feeding Click Choose EXTRUDER 1 Click Confirm to After completed Click TOOLS→CHANGE Click IN automatic feeding Confirm Install the filament Press hard in the The filament pass Insert the filament and cut a triangle direction of the arrow through the quick through the small hole…
-
Page 10: B2-4. Software Installation
Use Part 1.Dual click to install Cura 2.Open Cura Open Cura Click Load to load Software auto-slice , save Gcode to anywhere STL file 3.Click Settings→Printer→Add Printer→FLSUN QQ→Add Printer→Finish 2.Machine Operation Click PRINT Choose file Automatic printing Insert SD card…
-
Page 11
Precise Leveling Use Part 2.You can adjust the Z-offset while printing .The value can save 1.After automatic leveling, maybe the nozzle is too close or too far from the platform. Automatically, There is no need to repeat the operation. ①The nozzle is too ③The nozzle is middle ③The nozzle is too low from the platform… -
Page 12: B-4. Touch Screen Introductions
3.Preheat 4.Extrusion Touch Screen Introductions Use Part Preheat bed Heat Extrude Nozzle1 Adjust Heat bed 1.Print 2.More Operations Filament extrude speed nozzle nozzle1 Stop print Pause print X/Ydirection X/Ydirection Filament Close heat Add 1℃ Add 10℃ Extrude Back increase in decrease in move10 size 0.1…
-
Page 13
3. What is the printing temperature of the common materials? Common Problems Use Part Number Material Nozzle Hot bed Number Material Nozzle Hot bed 195-210 50-60 190-210 50-60 1. What to do after automatic leveling? 220-250 80-100 210-230 40-60 Nylon 200-220 50-60 WOOD… -
Page 14: B-7. After-Sales Service
1.Is there Gcode 2.Format SD card 3.Change SD card Start SD card 1.Format SD card 2.Change SD card have a shelf life of 12 months 1.Customers who purchase FLSUN 3D printers SD card Can identify Other Gcode Silce Slice again…
-
Page 15
Type: Purchase date: If you have any questions, please contact us at the first time and we will solve it for you. Name: Damage date: Email: Service@flsund3d.com Address: Damage details: james@flsund3d.com Facebook group: FLSUN QQ 3D Printer Owners Phone: Amazon/AliExpress/Ebay/Others:…
Заметка просто чтобы желающие купить понимали сколько им возможно придётся вложить времени и сил в QQ-S чтобы он стал действительно быстрой и всё равно не факт, что толковой дельтой.
Стал обладателем FLSun QQ-S в январе 2019 года. Это была первая версия с пластелиновым эффектором и калибровкой не концевиком, а «соплом по проводящей пластине».

Явной потребности печатать много 3-д деталей не было (хотя при всех недостатках, принтер успел напечатать изрядно деталей необходимых мне для работы с вполне достаточным качеством), поэтому решено было брать не хороший принтер для работы, а интересный для себя.
В принципе мне было понятно, что FLSun QQ-S это если и не плохой принтер, то ни разу не хороший. Но было непонятно почему. На момент покупки принтера обзоров вообще не было, через недельку появился «обзор» от Вольтника.
Что я как юзер, могу сказать про КуКусика? Обзор Димы Соркина видели? Дима не коснулся 60-70% минусов этого «агрегата». Мне кажется Дима не пытался печатать ABS/SBS/HIPS/PP-GF. Если бы попробовал, то он бы рассказывал об этом агрегате совсем в других словах и выражениях 
Но это лирика. Если коротко, то результат хоть как-то похожий на стандарты качества 2019 года (отлаженный Ender-3) на QQ-S можно получать только при печати PLA пластиком на скоростях 30мм/с.
Ну а мне было интересно полюбится с дельтой и я свою любовь реализовал почти полностью. И принтер спустя 11 месяцев ещё далёк от состояния «нормально печатает».
Как выглядит сейчас принтер видно на фото вверху. А вот результат печати Pet-G, сопло 0,4, слой 0,2 на скорости 100мм/с (просто 100мм/с, а не вот эти фокусы, когда внутреннее заполнение 100, а наружные периметры — 20мм/с) и ускорении 3500мм/с2, рывок — 30мм/с.


В жизни кубики выглядят не совсем ужасно, и уж точно в разы лучше, чем кубики, напечатанные моим стоковым QQ-S со скоростью наружного периметра хотя бы 60мм/с (при этом в стоке ускорение вообще смешное — 1000м/с2).
Ну и PLA на тех же параметрах (100мм/с, 3500мм/с2) слой, 0.2, но сам кубик 40х40.

Для понимания того, что такое стоковый QQ-S — когда в мае 2019 года на QQ-S вышел Марлин (спасибо Алексею Полякову — он герой) и я смог воспользоваться стандартным G33 тестом он выдал мне Std Dev = 0.440). То есть дельта хоть как-то печатала исключительно за счёт Auto Bed Level, дико наклоняя сопло, но как-то печатала). После всех доработок у меня sd в районе 0.060 и это всё равно плохо просто механически для дельта принтера).
Для тех кто захочет (не дай бог) купить Кукусик список уже сделанных апгрейдов:
1) Материнка. Родная материнка дикий FAIL- я заменил на Китайский клон Дуэта 2 Wi-Fi. Неплохие драйвера TMC (учитывайте что у Wi-Fi версии есть только SpreadChop, не StealthChop, СтесЧоп есть у Маэстро версии Дуэта), очень лёгкую настройку и подбор параметров «на ходу». В принципе какой-нибудь SKR 1.3 или Gen.L будут тоже норм, только ещё придётся освоить компиляцию Марлина 2.0. Смузи, Клипер, Репитер… Да что угодно будет лучше чем родная плата. Чтобы вы поняли насколько она дно доннное. На родной плате объединены свой источник 5В и 5В, идущие по USB. Финиш, капец. Так делать нельзя. На том же СКРе сделан тумблер для выбора режима работы.
2) Валы мне пришли 7.92-7.94мм. Понятно что комплектные втулки на них люфтили как безумные. Заменил на IGUS (их можно стягивать для выборки люфта). Кстати LM8UU за месяц эксплуатации вполне внятно «накатали» на этих валах явно видимые дорожки. Так что с закалкой у моих валов тоже не ахти.

3) Заменил голову (родной хотэнд — это Франкенштейн с диким месивом из запчастей разных версий. Вот как про него написано в «народном FAQ»: It’s a combination of: XCR BP6 block, mk8 nozzle, V6-clone heatsink & throat. И всё это собрано на клей.), плюс у родной головы вентилятор 40х40х15 обдувает ВЕРХНИЕ рёбра радиатора, увеличивая зону расплава, после чего воздух выдувает вниз, вдоль хотэнда. АБС и сбой в виде Th-Error3 (см. пункт про плохую материнку) говорят вам спасибо ) Так что у меня теперь установлен целиком BP6 (термобарьер на винтиках), чтобы было легче обслуживать и можно было менять хотэнд с тефлоном на фул-метал хотэнд за минуту-две (сменные эффекторы пока «в работе»).

4) Вообще заменил весь эффектор, т.к. заменил тяги на fish-eye подшипниках трения (буквально через 3 месяца работы со смазкой там стали слишком большие люфты) на нормальные по прочности тяги с магнитными подшипниками трения.
5) Установил экструдер (добротный комплектный клон Титана) в виде «летающего экструдера), уменьшив длину трубки подачи с 80см, до 30см (ретракт стал 2.5-4мм против 8-12мм).
6) Масса доработок корпуса на прочность и жёсткость: демонтаж хилого дна с ножками, «башмаки» на двигатели осей, державки 8мм валов, распорки стоек/крышки.
7) Всякое по мелочи, вроде проводки/резисторов для утихомиривания радиатора/подсветки, замена ленивцев и так далее.
 Пассивная термокамера.
9) Доработки термостола. Он по умолчанию стоит на проставках из АБС, Карл! Стол, который греется до 110 градусов, чтобы АБС начинал «течь», стоит на проставках из АБС! А ещё, Карл, они ультрабазу положили на 2мм алюминий на термопластичный клей. На термопластичный клей, Карл! Хорошо что не на обычные «термогвозди», которые при 70градусах плывут. Но при 110 градусах мой стол начинало «пучить».
Что планирую сделать дальше?
1) Обдув надо спроектировать и сделать воздуховоды точно направляющие поток. При реальной скорости 100мм/с турбинок 40х40х10 дующих просто «куда-то примерно под сопло» уже не хватает для PLA, надо или их точнее нацеливать или делать воздуховоды.
2) Ремни. Пришли GATES и PU с стальным кордом. Хочу посмотреть как с ними будет работать. Просто интересно.
3) Перепечатать печатные детали из нового пластика (есть на примете один пластик насквозь перспективный для деталек 3д принтеров, обещает быть лучше чем ABS и даже PLA).
4) Заменить валы на 12мм стальную калибровку.
5) Заменить пластиковые проставки на тягах на проставки с более глубокими «лунками» или вообще переделать тяги на ещё более мощные магниты (после апгрейдов жёсткости эффектора/валов именно это место стало «слабым» местом конструкции и башку стало иногда «срывать» с них (раньше она просто на нежёсткости валов могла на 0,5-1мм гулять при ударе о наплыв пластика или ином ЧП, а теперь фига-два — башку натурально «отрывает» с магнитных опор, т.к. гулять ей некуда и хорошо если манит обратно притягивает шарик к тяге (как разберусь куда можно выложить видео в 120к/с — выложу, крайне интересное зрелище, как срывает магнитную связь силой почти 400гс и потом тяга обратно находит шарик) ).
6) При возможности доработать стол. Заменить хилую 2мм алюминиевую пластину, на что-то вроде 4-5мм с возможностью регулировки и установки Пьезо-датчика.
П.С. В общем я брал принтер для того чтобы понять как устроена линейная дельта и в чём в ней подводные камни? Я этого получил. Брать QQ-S для чего-то кроме медленной печати ПЛА пластиком — крайне сомнительное решение в 2019-2020 году. Где-нибудь году в 2016-2017 оригинальный QQ может быть был и не самым плохим принтером.
П.П.С. В целом если есть нестерпимое желание брать линейную дельту — лучше берите что-то с маленькой областью печати. На линейных направляющих или на колёсах. А лучше вообще не берите дельту Ну только если ощущаете нестерпимый зуд в ладошках.
What motherboard does SR use?
SR uses two different motherboards, SKR V1.3 and Robin Nano V3.0. If your printer is using Robin Nano V3.0,there will be a U disk interface, just like in the photo NO1.
What stepper driver block does SR use?
4 TMC2209
What is the model of the SR belt? What is the length of one single belt?
The model of the SR belt is: 2GT 10mm. The length of a single belt is 1250mm.
What firmware does SR use? Where can I get the source files?
SR uses an open source firmware based on Marlin 2.0.8, you can download the source file from FLSUN’s official website.
What type of nozzle does SR use?
0.4mm volcano nozzle.
What are the models of the three fans on the SR hot end?
Two 4010 turbo fans and one 4010 cooling fan.
What is the length of the SR ptfe tube?
565mm.
Why does the printer continue to print for about 1 minute when the filament run out?
This is deliberately designed to prevent the filament from getting stuck in the filament detecting sensor, which may damage the filament detecting sensor when auto return the filament.
What is the current of the extruder motor? How to modify the current of the extruder motor?
The default extruder current of SR is 0.95A. Use Repetier to connect the printer, enter the command «M906 T0 E (value)», and then enter «M500» to save.For example, enter «M906 T0 E800» to modify the extruder current to 0.8A.
What is the default steps of SR’s extruder? How to modify the extruder steps?
The default steps of SR extruder is 420. Use Repetier to connect the printer, enter the command «M92 E (value)», and then enter «M500» to save the steps of the extruder, for example enter the command «M92 E370» can modify the steps of the extruder to 370.
What is the maximum printing speed of SR?
When the printing speed exceeds 200mm/s, the printing quality will start to deteriorate, so we do not recommend setting the printing speed to exceed 200mm/s.
What is the length of the SR parallel arm?
315mm, the distance from the center to the center of the two fish eyeballs.
What model of SR heating rod is?
24V 40W.
What model is the thermistor ?
NTC 100K.
What model is the SR power supply?
24V 15A 360W.
What model of SR motherboard cooling fan is?
24V 6010 fan.
Table of Contents for flsun QQ:
-
Adjust Z0 before printing After auto leveling, put an A4 paper and adjust the position of Z0 Click ‘Move Z0’ Click ‘Save’ Click ‘Adjust Z’ (The distance between the nozzle and the platform is an A4 paper.) ‘+’ nozzle move up ‘-’ nozzle move down ‘0.01mm’ adjust move range Make sure the leveling sensor has been removed before adjusting Z0 B Use Part B-2-2 1211 Move the A4 paper to test the distance of nozzle from the platform
-
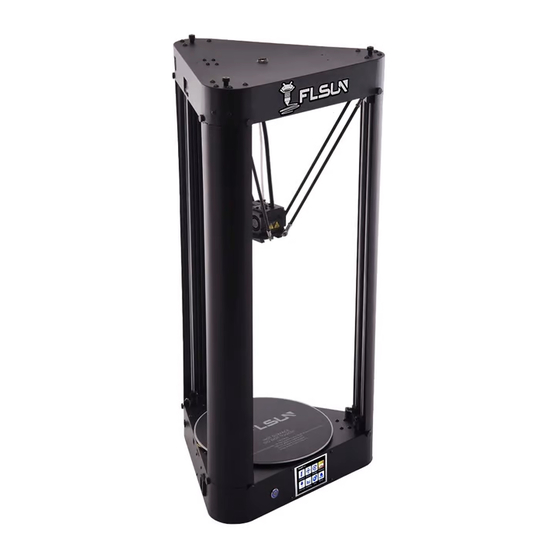
Equipment Introduction A Basic Part A-1 3D Printer Parameters A Basic Part A-2 1 Filament SD card slot USB interface Parallel arm Slider Side shell Belt fixing nut Power socket Shell screws Heating block Optical axis Touch screen Filament frame Extruder Turbo fan Nozzle Hot bed 1 7 16 17 15 11 12 13 14 8 9 10 2 3 4 5 6 Molding technology FDM Print size φ255×360mm Print accuracy 0.05-0.3mm Positional accuracy XYZ 0.01mm Nozzle type Single nozzle Nozzle diameter 0.4mm Print speed 10-30
-
Type: Name: Address: Phone: Purchase date: Damage date: Damage details:
-
Cautions A Basic Part A-3 Packing List A Basic Part A-4 1. The printer default selection voltage is 220V,if you need to use 110V,please change it before using. 2. The assemble and user manual,software and other files are in the SD card with printer. 3. The nozzle part and heated bed can produce high temperature when the printer is working ,so do not touch them by hand to avoid being scalded. 4. Before the automati
-
Instruction Manual FLSUN-QQ Zhengzhou Chaokuo Electronic Technology Co., Ltd. VK-3D принтер Flsun Facebook-Flsun 3D Printer (QQ-S)
-
After-sales Service B Use Part B-7 1.Customers who purchase FLSUN 3D printers have a shelf life of 12 months. 2.The warranty period for all products is from the date of purchase. 3. You can find a solution from the user’s manual, or contact the customer service of the website where you bought the printer. 4. You can also send mail to our enterprise email: [email protected] please attach the purchase website and order number, and we will also solve the problem for you at the first time. 5. After-sales and pre-sale support time: Monday to Saturday: 9.00-18.00
-
Auto Leveling B Use Part B-2-1 1.Install leveling Sensor 2.Leveling Ready autolevel sensor Click TOOLS→Autolevel Click LEVEL →Autolevel (When autoleveling, In order to ensure the accuracy of data ,the nozzle moves very slowly) 9 10 Connecting magnet After autoleveling, remove the leveling sensor Connecting the autolevel sensor
-
Basic part A A-1. Equipment Introduction ————1 A-2. 3D Printer Parameters —————2 A-3. Cautions ————————3 A-4. Packing List ———————4 Use part B B-1. Assembly Instructions ————— 5 B-2. Using Instructions —————— 9 B2-1. Auto Leveling ——————— 9 B2-2. Adjust Z0 ————————11 B2-3. Filaments Installation ——————13 B2-4. Software Installation —————-15 B2-5. First Printing —————
-
Common Problems B Use Part B-5 1. What to do after automatic leveling? 3. What is the printing temperature of the common materials? 4. The first layer can not normally stick to the platform. 5. The nozzle block 2.When the nozzle is too close or too far away from the hot bed after leveling? Remove the leveling sensor, then adjust Z0,install the filament, then preheat the nozzle to 210 ° C, preheat the hot bed to 60 ° C, feed filament and start printing. Click once to move the nozzle 0.1, Z+ nozz
-
Precise Leveling B Use Part B-3 1.After automatic leveling, maybe the nozzle is too close or too far from the platform. 2.You can adjust the Z-offset while printing .The value can save Automatically, There is no need to repeat the operation. 17 18 Nozzle Nozzle Nozzle filament filament filament ①The nozzle is too low from the platform ③The nozzle is too far from the platform ③The nozzle is middle from the platform Click Z+0.1 nozzle moves up 0.1 Click Z-0.1 nozzle moves down 0.1
-
Software Installation B Use Part B-2-4 1.Slice 2.Machine Operation 1.Dual click to install Cura 3.Click Settings→Printer→Add Printer→FLSUN QQ→Add Printer→Finish 2.Open Cura Open Cura Insert SD card Click PRINT Automatic printingChoose file Click Load to load STL file Software auto-slice , save Gcode to anywhere First Printing B Use Part B-2-5 15 16
-
Filaments Installation B Use Part B-2-3 1.Install filaments 2.Automatic feeding Install the filament and cut a triangle Press hard in the direction of the arrow Insert the filament through the small hole The filament pass through the quick connector will be ok Click TOOLS→CHANGE Choose EXTRUDER 1 Click IN Click Confirm to automatic feeding After completed Click Confirm 13 14
-
Touch Screen Introductions B Use Part B-4 1.Print 2.More Operations Stop print Resume print Adjust fan speed Pause print Adjust temp Adjust speed Preheat bed nozzle Close heat Change Filament Feeding Take out filament E1 change filament Home Auto level Moves down 0.1 Moves up 0.1 Close all motors Move Add 1℃ Add 10℃ Heat nozzle1 Heat bed Extrude Filament Filament move10 mm Extrude Back Nozzle1 extrude Adjust speed X/Ydirection increase in size 0.1 Curvature down X/Ydirection decrease in size 0.1 Curvature u
-
Assembly instructions B Use Part B-1 1.Preparation 3.Install top shell 4.Assembly belt 2.Install optical axis Open package All the components for assembly Place the Bottom shell Insert optical axis through slider to shaft seat bottom Belt must be in the middle of two axis Logo and touch screen are at the same direction Align all axis with seat holes then press to bottom Upper shell completed Untie the belt a
Questions, Opinions and Exploitation Impressions:
You can ask a question, express your opinion or share our experience of flsun QQ device using right now.
-
Contents
Table of Contents -
Bookmarks
A
A-1
Equipment Introduction
Basic Part
Filament
Filament frame
1
Shell screws
Extruder
2
Heating block
Turbo fan
3
Nozzle
4
Optical axis
Hot bed
5
6
Touch screen
7
Belt fixing nut
11
8
Slider
12
Parallel arm
9
Side shell
13
1 0
SD card slot
USB interface
14
1
15
Printing
parameters
16
Power socket
17
Molding technology
FDM
Temperature
Print size
φ255×360mm
parameter
Print accuracy
0.05-0.3mm
Positional accuracy
XYZ 0.01mm
Nozzle type
Single nozzle
Software
Nozzle diameter
0.4mm
parameters
Print speed
10-300mm/s
1.75mm
PLA/ABS/
Material support
NYLON/PVA/TPU/
Power
PETG/WOOD
parameters
Touch screen
3.2 inches
2
A
A-2
3D Printer Parameters
Basic Part
ENV TEMP
5-40℃
Nozzle TEMP
0-260℃
Hot bed TEMP
0-110℃
Slicing software
Cura
Input format
STL/OBJ/AMF/3DS
Output format
Gcode
Connection type
SD card,USB
Input
110 / 220v
Output
24V