- Manuals
- Brands
- Siemens Manuals
- Measuring Instruments
- CLINITEK Status
- Operator’s manual
-
Contents
-
Table of Contents
-
Troubleshooting
-
Bookmarks
Quick Links
+
Operator’s Manual
REF 10379682
Related Manuals for Siemens CLINITEK Status
Summary of Contents for Siemens CLINITEK Status
-
Page 1
Operator’s Manual REF 10379682… -
Page 3
Operator’s Manual 134798 Rev. A, 2009 07… -
Page 4
© 2009 Siemens Healthcare Diagnostics Inc. All rights reserved. Clinitek, Clinitek Status, Multistix, Multistix PRO, Combistix, Uristix, Labstix, Neostix, Clinitest and Chek-Stix are trademarks of Siemens Healthcare Diagnostics. Presept and Cidex are trademarks of Johnson & Johnson. Theracide is a trademark of Lafayette Pharmaceuticals, Inc. -
Page 5: Table Of Contents
Interfacing to a Computer ……… 1-3 Inserting Test Strip Table ……..1-3 Loading Test Table Insert ……… 1-3 Interfacing to the Clinitek Status Connector ..1-4 Analyzer Software Upgrades ……1-4 Loading the Printer Paper or Label Roll … 1-5 Warranty Registration ……..
-
Page 6
Appendix E: System Overview & Principles ….10-12 Appendix F: Training & Educational Materials ..10-18 Appendix G: Sample Interference Notes ….10-19 Appendix H: Safety Information …….. 10-20 Appendix I: Clinitek Status®+ Intended Use and Indications for Use ……….10-22 11 Index 11-1… -
Page 7: A Brief Description
The white calibration bar (on the test table) provides NIST What does the analyzer do? traceable calibration. ® Your Clinitek Status analyzer is a How does it work? portable instrument for reading Siemens Healthcare Diagnostics Testing starts (in the Quick Test ®…
-
Page 8
A Brief Description How do I get results? the analyzer, use it for your daily Siemens urinalysis and Clinitest Results will be displayed on the immunoassay testing and keep it in touch screen and printed (if good working condition. desired). The results can also be… -
Page 9: Understanding The Symbols And Display Icons
Instrument and Labeling Symbols This section describes the symbols that appear on the exterior of the Clinitek Status+ analyzer, the power supply provided with the instrument, the carton in which the instrument was delivered and the supplies of reagent strips and cassettes which you will use with the instrument.
-
Page 10
Understanding the Symbols and Display Icons Indicates a serial port This system contains certain toxic or hazardous substances or elements. The environmental protection use period for this system is 50 years. The system can be used safely during its environmental protection use period. The system should be recycled immediately after its environmental protection use period has expired. -
Page 11
Understanding the Symbols and Display Icons Keep this way up Fragile, handle with care Keep dry Keep away from sunlight and heat VDE Testing and Certification Institute Germany Manufacturer’s mark (FRIWO) and manufacturing location (Hong Kong) Manufacturer’s mark (FRIWO) and manufacturing location (Geratebau, Germany) Encapsulated safety isolating transformer (short circuit proof) Positive Temperature Coefficient (PTC) A thermistor device… -
Page 12
Understanding the Symbols and Display Icons Display Icons There are seven icons which display in the top left of the display to show the mode of the instrument. They also appear on the selection area for each function. The icons are: Instrument Set Up This is displayed when the instrument is being set up to suit the users’… -
Page 13: Unpacking & Set Up
Check the and check for the following items: carton and instrument for visible signs of damage; if seen, immediately contact the carrier. Clinitek Status ® + analyzer Power Supply Test table If the power cord is not the style…
-
Page 14: Set Up
Plug the appropriate end of the power cord into the power inlet socket located on the rear of the Clinitek Status+ analyzer. Plug the other end of the power cord into an AC electrical wall outlet. Only use the power supply adapter included with the unit.
-
Page 15: Interfacing To A Computer
Do not touch the white calibration bar. Loading Test Table Insert The test table insert adapts for use with a Siemens Healthcare Diagnostics urinalysis strip or Clinitest immunoassay cassette. One side is used for a strip test and the other side is used for a cassette test.
-
Page 16: Interfacing To The Clinitek Status Connector
Clinitek Status+ analyzer. This connector provides standard wired and wireless connectivity of the Clinitek Status+ system to your LAN, LIS, HIS, EMR, and allows for centralized control of all satellite Point of Care (POC) Clinitek Status+ analyzers.
-
Page 17: Loading The Printer Paper Or Label Roll
Unpacking & Set Up Set Up Loading the Printer Paper or Label Roll 1. Open the printer cover by pulling up on the tab. 2. Open the paper roll compartment cover by pressing down on its tab and pulling out. 3.
-
Page 18: Warranty Registration
Warranty Registration Card. After the instrument has been successfully installed, complete the information on the Warranty Registration Card and return the card to your local Siemens office (for a contact list see Appendix A, Local Technical Support Providers and Distributors).
-
Page 19: Powering Up
Unpacking & Set Up Powering Up Powering Up Press the on/off button located on the front of the instrument. This is the first screen displayed. The analyzer will run an automatic system diagnostic test each time it is turned on. If this is the first time you have turned on the analyzer, you will be led through a Start-Up Wizard, a…
-
Page 20: Powering Down
Unpacking & Set Up Powering Down Powering Down 1. Before turning the analyzer off, always ensure that there is no strip or cassette on the test table and that the table and insert are clean. 2. Press the on/off button at least 2 seconds.
-
Page 21: Screens
Interacting with the Touch Screen Screens Screens The touch screen will guide you through the operation of the ® Clinitek Status analyzer. The screen will display messages, instructions and options to which you respond by touching the appropriate area on the screen.
-
Page 22
Interacting with the Touch Screen Screens How to Touch the Screens If a touched area does not The screen needs to be touched respond as expected, slide your lightly in the touch-sensitive area to finger across the appropriate activate a response. selection area. -
Page 23
Interacting with the Touch Screen Screens Boxed Areas These are areas on the screen enclosed in boxes. Simply touch any area within the box to activate that function. The boxed areas vary in size. The boxes located on the main Select screen are examples of larger areas. -
Page 24: Keyboards
Interacting with the Touch Screen Keyboards Keyboards Press to switch to numeric keyboard Using the Alpha-Numeric Back Space/ Keyboard Data Entry Box Erase key When the screen prompts you to enter information for Operator, Patient’s Name and/or Patient Identification, a keyboard will appear on the screen.
-
Page 25
Interacting with the Touch Screen Keyboards The maximum number of characters allowed is 32. An audible tone will sound when you have exceeded the maximum number of characters. Once you have finished entering the information, touch Enter (from either keyboard screen). -
Page 27: Start-Up Wizard
Start-Up Wizard ® The first time your Clinitek Status analyzer is turned on (following an automatic system diagnostic test), it will take you through a quick set up procedure. This procedure will allow you to select the basic functions of the analyzer so you can use the analyzer with your choice of settings.
-
Page 29: Testing
Testing Quick Tests Quick Tests Urinalysis Strip Test BIOHAZARD Wear personal protective equipment. Use universal precautions. Refer to Appendix H for recommended precautions when working with biohazardous materials. Testing is started from the main Select screen. If you require more information regarding use and storage of test strips, please refer to the strip package insert.
-
Page 30
Testing Quick Tests The next screen that appears is another Prepare Test. This screen prompts you through the steps to prepare the test strip. A timer displays how much time you have remaining to complete the steps. You have 8 seconds to complete the following four steps: Dip the reagent strip into the urine sample, wetting all pads. -
Page 31
NOTE: A warning message displays if you are not using a Siemens reagent strip. Press OK to continue. The Results may not display if you are using a non- Siemens reagent strip. Repeat the… -
Page 32
Testing Quick Tests The Analyzing screen will be displayed when the calibration has been completed and the analysis of the strip has begun. A timer will count down the time remaining in analyzing the strip results. If the analyzer has been set up to automatically print the results, then the Printing screen will be displayed until the print out has… -
Page 33
Testing Quick Tests The next screen displayed is the Results screen. The first page of the test results are displayed on the screen and the test table and strip are automatically pushed out of the analyzer. To view the remaining test results, touch More on the screen. -
Page 34
Testing Quick Tests Up to 5 Sample Interference notes display on the screen. Use the up and down arrows to scroll through the notes. If enabled, the notes print with the test results. If Sample Interference notes have been disabled in the setup, the NOTES button does not display. -
Page 35
Testing Quick Tests From the test table, remove the used urinalysis strip and dispose of it according to your standard laboratory procedures. Wipe the table insert, if necessary. Report the results to a laboratory supervisor or physician. Touch Done to complete the test and return to main Select screen. -
Page 36: Cassette Test
Testing Quick Tests Cassette Test BIOHAZARD Wear personal protective equipment. Use universal precautions. Refer to Appendix H for recommended precautions when working with biohazardous materials. Testing is started from the main Select screen. ® Please refer to the Clinitest cassette test package insert for more information regarding use and storage of test cassettes.
-
Page 37
Testing Quick Tests Make sure the test table insert is in position for a cassette test. Remove the test cassette from the foil package and place the cassette on the test table. Once you touch the START button you have 8 seconds to draw the urine sample into the pipette and add the urine sample into the well on the cassette. -
Page 38
Testing Quick Tests You have 8 seconds to complete the following two steps: Draw the urine sample to the line marked on the pipette (approximately 0.2 mL). Add entire contents of the pipette into the sample well of the test cassette. At the end of the 8 second countdown, the test table and cassette will automatically be pulled… -
Page 39
Testing Quick Tests The Clinitek Status+ analyzer will perform an automatic calibration each time a test is run. Be sure not to move or bump the table while the instrument is calibrating. The Analyzing screen will be displayed when the calibration has been completed and the analysis of the cassette has begun. -
Page 40
Testing Quick Tests If the analyzer has been set up to automatically print the results, the Printing screen will be displayed until the print out has been completed (otherwise the Results screen will appear). The date, time and test sequence number will be printed along with the test results. -
Page 41: Full Tests
The strip testing process is identical to a Quick Strip Test. If you require further instruction regarding the procedures required for running a Siemens Healthcare Diagnostics urinalysis strip test see Section 4, Quick Tests. Testing is started from the main Select screen.
-
Page 42
Testing Full Tests The next screen that appears is Operator Name. There are two options under Operator Name: Last Operator or Enter New Operator Name. Option 1: Last Operator If this option is enabled, the last operator that entered his/her Name will be displayed on the screen in the lower right side of the box. -
Page 43
Testing Full Tests The next screen displayed is Patient Information. There are two options under Patient Information: Recall Patient or Enter New Patient. Option 1: Recall Patient In order to look up previous patients, touch Recall Patient. If previous patient identification has been entered, a list of up to 950 patient results will appear on the screen. -
Page 44
Testing Full Tests Option 2: Enter New Patient In order to enter the information for a new patient, touch Enter New Patient button. The next screen displayed is Enter Patient Name. Use the keyboards to enter Patient Name using a maximum of 20 characters. -
Page 45
Testing Full Tests The next screen displayed is Patient Identification. Use the keyboards to enter Patient Identification using a maximum of 13 characters. Touch Enter when you have finished entering the patient’s ID and to proceed to the next screen. If you require further instruction regarding keyboard usage see Section 2, Interacting with the Touch… -
Page 46
The next screen that appears is Prepare Test. If you require further instruction regarding the procedures for running a Siemens urinalysis strip test see Section 4, Quick Tests. While the strip is being analyzed, a Select Appearance screen will be displayed. -
Page 47
Testing Full Tests Select the clarity by touching the circle that corresponds to the correct description. Then touch Next. There is a time indicator on the Select Appearance screen that is counting down the time remaining in the analysis of the strip. After color and clarity have been entered the next screen displayed will either be:… -
Page 48
Testing Full Tests Entering the Strip Lot Number and Expiration Date To enter strip lot information for a second strip test, perform the following steps: 1. At the Select screen, touch Strip Test. The Strip screen displays. 2. To use the last strip number and begin the test, touch Use Last Lot. -
Page 49
Testing Full Tests The test results displayed on the screen and the printout will include the following information: Patient Name, ID or both Type of strip used Test date Time Operator Test Number Color Clarity Results Sample Interference Notes If the results are positive, an asterisk* will appear next to the results (if “mark positive results”… -
Page 50: Cassette Test
The cassette testing process is identical to a Quick Cassette Test. If you require further instruction regarding the procedures for running a Siemens Clinitest immunoassay test see Section 4, Quick Tests. Testing is started from the main Select screen. Touch Cassette Test to conduct an hCG pregnancy test.
-
Page 51
Testing Full Tests Option 1: Last Operator If this option is enabled, the last operator that entered his/her Name will be displayed on the screen in the lower right side of the box. If you are this operator, then touch the Last Operator button to proceed. -
Page 52
Testing Full Tests Option 1: Recall Patient In order to look up previous patients, touch Recall Patient. If the previous patient identification has been entered, a list of up to 950 patients will appear on the screen. Use the up and down arrow buttons to scroll through the list of patients. -
Page 53
Testing Full Tests Option 2: Enter New Patient In order to enter the information for a new patient, touch the Enter New Patient button. The next screen displayed is Enter Patient Name. Use the keyboards to enter Patient Name using a maximum of 20 characters. -
Page 54
Testing Full Tests The next screen displayed is Enter Patient ID. Use the keyboards to enter Patient Identification using a maximum of 13 characters. Touch Enter when you have finished entering the patient’s ID and are ready to proceed to the next screen. -
Page 55
Testing Full Tests The next screen that appears is Test Type. If you require further instruction regarding the procedures for running a Clinitest hCG cassette test see Section 4, Quick Tests. The test results displayed on the screen and the printout will include the following information: Patient Name, ID or both Type of Clinitest cassette test… -
Page 56
4-28… -
Page 57: Instrument Set Up
Instrument Set Up Instrument Set Up Instrument Set Up Your Clinitek Status ® + analyzer allows you to change settings to suit your workplace requirements. If no customizing is desired, the analyzer will automatically be programmed with default settings (to…
-
Page 58: Language Settings
Instrument Set Up Language Settings Language Settings Use the up and down arrows to scroll through the list of languages. Touch Select when you have highlighted the desired language. Before changing the language an alert screen will be displayed requesting you to confirm your decision.
-
Page 59: Password
Instrument Set Up Password Password When a password has been set, no changes can be made to the Instrument Set Up until the password has been entered. Set Password Enter a password into the data entry box using the alphabetic and/ or numeric keyboards (maximum 12 characters).
-
Page 60: Operator And Patient Information
Instrument Set Up Operator and Patient Information Operator and Patient Information Selecting this option will allow you to choose display options for data entry. The Input Settings screen allows you to select 1 of 3 test sequences. Quick Test A test without any operator or patient information required.
-
Page 61
Instrument Set Up Operator and Patient Information On the Input Settings screen, touch a round button in the box of the preferred test sequence. Then touch Next for test sequence confirmation. Touch Done on the Input Settings screen to return to the Choose Settings screen. -
Page 62
Instrument Set Up Operator and Patient Information Custom Settings Touch the round button in the Custom Set Up box to customize selections for data entry. Touch Next. The next 5 screens present choices for customizing your testing. Choose settings by touching and highlighting a round button for each category. -
Page 63
Instrument Set Up Operator and Patient Information Screen 2 of 5 Patient Name – allows you to choose whether patient name will be required for running a test – Enabled (on) or Disabled (off). Patient ID – allows you to choose whether Patient ID will be required for running a test –… -
Page 64
Instrument Set Up Operator and Patient Information Screen 4 of 5 Choose which to record during a strip test – allows you to select which sample details you would like to be recorded during a strip test – Color and Clarity, Color only, Clarity only or None (no sample information). -
Page 65
Instrument Set Up Operator and Patient Information Touch the round button next to Enabled (on) to highlight and activate this custom setting. Touch the round button next to Disabled (off) to deactivate the custom setting. Touch Previous to scroll back through custom setting screens to review. -
Page 66
Operator and Patient Information Managing Urine Colors The following sections describe how to customize and set urine color choices and urine clarity for Siemens strip tests. When you print patient test results, you can include urine color, clarity, or color and clarity in the printout. -
Page 67
Instrument Set Up Operator and Patient Information 7. Touch Edit colors. The Sample Appearance-Select colors screen 1 of 3 displays. 8. To choose colors, touch the button for the color you want. To remove a selected color, touch that color button again. 9. -
Page 68
Instrument Set Up Operator and Patient Information 3. Touch Enter. The Sample Appearance-Select colors screen 3 of 3 displays. CAUTION Do not edit a custom color that already exists because doing so deletes all patient records stored on the system. If a custom color exists, the Sample Appearance screen displays. -
Page 69
Instrument Set Up Intrument Settings Setting Strip Information Prompt To set the prompt for strip information, perform the following steps: 1. At the Select screen, touch Instrument Set Up. The Choose Settings screen displays. 2. Use the arrow keys to select Instrument Settings. -
Page 70: Date And Time Settings
Instrument Set Up Date and Time Settings Date and Time Settings The date and time are displayed on the Select screen and are recorded with test results. The format of the date and time are displayed along with specific date and time values.
-
Page 71
Instrument Set Up Date and Time Settings The AM and PM selections will not be available if the time is in the 24 hour format. The Set Date & Time display will show the date and time in the formats selected. Select Set to confirm your choices and return to the Choose Settings screen. -
Page 72: Test Sequence Number
Instrument Set Up Test Sequence Number Test Sequence Number The test sequence numbers run from 0001 to 9999 and can be reset. The screen shows the next test number. Touch the Reset to 0001 round button if you would like to reset the numbers to start at 0001 for the next test.
-
Page 73: Instrument Settings
Instrument Set Up Instrument Settings Instrument Settings This section has a series of screens which control the way in which the Clinitek Status+ analyzer displays information and operates. There are 8 Instrument Setting items. Results Format System Settings Display Contrast…
-
Page 74
Instrument Set Up Instrument Settings Plus System – select Enabled (on) if you wish to have results shown in the Plus System. You will also see in Appendix B that results can be recorded in the Plus System (which uses “+” symbols) instead of clinical units such as mg/dL (mmol/L). -
Page 75
Instrument Set Up Instrument Settings System Settings This allows selections regarding the printer, power and sound. System Settings Screen 1 of 2 Printer – allows you to select the preferred printing option by touching the round button. Automatic – Results for each test will be printed automatically when the test is complete. -
Page 76
Instrument Set Up Instrument Settings Screen 2 of 2 Sound – allows you to adjust the sound by highlighting and selecting a level. Sound on – The instrument will use a range of audible tones. Sound off – No audible tones will be made by the instrument. -
Page 77
Instrument Settings Connectivity You can connect the instrument to a PC or host computer, or, if you have a Clinitek Status connector, to an LIS using an Ethernet or wireless network. If you are using the connector, refer to the… -
Page 78
Touch round button of either Yes or No depending on whether you choose to include the serial number of your Clinitek Status+ analyzer as part of the patient results sent to the computer. If you have enabled the upload… -
Page 79
Stop Bits – Touch a round button to select the number of Stop Bits. Select Urinalysis Test This displays a list of some of the Siemens Healthcare Diagnostics urinalysis strips which can be used with the Clinitek Status+ analyzer. 5-23… -
Page 80
Instrument Set Up Instrument Settings Use the up and down arrows to scroll through the list until the type of strip you want to use is highlighted. Touch Select to confirm and return to the Instrument Settings screen. Do not use any reagent strip product other than what is shown on the display. -
Page 81
Instrument Set Up Instrument Settings 8. Touch Next to advance to the Edit Reported Chemistries next screen. The Reported Chemistries This section describes how to screen 2 of 2 displays. include or exclude urinalysis tests 9. Touch the button for the test from the reported results. -
Page 82
QC tests (when using the connector), recall results, or modify system settings. Operators gain access by entering their ID. The Clinitek Status+ analyzer stores 700 operators. NOTE: The Operator ID is never printed or displayed with patient results. If you wish to associate the Operator’s Name with patient… -
Page 83
Instrument Set Up Instrument Settings 4. Use the arrow keys to select 3. Touch Enter. Authorized Operator. The Authorized Operator screen 5. Touch Select. displays indicating the Operator The Authorized operator screen ID and which functions the displays. operator can perform. 6. -
Page 84
Instrument Set Up Instrument Settings 5. To edit which functions this Viewing, Editing, Printing, and Operator ID can access, touch Deleting Operator IDs Edit. The Authorized Operator- You can view, print, or delete the Operator access screen 1 of 2 entire operator list or edit individual displays. -
Page 85
Instrument Set Up Instrument Settings At the Authorized operator screen, NOTE: Enabling the instrument perform the following steps: password restricts access to 1. To delete the entire operators Instrument Setup to those who list, touch Delete operators list. know the password. If both The Delete operators list caution Operator ID and password are screen displays. -
Page 86
Instrument Set Up Instrument Settings 6. To select options, for example Printer Settings Operator Name, Serial Number, Patient Name, or This section describes how to Patient ID to include in the customize the printed test results. printout, touch the option button. -
Page 87
Instrument Set Up Instrument Settings To remove a selected option, touch that option button again. 7. Touch Next. The Printer Settings-Included in print-out screen 2 of 4 displays. 8. To select options, for example, Color, Clarity, or Custom Information to include in the printout, touch the option button. -
Page 88
18. Touch Done 3 times to return to the Select Ready screen. NOTE: To use an external printer, you must connect and enable the Clinitek Status connector. Quality Control For QC instructions, refer to the Clinitek Status Connect System Operator’s Guide. 5-32… -
Page 89: Restore Default Settings
Instrument Set Up Restore Default Settings Restore Default Settings This option lists the analyzer’s original settings. Use the up and down arrows to view the default settings. Touch Restore in order to return the analyzer to the settings listed. Touch Yes to confirm your decision or No to maintain the current settings of your analyzer.
-
Page 90: Diagnostics
Instrument Set Up Diagnostics Diagnostics This option lists 7 diagnostic tests which can be conducted. Display Touch Screen Printer Test Table Light Source Electronics Check Cassette These diagnostics tests should only be conducted when instructed by your local representative. The representative will lead you through the test procedures (see Appendix A for Local Technical Support…
-
Page 91: Sample Interference Notes
Instrument Set Up Sample Notes Sample Interference Notes To include Sample Interference Notes, perform the following steps: 1. At the Select screen, touch Instrument Set Up. The Choose Settings screen displays. 2. Use the arrow keys to select Sample Notes. 3.
-
Page 92: System Information
Instrument Set Up System Information This screen has information about your analyzer. Touch System Configuration to view details of the current system configuration. This screen will show the current settings for all the items which can be changed within the Input Settings and Instrument Settings screens.
-
Page 93
Instrument Set Up System Information This completes the settings and choices within Instrument Set Up. Touch Done to return to the main Select screen. 5-37… -
Page 94
5-38… -
Page 95: Recall Results
Recall results enables you to search, view, and print patient test results. These results are stored on the analyzer. If you are using the Clinitek Status connector, you can also recall QC results. At the Select Screen, touch Recall Results button.
-
Page 96
Recall Results Patient Results The first page of the patient’s results is displayed on the screen. If more than one page of results exists for the patient, then the More button will be present on the screen. If you would like to print the results, touch the Print button. -
Page 97: Sending Data To A Pc
To send data to a computer; if a computer has been connected to the analyzer, all results can be sent to the computer by touching the Send all data button. If you are using a Clinitek Status connector, refer to the Clinitek Status Connect System Operator’s Guide.
-
Page 99: Troubleshooting
If more than one of this Error messages will be displayed to class of error occurs, clearing one help you when the Clinitek Status+ message will enable the next to be analyzer detects something which displayed in order of importance to needs your attention.
-
Page 100
Troubleshooting Battery Power Icon Dashes may appear next to Color and Clarity on test result printouts. This occurs when the instrument is powered by batteries. Color and The battery icon indicates the Clarity are selected in the power level of the battery. Power Instrument Set Up, but no can be reduced while testing selections have been recorded on… -
Page 101
Troubleshooting Calling for Assistance Warranty If your Clinitek Status+ analyzer is Your Clinitek Status+ analyzer has displaying corrective actions for a a one-year warranty period. This detected problem, please carry out warranty is designed to protect you the displayed instructions before from the cost associated with calling for assistance. -
Page 102: List Of Errors And Advisory Messages
Troubleshooting Lists of Errors and Advisory Messages Clinitek Status+ Analyzer: List of Errors and Advisory Messages Error Code Description Action Low battery power Replace the batteries: a) To view instructions on the display, touch the Error Report selection area, or b) To use the instructions in this manual, see page 9 7, Changing Batteries.
-
Page 103
Chek Stix® (see page 8 1, Quality Control Testing). Repeat the test using the correct Siemens Invalid barcode cassette. Strip Test… -
Page 104
Troubleshooting Lists of Errors and Advisory Messages Error Code Description Action Misplaced strip Repeat the test ensuring that the strip is correctly positioned on the test table (see page 4 3). If error remains and you are testing a urine dip strip, examine the test table insert to insure that the small, white line located near the tip of the strip (on strip side of insert) is present and not damaged. -
Page 105
Troubleshooting Lists of Errors and Advisory Messages Error Code Description Action E03, E04, Failure of Contact your local representative (contact E05, E06, computer software information is given in Appendix A). E07, E08, E21, E22, E90, E91, E92 or E93… -
Page 106: Problem Checklist
Troubleshooting Problem Checklist Problem Checklist Clinitek Status+ Analyzer: Serial Number ___________________________ Installation Date___________________________ 1. Have you reviewed the error messages on pages 7-4 to 7-7? 2. Please record any error messages that have been displayed: ________________________________________________________________ ________________________________________________________________ ________________________________________________________________ 3. Does the test table move out to the “load” position when the analyzer is first turned on? 4.
-
Page 107
Troubleshooting Problem Checklist 8. Is the name of the Siemens Healthcare Diagnostics urinalysis strip or Clinitest immunoassay cassette shown on the display the same as the product being used? 9. Does the display or printout show the correct test names and expected results? 10. -
Page 108
7-10… -
Page 109: Quality Control Testing
Quality Control Testing Quality Control Testing If you are using a Clinitek Status Please refer to the connector, refer to the Clinitest ® hCG cassette test package Clinitek Status Connect System insert for the appropriate quality Operator’s Guide. control material.
-
Page 111: Cleaning And Maintenance
Cleaning and Maintenance Cleaning Cleaning The test table insert and the test table should be kept clean if the analyzer is to operate properly. Do not autoclave the test table or test table insert. BIOHAZARD Wear personal protective equipment. Use universal precautions. Refer to Appendix H for recommended precautions when working with biohazardous materials.
-
Page 112
Cleaning and Maintenance Cleaning Dry the test table thoroughly (except for the white calibration bar) with a soft cloth or lint-free tissue. Care should be taken not to scratch the white calibration bar. Instructions for cleaning the white calibration bar are given later in this section. -
Page 113
Cleaning and Maintenance Cleaning Disinfecting the Test Table and Place the insert and/or test Insert table into the solution, making sure the white calibration bar on Prepare one of the following the test table remains above solutions in a tall, narrow the liquid level. -
Page 114
Cleaning and Maintenance Cleaning ® To enable your Clinitek Status analyzer to perform as intended and provide reliable test results, it is recommended that you regularly check the white calibration bar on the test table, and always check it after a strip jam. -
Page 115
Cleaning and Maintenance Cleaning If the white calibration bar is clean and unmarked, replace the table into the analyzer by holding the table at the end opposite the white calibration bar, with the white calibration bar facing upwards. Push the test table firmly but slowly, just over half way into the analyzer. -
Page 116
Cleaning and Maintenance Cleaning Always keep the outside of the Clinitek Status+ analyzer clean and free of dust. BIOHAZARD Wear personal protective equipment. Use universal precautions. Refer to Appendix H for recommended precautions when working with biohazardous materials. Turn the analyzer off by pressing the on/off button for 2 seconds. -
Page 117: Changing Batteries
Cleaning and Maintenance Changing Batteries Changing Batteries Battery-Powered Operation The Clinitek Status+ analyzer is designed to let you carry out the maximum number of tests (approximately 100) from a set of batteries. To achieve this, the Power Save feature is always activated when the instrument is powered by batteries.
-
Page 118
Cleaning and Maintenance Changing Batteries Remove the test table from the analyzer. Next, place the analyzer on its side and remove the battery cover by pressing down on the tab and pulling out. Remove current batteries. Place 6 new AA-size batteries into the analyzer. -
Page 119: Appendices
Appendix A: Local Technical Support Providers and Distributors Legal Information To contact the legal representative for Siemens Healthcare Diagnostics within the European community, contact the Siemens Authorized Representative. To order supplies or replacement parts, or to obtain service, contact your local technical support provider.
-
Page 120: Appendix B: Tables Of Results
Appendices Appendix B: Tables of Results Appendix B: Tables of Results Table 1 English – Conv. Units – Conventional Reagent Strip Tests Test Abbreviation Units Reported Results Normal System Plus System Glucose Negative Negative mg/dL >=1000 Trace Glucose mg/dL Negative Negative (CT Malb 9*) 1000…
-
Page 121
Appendices Appendix B: Tables of Results Test Abbreviation Units Reported Results Normal System Plus System Albumin: Normal Dilute 30-300 <30 Abnormal Creatinine mg/g Normal >300 No Difference (CT Malb 9*) High Abnormal Protein: Normal Dilute Creatinine Abnormal (Multistix PRO) Normal >500 mg/g No Difference… -
Page 122
Appendices Appendix B: Tables of Results Table 2 English – S.I. Units – International (S.I.) Reagent Strip Tests Test Abbreviation Units Reported Results Normal System Plus System Glucose Negative Negative mmol/L >=55 Trace Glucose Negative Negative (CT Malb 9*) mmol/L Trace >=110 Bilirubin… -
Page 123
Appendices Appendix B: Tables of Results Test Reported Results Abbreviation Units Normal System Plus System Protein: Normal Dilute 33.9 Creatinine Abnormal (Multistix PRO) Normal >56.6 mg/mmol No Difference Abnormal 17.0 Abnormal Protein: Normal Dilute Creatinine Normal Abnormal (CT Malb 9*) 33.9 >=566 mg/mmol… -
Page 124
Appendices Appendix B: Tables of Results Table 3 English – Nordic Units – Nordic Plus System Reagent Strip Tests Test Abbreviation Units Reported Results Normal System Plus System Glucose Negative Negative Trace Glucose Negative Negative (CT Malb 9*) Trace Bilirubin Negative No Difference Ketone… -
Page 125
Appendices Appendix B: Tables of Results Cassette Test Test Abbreviation Units Reported Results Normal System Plus System Human hCG Negative hCG Positive Chorionic Gonadotropin Borderline hCG No Difference level Test fresh sample in 48 72 hours The results shown in shaded areas will be marked as positives, if “mark positive results”… -
Page 126: Appendix C: Specifications
18°C to 30°C (64°F to 86°F) and/or Patient Identification) Ambient Operating Humidity Safety Standards Range The Clinitek Status+ analyzer is 18% to 80% Relative Humidity classed as a Class A computing (non-condensing) device in accordance with Part 15 of FCC Rules.
-
Page 127
Appendices Appendix C: Specifications NOTE: This equipment has been The instrument is certified as tested and found to comply with meeting the EMC requirements and the limits for a Class A digital safety specifications of the In Vitro device, pursuant to Part 15 of the Diagnostic Directive FCC Rules. -
Page 128: Appendix D: Instrument Default Settings — English
Appendices Appendix D: Instrument Default Settings – English Appendix D: Instrument Default Settings – English Time Format Password 12 hour Password protection not set Results Format Input Settings Units Selection Quick Test Conventional Operator Name Plus System Disabled Disabled Keyboard Priority Mark Positive Results Alphabetic Disabled…
-
Page 129
Appendices Appendix D: Instrument Default Settings – English Baud Rate 115200 Parity None Stop Bits 1 (one) Urinalysis Test Selected ® Multistix 10 SG Sample Notes Enabled Authorized Operator Disabled 10-11… -
Page 130: Appendix E: System Overview & Principles
Appendices Appendix E: System Overview & Principles Appendix E: System Overview & Principles Description of Optical System When using a Clinitest immunoassay cassette, the detector will scan the The optical system consists of six light emitting diodes, a light guide, “read area”…
-
Page 131
Appendices Appendix E: System Overview & Principles The table and test strip are pulled Differences between the Human into the instrument after the correct Eye and Instrumental Optics placement of the test strip is There are inherent differences confirmed. The table then moves between the colors that are completely into the instrument perceived by the human eye and… -
Page 132
Appendices Appendix E: System Overview & Principles 10-14… -
Page 133
Appendices Appendix E: System Overview & Principles 10-15… -
Page 134
Appendices Appendix E: System Overview & Principles 10-16… -
Page 135
Appendices Appendix E: System Overview & Principles 10-17… -
Page 136: Appendix F: Training & Educational Materials
Appendices Appendix F: Training & Educational Materials Appendix F: Training & Educational Materials ® Chek-Stix Positive and Negative control strips are available for use in your training program for routine urine strip testing (for supply information see Appendix A, Local Technical Support Providers and Distributors).
-
Page 137: Appendix G: Sample Interference Notes
Appendices Appendix G: Sample Interference Notes Appendix G: Sample Interference Notes Sample Interference Notes inform the user about test results that can be affected by components detected in the urine sample. Depending upon the strip and sample, Sample Interference Notes include the following: High SG may cause falsely lowered GLU results.
-
Page 138: Appendix H: Safety Information
Appendices Appendix H: Safety Information Appendix H: Safety Information Protecting Yourself from direct contact with superficial Biohazards cuts, open wounds, and other skin conditions that This information summarizes the may permit absorption into established guidelines for handling subcutaneous skin layers laboratory biohazards.
-
Page 139
Appendices Appendix H: Safety Information Keep your hands away from References your face. 1. Centers for Disease Control. Cover all superficial cuts and Update: Universal precautions for wounds before starting any prevention of transmission of work. human immunodeficiency virus, Dispose of contaminated hepatitis B virus and other materials according to your bloodborne pathogens in… -
Page 140: Appendix I: Clinitek Status®+ Intended Use And Indications For Use
Appendices Appendix I: Clinitek Status®+ Intended Use and Indications for Use Appendix I: Clinitek Status®+ Intended Use and Indications for Use The Clinitek Status®+ Urine Tests performed using the Chemistry Analyzer is a portable Clinitek Status®+ Analyzer are easy to use analyzer. It is…
-
Page 141
Index Analyzing screen Date and time strip test, 4-4 settings, 5-14, 5-15 cassette tests, 4-11 Default restore default settings, 5-33 settings, 10-10 Diagnostic tests, 5-34 Batteries display contrast, 5-20 error messages, 7-5 installing/changing the batteries, 1-2, 9-8 troubleshooting, 7-1 Error(s) Battery powered operation, 9-7 calling for assistance with an Baud rate setting, 5-22… -
Page 142
Index Icons Parity setting, 5-23 battery power icon, 7-2 Password display icons, vii, viii, x remove password, 5-3 paper-out icon, 7-2 set password, 5-3 Instrument Patient diagnostics, 5-34 enter new patient error messages, 7-4 identification, 4-16, 4-17, 4-25 settings, 5-17 information, 4-15, 4-25 Interfacing to a computer, 1-3 patient identification set up, 5-7… -
Page 143
Index Sound settings, 5-20 Specifications of instrument, 10-8 Quality control Start-up wizard, 3-1 cassette testing, 8-1 Stop bits setting, 5-23 urinalysis strip testing, 8-1 Strip Quick test blot strip, 4-3 set up, 5-5 changing strip type, 5-23 dip strip 4-2 holding channel, 4-3 preparing a urine strip, 4-2 Reagent… -
Page 144
Index Units conventional units, 5-17 Unpacking, 1-1 Urinalysis test, 5-23, 5-24 Urine sample clarity, 4-19 color, 4-18 settings, 5-8 visual appearance, 4-18, 4-19 Warranty, 7-3 registration card, 1-6 11-4…
|
Анализатор мочи Clinitek Status |
||||||
|
||||||
|
||||||
|
||||||
|
||||||
|
||||||
|
||||||
|
||||||
|
||||||
|
||||||
|
||||||
|
||||||
|
||||||
|
||||||
|
||||||
|
||||||
|
||||||
|
||||||
|
||||||
|
||||||
|
||||||
|
||||||
|
||||||
|
||||||
|
||||||
|
||||||
|
||||||
|
||||||
|
||||||
|
||||||
|
||||||
|
||||||
|
||||||
|
||||||
|
||||||
|
||||||
|
||||||
|
||||||
|
||||||
|
||||||
|


Bayer Diagnostic Devices
Urine Analyzer
Basic Service Manual
172 Pages

File Type: PDF
File Size: 6.66 MB
File Name: clinitek_status_basic_service_manual.pdf
By clicking Download you are confirming this is the correct document for your purposes
and that you agree to our Terms & Conditions
Содержание
- 1 Плюсы использования
- 1.1 Функции анализатора мочи Clinitek Status
- 1.1.1 Технические характеристики
- 1.1 Функции анализатора мочи Clinitek Status
- 2 Как пользоваться?
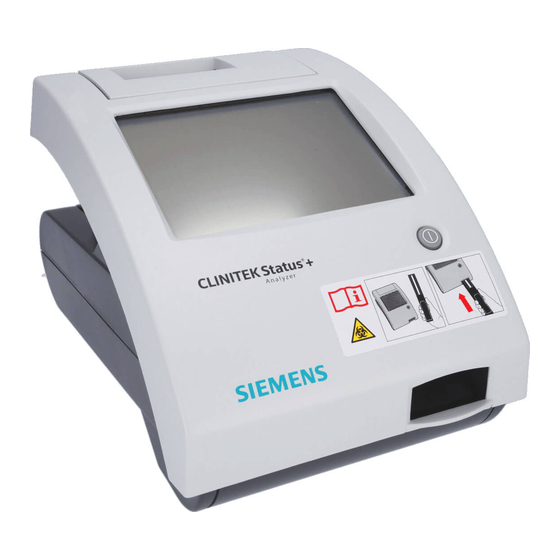
Портативный анализатор мочи Clinitek Status создан для определения основных показателей мочи. Благодаря простому и понятному управлению его могут использовать все желающие. Анализатор дает надежные результаты, противоречивость данных исключена, так как автоматическая система не допускает ошибок. Прибор сочетает в себе высокие технологии анализа в любых условиях и программу интеграции данных, что позволяет удобно обрабатывать клиническую информацию.

Плюсы использования
Использование автоматического анализатора для исследования мочи позволяет ускорить процесс получения результата, что очень важно, когда нужно немедленно определить патологию и назначить соответствующее лечение. Анализатор способен проверять каждую тест-полоску на влажность, а это дает возможность избежать ложноположительных результатов. Основные преимущества:
- результаты проведенных анализов высвечиваются на мониторе, а встроенный термопринтер их распечатывает;
- память прибора хранит до 200 предыдущих результатов исследования, и передавать их в ЛИС (лабораторную информационную систему) для хранения и обработки;
- анализатором «Клинитек Статус» не сложно пользоваться, благодаря сенсорному экрану и интуитивному меню;
- тест-полоски для работы с прибором широко распространены;
- есть функция передачи данных на ПК.
Современный анализатор мочи Clinitek Status — это экономия времени специалиста, гарантия точных результатов, широкий спектр проводимых исследований, удобство в использовании.
Вернуться к оглавлению
Функции анализатора мочи Clinitek Status

Анализатор мочи предназначен для выполнения таких функций:
- Способен определить рН и удельный вес мочи, количество эритроцитов, лейкоцитов. Реагирует на альбумин, билирубин, глюкозу, креатинин, кетоновые тела нитриты, белок, уробилиноген — основные показатели анализа мочи.
- Полуколичественно определяет соотношения альбумина и белка к креатинину (с помощью специальных полосок).
- Обнаруживает хорионический гонадотропин при помощи тест-кассет «Клинитест ХГЧ» (определение беременности).
Вернуться к оглавлению
Технические характеристики
С помощью регулируемых настроек не допускает несанкционированное использование. Анализатор Clinitek Status обнаруживает взаимное увеличение или уменьшение показателей в исследуемом материале и распечатывает примечания в отчете. Технические характеристики прибора указывают на легкость, компактность, способность работать при различных условиях.
| Параметр | Характеристика |
| Длина | 272 мм |
| Ширина | 171 мм |
| Высота | 158 мм |
| Масса анализатора | 1.66 кг (без источника питания) |
| Производительность | 40 анализов в час (80 секунд на одну тест-полоску) |
| Объем памяти | 200 результатов в хронологическом порядке |
| Калибровка | Автоматическая |
| Напряжение питания | 100—250 В, 50—60 Гц, работает от щелочных батареек АА (6 штук) |
| Требования к окружающей среде | Температура 10—40 С, влажность 10—90% без конденсации |
Вернуться к оглавлению
Как пользоваться?
- Чтобы начать работу нужно подсоединить к разъему анализатора сетевой адаптер, и подключить к источнику питания.
- Включить прибор, но 20 секунд занимает самодиагностика и тестирование аппарата.
- Погрузить тест-полоски в урину на 3 секунды — уровень, что указан в инструкции.
- Убрать избыток влаги с поверхности чистой салфеткой.
- Разместить тестируемый материал в лотке прибора. Сенсорные зоны направлены кверху.
- На дисплее нажать кнопку START. После этого происходит автоматическое затягивание лотка. Затем анализатор начнет сканирование, а лоток разместится в исходном положении. На дисплее появятся результаты анализа, и принтер приступит к распечатыванию.
- Прежде чем удалить полоску, следует убедиться в том, что индикаторные зоны тест-полоски равномерно окрашены. В случае неравномерного окрашивания нужно повторить пункты 1—6 с использованием новой полоски.
- После проведения анализа убрать полоску из лотка, безворсовой чистой тканью протереть поверхность.
Распечатка результатов, возможность вносить данные непосредственно в компьютер освобождает врача от переписывания информации вручную. Портативный анализатор удобно использовать, транспортировать, обслуживать, а точность проведенных анализов делает его необходимым для специалистов, которые могут делать исследования не отходя от пациента, тем самым ускоряя процесс постановки диагноза.

Врач-онкоуролог, уролог, андролог. Клиника урологии Первого МГМУ им. И. М. Сеченова. Изучить профиль…
Скорость измерения: 60 сек. на каждую тест-полоску.
Калибровка: автоматическая при введении новой тест-полоски.
Напряжение питания 220 Вт от сети или 9V (6 батареек по 1,5 V).
Объем памяти: 200 проб, 200 записей о пациентах.
Габаритные размеры: 27,5 х 17,1 х 15,8 см.
Вес: 1,66 кг.
Определяемые параметры:
Клинитек Статус c тест-полосками Мультистикс®10SG: глюкоза, билирубин, кетоновые тела, удельный вес мочи, эритроциты, pH мочи, белок, уробилиноген, нитриты, лейкоциты.
Клинитек Статус c тест-кассетами Клинитест®ХГч: хорионический гонадотропин человека (ХГч).
Клинитек Статус с тест-полосками Клинитек®Микроальбумин: соотношение альбумина к креатинину и белка к креатинину.
Технические характеристики:
Преимущества:
Автоматическое определение 13 параметров анализа мочи.
Тест-полоски «Мультистикс» можно использовать не только в аппарате но и простым визаульным способом.
Вывод результатов анализа на дисплей и распечатка.
Автоматическое, надежное и очень быстрое получение результатов анализа (до 60 анализов в час).