Содержание
- Gigabyte B450 Aorus Elite инструкция
- B450 AORUS ELITE
- User’s Manual
- Rev. 1002
- 12ME-B45ARSE-1002R
- Нужна помощь?
- Обзор GIGABYTE AORUS B450 Elite
- Где купить?
- Спецификации
- Дополнительная информация
- Разъемы и интерфейсы
- Обзор
- Главные особенности
- Поддержка AMD RYZEN™ 3000-серии
- Технология AMD StoreMI
- Hybrid Digital Power Design оптимизированный для процессоров второго поколения AMD Ryzen™
- Гибридный цифровой PWM + нижние МОП-транзисторы с RDS (on)
- Преимущества полевых транзисторов Lower RDS(on)
- Два NVMe M.2 PCIe SSD в RAID
- Термозащита AORUS M.2 Thermal Guard
- Термотроттлинг при повышении температуры
- Погружение в виртуальную реальность
- Коммуникации и сетевые возможности
- Эксклюзивная игровая сеть Realtek 8118
- Программа получает самый высокий приоритет
- Мониторинг сети в реальном времени
- Дизайн материнской платы и подсветка RGB
- RGB Fusion 2.0 с поддержкой цифровых светодиодов
- Многозональное световое шоу
- RGBW и UV светодиодные линейки и независимые прогграмируемые разъемы для их подключения
- RGBW Pin Header Support True White and RGB/UV LED Strips
- Программное обеспечение RGB Fusion 2.0
- Приложение GIGABYTE RGB Fusion
- RGB Fusion 2.0
- Охлаждение
- Функция SmartFan 5
- Интеллектуальное управление вентиляторами
- Гибридные Fan-разъемы
- Новое приложение SmartFan 5
- Аудиоподсистема
- Эксклюзивный дизайн встроенной аудиоподсистемы
- Концепция ULTRA DURABLE / защита разъемов ввода /вывода
- Усиленные контакты разъема питания
- Колодка с двойной фиксацией (запатентовано GIGABYTE)
- ЗАЩИТА ОТ ОКИСЛОВ СЕРЫ
- Светодиоды диагностики
- Идентификация и устранение неисправностей
- BIOS и приложения GIGABYTE
- Обновление BIOS
- Центр приложений APP Center
- Утилита 3D OSD
- XSplit Gamecaster + Broadcaster: руководство к действию
- Экономия электроэнергии одним щелчком кнопки мыши
- Экранное разрешение 4K (Ultra HD)
- HDMI™ – мультимедийный интерфейс нового поколения
- Отзывы покупателей
Gigabyte B450 Aorus Elite инструкция

инструкция Gigabyte B450 Aorus Elite

B450 AORUS ELITE
User’s Manual
Rev. 1002
12ME-B45ARSE-1002R
Посмотреть инструкция для Gigabyte B450 Aorus Elite бесплатно. Руководство относится к категории Материнские платы, 28 человек(а) дали ему среднюю оценку 8.9. Руководство доступно на следующих языках: английский. У вас есть вопрос о Gigabyte B450 Aorus Elite или вам нужна помощь? Задайте свой вопрос здесь
Нужна помощь?
У вас есть вопрос о Gigabyte а ответа нет в руководстве? Задайте свой вопрос здесь Дай исчерпывающее описание проблемы и четко задайте свой вопрос. Чем детальнее описание проблемы или вопроса, тем легче будет другим пользователям Gigabyte предоставить вам исчерпывающий ответ.
Провод FAN выходящий из кнопки на панели RGB как подключить в какой пин?

Поставил на данную материнку ssd накопитель формата М.2 wd black в первый слот. Накопитель ни где не отображается, система стоит на hdd 1500 gb на разъёме sata 0
Кувстовлять медиа инаушник

руководство на русском языке для материнской платы B450Aorus Elite
B450 aorus elite, при установке драйверов пишет что адаптер в глубоком сне,я подключал лан кабель, вытаскивал батарейку,память,менял виндовс 10, ничего не помогло, подскажите что сделать или надо по гарантии возвращать, и если да то через сколько будет материнка?
Прошил Биос до последней версии стоял процессор р 5 3600 ,так как продал видео карту купил ещё один процессор р 3 2200g,вставил увидел рабочий стол и всё каждый раз синий экран тоесть рабочий стол и потом синий экран,мать гигабайт в 450 елит аурс,может надо отметить Биос опять на f 1 по-моему ,щас стоит Биос под 5 тысячный процессор
B 450 aorus elit совместима с AMD PRO A6-8580 OEM. А то при включении мигнёт материка и все
Источник
Обзор GIGABYTE AORUS B450 Elite
GIGABYTE AORUS B450 Elite — типичный вариант платы на чипсете AMD B450. Здесь нет никаких излишних наворотов, но функциональные возможности чипсета используются в полной мере. Такую плату оптимально использовать для универсальных и не очень дорогих домашних ПК, на которых можно и поработать, и даже поиграть, установив дискретную видеокарту. Если использовать производительный процессор, скажем, AMD Ryzen 7, то в сочетании с производительной видеокартой и SSD-накопителем можно получить очень мощный компьютер, который справится с любыми ресурсоемкими пользовательскими приложениями. Если верить отзывам покупателей, на этой плате неплохо разгоняется и процессор и оперативная память. При возникновении проблем с совместимостью, следует обновить BIOS материнской платы.

Где купить?
Материнскую плату GIGABYTE AORUS B450 Elite можно купить на computeruniverse по цене 81,51 € (5757,92 ₽). Стоимость товара по Яндекс.Маркету составляет от 7 тысяч рублей. Выгодные цены предлагают такие магазины, как Регард, NewMart, Онлайнтрейд. Но мы рекомендуем покупать материнскую плату совместно с другими комплектующими в немецком интернет-магазине computeruniverse.net , используя купон на скидку FWANUVT (Как использовать купон computeruniverse?). Также, не лишним будет для оплаты завести Карту Кукурузу, чтобы сэкономить на конвертации 3-5% по сравнению с картами таких банков как Сбербанк, HomeCrdeit, Qiwi, Яндекс.

Спецификации
Дополнительная информация
- Поддержка многоядерных процессоров есть
- BIOS AMI
- Поддержка EFI есть
- Поддержка SLI/CrossFire CrossFire
- Тип памяти ECC/non-ECC
- Дисковые контроллеры IDE нет
Разъемы и интерфейсы
- Количество разъемов SATA 6Gb/s: 6, RAID: 0, 1, 10 на основе AMD B450 Количество слотов M.2: 2
- Тип интерфейса M.2 PCI-E/SATA 3.0
- Тип слотов M.2 Socket 3, M key, 2242/2260/2280/22110; Socket 3, M key, 2242/2260/2280
- Слоты расширения 2xPCI-E x16, 2xPCI-E x1
- Поддержка PCI Express 2.0 есть
- Поддержка PCI Express 3.0 есть
- Наличие интерфейсов 14 USB, 6 USB 3.1 (4 на задней панели), выход S/PDIF, 1xCOM, DVI, HDMI, Ethernet, PS/2 (клавиатура), PS/2 (мышь)
- Разъемы на задней панели 8 USB, DVI, HDMI, Ethernet, PS/2 (клавиатура), PS/2 (мышь)
- Основной разъем питания 24-pin
- Разъем питания процессора 8-pin
- Разъем подключения ленты RGB есть

Обзор
Компания Gigabyte стала использовать новую схему питания и лучшенную систему охлаждения во всех платах: количество дросселей было сильно увеличено и установлены годные радиаторы. В следствии этого VRM и дроссели питания (на которых нарисована молния) перестали перегреваться.
На питание процессора идет всего четыре фазы питания и максимальная нагрузка, которую выдерживают мосфеты всего 20 ампер – так что “топовые” процессоры поставить на эту плату не получится. На этой материнской плате прекрасно заведутся и будут работать любые шестиядерные процессоры, такие как 1600, 1600x, 2600, 2600x. Но восьмиядерники сюда лучше не ставить (2700x и более мощные “камни”).
Отличие от M и Pro версий заключается в следующем: отсутствие второго Bios’а, наличие дополнительного радиатора на фазе питания.

Главные особенности
- Поддержка AMD Ryzen™ 2nd Generation/ Ryzen™ with Radeon™ Vega Graphics/ Athlon™ with Radeon™ Vega Graphics/ Ryzen™ 1st Generation Processors
- 4 DIMM-разъема для ОЗУ DDR4, двухканальный режим работы модулей памяти без ECC и буферизации
- HDMI, DVI-D Ports for Multiple Display
- Интегрированный I/O Shield of Ultra Durable™ Design
- Dual Ultra-Fast NVMe PCIe Gen3 M.2 (x4, x2) with One Thermal Guard
- Высококачественные аудиоконденсаторы, экранирование шумов и LED-трассировка зоны размещения аудиоподсистемы
- RGB FUSION 2.0 with Multi-Zone LED Light Show Design, Supports Digital LED & RGB LED Strips
- Эксклюзивный LAN-контроллер GIGABYTE 8118 Gaming, контроль и управление пропускной способностью
- Smart Fan 5 Features 6 Temperature Sensors and 4 Hybrid Fan Headers with FAN STOP
- Набор фирменных приложений APP Center (утилиты EasyTune™ и Cloud Station™)
- Соответствие требованиям стандарта CEC 2019 Ready, активация функций энергосбережения кнопкой мыши

Поддержка AMD RYZEN™ 3000-серии
Материнские платы GIGABYTE AM4 готовы поддерживать новейшие процессоры AMD Ryzen ™ 3000 и обратно совместимы с процессорами AMD Ryzen ™ 2000 и 1000. С богатым списком функций на материнских платах GIGABYTE AM4, таких как Ultra Durable ™ Armor для слотов PCIe / памяти, интерфейсы USB Type-C ™ на отдельных платах, улучшенное качество звука, высокоскоростной Ethernet и новейшая стандартная конструкция WIFI, материнские платы GIGABYTE AM4 идеально подходят для пользователей, желающих создать лучшие системы на платформе AMD.

Совместима с процессорами AMD Ryzen™ 2000- и 1000-серии
Технология AMD StoreMI
Материнские платы GIGABYTE серии 400 максимизируют потенциал вашего ПК с технологией AMD StoreMI. StoreMI ускоряет традиционные устройства хранения данных, сокращая время загрузки и улучшая общее взаимодействие с пользователем. Эта простая в использовании утилита объединяет скорость SSD с высокой емкостью жестких дисков в одном жестком диске, повышает скорость чтения / записи устройства в соответствии со скоростью SSD, повышает производительность данных до невероятных значений и превращает повседневный ПК к производительности системы.
Преимущества AMD StoreMI:
• Быстрая, плавная и легкая работа на ПК
Минимальное время отклика и ускоренная загрузка ПК и приложений.
• Быстродействие SSD-накопителя и емкость типового жесткого диска по доступной цене
• Быстрый доступ к файлам на основе анализа поведения
- Гибридный цифровой PWM-контроллер
- 4 DIMM-разъема для модулей DDR4, Двухканальный режим
- Разъем AM4 для процессоров семейства AMD Ryzen™
- Цельнометаллические контакты разъема питания
- Разъем M.2 и радиатор Thermal Guard
- Видео: DVI-D, HDM
- Порты USB 3.1 Gen1 Type-A
- Антишумовой экран
- 8-канальный кодек HD Audio
- High-End аудиоконденсаторы
- RGB Fusion 2.0
- Addressable LED Header*2
- Разъем RGB LED*2

Hybrid Digital Power Design оптимизированный для процессоров второго поколения AMD Ryzen™
Гибридный цифровой PWM + нижние МОП-транзисторы с RDS (on)
Материнские платы AORUS серии 400 используют гибридные цифровые ШИМ + более низкие RDS (вкл.) Конструкции MOSFET для поддержки процессоров AMD Ryzen ™ 2-го поколения, предлагая невероятную точность при разработке мощности самых энергоемких и энергосберегающих компонентов материнской платы, а также предоставляя улучшенные производительность системы и максимальная аппаратная масштабируемость.
Преимущества полевых транзисторов Lower RDS(on)

Два NVMe M.2 PCIe SSD в RAID
Высочайшая производительность благодаря твердотельным накопителям NVMe PCIe Gen3 x4, x2
Благодаря наличию Dual M.2 на материнских платах AORUS серии 400, настройка RAID-массивов стала еще проще.

Термозащита AORUS M.2 Thermal Guard
Энергоэффективное решение GIGABYTE M.2 Thermal Guard
Чтобы повысить надежность и обеспечить безотказную работу компонентов на протяжении всего срока службы, инженеры GIGABYTE реализовали вариант принудительного охлаждения M.2-накопителей средствами фирменных радиаторов Thermal Guard. Комплексное решение Thermal Guard эффективно рассеивает тепло, помогая устранить причину троттлинга применительно к M.2- устройствам и не допуская падения производительности дисковой подсистемы.

Термотроттлинг при повышении температуры

Погружение в виртуальную реальность
VR требует от системы большей чем Full HD графика производительности, для гарантированной смены кадров с частотой не менее 90 кадр/c
Только игровые ПК способны раскрыть весь потенциал VR
ПК для виртуальной реальности: рекомендованная конфигурация
■ Видеокарта: NVIDIA GTX 1050 / AMD R9 290 or greater, Compatible HDMI 1.4 video output
■ Процессор: AMD Ryzen™ 7 series processor
■ Размеры платы: GIGABYTE AMD X470 / B450 motherboards
■ ОЗУ: 8GB RAM or greater
■ USB Ports: 3x USB 3.0 ports plus 1x USB 2.0 port or greater
■ OS: Windows 10 64-bit or newer
Коммуникации и сетевые возможности
Эксклюзивная игровая сеть Realtek 8118
Высокоскоростная гигабитная локальная сеть с автоматическим распределением полосы пропускания
Realtek 8118 LAN – это высокопроизводительный и дружественный сетевой чип для игровых плееров с автоматическим распределением полосы пропускания для обеспечения наивысшего сетевого приоритета игры или приложения. Он может предоставить пользователям самые всесторонние функции и самый быстрый и плавный опыт работы в Интернете.
Программа получает самый высокий приоритет

Мониторинг сети в реальном времени

Дизайн материнской платы и подсветка RGB
RGB Fusion 2.0 с поддержкой цифровых светодиодов

С материнскими платами AORUS RGB Fusion 2.0 еще лучше с цифровыми светодиодами.
RGB Fusion 2.0 предлагает пользователям возможность управления встроенными RGB и внешними светодиодами RGBW / Digital для своих ПК. RGB Fusion 2.0 на материнских платах AORUS, уже наполненных цветами и узорами, теперь дополнен поддержкой цифровых светодиодов. Благодаря внешним цифровым светодиодным полосам, где каждый светодиод имеет цифровую адресацию, пользователи могут получить еще больше рисунков, стилей и подсветок.
Материнские платы AORUS Gaming будут поддерживать цифровые светодиодные полосы 5 В или 12 В и до 300 светодиодных ламп. RGB Fusion 2.0 с цифровыми светодиодами поставляется с 9 новыми шаблонами и различными настройками скорости.


Многозональное световое шоу
Теперь, предлагая больше светодиодных настроек, чем когда-либо, пользователи могут по-настоящему адаптировать свой ПК для представления своего образа жизни. Благодаря полной поддержке RGB и переработанному приложению RGB Fusion 2.0 пользователь полностью контролирует светодиоды, которые окружают материнскую плату.


RGBW и UV светодиодные линейки и независимые прогграмируемые разъемы для их подключения
Не достаточно яркая подсветка? Вы можете установить стандартные 12 В внешние полосы RGB, RGBW или RGB / UV на контактный разъем RGBW и контролировать его цвет с помощью программного обеспечения RGB Fusion 2.0. Используя световую полосу RGBW с выделенным белым светодиодом, пользователи получат более яркие и более яркие оттенки цветов.

RGBW Pin Header Support True White and RGB/UV LED Strips
Цвет RGB/UV
RGB/UV могут осветить ваш компьютер флуоресцентным свечением. С помощью кабелей, реагирующих на ультрафиолетовое излучение, ваш ПК может излучать яркие или светящиеся лучи.
Настоящий белый цвет
RGBW light полоски могут давать чистый белый цвет вместо смешивания цветов R / G / B, из-за которого получаются неточный белый цвет.

Более богатый цвет
Благодаря выделенным белым светодиодам световые полосы могут давать более насыщенный и яркий цвет в цветовой гамме.

RGB калибровка
Разные световые полосы иногда имеют разные определения выводов RGB, программное обеспечение RGB Fusion 2.0 может перемещать расположение каждого вывода для лучшей совместимости.

Программное обеспечение RGB Fusion 2.0
Интуитивно понятный пользовательский интерфейс и расширенный функционал приложения RGB Fusion 2.0 позволяют быстро и максимально эффективно настроить подсветку любого совместимого с данной технологией устройства. Объединяйте в одну схему подсветки материнскую плату и графический 3D-ускоритель, периферийные устройства и другие компоненты, придайте Вашему игровому ПК уникальный неповторимый облик и поделитесь персональными профилями с друзьями. Новый режим подсветки позволяет применить доступные световые эффекты к выбранным игровым приложениям, помогая сделать развлечения на ПК еще более интерактивными и приобрести неоценимый игровой опыт.

Индивидуальные настройки к Вашим услугам

Приложение GIGABYTE RGB Fusion
Cделайте так, чтобы ваш компьютер засиял словно произведение искусства, друзьям на зависть! С помощью мобильного приложения GIGABYTE RGB Fusion пользователи могут наблюдать и управлять подсветкой собственного игрового ПК. Выполнить поставленную задачу стало намного проще, поскольку настроить цветовую гамму и выбрать скорость переходов, применительно к различным режимам, теперь можно без участия клавиатуры и монитора.

RGB Fusion 2.0
RGB Fusion 2.0 – это программное обеспечение, которое объединяет все это, позволяя синхронизировать ваши аксессуары в одном ритме. Настройте все свои светодиоды так, как вам нравится – пусть они совпадают, ослепляют и впечатляют. Узнайте больше о RGB Fusion 2.0

Охлаждение
Функция SmartFan 5
Благодаря Smart Fan 5 пользователи могут быть уверены в том, что их игровой ПК будет функционировать в наиболее благоприятном температурном режиме без ущерба для производительности. Благодаря термодатчикам, размещенным на материнской плате, средствами Smart Fan 5 можно контролировать работу каждого вентилятора. Кроме того, Smart Fan 5 – это еще и большее количество гибридных разъемов для подключения вентиляторов, которые поддерживают режимы работы PWM и Voltage, обеспечивая максимальное удобство обслуживания установленной жидкостной системы охлаждения.

■ 4 Fan Pin Headers
■ 6 термодатчиков
■ Гибридные разъемы двойного назначения
■ Supports High Current Fans up to 24W(2Ax12V) with Over-Current Protection
■ Интуитивно понятный интерфейс приложения
■ Разъемы для подключения вентиляторов
■ Internal Temperature Sensors
Разные модели плат имеют разное количество термодатчиков и разъемов для подключения вентиляторов Функционал приложения Smart Fan 5 варьируется в зависимости от модели платы.

Интеллектуальное управление вентиляторами
Выбирайте тишину! Когда температура опустится ниже заданного значения, функция Fan Stop выдаст команду остановить указанный вентилятор. Средствами встроенных датчиков отслеживается текущая температура и определяется момент остановки крыльчатки конкретного вентилятора, – функционал Fan Stop и персональные настройки доступны пользователю в полном объеме.

Гибридные Fan-разъемы
Все гибридные Fan-разъемы могут автоматически определять тип подключаемого устройства (вентилятор или помпа) и предусматривают возможность выбора режима PWM или Voltage.

Новое приложение SmartFan 5
Возможность выбора оптимального режима от самого тихого до полноскоростного, в соответствии с особенностями функционирования системы. Для каждого вентилятора или помпы может быть задан свой график работы с указанием пороговых значений для перехода на иную скорость вращения.

Датчики и вентиляторы оперативного взаимодействия
Для каждого вентилятора можно указать скорость вращения крыльчатки в соответствии с определенной температурой охлаждаемого компонента системы (за исключением вентилятора ЦП)
Функция кривой вентилятора
Индивидуальная настройка кривой вентилятора в зависимости от конкретной температуры, интуитивно понятный графический интерфейс утилиты.

Аудиоподсистема
Эксклюзивный дизайн встроенной аудиоподсистемы
Обеспечивает высокое качество звука и расширение звука для создания наиболее реалистичных звуковых эффектов для профессиональных геймеров.
Аудио шумозащита со Светодиодным освещением трассировки

Аудио компоненты класса High-End

Концепция ULTRA DURABLE / защита разъемов ввода /вывода
Интегрированная защитная защита разъемов ввода / вывода
Прочный дизайн и простота установки
Благодаря встроенному экрану ввода / вывода создание сверхпрочного ПК GIGABYTE становится еще проще и удобнее. Пользователи могут рассчитывать на превосходную долговечность благодаря прочной конструкции предварительно установленного экрана ввода / вывода.

Усиленные контакты разъема питания
Установите хорошее соединение и значительно уменьшите количество проводов
Материнские платы AORUS серии 400 имеют сплошные 24-контактные разъемы питания ATX 24 В и ATX 12 В для обеспечения стабильного питания при перегрузке ЦП.
Преимущества разъема Solid Pin Power
- Большая площадь контакта для электричества
- Большее количество металла для поддержания большей мощности и вырабатываемого тепла
- Ультра прочный и длительный срок службы

Колодка с двойной фиксацией (запатентовано GIGABYTE)

ЗАЩИТА ОТ ОКИСЛОВ СЕРЫ
Соединения серы в воздухе могут воздействовать на планарные компоненты (в частности, резисторы), создавая химические соединения, способные вызвать короткое замыкание. Если это произойдет, материнская плата не сможет функционировать. Устанавливая резисторы, устойчивые к воздействию окислов серы, компания GIGABYTE предлагает качественно новый уровень защиты Ultra Durable своих изделий.

Светодиоды диагностики
Идентификация и устранение неисправностей
Установленные на плате светодиоды встроенными средствами BIOS информируют о неисправностях на этапе загрузки, что дает возможность пользователю быстро определить какой из основных компонентов (ЦП / ОЗУ / Графика / Накопитель) неисправен, и незамедлительно принять соответствующие меры.

BIOS и приложения GIGABYTE
Обновление BIOS
Функционал BIOS имеет первостепенное значение для пользователя на этапе поиска и выбора оптимальных параметров. Предложенный GIGABYTE новый графический интерфейс обеспечивает удобный доступ к функционалу существенно переработанной BIOS и дает возможность пользователю приобрести уникальный опыт тонкой настройки новой системы.

Центр приложений APP Center
Центр приложений GIGABYTE App Center предоставляет мгновенный доступ к фирменным приложениям GIGABYTE, которые помогут получить максимальный эффект от эксплуатации материнской платы. Интуитивно понятный пользовательский интерфейс GIGABYTE App Center позволяет выполнять запуск всех приложений GIGABYTE, установленных в системе, проверять и уведомлять в режиме онлайн о доступных для загрузки обновлениях, загружать актуальные приложения, драйверы и BIOS.

Утилита 3D OSD
Утилита 3D OSD автоматически идентифицирует и выводит на дисплее информацию о системе одновременно с активным игровым приложением, что позволяет наблюдать и анализировать данные, не переключаясь между экранами утилиты (на рабочем столе) и приложения.

XSplit Gamecaster + Broadcaster: руководство к действию
Поделитесь с друзьями незабываемыми впечатлениями от прохождения того или иного эпизода игры с помощью XSplit Gamecaster + Broadcaster! Полностью оптимизированная процедура интеграции в социальные сети и интерактивное общение в режиме реального времени – оставайтесь в эпицентре событий, не теряя нитей игры. Всего один щелчок кнопкой мыши, и все ваши действия в игре переместят видеопоток в Twitch. Управляйте игрой как профи!
Экономия электроэнергии одним щелчком кнопки мыши
Требования CEC: Энергопотребление ПК должно находиться на определенном уровне, когда он находится в выключенном режиме, режиме ожидания или в состоянии покоя. Благодаря программно-аппаратному комплексу и точной настройке BIOS материнские платы GIGABYTE способны обеспечить более низкое энергопотребление в режиме ожидания и в полном объеме соответствуют стандартам, выработанным Калифорнийской энергетической комиссией (CEC 2019) для изделий с малой мощностью и высокой эффективностью.


Экранное разрешение 4K (Ultra HD)
Разрешение 4K является следующей технологической вехой в доставке контента высокой четкости, использующей приблизительно 4000 пикселей по горизонтальной оси, что более чем в четыре раза превышает стандартную плотность пикселей HD. Материнские платы GIGABYTE обеспечивают встроенную поддержку 4K с интегрированной графикой AMD Radeon® через HDMI.

HDMI™ – мультимедийный интерфейс нового поколения
HDMI™ (High Definiton Multimedia Interface) – это мультимедийный интерфейс высокой четкости, который обеспечивает одновременную передачу видеоконтента со скоростью до 5 Гбит/с (в рамках базовой спецификации HDMI 1.0) и 8-канального HD-аудиосигнала по одному кабелю. Среди преимуществ HDMI-интерфейса – возможность передачи видео- и аудио-компонентов без сжатия и передача цифрового контента в формате Full HD 1080p без потери качества (отсутствуют потери на операциях аналогово-цифрового преобразования сигнала, характерные для интерфейсов предыдущего поколения). Интерфейс HDMI совместим с функцией HDCP (High–bandwidth Digital Content Protection), которая обеспечивает защиту цифрового контента при воспроизведении дисков Blu-Ray, HD DVD и некоторых других форматов, распространяемых на защищенных носителях.

Отзывы покупателей
Покупатели остались довольны продуманной системой охлаждения платы – радиаторы качественные и в избытке (в том числе на M.2, в зоне VRM), гибко-настраиваемой RGB подсветкой, качеством звук встроенного аудиоконтроллера, дизайном и внешним видом материнской платы.
Покупатели отметили в качестве достоинств также наличие слота для ленты RGB, наличие четырех портов USB 3.0 и хороший и легкий разгон для памяти и процессора.
По словам пользователей, при разгоне Ryzen R5 1600 до 3,8 Ггц температура не превышала 60 градусов, чипсет оставался холодным и это почти при полной тишине кулеров.
Покупателям удавалось разогнать свои модули памяти с 2400 Mhz до 2933 Mhz или даже до 3400 Mhz на данной материнской плате:
Память Samsung [M378A1K43BB2-CRC] 8 ГБ разогналась до 3200 с таймингами 16-17-17-36 и напряжением 1,36
HX424C15FBK2/8 2400 завел до 2933 на 1.35В выше уже не инициализирует память
Память Samsung M378A1G43TB1 8Gb в двухканале спокойно взяла 3200 с таймингами 16 19 19 38 и напряжением 1.3v.
Некоторые покупатели пожаловались на проблемы в BIOS, связанные с настройкой памяти, которые, однако, можно решить, обновив прошивку. Другие недостатки, отмеченные пользователями связаны с форм-фактором платы, в отзывах утверждалось, что по ширине плата немного не стандартная, по этому при подключении 24 pin коннектора нужно быть аккуратным, так как текстолит начинает прогибаться.
Мой первый DIY PC $ 460 build.
15 марта 2019 г. Подтвержденная покупка
Я думаю, что сделал отличный выбор в пользу этой материнской платы Aorus Elite B450. Я добавил Ryzen 3 2200G. Эта плата имеет 6 датчиков температуры, что, на мой взгляд, является хорошей особенностью. 4 разъема RGB (2 адресуемых) плюс 2 зоны RGB, встроенные в МБ (одна из них – Falcon’s Head или “голова Сокола”). Вы можете программировать их все по-разному с помощью RGB Fusion. Я получил 3 зеленых вентилятора 4 пиновых за 10,00 $. Вентиляторы не меняют цвет, но 4 штифта позволяют регулировать скорость. Мне нравится местоположение разъемов памяти на плате. Я вставил 2 Patriot Vipers 3000mhz Red, они выглядят потрясающе светящимися от RGB-полосы, которую я установил. Я получаю 3000 МГц без разгона. Этот MB имеет два разъема для твердотельных накопителя NVME M.2, которые намного быстрее, чем твердотельных накопители форм-фактора 2.5. 1 – PCIE Gen 3×4, а 1 – PCIE Gen 3×2. Я купил X2, прежде чем понял, что X4 был в два раза быстрее X2 и в 5 раз быстрее, чем 2.5 SSD. Оба 256 ГБ, один был 41,00 $, другой 45,00 $. Это дает мне 500 ГБ места на дисках, причем полностью в твердотельном состоянии. Я использую StoreMI для объединения двух дисков. Я могу добавить свой старый жесткий диск емкостью 1 ТБ, но пока я хочу попробовать как будут чувствовать себя в паре твердотельные диски. Ryzen имеет довольно хорошую встроенную видеокарту, но мне нужно было подключить 3 монитора, поэтому я установил свою старую видеокарту 1050i. У моего старого компьютера Dell был DDR3, Intel I7 4-го поколения (так что не поддается оценке). DVD-плееры сейчас устарели. Я не знаю, в основном ли это NVME, но этот новый ПК намного быстрее и отзывчивее. Мой Windows 10 обновился пару раз и сделал это за 30 секунд. BIOS тоже великолепен, там можно увидеть температуру, скорость вращения каждого вентилятора, частоту, с которой работает память. Можно нажать F2 для переключения из простого режима в режим эксперта. Разогнать систему также легко. Я старый пердун, поэтому не то чтобы играю, но много занимаюсь графическим дизайном. Я рад, что сделал переход на AMD с Intel’а. Я рад, что ушел с материнской платой большего размера. Возможно, мне понадобятся дополнительные слоты PCI и DDR. Я уверен, что буду использовать все 4 светодиодных разъема, и думаю о том, чтобы повесить светодиодные часы на стену и поставить маленькое зеркало внутри системника. Таким образом, за 400 долларов + стоимость монитора(ов) вы можете построить хорошую игровую систему.
Положительный отзыв о материнской плате покупателя с сайта Amazon
Драйвера отстой
18 мая 2019 г.
По сравнению с моей материнской платой Asus ROG STRIX b350-F, эта модель кажется дешевкой. Она не идет с креплениями для материнской платы, есть только для m.2. Я потратил 9 часов, пытаясь обновить последние версии BIOS с помощью qflash, пошел читать статьи из Reddit, чтобы найти решение, и пришел к выводу, что нужно оставить все как есть и надеяться, что когда выйдет новое обновление BIOS, все заработает как надо. К счастью, у меня не было проблем с нестабильностью. Я обновлю свой обзор позже, если будут какие-либо изменения или если мне придется вернуть доску.
Негативный отзыв недовольного материнской платой покупателя
Производитель врет в описании. НЕ ПОКУПАЙТЕ
1 июня 2019 г.
Подтвержденная покупка
Я совершил ошибку, купив эту плату для нового компьютера на базе Ryzen. Два слота M. @, четыре SATA-порта, достойная цена, выглядели неплохо, верно? Нет.
На самом деле работает только один слот M.2; второе – подделка. Плата НЕ будет читать любые SSD во втором слоте, только в одном. Один рабочий слот M.2 нельзя установить для загрузки, что делает его более еще бесполезным, чем мэра в сенате из Кентукки. Также придется отключить все порты SATA, кроме одного, если вы его используете. Это означает, что у вас не может быть одновременно установлен SSD для программ и ОС (так как он в любом случае не загружается), жесткий диск для данных и DVD-привод или картридер.
Источник
инструкцияGigabyte B450 Aorus Elite
To reduce the impacts on global warming, the packaging materials of this product
are recyclable and reusable. GIGABYTE works with you to protect the environment.
For more product details, please visit GIGABYTE’s website.
B450 AORUS ELITE
User’s Manual
Rev. 1002
12ME-B45ARSE-1002R
Посмотреть инструкция для Gigabyte B450 Aorus Elite бесплатно. Руководство относится к категории материнские платы, 29 человек(а) дали ему среднюю оценку 8.9. Руководство доступно на следующих языках: английский. У вас есть вопрос о Gigabyte B450 Aorus Elite или вам нужна помощь? Задайте свой вопрос здесь
- B450 AORUS ELITE Motherboard Layout
- Chapter 1 Hardware Installation
- Chapter 2 BIOS Setup
- Chapter 3 Appendix
Свойства
| Семейство чипсета материнской платы | AMD |
| Чипсет материнской платы | AMD B450 |
| Комплектующие для | ПК |
| Выходные звуковые каналы | 7.1 канала |
| Аудио чип | Realtek ALC892 |
| Поддерживаемые операционные системы Windows | Windows 10, Windows 7 |
| Формат материнской платы | ATX |
| Сертификация | CE, FCC |
Процессор
| Производитель процессора | AMD |
| Совместимые серии процессоров | AMD Athlon, AMD Ryzen 3, AMD Ryzen 3 2nd Gen, AMD Ryzen 3 3rd Gen, AMD Ryzen 5, AMD Ryzen 5 2nd Gen, AMD Ryzen 5 3rd Gen, AMD Ryzen 7, AMD Ryzen 7 2nd Gen, AMD Ryzen 7 3rd Gen, AMD Ryzen 9 3rd Gen |
| Сокет процессора | Разъем AM4 |
Память
| Тип слотов памяти | DIMM |
| Количество слотов памяти | 4 |
| Каналы памяти | Dual-channel |
| Error-correcting code (ECC) | Да |
| без функции коррекции ошибок | Да |
| Поддерживаемые частоты памяти | 2133,2400,2667,2933 MHz |
| Небуферизованная память | Да |
| Поддерживаемые типы памяти | DDR4-SDRAM |
| Максимальная внутренняя память | 64 GB |
| 2933 MHz |
Графический адаптер
| HDCP | Да |
| Максимальное разрешение | 4096 x 2160 пикселей |
| Поддержка технологии параллельной обработки | CrossFire |
Внутренние порты
| Разъем выхода S/PDIF | Да |
| Количество разъемов SATA III | 6 |
| Количество разъемов SATA II | 0 |
| Разъем питания ATX (24-конт.) | Да |
| 12В разъем питания | Да |
| Разъем вентилятора центрального процессора | Да |
| Количество разъемов вентилятора корпуса | 3 |
| RGB LED контактный разъем | Да |
| Разъем передней панели | Да |
| Аудиоразъем передней панели | Да |
| Количество параллельных разъемов ATA (PATA) | 0 |
| Разъемы USB 2.0 | 2 |
| Разъемы USB 3.2 Gen 1 (3.1 Gen 1) | 1 |
| Разъемы USB 3.2 Gen 2 (3.1 Gen 2) | 0 |
| TPM коннектор | Да |
| Коннекторы последовательного порта | 1 |
Особые свойства процессора
| Технология Intel HD Audio | Да |
| экстремальный профиль памяти Intel | Да |
Сеть
| Подключение Ethernet | Да |
| Тип Ethernet интерфейса | Гигабитный Ethernet |
| Wi-Fi | Нет |
Слоты расширения
| Количество M.2 (M) слотов | 2 |
| PCI Express x16 слоты | 2 |
| PCI Express x1 слоты | 2 |
BIOS
| Перемычка Clear CMOS | Да |
| Тип BIOS | UEFI AMI |
| Размер памяти BIOS | 128 Mbit |
| Версия ACPI | 5.0 |
| Plug & Play | Да |
| Desktop Management Interface (DMI) версия | 2.7 |
| Версия BIOS (SMBIOS) | 2.7 |
Порты на задней панели
| Количество портов USB 2.0 | 4 |
| Количество портов USB 3.2 Gen 1 (3.1 Gen 1) Type-A | 4 |
| Количество портов USB 3.2 Gen 1 (3.1 Gen 1) Type-С | 0 |
| Количество портов USB 3.2 Gen 2 (3.1 Gen 2) Type-A | 0 |
| Количество портов USB 3.2 Gen 2 (3.1 Gen 2) Type-С | 0 |
| Количество портов Ethernet LAN ( RJ-45) | 1 |
| Количество портов eSATA | 0 |
| Количество портов PS/2 | 1 |
| Порты FireWire | 0 |
| Количество портов VGA (D-Sub) | 0 |
| Количество HDMI портов | 1 |
| Количество портов DVI-D | 1 |
| Линейные выходы наушников | 6 |
Вес и размеры
| Ширина | 305 mm |
| Глубина | 235 mm |
| Высота | 80 mm |
Контроллеры хранения данных
| Поддерживаемые типы накопителей | Твердотельный накопитель (SSD) |
| Уровни RAID | 0, 1,10 |
| Поддерживаемые интерфейсы носителя | M.2, SATA |
Логистические данные
| Код гармонизированной системы описания (HS) | 84733020 |
Прочие свойства
показать больше
Не можете найти ответ на свой вопрос в руководстве? Вы можете найти ответ на свой вопрос ниже, в разделе часто задаваемых вопросов о Gigabyte B450 Aorus Elite.
Какой вес Gigabyte B450 Aorus Elite?
Какие сертификаты Gigabyte B450 Aorus Elite имеет?
Какая высота Gigabyte B450 Aorus Elite?
Какая ширина Gigabyte B450 Aorus Elite?
Какая толщина Gigabyte B450 Aorus Elite?
Инструкция Gigabyte B450 Aorus Elite доступно в русский?
Не нашли свой вопрос? Задайте свой вопрос здесь

- Manuals
- Brands
- Gigabyte Manuals
- Motherboard
- B450 AORUS ELITE V2
- User manual
-
Contents
-
Table of Contents
-
Bookmarks
Quick Links
B450 AORUS ELITE V2
User’s Manual
Rev. 1101
12ME-B45AET2-1101R
For more product details, please visit GIGABYTE’s website.
To reduce the impacts on global warming, the packaging materials of this product
are recyclable and reusable. GIGABYTE works with you to protect the environment.
Related Manuals for Gigabyte B450 AORUS ELITE V2
Summary of Contents for Gigabyte B450 AORUS ELITE V2
-
Page 1
B450 AORUS ELITE V2 User’s Manual Rev. 1101 12ME-B45AET2-1101R For more product details, please visit GIGABYTE’s website. To reduce the impacts on global warming, the packaging materials of this product are recyclable and reusable. GIGABYTE works with you to protect the environment. -
Page 2
The trademarks mentioned in this manual are legally registered to their respective owners. Disclaimer Information in this manual is protected by copyright laws and is the property of GIGABYTE. Changes to the specifications and features in this manual may be made by GIGABYTE without prior notice. -
Page 3: Table Of Contents
Table of Contents B450 AORUS ELITE V2 Motherboard Layout …………..4 Chapter 1 Hardware Installation ………………5 Installation Precautions ………………5 1-2 Product Specifications ………………6 Installing the CPU ……………….. 9 Installing the Memory ………………9 Installing an Expansion Card …………….. 10 Back Panel Connectors ……………… 10 Internal Connectors ………………
-
Page 4: B450 Aorus Elite V2 Motherboard Layout
B450 AORUS ELITE V2 Motherboard Layout ATX_12V KB_MS_USB CPU_FAN Socket AM4 R_USB30 USB_LAN SYS_FAN1 LED_CPU AUDIO M_BIOS PCIEX1_1 B450 AORUS ELITE V2 PCIEX16 Realtek ® GbE LAN AMD B450 PCIEX4 CODEC CPU DRAM VGA BOOT ® Super I/O PCIEX1_2 DLED_V_SW1 SPDIF_O…
-
Page 5: Chapter 1 Hardware Installation
Chapter 1 Hardware Installation Installation Precautions The motherboard contains numerous delicate electronic circuits and components which can become damaged as a result of electrostatic discharge (ESD). Prior to installation, carefully read the user’s manual and follow these procedures: • Prior to installation, make sure the chassis is suitable for the motherboard. • Prior to installation, do not remove or break motherboard S/N (Serial Number) sticker or warranty sticker provided by your dealer.
-
Page 6: 1-2 Product Specifications
Š S upport for ECC Un-buffered DIMM 1Rx8/2Rx8 memory modules (operate in Š non-ECC mode) Support for non-ECC Un-buffered DIMM 1Rx8/2Rx8/1Rx16 memory modules Š Support for Extreme Memory Profile (XMP) memory modules Š (Go to GIGABYTE’s website for the latest supported memory speeds and memory modules.) Onboard Integrated Graphics Processor: Š Graphics 1 x DVI-D port, supporting a maximum resolution of 1920×1200@60 Hz (Note) * The DVI-D port does not support D-Sub connection by adapter.
-
Page 7
Storage Interface Š 1 x M.2 connector (Socket 3, M key, type 2242/2260/2280/22110 SATA and PCIe 3.0 x4/x2 SSD support) (M2A_SOCKET) 1 x M.2 connector (Socket 3, M key, type 2242/2260/2280 PCIe 3.0 x2 SSD Š support) (M2B_SOCKET) 6 x SATA 6Gb/s connectors Š… -
Page 8
ATX Form Factor; 30.5cm x 23.5cm Š * GIGABYTE reserves the right to make any changes to the product specifications and product-related information without prior notice. Please visit the SupportUtility List Please visit GIGABYTE’s website for support lists of CPU, memory page on GIGABYTE’s website to modules, SSDs, and M.2 devices. download the latest version of apps. — 8 -… -
Page 9: Installing The Cpu
• Make sure that the motherboard supports the memory. It is recommended that memory of the same capacity, brand, speed, and chips be used. (Go to GIGABYTE’s website for the latest supported memory speeds and memory modules.) • Always turn off the computer and unplug the power cord from the power outlet before installing the memory to prevent hardware damage.
-
Page 10: Installing An Expansion Card
Dual Channel Memory Configurations Table DDR4_4 DDR4_2 DDR4_3 DDR4_1 2 Modules DS/SS DS/SS DS/SS DS/SS 4 Modules DS/SS DS/SS DS/SS DS/SS (SS=Single-Sided, DS=Double-Sided, «- -«=No Memory) Due to CPU limitations, read the following guidelines before installing the memory in Dual Channel mode. Dual Channel mode cannot be enabled if only one memory module is installed. When enabling Dual Channel mode with two or four memory modules, it is recommended that memory of the same capacity, brand, speed, and chips be used. For optimum performance, when enabling Dual Channel mode with two memory modules, we recommend that you install them in the DDR4_1 and DDR4_2 sockets. Installing an Expansion Card Read the following guidelines before you begin to install an expansion card: •…
-
Page 11
Side Speaker Out Line In Line Out/Front Speaker Out Mic In To enable or configure the audio amplifying function for the Line out jack, please access the HD Audio Manager application. • When removing the cable connected to a back panel connector, first remove the cable from your device and then remove it from the motherboard. • When removing the cable, pull it straight out from the connector. Do not rock it side to side to prevent an electrical short inside the cable connector. Please visit GIGABYTE’s website for details on configuring the audio software. — 11 -… -
Page 12: Internal Connectors
Internal Connectors ATX_12V SPDIF_O F_PANEL CPU_FAN F_AUDIO SYS_FAN1/2/3 LED_CPU CLR_CMOS LED_C F_USB30 D_LED1/D_LED2 F_USB1/F_USB2 DLED_V_SW1/DLED_V_SW2 COMA ASATA3 0/1 SATA3 0/1/2/3 CPU/DRAM/VGA/BOOT M2A_SOCKET/M2B_SOCKET Read the following guidelines before connecting external devices: • First make sure your devices are compliant with the connectors you wish to connect. •…
-
Page 13
1/2) ATX_12V/ATX (2×4 12V Power Connector and 2×12 Main Power Connector) With the use of the power connector, the power supply can supply enough stable power to all the components on the motherboard. Before connecting the power connector, first make sure the power supply is turned off and all devices are properly installed. The power connector possesses a foolproof design. Connect the power supply cable to the power connector in the correct orientation. The 12V power connector mainly supplies power to the CPU. -
Page 14
S B_ 1 2 3 5) LED_CPU (CPU Cooler LED Strip/RGB LED Strip Header) The header can be used to connect a CPU cooler LED strip or a standard 5050 RGB LED strip (12V/G/R/B), with maximum power rating of 2A (12V) and maximum length of 2m. Pin No. Definition F_USB3 F Connect the CPU cooler LED strip/RGB LED strip to the header. The power pin (marked with a triangle on the plug) of the LED strip must LED Strip be connected to Pin 1 (12V) of this header. Incorrect connection may lead to the damage of the LED strip. -
Page 15
7) D_LED1/D_LED2 (Addressable LED Strip Headers) The headers can be used to connect a standard 5050 Addressable LED strip, with maximum power rating of 2A (12V or 5V) and maximum length of 5m or maximum number of 300 LEDs. There are 12V and 5V Addressable LED strips. Be sure to verify the voltage requirements of your Addressable LED strip and set the DLED_V_SW1 and DLED_V_SW2 jumpers accordingly. Pin No. Definition V (5V) Data No Pin D_LED1 D_LED2 Connect your addressable LED strip to the header. There are 12V and Addressable LED Strip 5V addressable LED strips. Be sure to verify the voltage requirements of your addressable LED strip and set the DLED_V_SW1 and DLED_V_SW2 jumpers accordingly. The power pin (marked with a triangle on the plug) of the LED strip must be connected to Pin 1 of the addressable LED strip header. Incorrect connection may lead to the damage of the LED strip. -
Page 16
S B_ DEBUG PORT DEBUG PORT 9/10) ASATA3 0/1, SATA 3 0/1/2/3 (SATA 6Gb/s Connectors) The SATA connectors conform to SATA 6Gb/s standard and are compatible with SATA 3Gb/s and SATA 1.5Gb/s standard. Each SATA connector supports a single SATA device. The SATA connectors support RAID 0, RAID 1, and RAID 10. Refer to Chapter 3, «Configuring a RAID Set,» for instructions on configuring a RAID array. -
Page 17
B S_ Installation Notices for the M.2 and SATA Connectors: The availability of the SATA connectors may be affected by the type of device installed in the M.2 connector. S B_ Refer to the following table for details. • M2A_SOCKET: Connector Type of M.2 SATA3 0… -
Page 18
13) F_PANEL (Front Panel Header) Connect the power switch, reset switch, speaker, chassis intrusion switch/sensor and system status indicator on the chassis to this header according to the pin assignments below. Note the positive and negative pins before connecting the cables. •… -
Page 19
15) BAT (Battery) The battery provides power to keep the values (such as BIOS configurations, date, and time information) in the CMOS when the computer is turned off. Replace the battery when the battery voltage drops to a low level, or the CMOS values may not be accurate or may be lost. You may clear the CMOS values by removing the battery: 1. -
Page 20
18) F_USB1/F_USB2 (USB 2.0/1.1 Headers) The headers conform to USB 2.0/1.1 specification. Each USB header can provide two USB ports via an optional USB bracket. For purchasing the optional USB bracket, please contact the local dealer. Pin No. Definition Pin No. Definition Power (5V) USB DY+ Power (5V) USB DX- USB DY- No Pin USB DX+ • Do not plug the IEEE 1394 bracket (2×5-pin) cable into the USB 2.0/1.1 header. • Prior to installing the USB bracket, be sure to turn off your computer and unplug the power cord from the power outlet to prevent damage to the USB bracket. -
Page 21
21) CPU/DRAM/VGA/BOOT (Status LEDs) The status LEDs show whether the CPU, memory, graphics card, and operating system are working F_USB3 F_USB30 3 properly after system power-on. If the CPU/DRAM/VGA LED is on, that means the corresponding device is not working normally; if the BOOT LED is on, that means you haven’t entered the operating system yet. USB 0_ B CPU: CPU status LED DRAM: Memory status LED VGA: Graphics card status LED DRAM BOOT: Operating system status LED BOOT — 21 -… -
Page 22: Chapter 2 Bios Setup
Its major functions include conducting the Power-On Self-Test (POST) during system startup, saving system parameters and loading operating system, etc. BIOS includes a BIOS Setup program that allows the user to modify basic system configuration settings or to activate certain system features. When the power is turned off, the battery on the motherboard supplies the necessary power to the CMOS to keep the configuration values in the CMOS. To access the BIOS Setup program, press the <Delete> key during the POST when the power is turned on. To upgrade the BIOS, use either the GIGABYTE Q-Flash or @BIOS utility. Q-Flash allows the user to quickly and easily upgrade or back up BIOS without entering the operating system. • @BIOS is a Windows-based utility that searches and downloads the latest version of BIOS from the Internet • and updates the BIOS.
-
Page 23: The Main Menu
The Main Menu System Setup Menus Time Hardware Information Configuration Items Current Settings Quick Access Bar allows you to enter Easy Mode, select BIOS default language, configure fan settings, or enter Q-Flash. Classic Setup Function Keys <f><g> Move the selection bar to select a setup menu <h><i> Move the selection bar to select an configuration item on a menu <Enter> Execute command or enter a menu < + >/<Page Up> Increase the numeric value or make changes <…
-
Page 24
M.I.T. Whether the system will work stably with the overclock/overvoltage settings you made is dependent on your overall system configurations. Incorrectly doing overclock/overvoltage may result in damage to CPU, chipset, or memory and reduce the useful life of these components. This page is for advanced users only and we recommend you not to alter the default settings to prevent system instability or other unexpected results. (Inadequately altering the settings may result in system’s failure to boot. -
Page 25
& Core Performance Boost Allows you to determine whether to enable the Core Performance Boost (CPB) technology, a CPU performance-boost technology. (Default: Auto) & AMD Cool&Quiet function Enabled L ets the AMD Cool’n’Quiet driver dynamically adjust the CPU clock and VID to reduce heat output from your computer and its power consumption. (Default) Disabled Disables this function. & SVM Mode Virtualization enhanced by Virtualization Technology will allow a platform to run multiple operating systems and applications in independent partitions. With virtualization, one computer system can function as multiple virtual systems. (Default: Disabled) & PPC Adjustment (Note 1) Allows you to fix the PState of the CPU. (Default: PState 0) &… -
Page 26
& Memory Frequency (MHz) The first memory frequency value is the normal operating frequency of the memory being used; the second is the memory frequency that is automatically adjusted according to the System Memory Multiplier settings. ƒ Advanced Memory Settings & Extreme Memory Profile (X.M.P.) , System Memory Multiplier, Memory Frequency(MHz) (Note) The settings above are synchronous to those under the same items on the Advanced Frequency Settings menu. -
Page 27
ƒ Smart Fan 5 & Monitor Allows you to select a target to monitor and to make further adjustment. (Default: CPU FAN) & Fan Speed Control Allows you to determine whether to enable the fan speed control function and adjust the fan speed. Allows the fan to run at different speeds according to the temperature. You can adjust Normal the fan speed with System Information Viewer based on your system requirements. -
Page 28: System
System This section provides information on your motherboard model and BIOS version. You can also select the default language used by the BIOS and manually set the system time. & System Language Selects the default language used by the BIOS. &…
-
Page 29: Bios
System program. (Default) & Full Screen LOGO Show Allows you to determine whether to display the GIGABYTE Logo at system startup. Disabled skips the GIGABYTE Logo when the system starts up. (Default: Enabled) & Fast Boot Enables or disables Fast Boot to shorten the OS boot process. Ultra Fast provides the fastest bootup speed. (Default: Disabled)
-
Page 30
& VGA Support Allows you to select which type of operating system to boot. Enables legacy option ROM only. Auto EFI Driver Enables EFI option ROM. (Default) This item is configurable only when Fast Boot is set to Enabled or Ultra Fast. & USB Support Disabled All USB devices are disabled before the OS boot process completes. Full Initial All USB devices are functional in the operating system and during the POST. (Default) Partial Initial Part of the USB devices are disabled before the OS boot process completes. -
Page 31
& Administrator Password Allows you to configure an administrator password. Press <Enter> on this item, type the password, and then press <Enter>. You will be requested to confirm the password. Type the password again and press <Enter>. You must enter the administrator password (or user password) at system startup and when entering BIOS Setup. Differing from the user password, the administrator password allows you to make changes to all BIOS settings. & User Password Allows you to configure a user password. Press <Enter> on this item, type the password, and then press <Enter>. You will be requested to confirm the password. Type the password again and press <Enter>. You must enter the administrator password (or user password) at system startup and when entering BIOS Setup. However, the user password only allows you to make changes to certain BIOS settings but not all. To cancel the password, press <Enter> on the password item and when requested for the password, enter the correct one first. When prompted for a new password, press <Enter> without entering any password. -
Page 32: Peripherals
Peripherals & AMD CPU fTPM Enables or disables the TPM 2.0 function integrated in the AMD CPU. (Default: Disabled) & Initial Display Output Specifies the first initiation of the monitor display from the installed PCI Express graphics card or the onboard graphics. Sets the onboard graphics as the first display. (Note) IGD Video Sets the graphics card on the PCIEX16 slot as the first display. (Default) PCIe 1 Slot Sets the graphics card on the PCIEX4 slot as the first display. PCIe 2 Slot Sets the graphics card on the PCIEX1_2 slot as the first display. PCIe 3 Slot & RGB Fusion Allows you to set the LED lighting mode for the motherboard. Disables this function. Off All LEDs simultaneously fade in and fade out. Pulse Mode Color Cycle All LEDs simultaneously cycle through a full spectrum of colors. All LEDs emit a single color. (Default) Static Mode All LEDs simultaneously flash on and off. Flash Mode Double Flash All LEDs flash in an interlaced pattern. & LEDs in Sleep, Hibernation, and Soft Off States Allows you to set the lighting mode of the motherboard LEDs in system S3/S4/S5 state.
-
Page 33
ƒ Trusted Computing Enables or disables Trusted Platform Module (TPM). ƒ Super IO Configuration & Serial Port 1 Enables or disables the onboard serial port. (Default: Enabled) ƒ USB Configuration & Legacy USB Support Allows USB keyboard/mouse to be used in MS-DOS. (Default: Enabled) & XHCI Hand-off Determines whether to enable XHCI Hand-off feature for an operating system without XHCI Hand-off support. (Default: Enabled) &… -
Page 34
& Ipv6 PXE Support Enables or disables IPv6 PXE Support. This item is configurable only when Network Stack is enabled. & Ipv6 HTTP Support Enables or disables HTTP boot support for IPv6. This item is configurable only when Network Stack is enabled. & IPSEC Certificate Enables or disables Internet Protocol Security. This item is configurable only when Network Stack is enabled. & PXE boot wait time Allows you to configure how long to wait before you can press <Esc> to abort the PXE boot. This item is configurable only when Network Stack is enabled. (Default: 0) &… -
Page 35: Chipset
Chipset & IOMMU Enables or disables AMD IOMMU support. (Default: Auto) & Integrated Graphics (Note) Enables or disables the onboard graphics function. The BIOS will automatically enable or disable the onboard graphics depending on the Auto graphics card being installed. (Default) Enables the onboard graphics. Forces Disabled Disables the onboard graphics. & UMA Mode (Note) Specify the UMA mode.
-
Page 36
& NVMe RAID mode (M2A_SOCKET and M2B_SOCKET Connectors) Allows you to determine whether to use your M.2 NVMe PCIe SSDs to configure RAID. (Default: Disabled) & APU SATA Port Enable (ASATA3 0, 1 Connectors) Enables or disables the integrated SATA controller(s). (Default: Enabled) & APU SATA Hot plug Enables or disable the hot plug capability for each SATA port. (Default: Disabled) & Chipset SATA Port Enable (SATA3 0, 1, 2, 3 Connectors) Enables or disables the integrated SATA controller(s). (Default: Enabled) & APU SATA Port 0/1 (ASATA3 0, 1 Connectors) Displays the information of the connected SATA device(s). -
Page 37: Power
Power & AC BACK Determines the state of the system after the return of power from an AC power loss. The system returns to its last known awake state upon the return of the AC power. Memory Always On The system is turned on upon the return of the AC power. Always Off T he system stays off upon the return of the AC power. (Default) & Power On By Keyboard Allows the system to be turned on by a PS/2 keyboard wake-up event.
-
Page 38
& Power Loading Enables or disables dummy load. When the power supply is at low load, a self-protection will activate causing it to shutdown or fail. If this occurs, please set to Enabled. Auto lets the BIOS automatically configure this setting. (Default: Auto) & Resume by Alarm Determines whether to power on the system at a desired time. (Default: Disabled) If enabled, set the date and time as following: Wake up day: Turn on the system at a specific time on each day or on a specific day in a month. Wake up hour/minute/second: Set the time at which the system will be powered on automatically. Note: When using this function, avoid inadequate shutdown from the operating system or removal of the AC power, or the settings may not be effective. & Wake on LAN Enables or disables the wake on LAN function. (Default: Enabled) & High Precision Event Timer Enables or disables High Precision Event Timer (HPET) in the operating system. (Default: Enabled) &… -
Page 39: Save & Exit
Save & Exit & Save & Exit Setup Press <Enter> on this item and select Yes. This saves the changes to the CMOS and exits the BIOS Setup program. Select No or press <Esc> to return to the BIOS Setup Main Menu. & Exit Without Saving Press <Enter> on this item and select Yes. This exits the BIOS Setup without saving the changes made in BIOS Setup to the CMOS. Select No or press <Esc> to return to the BIOS Setup Main Menu. &…
-
Page 40: Chapter 3 Appendix
Chapter 3 Appendix 3-1 Configuring a RAID Set RAID Levels RAID 0 RAID 1 RAID 10 Minimum Number of ≥2 Hard Drives Array Capacity Number of hard drives * Size of the smallest drive (Number of hard drives/2) * Size of the smallest drive Size of the smallest drive Fault Tolerance Before you begin, please prepare the following items: •…
-
Page 41
3. Insert the USB thumb drive and then browse to the location of the driver. The location of the drivers is as follows: Hw10RAIDx64 4. Select AMD-RAID Bottom Device first and click Next to load the driver. Then select AMD-RAID Controller and click Next to load the driver. Finally, continue the OS installation. Please visit GIGABYTE’s website for details on configuring a RAID array. — 41 -… -
Page 42: Drivers Installation
You can click the Xpress Install button and «Xpress Install» will install all of the selected drivers. Or click the arrow icon to individually install the drivers you need. Please visit GIGABYTE’s website for Please visit GIGABYTE’s website for more software information.
-
Page 43: Regulatory Notices
The parts and components have been carefully selected to meet RoHS CE Declaración de conformidad requirement. Moreover, we at GIGABYTE are continuing our efforts to Este producto que llevan la marca CE cumplen con las siguientes develop products that do not use internationally banned toxic chemicals.
-
Page 44: Contact Us
Contact Us GIGA-BYTE TECHNOLOGY CO., LTD. Address: No.6, Baoqiang Rd., Xindian Dist., New Taipei City 231, Taiwan TEL: +886-2-8912-4000, FAX: +886-2-8912-4005 Tech. and Non-Tech. Support (Sales/Marketing) : https://esupport.gigabyte.com WEB address (English): https://www.gigabyte.com WEB address (Chinese): https://www.gigabyte.com/tw GIGABYTE eSupport • To submit a technical or non-technical (Sales/Marketing) question, please link to: https://esupport.gigabyte.com — 44 -…
Содержание
- Gigabyte B450 Aorus Elite инструкция
- B450 AORUS ELITE
- User’s Manual
- Rev. 1002
- 12ME-B45ARSE-1002R
- Инструкция
- Содержание
- Нужна помощь?
- Технические характеристики Gigabyte B450 Aorus Elite
- Часто задаваемые вопросы
- Gigabyte B450 Aorus elite Service Manual
- B450 AORUS ELITE Motherboard Layout
- Chapter 1 Hardware Installation
- 1-1 Installation Precautions
- 1-2 Product Specifications
- Installing the CPU
- 1-4 Installing the Memory
- 1-5 Installing an Expansion Card
- 1-6 Back Panel Connectors
Gigabyte B450 Aorus Elite инструкция
инструкция Gigabyte B450 Aorus Elite
B450 AORUS ELITE
User’s Manual
Rev. 1002
12ME-B45ARSE-1002R
Инструкция
Посмотреть инструкция для Gigabyte B450 Aorus Elite бесплатно. Руководство относится к категории Материнские платы, 26 человек(а) дали ему среднюю оценку 8.9. Руководство доступно на следующих языках: английский. У вас есть вопрос о Gigabyte B450 Aorus Elite или вам нужна помощь? Задайте свой вопрос здесь
Содержание
Нужна помощь?
У вас есть вопрос о Gigabyte B450 Aorus Elite а ответа нет в руководстве? Задайте свой вопрос здесь Дай исчерпывающее описание проблемы и четко задайте свой вопрос. Чем детальнее описание проблемы или вопроса, тем легче будет другим пользователям Gigabyte B450 Aorus Elite предоставить вам исчерпывающий ответ.
Провод FAN выходящий из кнопки на панели RGB как подключить в какой пин?
Поставил на данную материнку ssd накопитель формата М.2 wd black в первый слот. Накопитель ни где не отображается, система стоит на hdd 1500 gb на разъёме sata 0
Кувстовлять медиа инаушник
руководство на русском языке для материнской платы B450Aorus Elite
B450 aorus elite, при установке драйверов пишет что адаптер в глубоком сне,я подключал лан кабель, вытаскивал батарейку,память,менял виндовс 10, ничего не помогло, подскажите что сделать или надо по гарантии возвращать, и если да то через сколько будет материнка?
Прошил Биос до последней версии стоял процессор р 5 3600 ,так как продал видео карту купил ещё один процессор р 3 2200g,вставил увидел рабочий стол и всё каждый раз синий экран тоесть рабочий стол и потом синий экран,мать гигабайт в 450 елит аурс,может надо отметить Биос опять на f 1 по-моему ,щас стоит Биос под 5 тысячный процессор
B 450 aorus elit совместима с AMD PRO A6-8580 OEM. А то при включении мигнёт материка и все
Поддерживает ли плата B450 AORUS ELITE процессор AMD 6-9700 .При включении питания RGB мигнёт, и не запускается.
Поддерживает ли плата B450 AORUS ELITE процессор AMD 10-9700 R7.При включении питания RGB мигнёт, и не запускается.
Количество вопросов: 8


Технические характеристики Gigabyte B450 Aorus Elite
Ниже вы найдете технические характеристики изделия и руководства по эксплуатации Gigabyte B450 Aorus Elite.
| Бренд | Gigabyte |
| Модель | B450 Aorus Elite | B450 AORUS ELITE |
| Изделие | Материнская плата |
| EAN | 4719331803995 |
| Язык | английский |
| Тип файла | Руководство пользователя (PDF) |
Часто задаваемые вопросы
Не можете найти ответ на свой вопрос в руководстве? Вы можете найти ответ на свой вопрос ниже, в разделе часто задаваемых вопросов о Gigabyte B450 Aorus Elite.
Источник
Gigabyte B450 Aorus elite Service Manual
![]()
B450 AORUS ELITE
For more product details, please visit GIGABYTE’s website.
To reduce the impacts on global warming, the packaging materials of this product are recyclable and reusable. GIGABYTE works with you to protect the environment.
B450 AORUS ELITE
B450 AORUS ELITE
© 2018 GIGA-BYTE TECHNOLOGY CO., LTD. All rights reserved.
The trademarks mentioned in this manual are legally registered to their respective owners.
Information in this manual is protected by copyright laws and is the property of GIGABYTE.
No part of this manual may be reproduced, copied, translated, transmitted, or published in any form or by any means without GIGABYTE’s prior written permission.
In order to assist in the use of this product, carefully read the User’s Manual.
For product-related information, check on our website at: https://www.gigabyte.com
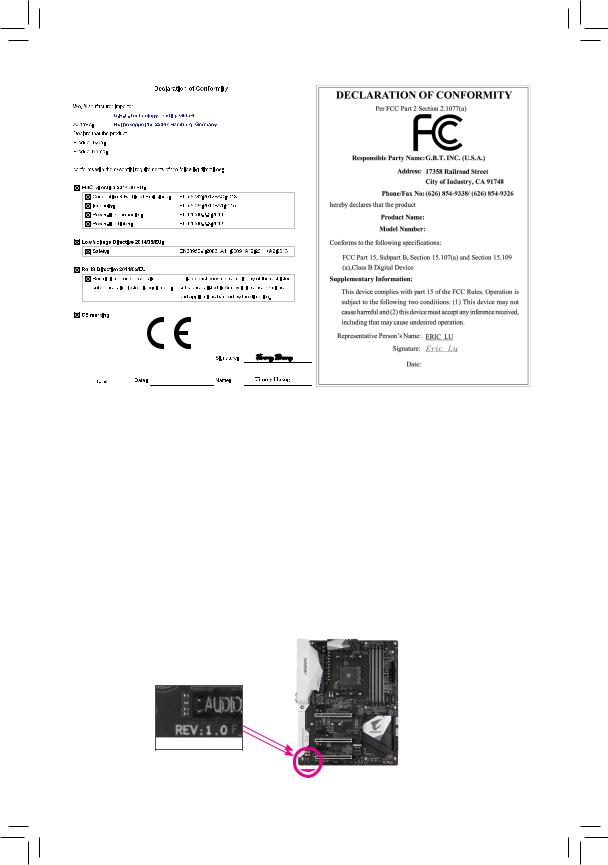
Identifying Your Motherboard Revision
The revision number on your motherboard looks like this: «REV: X.X.» For example, «REV: 1.0» means the revision of the motherboard is 1.0. Check your motherboard revision before updating motherboard BIOS, drivers, or when looking for technical information.

Table of Contents
B450 AORUS ELITE Motherboard Layout.
Chapter 1 Hardware Installation.
Installing the CPU.
Installing the Memory.
1-5 Installing an Expansion Card.
Back Panel Connectors.
Chapter 2 BIOS Setup.
Chapter 3 Appendix.
3-1 Configuring a RAID Set.
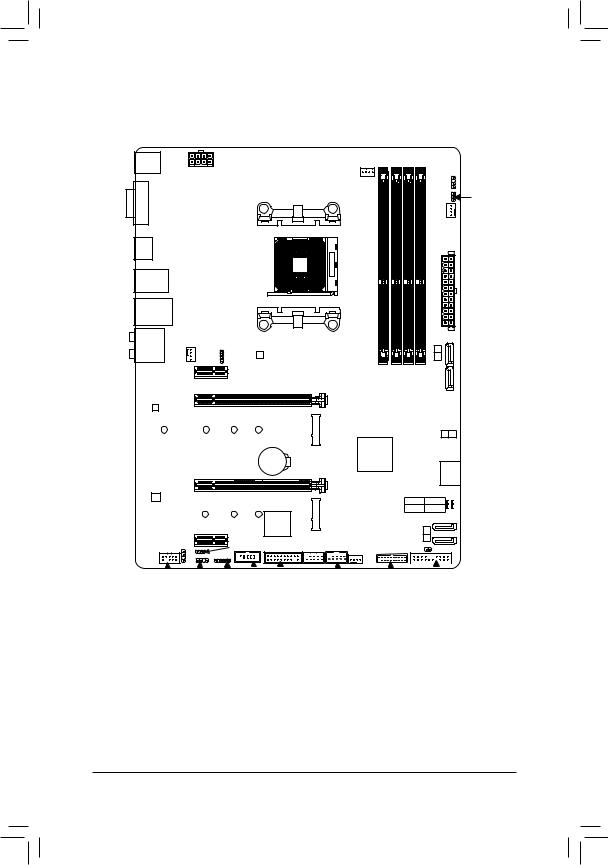
B450 AORUS ELITE Motherboard Layout
B450 AORUS ELITE
DDR4 2 DDR4 3 DDR4 1
F_AUDIO D_LED1 LED_C COMA TPM
B450 AORUS ELITE Motherboard
Two SATA cables
Motherboard driver disk
M.2 screw(s)/M.2 standoff(s)
* The box contents above are for reference only and the actual items shall depend on the product package you obtain. The box contents are subject to change without notice.

Chapter 1 Hardware Installation
1-1 Installation Precautions
The motherboard contains numerous delicate electronic circuits and components which can become damaged as a result of electrostatic discharge (ESD). Prior to installation, carefully read the user’s manual and follow these procedures:
• • Prior to installation, make sure the chassis is suitable for the motherboard.
• • Prior to installation, do not remove or break motherboard S/N (Serial Number) sticker or warranty sticker provided by your dealer. These stickers are required for warranty validation.
• • Always remove the AC power by unplugging the power cord from the power outlet before installing or removing the motherboard or other hardware components.
• • When connecting hardware components to the internal connectors on the motherboard, make sure they are connected tightly and securely.
• • When handling the motherboard, avoid touching any metal leads or connectors.
• • It is best to wear an electrostatic discharge (ESD) wrist strap when handling electronic components such as a motherboard, CPU or memory. If you do not have an ESD wrist strap, keep your hands dry and first touch a metal object to eliminate static electricity.
• • Prior to installing the motherboard, please have it on top of an antistatic pad or within an electrostatic shielding container.
• • Before connecting or unplugging the power supply cable from the motherboard, make sure the power supply has been turned off.
• • Before turning on the power, make sure the power supply voltage has been set according to the local voltage standard.
• • Before using the product, please verify that all cables and power connectors of your hardware components are connected.
• • To prevent damage to the motherboard, do not allow screws to come in contact with the motherboard circuit or its components.
• • Make sure there are no leftover screws or metal components placed on the motherboard or within the computer casing.
• • Do not place the computer system on an uneven surface.
• • Do not place the computer system in a high-temperature or wet environment.
• • Turning on the computer power during the installation process can lead to damage to system components as well as physical harm to the user.
• • If you are uncertain about any installation steps or have a problem related to the use of the product, please consult a certified computer technician.
• • If you use an adapter, extension power cable, or power strip, ensure to consult with its installation and/or grounding instructions.
1-2 Product Specifications
— AMD Ryzen ™ 2nd Generation processors
— AMD Ryzen ™ with Radeon ™ Vega Graphics processors
— AMD Ryzen ™ 1st Generation processors
(Go to GIGABYTE’s website for the latest CPU support list.)
4 x DDR4 DIMM sockets supporting up to 64 GB of system memory
Dual channel memory architecture
Support for DDR4 2933/2667/2400/2133 MHz memory modules
Support for ECC Un-buffered DIMM 1Rx8/2Rx8 memory modules (operate in
Support for non-ECC Un-buffered DIMM 1Rx8/2Rx8/1Rx16 memory modules
Support for Extreme Memory Profile (XMP) memory modules
(Go to GIGABYTE’s website for the latest supported memory speeds and memory
Integrated Graphics Processor:
— 1 x DVI-D port, supporting a maximum resolution of 1920×1200@60 Hz
* The DVI-D port does not support D-Sub connection by adapter.
— 1 x HDMI port, supporting a maximum resolution of 4096×2160@60 (Note) Hz
* Support for HDMI 2.0 version and HDCP 2.2. (Note)
— Maximum shared memory of 16 GB
Realtek ® ALC892 codec
High Definition Audio
Support for S/PDIF Out
Realtek ® GbE LAN chip (10/100/1000 Mbit)
1 x PCI Express x16 slot, running at x16 (PCIEX16) (Note)
* For optimum performance, if only one PCI Express graphics card is to be installed,
be sure to install it in the PCIEX16 slot.
(The PCIEX16 slot conforms to PCI Express 3.0 standard.)
1 x PCI Express x16 slot, running at x4 (PCIEX4)
* The PCIEX4 slot shares bandwidth with the PCIEX1_2 slot. The PCIEX4 slot operates
at up to x2 mode when the PCIEX1_2 slot is populated. The PCIEX4 slot operates
at up to x4 mode when the PCIEX1_2 is empty.
2 x PCI Express x1 slots
(The PCIEX4 and PCIEX1 slots conform to PCI Express 2.0 standard.)
SupportforAMDQuad-GPUCrossFire ™ and2-WayAMDCrossFire ™ technologies
(Note) Actual support may vary by CPU.
— 1 x M.2 connector (Socket 3, M key, type 2242/2260/2280/22110 SATA and
PCIe 3.0 x4/x2 SSD support) (M2A_SOCKET)
— 1 x M.2 connector (Socket 3, M key, type 2242/2260/2280 PCIe 3.0 x2 SSD
6 x SATA 6Gb/s connectors
Support for RAID 0, RAID 1, and RAID 10
* Refer to «1-7 Internal Connectors,» for the installation notices for the M.2 and SATA
— 2 x USB 3.1 Gen 1 ports available through the internal USB header
— 8 x USB 2.0/1.1 ports (4 ports on the back panel, 4 ports available through
the internal USB headers)
Integrated in the APU:
— 4 x USB 3.1 Gen 1 ports on the back panel
1 x 24-pin ATX main power connector
1 x 8-pin ATX 12V power connector
2 x M.2 Socket 3 connectors
6 x SATA 6Gb/s connectors
1 x CPU fan header
3 x system fan headers
1 x CPU cooler LED strip/RGB LED strip extension cable header
1 x RGB (RGBW) LED strip header
2 x digital LED strip headers
2 x digital LED strip power select jumpers
1 x front panel header
1 x front panel audio header
1 x S/PDIF Out header
1 x USB 3.1 Gen 1 header
2 x USB 2.0/1.1 headers
1 x Trusted Platform Module (TPM) header (2×10 pin, for the GC-TPM2.0 module
1 x serial port header
1 x Clear CMOS jumper
1 x PS/2 keyboard/mouse port
4 x USB 3.1 Gen 1 ports
4 x USB 2.0/1.1 ports
6 x audio jacks
iTE ® I/O Controller Chip
Fan speed detection
Fan fail warning
Fan speed control
* Whether the fan speed control function is supported will depend on the cooler you
1 x 128 Mbit flash
Use of licensed AMI UEFI BIOS
PnP 1.0a, DMI 2.7, WfM 2.0, SM BIOS 2.7, ACPI 5.0
Support for APP Center
* Available applications in APP Center may vary by motherboard model. Supported
System Information Viewer
Support for Q-Flash
Support for Xpress Install
Norton ® Internet Security (OEM version)
Realtek ® 8118 Gaming LAN Bandwidth Control Utility
Support for Windows 10 64-bit
ATX Form Factor; 30.5cm x 23.5cm
* GIGABYTE reserves the right to make any changes to the product specifications and product-related information without prior notice.
Please visit GIGABYTE’s website for support lists of CPU, memory modules, SSDs, and M.2 devices.
Please visit the SupportUtility List page on GIGABYTE’s website to download the latest version of apps.
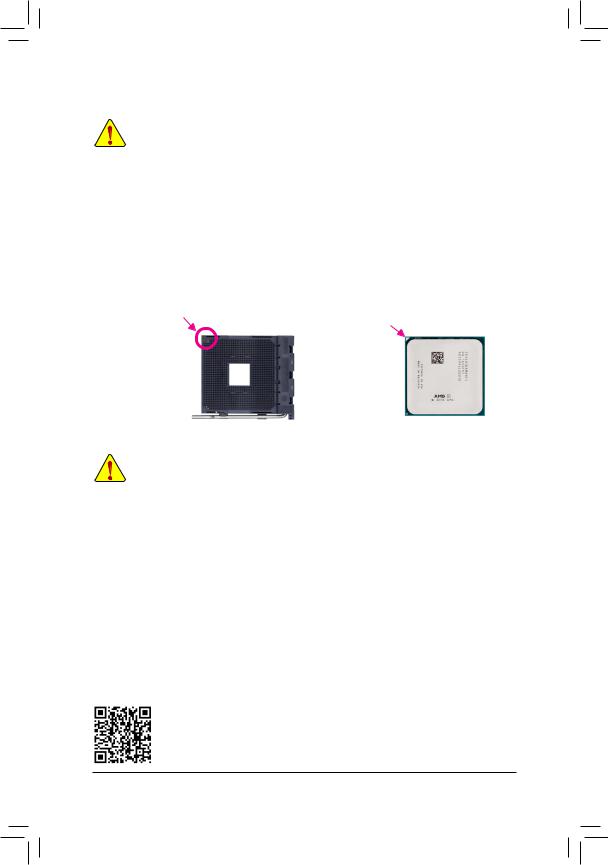
Installing the CPU
Read the following guidelines before you begin to install the CPU:
Make sure that the motherboard supports the CPU.
(Go to GIGABYTE’s website for the latest CPU support list.)
Always turn off the computer and unplug the power cord from the power outlet before installing the
CPU to prevent hardware damage.
Locate the pin one of the CPU. The CPU cannot be inserted if oriented incorrectly.
Apply an even and thin layer of thermal grease on the surface of the CPU.
Do not turn on the computer if the CPU cooler is not installed, otherwise overheating and damage
of the CPU may occur.
Set the CPU host frequency in accordance with the CPU specifications. It is not recommended
that the system bus frequency be set beyond hardware specifications since it does not meet the
standard requirements for the peripherals. If you wish to set the frequency beyond the standard
specifications, please do so according to your hardware specifications including the CPU, graphics
card, memory, hard drive, etc.
Installing the CPU
Locate the pin one (denoted by a small triangle) of the CPU socket and the CPU.
A Small Triangle
A Small Triangle
Marking Denotes Pin
Marking Denotes CPU
One of the Socket
1-4 Installing the Memory
Read the following guidelines before you begin to install the memory:
•• Make sure that the motherboard supports the memory. It is recommended that memory of the same capacity, brand, speed, and chips be used.
(Go to GIGABYTE’s website for the latest supported memory speeds and memory modules.)
•• Always turn off the computer and unplug the power cord from the power outlet before installing the memory to prevent hardware damage.
•• Memory modules have a foolproof design. A memory module can be installed in only one direction. If you are unable to insert the memory, switch the direction.
Dual Channel Memory Configuration
This motherboard provides four memory sockets and supports Dual Channel Technology. After the memory is installed, the BIOS will automatically detect the specifications and capacity of the memory. Enabling Dual
Channel memory mode will double the original memory bandwidth.
The four memory sockets are divided into two channels and each channel has two memory sockets as following:
Channel A: DDR4_2, DDR4_4Channel B: DDR4_1, DDR4_3
Dual Channel Memory Configurations Table
(SS=Single-Sided, DS=Double-Sided, «- -«=No Memory)
Please visit GIGABYTE’s website for details on hardware installation.
Due to CPU limitations, read the following guidelines before installing the memory in Dual Channel mode.
1. Dual Channel mode cannot be enabled if only one memory module is installed.
2. WhenenablingDualChannelmodewithtwoorfourmemorymodules,itisrecommendedthatmemory of the same capacity, brand, speed, and chips be used. For optimum performance, when enabling
Dual Channel mode with two memory modules, we recommend that you install them in the DDR4_1 and DDR4_2 sockets.
1-5 Installing an Expansion Card
Read the following guidelines before you begin to install an expansion card:
•• Make sure the motherboard supports the expansion card. Carefully read the manual that came with your expansion card.
•• Always turn off the computer and unplug the power cord from the power outlet before installing an expansion card to prevent hardware damage.
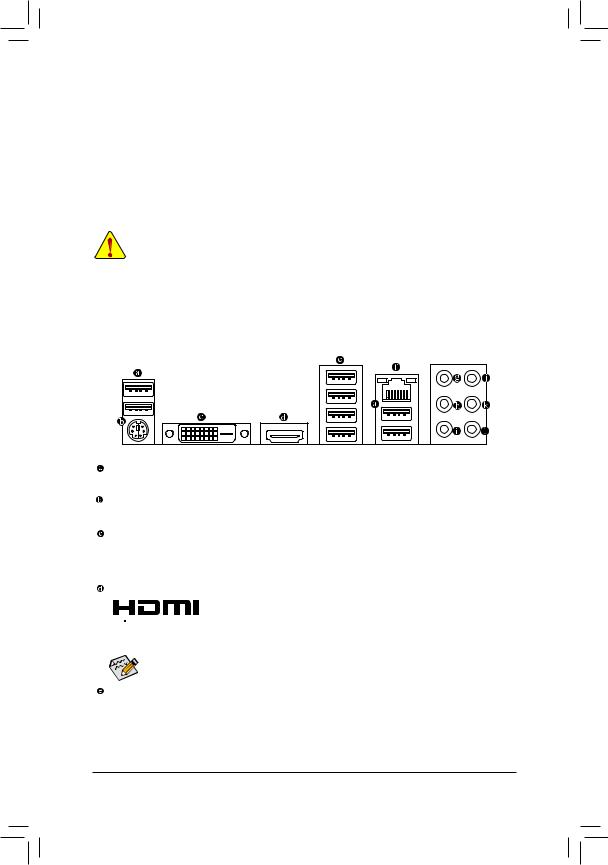
1-6 Back Panel Connectors
The USB port supports the USB 2.0/1.1 specification. Use this port for USB devices.
PS/2 Keyboard/Mouse Port
Use this port to connect a PS/2 mouse or keyboard.
DVI-D Port (Note 1)
The DVI-D port conforms to the DVI-D specification and supports a maximum resolution of 1920×1200@60 Hz (the actual resolutions supported depend on the monitor being used). Connect a monitor that supports DVI-D connection to this port.
 The HDMI port supports HDCP 2.2 (Note 2) and Dolby TrueHD and DTS HD Master


 Audioformats.Italsosupportsupto192KHz/24bit8-channelLPCMaudiooutput. You can use this port to connect your HDMI-supported monitor. The maximum supported resolution is 4096×2160@60 Hz (Note 2) , but the actual resolutions supported are dependent on the monitor being used.
After installing the HDMI device, make sure to set the default sound playback device to HDMI. (The
item name may differ depending on your operating system.)
USB 3.1 Gen 1 Port
The USB 3.1 Gen 1 port supports the USB 3.1 Gen 1 specification and is compatible to the USB 2.0 specification. Use this port for USB devices.
(Note 1) The DVI-D port does not support D-Sub connection by adapter.
(Note 2) Actual support may vary by CPU.
![]()
The Gigabit Ethernet LAN port provides Internet connection at up to 1 Gbps data rate. The following describes the states of the LAN port LEDs.
Источник
Содержание
- Gigabyte B450 Aorus Elite инструкция
- B450 AORUS ELITE
- User’s Manual
- Rev. 1002
- 12ME-B45ARSE-1002R
- Нужна помощь?
- Gigabyte B450 Aorus Elite инструкция
- 2-9 Save & Exit
- & Save & Exit Setup
- & Exit Without Saving
- & Load Optimized Defaults
- & Boot Override
- & SaveProles
- & LoadProles
- Нужна помощь?
- gigabyte b450 aorus elite сброс биос и CMOS. Обновление и прошивка Bios
- Когда необходимо обнулить настройки BIOS / EFI / сбросить CMOS
- gigabyte b450 aorus elite сброс биос
- Способы сброса
- Как обновить BIOS
- Добавить комментарий Отменить ответ
- Gigabyte B450 Aorus elite Service Manual
- B450 AORUS ELITE Motherboard Layout
- Chapter 1 Hardware Installation
- 1-1 Installation Precautions
- 1-2 Product Specifications
- Installing the CPU
- 1-4 Installing the Memory
- 1-5 Installing an Expansion Card
- 1-6 Back Panel Connectors
Gigabyte B450 Aorus Elite инструкция
инструкция Gigabyte B450 Aorus Elite
User’s Manual
Rev. 1002
12ME-B45ARSE-1002R
Посмотреть инструкция для Gigabyte B450 Aorus Elite бесплатно. Руководство относится к категории Материнские платы, 28 человек(а) дали ему среднюю оценку 8.9. Руководство доступно на следующих языках: английский. У вас есть вопрос о Gigabyte B450 Aorus Elite или вам нужна помощь? Задайте свой вопрос здесь
Нужна помощь?
У вас есть вопрос о Gigabyte а ответа нет в руководстве? Задайте свой вопрос здесь Дай исчерпывающее описание проблемы и четко задайте свой вопрос. Чем детальнее описание проблемы или вопроса, тем легче будет другим пользователям Gigabyte предоставить вам исчерпывающий ответ.
Провод FAN выходящий из кнопки на панели RGB как подключить в какой пин?
Поставил на данную материнку ssd накопитель формата М.2 wd black в первый слот. Накопитель ни где не отображается, система стоит на hdd 1500 gb на разъёме sata 0
Кувстовлять медиа инаушник
руководство на русском языке для материнской платы B450Aorus Elite
B450 aorus elite, при установке драйверов пишет что адаптер в глубоком сне,я подключал лан кабель, вытаскивал батарейку,память,менял виндовс 10, ничего не помогло, подскажите что сделать или надо по гарантии возвращать, и если да то через сколько будет материнка?
Прошил Биос до последней версии стоял процессор р 5 3600 ,так как продал видео карту купил ещё один процессор р 3 2200g,вставил увидел рабочий стол и всё каждый раз синий экран тоесть рабочий стол и потом синий экран,мать гигабайт в 450 елит аурс,может надо отметить Биос опять на f 1 по-моему ,щас стоит Биос под 5 тысячный процессор
B 450 aorus elit совместима с AMD PRO A6-8580 OEM. А то при включении мигнёт материка и все
Источник
Gigabyte B450 Aorus Elite инструкция
инструкция Gigabyte B450 Aorus Elite

2-9 Save & Exit
& Save & Exit Setup
& Exit Without Saving
& Load Optimized Defaults
& Boot Override
& SaveProles
Setup Prole 8. Press to complete. Or you can select Select File in
& LoadProles
Посмотреть инструкция для Gigabyte B450 Aorus Elite бесплатно. Руководство относится к категории Материнские платы, 28 человек(а) дали ему среднюю оценку 8.9. Руководство доступно на следующих языках: английский. У вас есть вопрос о Gigabyte B450 Aorus Elite или вам нужна помощь? Задайте свой вопрос здесь
Нужна помощь?
У вас есть вопрос о Gigabyte а ответа нет в руководстве? Задайте свой вопрос здесь Дай исчерпывающее описание проблемы и четко задайте свой вопрос. Чем детальнее описание проблемы или вопроса, тем легче будет другим пользователям Gigabyte предоставить вам исчерпывающий ответ.
Провод FAN выходящий из кнопки на панели RGB как подключить в какой пин?
Поставил на данную материнку ssd накопитель формата М.2 wd black в первый слот. Накопитель ни где не отображается, система стоит на hdd 1500 gb на разъёме sata 0
Кувстовлять медиа инаушник
руководство на русском языке для материнской платы B450Aorus Elite
B450 aorus elite, при установке драйверов пишет что адаптер в глубоком сне,я подключал лан кабель, вытаскивал батарейку,память,менял виндовс 10, ничего не помогло, подскажите что сделать или надо по гарантии возвращать, и если да то через сколько будет материнка?
Прошил Биос до последней версии стоял процессор р 5 3600 ,так как продал видео карту купил ещё один процессор р 3 2200g,вставил увидел рабочий стол и всё каждый раз синий экран тоесть рабочий стол и потом синий экран,мать гигабайт в 450 елит аурс,может надо отметить Биос опять на f 1 по-моему ,щас стоит Биос под 5 тысячный процессор
B 450 aorus elit совместима с AMD PRO A6-8580 OEM. А то при включении мигнёт материка и все
Источник
gigabyte b450 aorus elite сброс биос и CMOS. Обновление и прошивка Bios

Здесь я показываю на пальцах как сбросить настройки BIOS на gigabyte b450 aorus elite. с помощью простой инструкции и без вызова хитрожопых мастеров по объявлению на Avito.
Когда необходимо обнулить настройки BIOS / EFI / сбросить CMOS
- ПК перестал запускаться после смены оборудования, пересборки или смены настроек биоса.
- Вы потеряли пароль на вход в BIOS, если конечно он был установлен
- Нестабильная работа ПК
- Неудачный разгон
- Периодический BSOD
- Надпись на экране «please clear cmos if system no display after overclocking»
- Определёные звуки системного динамика, указывающие на то что надо изменить настройки
gigabyte b450 aorus elite сброс биос
Выключите блок питания или выдерните шнур из розетки. Теперь приступим.
Способы сброса
- Находим на материнке батарейку, она там одна и вытаскиваем её на 30 секунд. Потом возвращаем её на место. Готово, можно включать ПК! Выглядит так:

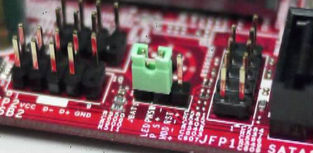
- Если контакта всего 2 и пластиковой перемычки нет, то замкните контакты, например, ножницами или отвёрткой на 30 секунд. Пример на фото ниже:

В общем сложного ничего нет, берите и делайте.
Как обновить BIOS
- Скачиваем самую последнюю версию BIOS для gigabyte b450 aorus elite
- Копируем файл на флешку, заходим в биос и в разделе обновлений выбираем нужный файл с флешки. В данный момент многие производители современных материнских плат позволяют обновляться из под Windows, но это рискованно, процесс может прервать ложно срабатывание антивируса и вы можете запороть bios, а потом пытаться его восстановить.
Прошивка до последней версии может улучшить работу вашего ПК и решить многие проблемы, убрать BSOD и проблемы с несовместимостью оборудования.
Добавить комментарий Отменить ответ
Для отправки комментария вам необходимо авторизоваться.
Источник
Gigabyte B450 Aorus elite Service Manual
![]()
B450 AORUS ELITE
For more product details, please visit GIGABYTE’s website.
To reduce the impacts on global warming, the packaging materials of this product are recyclable and reusable. GIGABYTE works with you to protect the environment.
B450 AORUS ELITE
B450 AORUS ELITE
© 2018 GIGA-BYTE TECHNOLOGY CO., LTD. All rights reserved.
The trademarks mentioned in this manual are legally registered to their respective owners.
Information in this manual is protected by copyright laws and is the property of GIGABYTE.
No part of this manual may be reproduced, copied, translated, transmitted, or published in any form or by any means without GIGABYTE’s prior written permission.
In order to assist in the use of this product, carefully read the User’s Manual.
For product-related information, check on our website at: https://www.gigabyte.com
Identifying Your Motherboard Revision
The revision number on your motherboard looks like this: «REV: X.X.» For example, «REV: 1.0» means the revision of the motherboard is 1.0. Check your motherboard revision before updating motherboard BIOS, drivers, or when looking for technical information.
Table of Contents
B450 AORUS ELITE Motherboard Layout.
Chapter 1 Hardware Installation.
Installing the CPU.
Installing the Memory.
1-5 Installing an Expansion Card.
Back Panel Connectors.
Chapter 2 BIOS Setup.
Chapter 3 Appendix.
3-1 Configuring a RAID Set.
B450 AORUS ELITE Motherboard Layout
B450 AORUS ELITE
DDR4 2 DDR4 3 DDR4 1
F_AUDIO D_LED1 LED_C COMA TPM
B450 AORUS ELITE Motherboard
Two SATA cables
Motherboard driver disk
M.2 screw(s)/M.2 standoff(s)
* The box contents above are for reference only and the actual items shall depend on the product package you obtain. The box contents are subject to change without notice.
Chapter 1 Hardware Installation
1-1 Installation Precautions
The motherboard contains numerous delicate electronic circuits and components which can become damaged as a result of electrostatic discharge (ESD). Prior to installation, carefully read the user’s manual and follow these procedures:
• • Prior to installation, make sure the chassis is suitable for the motherboard.
• • Prior to installation, do not remove or break motherboard S/N (Serial Number) sticker or warranty sticker provided by your dealer. These stickers are required for warranty validation.
• • Always remove the AC power by unplugging the power cord from the power outlet before installing or removing the motherboard or other hardware components.
• • When connecting hardware components to the internal connectors on the motherboard, make sure they are connected tightly and securely.
• • When handling the motherboard, avoid touching any metal leads or connectors.
• • It is best to wear an electrostatic discharge (ESD) wrist strap when handling electronic components such as a motherboard, CPU or memory. If you do not have an ESD wrist strap, keep your hands dry and first touch a metal object to eliminate static electricity.
• • Prior to installing the motherboard, please have it on top of an antistatic pad or within an electrostatic shielding container.
• • Before connecting or unplugging the power supply cable from the motherboard, make sure the power supply has been turned off.
• • Before turning on the power, make sure the power supply voltage has been set according to the local voltage standard.
• • Before using the product, please verify that all cables and power connectors of your hardware components are connected.
• • To prevent damage to the motherboard, do not allow screws to come in contact with the motherboard circuit or its components.
• • Make sure there are no leftover screws or metal components placed on the motherboard or within the computer casing.
• • Do not place the computer system on an uneven surface.
• • Do not place the computer system in a high-temperature or wet environment.
• • Turning on the computer power during the installation process can lead to damage to system components as well as physical harm to the user.
• • If you are uncertain about any installation steps or have a problem related to the use of the product, please consult a certified computer technician.
• • If you use an adapter, extension power cable, or power strip, ensure to consult with its installation and/or grounding instructions.
1-2 Product Specifications
— AMD Ryzen ™ 2nd Generation processors
— AMD Ryzen ™ with Radeon ™ Vega Graphics processors
— AMD Ryzen ™ 1st Generation processors
(Go to GIGABYTE’s website for the latest CPU support list.)
4 x DDR4 DIMM sockets supporting up to 64 GB of system memory
Dual channel memory architecture
Support for DDR4 2933/2667/2400/2133 MHz memory modules
Support for ECC Un-buffered DIMM 1Rx8/2Rx8 memory modules (operate in
Support for non-ECC Un-buffered DIMM 1Rx8/2Rx8/1Rx16 memory modules
Support for Extreme Memory Profile (XMP) memory modules
(Go to GIGABYTE’s website for the latest supported memory speeds and memory
Integrated Graphics Processor:
— 1 x DVI-D port, supporting a maximum resolution of 1920×1200@60 Hz
* The DVI-D port does not support D-Sub connection by adapter.
— 1 x HDMI port, supporting a maximum resolution of 4096×2160@60 (Note) Hz
* Support for HDMI 2.0 version and HDCP 2.2. (Note)
— Maximum shared memory of 16 GB
Realtek ® ALC892 codec
High Definition Audio
Support for S/PDIF Out
Realtek ® GbE LAN chip (10/100/1000 Mbit)
1 x PCI Express x16 slot, running at x16 (PCIEX16) (Note)
* For optimum performance, if only one PCI Express graphics card is to be installed,
be sure to install it in the PCIEX16 slot.
(The PCIEX16 slot conforms to PCI Express 3.0 standard.)
1 x PCI Express x16 slot, running at x4 (PCIEX4)
* The PCIEX4 slot shares bandwidth with the PCIEX1_2 slot. The PCIEX4 slot operates
at up to x2 mode when the PCIEX1_2 slot is populated. The PCIEX4 slot operates
at up to x4 mode when the PCIEX1_2 is empty.
2 x PCI Express x1 slots
(The PCIEX4 and PCIEX1 slots conform to PCI Express 2.0 standard.)
SupportforAMDQuad-GPUCrossFire ™ and2-WayAMDCrossFire ™ technologies
(Note) Actual support may vary by CPU.
— 1 x M.2 connector (Socket 3, M key, type 2242/2260/2280/22110 SATA and
PCIe 3.0 x4/x2 SSD support) (M2A_SOCKET)
— 1 x M.2 connector (Socket 3, M key, type 2242/2260/2280 PCIe 3.0 x2 SSD
6 x SATA 6Gb/s connectors
Support for RAID 0, RAID 1, and RAID 10
* Refer to «1-7 Internal Connectors,» for the installation notices for the M.2 and SATA
— 2 x USB 3.1 Gen 1 ports available through the internal USB header
— 8 x USB 2.0/1.1 ports (4 ports on the back panel, 4 ports available through
the internal USB headers)
Integrated in the APU:
— 4 x USB 3.1 Gen 1 ports on the back panel
1 x 24-pin ATX main power connector
1 x 8-pin ATX 12V power connector
2 x M.2 Socket 3 connectors
6 x SATA 6Gb/s connectors
1 x CPU fan header
3 x system fan headers
1 x CPU cooler LED strip/RGB LED strip extension cable header
1 x RGB (RGBW) LED strip header
2 x digital LED strip headers
2 x digital LED strip power select jumpers
1 x front panel header
1 x front panel audio header
1 x S/PDIF Out header
1 x USB 3.1 Gen 1 header
2 x USB 2.0/1.1 headers
1 x Trusted Platform Module (TPM) header (2×10 pin, for the GC-TPM2.0 module
1 x serial port header
1 x Clear CMOS jumper
1 x PS/2 keyboard/mouse port
4 x USB 3.1 Gen 1 ports
4 x USB 2.0/1.1 ports
6 x audio jacks
iTE ® I/O Controller Chip
Fan speed detection
Fan fail warning
Fan speed control
* Whether the fan speed control function is supported will depend on the cooler you
1 x 128 Mbit flash
Use of licensed AMI UEFI BIOS
PnP 1.0a, DMI 2.7, WfM 2.0, SM BIOS 2.7, ACPI 5.0
Support for APP Center
* Available applications in APP Center may vary by motherboard model. Supported
System Information Viewer
Support for Q-Flash
Support for Xpress Install
Norton ® Internet Security (OEM version)
Realtek ® 8118 Gaming LAN Bandwidth Control Utility
Support for Windows 10 64-bit
ATX Form Factor; 30.5cm x 23.5cm
* GIGABYTE reserves the right to make any changes to the product specifications and product-related information without prior notice.
Please visit GIGABYTE’s website for support lists of CPU, memory modules, SSDs, and M.2 devices.
Please visit the SupportUtility List page on GIGABYTE’s website to download the latest version of apps.
Installing the CPU
Read the following guidelines before you begin to install the CPU:
Make sure that the motherboard supports the CPU.
(Go to GIGABYTE’s website for the latest CPU support list.)
Always turn off the computer and unplug the power cord from the power outlet before installing the
CPU to prevent hardware damage.
Locate the pin one of the CPU. The CPU cannot be inserted if oriented incorrectly.
Apply an even and thin layer of thermal grease on the surface of the CPU.
Do not turn on the computer if the CPU cooler is not installed, otherwise overheating and damage
of the CPU may occur.
Set the CPU host frequency in accordance with the CPU specifications. It is not recommended
that the system bus frequency be set beyond hardware specifications since it does not meet the
standard requirements for the peripherals. If you wish to set the frequency beyond the standard
specifications, please do so according to your hardware specifications including the CPU, graphics
card, memory, hard drive, etc.
Installing the CPU
Locate the pin one (denoted by a small triangle) of the CPU socket and the CPU.
A Small Triangle
A Small Triangle
Marking Denotes Pin
Marking Denotes CPU
One of the Socket
1-4 Installing the Memory
Read the following guidelines before you begin to install the memory:
•• Make sure that the motherboard supports the memory. It is recommended that memory of the same capacity, brand, speed, and chips be used.
(Go to GIGABYTE’s website for the latest supported memory speeds and memory modules.)
•• Always turn off the computer and unplug the power cord from the power outlet before installing the memory to prevent hardware damage.
•• Memory modules have a foolproof design. A memory module can be installed in only one direction. If you are unable to insert the memory, switch the direction.
Dual Channel Memory Configuration
This motherboard provides four memory sockets and supports Dual Channel Technology. After the memory is installed, the BIOS will automatically detect the specifications and capacity of the memory. Enabling Dual
Channel memory mode will double the original memory bandwidth.
The four memory sockets are divided into two channels and each channel has two memory sockets as following:
Channel A: DDR4_2, DDR4_4Channel B: DDR4_1, DDR4_3
Dual Channel Memory Configurations Table
(SS=Single-Sided, DS=Double-Sided, «- -«=No Memory)
Please visit GIGABYTE’s website for details on hardware installation.
Due to CPU limitations, read the following guidelines before installing the memory in Dual Channel mode.
1. Dual Channel mode cannot be enabled if only one memory module is installed.
2. WhenenablingDualChannelmodewithtwoorfourmemorymodules,itisrecommendedthatmemory of the same capacity, brand, speed, and chips be used. For optimum performance, when enabling
Dual Channel mode with two memory modules, we recommend that you install them in the DDR4_1 and DDR4_2 sockets.
1-5 Installing an Expansion Card
Read the following guidelines before you begin to install an expansion card:
•• Make sure the motherboard supports the expansion card. Carefully read the manual that came with your expansion card.
•• Always turn off the computer and unplug the power cord from the power outlet before installing an expansion card to prevent hardware damage.
1-6 Back Panel Connectors
The USB port supports the USB 2.0/1.1 specification. Use this port for USB devices.
PS/2 Keyboard/Mouse Port
Use this port to connect a PS/2 mouse or keyboard.
DVI-D Port (Note 1)
The DVI-D port conforms to the DVI-D specification and supports a maximum resolution of 1920×1200@60 Hz (the actual resolutions supported depend on the monitor being used). Connect a monitor that supports DVI-D connection to this port.
The HDMI port supports HDCP 2.2 (Note 2) and Dolby TrueHD and DTS HD Master
Audioformats.Italsosupportsupto192KHz/24bit8-channelLPCMaudiooutput. You can use this port to connect your HDMI-supported monitor. The maximum supported resolution is 4096×2160@60 Hz (Note 2) , but the actual resolutions supported are dependent on the monitor being used.
After installing the HDMI device, make sure to set the default sound playback device to HDMI. (The
item name may differ depending on your operating system.)
USB 3.1 Gen 1 Port
The USB 3.1 Gen 1 port supports the USB 3.1 Gen 1 specification and is compatible to the USB 2.0 specification. Use this port for USB devices.
(Note 1) The DVI-D port does not support D-Sub connection by adapter.
(Note 2) Actual support may vary by CPU.
![]()
The Gigabit Ethernet LAN port provides Internet connection at up to 1 Gbps data rate. The following describes the states of the LAN port LEDs.
Источник