- Manuals
- Brands
- Arctic Cat Manuals
- Offroad Vehicle
- 650 Twin2004
- Service manual
-
Contents
-
Table of Contents
-
Troubleshooting
-
Bookmarks
Related Manuals for Arctic Cat 650 Twin2004
Summary of Contents for Arctic Cat 650 Twin2004
-
Page 1
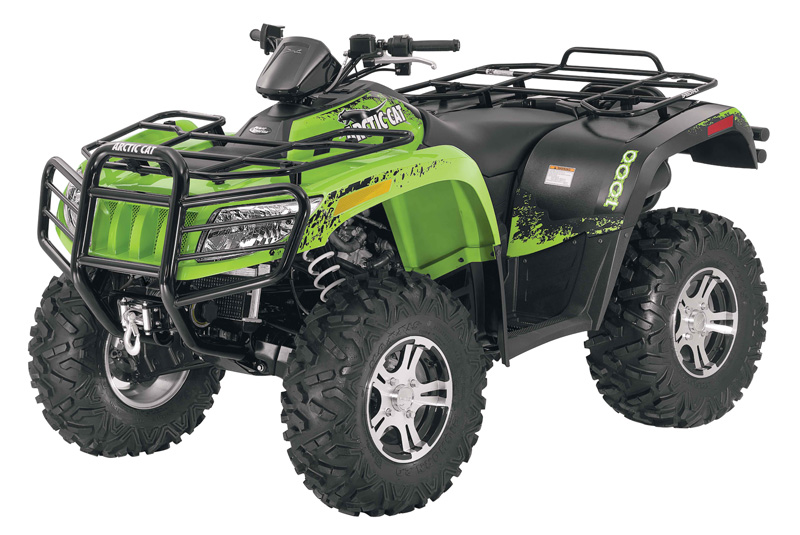
2004 2004 650 Twin RC C C ®… -
Page 2
Such efficiency not only helps build consumer confidence but also saves time and labor. All Arctic Cat ATV publications and decals display the words Warning, Caution, Note, and At This Point to emphasize important information. The symbol ! WARNING identifies personal safety-related information. Be sure to fol- low the directive because it deals with the possibility of severe personal injury or even death. -
Page 3
TABLE OF CONTENTS Section General Information Periodic Maintenance/Tune-Up 3. Engine/Transmission Fuel/Lubrication/Cooling Electrical System Drive System Suspension 8. Steering/Frame Controls/Indicators 10. Aids for Maintenance 11. Troubleshooting… -
Page 4: Table Of Contents
SECTION 1 — GENERAL INFORMATION TABLE OF CONTENTS General Specifications ……….1-2 Break-In Procedure ……….1-3 Gasoline — Oil — Lubricant ……..1-3 Genuine Parts …………1-4 Preparation For Storage………. 1-5 Preparation After Storage……..1-5…
-
Page 5: General Specifications
General Specifications* CHASSIS CARBURETOR Dry Weight (approx) 293 kg (646 lb) Type Keihin CVKR-D32 (2) Length (overall) 205 cm (81 in.) Main Jet 122 — Front 122 — Rear Height (overall) 125 cm (49.3 in.) Slow Jet Width (overall) 120.7 cm (47.5 in.) Pilot Screw Setting (turns) 2 1/2 Suspension Travel (front)
-
Page 6: Break-In Procedure
! CAUTION reached normal operating temperature. Do not idle the engine for excessively long periods of time. Do not use white gas. Only Arctic Cat approved gasoline additives should be used. During the break-in period, a maximum of 1/2 throttle is recommended;…
-
Page 7: Genuine Parts
The recommended lubricant is Arctic Cat Gear Lube (p/n 0436-007) or an equivalent gear lube which is SAE approved 80W-90 hypoid. This lubricant meets all of the lubrication requirements of the Arctic Cat ATV front differentials and rear drives. ! CAUTION…
-
Page 8: Preparation For Storage
3. Check all control wires and cables for signs of the air filter housing cover and air filter. Start the wear or fraying. Replace if necessary. engine and allow it to idle; then using Arctic Cat Engine Storage Preserver (p/n 0636-177), rapidly 4. Change the engine/transmission oil and filter.
-
Page 9
NOTES… -
Page 10
SECTION 2 — PERIODIC MAINTENANCE/TUNE-UP TABLE OF CONTENTS Periodic Maintenance Chart……..2-2 Lubrication Points………… 2-3 Battery…………..2-3 Fuses …………..2-4 Air Cleaner/Filter …………. 2-4 Valve/Tappet Clearance (Feeler Gauge Procedure) ……..2-6 Valve/Tappet Clearance (Valve Adjuster Procedure) ……… 2-7 Testing Engine Compression ……..2-7 Spark Plugs…………. -
Page 11: Periodic Maintenance Chart
A = Adjust I = Inspect C = Clean L = Lubricate Periodic Maintenance D = Drain R = Replace Chart Every Month Every 3 Initial Service Every 6 Every Year or Months or After Break-In Every Months or Item Every 1500 As Needed (First Mo or…
-
Page 12: Lubrication Points
Lubrication Points It is advisable to lubricate certain components periodi- cally to ensure free movement. Apply light oil to the components using the following list as reference. A. Throttle Lever Pivot/Cable Ends B. Brake Lever Pivot C. Auxiliary Brake Pedal Pivot ChargTim D.
-
Page 13: Fuses
3. Remove the vent plugs; then (if necessary) fill the NOTE: To remove the fuse, compress the locking battery with distilled water to the upper level tabs on either side of the fuse cover and lift off. indicated on the battery. 4.
-
Page 14
NOTE: Foam Filter Cleaner (p/n 0436-194) and Foam Filter Oil (p/n 0436-195) are available from Arctic Cat. 5. Dry the filter. 6. Put the filter in a plastic bag; then pour in air filter oil and work the filter. Reattach the filter to the frame. -
Page 15: Valve/Tappet Clearance (Feeler Gauge Procedure)
3. Wipe any accumulation of oil or gas from the filter housing and one-way drains. Valve/Tappet Clearance (Feeler Gauge Procedure) To check and adjust valve/tappet clearance, use the following procedure. KX227 NOTE: The seat, air filter housing, front fenders, ! CAUTION front inner covers, and side panels must be removed for this procedure.
-
Page 16: Valve/Tappet Clearance (Valve Adjuster Procedure)
8. Rotate the crankshaft counterclockwise until the TR mark aligns in the timing hole; then repeat Valve/Tappet Clearance steps 3-7 for the rear cylinder. (Valve Adjuster Procedure) 9. Install the timing inspection plug; then install the four tappet covers and tighten securely. To check and adjust valve/tappet clearance, use the 10.
-
Page 17: Spark Plugs
7. If compression is abnormally low, inspect the following items. A. Verify starter cranks engine over. B. Gauge is functioning properly. C. Throttle lever in the full-open position. D. Valve/tappet clearance correct. E. Valve bent or burned. F. Valve seat burned. ATV0052B …
-
Page 18: Gas/Vent Hoses
3. Tighten the jam nut against the throttle cable adjuster securely; then slide the rubber boot over Gas/Vent Hoses the adjuster. Replace the gas hose every two years. Damage from aging may not always be visible. Do not bend or Adjusting Engine RPM obstruct the routing of the carburetor vent hose.
-
Page 19: Front Differential/Rear Drive Lubricant
7. Start the engine (while the ATV is outside on level ground) and allow it to idle for a few minutes. 8. Turn the engine off and wait approximately one minute. 9. Unscrew the oil level stick and wipe it with a clean cloth.
-
Page 20: Tires
0736-568 KX395A 4. After all the oil has been drained, install the drain plugs and tighten to 0.5 kg-m (3.5 ft-lb). 5. Pour the appropriate amount of recommended oil into each filler hole. 6. Install the filler plugs. Tighten to 2.2 kg-m (16 ft-lb).
-
Page 21: Steering Components
Steering Components Nuts/Bolts/Cap Screws The following steering components should be Tighten all nuts, bolts, and cap screws. Make sure riv- inspected periodically to ensure safe and proper opera- ets holding components together are tight. Replace all tion. loose rivets. Care must be taken that all calibrated nuts, bolts, and cap screws are tightened to specifica- A.
-
Page 22: Switches
TAILLIGHT-BRAKELIGHT To replace the taillight-brakelight bulb, use the follow- ing procedure. 1. Remove the two screws and remove the lens cover. 2. Push the bulb in and turn it counterclockwise. 3. Install the new bulb by turning it clockwise while pushing in.
-
Page 23
Stop the ATV completely and shift the transmission If the reverse lever light does not illuminate when into the R position. The reverse gear indicator light shifted to the reverse position, the switch may be should be illuminated. faulty, the fuse may be blown, the bulb may be faulty, a connection may be loose or corroded, or the lever may need adjusting. -
Page 24: Speedometer/Indicator Lights
7. Rotate the shift rod end as necessary to align its 6. 4WD Indicator — Displays 4WD when the front threaded shaft with the hole in the shifter arm. drive selector switch is moved to the 4WD posi- Secure with a new lock nut (B). Tighten securely. tion.
-
Page 25: Frame/Welds/Racks
14. Mode Button — Used (in conjunction with the Odometer/Trip Meters/Hour Meter) to shift the odometer/trip meters/hour meter display through the four modes: odometer, trip meter (A), trip meter (B), and hour meter. Frame/Welds/Racks The frame, welds, and racks should be checked period- CD091 ically for damage, bends, cracks, deterioration, broken 2.
-
Page 26
730-434B AF739DB NOTE: During the bleeding procedure, watch the 3. If thickness of either brake pad is less than 3.2 mm reservoir sight glass very closely to make sure (0.125 in.), the brake pads must be replaced. there is always a sufficient amount of brake fluid. When the sight glass changes from dark to light, … -
Page 27: Burnishing Brake Pads
E. Install the wheel. Tighten to 5.5 kg-m (40 ft-lb). 5. Burnish the brake pads (see Burnishing Brake Pads in this section). Burnishing Brake Pads All brake pads must be burnished to achieve full brak- AN604D ing effectiveness. Braking distance will be extended until brake pads are properly burnished.
-
Page 28
REMOVING 4. Remove the drive clutch cap screw (C) (left-hand threads) and account for two washers and a 1. Make sure that the ignition switch is in the off stepped washer. position; then remove the clamps (A) and air duct (B). -
Page 29
2. If belt width is below the service limit of 28.8 mm (1.13 in.) or there is damage to the belt, it must be replaced. INSTALLING NOTE: Be sure to install the belt in the same direction as originally installed. When installing a new belt, direct the top of the lettering (A) toward the engine. -
Page 30
SECTION 3 — ENGINE/TRANSMISSION TABLE OF CONTENTS Engine/Transmission ……….3-2 Specifications …………3-2 Table of Contents ………… 3-3… -
Page 31
11.973-11.984 mm (0.4714-0.4718 in.) removed from the frame. Diameter Cylinder Head Distortion (max) 0.05 mm (0.002 in.) NOTE: Arctic Cat recommends the use of new Cylinder Head Cover (max) 0.05 mm (0.002 in.) Distortion gaskets, lock nuts, and seals and lubricating all… -
Page 32
3. Disconnect the wiring on the starter relay; then disconnect the CDI unit and the engine brake Table of Contents actuator control connectors. Removing Engine/Transmission ……3-3 Left-Side Components ……….3-6 Removing Left-Side Components ……3-6 Right-Side Components ………. 3-8 Removing Right-Side Components…… -
Page 33
11. Remove the front and rear spark plug caps; then remove the oil pressure sending unit lead (I). KX101A 8. Remove the rear V-belt cooling boot; then disconnect the belt failure detection lead (D) and KX046A the engine brake control actuator lead (C). 12. -
Page 34
KX136 KX126 15. Lift the carburetors above the frame and tie to the 18. Remove the front exhaust pipe accounting for the handlebar; then cover the carburetor openings with ring gasket. duct tape or other suitable material. KX067 KX121 19. Remove the two upper coolant hoses and the breather hose;… -
Page 35: Left-Side Components
20. Remove the rear engine mount through-bolt; then remove the rear engine mount brackets from the Left-Side Components frame. NOTE: Removing the brackets will allow the engine to be moved rearward enough to release the front drive coupler. NOTE: For efficiency, it is preferable to remove and disassemble only those components which need to be addressed and to service only those…
-
Page 36
3. Remove the V-belt cover (See Removing Right-Side Components); then remove the three clutch cover bolts (B) noting the arrow (D) and attach the clutch holding tool (A). KX239 7. Remove the ball bearing; then thread the flywheel puller (A) into the rotor/flywheel. KX236A 4. -
Page 37: Right-Side Components
Removing Right-Side Components A. V-Belt Cover B. Driven Pulley C. Clutch Assembly ! WARNING KX242 Imbalance of clutch or driven pulley or excessive 11. Remove the cap screws securing the oil pump (A); RPM could cause component failure resulting in then remove the oil pump drive chain (B) and oil severe injury or death.
-
Page 38: Top-Side Components
KX138A KX232A 4. Remove the V-belt cover accounting for the seal. 6. Hold the driven pulley with an appropriate holder; Note the position of the glue joint (A). then remove the driven pulley nut and the driven pulley. ATV2064 KX246A 5.
-
Page 39: Removing Top-Side Components
Removing Top-Side Components A. Valve Covers B. Cylinder Heads NOTE: Remove the spark plugs and timing inspection plug (A); then using the recoil starter, rotate the crankshaft to top-dead-center (TDC) of ATV2065 the compression stroke of the front cylinder. TF is top-dead-center front.
-
Page 40
KX248 KX250A 9. Remove the front cylinder head assembly and ! CAUTION account for two alignment pins (A), cylinder head This is a ratchet-type chain tensioner and must gasket (B), oil pipe (C), and camshaft chain guides be completely removed and reset if the mounting (D). -
Page 41
KX252 KX253 13. Hold the intermediate shaft (A) with an Allen 16. Remove the cylinder bolts (B); then remove the wrench. cylinder (A). Account for the base gasket (C) and alignment pins (D). KX253 KX256A 14. Remove the intermediate shaft sprocket nut (A); then remove the sprocket (B), drive chain (C), and the rear camshaft drive chain (D). -
Page 42: Center Crankcase Components
18. Using a piston pin puller (A), remove the piston pins (B); then remove the pistons from the connecting rods. KX258 2. Remove the shift shaft positioning bolt (A) ATV2068 accounting for a washer, spring, and ball; then remove the left crankcase bolts (B = 6 mm) (C = 8 mm).
-
Page 43: Disassembling Crankcase Half
NOTE: Connecting rod cap should be immedi- ately installed on its connecting rod to prevent a Disassembling mismatch. Crankcase Half 3. Remove the three cap screws (A); then remove the shift shaft cover (B). 1. Using a press, remove the crankshaft from the right case;…
-
Page 44
KX266 KX269 7. Remove the spacer (A), idler gear assembly (B), 9. Check angle (A) for shift fork bending. It must be and washers and spacer (C); then remove low and 90°. high range gears (D). ATV2069 KX267 10. Measure the thickness of the shift fork at (A); then 8. -
Page 45
KX271 KX274 2. Remove circlip (A); then remove the output drive idler gear (B). KX275A NOTE: Check the bevel gears (A) for scoring, chipping, or abnormal gear patterns; then check KX272 the bearings by rotating the drive and driven 3. -
Page 46: Servicing Components
2. Place the valve cover on the Surface Plate (p/n NOTE: For disassembling and servicing, refer to 0644-016) covered with #400 grit wet-or-dry Servicing Center Crankcase Components, this sandpaper. Using light pressure, move the valve section. cover in a figure eight motion. Inspect the sealing surface for any indication of high spots.
-
Page 47
Measuring Valve Face/Seat Width 2. Remove the valve seal and the lower remaining spring seat. Discard the valve seal. 1. Using a micrometer, measure the width of the valve face. CC136D NOTE: The valve seals must be replaced. ATV-1004 2. -
Page 48
2. Using the Standard Valve Guide Reamer (p/n 0444-017), remove any burrs or tight areas from the valve guide journals. CC131D 3. Push the valve from side to side; then from top to bottom. CC142D 4. Maximum “wobble” deflection must not exceed specifications. -
Page 49
Valve Seat/Guide Servicing Flow 2. Insert an intake valve seat pilot shaft into one of the intake valve guides. Slide the intake valve seat Chart grinding tool onto the pilot shaft; then using light pressure on a driver handle and a deep socket, grind intake valve… -
Page 50: Piston Assembly
Installing Valves Cleaning/Inspecting Piston 1. Apply grease to the inside surface of the valve 1. Using a non-metallic carbon removal tool, remove seals; then place a lower spring seat and valve any carbon buildup from the dome of the piston. guide seal over each valve guide.
-
Page 51
Cleaning/Inspecting Piston Rings 2. Insert an inside dial indicator into the piston-pin bore. The diameter must not exceed specifications. Take two measurements to ensure accuracy. 1. Take an old piston ring and snap it into two pieces; then grind the end of the old ring to a 45° angle and to a sharp edge. -
Page 52: Cylinder/Cylinder Head Assembly
3. Place the cylinder head on the surface plate covered with #400 grit wet-or-dry sandpaper. Using light pressure, move the cylinder head in a figure eight motion. Inspect the sealing surface for any indication of high spots. A high spot can be noted by a bright metallic finish.
-
Page 53
2. Inspect the cylinder for pitting, scoring, scuffing, warpage, and corrosion. If marks are found, repair the surface using a cylinder hone (see Honing Cylinder in this sub-section). 3. Place the cylinder on the surface plate covered with #400 grit wet-or-dry sandpaper. Using light pressure, move the cylinder in a figure eight motion. -
Page 54
CC283D CC005D 2. Rotate the camshaft and note runout; maximum 2. Place a strip of plastigauge in each of the camshaft tolerance must not exceed specifications. lands in the cylinder head. 3. Place the valve cover on the cylinder head and Measuring Camshaft Lobe Height secure with the valve cover cap screws. -
Page 55: Servicing Left-Side Components
CC145D KX279 6. If clearance is excessive, measure the journals of the camshaft. Servicing Left-Side NOTE: If the journals are worn, replace the cam- shaft; then measure the clearance again. If it is still Components our of tolerance, replace the cylinder head. Inspecting Automatic Compression Release RECOIL STARTER…
-
Page 56
CD047 KX282 2. Place the driven pulley assembly onto the 6. Wipe out excessive grease; then using a standard compressor tool base engaging the dowel pins into tip screwdriver (B), dislodge the four guide pins appropriate holes in the fixed face of the assembly. (A). -
Page 57: Drive Clutch Assembly
CD060 CD058 4. Install the spring seat (C), spring (D), spring seat 4. Inspect the pins and bushings for wear, flat spots, (E), and circlip (F); then attach the spring holder looseness, or cracking. (B) and tighten nut (A) until the circlip (F) can be installed.
-
Page 58
Inspecting ! WARNING Inspect all rotating parts carefully for cracks, loose bolts, chips, or nicks. Clutches and driven pulleys rotate at high speeds and can break up with explo- sive force causing severe injury or death. 1. Inspect the sheave faces (A) for cracks, galling, or hollowing;… -
Page 59
KX291 KX294 3. Inspect the ramp weights (A) and pins (B) in the 2. Place the fixed sheave on the clutch holder; then movable sheave. Replace any worn parts. install the movable sheave, spider (A) and shoes (B) aligning the arrow (C) with the arrow (D) on the movable sheave. -
Page 60: Servicing Center Crankcase Components
ATV2072 KX297 4. Measure the crank pin diameter (A) and check the crankshaft marking (B). If no mark is on the crankshaft, the crank pin diameter should be 39.984-39.992 mm (1.5742-1.5745 in.). If the crankshaft is marked with “O,” crank pin diameter Servicing Center should be 39.993-40.000 mm (1.5745-1.5748 in.).
-
Page 61: Disassembling Output Drive Bevel Gear Assembly
DISASSEMBLING OUTPUT DRIVE 7. Slowly turn the crankshaft and note the readings at the points indicated. Crankshaft runout must be BEVEL GEAR ASSEMBLY less than 0.10 mm (0.0039 in.). AT THIS POINT If no abnormal wear, chipping, or bearing roughness is found, proceed to Installing Output Drive/Driven Bevel Gears in this sub-section.
-
Page 62: Disassembling Output Driven Bevel Gear Assembly
3. Loosen the bevel gear (B) using an Allen wrench while holding the housing (A) in a vise; then continue to turn the bevel gear (about 4-5 turns) until the internal nut is free of the holder bolts. KX302 KX299 4.
-
Page 63: Assembling Crankcase Half
ATV2080 KX308 4. Hold the housing assembly (A) with the output shaft holder (B) and spacer (C) in a vise; then remove the oil seal (D). KX309 KX306 5. Using a special deep socket (B), remove the output Assembling Crankcase shaft retainer nut (A).
-
Page 64
KX310 ATV2081 3. Install the rear cylinder camshaft chain guide (A) 6. Select connecting rod big end inserts using the and tighten bolt (B) to 2.0 kg-m (14.5 ft-lb). following chart and the markings on the crankshaft and connecting rod. Big End Bearing Insert Selection Con-Rod Big End Crank Pin… -
Page 65
ATV2074A KX313 7. Install the inserts into the connecting rods and 10. Install the crankshaft assembly in the right caps; then use plastigauge (A) to measure crankcase half. connecting rod/crankshaft clearance (B). Tighten 11. Using a press, install the driven shaft in the the connecting rod nuts to 3.5 kg-m (25 ft-lb). -
Page 66
KX319A KX316 16. Apply molybdenum disulfide oil to the shift shaft 14. Apply clean engine oil to the shift rod (A), shift (A); then install the shift spring (C) and guide (D). fork (B), and needle bearing (C); then install the Apply red Loctite #271 to the shift shaft spring shift rod with shifter, spacer (D), and needle bolt (B) and tighten to 2.5 kg-m (18 ft-lb). -
Page 67: Joining Crankcase Halves
Joining Crankcase Halves A. Breather Tube B. Positioning Bolt C. Drive Bevel Gear (Assembling) D. Driven Bevel Gear (Assembling) E. Drive/Driven Bevel Gears ATV2085 (Installing) 3. Install the breather tube (A) on the crankcase fitting aligning the white line on the tube with the F.
-
Page 68
KX322 KX325A 7. Place the bearing housing into the holding fixture; 10. Using the bearing driver (A), drive the bearing then apply blue Loctite #242 on the threads of the into the housing until it bottoms out. bearing retainer (A). Install with the dished side (B) directed away from the bearing and tighten to 12 kg-m (87 ft-lb). -
Page 69
KX328 KX331A 14. Apply grease to the output drive oil seal; then 17. Install the driven gear assembly (B) in the install in the housing being careful not to damage crankcase; then tighten the four cap screws (A) to the lip of the seal or distort the seal. 2.7 kg-m (19.5 ft-lb). -
Page 70
NOTE: To decrease backlash, decrease the thick- ness of shims (7). To increase backlash, increase the thickness of shims (7). Make small changes at a time. 1. Ball Bearings 2. Drive Bevel Gear Shims 3. Output Drive Bevel Gear 4. -
Page 71
NOTE: The following illustration indicates that the drive gear is running too deep in the set. Increase drive housing shims and decrease driven housing shims. ATV2089 22. Increase or decrease shim thickness on the drive bevel gear housing until the correct contact pattern is obtained. -
Page 72
KX339 KX336 29. Install the position plate (A); then tighten cap 26. Align the punch mark (B) on the intermediate screws (B) to 0.9 kg-m (78 in.-lb). shaft sprocket (A) with the index mark (C) on the crankcase. KX340 KX337 30. -
Page 73: Installing Right-Side Components
32. To prepare the intermediate shaft chain tensioner (A) for installation, release the stopper (B); then Installing Right Side push the rod (C) into the housing and secure with a piece of wire (D). Components 1. Install the driven pulley on the transmission driven shaft (A) being careful not to jam the splines (B) with the splines in the pulley (C).
-
Page 74: Installing Left-Side Components
KX348A KX350A 3. Loop the belt over the driven pulley; then install 2. Make sure that alignment pins (A) are in place and the drive clutch with holding tool (A) with cap apply clean engine oil to oil port (B). screws (B) referenced to the arrow (D) and tighten the cap screw (C) (left-hand threads) to 9.5 kg-m (69 ft-lb).
-
Page 75
5. Apply grease to the O-ring (A); then install the pin (B), spring (C), and oil pump chain tensioner bolt (D) and tighten to 2.5 kg-m (18 ft-lb). KX355 9. Install the starter clutch gear (C) and torque limiter (A); then wipe the crankshaft and rotor/flywheel mating surfaces clean… -
Page 76: Installing Top-Side Components
KX359 KX358 12. Install a new O-ring (A) in the collar (B); then apply grease to the O-ring and install the collar into the alternator cover. Installing Top-Side Components A. Piston B. Cylinder C. Cylinder Heads D. Camshafts NOTE: If the piston rings were removed, install them in this sequence.
-
Page 77
3. Apply clean engine oil to the piston skirts and cylinder walls; then install the cylinders and clamp (A) (rear only) and tighten the cylinder cap screws (B) to 1.0 kg-m (87 in.-lb). Install the cam chain guide (C) and the oil pipe (D). ATV2098 ! CAUTION Incorrect installation of the piston rings will… -
Page 78
ATV2101 KX364 7. Install the rear camshaft (A) identified by the 10. Install pin (A), spring (B), washer (C), and chain groove (B). tensioner cap bolt (D); then tighten cap bolt to 2.2 kg-m (16 ft-lb). KX363 KX365 8. Direct the arrow (A) of the rear camshaft upward (left side view);… -
Page 79: Installing Engine/Transmission
270° and align the “TF” mark (A) with the notch (B) in the inspection window. ATV2107 Installing Engine/Transmission NOTE: Arctic Cat recommends that new gaskets and O-rings be installed whenever servicing the ATV. ATV2106 1. Using suitable lifting…
-
Page 80
KX078A KX089B 2. Raise the front of the engine/transmission sufficiently to enable the front drive coupler to engage the front output shaft; then lower the front of the engine/transmission and engage the coupler. Slide the boot over the yoke. KX069A 5. -
Page 81
10. Remove the tape or caps from the intake hoses checking for any dirt, hardware items, or liquids; then install the carburetors into the intake hoses and tighten the clamps securely. Make sure the carburetors are securely seated by rocking side to side after installation. -
Page 82
16. Connect the speed sensor, forward/reverse sensor lead, and oil pressure warning lead; then connect the drive belt failure detector lead and the engine brake control servo lead to the main harness. Connect the spark plug wires. 17. Remove the tape from the carburetor inlets checking for any foreign material;… -
Page 83
NOTES 3-54… -
Page 84
SECTION 4 — FUEL/LUBRICATION/COOLING TABLE OF CONTENTS Carburetor Specifications ……..4-2 Carburetor Schematic ……….4-2 Carburetor …………… 4-3 Cleaning and Inspecting Carburetor……4-6 Throttle Cable Free-Play ……… 4-8 Engine RPM (Idle)……….. 4-8 Gas Tank …………..4-9 Gas Tank Valve …………4-9 Gas/Vent Hoses ………… -
Page 85: Carburetor Specifications
Carburetor Specifications ITEM Type Keihin CVKR-D32 (2) Main Jet 122 (Front)/122 (Rear) Slow Jet Pilot Screw Setting 2 1/2 (turns) Needle Jet 3.6 #3 Jet Needle BZL-2.470 Idle RPM 1050-1150 Float Arm Height 3-5 mm (0.12-0.20 in.) Throttle Cable Free-Play 3-6 mm (at lever) (1/8-1/4 in.)
-
Page 86: Carburetor
Carburetor ! WARNING Whenever any maintenance or inspection is per- formed on the fuel system during which there may be fuel leakage, there should be no welding, smok- ing, open flames, etc., in the area. TROUBLESHOOTING KX025E 1. Drain float bowls into a clean, clear container. 8.
-
Page 87
8. Loosen the outer jam nut securing the throttle cable to the carburetor body; then route the cable out of the way. KX118 KX137 9. Remove the Phillips-head screws holding the cable end plates (A); then pull out the starter plungers and set aside. -
Page 88
KX369 KX122 4. Measure the float height (A) from the float ! CAUTION chamber mating surface (B) by tilting the carburetor so the float valve contact tab (C) just Any objects or liquid entering the intake tubes touches the float valve rod (D). The float valve will fall into the engine causing severe damage if spring (E) must not be compressed. -
Page 89: Cleaning And Inspecting Carburetor
2. Remove the four screws (A) securing the float chamber (B); then remove the float chamber. Account for the O-ring seal. KX373A KX370 Cleaning and Inspecting NOTE: Do not remove the pilot screws unless Carburetor idle problems have been encountered. If pilot screws are removed, the carburetors will have to be synchronized after installation.
-
Page 90
9. Inspect tips of the jet needle, pilot screw, and the needle valve for wear, damage, or distortion. 10. Inspect the slow jet and main jet for obstructions or damage. NOTE: If the slow jet is obstructed, the mixture will be extremely lean at idle and part-throttle oper- ation. -
Page 91: Throttle Cable Free-Play
INSTALLING 1. Lay the carburetor on top of the engine; then install the starter plungers and secure with the retainer screws. 2. Connect vent lines; then connect the coolant hoses. 3. Insert the carburetor into the intake tubes making sure they seat properly; then tighten the clamps securely.
-
Page 92: Gas Tank
1. Clean all gas tank components with parts-cleaning solvent. Gas Tank 2. Inspect all hoses for cracks or leaks. 3. Inspect tank cap and tank for leaks, holes, and damaged threads. 1. Gas Tank INSTALLING 2. Sleeve 3. Tank Cap 1.
-
Page 93: Gas/Vent Hoses
Gas/Vent Hoses Replace the gas hose every two years. Damage from aging may not always be visible. Do not bend or obstruct the routing of the carburetor vent hose. Make certain that the vent hose is securely connected to the carburetor and the opposite end is always open.
-
Page 94: Testing Oil Pump Pressure
REMOVING/DISASSEMBLING 1. Connect the Arctic Cat Engine Tachometer (p/n 0644-275) to the engine. 1. Remove the oil pump from the engine (see Left-Side Components in Section 3). 2. Remove the oil pressure sender switch; then connect the Oil Pressure Gauge (p/n 0444-039) to 2.
-
Page 95: Liquid Cooling System
NOTE: The valve is not serviceable and individ- ual parts are not available. If the plunger move- ment is not free and smooth, replace the valve. INSTALLING 1. Apply blue Loctite #242 to the threads of the oil pressure relief valve; then install and tighten to 1.5 kg-m (11 ft-lb).
-
Page 96: Radiator
CC863 AN604D CLEANING AND INSPECTING ! CAUTION NOTE: Whenever a part is worn excessively, After operating the ATV for the initial 5-10 cracked, or damaged in any way, replacement is minutes, stop the engine, allow the engine to necessary. cool down, and check the coolant level.
-
Page 97: Hoses/Thermostat
3. Inspect all coolant hoses, connections, and clamps for deterioration, cracks, and wear. Hoses/Thermostat NOTE: All coolant hoses and clamps should be replaced every four years or 4000 miles. REMOVING INSTALLING 1. Remove the front rack and fenders; then remove 1.
-
Page 98: Water Pump/Alternator Cover
Water Pump/Alternator Cover NOTE: Check for water pump seal leakage by examining drain catch tank (A). KX379 AT THIS POINT If the impeller is corroded or damaged, replace the impeller; then proceed to step 10. If additional service on the water pump/alternator cover is necessary, proceed to step 3.
-
Page 99: Testing Electric Fuel Pump
ATV2115 KX380 6. Press ball bearing (A) into the alternator cover 9. Install the alternator cover (see Installing from the inside until it is bottomed; then using a Left-Side Components in Section 3); then install suitable socket (B) and bearing driver (C), press in the impeller and tighten clockwise to 0.8 kg-m (69 a new mechanical seal (D) until the flange stops at in.-lb).
-
Page 100
KX192 KX187 3. Turn the ignition switch to the ON position. The 4. Rotate the fuel pump assembly clockwise 90° to fuel pressure should build until the pump shuts off. allow removal without removing the fuel tank. Pressure should read 0.18-0.23 kg-cm (2.6-3.3 psi). -
Page 101
INSPECTING NOTE: If readings are erratic, clean the resistor wiper and resistor with clean alcohol and retest. If still not correct, replace the fuel pump assembly. AT THIS POINT INSTALLING If the pump has failed earlier test and must be replaced, proceed to INSTALLING. -
Page 102
SECTION 5 — ELECTRICAL SYSTEM TABLE OF CONTENTS Specifications …………5-2 Battery…………..5-2 Testing Electrical Components…….. 5-2 Accessory Receptacle/Connector ……5-3 Brakelight Switch (Auxiliary)……..5-3 Brakelight Switch (Handlebar Control) ….5-4 Coolant Temperature and Cooling Fan Switches …………… 5-4 Fan Motor …………..5-5 Power Distribution Module…….. -
Page 103: Specifications
NOTE: Electrolyte should be at room tempera- ture before filling. Do not use water or any other Specifications liquid to activate a battery. ! WARNING IGNITION Electrolyte is a sulfuric acid solution. Avoid spillage and contact with skin, eyes, and clothing. Spark Plug Type NGK CR7E Spark Plug Gap…
-
Page 104: Accessory Receptacle/Connector
Accessory Receptacle/Connector NOTE: This test procedure is for either the receptacle or the connector. VOLTAGE 1. Set the meter selector to the D.C. Voltage position. AR627D 2. Connect the red tester lead to the red/white wire or the positive connector; then connect the black 3.
-
Page 105: Brakelight Switch (Handlebar Control)
Brakelight Switch (Handlebar Control) The switch connector is the two-prong black connector in front of the steering post. To access the connector, the front rack and front fenders must be removed (see Section 8). NOTE: The ignition switch must be in the ON position.
-
Page 106: Fan Motor
4. On the coolant temperature switch, allow the 2. Connect the red tester lead to the red wire; then water to cool, and when the temperature is at (or connect the black tester lead to the black wire. just before) a temperature of 108°-111° C (226°-232°…
-
Page 107: Fuses
1. Set the meter selector to the OHMS position. 2. Connect the red tester lead to one spade end of the fuse; then connect the black tester lead to the other spade end. 3. The meter must show less than 1 ohm resistance. If the meter reads open, replace the fuse.
-
Page 108: Ignition Switch
RESISTANCE ! CAUTION Always disconnect the battery when performing resistance tests avoid damaging multimeter. NOTE: For these tests, the meter selector should be set to the OHMS position. Primary Winding 1. Connect the red tester lead to the (+) terminal (with the wire removed);…
-
Page 109: Handlebar Control Switches
5. Turn the ignition switch to the LIGHTS position. NOTE: If the meter reads resistance, trouble- shoot or replace the switch/component, the con- 6. Connect the red tester lead to the red wire; then nector, or the switch wiring harness. connect the black tester lead to the brown wire.
-
Page 110: Front Drive Selector Switch
4. Connect the red tester lead to the blue wire; then NOTE: If the meter shows other than specified, connect the black meter lead to the black wire. The check the harness, connector, 30 amp fuse, and meter must show an open circuit. battery connections.
-
Page 111: Magneto Coils
3. Turn the ignition switch to the ON position and 3. With the engine running at a constant 3000 RPM, select 2 WD on the front drive selector switch; all wire tests must show 39-59 A.C. volts. then while watching the meter (12 D.C.volts), select the lock position on the differential lock.
-
Page 112: Starter Motor
Magneto Coil (Trigger) 5. Remove the two long starter cap screws securing the starter components. 1. Set the meter selector to the D.C. Voltage position. 6. Remove the front cover from the starter housing 2. Connect the red tester lead to the black/white wire; and armature shaft.
-
Page 113
CLEANING AND INSPECTING NOTE: Whenever a part is worn excessively, cracked, or damaged in any way, replacement is necessary. 1. Thoroughly clean all components except the armature and brushes in parts-cleaning solvent; then dry with compressed air. ! CAUTION Do not wash the armature and brushes in any kind of solvent. -
Page 114
C. Touch the red tester lead to the brush holder assembly. NOTE: If no resistance is indicated, check the ground connection for tightness and for cleanli- ness. If there is still no meter indication, replace the brush assembly. ASSEMBLING/INSTALLING 1. -
Page 115
BC015 BC006 5. Apply a small amount of grease to the rear cover bushing; then install the cover on the starter housing making sure the reference marks align. BC004 8. Place the front cover onto the starter housing making sure it seats properly. 9. -
Page 116: Starter Relay
TESTING VOLTAGE NOTE: Make sure that the ignition switch is in the ON position, transmission in neutral, brake Perform this test on the starter motor positive terminal. lock released, and the emergency stop switch in To access the terminal, slide the boot away. the RUN position.
-
Page 117: Cdi Unit
CDI Unit Neutral Start/Front Drive Actuator/Start-in-Gear/ Differential Lock The CDI is located beneath the seat near the battery. Relays NOTE: The CDI unit is not a serviceable compo- nent. If the unit is defective, it must be replaced. The relays are indentical plug-in type located on the The CDI is rarely the cause for electrical problems;…
-
Page 118: Taillight — Brakelight
NOTE: If either the taillight or brakelight fails to crankcase cover. illuminate, inspect the bulb, the connectors, or the component wiring harness. 2. With the Arctic Cat Engine Tachometer (p/n 0644-275) connected, start the engine and run at VOLTAGE (Taillight) the specified RPM.
-
Page 119: Electronic Speedometer
4. Install the timing inspection plug. If ignition timing is incorrect, replace the CDI and pick-up coil. Electronic Speedometer/Indicator Lights REMOVING 1. Remove the four nylon fasteners securing the instrument pod; then remove the ignition switch retaining nut. ATV2208B 2. Remove the front rack and front fenders; then dis- connect the multi-pin connector.
-
Page 120
7. Depress the MODE button (A) and cycle to trip meters A and B (B); then check the function of both trip meters in the same manner as the odometer. Disconnect the oscillator. ATV2123 5. Connect a signal oscillator (A) to the battery negative post and the output to terminal (13);… -
Page 121
12. Connect a jumper wire from the negative battery terminal to terminal (8) of the connector. The water temperature warning light (A) should appear. ATV2121A ! CAUTION Remove the jumper wire after all segments have appeared or meter damage will occur. 10. -
Page 122
ATV2134 14. Connect a jumper wire from the negative battery terminal to terminal (4) in the connector. The neutral indicator light (A) should illuminate. ATV2208I ATV2138 16. Connect a jumper wire from the negative battery terminal to terminal (15) of the connector. The reverse indicator light (A) should illuminate. -
Page 123: V-Belt Failure Mode Clearing
INSTALLING 1. Route the new wiring harness down through the opening; then place the speedometer into position and secure with the three nuts. Connect the multi-pin connector. 2. Install the front fenders and front rack; then install the instrument pod and secure with the nylon fas- teners.
-
Page 124: 100-Hour Belt Inspection Mode Clearing
100-Hour Belt Inspection Mode Clearing Every 100 hours, the belt indicator light will illuminate to alert for inspection. See Section 2 — Check- ing/Replacing V-Belt. To reset the belt indicator light use the following procedure. ! WARNING KX381 ! CAUTION V-belt inspection must be conducted in accordance with Section 2.
-
Page 125: Controller-To-Engine Brake Actuator Voltage
3. If battery voltage is not present, check the 30-amp fuse, ignition switch, or wiring harness. Forward/Reverse Detecting Sensor Resistance ! CAUTION Always disconnect the battery when performing resistance tests avoid damaging multimeter. 1. Disconnect the sensor lead wire connector (A); then select OHMS on the multimeter and check resistance between the sensor pins.
-
Page 126: Output-To-Speed Sensor Voltage
ATV2146 ATV2147 3. Spin a rear wheel in the forward direction while observing the multimeter. The meter should alternately show 0 volts and 5 D.C. volts. If the reading is not as specified, replace the speed Output-to-Speed sensor. Sensor Voltage Select D.C.
-
Page 127
2. Install the needle adapters (E) to the multimeter leads; then select D.C. Voltage on the multimeter (D). 3. Connect the red tester lead to the yellow/green wire terminal (F) and the black tester lead black/yellow wire terminal (G); then turn the ignition switch ON and with the tilt sensor (A) held with the UP arrow as shown (B), observe the meter. -
Page 128: Wiring Diagram
Wiring Diagram Harness (p/n 0486-147) 739-259A 5-27…
-
Page 129
SECTION 6 — DRIVE SYSTEM TABLE OF CONTENTS Drive System …………6-2 General Information……….6-2 Rear Suspension/Rear Drive Assembly Schematics ……..6-3 Front Drive Actuator ……….6-4 Front Differential …………6-5 Drive Axles …………6-18 Rear Gear Case ………… 6-23 Hub……………. -
Page 130: Drive System
NOTE: Special tools are available from the Arctic Cat Service Parts Department. Drive System TROUBLESHOOTING If a noise is heard from the gear case area, it can be dif- ficult to locate and/or diagnose. If the noise is related NOTE: Some photographs and illustrations used to wheel speed, but not to engine RPM, the problem is in this section are used for clarity purposes only…
-
Page 131: Rear Suspension/Rear Drive Assembly Schematics
Rear Suspension/Rear Drive Assembly Schematics REAR SUSPENSION/AXLE ASSEMBLY 1. Knuckle 2. Knuckle 3. Wheel Bearing 4. Retaining Ring 5. Collar 6. Bushing 7. Cap Screw 8. Lock Nut 9. A-Arm 10. Bushing 11. Collar 12. A-Arm 13. Cap Screw 14. Axle 15.
-
Page 132: Front Drive Actuator
NOTE: Apply Arctic Cat ATV High-Performance Grease (p/n 0436-501) to the O-ring surface. 2. Using a T-30 torx wrench, remove the mounting cap screw from the driveshaft side of the actuator.
-
Page 133: Front Differential
4. Loosen the front cap screw; then tighten the cap 4. Pump up the hand brake; then engage the brake screw on the driveshaft side. lever lock. 5. Remove the cotter pin securing the hex nut; then remove the hex nut and washer. Release the brake lever lock.
-
Page 134
12. Remove the lower shock bolts. Account for the lock nuts; then move the shocks aside and secure them with a strap. AF896D 9. Remove the upper ball joint cap screws taking care not to strip the threads on the ball joint shaft; then using a rubber mallet, tap the end of the axle and AF897D free it from the knuckle assembly. -
Page 135
AF902D CD016 19. Free the differential assembly from the frame NOTE: To remove the panels, there will be a mountings; then shift the assembly forward in the torx-head screw and three cable ties per side. frame sufficiently to disengage the splines of the 16. -
Page 136
CD106 KX219 3. Remove the circlip; then remove the input shaft from the housing. NOTE: The input shaft-to-bearing clearance is a hand-press fit. A light tap with a rubber mallet may be necessary to remove the shaft from the bearing. 4. -
Page 137
4. Place the input shaft assembly with a new gasket onto the gear housing; then secure with the existing cap screws. Tighten to 2.9-3.5 kg-m (21-25 ft-lb). NOTE: If a new gear housing is being installed, tighten the cap screws to 3.5-4.3 kg-m (25-31 ft-lb). AF994 2. -
Page 138
KX173 KX176 3. Using a plastic mallet, tap lightly to remove the differential cover. Account for an O-ring. KX177 KX174 NOTE: If the cover is difficult to remove, pry on the cover in more than one recessed location. 4. Remove the splined coupler, shifter fork, pin, and spring of the differential lock assembly and set aside. -
Page 139
KX181 CC878 7. Using the 48 mm Internal Hex Socket (p/n 9. Secure the pinion gear in a bearing puller; then 0444-104), remove the nut securing the pinion remove the pinion bearing using a press. Account gear assembly. for a collar, a bearing, and a shim. … -
Page 140
Shimming Procedure/Shim Selection 738-268A 3. Apply molybdenum disulfide grease to all oil seal lips. 4. Prelubricate journal on pinion assembly with SAE 80W-90 hypoid gear lubricant prior to pressing assembly into gear case housing. 5. Tighten lock collar to 16.6 kg-m (120 ft-lb) and deform/lock edge approximately 1.5 mm (0.060 502-119A in.) into lower oil channel. -
Page 141
CC883 CC891 2. Place the pinion assembly in a bearing puller; then 5. Install the shift fork shaft w/spring into the gear install the bearing using a press. housing making sure the shaft O-ring is positioned to the inside. CC884 CC892 3. -
Page 142
CD103 CC897 CD110 KX178 8. Install the proper shim onto the ring gear spider 9. Install the left bearing housing aligning the match assembly making sure the chamfer side of the mark to the mark on the differential housing. shim is facing toward the ring gear. Install the ring gear in the housing;… -
Page 143
CC885 KX175 2. Using a propane torch, heat the area surrounding the needle bearing to approximately 300°. KX174 11. Making sure the O-ring is properly positioned on the differential cover, install the differential cover CC886 with existing hardware. Account for the ID tag. 3. -
Page 144
CC888 CC891 2. Using a suitable driver, install the needle bearing 5. Install the input shaft housing. into the housing making sure the bearing is seated. Removing/Installing Axle Seal NOTE: Do not push the bearing too far into the housing. -
Page 145
AF905D CC901 NOTE: Prior to installing the seal, apply grease to the seal outside diameter. 4. Install the seal into the housing pressing evenly on the outside edge until the seal is seated. AF904D 2. Pour 275 ml (9.3 fl oz) of SAE 80W-90 hypoid lubricant into the differential and install the filler plug. -
Page 146: Drive Axles
9. Install the brake calipers. Secure with the cap screws tightened to 2.8 kg-m (20 ft-lb). AF610D 7. Secure the lower shock eyelets with cap screws and lock nuts. Tighten to 4.8 kg-m (35 ft-lb). AF894D 10. Install the wheels and tighten to 5.5 kg-m (40 ft-lb).
-
Page 147
REMOVING FRONT DRIVE AXLE NOTE: Do not allow a brake caliper to hang from its hose. 1. Secure the ATV on a support stand to elevate the wheels. ! CAUTION ! WARNING The calipers should be supported. If the calipers are allowed to hang from the hoses, damage may occur. -
Page 148
7. Remove the tie rod from the steering knuckle. CD019 2. Inspect boots tears, cracks, AF896D deterioration. 8. Remove the cap screw and lock nut securing the lower shock eyelet to the upper A-arm. Discard NOTE: If a boot is damaged in any way, it must the lock nut. -
Page 149
7. Using a side-cutters (or suitable substitute), remove both outer boot clamps from the shaft. Note the position of the different-sized clamps for assembling purposes. CD023 4. Note the difference inside each bearing ring end for assembling purposes; then remove the bearing ring. -
Page 150
! CAUTION INSTALLING REAR DRIVE AXLE The bearing ring must go onto the shaft with the 1. Apply Arctic Cat ATV High-Performance Grease side without splines facing toward the small (p/n 0436-501) to the splines; then slide the drive clamp of the inner boot or severe damage will result. -
Page 151: Rear Gear Case
4. Slide the hub w/brake disc into position in the NOTE: To assure proper seating of the axle, give steering knuckle followed by a washer and hex it a light pull; the axle should remain “clipped” in nut. Tighten finger-tight at this time. place.
-
Page 152: Hub
3. Remove the two cap screws and lock nuts securing 2. Thread a lug nut onto the stud; then using a the rear gear case to the frame; then move the gear hammer drive the stud out of the hub. case to the rear sufficiently to disengage the splined yoke from the rear output spline shaft.
-
Page 153
3. Remove the nut securing the hub. Account for a 3. Install the hub assembly onto the splines of the washer. shaft. 4. Remove the brake caliper. CD009 4. Insert the hub seal onto the shaft; then position it CD007 into the hub. -
Page 154: Hydraulic Brake Caliper
CD006 AF636D 9. Remove the ATV from the support stand. CLEANING AND INSPECTING 1. Clean all caliper components (except the brake pads) with parts-cleaning solvent. Hydraulic 2. Inspect the brake pads for damage and excessive wear. Brake Caliper NOTE: For measuring brake pads, see Section 2. ASSEMBLING/INSTALLING …
-
Page 155: Hydraulic Brake Assembly Schematic
7. Remove the ATV from the support stand and verify brake operation. CD006 Hydraulic Brake Assembly Schematic 1. Cap Screw 2. Hose — Front 3. Junction Block 4. Plug 5. Cap Screw 6. Caliper 7. Housing 8. Piston/Seal Set 9. Seal Set 10.
-
Page 156
NOTES 6-28… -
Page 157
SECTION 7 — SUSPENSION TABLE OF CONTENTS Front and Rear Suspension Assembly Schematics…………7-2 Shock Absorbers …………. 7-3 Front A-Arms …………7-4 Rear A-Arms …………7-7 Wheels and Tires ………… 7-9… -
Page 158: Front And Rear Suspension Assembly Schematics
Front and Rear Suspension Assembly Schematics FRONT 1. Retainer 31. Spanner Wrench 2. Shock Absorber 32. A-Arm Brace 33. Cap Screw 3. Bushing 4. Sleeve 5. Adjuster Cam 6. Spring 7. Cap Screw 8. Lock Nut 9. A-Arm Assy 10. Bushing 11.
-
Page 159: Shock Absorbers
4. Compress the shock absorber spring, remove the retainer, and remove the spring. Shock Absorbers REMOVING 1. Secure the ATV on a support stand to elevate the wheels and to release load on the suspension. ! WARNING Make sure the ATV is solidly supported on the sup- port stand to avoid injury.
-
Page 160: Front A-Arms
Front A-Arms REMOVING 1. Secure the ATV on a support stand to elevate the wheel; then remove the wheel. ! WARNING Make sure the ATV is solidly supported on the sup- AF618D port stand to avoid injury. 7. Remove the cap screws securing the ball joints to the knuckle.
-
Page 161
AF610D AF616D 11. Remove the circlip from the ball joint; then 2. Install the A-arm assemblies into the frame remove the ball joint from the A-arm. mounts and secure with the cap screws. Only finger-tighten at this time. AF616D AF610D CLEANING AND INSPECTING 3. -
Page 162
6. Install the knuckle assembly onto the ball joints 10. Secure the brake caliper to the knuckle with the and secure with cap screws. Tighten to 4.8 kg-m two cap screws. Tighten to 2.8 kg-m (20 ft-lb). (35 ft-lb). CD007 AF628D 11. -
Page 163: Rear A-Arms
Rear A-Arms REMOVING 1. Secure the ATV on a support stand to elevate the wheels ! WARNING Make sure the ATV is solidly supported on the sup- AF934 port stand to avoid injury. 8. Slide the hub out of the knuckle and set aside. 2.
-
Page 164
2. Slide the knuckle onto the drive axle and into position on the A-arms; then secure the knuckle to the A-arms with cap screws and new lock nuts. Tighten to 4.8 kg-m (35 ft-lb). 3. Tighten the hardware securing the A-arms to the frame mounts (from step 1) to 4.8 kg-m (35 ft-lb). -
Page 165: Wheels And Tires
REMOVING 1. Secure the ATV on a support stand to elevate the ! WARNING wheels. Use only Arctic Cat approved tires when replacing ! WARNING tires. Failure to do so could result in unstable ATV operation. Make sure the ATV is solidly supported on the sup- The ATV is equipped with low-pressure tubeless tires port stand to avoid injury.
-
Page 166
CLEANING AND INSPECTING CHECKING/INFLATING 1. Using an air pressure gauge, measure the air NOTE: Whenever a part is worn excessively, pressure in each tire. Adjust the air pressure as cracked, or damaged in any way, replacement is necessary to meet the recommended inflation necessary. -
Page 167: Steering/Frame
SECTION 8 — STEERING/FRAME TABLE OF CONTENTS Steering Post/Tie Rods ……….. 8-2 Handlebar Grip…………8-4 Steering Knuckles ……….. 8-4 Measuring/Adjusting Toe-In/Toe-Out ……. 8-8 Body Panel Assembly Schematic……8-10 Front Rack …………. 8-10 Front Bumper Assembly ……..8-11 Front Fender/Side Panels……..8-12 Fender Flares/Extensions ……..
-
Page 168: Steering Post/Tie Rods
Steering Post/ Tie Rods REMOVING 1. Remove the seat (see Seat in this section). 2. Remove the storage compartment cover; then remove the cap screws securing the storage compartment/air filter cover. AL600D 6. Remove the nylon fastners securing the instrument pod.
-
Page 169
AL618D AL619D 2. Place the handlebar into position and secure with CLEANING AND INSPECTING the handlebar caps (blocks). Tighten the four cap screws to 2.8 kg-m (20 ft-lb). NOTE: Whenever a part is worn excessively, cracked, or damaged in any way, replacement is necessary. -
Page 170: Handlebar Grip
Handlebar Grip REMOVING 1. Remove the plug from the head of the rivet. 2. Using a 1/8-in. drill bit, drill out the rivet. 3. Using compressed air between the grip and the handlebar, twist the grip back and forth until it slides free of the handlebar.
-
Page 171
3. Remove the nut securing the hub. Account for a washer and a hub seal. 4. Remove the brake caliper. 5. Remove the hub assembly. 6. Remove the cotter pin from the tie rod end and remove the tie rod end from the knuckle. 7. -
Page 172
ASSEMBLING AND INSTALLING 1. Retainer 32. A-Arm Brace 2. Shock Absorber 33. Cap Screw 3. Bushing 4. Sleeve 5. Adjuster Cam 6. Spring 7. Cap Screw 8. Lock Nut 9. A-Arm Assy 10. Bushing 11. Collar 12. Ball Joint Clip 13. -
Page 173
6. Install the tie rod end and secure with the nut. Tighten to 4.2 kg-m (30 ft-lb); then install a new cotter pin and spread the pin. NOTE: During assembling, new cotter pins should be installed. CD015 10. Secure the brake caliper to the knuckle with the two cap screws. -
Page 174: Measuring/Adjusting Toe-In/Toe-Out
NOTE: When measuring and adjusting, there should be a normal operating load on the ATV (without an operator but with Arctic Cat approved accessories). 4. Measure the distance from the outside edge of each handlebar grip to the seat catch brackets.
-
Page 175
9. Measure the overall width of the front tires (at a height parallel to the belly panel) at the front side; then record the measurement. 10. Push the ATV forward until the marks are parallel to the belly panel on the back side; then measure the overall width of the front tires at the rear side. -
Page 176: Body Panel Assembly Schematic
Body Panel Assembly Schematic 29. Fender Panel 1. Fender Panel 30. Cable Tie 2. Access Cover 31. Fender Panel 3. Rack 32. Self-Tapping Screw 4. Cap Screw 5. Reflector 6. Cap Screw 7. Flare 8. Stamped Nut 9. Body Screw 10.
-
Page 177: Front Bumper Assembly
Front Bumper Assembly REMOVING NOTE: Remove the headlights with the front bumper. 1. Remove the main wiring harness connectors from the four headlights. CC857 2. Remove the two screws securing the grille to the 7. Remove the front bumper with headlights. front bumper.
-
Page 178: Front Fender/Side Panels
Front Fender/ Side Panels REMOVING 1. Remove the front rack (see Front Rack in this section). 2. Remove the three cap screws securing the two side panels to the frame and rear fenders; then remove CC853 the side panels. 6. Remove the six cap screws securing the fender to 3.
-
Page 179: Fender Flares/Extensions
8. Disconnect the wires from the accessory plug (if equipped); then remove the accessory plug from the fender. 9. Remove the fenders from the ATV. CLEANING AND INSPECTING NOTE: Whenever a part is worn excessively, cracked, or damaged in any way, replacement is necessary.
-
Page 180: Footrests
Footrests Belly Panel REMOVING REMOVING 1. Remove the cap screws securing the fender 1. Remove the machine screws and shoulder washers extension to the footrest. Account for all cap securing the belly panel to the underside of the screws and one nut. frame.
-
Page 181: Rear Rack
NOTE: For additional details on cleaning the muffler/spark arrester, see Section 2. Rear Fender INSTALLING MUFFLER 1. Install the muffler on the frame and into the REMOVING muffler/exhaust pipe juncture and rear cylinder exhaust port accounting for all mounting 1.
-
Page 182: Adjusting Headlight
7. Install the rear rack (see Rear Rack in this section). 8. Install the seat (see Seat in this section). Adjusting Headlight The headlights can be adjusted vertically and horizon- tally. The geometric center of the HIGH beam light zone is to be used for vertical and horizontal aiming. AF926A 1.
-
Page 183: Seat
INSPECTING 3. Inspect the bulb for wattage, voltage, and proper operation. NOTE: Whenever a part is worn excessively, INSTALLING cracked, or damaged in any way, replacement is necessary. 1. Place the assembly into position on the frame and secure with torx-head cap screws and any washers. 1.
-
Page 184
NOTES 8-18… -
Page 185: Controls/Indicators
SECTION 9 — CONTROLS/INDICATORS TABLE OF CONTENTS Hand Brake Lever/Master Cylinder Assembly..9-2 Auxiliary Brake Assembly Schematic …… 9-4 Throttle Control …………9-4 Drive Selector…………9-6 Shift Lever …………… 9-6 Speedometer (Electronic)/Indicator Lights ….9-8…
-
Page 186: Hand Brake Lever/Master Cylinder Assembly
4. Dislodge the brakelight switch from the master cylinder housing by gently pressing it toward the Hand Brake Lever/ pivot pin hole in the housing; then lay it aside Master Cylinder leaving the switch and wiring harness connected. Assembly NOTE: The master cylinder is a non-serviceable component;…
-
Page 187
INSTALLING 1. Brake Assy 2. Screw 3. Cover 4. Screw 5. Clamp 6. Master Cylinder 7. Brake Lever 8. Brake Lever Lock 9. Pin 10. Brake Switch 11. Hose 0738-331 1. Position the brake housing on the handlebar. 3. Gently press the brakelight switch into the housing Secure with clamp screws;… -
Page 188: Auxiliary Brake Assembly Schematic
Auxiliary Brake Assembly Schematic Pressing the auxiliary brake pedal downward will apply the auxiliary brake to the rear wheels. 25. O-Ring 1. Brake Lever 26. Brake Pad 2. O-Ring 3. Spring 27. Housing 28. Valve 4. Nut 29. Cap 5. Axle 30.
-
Page 189
AF676D AF679D 3. Remove the cap screw, lock washer, and washer 2. Using a pair of needle-nose pliers, place the spring securing the actuator arm to the throttle control into position on the actuator arm. lever. AF680D AF677D 3. Place the two halves of the throttle control onto the 4. -
Page 190: Drive Selector
To either engage or disengage the front wheels, move the switch to the 4WD position or to the 2WD posi- tion. AF682D 2. Rotate the adjuster sleeve until 0.5-1.0 mm (0.02-0.04 in.) is attained. 738-422A ! CAUTION Do not attempt to either engage or disengage the front differential while the ATV is moving.
-
Page 191
5. Remove the axle and nut securing the shift lever to the upper shift arm; then remove the shift lever. 1. Nut Account for the spring and two O-rings on the 2. Cap Screw axle. 3. Axle 4. Lever 6. Using two open-end wrenches, remove the lock 5. -
Page 192: Speedometer (Electronic)/Indicator Lights
3. Place the spring into position between the upper 5. Oil Pressure Indicator — An oil pressure warn- shift arm and shift lever; then making sure the ing symbol LED (light emitting diode) will flash O-rings are in place on the axle, secure the shift when low oil pressure is detected.
-
Page 193
14. Mode Button — Used (in conjunction with the 2. Remove the front rack and front fenders; then dis- Odometer/Trip Meters/Hour Meter) to shift the connect the multi-pin connector. odometer/trip meters/hour meter display through 3. Remove the three nuts securing the mounting the four modes: odometer, trip meter (A), trip studs;… -
Page 194
NOTES 9-10… -
Page 195: Aids For Maintenance
SECTION 10 — AIDS FOR MAINTENANCE TABLE OF CONTENTS Torque Specifications ……….10-2 Torque Conversions ……….10-3 Tightening Torque (General Bolts) ……10-3 10-1…
-
Page 196: Torque Specifications
BRAKE COMPONENTS Torque Specifications Torque Part Part Bolted To kg-m ft-lb Brake Disc* Brake Hose Caliper DRIVE TRAIN COMPONENTS Brake Hose Master Cylinder Torque Master Cylinder Cover Master Cylinder 10 in.-lb Part Part Bolted To kg-m ft-lb Auxiliary Brake Lever Footrest Engine Mounting Frame…
-
Page 197: Tightening Torque
Torque Conversions ft-lb kg-m ft-lb kg-m ft-lb kg-m ft-lb kg-m ft-lb kg-m 11.2 11.3 11.5 11.6 11.8 11.9 12.0 12.2 12.3 12.5 12.6 10.0 12.8 10.1 12.9 10.2 13.0 10.4 13.1 10.5 13.3 10.7 13.4 10.8 13.6 10.9 13.7 11.1 13.8 Tightening Torque (General Bolts)
-
Page 198
NOTES 10-4… -
Page 199: Troubleshooting
SECTION 11 — TROUBLESHOOTING TABLE OF CONTENTS Engine …………..11-2 Drive …………..11-6 Fuel System …………11-7 Electrical…………..11-8 Steering/Suspension ……….. 11-10 Brakes …………..11-11 11-1…
-
Page 200: Engine
Engine Problem: Engine will not start or is hard to start (Compression too low) Condition Remedy 1. Valve clearance out of adjustment 1. Adjust clearance 2. Valve guides worn — seated poorly 2. Repair — replace guides 3. Valves mistimed 3.
-
Page 201
Problem: Engine noisy (Noise seems to come from piston) Condition Remedy 1. Piston — cylinder worn 1. Replace — service piston — cylinder 2. Combustion chamber carbon buildup 2. Clean chamber 3. Piston pin — piston pin bore worn 3. Replace — service pin — bore 4. -
Page 202
Problem: Secondary-transmission will not shift or shift back Condition Remedy 1. Sliding dog broken — worn 1. Replace dog 2. Gearshift fork broken — worn 2. Replace fork 3. Hi/Low shift lever out of adjustment 3. Adjust lever 4. Gearshift cam worn 4. -
Page 203
Problem: Engine lacks power Condition Remedy 1. Valve clearance incorrect 1. Adjust clearance 2. Valve springs weak 2. Replace springs 3. Valve timing out of adjustment 3. Adjust timing 4. Piston ring(s) — cylinder worn 4. Replace — service rings — cylinder 5. -
Page 204: Drive
Drive Problem: Power not transmitted from engine to wheels Condition Remedy 1. Rear axle shaft serration worn — broken 1. Replace shaft Problem: Power not transmitted from engine to either front wheel Condition Remedy 1. Secondary drive — driven gear teeth broken 1.
-
Page 205: Fuel System
Fuel System Problem: Starting impaired Condition Remedy 1. Starter jet obstructed 1. Clean jet 2. Starter jet passage obstructed 2. Clean passage 3. Starter body — carburetor leaking air 3. Tighten — adjust — replace gasket 4. Starter valve not operating properly 4.
-
Page 206: Electrical
Electrical Problem: Spark absent or weak Condition Remedy 1. Ignition coil defective 1. Replace ignition coil 2. Spark plug defective 2. Replace plug 3. Magneto defective 3. Replace magneto 4. CDI unit defective 4. Replace CDI unit 5. Pick-up coil defective 5.
-
Page 207
Problem: Magneto overcharges Condition Remedy 1. Internal battery short circuited 1. Replace battery 2. Regulator/rectifier resistor damaged — 2. Replace resistor defective 3. Regulator/rectifier poorly grounded 3. Clean — tighten ground connection Problem: Charging unstable Condition Remedy 1. Lead wire intermittently shorting 1. -
Page 208: Steering/Suspension
Steering/Suspension Problem: Handling too heavy or stiff Condition Remedy 1. Front wheel alignment incorrect 1. Adjust alignment 2. Lubrication inadequate 2. Lubricate appropriate components 3. Tire inflation pressure incorrect 3. Adjust pressure 4. Tie rod ends seizing 4. Replace tie rod ends 5.
-
Page 209: Brakes
Problem: Suspension too soft Condition Remedy 1. Spring(s) weak 1. Replace spring(s) 2. Shock absorber damaged 2. Replace shock absorber Problem: Suspension too stiff Condition Remedy 1. A-arm-related bushings worn 1. Replace bushing Problem: Suspension noisy Condition Remedy 1. Cap screws (suspension system) loose 1.
-
Page 210
ARCTIC CAT ® Printed in U.S.A. ®™ Trademarks of Arctic Cat Inc., Thief River Falls, MN 56701 p/n 2257-030…
|
Title |
File Size |
Download Links |
|
2002 Arctic Cat All Model ATV Service Manual.pdf |
231.7Mb |
Download |
|
2004 Arctic Cat 650 Service Manual.pdf |
25.1Mb |
Download |
|
2006 Arctic Cat ATV All Models Repair Manual.pdf |
146Mb |
Download |
|
2006 Arctic Cat ATV 250 Service Manual.pdf |
32.9Mb |
Download |
|
2006 Arctic Cat Y-6/Y-12 Youth ATV Service Manual.pdf |
50.9Mb |
Download |
|
2007 Arctic Cat Atv All Models Service Repair Manual.pdf |
126.4Mb |
Download |
|
2008 Arctic Cat 366 ATV Service Manual.pdf |
44.1Mb |
Download |
|
2008 Arctic Cat Prowler Xt Xtx Service Manual.pdf |
47.3Mb |
Download |
|
2008 Arctic Cat PROWLER XT/ PROWLER XTX Service Manual.pdf |
24.6Mb |
Download |
|
2008 Arctic Cat Thundercat 08 ATV Service Manual.pdf |
55Mb |
Download |
|
2009 Arctic Cat 150 Service Manual.pdf |
30Mb |
Download |
|
2010 Arctic Cat 450 H1, 700 H1, 550 H1, 1000 H2 mud pro, Thundercat Operator’s Manual.pdf |
4Mb |
Download |
|
2010 Arctic Cat Cat 700 Diesel SD Service Manual.pdf |
63.1Mb |
Download |
|
2011 Arctic Cat 400TRV Service Manual.pdf |
45.9Mb |
Download |
|
2011 Arctic Cat 700 PS EFT, 700 TRV PS EFT, 550 EFT, 550 PS EFT, 550 TRV EFT Operator’s Manual.pdf |
5.9Mb |
Download |
|
2012 Arctic Cat 350 HS / 425 HS Operator’s Manual.pdf |
3.3Mb |
Download |
|
2012 Arctic Cat 350 Service Manual.pdf |
38.3Mb |
Download |
|
2012 Arctic Cat DVX 90 Service Manual.pdf |
35.1Mb |
Download |
|
2012 Arctic Cat DVX 90, 1000 I MUD PRO, 450 I TRV/GT, 550 I TRV/GT, 550 I CRUISER, 700 I TRV/GT, 1000 I TRV/GT, 350 FIS Operator’s Manual.pdf |
21.4Mb |
Download |
|
2012 Arctic Cat XC 450i ATV Service Manual.pdf |
36.4Mb |
Download |
|
2014 Arctic Cat 450 Service Manual.pdf |
33.7Mb |
Download |
|
2015 Arctic Cat PROWLER HDX Service Manual.pdf |
13.2Mb |
Download |
|
2015 Arctic Cat XR 500б Xr 700, Xr 550 Operator’s Manual.pdf |
1.8Mb |
Download |
|
2016 Arctic Cat Alterra 500 Service Manual.pdf |
55.5Mb |
Download |
|
2017 Arctic Cat VLX 7000 Service Manual.pdf |
37.6Mb |
Download |
|
Arctic Cat 450/1000 Service Manual.pdf |
61.9Mb |
Download |
|
Arctic Cat 500, 700, 1000, 700 MUD PRO, 700 TBX, 1000 MUD PRO, 550 Operator’s Manual.pdf |
3.8Mb |
Download |
|
Arctic Cat ATV Electrical & Batteries.pdf |
6.1Mb |
Download |
|
2001 |
Arctic Cat . 2001 models
Guide for repairs and maintenance ( the Service manual ) in English. Format: PDF, Size: |
|
2002 |
Arctic Cat . 2002 models
Repair and maintenance manual ( the Service manual ) in English. Format: PDF, Size: |
|
2006 |
Arctic Cat DVX 400.
Repair and maintenance manual ( the Service manual ) in English. Format: PDF, Size: |
|
Arctic Cat Y6 / Y12.
Repair and maintenance manual ( the Service manual ) in English. Format: PDF, Size: |
|
|
2007 |
Arctic Cat Prowler / XT.
Repair and maintenance manual ( the Service manual ) in English. Format: PDF, Size: |
|
2008 |
Arctic Cat 366.
Repair and maintenance manual ( the Service manual ) in English. Format: PDF, Size: |
|
Arctic Cat Y6.
Repair and maintenance manual ( the Service manual ) in English. Format: PDF, Size: |
|
|
2009 |
Arctic Cat Prowler XTZ.
Repair and maintenance manual ( the Service manual ) in English. Format: PDF, Size: |
|
2010 |
Arctic Cat 150.
Repair and maintenance manual ( the Service manual ) in English. Format: PDF, Size: |
|
Arctic Cat 450.
Repair and maintenance manual ( the Service manual ) in English. Format: PDF, Size: |
|
|
2011 |
Arctic Cat 350/425.
Repair and maintenance manual ( the Service manual ) in English. Format: PDF, Size: |
|
Arctic Cat 366/450/550/650/700/450 TRV / 550 TRV / 700 TRV / 700 Cruiser / 1000 Cruiser / 700 Mud Pro / 700 TBX / 1000 The instruction manual is in Russian. Format: PDF, Size: 4.6 Mb . |
|
|
Arctic Cat 450 TRV / 550 TRV / 700 TRV / 700 Cruiser / 1000 Cruiser.
Guide Operation ( Operator`s manual ) (User Guide) in English. Format: PDF, Size: |
|
|
Arctic Cat 700 Diesel SD.
Repair and maintenance manual ( the Service manual ) in English. Format: PDF, Size: |
|
|
2012 |
Arctic Cat XC 450i.
Repair and maintenance manual ( the Service manual ) in English. Format: PDF, Size: |
|
2014 |
Arctic Cat Prowler HDX.
Repair and maintenance manual ( the Service manual ) in English. Format: PDF, Size: |
|
Arctic Cat XC 450.
Repair and maintenance manual ( the Service manual ) in English. Format: PDF, Size: |
Arctic Cat ATVs have long been a success with amateurs and professionals due to their brilliant technical characteristics, excellent design and most importantly — the highest
reliability.
The company’s products have earned the status of all-terrain vehicles for excellent cross-country ability even in the most adverse terrain, and achieved without compromising maneuverability and
other properties.
The company Arctic Cat (USA) began operations for more than half a century ago — in 1960.
Such a long presence in the global market helps to maintain a leading position.
Constantly developing production, improving snowmobiles and ATVs, releasing new, all the best models and adhering to a winning pricing policy.
The main advantages (advantages) of the Arctic Cat ATVs:
- lowered center of gravity, providing all-terrain and preventing overturning;
- high ground clearance;
- independent suspension;
- low fuel consumption;
- Great ergonomics combined with great design.
By the way, the reliable partner powerful motor vehicles Arctic Cat supplies the famous partner — the Japanese brand Suzuki.
ATVs of this company are bought even by the Pentagon — for use in the US Army. They are also supplied to the Finnish border agency to patrol the border with Russia.
|
Detail Specifications: 959/959139-650_twin2004.pdf file (13 Jan 2023) |
Accompanying Data:
Arctic Cat 650 Twin2004 Offroad Vehicle PDF Service Manual (Updated: Friday 13th of January 2023 11:59:35 PM)
Rating: 4.6 (rated by 77 users)
Compatible devices: 150 2015, DVX 400 2006, 2014 XC 450, Bearcat 570 XT, ZR 5000, PROWLER 500 HDX, 08 ATV, 500 Sno Pro.
Recommended Documentation:
Text Version of Service Manual
(Ocr-Read Summary of Contents, UPD: 13 January 2023)
-
210, ARCTIC CAT ® Printed in U.S.A. Trademarks of Arctic Cat Inc., Thief River Falls, MN 56701 p/n 2257-030 ®™
… -
33, 3-4 KX101A 8. Remove the rear V-belt cooling boot; then disconnect the belt failure detection lead (D) and the engine brake control actuator lead (C). KX234A 9. Disconnect the alternator lead connector (A); then disconnect the pick-up coil lead (B) and the speed sensor connector (E). 10. Remove the neutral position connector (F) and reverse position connector (H); then disco…
-
197, Arctic Cat 650 Twin2004 10-3 10 Torque Conversions Tightening Torque (General Bolts) ft-lb kg-m ft-lb kg-m ft-lb kg-m ft-lb kg-m ft-lb kg-m 1 0.1212.941 5.7618.481 11.2 2 0.3223.042 5.8628.682 11.3 3 0.4233.243 5.8638.783 11.5 4 0.6243.344 6.1648.984 11.6 5 0.7253.545 6.2659.085 11.8 6 0.8263.646 6.4669.186 11.9 7 1.0273.747 6.5679.387 12.0 8 1.1283.948 6.6689.488 12.2 9 1.2294.049 6.8699.589 12.3 10 1.4304.…
-
59, 3-30 KX291 3. Inspect the ramp weights (A) and pins (B) in the movable sheave. Replace any worn parts. KX292 4. Inspect the rollers (A) and washers (C) in the spider. If they are worn, replace the spider assembly (B). KX293 Assembling 1. Install the ramp weights (A) and tighten nuts (B) to specifications; then check that the ramp weights swing freely. KX294 2. Place the fixed s…
-
119, 5-18 4. Install the timing inspection plug. If ignition timing is incorrect, replace the CDI and pick-up coil. Electronic Speedometer/Indicator Lights REMOVING 1. Remove the four nylon fasteners securing the instrument pod; then remove the ignition switch retaining nut. 2. Remove the front rack and front fenders; then dis- connect the multi-pin connector. 3. Remove the three nuts securi…
-
17, Arctic Cat 650 Twin2004 2-8 7. If compression is abnormally low, inspect the following items. A. Verify starter cranks engine over. B. Gauge is functioning properly. C. Throttle lever in the full-open position. D. Valve/tappet clearance correct. E. Valve bent or burned. F. Valve seat burned. NOTE: To service valves, see Section 3. 8. Pour 29.5 ml (1 fl oz) of oil into the spark plug…
-
31, 3-2 Engine/Transmission This section has been organized into sub-sections which show a progression for the complete servicing of the Arctic Cat ATV engine/transmission. To service the center crankcase halves, the engine/transmission must be removed from the frame. To service top-side, left-side, and right-side compo- nents, the engine/transmission does not have to be remov…
-
55, Arctic Cat 650 Twin2004 3-26 CC145D 6. If clearance is excessive, measure the journals of the camshaft. NOTE: If the journals are worn, replace the cam- shaft; then measure the clearance again. If it is still our of tolerance, replace the cylinder head. Inspecting Automatic Compression Release 1. Check that the weights (B) are in the retracted position. If the weights are extended, check the spring (A) for …
-
46, 3-17 3 NOTE: For disassembling and servicing, refer to Servicing Center Crankcase Components, this section. Table of Contents (Servicing Components) NOTE: Critical engine/transmission specifica- tions are located at the beginning of this section. Servicing Top-Side Components …………………….. 3-17 Valve Assembly …………………………………………. 3-17 Piston Asse…
Recommended Instructions:
MCM2150/55, VPC-J1, CAMEDIA C-730 Ultra Zoom, VP83F, PIXMA MX522, T2265


-
Page 1 655920 KIT NUMBER 8051790 09-10 Polaris Ranger Electra-Steer Installation Manual Thank you for purchasing our ELECTRA-STEER 12v electric assist power steering system. Please carefully read this instruction sheet entirely before you begin to install the system. Remember, before beginning installation; insure that you are in a level well lit, organized, work area. Engage the parkin …
2009 Ranger ELECTRA-STEER 10
-
1OWNER’S MANUAL SUPPLEMENT2002 SCRAMBLER 400 4X4PN 9917466IMPORTANT: This is a supplement to your owner’s manual. This information should remain with your owner’s manual at alltimes.CapacitiesBody Style Gen IIIGross Vehicle Weight 845Fuel Capacity 4 U.S. GallonsGearcase Oil 32 OuncesEngine Oil Capacity 2 QuartsFront Rack (Maximum -Capacity)Accessory (30 Lbs.)Rear Rack …
Scrambler 400 4X4 2
-
11-12 Can-Am Commander 800 PCV — 125-007 www.powercommander.comInstallation InstructionsPLEASE READ ALL DIRECTIONS BEFORE STARTING INSTALLATIONTHE IGNITION MUST BE TURNED OFF BEFORE INSTALLATION!YOU CAN ALSO DOWNLOAD THE POWER COMMANDER SOFTWARE AND LATEST MAPS FROM OUR WEB SITE AT:www.powercommander.com2191 Mendenhall Drive North Las Vegas, NV 89081 (800) 992-4993 www.pow …
Power commander v 5
-
1Effective: November 2015p/n 2261-084ARCTIC CAT PRE-DELIVERYINSTRUCTIONS(Alterra 90) NOTE: Read these instructions thoroughly beforestarting.Even though the vehicle has been set up (with someminor exceptions) and inspected at the factory, EVERYvehicle must be properly inspected and serviced at thedealership prior to being released to the customer. Expe-rience has shown that dealerships that pr …
Alterra 90 8
Additional Information:
Popular Right Now:
Operating Impressions, Questions and Answers:
A Downloadable Arctic Cat ATV repair manual is a digitally transmitted book of repair instructions containing maintenance, troubleshooting, service and repair information for the off-road four-wheeler vehicle. It’s a digitally formatted handbook that covers every aspect of repair. Whether you are doing periodic maintenance, rebuilding the carburetor/electronic fuel injection or overhauling the entire engine, an Arctic Cat all-terrine vehicle repair manual covers it all.
Each manual is divided into chapters and subsections. Each section covers a specific component or system in addition to easy-to-understand repair procedures, such as disassembly, inspection, cleaning, assembly and reinstallation instructions. All manuals contain a wealth of high-definition photos, diagrams, illustrations and schematics to ensure the person performing the repair work completes the job successfully. Here’s a small list of chapters and subchapters in an Arctic Cat repair manual (actual topics may differ depending on year and model):

Руководство на русском языке по эксплуатации и техническому обслуживанию квадроциклов Arctic Cat 2011 года выпуска.
- Издательство: —
- Год издания: —
- Страниц: 126
- Формат: PDF
- Размер: 4,6 Mb
Руководство на английском языке по техническому обслуживанию и ремонту квадроциклов Arctic Cat 2001 года выпуска.
- Издательство: Arctic Cat Inc.
- Год издания: 2000
- Страниц: —
- Формат: PDF
- Размер: 195,4 Mb
Руководство на английском языке по техническому обслуживанию и ремонту квадроциклов Arctic Cat 2002 года выпуска.
- Издательство: Arctic Cat Inc.
- Год издания: —
- Страниц: 396
- Формат: PDF
- Размер: 231,7 Mb
Руководство на английском языке по техническому обслуживанию и ремонту квадроциклов Arctic Cat 150.
- Издательство: Arctic Cat Inc.
- Год издания: 2009
- Страниц: 101
- Формат: PDF
- Размер: 28,5 Mb
Руководство на английском языке по техническому обслуживанию и ремонту квадроциклов Arctic Cat 350 и Arctic Cat 425.
- Издательство: Arctic Cat Inc.
- Год издания: 2010
- Страниц: 190
- Формат: PDF
- Размер: 47,2 Mb
Руководство на английском языке по техническому обслуживанию и ремонту квадроциклов Arctic Cat 366.
- Издательство: Arctic Cat Inc.
- Год издания: 2008
- Страниц: 143
- Формат: PDF
- Размер: 42,2 Mb
Руководство на английском языке по техническому обслуживанию и ремонту квадроциклов Arctic Cat 450.
- Издательство: Arctic Cat Inc.
- Год издания: 2009
- Страниц: 149
- Формат: PDF
- Размер: 38,5 Mb
Руководство на английском языке по техническому обслуживанию и ремонту квадроциклов Arctic Cat 700 Diesel SD.
- Издательство: Arctic Cat Inc.
- Год издания: 2011
- Страниц: 164
- Формат: PDF
- Размер: 52,8 Mb
Руководство на английском языке по техническому обслуживанию и ремонту квадроциклов Arctic Cat DVX 400.
- Издательство: Arctic Cat Inc.
- Год издания: 2006
- Страниц: 165
- Формат: PDF
- Размер: 55,6 Mb
Руководство на английском языке по техническому обслуживанию и ремонту квадроциклов Arctic Cat Prowler и Arctic Cat Prowler XT.
- Издательство: Arctic Cat Inc.
- Год издания: 2006
- Страниц: 184
- Формат: PDF
- Размер: 53,0 Mb

Руководство на английском языке по техническому обслуживанию и ремонту квадроциклов Arctic Cat Prowler HDX.
- Издательство: Arctic Cat Inc.
- Год издания: 2013
- Страниц: 192
- Формат: PDF
- Размер: 57,0 Mb
Руководство на английском языке по техническому обслуживанию и ремонту квадроциклов Arctic Cat Prowler XTZ.
- Издательство: Arctic Cat Inc.
- Год издания: 2009
- Страниц: 169
- Формат: PDF
- Размер: 53,1 Mb

Руководство на английском языке по эксплуатации и техническому обслуживанию квадроциклов Arctic Cat 450 TRV/550 TRV/700 TRV/TRV 700 Cruiser/TRV 1000 Cruiser.
- Издательство: Arctic Cat Inc.
- Год издания: —
- Страниц: 92
- Формат: PDF
- Размер: 28,6 Mb
Руководство на английском языке по техническому обслуживанию и ремонту квадроциклов Arctic Cat XC 450.
- Издательство: Arctic Cat Inc.
- Год издания: 2013
- Страниц: 128
- Формат: PDF
- Размер: 33,0 Mb
Руководство на английском языке по техническому обслуживанию и ремонту квадроциклов Arctic Cat XC 450i.
- Издательство: Arctic Cat Inc.
- Год издания: 2011
- Страниц: 123
- Формат: PDF
- Размер: 32,8 Mb
Руководство на английском языке по техническому обслуживанию и ремонту квадроциклов Arctic Cat Y6.
- Издательство: Arctic Cat Inc.
- Год издания: 2007
- Страниц: 116
- Формат: PDF
- Размер: 46,5 Mb
Руководство на английском языке по техническому обслуживанию и ремонту квадроциклов Arctic Cat Y6 и Arctic Cat Y12.
- Издательство: Arctic Cat Inc.
- Год издания: 2006
- Страниц: 122
- Формат: PDF
- Размер: 50,9 Mb
