Руководства пользователя
Версия T4515
2.99 MB
M2N68 PLUS user’s manual (Traditional Chinese)
Версия E4515
2.6 MB
M2N68 PLUS user’s manual (English)
Версия G4515
2.38 MB
M2N68 PLUS user’s manual(German)
Версия T4204
1.97 MB
Motherboard Installation Guide (Traditional Chinese)
Версия C4204
1.83 MB
Motherboard Installation Guide (Simplified Chinese)
Версия F4515
2.93 MB
M2N68 PLUS user’s manual(French)
Версия A4515
3.14 MB
M2N68 PLUS Asian Quick Start Guide for Multiple Languages
Версия U4515
941.82 KB
M2N68 PLUS European Quick Start Guide for Multiple Languages
-
Драйверы
14
-
Инструкции по эксплуатации
5
Языки:

ASUS M2N68 PLUS инструкция по эксплуатации
(54 страницы)
- Языки:Немецкий
-
Тип:
PDF -
Размер:
2.42 MB -
Описание:
M2N68 PLUS user’s manual(German)
Просмотр

ASUS M2N68 PLUS инструкция по эксплуатации
(54 страницы)
- Языки:Китайский
-
Тип:
PDF -
Размер:
3.04 MB -
Описание:
M2N68 PLUS user’s manual (Traditional Chinese)
Просмотр

ASUS M2N68 PLUS инструкция по эксплуатации
(44 страницы)
- Языки:Китайский, Молдавский
-
Тип:
PDF -
Размер:
1.88 MB -
Описание:
Motherboard Installation Guide (Simplified Chinese)
Просмотр

ASUS M2N68 PLUS инструкция по эксплуатации
(44 страницы)
- Языки:Китайский, Молдавский
-
Тип:
PDF -
Размер:
2.02 MB -
Описание:
Motherboard Installation Guide (Traditional Chinese)
Просмотр

ASUS M2N68 PLUS инструкция по эксплуатации
(38 страниц)
-
Тип:
PDF -
Размер:
978.74 KB -
Описание:
M2N68 PLUS European Quick Start Guide for Multiple Languages
Просмотр
На NoDevice можно скачать инструкцию по эксплуатации для ASUS M2N68 PLUS. Руководство пользователя необходимо для ознакомления с правилами установки и эксплуатации ASUS M2N68 PLUS. Инструкции по использованию помогут правильно настроить ASUS M2N68 PLUS, исправить ошибки и выявить неполадки.
-
Contents
-
Table of Contents
-
Bookmarks
Quick Links
Related Manuals for Asus M2N68 PLUS
Summary of Contents for Asus M2N68 PLUS
-
Page 1
M2N68 PLUS… -
Page 2
Product warranty or service will not be extended if: (1) the product is repaired, modified or altered, unless such repair, modification of alteration is authorized in writing by ASUS; or (2) the serial number of the product is defaced or missing. -
Page 3: Table Of Contents
Contents Notices ………………….vi Safety information ………………vii About this guide ………………vii M2N68 PLUS specifications summary …………ix Chapter 1: Product introduction Welcome! ………………1-1 Package contents …………….. 1-1 Special features …………….1-1 1.3.1 Product highlights …………1-1 1.3.2 Innovative ASUS features ……….
-
Page 4
BIOS information Managing and updating your BIOS ……….2-1 2.1.1 ASUS Update utility …………2-1 2.1.2 ASUS EZ Flash 2 utility ……….. 2-2 2.1.3 ASUS CrashFree BIOS 3 utility ……..2-3 BIOS setup program …………..2-4 2.2.1 BIOS menu screen …………2-5 2.2.2… -
Page 5
Boot menu ……………… 2-17 2.6.1 Boot Device Priority …………2-17 2.6.2 Boot Settings Configuration ………. 2-17 2.6.3 Security …………….. 2-18 Tools menu …………….. 2-19 2.7.1 ASUS EZ Flash 2 …………2-19 2.7.2 AI NET 2……………. 2-19 Exit menu ………………2-20… -
Page 6: Notices
Notices Federal Communications Commission Statement This device complies with Part 15 of the FCC Rules. Operation is subject to the following two conditions: • This device may not cause harmful interference, and • This device must accept any interference received including interference that may cause undesired operation.
-
Page 7: Safety Information
Safety information Electrical safety • To prevent electrical shock hazard, disconnect the power cable from the electrical outlet before relocating the system. • When adding or removing devices to or from the system, ensure that the power cables for the devices are unplugged before the signal cables are connected. If possible, disconnect all power cables from the existing system before you add a device.
-
Page 8: Conventions Used In This Guide
Refer to the following sources for additional information and for product and software updates. ASUS websites The ASUS website provides updated information on ASUS hardware and software products. Refer to the ASUS contact information. Optional documentation Your product package may include optional documentation, such as warranty flyers, that may have been added by your dealer.
-
Page 9: M2N68 Plus Specifications Summary
Supports up to 8GB system memory * DDR2 1066 is supported by AM3/AM2+ CPU only. ** Refer to www.asus.com for the latest Memory QVL (Qualified Vendors List). *** When you install a total memory of 4GB or more, Windows 32-bit operating system may only ®…
-
Page 10
M2N68 PLUS specifications summary Back panel I/O ports 1 x PS/2 Keyboard port 1 x PS/2 Mouse port 1 x LAN (RJ45) port 4 x USB 2.0/1.1 ports 6-channel Audio ports 1 x LPT port 1 x COM port Internal I/O connectors 3 x USB 2.0/1.1 connectors support additional… -
Page 11: Chapter 1: Product Introduction
® The motherboard delivers a host of new features and latest technologies, making it another standout in the long line of ASUS quality motherboards! Before you start installing the motherboard, and hardware devices on it, check the items in your package with the list below.
-
Page 12
This enhances system performance in 3D graphics and other memory demanding applications. DDR2 1066 is supported by AM3 / AM2+ CPU only. Refer to www.asus.com for the AM3 / AM2+ CPU models. AMD Cool ‘n’ Quiet Technology This motherboard supports the AMD Cool ‘n’… -
Page 13: Innovative Asus Features
BIOS file using the bundled support DVD, or USB disk that contains the BIOS file. ASUS EZ Flash 2 ASUS EZ Flash 2 is a utility that allows you to update the BIOS without using a bootable floppy disk or an OS-based utility. ASUS AI NET2…
-
Page 14: Before You Proceed
ON, in sleep mode, or in soft-off mode. This is a reminder that you should shut down the system and unplug the power cable before removing or plugging in any motherboard component. The illustration below shows the location of the onboard LED. M2N68 PLUS SB_PWR Standby Power Powered Off M2N68 PLUS Onboard LED ASUS M2N68 PLUS…
-
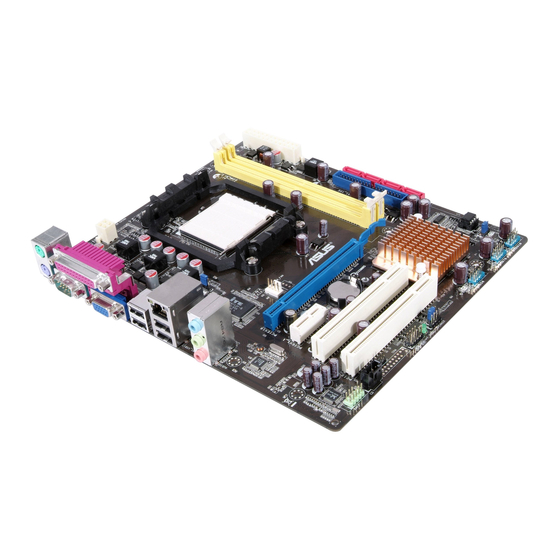
Page 15: Motherboard Overview
Motherboard overview 1.5.1 Placement direction When installing the motherboard, ensure that you place it into the chassis in the correct orientation. The edge with external ports goes to the rear part of the chassis as indicated in the image below. 1.5.2 Screw holes Place six (6) screws into the holes indicated by circles to secure the motherboard to the…
-
Page 16: Motherboard Layout
CPU_FAN LAN1_USB12 AUDIO M2N68 PLUS PCIEX1_1 Realtek PCIEX16 8211CL Lithium Cell CMOS Power PCIEX1_2 SB_PWR NVIDIA ® MCP68 SE PCI1 SATA4 SATA3 PCI2 SATA2 SATA1 BIOS PCI3 CLRTC PRI_IDE SPEAKER PCI4 USB56 USB78 USB910 F_PANEL SPDIF_OUT AAFP ASUS M2N68 PLUS…
-
Page 17: Layout Contents
1.5.4 Layout contents Connectors/Jumpers/Slots Page Connectors/Jumpers/Slots Page ATX power connectors (24-pin EATXPWR, 1-21 System panel connector (10-1 pin F_PANEL) 1-23 4-pin ATX12V) DDR2 DIMM slots 1-10 USB connectors (10-1 pin USB56, USB78, 1-20 USB910) CPU Socket 10. Speaker connector (4-pin SPEAKER) 1-17 CPU fan connector (4-pin CPU_FAN) 1-22…
-
Page 18
Connect the CPU fan cable to the CPU_FAN connector on the motherboard. Do not forget to connect the CPU fan connector! Hardware monitoring errors can occur if you fail to plug this connector. ASUS M2N68 PLUS… -
Page 19: Installing The Heatsink And Fan
1.6.2 Installing the heatsink and fan Make sure that you use only AMD-certified heatsink and fan assembly. Follow these steps to install the CPU heatsink and fan. Place the heatsink on top of the installed CPU, making sure that the heatsink fits properly on the retention module base.
-
Page 20: System Memory
240-pin footprint compared to the 184-pin DDR DIMM. DDR2 DIMMs are notched differently to prevent installation on a DDR DIMM socket. The figure illustrates the location of the DDR2 DIMM sockets: Channel Sockets Channel A DIMM_A1 Channel B DIMM_B1 1-10 ASUS M2N68 PLUS…
-
Page 21: Memory Configurations
The motherboard supports up to 8GB memory modules on Windows XP Professional x64 ® and Vista x64 editions. You may install a maximum of 4GB DIMMs on each slot. M2N68 PLUS Motherboard Qualified Vendors Lists (QVL) DDR2-667MHz capability DIMM support Chip Vendor Part No.
-
Page 22
• A*: Supports one module inserted into either slot as the single-channel memory configuration. • B*: Supports one pair of modules inserted into both the yellow slots as one pair of dual-channel memory configuration. Visit the ASUS website at www.asus.com for the latest QVL. 1-12 ASUS M2N68 PLUS… -
Page 23: Installing A Dimm
1.7.3 Installing a DIMM Unplug the power supply before adding or removing DIMMs or other system components. Failure to do so can cause severe damage to both the motherboard and the components. Unlock a DDR2 DIMM socket by DDR2 DIMM notch pressing the retaining clips outward.
-
Page 24: Expansion Slots
This motherboard supports PCI Express x1 network cards, SCSI cards and other cards that comply with the PCI Express specifications. 1.8.5 PCI Express x16 slot This motherboard supports a PCI Express x16 graphics card that complies with the PCI Express specifications. 1-14 ASUS M2N68 PLUS…
-
Page 25: Jumpers
Jumpers Clear RTC RAM (3-pin CLRTC) This jumper allows you to clear the Real Time Clock (RTC) RAM in CMOS. You can clear the CMOS memory of date, time, and system setup parameters by erasing the CMOS RTC RAM data. The onboard button cell battery powers the RAM data in CMOS, which include system setup information such as system passwords.
-
Page 26: Connectors
Ensure that the audio device of Sound playback is Realtek High Definition Audio (the name may be different based on the OS). Go to Start > Control Panel > Sounds and Audio Devices > Sound Playback to configure the setting. 1-16 ASUS M2N68 PLUS…
-
Page 27: Internal Connectors
USB 2.0 ports 1 and 2. These two 4-pin Universal Serial Bus (USB) ports are available for connecting USB 2.0 devices. USB 2.0 ports 3 and 4. These two 4-pin Universal Serial Bus (USB) ports are available for connecting USB 2.0 devices. COM port.
-
Page 28
This prevents incorrect insertion when you connect the IDE cable. • Use the 80-conductor IDE cable for Ultra DMA 133/100/66 IDE devices. If any device jumper is set as “Cable-Select”, ensure that all other device jumpers have the same setting. 1-18 ASUS M2N68 PLUS… -
Page 29
Serial ATA connectors (7-pin SATA1, SATA2, SATA3, SATA4) These connectors are for the Serial ATA signal cables for Serial ATA 3Gb/s hard disk and optical disk drives. The Serial ATA 3Gb/s is backward compatible with Serial ATA 1.5Gb/s specification. The data transfer rate of the Serial ATA 3Gb/s is faster than the standard parallel ATA with 133 MB/s (Ultra DMA133). -
Page 30
• By default, this connector is set to [HD Audio]. If you want to connect a High Definition front panel audio module to this connector, set the Front Panel Select item in the BIOS to [HD Audio]. See section “2.4.3 Chipset” for details. 1-20 ASUS M2N68 PLUS… -
Page 31
The system may become unstable or may not boot up if the power is inadequate. • If you are uncertain about the minimum power supply requirement for your system, refer to the Recommended Power Supply Wattage Calculator at http://support.asus. com/PowerSupplyCalculator/PSCalculator.aspx?SLanguage=en-us for details. Chapter 1: Product introduction… -
Page 32
These are not jumpers! Do not place jumper caps on the fan connectors! Only the CPU fan supports the ASUS Q-Fan feature. Digital audio connector (4-1 pin SPDIF_OUT) This connector is for an additional Sony/Philips Digital Interface (S/PDIF) port(s). -
Page 33
M2N68 PLUS PIN 1 +HD_LED RESET M2N68 PLUS System panel connector System power LED (2-pin PWRLED) • This 2-pin connector is for the system power LED. Connect the chassis power LED cable to this connector. The system power LED lights up when you turn on the system power, and blinks when the system is in sleep mode. -
Page 34: Software Support
The contents of the Support DVD are subject to change at any time without notice. Visit the ASUS website at www.asus.com for updates. To run the Support DVD Place the Support DVD to the optical drive.
-
Page 35: Bios Information
BIOS in the future. Copy the original motherboard BIOS using the ASUS Update or AFUDOS utilities. 2.1.1 ASUS Update utility The ASUS Update is a utility that allows you to manage, save, and update the motherboard BIOS in Windows environment. ®…
-
Page 36: Asus Ez Flash 2 Utility
2.1.2 ASUS EZ Flash 2 utility The ASUS EZ Flash 2 feature allows you to update the BIOS without having to use an OS-based utility. Before using this utility, download the latest BIOS file from the ASUS website at www.asus.
-
Page 37: Asus Crashfree Bios 3 Utility
2.1.3 ASUS CrashFree BIOS 3 utility The ASUS CrashFree BIOS 3 is an auto recovery tool that allows you to restore the BIOS file when it fails or gets corrupted during the updating process. You can update a corrupted BIOS file using the motherboard support DVD or a USB flash disk that contains the updated BIOS file.
-
Page 38: Bios Setup Program
• The BIOS setup screens shown in this section are for reference purposes only, and may not exactly match what you see on your screen. • Visit the ASUS website at www.asus.com to download the latest BIOS file for this motherboard.
-
Page 39: Bios Menu Screen
• The BIOS setup screens shown in this chapter are for reference purposes only, and may not exactly match what you see on your screen. • Visit the ASUS website at www.asus.com to download the latest BIOS information. Chapter 2: BIOS information…
-
Page 40: Navigation Keys
(C)Copyright 1985-2008, A m e r i c a n Megatrends, Inc. Pop-up window Press the Scroll bar <Up> / <Down> arrow keys or <Page Up> /<Page Down> keys to display the other items on the screen. ASUS M2N68 PLUS…
-
Page 41: Main Menu
Main menu When you enter the BIOS Setup program, the Main menu screen appears, giving you an overview of the basic system information. Refer to section “2.2.1 BIOS menu screen” for information on the menu screen items and how to navigate through them. BIOS SETUP UTILITY Main Advanced…
-
Page 42: Primary Ide Master/Slave And Sata 1~4
Selects the DMA mode. Configuration options: [Auto] SMART Monitoring [Auto] Sets the Smart Monitoring, Analysis, and Reporting Technology. Configuration options: [Auto] [Disabled] [Enabled] 32Bit Data Transfer [Enabled] Enables or disables 32-bit data transfer. Configuration options: [Disabled] [Enabled] ASUS M2N68 PLUS…
-
Page 43: System Information
2.3.5 System Information This menu gives you an overview of the general system specifications. The BIOS automatically detects the items in this menu. AMI BIOS Displays the auto-detected BIOS information. Processor Displays the auto-detected CPU specification. System Memory Displays the auto-detected system memory. Advanced menu The Advanced menu items allow you to change the settings for the CPU and other system devices.
-
Page 44
Memclock Value [200 MHz] Allows you to set the Memclock value. Configuration options: [200 MHz] [266 MHz [333 MHz] [400 MHz] DRAM Timing Mode [Auto] Allows you to set the DRAM timing mode. Configuration options: [Auto] [DCT 0] 2-10 ASUS M2N68 PLUS… -
Page 45
The following items appear only when the DRAM Timing Mode item is set to [DCT0]. CAS Latency (CL) [Auto] Allows you to set CAS# latency. Configuration options: [Auto] [3 CLK] [4 CLK] [5 CLK] [6 CLK] [7 CLK DH_Only] TRCD [Auto] Allows you to set TRCD. -
Page 46: Cpu Configuration
Configuration options: [Disabled] [Address bits 6] [Address bits 12] [XOR of Address bits [20:16,6] ] [XOR of Address bits [20:16,9] ] Enable Clock to All DIMMs [Disabled] Enables or disables clock to all DIMMs. Configuration options: [Disabled] [Enabled] 2-12 ASUS M2N68 PLUS…
-
Page 47: Onboard Devices Configuration
MemClk Tristate C3/ATLVID [Disabled] Enables or disables the MemClk Tristate C3/ALTVID. Configuration options: [Disabled] [Enabled] Memory Hole Remapping [Enabled] Enables or disables the memory remapping around memory hole. Configuration options: [Disabled] [Enabled] DCT Unganged Mode [Auto] Allows you to enable or disable Unganed mode. Configuration options: [Auto] [Always] Power Down Enable [Enabled] Enables or disables the DDR power down mode.
-
Page 48: Pci Pnp
USB support is disabled. Configuration options: [Disabled] [Enabled] [Auto] USB 2.0 Controller Mode [HiSpeed] Allows you to configure the USB 2.0 controller in HiSpeed (480 Mbps) or Full Speed (12 Mbps). Configuration options: [FullSpeed] [HiSpeed] 2-14 ASUS M2N68 PLUS…
-
Page 49: Power Menu
Power menu The Power menu items allow you to change the settings for the Advanced Configuration and Power Interface (ACPI) and the Advanced Power Management (APM). Select an item then press <Enter> to display the configuration options. Suspend Mode [Auto] Select the ACPI state ACPI 2.0 Support [Disabled]…
-
Page 50: Hardware Monitor
Smart Q-Fan Function [Disabled] Allows you to enable or disable the ASUS Q-Fan feature that smartly adjusts the fan speeds for more efficient system operation. Configuration options: [Disabled] [Enabled] The following items appear only when the Smart Q-Fan Function is set to [Enabled] Fan Auto Mode Start Voltage [5.0V]…
-
Page 51: Boot Menu
This allows you to enable or disable the full screen logo display feature. Configuration options: [Disabled] [Enabled] Set this item to [Enabled] to use the ASUS MyLogo 2™ feature. AddOn ROM Display Mode [Force BIOS] Sets the display mode for option ROM. Configuration options: [Force BIOS] [Keep Current] Bootup Num-Lock [On] Allows you to select the power-on state for the NumLock.
-
Page 52: Security
View Only allows access but does not allow change to any field. Limited allows changes only to selected fields, such as Date and Time. Full Access allows viewing and changing all the fields in the Setup utility. 2-18 ASUS M2N68 PLUS…
-
Page 53: Tools Menu
1.NTFS format 2.7.1 ASUS EZ Flash 2 Allows you to run ASUS EZ Flash 2. When you press <OK>, a confirmation message appears. Use the left/right arrow key to select between [Yes] or [No], then press <OK> to confirm your choice.
-
Page 54: Exit Menu
When you select this option or if you press <F5>, a confirmation window appears. Select OK to load default values. Select Exit & Save Changes or make other changes before saving the values to the non-volatile RAM. 2-20 ASUS M2N68 PLUS…
Manuals Directory
Manualsdir.ru — Онлайн поиск инструкций и руководств
M2n68-am se, Quick start guide
- Текст
- Оригинал
Advertising

Quick Start Guide
First Edition V1 Published October 2008
Copyright © 2008 ASUSTeK COMPUTER INC. All Rights Reserved.
15G0621400K0
Français
Deutsch
Italiano
Español
Русский
Português
Polski
Česky
Magyar
Български
Română
Srpski
U4267
M2N68-AM SE
Advertising
Популярные бренды
- Apple
- Bissell
- Brother
- Canon
- Casio
- Dell
- Garmin
- Honeywell
- HP
- LG
- Motorola
- Nikon
- Panasonic
- Pioneer
- Samsung
- Sharp
- SINGER
- Sony
- Whirlpool
- Yamaha
Популярные инструкции
- Nikon — D5000
- Nikon — D40
- Nikon — D3100
- Nikon — D90
- Nikon — D7000
- Nikon — D80
- Nikon — D3000
- HP — Officejet Pro 8600
- Canon — EOS 60D
В представленном списке руководства для конкретной модели Материнской платы — ASUS M2N68 PLUS. Вы можете скачать инструкции к себе на компьютер или просмотреть онлайн на страницах сайта бесплатно или распечатать.
- Инструкции и файлы
- Характеристики
- Основные поломки
- Сервисы по ремонту
В случае если инструкция на русском не полная или нужна дополнительная информация по этому устройству, если вам нужны
дополнительные файлы: драйвера, дополнительное руководство пользователя (производители зачастую для каждого
продукта делают несколько различных документов технической помощи и руководств), свежая версия прошивки, то
вы можете задать вопрос администраторам или всем пользователям сайта, все постараются оперативно отреагировать
на ваш запрос и как можно быстрее помочь. Ваше устройство имеет характеристики:Socket: AM2, Поддерживаемые процессоры: AMD PhenomII/AthlonII/Phenom/Athlon/Sempron, Системная шина: HyperTransport, Поддержка многоядерных процессоров: есть, Чипсет: NVIDIA nForce 630a, BIOS: AMI, полные характеристики смотрите в следующей вкладке.
Для многих товаров, для работы с ASUS M2N68 PLUS могут понадобиться различные дополнительные файлы: драйвера, патчи, обновления, программы установки. Вы можете скачать онлайн эти файлы для конкретнй модели ASUS M2N68 PLUS или добавить свои для бесплатного скачивания другим посетителями.
Если вы не нашли файлов и документов для этой модели то можете посмотреть интсрукции для похожих товаров и моделей, так как они зачастую отличаются небольшим изменениями и взаимодополняемы.
Обязательно напишите несколько слов о преобретенном вами товаре, чтобы каждый мог ознакомиться с вашим отзывом или вопросом. Проявляйте активность что как можно бльше людей смогли узнать мнение настоящих людей которые уже пользовались ASUS M2N68 PLUS.
Основные и самые важные характеристики модели собраны из надежных источников и по характеристикам можно найти похожие модели.
| Процессор | |
| Socket | AM2 |
| Поддерживаемые процессоры | AMD PhenomII/AthlonII/Phenom/Athlon/Sempron |
| Системная шина | HyperTransport |
| Поддержка многоядерных процессоров | есть |
| Чипсет | |
| Чипсет | NVIDIA nForce 630a |
| BIOS | AMI |
| Поддержка SLI/CrossFire | нет |
| Память | |
| Память | DDR2 DIMM, 667 — 1066 МГц |
| Тип памяти | ECC/non-ECC |
| Количество слотов памяти | 2 |
| Поддержка двухканального режима | есть |
| Максимальный объем памяти | 8 Гб |
| Дисковые контроллеры | |
| IDE | количество слотов: 1, UltraDMA 133 |
| SATA | количество разъемов SATA 3Gb/s: 4, RAID: 0, 1, 5, 10, JBOD |
| Слоты расширения | |
| Слоты расширения | 1xPCI-E x16, 1xPCI-E x1, 4xPCI |
| Аудио/видео | |
| Звук | 5.1CH, HDA, на основе Realtek ALC662 |
| Сеть | |
| Ethernet | 1000 Мбит/с |
| Подключение | |
| Наличие интерфейсов | 10 USB, выход S/PDIF, 1xCOM, Ethernet, PS/2 (клавиатура), PS/2 (мышь), LPT |
| Разъемы на задней панели | 4 USB, 1xCOM, Ethernet, PS/2 (клавиатура), PS/2 (мышь), LPT |
| Основной разъем питания | 24-pin |
| Разъем питания процессора | 4-pin |
| Дополнительные параметры | |
| Форм-фактор | ATX |
| Комплектация | 1 шлейф IDE, 1 кабель SATA, заглушка тыловых портов корпуса |
Здесь представлен список самых частых и распространенных поломок и неисправностей у Материнских плат. Если у вас такая поломка то вам повезло, это типовая неисправность для ASUS M2N68 PLUS и вы можете задать вопрос о том как ее устранить и вам быстро ответят или же прочитайте в вопросах и ответах ниже.
| Название поломки | Описание поломки | Действие |
|---|---|---|
| Разрыв Печатных Проводников | ||
| Обрыв Конденсаторов Или Резисторов | ||
| Короткое Замыкание В Электрических Цепях | ||
| Разрушение Разъемов И Слотов | ||
| Поломка Процессорного Разъема | ||
| Выгорание Портов | ||
| Микротрещины В Плате | ||
| Выход Из Строя Сетевого Адаптера | ||
| Перегрев Компонентов | ||
| Не Запускается При Включении | При Включении Не Загружается. В Биос Не Входит. Пост Код — А3 | |
| Какой Компонент | Подскажите Марку Траyзистора Q46? | |
| Не Работает Ps/2 | Сначала Отвалилась Клавиатура, А Через Некоторое Время 6 Коротких Гудков И Не Запускается | |
| Подключить Переднюю Панель | Не Могу Подключить Переднюю Панель | |
| Судя По Всему Отвал Биоса | Материнка Стартует Секунд На 5,Кулер Процессора Берет Обороты И Останавливается.и Так-Циклически,Без Остановок.запуск Невозможен.вечером Либо Завтра Буду Пытаться Его Восстановить,Потом Может Дополню | |
| Пропал Звук На Материнке | Пропал Звук На Материнке, Отображается Только Nvidia Hdmi. Переустановка Драйверов С Офсайта Не Помогла. | |
| Биос | При Старте Звук Через Промежетки Времени Примерно В 1-3 Мин Три Сигнала Потом Стартует Винда , Недавно Вообще Написал Cmos Setting Wrong И C7, Жму Del Меняется На B2 Чтоб Воити В Биос Три Сигнала По Одному Через Промеежутки Времени 1-3 Мин И Черный Экра | |
| Asus M2A-Vm Hdmi | Не Запускается Процессор Phenom Ii X4 945 Rev. C3, На Socket-Ам 3, Нет Даже Сигнала, Черный Экран | |
| Не Включается | После Замены Конденсаторов С34 И С35 Не Включается | |
| Черный Экран | Все Уже Перепробовал И Озу Менял И Переставлял И Ластиком Чистил, И Батарейку Вынимал И Измерял, И Видеокарту С Бп На Заведомо Годную Ставил Исход Один, Черный Экран И Speaker Издает 1 Длинный 2 Коротких, Если Я Не Путаю. | |
| Неправильно Отображается Память | При Установленной Памяти 4 Гигабайта В Биосе Отображается 8. Установил Одну Планку 2 Гига — Отображается 4 | |
В нашей базе сейчас зарегестрированно 18 353 сервиса в 513 города России, Беларусии, Казахстана и Украины.

ГАДЖЕТ СЕРВИС
⭐
⭐
⭐
⭐
⭐
Адресс:
1-я Тверская-Ямская улица. д.29 стр.3
Телефон:
74955458877
Сайт:
n/a
Время работы
Время работы не указано
АБИТ-ЦЕНТР
⭐
⭐
⭐
⭐
⭐
Адресс:
ул. Верхние Поля, д.36, корп.1
Телефон:
74957419058
Сайт:
n/a
Время работы
Время работы не указано
IBOOKNET
⭐
⭐
⭐
⭐
⭐
Адресс:
ул. 3-я Мытищинская, д. 3, стр. 1
Телефон:
79850624999
Сайт:
n/a
Время работы
Будни: с 0900 до 2100
Суббота: с 1100 до 1700
Воскресенье: с 1100 до 1700
РЕМОНТ НОУТБУКОВ
⭐
⭐
⭐
⭐
⭐
Адресс:
Варшавское шоссе 132А
Телефон:
74957259053
Сайт:
n/a
Время работы
Время работы не указано
REMOBI
⭐
⭐
⭐
⭐
⭐
Адресс:
ул. Гарибальди, 23, ТЦ Панорама
Телефон:
74993222524
Сайт:
n/a
Время работы
Ежедневно: с 1000 до 2100
Редкостная проблема с запуском ASUS M2N68 AM SE2
5:53

Очень доволен
хочу
авпваы
Хочу купить
ирлдоьвап ькеьпрлджыкеь дзьакерджь щзрбкежбрь апкыезрбкыеджрбеджр щзапбкерл
Только приобрела,а инструкции нет
Только приобрела,а инструкции нет
Отвалился распрыскиватель
Инструкция к Материнской Плате Asus M2N68 PLUS

M2N68 PLUS
Motherboard

G4515
Erste Ausgabe V1
März 2009
Copyright © 2009 ASUSTeK COMPUTER INC. Alle Rechte vorbehalten.
Kein Teil dieses Handbuchs, einschließlich der darin beschriebenen Produkte und Software, darf
ohne ausdrückliche, schriftliche Genehmigung von ASUSTeK COMPUTER INC. (“ASUS”) in
irgendeiner Form, ganz gleich auf welche Weise, vervielfältigt, übertragen, abgeschrieben, in einem
Wiedergewinnungssystem gespeichert oder in eine andere Sprache übersetzt werden.
Produktgarantien oder Service werden nicht geleistet, wenn: (1) das Produkt
repariert, modiziert oder abgewandelt wurde, außer schriftlich von ASUS genehmigte
Reparaturen, Modizierung oder Abwandlungen; oder (2) die Seriennummer des
Produkts unkenntlich gemacht wurde oder fehlt.
ASUS STELLT DIESES HANDBUCH “SO, WIE ES IST”, OHNE DIREKTE ODER
INDIREKTE GARANTIEN, EINSCHLIESSLICH, JEDOCH NICHT BESCHRÄNKT AUF
GARANTIEN ODER KLAUSELN DER VERKÄUFLICHKEIT ODER TAUGLICHKEIT
FÜR EINEN BESTIMMTEN ZWECK, ZUR VERFÜGUNG. UNTER KEINEN
UMSTÄNDEN HAFTET ASUS, SEINE DIREKTOREN, VORSTANDSMITGLIEDER,
MITARBEITER ODER AGENTEN FÜR INDIREKTE, BESONDERE, ZUFÄLLIGE
ODER SICH ERGEBENDE SCHÄDEN (EINSCHLIESSLICH SCHÄDEN AUF
GRUND VON PROFITVERLUST, GESCHÄFTSVERLUST, BEDIENUNGSAUSFALL
ODER DATENVERLUST, GESCHÄFTSUNTERBRECHUNG UND ÄHNLICHEM),
AUCH WENN ASUS VON DER WAHRSCHEINLICHKEIT DERARTIGER SCHÄDEN
AUF GRUND VON FEHLERN IN DIESEM HANDBUCH ODER AM PRODUKT
UNTERRICHTET WURDE.
SPEZIFIKATIONEN UND INFORMATIONEN IN DIESEM HANDBUCH
DIENEN AUSSCHLIESSLICH DER INFORMATION, KÖNNEN JEDERZEIT
OHNE ANKÜNDIGUNG GEÄNDERT WERDEN UND DÜRFEN NICHT ALS
VERPFLICHTUNG SEITENS ASUS AUSGELEGT WERDEN. ASUS ÜBERNIMMT
FÜR EVENTUELLE FEHLER ODER UNGENAUIGKEITEN IN DIESEM HANDBUCH
KEINE VERANTWORTUNG ODER HAFTUNG, EINSCHLIESSLICH DER DARIN
BESCHRIEBENEN PRODUKTE UND SOFTWARE.
In diesem Handbuch angegebene Produkt— und Firmennamen können u.U.
eingetragene Warenzeichen oder Urheberrechte der entsprechenden Firmen sein
und dienen nur der Identizierung oder Erklärung zu Gunsten des Eigentümers, ohne
Rechte verletzen zu wollen.
ii

Inhalt
Erklärungen ……………………………………………………………………………………. vi
Sicherheitsinformationen ………………………………………………………………. vii
Über dieses Handbuch …………………………………………………………………… vii
M2N68 PLUS Spezikationsübersicht ……………………………………………… ix
Kapitel 1: Produkteinführung
1.1 Willkommen! ……………………………………………………………………… 1-1
1.2
Paketinhalt ………………………………………………………………………… 1-1
1.3
Sonderfunktionen ……………………………………………………………… 1-1
1.3.1
Leistungsmerkmale des Produkts …………………………….. 1-1
1.3.2
Innovative ASUS-Funktionen …………………………………… 1-3
1.4
Bevor Sie beginnen ……………………………………………………………. 1-4
1.5
Motherboard-Übersicht ……………………………………………………… 1-5
1.5.1
Ausrichtung …………………………………………………………… 1-5
1.5.2
Schraubenlöcher ……………………………………………………. 1-5
1.5.3
Motherboard-Layout ……………………………………………….. 1-6
1.5.4
Ansichtenbeschreibung …………………………………………… 1-7
1.6
Zentralverarbeitungseinheit (CPU) ……………………………………… 1-7
1.6.1
Installieren der CPU ……………………………………………….. 1-7
1.6.2
Installieren des CPU-Kühlkörpers und Lüfters ……………. 1-9
1.7
Systemspeicher ……………………………………………………………….. 1-10
1.7.1
Übersicht …………………………………………………………….. 1-10
1.7.2
Speicherkongurationen …………………………………………1-11
1.7.3
Installieren eines DIMMs ……………………………………….. 1-13
1.7.4
Entfernen eines DIMMs ………………………………………… 1-13
1.8
Erweiterungssteckplätze ………………………………………………….. 1-14
1.8.1
Installieren einer Erweiterungskarte ………………………… 1-14
1.8.2
Kongurieren einer Erweiterungskarte …………………….. 1-14
1.8.3
PCI-Steckplätze …………………………………………………… 1-14
1.8.4
PCI Express x1-Steckplatz ……………………………………. 1-14
1.8.5
PCI Express x16-Steckplatz ………………………………….. 1-14
1.9
Jumper ……………………………………………………………………………. 1-15
1.10
Anschlüsse ……………………………………………………………………… 1-16
1.10.1
Rücktafelanschlüsse …………………………………………….. 1-16
1.10.2
Interne Anschlüsse ……………………………………………….. 1-17
iii

Inhalt
1.11 Software-Unterstützung …………………………………………………… 1-24
1.11.1
Installieren eines Betriebssystems ………………………….. 1-24
1.11.2
Support-DVD-Informationen ………………………………….. 1-24
Kapitel 2
BIOS-Informationen
2.1 Verwalten und Aktualisieren des BIOS ……………………………….. 2-1
2.1.1
ASUS Update-Programm ………………………………………… 2-1
2.1.2
ASUS EZ Flash 2-Programm …………………………………… 2-2
2.1.3
ASUS CrashFree BIOS 3-Programm ………………………… 2-3
2.2
BIOS-Setupprogramm ……………………………………………………….. 2-4
2.2.1
BIOS-Menübildschirm …………………………………………….. 2-5
2.2.2
Menüleiste …………………………………………………………….. 2-5
2.2.3
Navigationstasten ………………………………………………….. 2-6
2.2.4
Menüelemente ………………………………………………………. 2-6
2.2.5
Untermenüelemente ………………………………………………. 2-6
2.2.6
Kongurationsfelder ……………………………………………….. 2-6
2.2.7
Allgemeine Hilfe …………………………………………………….. 2-6
2.2.8
Pop-up-Fenster ……………………………………………………… 2-6
2.2.9
Bildlaueiste ………………………………………………………….. 2-6
2.3
Main-Menü ………………………………………………………………………… 2-7
2.3.1
System Time [xx:xx:xx] …………………………………………… 2-7
2.3.2 System Date [Day xx/xx/xxxx] …………………………………..
2-7
2.3.3 Storage Conguration ……………………………………………..
2-7
2.3.4
Primary IDE Master/Slave und SATA 1~4 ………………….. 2-8
2.3.5 System Information …………………………………………………
2-9
2.4
Advanced-Menü ………………………………………………………………… 2-9
2.4.1
JumperFree Conguration ………………………………………. 2-9
2.4.2 CPU Conguration ………………………………………………..
2-12
2.4.3 Chipset ………………………………………………………………..
2-12
2.4.4
Onboard Device Conguration ……………………………….. 2-13
2.4.5 PCI PnP ………………………………………………………………
2-14
2.4.6 USB Conguration ………………………………………………..
2-14
2.5
Power-Menü …………………………………………………………………….. 2-15
2.5.1 Suspend Mode [Auto] ……………………………………………
2-15
iv

Inhalt
2.5.2 ACPI 2.0 Support [Disabled] ………………………………….. 2-15
2.5.3 ACPI APIC Support [Enabled] …………………………………
2-15
2.5.4 APM Conguration ………………………………………………..
2-15
2.5.5 Hardware Monitor …………………………………………………
2-16
2.6
Boot-Menü ………………………………………………………………………. 2-17
2.6.1
Boot Device Priority ……………………………………………… 2-17
2.6.2 Boot Settings Conguration ……………………………………
2-17
2.6.3 Security ……………………………………………………………….
2-18
2.7
Tools-Menü ……………………………………………………………………… 2-19
2.7.1 ASUS EZ Flash 2 ………………………………………………….
2-19
2.7.2 AI NET 2
……………………………………………………………… 2-19
2.8
Exit-Menü ………………………………………………………………………… 2-20
v
Erklärungen
Erklärung der Federal Communications Commission
Dieses Gerät stimmt mit den FCC-Vorschriften Teil 15 überein. Sein Betrieb
unterliegt folgenden zwei Bedingungen:
• Dieses Gerät darf keine schädigenden Interferenzen erzeugen, und
• Dieses Gerät muss alle empfangenen Interferenzen aufnehmen, einschließlich
derjenigen, die einen unerwünschten Betrieb erzeugen.
Dieses Gerät ist auf Grund von Tests für Übereinstimmung mit den Einschränkungen
eines Digitalgeräts der Klasse B, gemäß Teil 15 der FCC-Vorschriften, zugelassen.
Diese Einschränkungen sollen bei Installation des Geräts in einer Wohnumgebung
auf angemessene Weise gegen schädigende Interferenzen schützen. Dieses Gerät
erzeugt und verwendet Hochfrequenzenergie und kann, wenn es nicht gemäß
den Anweisungen des Herstellers installiert und bedient wird, den Radio- und
Fernsehempfang empndlich stören. Es wird jedoch nicht garantiert, dass bei einer
bestimmten Installation keine Interferenzen auftreten. Wenn das Gerät den Radio-
oder Fernsehempfang empndlich stört, was sich durch Aus- und Einschalten des
Geräts feststellen lässt, ist der Benutzer ersucht, die Interferenzen mittels einer oder
mehrerer der folgenden Maßnahmen zu beheben:
• Empfangsantenne neu ausrichten oder an einem anderen Ort aufstellen.
• Den Abstand zwischen dem Gerät und dem Empfänger vergrößern.
• Das Gerät an die Steckdose eines Stromkreises anschließen, an die nicht
auch der Empfänger angeschlossen ist.
• Den Händler oder einen erfahrenen Radio-/Fernsehtechniker um Hilfe bitten.
Um Übereinstimmung mit den FCC-Vorschriften zu gewährleisten, müssen
abgeschirmte Kabel für den Anschluss des Monitors an die Grakkarte
verwendet werden. Änderungen oder Modizierungen dieses Geräts, die nicht
ausdrücklich von der für Übereinstimmung verantwortlichen Partei genehmigt
sind, können das Recht des Benutzers, dieses Gerät zu betreiben, annullieren.
Erklärung des kanadischen Ministeriums für
Telekommunikation
Dieses Digitalgerät überschreitet keine Grenzwerte für Funkrauschemissionen
der Klasse B, die vom kanadischen Ministeriums für Telekommunikation in den
Funkstörvorschriften festgelegt sind.
Dieses Digitalgerät der Klasse B stimmt mit dem kanadischen ICES-003
überein.
Werfen Sie das Motherboard NICHT in den normalen Hausmüll. Dieses Produkt wurde
entickelt, um ordnungsgemäß wiederverwertet und entsorgt werden zu können. Das
durchgestrichene Symbol der Mülltonne zeigt an, dass das Produkt (elektrisches
und elektronisches Zubehör) nicht im normalen Hausmüll entsorgt werden darf. Bitte
erkundigen Sie sich nach lokalen Regelungen zur Entsorgung von Elektroschrott.
Werfen Sie quecksilberhaltige Batterien NICHT in den normalen Hausmüll. Das
Symbol der durchgestrichenen Mülltonne zeigt an, dass Batterien nicht im normalen
Hausmüll entsorgt werden dürfen.
vi

Sicherheitsinformationen
Elektrische Sicherheit
• Um die Gefahr eines Stromschlags zu verhindern, ziehen Sie die Netzleitung
aus der Steckdose, bevor Sie das System an einem anderen Ort aufstellen.
• Beim Anschließen oder Trennen von Geräten an das oder vom System
müssen die Netzleitungen der Geräte ausgesteckt sein, bevor die Signalkabel
angeschlossen werden. Ziehen Sie ggf. alle Netzleitungen vom aufgebauten
System, bevor Sie ein Gerät anschließen.
• Vor dem Anschließen oder Ausstecken von Signalkabeln an das oder vom
Motherboard müssen alle Netzleitungen ausgesteckt sein.
• Erbitten Sie professionelle Unterstützung, bevor Sie einen Adapter oder eine
Verlängerungsschnur verwenden. Diese Geräte könnte den Schutzleiter
unterbrechen.
• Prüfen Sie, ob die Stromversorgung auf die Spannung Ihrer Region
richtig eingestellt ist. Sind Sie sich über die Spannung der von Ihnen
benutzten Steckdose nicht sicher, erkundigen Sie sich bei Ihrem
Energieversorgungsunternehmen vor Ort.
• Ist die Stromversorgung defekt, versuchen Sie nicht, sie zu reparieren.
Wenden Sie sich an den qualizierten Kundendienst oder Ihre Verkaufsstelle.
Betriebssicherheit
• Vor Installation des Motherboards und Anschluss von Geräten müssen Sie alle
mitgelieferten Handbücher lesen.
• Vor Inbetriebnahme des Produkts müssen alle Kabel richtig angeschlossen
sein und die Netzleitungen dürfen nicht beschädigt sein. Bemerken Sie eine
Beschädigung, kontaktieren Sie sofort Ihren Händler.
• Um Kurzschlüsse zu vermeiden, halten Sie Büroklammern, Schrauben und
Heftklammern fern von Anschlüssen, Steckplätzen, Sockeln und Stromkreisen.
• Vermeiden Sie Staub, Feuchtigkeit und extreme Temperaturen. Stellen Sie das
Produkt nicht an einem Ort auf, wo es nass werden könnte.
• Stellen Sie das Produkt auf eine stabile Fläche.
• Sollten technische Probleme mit dem Produkt auftreten, kontaktieren Sie den
qualizierten Kundendienst oder Ihre Verkaufsstelle.
Über dieses Handbuch
Dieses Benutzerhandbuch enthält die Informationen, die Sie bei der Installation
und Konguration des Motherboards brauchen.
Die Gestaltung dieses Handbuchs
Das Handbuch enthält die folgenden Teile:
• Kapitel 1: Produkteinführung
Dieses Kapitel beschreibt die Leistungsmerkmale des Motherboards und die
unterstützten neuen Technologien.
• Kapitel 2: BIOS-Setup
Dieses Kapitel erklärt Ihnen, wie Sie die Systemeinstellungen über die BIOS-
Setupmenüs ändern. Hier nden Sie auch ausführliche Beschreibungen der
BIOS-Parameter.
vii
In diesem Handbuch verwendete Symbole
Um sicherzustellen, dass Sie bestimmte Aufgaben richtig ausführen, beachten
Sie bitte die folgenden Symbole und Schriftformate, die in diesem Handbuch
verwendet werden.
GEFAHR/WARNUNG: Informationen zum Vermeiden von
Verletzungen beim Ausführen einer Aufgabe.
VORSICHT: Informationen zum Vermeiden von Schäden an den
Komponenten beim Ausführen einer Aufgabe.
WICHTIG: Anweisungen, die Sie beim Ausführen einer Aufgabe
befolgen müssen.
HINWEIS: Tipps und zusätzliche Informationen zur Erleichterung
bei der Ausführung einer Aufgabe.
Schriftformate
Fettgedruckter Text Weist auf ein zu wählendes Menü/Element hin.
Kursive Wird zum Betonen von Worten und Aussagen
verwendet.
<Taste> Die Taste, die Sie drücken müssen, wird mit einem
“kleiner als” und “größer als”-Zeichen gekennzeichnet.
Beispiel: <Enter> bedeutet, dass Sie die Eingabetaste
drücken müssen.
<Taste1+Taste2+Taste3> Wenn zwei oder mehrere Tasten gleichzeitig gedrückt
werden müssen, werden die Tasten-namen mit einem
Pluszeichen (+) verbunden.
Beispiel: <Strg+Alt+D>
Befehl Bedeutet, dass Sie den Befehl genau wie dargestellt
eintippen und einen passenden Wert entsprechend der
in der eckigen Klammer stehenden Vorgabe eingeben
müssen.
Beispiel: Tippen Sie den folgenden Befehl hinter der
DOS-Eingabeaufforderung ein:
afudos /i[lename]
afudos /iM2N68 PLUS.ROM
viii
Аннотации для Материнской Платы Asus M2N68 PLUS в формате PDF
Топ 10 инструкций
Другие инструкции
Посмотреть инструкция для Asus M2N68-AM Plus бесплатно. Руководство относится к категории материнские платы, 4 человек(а) дали ему среднюю оценку 8.8. Руководство доступно на следующих языках: английский. У вас есть вопрос о Asus M2N68-AM Plus или вам нужна помощь? Задайте свой вопрос здесь
Не можете найти ответ на свой вопрос в руководстве? Вы можете найти ответ на свой вопрос ниже, в разделе часто задаваемых вопросов о Asus M2N68-AM Plus.
Какая ширина Asus M2N68-AM Plus?
Какая толщина Asus M2N68-AM Plus?
Инструкция Asus M2N68-AM Plus доступно в русский?
Не нашли свой вопрос? Задайте свой вопрос здесь