Посмотреть инструкция для Asus Prime B365M-A бесплатно. Руководство относится к категории материнские платы, 6 человек(а) дали ему среднюю оценку 8. Руководство доступно на следующих языках: английский. У вас есть вопрос о Asus Prime B365M-A или вам нужна помощь? Задайте свой вопрос здесь
Не можете найти ответ на свой вопрос в руководстве? Вы можете найти ответ на свой вопрос ниже, в разделе часто задаваемых вопросов о Asus Prime B365M-A.
Какая ширина Asus Prime B365M-A?
Какая толщина Asus Prime B365M-A?
Инструкция Asus Prime B365M-A доступно в русский?
Не нашли свой вопрос? Задайте свой вопрос здесь

Регистрация устройства поможет вам управлять его гарантией, получать техническую поддержку и отслеживать статус ремонта.
Регистрация продукта
Руководства пользователя
Версия J15045
1.76 MB
PRIME B365M-A User’s Manual ( Japanese )
Версия G15045
1.41 MB
PRIME B365M-A User’s Manual ( German )
Версия —
1.1 MB
PRIME B365M-A Quick Start Guide for Multiple Languages
Версия —
1.16 MB
PRIME B365M-A User’s Manual ( English )
Версия —
1.19 MB
PRIME B365M-A User’s Manual ( Simplified Chinese)
Версия T15045
1.06 MB
PRIME B365M-A User’s Manual ( Traditional Chinese )
Версия F15045
1.37 MB
PRIME B365M-A User’s Manual ( French)
- Manuals
- Brands
- Asus Manuals
- Motherboard
- Prime B365M-A
- Manual
-
Contents
-
Table of Contents
-
Bookmarks
Quick Links
Related Manuals for Asus PRIME B365M-A
Summary of Contents for Asus PRIME B365M-A
-
Page 1
PRIME B365M-A… -
Page 2
Product warranty or service will not be extended if: (1) the product is repaired, modified or altered, unless such repair, modification of alteration is authorized in writing by ASUS; or (2) the serial number of the product is defaced or missing. -
Page 3: Table Of Contents
Contents Safety information ………………iv About this guide ………………iv Package contents ………………vi PRIME B365M-A specifications summary ……….vi Chapter 1 Product introduction Motherboard overview …………….1-1 Central Processing Unit (CPU) …………..1-7 System memory ………………1-8 Chapter 2 BIOS information BIOS setup program ……………..
-
Page 4: Safety Information
Safety information Electrical safety • To prevent electrical shock hazard, disconnect the power cable from the electrical outlet before relocating the system. • When adding or removing devices to or from the system, ensure that the power cables for the devices are unplugged before the signal cables are connected. If possible, disconnect all power cables from the existing system before you add a device.
-
Page 5
Refer to the following sources for additional information and for product and software updates. ASUS websites The ASUS website provides updated information on ASUS hardware and software products. Refer to the ASUS contact information. Optional documentation Your product package may include optional documentation, such as warranty flyers, that may have been added by your dealer. -
Page 6: Package Contents
** DDR4 2666MHz and higher memory modules will run at max. 2666MHz on Intel ® Generation 6-core or higher processors. *** Refer to www.asus.com for the latest Memory QVL (Qualified Vendors List). 1 x PCI Express 3.0/2.0 x16 slot (at x 16 mode) Expansion slots 2 x PCI Express 3.0/2.0 x1 slots…
-
Page 7
— ASUS SafeSlot — Protect your graphics card investment ASUS 5X PROTECTION III — ASUS SafeSlot Core — Fortified PCIe Slot prevents damage — ASUS LANGuard: Protects against LAN surges, lightning strikes and static- electricity discharges! — ASUS Overvoltage Protection: World-class circuit-protecting power design… -
Page 8
PRIME B365M-A specifications summary EZ DIY UEFI BIOS EZ Mode — Featuring friendly graphics user interface — ASUS CrashFree BIOS 3 ASUS unique features — ASUS EZ Flash 3 Q-Design — ASUS Q-DIMM — ASUS Q-Slot Quiet Thermal Design ASUS Quiet… -
Page 9
PRIME B365M-A specifications summary 128Mb Flash ROM, UEFI AMI BIOS, PnP, SM BIOS 3.1, ACPI 6.1, Multi- language BIOS, ASUS EZ Flash 3, CrashFree BIOS 3, F3 My Favorites, Last BIOS features Modified log, F6 Qfan Control, F12 PrintScreen, and ASUS DRAM SPD (Serial… -
Page 10: Motherboard Overview
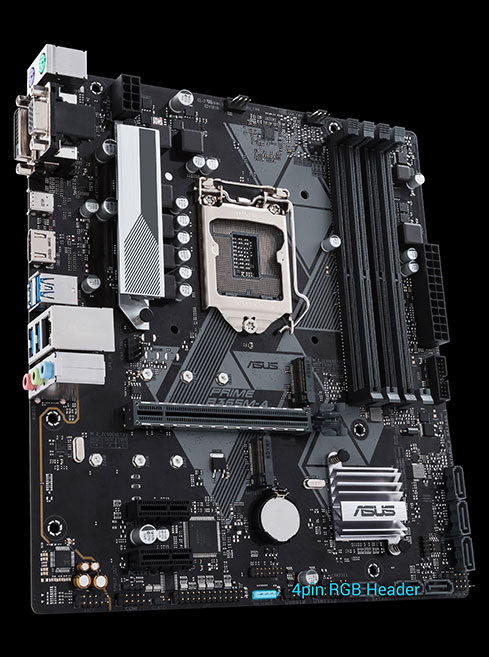
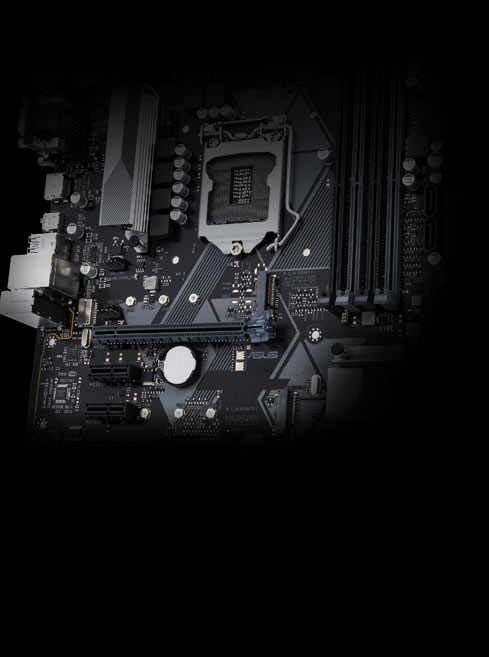
2280 2260 2242 AUDIO PCIEX16 M.2_2(SOCKET3) PCIE SATA IRST Realtek 8111H 2280 2260 2242 SATA6G_1 Intel ® B365 PCIEX1_1 Super SATA6G_2 128Mb BIOS PCIEX1_2 CHASSIS SATA6G_3 SPDIF_OUT SPEAKER SATA6G_5 SATA6G_4 SATA6G_6 USB910 USB1112 AAFP RGB_HEADER F_PANEL Scan the QR code to get the detailed pin definitions. ASUS PRIME B365M-A…
-
Page 11
Correctly orient the ATX power supply plugs into these connectors and push down firmly until the connectors completely fit. • For a fully configured system, we recommend that you use a power supply unit (PSU) that complies with ATX 12 V Specification 2.0 (or later version) and provides a minimum power of 350 W. This PSU type has 24-pin and 8-pin power plugs. • We recommend that you use a PSU with higher power output when configuring a system with more power-consuming devices or when you intend to install additional devices. The system may become unstable or may not boot up if the power is inadequate. • If you are uncertain about the minimum power supply requirement for your system, refer to the Recommended Power Supply Wattage Calculator at http://support. asus.com.cn/PowerSupply.aspx?SLanguage=en for details. CPU and chassis fan connectors (4-pin CPU_FAN, 4-pin CHA_FAN 1/2) Connect the fan cables to the fan connectors on the motherboard, ensuring that the black wire of each cable matches the ground pin of the connector. Do not forget to connect the fan cables to the fan connectors. Insufficient air flow inside the system may damage the motherboard components. These are not jumpers! Do not place jumper caps on the fan connectors! The CPU_FAN connector supports a CPU fan of maximum 1A (12 W) fan power. Intel LGA1151 CPU socket ® Install Intel LGA1151 CPU into this surface mount LGA1151 socket, which is designed ® for 9 Generation Intel Core™, Pentium… -
Page 12
PWR BTN This connector supports several chassis-mounted functions. PIN 1 USB 2.0 connectors (10-1 pin USB910, USB1112) +HDD_LED RESET Connect the USB module cable to any of these connectors, then install the module to a slot opening at the back of the system chassis. These USB connectors comply with USB 2.0 specifications and support up to 480Mbps connection speed. RGB header (4-pin RGB_HEADER) This header is for RGB LED strips. The RGB header supports 5050 RGB multi-color LED strips (12V/G/R/B), with a maximum power rating of 3A (12V), and no longer than 3 m. Before you install or remove any component, ensure that the ATX power supply is switched off or the power cord is detached from the power supply. Failure to do so may cause severe damage to the motherboard, peripherals, or components. • Actual lighting and color will vary with LED strip. • If your LED strip does not light up, check if the RGB LED extension cable and the RGB LED strip is connected in the correct orientation, and the 12V connector is aligned with the 12V header on the motherboard. • The LED strip will only light up when the system is operating. • The LED strips are purchased separately. ASUS PRIME B365M-A… -
Page 13
TPM connector (14-1 pin TPM) This connector supports a Trusted Platform Module (TPM) system, which can securely store keys, digital certificates, passwords and data. A TPM system also helps enhance network security, protects digital identities, and ensures platform integrity. LPT connector (26-1 pin LPT) The LPT (Line Printing Terminal) connector supports devices such as a printer. LPT standardizes as IEEE 1284, which is the parallel port interface on IBM PC- compatible computers. Clear RTC RAM (2-pin CLRTC) This header allows you to clear the CMOS RTC RAM data of the system setup information such as date, time, and system passwords. CLRTC To erase the RTC RAM: Turn OFF the computer and unplug the power cord. Use a metal object such as a screwdriver to short the two pins. PIN 1 Plug the power cord and turn ON the computer. Hold down the <Del> key during the boot process and enter BIOS setup to re-enter data. If the steps above do not help, remove the onboard battery and short the two pins again to clear the CMOS RTC RAM data. After clearing the CMOS, reinstall the battery. Serial port connector (10-1 pin COM) This connector is for a serial (COM) port. Connect the serial port module cable to this connector, then install the module to a slot opening at the back of the system chassis. -
Page 14
Activity/Link LED Speed LED Description Status Description Status No link 10Mbps connection Orange Linked ORANGE 100Mbps connection Orange (Blinking) Data activity GREEN 1Gbps connection Orange (Blinking then Ready to wake up steady) from S5 mode Line In port (light blue). This port connects to the tape, CD, DVD player, or other audio sources. Line Out port (lime). This port connects to a headphone or a speaker. In the 4.1, 5.1 and 7.1-channel configurations, the function of this port becomes Front Speaker Out. Microphone port (pink). This port connects to a microphone. Refer to the audio configuration table for the function of the audio ports in 2.1, 4.1, 5.1, or 7.1-channel configuration. ASUS PRIME B365M-A… -
Page 15
Audio 2.1, 4.1, 5.1, or 7.1-channel configuration Headset 7.1-channel Port 4.1-channel 5.1-channel 2.1-channel Light Blue (Rear panel) Line In Rear Speaker Out Rear Speaker Out Rear Speaker Out Lime (Rear panel) Line Out Front Speaker Out Front Speaker Out Front Speaker Out Pink (Rear panel) Mic In Mic In Bass/Center Bass/Center Lime (Front panel) Side Speaker Out To configure a 7.1-channel audio output: Use a chassis with HD audio module in the front panel to support a 7.1-channel audio output. USB 3.1 Gen 1 ports. These 9-pin Universal Serial Bus (USB) ports are for USB 3.1 Gen 1 devices. -
Page 16: Central Processing Unit (Cpu)
Central Processing Unit (CPU) This motherboard comes with a surface mount LGA1151 socket designed for the 9 Generation Intel Core™, Pentium Gold and ® ® Celeron processors. ® Unplug all power cables before installing the CPU. • Ensure that you install the correct CPU designed for the LGA1151 socket only. DO NOT install a CPU designed for LGA1150, LGA1155 and LGA1156 sockets on the LGA1151 socket. • Upon purchase of the motherboard, ensure that the PnP cap is on the socket and the socket contacts are not bent. Contact your retailer immediately if the PnP cap is missing, or if you see any damage to the PnP cap/socket contacts/motherboard components. • Keep the cap after installing the motherboard. ASUS will process Return Merchandise Authorization (RMA) requests only if the motherboard comes with the cap on the LGA1151 socket. • The product warranty does not cover damage to the socket contacts resulting from incorrect CPU installation/removal, or misplacement/loss/incorrect removal of the PnP cap. Installing the CPU Apply the Thermal Interface Material to the CPU heatsink and CPU before you install the heatsink and fan if necessary. ASUS PRIME B365M-A…
-
Page 17: System Memory
Channel A DIMM_A1 & DIMM_A2* DIMM_B1 Channel B DIMM_B1 & DIMM_B2* DIMM_B2* • You may install varying memory sizes in Channel A and Channel B. The system maps the total size of the lower-sized channel for the dual-channel configuration. Any excess memory from the higher-sized channel is then mapped for single-channel operation. • Always install the DIMMS with the same CAS Latency. For an optimum compatibility, we recommend that you install memory modules of the same version or data code (D/C) from the same vendor. Check with the vendor to get the correct memory modules. • DDR4 2666MHz and higher memory modules will run at max. 2666MHz on Intel 8th ® Generation 6-core or higher processors. • Memory modules with memory frequency higher than 2133 MHz and its corresponding timing or the loaded X.M.P. Profile is not the JEDEC memory standard. The stability and compatibility of these memory modules depend on the CPU’s capabilities and other installed devices. • The default memory operation frequency is dependent on its Serial Presence Detect (SPD), which is the standard way of accessing information from a memory module. Under the default state, some memory modules for overclocking may operate at a lower frequency than the vendor-marked value. • For system stability, use a more efficient memory cooling system to support a full memory load (4 DIMMs). • Refer to www.asus.com for the latest Memory QVL (Qualified Vendors List) Chapter 1: Product introduction…
-
Page 18
Recommended memory configurations DIMM_B1 DIMM_B2* DIMM_B2* DIMM_A1 DIMM_A2* DIMM_A2* DIMM_A2* Installing a DIMM To remove a DIMM ASUS PRIME B365M-A… -
Page 19: Chapter 2 Bios Information
To enter BIOS Setup after POST: • Press <Ctrl>+<Alt>+<Del> simultaneously. • Press the reset button on the system chassis. • Press the power button to turn the system off then back on. Do this option only if you failed to enter BIOS Setup using the first two options. Using the power button, reset button, or the <Ctrl>+<Alt>+<Del> keys to force reset from a running operating system can cause damage to your data or system. We recommend you always shut down the system properly from the operating system. • The BIOS setup screens shown in this section are for reference purposes only, and may not exactly match what you see on your screen. • Visit the ASUS website at www.asus.com to download the latest BIOS file for this motherboard. • If the system becomes unstable after changing any BIOS setting, load the default settings to ensure system compatibility and stability. Select the Load Optimized Defaults item under the Exit menu or press hotkey F5. • If the system fails to boot after changing any BIOS setting, try to clear the CMOS and reset the motherboard to the default value. See section Motherboard overview for information on how to erase the RTC RAM. BIOS menu screen The BIOS setup program can be used under two modes: EZ Mode and Advanced Mode. Press <F7> to change between the two modes. ASUS PRIME B365M-A…
-
Page 20: Ez Mode
EZ Mode By default, the EZ Mode screen appears when you enter the BIOS setup program. The EZ Mode provides you an overview of the basic system information, and allows you to select the display language, system performance mode, fan profile and boot device priority. To access the Advanced Mode, click Advanced Mode(F7) or press <F7>. The default screen for entering the BIOS setup program can be changed. Selects the display language of Displays the CPU/ the BIOS setup program Displays the system motherboard properties of the temperature, CPU selected mode. Click voltage output, CPU/ <Enter> to switch EZ Creates storage RAID chassis fan speed, System Tuning modes and SATA information…
-
Page 21: Advanced Mode
Language EZ Tuning Wizard Hotkeys Menu bar Scroll bar Configuration Sub-menu items General fields Goes back to EZ help Last modified Menu items Mode settings Search on FAQs Popup window Displays the CPU temperature, memory and voltage ASUS PRIME B365M-A…
-
Page 22: Exit Menu
Search on FAQ Move your mouse over this button to show a QR code. Scan this QR code with your mobile device to connect to the ASUS BIOS FAQ web page. You can also scan the QR code below. Exit menu The Exit menu items allow you to load the optimal default values for the BIOS items, and save or discard your changes to the BIOS items. Load Optimized Defaults This option allows you to load the default values for each of the parameters on the Setup menus. When you select this option or if you press <F5>, a confirmation window appears. Select OK to load the default values. Save Changes & Reset Once you are finished making your selections, choose this option from the Exit menu to ensure the values you selected are saved. When you select this option or if you press <F10>, a confirmation window appears. Select OK to save changes and exit. Discard Changes and Exit This option allows you to exit the Setup program without saving your changes. When you select this option or if you press <Esc>, a confirmation window appears. Select OK to discard changes and exit. Launch EFI Shell from USB drives This option allows you to attempt to launch the EFI Shell application (shellx64.efi) from one of the available USB devices. Chapter 2: BIOS information…
-
Page 23: Appendix
Appendix Notices FCC Compliance Information Responsible Party: Asus Computer International Address: 48720 Kato Rd., Fremont, CA 94538, USA Phone / Fax No: (510)739-3777 / (510)608-4555 This device complies with part 15 of the FCC Rules. Operation is subject to the following two conditions: (1) This device may not cause harmful interference, and (2) this device must accept any interference received, including interference that may cause undesired operation.
-
Page 24
Compliance Statement of Innovation, Science and Economic Development Canada (ISED) This device complies with Innovation, Science and Economic Development Canada licence exempt RSS standard(s). Operation is subject to the following two conditions: (1) this device may not cause interference, and (2) this device must accept any interference, including interference that may cause undesired operation of the device. -
Page 25
ASUS Recycling/Takeback Services ASUS recycling and takeback programs come from our commitment to the highest standards for protecting our environment. We believe in providing solutions for you to be able to responsibly recycle our products, batteries, other components as well as the packaging materials. -
Page 26
доступний на: www.asus.com/support Cijeli tekst EU izjave o sukladnosti dostupan je na: www.asus.com/support Türkçe AsusTek Computer Inc., bu aygıtın temel gereksinimlerle ve ilişkili Čeština Společnost ASUSTeK Computer Inc. tímto prohlašuje, že toto Yönergelerin diğer ilgili koşullarıyla uyumlu olduğunu beyan eder. -
Page 27: Asus Contact Information
+1-510-739-3777 +1-510-608-4555 Web site http://www.asus.com/us/ Technical Support Support fax +1-812-284-0883 Telephone +1-812-282-2787 Online support http://qr.asus.com/techserv ASUS COMPUTER GmbH (Germany and Austria) Address Harkort Str. 21-23, 40880 Ratingen, Germany +49-2102-959931 Web site http://www.asus.com/de Online contact http://eu-rma.asus.com/sales Technical Support Telephone +49-2102-5789555 Support Fax…
-
Page 28
Appendix…
-
Драйверы
27
-
Инструкции по эксплуатации
2
Языки:

ASUS PRIME B365M-A инструкция по эксплуатации
(28 страниц)
- Языки:Французский
-
Тип:
PDF -
Размер:
1.37 MB -
Описание:
PRIME B365M-A User’s Manual ( French)
Просмотр

ASUS PRIME B365M-A инструкция по эксплуатации
(30 страниц)
- Языки:Японский
-
Тип:
PDF -
Размер:
1.76 MB -
Описание:
PRIME B365M-A User’s Manual ( Japanese )
Просмотр
На NoDevice можно скачать инструкцию по эксплуатации для ASUS PRIME B365M-A. Руководство пользователя необходимо для ознакомления с правилами установки и эксплуатации ASUS PRIME B365M-A. Инструкции по использованию помогут правильно настроить ASUS PRIME B365M-A, исправить ошибки и выявить неполадки.
На чтение 22 мин Просмотров 7 Опубликовано 11 апреля 2023 Обновлено 11 апреля 2023
Содержание
- Обзор материнской платы ASUS PRIME B365M-A
- Содержание
- Содержание
- Описание
- BIOS Setup
- Плюсы
- Минусы
- Итоговые выводы
- За обзор были начислены клубкоины.
- PRIME B365M-A
- Improved DDR4 stability
- 5-Way Optimization
- One-click overclock and cooling, done!
- Cooler by design
- Media-acclaimed UEFI BIOS
- OC Design – ASUS Pro Clock Technology
- ASUS Fan Holder
- Make your memory go faster
- USB 3.1 Gen 2 Type-A
- Ultimate-speed 10Gbps with USB 3.1 Gen 2 onboard
- USB 3.1 Gen 1 front-panel connector
- Future-proof connectivity
- Speed up with onboard M.2
- M.2 heatsink
- Keep your SSD cooler
- 3D-Printable M.2 fan mount
- Active cooling for your SSD
- Guide to start 3D printing
- Upgrade your RAID
- U.2 connector
- Join the NVMe revolution
- Intel Optane memory
- Intel Optane memory ready
- ThunderboltEX 3 Card
- Experience blistering Thunderbolt TM 3 speeds and any-way-up connectivity
- 802.11ad Wi-Fi
- Fastest onboard Wi-Fi up to 4.6 Gbps
- Native M.2/NVMe PCIe RAID Support for Lightning Fast Storage Speed!
- LANGuard
- Pumped-up throughput, 2.5x higher surge tolerance
- Turbo LAN
- Network-optimization software for customizable packet prioritization
- Multi-GPU support
- SafeSlot
- Protect your graphics card investment
- Built to Last
- SafeSlot Core
- Fortified PCIe slot prevents damage
- LANGuard
- Pumped-up throughput, 2.5X-higher surge tolerance
- Overvoltage Protection
- World-class circuit-protecting power design
- DIGI+ VRM
- Precision control for stable power
- DRAM Overcurrent Protection
- Short-circuit damage prevention
- Stainless-steel back I/O panel
- 3X corrosion-resistance for greater durability
- ESD Guards
- Electrostatic discharge protection
- Compatible devices and components
- VALIDATION HOURS
- SafeSlot
- Protect your graphics card investment
- Outstanding audio
- Combined onboard features deliver elevated audio
- LiveDash
- See system info at a glance
- Addressable RGB LED strip header
- Control every LED
- Aura Sync
- Outshine the competition
- Brighten Up Your Build
- LED-illuminated control for trace paths
- Beyond VR ready
- Complete your immersion
Обзор материнской платы ASUS PRIME B365M-A

Содержание
Содержание
На одном из компьютеров возникла необходимость замены материнской плату. В связи с тем, что данное устройство работает в круглосуточном режиме, решил подобрать устройство с улучшенными возможностями охлаждения и электропитания. Мое внимание привлекла материнская плата ASUS PRIME B365M-A.
Описание
Товар поставляется в картонной коробке, открывающейся с передней стороны. Цветовое оформление не слишком яркое, но полностью указываются все преимущества и возможности материнской платы.
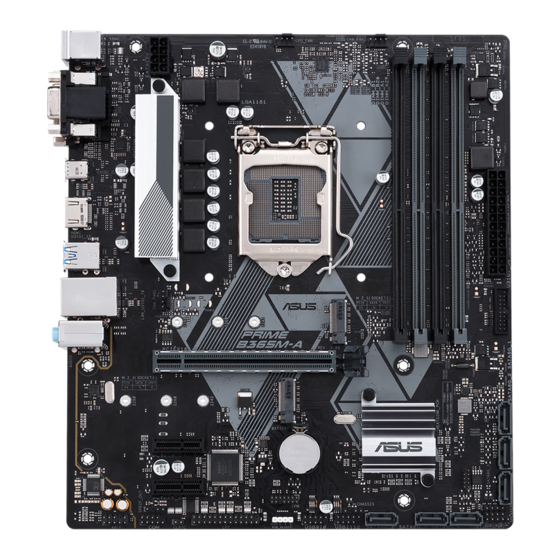
После, того, как упаковка была открыта, мы видим предмет обзора, который запакован в антистатическом пакете затьемненного цвета. Для исключения повреждений при перевозке товара, в коробке установлен каркас из картона. Данная материнская плата имеет форм-фактор Micro-ATX. Ее габаритные размеры 244*218 мм.

Лицевая сторона устройства имеет черный и серый цвета. Общее содержимое коробкивключает саму материнскую плата, два кабеля SATA для подключения накопителей данных, задняя корпусная планка, набор крепежа для фиксации моделей стандарта M.2., инструкция по использованию, диск с ПО и драйверами, руководство по установке и прочие инструкции.

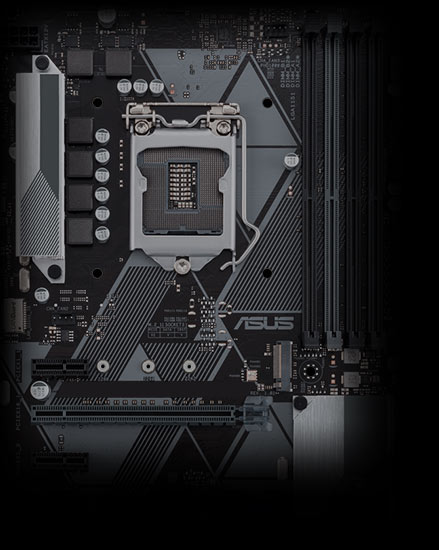
В ASUS PRIME B365M-A используется сокет LGA1151 v2. Сверху, гнездо процессора закрыто защитной пластиковой крышкой. Открытие механизма для установки процессора производится нажатием и выводом металлической лапки из своего гнезда и откидыванием прижимной рамки. После установки процессора и прижимной рамки на место, пластиковая крышка самостоятельно вылетает из своих креплений и может быть убрана. Плата поддерживает, в частности, процессоры i3-i7 8-го и 9-го поколений, но для установки некоторых из них может потребоваться предварительно обновить версию BIOS.
Устройство имеет в составе 4 слотами, в которые можно установить модули оперативной памяти (ОЗУ) DIMM DDR4. Заявленная максимальная поддерживаемая частота равно 2666 МГц. Модули ОЗУ могут работать в двухканальном режиме. Раскраска слотов черная и серая. Допускается установка модулей общим объемом 64Гб.

Питание материнской платы выполнено с использованием разъема 20+4-pin, а процессор подключается с помощью разъема 8-pin. Элементы зоны VRM (Voltage Regulator Module) в основном находятся слева от сокета. MOSFET-транзисторы имеют сверху радиатор для охлаждения.

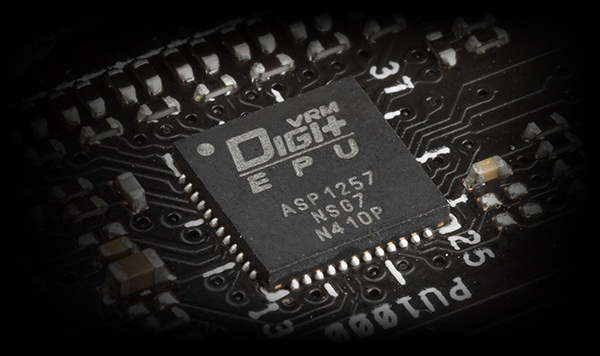
Управление регулированием напряжения производится с помощью чипа с маркировкой Digi+ ASP1400CTB.

Чтобы подключить питание устройств охлаждения производитель выполнил в верхней части платы два разъема 4-pin. Левый предназначен для кулера процессора, а правый имеет маркировку CHA-FAN2 и служит для обеспечения питания и управления скоростью вращения корпусного вентилятора.

Еще один 4-pin разъем, с помощью которого можно обеспечить установку и подключение вентилятора на задней крышке корпуса. Он находится рядом с разъемами задней панели.

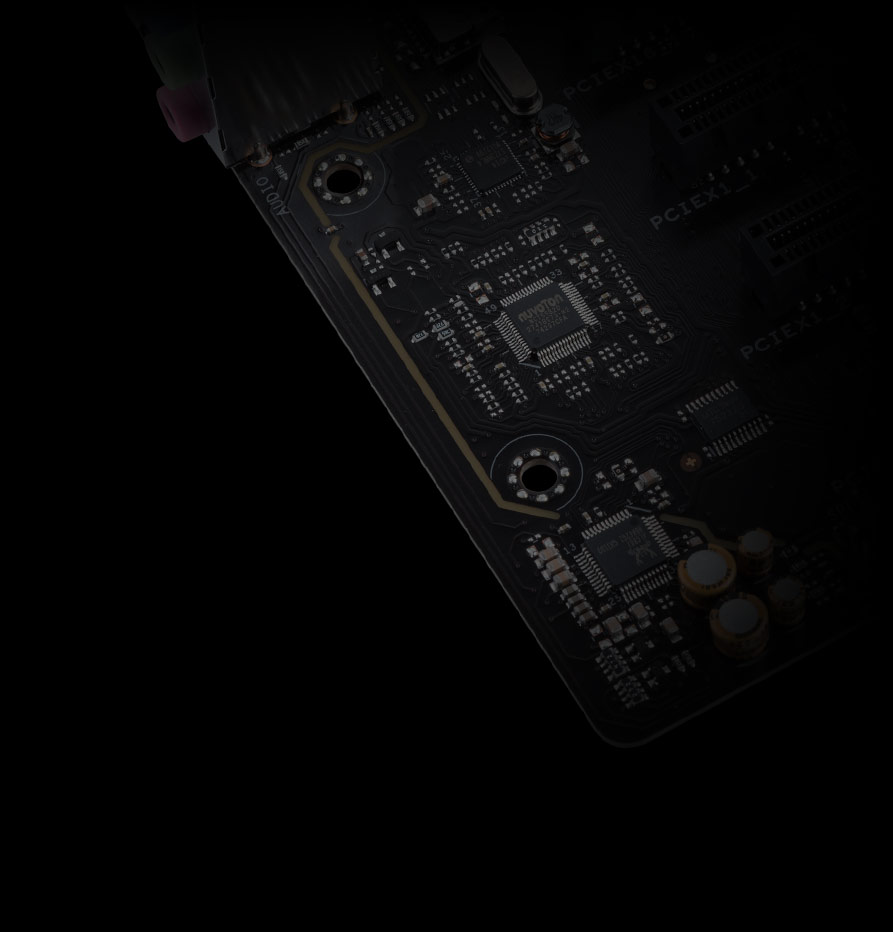
Материнская плата поддерживает версия PCI Express 3.0. Имеется один слот PCI-E x16 и два форм-фактора PCI-E x1. Слот PCI-E x16 имеет по бокам усиливающую металлическую пластину. Работа периферийных устройств обеспечивается с помощью контроллера Nuvoton NCT6796D.

На плате присутствуют два слота M.2., выше и ниже слота PCI-E x16. Оба слота совместимы с M.2 устройствами, соответствующими типоразмеру 2242, 2260, 2280. Ближайший к процессору совместим с SATA 3 , PCI-E 3.0 x4, нижний только с PCI-E 3.0 x4. Материнской платой поддерживается технология Intel Optane Memory.

Для крепления устройств в слоты M.2. в комплекте имеется металлический винтовой крепеж в прозрачном пакете.

Данная плата оснащена чипсетом Intel B365. Сверху на нем установлен радиатор серебристого цвета с логотипом ASUS. Неподалеку от него находятся 6 портов SATA 6Gb/s. Они расположены по левому и нижнему краю.

Звуковая часть материнской платы усправляется с помощью чипа Realtek ALC887. Помимо этого использованы высококачественные японские конденсаторы и LED-подсветка зоны аудиоподсистемы.

Сетевой адаптер Ethernet работает под управлением чипа Realtek RTL8111H. Он может обеспечивать передавачу данных со скоростью до 1Гбит/с.

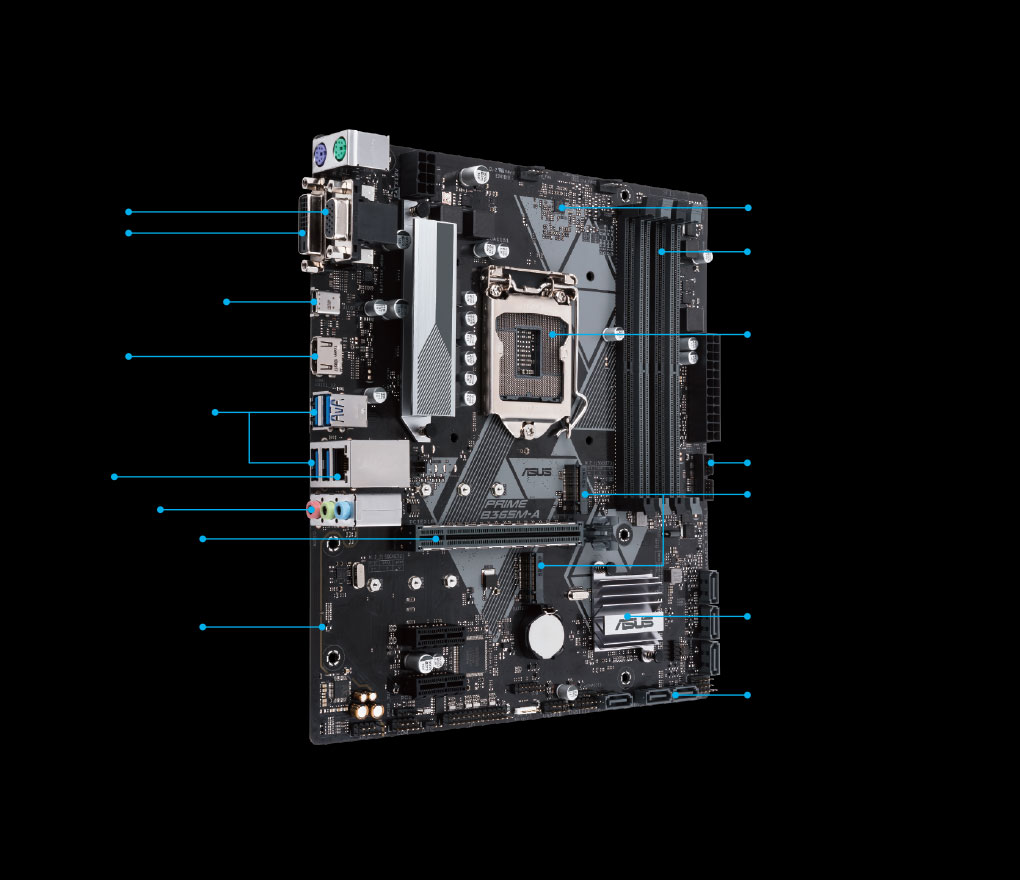
Задняя панель в нашем случае включает в себя два разъема PS/2 для подключения мыши и клавиатуры. Это может быть не лишним при инсталляции Windows 7, до момента установки драйверов USB. Также здесь присутствуют два цифровых видеоразъема DVI-D и HDMI, далее имеется порт USB Type C. После присутствует аналоговый VGA (D-Sub). Имеется 4 порта USB 3.2 В объединенном блоке с портами USB установлен сетевой адаптер Ethernet и три гнезда 3,5 мм. аудиоподсистемы.

Преобразование цифрового видеосигнала в аналоговый для разъема VGA осуществляется с помощью контроллера Realtek RTD2166.

На обратной стороне материнской платы имеется наклейка с указанием адресов, по которым можно найти представительств фирмы ASUS в Тайване и Германии.

Из прочих особенностей материнской платы можно отметить защиту от перепадов напряжения сетевого адаптера, защиту элементов платы от повышенного напряжения, цифровой контроль питания устройства.
BIOS Setup
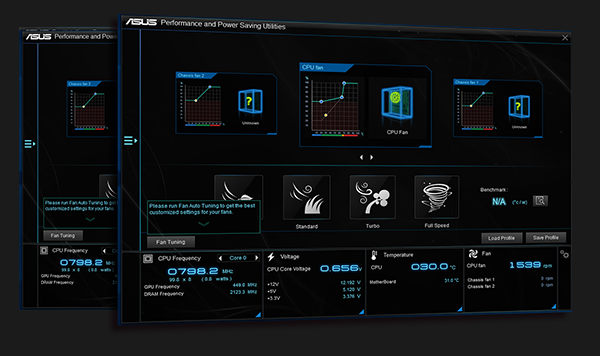
Визуальное оформление программы UEFI BIOS выполнено по-современному в 2 режимах. Первоначально (после включение компьютера и нажатия копки F2 или Delete), пользователь попадает на экран EZ Mode, где присутствует сжатая информация о системе. Здесь можно воспользоваться активацией профиля ОЗУ XMP, выбрать устройство для основной загрузки или воспользоваться настройками работы вентиляторов.
Производитель оснастил данную материнскую плату системой контроля над вентиляторами FAN Xpert 2+. Данная опция позволяет производить автонастройку одного из четырех режимов охлаждения в BIOS Setup от наиболее бесшумного Silent до наиболее производительного Full Speed одним щелчком мыши.

Если режима EZ Mode вам мало, то можно перейти в Advanced Mode, вызываемому клавишей F7. Там меню расширенное ближе к классическому. Помимо этого, много сделано для визуального восприятия условий материнской платы в BIOS. Многие параметры датчиков выполнены крупными, а некоторые из них снабжены графическим исполнением во временном периоде.
Основные характеристики
| Модификация | ASUS PRIME B365M-A |
| Форм-фактор | Micro-ATX |
| Сокет | LGA 1151-v2 |
| Установленный чипсет | Intel B365 |
| Оперативная память | DIMM DDR4 |
| Работа ECC памяти | не поддерживается |
| Количество слотов для моделей ОЗУ | 4 |
| Допустимая частота ОЗУ | 2666 МГц |
| Максимальный поддерживаемый объем | 64 ГБ |
| Порты SATA | 6x SATA 6Gb/s |
| Разъемы M.2, количество | 2 |
| Поддерживаемые форматы M.2 | 2280 , 2260 , 2242 |
| NVMe | не поддерживается |
| PCI Express, версия | 3.0 |
| Количество PCI-E x16 / PCI-E x1 | 1 / 2 |
| Тип USB на задней панели и их количество | 1 x USB Type C , 4 x USB 3.2 |
| Видеоразъемы | VGA (D-Sub), HDMI , DVI-D , |
| Порты PS/2 | 2 шт. |
| Звук / Звуковая схема | Realtek ALC887 / 7.1 |
| Контроллер сетевого адаптера / Скорость | Realtek RTL8111H / 1 Гбит/с |
| Основной разъем питания / Разъем питания процессора | 24-pin / 8-pin |
| Подсветка элементов платы | есть |
| Страна-производитель | Китай |
| Гарантия | 36 мес. |
Надежность модели 98.6%. Статистика предоставлена на основе продаж в сети магазинов DNS.
Плюсы
Производитель предусмотрел 3 разъема 4-pin для подключения вентиляторов. Это позволяет гибко управлять схемой охлаждения системного блока и процессора.

На официальной сайте имеются драйвера для Windows 7 x64. В моем случае это было важно.
Три видеовыхода (два цифровых и один аналоговый) без проблем позволяют подключить практически любой монитор. Наличие на задней панели порта USB Type C тоже иногда может пригодиться.
Два слота M.2. позволяют установить (например) и накопитель, и модуль Wi-Fi для уменьшения количества проводов, идущих к компьютеру.
Минусы
На мой взгляд, разъемов USB, которые размещены на задней панели может оказаться недостаточно. Хотелось бы иметь 6 портов, пускай даже часть из них были бы USB 2.0.

При необходимости эту проблему можно решить установки планки USB портов с подключением ее к разъемам USB 2.0 или USB 3.2 на материнской плате.
Итоговые выводы
Материнская плата ASUS PRIME B365M-A является универсальным устройством средне-бюджетного сегмента, которую можно использовать без «разгона» в как в офисе, так и дома.
За обзор были начислены клубкоины.
Хочешь также? Пиши обзоры и получай вознаграждение.
Источник
PRIME B365M-A
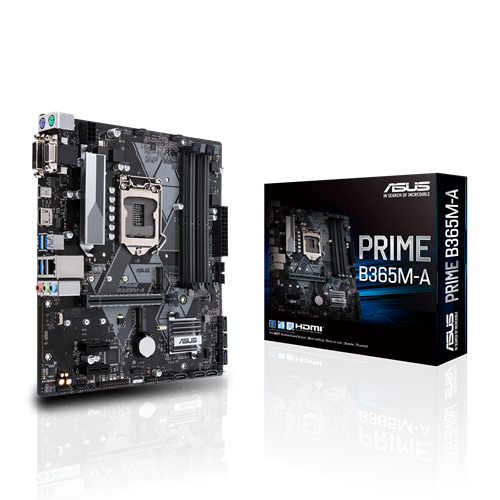


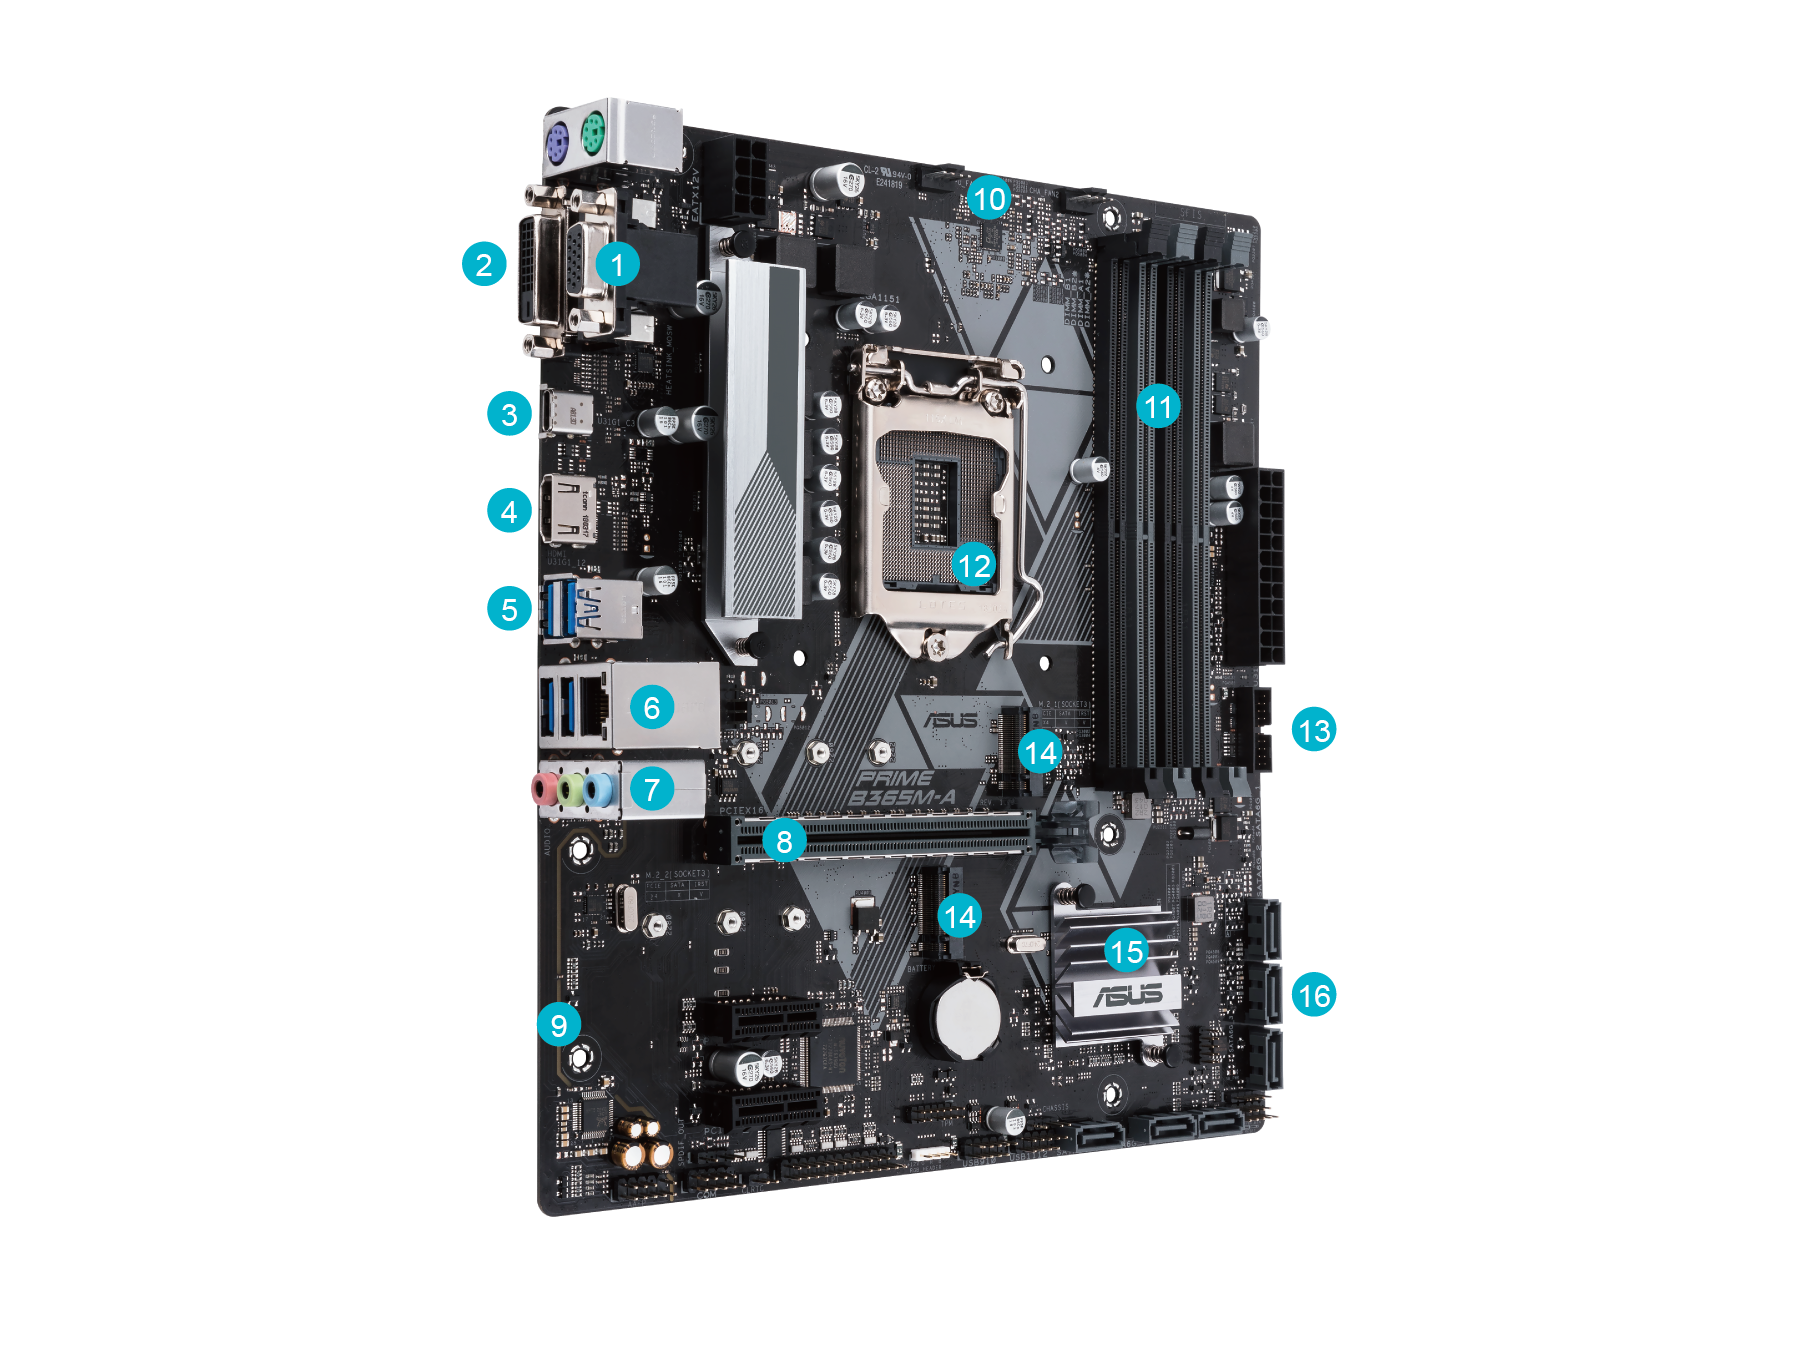
11 DDR4 2666/2400/2133 Support
12 Supports 14nm CPU Intel ® LGA 1151 Socket
13 Front USB 3.1 Gen 1 Headers
14 2 x 32Gb/s M.2
Intel ® Optane™ Memory Ready

ASUS Prime 300 Series motherboards provide the solid foundation needed for your first build, plus flexibility to grow with your ambitions. We’ve melded all the good stuff that’s packed into the latest processors with essential ASUS design and engineering, so you benefit from industry-leading technologies — including automated system tuning, comprehensive cooling controls, and immersive onboard audio. When you build with an ASUS Prime 300 Series motherboard, you build smart, easy and affordably.
Improved DDR4 stability
ASUS OptiMem preserves memory signal integrity by routing traces and vias to the optimal PCB layer, and our T-Topology trace layout ensures time-aligned signaling by balancing trace lengths between memory slots. These enhancements allow the Prime 300 Series to support a wide range of dual and quad-DIMM memory kits, while providing your rig with the stability it needs to deal with any type of workload — whether you’re gaming or running intensive applications
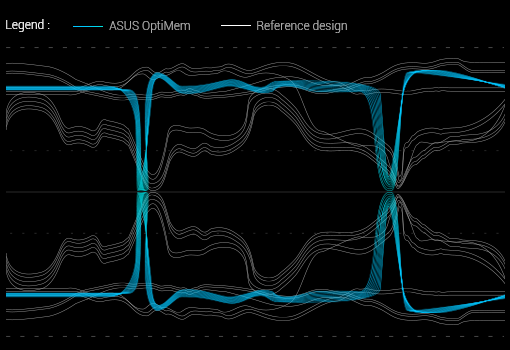
A larger signal eye results in improved stability, more overclocking headroom, and lower operating voltages
- Improved memory stability and compatibility
- Allows lower memory latencies at equivalent voltages
- Improved memory frequency margin
Tested by using Synopsys HSPICE simulation software
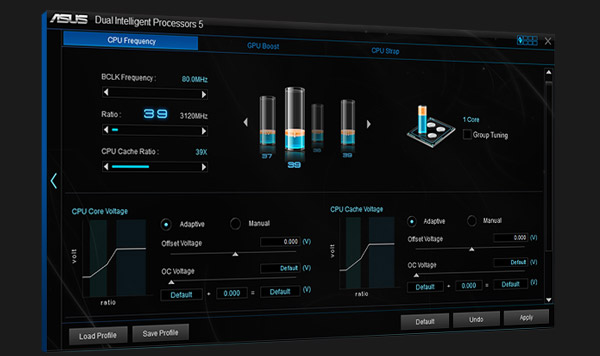
5-Way Optimization
One-click overclock and cooling, done!
ASUS 5-Way Optimization makes your PC smart. One click takes care of complex tuning, dynamically optimizing essential aspects of the system to provide overclocking and cooling profiles that are tailored for your rig.
An automated tuning utility that optimizes overclocking and cooling profiles for your unique system configuration.
Fans stay whisper-quiet with everyday computing, and deliver optimal airflow when the system is crunching through CPU or GPU-intensive tasks.
Stress test function helps optimize and overclock for CPU- or memory-centric workloads.
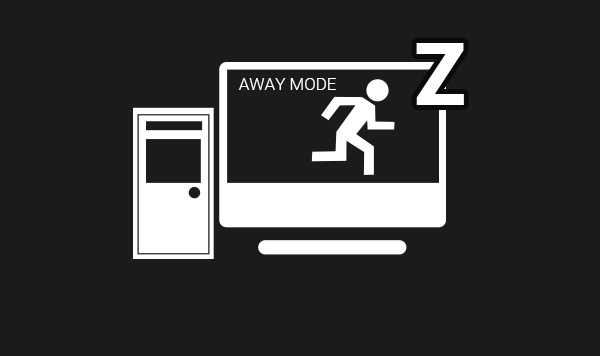
With the Energy Processing Unit (EPU) you’ll enjoy system-wide power savings. The EPU automatically optimizes power consumption and maximizes savings with Away mode — a smart setting that creates an extreme energy-saving scenario by shutting down unused I/O controllers.
Prime 300 Series motherboards offer comprehensive control over system fans, via the included Fan Expert 2+ software. Auto-Tuning mode intelligently configures all parameters with a single click.
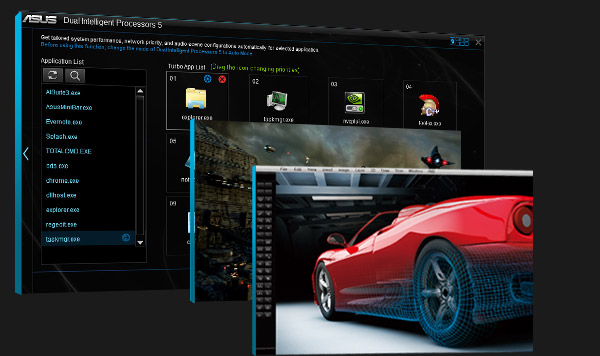
Whether you’re a professional designer or hardcore gamer, you’ll feel the benefit of the ASUS-exclusive Turbo App. This intuitive tool allows you to define CPU overclocking, apply fan profiles, prioritize network data and optimize audio settings at app level ― so your Prime Z370-A system is perfectly optimized for whatever you’re doing.
Cooler by design
Prime 300 Series features the most comprehensive cooling controls ever, configurable via ASUS Fan Xpert software or the UEFI BIOS.

Each header can be set to monitor and react to up to three thermal sensors. Via Fan Xpert, you can also assign a sensor to monitor the temperature of supported ASUS graphics cards to ensure optimal cooling during GPU- or CPU-intensive workloads.
Each onboard CHA FAN header supports PWM and DC mode.
* Specifications and features vary by model, and all images are illustrative. Please refer specification pages for full details.
The UEFI BIOS is an early waypoint on any PC-building journey, and Prime 300 Series has one of the best in the business.
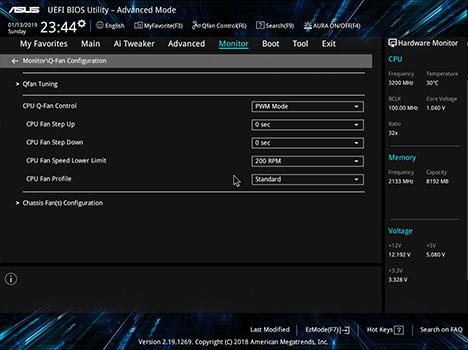
Q-Fan Control Can configure the fan’s operating speed manually, or use the easy pre-configured fan profiles to select Standard, Silent, Turbo or Full Speed modes, plus automatic switch to full speed if the temperature hits 75°C.
Intuitive graphical fan control Fine-tune individual fans simply by dragging a curve with the mouse.
SATA Information: Display SATA port details that help you easily recognize drives.
Fast Clock Adjustment: Use mouse controls to change the time and date.
My Favorites Quickly find tuning options and add preferred tools to the list.
User Profile Save BIOS settings for migration to new BIOS version or system.
SATA Port Renaming: Rename SATA ports for easy identification.
OC Design – ASUS Pro Clock Technology
Prime Z370-A includes a dedicated base-clock (BCLK) generator that extends CPU and memory overclocking margins. This custom solution works in tandem with the TPU to enhance voltage and BCLK overclocking control, providing the flexibility to extract every ounce of performance from the Intel Core 8th Generation processors.

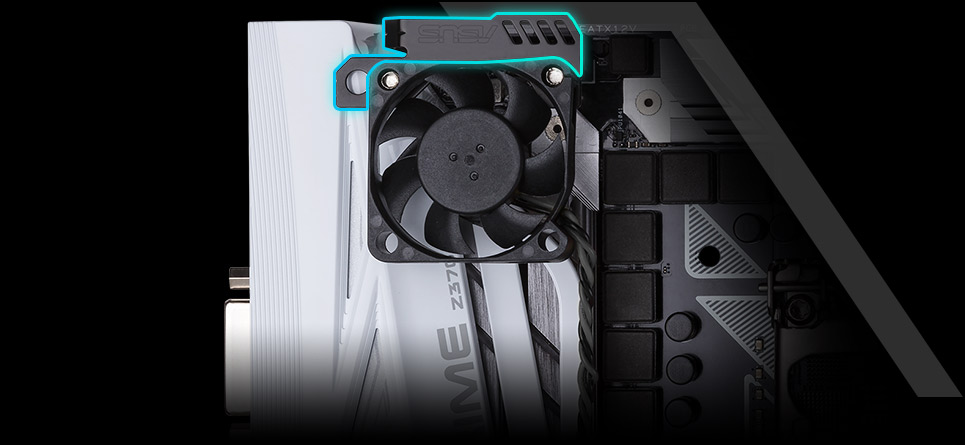
ASUS Fan Holder
With the all-new ASUS Fan Holder increasing airflow your Prime Z370 Series motherboard’s VRM area is simple. Just screw on a 40/50mm fan, mount the bracket on the heatsink, and hook the fan up to a header for a targeted cooling boost. With the Fan Holder and fan in place, VRM temperatures are reduced by up to 25 o C — perfect for your overclocking adventures.
Make your memory go faster
Prime X399-A is engineered to support quad-channel memory kits rated up to a staggering DDR4 3600MHz, allowing you to get the best performance from the X399 platform. We’ve worked with all major DDR4 memory vendors to help ensure compatibility, so you’re assured the best compatibility.

CPU : Ryzen™ Threadripper™ 1950X | Motherboard: PRIME X399-A |
DRAM : G.Skill F4-3866C18Q-16GTZ | PSU: Cooler Master-RS850-AFBA-G1 | Water-cooling : Corsair H115i
USB 3.1 Gen 2 Type-A
Ultimate-speed 10Gbps with USB 3.1 Gen 2 onboard
With backward-compatible USB 3.1 Gen 2 Type-A™, you’ll experience ultimate connection flexibility and blazing data-transfer speeds of up to 10Gbps — twice as fast as standard USB 3.1 Gen 1.
* Specifications and features vary by model, and all images are illustrative. Please refer specification pages for full details.

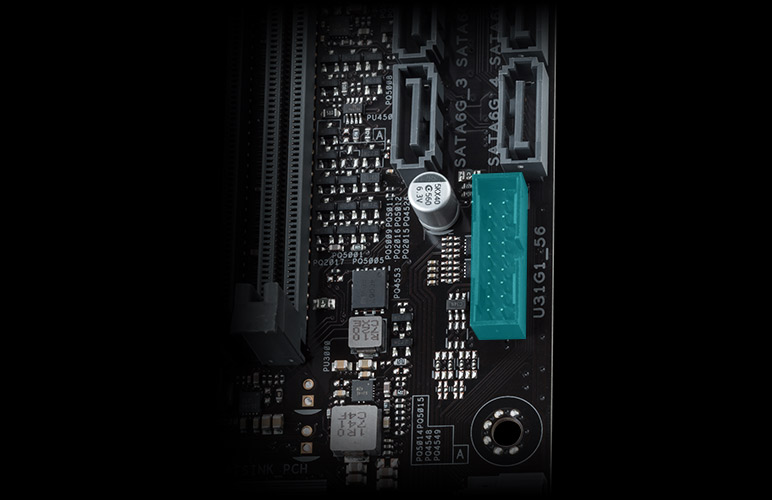
USB 3.1 Gen 1 front-panel connector
Future-proof connectivity
USB 3.1 Gen 1 is right where you need it, with two super-speed headers for the front panel. Experience data-transfer speeds up to 10X faster than USB 2.0 with instant plug-and-play connectivity, and avoid back-breaking contortions in the hunt for hard-to-reach rear ports.
* Specifications and features vary by model, and all images are illustrative. Please refer specification pages for full details.
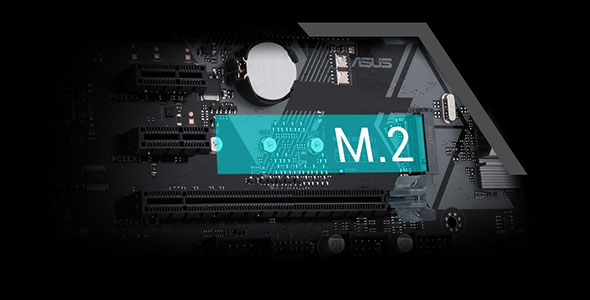
Speed up with onboard M.2
With x4 PCI Express ® 3.0/2.0 bandwidth, M.2 supports up to 32Gbps data-transfer speeds. It’s the perfect choice for an operating system or application drive, providing fast access to data.
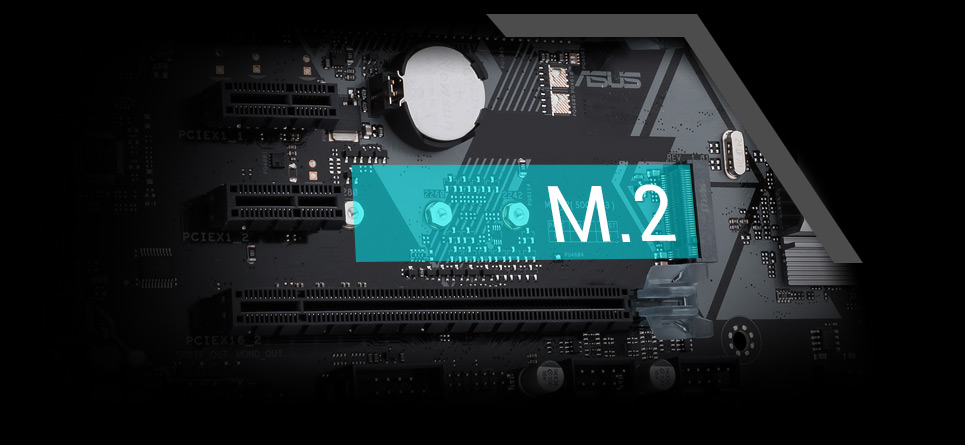
* Specifications and features vary by model, and all images are illustrative. Please refer specification pages for full details.
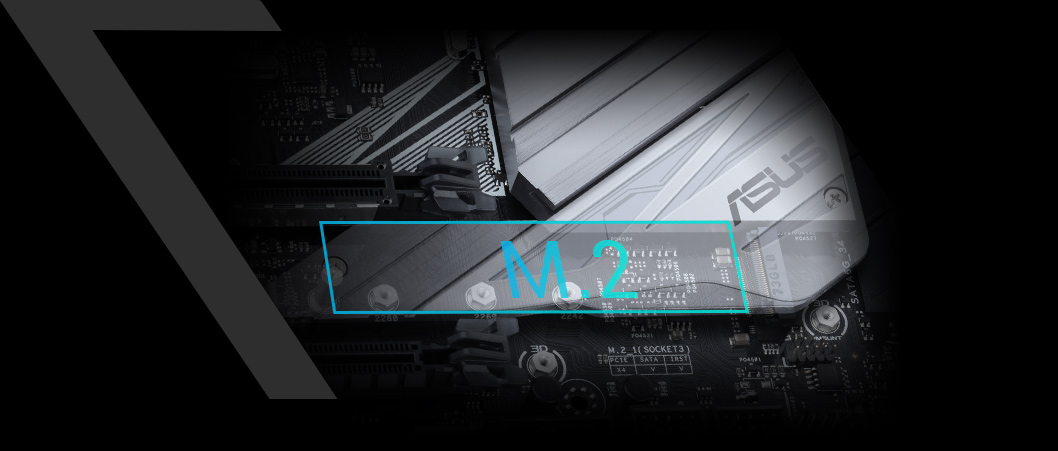
M.2 heatsink
Keep your SSD cooler
Prime Z370-A has an ultra-efficient heatsink to reduce M.2 SSD temperatures by up to 20°C — and that means optimal storage performance and improved SSD longevity.
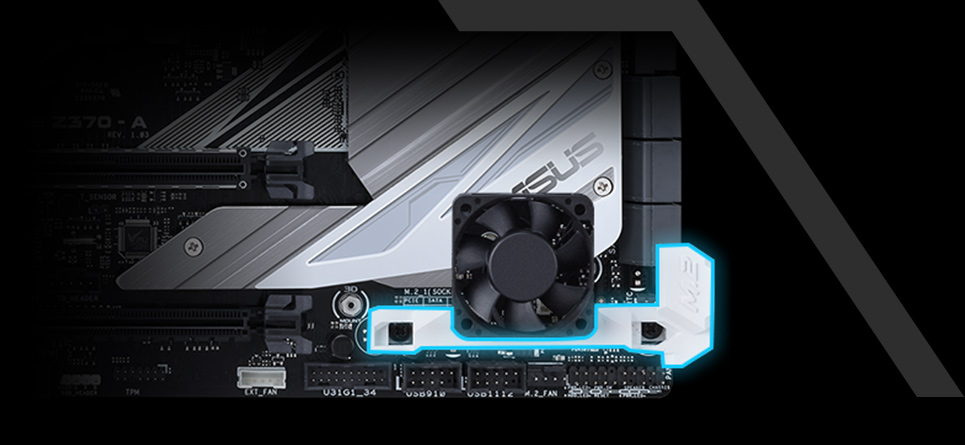
3D-Printable M.2 fan mount
Active cooling for your SSD
ASUS Prime Z370-A features dedicated mounting points for the ASUS 3D-printable M.2 cooler. Supporting a 40mm fan, the M.2 cooler teams up with the onboard M.2 heatsink to reduce drive temperatures by up to 25°C, ensuring your high-performance SSD always delivers peak performance.
Guide to start 3D printing
Download Select the 3D source files you want to download.
Personalize Adjust size or shape, add text or change other attributes.
Print Use your own printer, or visit a local vendor or ASUS store with Shapeways.

Setup Easily assemble and fit your 3D-printed parts using M.2 nuts or existing case mounts.
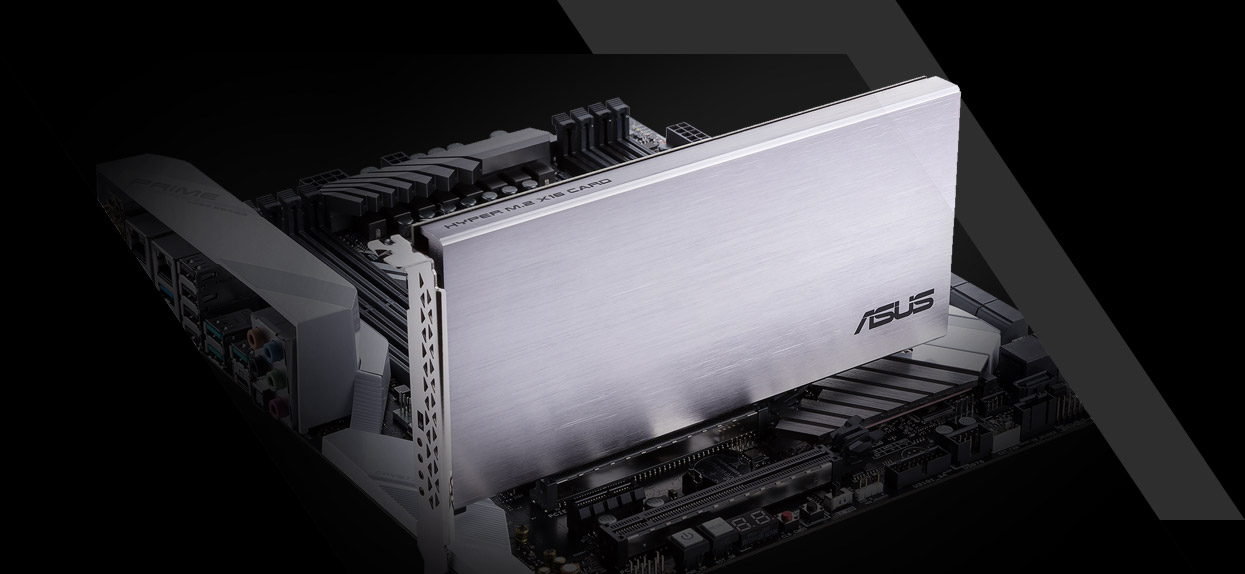
Upgrade your RAID
Unleash the Prime X299-Deluxe Virtual RAID on CPU (VROC) feature with the addition of an ASUS Hyper M.2 X16 Card*, which allows you to attach up to four PCIe ® 3.0 x16 M.2 drives — for a total bandwidth of up to 128Gbps. With VROC, you can utilize CPU PCIe lanes to configure a bootable RAID array, eliminating traditional DMI bottlenecks, so that storage transfers aren’t held back by other traffic.

U.2 connector
Join the NVMe revolution
The revolutionary specification that lets your SSDs scream at top speed. Just attach your chosen drive to with plug-and-play ease to experience data-transfer speeds of up to 32Gbps — and free up a PCIe slot for another expansion card.

Intel Optane memory
Intel Optane memory ready
Intel Optane™ is a revolutionary non-volatile memory technology supported by Prime 300 Series motherboards. Intel Optane memory modules accelerate attached storage to reduce boot and load times, so everything feels faster and more responsive.
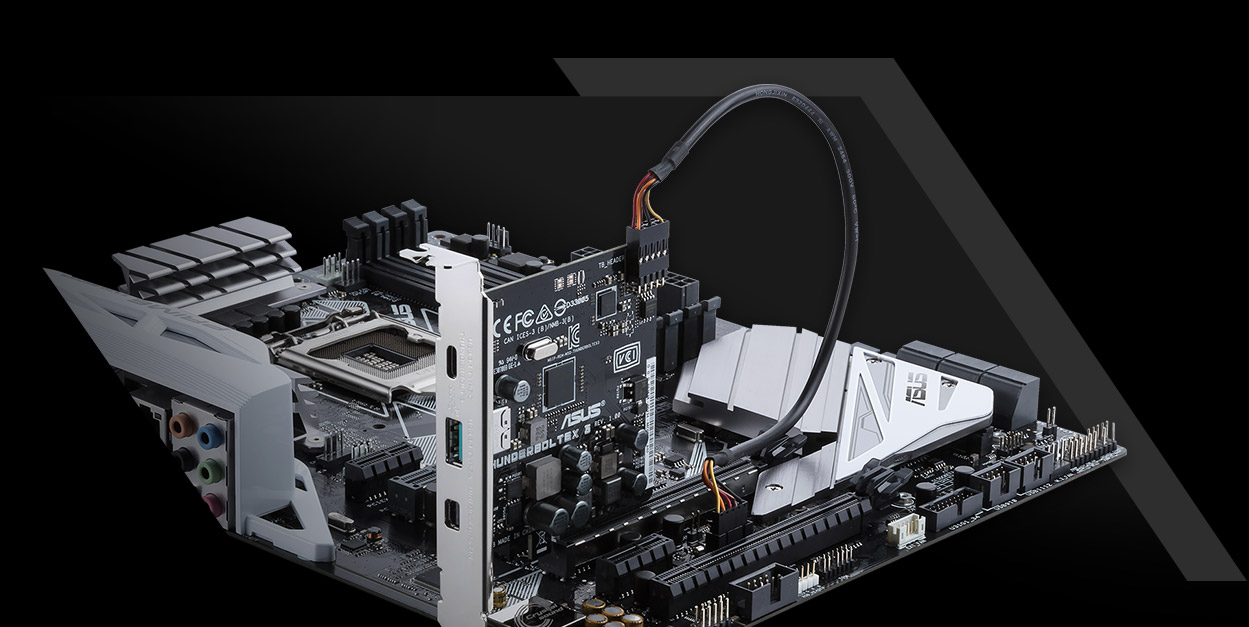
ThunderboltEX 3 Card
Experience blistering Thunderbolt TM 3 speeds and any-way-up connectivity
Prime Z370-A provides full support for a ThunderboltEX 3* card. An Intel-certified Thunderbolt™ 3 add-on card enables breathtaking bi-directional speeds of up to 40Gbps through a single cable — up to 4X faster than other PC data-transfer protocols. Beyond sheer bandwidth, Thunderbolt 3 supports daisy-chaining up to six devices, utilizes a Type-C reversible connector for compatibility with the latest USB 3.1 Gen 2 Type-C devices, and meets USB Power Delivery specifications for fast, high-power charging of up to 36W.
*ThunderboltEX 3 card available separately for purchase.
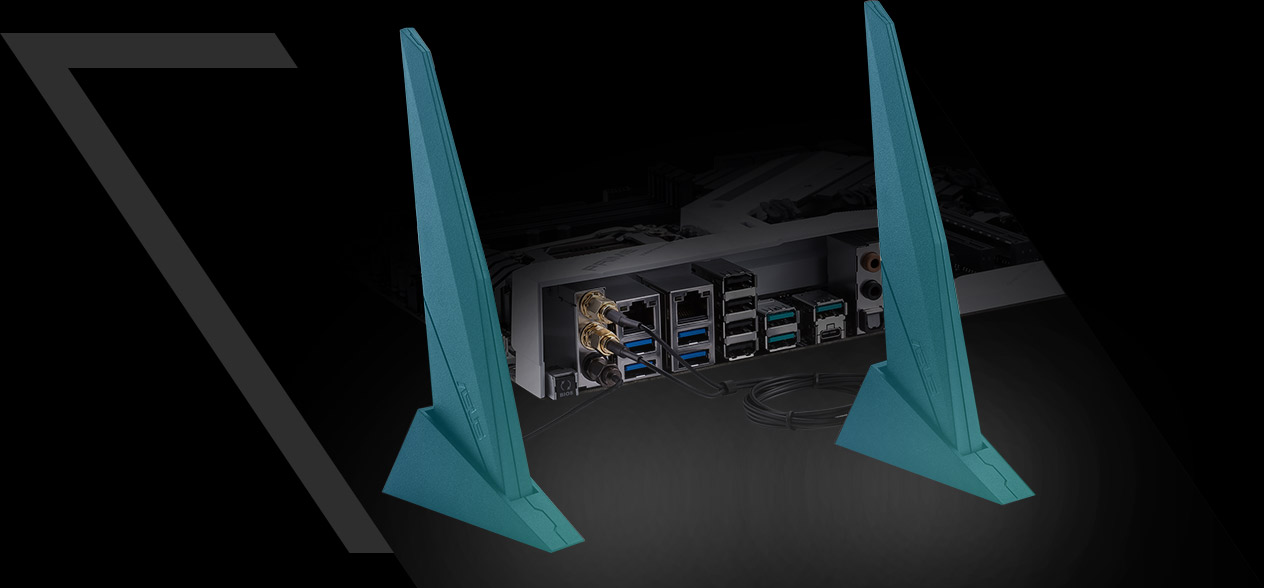
802.11ad Wi-Fi
Fastest onboard Wi-Fi up to 4.6 Gbps
Prime X299-Deluxe is engineered with the very latest 802.11ad (WiGig) Wi-Fi* for ultrafast, lag–free wireless connections of up to 4.6Gbps**, delivering smooth streaming of 4K UHD video and faster, slicker VR experiences!
* Availability of 801.11ad (WiGig) varies by region. Check with your local ASUS representative for more details.
** Actual speed varies, and depends on networking conditions.
Native M.2/NVMe PCIe RAID Support for
Lightning Fast Storage Speed!
Lightning-fast storage speed: With x4 PCI Express 3.0/2.0 bandwidth, M.2 supports up to 32Gb/s data-transfer speeds. It is the perfect choice for an operating system or application drive, making your whole PC or professional apps work as fast as possible.

LANGuard
Pumped-up throughput, 2.5x higher surge tolerance
ASUS LANGuard is hardware-level networking protection that employs signal-coupling technology and premium anti-EMI surface-mounted capacitors to ensure a more reliable connection and better throughput.

Turbo LAN
Network-optimization software for customizable packet prioritization
Turbo LAN with cFosSpeed traffic-shaping technology allows you to configure application priority via an intuitive interface, and reduces network lag.
Multi-GPU support
With support for both NVIDIA ® SLI™ and AMD CrossFireX™ 2/3-WAY configurations, Prime X399-A motherboard enables multi-GPU setups so you can harness the full power of the latest graphics technologies to drive games at 4K and beyond.

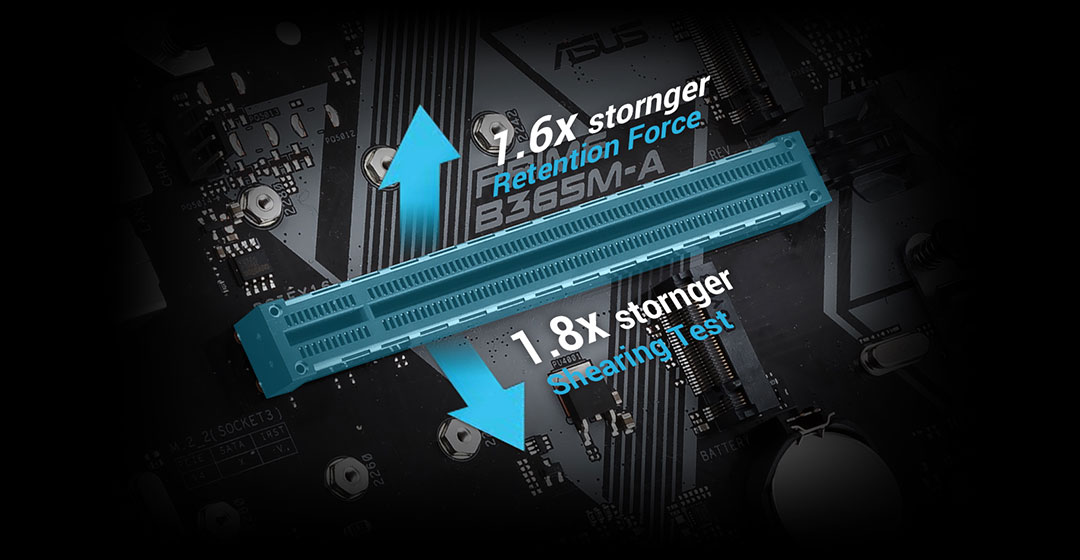
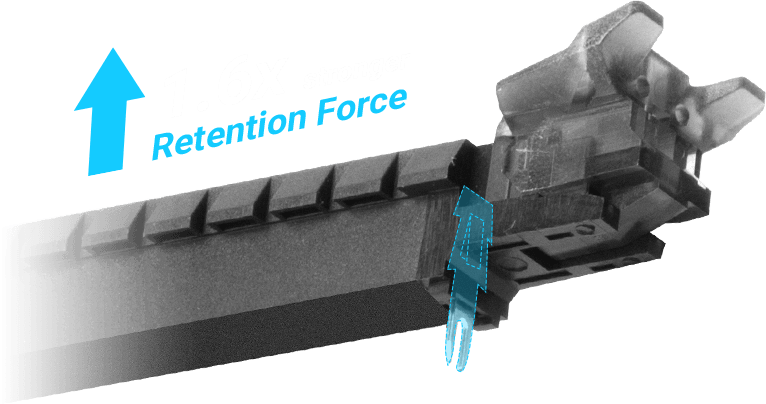
SafeSlot
Protect your graphics card investment
SafeSlot is the PCIe slot reinvented by ASUS and engineered to provide superior retention and shearing resistance. Manufactured in a single step using a new insert-molding process, SafeSlot integrates the slot with fortifying metal for an inherently stronger slot, which is then firmly anchored to the PCB through additional solder points.
Built to Last
ASUS is the world’s leading motherboard brand. Our motherboards are extensively tested for compatibility with more than 1,000 components and devices, and each new model undergoes a minimum of 8,000 hours of strict validation — offering the peace of mind of knowing that your ASUS motherboard is fit for all environments and applications. Choosing ASUS is an assurance of trouble-free DIY experiences.
Hardware safeguards to ensure long-term durability.
Industry-leading DDR4 memory compatibility for best flexibility and reassurance.
Compatibility with a range of CPUs, memory modules, graphics cards and more.
Extensive testing with latest components for enhanced reliability, compatibility and safety.

Prime 300 Series motherboards are engineered with industry-leading 5X Protection III, employing the finest components, excellent circuit design and exacting standards to guarantee the quality and long-term durability of your investment. That means exceptional protection and stability for your build — thanks to decades of engineering experience from the world’s leading motherboard brand.
SafeSlot Core
Fortified PCIe slot prevents damage
Our Prime 300 Series motherboards also have strengthened solder points around both the PCIe and DIMM pins.

LANGuard
Pumped-up throughput, 2.5X-higher surge tolerance
ASUS LANGuard is hardware-level networking protection that employs signal-coupling technology and premium anti-EMI surface-mounted capacitors to ensure a more reliable connection and better throughput.

Overvoltage Protection
World-class circuit-protecting power design
An exclusive circuit design with built-in voltage regulators protects your motherboard from damage caused by unexpected high-level voltages from unstable or inferior power supplies.

DIGI+ VRM
Precision control for stable power
ASUS-exclusive DIGI+ VRM intelligently delivers power to the processor based on real-time demands, reducing energy waste and improving system stability.

DRAM Overcurrent Protection
Short-circuit damage prevention
Onboard resettable fuses prevent overcurrent and short-circuit damage. This extends beyond I/O ports to DRAM ― so it provides a safeguard to protect the lifespan of your system and connected devices.

Stainless-steel back I/O panel
3X corrosion-resistance for greater durability
Corrosion-resistant stainless-steel back I/O panels bonded with chromium oxide assure a lifespan that’s 3X longer than ordinary panels.

ESD Guards
Electrostatic discharge protection
ASUS ESD Guards prolong the life of components while preventing damage from electrostatic discharge, providing protection for up to +/- 10kV of air discharge and +/- 6kV of contact discharge.
Compatible devices and components
The superior compatibility of Prime 300 Series is evidenced by our extensive list of supported devices — which includes thousands of compatible components — and our Qualified Vendor List (QVL) that identifies memory compatibility. It all adds up to more choices for worry-free PC-building experiences.
VALIDATION HOURS
ASUS motherboards offer superb endurance. We verify this by subjecting every board to more than 8,000 hours of stringent tests. A barrage of burn-in, environmental, compatibility, software and safety tests confirm that our motherboards are exceptionally robust. It also shows that ASUS reliability surpasses industry standards, ensuring that every component is designed to function flawlessly in any environment.
SafeSlot
Protect your graphics card investment
SafeSlot is the PCIe slot reinvented by ASUS and engineered to provide superior retention and shearing resistance. Manufactured in a single step using a new insert-molding process, SafeSlot integrates the slot with fortifying metal for an inherently stronger slot, which is then firmly anchored to the PCB through additional solder points.
Outstanding audio
Combined onboard features deliver elevated audio
Intelligent design and premium hardware create audio quality unlike anything you’ve ever experienced!
Immersive 3D surround-sound technology provides incredible audio experiences.
Separates analog/digital signal domains, significantly reducing multi-lateral interference.
Ensures minimal crosstalk between audio paths.
Premium parts provide an immersive sound signature, with exceptional fidelity.
* Specifications and features vary by model, and all images are illustrative. Please refer specification pages for full details.
LiveDash
See system info at a glance
Prime X299-Deluxe includes LiveDash, a built-in OLED dashboard that displays custom information such as system temperatures, CPU frequency, fan speed and error messages — so everything you need to know is available at a glance.


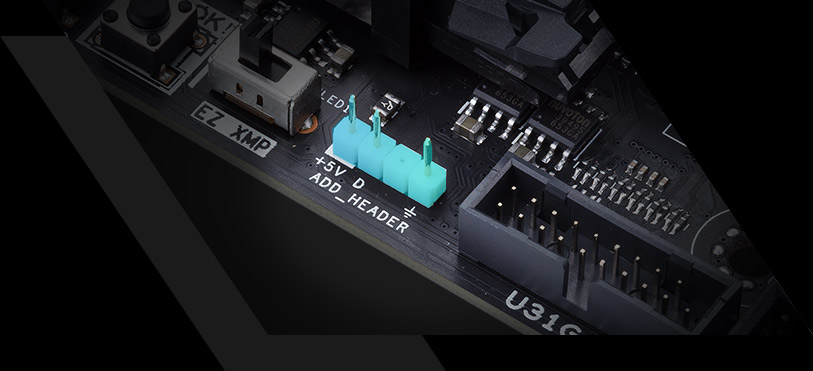
Control every LED
Prime X299-Deluxe now has a dedicated addressable RGB header, suitable for connecting to lighting strips, fans, and compatible PC cases. Our Aura software contains an array of effects for addressable gear, and the Aura SDK takes things to the next level, allowing developers to control each LED individually — unleashing infinite lighting possibilities.


Aura Sync
Outshine the competition
A well-tuned enthusiast system deserves a matching aesthetic. ASUS Aura Sync offers full lighting connected via the motherboard’s RGB header, with a variety of functional presets for external LED strips.* And it can all be synced with an ever-growing portfolio of Aura-capable ASUS hardware.
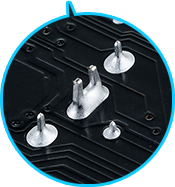
* The Aura RGB-strip header supports 5050 RGB LED strips with a max power rating of 3A (12V). For maximum brightness, strip length should not exceed 3m.
LED strips and Aura Sync-compatible devices are sold separately.
* Specifications and features vary by model, and all images are illustrative. Please refer specification pages for full details.
Brighten Up Your Build
LED-illuminated control for trace paths
Built-in LED lighting options illuminate your build in a variety of eye-catching styles.

* Specifications and features vary by model, and all images are illustrative. Please refer specification pages for full details.
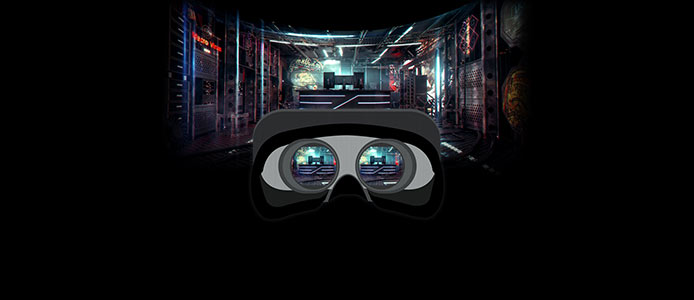
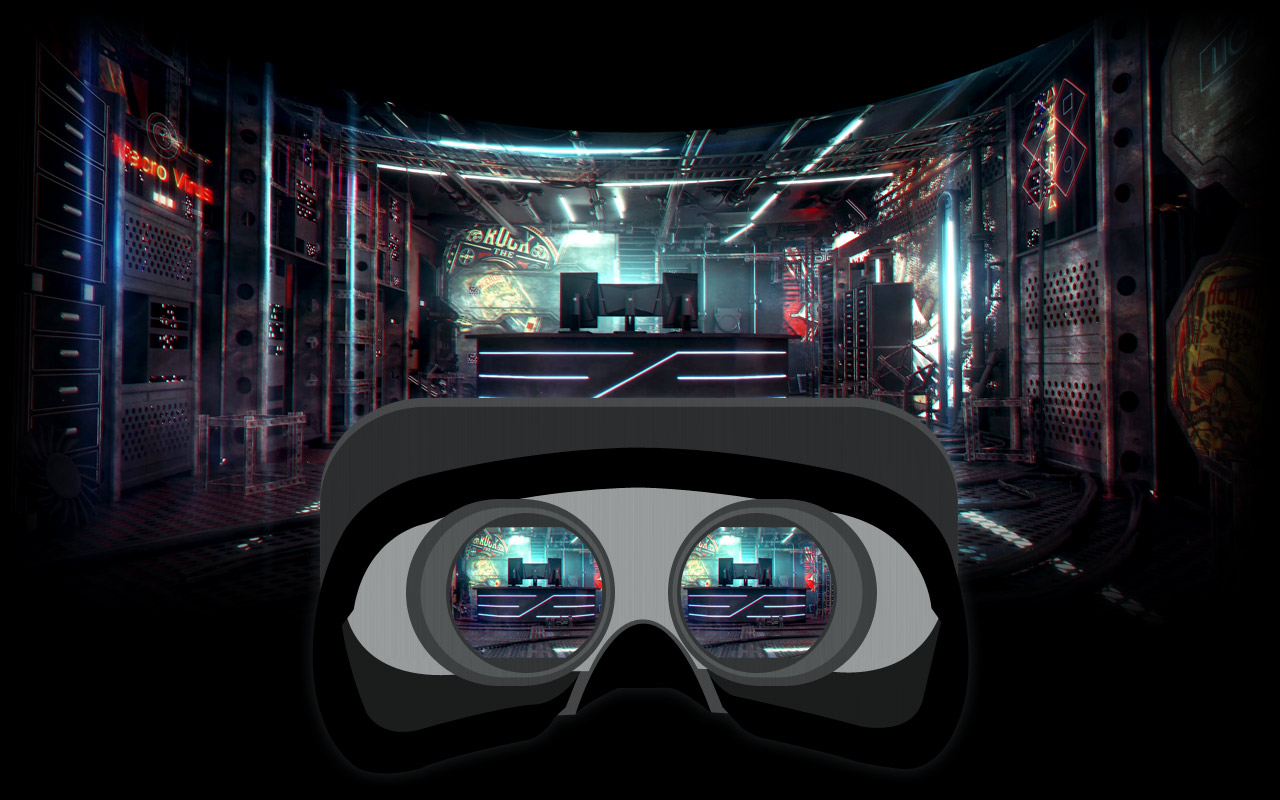
Beyond VR ready
Complete your immersion
Prime 300 series isn’t just VR ready — it goes way beyond. The ASUS Beyond VR Ready marque means that Prime 300 series has been tested with loads of class-leading components to ensure that your productivity, gaming and entertainment needs are tuned for maximum performance. ASUS Beyond VR Ready opens up a new way to configure and build your dream system with total confidence.
Intel B365 chipset The Intel ® B365 is a single-chipset design that supports Socket 1151 for 9th Gen and 8th Gen Intel ® Core™, Pentium ® Gold and Celeron ® processors. It provides improved performance by utilizing serial point-to-point links, allowing increased bandwidth and stability. Additionally, the B365 chipset provides a maximum of eight USB 3.1 Gen 1 ports, six SATA 6Gbps ports, and 32Gbps M.2 and PCIe 3.0 lane-speed support, for faster data retrieval. Intel B365 also supports integrated-graphics, so you’ll enjoy the very latest in graphics performance.

Ready for Socket 1151 for 9th / 8th Gen Intel ® Core™, Pentium ® Gold and Celeron ® processors This motherboard supports Socket 1151 for 9th Gen and 8th Gen Intel ® Core™, Pentium ® Gold and Celeron ® processors, with integrated graphics, memory and PCI Express controllers to support onboard graphics output with dedicated chipsets, dual-channel (4-DIMM) DDR4 memory and 16 PCI Express 3.0/2.0 lanes for great performance.
Источник