-
Contents
-
Table of Contents
-
Bookmarks
Quick Links
Related Manuals for Asus TUF GAMING B550-PLUS
Summary of Contents for Asus TUF GAMING B550-PLUS
-
Page 1
TUF GAMING B550-PLUS… -
Page 2
Product warranty or service will not be extended if: (1) the product is repaired, modified or altered, unless such repair, modification of alteration is authorized in writing by ASUS; or (2) the serial number of the product is defaced or missing. -
Page 3: Table Of Contents
Contents Safety information …………………. iv About this guide ………………….v Package contents ………………….. vi TUF GAMING B550-PLUS specifications summary ……….vi Connectors with shared bandwidth …………….x Chapter 1 Product introduction Before you proceed ………………1-1 Motherboard overview …………….. 1-1 Central Processing Unit (CPU) …………..
-
Page 4: Safety Information
Safety information Electrical safety • To prevent electrical shock hazard, disconnect the power cable from the electrical outlet before relocating the system. • When adding or removing devices to or from the system, ensure that the power cables for the devices are unplugged before the signal cables are connected. If possible, disconnect all power cables from the existing system before you add a device.
-
Page 5: About This Guide
Refer to the following sources for additional information and for product and software updates. ASUS website The ASUS website provides updated information on ASUS hardware and software products. Refer to the ASUS contact information. Optional documentation Your product package may include optional documentation, such as warranty flyers, that may have been added by your dealer.
-
Page 6: Package Contents
4 x DIMM, Max. 128GB, DDR4 4400(O.C)/4000(O.C)/3866(O.C)/3600(O.C)/ 3466(O.C.)/3200/3000/2800/2666/2400/2133 MHz, Un-buffered Memory* Memory Dual Channel Memory Architecture *ECC Memory (ECC mode) support varies by CPU. **Refer to www.asus.com for the Memory QVL (Qualified Vendors Lists). 1 x DisplayPort 1.2 Graphics 1 x HDMI 2.1(4K@60HZ) *Graphics specifications may vary between CPU types.
-
Page 7
TUF GAMING B550-PLUS specifications summary 1 x Realtek RTL8125B 2.5Gb Ethernet Ethernet Wireless & M.2 slot (Key E) (Wi-Fi module is sold separately) Bluetooth Rear USB (Total 8 ports) 2 x USB 3.2 Gen 2 ports (1 x Type-A + 1 x USB Type-C ®… -
Page 8
— ASUS Overvoltage Protection — ASUS SafeSlot — ASUS Stainless-Steel Back I/O ASUS Q-Design — ASUS Q-DIMM — ASUS Q-LED (CPU [red], DRAM [yellow], VGA [white], Boot Device Special Features [yellow green]) — ASUS Q-Slot ASUS Thermal Solution — Aluminum M.2 heatsink ASUS EZ DIY — BIOS FlashBack™… -
Page 9
Windows 10 — 64 bit ® System mATX Form Factor Form Factor 9.6 inch x 9.6 inch ( 24.4 cm x 24.4 cm ) Specifications are subject to change without notice. Refer to the ASUS website for the latest specifications. -
Page 10: Connectors With Shared Bandwidth
Connectors with shared bandwidth RGB_HEADER1 RGB_HEADER2 Configuration PCIEX16_2 PCIEX1_1 PCIEX1_2 PCIEX1_3 Configuration M.2_2 PCIe 3.0 x4 / SATA SATA6G_56 • PCIE 3.0 X16_2 runs x1 mode when any of the PCIe 3.0 x1 slots is occupied. • M2_2 shares bandwidth with SATA6G_56. When M.2_2 is populated, SATA6G_56 will be disabled.
-
Page 11: Chapter 1 Product Introduction
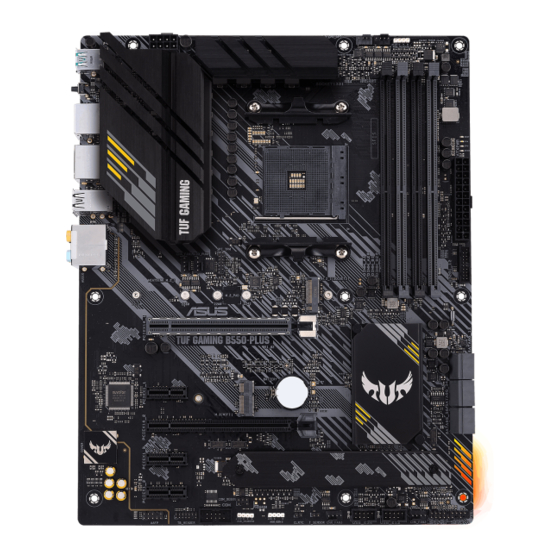
Motherboard overview 24.4cm(9.6in) RGB_HEADER1 Place this side towards the rear of the chassis RGB_HEADER2 Unplug the power cord before installing or removing the motherboard. Failure to do so can cause you physical injury and damage motherboard components. ASUS TUF GAMING B550-PLUS…
-
Page 12
1.2.1 Layout contents 1. CPU socket The motherboard comes with an AMD Socket AM4 designed for 3 Gen AMD Ryzen™ Processors. For more details, refer to Central Processing Unit (CPU). 2. DDR4 DIMM slots The motherboard comes with Dual Inline Memory Modules (DIMM) slots designed for DDR4 (Double Data Rate 4) memory modules. -
Page 13
Before you install or remove any component, ensure that the power supply is switched off or the power cord is detached from the power supply. Failure to do so may cause severe damage to the motherboard, peripherals, or components. ASUS TUF GAMING B550-PLUS… -
Page 14
• Actual lighting and color will vary with LED strip. • If your LED strip does not light up, check if the addressable RGB LED strip is connected in the correct orientation, and the 5V connector is aligned with the 5V header on the motherboard. -
Page 15
Pressing the power switch for more than four seconds while the system is ON turns the system OFF. • Reset button (2-pin RESET) This 2-pin header is for the chassis-mounted reset button for system reboot without turning off the system power. ASUS TUF GAMING B550-PLUS… -
Page 16
• Chassis intrusion header (2-pin CHASSIS) This header is for a chassis-mounted intrusion detection sensor or switch. Connect one end of the chassis intrusion sensor or switch cable to this header. The chassis intrusion sensor or switch sends a high-level signal to this connector when a chassis component is removed or replaced. -
Page 17
3.2 (USB 3.2) port is for USB 3.2 Gen 2 Type-C devices. ® BIOS FlashBack button. Press the BIOS FlashBack button for three seconds until the FlashBack LED blinks three times, indicating that the BIOS FlashBack function is enabled. ASUS TUF GAMING B550-PLUS… -
Page 18
USB 3.2 Gen 1 (up to 5Gbps) ports. These 9-pin Universal Serial Bus (USB) ports connect to USB 3.2 Gen 1 devices. port. This port is for a High-Definition Multimedia Interface (HDMI HDMI connector, and is HDCP compliant allowing playback of HD DVD, Blu-ray, and other protected content. -
Page 19: Central Processing Unit (Cpu)
CPU! Installing the CPU Apply the Thermal Interface Material to the CPU heatsink and CPU before you install the heatsink and fan if necessary. ASUS TUF GAMING B550-PLUS…
-
Page 20: System Memory
• For system stability, use a more efficient memory cooling system to support a full memory load. • Refer to www.asus.com for the latest Memory QVL (Qualified Vendors Lists). Recommended memory configurations DIMM_A1 DIMM_A2* DIMM_A2*…
-
Page 21: M.2 Installation
The rubber pad installed by default is compatible with double sided M.2 storage devices. • The M.2 heatsink can be installed to either M.2_1 or M.2_2. • The diagrams in this section are for reference only. ASUS TUF GAMING B550-PLUS 1-11…
-
Page 22
The M.2 is purchased separately. 1-12 Chapter 1: Product introduction… -
Page 23: Chapter 2 Bios And Raid Support
BIOS and RAID Support Knowing BIOS The new ASUS UEFI BIOS is a Unified Extensible Interface that complies with UEFI architecture, offering a user-friendly interface that goes beyond the traditional keyboard- only BIOS controls to enable a more flexible and convenient mouse input. You can easily navigate the new UEFI BIOS with the same smoothness as your operating system.
-
Page 24: Bios Setup Program
BIOS setup program Use the BIOS Setup to update the BIOS or configure its parameters. The BIOS screen includes navigation keys and brief onscreen help to guide you in using the BIOS Setup program. Entering BIOS at startup To enter BIOS Setup at startup, press <Delete> or <F2> during the Power-On Self Test (POST).
-
Page 25: Asus Ez Flash 3
ASUS EZ Flash 3 The ASUS EZ Flash 3 feature allows you to update the BIOS without using an OS-based utility. Ensure to load the BIOS default settings to ensure system compatibility and stability. Select the Load Optimized Defaults item under the Exit menu or press hotkey <F5>.
-
Page 26: Asus Crashfree Bios 3
ASUS CrashFree BIOS 3 The ASUS CrashFree BIOS 3 utility is an auto recovery tool that allows you to restore the BIOS file when it fails or gets corrupted during the updating process. You can restore a corrupted BIOS file using a USB flash drive that contains the BIOS file.
-
Page 27: Raid Configurations
For more information on configuring your RAID sets, please refer to the RAID Configuration Guide which you can find at https://www.asus.com/support, or by scanning the QR code. RAID definitions RAID 0 (Data striping) optimizes two identical hard disk drives to read and write data in parallel, interleaved stacks.
-
Page 28
Chapter 2: BIOS and RAID Support… -
Page 29: Appendix
Appendix Notices FCC Compliance Information Responsible Party: Asus Computer International Address: 48720 Kato Rd., Fremont, CA 94538, USA Phone / Fax No: (510)739-3777 / (510)608-4555 This device complies with part 15 of the FCC Rules. Operation is subject to the following two conditions: (1) This device may not cause harmful interference, and (2) this device must accept any interference received, including interference that may cause undesired operation.
-
Page 30
Compliance Statement of Innovation, Science and Economic Development Canada (ISED) This device complies with Innovation, Science and Economic Development Canada licence exempt RSS standard(s). Operation is subject to the following two conditions: (1) this device may not cause interference, and (2) this device must accept any interference, including interference that may cause undesired operation of the device. -
Page 31
ASUS products sold in Vietnam, on or after September 23, 2011,meet the requirements of the Vietnam Circular 30/2011/TT-BCT. Các sản phẩm ASUS bán tại Việt Nam, vào ngày 23 tháng 9 năm2011 trở về sau, đều phải đáp ứng các yêu cầu của Thông tư 30/2011/TT-BCT của Việt Nam. -
Page 32
ASUS Recycling/Takeback Services ASUS recycling and takeback programs come from our commitment to the highest standards for protecting our environment. We believe in providing solutions for you to be able to responsibly recycle our products, batteries, other components as well as the packaging materials. -
Page 33
Директив. Повний текст декларації відповідності стандартам ЄС доступний s bitnim zahtjevima i ostalim odgovarajućim odredbama vezanih direktiva. на: www.asus.com/support Cijeli tekst EU izjave o sukladnosti dostupan je na: www.asus.com/support Türkçe AsusTek Computer Inc., bu aygıtın temel gereksinimlerle ve ilişkili Čeština Společnost ASUSTeK Computer Inc. tímto prohlašuje, že Yönergelerin diğer ilgili koşullarıyla uyumlu olduğunu beyan eder. -
Page 34: Asus Contact Information
+1-510-739-3777 +1-510-608-4555 Web site https://www.asus.com/us/ Technical Support Support fax +1-812-284-0883 Telephone +1-812-282-2787 Online support https://qr.asus.com/techserv ASUS COMPUTER GmbH (Germany and Austria) Address Harkortstrasse 21-23, 40880 Ratingen, Germany Web site https://www.asus.com/de Online contact https://www.asus.com/support/Product/ContactUs/ Services/questionform/?lang=de-de Technical Support Telephone (DE) +49-2102-5789557 Telephone (AT)
перейти к содержанию
ASUS B550-Plus Tuf Gaming;

Макет материнской платы

Уведомление о заявлении для Австралии
С 1 января 2012 г. на всю продукцию ASUS распространяются обновленные гарантии в соответствии с законодательством Австралии о защите прав потребителей. Для получения последней информации о гарантии на продукт посетите http://www asus com/support/. Наши товары поставляются с гарантиями, которые не могут быть
исключено в соответствии с Законом Австралии о защите прав потребителей. Вы имеете право на замену или возмещение в случае серьезного сбоя и компенсацию за любые другие разумно предсказуемые убытки или ущерб. Вы также имеете право на ремонт или замену товара, если товар не соответствует приемлемому качеству и неисправность не считается серьезной неисправностью.
Если вам нужна помощь, позвоните в службу поддержки клиентов ASUS 1300 2787 88 или посетите нас по адресу http://www asus com/support/
Правило Индии по электронным отходам (управление) 2016 г.
Этот продукт соответствует «Правилам обращения с электронными отходами Индии, 2016 г.» и запрещает использование свинца, ртути, шестивалентного хрома, полибромированных дифенилов.
(ПБД) и полибромированные дифениловые эфиры (ПБДЭ) в концентрациях, превышающих 0.1% по весу в гомогенных материалах и 0.01% по весу в гомогенных материалах для кадмия, за исключением исключений, перечисленных в Приложении II Правил.
Шаг 1
Установите ЦП

Step2
Установите вентилятор процессора
Введите 1

Введите 2

Шаг 3
Установите модули памяти

Шаг 4
Установить устройства хранения
Шаг 5
Установите карты расширения

Шаг 6
Установите разъем системной панели.

Шаг 7
Установите разъемы питания ATX

Шаг 8
Подключите устройства ввода / вывода

Шаг 9
Включите систему и установите операционную систему и драйверы.

![]()
Документы / Ресурсы

30.5cm (12in)
24.4cm(9.6in)
RGB_HEADER1
RGB_HEADER2
AMD
B550
Motherboard Layout
15060-0vE10000
Q16519
First Edition
April 2020
Copyright © ASUSTeK Computer Inc.
All Rights Reserved
Step 1 Step 2
Step 3
Step 4
B
A
Step 2
Step 7
Step 6
Step 7
Step 1
Quick start guide
Кратко упътване за бърз старт
Stručná příručka
Quick Start-vejledning
Snelstartgids
Lühijuhend
Guide de démarrage rapide
Pikakäynnistysopas
Schnellstartanleitung
Οδηγός γρήγορης έναρξης
Beüzemelési útmutató
Guida Rapida
Panduan Ringkas
クイックスタートガイド
Жылдам іске қосу нұсқаулығы
빠른 시작 설명서
Greitos darbo pradžios vadovas
Īsa pamācība
Install the CPU
Инсталирайте процесора
Instalace procesoru
Installer CPU’en
De CPU installeren
Paigaldage CPU
Installer le CPU
Asenna suoritin
Installieren der CPU
Εγκατάσταση της CPU
Helyezze be a CPU-t
Installare la CPU
Pasang CPU
C P Uを取り付 ける
CPU 설치
Sumontuokite centrinį procesorių
Uzstādiet centrālo procesoru
Installer sentralprosessoren (CPU)
Instale a CPU
Instalacja procesora
Установка процессора
Instalaţi CPU-ul
Instalar la CPU
Instalirajte CPU
Inštalácia centrálneho procesora
Installera CPU
ติดตั้ง CPU
CPU’yu takın
Lắp CPU
Instalacija procesora
Інсталюйте процесор
Namestitev CPE-ja
Install the CPU fan
Инсталирайте вентилатора на процесора
Instalace ventilátoru procesoru
Installer CPU-blæseren
De CPU-ventilator installeren
Paigaldage CPU ventilaator
Installer le ventilateur de CPU
Asenna suorittimen tuuletin
Installieren des CPU-Lüfters
Εγκατάσταση του ανεμιστήρα της CPU
Szerelje be a CPU ventillátort
Installare la ventola della CPU
Pasang kipas CPU
C P Uクーラーを取り付ける
CPU 팬 설치
Sumontuokite centrinio procesoriaus ventiliatorių
Uzstādiet centrālā procesora ventilatoru
Installer CPU-viften
Instale a ventoinha de CPU
Instalacja wentylatora procesora
Установка вентилятора
Instalaţi ventilatorul CPU-ului
Instalar el ventilador de la CPU
Instalirajte CPU ventilator
Inštalácia ventilátora centrálneho procesora
Installera CPU-äkten
ติดตั้งพัดลม CPU
CPU fanını takın
Lắp quạt CPU
Instalacija ventilatora procesora
Інсталюйте вентилятор процесора
Namestitev ventilatorja CPE-ja
Install memory modules
Инсталирайте модулите памет
Instalace paměťových modulů
Installer hukommelsesmodulerne
Geheugenmodules installeren
Paigaldage mälumoodulid
Installer les modules mémoire
Asenna muistimoduulit
Installieren der Speichermodule
Εγκατάσταση των στοιχείων μνήμης
Helyezze be a memória modulokat
Installare i moduli di memoria
Pasang modul memori
メモリーモジュー ルを取り付ける
메모리 모듈 설치
Sumontuokite atminties modulius
Uzstādiet atmiņas moduļus
Installer minnemoduler
Instale módulos de memória
Instalacja modułów pamięci
Установка модулей памяти
Instalaţi modulele de memorie
Instalar los módulos de memoria
Instalirajte module memorije
Inštalácia pamäťových modulov
Installera minnesmoduler
ติดตั้งโมดูลหน่วยความจำา
Bellek modüllerini takın
Lắp các thanh nhớ
Instalacija memorijskih modula
Інсталюйте модулі пам’яті
Namestitev pomnilniških modulov
Step 3
Step 5
*
*
*
*
*
Step 4
A
B
C
D
IMPRESSO NA CHINA
Install storage devices
Инсталиране на устройства за съхранение
Instalování paměťových zařízení
Installering af lagerenheder
Opslagapparaten installeren
Installige salvestid
I
nstaller les périphériques de stockage
Tallennuslaitteiden asentaminen
Installieren der Speichergeräte
Εγκατάσταση συσκευών αποθήκευσης
Tárolóeszközök telepítése
Installare i dispositivi di archiviazione
Memasang perangkat penyimpanan
ストレージデバイスを取り付ける
Сақтау құрылғыларын орнату
저장 장치 설치
Įdiegti saugojimo įrenginius
Instalējiet atmiņas ierīces
Montere lagringsenheter
Instalar
dispositivos de armazenamento
Instalacja urządzeń pamięci
Установите накопители
Instalarea dispozitivelor de stocare
Instalar
dispositivos de almacenamiento
Instalirajte uređaje za skladištenje
Ištalácia pamäťových zariadení
Installera lagringsenheter
การติดตั้งอุปกรณ์เก็บข้อมูล
Depolama aygıtlarınızı takma
lắp đặt các thiết bị lưu trữ
Instalirajte uređaje za pohranjivanje
Інсталяція пристроїв пам’яті
Namestitev naprav za shranjevanje
Australia statement notice
From 1 January 2012 updated warranties apply to all ASUS products, consistent with
the Australian Consumer Law. For the latest product warranty details please visit
http://www.asus.com/support/. Our goods come with guarantees that cannot be
excluded under the Australian Consumer Law. You are entitled to a replacement or
refund for a major failure and compensation for any other reasonably foreseeable loss
or damage. You are also entitled to have the goods repaired or replaced if the goods
fail to be of acceptable quality and the failure does not amount to a major failure.
If you require assistance please call ASUS Customer Service 1300 2787 88 or visit us at
http://www.asus.com/support/
India E-waste (Management) Rule 2016
This product complies with the “India E-Waste (Management) Rules, 2016” and
prohibits use of lead, mercury, hexavalent chromium, polybrominated biphenyls
(PBBs) and polybrominated diphenyl ethers (PBDEs) in concentrations exceeding 0.1%
by weight in homogenous materials and 0.01 % by weight in homogenous materials
for cadmium, except for the exemptions listed in Schedule II of the Rule.
Regional notice for Turkey
AEEE Yönetmeliğine Uygundur.
Hurtigstartsveiledning
Guia de consulta rápida
Instrukcja szybkiej instalacji
Краткое руководство
Ghid de pornire rapidă
Guía de inicio rápida
Vodič za brzo korišćenje
Stručný návod na spustenie
Snabbstartsguide
คู่มือเริ่มต้นอย่างเร็ว
Hızlı Başlatma Kılavuzu
Höôùng daãn khôûi ñoäng nhanh
Vodič za brzi početak rada
Стисле керівництво для
початку експлуатації
Vodnik za hitri začetek
C
D
Type 1
Type 2
E
A
B
C
NOTE: Remove the screws and the
retention module only. Do not remove the
plate on the bottom.
- Manuals
- Brands
- Asus Manuals
- Motherboard
- TUF GAMING B550M-PLUS WI-FI
- Manual
-
Contents
-
Table of Contents
-
Bookmarks
Quick Links
TUF GAMING
B550M-PLUS (WI-FI)
Related Manuals for Asus TUF GAMING B550M-PLUS WI-FI
Summary of Contents for Asus TUF GAMING B550M-PLUS WI-FI
-
Page 1
TUF GAMING B550M-PLUS (WI-FI) -
Page 2
Product warranty or service will not be extended if: (1) the product is repaired, modified or altered, unless such repair, modification of alteration is authorized in writing by ASUS; or (2) the serial number of the product is defaced or missing. -
Page 3: Table Of Contents
M.2 installation ……………….. 1-10 Chapter 2 BIOS and RAID Support Knowing BIOS ………………..2-1 BIOS setup program ………………2-2 ASUS EZ Flash 3 ………………. 2-3 ASUS CrashFree BIOS 3 …………….2-4 RAID configurations ………………2-5 Appendix Notices ……………………A-1 ASUS contact information ………………A-8…
-
Page 4: Safety Information
Safety information Electrical safety • To prevent electrical shock hazard, disconnect the power cable from the electrical outlet before relocating the system. • When adding or removing devices to or from the system, ensure that the power cables for the devices are unplugged before the signal cables are connected. If possible, disconnect all power cables from the existing system before you add a device.
-
Page 5: About This Guide
Refer to the following sources for additional information and for product and software updates. ASUS website The ASUS website provides updated information on ASUS hardware and software products. Refer to the ASUS contact information. Optional documentation Your product package may include optional documentation, such as warranty flyers, that may have been added by your dealer.
-
Page 6: Package Contents
(O.C.)/3466(O.C.)/3200/3000/2800/2666/2400/2133 MHz, Un-buffered Memory* Memory Dual Channel Memory Architecture *ECC Memory (ECC mode) support varies by CPU. *Refer to www.asus.com for the Memory QVL (Qualified Vendors Lists). 1 x DisplayPort 1.2 Graphics 1 x HDMI 2.1(4K@60HZ) Gen AMD Ryzen™ Processors 1 x PCIe 4.0 x16 slot (supports x16 mode)
-
Page 7
2 x USB 2.0 ports (2 x Type-A) 1 x DisplayPort 1 x HDMI port 1 x ASUS Wi-Fi Module Back Panel I/O Ports 1 x Realtek RTL8125B 2.5Gb Ethernet port 5 x Audio jacks 1 x Optical S/PDIF out port 1 x BIOS FlashBack™… -
Page 8
— ASUS Overvoltage Protection — ASUS SafeSlot — ASUS Stainless-Steel Back I/O ASUS Q-Design — ASUS Q-DIMM — ASUS Q-LED (CPU [red], DRAM [yellow], VGA [white], Boot Device Special Features [yellow green]) — ASUS Q-Slot ASUS Thermal Solution — Aluminum M.2 heatsink ASUS EZ DIY — BIOS FlashBack™… -
Page 9
Windows 10 — 64 bit ® System mATX Form Factor Form Factor 9.6 inch x 9.6 inch ( 24.4 cm x 24.4 cm ) Specifications are subject to change without notice. Refer to the ASUS website for the latest specifications. -
Page 10: Connectors With Shared Bandwidth
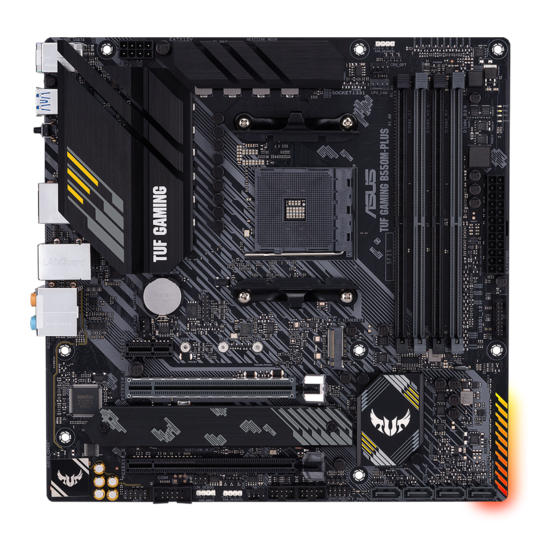
Connectors with shared bandwidth RGB_HEADER1 KBMS _USB78 EATX12V CPU_OPT DIGI+ CPU_FAN U32G1_3-6 BOOT DRAM BIOS_FLBK FLBK_LED1 M.2(WIFI) HDMI U32G2_C2 LAN_U32G2_1 8125B BATTERY AUDIO 256Mb BIOS PCIEX1 2280 2260 2242 PCIEX16_1 Super B550 22110 2280 2260 2242 AURA CLRTC PCIEX16_2 COM_DEBUG SPEAKER CHA_FAN2 USB_E34…
-
Page 11: Before You Proceed
SATA6G_3 SATA6G_2 SATA6G_1 USB_E12 AAFP RGB_HEADER2 ADD_GEN 2 F_PANEL 10 11 4 Unplug the power cord before installing or removing the motherboard. Failure to do so can cause you physical injury and damage motherboard components. ASUS TUF GAMING B550M-PLUS (WI-FI)
-
Page 12
1.2.1 Layout contents 1. CPU socket The motherboard comes with an AMD Socket AM4 designed for 3 Gen AMD Ryzen™ Processors. For more details, refer to Central Processing Unit (CPU). 2. DDR4 DIMM slots The motherboard comes with Dual Inline Memory Modules (DIMM) slots designed for DDR4 (Double Data Rate 4) memory modules. -
Page 13
Before you install or remove any component, ensure that the power supply is switched off or the power cord is detached from the power supply. Failure to do so may cause severe damage to the motherboard, peripherals, or components. ASUS TUF GAMING B550M-PLUS (WI-FI) -
Page 14
• Actual lighting and color will vary with LED strip. • If your LED strip does not light up, check if the addressable RGB LED strip is connected in the correct orientation, and the 5V connector is aligned with the 5V header on the motherboard. -
Page 15
Power button/Soft-off button (2-pin PWR_BTN) This header is for the system power button. • Reset button (2-pin RESET) This 2-pin header is for the chassis-mounted reset button for system reboot without turning off the system power. ASUS TUF GAMING B550M-PLUS (WI-FI) -
Page 16
18. Q-LEDs The Q-LEDs check key components (CPU, DRAM, VGA, and booting devices) during the motherboard booting process. If an error is found, the critical component’s LED stays lit up until the problem is solved. The Q-LEDs provide the most probable cause of an error code as a starting point for troubleshooting. -
Page 17
Wi-Fi 6 AX200 ports. These ports connect to Wi-Fi antennas. ® • Ensure that the ASUS 2×2 dual band Wi-Fi antenna is securely installed to the Wi-Fi ports. • Ensure that the antenna is at least 20 cm away from all persons. -
Page 18: Central Processing Unit (Cpu)
Central Processing Unit (CPU) This motherboard comes with an AMD Socket AM4 designed for 3 Gen AMD Ryzen Processors. Unplug all power cables before installing the CPU. The AM4 socket has a different pinout design. Ensure that you use a CPU designed for the AM4 socket.
-
Page 19: System Memory
• For system stability, use a more efficient memory cooling system to support a full memory load. • Refer to www.asus.com for the latest Memory QVL (Qualified Vendors Lists). Recommended memory configurations DIMM_A1 DIMM_A2* DIMM_A2*…
-
Page 20: M.2 Installation
Installing a DIMM To remove a DIMM M.2 installation OPTIONAL • Ensure to install the bundled M.2 rubber pad before installing your single sided M.2 storage device. • DO NOT install the bundled M.2 rubber pads when installing a double-sided M.2 storage device.
-
Page 21: Chapter 2 Bios And Raid Support
BIOS and RAID Support Knowing BIOS The new ASUS UEFI BIOS is a Unified Extensible Interface that complies with UEFI architecture, offering a user-friendly interface that goes beyond the traditional keyboard- only BIOS controls to enable a more flexible and convenient mouse input. You can easily navigate the new UEFI BIOS with the same smoothness as your operating system.
-
Page 22: Bios Setup Program
BIOS setup program Use the BIOS Setup to update the BIOS or configure its parameters. The BIOS screen includes navigation keys and brief onscreen help to guide you in using the BIOS Setup program. Entering BIOS at startup To enter BIOS Setup at startup, press <Delete> or <F2> during the Power-On Self Test (POST).
-
Page 23: Asus Ez Flash 3
ASUS EZ Flash 3 The ASUS EZ Flash 3 feature allows you to update the BIOS without using an OS-based utility. Ensure to load the BIOS default settings to ensure system compatibility and stability. Select the Load Optimized Defaults item under the Exit menu or press hotkey <F5>.
-
Page 24: Asus Crashfree Bios 3
ASUS CrashFree BIOS 3 The ASUS CrashFree BIOS 3 utility is an auto recovery tool that allows you to restore the BIOS file when it fails or gets corrupted during the updating process. You can restore a corrupted BIOS file using a USB flash drive that contains the BIOS file.
-
Page 25: Raid Configurations
For more information on configuring your RAID sets, please refer to the RAID Configuration Guide which you can find at https://www.asus.com/support, or by scanning the QR code. RAID definitions RAID 0 (Data striping) optimizes two identical hard disk drives to read and write data in parallel, interleaved stacks.
-
Page 26
Chapter 2: BIOS and RAID Support… -
Page 27: Appendix
Appendix Notices FCC Compliance Information Responsible Party: Asus Computer International Address: 48720 Kato Rd., Fremont, CA 94538, USA Phone / Fax No: (510)739-3777 / (510)608-4555 Identification of the assembled product: INTEL WI-FI 6 AX200 ® Identification of the modular components used in the assembly:…
-
Page 28
Compliance Statement of Innovation, Science and Economic Development Canada (ISED) This device complies with Innovation, Science and Economic Development Canada licence exempt RSS standard(s). Operation is subject to the following two conditions: (1) this device may not cause interference, and (2) this device must accept any interference, including interference that may cause undesired operation of the device. -
Page 29
Tenez cet appareil à distance du ventre des femmes enceintes et du bas-ventre des adolescents. ASUS TUF GAMING B550M-PLUS (WI-FI) -
Page 30
ASUS products sold in Vietnam, on or after September 23, 2011,meet the requirements of the Vietnam Circular 30/2011/TT-BCT. Các sản phẩm ASUS bán tại Việt Nam, vào ngày 23 tháng 9 năm2011 trở về sau, đều phải đáp ứng các yêu cầu của Thông tư 30/2011/TT-BCT của Việt Nam. -
Page 31
DO NOT throw the mercury-containing button cell battery in municipal waste. This symbol of the crossed out wheeled bin indicates that the battery should not be placed in municipal waste. Regional notice for California WARNING Cancer and Reproductive Harm — www.P65Warnings.ca.gov ASUS TUF GAMING B550M-PLUS (WI-FI) -
Page 32
2014/53/EU. Cijeli di: https://www.asus.com/support/ tekst EU izjave o sukladnosti dostupan je na https://www.asus.com/support/ WiFi yang Beroperasi pada 5150-5350 MHz akan terbatas untuk penggunaan WiFi koji radi na opsegu frekvencija 5150-5350 MHz bit će ograničen na… -
Page 33
ASUSTek Computer Inc. tukaj izjavlja, da je ta naprava skladna s temeljnimi zahtevami in drugimi relevantnimii določili Direktive 2014/53/EU. Polno besedilo izjave EU o skladnosti je na voljo na https://www.asus.com/ support/ WiFi, ki deluje v pasovnem območju 5150–5350 MHz, mora biti v državah, navedenih v spodnjem seznamu, omejen na notranjo uporabo: Declaración de conformidad simplificada para la UE… -
Page 34: Asus Contact Information
+1-510-739-3777 +1-510-608-4555 Web site https://www.asus.com/us/ Technical Support Support fax +1-812-284-0883 Telephone +1-812-282-2787 Online support https://qr.asus.com/techserv ASUS COMPUTER GmbH (Germany and Austria) Address Harkortstrasse 21-23, 40880 Ratingen, Germany Web site https://www.asus.com/de Online contact https://www.asus.com/support/Product/ContactUs/ Services/questionform/?lang=de-de Technical Support Telephone (DE) +49-2102-5789557 Telephone (AT)
-
Драйверы
21
-
Инструкции по эксплуатации
4
Языки:

ASUS TUF GAMING B550-PLUS инструкция по эксплуатации
(34 страницы)
- Языки:Немецкий
-
Тип:
PDF -
Размер:
2.33 MB -
Описание:
TUF GAMING B550-PLUS User’s Manual ( German Edition )
Просмотр

ASUS TUF GAMING B550-PLUS инструкция по эксплуатации
(34 страницы)
- Языки:Французский
-
Тип:
PDF -
Размер:
3.18 MB -
Описание:
TUF GAMING B550-PLUS User’s Manual ( French Edition )
Просмотр

ASUS TUF GAMING B550-PLUS инструкция по эксплуатации
(36 страниц)
- Языки:Японский
-
Тип:
PDF -
Размер:
2.77 MB -
Описание:
TUF GAMING B550-PLUS User’s Manual ( Japanese Edition )
Просмотр

ASUS TUF GAMING B550-PLUS инструкция по эксплуатации
(52 страницы)
- Языки:Японский
-
Тип:
PDF -
Размер:
2.44 MB -
Описание:
PRIME TUF GAMING B550 Series BIOS Manual ( Japanese Edition )
Просмотр
На NoDevice можно скачать инструкцию по эксплуатации для ASUS TUF GAMING B550-PLUS. Руководство пользователя необходимо для ознакомления с правилами установки и эксплуатации ASUS TUF GAMING B550-PLUS. Инструкции по использованию помогут правильно настроить ASUS TUF GAMING B550-PLUS, исправить ошибки и выявить неполадки.