Руководства пользователя
- Руководства пользователя
- Декларация соответствия
Версия —
511.02 KB
ASUS WebStorage Insert Page For MB
Версия —
3.46 MB
Intel 600 series Channel BIOS UM ( Japanese Edition )
Версия —
238.28 KB
Intel 600 series Channel BIOS UM ( Simplified Chinese Edition )
Версия —
238.31 KB
Intel 600 series Channel BIOS UM ( Traditional Chinese Edition )
Версия —
2.73 MB
TUF GAMING B660M-PLUS WIFI D4 User’s Manual ( Japanese Edition )
Версия —
2.17 MB
TUF GAMING B660M-PLUS WIFI D4 User’s Manual ( French Edition )
Версия —
2.24 MB
TUF GAMING B660M-PLUS WIFI D4 User’s Manual ( German Edition )
Версия —
2.51 MB
TUF GAMING B660M-PLUS WIFI D4 User’s Manual ( English Edition )
Версия —
238.15 KB
Intel 600 series Channel BIOS UM (English Edition)
Версия —
1.21 MB
TUF GAMING B660M-PLUS WIFI D4 Quick Start Guide ( Multiple Languages )
Версия —
2.57 MB
TUF GAMING B660M-PLUS WIFI D4 User’s Manual ( Traditional Chinese Edition )
Версия —
2.67 MB
TUF GAMING B660M-PLUS WIFI D4 User’s Manual ( Simplified Chinese Edition )
- Manuals
- Brands
- Asus Manuals
- Motherboard
- TUF Gaming B660-PLUS WIFI D4
- Manual
-
Contents
-
Table of Contents
-
Bookmarks
Quick Links
TUF GAMING
B660-PLUS WIFI D4
Related Manuals for Asus TUS GAMING B660-PLUS WIFI D4
Summary of Contents for Asus TUS GAMING B660-PLUS WIFI D4
-
Page 1
TUF GAMING B660-PLUS WIFI D4… -
Page 2
Product warranty or service will not be extended if: (1) the product is repaired, modified or altered, unless such repair, modification of alteration is authorized in writing by ASUS; or (2) the serial number of the product is defaced or missing. -
Page 3: Table Of Contents
Wi-Fi antenna installation …………….1-18 Chapter 2 BIOS and RAID Support Knowing BIOS ………………..2-1 BIOS Setup program ………………2-2 ASUS EZ Flash 3 ………………. 2-3 ASUS CrashFree BIOS 3 …………….2-4 RAID configurations ………………2-5 Appendix Notices ……………………A-1 Warranty ……………………
-
Page 4: Safety Information
Safety information Electrical safety • To prevent electrical shock hazard, disconnect the power cable from the electrical outlet before relocating the system. • When adding or removing devices to or from the system, ensure that the power cables for the devices are unplugged before the signal cables are connected. If possible, disconnect all power cables from the existing system before you add a device.
-
Page 5: About This Guide
Refer to the following sources for additional information and for product and software updates. ASUS website The ASUS website provides updated information on ASUS hardware and software products. Refer to the ASUS contact information. Optional documentation Your product package may include optional documentation, such as warranty flyers, that may have been added by your dealer.
-
Page 6: Package Contents
Extreme Memory Profile (XMP) ® OptiMem II * Actual Memory data rate depends on the CPU types and DRAM modules, for more information refer to www.asus.com for the Memory QVL (Qualified Vendors Lists). 1 x DisplayPort** 1 x HDMI port*** ®…
-
Page 7
TUF GAMING B660-PLUS WIFI D4 specifications summary Total supports 3 x M.2 slots and 4 x SATA 6Gb/s ports Intel Gen Processors ® M.2_1 slot (Key M), type 2242/2260/2280/22110 — Intel Gen processors support PCIe 4.0 x4 mode. ® Intel B660 Chipset ®… -
Page 8
1 x Front Panel Audio header (AAFP) 1 x 20-3 pin System Panel header with Chassis intrude function 1 x Thunderbolt™ header ASUS TUF PROTECTION — DIGI+ VRM (- Digital power design with DrMOS) — Enhanced DRAM Overcurrent Protection — ESD Guards… -
Page 9
12 inch x 9.6 inch (30.5 cm x 24.4 cm) • Specifications are subject to change without notice. Please refer to the ASUS website for the latest specifications. • MyASUS offers a variety of support features such as helping to troubleshoot issues, optimizing product performance, integrating ASUS software, and recovery drive creation. -
Page 11: Before You Proceed
Unplug the power cord before installing or removing the motherboard. Failure to do so can cause you physical injury and damage motherboard components. The pin definitions in this chapter are for reference only. The pin names depend on the location of the header/jumper/connector. ASUS TUF GAMING B660-PLUS WIFI D4…
-
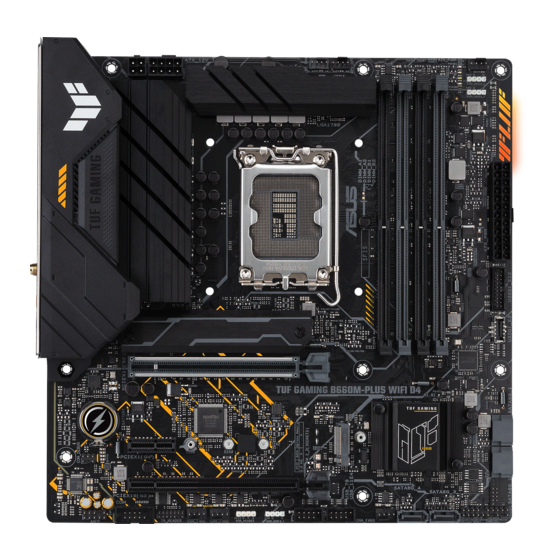
Page 12
1.2.1 Layout contents 1. CPU socket The motherboard comes with a LGA1700 socket designed for 12 Gen Intel Core™ ® processors, Pentium Gold and Celeron Processors. ® ® For more details, refer to Central Processing Unit (CPU). 2. DDR4 DIMM slots The motherboard comes with Dual Inline Memory Modules (DIMM) slots designed for DDR4 (Double Data Rate 4) memory modules. -
Page 13
Failure to do so may cause severe damage to the motherboard, peripherals, or components. • Actual lighting and color will vary with LED strip. ASUS TUF GAMING B660-PLUS WIFI D4… -
Page 14
• If your LED strip does not light up, check if the addressable RGB LED strip is connected in the correct orientation, and the 5V connector is aligned with the 5V header on the motherboard. • The addressable RGB LED strip will only light up when the system is powered on. •… -
Page 15
The chassis intrusion sensor or switch sends a high-level signal to this connector when a chassis component is removed or replaced. The signal is then generated as a chassis intrusion event. ASUS TUF GAMING B660-PLUS WIFI D4… -
Page 16
17. Thunderbolt™ header The Thunderbolt™ header allows you to connect an add-on Thunderbolt™ I/O card that supports Intel®’s Thunderbolt™ Technology, allowing you to connect Thunderbolt™-enabled devices to form a daisy chain-configuration. TB_HEADER • The add-on Thunderbolt™ I/O card and PIN 1 Thunderbolt™… -
Page 17
HDCP compliant allowing playback of HD DVD, Blu-ray, and other protected content. USB 3.2 Gen 1 (up to 5Gbps) ports. These Universal Serial Bus (USB) ports connect to USB 3.2 Gen 1 devices. ASUS TUF GAMING B660-PLUS WIFI D4… -
Page 18
3.2 (USB 3.2) port is for USB 3.2 Gen 2 devices. Wi-Fi 6 ports. These ports connect to Wi-Fi antennas. • Ensure that the ASUS Wi-Fi moving antennas are securely installed to the Wi-Fi ports. • Ensure that the antennas are at least 20cm away from all persons. -
Page 19: Central Processing Unit (Cpu)
PnP cap/socket contacts/motherboard components. • Keep the cap after installing the motherboard. ASUS will process Return Merchandise Authorization (RMA) requests only if the motherboard comes with the cap on the LGA1700 socket.
-
Page 20
Ensure to remove the CPU socket lever protector on the lever latch before locking the lever latch under the retention tab. Failure to do so may cause damages to your system when installing the cooling system. 1-10 Chapter 1: Product Introduction… -
Page 21: System Memory
(D/C) from the same vendor. Check with the retailer to get the correct memory modules. • Refer to www.asus.com for the Memory QVL (Qualified Vendors Lists), and memory frequency support depends on the CPU types. Recommended memory configurations…
-
Page 22
Installing a DIMM To remove a DIMM 1-12 Chapter 1: Product Introduction… -
Page 23: Installation
• The M.2 is purchased separately. When installing an M.2 to the M.2 slot, you may need to use the removable screw stand. Remove the screws from the heatsink. Remove the heatsink. ASUS TUF GAMING B660-PLUS WIFI D4 1-13…
-
Page 24
Install your M.2 to your M.2 slot. The steps may differ between installing M.2 of different lengths, please refer to the different types and their installation steps below: • To install an M.2 to M.2_1 and M.2_3 slot For 2280, 22110 length (optional) Remove the pre-installed removable M.2 Q-Latch screw at the 2280 length screw hole. -
Page 25
Rotate and adjust the M.2 Q-latch so that the handle points away from the M.2 slot. Install your M.2 to the M.2 slot. Rotate the M.2 Q-Latch clockwise to secure the M.2 in place. ASUS TUF GAMING B660-PLUS WIFI D4 1-15… -
Page 26
• To install an M.2 to M.2_2 slot For 2280 length (optional) Install the bundled M.2 rubber pad if you are installing a single sided M.2 storage device. DO NOT install the bundled M.2 rubber pads when installing a double-sided M.2 storage device. The rubber pad installed by default is compatible with double sided M.2 storage devices. -
Page 27
Install the bundled screw stand to the M.2 length screw hole you wish to install your M.2 to. Install your M.2 to the M.2 slot. Secure your M.2 using the bundled screw stand’s screw. ASUS TUF GAMING B660-PLUS WIFI D4 1-17… -
Page 28: Wi-Fi Antenna Installation
Wi-Fi antenna installation Installing the ASUS Wi-Fi moving antenna Connect the bundled ASUS Wi-Fi moving antenna connectors to the Wi-Fi ports at the back of the chassis. • Ensure that the ASUS Wi-Fi moving antenna is securely installed to the Wi-Fi ports.
-
Page 29: Chapter 2 Bios And Raid Support
BIOS and RAID Support Knowing BIOS The new ASUS UEFI BIOS is a Unified Extensible Interface that complies with UEFI architecture, offering a user-friendly interface that goes beyond the traditional keyboard- only BIOS controls to enable a more flexible and convenient mouse input. You can easily navigate the new UEFI BIOS with the same smoothness as your operating system.
-
Page 30: Bios Setup Program
BIOS Setup program Use the BIOS Setup to update the BIOS or configure its parameters. The BIOS screens include navigation keys and brief onscreen help to guide you in using the BIOS Setup program. Entering BIOS at startup To enter BIOS Setup at startup, press <Delete> or <F2> during the Power-On Self Test (POST).
-
Page 31: Asus Ez Flash 3
ASUS EZ Flash 3 The ASUS EZ Flash 3 feature allows you to update the BIOS without using an OS-based utility. Ensure to load the BIOS default settings to ensure system compatibility and stability. Select the Load Optimized Defaults item under the Exit menu or press hotkey <F5>.
-
Page 32: Asus Crashfree Bios 3
ASUS CrashFree BIOS 3 The ASUS CrashFree BIOS 3 utility is an auto recovery tool that allows you to restore the BIOS file when it fails or gets corrupted during the updating process. You can restore a corrupted BIOS file using a USB flash drive that contains the BIOS file.
-
Page 33: Raid Configurations
For more information on configuring your RAID sets, please refer to the RAID Configuration Guide which you can find at https://www.asus.com/support, or by scanning the QR code. RAID definitions RAID 0 (Data striping) optimizes two identical hard disk drives to read and write data in parallel, interleaved stacks.
-
Page 34
Chapter 2: BIOS and RAID Support… -
Page 35: Appendix
RF exposure compliance. HDMI Compliance Statement The terms HDMI, HDMI High-Definition Multimedia Interface, and the HDMI Logo are trademarks or registered trademarks of HDMI Licensing Administrator, Inc. ASUS TUF GAMING B660-PLUS WIFI D4…
-
Page 36
Compliance Statement of Innovation, Science and Economic Development Canada (ISED) This device complies with Innovation, Science and Economic Development Canada licence exempt RSS standard(s). Operation is subject to the following two conditions: (1) this device may not cause interference, and (2) this device must accept any interference, including interference that may cause undesired operation of the device. -
Page 37
Tenez cet appareil à distance du ventre des femmes enceintes et du bas-ventre des adolescents. ASUS TUF GAMING B660-PLUS WIFI D4… -
Page 38
ASUS products sold in Vietnam, on or after September 23, 2011,meet the requirements of the Vietnam Circular 30/2011/TT-BCT. Các sản phẩm ASUS bán tại Việt Nam, vào ngày 23 tháng 9 năm2011 trở về sau, đều phải đáp ứng các yêu cầu của Thông tư 30/2011/TT-BCT của Việt Nam. -
Page 39
ASUSTek Computer Inc. hereby declares that this device is in compliance with the essential requirements and other relevant provisions of The Radio Equipment Regulations 2017 (S.I. 2017/1206). Full text of UKCA declaration of conformity is available at https://www.asus.com/support/. The WiFi operating in the band 5150-5350MHz shall be restricted to indoor use for the country listed below: UKCA RF Output table (The Radio Equipment Regulations 2017) Intel®… -
Page 40
2014/53/EU. Cijeli di: https://www.asus.com/support/ tekst EU izjave o sukladnosti dostupan je na https://www.asus.com/support/ WiFi yang Beroperasi pada 5150-5350 MHz akan terbatas untuk penggunaan WiFi koji radi na opsegu frekvencija 5150-5350 MHz bit će ograničen na… -
Page 41
ASUSTek Computer Inc. tukaj izjavlja, da je ta naprava skladna s temeljnimi zahtevami in drugimi relevantnimii določili Direktive 2014/53/EU. Polno besedilo izjave EU o skladnosti je na voljo na https://www.asus.com/ support/ WiFi, ki deluje v pasovnem območju 5150–5350 MHz, mora biti v državah,… -
Page 42: Warranty
• ASUS offers a voluntary manufacturer’s Commercial Guarantee. • ASUS dragovoljno nudi komercijalno proizvođačko jamstvo. • ASUS reserves the right to interpret the provisions of the ASUS • ASUS zadržava prava na tumačenje odredbi ASUS komercijalnog Commercial Guarantee. jamstva. •…
-
Page 43
• ASUS tilbyr som produsent en frivillig kommersiell garanti. • Bảo hành thương mại này của ASUS được cung cấp độc lập và ngoài • ASUS forbeholder seg retten til å tolke bestemmelsene i ASUS sin Bảo đảm pháp lý theo luật định và không có cách nào ảnh hưởng đến kommersielle garanti. -
Page 44: Asus Contact Information
Address: 1F., No. 15, Lide Rd., Beitou Dist., Taipei City 112, Taiwan ASUS COMPUTER INTERNATIONAL (America) Address: 48720 Kato Rd., Fremont, CA 94538, USA ASUS COMPUTER GmbH (Germany and Austria) Address: Harkortstrasse 21-23, 40880 Ratingen, Germany ASUSTeK (UK) LIMITED Address: 1st Floor, Sackville House, 143-149 Fenchurch Street, London, EC3M 6BL,…
B660M-PLUS WIFI D4 Tuf Gaming
T18759 // 2021 9 ©
15060-14J03000
TUF GAMING B660M-PLUS WIFI D4
5
6
HDMI_DP
ATX_12V_2 ATX_12V_1
U2_56 U32G2_E56 U32G2X2_C1
У32Г1_9
LAN_U32G2_34
М.2 (WI-FI)
1
4
24.4cm (9.6in)
CPU_FAN
CPU_OPT
DIGI + VRM
LGA1700
2
18 4
ОЗУ процессора
ЗАГРУЗКА VGA
AIO_PUMP
ДОБАВИТЬ GEN 2_2 ДОБАВИТЬ GEN 2_3
ATX_PWR
DDR4 DIMM_A1 (64-разрядный, 288-контактный модуль) DDR4 DIMM_A2 (64-разрядный, 288-контактный модуль) DDR4 DIMM_B1 (64-разрядный, 288-контактный модуль) DDR4 DIMM_B2 (64-разрядный, 288-контактный модуль)
U32G1_E3 U32G1_E12
PCIE SATA 4.0 X4 X
M.2_1(SOCKET3) M.2_1(SOCKET3)
АУДИО
2242
2260
2280
PCIEX16(G5)
ASM 1074
RTL
3
Ethernet
БАТАРЕИ
AURA
Супер I / O
COM_DEBUG
PCIEX1(G4) 2280
2260
M.2_2(SOCKET3) 2242 PCIE SATA Optane Память
4.0 х 4 х
V
Intel® B660
Аудио кодек
AAFP
COM
PCIEX16(G3)
TB_HEADER CHA_FAN1 CHA_FAN2
CLRTC ДОБАВИТЬ GEN 2_1 USB_78 USB_11E4
RGB_HEADER
SATA6G_4
CHA_FAN3
SATA6G_3
ПАНЕЛЬ БИОС 128Mb
15 14 17 4 12 11 13 10
4
7
16
M.2_2(SOCKET3) SATA6G_2 SATA6G_1
24.4cm (9.6in)
11
5 9 8 6 7
TUF GAMING B660M-PLUS WIFI D4 2 x SATA 6 Гбит/с 1 x Wi-Fi 1 x M.2 1 x M.2 SSD 1 x TUF GAMING
1 х
1 х ТЮФ 1 х
LGA1700 Intel® CoreTMPentium® Gold Celeron®
ЦП
DDR4 DDR4Double Data Rate 2GB4GB8GB16GB 32GB Non-ECCНебуферизованный DDR4 DIMM
PCIe x16 PCIe 4.0 x1 PCI Express
· PCIe x16(G5) PCIe 5.0 x16 PCIe x16(G3) PCIe 3.0 x4 · Intel® Optane H PCH PCIe
ВЕНТИЛЯТОР ШИМ ВЕНТИЛЯТОР ВХОД
FAN PWR GND GND FAN PWR FAN IN FAN PWM
GND
·
· CPU_FAN 1 12
8-контактный
2
·
· Блок питания PCI Express x16 1000 Вт
М.2 Клавиша М
М.2 М.2
· Ключ M.2_1 M 2242/2260/2280 Intel® PCIe 4.0 x4
· M.2_2 M Key 2242/2260/2280 PCIe 4.0 x4 · Intel® Optane H PCH M.2 Intel® Rapid Storage
Технологии
SATA 6Gb / s
SATA 6 Гбит / с SATA
СБУ2
VBUS
СБУ1
ТХ2+
USB 3.2 Gen 1 USB Type-C®
CC1 VBUS
TX2GND
RX1-
RX2+
USB 3.2 Gen 1 USB 3.2 Gen 1 Type-C®
RX1+ ЗАЗЕМЛЕНИЕ
ТХ1-
RX2GND D-
USB 3.2 1-го поколения 5 Гбит/с
TX1+ VBUS
Д+ СС2
USB 3.2 Gen 1 USB 3.2 Gen 1 USB 3.2 Gen 1 USB 3.2 Gen 1 5 Гбит/с
USB 3.2 Gen 1
USB3+5В IntA_P2_SSRXIntA_P2_SSRX+
Земля IntA_P2_SSTXIntA_P2_SSTX+
Земля IntA_P2_DIntA_P2_D+
ПИН 1
USB3+5V IntA_P1_SSRXIntA_P1_SSRX+ GND IntA_P1_SSTXIntA_P1_SSTX+ GND IntA_P1_DIntA_P1_D+ GND
USB+5V USB_E1USB_E1+ ЗАЗЕМЛЕНИЕ НЗ
USB 2.0 USB 2.0 USB 2.0 USB 2.0 480 Мбит/с
ПИН 1
USB 2.0
USB+5В USB_E2USB_E2+
GND
RGB WS2812B WS2812B
Земля данных +5 В
ADD_GEN 2
ПИН 1
WS2812B Светодиод RGB 5 В/данные/земля 3 5 500 светодиод
ВЫКЛЮЧЕННЫЙ /
3
· Светодиод · RGB
5V5V · RGB · RGB
Светодиодные ленты AURA RGB RGB
RGB LED 5050 RGB LED +12V/G/R/B 3 12 3
ВЫКЛЮЧЕННЫЙ /
· Светодиод · RGB
12V12V · светодиод · светодиод
CMOS
CMOS
КЛРТЦ
+3V_BAT ЗАЗЕМЛЕНИЕ
1. ПИН 1
2. КЛРТЦ
3.
4. Дел БИОС БИОС
CMOS RTC RAM CMOS
RXD DTR DSR CTS
COM
COM
COM
ПИН 1
DCD TXD GND RTS
RI
4
АГНД НЗ SENSE1_RETUR SENSE2_RETUR
/ HD-аудио /
AAFP
PORT1 L PORT1 R PORT2 R SENSE_SEND PORT2 L
· высокое разрешение
· Тип передней панели BIOS [HD]
HD-аудио-совместимое определение контактов
· 4-контактный PLED
4-контактный
· 2-контактный HDD_LED
2-контактный
· 4-контактный ДИНАМИК
4-контактный
· /2-контактный PWRSW
2-контактный биос
· 2-контактный СБРОС
2-контактный Сброс СБРОС
· 2-контактное ШАССИ
2-контактный
I2C_SCL I2C_SDA I2C_IRQ# RTD3_POWER_EN S_SLP_S0#_IDLE PERST_N WAKE#
ТандерболтМ
ThunderboltTM Intel ThunderboltTM ThunderboltTM Шлейфовая цепочка ввода-вывода ThunderboltTM DisplayPort
· Ввод/вывод ThunderboltTM ThunderboltTM
· Удар молнииTM
TB_HEADER
ПИН 1
FORCE_PWR CIO_PLUG_EVENT
SLP_S3# SLP_S5#
ЗАЗЕМЛЕНИЕ RTD3_SW
5
ЦП QQ
Q
1
2
3
4
567
8
9
10
9
11 12 13 14
DisplayPort USB 2.0 USB 3.2 1-го поколения 2.5 Гбит/с
HDMI® USB 3.2 Gen 2 Type-A USB 3.2 Gen 2×2 USB Type-C® Intel® Wi-Fi 6 S/PDIF
QR код
ЦП
LGA1700 Intel® CoreTMPentium® Gold Celeron®
· LGA1700 LGA1700
·
6
· QR код
·
DDR4Двойная скорость передачи данных
· АБ
· CASCAS-задержка
· Intel® 3200/3000/2933/2800/2666/2400/2133
· 4 DIMM
· https://www.asus.com/tw QVL
· QR код
PCIe x16 PCIe 4.0 x1
/
QR код
SATA 6 Гбит/с SATA 6 Гбит/с SATA M.2 M.2
QR-код SATA
· Ключ M.2_1 M 2242/2260/2280 Intel® PCIe 4.0 x4
· M.2_2 M Key 2242/2260/2280 PCIe 4.0 x4 · Технология Intel® Rapid Storage SATA RAID 0/1/5/10 · Intel® Optane H PCH M.2 Intel® Rapid Storage
Технологии
7
QR-код ввода/вывода
https://www.asus.com/ tw QR Code
MyASUS ASUS QR-код
BIOS
· QR-код BIOS RAID
· BIOS ASUS.CAP TGB660PW.CAP
BIOS
BIOS
RAID
БИОС БИОСБИОС
BIOS
POST Удалить F2 Удалить F2
ПОСТ БИОС Ctrl+Alt+Del СБРОС
Сбросить Ctrl+Alt+Del
· BIOS · https://www.asus.com/tw BIOS · BIOS BIOS
Выход из BIOS Загрузка оптимизированных значений по умолчанию BIOS · BIOS CMOS
8
BIOS BIOS EZ EZ ModeРасширенный режим
ЭЗ Флэш 3 БИОС
EZ Flash 3 BIOS Выход из BIOS Загрузка Оптимизированные настройки по умолчанию BIOS
EZ Flash 3 BIOS 1. BIOS USB USB 2. BIOS Advanced Mode Tool ASUS EZ Flash 3 Utility Enter 3. /Drive 4. / BIOS USB Enter 5. /Folder 6. / BIOS Enter BIOS · FAT 32/16 USB · BIOS
9
· ·
·
· · ·
(Пб)
(Рт. Ст.)
(CD)
(CR + 6)
(ПБД)
(ПБДЭ)
1. «» 2. «»
REACH
REACHRegistrationEvaluation Разрешение и ограничение химических веществ REACH http://csr.asus.com/english/REACH.html
https://www.asus.com/tw/support/Service-Center/Taiwan 0800-093-456
10
Информация о соответствии требованиям FCC
Ответственная сторона: Asus Computer International Адрес: 48720 Kato Rd., Fremont, CA 94538, США.
Номер телефона/факса: (510)739-3777 / (510)608-4555 Это устройство соответствует части 15 Правил FCC. Эксплуатация осуществляется при соблюдении следующих двух условий: (1) это устройство не должно создавать вредных помех, и (2) это устройство должно принимать любые получаемые помехи, включая помехи, которые могут вызвать нежелательную работу. Это оборудование было протестировано и признано соответствующим ограничениям для цифровых устройств класса B в соответствии с частью 15 правил FCC. Эти ограничения предназначены для обеспечения разумной защиты от вредных помех при установке в жилых помещениях. Это оборудование генерирует, использует и может излучать радиочастотную энергию и, если оно не установлено и не используется в соответствии с инструкциями, может создавать вредные помехи для радиосвязи. Однако нет гарантии, что помехи не возникнут в конкретной установке. Если это оборудование создает вредные помехи для радио- или телевизионного приема, что можно определить, выключив и включив оборудование, пользователю рекомендуется попытаться устранить помехи одним или несколькими из следующих способов: – Переориентировать или переместить приемное устройство антенна. — Увеличьте расстояние между оборудованием и приемником. – Подключите оборудование к розетке в цепи, отличной от той, к которой подключен приемник. – Обратитесь за помощью к дилеру или опытному специалисту по радио/телевидению. Предупреждение о радиочастотном воздействии Это оборудование должно быть установлено и эксплуатироваться в соответствии с предоставленными инструкциями, а антенна(ы), используемые для этого передатчика, должны быть установлены на расстоянии не менее 20 см от всех людей и не должны находиться рядом или работать в сочетании с любой другой антенной или передатчиком. Конечным пользователям и установщикам должны быть предоставлены инструкции по установке антенны и условия эксплуатации передатчика для соблюдения требований по радиочастотному излучению.
Заявление о соответствии стандарту HDMI
Термины HDMI, HDMI High-Definition Multimedia Interface и логотип HDMI являются товарными знаками или зарегистрированными товарными знаками HDMI Licensing Administrator, Inc.
11
ASUSTEC COMPUTER INC.
112 15 1
ASUSTEC COMPUTER INC.
112 15 1
ASUS КОМПЬЮТЕР МЕЖДУНАРОДНЫЙ
48720 Kato Rd., Fremont, CA 94538, США
ASUS КОМПЬЮТЕР ГмбХ/
Harkortstrasse 21-23, 40880 Ратинген, Германия
ASUSTeK (Великобритания) LIMITED
1-й этаж, Sackville House, 143-149 Fenchurch Street, Лондон, EC3M 6BL, Англия, Великобритания
https://www.asus.com/tw/support/ QR Code
12
Документы / Ресурсы
Рекомендации
инструкцияAsus TUF Gaming B660M-PLUS D4

Motherboard
TUF GAMING
B660M-PLUS D4
Посмотреть инструкция для Asus TUF Gaming B660M-PLUS D4 бесплатно. Руководство относится к категории материнские платы, 1 человек(а) дали ему среднюю оценку 9.8. Руководство доступно на следующих языках: английский. У вас есть вопрос о Asus TUF Gaming B660M-PLUS D4 или вам нужна помощь? Задайте свой вопрос здесь
- Safety information
- Product Introduction
- BIOS and RAID Support
- Appendix
Нужна помощь?
У вас есть вопрос о Asus а ответа нет в руководстве? Задайте свой вопрос здесь Дай исчерпывающее описание проблемы и четко задайте свой вопрос. Чем детальнее описание проблемы или вопроса, тем легче будет другим пользователям Asus предоставить вам исчерпывающий ответ.
Количество вопросов: 0

Главная
Не можете найти ответ на свой вопрос в руководстве? Вы можете найти ответ на свой вопрос ниже, в разделе часто задаваемых вопросов о Asus TUF Gaming B660M-PLUS D4.
Инструкция Asus TUF Gaming B660M-PLUS D4 доступно в русский?
Не нашли свой вопрос? Задайте свой вопрос здесь
- Manuals
- Brands
- Asus Manuals
- Motherboard
- TUF GAMING B660M-PLUS WIFI
- Manual
-
Contents
-
Table of Contents
-
Bookmarks
Quick Links
TUF GAMING
B660M-PLUS WIFI
Related Manuals for Asus TUF GAMING B660M-PLUS WIFI
Summary of Contents for Asus TUF GAMING B660M-PLUS WIFI
-
Page 1
TUF GAMING B660M-PLUS WIFI… -
Page 2
Product warranty or service will not be extended if: (1) the product is repaired, modified or altered, unless such repair, modification of alteration is authorized in writing by ASUS; or (2) the serial number of the product is defaced or missing. -
Page 3: Table Of Contents
Contents Safety information …………………. iv About this guide ………………….v Package contents ………………….. vi TUF GAMING B660M-PLUS WIFI specifications summary ……..vi Chapter 1 Product Introduction Before you proceed ………………1-1 Motherboard overview …………….. 1-1 Central Processing Unit (CPU) …………..1-8 System memory ………………
-
Page 4: Safety Information
Safety information Electrical safety • To prevent electrical shock hazard, disconnect the power cable from the electrical outlet before relocating the system. • When adding or removing devices to or from the system, ensure that the power cables for the devices are unplugged before the signal cables are connected. If possible, disconnect all power cables from the existing system before you add a device.
-
Page 5: About This Guide
Refer to the following sources for additional information and for product and software updates. ASUS website The ASUS website provides updated information on ASUS hardware and software products. Refer to the ASUS contact information. Optional documentation Your product package may include optional documentation, such as warranty flyers, that may have been added by your dealer.
-
Page 6: Package Contents
Package contents Check your motherboard package for the following items. Motherboard 1 x TUF GAMING B660M-PLUS WIFI motherboard Cables 2 x SATA 6Gb/s cables 1 x ASUS Wi-Fi moving antennas 1 x M.2 rubber package Miscellaneous 1 x M.2 SSD screw package…
-
Page 7
TUF GAMING B660M-PLUS WIFI specifications summary Total supports 2 x M.2 slots and 4 x SATA 6Gb/s ports* Intel Gen Processors ® M.2_1 slot (Key M), type 2242/2260/2280 — Intel Gen processors support PCIe 4.0 x4 mode ® Intel B660 Chipset** ®… -
Page 8
TUF GAMING B660M-PLUS WIFI specifications summary Fan and cooling related 1 x 4-pin CPU Fan header 1 x 4-pin CPU OPT Fan header 1 x 4-pin AIO Pump header 3 x 4-pin Chassis Fan headers Power related 1 x 24-pin Main Power connector… -
Page 9
TUF GAMING B660M-PLUS WIFI specifications summary AURA Sync Special Features — AURA RGB header — Addressable Gen 2 headers ASUS Exclusive Software Armoury Crate — AURA Creator — AURA Sync — Fan Xpert 2+ — Two-Way AI Noise Cancelation AI Suite 3… -
Page 11: Before You Proceed
Unplug the power cord before installing or removing the motherboard. Failure to do so can cause you physical injury and damage motherboard components. The pin definitions in this chapter are for reference only. The pin names depend on the location of the header/jumper/connector. TUF GAMING B660M-PLUS WIFI…
-
Page 12
1.2.1 Layout contents 1. CPU socket The motherboard comes with a surface mount Intel Socket LGA1700 designed for 12 ® Intel Core™, Pentium Gold and Celeron Processors. ® ® ® For more details, refer to Central Processing Unit (CPU). 2. DDR5 DIMM slots The motherboard comes with Dual Inline Memory Modules (DIMM) slots designed for DDR5 (Double Data Rate 5) memory modules. -
Page 13
Before you install or remove any component, ensure that the power supply is switched off or the power cord is detached from the power supply. Failure to do so may cause severe damage to the motherboard, peripherals, or components. TUF GAMING B660M-PLUS WIFI… -
Page 14
• Actual lighting and color will vary with LED strip. • If your LED strip does not light up, check if the addressable RGB LED strip is connected in the correct orientation, and the 5V connector is aligned with the 5V header on the motherboard. -
Page 15
The chassis intrusion sensor or switch sends a high-level signal to this connector when a chassis component is removed or replaced. The signal is then generated as a chassis intrusion event. TUF GAMING B660M-PLUS WIFI… -
Page 16
17. Thunderbolt™ header The Thunderbolt™ header allows you to connect an add-on Thunderbolt™ I/O card that supports Intel ’s Thunderbolt™ ® Technology, allowing you to connect Thunderbolt™-enabled devices to form a daisy chain-configuration. TB_HEADER PIN 1 • The add-on Thunderbolt™ I/O card and Thunderbolt™… -
Page 17
Line Out Front Speaker Out Front Speaker Out Front Speaker Out Pink Mic In Mic In Mic In Mic In Orange — — Center/Subwoofer Center/Subwoofer Black — Rear Speaker Out Rear Speaker Out Rear Speaker Out TUF GAMING B660M-PLUS WIFI… -
Page 18: Central Processing Unit (Cpu)
CPU designed for LGA1155, LGA1156, LGA1151, and LGA1200 sockets on the LGA1700 socket. • ASUS will not cover damages resulting from incorrect CPU installation/removal, incorrect CPU orientation/placement, or other damages resulting from negligence by the user. Installing the CPU…
-
Page 19
Ensure to remove the CPU Socket lever protector on the lever latch before locking the lever latch under the retention tab. Failure to do so may cause damages to your system when installing the cooling system. TUF GAMING B660M-PLUS WIFI… -
Page 20: System Memory
(D/C) from the same vendor. Check with the retailer to get the correct memory modules. • Refer to www.asus.com for the Memory QVL (Qualified Vendors Lists), and memory frequency support depends on the CPU types. Recommended memory configurations…
-
Page 21
Installing a DIMM To remove a DIMM TUF GAMING B660M-PLUS WIFI 1-11… -
Page 22: Installation
M.2 installation • Use a Phillips screwdriver when removing or installing the screws or screw stands mentioned in this section. • The M.2 is purchased separately. Completely loosen the screws on the heatsink(s). Remove the heatsink(s). Install your M.2 to your M.2 slot(s). For 2280 length Rotate and adjust the M.2 Q-latch so that the handle points away from the M.2 slot(s).
-
Page 23
If the thermal pad on the M.2 heatsink becomes damaged and needs to replaced, we recommend replacing it with a thermal pad with a thickness of 1.25mm. Replace the heatsink(s). Secure the heatsink(s) using the screws removed previously. TUF GAMING B660M-PLUS WIFI 1-13… -
Page 24: Wi-Fi Antennas Installation
Wi-Fi antennas installation Installing the ASUS Wi-Fi antennas Connect the bundled ASUS Wi-Fi antennas connectors to the Wi-Fi ports at the back of the chassis. • Ensure that the ASUS Wi-Fi antennas are securely installed to the Wi-Fi ports. •…
-
Page 25: Chapter 2 Bios And Raid Support
BIOS and RAID Support Knowing BIOS The new ASUS UEFI BIOS is a Unified Extensible Interface that complies with UEFI architecture, offering a user-friendly interface that goes beyond the traditional keyboard- only BIOS controls to enable a more flexible and convenient mouse input. You can easily navigate the new UEFI BIOS with the same smoothness as your operating system.
-
Page 26: Bios Setup Program
BIOS Setup program Use the BIOS Setup to update the BIOS or configure its parameters. The BIOS screens include navigation keys and brief onscreen help to guide you in using the BIOS Setup program. Entering BIOS at startup To enter BIOS Setup at startup, press <Delete> or <F2> during the Power-On Self Test (POST).
-
Page 27: Asus Ez Flash 3
ASUS EZ Flash 3 The ASUS EZ Flash 3 feature allows you to update the BIOS without using an OS-based utility. Ensure to load the BIOS default settings to ensure system compatibility and stability. Select the Load Optimized Defaults item under the Exit menu or press hotkey <F5>.
-
Page 28: Asus Crashfree Bios 3
ASUS CrashFree BIOS 3 The ASUS CrashFree BIOS 3 utility is an auto recovery tool that allows you to restore the BIOS file when it fails or gets corrupted during the updating process. You can restore a corrupted BIOS file using a USB flash drive that contains the BIOS file.
-
Page 29: Raid Configurations
For more information on configuring your RAID sets, please refer to the RAID Configuration Guide which you can find at https://www.asus.com/support, or by scanning the QR code. RAID definitions RAID 0 (Data striping) optimizes two identical hard disk drives to read and write data in parallel, interleaved stacks.
-
Page 30
Chapter 2: BIOS and RAID Support… -
Page 31: Appendix
Appendix Notices FCC Compliance Information Responsible Party: Asus Computer International Address: 48720 Kato Rd., Fremont, CA 94538, USA Phone / Fax No: (510)739-3777 / (510)608-4555 This device complies with part 15 of the FCC Rules. Operation is subject to the following two conditions: (1) This device may not cause harmful interference, and (2) this device must accept any interference received, including interference that may cause undesired operation.
-
Page 32
Compliance Statement of Innovation, Science and Economic Development Canada (ISED) This device complies with Innovation, Science and Economic Development Canada licence exempt RSS standard(s). Operation is subject to the following two conditions: (1) this device may not cause interference, and (2) this device must accept any interference, including interference that may cause undesired operation of the device. -
Page 33
Tenez cet appareil à distance du ventre des femmes enceintes et du bas-ventre des adolescents. TUF GAMING B660M-PLUS WIFI… -
Page 34
ASUS products sold in Vietnam, on or after September 23, 2011,meet the requirements of the Vietnam Circular 30/2011/TT-BCT. Các sản phẩm ASUS bán tại Việt Nam, vào ngày 23 tháng 9 năm2011 trở về sau, đều phải đáp ứng các yêu cầu của Thông tư 30/2011/TT-BCT của Việt Nam. -
Page 35
ASUSTek Computer Inc. hereby declares that this device is in compliance with the essential requirements and other relevant provisions of The Radio Equipment Regulations 2017 (S.I. 2017/1206). Full text of UKCA declaration of conformity is available at https://www.asus.com/support/. The WiFi operating in the band 5150-5350MHz shall be restricted to indoor use for the country listed below: UKCA RF Output table (The Radio Equipment Regulations 2017) Intel®… -
Page 36
2014/53/EU. Cijeli di: https://www.asus.com/support/ tekst EU izjave o sukladnosti dostupan je na https://www.asus.com/support/ WiFi yang Beroperasi pada 5150-5350 MHz akan terbatas untuk penggunaan WiFi koji radi na opsegu frekvencija 5150-5350 MHz bit će ograničen na… -
Page 37
ASUSTek Computer Inc. tukaj izjavlja, da je ta naprava skladna s temeljnimi zahtevami in drugimi relevantnimii določili Direktive 2014/53/EU. Polno besedilo izjave EU o skladnosti je na voljo na https://www.asus.com/ support/ WiFi, ki deluje v pasovnem območju 5150–5350 MHz, mora biti v državah, navedenih v spodnjem seznamu, omejen na notranjo uporabo: Declaración de conformidad simplificada para la UE… -
Page 38: Warranty
• ASUS offers a voluntary manufacturer’s Commercial Guarantee. • ASUS dragovoljno nudi komercijalno proizvođačko jamstvo. • ASUS reserves the right to interpret the provisions of the ASUS • ASUS zadržava prava na tumačenje odredbi ASUS komercijalnog Commercial Guarantee. jamstva. •…
-
Page 39
• ASUS tilbyr som produsent en frivillig kommersiell garanti. • Bảo hành thương mại này của ASUS được cung cấp độc lập và ngoài • ASUS forbeholder seg retten til å tolke bestemmelsene i ASUS sin Bảo đảm pháp lý theo luật định và không có cách nào ảnh hưởng đến kommersielle garanti. -
Page 40: Asus Contact Information
Address: 1F., No. 15, Lide Rd., Beitou Dist., Taipei City 112, Taiwan ASUS COMPUTER INTERNATIONAL (America) Address: 48720 Kato Rd., Fremont, CA 94538, USA ASUS COMPUTER GmbH (Germany and Austria) Address: Harkortstrasse 21-23, 40880 Ratingen, Germany ASUSTeK (UK) LIMITED Address: 1st Floor, Sackville House, 143-149 Fenchurch Street, London, EC3M 6BL,…
-
Драйверы
14
-
Инструкции по эксплуатации
2
Языки:

ASUS TUF GAMING B660-PLUS WIFI D4 инструкция по эксплуатации
(44 страницы)
- Языки:Японский
-
Тип:
PDF -
Размер:
3.68 MB -
Описание:
TUF GAMING B660-PLUS WIFI D4 User’s Manual ( Japanese Edition )
Просмотр

ASUS TUF GAMING B660-PLUS WIFI D4 инструкция по эксплуатации
(44 страницы)
- Языки:Французский
-
Тип:
PDF -
Размер:
2.34 MB -
Описание:
TUF GAMING B660-PLUS WIFI D4 User’s Manual ( French Edition )
Просмотр
На NoDevice можно скачать инструкцию по эксплуатации для ASUS TUF GAMING B660-PLUS WIFI D4. Руководство пользователя необходимо для ознакомления с правилами установки и эксплуатации ASUS TUF GAMING B660-PLUS WIFI D4. Инструкции по использованию помогут правильно настроить ASUS TUF GAMING B660-PLUS WIFI D4, исправить ошибки и выявить неполадки.