Всем привет дорогие мои друзья !
Вчера общался с другом, и зашёл разговор о музыки) У него тоже w204, недавно поменял на следующую версию на Comand и по совместительству поставил другие колонки.
Сказал что играет четко ! Но знал бы раньше о дополнительной настройки аудио системы через инженерное меню, возможно бы не стал заморачиваться)
Для меня это было в ново что ли, т.к ни о каком меню я не знал, более того даже не разу не слышал.
Задав кучу вопросов, понял что он знает об этом поверхностно, но мне как человеку зависимому от хорошего звука стало безумно интересно, что же это за меню ? И реально ли поменяется звук т.к со слов моего друга — звук будет просто ВАУ! Что все хвалят и говорят что разница огромная.
Начал копать интернет и в скором времени выяснил, что да, действительно есть инженерное меню, в котором можно настроить много чего ( звук, aux, установить себе другие часы, поменять расцветку и.т.д ) Изучал конкретно все о звуке . Нашёл много настроек от разных ребят, приступил ковыряться на свой страх и риск, интерес взял своё )
И так, краткая инструкция, ОЧЕНЬ ВАЖНЫЙ МОМЕНТ!
1. Внимательно прочтите весь пост прежде чем делать.
2. Зайдя в меню и притупив к настройкам, обязательно сфотографируйте ваши старые настройки ! У всех они разные, что бы в случае если вам не понравится, вы могли бы а е вернуть обратно — но думаю что понравится даже очень !
Приступим.
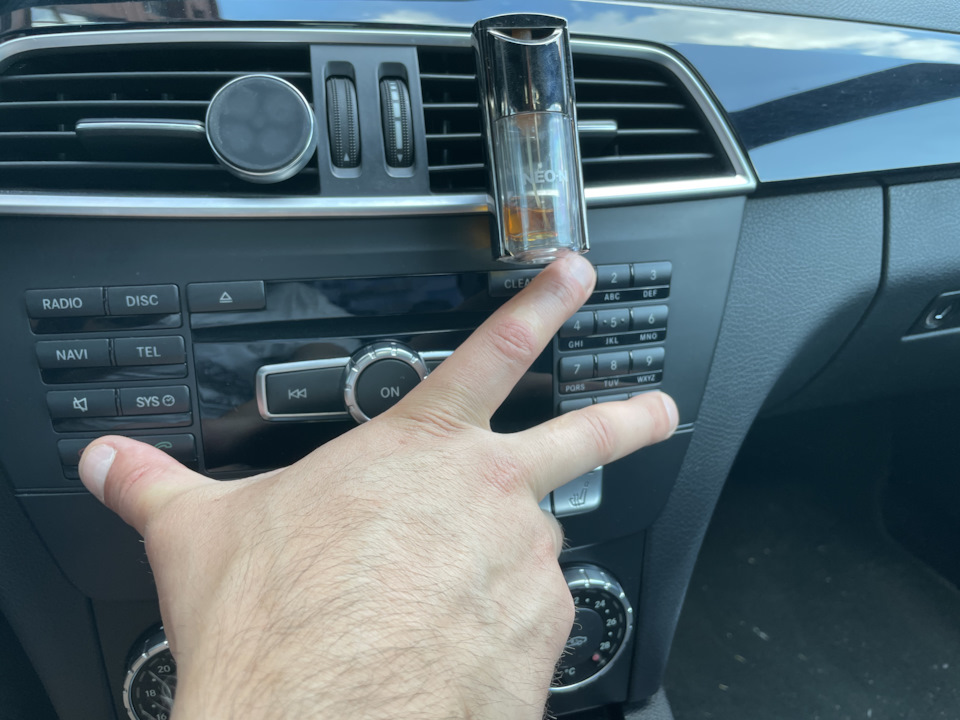
1. Заходим в инженерное меню — Зажимаем
Полный размер
СБРОС • # • 1
одновременно и держим 5 сек пока не высветиться меню.
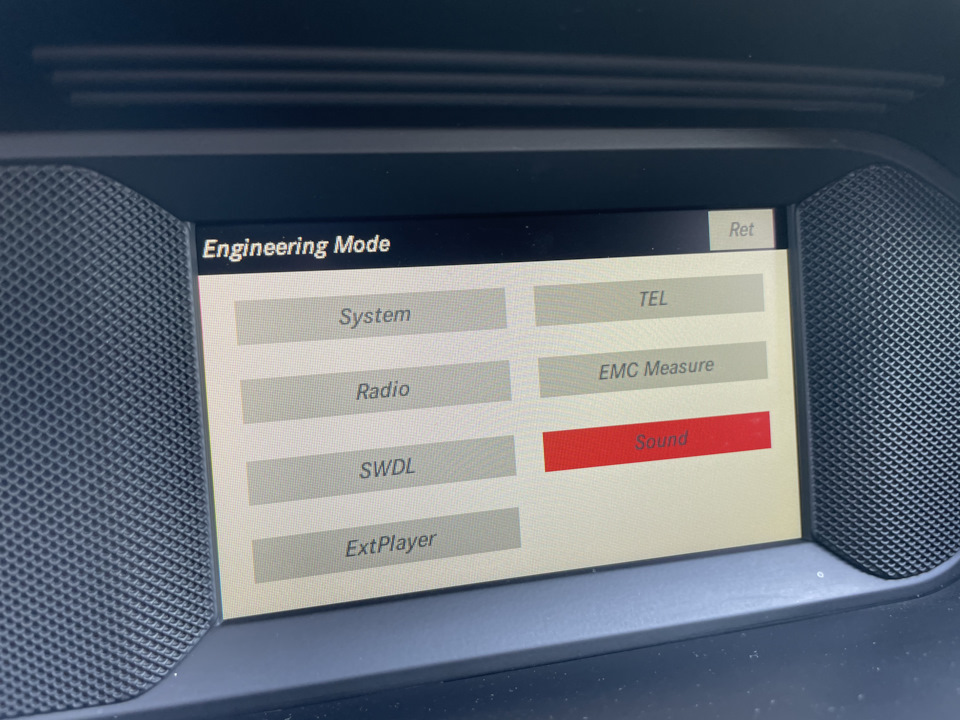
2. Выберем джойстиком Sound
Полный размер
Заходим в Sound
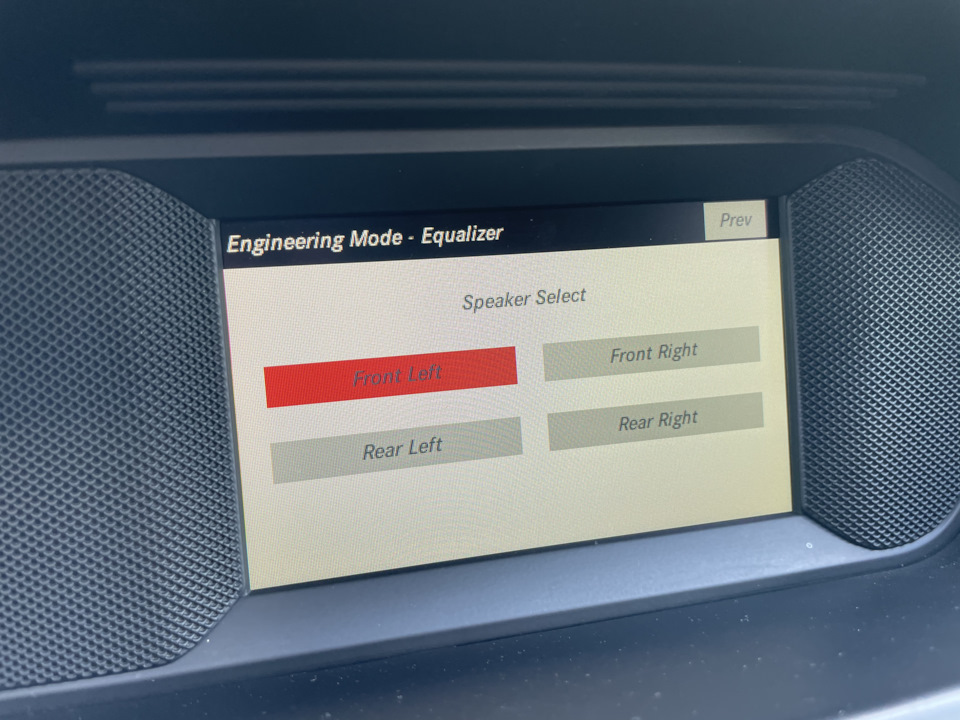
3. Далее Equalizer
Полный размер
Заходим в Equalizer
Тут видим front left — front right передние колонки, ниже задние левая и правая.
Настраиваем сначала весь перед.
4. Заходим в front left
Полный размер
Заходим front left
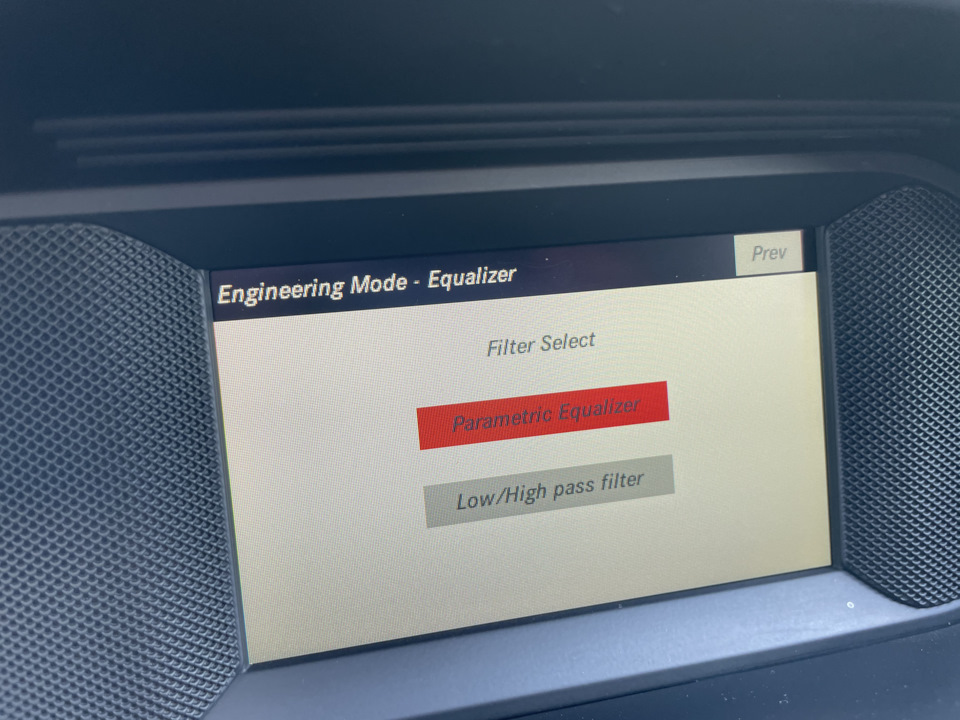
5. Далее parametric Equalizer
Полный размер
Заходим parametric Equalizer
Тут внимательно . Видим следующее, нажимаем Tune и у вас появятся много значений.
Полный размер
Нажимаем Tune
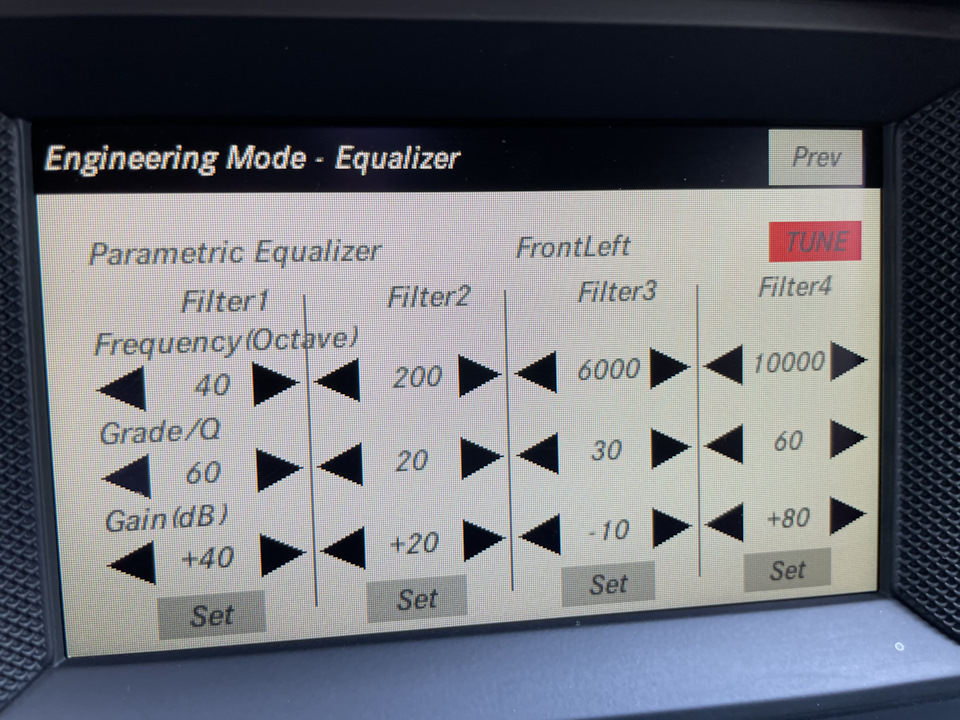
Вот фото моих заводских настроек
Полный размер
Заводчике настройки
Фотографируем и проступаем к настройке.
Идём с левого столбца, после настройки сверху вниз, ОБЯЗАТЕЛЬНО нажимаем снизу на надпись SET. И идём к следующему столбцу.
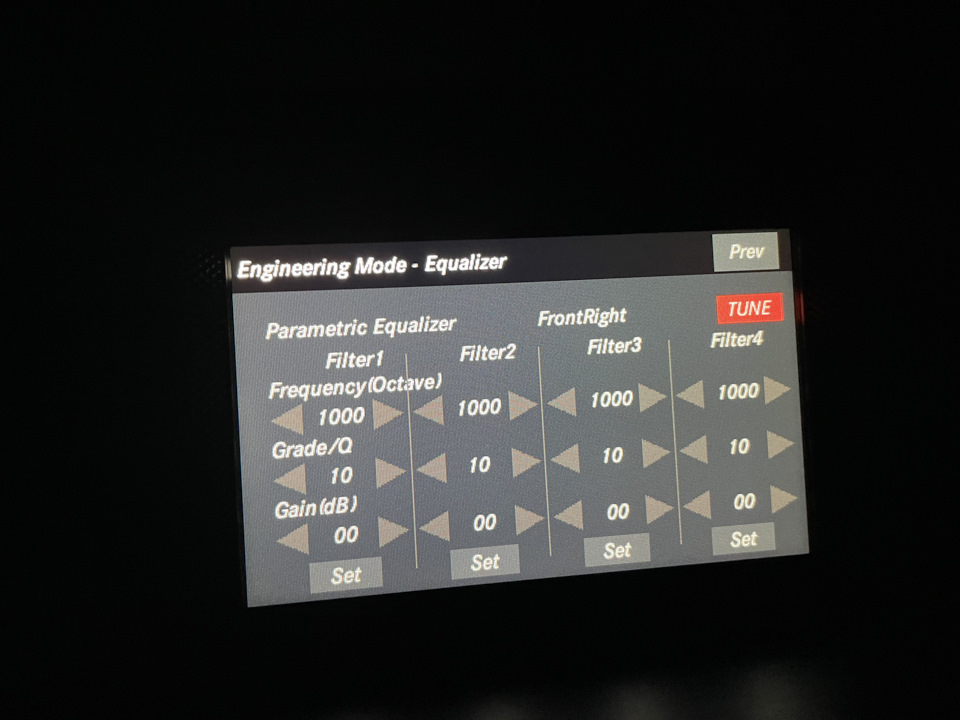
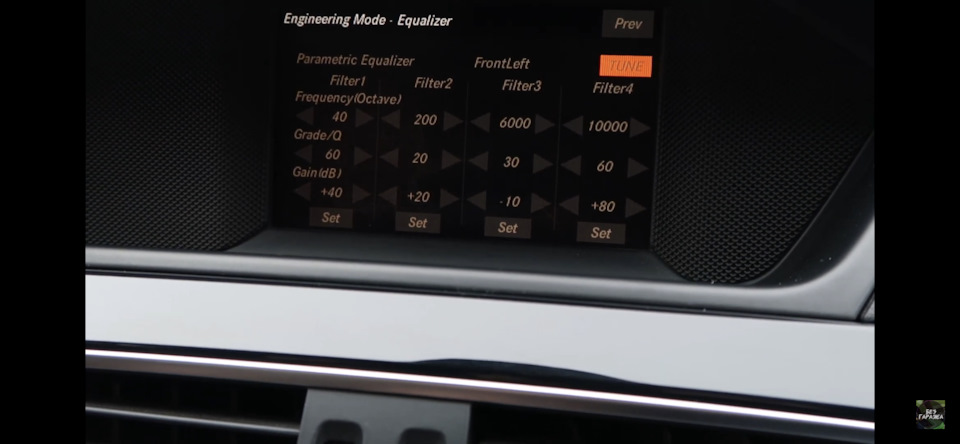
Вот фото настроек для передних колонок.
Полный размер
Настройки передних колонок — left- right
Все сохранили, выходим на кнопку назад рядом с селектором ( с джойстиком )
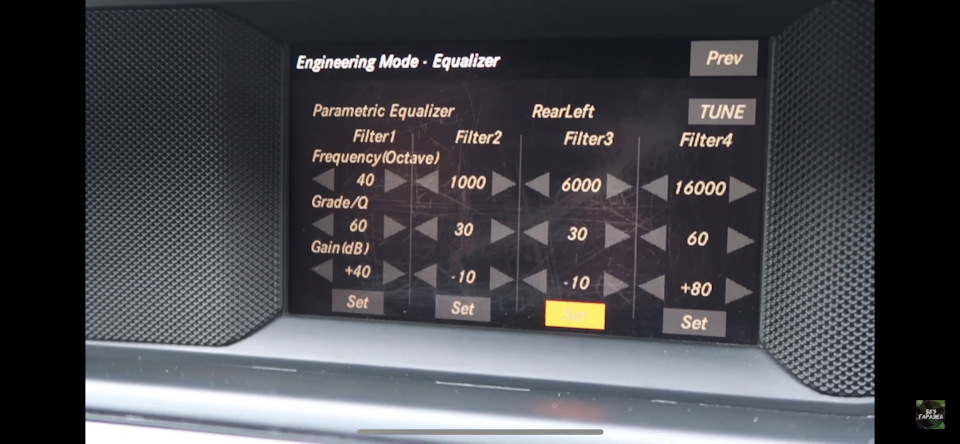
Далее та же самая процедура, но настройки другие . Фото
Полный размер
Настройка задних колонок left — right
Настроили, выходим назад, не забывайте сохранять каждый столбец, это важно !
Ну а далее идём в настройку нашего заводского эквалайзера. Тут на любителя, фото мои настройки, может кому понравится)
Что получил по итогу ? Звук господа правда изменился ! Стал играть чище, бас начал разделять высокие чистоты, стало громче, нет никаких хрипов в независимости от стиля музыки. Я слушаю лёгкий репчик deep house, progressive . Все изумительно 👍🏼👍🏼
Надеюсь все понятно описал, может кому пригодится, всех обнял 🤝
- Manuals
- Brands
- Mercedes-Benz Manuals
- Car Video System
- Audio 20
- Operating instructions manual
-
Contents
-
Table of Contents
-
Bookmarks
Related Manuals for Mercedes-Benz Audio 20
Summary of Contents for Mercedes-Benz Audio 20
-
Page 1
Audio 20 Operating Instructions É2075846701bËÍ 2075846701 Order no. 6515 7916 13 Part no. 207 584 67 01 Edition A-2016… -
Page 2
Symbols Publication details In this Operator’s Manual you will find the fol- Internet lowing symbols: Further information about Mercedes-Benz WARNING vehicles and about Daimler AG can be found Warning notes make you aware of dangers on the following websites: which could pose a threat to your health or http://www.mbusa.com (USA only) -
Page 3
This will help you to obtain the maximum pleasure from your Audio 20 and avoid endan- gering yourself and others. The equipment level and functions of your Audio 20 may differ depending on:… -
Page 5
Contents Index …………4 Overview and operation ….. 13 Introduction ……… 10 System settings ……..23 Vehicle functions …….. 33 Navigation ……….. 43 Telephone ……….47 Online and Internet functions …. 69 Radio ………… 81 Media ……….. 91 Sound ……….111… -
Page 6: Table Of Contents
Ambient light Opening and selecting an entry ..63 Settings (Audio 20) ……34 Camera Armrest 360° camera (Audio 20) ….38 Adjusting (Audio 20) ……36 Rear view camera ……39 Audio 20 Category list (music search) ….98 Adjusting the display …….
-
Page 7
Procedure and general informa- Renaming ……… 21 tion ……….77 Favorites button ……..29 Sending destinations to the Fuel consumption (Audio 20) ….. 36 server ……….77 Using a destination for route guid- ance ……….78 Using destinations ……78 GARMIN ®… -
Page 8
Index Ambient light settings (Audio 20) ..34 Stop and playback function ….. 97 List of access data New provider ……..72 List of mobile phone network pro- Navigation viders Adjusting the volume of the navi- With the selected provider ….72 gation announcements …. -
Page 9
(Audio 20) ……..36 Overview ………. 82 Balance (seat heating) ….. 37 Setting the waveband …… 83 Massage function (Audio 20) … 37 Sound settings (balance, bass, Massage programs (Audio 20) ..37 treble) ……….85 Resetting settings ……38 Storing stations ……. -
Page 10
……..28 Reconnecting a mobile phone Date ……….25 automatically ……..53 Importing/exporting data ….29 Rejecting a call (Audio 20) ….55 Language ……… 28 Safety notes ……..48 Time ……….25 Sending DTMF tones ……57 Time zone ……..25 Setting up a speed dial …. -
Page 11: Index
Index USB audio mode Selecting a track ……97 USB devices Connecting to the Media Inter- face ……….96 Vehicle settings Calling up ……… 34 Volume, adjusting Navigation messages ……. 18…
-
Page 12: Introduction
In particular, systems Always observe the following when using relevant to safety could also be affected. As a Audio 20: result, these may no longer function as inten- the safety notes in this manual ded and/or jeopardize the operating safety of the vehicle.
-
Page 13
Audio 20/mbrace Canada only: The wireless devices of this If the vehicle is equipped with Audio 20 or vehicle comply with Industry Canada mbrace, additional data about the vehicle’s license-exempt RSS standard(s). Operation… -
Page 14
EDR. for your Audio 20 system at the time of pur- EDR data may be used in civil and criminal chase. Country-specific differences are pos- matters as a tool in accident reconstruction, sible. -
Page 15
Overview ……….14 Basic functions ……..18 Favorites ……….20… -
Page 16: Components
Controller and buttons ( page 17) Audio 20 consists of: the display Audio 20 control panel with a single drive (if available) the controller a slot for an SD card two connection options via USB or Media Interface in the center console ®…
-
Page 17: Vehicle Functions
Overview Overview load, Facebook, Google Street View™, stock prices, news and much more Mercedes-Benz mobile website Vehicle functions: Vehicle settings, e.g. fuel consumption 360° camera Rear view camera Ionization Seat functions Seat functions, for example adjustment of driving dynamics Status bar with traffic announcements,…
-
Page 18: Control Panel
Overview Audio 20 control panel Function Page Function Page Switches to radio mode Number pad Calls up the Radio menu • Saves a station • Authorizes (connects) a Switches to the last selec- mobile phone ted media mode • Telephone number entry Calls up the Media menu •…
-
Page 19: Controller
To exit the menu: briefly press the % Clear button button. Switches the display on/off Audio 20 changes to the next higher menu Favorites button level in the current operating mode. Back button To call up the basic display: press the Controller % button for longer than two seconds.
-
Page 20: Traffic Announcements
Basic functions To delete individual characters: briefly If you switch off Audio 20, playback of the current media source will also be switched press the $ button on the control panel. off. To delete an entire entry: press and hold the $ button on the control panel.
-
Page 21
To show the menu: slide 4 the con- appears. troller. To switch navigation announcements The menu for the selected functions on again: switch Audio 20 off and then on appears. Depending on the operation, the marking is shown in main function bar (top) again ( page 18). -
Page 22: Audio
Favorites In the communication menu, you can: To move a selected favorite page 21) switch to telephone mode To delete a selected favorite call up the Internet page 21) call up the digital operating instructions for Displaying the favorites overview the telephone/®…
-
Page 23: Deleting
Favorites If a favorite is stored over another favorite, Moving favorites the favorite underneath is deleted. Adding your own favorites You can store phone numbers from the phone book, preferred media or radio stations as favorites. A phone number from the phone book is used as an example.
-
Page 25: Bluetooth
Features of your Audio 20 ….24 Important safety notes ……. 24 Display settings ……..24 Time settings ……..25 Bluetooth ® settings ……28 Setting the system language ….. 28 Calling up the favorite functions ..29 Importing/exporting data ….29…
-
Page 26: Features Of Your Audio 20
These operating instructions describe all standard and optional equipment available The brightness detected by the display light for your Audio 20 system at the time of pur- sensor affects the setting options for this chase. Country-specific differences are pos- function.
-
Page 27: Time Settings
Vehicles without a GPS module: you can The # dot indicates the current setting. manually set the time and date with Audio 20. Design Explanation Day Mode Switching automatic time on and off The display is set perma- nently to day design.
-
Page 28: And Standard Time
Time settings To select Time: slide 6, turn and press Setting Function the controller to confirm. Automatic The summer and A menu appears. Time Zone:: turn and press the standard time are To select automatically controller. changed over. A list of countries appears. The # dot indi- cates the current setting.
-
Page 29: Setting The Date
The vehicle menu is displayed. To select Time: slide 6, turn and press Press the Ø button on the Audio 20 control panel. the controller to confirm. A menu appears.
-
Page 30: Bluetooth ® Settings
® Bluetooth -capable devices, e.g. mobile year (all four phones, need to comply with a certain profile digits) in order to be connected to Audio 20. Every DD/MM/YYYY Bluetooth ® device has its own specific Blue- Day/Month/ Year tooth ®…
-
Page 31: Calling Up The Favorite Functions
Press the favorites button on the controller. ments will be in English. The favorites are displayed. Phone Press the Ø button on the Audio 20 To select the desired function, e.g. book: turn and press the controller. control panel. The Favorites function can be exited at any…
-
Page 32
PIN protection for you. Alternatively, you can deactivate PIN protection by resetting your personal Audio 20 data ( page 31). Importing/exporting data Press the Ø button on the Audio 20 control panel. Vehicle Press in the main function bar. The vehicle menu is displayed. -
Page 33: Reset Function
Select the data has been exported. If you select a message will be shown. Audio 20 is reset to the factory settings and You can export address data, bookmarks, restarted. system settings that you have made and If you select the process is canceled.
-
Page 35
Features of your Audio 20 ….34 Important safety notes ……. 34 Vehicle settings ……..34 Seats ………… 36 360° camera ……..38 Rear view camera …….. 39 DYNAMIC SELECT …….. 39… -
Page 36: Features Of Your Audio 20
To select the desired vehicle setting: These operating instructions describe all standard and optional equipment available turn and press the controller. for your Audio 20 system at the time of pur- The main area with the setting element is chase. Country-specific differences are pos- active.
-
Page 37: Interior Lighting
Vehicle settings Setting the color Setting the delayed switch-off time Vehicle Settings Call up page 34). Interior lighting delayed switch-off Ambient Light Color: turn and To select The interior lighting is activated for the dura- press the controller. tion of the delayed switch-off time when the The setting element is active.
-
Page 38: Seats
For further information on energy consump- Selecting the adjustment function tion, see the vehicle Operator’s Manual. and seat Press the Ø button on the Audio 20 control panel. Displaying the fuel consumption A bar graph displays the fuel consumption. Vehicle…
-
Page 39
Seats Classic Massage To change the setting: slide 4 or 1 the controller. Single and twin waves moving upwards The change will be visible in the setting ele- across the entire back ment. Mobilizing Massage To exit the menu: press the % button. Mobilization via stronger single and twin waves moving upwards across the entire back… -
Page 40: 360° Camera
You are always responsi- Press the Ø button on the Audio 20 ble for safe maneuvering and parking. Make control panel. sure that no persons or animals are in the maneuvering range.
-
Page 41: Rear View Camera
Drive system Suspension This function activates the rear view camera when reverse gear is engaged. Steering Press the Ø button on the Audio 20 Climate control control panel. ECO start/stop function In a few countries, the ECO start/stop Vehicle Press in the main function bar.
-
Page 42: Configuration Via The Dynamic Select Controller
DYNAMIC SELECT DYNAMIC To select Drive, Suspension, Steering, For AMG vehicles, you can press SELECT Climate Control Eco Start/Stop to configure the following settings for Individual Function: turn and press the controller. drive program: To select Drive, Suspension Trans Drive system mission on AMG vehicles: turn and press Suspension…
-
Page 43
DYNAMIC SELECT You can choose from the following settings for the ECO start/stop function: Switches the ECO start/stop function Unlit Switches the ECO start/stop function Setting options (AMG vehicles) You can choose from the following settings for the drive: Race Comfort Sport Sport +… -
Page 45: Navigation
Audio 20 features ……. 44 GARMIN ® MAP PILOT navigation module ……….44…
-
Page 46: Garmin ® Map Pilot
If an SD memory card is swallowed, These operating instructions describe all seek immediate medical attention. standard and optional equipment available for your Audio 20 system at the time of pur- chase. Country-specific differences are pos- General notes sible. Please note that your Audio 20 system…
-
Page 47
GARMIN ® MAP PILOT navigation module Adjusting the volume During a navigation announcement: Turn the q control knob. Press the W or X button on the mul- tifunction steering wheel. You can set the volume for navigation announcements to be different from the volume of the respective media source. -
Page 49: Telephone
Audio 20 features ……. 48 Important safety notes ……. 48 General notes ……..48 Telephone menu overview ….49 Connecting/disconnecting a mobile phone ……..50 Setting the reception and trans- mission volume ……..54 Using the telephone ……55 Phone book ………. 59 Importing contacts ……
-
Page 50: Audio 20 Features
These operating instructions describe all standard and optional equipment available for your Audio 20 system at the time of pur- General notes chase. Country-specific differences are pos- sible. Please note that your Audio 20 system…
-
Page 51: Telephone Menu Overview
PIN has been entered in the mobile phone Press %. a mobile phone network is available Showing the menu bar the mobile phone is connected to Audio 20 Slide 6 the controller. via Bluetooth ® If you cannot make an emergency call, you If the mobile phone connected supports the must arrange rescue measures yourself.
-
Page 52: Connecting/Disconnecting A Mobile Phone
-capable mobile more detailed information about suitable phone. The mobile phone must support mobile phones and about the connection Hands-Free Profile 1.0 or above. between the mobile phone and Audio 20 on On Audio 20 the Internet at www.mercedes-benz-mobile.com. Activate Bluetooth ®…
-
Page 53: Searching For A Mobile Phone
You can recognize Secure Simple Pair- ing by a code which is displayed in Audio 20 and on the mobile phone. You can recognize the passkey system by the fact that you have to enter a code on the mobile phone and in Audio 20.
-
Page 54: Authorizing A Mobile Phone (Con Necting)
Audio 20 and for the A code is displayed in Audio 20 and on the PBAP and MAP Bluetooth ® profiles individ- mobile phone.
-
Page 55: Establishing The Connection From The Mobile Phone
Device: turn and press To select choose yourself. Enter the same passkey on the controller. both Audio 20 and the mobile phone and con- The device list is displayed. firm. Depending on the mobile phone used, Connect via Phone: turn and…
-
Page 56: Setting The Reception And Trans- Mission Volume
To close the detailed display: slide 9 Mercedes-Benz USA, LLC recommends de- the controller. authorization in Audio 20 as well as in the mobile phone. Subsequent authorization may otherwise fail. Setting the reception and transmis- sion volume To call up the telephone menu: press the % button.
-
Page 57: Using The Telephone
Using the telephone To highlight the desired mobile phone in the Making a call device list: turn the controller. Using the telephone menu To select G: slide 9 the controller. Reception Volume Trans To call up the telephone menu: press the To select mission Volume: turn and press the con-…
-
Page 58: Adding A Call
Using the telephone Calls Received Calls To select Further information about ending a call Dialed: turn and press the controller. page 58). The relevant list is displayed. To select an entry and make a call: turn and Functions available during a call press the controller.
-
Page 59: Sending Dtmf Tones
Using the telephone If the mobile phone network provider and the acters in the telephone menu: turn and mobile phone support the function, you can press the controller each time. make another call during an existing call. The previously active call is held. Press the corresponding key on the number To select °…
-
Page 60: Call Waiting
Using the telephone To activate the call on hold: select Resume. hear a tone. You can decide whether to The call on hold is activated. If you select accept or reject the call. Hang Up, the call on hold is also ended. Accepting: On some mobile phones, the call on hold To select Accept: press the controller.
-
Page 61: Phone Book
¯ Contact imported from the SD contacts will remain there even when you memory card or USB device. connect Audio 20 to a different mobile phone. You can view these contacts even without a ® Contact imported via the Blue- mobile phone.
-
Page 62: Automatically Importing Contacts From The Mobile Phone
It switches to the next character up automatically after the mobile phone is each time the key is pressed. connected to Audio 20. To call up the telephone menu: press the % button. Displaying the details of a contact…
-
Page 63: Importing Contacts
Up to 2000 entries can be imported into phone book. the phone book. A message notifies you Saving the contact data on Audio 20 does when the maximum number is reached. In not change the contacts on the mobile order to be able to then import new con- phone.
-
Page 64: Receiving Vcards
From Bluetooth Device: turn To select and 3.0. and press the controller. If Audio 20 is connected to a mobile phone, all connections are terminated. vCards can now be received by a device (PC, mobile phone) via Bluetooth ® External device Start the data transfer (see the manufac- turer’s operating instructions).
-
Page 65: Call Lists
If you connect a different mobile phone to reception of vCards will be terminated. Audio 20, the call lists from the new mobile phone are displayed. Deleting imported contacts To call up the telephone menu: press the Opening the call list and selecting an % button.
-
Page 66: Speed Dial Lists
Speed dial lists Assign Speed Dial Preset: Closing the call list To select turn and press the controller. To select &: slide 8 the controller. The speed dial list is displayed. To select a memory position for the speed Press the % button. dial: turn and press the controller.
-
Page 67: Messages (Text Messages And E- Mails)
(see the controller. manufacturer’s operating instructions). To select 1: turn and press the controller. To be able to read e-mails in Audio 20, the e- The message menu is displayed. mail account first needs to be configured page 66).
-
Page 68: Account
A menu with the following options is shown: the controller. All Messages The e-mail account is now configured. E- mails can now be received in Audio 20. All the messages are displayed. New Messages Deactivating the e-mail function Only the messages that are new on the mobile phone are displayed.
-
Page 69: Reading
Messages (text messages and e-mails) Downloading messages manually To select the message: turn and press the controller. To call up the telephone menu: press the The message text is displayed. % button. To close the message text: press the To switch to the menu bar: slide 6 the % button.
-
Page 70: Deleting
To select Use: press the controller. Displaying details and phone numbers To select Call: turn and press the control- Audio 20 can also show the full details instead ler. of the shortened sender display. The call is made. To call up the telephone menu: press the % button.
-
Page 71
Audio 20 features ……. 70 Important safety notes ……. 70 General notes ……..70 Conditions for access ……71 Setting up an Internet connection (Canada) ……….71 Establishing/ending the connec- tion …………74 Google™ local search ……75 Destination/route download ….. 77… -
Page 72: Audio 20 Features
These operating instructions describe all cle is in motion standard and optional equipment available for your Audio 20 system at the time of pur- The connection may be lost if: chase. Country-specific differences are pos- the mobile phone network coverage is sible.
-
Page 73: Conditions For Access
Bluetooth ® page 50) to current Internet connection. Therefore, you Audio 20. If you are using Internet access for cannot establish an Internet connection dur- the first time, you must enable the connected ing a service call. mobile phone for Internet access Canada: a mobile phone must be connected page 71).
-
Page 74: Selecting
Setting up an Internet connection (Canada) Configure Internet Set To select If the mobile phone network provider pro- tings: turn and press the controller. vides multiple access data options, the rele- The device list is displayed. vant access data still has to be selected. This Search for Bluetooth Phone: depends on the data package used, for exam-…
-
Page 75: Calling Up The Device List
Setting up an Internet connection (Canada) phone network provider to obtain the precise Input field Meaning access data. Auto DNS: Automatic allocation of Explanation of the access data DNS servers is activated. Input field Meaning If the function is deactiva- ted, the DNS server Phone Num Access number for estab-…
-
Page 76: Establishing/Ending The Connection
A connection can be established by: To select G: slide 9 the controller. Change Configuration: turn To select calling up a Mercedes-Benz App and press the controller. calling up a Favorite. Predefined Settings Manual Select Ending the connection Settings.
-
Page 77: Google™ Local Search
To switch to the menu bar: slide 6 the page 76). controller. You will first need to register Audio 20 To select the scissors symbol: turn and before you can use the Internet functions. press the controller.
-
Page 78: Entering A Search Position And Search Term
Google™ local search Entering a search position and search Using search results term To select a search result: turn and press the controller. The following options are available: Details The address of the selected entry is dis- played. Set as Destination The navigation is called up.
-
Page 79: Destination/Route Download
Search history: turn and press Select «Send to car». To select Select Mercedes-Benz as the vehicle the controller. brand. The most recent search queries are dis- played. Enter the mbrace e-mail address or the vehicle identification number.
-
Page 80: Deleting A Destination From The Server
Display the destination in the vehicle The menu with the Internet functions is dis- page 77). played. To highlight a destination: turn the control- Mercedes-Benz Apps: turn and To select ler. press the controller. To select G: slide 9 the controller.
-
Page 81: Further Mercedes-Benz Apps
General notes A prompt appears asking whether the des- tination should be deleted. To be able to use Mercedes-Benz Apps, you To select Yes: turn and press the controller. first have to register. To do so, you have to enter your name and postal address once in The phone number is deleted.
-
Page 82
Press the % button. The Internet menu appears. Press the % button for longer than two seconds. The Mercedes-Benz Apps menu or the Internet menu appears. Resetting adjustments With the reset function, all Mercedes-Benz Apps settings are reset to the factory set- tings. -
Page 83: Radio
Audio 20 features ……. 82 Switching on the radio ……. 82 Overview ……….82 Setting the waveband ……83 Station ……….83 Tagging music tracks ……85 Displaying the artist and track ..85 Calling up sound settings ….85 Displaying information …….
-
Page 84: Audio 20 Features
Overview These operating instructions describe all standard and optional equipment available for your Audio 20 system at the time of pur- chase. Country-specific differences are pos- sible. Please note that your Audio 20 system may not be equipped with all the features described.
-
Page 85: Setting The Waveband
Station Using the current station list Setting the waveband In radio mode, press the controller. In radio mode: press the $ button. The station list appears with the stations A menu appears with a selection of currently available. Radio HD Radio Radio, To select the desired station: turn and Info on Radio…
-
Page 86
Station Saving/deleting a station Set the desired station in radio mode. Press and hold the controller until the pre- set list appears. To select the preset number: turn and press the controller. A tone confirms that the storing process was successful. Moving highlighted stations In radio mode: slide 6 the controller. -
Page 87: Tagging Music Tracks
Information on the currently received pro- Tag This Track. Select gram is displayed. A message appears in Audio 20 about stor- If available, you will see: ing track information. the track that is currently being played the artist of the track that is currently being…
-
Page 88: Registering
These include environmental or topo- graphical conditions as well as other factors beyond the control of Mercedes-Benz USA, LLC. This means operation may not be possi- ble in certain areas. These include:…
-
Page 89: Overview
Satellite radio overview Changing channels When the display/selection window in the satellite radio display is selected, slide 1 or turn the controller. Audio 20 switches to the next available channel. Entering channel numbers directly Options To select in the radio menu bar: turn and press the controller.
-
Page 90: Memory Functions
The newly saved station overwrites the existing preset. Press the z key on the number keypad. Audio 20 sets the selected channel. To quick store: press and hold number key You can only select currently permitted digits.
-
Page 91: Music And Sports Alerts
Satellite radio Setting a sport alert Music and sport alerts Options To select in the menu bar: turn General notes and press the controller. This function makes it possible to store a pro- Alert for Artist, Track & To select gram alert for your favorite artists, tracks or Sports Event: turn and press the control-…
-
Page 92: Tagging Music Tracks
Satellite radio Tagging music tracks general questions or questions on the ver- sions available. This function allows you to transfer the music Options To select in the menu bar: turn track currently playing to an Apple ® device and press the controller. and then purchase it in the iTunes store ®…
-
Page 93: Media
Audio 20 features ……. 92 Activating media mode ……. 92 Audio mode ………. 93 Media search ……..98 Bluetooth ® audio mode ….101 Operation with the Media Inter- face ………… 107 Picture viewer ……..109…
-
Page 94: Audio 20 Features
If playable media files are found, they will standard and optional equipment available be played by Audio 20. for your Audio 20 system at the time of pur- chase. Country-specific differences are pos- sible. Please note that your Audio 20 system…
-
Page 95: Audio Mode
Writing access is not possible on NTFS. Multisession CDs For multisession CDs, the content of the first session determines how Audio 20 will proc- ess the CD. Audio 20 only plays back one session and gives priority to the first session on the CD.
-
Page 96: Copyright
Files beyond the eighth level will not be rec- DRM (Digital Rights Management) encryp- ognized by the system. ted files Audio 20 supports up to 15,000 files for variable bit rate all of the connected sources. WMA Pro 5.1 surround sound…
-
Page 97: Inserting
The drive closes and the disc is played. quently, it may not be possible to play them If the CD is operated in Media mode, the on the Audio 20 system. corresponding basic menu will be shown. If Playback problems may occur when playing the CD is started using another application copied discs.
-
Page 98: Inserting
High temperatures can dam- age the card. Audio 20 supports SD memory cards (Secure Digital), SDHC memory cards (Secure Digital High Capacity), and SDXC memory cards (Secure Digital eXtended Capacity.
-
Page 99: Selecting A Track
Audio mode Skip to time Pause and playback function Skip to Time: turn and press the To select To pause playback: in audio mode, slide controller. 6 the controller. A menu appears. The media menu bar is shown. To set the time: turn the controller To activate Ë…
-
Page 100: Media Search
Depending on the connected media sources and files, the following categories are listed: Media search Current Track List General notes Folder Select By Cover Audio 20 plays back files from the following Keyword Search data media: Playlists Disc (audio CD) Artists Memory card…
-
Page 101: Current Tracklist
To select in the category list: turn and press the controller. An album list sorted by artist appears. Audio 20 searches all media sources. There is a database for iPod ® and for each of the other media sources (CD, USB, SD card).
-
Page 102: Keyword Search
The search result then dis- plays the entire text. Genres To select in the category list: turn and press the controller. Audio 20 searches all media sources. A Genres selection list with and media sour- ces appears. Select ¬.
-
Page 103: Bluetooth ® Audio Mode
® Before using your Bluetooth ® audio device Connecting Bluetooth ® audio devices with Audio 20 for the first time, you will need Prerequisites to authorize it. When you authorize a new Bluetooth ® audio Activate the Bluetooth ®…
-
Page 104: Device List
On some Bluetooth ® audio devices, play- menu: slide 6 the controller and press to back has to be started on the device itself confirm. first so that Audio 20 can play the audio Bluetooth Audio Devices: To select files. Bluetooth ®…
-
Page 105: Bluetooth
® On some Bluetooth audio devices, playback connected. has to be started on the device itself first so that Audio 20 can play the audio files. ® For some Bluetooth audio devices, the pairing must be confirmed within 10 sec- onds.
-
Page 106: Bluetooth
Connect Last Used Player To select authorization status the basic display: press the controller. To close the detailed display: press the If Audio 20 can locate the Bluetooth ® audio % button. device, it will be connected and playback will start.
-
Page 107: Tooth ® Audio Device Has Been Stopped
Bluetooth Audio To select in the menu: turn and press the controller. Connect Last Used Player: To select Audio 20 activates the Bluetooth ® audio press the controller. device. The basic display then appears. ® Depending on the Bluetooth audio device Playback starts.
-
Page 108
If you press and hold the 9 or : buttons, the rapid scrolling speed increa- ses after a short time. Increasing the Audio 20 volume Further ways to select tracks ( page 97). To select Options: slide 6 and press the In rapid scroll, track names are not controller. -
Page 109: Operation With The Media Interface
General notes following devices to Audio 20: Media Interface is a universal interface for the iPod ® connection of mobile audio devices. Media Interface in Audio 20 has two USB connec- iPhone ® tions. iPad ® The USB connection sockets are located in the stowage compartment under the armrest.
-
Page 110: Search
Operation with the Media Interface Composers Selecting a music file Photos Selecting with the controller Audiobücher (Audio Books) Podcasts To display the current track list: press the controller in the basic display. iTunes U The track list for the active data medium Genius Mixes appears.
-
Page 111: Picture Viewer
If pictures are stored on a medium (except on ® Apple devices) which is connected to Audio 20, you can view these on the Audio 20 dis- play. The following data media and picture formats are supported: Data media: CD, USB devices, SD memory…
-
Page 112
The image menu appears. and press the controller. Start Slideshow: turn and To select Audio 20 returns to the last accessed press the controller. media function. The slide show starts. To end the slide show: press the controller. The image menu appears. -
Page 113: Sound
Audio 20 features ……112 Sound settings ……..112 Harman/kardon ® Logic 7 ® sur- round sound system ……113…
-
Page 114: Sound Settings
Setting treble, mid-range and bass These operating instructions describe all standard and optional equipment available for your Audio 20 system at the time of pur- chase. Country-specific differences are pos- sible. Please note that your Audio 20 system may not be equipped with all the features described.
-
Page 115: Calling Up The Sound Menu
Harman/kardon ® Logic 7 ® surround sound system Call up the sound menu ( page 112). Switch to radio mode ( page 82). Balance/Fader Turn the controller until brought to the front and then slide 6 the Switch to media mode ( page 92).
-
Page 116: Surround Sound
Harman/kardon ® Logic 7 ® surround sound system To return to the menu: slide 5 the con- Setting surround sound troller. To return to the basic menu: press the % button briefly. Adjusting the balance/fader Logic7 setting optimizes the sound play- back.
Посмотреть инструкция для Mercedes-Benz Audio 20 бесплатно. Руководство относится к категории автомагнитолы, 31 человек(а) дали ему среднюю оценку 8.2. Руководство доступно на следующих языках: английский. У вас есть вопрос о Mercedes-Benz Audio 20 или вам нужна помощь? Задайте свой вопрос здесь
Не можете найти ответ на свой вопрос в руководстве? Вы можете найти ответ на свой вопрос ниже, в разделе часто задаваемых вопросов о Mercedes-Benz Audio 20.
В чем разница между FM и AM?
Когда звук считается слишком громким?
Автомобильный радиоприемник не включается, что делать?
Как лучше всего выполнять чистку автомагнитола?
Инструкция Mercedes-Benz Audio 20 доступно в русский?
Не нашли свой вопрос? Задайте свой вопрос здесь
Содержание
- Mercedes C-class Almost «Stance» › Бортжурнал › Корректная настройка эквалайзера или второе дыхание Audio 20:)
- Mercedes audio 20 настройка
- Mercedes E-class Оцелот › Бортжурнал › Audio 20 W212 — настройка Bluetooth Audio.
- Mercedes V-class 136 лошадок FR › Бортжурнал › Audio 20 cd скрытое меню
- Mercedes V-class 2018, двигатель дизельный 2.1 л., 136 л. с., задний привод, автоматическая коробка передач — автозвук
- Машины в продаже
- Toyota Corolla Fielder, 2009
- Hyundai ix35, 2010
- Land Rover Range Rover Sport, 2009
- Jeep Grand Cherokee, 2005
- Комментарии 52
Mercedes C-class Almost «Stance» › Бортжурнал › Корректная настройка эквалайзера или второе дыхание Audio 20:)
Друзья, доброго времени суток;)
Данный пост будет про звук в системе Audio 20. Как только пересел со своей предыдущей Вольво (там была предтоповая аудио система, которой мне всецело хватало) осознал, что звук в мерседесе какой то грустный…
Слишком много басов, которые не обираются и заваленные верха.
Перед покупкой авто, я как правило, всегда читаю весь Д2 по данной модели и скидываю себе на почту интересные статьи, которые по моему мнению, будут мне полезны в дальнейшей эксплуатации… Это статьи про частые поломки, про маленькие доработки и ухищрения и обязательно про корректную настройку «Эквалайзера».
Я поездил пару дней на авто и понял, что звук меня абсолютно не устраивает (хотя ухом то слышу, что акустика то может выдавать более сочный звук)… Но вспомнил, что на почту себе кидал ссылку на интересную статью, про программную настройку эквалайзера Аудио 20. Вот ссылка на статью — www.drive2.ru/l/3740569/.
Решил проделать данную манипуляцию и на своем авто, ради эксперимента:D В любом случае откатиться назад я могу всегда) Пока грел машину, открыл телефон и давай тапать по джойстику для введений этих значений. Долго я конечно их вбивал, но в итоге спустя минут 10 я наконец справился:D
Друзья, как говорил автор статьи, «медведь наступил на ухо всем по-разному», но результат был оценен мной на 8 из 10. По моему мнению, стало намного лучше и звук заиграл новыми нотами! Но все равно, чувствовался фальш в колонках…
Решил также заглянуть в поднастройки эквалазера Apple Music. Стояла настройка «Поп». Потыкав на разные варианты, наткнулся на вариант — «Лаундж» и о ВОТ ОНО! Звук тот, который я и ждал от этой аудио системы!
+ еще выставил басс на -2 и остался капитально доволен:D
Всех, кого не устраивает звуча-ча-чание своей Аудио 20 — настоятельно рекомендую данную процедуру!)))
Также выражаю большую благодарность chines , за написание подробной инструкции и сохранения моего времени!))
Всем хороших приближающихся выходных и звонкого баса, друзья;)))
источник
Mercedes audio 20 настройка
Простите, что заставил ждать. Только вечером до форума добрался.
Итак, сразу скажу, что копаться в инженерном меню можно только на свой страх и риск, поэтому ко мне, плиз, никаких претензий, если что не так получится или настройки какие-то собъются. О.к.?
Рекомендую распечатать этот пост, чтобы войдя в меню, знать, что делать дальше.
Вход в инженерное меню:
Ключ зажигания в положение 1
Audio 20 включено, но не громко.
5 сек одновременно держим красную кнопку «положить трубку» + «1» + «#»
Так попадают в «engineering menu».
Далее все управление джойсиком на центральной консоли.
Там «sound»- «equalizer»- выбор колонки «speaker» (леваяправаяпередняязадняя)- выбираем левую переднюю-потом «parametric equalizer»
Эквалайзер, к сожалению, не графический, а цифровой.
В распоряжении 4 фильтра. Это и есть те слайдеры как у iTunes или какого-нибудь MP 3- плеера, только здесь вбиваешь сам, какую частоту хочешь подрегулировать. Эта регулировка происходит через изменение показателя «gain».
Так, например, если хочется увеличить бассы,то частоту, указанную в фильтр 1 меняешь до значения 50 Hz, а Gain до значения +5,0. Потом сразу «set». Чтобы увеличить высоты, я заменил в фильтре 4 частоту на 13 000 Hz, а Gain +4. Снова «set». Потом поменял фильтр 2 и 3.
Последние, установленные мной значения сообщу ниже.
Каждое изменение нужно фиксировать с помощью «set».
На кнопку tune не нажимать, иначе все значения обнуляются.
Записываем новые значения на бумажку или фотографируем на мобильник.
Покидаем эквалайзер первой колонки через «Prev».Потом снова «prev».
Переходим к смене значений на правой передней колонке. Вбиваем те же значения, что и в левой, сверяя их со своими записями. Так же фиксируем все изменения в каждом фильтре через «set». И покидаем инж. меню, совершив вышеуказанные шаги в обратном направлении.
Вот моя текущая установка:
— filter 1 : frequenz 40HZ : gain +3—> Бум- бум
— filter 2 : frequenz 300HZ : gain -4 —> меньше резонанса от semi- бассов
— filter 3 : frequenz 1000Hz : gain -3 —> голоса мягче
— filter 4 : frequenz 13000Hz : gain +4 —> приятные высоты
Не скажу, что такая установка- идеал, но, по моему вкусу,лучше, чем заводская.
Еще есть показатель «GradeQ». Думаю, это т.н. «предусиление», по аналогии с эквалайзером iTunes. Я там тоже начал что-то менять, но теперь не знаю- стоит ли: у одного из фильтров был показатель GradeQ2,2, но если один раз поменять, возможно вернуться только либо к 2,0 , либо к 2,5. Возможно и не надо было трогать.
До задних колонок еще не добрался- надеялся на рекомендации форумчан по настройке задних колонок.
Не знаю, не дадут ли по рукам в сервисе за «взлом» инж. меню. Интересно, что скажет Herr «романофф» по этому поводу?
В любом случае повторюсь: все манипуляции в инж.меню — на свой «страх и риск».
На всякий случай выкладываю фото заводских настроек.
Вот, что по теме варианты настройки:
Вход в инженерное меню:
Ключ зажигания в положение 1
Audio 20 включено, но не громко.
5 сек одновременно держим красную кнопку «положить трубку» + «1» + «#»
Так попадают в «engineering menu».
Далее все управление джойсиком на центральной консоли.
Там «sound»- «equalizer»- выбор колонки «speaker» (леваяправаяпередняязадняя)- выбираем левую переднюю-потом «parametric equalizer»
Эквалайзер, к сожалению, не графический, а цифровой.
В распоряжении 4 фильтра. Это и есть те слайдеры как у iTunes или какого-нибудь MP 3- плеера, только здесь вбиваешь сам, какую частоту хочешь подрегулировать. Эта регулировка происходит через изменение показателя «gain».
Так, например, если хочется увеличить бассы,то частоту, указанную в фильтр 1 меняешь до значения 50 Hz, а Gain до значения +5,0. Потом сразу «set». Чтобы увеличить высоты, я заменил в фильтре 4 частоту на 13 000 Hz, а Gain +4. Снова «set». Потом поменял фильтр 2 и 3.
Последние, установленные мной значения сообщу ниже.
Каждое изменение нужно фиксировать с помощью «set».
На кнопку tune не нажимать, иначе все значения обнуляются.
Записываем новые значения на бумажку или фотографируем на мобильник.
Покидаем эквалайзер первой колонки через «Prev».Потом снова «prev».
Переходим к смене значений на правой передней колонке. Вбиваем те же значения, что и в левой, сверяя их со своими записями. Так же фиксируем все изменения в каждом фильтре через «set». И покидаем инж. меню, совершив вышеуказанные шаги в обратном направлении.
Вот моя текущая установка:
— filter 1 : frequenz 40HZ : gain +3—> Бум- бум
— filter 2 : frequenz 300HZ : gain -4 —> меньше резонанса от semi- бассов
— filter 3 : frequenz 1000Hz : gain -3 —> голоса мягче
— filter 4 : frequenz 13000Hz : gain +4 —> приятные высоты
Не скажу, что такая установка- идеал, но, по моему вкусу,лучше, чем заводская.
Еще есть показатель «GradeQ». Думаю, это т.н. «предусиление», по аналогии с эквалайзером iTunes. Я там тоже начал что-то менять, но теперь не знаю- стоит ли: у одного из фильтров был показатель GradeQ2,2, но если один раз поменять, возможно вернуться только либо к 2,0 , либо к 2,5. Возможно и не надо было трогать.
Для входа в инженерное меню одновременно нажимаем:
Отбой тел, 1, #
Надо понимать, что такое параметрический эквалайзер. Как влияет и как управляет АЧХ.
Имеем три регулятора.
1 Frequency: устанавливаем частоту с которой надо поработать
я внёс изменения по фронту по этим 40, 125, 6000, 10000
2 Grade отвечает за широту(добротность) регулировки. Чем больше число, тем уже полоса, на которую мы влияем.
Сейчас у меня по фронту:
40 125 6000 10000
+6 +2 +3 +6
+4 +2 -1 +8
По тылу сделал:
40 1000 6000 16000
+6 +3 +3 +6
+4 -1 -1 -8
источник
Mercedes E-class Оцелот › Бортжурнал › Audio 20 W212 — настройка Bluetooth Audio.
Не возможно передать, как меня вымораживает, что когда садишься в машину, мне нужно:
— открыть бардачок,
— пультом переключить mode внешнего устройства, воткнутого в AUX на Bluetooth,
— после чего достать телефон из сумки,
— убедится, что он присодинился к BT этого внешнего устройства,
— благо на Команде ранее включённый AUX сохраняется — ничего дополнительного делать не нужно
— но музыку надо включать на ТЕЛЕФОНЕ! На сраном скользком бликующем конченом телефоне, который потные пальцы не всегда с первого раза разблокирует.
— следующий трек и предыдущий, я то-же должен отвлекаясь от вождения включать на телефоне! Разблокировав его! И это вместо крутейших кнопок, вместо крутейшей шайбы команда — сраный тачскрин сраного телефона.
Затем. Ты выходишь за хлебом — закрыл машину, вернулся, садишься в машину, и… сука ВСЁ заново… ВСЕ эти пункты. И нет НИКАКИХ нормальных решений. НИ ОДНОГО! Люди уже NGT 4.5 ставят за полтос, переплачивая за нахер не нужные фишки — только ради этой ОДНОЙ!
А потом читаешь в коментах, что некоторые вообще AUX с телефона проводом тянут и скрывают какое это пи3дец и угнетение. Я уж и не говорю про какие-то торчащие из прикуривателя китайские приборы, которые вещают радио тебе в салон в виде одной из радиостанций, и ты должен переключать треки так-же не в машине, а на этом дебильном приборе или стороннем пульте.
В общем цена вопроса явно высока. Поехал к электрикам — попросил прошейте мне этот сраный команд, они посмотрели Старом — говорят можем попробовать только обновить его софт. Пробовали, провали, так и не получилось, то-ли их подвязки диллера дали сбой, то-ли они отказались обслуживать регион.
Поехал к другому, которого дали эти ребята. Тот уже имел более серъёзные подвязки и за 5 тысяч мне оф. диллер удалённо скорректировал профили так, чтобы я мог пользовать BT Audio! Это неслыханное счастье! Я ещё никогда так легко не расставался с пятёрой.
Теперь я сажусь в машину… и ВСЁ! Музыка не доставая телефон, не включая ничего сразу играет! СРАЗУ! Треки листаются пачками прямо шайбой команда! То-ессть я раз мотнул к примеру на 15 песен взад — и сразу играет та, куда и перемотал! Названия не показывает, правда — слишком старый у меня команд. Но это счастье. Это победа.
У кого удалось за 5 секунд, через инженерное меню это активировать, просьба учесть, что я пробовал вот в этом посте ВСЁ.
источник
Mercedes V-class 136 лошадок FR › Бортжурнал › Audio 20 cd скрытое меню
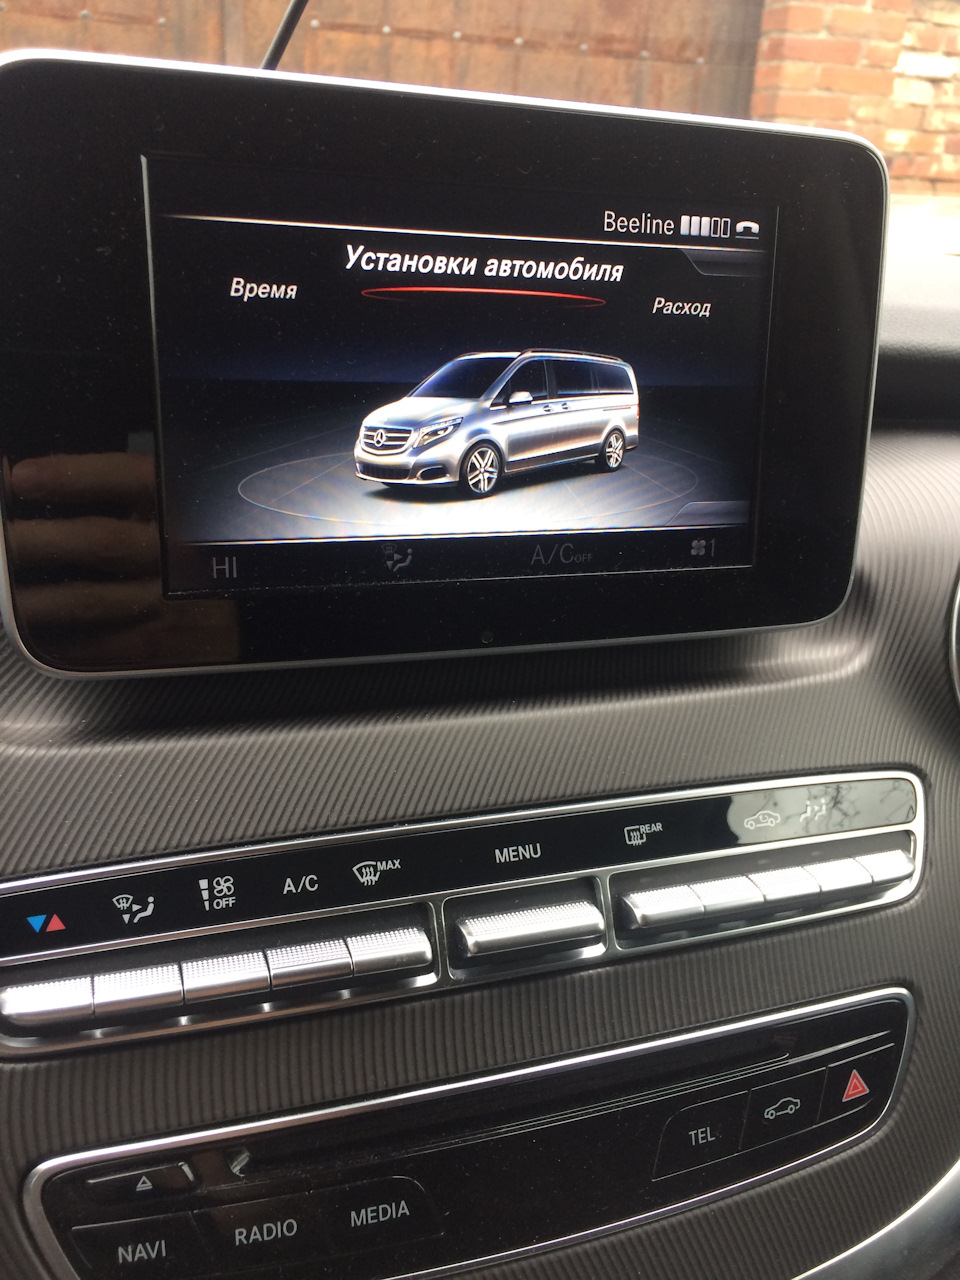
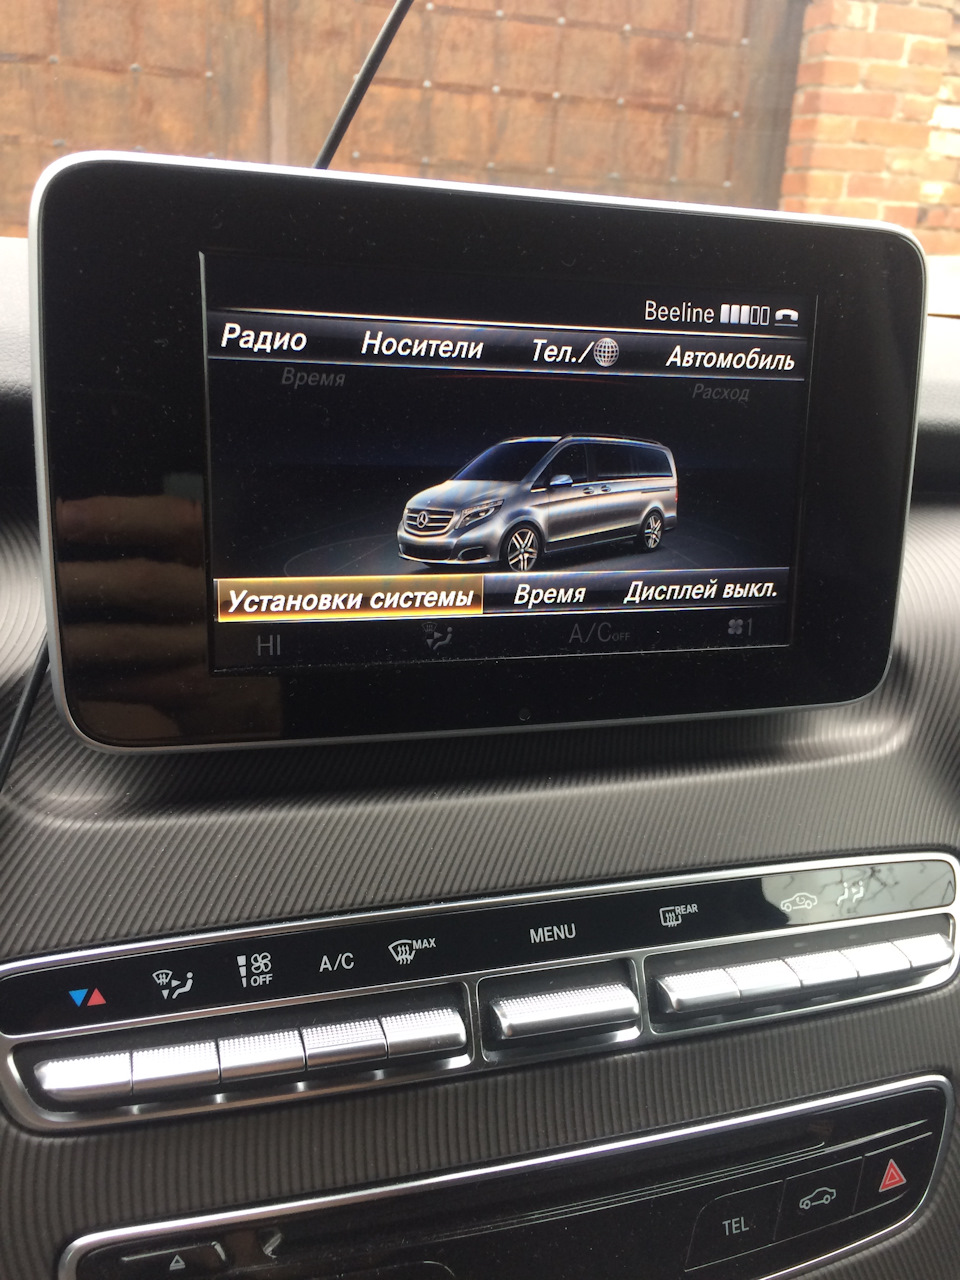
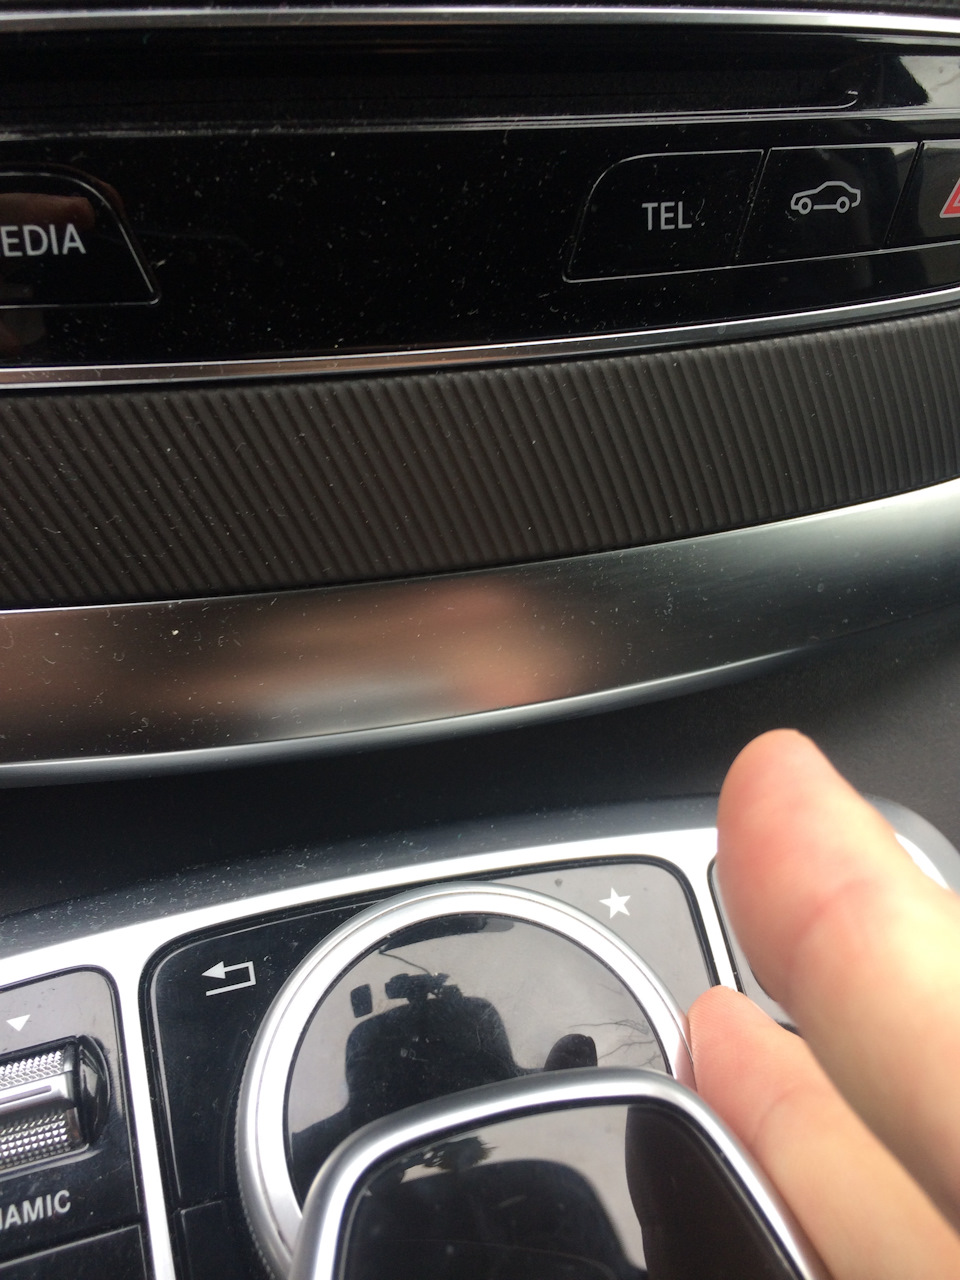
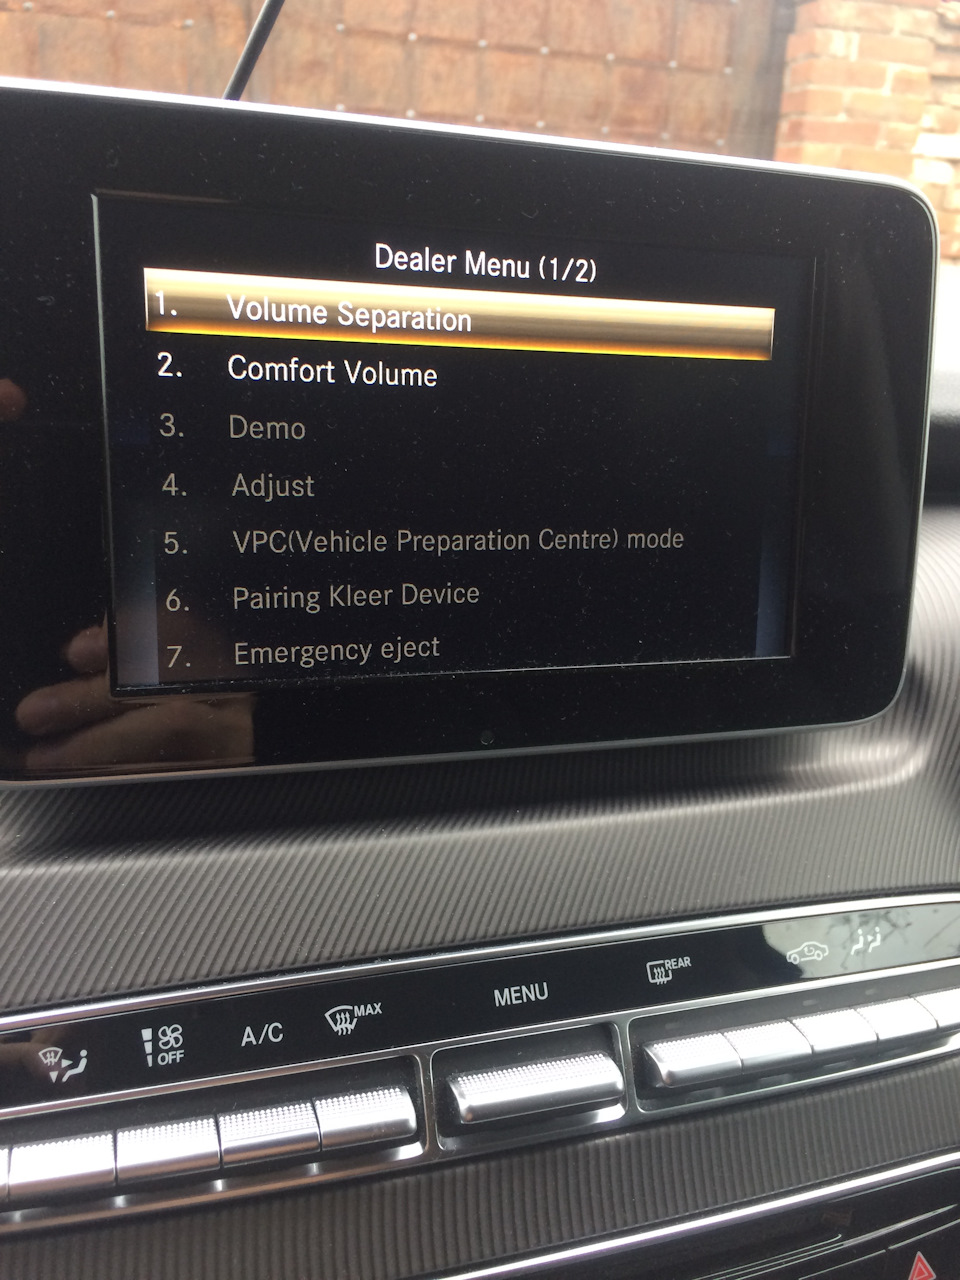
Всем привет. Нарыл скрытое меню. Может кому надо. Нажимаем на кнопку автомобиль. Переводим на УСТАНОВКИ СИСТЕМЫ. Зажимаем шайбу Влево ни держим около 5 секунд. Появляется меню. У меня много пунктов не активны. Кто что знает про это? Чем и как доработать штатную аудио 20?
Цена вопроса: 0 ₽ Пробег: 26 000 км
Mercedes V-class 2018, двигатель дизельный 2.1 л., 136 л. с., задний привод, автоматическая коробка передач — автозвук
Машины в продаже
Toyota Corolla Fielder, 2009
Hyundai ix35, 2010
Land Rover Range Rover Sport, 2009
Jeep Grand Cherokee, 2005
Комментарии 52
Так курс к рублю 1 к 33. Ничего не понимаю. Если ТО стоит 100000 то в рублях миллионы получаются. Если 100 рублей белорусских то 3300 рублей российских.
Тут подробнее описание. Цена вопроса 85000. Есть более бюджетные варианты.
Здорово, когда имеешь возможность исправить недостатки производителя. Но для такого нищеброда, типа меня, цена — космос. Проще отдельный планшет или телефон использовать для всяких яндексов
По музыке больше и не нужно. Хотелось именно навигацию Типа яндекс прикрутить ( телефон рядом не очень вариант) да и звонят на него в самый неподходящий момент. Насчёт видео — не большой фанат. Да и в дороге отвлекает ( пробовал планшет с фильмом поставить) чуть в попу не въехал впереди машине.
мне даже сложно комментировать — смотреть видео и управлять автомобилем…
по навигации — да иметь WAZE на большом мониторе приятнее, на смартфоне…но ничего — это работает…и мне звонят, и я разговариваю…но говорю через блютуз и при этом навигация работает … не вижу проблемы…
Мне тоже когда звонят на телефон навигация работает без проблем.звонки не мешают.только музыка которая идёт с телефона.в основном интернет радио.на время звонка выключается.
ну это нормально — или говорить или музыку слушать…два взаимоисключающих момента
По музыке больше и не нужно. Хотелось именно навигацию Типа яндекс прикрутить ( телефон рядом не очень вариант) да и звонят на него в самый неподходящий момент. Насчёт видео — не большой фанат. Да и в дороге отвлекает ( пробовал планшет с фильмом поставить) чуть в попу не въехал впереди машине.
Вчера ехал на каршеринге, кия Рио…
Яндекс навигатор там был прям впечатляющего размера…
Двудиновые магнитолы с андроидом стоят других денег .чем переделка вэшки под Андроид.
Справедливости ради, это не двух диновая магнитола…это в целом другое устройство с заменой части центральной консоли.
Это просто демонстрация заморочки самого яндекса с головным устройством и выводом навигатора.
Какая система стоит на вэшке я знаю…
Вот что-то похожее что стоит в Рио с Яндекс навигатором.
Да поставить можно что угодно, вопрос в том что с завода вся мультимедиа в вэшке отвратна, старый команд, бурмейстер в котором от бурмейстера одно название.
полностью поддерживаю мнение о странных, по современным меркам, решениям по мультимедия — это даже, в некоторых местах, граничит с издевательством над пользователем…
Ну ждём обновления, что ещё остаётся🤷♂️
Но конечно забавно, новый спринтер(!) реально намного интереснее оснащён
Здорово, когда имеешь возможность исправить недостатки производителя. Но для такого нищеброда, типа меня, цена — космос. Проще отдельный планшет или телефон использовать для всяких яндексов
У самого не очень жирно с деньгами. Но думаю приемлимые варианты должны быть. Прочитал тут на драйве про ТО 2 за 70000 руб. Что то как то не айс
источник
© 2008-2023 Форум официального клуба Мерседес-Бенц в России — Mercedes-Benz Classic Club Russia
Все права защищены. Все материалы форума, любая текстовая, графическая или видео информация, а также структура сайта и оформление страниц, защищены российским и международным законодательством в соответствии с соглашением об охране авторских прав, смежных прав и интеллектуальной собственности (ст. №№ 1259, 1260, главы 70 «Авторское право» Гражданского Кодекса Российской Федерации от 18.12.2006 года № 230-ФЗ).
Любое копирование и воспроизведение текста, в том числе частичное и в любых формах, без письменного разрешения правообладателя запрещено.

