Avolites Titan инструкция на русском и методическое пособие по
программированию пультов Avolites на базе
ОС «Титан»
-
Лицевая панель пульта, рабочее окружение и логика ОС Титан.
-
Очистка текущего шоу и создание патча.
-
Прочие операции патча.
-
Выбор приборов и настройка значений атрибутов.
-
Создание и использование групп приборов.
-
Работа с сеткой каналов (программером)
-
Создание и использование паллет.
-
Работа с генератором эффектов (шейп-генератор).
-
Программирование простых сцен.
-
Программирование динамических последовательностей (чейзов).
-
Канальный режим записи.
-
Захват значений атрибутов. Клавиши «Include» и «Off».
-
Ещё несколько слов о режимах записи.
-
Организация воспроизведения.
-
Программирование света для смешанной шоу-программы.
-
Работа со списками сцен.
-
Конфигурация воспроизведения на основе списков сцен для театра.
-
Автоматическое переключение сцен в списке.
-
Комплексное воспроизведение. Работа со страницами.
-
Практические советы по конфигурации воспроизведения для ТВ съёмок и дискотек.
-
Вместо заключения
Данная публикация позволит максимально быстро и легко понять
основные принципы настройки и программирования пульта Tiger Touch
(читается: тайгер тач) на базе операционной системы «Титан», а также
наглядным образом продемонстрировать то, каким образом можно с
максимальным удобством для себя использовать данную консоль для решения
различных постановочных задач по управлению интеллектуальным
освешением и видеоконтентом. В дальнейшем вы также сможете с успехом
применять полученные навыки и при программировании других моделей
пультов от Avolites на базе ОС Титан.
Уровень развития современных шоу-технологий предъявляет высокие
требования к системам управления светом, а устойчиво развивающиеся
тенденции интеграции света и видео в единое целое требуют от производителей
современных консолей обязательной поддержки функций по управлению
медиасерверами. Понимая это, специалисты британской компании Avolites Ltd
разработали принципиально новую операционную систему «Титан».
Логика ОС Титан достаточно прозрачная и интуитивно понятная как
пользователям, хорошо знакомым с пультами ранних версий семейства Pearl и
Diamond, так начинающим пользователям, в т.ч. пользователям других пультов.
Большой арсенал инструментов позволяет без труда программировать
современные многоканальные световые приборы и медиасерверы. Кроме всего
этого интерфейс ОС Титан имеет мультиязыковую поддержку, в т.ч. и русского
языка. Не у всех производителей есть подобная забота о пользователе 
Если рассмотреть принцип программирования любого светового шоу на
любом современном пульте, то можно отметить следующие основные этапы:
-
Настройка пульта для работы с приборами, или так называемый патч;
-
Разделение приборов на группы по их типам и функциям;
-
Подготовка пресетов, паллет и прочего «стройматериала»;
-
Программирование световых сцен;
-
Воспроизведение запрограммированного шоу.
Чтобы было легче понять о чём идёт речь в дальнейшем, дадим
определение основным терминам:
Канал – это может быть диммерный канал, т.е. регулируемая линия с
единичной нагрузкой, либо отдельный механизм интеллектуального прибора.
Прибор – интеллектуальный прожектор, или любое другое DMX
управляемое устройство, в т.ч медиасервер.
Атрибут прибора – конкретная функция прибора, например
интенсивность свечения, цвет, гобо, позиция и т.п. Чтобы лучше знать обо всех
атрибутах ваших приборов, следует ознакомиться с инструкцией от них.
Во всех пультах Avolites атрибуты разделены на 7 групп по их
функциональному назначению:
-
I (INTENSITY) – интенсивность (Dimmer, Strobe, Shutter).
-
P (POSITION) – положение приборов (Pan, Tilt).
-
C (COLOUR) – колёса светофильтров и цветосмешение (CMY, RGB).
-
G (GOBO) – статичные и вращающиеся трафареты (гобо).
-
B (BEAM) – эффекты формы луча (Iris, focus, zoom).
-
E (EFFECTS) – призма, фрост-фильтр.
-
S (SPECIAL) – каналы управления скоростью двигателей, перезагрузка прибора и т.п.
Работа на пультах с ОС Титан организована прозрачно и логично.
Обращение к приборам осуществляется методом прямого доступа, т.е. в
буквальном смысле, тыкая пальцем или курсором мыши в кнопку на тач-
скрине, соответствующую нужному прибору. Выбрав нужный прибор вы сразу
же получаете прямой доступ ко всем его атрибутам. Для выбора нужной группы
атрибутов для настройки предусмотрены специальные клавиши.
Итак, приступаем к изучению пульта Tiger Touch.
Для начала давайте посмотрим на лицевую панель пульта. Здесь можно
условно выделить 4 зоны:
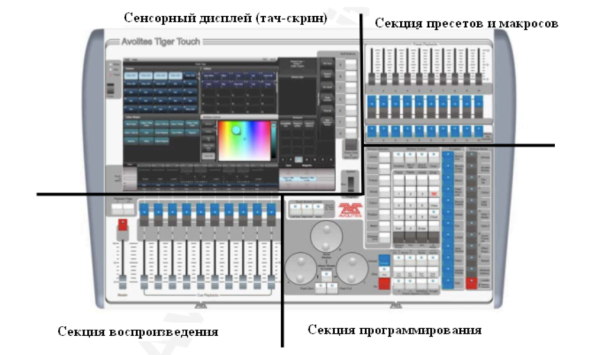
Разумеется, вся основная информация о приборах, паллетах, а также о том,
какие атрибуты приборов в данный момент назначены на колёса настройки, а
также какие программы назначены на мастера воспроизведения, можно увидеть
на встроенном тач-скрине. В секции программирования находятся числовая
клавиатура, клавиши выбора атрибутов, колёса настройки и многое другое,
необходимое для программирования шоу. В секции воспроизведения
расположены 10 Playback мастеров для воспроизведения записанных программ,
главный мастер, отвечающий за общий уровень интенсивности всех приборов и
кнопка полного затемнения. В секции пресетов и макросов можно найти 10
дополнительных мастеров воспроизведения для дополнительных программ и 10
клавиш для записи и воспроизведения макрокоманд, позволяющих заменить
длительный набор команд на клавиатуре нажатием всего одной клавиши. Более
детальный вид лицевой панели пульта и назначение отдельных элементов
управления следующие:

Назначение каждой клавиши указано непосредственно на каждой из них.
Не совсем понятной может показаться только клавиша с логотипом Avolites. Её
функция идентична функции клавиши «Shift» на компьютере и нажатие её в
сочетании с другими клавишами открывает доступ к новым функциям.
На задней панели пульта располагаются разьёмы для подключения
сетевого кабеля, VGA/SVGA — разьём для внешнего монитора, Ethernet-порт
RJ-45, 2 USB порта, MIDI In/Out порты, 4 5 pin XLR коннектора для DMX out
кабелей, 3 pin XLR коннектор для питания лампы подсветки пульта и кнопка
аварийного перезапуска.
5
Включите питание пульта. Дождитесь полной загрузки программного
обеспечения. Знаком того, что загрузка завершена и пульт готов к работе станет
появление на тач-скрине окон рабочего пространства ( Workspace windows):
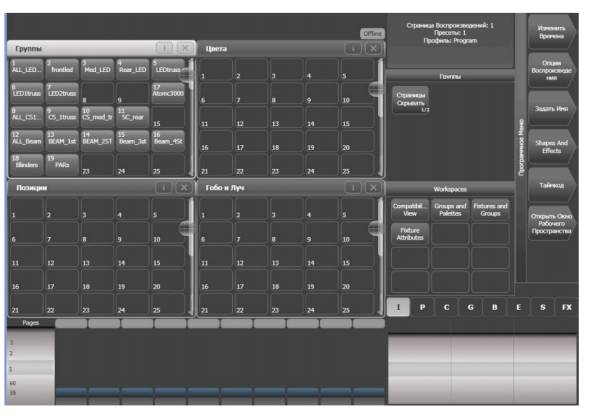
В этих окнах сосредоточена вся информация, которая будет полезна при
программировании и воспроизведении шоу. Конфигурировать окна, т.е. менять
их содержимое, размер и расположение можно на своё усмотрение. В ОС Титан
это можно сделать следующими способами (выберите наиболее удобный для
себя):
1)Через выпадающее меню. В верхней правой части
каждого окна, рядом с «крестиком» есть кнопка «I», кликнув по
которой можно открыть окно настроек размера и положения
окна:

Здесь можно выбрать один из 9 предлагаемых вариантов величины и
расположения окна. Чтобы закрыть это меню, кликните «I» ещё раз.
2) Используя экранные клавиши. На числовой клавиатуре имеются
специальные клавиши открывания и изменения размеров окон:

СОВЕТ!
На тач-скрине одновременно можно открыть не более 4-х окон,
но если вы используете внешний монитор, вы можете вывести на
него отдельные окна, получив таким образом до 8 окон. Опция
выбора внешнего монитора находится в выпадающем меню окна.
После того как необходимая
конфигурация рабочего пространства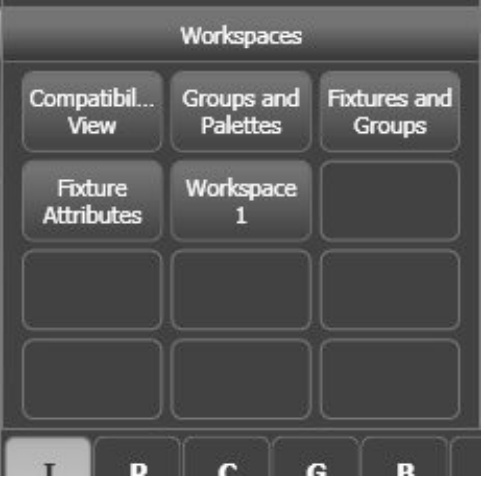
будет настроена, сохраните её вид для
п о с л е д у ю щ и х в ы з о в о в . В с е
конфигурации рабочего окружения
сохраняются в отдельном меню тач-
скрина workspace. Здесь есть 4
п р е д п р о г р а м м и р о в а н н ы х
конфигураций и 8 пустых кнопок для
пользовательских конфигураций.
Сохранить новую конфигурацию очень
легко, используя функцию быстрой
з ап и с и Quick Record. П р о ст о
выберите ячейку или кнопку, куда вы
хотите сохранить ваш вид и быстро 2
раза кликните по нему. После первого клика выделенная
ячейка окрасится в темно-красный цвет и в её правом
нижнем углу появится знак (+). Это означает, что ячейка
готова к записи. Второй клик служит подтверждением
записи. Присвоить имя новой ячейке можно при помощи
клавиши «F (Задать имя)» и кликнув по ячейке, которой
собираетесь присвоить имя. Подтвердите ввод нажатием клавиши «A» — имя тут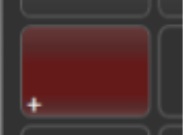
же появится на ячейке или кнопке.
СОВЕТ!
С помощью функции быстрой записи можно сохранять не только
конфигурацию рабочего окружения, но и многое другое: группы,
паллеты и т.п
Перейдём теперь непосредственно к первому шагу в программировании
шоу — операциям патча.
До того как мы начнём программировать работу световых приборов, нам
необходимо «познакомить» пульт с приборами, т.е. установить связь между
пультом и приборами. На профессиональном языке такая процедура называется
патчем (Patch). Но перед тем как мы приступим к этому, научимся выполнять
ещё одно важное действие — сброс текущих настроек пульта. Это бывает
необходимым, когда требуется начать работу «с чистого листа», или если
произошла фатальная ошибка и пульт начал себя вести неадекватно. Итак,
чтобы полностью очистить память пульта до заводских
параметров:
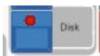
-
— нажмите функциональную клавишу «Disk»;
-
— нажмите «А (Новое шоу)»;

-
— нажмите «А(OK)» для подтверждения;
-
— чтобы выйти из режима работы с диском нажмите «Exit» на

-
числовой клавиатуре.

Альтернативно можно войти в режим «System» (устанавливается
специальным переключателем на лицевой панели), и нажать «E (стереть)».
После этого все запрограммированные настройки шоу будут удалены.
СОВЕТ!
Чтобы случайно не удалить нужные настройки рекомендуется
сохранять копию текущего шоу
Переходим теперь непосредственно к процедуре патча. Во всех пультах
Avolites патч диммерных каналов и интеллектуальных приборов вынесен в
отдельное меню. Для начала мы рассмотрим процедуру патча диммеров.
-На лицевой панели пульта нажмите командную кнопку
«Patch» чтобы войти в режим патча;
— «А (профильные приборы (Dimmers)».
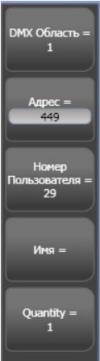
Откроется меню
патча, в котором следует выбрать DMX область (клавиша А),
стартовый адрес (B), пользовательский номер прибора (C), можно
присвоить имя каналу (D) и количество добавляемых диммеров
(E). Чтобы задать нужное значение каждого пункта, прикоснитесь
к нему и в появившемся поле введите нужное значение с помощью
числовой клавиатуры. Подтвердите ввод нажатием «Enter».
— В рабочем окружении откройте окно «Приборы» и выбрав
свободную ячейку прикоснитесь к ней. Все остальные выбранные
диммера тут же будут назначены на другие свободные ячейки.
Альтернативно можно задать количество выбираемых диммеров
равное 1, затем, прикоснувшись к первой свободной ячейке,
провести пальцем вдоль требуемого количества ячеек. На каждую
из них будет назначен свой диммерный канал. Всё!
— Покиньте данное меню, нажав «Exit».
Мы только что произвели патч диммерных каналов. Выполнить патч
интеллектуальных приборов также
легко.
-Войдите в меню патча и выберите пункт
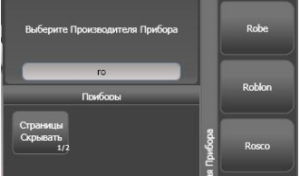
«(Fixtures)». В списке справа появятся
названия производителей приборов.
Чтобы ускорить поиск нужного
производителя, введите его имя в
поле поиска рядом со списком.
Достаточно ввести только первые
буквы имени — и пульт автоматически предложит вам близкие варианты.
-Аналогичным образом найдите нужный вам прибор.
-Выберите DMX режим работы прибора. Убедитесь, что выбранный
режим соответствует настройкам прибора.
-Укажите для выбранного типа прибора DMX область, стартовый адрес,
пользовательский номер и пр. подобно тому как мы делали с диммерами.
-Выберите свободную ячейку и прикоснитесь к ней. Если количество
приборов более 1, то остальные приборы будут назначены в свободные ячейки.
Либо воспользуйтесь альтернативным способом (см. выше).
— Если вам нужно выбрать другую модель прибора, или же другого
производителя, нажмите «Выбрать другой прибор». Далее повторите
описанные выше действия.
-Готово! покиньте меню патча, 2 раза нажав «Exit».
9
Мы только что произвели патч диммерных каналов. Выполнить патч
интеллектуальных приборов также
легко.
Чтобы увидеть теперь все
настройки патча ,нажмите
числовой клавиатуре клавишу «View»
и затем «Патч прибора». Откроется
окно патча таблицы.
Используйте клавиши со стрелками
для прокрутки всего списка.
Некоторые приборы например лиры управляются
скроллером, имеют отдельный
диммерный канал.
Такие приборы
называются комплексными. Чтобы
вызывать их как один прибор, сначала
следует выполнить патч диммерного канала, а затем, на эту же самую кнопку
назначить и саму лиру со скроллером. Таким же точно образом можно
произвести патч нескольких диммеров на одну кнопку; патч более чем 1
прибора на одну кнопку невозможен!
Выполнить патч
интеллектуальных приборов также
легко.
-Войдите в меню патча и выберите
«(Fixtures)». В списке справа появятся
названия производителей приборов.
Чтобы ускорить поиск нужного
производителя, введите его имя в
поле поиска рядом со списком.
Достаточно ввести только__ первые
буквы имени — и пульт автоматически предложит вам близкие варианты.
-Аналогичным образом найдите нужный вам прибор.
-Выберите DMX режим работы прибора. Убедитесь, что выбранный
режим соответствует настройкам прибора.
-Укажите для выбранного типа прибора DMX область, стартовый адрес,
пользовательский номер и пр. подобно тому как мы делали с диммерами.
-Выберите свободную ячейку и прикоснитесь к ней. Если количество
приборов более 1, то остальные приборы будут назначены в свободные ячейки.
Либо воспользуйтесь альтернативным способом (см. выше).
— Если вам нужно выбрать другую модель прибора, или же другого
производителя, нажмите «Выбрать другой прибор». Далее повторите
описанные выше действия.
-Готово! покиньте меню патча, 2 раза нажав «Exit»
Патч более чем 1
прибора на одну кнопку невозможен!
Прочие операции патча. Инверсия.

Очень часто бывает необходимо задать инверсию отдельных
атрибутов прибора, т.е. изменить направление его работы. Как
правило, чаще всего это атрибуты Pan/Tilt. Например, если ваши
приборы подвешаны с противоположных сторон сцены лицом друг к
другу и вы хотите, чтобы они всегда поворачивались навстречу друг
другу. Задать инверсию можно следующим способом:
— Нажмите «Patch»;
— «D (Редактирование приборов)»;
— «B (Инвертировать атрибут)»;
— Выберите приборы, атрибуты которых вы желаете
инвертировать. На дисплее слева отобразятся названия атрибутов,
которые поддаются инверсии. Перелистывайте список клавишами
«Next (Следующий)» и «Previous (Предыдущий)»;
— Нажмите кнопку, соответствующую желаемому атрибуту.
Соответствующая кнопка выделится светло-голубым цветом и
появится надпись «Inverted (Инвертирован)».
— Покиньте данное меню нажатием «Exit».
Изменение стартового адреса (ре-патчинг) прибора/диммера.
— Войдите в режим патча, нажав «Patch»;
— «E (ре-патчинг прибора)»;
— Выберите нужный прибор;
— Измените в появившемся меню слева значения DMX области,
стартовый адрес, пользовательский номер прибора, выделяя
кликом нужные поля;
— Для сохранения изменений нажмите «Enter», либо «F (Перепатчить)»;
Проделайте такие же действия для других приборов.
В случае, если выбранный вами адрес будет занят другим
прибором, пульт тут же оповестит вас об этом. Вам будет
предложено на выбор: указать другой стартовый адрес для прибора,
либо «запарковать», т.е. вывести из управления конфликтующий
прибор, чтобы потом назначить ему другой адрес и снова ввести его
«в строй».
Присвоение имени прибору/диммеру.
ОС «Титан» позволяет присваивать имя любому выбранному
объекту. Чтобы присвоить имя прибору, в основном меню пульта выберите
опцию «Задать имя». Далее выберите нужный прибор и в поле «Имя» введите
название для прибора. Нажмите «Enter» для подтверждения — название
отобразится на кнопке, соответствующей данному прибору.
ОС «Титан» позволяет использовать вместо текстовых названий
изображения, которые вы можете сами нарисовать, используя
функцию Quick Sketch. В меню «Задать имя» выберите опцию
«Картинка». Откроется окно для рисования. Нарисуйте свой
рисунок, используя предлагаемые вам инструменты и формы и
сохраните его. Созданное изображение можно будет использовать
в дальнейшем.
Перемещение приборов.
Если при создании патча вы располагали приборы хаотично, и теперь для
большего удобства желаете «навести порядок», то вы можете воспользоваться
функцией перемещения приборов. Для этого нажмите командную кнопку
«Copy/Move/Link» , опция «Передвинуть». Выберите прибор или
несколько приборов и переместите их в желаемое место. Чтобы не
нажимать кнопку «Copy/Move/Link» каждый раз, можно закрепить
меню перемещения, нажав кнопку «Fixture tools or Menu
latch» (находится справа от тач-скрина, ниже функциональных
клавиш дисплея). Рядом с меню появится красная полоса с
надписью, что данное меню закреплено (Latched).
Удаление прибора/диммера из патча.
Чтобы удалить прибор из шоу «раз и навсегда» нажмите «Patch» и
«Delete», затем выберите нужный прибор, прикоснувшись к его кнопке на тач
скрине. Прибор выделится красным цветом и появится сообщение о
подтверждении удаления. Прикоснитесь к кнопке с прибором ещё раз — прибор
будет удалён. Если вы хотите удалить и другие приборы, то закрепите меню
удаления, как это описано выше.
Покиньте данное меню, нажав «Exit».
Выбор приборов и настройка значений атрибутов.
После того как нужные приборы будут скоммутированы на нужные DMX
адреса, можно переходить непосредственно к управлению ими. Чтобы начать
управлять приборами, их следует сначала выбрать и открыть по интенсивности.
В ОС «Титан» выбор приборов осуществляется в окне «Приборы» в рабочем
окружении.
На пультах «Pearl Expert» и «Diamond Titan» для этого есть также
специальные кнопки «Select» на лицевой панели
Чтобы выбрать нужный
прибор, достаточно нажать соответствующую ему кнопку. Чтобы
несколько приборов одновременно, нажмите и удерживая нажатой кнопку
первого прибора, нажмите кнопку последнего, либо просто проведите пальцем
по кнопкам от первой до последней.выбрать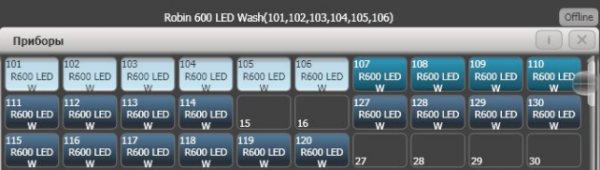 Выбранные приборы будут выделены
светло-голубым цветом, а в строке состояния над окном будут отображены
номера выбранных приборов:
Чтобы отменить выбор прибора, достаточно снова нажать
соответствующую ему кнопку. Невыбранные приборы отмечаются тёмносиним
цветом. Рассмотрим также другие способы выбора приборов
Те, кто привык выбирать приборы через командную строку, могут
воспользоваться режимом выбора Channel. Нажмите над числовой
клавиатурой кнопку «Channel», введите пользовательский номер прибора и
«Enter». Чтобы выбрать несколько приборов, используйте между их номерами
команду «Также» (Клавиша «D»).
Например, чтобы выбрать приборы 201 и 204, наберите команду:
[201] ‹Также› [204] ‹Enter›
На дисплее эта команда отобразится так: 201 AND 204
Чтобы выбрать несколько приборов подряд, используйте команду
«До» (клавиша F):
[201] ‹До› [204] ‹Enter› - выбрать приборы с 201 по 204.
Чтобы выбрать несколько приборов, за исключением какого-либо,
используйте команду «За исключением» (клавиша E):
[201] ‹До› [204] ‹За исключением› [203] ‹Enter› - выбрать приборы с 201

по 204, кроме 203.
Через командную строку не забывайте закреплять меню режима
Channel клавишей «Fixture tools or Menu latch».
Иногда в процессе программирования оператору требуется
оперативно делать выбор всех чётных, всех нечётных приборов,
или же каждого третьего (четвёртого, пятого) прибора. ОС «Титан» предлагает
для этого специальное меню шаблонов быстрого выбора, открывающегося
клавишей «Add Odd Even», которая находится в самой нижней части секции

Выберите какое-то количество приборов и войдя в меню «Add Odd Even»
выберите и примените один из предлагаемых здесь шаблонов
Для отмены выбора ВСЕХ ранее выбранных приборов, нажмите
«Clear»
После того как мы освоили основные приёмы выбора приборов,
можно переходить к настройкам значений атрибутов.
Для открытия приборов по интенсивности и установки его в «домашнее
положение» используйте красную клавишу «Locate». При этом
выбранные приборы откроются по интенсивности на 100% с
открытым белым лучом; значения Pan/Tilt в центральном
положении. Альтернативно можно выбрать атрибуты «Dimmer» и
«Shutter» и настроить их значения в положение «Открыто».
Как мы уже говорили в начале, все атрибуты приборов в пультах Avolites
разделены на 7 основных групп по их функциональному назначению. Для
выбора конкретной группы атрибутов существуют специальные клавиши с их
названиями в правой части лицевой панели пульта
рядом с командными клавишами. Настройка значений
атрибутов производится при помощи трёх
специальных колёс-энкодеров, расположенных в
нижней части секции программирования, справа от
мастеров воспроизведения. При этом значения
настраиваемых атрибутов будут отображаться на тачскрине
в специальном окне:
Альтернативно настройку значений атрибутов можно производить в
специальном окне «Fixture Attributes» или редактор атрибутов, на тач-скрине
(открывается нажатием специальной кнопки в окне выбора рабочего
окружения):
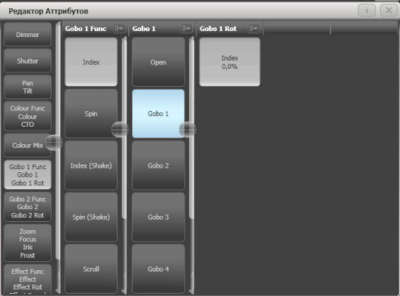
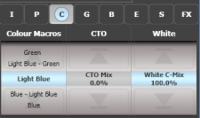
Это окно позволяет осуществлять выбор конкретных значений атрибутов
напрямую из раскрывающегося списка. Если выбранные приборы имеют
функцию цветосмешения (CMY или RGB), то для них нужный цвет можно
задать во вкладке «Colour Mix»:

Выберите нужный цвет или оттенок в данном окне, перемещая крестик.
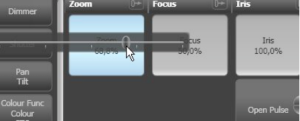
Помимо всего прочего, для настройки значений линейных атрибутов, таких
как Dimmer, Focus, Zoom, Iris и т.п. в этом окне есть специальный слайдер,
который появляется, если прикоснуться и провести пальцем по ярлычку с
именем атрибута:
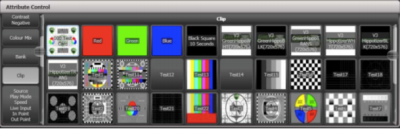
Так называемые Активные приборы, такие как медиасерверы с
поддержкой протокола CITP позволяют ОС «Титан» делать захват своего
медиаконтента с последующим отображением его на тач-скрине в виде
квадратиков с эскизами (Thumbnails), которые легко можно выбирать в окне
редактора атрибутов:
Практически все модели пультов Avolites с ОС «Титан» помимо
стандартных приёмов настройки значений атрибутов имеют в своём арсенале
вспомогательные инструменты. Один из них — инструмент Fan
(распределение). С его помощью можно быстро создавать сложные действия,
на создание которых порой уходит много времени. Например, если требуется
собрать несколько лучей приборов в одну точку, либо красиво разбросать
множество лучей в пространстве сцены, или же раскрасить лучи в
разные цвета. Для включения Fan есть специальная клавиша на
лицевой панели
Принцип действия этого инструмента основан на
сунусоидальном сдвиге значения выбранного параметра для указанного
множества значений. Проиллюстрировать его работу можно так: допустим, у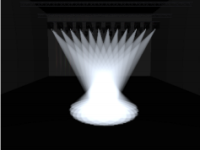
нас выбрано три прибора с атрибутом «Iris». Применяя Fan к данному атрибуту,
мы увидим, что у нас лучи поведут себя следующим образом: луч прибора 1
сожмётся (станет уже), луч прибора 2 не изменится, а луч прибора 3 станет чуть
шире чем луч 1.
При использовании Fan важную роль играет порядок выбора приборов!
Рекомендуемый порядок выбора приборов – от первого к последнему. Если
выполняя патч, а также при записи групп вы назначали (выбирали) приборы
последовательно друг за другом, то каких-либо проблем быть не должно.
Давайте рассмотрим теперь, как мы можем
использовать данную функцию применительно
к атрибуту «Pan/Tilt». Пусть нам требуется
собрать лучи от всех приборов на контровой
ферме в одну точку на авансцене. Для начала
вы берите приборы и откройте их по
интенсивности (клавиша «Locate»). Используя
колеса настройки атрибутов Pan и Tilt направьте
лучи всех приборов на авансцену. Теперь
выберите все приборы подряд, начиная с
первого, нажмите клавишу «Fan» и вращайте колесо настройки атрибута Pan
Рассмотренный пример является линейным (Linear) распределением.
Начиная с ОС «Титан» версии 4.1 стали доступны следующие режимы
распределения (Fan curves):
Pull Middle (распределение от центра) — крайние
приборы остаются на своих местах, а середина
вытягивается вперёд (см. рис. справа).
Pull Ends (распределение от конца) — крайние
приборы вытягиваются вперёд, а середина остаются на
месте (так называемая «птичка» :)).
Arrow (стрела) — первый и последний выбранные
приборы будут распределяться относительно
центральной точки, но в противоположных
направлениях.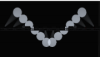
Чтобы выбрать нужный режим распределения, нажмите и удерживая
клавишу «Fan», нажмите одну из дисплейных клавиш с соответствующей
пометкой.
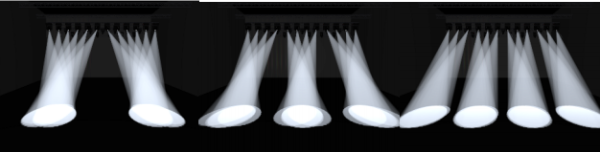
Ещё более интересные эффекты распределения можно получить, если
удерживая нажатой клавишу «Fan» набрать на числовой клавиатуре и ввести
число, равное количеству долей, на которые можно разделить выбранное
количество приборов. При этом распределение будет выполнено внутри каждой
доли отдельно. На рисунках ниже показано распределение внутри 2, 3 и 4-
долей:
Советуют профессионалы:
-
Для доступа к специальным функциям приборов, таким как поджиг и
тушение лампы, reset имеется специальное меню макрокоманд. Для их
вызова выберите нужный прибор или несколько приборов, нажмите клавишу
«Fixture tools or Menu launch» и выберите опцию «Макрос» (дисплейная
клавиша B). Выберите в раскрывшемся списке нужную команду.
-
Для выхода ИЗО ВСЕХ МЕНЮ СРАЗУ и возвращению в основное
меню используйте сочетание клавиши «Shift (с логотипом Avo)» + «Exit»
Загрузка…
- Manuals
- Brands
- Avolites Manuals
- Control Panel
- Titan One
- Operator’s manual
-
Contents
-
Table of Contents
-
Bookmarks
Quick Links
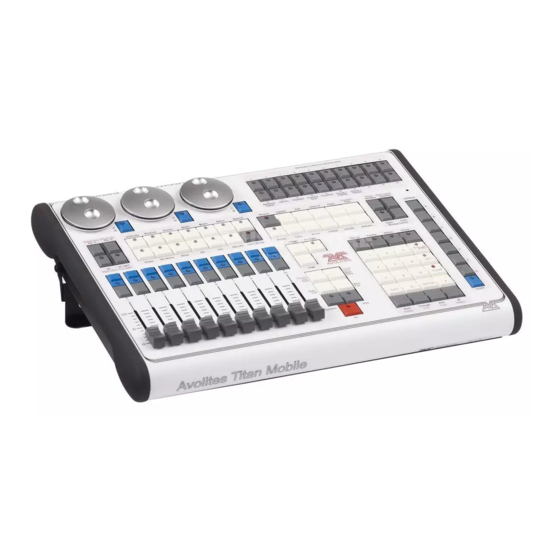
Titan Mobile
and Titan One
Operator’s Manual
Version 8.0
Related Manuals for Avolites Titan Mobile
Summary of Contents for Avolites Titan Mobile
-
Page 1
Titan Mobile and Titan One Operator’s Manual Version 8.0… -
Page 2
Page 2 – Reference Manual Contents… -
Page 3
Avolites Ltd. has been advised of the possibility of such damages. Because some jurisdictions do not allow the exclusion or limitation of liability for consequential or incidental damages, the above limitation may not apply to you. -
Page 4
Page 4 – Reference Manual Contents Written by Tim Mitchell, Sabre Technology Ltd http://www.sabretechnology.co.uk with examples by Nic Morris… -
Page 5: Table Of Contents
11. REMOTE CONTROL 12. USER SETTINGS AND OTHER OPTIONS 13. WORKING WITH FIXTURE PERSONALITIES 14. NETWORKING THE CONSOLE 15. USING DIFFERENT AVOLITES CONSOLES 16. RELEASE NOTES 17. TITAN COMMANDS QUICK REFERENCE 18. GLOSSARY OF WORDS This icon shows important information which you should know about to avoid damage to your console or loss of important data.
-
Page 6
Page 6 – Reference Manual Contents… -
Page 7
Guide to Titan Mobile …………. 18 Connecting up…………… 22 2.2.1 Cautions ……………….. 22 2.2.2 Software installation…………….22 2.2.3 Connecting Titan Mobile panel to your laptop/PC……..22 2.2.4 Connecting DMX lines …………….23 2.2.5 Using two monitors …………….23 2.2.6 Other connections …………….24 2.2.7… -
Page 8
Page 8 – Reference Manual Contents Advanced options …………..58 3.4.1 Swap pan and tilt…………….58 3.4.2 Invert attributes …………….. 58 3.4.3 Attribute limits ………………. 59 3.4.4 Fixture Offset ………………60 3.4.5 Fixture / Attribute curves …………..60 3.4.6 Freeze fixtures or attributes …………..61 3.4.7 Editing the personality …………….. -
Page 9
Playback Order and Priorities……………117 6.4.6 Displacement and Layer Properties…………121 6.4.7 Spawn and Pre-Spool ……………..124 Cues Creating a cue…………..128 7.1.1 How Titan Mobile works when programming ……….128 7.1.2 Creating a cue ……………….129 7.1.3 Quick Build cues …………….129 7.1.4 Using shapes/effects in cues…………..130 7.1.5 Blind mode ………………130… -
Page 10
Page 10 – Reference Manual Contents 8.2.1 Playing back a chase …………….147 8.2.2 Connecting a chase for control………….148 8.2.3 Setting speed and crossfade for a chase ……….148 8.2.4 Manually controlling the steps of a chase ……….149 8.2.5 Changing chase direction …………..149 8.2.6 Jumping to a step …………….149 Editing a chase………….. -
Page 11
Recovering/reinstalling the system……… 203 12.7.1 Booting from USB recovery stick …………203 12.7.2 Installation Instructions …………..204 12.7.3 Software licensing …………….204 13. Working with Fixture Personalities 13.1.1 Downloading fixture personalities from Avolites ……..205 13.1.2 Updating the personality library on the console ……..206… -
Page 12
Page 12 – Reference Manual Contents 13.1.3 User/custom personalities …………..206 13.1.4 Requesting a new fixture personality ……….207 13.1.5 Reporting a personality bug to Avolites ……….207 13.1.6 In an emergency…………….207 14. Networking the console 14.1 Controlling fixtures over a network……… 209 14.1.1… -
Page 13: Quick Start
1. Quick Start — Page 13 1. Quick Start This section is a quick guide on how to do most things on Titan Mobile. Each section has a link to take you to the appropriate manual section for more details. Softkeys are shown in square brackets like [This].
-
Page 14: Programming Cues And Chases
All times (cue times and fixture attribute times) are stored in the programmer and are saved when you store a cue. To edit times in the programmer before saving, press the Times button (previously labelled “Set” on Quartz/Titan Mobile/Sapphire Touch/Tiger Touch and “Next Time” on Pearl Expert/Tiger Touch mk1).
-
Page 15: Programming Palettes
1. Quick Start — Page 15 [Fixture Overlap] sets each fixture to fade in sequence (100%=all together, 0%=fixture waits for previous one to complete). [Attribute times] sets individual fade times for different attributes. [Fixture order] changes sequence for shapes and Overlap. (Section 8.5, p151).
-
Page 16
Page 16 – 1. Quick Start Switch to System mode by holding Avo and pressing Disk, press [DMX Settings]. Select a Node on the left (where the DMX is going to), click the blue arrow. On the right, select the DMX line it will be fed by. The ‘i’ buttons set properties for Nodes/Lines. -
Page 17
2. Setting up and using the console — Page 17… -
Page 18: Setting Up And Using The Console
Page 18 – 2. Setting up and using the console 2. Setting up and using the console Welcome to Titan Mobile from Avolites. This manual is a reference guide to all the functions of the console. We explain things in the order you’re most likely to use them, so we start with how to set up the console, then look at patching lights, controlling lights and how to program cues.
-
Page 19
2. Setting up and using the console — Page 19 Control wheels. The buttons have lights on to show you which attributes are active. Attribute functions such as Fan and Shapes are also controlled here. • The Chase and Cuelist control buttons allow you to start and stop chases and cuelists, and move about in the list. -
Page 20
Normally the panel is powered via the USB connection. Some laptop USB ports may not provide sufficient power for the panel, in which case the DC power input can be used to connect an external 9V DC power supply, available from Avolites. -
Page 21
2. Setting up and using the console — Page 21 • The PE socket is to allow you to ground/earth the panel, which can help resolve DMX problems if your laptop is not earthed. -
Page 22: Connecting Up
Your PC must be running Windows 7 or Windows 8. Do not connect the Titan Mobile panel to your PC for the first time until you have installed the Titan Mobile software, which you do simply by running the installer file. This will make sure the drivers for the panel are installed.
-
Page 23: Connecting Dmx Lines
Ethernet systems to allow connection to remote DMX Ethernet nodes, media servers, and so on. When you patch a dimmer or fixture you tell Titan Mobile which of the 12 (or 64 with TitanNet) DMX universes it is on. Each universe can be…
-
Page 24: Other Connections
Page 24 – 2. Setting up and using the console 2.2.6 Other connections The Titan Mobile panel provides MIDI connections which can be used to trigger playbacks or connect MIDI timecode for timecode-controlled cue lists. 2.2.7 Connecting the Fader Wing The Fader Wing adds 20 additional playback faders and 30 macro/executor buttons to the main console.
-
Page 25
2. Setting up and using the console — Page 25 Context buttons 4 window positions Up to 4 windows can be shown on the screen in a 2×2 grid, but if you need a larger view, you can make a window twice as big, or maximise it to take up the whole screen. -
Page 26
Page 26 – 2. Setting up and using the console Window shortcuts Press Window Open then an Attribute Bank button to open the Palette window for that attribute. Press Window Open then Patch to open the Patch View window. Press Window Open then a fixture select button to open the Fixture View window showing patch details for that fixture. -
Page 27: The Menu Area Of The Touch Screen
2. Setting up and using the console — Page 27 The Quick Record function can be disabled using Key Profiles (see section 12.2.1 on page 193). Legends and picture legends All touch buttons can have legends set to remind you what they do. In addition, you can draw picture legends on the buttons.
-
Page 28
Page 28 – 2. Setting up and using the console System prompt Context buttons Menu softkeys (showing softkey letter) Workspace selection buttons Attribute groups Current menu name Wheel attributes Current selection Touch to change up or down Down the right hand side of the screen, the functions of the A-G menu softkeys are listed. -
Page 29: The Heads-Up Display (Hud)
2. Setting up and using the console — Page 29 If a chase is being controlled, information about the chase is shown here. Above this, the screen shows which attribute group (Intensity, Position, Colour, Gobo, Beam, Effect and Special) is selected (grey box) and which are currently modified (blue circle).
-
Page 30: Visualiser
2.3.4 Visualiser The console runs Avolites Visualiser internally. This allows you to view the output of the console if you can’t use the real lights, enabling you to make changes to your show at home or in your hotel. It can also be used in Blind mode for programming during a show.
-
Page 31: Key Profiles
2. Setting up and using the console — Page 31 When you patch fixtures on the console, a Console Patch window is shown in Capture allowing you to add the new fixtures to Capture. 2.3.5 Key profiles The console allows you to change the function of the blue select and grey flash panel buttons.
-
Page 32: Keyboard Shortcuts
2.3.8 Keyboard shortcuts Many features of the console can be controlled by shortcuts on the keyboard. These are especially useful when using Titan Mobile or Titan Simulator. The Titan application “captures” the keyboard on start up, meaning that if you try to use other applications at the same time they will not receive keypresses.
-
Page 33: Locking The Console
2. Setting up and using the console — Page 33 / (num) Thro Alt ← Previous fixture * (num) Alt → Next fixture — (num) Alt ↑ + (num) Alt ↓ Highlight ⇑ means shift (num) means on the numeric keypad 2.3.9 Locking the console You can lock the console controls to prevent people fiddling with it…
-
Page 34: Handle Worlds
Page 34 – 2. Setting up and using the console 2.4.2 Handle Worlds Each show can have multiple Handle Worlds, each having its own layout of handles. This allows each user to have their own layout of cues, palettes and chases which can be easily switched, for example when a support band and headline band are using the same console, or when multiple programmers are working collaboratively on a number of consoles.
-
Page 35
2. Setting up and using the console — Page 35 • A green line shows a good connection, a dotted red line shows a problem with a connection. Unavailable consoles are shown with a red background. Initially all consoles are “Master” consoles. If you connect to a session on another console as multi-user you become a “Slave”… -
Page 36: Titan Simulator
Simply download and run the installer from the Avolites Download website. The first time you run Simulator you will need to license the software with the Avolites website. For this you will need an account set up on the Download site, which you should go and create now if you don’t already have one.
-
Page 37: Running Titan Simulator
You can save any number of different shows on a USB drive or the console’s internal hard disk. The console will also autosave the show periodically. Shows created on Titan Mobile can be loaded into any other Avolites Titan console, but not to older non-Titan consoles as the showfile format is different.
-
Page 38: Loading A Show
Page 38 – 2. Setting up and using the console • A new version of the file will be saved even if you enter the same tag as previously used. If you save to hard drive, shows are saved in the folder ‘DocumentsTitanShow Files’, unless you change this in the User Settings.
-
Page 39: Importing Parts Of Other Shows
2. Setting up and using the console — Page 39 6> Press Load Show. The console will show a loading screen as the different elements of the show load. 7> When the show has loaded the normal operating screen will reappear.
-
Page 40: Autosave
Page 40 – 2. Setting up and using the console Filter display of The items which items in show can be imported 1> Press the Disk button. 2> Press [Import Show] (The plus button at the top right of the Show Library window also opens this menu).
-
Page 41: Backing Up Existing Show Files To Usb Pen Drive
Alternatively you can use the Folders command on the Tools menu. Clearing the console When you start a new show on Titan Mobile it is usually a good idea to clear the console. All programming and patching is deleted, but user options are not changed.
-
Page 42
Page 42 – 2. Setting up and using the console Reports can be created in HTML, PDF, CSV or XML formats for the following: • Fixtures • Memory (Cues) • Chases • Cue Lists • Palettes • Groups To generate reports: 1>… -
Page 43: Patching
3. Patching — Page 43 3. Patching Patching is the process where you tell Titan Mobile • What type of lighting units you have connected to it • What DMX addresses they are operating at • Which DMX line (universe) each unit is connected to (there are 64 lines, but the console itself can only output 12;…
-
Page 44: Patching Dimmers
Page 44 – 3. Patching the [Pages Show/Hide] button on the right of the screen to select between page buttons and scrolling mode. You can change the fixture page at any time. You can allocate fixtures and dimmers to Groups, which allows you to quickly select a set of fixtures with one button.
-
Page 45: Patching Moving Light Fixtures
Avolites consoles use a “personality” system to control fixtures. This means you don’t have to know how each fixture works, you just tell Titan Mobile what you want to do and it will send the right control commands. The console has built-in personalities for most types of fixture, which tell it what attributes are available and how to control them.
-
Page 46
Page 46 – 3. Patching 3> Select the correct fixture manufacturer from the softkeys ([Previous] and [Next] page through the list of manufacturers). Or use Quick Search and type the first few letters of the manufacturer’s name on the keyboard to find the one you want. 4>… -
Page 47
3. Patching — Page 47 7> Press a Fixture Select button to patch the selected fixture. 8> The onscreen Select button turns dark blue and shows fixture details when it is patched. 9> Repeat from 7 to patch more of the same fixture type. The DMX address automatically updates so you can just keep patching by pressing Select buttons. -
Page 48: Visualiser Auto Patch
The Sub fixtures feature requires an updated personality file. If sub fixtures does not work on your fixture you may need to obtain the latest fixture personality from Avolites. 3.1.6 Patching by RDM RDM (Remote Device Management) is a system which allows the console to interrogate the lighting rig to find out what’s there.
-
Page 49: Finding A Lost Fixture
3. Patching — Page 49 console. Press Window Open then Patch to open the Patch View window then select the RDM tab. All devices which support RDM will be listed here. Click the Full Discover context menu button to rescan the rig for RDM devices.
-
Page 50: Changing The Patch
Page 50 – 3. Patching 4> Turn off [Find Fixture] mode and (if not already occupied) patch the fixture. The DMX address/Line will be automatically set to match the Find Fixture settings. • On consoles with 3 wheels, wheel C (DMX Slot) jumps through DMX addresses using the fixture channel count (for example if a fixture uses 16 channels, it will jump through in 16’s).
-
Page 51: View Detailed Fixture Information
3. Patching — Page 51 fixtures. • You can switch off some of the display columns to make the Patch View simpler. Press the Choose Columns context menu button and then use the options on the softkeys to turn columns on and off. •…
-
Page 52: Setting Legends
Page 52 – 3. Patching 1> Press Patch (if you’re not already in Patch mode). 2> Press [Repatch Fixtures]. 3> Press the Select button of the fixture you want to change. 4> To change DMX press [Address], type the new address and press enter.
-
Page 53: Dmx View Window
3. Patching — Page 53 • You can set the same legend for multiple fixtures by selecting a group of fixtures after pressing [Set Legend]. • You can automatically allocate User Numbers for multiple fixtures by selecting a group of fixtures, then using softkey A on the Set Legend menu.
-
Page 54: Fixture Exchange
Page 54 – 3. Patching The buttons on the left let you select the different output lines from the console. Scrolling the window to the right shows more information about each DMX channel. 3.2.6 Fixture Exchange The Fixture Exchange function enables you to repatch fixtures in your show using alternative fixtures, retaining important elements such as cue times, shapes and legends.
-
Page 55
3. Patching — Page 55 However, this may not always work out quite right, so using Exchange Mapping you can manually map functions between the fixtures. For example this allows you to map the old gobos to similar new gobos even if they are not in the same wheel position, and to ensure that rotation speeds work the same. -
Page 56: Update Personalities
Here you can store the new mappings by pressing Apply, forget the changes by pressing Cancel or restore all mappings to Avolites factory default by pressing Reset. All these actions have to be confirmed by pressing the [Confirm] softkey.
-
Page 57: Copying, Moving And Deleting Fixtures
3. Patching — Page 57 • The new personality is loaded from the Titan/Personalities folder. Copying, moving and deleting fixtures 3.3.1 Copying or moving a patched fixture Using the Copy button you can make a copy of an existing fixture or move it to a new button.
-
Page 58: Advanced Options
Page 58 – 3. Patching All programming for the fixture is also deleted. You cannot undo deletion of a fixture or get the programming back by repatching a fixture to the same handle. If you think you might need the fixtures again later, copy them to an unused fixture page.
-
Page 59: Attribute Limits
3. Patching — Page 59 • You can change the invert on multiple fixtures by selecting more than one, but the “Inverted” display will not show if there is a mixture of inverted and non-inverted fixtures in the selection. • Some attributes cannot be inverted.
-
Page 60: Fixture Offset
Page 60 – 3. Patching 3.4.4 Fixture Offset You can set an offset to any attribute of any fixture. The normal use for this is to correct pan/tilt positions when fixtures are rigged in a different orientation to how they were programmed. The offset is applied to channels just before final output.
-
Page 61: Freeze Fixtures Or Attributes
My DocumentsTitanPersonalities. Personalities in this folder are searched and loaded before those in the library and are not overwritten when a new fixture library is installed. • A separate user guide for Personality Builder is available from the Avolites website.
-
Page 62: Controlling Dimmers And Fixtures
Page 62 – 4. Controlling dimmers and fixtures 4. Controlling dimmers and fixtures When you are programming a show, and sometimes when you are running a show, you need to manually control the fixtures and dimmers to set the intensity, position, colour, etc. To do this you first select the fixtures you want to change using the select buttons, then you set the attributes of those fixtures using the Wheels and Attribute buttons.
-
Page 63: Setting Fixtures To A Start Position (Locate)
4. Controlling dimmers and fixtures — Page 63 • Once you have changed any attribute, pressing a Select button will deselect all fixtures and start the selection process again. All previously selected fixtures (since you last pressed Clear) stay in the programmer. Once a fixture has been edited, the button shows a darker blue (also on the HUD).
-
Page 64: Clearing Selection
Page 64 – 4. Controlling dimmers and fixtures cues you store. If the option is set to “Clear” then the Located attributes will not be stored in the Programmer unless you modify them using the wheels. This is useful if for example you want to program a cue which sets the position of fixtures, but does not turn them on.
-
Page 65: Fixtures With Multiple Cells/Subfixtures
4. Controlling dimmers and fixtures — Page 65 programming in future and is currently used to clear values added to the Titan Remote programmer. The options in the “Clear Options” submenu are: • [Auto Reset Mask] sets the mask to be automatically reset to clear everything each time Clear is pressed, or you can toggle the option to [Remember Mask] which will keep the mask setting you used last time.
-
Page 66: Changing Attributes Using The Wheels
Page 66 – 4. Controlling dimmers and fixtures • Press Unfold then select range of fixtures. The cells will immediately appear on the handles. • Select fixtures, press Unfold, then press [Selected Fixtures]. This method allows for non-consecutive fixtures to be unfolded. To go back to normal, press Unfold then [Exit Unfold].
-
Page 67
4. Controlling dimmers and fixtures — Page 67 2> Turn the wheels to set the attribute. The display above the wheels shows which attributes are being controlled, and the settings which are available scroll up and down as you turn the wheels. -
Page 68: Setting Attributes Using The Touch Screen
Page 68 – 4. Controlling dimmers and fixtures 4.1.6 Setting attributes using the touch screen For attributes with fixed values such as gobos and fixed colour wheels, the Attribute Editor window can be easier to work with than the wheels. It also offers a colour picker window for fixtures with RGB or CMY colour mixing.
-
Page 69
4. Controlling dimmers and fixtures — Page 69 For fixtures which are capable of colour mixing, you can select a colour from an onscreen palette of colours. The slider on the right hand side sets the intensity. For variable attributes like Dimmer, holding down the button will display a horizontal slider bar. -
Page 70: Setting Attributes From The Softkeys
Page 70 – 4. Controlling dimmers and fixtures Updated personality files may be required to support the keystone/blade functions. When the selected fixture has subfixtures, buttons appear at the top of the attribute editor window allowing you to select the main fixture, or individual cells for control.
-
Page 71: Adjusting Attributes With The @ Buttons
4. Controlling dimmers and fixtures — Page 71 For attributes displayed in percent, such as Dimmer, or Colour Mix, you enter a value from 0-100 to set the percentage output. For attributes where the output is divided up into ranges, such as colour wheels, you enter the index of the range you want.
-
Page 72: Selecting Using A Pattern
Page 72 – 4. Controlling dimmers and fixtures For Through, And and @ you can either use the softkeys or the grey buttons at the bottom of the numeric keypad. When using the Channel menu it is helpful to latch it by pressing the Menu Latch button.
-
Page 73: Selecting Fixtures Which Are In A Palette Or Playback
4. Controlling dimmers and fixtures — Page 73 3> Select a pattern from the softkeys. Your selection is modified so you will only be controlling, say, the odd fixtures. 4> Press the Fix+1 or Fix-1 buttons button to change the selection to the next stage of the pattern.
-
Page 74: Attribute Groups — Ipcgbes-Fx
Page 74 – 4. Controlling dimmers and fixtures 4.1.12 Attribute groups – IPCGBES-FX To make life a bit simpler, the console groups together attributes which have similar effects, using the letters IPCGBES-FX. I-Intensity (dimmer, strobe shutter) P-Position (pan, tilt) C-Colour (colour wheel, CMY mixing) G-Gobo (gobo wheels, gobo rotate, gobo position) B-Beam (iris, focus, zoom, beam shaper) E-Effects (prism)
-
Page 75: Fixture Order And Fixture Layout In Groups
4. Controlling dimmers and fixtures — Page 75 1> Select the fixtures/dimmers you want in the group (the order in which you select them will also be stored in the group). 2> Press the grey Group button (top right of the numeric keys) then [Record Group].
-
Page 76
Page 76 – 4. Controlling dimmers and fixtures The fixtures in the group will be shown numbered in the fixtures window. To change the order, select [Auto Increment] to On, then select the fixtures in the order you want. If you press a fixture twice, it will show an X indicating that it is not part of the sequence. -
Page 77: Stepping Through Selected Fixtures One At A Time
4. Controlling dimmers and fixtures — Page 77 • You can use the Fan button to evenly spread fixtures in the layout. 4.1.15 Stepping through selected fixtures one at a time If you have selected a range of fixtures, or a group, the console has functions to step through the selected fixtures one at a time.
-
Page 78: Flip
Page 78 – 4. Controlling dimmers and fixtures accidentally left a fixture out of a cue you can copy settings from its neighbour. 1> Select the fixtures you want to Align. 2> At the top level menu press Fixture Tools/ML Menu then [Align Fixtures].
-
Page 79
4. Controlling dimmers and fixtures — Page 79 if you have 12 fixtures across the stage in 3 groups of 4, you may want a fan of light beams spread evenly across the stage, or you may want 3 groups of separately fanned light beams. By holding down the Fan button you can select: •… -
Page 80
Page 80 – 4. Controlling dimmers and fixtures • Pull Ends — The first and last selected fixture are affected most, the midpoint is unchanged. This is useful for colour mixing, tilt and dimmer. • Arrow — The first and last selected fixture are affected equally to the midpoint fixture but in the opposite direction. -
Page 81: Setting Fixture/Attribute Times
4. Controlling dimmers and fixtures — Page 81 4.1.22 Setting fixture/attribute times Fade and delay timings can be directly set for each fixture or individual attributes of a fixture. When you store the settings into a cue, the time settings will then become part of the cue. There are a number of ways to set the times: •…
-
Page 82: Viewing And Using Numerical Values
Page 82 – 4. Controlling dimmers and fixtures Setting a time attribute value will cause the ‘in programmer’ indication to light up. The Channel Grid window has a Times context menu button which allows you to view or edit all the attribute times currently in the programmer.
-
Page 83: Advanced Options
4. Controlling dimmers and fixtures — Page 83 You can clear attributes in the channel grid by selecting them (touch or touch and drag to select multiple attributes). Then press Clear. You can edit values by selecting one or more values in the grid, then modify the values using the wheels, or type a new value on the numeric keypad and press Enter.
-
Page 84: Palettes
Page 84 – 5. Palettes 5. Palettes When programming a show you will find that you frequently use certain positions, colours, etc. The console lets you store these settings so you can recall them at the touch of a button rather than having to find them on the wheels every time.
-
Page 85: Creating Palettes
5. Palettes — Page 85 If the Colours, Positions, Gobos & Beams windows are not shown, press Window Open then [Open Workspace Window] then [Groups and Palettes] to show all three windows. Creating palettes 5.1.1 Which attributes are stored in palettes Although each palette entry could store all attributes of a fixture, it’s easier to operate the console if you create some palettes which only set positions, some for colour, some for gobo and so on.
-
Page 86
Page 86 – 5. Palettes 1> Press Clear to clear the programmer. 2> Select the fixtures for which you want to store palette values. 3> Using the attribute buttons and wheels, set the attributes you want in the palette entry. You can store any or all attributes of a fixture in each palette entry. -
Page 87
5. Palettes — Page 87 • [Record By…] allows you to control how the mask is used when saving the palette. The options are: [Channel in programmer] records only channels which are in the programmer (ones which you have changed) [Group in programmer] records all channels in any attribute group which has one or more channels in the programmer. -
Page 88: Nested Palettes
Page 88 – 5. Palettes fixture settings. Pressing the palette button again will automatically merge. The palettes are merged using Quick Merge, which has a mask to include or exclude attribute types. • The console will select Global mode if the programmer contains the same values for all selected fixtures and one or more of the attributes is suitable for Global.
-
Page 89: Setting Legends For Palettes
5. Palettes — Page 89 5.1.5 Setting legends for palettes You can enter a legend for each palette which is displayed on the palette touch button. 1> Press [Set Legend] at the top level menu. 2> Press the palette button for the palette you want to legend. 3>…
-
Page 90: Creating An Effects Palette (Shape Or Pixel Mapper)
Page 90 – 5. Palettes 5.1.6 Creating an effects palette (shape or pixel mapper) It can be very useful to create some palettes which apply shapes or pixel mapping effects. For an effects palette to be useful, it needs to contain only effect settings (for example, for a pan/tilt circle you want it to move the fixtures around their current set position, not to change the position as well).
-
Page 91: Recalling Palettes
5. Palettes — Page 91 5> If you moved the fixtures in step 1, press [Set Mask] and exclude everything except Time. 6> Press a palette button to store the Time palette. Recalling palettes 5.2.1 Recalling a palette value To recall a palette value from a button, this is what you do: 1>…
-
Page 92: Only Showing Relevant Palettes
Page 92 – 5. Palettes 5.2.3 Only showing relevant palettes If the User Setting [Filter Relevant Palettes] is enabled, when you select fixtures any palettes which are not applicable will grey out. This is very useful to see which palettes are available for the fixtures you are working with.
-
Page 93: Updating Palettes Used In A Playback
5. Palettes — Page 93 palette), make the changes you want, then press the [Update Palette x] softkey to save the changes. The Update Palette button also allows you to change the palette name and number. You can also load the palette into some fixtures, modify the attributes and record the new information back on top of the existing palette entry.
-
Page 94: Copying, Moving And Deleting Palettes
Page 94 – 5. Palettes Copying, moving and deleting palettes 5.4.1 Copying or moving a palette Using the Copy button you can make a copy of an existing palette or move it to a new button. You can copy or move multiple palettes in one operation.
-
Page 95: Manually Overriding Palette Times
5. Palettes — Page 95 You can turn this off (which can be useful during programming) using the key profile setting for palette keys (see section 12.2.1 on page 193). You can set [Palette Is Fired With Its Times] or [Palette Is Fired Ignoring Its Times].
-
Page 96
Page 96 – 5. Palettes You can create macro buttons to set different palette fade times. Press Macro, Record, press a button to store your macro on. Then press Palette, [Master Time], 3 (for 3 sec), Exit, Macro. Repeat these steps to create a Palette Snap button (0 sec), or a 1 sec fade button, and so on. -
Page 97: Shapes And Pixel Mapper Effects
6. Shapes and Pixel Mapper effects — Page 97 6. Shapes and Pixel Mapper effects The Shape Generator in Titan Mobile (sometimes known as an Effects Generator on other consoles) allows you to quickly create exciting light shows using lots of movement and changes, with the minimum of programming.
-
Page 98: Creating Effects
Page 98 – 6. Shapes and Pixel Mapper effects Creating effects 6.1.1 Creating a shape To create a shape you simply pick the attribute of the shape from a list on the softkeys, then choose the shape you want from the Shapes window.
-
Page 99: Changing Size And Speed Of A Shape
6. Shapes and Pixel Mapper effects — Page 99 • Shapes are based on the current settings of the fixture, so a position circle would move around the current pan-tilt position of the fixture. • You can change the base value of a shape (e.g. the centre of a circle) by changing the attributes using the wheels in the usual way.
-
Page 100: Changing The Phase Of A Shape Across Multiple Fixtures
Page 100 – 6. Shapes and Pixel Mapper effects 1> Control the speed of the shape using the left hand wheel. 2> Control the size of the shape using the middle wheel. 3> The size and speed is shown above the wheels on the display. Other things to know about size and speed of shapes: •…
-
Page 101: Creating Pixel Mapper Effects
6. Shapes and Pixel Mapper effects — Page 101 Phase=0 deg Phase=22.5 deg (Spread=16 fixture) Phase=60 deg (Spread=6 fixture) Phase=180 deg (Spread=2 fixture) The display above the left hand wheel shows the phase in degrees. For example, 180 degrees repeats every 2 fixtures, 90 degrees repeats every 4 fixtures, 60 degrees repeats every 6 fixtures, and so The Offset function allows you to set the starting phase of the shape, when more than one shape is running.
-
Page 102
Page 102 – 6. Shapes and Pixel Mapper effects 1> Select the group of fixtures. 2> From the top level menu select [Shapes and Effects] then [Pixel Mapper] 3> Select [Create effect]. The Pixel Mapper Editor will open with a blank background. -
Page 103
6. Shapes and Pixel Mapper effects — Page 103 Available animations are: • Rotate • Slide • Zoom • Opacity/Fade • Random • Grid Fit (elements will accurately align with the pixel grid) Edit the parameters of the effect by clicking the effect name on the left hand side. -
Page 104: Pixel Mapper Layer Masters
Page 104 – 6. Shapes and Pixel Mapper effects running is shown in a button at the bottom of the screen, you can select each of these by pressing the button. If you wish you can overlay further layers on the effect. Once you have an effect you like, you can save it to a playback.
-
Page 105: Editing Shapes And Effects
6. Shapes and Pixel Mapper effects — Page 105 Editing shapes and effects 6.2.1 Editing shapes and effects in cues Shapes and pixel mapper effects stored in cues can be edited from the Cue View window. To view and/or edit the parameters of the shape or effect, click on the View Shape or View Pixel Effect button.
-
Page 106: Removing Or Adding Fixtures
Page 106 – 6. Shapes and Pixel Mapper effects 6.2.4 Removing or adding fixtures You can add or remove individual fixtures from a shape using the [Add/Remove Fixtures] option in the [Edit] menu, or use the context menu button in the Shapes Fixture view window. All fixtures currently included in the shape will be selected.
-
Page 107: Pixel Mapper Examples
6. Shapes and Pixel Mapper effects — Page 107 Pixel Mapper examples 6.4.1 Randomising effects This example shows you how to use the pixel mapper to create an effect where random dimmer cells turn on. This effect will overlay any existing intensities. 1>…
-
Page 108
Page 108 – 6. Shapes and Pixel Mapper effects 6> Select [Layer 1], click [+] at the bottom of the screen and then choose Circle from the elements that appear. 7> Drag the ‘Zoom’ slider until the circle covers approximately one cell. -
Page 109
6. Shapes and Pixel Mapper effects — Page 109 9> Select [+] and this time choose Opacity animation (represented as a block fading in). The displacement acts on the opacity animation causing it to appear at random locations each time it is drawn. Drag the ‘In Time’ and ‘Out Time’ sliders to 0%. -
Page 110: Overlaying Effects
Page 110 – 6. Shapes and Pixel Mapper effects 6.4.2 Overlaying effects This example shows you how to create a diagonal white wipe with a rotating red fan on top. 1> Select a group containing a fixture layout as described in previous example.
-
Page 111
6. Shapes and Pixel Mapper effects — Page 111 Reduce ‘Spawn Rate’ until only one stripe is on screen the same time. For this type of effect the value will usually need to be quite low — approximately 0.2. You might want to reduce ‘Speed’ slightly at this point. (Note that a higher speed was initially useful for getting the correct spawn rate above.) 5>… -
Page 112: Creative Use Of Fixture Layouts
Page 112 – 6. Shapes and Pixel Mapper effects 8> Click on [Effect] at the top left to access the global controls. Drag ‘Pre Spool’ to the left until it reads 0s. (This is to ensure the wipe begins off screen where we placed it when it is fired.) 9>…
-
Page 113
6. Shapes and Pixel Mapper effects — Page 113 Example 1: Odd/Even 1> Select your fixtures. 2> Open the Selection Pattern menu by pressing the ‘All’ key. 3> Choose [Odd] from the softkey options. (This will select all the odd numbered fixtures according to fixture order.) 4>… -
Page 114
Page 114 – 6. Shapes and Pixel Mapper effects 2> Drag a marquee select across the even fixtures. 3> Drag the selected fixtures so they sit directly under the odd fixtures. 4> Select ‘Crop Grid’ from the Layout Editor context menu. (This will get rid of the unused pixels.) Now a block element animated to run vertically from top to bottom will run down the odd fixtures followed by the even fixtures. -
Page 115
6. Shapes and Pixel Mapper effects — Page 115 Example 2 — Pseudo random 1> Select your fixtures and create a group. 2> Open the Layout Editor. 3> Click on the vertical resize tool and drag down until the grid is at least twice the original height. -
Page 116: Other Layout Editor Tools
Page 116 – 6. Shapes and Pixel Mapper effects 2> Open the Layout Editor. 3> Select the fixture(s) that you want to angle and use the appropriate wheel to control. (If wheels are not assigned to control the cell layout you can toggle this on/off using the context menu item ‘Wheel Control’.
-
Page 117: Playback Order And Priorities
6. Shapes and Pixel Mapper effects — Page 117 Context menu — ‘Highlight’ When enabled this will highlight selected fixtures live on stage. This can be useful to see which fixture you are positioning in the layout. Context menu — ‘Arrange/Select Only’ When set to ‘Select Only’ fixtures are locked in position on the grid and cannot be dragged around.
-
Page 118
Page 118 – 6. Shapes and Pixel Mapper effects Drag ‘In Time’ to zero and ‘Out Time’ to 100%. (This will make the effect start large and finish small. Alternatively the same effect can be created by making ‘Start Zoom’ larger than ‘End Zoom’.) Increase ‘End Zoom’ until the element begins by filling the whole window. -
Page 119
6. Shapes and Pixel Mapper effects — Page 119 having to manually match the individual values.) 7> Record the cue. Next we will create the second effect: 1> Select the same group as used for the first effect and [Create Effect] 2>… -
Page 120
Page 120 – 6. Shapes and Pixel Mapper effects Increase ‘Exponent’ to around 25%. (This causes the spiral to ‘expand’ at a faster rate.) 4> Add a Spin animation for genuine psychedelic effect. Adjust speed until you are unable to look away from the screen. 5>… -
Page 121: Displacement And Layer Properties
6. Shapes and Pixel Mapper effects — Page 121 • Fire the white pulse. Notice how the white takes priority over the spiral. The blue spiral only appears as the white oval fades out and gets smaller. • Kill both effects. •…
-
Page 122
Page 122 – 6. Shapes and Pixel Mapper effects horizontally. 5> Reduce Y until the bar disappears off the top of the grid. (This is in preparation for adding a displacement animation.) 6> Add a Displacement animation. By default this will offset the original position by anything up to 30% distance. -
Page 123
6. Shapes and Pixel Mapper effects — Page 123 Reduce ‘In Time’ and ‘Out Time’ to create a snapping effect. 8> Click on ‘Displacement’ in the Layer to get back to the controls for this animation again. Now increase ‘Distance Random’ to 100%. (This will make the bar draw at a random offset around the ‘Distance’ setting, in this case making it anywhere within the grid.) 9>… -
Page 124: Spawn And Pre-Spool
Page 124 – 6. Shapes and Pixel Mapper effects Now you have a vertical bar that draws randomly using a horizontal displacement. Similarly you can use the [layer] or [effect] controls to make global changes to X/Y position and Zoom allowing quick manipulation of entire effects.
-
Page 125
6. Shapes and Pixel Mapper effects — Page 125 Reduce ‘Zoom’ so that we can fit lots of baby shurikens in the grid. 3> Add a Spin animation. Reduce ‘Speed’ so they are relatively harmless. 4> Add a Linear Movement animation. Slow it down so it looks like it is rolling along. -
Page 126
Page 126 – 6. Shapes and Pixel Mapper effects Increase ‘Direction Random’ slightly. (This will allow a random variation in the direction of travel based upon the ‘Direction’ value.) 8> Add a Zoom animation. Reduce ‘Spawn Rate’ to zero. (This is a special setting that will allow the zoom animation to run continuously during the life of a shuriken. -
Page 127
6. Shapes and Pixel Mapper effects — Page 127 9> Click on [Effect] and set ‘Pre-Spool’ to zero. (This is to demonstrate the purpose of the property.) 10> Store the cue. 11> Press clear, open the Pixel Mapper Preview workspace and fire the cue. -
Page 128: Cues
The optional fader wing can be added to give additional playback faders. The cue functions on Titan Mobile are very powerful; the first part of this section explains the basics of how the console uses cues.
-
Page 129: Creating A Cue
7. Cues — Page 129 Firing a cue does not place the values from the cue in the programmer (although the Include function lets you do this, see section 7.3.4 on page 135). 7.1.2 Creating a cue 1> Press Clear to clear the programmer. This ensures that you are starting with a clean slate.
-
Page 130: Using Shapes/Effects In Cues
This can be very useful for making changes during a live show. Your changes are still shown in the Visualiser window. To select Blind mode, hold down the Avolites button and select the [Blind] option. The option shows [Active] or [Inactive].
-
Page 131: Playing Back A Cue
7. Cues — Page 131 is output. When you fade out a cue, LTP channels retain their values until changed by another cue. 7.2.2 Playing back a cue To fire (play back) a cue, raise the fader. (Make sure there are no values in the programmer by pressing the Clear button, because anything in the programmer will override the playback).
-
Page 132: Viewing Active Playbacks
Page 132 – 7. Cues • You can set a legend for each playback page. The legend is shown on the ‘Pages’ roller on the screen and on the HUD. Use [Set Legend] from the main Program menu then [Page Legends].
-
Page 133: Releasing Running Playbacks
7. Cues — Page 133 You will also need to assign one or more handles to act as the master faders; to do this, switch the console to System mode and select [Assign Mastering]. Special key profile options are available for Speed Masters, BPM Masters default to Tap Tempo.
-
Page 134: Programming The Release / Power On State
Page 134 – 7. Cues 7.2.8 Programming the Release / Power On state You can program the state which fixtures will go to at power on, or when all playbacks are released. It can be useful to program this as a general lighting state so that there is some light on the stage when the console powers up, or when all playbacks are released.
-
Page 135: Updating Stored Values And Palettes Used In A Cue
7. Cues — Page 135 “Record by Stage” mode, any fixtures you haven’t changed won’t be saved. • To speed up editing, you can set the console to “Always Merge” the cue. This is option A in the User Settings (press Avo and select User Settings).
-
Page 136
Page 136 – 7. Cues If you touch the View button at the right hand end of the row or the [View Cue] context button, the Cue View window opens, showing you details of the settings individual timings for all the fixtures in the cue. The Cue View has four different views: Levels, Palettes, Times, Shapes. -
Page 137: Using Parts Of Existing Cues — The Include Function
7. Cues — Page 137 Any changes take immediate effect. • The context menu option View Tracking Values allows you to highlight in grey values which are tracked from previous cues. 7.3.4 Using parts of existing cues — the Include function The Include function lets you load selected parts of a cue back into the programmer.
-
Page 138: Copying, Moving, Linking And Deleting
Page 138 – 7. Cues set by previous playbacks will remain, you set the colour values to Off in the programmer, which when saved will remove those values from the cue. You can also use the Off function to remove complete fixtures from a cue by selecting all the attributes.
-
Page 139: Deleting A Cue
7. Cues — Page 139 2> Select [Copy], [Move] or [Link]. Pressing the Copy button again will also toggle these options. 3> Press the Select button of the cue you want to copy/move/link. You can select a range of playbacks by holding the first button while pressing the last in the range.
-
Page 140
Page 140 – 7. Cues All times which you have set while programming the fixtures/dimmers will be recorded when you save the cue. You can also edit times of a cue you have already saved like this: 1> Press [Edit Times] at the top level menu. 2>… -
Page 141: Changing Fixture Order
TIME 5 AND 2 sets 5 sec fade in and 2 sec fade out. (The Time button is the button previously labelled Set on Titan Mobile and Sapphire Touch, and Next Time on Tiger Touch and Pearl Expert).
-
Page 142: Setting Attribute Fade Times For A Cue
Page 142 – 7. Cues 3> Press [Fixture Order]. 4> Set the sequence number to start from using option A. 5> If you want the sequence number to increase automatically, set [Autoincrement] to On. If you want some fixtures to have the same sequence number, set it to Off.
-
Page 143: Editing Times In The Programmer
Press the Time button to access this menu. • On Titan Mobile and Sapphire Touch, the Time button is the key above Clear (previously labelled SET). On Pearl Expert and Tiger Touch it is the key previously labelled NEXT TIME.
-
Page 144: Shape Size/Speed On Fader
Page 144 – 7. Cues When using with chases you need to press [Mask] before pressing the Shutter button. You can use Key Profiles to allocate one of the handle buttons to release the playback. 7.6.2 Shape size/speed on fader If the cue contains shapes, options B and C set how the shape behaves when the playback fades in.
-
Page 145: Blind Mode
7. Cues — Page 145 the strobe playback, and it will keep going during the strobe and continue smoothly when you release the Swop button. • Attributes set by manually applying a palette to a fixture will override all playback priorities except Very High. 7.6.6 Blind mode Individual playbacks can be set to Blind mode using this option.
-
Page 146: Chases
Page 146 – 8. Chases 8. Chases As well as being used to store static cues, the playback faders can also be used to store chases (sequences of cues). You can also store chases on touch buttons in the Playbacks window. Chases can run once or repeat continuously.
-
Page 147: Creating A Chase With Quick Build
8. Chases — Page 147 • You can set a legend for the chase by pressing Set Legend, then pressing the Swop button for the chase and entering the legend, as with cues. • There is no limit to the number of steps in a chase. 8.1.2 Creating a chase with Quick Build Quick Build mode, as the name suggests, allows you to build a chase…
-
Page 148: Connecting A Chase For Control
You can also enter a speed from the keypad as described below. The last speed you set on the wheel is always remembered, you do not have to tell Titan Mobile to save it. Crossfade is the “slope” between cues; with a crossfade of 0, the fixtures snap instantly to the next cue, but with a crossfade of 100, the fixtures spend the whole cue time fading to the next cue.
-
Page 149: Manually Controlling The Steps Of A Chase
8. Chases — Page 149 2> To set the crossfade, press [Xfade] and type the fade from 0 – 100. 0=no fade (the chase will “snap”), 100=max fade (the chase will move continuously from step to step). 3> To set the speed, press [Speed], type the new speed, then press Enter.
-
Page 150: Editing A Chase
Page 150 – 8. Chases Editing a chase 8.3.1 Opening a chase for editing You can open a chase for editing by pressing Chase then the Swop button of the chase. This does not affect any existing cues in the chase.
-
Page 151: Copying, Moving, Linking And Deleting
8. Chases — Page 151 • To merge the programmer into the live step, double tap [Record Step]. • To Insert a cue between two other cues, set up the look for the new cue, press [Insert Step], then type the cue number for the new cue (such as 1.5 to go between 1 and 2).
-
Page 152
Page 152 – 8. Chases 1> Press [Edit Times] from the top level menu then the Swop button of the chase. 2> Set the Crossfade, Speed, Fixture Overlap and Attribute Overlap settings as described below. 3> Press Exit to finish. •… -
Page 153: Individual Cue Times In Chases
8. Chases — Page 153 through its fade. The order of the fixtures is set by the order you selected them when the cue was saved; you can change the order using Unfold. From version 3 of Titan software, [Cue Overlap] is no longer available in chases.
-
Page 154: Setting Attribute Fade Times For A Cue In A Chase
Page 154 – 8. Chases Initially all the timing options are set to Global. You can cancel any individual timings and set the time back to global timings by pressing the softkey for the option then pressing [Use Global]. The timing options for the cue are: •…
-
Page 155: Cue Linking
8. Chases — Page 155 8.6.3 Cue linking Option D sets how the cues in the chase are linked. The settings are: • [Always Link Steps]: The chase will run on its own using the times • [Never Link Steps]: The chase will pause after every delay/fade time for the user to press Go.
-
Page 156: Cue Lists
Page 156 – 9. Cue Lists 9. Cue Lists Cue Lists allow you to record a sequence of cues, each of which can have its own timings and can be triggered by the Go button or run automatically to the next cue. This allows you to build a complete show in a single list and is ideal for theatrical shows where the show must be exactly the same each time.
-
Page 157
9. Cue Lists — Page 157 Channel] is best as you are sure to only record the attributes you have explicitly set, but you do need to make sure you have changed all the things you want to be recorded so they are in the programmer. -
Page 158: Changing Legends For Cues In A Cue List
Page 158 – 9. Cue Lists 9.1.2 Changing legends for cues in a cue list You can set a legend for each cue, which is shown on the screen when running the cue list and can be helpful for keeping track of where you are.
-
Page 159: Running A Key Macro From A Cue List
9. Cue Lists — Page 159 The Autoloaded playback will be fired when the cue starts, and killed when the cue list moves on to the next cue, unless you have also loaded the playback into the next cue. You can set options for each Autoloaded playback by pressing the softkey where the Autoloaded playback is shown.
-
Page 160: Cue List Playback
Page 160 – 9. Cue Lists Cue List playback 9.2.1 Running a cue list Raise the fader of the cue list and press the Go button to run the first cue. The bottom section of the display shows the cue list; the current cue is highlighted in grey and the next cue has a box round it.
-
Page 161: Editing Cue Lists
9. Cue Lists — Page 161 You can change this in the Playback Options to make the cue list automatically clear when the fader reaches zero (press [Playback Options] at the program menu, then press the Select button of the cue list, then select [Fader Mode Intensity Kill At 0].
-
Page 162: Moving And Copying Cues
Page 162 – 9. Cue Lists • If the View Tracking Values button is selected, tracking values (values which have tracked through from another cue rather than being stored directly in this cue) are shown in light grey. 9.3.3 Moving and copying cues You can copy or move cues within a cue list or to other cue lists.
-
Page 163: Using Update To Change Tracked Cues
9. Cue Lists — Page 163 • To change the times or cue linking for the cue, press [Edit Times], then the Select button for the cue, then set the times (see Timing on the following page) • To Insert a new cue, set up the look for the new cue, press B [Insert Step], then press the playback button where you want the new cue to go.
-
Page 164: Editing A Cue List While Recording
Page 164 – 9. Cue Lists 6> Press the Go button to jump on to the next step. • You can edit the times for a cue using the Live Time and Next Time buttons as follows: 1> Fire the cue list by raising its fader. 2>…
-
Page 165: Disabling A Cue
9. Cue Lists — Page 165 9.3.9 Disabling a cue You can temporarily disable a cue using the Disable option at the right hand end of the Playback View window. Select the Disabled box and the softkeys let you set [Cue Disabled]. When a cue is set to Disabled it will be skipped.
-
Page 166: Cue Linking & Link Offset
Page 166 – 9. Cue Lists buttons to the right of the Connect button also step through the cues. • You can select a range of cues, enabling you to alter the timings of multiple cues all in one go, by using Wheel B, or in the Playback View window, dragging across the cues you want to select in the grid.
-
Page 167: Individual Attribute Fade Times
9. Cue Lists — Page 167 These options allow you to create complex self timed sequences by building up simple steps. For example if you wanted the following effect: • Go is pressed, fixture one starts fading up over 20s •…
-
Page 168: Fixture Overlap
Fixture overlap For each cue you can set a (linked together) fixture overlap, which causes Titan Mobile to apply the settings in the cue to each fixture sequentially giving a “rolling” change across the fixtures in the cue. This can create some great effects without much programming on your part.
-
Page 169: Running A Cue List To Timecode
9. Cue Lists — Page 169 9.5.5 Running a cue list to timecode The console can run a cue list automatically to a timecode. This is very useful for complex performances which must be exactly the same time after time, or for unattended operation. Each step in the cue list is assigned a time at which it will run.
-
Page 170: Advanced Options
Page 170 – 9. Cue Lists Advanced options Advanced cue list options are set from the Playback Options menu. You can enter the playback options menu by doing the following 1> At the top level menu press [Playback Options]. 2> Press the select button for the cue list you wish to edit.
-
Page 171: Cue Options
9. Cue Lists — Page 171 If you select “Transparent Lock” then the playback will appear on the current page if no other playback is programmed in that position. 9.6.5 Cue Options This option allows you to change settings for each cue in the cue list. To select the cue number to edit, use the left hand wheel or press softkey A then enter the cue number on the numeric keypad.
-
Page 172: Tracking
Page 172 – 9. Cue Lists 9.6.10 Tracking Tracking mode (where each cue depends on the state of the previous cue) may be changed using this option. Settings are: • [Block]: the cue will not take tracking states from previous cues.
-
Page 173: Fire First Cue Option
9. Cue Lists — Page 173 If the fixture has its intensity above zero or Move In Dark is inhibited when the Move In Dark is supposed to occur, the console will attempt the movement in the nearest suitable cue instead. 9.6.12 Fire first cue option When this option is enabled, the first cue of the cue list will…
-
Page 174: Running The Show
Page 174 – 10. Running the show 10. Running the show So, it’s showtime. This chapter describes the functions of the console which are useful when running a show. 10.1 Playback controls 10.1.1 Back up the show At regular intervals while you are programming, and when you have finished programming (or you’ve run out of time) and it’s showtime, the most important thing is to save the show (see section 2.3.5 on page 31 for instructions).
-
Page 175: Group Masters
10. Running the show — Page 175 • Local (default — no Speed Master) • BPM 1-4 (override the local speed with a fixed value from the master) • Rate 1-4 (proportionally modify the local speed using the master) There is also a Rate Grand Master which, if used, proportionally controls the four Rate Masters (BPM Masters are not affected).
-
Page 176: Flash And Swop Buttons
Page 176 – 10. Running the show You can release all masters by pressing Release then [Release All Masters]. This can be useful if something is being controlled by a master but you are not sure where it is. 10.1.6 Flash and swop buttons The Flash and Swop buttons on the playback faders may be used at any time to flash and solo cues and chases.
-
Page 177: 10.1.10 Blind Mode
10. Running the show — Page 177 The top line of the button shows the page number and tells you where on the desk the playback is stored. The second line shows the legend, and the third line shows which attributes are affected by the playback.
-
Page 178: Using Multiple On-Screen Workspaces
Page 178 – 10. Running the show using a series of fixtures. With overlap=100%, all fixtures change at the same time. If overlap=50%, the second fixture will not start its fade until the first fixture is half way (50%) through fading. The order of the fixtures is set by the order in which you selected them.
-
Page 179: Using The Move Function
10. Running the show — Page 179 10.3.1 Using the Move function To move fixtures, palettes, groups and playbacks is very simple. 1> Press Avo and the Copy button to select Move mode. 2> Press or touch the select key(s) of the item(s) to move. 3>…
-
Page 180: Midi Or Dmx Remote Triggering
DMX male to male gender changer cable. (This is a simple plug to plug cable with all pins wired straight through, i.e. 1-1, 2-2 and 3-3). Titan Mobile may require an update of the USB Expert software to enable this function, this can be downloaded from the Avolites website.
-
Page 181
10. Running the show — Page 181 The left hand side of the window has a list of trigger sets. The “classic Pearl” MIDI trigger implementation is provided as one of these. Each set of triggers can be enabled or disabled using the button at the right hand end of the mapping name. -
Page 182: Classic Pearl Midi Triggers
Page 182 – 10. Running the show To delete a trigger from the mapping, select it in the list and press the rubbish bin button at the bottom. To delete a complete mapping, select it and press the rubbish bin button at the bottom of the left hand column.
-
Page 183: Setting Up Consoles For Multi-User
10. Running the show — Page 183 In addition, on many shows it is important to have a backup console running in case the main console fails during the show. Titan allows you to run a second console over the network which it keeps synchronised with the main console.
-
Page 184
Page 184 – 10. Running the show • Shows will automatically sync whenever a show is saved on the main console (including autosave). You can also choose to sync at any time by selecting [Sync Now]. • Pressing [Exit] will abort backup. •… -
Page 185: Remote Control
The remote function operates using the Avolites Remote app on the mobile device. This can be downloaded from the Google Play store or Apple App Store.
-
Page 186: Using An Existing Network
Page 186 – 11. Remote control • You may experience problems with the remote if you have an internet router on the network, as this may route show traffic to the internet rather than between the remote and the console. If the remote does not work properly, disconnect your router from the network.
-
Page 187: Keypad
11. Remote control — Page 187 Choose what you want to control using the row of buttons across the middle of the app. The Keypad button enables or disables the numeric pad (the keypad overlays all the other screens, so you will need to turn it off to see the others).
-
Page 188
Page 188 – 11. Remote control You can then use the Palette screens to control the fixtures, or press the IPCGBES buttons to directly control functions of the fixtures using wheels. You can scroll the fixture screen up and down by dragging the window. -
Page 189: Recording Groups And Palettes
11. Remote control — Page 189 The wheels show function values (such as colours or gobo names). To go to the next function, just touch the arrows at the top or bottom of the wheel. To manually scroll the value, spin the wheel with your fingers.
-
Page 190
Page 190 – 11. Remote control… -
Page 191: User Settings And Other Options
12. User Settings and other options — Page 191 12. User Settings and other options The console has a large number of options to help you set it up just the way you like it. Commonly used options can be set from the User Settings menu which is available on a softkey when you hold down the Avo button.
-
Page 192: Saving Workspaces
Page 192 – 12. User Settings and other options 12.1.3 Saving workspaces You can save different workspace setups to the Workspaces touch buttons (to the left of the menu) by pressing Window Open then [Record Workspace], then touching one of the Workspaces buttons. This button will then reconfigure the entire workspace with a single touch.
-
Page 193: Compatibility Windows For Pearl Expert Shows
12. User Settings and other options — Page 193 12.1.4 Compatibility windows for Pearl Expert shows The “Fixtures and Playbacks” and “Groups and Palettes” windows allow you to access the preset fader handles in shows which have been programmed on the Pearl Expert. When either of these windows is opened, there is a context button option to [Move to workspace].
-
Page 194: Selecting A Key Profile
Page 194 – 12. User Settings and other options The groups of keys you can set are as follows. The blue or grey fixture/palette buttons only exist on the Pearl Expert, on other consoles these settings will not do anything. Fixtures: the blue, grey or touch key can be allocated to Disabled, Select, Flash, Swop, Latch.
-
Page 195: Individual Key Profiles For Playbacks
• [Grand Master…] sets whether the Grand Master fader is enabled or disabled. Titan Mobile does not have a Grand Master fader and this option has no effect. • [Delete Default…] sets whether items are deleted when you press Delete and double tap them, or whether they are released from the handle and become unassigned.
-
Page 196
Page 196 – 12. User Settings and other options “parked” The options are [Always] (console will warn you) and [Never] (console will park the fixture without warning you). • [Tempo Units…] sets the units for displaying tempo. The options are [Beats per Minute] or [Seconds]. •… -
Page 197: Key Profiles
The Wipe menu erases the current show. This is the same as the [New Show] option on the Disk menu, but is provided here for old fashioned Avolites users who are used to it being on the System menu. The [Wipe Visualiser Patch] option will erase all fixtures from the visualiser without affecting the current show.
-
Page 198: Configuring Dmx Outputs
Page 198 – 12. User Settings and other options 12.4.1 Configuring DMX outputs Switch the console to System mode and select [DMX Settings] on the second page of options. The screen will initially show the node tab relating to the console itself.
-
Page 199: Titannet Overview
12. User Settings and other options — Page 199 Group delete Individual delete If you have further networked DMX processing nodes connected, these can be individually configured using the tabs across the top of the screen. 12.4.2 TitanNet Overview If you select the TitanNet Overview tab at the top of the screen, you can see all the DMX nodes which are connected and which output lines they are allocated to.
-
Page 200: Curves
Page 200 – 12. User Settings and other options 12.5 Curves The console provides a variety of curves which set how the console tracks fades in playbacks; either the same speed all the way (linear), or starting and ending gently but faster in the middle, and various other options.
-
Page 201
12. User Settings and other options — Page 201… -
Page 202
Page 202 – 12. User Settings and other options… -
Page 203: Upgrading The Software
Avolites team. You can always download the latest version of the software from the Avolites website: http://www.avolitesdownload.com. The Titan Mobile software is installed simply by running the installer program. Please ensure you have exited the Titan Mobile software before running the installer.
-
Page 204: Installation Instructions
Titan. Each console has a unique licence code which is obtained from the Titan Licensing section of the Avolites website. The licence code is manually processed and can take up to 5 days to be returned to you. However,…
-
Page 205: Working With Fixture Personalities
The console holds a personality library containing all commonly used fixtures, but new fixtures are appearing all the time and Avolites are constantly updating the library. We recommend that you should update the library from time to time…
-
Page 206: Updating The Personality Library On The Console
You can incorporate your custom personality into the standard fixture library on the console, however there is a danger that it will be overwritten when you next update the Fixture Library from Avolites. To avoid this the console provides a special folder for user-provided…
-
Page 207: Requesting A New Fixture Personality
13.1.4 Requesting a new fixture personality If a personality does not exist for your fixture, Avolites will create one for you. Click on the “Request” link on the above web page to submit your request. A list of current requests is shown, so you can check if someone else is asking for the same thing.
-
Page 208
Page 208 – 14. Networking the console… -
Page 209: Networking The Console
14. Networking the console — Page 209 14. Networking the console There are a number of ways for the console to communicate with lighting fixtures beyond the traditional DMX sockets, and these are described in this chapter. The console also supports communicating with a number of different simulators/visualisers over various communication methods.
-
Page 210: Setting Up Dmx Outputs
Page 210 – 14. Networking the console 14.1.2 Setting up DMX outputs The console has 64 DMX output lines (up to 12 on the console itself, with further lines available using networked DMX processing nodes). The Titan One dongle is limited to one DMX line. The lines may be routed to physical DMX sockets or to network nodes.
-
Page 211: Setting Up An Art-Net System
14. Networking the console — Page 211 • Each device may have one or more nodes(i.e. the Art-Net to DMX box has 2 nodes, these are the 2 DMX outputs; the dimmer itself is a node), • Each node can be set to a Universe (1-256). This universe is equivalent to a 512 channel DMX line You can then specify which console line is assigned to each node.
-
Page 212
Page 212 – 14. Networking the console A lot of Art-Net devices, including the Net-Lynx box, are set to IP address 2.x.x.x as default, and can be set to 10.x.x.x using an option jumper, so you should check what the setting of your device is. If your Art-Net devices need to be set to a non-standard IP address, then in steps 1 and 2 you need to use Windows Control Panel to set the console to that address range instead of 2.x.x.x… -
Page 213: Additional Art-Net Resources
To find out more information about Art-Net please refer to the Art-Net Standard published by Artistic Licence. 14.2 Connecting to a simulator with ACDI ACDI is Avolites’ Application for Interfacing Consoles and Simulators with lighting software such as Visualiser, Capture or Show designer. 14.2.1 ACDI…
-
Page 214: Module Setup
This allows you to adjust settings for each module, and to select a network adapter for ACDI and Art-Net. The consoles only have one network adapter, however on Titan Mobile and Simulator this depends on your computer; many laptop users will have their standard network adapter and also a Wi-Fi (wireless) adapter, both of which will be shown.
-
Page 215: Example Citp Setup
14. Networking the console — Page 215 14.4.1 Example CITP setup This example shows how to set up a Hippotizer with Titan Mobile. 1> Connect the console and Hippotizer to the network. (You can connect the Hippotizer directly to the console, if no other devices are being connected, using a crossover patch cable).
-
Page 216: Subnet Masks
Page 216 – 14. Networking the console There is a strong possibility that if you set the IP address on one network device you will have to set it on all of them, therefore if you manually set your IP address on the console you will have to do it on any TitanNet devices you are using and any Art-Net fixtures.
-
Page 217: Automatically Assigning Ip Addresses (Dhcp)
14. Networking the console — Page 217 IP Address Subnet Mask Titan console 10.100.100.100 255.0.0.0 ShowSafe 10.100.100.101 255.0.0.0 Art-Net 10.x.y.z 255.0.0.0 Fixtures Where a combination of x, y and z are unique for these fixtures. Never set the last number of an IP address to be 255. This is a special address which will not function correctly.
-
Page 218
Page 218 – 14. Networking the console… -
Page 219: Using Different Avolites Consoles
15. Using different Avolites consoles — Page 219 15. Using different Avolites consoles If you are used to other Avolites consoles, this section will help you to cope with the differences between each console. Shows from a Titan console can be loaded into any…
-
Page 220: Programming Features In Titan
Page 220 – 15. Using different Avolites consoles You can change the functions of the blue and grey buttons on the console to give you quick access to the functions you want, such as Preload, Stop and Go for chases, Tap Tempo and so on. This feature is called Key Profiles (see page 197).
-
Page 221
15. Using different Avolites consoles — Page 221 will not change when the playback is killed), but you can set attributes to revert to their state in the most recently active playback. -
Page 222
Page 222 – 15. Using different Avolites consoles… -
Page 223: Release Notes
16.1.3 Upgrading from: PC any version: Please note that as of version 7.0 Windows XP and Vista operating systems are no longer supported. Supported versions on Windows are Windows 7 and Windows 8. This affects Titan One, Titan Mobile, Titan…
-
Page 224: Version 8.0 Release Notes
Titan 6.x is provided. You can download the latest Titan software by clicking on the relevant console on the Avolites website. Please download the setup file to your computer. When it has finished downloading find the setup file and double click to run it.
-
Page 225
16. Release notes — Page 225 A new [Handle Worlds] softkey option has been added to the disk menu. Pressing this will open the Manage Handle Worlds menu. [Add Handle World] will prompt for a new handle world legend. [Cancel] will exit and [Ok] or <enter>… -
Page 226
Page 226 – 16. Release notes Either method will then set the selected console as the Master and connect the current console as a slave, a backup or a slave & backup, depending on which option was chosen. When a console connects as slave or backup the show is transferred across the network from the master console and the shows are synchronised. -
Page 227
16. Release notes — Page 227 mixing fixture, both RGB and CMY are calculated regardless of source and a special ‘dynamic’ value is added to fixed colour channels. When a global palette containing a dynamic colour channel is applied to a fixture that only has fixed colour capability it will attempt to match the colour mixing values wherever possible. -
Page 228
Page 228 – 16. Release notes Filter relevant palettes: There is a new user setting option [Filter Relevant Palettes Enabled/Disabled]. When Enabled (default) selecting fixtures or groups will cause non-applicable palettes to grey out in the palette workspaces. This makes it easy see which palettes are available, particularly when you have large numbers Highlight active palettes: There is a new user setting option [Highlight Active Palettes Enabled/Disabled]. -
Page 229
16. Release notes — Page 229 converting to a cuelist the list will also automatcially connect. Additionally, when viewing a cue playback pressing record then touching in the empty space underneath the cue will automatically convert to a cuelist and append cue 2 Record mask: You can now set a mask when recording cues in the same way you can for palettes. -
Page 230
Page 230 – 16. Release notes the local mask. This provides an easy way to set release masks that apply to everything, or nearly everything, should you wish. Local release masks are remembered even after changing a playback mask source to global allowing you to toggle the local release mask on or off without having to reset the local mask each time. -
Page 231
16. Release notes — Page 231 visualisation image and apply it directly to a cue or palette legend giving you a legend with a rendition of how it might look. Copy/move pixel mapper effect layers, elements and animations: You can now copy or move layers, elements and animations in the Effect Editor. -
Page 232: Improvements
Page 232 – 16. Release notes sACN merge priority: A new property has been added to the Streaming ACN Dmx Module Properties to allow setting of an ACN stream priority value for DMX merge sACN network adapter softkey: It is now possible to select network adapters using softkeys when editing Streaming ACN Settings.
-
Page 233: Changes
16. Release notes — Page 233 Warning when attempting to assign master to occupied handle: If you attempt to move or assign a master to an occupied handle the software will now prompt to warn you of this terrible mistake. Record/cue<n>…
-
Page 234
Page 234 – 16. Release notes Preload breaks swop: Fixed issue where preloading a playback would prevent swop working on the same playback until it was lifted. Effect palettes don’t reference: Previously cues containing effect palettes would only contain hard values and not the palette reference meaning any changes to the effect palette would not transfer to the cue. -
Page 235
16. Release notes — Page 235 No SMPT E tab in timecode workspace: Previously SMPTE was only selectable as a source from the timecode menu softkeys. A SMPTE tab has now been added to the timecode workspace Shape channels in cue view: It is now possible to see channels in cue view used for shapes even if the channel itself has no information. -
Page 236
Page 236 – 16. Release notes already containing dimmers would result in an error claiming the address was in use. The erroneous message will no longer appear and the dimmers will patch on top of existing dimmers as expected. [@][@] not taking intensities to full following locate: Fixed an issue where @@ wouldn’t take intensities to full for a numeric group immediately after locating a different group. -
Page 237: Known Issues
16. Release notes — Page 237 Set list active page on show load: Fixed an issue where the current page wouldn’t highlight an associated track in the set list workspace on show load when pages are in set list mode and the set list workspace is already open.
-
Page 238: Titan Commands Quick Reference
Page 238 – 17. Titan Commands quick reference 17. Titan Commands quick reference Please note that some commands may require [Enter] to complete the command. In this reference [Enter] has always been omitted for clarity. [] = the use of square backets denotes a physical key on the console. <>…
-
Page 239: Select If
17. Titan Commands quick reference — Page 239 n [.] all sub fixtures of fixture n 1 [THRU] 5 [.] 2 Select the second cell of fixtures 1 to 5 [.] [THRO] [.] j [THRO] [.] j Select cells 1 to j of all selected fixtures [.] m [THRO] Cells m->last of all selected fixtures [.] m [THRO] [.]j…
-
Page 240: Copy, Move
Page 240 – 17. Titan Commands quick reference [Record] [Position] [Cue] [Cue] Merge all but position from the programmer with the live cue. [Record] [Options] [Position] [Cue] [Cue] Merge only position from the programmer with the live cue. 17.1.4 Copy, Move [Copy] [Cue] n Copy cue n at the end of the cue list.
-
Page 241: Cue Lists
17. Titan Commands quick reference — Page 241 5sec fade in for attribute connected to wheel B on selected fixtures [TIME] 5 [@] 3 5sec fade in, 3 sec delay [TIME] 5 [AND] 2 5sec fade in, 2sec fade out [TIME] 1 [THRO] 10 times spread across fixtures according to selection order 17.1.8…
-
Page 242: Glossary Of Words
Page 242 – 18. Glossary of words 18. Glossary of words ADDRESSES The DMX Channels occupied by individual Fixtures. The first Channel occupied is usually encoded onto the Fixture somehow (often by switches or using a menu) and called its ADDRESS. ALIGN A means of copying Attribute characteristics from the first Fixture selected to other selected Fixtures,…
-
Page 243
Pan and Tilt positions for each point on stage, and FLIP will alternate between them. FOCUS What Palettes used to be called on older Avolites consoles. See PALETTE. May also be used in connection with moving fixtures to focus (set the sharpness) of a gobo projection. -
Page 244
Personality File. Also used in Titan to refer to a stored sequence of button presses. MEMORY The name for a Cue on older Avolites consoles. MIDI Stands for Musical Instrument Digital Interface. It is the established hardware and software specification… -
Page 245
Also a cue list function which allows one cue to preload the LTP channels in another cue. PRESET FOCUS The old name for Palettes on previous Avolites consoles. See PALETTE. PROGRAMMER The part of the console which contains Channel information which has been changed by the user, prior to recording. -
Page 246
Page 246 – 18. Glossary of words TRIGGER POINT The level set in the User Settings which determines at which point a Playback Fader triggers the LTP Channels programmed onto it. UNFOLD A function that allows Chase Steps to be laid out onto Playback Faders for easy editing. -
Page 247
18. Glossary of words — Page 247… -
Page 248: Index
Page 248 — Index Index Softkey Menu items are indicated with capital letters (for example “Activate A Timecode Cuelist”) deleting · 140 difference between chase and cue list · direction · 150 editing using unfold function · 151 global timing · 152 @ button ·…
-
Page 249
18. Glossary of words — Page 249 custom/user fixture personalities · fixture personalities, custom · 207 fixture personalities, downloading and installing · 206 fixture select buttons · 44 fixtures changing page · 64 groups · 75 locating · 64 Delay Time · 142 patching ·… -
Page 250
Page 250 — Index latch menu · 29 Off button · 138 latching the copy menu · 140 offset fixture attribute · 60 latching the rec cue menu · 130 offset, DMX patching · 48 layer masters · 105 order of fixtures · 142 LED brightness ·… -
Page 251
18. Glossary of words — Page 251 priority setting for playback · 145 show file Programmer · 129 saving and loading · 39 simulator · 37 prompt for merge · 196 Snap Back button (cue lists) · 161 software, recovery · 204 software, upgrading ·… -
Page 252
Page 252 — Index wheels saving · 27, 193 window options · 27 acceleration · 68 controlling attributes · 67 fast mode · 68 wheels= softkey · 82 window positions · 26, 27, 192 Wipe · 198 wipeall · 42 X in fixture order ·… -
Page 253
8200-0170 Price £30 Additional copies of this manual, together with other useful spares etc. can be purchased through the Avolites On line shop. Visit http://www.avolites.com then navigate to Avo Shop from the links on the left hand side.
#1
kyiiukyiiu
-

- Members
-
- 1 Сообщений:
Newbie


Опубликовано 09 января 2017 — 22:31
Приобрёл пульт Avolites titan mobile но Англ.яз. я не изучал .
Помогите пожалуйста найти мануал на русском языке
Очень сильно нужно,буду благодарен
Если пришлёте на почту,то это будет самым идеальным вариантом
Если вдруг найду раньше,то тему удалю
Почта KyIIuKyIIu2@gmail.com
- Наверх
#2
vadim67
vadim67
- Gender:Male
- Location:Северск
Опубликовано 10 января 2017 — 15:01
Если у Вас пульт фирменный, найдите в ВК пользователя Aziz Adilkhodjaev Он поможет. Оф. представитель Аво.
- Наверх
#3
Dancesound
Dancesound
-
- Members
-
- 3 Сообщений:
Newbie

- Gender:Male
Опубликовано 04 апреля 2017 — 12:48
 kyiiukyiiu, 09 января 2017 — 22:31, написал:
Приобрёл пульт Avolites titan mobile но Англ.яз. я не изучал .
Помогите пожалуйста найти мануал на русском языке
Очень сильно нужно,буду благодарен
Если пришлёте на почту,то это будет самым идеальным вариантом
Если вдруг найду раньше,то тему удалю
Почта KyIIuKyIIu2@gmail.com
Посмотрите лучше видео уроки у Азиза. Это самый лучший мануал. Все четко, доходчиво и понятно.
- Наверх
#4
Sonar_lip
Опубликовано 04 апреля 2017 — 18:08
kyiiukyiiu, 09 января 2017 — 22:31, написал:
Приобрёл пульт Avolites titan mobile но Англ.яз. я не изучал .
Помогите пожалуйста найти мануал на русском языке
Очень сильно нужно,буду благодарен
Если пришлёте на почту,то это будет самым идеальным вариантом
Если вдруг найду раньше,то тему удалю
Почта KyIIuKyIIu2@gmail.com
https://www.youtube….c0zLx1pjVVKXofS
я тут собрал в один плейлист уроки азиза. позже он вроде как еще обещал добавить, но и этого вполне достаточно для изучения титана.
- Наверх
#5
HILTON
Опубликовано 20 июля 2018 — 07:34
Помогите разобраться с проблемой: использую titan one pc, версия софта 10.1
не могу правильно записать chase (хотя урок Азиза неоднократно пересмотрел на эту тему, но все равно не получается). Записал две отдельные cue с эффектами вращения pan/tilt. В режиме быстрой сборки добавляю эти cue в новый chase. Далее запускаю готовый chase: сначала выполняется первая cue, потом вторая, но потом chase не переключает обратно на первую cue. Нет цикличности, хотя когда заходишь в сам chase он показывает, что первая cue выполняется, но приборы рисуют последнюю, вторую cue. Треккинг включал и выключал. В настройках воспроизведения включен «LOOP», для каждой cue выставил After previous.
Заранее спасибо за помощь!
- Наверх
#6
Magiclight
Magiclight
- Location:Москва
- Interests:Профессиональная шоу-техника
Опубликовано 21 июля 2018 — 21:08
HILTON, 20 июля 2018 — 07:34, написал:
В режиме быстрой сборки добавляю эти cue в новый chase.
Попробуйте ради эксперимента записать без быстрой сборки, т.е. накрутив оба эффекта с нуля, либо захватив значения из кьюшек инклудом. Есть подозрение, что это баг.
- Наверх
#7
HILTON
Опубликовано 22 июля 2018 — 08:07
Magiclight, 21 июля 2018 — 21:08, написал:
Попробуйте ради эксперимента записать без быстрой сборки, т.е. накрутив оба эффекта с нуля, либо захватив значения из кьюшек инклудом. Есть подозрение, что это баг.
не думаю, что это баг! Люди же как-то записывают chase, как-то же работают :о) просто что-то где-то надо переключить в настройках. Я накручивал эффекты из режима записи chase и такая же ерунда! А режим списка сцен может циклично воспроизводить кьюшки? Просто не вижу кардинальной разницы между списком сцен и режимом chase
- Наверх
#8
Magiclight
Magiclight
- Location:Москва
- Interests:Профессиональная шоу-техника
Опубликовано 06 августа 2018 — 23:31
HILTON, 22 июля 2018 — 08:07, написал:
А режим списка сцен может циклично воспроизводить кьюшки?
Может. Откройте список сцен для просмотра, чтобы было видно шаги (2 раза нажать синюю клавишу) и во всех кьюшках в поле Link поменяйте значение с Wait for Go на After Previous. Задайте Link Offset, т.е. время, через которое должен произойти переход и вуаля.
HILTON, 22 июля 2018 — 08:07, написал:
Просто не вижу кардинальной разницы между списком сцен и режимом chase
А она есть. Чейз — это просто бегушка по кругу. Список сцен — это уже упорядоченная последовательность кьюшек с индивидуальным временем Fade in/out для каждой, возможность перепрыгнуть к заданной кьюшке, сделать так, чтобы несколько кьюшек воспроизвелись с повтором (циклично) указанное количество раз и затем далее по списку пошли. В чейзе так не сделаешь.
- Наверх
#9
HILTON
Опубликовано 07 августа 2018 — 18:57
в общем суть проблемы наглядно и подробно:
есть эффект движения — TILT SWING (cue 1, cue 5). второй эффект TILT SWING (cue 3) точной такой же как предыдущие cue 1, cue 5, но только повернут PAN, третий эффект CIRCLE. По сути в чейз записаны три разных эффекта, но при воспроизведении чейза приборы визуально выполняют только первые два эффекта (cue 1 и cue 2), хотя в программе все cue переключаются. То есть при наличии двух одинаковых по названию эффектов будет выполняться лишь последний в сочетании с другими…
Еще один пример: если записать чейз из двух разных эффектов, то работает! Если взять два разных эффекта по движениям, но с одинаковыми названиями, то будет выполняться постоянно один и тот же. Причем косяк у меня с одним и тем же эффектом, такое ощущение, что он не выгружается из чейза при переходе. Релиз стоит на PAN/TILT
вроде понятно постарался донести этот бред :о))
- Наверх
#10
Radonishe
Radonishe
-
- Members
-
- 1 Сообщений:
Newbie

- Gender:Male
Опубликовано 15 декабря 2018 — 18:33
Подскажите, а есть вариант ускорить получение лицензии для Avolites Titan PC Suite 11. К примеру, вышел из строя компьютер с полученной лицензией перед мероприятием и срочно необходимо запустить пульт с другим ПК. На данный момент я так понимаю активация занимает до 5 рабочих дней. Можно ли сократить это время хотя бы до 1 суток?
- Наверх
#11
dromma
dromma
-
- Members
-
- 2 Сообщений:
Newbie

Опубликовано 16 декабря 2018 — 11:17
«до 5 рабочих дней» — это для полной лицензии. А сразу же получаешь временную (кажется, на 14 дней) и ждёшь прилета полной на почту…
- Наверх
———————————————————
>>> СКАЧАТЬ ФАЙЛ <<<
———————————————————
Проверено, вирусов нет!
———————————————————

.
.
.
.
.
.
.
.
.
.
.
.
.
.
.
.
.
.
.
.
.
.
.
.
.
.
.
.
.
.
.
.
.
.
.
DMX-интерфейс Avolites Titan One. Українська Русский. DMX контролер AVOLITES Titan One QR Code. Описание Характеристики Отзывы (0). Добро пожаловать на видео тренинги от компании AVOLITES ( Великобритания). Во время наших тренингов мы будем показывать как. Avolites is a British manufacturer of state-of-the-art lighting control consoles, dimmers and media. The backbone of your Titan system, for increased capacity and reliability. Located just outside of London, one of the world s busiest entertainment capitals, is Storm. For Spanish videos click here and Russian click here. Titan Mobile – the power of Titan in its most concentrated form! Avolites Titan Mobile binds the awesome power of Titan software with a compact and lightweight. В этой категории обсуждаем пульты фирмы Avolites такие как: Tiger Touch, Pearl Tiger, Pearl. Ищу мануал к ETC Express, желательно на русском. При этом, например, Avolites Titan One нереально запустить на таком буке. По поводу мануалов и русского языка- я не очень люблю. ну или отправлять на аволайт мануалы, они будут делать))). Пардон муа, коллега, но на помощь от Avolites Ltd в таком случае даже не рассчитывайте. обновить до про версии железо, или купить еще 1 или титан мобаил). по идее не сложные, руководство на русском есть но перевод ;). Titan One allows you unlimited usage which gives you uninterrupted programming and playback time. Titan One is the cost effective solution for every lighting. Titan One Lichtsteuerungs-Software mit USB-Dongle zur Ausgabe eines DMX- Universums. Die Software ist show-kompatibel mit allen Titan-Pulten, es wird. Описание DMX-интерфейс Avolites Titan One. в том числе и на русском языке, что очень важно для новичков и благодаря сети интернет происходит. Avolites Lighting Equipment Price list — Download as PDF File (.pdf), Text File (.txt ) or read online. Console Avolites Pearl 2010 Console (With 8 Inch LCD Screen) Avolites Titan Mobile Avolites Titan Pearl. Art 2000 3 x 15 Amp Round Pin Avolites Art 2000 T4.30 £583.60 £795.70 £1.080.60 £1. Martin M-Touch manual. Pearl Expert — Read more about pearl, fixtures, fixture, manual, palette and fade. Diamond 4 Manual — Avolites. User manual AVOLITES PEARL EXPERT — 1. 9 Feb 2014. The Titan Remote works alongside your Avolites Titan lighting console to provide. If your device is connected to the internet, the manual is then. 1. Take a picture by camera or choose a picture from your gallery. 2. Italian, Korean, Spanish, Russian, Danish, Chinese, Portuguese, Japanese and English! Buy used Tiger Touch Lighting Consoles by Avolites. Previously used. (1) Tiger Touch (1) Flight Case (1) Littlite (1) Cover (1) Manual. SOLD OUT : Financing. Buy used Pearl Expert Titan Lighting Consoles by Avolites. Comes with a Wireless N-Class Router, Manual and the Standard New Package. Quantity, 1. Buy used Diamond 4 Elite Lighting Consoles by Avolites. In like new. (1) Power Cord (1)Cover (1) Littlite (1) Manual (1) Flight Case. SOLD OUT : Financing. Please sign in or create an account to request a new fixture. Sign in. About us. Nicolaudie Group | USB DMX 512 controller, stage lighting control, lighting. 4458 products. Avolites Tiger Touch Titan Lighting Console. Weight: 4.4kg; Size: 365 X 395 X 70mm; Input Connectors: 1 X USB; Operating Voltage/ Supply. China DMX 2048 Avolites Pearl Tiger Touch Console, Find details about China Pearl Tiger. Flight case , including all the accessories ,external monitor, power supply, user manual ,and USB software. 1. Model Number: tiger touch 2. Item Name: Tiger touch dmx controller 3. When using powerful Titan operating system; If you want to purchase more than one product, please add everything to your. Clone Tiger Titan System Controlle. Pro Clone DMX Console Avolite Tige.