-
Contents
-
Table of Contents
-
Bookmarks
Quick Links
EURO
C E R T
1128
0197
English
CLASS B and S
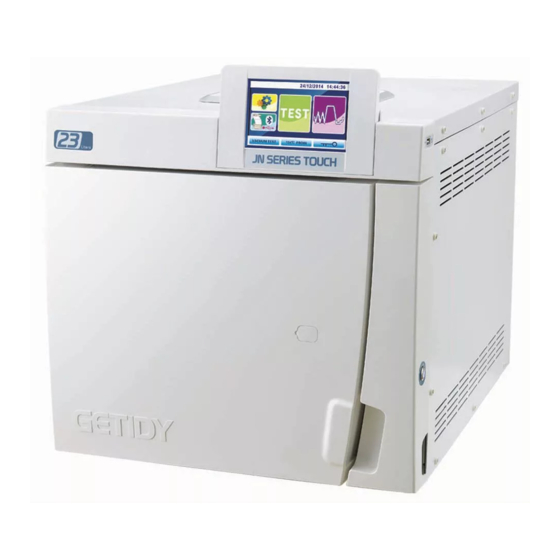
Steam Sterilizer
Instruction Manual
JN-23
MODEL:
Summary of Contents for Getidy KD Series
-
Page 1
EURO C E R T 1128 0197 English CLASS B and S Steam Sterilizer Instruction Manual JN-23 MODEL:… -
Page 2
Contents 1.Summary &Suitalbe Using Range……………………08 2.Technical parameter………………………..08 3.Installation…………………………..12 JN-23 steam sterilizer function and operation instruction …………….16 JN-23 steam sterilization program introduction ………………..27 6.Mantenance…………………………..38 7.Scraping……………………………45 APPENDIX 1:Preparing the instruments for sterilization………………45 APPENDIX 2:Packing………………………….46 APPENDIX 3:Positioning the load……………………..47 APPENDIX 4:Description of tests………………………49 APPENDIX 5:Validating the cycles…………………….51 APPENDIX 6:Quality of process water……………………52 APPENDIX 7:JN-23 steam sterilizer hydraulic circuit……………….53… -
Page 3
To buyers: Thank you very much for your choice of using our Desktop Pressure steam sterilizer! Before you use steam sterilizer,please fill in “User Report”firstly. Had it,we can check your using file promptly,so we can service you more quickly and effective! Page 02 of 58… -
Page 4
Page 03 of 58… -
Page 5
Page 04 of 58… -
Page 6
ZHEJIANG GETIDY MEDICAL INSTRUMENT CO.,LTD. ADDRESS:Duancun, Dongnan Industrial Zone, Shuxi Street, Wuyi, Jinhua, Zhejiang321200, China. TEL:0086-579-87712106 87707499 DOWNLOAD Web: www.getidy.com E-MAIL:getidy@getidy.com john@getidy.com Page 05 of 58… -
Page 7
Page 06 of 58… -
Page 8
Page 07 of 58… -
Page 9
TEST CYCLES: 3 CLASS: B and S ± CAPACITY OF CLEAN-WATER TANK: 4.5L POWER SUPPLY VOLTAGE: AC 230V 10% CAPACITY OF USED-WATER TANK: 3.5L MAINS FREQUENCY:50~60Hz GROSS WEIGHT: 65Kg POWER OUTPUT: 1600W NET WEIGHT: 59Kg CHAMBER: 23L φ PACKING SIZE(LxWxH):730mmx580mmx560mm DIAMETER x DEPTH: 250mmx450mm ABSORBED CURRENT: 10A… -
Page 10
JN-23 overall space required Page 09 of 58… -
Page 11
Usable space 23 litres=10.60litres Model:JN-23 Date of Manufacture Serial Number Page 10 of 58… -
Page 12
Page 11 of 58… -
Page 13
Page 12 of 58… -
Page 14
Page 13 of 58… -
Page 15
-The two front feet of the sterilizer are raised by 2 to 3 cm, resulting in the front end point being higher than the rear end point. -Artificially open the door to the steps: (1)Open the small cover of the sterilizer door.(Fig.3.1-5) (2)Insert the hexagon spanner into the door shaft and rotated clockwise until the door is fully opened.(Fig.3.1-6) (3)Remove the operation panel placed in the chamber and connect the operation panel and the control panel. -
Page 16
-Bring the instrument tray and accessories, remove the poly bag. -After you put medical instrument into the tray,turn on the power (green switch indicator light).(Fig.3.1-9) -Press the power revert button and LCD screen appears the main interface.(Fig.3.1-9) -Select the sterilization program you want, then press start to sterilization. -For details, please refer to Chapter 4. -
Page 17
4.JN-23 steam sterilizer function and operation instruction 4.1 JN series steam sterilizer contains 1-time(solid/plastic) and 3-times(hollow/prion/cotton) vacuum programs. With lager color LCD screen for showing pressure, temperature, time, running state and error warning. Temperature precision: 0.1℃ ;Pressure precision: 0.001bar. 4.2 Operator interface introduction Turn on the power at the bottom right,click the power revert button located on the right side of the middle. -
Page 18
4.3 Warning icon introduction Press “program ”(Fig.4.3-1),to enter the program interface(Fig.4.3-2).Select the program you want and click to enter. 4.3.1 Door status Fig.4.3-1 Fig.4.3-2 Fig.4.3-3 Fig.4.3-4 A)when you turn on the power and the door was closeing,it is show Fig.4.3-3 interface warning.It promps you to open the door and close the door again. -
Page 19
σ C)when it show Fig.4.3-7 interface warning,means that distilled water was unqualified ( >80μms) Prompts you to drain unqualified water in the clean-water tank and add the qualified distilled water again.The warning Will be eliminated. Water supply requirements: ●conductivity ≤15μs/cm(Room temperature) ●bleach content≤2mg/L ●PH:5~7 ●Hardness:≤0.02mmol/L… -
Page 20
Click“SET UP 1”(Fig.4.4-1)into Fig.4.4-2 interface.Select the program you want and click to enter. Fig.4.4-1 Fig.4.4-2 Fig.4.4-3 Fig.4.4-4 4.4.1.Language: Click “LANGUAGE”(Fig.4.4-3) into Fig.4.4-4 interface.click “ ”,Select language you want,then click“ ” to save and exit. 4.4.2.Date and time Click “Date and Time”(Fig.4.4-5) into Fig.4.4-6 interface.Click“ ”,change number of “Year,Month,Date,Hour, Minute,second”,then click “… -
Page 21
4.4.5.Preference: Sleepmode/Delay Start/Power Saving Click “Preference”(Fig.4.4-11) into Fig.4.4-12 interface. Fig.4.4-9 Fig.4.4-10 Fig.4.4-11 Fig.4.4-12 4.4.5.1.Sleepmode If the sterilizer was not operated for a long time, power will be disconnected for safety and saving power automatically. When you want to revert back to working, sterilizer will get rid of sleep mod after pressing the Revert Switch. “… -
Page 22
4.4.5.3.Power Saving Click “Power Saving”(Fig.4.4-17) into Fig.4.4-18 interface.Press “ ”to select power saving mode you want,then click“ ” to save and exit. “NO”:After each sterilization cycle is completed, the power will not be turn off. “Single”:The power saving will be activated only for this operation. But not effective for next cycle. “ALL”:After each sterilization cycle is completed, the power will be turn off. -
Page 23
4.4.6.2.Pipeline Cleaning Click“ Pipeline Cleaning”(Fig.4.4-23) into Fig.4.4-24 interface.Press “ ” buttom will start,into Fig.4.4-25 interface. Fig.4.4-25 Fig.4.4-26 Fig.4.4-27 Fig.4.4-28 WARN:Please after fill with distilled water,closing the door,then press the “ ” button,Start cleaning. Recommend cleaned once every 3 months. ATTENTION:Cleaning work will begin only when the steam generator temperature reaches 200℃ below the “… -
Page 24
4.4.6.5.Auto-Water Supply Click“ Auto-Water Supply”into Fig.4.4-31 interface.Press “ ” to start(Fig.4.4-32).If you need to stop halfway, press “ ” to exit. WARN:Before starting, please provide enough distilled water and plug in the inlet pipe to the valve. 4.5“SET UP 2” introduction 4.5. -
Page 25
Click“ Label Printer”(Fig.4.5-4) into Fig.4.5-5 interface.then press “Bluetooth signal connection”Fig.4.5-6 into Fig.4.5-7 interface.Click “ ”bottom to start connection.“CONNECTING…”:During the connection;“SUCCESS”:connection succeeded. Back to Fig.4.5-6 interface.click “Label Printer”(Fig.4.5-8) into Fig.4.5-9 interface. Click on “ ”to change the number of labels you want,Click “ ”bottom to print. -
Page 26
4.5.3. USB Record If you want to check the sterilization reports, please press “USB Record”(Fig.4.5-10) enter into interface Fig.4.5-11. “ ”: select the different cycle reports from 1~128; “ ” : move the page up/down. You can insert U disk to download the sterilization reports . Download the current a record Download all the records Fig.4.5-13… -
Page 27
4.6“Abnormally Exit”function If you wish to stop the running program, you can click the stop(Fig.4.6-1) and select OK(Fig.4.6-2) . The LCD screen will show E00 alarm code and alarm cause.After you click on start (Fig.4.6-3),into automatically.(Fig.4.6-4) After about 3 minutes, the program will be finished. When the screen show the sterilization program initial interface, you can open the door and bring out the medical instrument inside chamber. -
Page 28
5.JN-23 steam sterilizer program introduction Click“program”(Fig.5-1) into the sterilization program interface(Fig. 5-2) . 5.1 Sterilization program list Program sterilization sterilization drying vacuum Name temperature time time times ℃ 04min 09min 1 times 1.Solid ℃ 2.Hollow 04min 15min 3 times Fig.5-1 Fig.5-2 ℃… -
Page 29
5.2 Each sterilization phase diagram Heating coil preheating stage Start sterilization stage Pre-vacuum stage Exhaust stage After sterilization ONE PRE-VACUUM Heating stage First times Drying stage STERILIZATION PROGRAM Exhaust stage Balance atmospheric PROCESS SCHEMATIC and print sterilization Heating stage Second times record stage TIME Page 28 of 58… -
Page 30
THREE PRE-VACUUM STERILIZATION PROGRAM PROCESS SCHEMATIC TIME Heating stage The third times Heating coil preheating stage The econd times pre-vacuum stage Heating stage Start sterilization stage First times p re-vacuum stage The Second times Heating stage Exhaust stage The econd times Exhaust stage The First times After sterilization… -
Page 31
5.3 Run sterilization program 5.3.1 THREE TIMES PRE-VACUUM PROGRAM(HOLLOW PRION COTTON) “ ” Click start botton of Fig.5.3-1 interface,the sterilization program will be started and enter into Fig.5.3-2 or Fig.5.3-3 interface. When temperature of heating coil(T3) rised and less than 100℃,Screen will show Fig.5.3-2 interface (the heating coil pre-heating stage). When temperature of heating coil(T3) rised and over than 100℃,Screen will show Fig.5.3-3 interface (the first times pre-vacuum stage). -
Page 32
Fig.5.3-5 Fig.5.3-6 Fig.5.3-7 Fig.5.3-8 When the vacuum value reaches -0.700bar value,the control system will open water pump-solenoid valve(Ev2) and steam generator start to inject the steam into chamber.The temperatures(T1 and T2) and pressure inside the chamber will be rised at the same time. 5.3.1.6.THE SECOND TIMES EXHAUST STAGE(Fig.5.3-9) When the pressure inside the chamber reaches 1.100bar,the control system will open the exhaust-solenoid valve(Ev1) for exhausting untill pressure downs to P=0.000bar.LCD shows “00:01:29”time countdown. -
Page 33
Fig.5.3-13 Fig.5.3-14 Fig.5.3-15 Fig.5.3-16 5.3.1.10.AFTER STERILIZATION EXHAUST STAGE(Fig.5.3-13) When the “sterilization time”countdown is over,the control system will open the exhaust-solenoid valve(Ev1) for exhausting untill pressure downs to P=0.000bar.LCD shows “00:01:29”time countdown. 5.3.1.11.DRYING STAGE(Fig.5.3-14) When the pressure inside the chamber downs to 0.000bar,the control system will open the vacuum pump-solenoid valve(Ev4) and start evacuating and drying.LCD shows “00:14:59”time countdown. -
Page 34
PLASTIC ) 5.3.2 ONE TIMES PRE-VACUUM PROGRAM(SOLID “ ” Click start botton of Fig.5.3-19 interface,the sterilization program starts running, shows Fig.5.3-20 or Fig.5.3-21 interface. When temperature of heating coil(T3) rised and less than 100℃,screen will show Fig.5.3-20 interface (the heating coil pre-heating stage). When temperature of heating coil(T3) rised and over than 100℃,screen will show Fig.5.3-21 interface (the first times pre-vacuum stage). -
Page 35
Fig.5.3-23 Fig.5.3-24 Fig.5.3-25 Fig.5.3-26 5.3.2.10.AFTER STERILIZATION EXHAUST STAGE(Fig.5.3-27) When the “sterilization time”countdown is over,the control system will open the exhaust-solenoid valve(Ev1) for exhausting untill pressure downs to P=0.000bar.LCD shows “00:01:29”time countdown. 5.3.2.11.DRYING STAGE(Fig.5.3-28) When the pressure inside the chamber downs to 0.000bar,the control system will open the vacuum pump-solenoid valve(Ev4) and evacuating and drying.LCD shows “00:08:59”time countdown. -
Page 36
WARNNING: If the result of sterilization is “FAILURE”, medical instruments of this time can not be used. And it’s need to contact professional engineer to check the machine. Fig.5.3-31 Fig.5.3-32 5.3.3 USER-DEFINNED PROGRAM Fig.5.3-33 Fig.5.3-34 Fig.5.3-35 Click “User-definned”(Fig.5.3-33) enter into interface Fig.5.3-34.Press “ ”to change the number of “Temperature/ Vacuum times/Sterilization time/Drying time”. -
Page 37
5.4 Test program When LCD shows main interface,Click “TEST”(Fig.5.4-1) enter into interface Fig.5.4-2. 5.4.1 the “vacuum test” program following steps: This test is performed in order to check the performance of the unit,particularly: -the efficiency of the vacuum pump; -the seal of the pneumatic circuit. Click “Vacuum Test”enter into interface Fig.5.4-3.Then press “… -
Page 38
In compliance with EN 13060:2004,the test requires a tightness test (less than or equal to 13mbar during the 10 minutes of test).If the leakage is more than this value,the outcome of the test is failed; the seal of the pneumatic circuit of the device must be chceked. -
Page 39
6.Maintenance Safety warnnings —Observe the intervals prescribed or shown in this manual.Activates menorandum messages to assist the users to performing Routine Maintenance Page 38 of 58… -
Page 40
Page 39 of 58… -
Page 41
Fig.6.2-1 Fig.6.2-2 Fig.6.2-3 Page 40 of 58… -
Page 42
Chapter 4.3.2 Chapter 4.3.2 Fig.6.2-4 Fig.6.2-5 Fig.6.2-6 Page 41 of 58… -
Page 43
6.2.1 Periodic Maintenance Page 42 of 58… -
Page 44
Extraordinary Maintenance Page 43 of 58… -
Page 45
solenoid valve.(Fig.6.3-1) The fuse on the internal card is of the type: 5X20-10A(AC 230V/50Hz/60Hz);5X20-20A(AC 110V/60Hz) 6.3.1 Rusting Fig.6.3-1 Page 44 of 58… -
Page 46
Scraping .1 Scraping Instructions 7.2 Resale A correct sterilization depends on the processes described below being carried out correctly; these are allequally important and care must be performed carefully. 1. Preparing the instrumnets to sterilize; 2. Packing; 3. Loading; 4. Sterilizing; 5.Preserving the sterilized instruments;… -
Page 47
The way how the sterilized instruments are packaged,and then sticked,determines the state of preservation of sterilization. The following material can be used as containers:metal containers with lids or perforated buttoms with filters in paper,pouches in paper Page 46 of 58… -
Page 48
Pouches with paper-polypropylene are excellent packageing systems of steam sterilizing for small sets of surgical instruments and The way how to load to sterilize is arranged is also important to the sterilization process condiderably .Always observe Page 47 of 58… -
Page 49
distance from others that they remain separate for the whole sterilization cycle. -Do not stack the trays on another and use the tray wupport.It is necessary to leave a space beteen each tray to allow for the circulation of steam during the sterilization phase and facilitate drying. When sterilizing the material in pouches, Fig.A3-1 Fig.A3-2… -
Page 50
It can perform three tests: The frequency of these tests should be performed following: This test is performed in order to check the performance of the unit,particularly: In compliance with EN 13060,the test requires a tightness test(less than or equal to 13mbar during the 10 minutes of test).if the leakage is more than this value,the outcome of the test is failed;the seal of the pneumatic circuit of the device must be checked. -
Page 51
Page 50 of 58… -
Page 52
℃ ℃ ℃ 134 -04min-15min-3 134 -18min-15min-3 121 -20min-15min-3 Page 51 of 58… -
Page 53
Page 52 of 58… -
Page 54
APPENDIX 7: JN-23 Steam Sterilizer Hydraulic Circuit Safety vavle Opened-end Water and steam Condenser Solenoid Valve opend Solenoid Valve closed (one input and one output) separation device (Drain water) (one input and one output) Atmosphere Three-way piece Opend end(3#) Used-water tank (2#) Closed end Common end(1#) -
Page 55
The transformer output AC 21V Power Resume button Electronic valve closed(air filter, white, KD27 LED Light(N) The transformer Electronic valve closed(water pump, yellow, output AC 9V KD14 Electronic valve closed(drain water, brown, Electronic valve opened(vacuum pump, gray, Electronic lock DC12V output LED Light(L) KD16 Black… -
Page 56
APPENDIX 9:Alarm code and solutions of JN-23 Steam Sterilizer Alarm Code Release Alarm Alarm Cause Alarm Code Alarm Cause Solution “ ” If need abnormally exit during sterilization,you have to press button,then click “ ” “ ” “ ” ,LCD appear E00 alarm code and flashing.Press button again to relieve E 00… -
Page 57
Alarm Code Alarm Cause Solution Sterilization failed! (1)adjust the tightness of door seal may behave leakage.(2)Replace the door seal. E 04 (1)check the opened-solenoid valve(Ev1) and drain-solenoid valve(Ev5),take out and clean Pressure can not E 05 the s pool.(2)check three-way piece to used-water tank,open and clean it.(3)check the opened be exhausted! -Solenoid valve(Ev1) and drain-solenoid valve(Ev5) power is DC 24V. -
Page 58
Alarm Code Alarm Cause Solution Ω ≈ ℃ Temperature and Measure:temperature sensor resistance value( ) 1000+(Ambient temperature *3.8) E 10 Pressure do not (1)if measurement result is OK,check poor contact point between the sensor and the match! control board.(2)if measurement result is No,replac the temperature sensor. (1)check DC 24V d oor motor power supply indicator is lighted? -
Page 59
NOTE: 1.The sterilizer should be put on level worktable. 2.Be sure to use distilled water in order to prolong the use age of sterilizer. 3.Do not jam or cover the sterilizer radiator. 4.Sterilizer instrument should put in the instrument plate,each instrument should have some gap in order to make ventilation.
This manual is also suitable for:
Jn-23
|
|||
|
|||
|
|||
|
|||||||
|
|||||||
|
||||
|
||||
|
|||
|
|||
|
Русский Translate.Ru PROMT© |
|||
|
|||
|
Онлайн всего: 14 Гостей: 13 Пользователей: 1 DeniSta |
|||
|
Хранилище файлов |
Правила добавления:
Внимание !!!
Перед тем как загрузить файл, убедитесь, что его нет в «Хранилище файлов» для этого воспользуйтесь поиском.
При добавлении файлов в поле «Название материала» указываем марку аппарата, так как на шильдике или по паспорту.
В поле «Краткое описание» пишем что-это: схема; сервис мануал; руководство по эксплуатации и т.д. Также напишите формат материала, какой программой он сделан.
За сохранность и работоспособность файлов(ссылок) загруженных на сторонние файловые хостинги, Администрация сайта ответственности не несет.
Для загрузки файлов в «Хранилище» воспользуйтесь архиватором WinRAR или 7-Zip, максимальный объем загружаемого файла должен быть не более 15Mb.
Администрация сайта оставляет за собой право удалять и редактировать файлы.
| Главная » Файлы » Стерилизационное оборудование |
| В разделе материалов: 162 Показано материалов: 1-30 |
Страницы: 1 2 3 4 5 6 » |
Проект Таймера для Дезар, на контроллере pic16f630
Проект с описанием, кому интересно может улучшить.
Стерилизаторы УФ-облучения, бактерицидные облучатели |
Просмотров: 1821 |
Загрузок: 122 |
Дата: 28.Апр.2020
| Комментарии (0)
Таймер для «Дезар» на контроллере PIC16F630
сброс на нули, держать кнопку до подачи питания. не моргает через каждые 200 часов, ибо на фиг не нужно.
Стерилизаторы УФ-облучения, бактерицидные облучатели |
Просмотров: 2583 |
Загрузок: 149 |
Дата: 05.Апр.2020
| Комментарии (3)
Стерилизатор паровой ГК-100 ВВ
Руководство по эксплуатации Стерилизатор паровой ГК-100 ВВ, производство «Витязь», Беларусь, pdf
Стерилизаторы паровые |
Просмотров: 3034 |
Загрузок: 124 |
Дата: 03.Июн.2019
| Комментарии (0)
Автоклав Icanclave STE-8,18,23 Сервисное руководство
Сервисное руководство по ремонту и обслуживанию автоклава Icanclave STE третьего поколения.
Стерилизаторы паровые |
Просмотров: 2286 |
Загрузок: 145 |
Дата: 27.Май.2019
| Комментарии (0)
SES 2000
Servis Manual SES 2000 и перевод машинный корректированный слегка. PDF и DOC.
Стерилизаторы паровые |
Просмотров: 1204 |
Загрузок: 70 |
Дата: 04.Мар.2019
| Комментарии (0)
Утилизатор отходов медицинских «Балтнер-50» (паспорт)
Паспорт (руководство по эксплуатации) секции автоклавирования утилизатора МО «Балтнер-50» производства ЗАО «Медитек»
Стерилизаторы паровые |
Просмотров: 3274 |
Загрузок: 161 |
Дата: 18.Сен.2018
| Комментарии (0)
Getidy KD-8-А, -12-А, -18-A
Инструкция по эксплуатации паровой стерилизатор Getidy серии KD-8-А, -12-А, -18-A
Стерилизаторы паровые |
Просмотров: 3538 |
Загрузок: 215 |
Дата: 12.Июл.2018
| Комментарии (0)
Стерилизатор плазменный Пластер100
Краткое описание ошибки и борьбы с ней в файле. Этот файл на моём компьютере. Не вижу возможности его сюда прикрепить, только дурацкое «Ссылка для скачивания архива с другого сервера: *». С какого перепугу я должен этот файл размещать ещё на каком — то сервере???
Стерилизаторы воздушные |
Просмотров: 1475 |
Загрузок: 86 |
Дата: 20.Дек.2017
| Комментарии (0)
Стерилизатор плазменный Пластер100
В стерилизаторы надо бы добавить ещё одну категорию: «Стерилизаторы плазменные».
Ошибка стерилизации стерилизатора плазменного «Пластер100».
Стерилизаторы воздушные |
Просмотров: 1363 |
Загрузок: 68 |
Дата: 20.Дек.2017
| Комментарии (1)
Неисправности DGM
Описание ошибок стерилизаторов DGM
Стерилизаторы паровые |
Просмотров: 1501 |
Загрузок: 155 |
Дата: 18.Июл.2017
| Комментарии (0)
DGM AND 100 & 600
Сервисники на DGM 100 и DGM 600
Стерилизаторы паровые |
Просмотров: 1490 |
Загрузок: 160 |
Дата: 18.Июл.2017
| Комментарии (0)
DGM-130 документация
DGM-130
Стерилизаторы паровые |
Просмотров: 1870 |
Загрузок: 115 |
Дата: 22.Май.2017
| Комментарии (0)
Стерилизатор BMT sterident sterimat plus — инструкция по экплуатации (рус)
Инструкция по эксплуатации стерилизатора BMT sterident, sterimat, sterimat plus
Стерилизаторы паровые |
Просмотров: 2601 |
Загрузок: 136 |
Дата: 09.Апр.2017
| Комментарии (0)
Euronda E9 service manual
сервисная документация на семейство Е9
Стерилизаторы паровые |
Просмотров: 3193 |
Загрузок: 298 |
Дата: 30.Мар.2017
| Комментарии (0)
ГК-10 МИЗ-МА Украина
Паспорт на Стерилизатор паровой ГК-10 ООО «МИЗ-МА», г. Белгород-Днестровский Одесская обл. Украина. 2012 г.в. со схемами.
Стерилизаторы паровые |
Просмотров: 1371 |
Загрузок: 90 |
Дата: 09.Мар.2017
| Комментарии (0)
Сервис на Melag Euroklav 23 s
Сервис на Melag Euroklav 23 s
Стерилизаторы паровые |
Просмотров: 1910 |
Загрузок: 279 |
Дата: 25.Окт.2016
| Комментарии (0)
сервис мануал
сервис мануал на автоклав
Стерилизаторы паровые |
Просмотров: 2274 |
Загрузок: 274 |
Дата: 25.Окт.2016
| Комментарии (0)
Domina PLUS B Dental X
Сервис мануал,ppt файл.
Стерилизаторы паровые |
Просмотров: 1553 |
Загрузок: 121 |
Дата: 13.Ноя.2015
| Комментарии (0)
СТЕРИЛИЗАТОР ПАРОВОЙ TUTTNAUER МОДЕЛЬ 4472/80
ВАКУУМНЫЙ АВТОКЛАВ
С 12-КИЛОВАТТНЫМ ПАРОГЕНЕРАТОРОМ
Модель 4472/80
ИНСТРУКЦИЯ ПО ТЕХНИЧЕСКОМУ ОБСЛУЖИВАНИЮ
И ЭКСПЛУАТАЦИИ
Стерилизаторы паровые |
Просмотров: 2370 |
Загрузок: 179 |
Дата: 16.Май.2015
| Комментарии (0)
ГП-80-2 Ульяновск Паспорт и схема
Паспорт в PDF, схема в GPG, лишняя информация удалена, файлы оптимизированы и хорошо читабельны. Вес архива 14,4 мБ.
Стерилизаторы воздушные |
Просмотров: 3095 |
Загрузок: 272 |
Дата: 09.Мар.2015
| Комментарии (0)
Вариант ГК-100-ЗМ (с четырьмя кранами)
Не смотрите, что в паспорте ГК-100-3 (на самом деле ГК-100-3М). В автоклаве нет крана «ПАР ИЗ КАМЕРЫ», во всяком случае, он не вынесен отдельно, как в предшествующем автоклаве. Также здесь есть паспорт на парогаситель.
Стерилизаторы паровые |
Просмотров: 1866 |
Загрузок: 175 |
Дата: 04.Мар.2015
| Комментарии (0)
Шкаф сушильно-стерилизационный АС-80Ш2 схема
Схема.
Стерилизаторы воздушные |
Просмотров: 2783 |
Загрузок: 111 |
Дата: 30.Янв.2015
| Комментарии (0)
Блок управления БУС-5М к стерилизатору паровому с авт. сист. управления ГК-100-«СЗМО»
Используется в стерилизаторах ГК-100-«СЗМО»
Стерилизаторы паровые |
Просмотров: 2352 |
Загрузок: 151 |
Дата: 27.Ноя.2014
| Комментарии (0)
Стерилизатор паровой с авт. сист. управления ГК-100-«СЗМО» Рук-во по эксплутации
Бумагу для руководства ОАО использовал некачественную, поэтому при сканировании просвечивается обратная сторона. Пришлось картинки редактировать, распознавание кое-где может быть не совсем корректно.
Стерилизаторы паровые |
Просмотров: 2724 |
Загрузок: 200 |
Дата: 27.Ноя.2014
| Комментарии (0)
W&H Lisa руководство рус
ВОДНО-ПАРОВОЙ СТЕРИЛИЗАТОР
LISA модели 317, 322, 517,522
РУКОВОДСТВО ПО ЭКСПЛУАТАЦИИ
Стерилизаторы паровые |
Просмотров: 1790 |
Загрузок: 93 |
Дата: 14.Ноя.2014
| Комментарии (0)
Euronic 4D УЗ. ванна.
Применяется для чистки труднодоступных мест . Инструкция по эксплуатации.
Стерилизаторы паровые |
Просмотров: 1421 |
Загрузок: 41 |
Дата: 23.Окт.2014
| Комментарии (0)
Автоклав Е5
инструкция по эксплуатации.
Стерилизаторы паровые |
Просмотров: 1631 |
Загрузок: 72 |
Дата: 19.Окт.2014
| Комментарии (0)
стерилизаторы ГП 20-3 , ГП 40-3.
паспорт , инструкция и полная электросхема.
Стерилизаторы воздушные |
Просмотров: 3097 |
Загрузок: 335 |
Дата: 19.Окт.2014
| Комментарии (0)
Eurosonic Energy ультразвуковая мойка.
Инструкция по эксплуатации и блок схема- для стоматологии.
Стерилизаторы УФ-облучения, бактерицидные облучатели |
Просмотров: 1858 |
Загрузок: 72 |
Дата: 19.Окт.2014
| Комментарии (0)
Автоклавы серии BTD
Описание и инструкция по пользованию.
Стерилизаторы паровые |
Просмотров: 1595 |
Загрузок: 110 |
Дата: 11.Окт.2014
| Комментарии (0)
1-30 31-60 61-90 91-120 121-150 151-162
Вопросы по ремонту медицинской техники | Теоретические основы медицинского приборостроения | Информационный раздел | Информация о сайте | Хранилище файлов | Сертификаты и регистрационные удостоверения | Навигатор по сайту |
Написать администратору
| Copyright MyCorp © 2008 — 2023 |
1.Summary &Suitalbe Using Range…………………………………………………………………………………………………………08
2.Technical parameter……………………………………………………………………………………………………………………………08
3.Installation…………………………………………………………………………………………………………………………………………12
4.
5.
JN-23 steam sterilization program introduction
6.Mantenance……………………………………………………………………………………………………………………………………….38
7.Scraping……………………………………………………………………………………………………………………………………………..45
Appendix 2:Packing……………………………………………………………………………………………………………………………..46
Appendix 3:Positioning The Load…………………………………………………………………………………………………………..47
Appendix 4:Description Of Tests……………………………………………………………………………………………………………49
Appendix 5:Validating The Cycles………………………………………………………………………………………………………….51
Appendix 6:Quality Of Process Water…………………………………………………………………………………………………….52
Appendix 10:Accessories……………………………………………………………………………………………………………………..57
Contents
…………………………………………………………………….16
……………………………………………………………………………………27
Page 01 of 58
|
Detail Specifications: 1431/1431956-kd_series.pdf file (04 Nov 2022) |
Accompanying Data:
Getidy KD Series Laboratory Equipment PDF Instruction Manual (Updated: Friday 4th of November 2022 04:20:19 AM)
Rating: 4.3 (rated by 31 users)
Compatible devices: RZ2, Pipettor Turbo-Fix, piezobrush PZ2, RT-3, Frontier FC5306, MKIV, Sonicator Q700, SD-OCT Telesto Series.
Recommended Documentation:
Text Version of Instruction Manual
(Ocr-Read Summary of Contents, UPD: 04 November 2022)
-
54, Ev1 Ev5 Ev3 Ev4 Ev2 Clean-water vavle Used-water vavle Common end(1#) APPENDIX 7: JN-23 Steam Sterilizer Hydraulic Circuit Solenoid Valve opend (one input and one output) Safety vavle Pressure sensor Opened-end Solenoid Valve closed (Drain water) (one input and one output) Condenser Three-way piece Atmosphere Used-water tank vacuum pump Clean-water tank Water Pump Air Filter Solenoid Valve …
-
52, 134 -04min-15min-3 ℃ 134 -18min-15min-3 121 -20min-15min-3℃ ℃ Page 51 of 58
… -
59, Getidy KD Series NOTE: 1.The sterilizer should be put on level worktable. 2.Be sure to use distilled water in order to prolong the use age of sterilizer. 3.Do not jam or cover the sterilizer radiator. 4.Sterilizer instrument should put in the instrument plate,each instrument should have some gap in order to make ventilation. 5.Freezing water tank should drain out constantly,usu…
-
45, 6.3.1 Rusting The fuse on the internal card is of the type: 5X20-10A(AC 230V/50Hz/60Hz);5X20-20A(AC 110V/60Hz) Fig.6.3-1 solenoid valve.(Fig.6.3-1) Page 44 of 58
… -
16, -Bring the instrument tray and accessories, remove the poly bag. -After you put medical instrument into the tray,turn on the power (green switch indicator light).(Fig.3.1-9) -Press the power revert button and LCD screen appears the main interface.(Fig.3.1-9) -Select the sterilization program you want, then press start to sterilization. -For details, please refer to Chapter 4. p…
-
23, 4.4.6.2.Pipeline Cleaning Fig.4.4-25 Fig.4.4-26 Fig.4.4-27 Fig.4.4-28 Click“ Pipeline Cleaning”(Fig.4.4-23) into Fig.4.4-24 interface.Press “ ” buttom will start,into Fig.4.4-25 interface. WARN:Please after fill with distilled water,closing the door,then pre…
-
22, 4.4.5.3.Power Saving Fig.4.4-17 Fig.4.4-18 Fig.4.4-19 Fig.4.4-20 Click “Power Saving”(Fig.4.4-17) into Fig.4.4-18 interface.Press “ ”to select power saving mode you want,then click“ ” to save and exit. “NO”:After each sterilization cycle is…
-
9, Getidy KD Series Page 08 of 58 CLASS: B and S POWER SUPPLY VOLTAGE: AC 230V 10% MAINS FREQUENCY:50~60Hz POWER OUTPUT: 1600W CHAMBER: 23L DIAMETER x DEPTH: 250mmx450mm ABSORBED CURRENT: 10A STERILIZATION CYCLES: 6 ± φ TEST CYCLES: 3 CAPACITY OF CLEAN-WATER TANK: 4.5L CAPACITY OF USED-WATER TANK: 3.5L GROSS WEIGHT: 65Kg NET WEIGHT: 59Kg PACKING SIZE(LxWxH):730mmx580mmx560mm
… -
47, Getidy KD Series Page 46 of 58 The way how the sterilized instruments are packaged,and then sticked,determines the state of preservation of sterilization. The following material can be used as containers:metal containers with lids or perforated buttoms with filters in paper,pouches in paper
…
Recommended Instructions:
DWS-5800, TB 100, RP-5200, S300, KX-P3196 — KX-P 3196 B/W Dot-matrix Printer


-
www.velopex.comHi-TechDiagnosticsServicewww.velopex.comHi-TechDiagnosticsServiceswww.velopex.comDisplay/Écran/Pantalla/ДисплейThe lid is not closed correctly/Le couvercle n’est pas correctement fermé/Il coperchio non è chiuso correttamente/Der Deckel ist nicht richtig geschlossen/La tapa no está cerrada correctamente/Неправильно закрыта …
Intra-X 6
-
i-MyRunII核酸電気泳動システム取扱説明書i-MyRunⅡ核酸電気泳動システム取扱説明書B5.inddH1i-MyRunⅡ核酸電気泳動システム取扱説明書B5.inddH1 2014/10/0914:49:532014/10/0914:49:53 …
i-MyRun II 20
-
___________________________________________________________________________________________________________ EnCal 3000 Quad – Hardware Manual 22/06/2017 EnCal 3000 Quad Gas Chromatograph Hardware Manual 73022350 g 22.06.2017 …
EnCal 3000 Quad 52
-
SimpliAmp™ Thermal Cycler PCR System Installation andOperationCatalog Number A24811Pub. No. A24827 Rev. DNote: For safety and biohazard guidelines, see the “Safety”appendix in the SimpliAmp™ Thermal Cycler User Guide (Pub. No.MAN0009889). Read the Safety Data Sheets (SDSs) and follow thehandling instructions. Wear appropriate protective eyewear,clothing, and gloves.Product de …
SimpliAmp 8
Additional Information:
Popular Right Now:
Operating Impressions, Questions and Answers:
Table of Contents for Getidy KD Series:
-
Page 47 of 58 Pouches with paper-polypropylene are excellent packageing systems of steam sterilizing for small sets of surgical instruments and The way how to load to sterilize is arranged is also important to the sterilization process .Always observe condiderably If ( )
-
4.4.6.5.Auto-Water Supply Click“ Auto-Water Supply”into Fig.4.4-31 interface.Press “ ” to start(Fig.4.4-32).If you need to stop halfway, press “ ” to exit. WARN:Before starting, please provide enough distilled water and plug in the inlet pipe to the valve. 4.5“SET UP 2” introduction 4.5. 4.5. 4.5. 4.5. 4.5. 4.5. 1. System information 2. Label Printer 3. USB Record 4. MINI-Printer 5. System Setting 6. Cellphone App 4.5.1. System information Fig.4.5-1
-
4.4.6.2.Pipeline Cleaning Fig.4.4-25 Fig.4.4-26 Fig.4.4-27 Fig.4.4-28 Click“ Pipeline Cleaning”(Fig.4.4-23) into Fig.4.4-24 interface.Press “ ” buttom will start,into Fig.4.4-25 interface. WARN:Please after fill with distilled water,closing the door,then press the “ ” button,Start cleaning. Recommend clea
-
5.4 Test program When LCD shows main interface,Click “TEST”(Fig.5.4-1) enter into interface Fig.5.4-2. Click “Vacuum Test”enter into interface Fig.5.4-3.Then press “ ”buttom to start vacuum test. 5.4.1 the “vacuum test” program following steps: This test is performed in order to check the performance of the unit,particularly: -the efficiency of the vacuum pump; -the seal of the pneumatic circuit. Fig.5.4-1 Fig.5.4-2 Fi
-
Page 50 of 58
-
TIME 1 2 3 4 5 10 11 12 13 10 Start sterilization stage 11 After sterilization Exhaust stage 12 Drying stage 13 and print sterilization record stage Balance atmospheric ONE PRE-VACUUM STERILIZATION PROGRAM PROCESS SCHEMATIC Page 28 of 58 1 Heating coil preheating stage 2 Pre-
-
ZHEJIANG GETIDY MEDICAL INSTRUMENT CO.,LTD. ADDRESS:Duancun, Dongnan Industrial Zone, Shuxi Street, Wuyi, Jinhua, Zhejiang321200, China. TEL:0086-579-87712106 87707499 DOWNLOAD Web: www.getidy.com E-MAIL:[email protected] [email protected] Page 05 of 58
-
6.3 Extraordinary Maintenance Page 43 of 58
-
Fig.5.3-5 Fig.5.3-6 Fig.5.3-7 Fig.5.3-8 When the vacuum value reaches -0.700bar value,the control system will open water pump-solenoid valve(Ev2) and steam generator start to inject the steam into chamber.The temperatures(T1 and T2) and pressure inside the chamber will be rised at the same time. 5.3.1.6.THE SECOND TIMES EXHAUST STAGE(Fig.5.3-9) When the pressure inside the chamber reac
-
Fig.5.3-31 Fig.5.3-32 5.3.3 USER-DEFINNED PROGRAM Fig.5.3-33 Fig.5.3-34 Fig.5.3-35 Click “User-definned”(Fig.5.3-33) enter into interface Fig.5.3-34.Press “ ”to change the number of “Temperature/ Vacuum times/Sterilization time/Drying time”. Temperature range:121℃ or 134℃. Vacuum times range: 1 or 3.
-
Page 08 of 58 CLASS: B and S POWER SUPPLY VOLTAGE: AC 230V 10% MAINS FREQUENCY:50~60Hz POWER OUTPUT: 1600W CHAMBER: 23L DIAMETER x DEPTH: 250mmx450mm ABSORBED CURRENT: 10A STERILIZATION CYCLES: 6 ± φ TEST CYCLES: 3 CAPACITY OF CLEAN-WATER TANK: 4.5L CAPACITY OF USED-WATER TANK: 3.5L GROSS WEIGHT: 65Kg NET WEIGHT: 59Kg PACKING SIZE(LxWxH):730mmx580mmx560mm
Questions, Opinions and Exploitation Impressions:
You can ask a question, express your opinion or share our experience of Getidy KD Series device using right now.