Последние сообщения на форуме
![]()
Изучение системы зажиганияот BoxerПомозговал еще раз, кажется, картинка складывается.
Попробую опис … Читать далее3 года назад
![]()
АИ-92 или АИ-95?от Boxer
Цитата: Doc от 15.11.2019, 16:37
А кто-нибудь знает, что это за … Читать далее4 года назад
![]()
Покрышкиот DocВообщем поделюсь своим опытом, нет, не установки, а поиска бескаме … Читать далее4 года назад
![]()
Прокладка штока обогатителя своим …от DocВсем доброго времени суток. На сайте, уже есть советы как убрать с … Читать далее4 года назад
![]()
Какое масло льем?от DocТут дело не только в гофре на вилках. Как вы уже выше писали, влаг … Читать далее4 года назад
- Manuals
- Brands
- Bajaj Auto Manuals
- Motorcycle
- Boxer BM 150
- User manual
-
Contents
-
Table of Contents
-
Bookmarks
Quick Links
User’s Guide
User’s Guide
(Export)
(Export)
Related Manuals for Bajaj Auto Boxer BM 150
Summary of Contents for Bajaj Auto Boxer BM 150
-
Page 1
User’s Guide User’s Guide (Export) (Export) -
Page 2
You can entrust Bajaj Dealers, who are well equipped with all necessary facilities, skill sets and trained manpower for servicing and repairs of your “Boxer BM 150”. In the rare event of going to a local garage, always insist on Genuine Bajaj Spares to ensure safety, performance and longer life of your vehicle. -
Page 3
Notice: The description and illustration in this booklet are not to be taken as binding on the manufacturers. The essential features of the type described and illustrated herein remaining unaltered. Bajaj Auto Limited reserves the right to carry out modifications on the vehicle, parts or accessories as may be convenient and necessary at any moment… -
Page 4
Technical Specifications Engine : 4 stroke, single cylinder Front Brake : Mech. expanding shoe 130 mm dia. Drum Natural air cooled, 240 mm dia. Disc Spark ignition Rear Brake : Mech. expanding shoe Bore x Stroke : 56.0 mm x 58.8 mm 130 mm dia. -
Page 5
Technical Specifications Tyre Size : BM 150 Hi Beam Indi. Lamp : 12V, 2W Front 3.00 X 17”, 45 P RIB Speedometer Lamp : 12V, 2W (2 nos.) Rear 100/90X17”,55 P STUD Horn : 12 V 2A, DC Tyre Size : BM 150 X Battery : 12 V 4 Ah VRLA Front… -
Page 6
Identification Data The Frame and Engine serial numbers are used to register the motorcycle. They are the unique alpha-numeric codes to identify your particular vehicle from others of the same model and type. Frame Number Location On LH Side of Steering Tube (Alpha-Numeric — 17 Digits) Engine Number Location On LH Side Crankcase Near Gear… -
Page 7
Location of Parts Speedometer Fuel Tank Rear Grab Handle Shock Absorber Carburettor with Front Brake Manual choke Lever Headlamp Rear Number Plate Silencer Brake Pedal Engine Oil Rider Foot Rest Inspection Window Pillion Foot Rest… -
Page 8
Location of Parts Speedometer Fuel Tank Cap Grab Handle Clutch Lever Rear Shock Absorber Tail Lamp Front Fork Pillion Foot Rest Side Gear Change Stand Lever… -
Page 9
Location of Parts Steering cum Ignition Lock : To Lock the Steering : To lock the steering, turn the handle bar to the left or right. Push & It has three positions. release the key. Turn the key to “LOCK” position and remove the key. -
Page 10
Location of Parts Fuel Tank Cap Fuel Tap Fuel Tank Cap Fuel Tap • To open the fuel tank cap, insert the key in Fuel tap lever has following positions. the lock and turn it clockwise and lift fuel : When fuel level is above Reserve tank cap. -
Page 11
Location of Parts 1. Odometer : It shows the total distance that the vehicle 5. Fuel Level Indicator : It shows available fuel in fuel has been ridden. tank. 2. Speedometer : The Speedometer pointer shows the 6. Neutral Indicator : It illuminates when transmission is speed of the vehicle. -
Page 12
Location of Parts Left Handle Bar Switches C. Horn Button : ( ) Press horn button for sounding horn. A. Dipper Switch : When headlight is ON, High or Low beam can be selected with the dipper D. Pass Switch : Press the switch to flash the switch. -
Page 13
Location of Parts Right Handle Bar Switches USB Mobile Charger E. Head Light Switch : It has 2 positions. • Mobile charging facility using USB cable : All lamps ‘OFF’. : While engine running, Head lamp, CAUTION : Do not charge mobile in Tail lamp &… -
Page 14
Location of Parts Removal of Side Cover LH Fitment of Side Cover LH • Insert the key into the cover lock (A) and • Match & insert the Lug C (rear side) in turn the key clockwise. bracket mounted on chassis & slide ‘Side Cover’… -
Page 15
Location of Parts Removal of Side Cover RH Fitment of Side Cover RH • Match rear side (C) of ‘Side Cover’ lug with • Remove the screw (A) given on ‘Side Cover’. hole located on chassis & press the cover. •… -
Page 16
Location of Parts Fig. B Fig. A Removal of Seat Fitment of Seat • Remove 2 nos. M5 Allen bolts provided for • Match & insert the bracket (‘1’ of Fig. ‘B’) of fixing of seat on LH & RH sided with M5 seat with slot (‘2’ of Fig. -
Page 17
Location of Parts Tool Kit Location Make of Battery may differ from vehicle to vehicle Battery Tool Kit Location • It is located inside the ‘Side Cover’ LH. • It is located below the battery box. • Always maintain electrolyte level in each cell •… -
Page 18
How to Ride Your Bike Starting The Engine : • Release starter button / kick lever as soon as engine starts. • Turn the fuel tap knob to ‘ON’ or ‘RES’ • When the engine is warmed up enough to position. -
Page 19
How to Ride Your Bike Moving Off : Warning : When shifting down to lower gear, do not shift at such high speed that engine • Check that Center/Side stand is up. rpm jumps excessively. This may cause • Depress the clutch lever. engine damage, and rear wheel may skid. -
Page 20
How to Ride Your Bike Running IN • Never lock the brakes, or it will cause the tyres to skid. When cornering, use brakes Proper running-in is important for the better life judiciously and do not de-clutch. Reduce and trouble free performance of the vehicle. your speed before you get into the corner. -
Page 21
How to Ride Your Bike Ensure following maintenance points to get Fuel Saving Tips optimum fuel efficiency from your bike. A well maintained vehicle and good driving can contribute a lot to the saving of petrol. Following Fuel Check fuel lines & connections are a few simple fuel saving tips. -
Page 22
Safe Riding Tips Safe Riding Tips braking are important not only for safety and low fuel consumption, but also for longer life • Always wear helmets while driving or riding. of the vehicle. Your helmets should conform to appropriate • During monsoon drive the vehicle more Indian standards. -
Page 23
Safe Riding Tips If any irregularities are found during these • S m o o t h s t e e r i n g m o v e m e n t w i t h o u t checks, refer to the Maintenance chapter &… -
Page 24
Periodic Maintenance Information Recommended Engine Oil : Always insist on Genuine Oil for optimum engine performance. Recommended SAE 20W50 API‘SL’ or Oil Grade JASO‘MA2’ • Engine oil Replacement Frequency : 1st service & then every 5,000 Kms. A : Oil Filler Cap B : Oil Level Gauge Engine Oil Level Checking : •… -
Page 25
Periodic Maintenance Information CAUTION : Tyre Pressure : • I t i s m o s t i m p o r t a n t t o a d h e r e t o Keep appropriate tyre pressure as mentioned recommended grade &… -
Page 26
Periodic Maintenance Information Front Brake Fluid Level : (For Front Disc version) Front brake fluid master cylinder reservoir is located near RH switch on handle bar. • To check brake fluid level, keep vehicle on center stand with handle bar in straight ahead position. •… -
Page 27
Periodic Maintenance Information Battery Maintenance : How to keep battery healthy ? • Switch ‘Off’ ignition when engine is not running. Get battery checked / charged during periodic services. • Do not press starter button for more than 5 sec. After 3 successive crankings, wait for 15- 20 sec. -
Page 28
Periodic Maintenance Information Spark Plug Drive Chain Slackness • Remove spark plug by using plug spanner. • Chain top edge to be kept between the two marks during chain slackness adjustment. • Clean the spark plug. • Care should be taken, that the chain should •… -
Page 29
Periodic Maintenance Information Cleaning Chain Lubrication Drive Chain • Clean the chain with nylon brush by using • Lubricate chain every 500 kilometers with SAE kerosene/ with the help of chain cleaning machine. 90 oil. • Check & if required adjust chain slackness •… -
Page 30
Periodic Maintenance & Lubrication Chart RECOMMENDED FREQUENCY Servicing Operation Every 5000 Km Remarks 4500 9500 after Previous Service 5000 10000 1st — 750 kms / 30 days Servicing ü ü ü ü ü ü ü 2nd onward @ 5000 kms Engine idling speed / CO% Valve tappet clearance SAE 20W50 API ‘SL’… -
Page 31
Periodic Maintenance & Lubrication Chart RECOMMENDED FREQUENCY Servicing Operation Every 5000 Km Remarks 4500 9500 after Previous Service 5000 10000 Fuel pipes Replace @ every 20000 kms Clutch lever free play Throttle grip play Rear brake pedal free play Brake lining / pad wear / lubricate brake cam / Brake pedal pivot pin CL,R CL,R… -
Page 32
Periodic Maintenance & Lubrication Chart RECOMMENDED FREQUENCY Servicing Operation Every 5000 Km Remarks 4500 9500 after Previous Service 5000 10000 Brake cam & pedal pivot pin Steering play Steering stem bearing C,L,R C,L,R C,L,R C,L,R Replace @ every 10000 kms All fasteners tightness Rear sprocket fasteners Rear wheel rubber shock damper… -
Page 33
Periodic Maintenance & Lubrication Chart RECOMMENDED FREQUENCY Servicing Operation Every 5000 Km Remarks 4500 9500 after Previous Service 5000 10000 Tyre tread wear Front fork oil Replace @ every 20000 kms Clutch switch cleaning (if applicable) General lubrication Swing arm pivot pin lubrication Lubricate @ every 20000 kms * It is strongly recommended to use only recommended grade of oil. -
Page 34
Non-Use Maintenance Non-use maintenance is necessary if a vehicle ** For Battery : remains off road for a longer duration (more a. Remove battery and keep it on wooden than 15 days**). The correct and careful non-use plank, in properly ventilated area. maintenance carried out before storing the b. -
Page 35
Use only Bajaj Genuine Parts… -
Page 36
Bajaj Auto Limited Akurdi Pune 411 035 India +91 20 27472851 +91 20 27407385 www.bajajauto.com…
-

Admin
- Site Admin

- Сообщения: 136
- Зарегистрирован: 18 ноя 2017, 15:39
- Откуда: Москва
- Мотоцикл: Bajaj Dominar 400

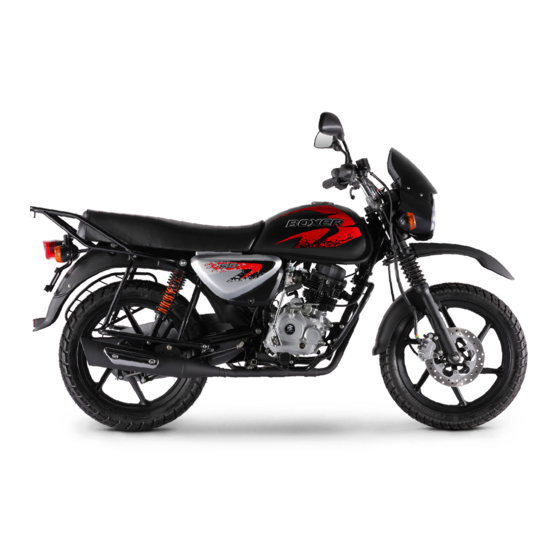
![]() Инструкция по эксплуатации для Bajaj Boxer 150/150x
Инструкция по эксплуатации для Bajaj Boxer 150/150x
Ссылка на скачивание

-
Strige
- Новичок
- Сообщения: 2
- Зарегистрирован: 25 ноя 2018, 01:36
- Откуда: Москва
- Мотоцикл: Boxer 150

25 ноя 2018, 10:28
Очень хотелось тут видеть каталог оригинальных запчастей.
Спасибо
-

Purga
- Бывалый
- Сообщения: 91
- Зарегистрирован: 13 фев 2018, 15:59
- Откуда: Москва

05 дек 2018, 09:32
Strige писал(а): ↑
25 ноя 2018, 10:28
Очень хотелось тут видеть каталог оригинальных запчастей.
Спасибо
А для чего Вам каталог оригинальных запчастей?
-
Sobrat
- Новичок
- Сообщения: 1
- Зарегистрирован: 20 апр 2019, 21:45
- Мотоцикл: Boxer 150 X
20 апр 2019, 21:59
А для чего Вам каталог оригинальных запчастей?
Если советуете пользоваться только неоригинальными ЗЧ, тогда, конечно, не нужен.
-
Purga
- Бывалый
- Сообщения: 91
- Зарегистрирован: 13 фев 2018, 15:59
- Откуда: Москва
22 апр 2019, 08:39
Sobrat писал(а): ↑
20 апр 2019, 21:59
А для чего Вам каталог оригинальных запчастей?
Если советуете пользоваться только неоригинальными ЗЧ, тогда, конечно, не нужен.
Все каталоги оригинальных запасных частей есть у дилеров. Если же что то интересует по оригинальным запчастям, на форуме есть тема.
-
Dron6110
- Новичок
- Сообщения: 1
- Зарегистрирован: 30 июл 2020, 07:17
- Мотоцикл: Boxer 125x
30 июл 2020, 07:23
Есть инструкция как отрегулировать фару на boxer? Не понятно где находится винт регулировки и как до него добраться(
Этот пост будет полезен владельцам Boxer’ов, которые сами обслуживают данный мотоцикл.
На просторах интернета нашел файл с дилерскими инструкция по обслуживанию и ремонту моего мотоцикла, но вся информация была на испанском языке.
Уже с первых слов понял что совершенно не знаю испанского, только картинки давали представление о чем идет речь)
Вооружившись переводчиком и потратив целый день на перевод на русский, получил понятную инструкцию как ремонтировать/проверять/менять жизненно важные детали мотоцикла, так чтоб было почти как на заводе.
Короче, что языком чесать, держите ссылку на файл (лежит на гугл диске) скачивайте себе и пользуйтесь=)
Файл на русском тут
Оригинал на Испанском тут
P.S. извиняюсь за корявый перевод местами, пытался предложения из набора слов сделать смысловыми. И даже великий переводчик не знает некоторых слов