Download Game Guide PDF, ePUB & iBooks
Welcome to the Warhammer 40,000 universe! The Battlefleet Gothic: Armada contains detailed description of the singleplayer campaign along with hints for side and main quests. Additionaly, you will find here all the relevant info about available factions and game mechanics.
Last update: Wednesday, May 11, 2016
The Battlefleet Gothic: Armada contains detailed description of the singleplayer campaign along with hits for side- and main quests. Additionally, you’ll find here all the relevant info about the campaign and its mechanics. You can also find here a detailed description of all the factions available in the game. I have also described all the available units — all of them evaluated and compared within class and nation. I will describe modifying abilities of the ships and evaluation of their usefulness in combat. All the base mechanics of equipment modification will be discussed as well. In the chapter entitled «general advice» that contains information that’s crucial for operating in the Gothic Sector. This guide also contains all the available game modes within the campaign and outside it, as well as advice as far as choosing the right units for specific missions is concerned.
In the Battlefleet Gothic: Armada guide you’ll find:
- All the crucial game mechanics info;
- Highlighted types of missions within the campaign and beyond it;
- A complete list of all the units of all the factions available;
- Evaluation of the units and a comparison of their efficiency within each class of ships;
- Advice concerning the campaign and its mechanics;
- All the info about ship’s workshop;
- Evaluation of the weapons available;
- A full description of mods for each faction and their application;
- Detailed guide for the SP campaign;
- «General Advice» chapter, containing a selection of the most important advice.
Lukasz Wisniewski (www.gamepressure.com)
About Battlefleet Gothic: Armada Game Guide
Author : Lukasz Wisniewski for gamepressure.com
last update : May 5, 2016
Guide contains :
30 pages, 462 images.
Use the comments below to submit your updates and corrections to this guide.
Hot Topics of Battlefleet Gothic: Armada Game Guide
- Imperial Navy | Units Battlefleet Gothic: Armada Guide. In this chapter you will find detailed description of Imperial Navy units divided in six categories: Transport, Support, Light cruisers, Cruisers, Battle Cruisers and Battleships.
- Chapter I — The Hand of Darkness | Campaign Battlefleet Gothic: Armada Guide.
- Chapter IV — 12th Black Crusade | Campaign Battlefleet Gothic: Armada Guide.
- Chaos | Units Battlefleet Gothic: Armada Guide.
- Combat | General tips Battlefleet Gothic: Armada Guide.
You are not permitted to copy any image, text or info from this page.
This site is not associated with and/or endorsed by the Focus Home Interactive or Tindalos Interactive. All logos and images are copyrighted by their respective owners.
Copyright © 2000 — 2023 GRY-Online S.A. for gamepressure.com, unofficial game guides, walkthroughs, secrets, game tips, maps & strategies for top games.
Встречайте наш Гайд и советы Battlefleet Gothic Armada – корабли, космические бои и секреты побед. Тут мы поделимся своими советами для этой игры, дабы вы были подготовлены к космическому бою не хуже, чем повстанцы из Звездных Войн. Поехали!
Гайд и советы Battlefleet Gothic Armada – корабли, космические бои и секреты побед
1. Если вы выберите количество кораблей, которые не были назначены группе, один из них будет ведущим кораблем. При выдаче специального приказа на выбор судов, не входящих в группу, этот заказ будет выполнять только ведущий корабль.
2. Помните, что торпеды всегда запускаются с носа корабля. Используйте их с осторожностью, так как они могут также повредить дружественные корабли.
3. Никогда не перегревайте двигатели. Лучше потратить больше времени, чем потерять свой корабль, застрявший среди врагов.
4. Вы должны отдавать приказы в тактическом режиме — у вас будет больше времени, чтобы обдумать их.
5. Избегайте скопления небольших подразделений в одном месте. Большой корабль, врезавшийся в такую группу, может одним махом уничтожить все эти корабли.
6. Взрывающийся корабль может повредить соседние юниты.
7. В игре есть физика; удар по кораблю с включенными ускорителями нанесет больше урона, чем без них.
8. Если корабль вот-вот взорвется, его индикатор здоровья исчезнет за две секунды до взрыва – это ваш шанс улететь куда подальше
9. В миссиях по извлечению данных сосредоточьтесь на генераторах вражеских кораблей — они не позволят им вернуть данные, которые вы только что украли.
10. После определения вражеского юнита вы должны указать, какая его часть должна быть атакована в первом порядке.
11. Уничтожение оружия хорошо экипированного подразделения может занять много времени. Обратите внимание на количество турелей у врага.
12. Сначала вы столкнетесь с небольшими кораблями, сфокусируйтесь на них до того, как прибудут большие отряды.
13. Инициирование кораблей должно основываться на их статистике.
14. Используйте газовые облака, чтобы восстановить ваши щиты и целостность корпуса.
15. Помните, что использование ускорителя даст врагам четкое представление о вашем корабле на их радарах.
16. Убедитесь, что вы знаете диапазон каждой доступной способности. Некоторые из них бесполезны, если вы находитесь внутри диапазона их действия.
17. Остерегайтесь ловушек и стазисных бомб. После их обнаружения лучше всего включить тактический режим, развернуться и выйти из их диапазона с помощью ускорителя.
18. Если вы видите, что собираетесь проиграть, постарайтесь сэкономить как можно больше юнитов, чтобы избежать больших затрат на ремонт.
19. Помните, что кораблю требуется 15-секундный период прогрева, прежде чем совершать варп-прыжок.
20. Если появляется информация о неповиновении одного из ваших капитанов, вы должны казнить его как можно скорее.
21. Вы можете попытаться помешать вражескому кораблю совершить варп-прыжок. Так вы сможете получить награду за его уничтожение.
22. После аварийного прыжка есть шанс, что корабль потеряется в космосе и не будет доступен для следующей миссии.
Battlefleet Gothic Армада 2 полное руководство
Battlefleet Gothic Армада 2 полное руководство по космической стратегической игре в темной вселенной Warhammer 40000. Она является продолжением Battlefleet Gothic: Armada 2016 года. И является работой той же студии Tindalos Interactive.
Свежие руководства
Об игре — Сюжет игры
История Battlefleet Gothic: Armada 2 основана на настольном воплощении Warhammer 40000. И вращается вокруг событий Gathering Storm и 13th Black Crusade. Зараженный хаосом морской пехотинец по имени Абаддон собрал самую большую армию. Самую большую армию зла со времен Ереси Гора. И пытается достичь сердца Империи людей, планеты Терра, и убить Императора. Мы следим за этими событиями на протяжении нескольких кампаний.
Вступление
Спасибо, что нашли время, чтобы посмотреть на это руководство. Я надеюсь и надеюсь, что из этого вы не только узнаете, как играть в Battlefleet Gothic Armada 2 с максимальным потенциалом, но также научитесь играть стратегическую мысль во время игры.
Я любил Warhammer всю свою жизнь и много играл в первую армаду Battlefleet. Мне понравилась механика и то, как у нас наконец появилась игра, в которой мы можем брать наши космические корабли и врезать их друг в друга. Приятно видеть новый запуск игры и постоянную поддержку не только от разработчиков, но и от отличной фан-базы.
Немного обо мне, прежде чем мы продолжим. В текущей бета-версии я поместил в первую десятку Имперский флот в списках лидеров, надеюсь, я буду продвигаться еще дальше. Я до сих пор не уверен, какая фракция лучше всего подходит для моего стиля игры. Потому что эта игра сильно отличается от последней готической армады, где я руководил Имперским флотом.
Мне нравится все, что может предложить игра от всех фракций, и люблю наблюдать, как игроки играют и реагируют на все виды уникальных ситуаций. Я надеюсь, что независимо от того, какую фракцию я выберу, или какую бы мне больше не нравилось играть, я смогу поделиться своими личными идеями и советами для всех вас.
Я просто хочу поделиться своими знаниями и опытом со всеми вами. Это руководство даст краткий обзор подгрупп, навыков и улучшений в игре. Затем мы начнем фокусироваться на конкретных фракциях, и я добавлю стратегии, которые являются общими для этих фракций, и то, что вы можете принести для борьбы с ними.
В каждой из этих фракций мы также будем изучать несколько выдающихся кораблей, которые доступны. Поскольку это по сути настольная игра, получение максимальной отдачи от ваших юнитов чрезвычайно важно.
Подфракции Battlefleet Gothic: Армада 2
Подфракции — это категория, которая может быть выбрана для предоставления вашему флоту другой эстетики. Я призываю всех вас просто создать свой собственный флот из ваших любимых фракций. И отфильтровать категорию подгрупп, находясь в режиме просмотра корабля.
Это позволит внимательно изучить детали и выбрать, какая из них соответствует теме вашего флота.
Пожалуйста, обратите внимание: когда дело доходит до выбора подфракции, статистического преимущества нет. Поэтому просто выбирайте то, что, по вашему мнению, выглядит лучше всего, и что пугает ваших врагов.
Четыре подгруппы Хаоса, посвященные поклонению богам Хаоса, каждый получает дополнительный навык и апгрейд на выбор. Каждая из подгрупп фракций орков также получает и дополнительные умения и улучшения.
Поскольку это относится ко всем фракциям Орков, я не буду перечислять их, но ниже я перечислю конкретные от Хаоса.
- Страж Смерти, ужасающие последователи Чумы-Отца-Нургла
- Дети Императора, искатели совершенства, отвечающие Слаанешу
- Тысяча Сынов, те, кто желает знания и любимых слуг Цеенча
- Пожиратели Мира, кровожадные и кровожадные агенты Кхорна

Боевая группа Детей Императора 13-го Черного Крестового Похода с символикой и эмблемой Бога Хаоса Слаанеша.
«Охватите свой голод, свою похоть, свое желание. Вселенная наша для взятия! »
— святитель ЛеВей, Культ Священного Союза
Секреты Советы и фишки Battlefleet Gothic: Armada 2
Battlefleet Gothic Армада 2 полное руководство
- — Даже если вы проиграете битву, вы заработаете немного славы и опыта адмирала.
- — Цели убийства — это всегда адмиральские корабли.
- — Данные, которые должны быть защищены, всегда происходят с адмиральского корабля.
- — Копья, Пульсары и Ззап всегда поражают и игнорируют большую часть брони.
- — Потерять корабль дорого. Не стесняйтесь выйти из боя с Warp Jump.
- — Ремонт разрушенных и сильно поврежденных кораблей можно ускорить, используя известность.
- — Корабль, потерянный в варпе, недоступен в течение заданного времени.
- — Флоты Империума и Хаоса идеально подходят для начинающих.
- — Повышайте уровень своего адмирала, чтобы разблокировать более мощные корабли для вашего флота.
- — Повышение уровня ваших капитанов открывает больше слотов апгрейда для его корабля.
- — У каждого корабля есть оборонительные башни, которые могут уничтожать вражеские торпеды, штурмовики и штурмовые катера.
- — Не стесняйтесь специализировать свои корабли в точные роли с помощью навыков и улучшений.
- — Специальные приказы — это сильные, временные бафы, подходящие для различных ситуаций.
- — «Перезарядка!» — это специальный приказ, который уменьшает время восстановления и пополняет датчик горения.
- — «Сфокусироваться на !» — это специальный заказ, который повышает как точность, так и критические шансы.
- — «Готовьтесь к удару» ухудшает точность противника и укрепляет броню корабля.
- — «бесшумный» скрывает присутствие вашего корабля для дальних сканеров для скрытых атак.
— Флоты Империума и Хаоса идеально подходят для начинающих.
Battlefleet Gothic Армада 2 полное руководство
- — Скорость и низкая стоимость сопровождения кораблей делает их пригодными для разведки или смягчения противника для линейных кораблей.
- — Корабли сопровождения — это чистые потери: вы всегда можете взять их в свой флот, и они не требуют ремонта.
- — Панель поведения имеет систему автоматического нацеливания, которую вы можете настроить. Используйте его, если микро управление вашим автопарком слишком сложно.
- — Щелчок правой кнопкой мыши по умению устанавливает его на автозапуск. Он будет использоваться автоматически при определенных условиях.
- — В одиночной игре нажмите [SpaceBar], чтобы замедлить игру. Это даст вам время подумать, спланировать и приказать своим кораблям.
- — Нажмите на вражеский корабль, чтобы установить значение приоритета. Приоритет 1 будет выбран первым, приоритет 4 останется последним.
- — Получите доступ к более подробной версии некоторых подсказок и информации в игре, нажав ALT.
- — ALT можно использовать в игре, чтобы увидеть размеры и эффекты газовых и астероидных полей.
- — Броня дает вам возможность уменьшить урон, блокируя попадания.
- — Используйте [SpaceBar], чтобы замедлить время, чтобы более эффективно управлять своим флотом.
Дополнительные советы и хитрости
Battlefleet Gothic Армада 2 полное руководство
- — Сразу казнить непокорного капитана, чтобы не дать ему отсоединиться.
- — Низкие уровни корпуса и корабля могут спровоцировать неповиновение.
- — Скорость и движения жизненно важны для флота Эльдар.
- — Корабли орков издалека слабы. Чем ближе они подходят, тем лучше.
- — Некоторые навыки хорошо работают в синергии. Попробуйте использовать Taunt и Supercharged Void Shields!
- — Критическое повреждение наносит урон кораблям, отключая необходимые детали.
- — Критический урон может вызвать пожары, которые со временем наносят огромный урон корпусу.
- — Аварийный ремонт не только восстанавливает очки корпуса, но и тушит пожары.
- — Лёгкие корабли с таранами — это проверенная и эффективная тактика.
Battlefleet Gothic Армада 2 полное руководство
- — Бомбардировщики и торпеды обходят щиты, что делает их полезными против кораблей с сильными щитами.
- — Элементы окружающей среды могут быть использованы, чтобы получить преимущество над врагами.
- — Каждые 100 очков корпуса теряются, корабль теряет оборонительную башню, ослабляя его еще больше.
- — Некоторые миссии легче с определенными маневрами. Попробуйте разделить свои транспортные корабли, чтобы увеличить шанс их выживания.
- — Бомбы опасны, но заметны. И их легко избежать, если вы используете маневры, чтобы избежать их радиуса.
- — Установите автоматическое поведение вашего корабля, чтобы лучше использовать его оружие и возможности.
- — Микро-управление движениями вашего флота и нацеливание на противника значительно повышает его эффективность.
- — У кораблей нет оружия в тылу, поэтому будьте осторожны, чтобы не оказаться в окружении.
- — Использование специальных маневров раскрывает ваш корабль … Используйте это, чтобы заманить врага в ловушку!
Battlefleet Gothic Армада 2 полное руководство
- — Если вы модернизируете свои системы оружия, не забудьте настроить боевое поведение. Чтобы получить максимальную отдачу от ваших кораблей.
- — Используя панель поведения, вы можете решить, какую сторону показывать врагу. Если ваше оружие отключено по правому борту, покажите им свое портовое вооружение.
- — Империумные корабли предназначены для того, чтобы противостоять сильному вражескому огню. Прямо перед тем, как использовать свое боковое оружие Таким образом, их лобная броня толще.
- — Своеобразный дизайн корабля Орков, как правило, оставляет более тонкую броню сзади.
- — Если ваше вооружение сильнее в фронте, или вы потеряли оружие Бродсайда, настройте поведение корабля так, чтобы оно поддерживало фронтальный бой.
- — Нажав на вражеский корабль, вы можете выбрать подсистему, чтобы сосредоточить на ней огонь. Фокусировка огня на подсистеме увеличивает шансы критического урона.
- — Ramming, All Ahead Full и Brace for Impact — смертельная комбинация.
- — Поскольку у них нет щитов и они более подвержены критическому урону, Эльдары слабы к ударам молнии.
- — Торпеды орков могут быть не такими, какими кажутся: они также используют их в качестве штурмовых устройств!
- — Микропереключения работают с зондами Аугур и разведывательными маяками.
- — Хотя это и сложно, можно перехватить огонь противника, чтобы защитить важные корабли.
- — Тактическое значение сопровождения кораблей не следует упускать из виду даже в играх высокого уровня.
- — Эльдар невосприимчив к солнечным вспышкам, делая их смертоносными, когда происходит это событие.
- — Успехи при посадке отменяют варп-прыжки и часто обрекают корабли на уничтожение.
Battlefleet Gothic Армада 2 полное руководство
- — Всегда есть место для улучшений! Большинство возможностей — это умения: легко использовать, трудно освоить!
- — Вражеские боеприпасы, такие как торпеды, бомбардировщики и катера, могут быть остановлены истребительными эскадронами.
- — Бомбы хорошо работают вместе. Начните с фазовой бомбы, подавьте щиты с помощью бомбы разрушения и нанесите ущерб плазменной бомбе.
- — Слепой враг — легкая добыча. Попытка объединить бесшумный приказ с разрушителем Авгура.
- — Не стоит недооценивать навигатор вашей команды. Он может быть бесполезен в бою. Но возможность отступать без штрафных санкций является ценным преимуществом.
- — Эльдар полагается на двигатели, но уязвимы для критических повреждений. Чтобы компенсировать это, у них есть три разных двигателя. Каждый из которых принимает треть своей мощности.
- — Изучите орков. В отличие от других, у них нет разных моделей кораблей каждого класса, но все они настраиваемые и разные.
- — Благосклонности хаоса видны на их кораблях. Используйте их, чтобы угадать роли кораблей и эффективно противостоять им.
- — Обновление «Спаситель» лучше всего использовать на кораблях с опасными, но важными ролями.
- — Успехи при посадке отменяют варп-прыжки и часто обрекают корабли на уничтожение.
- — Иногда лучше позволить врагу бежать, чтобы быстрее сосредоточиться на другой цели. Разрушение — это средство, а не цель.
- — Корабль без оружия не совсем бесполезен. Он может отступить, чтобы избежать разрушения, но вы также можете использовать его в качестве щита … или в качестве Овна.
- — Эскадрильи слабы на оборонительных башнях. Поэтому предпочитайте изолированные цели с четким путем подхода, а не корабли, которые идут вместе.
Игровая механика
Battlefleet Gothic Армада 2 полное руководство
Что касается игрового процесса, Battlefleet Gothic: Armada 2 основывается на идеях первой игры. Мы получили еще одну хорошую RTS, в которой мы ведем военный флот в космические сражения.
Игроки могут использовать много разных кораблей. От маленьких и быстрых фрегатов до гигантских и медленных космических кораблей. Перестрелки довольно медленные, и правильное расположение наших сил имеет решающее значение. Поскольку участки кораблей имеют различную долговечность.
Подразделения и их команды зарабатывают опыт в миссиях. Что позволяет нам открывать лучшее оружие и снаряжение. А также обучать наших подчиненных новым специальным навыкам.
По сравнению с первой игрой Battlefleet Gothic: Armada 2 предлагает гораздо больше контента. В то время как оригинал начинался только с четырьмя гонками, его продолжение позволяет нам управлять космическими флотами из двенадцати фракций.
К ним относятся Имперский флот, Космические Десантники, Механика Адептуса, Некроны. Хаос, Аелдари (также известные как Эльдары), Корсары Аелдари, Друкхары, Торговцы Тау. А так-же Флот Защитников Тау, Орки и Тираниды.
Кроме того, создатели увеличили масштаб сражений, улучшили игровую механику. И значительно расширили многопользовательские стычки с улучшенным балансом и дополнительными опциями. То же относится и к модификациям флотов и отдельных кораблей.
Battlefleet Gothic Армада 2 полное руководство
ПК / Windows
Минимум: Intel Core i5-3450 3,1 ГГц / AMD FX-6300 3,5 ГГц, 8 ГБ ОЗУ, графическая карта 2 ГБ GeForce GTX 660 / Radeon HD 7870 или лучше, 50 ГБ HDD, Windows 7/8/10 64-bit
Прохождения игр, мануалы, фишки и трюки
Battlefleet Gothic Армада 2 полное руководство
Просмотров сегодня: 4 559
Last update: Wednesday, May 11, 2016
In this chapter, you will find all of the basic information on single-player campaign.
1. Game options and Renown points
2. Information on the current turn
3. Number of missions that you can complete before the end of the turn.
4. Information on properties and loss of properties
5. List of properties in a given system
6. Current system tab
7. System view
Later on, the guide explains all of the aspects that the interface refers to.
- Game options and Renown points
- Turns and missions
- Imperial properties
- System view and tabs
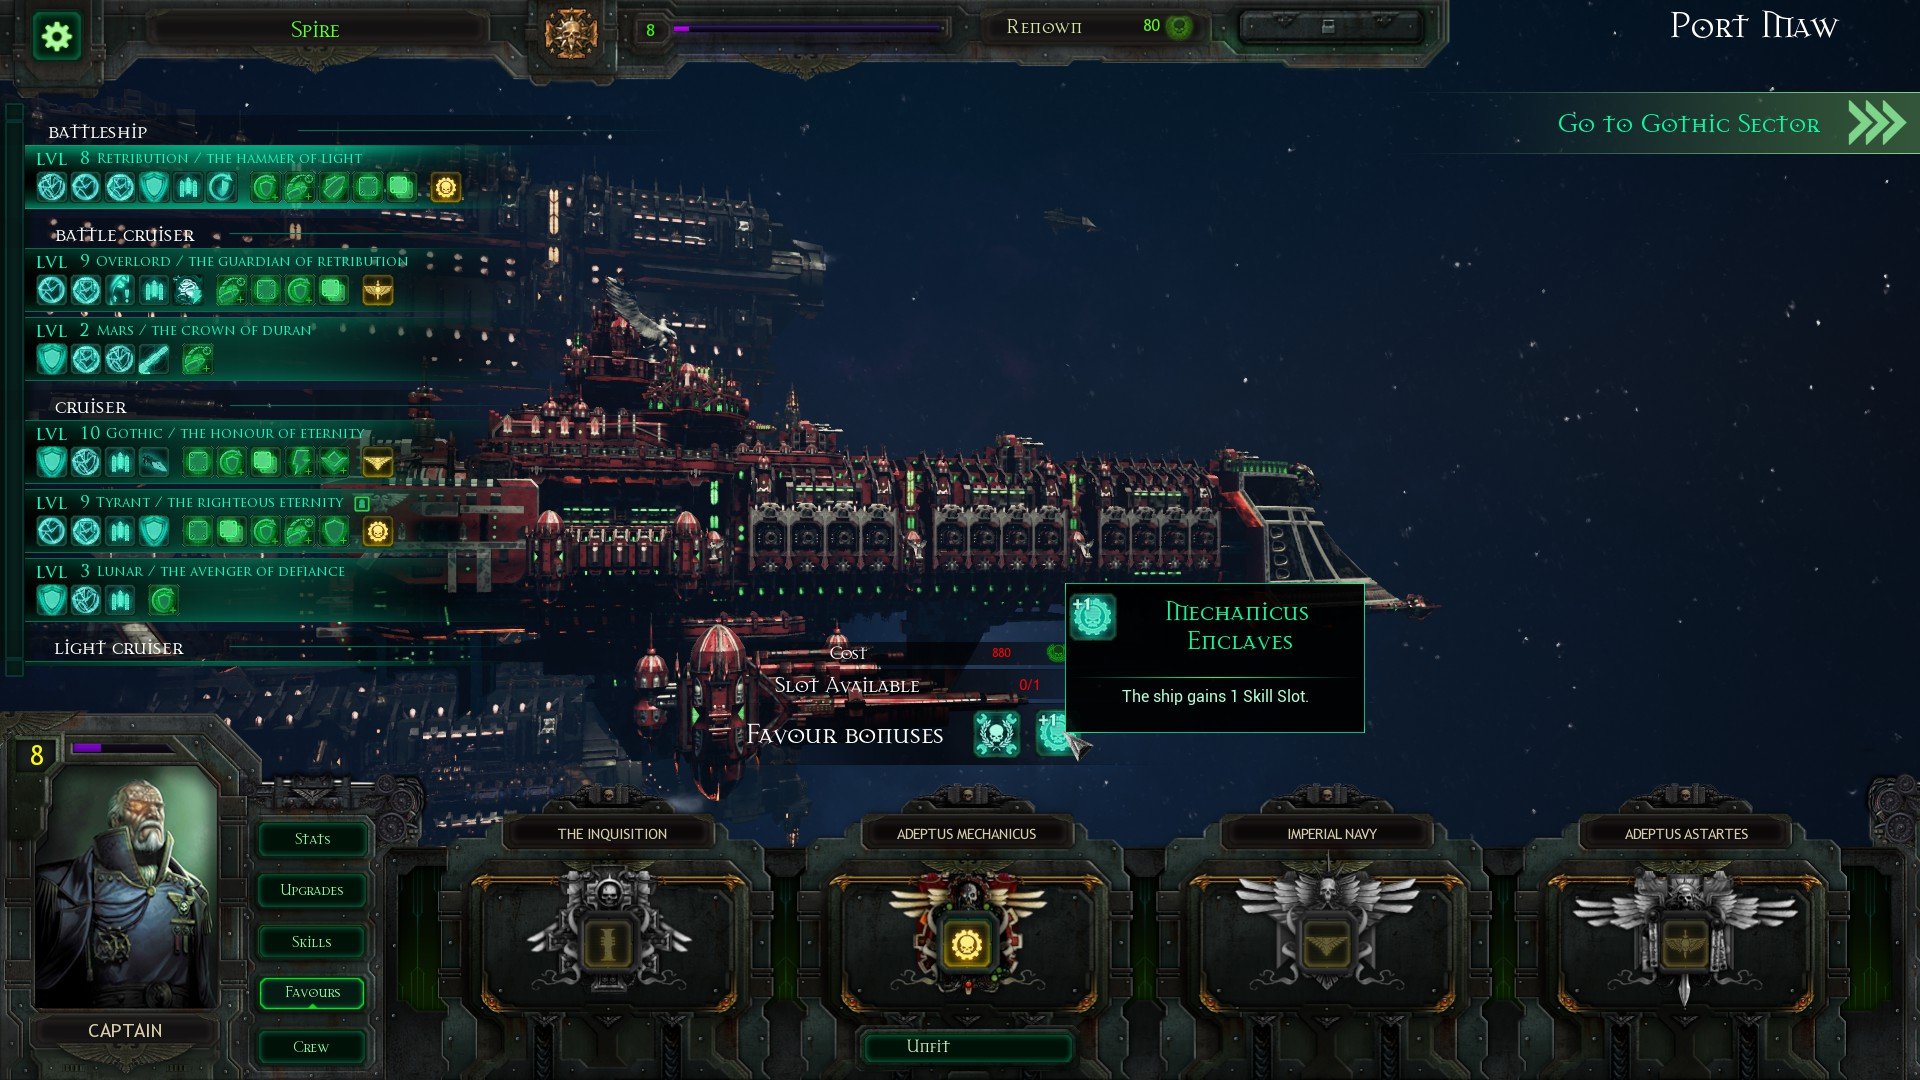
Game options and Renown points
Campaign is the only mode in which you can save game between individual missions. Use this option often, thanks to which you will avoid dire consequences connected with failing missions.
For each mission that you complete, you will be receiving Renown points. You can spend them on anything connected with development and management of the fleet. You receive information on the number of renown points to get before the beginning of each mission. The classification is as follows:
- X points — for a won battle
- X/2 points — for a lost battle
- X% value — additional points that you receive for destroying enemy ships, calculated basing on their value.
- X/2% value — additional points that you receive for destroying ships, calculated basing on their value.
After each mission, you receive information on how many points you have obtained for that mission. You can spend your points in the shipyard that becomes available after the second campaign mission.
You spend points on additional ship slots, upgrades for your units and on repairing them. Each skill that you buy is going to cost you a lot, so manage your resources well. Also, be careful with heave damage to ships or their utter destruction. In general, repairing units is a high cost that rises alongside the ship’s class.
Turns and missions
Campaign is divided into turns. During one turn you can complete a limited number of missions. Number of available missions will grow with Admiral Spire’s level. It is important that you compete missions available in that turn. Of course, you can complete only storyline missions, but you have to remember that ignoring missions will have its serious consequences in the following turn. By ignoring missions, you can cause a situation, in which the number of systems that you lose will be high enough to bankrupt you.
Each planet of the system comes with properties. You do not benefit in any major way for owning them, but losing any is severely punished. For causing the collapse of many systems, penalties may make you unable to introduce improvements to your ships and repair them. Before a turn ends, check the number of available missions and try to complete them all. To end a turn click the LMB on the button in the bottom-right corner of the screen.
By each planet of the system, you find icons that represent properties on that planet
Imperial properties
Imperial centers connected with religion, industry, technology and interplanetary infrastructure. Each of the properties has been assigned to a specific planet in the system. In total, there are nine types of properties, but not every system is big enough to hold all of the property types. Remember that implementing a modification, or performing repairs will be more costly if you lost a corresponding planet in any of the systems. Try to end modification process before the end of a turn, when you do not have any active mission to complete.
|
Icon |
Name and description |
Properties |
|
|
Cardinal Worlds A planet devoted to the cult of the Emperor. It is considered to be Sacred Ground. Tangible proof of the Emperor’s power. |
Increased chances of mutiny in the sector — each lost property. |
|
|
Schola Progenium Planets subject directly to Adeptus Ministorum. You can find academic centers there, which is where generations of future officers are trained. |
Ship commanders receive 5% less experience — each lost property. |
|
|
Penal Worlds They gather the worst criminals in the system. Criminals are often offered a chance to redeem their sins by enlisting in a unit and fighting with humanity’s enemies. |
Value of units on each ship drops by 3% — each lost property. |
|
|
Basic Product Worlds They provide workforce, food and necessary supplies. They are the source of all the aspects necessary for the Empire’s survival. |
Number of renown points that you receive after each mission lower by 1% — each lost property. |
|
|
Portal Worlds Convenient location and frequent use made them the safest routes for warp jumps. The main element that makes it possible to travel between systems quickly. |
It decreases your chance of using additional deployment (mission) by 10%- each lost property. |
|
|
Omnissiah Temples Sacred ground for the members of Tech-Priests. The location of their secret rites. |
Successful missions in the sector provide you with additional renown points and they decrease cost of favor — Adeptus Mechanicus |
|
Space Stations A structure whose purpose is to support the entire Imperial fleet fitted with tools necessary to perform ship repairs. |
Increased cost of repairs by 3% — each lost property. |
|
|
|
Inquisitorial Bastions Planets controlled by the Inquisition. Their aim is to support it in fight against enemies of humanity. |
Successful missions in the sector provide you with additional renown points and decrease cost of favor — The Inquisition. |
|
|
Forge Worlds Planets under the control of Adeptus Mechanicus. They produce everything that is necessary to support Empire’s fight, ranging from ammo to heavy vehicles. |
Increased cost of upgrades, by 10% — each lost property. |
System view and tabs
System has been presented by means of planets grouped together. Above each one of the planets, you can see an icon that represents which faction that planet belongs to. To perform a mission, you have to select the system in which it is available and click the LMB on the planet. Ions above threatened systems come in red.
Using tabs, you can switch between individual systems of the Gothic sector. The system has been named after its main planet. With progress into the campaign, more and more tabs will appear. At the beginning of each turn, you can access each tab to find out what kind of missions you will have to perform during the turn. All you have to do is roll the mouse over the tab and read information contained in it.
Tab description provides you with all the necessary information
You can switch between tabs by clicking the LMB on them. You cannot do this if there is a storyline mission available. Up until you have completed all of the storyline missions, you will not be able to access side missions.
Battlefleet Gothic: Armada is an RTS game that requires precise micro-management and fine tuning of your ships. Every little detail is important, as the game is full of deep mechanics that could fit into a whole book.
This beginner’s guide will give you a general sense of what to expect from various types of situations and how to prepare yourself for all the upcoming missions. You will be able to understand the basic rules of engagement and take your own path in the game from there on.
Choose your faction wisely

As of now, there are four factions in the game and there will be more in the future. So, which one do you choose? Many new players are struggling with this question, so here are a few tips on how to make the right choice.
Imperial Navy
This faction suits new players the best, as all of its elements are quite well-balanced. Here are a few things that make Imperial Navy perfect to start the game with:
- It has many really good ships to choose from with decent armor and speed.
- All ships are quite maneuverable, which allows them to quickly dodge torpedoes and other types of missiles.
- You can make Imperial ships even faster by investing points into the Ahead Full ability.
Chaos
This faction is mostly composed of Imperial traitors, so playing as Chaos can be a bit tricky at times. Here are a few main differences you need to be aware of:
- Chaos ships are mostly designed for long-range combat since most of them don’t have a very good armor.
- Due to lack of proper defense mechanisms, Chaos ships are faster than the Imperial boats and have better weaponry.
- Chaos is tightly connected with Imperial Navy, so it has almost the same set of abilities as the Imperial fleet.
Ork Pirates
As the title suggests this faction consists of space pirates that have some very cool-looking ships that are also quite heavy. Here are the main traits of the Ork fleet:
- Ork fleet is extremely well equipped that allows you to adjust each ship to your own particular playstyle.
- All Ork ships carry lots of weapons, but are also very heavy and have low maneuverability.
- Pirates are not the most reliable soldiers, so when your ship is heavily damaged they usually flee it and you can lose your crew.
Eldar Corsairs
This is a unique faction with a whole new ideology of tactics and strategy so it is not recommended for new players. This is what you should know about it:
- Instead of usual armor Eldar ships use holofields that get stronger the faster ship moves.
- Eldar fleet has probably the most dangerous weapon in the entire game – Prow Pulsar, a high-energy laser impulse weapon.
- The proper Eldar fleet management requires a lot of knowledge of the ins and outs of their trademark hit-and-run tactics.
Upgrade your ships properly
Battlefleet Gothic: Armada is all about warships that you have to keep in good shape, upgrade and repair them whenever needed. You can read more about ships in this guide.
Below are some of the most important tricks you should know about the management of ships in the game.
Make your ships more resilient
Every ship takes certain damage in combat, which is indicated by the Hull Integrity gauge on your screen.
If the ship’s integrity goes down to 15%, it means that you have to get it out of the battle immediately for a repair. Any damage beyond that point is deadly.
In order to prevent your ships going below that point you need to upgrade your Hull Reinforcement points. This will protect your ships from taking more damage and will make them last longer.
Keep your troops ready
Enemies can attack you in different ways, one of them is known as Assault Action – when they deploy troops to take control over your ship. You can prevent this by setting up your own resistance team against such assaults.
In order to do this you need to upgrade the ship’s Generator Security Team points.
Learn to identify your enemy
Attackers have an ability to conceal their ships and then attack when your convoy passes by. Every ship has scanners on board that constantly scan the radius around the ship for unknown objects. However, concealed ships won’t be detected in this way.
So, take note of the Improved Augur Array ability and invest some of your points into it. It will dramatically increase an ability of your ships to detect any hidden threats.
Don’t underestimate turrets
Turrets play an important role in your ship’s defense mechanism. They not only support other ships in your convoy, but also take out opponent’s torpedoes and constitute your ship’s hull integrity.
So, it would be smart to add extra turrets whenever you consider possible.
What you should know about weapons
The variety of weapons in Battlefleet Gothic: Armada is astonishing. The management of weapons requires precision and deliberate testing. One wrong move with your weapon and your whole game can be lost. Here’s what you should know:
Accuracy Rating is very important
Some ships have macro-weapons that can deal long-range damage, but the farther the target is the less accurate the shot will be. That’s why it’s crucial to check the Accuracy Rating before every long-range shot.
However, such weapons like Lance Turrets always have 100% Accuracy Rating, so they will never miss the target no matter how far it is.
Each faction has its own Accuracy Rating stats on weapons. You can find the complete breakdown of Accuracy stats in this spreadsheet.
Weapons and upgrades that ignore armor
Some ships in the game have excellent armor, such as Dauntless of the Imperial Navy, so it’s trickier to damage them. Even powerful Macro Cannons have only 50% chance of dealing damage to this Imperial Cruiser.
What you want in such cases is weapons with Armor Piercing trait, such as Lance Turrets. These types of weapons have the highest chance of breaking through the thickest armor.
Another weapon upgrade called Armor Piercing Ammunition can boost armor piercing effect even further and deal damage on a much longer range.
Torpedoes and their inconsistencies
You can also just use Torpedo Launchers that have a great chance of piercing through armor. However, these weapons are extremely volatile when it comes to dealing damage.
Most experienced players are well aware of the threat of torpedoes, and they put every effort to dodge the missiles. So, if you are an attacker, your mission will get complicated.
It’s quite easy to maneuver the ship off from the torpedo’s trajectory. If the ship is heavy, then usually they just send a group of interceptors and deal with the missiles anyway.
Additional tips and tricks
- Torpedoes should be launched only when you are absolutely sure that you will hit an enemy. If any of your own ships are on the way, the torpedoes might damage them, too.
- Regularly check the overheating gauge. If one of your ships explodes, get all the others away from it as quickly as possible, otherwise it will damage them.
- Avoid stacking a lot of ships in the same spot. Use only small squadrons and keep enough distance between them.
The game has a great system of hints that pop-up every time something happens, so take time and read through all of them – you will learn a lot, which this game requires, if you want to succeed.
What do you think about Battlefleet Gothic: Armada? How would you compare it to other space RTS games? Share your opinions in the comments section.
About the author

Serhii Patskan
Sergey has been a freelancer in the video games industry for more than five years, writing for various publications around the world. His favorite games are MtG, Dark Souls, Diablo, and Divinity: Original Sin.

Краткое руководство, которое поможет сделать битву Древнего в кампании Империума немного менее сложной.
Введение
Битва против Древнего служит как «боссом» вторжений тиранидов, так и способом завершить сюжетную линию тиранидов. В игре это не совсем ясно, но победа в битве остановит все вторжения тиранидов и снизит уровень угрозы тиранидов до 0 в каждом секторе. По сути, они будут удалены как враги, поэтому вам нужно выполнить эту миссию, как только она появится. Это руководство должно помочь немного облегчить решающее сражение и представляет мою стратегию победы на нормальном уровне сложности с Империумом.
Подготовка
Как и в любом сражении в Battlefleet Gothic 2, правильные корабли и знание противника перед битвой являются ключевыми.
Враг
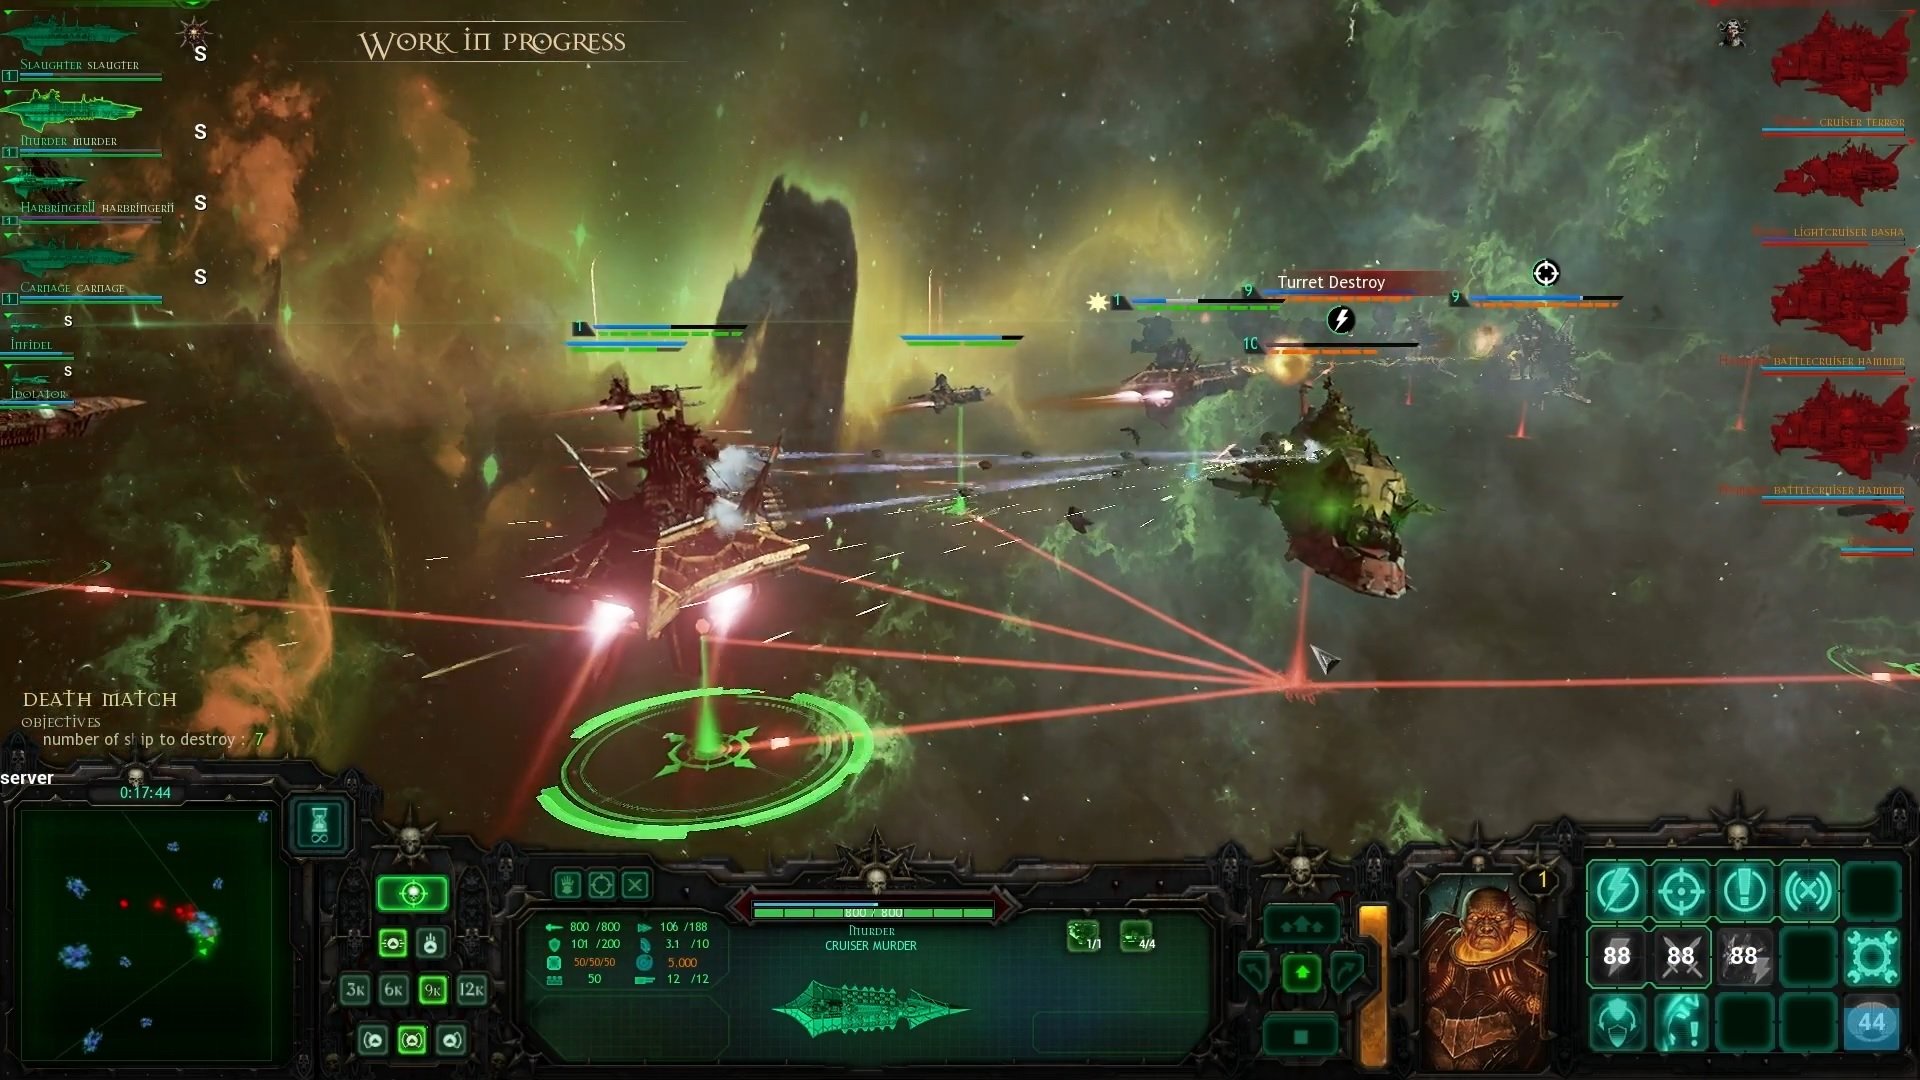
- Древний: массивный корабль-улей тиранидов/Титан. У него колоссальные 8000 очков корпуса, но это компенсируется относительной медлительностью и невозможностью использовать стандартную способность тиранидов. Удивительно слабое вооружение для Титана, с 8 ангарными отсеками и уникальной способностью «Ментальный крик» (которая наносит огромный урон моральному духу ваших кораблей, если они попадают в большой радиус взрыва, но в остальном не наносит никакого урона) , и почти ничего больше. Эта нехватка оружия нам пригодится (см. боевой план ниже).
- Первоначальные корабли тиранидов: в начале битвы вокруг Древнего стоит кольцо из меньших кораблей тиранидов (в основном эскортных и легких крейсеров). Поскольку тираниды по умолчанию замаскированы, и эти корабли не будут двигаться, пока вы не приблизитесь, они, по сути, являются ловушкой, чтобы застопорить ваши корабли.
- Подкрепления тиранидов: как только вы спровоцируете Древнего, подкрепления тиранидов начнут перемещаться. (Неважно, что они не путешествуют через варп). Они будут включать в себя корабли вместимостью до линейного крейсера, и им не будет конца, пока не появится Древний. мертв, и миссия выиграна, так что постарайтесь игнорировать их.
Имперские силы
Это список флотов/корабли, которые я привел в бой. В каждом флоте было больше кораблей, чем я показал здесь, но я пропустил их, так как они были не нужны.
Имперский флот 1 (Шпиль)
- Пассивные способности: торпеды короткого действия, улучшенные датчики
- Активные способности: зонд Augur, плазменная бомба
Корабли:
- Оберон (Морской бой): Я поставил Шпиль в этот для максимальной живучести. Орудия дальнего действия в сочетании с позицией Lock On позволяют ему держаться подальше от врага, продолжая наносить урон. Обероны также оснащены пусковым отсеком и способностями Sensor Pulse, которые помогают в разведке, что очень важно в битве с тиранидами.
- Армагеддон (Боевой крейсер): По сути, это модернизированный лунный корабль, который является приличным универсалом. Я держал его на линии пикета (см. Боевой план), чтобы он мог направить свои торпеды.
- Фальчион (сопровождение): дополнительная пара глаз, которую я держу рядом с Обероном Шпиля, вдали от боевые действия.
Imperium Fleet 2 (Воскамп)
- Пассивные способности: торпеды короткого действия, навигационные щиты
- Активные способности: Augur Probe, усиленные пустотные щиты
Корабли:

- Лунный (крейсер): флагман Воскампа. Хороший универсал, я заставил ее возглавить линию пикета.
- Готика (крейсер): хорошо подходит для нанесения критических ударов; пикетный линейный корабль.
- Доминатор (Крейсер): Я привез этот корабль в качестве эксперимента, но, если честно, я бы его заменил. Потеря торпед для Нова-пушки действительно того не стоила, а макробатареи меньшей дальности вполне годятся против тиранидов. Если бы мне пришлось предложить альтернативу, я бы, наверное, сказал еще один Lunar или Gothic.
- Dauntless MK2 (легкий крейсер): этот был просто для заполнения рангов, так как у меня было достаточно очков для него, но не для другого крейсера. У него как минимум разброс в 4 торпеды, что выше, чем у других легких крейсеров. Как правило, держите его подальше от боя и в стойке «Безмолвный бег».
Флот Механикус 1 (Шило)
- Пассивные способности: Модернизированный диапазон оружия, питание реактора марсианского образца
- Активные способности: бомба разрушения, устройство радиационного шторма
Корабли:
- Тиран (крейсер): Единственная причина, по которой я вообще взял какие-либо корабли Механикус, заключалась в том, чтобы иметь возможность использовать пушку «Нова» и устройство радиационного шторма. В общем, использование Механикус для борьбы с тиранидами может быть плохим планом, так как тираниды любят абордаж, а винтики немного непостоянны, когда дело доходит до боевого духа.
Имейте в виду, что эти списки флотов не являются какой-то окончательной гарантией победы. Это просто то, что я использовал, и оно предназначено для того, чтобы подчеркнуть две вещи: держать Шпиля на большом корабле, чтобы обезопасить его, и выбрать большее количество средних (крейсеров или линейных крейсеров) кораблей с торпедами, а не нескольких больших кораблей без них.
План битвы
Как я уже упоминал выше, мой план битвы зависел от нескольких вещей. А именно:
- Убить Древнего — это все, что имеет значение. Как только он погибнет, миссия будет выиграна независимо от того, сколько тиранидов осталось на поле боя.
- Из-за вышеизложенного следует свести к минимуму сражения с другими кораблями тиранидов, поскольку это отвлекает от нанесения урона Древнему. Сражайтесь с другими кораблями только в том случае, если их можно быстро убить; продолжительный рукопашный бой измотает ваши корабли, и вы не сможете нанести достаточно урона, чтобы убить Древнего.
- Древний кажется действительно страшным кораблем, но на самом деле он удивительно слаб для корабля класса Титан. Стартовые отсеки почти всегда используются для прикрытия истребителя, а Психический крик сильно телеграфируется. Это оставляет его естественные абордажные капсулы, которые, по общему признанию, могут отнять у ваших кораблей огромный кусок. Тем не менее, эти капсулы могут поражать только один корабль за раз и имеют приличное время перезарядки. Другим недостатком является то, что он большой, медленный и не может использовать маневр Rush. По сути, ему придется поедать каждую торпеду, пушку «Нова» и телепортирующую бомбу, которые вы в него бросите.
Основываясь на вышеизложенном, я разделил свой флот на две группы.< /p>
Группа 1: Преследователи
Я отправил Оберона Шпиля, Фальчион и Тирана отдельно от остальных. Их работа заключалась в том, чтобы спровоцировать Древнего, а затем отступить.
Группа 2: пикет
Остальные корабли держались свободной линией, скрытой в газовом облаке в нижней правой части карты. Их работа заключалась в том, чтобы стрелять торпедами и, как правило, наносить столько урона Древнему, как только он попадал в зону досягаемости. Убедитесь, что они находятся в положении «Прицеливание» и настроены на «Сжечь ретро», чтобы они оставались на одном месте.
План боя
Фаза 1: Расставьте всех по местам. Установите пикетную линию в газовом облаке и убедитесь, что она находится в правой части карты (это станет важным позже). Заставьте Преследователей двигаться вверх по центру карты, пока они не окажутся в пределах досягаемости Древнего. Пусть они проведут разведку вперед с помощью истребителей/зондов-авгуров или датчиков пинга, чтобы поймать любых тиранидов, затаившихся в засаде.
Фаза 2: Заставьте агрессоров стрелять в Древнего, чтобы спровоцировать его. Если вы останетесь на крайнем конце радиуса действия Оберона и Тирана, вы окажетесь далеко за пределами досягаемости его оружия и относительно близко к линии пикета. Это заставит Древнего использовать свой первый Психический Крик, но он так далеко, что не сможет поразить корабли. Древний будет преследовать одного из ваших Преследователей (для меня это был Тиран, потому что я думаю, что его Нова-пушка подключилась первой), и вы можете заманить его обратно на свою пикетную линию. В этот момент с верхней части карты начнут прибывать подкрепления тиранидов. Самый большой тоннаж, который я видел, был у крейсеров, но он мог бы быть и выше, так как я не сосредоточился на них. В любом случае, они должны быть слишком далеко от вас.
Фаза 3: Преследователи заманивают Древнего в пределах досягаемости оружия и торпед от Пикетной линии. Прежде чем корабли Пикетной Линии дали первый залп, я поразил Древнего бомбой-разрушителем. Причина в том, что защита точек кораблей тиранидов привязана к их щиту. Отсутствие щита означает, что единственное, что защищает Древнего от торпед, — это его экран истребителя, а они могут стрелять только одной торпедой за раз. После того, как щит исчезнет, убедитесь, что вы запускаете торпеды как можно ближе друг к другу, чтобы их было труднее снять до того, как они попадут. В противном случае, используйте все, что у вас есть: плазменные бомбы, устройство Rad-Tempest, все возможные абордажные действия. Единственное, от чего вы можете отказаться, это удары бомбардировщиков; вы могли бы рассчитать время их полета с помощью ваших торпед, но они, вероятно, будут уничтожены экраном вражеских истребителей, и лучше зарезервировать свои пусковые отсеки для своих собственных истребителей.
Фаза 4: Как только Древний подойдет достаточно близко к вашей линии пикета, чтобы его заметили, установите для него стойку «Перезарядка» и переключитесь с Burn Retros на обычное маневрирование. К этому моменту он, вероятно, перезарядит свой психический крик, поэтому обязательно отведите свои корабли, если увидите, что появляется круг. Пока торпеды Пикетлайна перезаряжаются, наведите их на курс и попытайтесь поразить Древнего в миделе. Я знаю многих игроков, которым нравится комбо «Торпеды» + «Подготовка к удару» + «Таран», но здесь я бы не советовал этого делать. У Древнего нет боевого духа, чтобы нанести урон тараном, а разница в размерах с вашими кораблями в конечном итоге нанесет минимальный урон. К настоящему времени он, вероятно, будет достаточно близко, чтобы запустить свои бортовые капсулы к одному из ваших кораблей. Это помещает на него 8 абордажных стеков, поэтому обязательно разверните «Призыв к оружию» на этом корабле. Как только здоровье Древнего опустится до ~50%, вы получите сообщение о том, что подкрепления увеличиваются.
Фаза 5: подкрепления тиранидов будут приходить чаще и в большем количестве. Самым высоким, я думаю, я видел, был Battle Cruiser, но там также могут быть некоторые Battleships/Hive Ships. Теперь они также начинают деформироваться в случайных точках карты, хотя по-прежнему группируются по краям. Как и раньше, не вступайте в бой с этими силами и продолжайте сосредотачиваться на Древнем. Продолжайте кайтить его любым кораблем, за которым он гонится в данный момент. Так как для меня это был Тиран, я смог заставить его двигаться, в то же время задействовав Оберона Шпиля. Это также должно быть моментом, когда вы получаете собственное подкрепление. Космические десантники (в комплекте с боевой баржей) появятся с правой стороны карты, примерно на полпути вниз. Они не очень хороши в убийстве Тиранидов и, скорее всего, даже не доберутся до Древнего, но они отлично подходят для отвлечения внимания врага. Вот почему вы настраиваетесь на правую сторону: тираниды, спускающиеся по краю карты, вместо этого нападут на морских пехотинцев и избавят вас от необходимости сражаться с ними.
Этап 6: прикончите Древний. К этому моменту он должен быть сильно поврежден, поэтому для его уничтожения будет достаточно еще нескольких торпед/бомб/выстрелов из пушки Нова. Вам будет показан ролик, в котором Древний кусает его, а затем битва будет выиграна.
Заключение
Вашей наградой за это будет достаточно очков славы, чтобы, возможно, повысить уровень , бесплатное очко исследования, постоянная прибавка к храбрости для всех кораблей и, самое главное, конец тиранидам как угрозе для вас. Учитывая, что я ненавижу охоту на жуков, которой становятся бои с ними, я был рад, что они ушли. Отпразднуйте свою победу; Император действительно защищает!
A guide I started months ago and forgot to finish but still has excellent advice for how to make your Imperium Hard campaign as easy as possible. Sorry it took so long, hope this helps anyone still looking to play this game.
TESTING FLEET COMPOSITIONS
If you want to test out fleet ideas against the AI (at 1200 point value), select “BATTLE” on the main menu, select Skirmish 1v1 on the left (right side is ranked), create a custom classic fleet and name it to save it, choose your skills, then just click Launch, and since you did not invite a player, it will pop up a screen where you will choose the AI faction you want to fight and whether it gets more or less points than you.
Note – I could not figure out how to do a 2v2 Skirmish against the AI, nor did I see how to adjust the point value to play with other point values than 1200 such as 1500 or 1650. Please comment if you know how and I will update.
IMPORTANT NOTE! concerning the Natural Selection achievement that I will place here:
This achievement may still be bugged, but even if it isn’t, it really isn’t worth it. My understanding is that you have to have a max level ship of each tonnage for each faction, Imperial Navy, Space Marines and Adeptus Mechanicus, as well as the special ship you get towards the end of the campaign. Trying to level up ship you otherwise would not use and then keep them alive throughout the campaign is a pain in the tush and really isn’t worth it. If you follow my guide your campaign should hopefully be relatively stress-free, but it won’t be if you try to go for this achievement as well.
There are better uses of your time. Just a heads up.
SAVE EVERY TURN! If my guide fails to prepare you for something and you mess up and lose the campaign, just back up enough turns and try again after figuring out what went wrong and learning from your mistakes.
Basic Info & Terminology
Order of Sectors you unlock during the Imperium Campaign:
Cadia > Nemesis Tessera > Agripinaa > Chin-Chare > Belis Corona > Medusa > Scarus > Belial IV > Caliban & Scelus > Sentinel Worlds > Eidolon
TERMS:
Imperium = IMP
Adeptus Mechanicus = Admech
Space Marine = SM
Escort
LC – Light Cruiser
C – Cruiser
BC – Battlecruiser
GC – Grand Cruiser
BS – Battleship
Fleet Capacity is the point capacity of a single fleet and maxes out at 1000 at Level 13.
Leadership is the point capacity for battle and maxes out at 1650 at Level 15 (same as Level 16).
At Level 1, you start with Fleet Capacity 400 and Leadership 600.
Every level adds 50 Fleet Capacity and 75 Leadership, until levels 13 and 15 respectively as noted above.
Note – I tend to write 1500 points or 1500 leadership interchangeably throughout the guide
CAMPAIGN START IN CADIA
After the first 3 training missions are done and you finally get full control, you should have 3 fleets, 1 Imp, 1 Admech, 1 SM. The first “Mission”, which is really just a set of objectives, is to take control of 4 systems; Cadia, the system due west and north-west of Cadia, and 1 south of Cadia.
What I did to start was, I went South from my starting point conquering systems along the way, then back up north to conquer Cadia, at this point having 2 of 4 systems needed for the objective. Then I jumped over the system due west of Cadia to get the NW system (a highly profitable system you want to get fast, just like Cadia). Now I had 3 of 4. Then, I skipped the final objective system and proceeded to take control of the rest of the Cadian sector then I went back to capture that final system. Once I captured 4 of 4, the Urgency Meter reset and the mission “Rise of Cadia” became available. Do not do this mission yet.
I did it this way because:
(1) I wanted to take the 3 systems I did take first before the enemy fleets in those systems reinforced themselves and made the battles more difficult. I could have gone east first and then come back I suppose.
(2) I wanted to make sure I captured all of the Cadian Sector before completing that “Mission” and starting the next step, why will become apparent shortly.
(3) Each turn that passed added another tick to the Urgency Meter. Every time a “Mission” is completed, whether an actual Mission or an list of objectives “mission”, the Urgency Meter resets. Saving Missions to complete while letting the Urgency Meter rise can give you the chance to regroup, collect resources, and farm enemy invasions until you are ready to move forward. I could have waited longer to complete this first mission and milk the extra resources and farm invasions, but I doubt it would be necessary, you’ll see why shortly.
Rise of Cadia Mission Available
STOP. You have captured every system in the Cadian Sector. You should have leveled up and now have the ability to recruit 1 new Imp fleet. MAKE SURE YOU RECRUIT THIS NEW FLEET BEFORE BEATING “RISE OF CADIA” MISSION! YOU WILL GET A FREE IMP FLEET ONCE YOU BEAT RISE OF CADIA. You do not have to recruit the new fleet immediately, just as long as you do before the mission. See my section on Technical Skills and Admiral Upgrades; monitor the admiral recruitment pool and recruit when you see an admiral with the abilities you like.
You are now going to let the Urgency Meter rise while you build up every system in the Cadian Sector to Level 3. Completely ignore Agri Worlds for now, first upgrade FORGE WORLDS (they give the most income), then HIVE WORLDS (next best income), then Shipyards. You also definitely want to upgrade the Listening Post system to start getting lots of Battle Plans. Ideally you were already trying to upgrade systems while securing the Cadian Sector, balanced alongside recruiting the ships you needed to win the battles. Once all the good systems have been upgraded to Level 3, and your fleets are how you want them and you have plenty of resources to spare, you *could* upgrade the Agri and Penal Worlds to Level 2 so they are ready to upgrade to Level 3 once you are flooded with income, but at the start of the game the 150+ resources you spend on upgrading them to Level 3 needs to be saved for your fleets and upgrading systems in Agripinaa (upgrading Agri worlds this early caused me unnecessary stress shortly after, not worth it).
You can let the Urgency Meter rise until it is into the final tier (past I think Tier 4 or 5, with Tier 5 or 6 being the “You Automatically Lose” point). Basically you can let the meter get close to the auto-lose meter level but obviously do Rise of Cadia before you auto-lose (and make sure you recruited that fleet first). You may be invaded once or twice, super easy and laid back to defend against though. Before doing Rise of Cadia you should have every important system leveled to Level 3, you should have 2/2 Imp Fleets, 1 Admech and 1 SM fleet. And you should be making some sweet income.
FINALLY – Do “Rise of Cadia”
You will be rewarded with another Imp fleet for free. So now you should have 3/2 Imp fleets, 1 Admech, 1 SM.
AFTER CADIA SECURE
Next you will be sent to retake the Nemesis Tessera Sector. Capture the sector before doing the mission.
Next you will take Agripinaa. Again, secure the whole sector as fast as possible before doing mission.
Next Chin-chare. Also here note, if you plan to go east with Spire before ♥♥♥♥♥hare, still a good idea to move Spire to the location for a mission to make it available before going east.
IMPORANT NOTE: Arilla Bay in Agripinaa will need a fleet stationed in it to prevent Imperium Pirates from spawning. As will Jubal in Chin-chare to prevent Eldar spawning. There are a couple more in other sectors, just pay attention to sector and system text. But these are the early ones in sectors you need to hold and you will need to plan around.
It has been awhile so I forget what causes the Tyrannids to spawn, but that is a pivotal event in the campaign that can cause you to lose, so I will cover that in the next section.
The basic point of this section is to try to secure and build up each sector before completing the mission that resets the urgency meter and opens up another area. Also, review my Fleet Composition guide and be building toward having the ideal fleet and armada compositions complete and positioned in preparation for the Tyranid invasion.
Tyranid Invasion!
I forget what the trigger for the Tyranid Invasion is, so save your game every turn so that if you accidentally start it before you are ready you can reload a previous save.
Once you trigger the Tyrannid Invasion, you will see that at least one system you own in each sector will be targeted by a Tyranid Invasion, and YOU CANNOT CANCEL OR DELAY THEM WITH BATTLEPLANS!
You must fight or let the Tyrannids auto-capture the system, you cannot delay or cancel them.
So you need to have Armadas of 2 Fleets with effective ship compositions like I advise in my “Fleet & Armada Composition” section spread out and ready to get to these systems and await the invasions, and then fight and win them.
Spire’s armada can assist with this, but you will want Spire’s armada to be able to break away and further the mission chain to the point you can end the Tyrannid threat, so keep that in mind.
——————–
IMPORTANT! After fighting off a bunch of these invasions and possibly after a mission or two to further the story, but before you reach the ultimate Tyrannid mission, there will be another undelayable invasion wave/mission that will tell you to defend a system in each of I believe 4 sectors. The mission dialogues leading up to this may hint at the ultimate result/reward, but I want to emphasize what this means.
If you successfully defend these 4 systems, you will be rewarded with an additional 1 Imp, 1 Admech and 1 SM fleet. Like I emphasized in the Cadia section, make sure you already have the maximum number of each faction fleet, because these 3 new fleets will be added on top, so if you had 3/3 Imp fleets, you will now have 4/3. Basically you are getting fleets sooner than your Renown Level allows. If you fail, I believe you don’t get the fleets.
——————–
Eventually you will unlock the mission to end the Tyrannid threat. The mission to destroy the Hivemind Ship will be in the southeast-most system in the Belis Corona sector (where you start if you play as Tyranids), I believe the system is invisible until the mission step reveals it.
I recommend Spire having the Vengeance GC composition I recommend for him in the “Fleet & Armada Composition” section. The Hive Ship launches a psychic wave attack within a radius around it that you do not want your ships to be in, so you want ships that can dish out a lot of damage and from as far away as possible.
And while you could let the Urgency Meter rise as you farm Tyrannid Invasion, I do not recommend it, I recommend ending the Tyrannid threat ASAP, because the Tyrannid Invasions continue to be unstoppable and undelayable, and as the Urgency Meter rises, other factions are going to start invading and you could quickly get overwhelmed if you are not careful.
After Ending the Tyrannid Threat
Upon destroying the Hive Ship and finishing defending against any leftover incoming Tyrannid Invasions, if you followed my advice in the Cadia section and then followed that same strategy as you captured sectors Agripinaa and Chin-chare and so on, namely letting the Urgency Meter rise as you collect income, build up systems, and collect even more income before completing the next mission; and if you followed my “Fleet & Armada Composition” advice and created the ideal 2 fleet armadas and mastered fighting battles with them; then the rest of this campaign should be easy.
You should be swimming in income and battle plans, have enough armadas to respond in time to any random invasion, and so have Spire move on to conquer the next Sectors and win the next missions that become available.
FLEET & ARMADA COMPOSITIONS
SPIRE’s MISSION ARMADA
You have to use Admiral Spire to complete missions. My end game for his Armada is 2 fleets composed of Vengeance Grand Cruisers, at least 3 Vengeance GC in each fleet in order to be able to bring 6 Vengeance GC’s once I reach Level 13 and am able to bring 1500 points into battle. Each fleet could have 4 Vengeance GC in them, however, the cheapest Imp Escort is the Cobra at 34 points, 4 Vengeance + 1 Cobra = 1002 points, it will not fit. However, you can have 3 Vengeance + 1 Exorcist in each 1000 point fleet, and the Exorcist’s fighters allows you to scout so you do not need an escort. At 1500 points, if you are fighting a battle where you do not need scouts, bring 6 Vengeance; if you are fighting a battle where you do need scouts (such as against Aeldari or Chaos), bring 5 Vengeance + 1 Exorcist. If you really like the Exorcist GC and want to bring 2 of them with 4 Vengeance, you could once you reach Level 14 and have 1575 points available (4 Vengeance + 2 Exorcist = 1504 points). The Exorcist has 4 launch bays but only has 4 Macro Batteries with 9000 range which sucks when the Vengeance has 13500 range Lances and 18000 range Plasma Macro Batteries, so the Exorcist will need to be in Lock-On Stance in order to be able to support the Vengeance. So I would personally only bring 1 Exorcist into battle then, just for the scouting and bomber support when needed.
2 Fleets of 3 Vengeance GC + 1 Exorcist GC is probably the ideal armada for Spire.
NOTE – Once you get the Macragge (Space Marine Super Battleship), which is 736 points, if you want to bring Spire and the Macragge and you have reached Level 15 (1650 Leadership), know this. Macragge + 3 Vengeance GC + 1 Strike Cruiser Mark III = 1650 points exactly. Another good reason to run Vengeance GC’s for Spire.
Non-Spire IMP Fleet Compositions
The same set up as Spire would be great if you run another 2 Imp Fleets together, but you could also try an all Avenger GC spam armada, which allows 6 Avengers at 1200 points (when you could only have 4 Vengeance), 7 Avengers at 1400 points and 8 Avengers at 1650. Spire’s setup allows you to do varying missions with varying requirements and still crush everything, but if follow the strategy I recommend of camping all your ships in a Nebula so the AI comes to you, Avenger spam could work very well as long as you put them in Lock-On Stance. I was worried that their short range of 9000 would be a hinderance, as Avengers are phenomenal in Reload Stance due to 8 Macros firing super fast, but I was worried the fire rate of Lock-On would dampen that too much, forcing the Avengers to move to the enemy to get close thereby defeating the best strategy of camping in a Nebula. However, I tested Avenger GC spam in a Custom Battle against Chaos AI, and only being able to bring 6 Avengers at 1200 points, they still shredded the AI Chaos Fleet while camping in a Nebula in Lock-On Stance. Very fun.
If you want to run an Imp fleet with an Admech fleet, Imp Dominators (188 points) + Admech Lunars (210 points). Admech Lunars are the cheapest Admech Cruisers and therefore 1 Admech Lunar + 1 Dominator = 398 points, which allows you to bring 5 cruisers at 1000 points, 6 at 1200 points, 7 at 1400 and 8 at 1650 (same idea as with SM Strike Cruiser Mark III). At 1200 points+ you could replace an Admech Lunar with an Admech Dictator for the fighter support for Scouting, because the spare 2 points from each of the 188 point Dominators gives 6 spare points at 1200 Leadership. If you went Tyrant’s for your Admech Cruisers, you wouldn’t be able to bring Dominators in the Imp fleet, and the whole idea is to run an all-Nova Cannon Armada.
Here would be a good time to discuss how even small point value differences can affect what ships you can bring in a fleet. At 1350 Leadership, if bringing an Imp + Admech armada, you could bring 3 Dominators, 3 Admech Lunars, and either 4 Admech Firestorm Escorts (156 points) or 1 Imp Gothic (154). And with either of these choices, you would not be able to swap out an Admech Lunar for an Admech Dictator for ability to bring fighters to scout. If you had an Imp Lunar in your Imp fleet instead of the Imp Gothic as your extra to the Dominators, you have to choose the Admech Firestorms because the Imp Lunar would bring you to 1354 points.
Space Marine Fleet Composition
If you want to run an SM fleet with an Admech fleet, Strike Cruiser Mark III’s (188 points) + Admech Lunars (210 points). Admech Lunars are the cheapest Admech Cruisers and therefore 1 Admech Lunar + 1 SC Mark III = 398 points, which allows you to bring 5 cruisers at 1000 points, 6 at 1200 points, 7 at 1400 and 8 at 1650 (same idea as with Imp Dominator). At 1200 points+ you could replace an Admech Lunar with an Admech Dictator for the fighter support for Scouting, because the spare 2 points from each of the 188 point SC Mark III’s gives 6 spare points at 1200 Leadership. If you went Tyrant’s for your Admech Cruisers, you would not be able to bring SC Mark III’s, you would have to bring SM Vanguard Light Cruisers which would be a significant loss of SM firepower and durability.
I do not recommend bring a Strike Cruiser Mark I for the fighter scouting suppot in your SM fleet. It is too costly at 224 points (you can have 5 SC Mark III’s in 1 SM fleet at 1000 Fleet Capacity, but only 4 Strike Cruisers if one of them is the SC Mark I), and the SC Mark III’s 1 Heavy Lance provides a surprisingly large boost in firepower over the SC Mark I and II while at a much lower cost. And even if you do a 2 SM fleet armada for all SM ships, I do not recommend the SC Mark II either. Boarding Torpedos + Torpedoes could be fun in certain situations, but I find that overwhelming firepower is the best strategy, and the loss of the Heavy Lance on the SC Mark I and II just hurts too much. When I first started my Hard Campaign I ran some SC Mark I’s with my SC Mark III’s, and I kept wondering why it was taking forever to kill things, when I remembered an all SC Mark III armada crushing enemy’s in my Normal Campaign. Quickly realized it was the lack of the Heavy Lance.
Admech Fleet Composition
This is where I stopped months ago and basically abandoned this guide. I’ll finish it up with this:
If you run my suggested [Two Imp Fleet Armada for Spire], see above, then what I suggest for SM and Admech is to follow my advice in the SM section above, “Strike Cruiser Mark III’s (188 points) + Admech Lunars (210 points)”.
Try to create as many of these 1 SM + 1 Admech armadas as you can, and then figure out remaining armadas with any leftover Imp, SM or Admech fleets.
If you end up having 2 Admech fleets for 1 Armada, I went all Lunar Cruisers so I could have 7 of them at 1500 points, leaving 30 points to spare. Could probably sub in a Dictator for one of the Lunars for scouting support using its fighters.
Summary:
If you fight well in battle and don’t lose any ships, then you should not need any reinforcements from a 3rd fleet, so a 2 fleet armada should always be sufficient. Especially since you will renown fighting with only 2 fleets instead of 3, and since it is good practice to fight this way, since if the AI builds mines, you will only be able to bring 2 fleets anyway. Might as well get good and not rely on a 3rd fleet as a crutch.
Do what works best for you, just remember the goal is to make an individual fleet as effective as possible and then combine it with another effective fleet to make the most effective armada possible.
How to Easily Win Battles
My Tyrannid guide discusses this strategy in-depth, I’ll summarize it here:
This works for run-of-the-mill Cruiser Clash battles. Many missions will require you to move around the map or attack the AI, so be prepared to adapt, but if you want to just curbstomp regular cruiser clash battles as you capture and defend systems, the following is easy mode.
Make sure you select Cruiser Clash as your exclusive battle type before you start your campaign for this strategy.
Even if you put your ships in a Nebula, the AI knows where you are and will come to you. We will use this to our advantage. Let’s use my recommended Armada Composition for Spire as our example:
Make sure that each Fleet Admiral has the skill that makes invulnerable/quickly regenerates their flagship shield.
Park your Vengeance Grand Cruisers in a Nebula, and click the order that causes them not to move even if you order them to attack a target, “reverse thrusters” I think. Figure out where the enemy AI will be coming from, and have your ships arranged such that their broadsides face the enemy (Vengeance do not have prow weapons). Click on your ships and see a circle around them, if 2 ships circle’s interlap then they will hit each other if they try to turn. Make sure your ships are in the nebula and that they are spread out just enough that if they need to turn in a complete circle they can without hitting another ship. Put your flagships with the shield skill in front of the regular ships that do not have the skill, still in the nebula.
How it should play out: The enemy cannot shoot your ships in the Nebula until they can detect them, so the enemy has to get close, and you will be able to shoot them as they approach before they can shoot you. The AI will often send escorts or other ships to detect you so that their longer range capital ships can shoot you from range; if you destroy all the ships near you that are detecting you, after a few moments your ships will be re-hidden by the Nebula, which will force the big bad battleship that was pounding your ships from max range to have to now approach the Nebula to detect your fleet, all while your ships get to shoot it. If your flagships are in front of your other ships, then they will tank the enemy’s fire, and once their shields get low/drop, click the shield skill and watch it regen back up to full so your flagship can keep tanking fire while all your ships destroy the enemy one by one.
Beware of the environmental effect/malus (I think it is lightning storms or something like it) that causes damage in Nebulae, it causes tons of damage to ships in Nebulae and the above strategy will not work in battles with this effect active.
Alternatively, if you use my SM + Admech Armada composition with the Strike Cruiser MkIIIs and Lunars, since they have forward-facing Heavy Lances, you would do everything above, have them in a Nebula, make they they don’t move when issuing an attack command, have your shield skill ship in front to tank fire, but you would select the “Fire-Forward” as opposed to “Broadside” option, and choose “Lock-On” Stance to extend their range, so that they all blast enemies with their Heavy Lances. You can always then switch to broadside or have them start moving and circling the enemy as needed.
Related Posts:
В игре Battlefleet Gothic: Armada прохождение не имеет и не может иметь единого четкого алгоритма, что обусловлено жанровой принадлежностью проекта. В случае со стратегиями в распоряжении игрока всегда полнейшая свобода действий, а потому поставленных задач можно добиваться любыми угодными способами и применяя самые разные тактики.
Данный проект исключением не стал: здесь продвижение по кампании может не только варьироваться от одного игрока к другому, но и существенно отличаться для одного и того же игрока, взявшегося повторно проходить игру. А потому здесь нужно четкое понимание механики геймплея, особенностей и характеристик доступных юнитов и знание тому подобной информации, чтобы прохождение Battlefleet Gothic: Armada не показалось сложным.
Навигация по игре Battlefleet Gothic: Armada
Прохождения
Чит-коды