Overview
Руководство предоставлено для новичков, переведено с англоязычной статьи “BoB – A Beginner’s Guide” by Jynn.UPD: Со временем и выходом новых патчей, статья будет обновляться, при условии добавления различных новых плюшек!
Игра

(Я уверен, что все это знают, но собираюсь заявить об этом в любом случае)
Beast of Bermuda ╴это игра, в которой ты берёшь под контроль одно из существ, сухопутное, морское, воздушное и пытаешься выжить, ╴От малыша, до взрослого, до старшего.
Игра содержит классические элементы выживания, такие как ╴Пища, жажда, выносливость и опасности, с которыми вам придется иметь дело, будь то окружающая среда или вызванные другим игроком.
Это руководство будет затрагивать как можно больше тем, чтобы помочь новичку, объясняя механику, элементы HUD и то, что вам нужно сделать для базового выживания.
Игровые моды

В игре есть три режима игры:
- Цикл жизни/Life Cycle: режим игры по умолчанию, вы начинаете играть за малыша, либо рождённого, либо вылупившегося, и получаете очки по мере роста. Вы постоянно растете, хотя рост замедляется после 1.2.
- Free room/Сандбокс: вы начинаете за взрослого и получаете определенное количество очков, когда вы спавнитесь. Там нет гнезд, и вы не растете (режим в разработке).
- Дедматч/Combat: режим deathmatch, как правило, происходит на небольших картах, чтобы способствовать быстрому взаимодействию игроков. Вы набираете определенное количество очков в начале игры, основываясь на весовой категории вашего существа, а более мелкие существа получают больше стартовых очков. Вы также зарабатываете очки, убивая других игроков. Чем больше очков они получат, когда вы их убьете, тем больше вы заработаете за их убийство.
Настройка персонажа и скина

Это ваша главная информационная панель для получения информации о вашем существе. Она показывает:
- Здоровье
- Выносливость
- Силу способности
- Вода
- Еда
- Насыщение (пищевой “бафер”, который истощается перед вашим фактическим голодом.)
- Уровень комфорта
- Смещаемость (сумма выше или ниже вашего нейтрального уровня комфорта.)
- Кол-во травм
- Кол-во кровотечения
- Кол-во отравления
- Очков всего
- Рост/Размер
- Пол
- Переносимый вес (с точки зрения веса пищи/существа, которого вы несёте)
- Процент Шелтера/Укрытия
Этот экран расскажет вам почти все, что вам нужно знать, и покажет любые баффы или дебаффы, которые у вас есть. (Дополнительную информацию см. В разделе “эффекты состояния”).

Настройку скина достаточно легко объяснить. Вы можете изменить свой скин, только если вы не спавнитесь в игре, чтобы начать или до того, как вы достигнете возраста 0.8. Если вы вылупляетесь из родительского гнезда, вы получите рандомизированную кожу, используя элементы цветов ваших родителей.
Во время спавна вы выбираете свой тип скина(см. вкладку “скины” на рисунке выше), каждый из которых поставляется с различными слоями и маркировками, которые вы можете настроить, от полностью настраиваемых скинов до полу настраиваемых. У некоторых существ есть несколько вариантов цветов для части тела, таких как головной гребень или отсутствие головного гребня у Ютараптора, а также безшёрстнный или пернатый Тираннозавр Рекс (см. выпадающее меню модели изображения выше)
Вы можете сохранять скины, а в правом верхнем углу экрана настройки персонажа находится кнопка “Показать сохраненные/Show Saved” (см. скриншот в начале этого раздела). Нажав на него, вы откроете сохраненные вами скины (см. рисунок выше), которые вы можете назвать, позволяя иметь любое количество скинов для одного существа, которое вы можете быстро загрузить.
В левом нижнем углу вы можете установить время суток, так что вы можете легко редактировать свой скин даже ночью или у водного в воде.
Список игроков

В списке игроков отображаются все игроки, находящиеся в данный момент на сервере. Помимо этого есть еще несколько вещей:
- Кол-во очков показывают, как долго кто-то жив. Чем выше на табло кто-то находится, тем больше вероятность того, что это более крупное существо или, по крайней мере, более старое. Вы теряете часть своих очков, когда умираете или возрождаетесь, поэтому это не 100% точная функция, чтобы показать, кто самый большой. (Функцию убрали)
- Цвет фона у имени игрока указывает на то, насколько хорошо проживает его существо. Оно работает аналогично шару комфорта, где синий цвет – хорошо, а красный – плохо. Однако при формировании цвета требуется нечто большее, чем просто комфорт: он сочетает в себе то, насколько полны вы сыты и утолили жажду, насколько полно ваше здоровье и насколько комфортно вашему существу. Вы можете иметь красный шар комфорта, и ваш цвет списка игроков будет желтым из-за вашего голода / воды, они уравновешивают его.
- Из этого списка вы можете приглашать людей в группу, выходить из группы, приглашать людей в партнёры и в конечном итоге драться с игроком за звание в группе.
- Вы можете увидеть свой уровень дружбы в верхнем левом углу значка партнера по команде. (например, обратите внимание на A и B на двух игроков в списке, которые находятся в моем стаде)
Поиск групп
Не так давно, в игру была введена такая функция как Поиск групп. Нововведение было создано для удобства игроков, а именно – чтобы каждый раз не просить пати, а самостоятельно присоединится к ныне существующим группам.
Как этим пользоваться:
- Заходим в меню, далее нажимаем на Поиск Групп (Search Groups);
- Создание групп: нажимаем на кнопку Опубликовать Группу (Post Group) и вводим желаемое название;
- Удаление групп: нажимаем на кнопку Удалить группу (Delete Group), после чего всему пати придет сообщение от игры: (имя игрока) убрал вашу группу из Поиска Групп;
- Как присоединится к существующей группе: если вы видите ныне существующие группы вашего вида, просто нажмите на саму пати и подтвердите запрос и ожидайте ответа.


Комфорт и здоровье

Комфорт ╴это очень важная игровая механика, которая влияет на то, как быстро вы растете, как быстро восстанавливается ваша выносливость и как хорошо вы исцеляетесь. Это показатель того, насколько ваше существо чувствует себя комфортно , принимая во внимание все счета, такие как ближайшие союзники, ближайшие враги, погода, и если вы хорошо или плохо питались.
Один из самых действенных способов, которым вы обнаружите, что теряете или получаете комфорт, – это через врагов и союзников. Близкий друг будет повышать ваш комфорт, в то время как близкий враг будет снижать его. Употребление в пищу определенных растений увеличит ваш комфорт или же “Bias”, который является основой, от которой будет зависеть ваш комфорт. Это предубеждение со временем будет ослабевать. Есть также таланты, которые увеличат ваш базовый уровень комфорта, и это постоянно для вашего динозавра.
Размер действительно играет здесь определенную роль, Велоцираптор будет чрезвычайно напряжен соседним Апатозавром, в то время как Апатозавр едва заметит присутствие Велоцираптора на своем комфорте. Равновеликие животные будут воздействовать друг на друга подобным же образом и будут более равноправной встречей.
Принятие таланта “запугивания/intimidation”, который увеличит степень потери комфорта или усиления вашего влияния на других. Существует также талант, который уменьшает количество стресса, который вы принимаете от ближайших врагов.
На экране персонажа цветной фон имени игрока является их уровнем комфорта. (Смотрите раздел таланты для видимости этого)
Смещение комфорта, как видно на экране под названием “O”(меню персонажа), – это то, насколько выше или ниже ваш уровня комфорта. Если вы едите хорошую пищу, такие как кристаллы и одуванчики, вы получите положительный уклон комфорта, в то время как если вы едите испорченное мясо или неправильный тип растения в качестве травоядного, вы получите отрицательный уклон комфорта.

Комфорт меняет цвет на этих уровнях:
Синий > 75-100
Зеленый > 50-75
Желтый цвет > 40-50
Оранжевый > 30-40
Красный > 0-30
Вы начинаете терять здоровье на оранжевом уровне, и эффект увеличивается, чем ниже падает ваш комфорт. Это означает, что может быть очень опасно оставаться рядом с врагами или пытаться держаться подальше от укрытия в суровую погоду.
Сила способности и выносливость

Сила способностей╶ это то, что позволяет вам атаковать, нюхать или использовать любые особые способности вашего существа. Это искусная механика, которую использует игра, чтобы сделать сражения более стратегическими. Если вы спамите укусом (попросту кусаете воздух) и пропустите атаки, вы поймёте, что не можете снова атаковать, что делает вас беззащитным до тех пор, пока ваша способность не перезарядится, давая стимул для правильной посадки атак.
У большинства существ есть сила способности 100%, за редким исключением, имеющая больше базового количества, и есть талант, который увеличивает количество силы способности, которую вы имеете, которая доступна для всех. Есть также таланты, которые потребляют меньшую силу способностей, и эти два таланта можно использовать вместе, чтобы продлить вашу силовую атаку.
Выносливость такая же, как и во многих других играх, где спринт и прыжки истощают его, и он заряжается медленно, заряжается быстрее, если вы сидите/если вы спите. Есть несколько талантов, влияющих на выносливость, от того, сколько у вас есть, до того, насколько она истощается во время бега. Существует также талант у плотоядных животных, который истощает выносливость их добычи при укусе.
Еда, вода и воздух

У наземных существ есть две разные характеристики: еда и вода. У водных существ тоже имеется два вида╶ пища и воздух. Они заполняются, как вы и ожидали, поедая необходимую пищу для вашего существа, выпивая воду или дыша воздухом. Чтобы есть, пить или дышать, необходимо нажать клавишу Use (по умолчанию E). Рыбу едят, нападая на нее. Наличие полноценной пищи и воды очень полезно, потому что ваша скорость роста измеряется суммой ваших продуктов питания, воды и комфорта, разделенной на сумму ваших максимальных продуктов питания, воды и комфорта
Чем больше вы становитесь, тем медленнее ваша пища будет падать (особенно с пищевыми талантами в дереве выживания), но также и тем больше вам нужно есть, чтобы оставаться сытым. Это означает, что после определенного размера вы начнете бороться за то, чтобы оставаться сытым, особенно если вокруг есть другие травоядные / плотоядные животные, которые могут взять вашу пищу. В то время как ваш размер действительно означает╶ больше здоровья, больше талантов и в целом больше шансов не быть убитым кем-то, но это приходит с недостатками более хорошего питания и восполнения жажды.
– Чем меньше у вас пищи и воды, тем медленнее она истощается.
– Вы не теряете больше еды / воды при состоянии стоя/ ходьбы / бега. Это пофиксили
– Еда, с которой можно взаимодействовать / съедобная пища будет выделена синим цветом и даст вам подсказку на экране

Переедание увеличит упитанность вашего существа, а также даст вам “Хорошо поевший” бафф, который обеспечивает больше здоровья и более быстрое восстановление за счет более низкой скорости, более медленное восстановление выносливости и пониженного комфорта.
Пищевое насыщение – это когда вы едите тот тип пищи, который предпочитает ваше существо. Это пищевой буффер истощается раньше, чем ваш пищевой бафф, давая вам больше времени, прежде чем вы снова начнёте есть.
Существует три различных вида пищи: рыба, растения и мясо. Их едят рыбоядные, травоядные и плотоядные животные.
Наземные растения:

Почти все виды растений в игре съедобны. Ваш размер действительно определяет, что вы можете или не можете есть. Например, Пахицефалозавр будет ограничиваться небольшими наземными растениями, в то время как Апатозавр может есть целые деревья. Некоторые растения предлагают больше преимуществ. Специальные светящиеся растения дают больше пищи, чем обычные растения, повышают ваш комфорт и могут пахнуть как зеленое облако. Это единственное растение, которое имеет запах.
Водные растения дадут пищевое отравление наземным травоядным, если их съесть, точно так же, как наземные растения дадут пищевое отравление водным травоядным, если их съесть. Есть талант, называемый ботаником, который смягчает ущерб.
Растения можно поднимать двойным нажатием на E (англ) и переносить. Ваш размер означает, сколько вы можете нести сразу.
Подводные растения:

Водные растения – это морские водоросли и ламинарии, и оба они съедобны для всех существ, хотя и вызовут пищевое отравление у наземных животных, которые их едят. Сухопутные растения точно так же отравят водных травоядных, если они их съедят, хотя талант ботаника может смягчить ущерб.
Мясо:

Мясо добывается двумя способами: убивая других существ или находя каркасы, которые иногда появляются на карте. Мясо будет разлагаться, когда оно портится, это видно по его текстуре, цвету и звуку мух, когда оно начинает гнить. Его цвет запаха также изменится с красного на желтый (см. раздел запахов). Поедание гнилого мяса сопроводит вас пищевым отравлением. Хранение мяса в пещере замедлит скорость его сгнивания.
Плотоядные могут есть рыбу,но при этом они будут страдать от негативного последствия. Существует талант, который позволит плотоядному животному более менее питаться рыбой, что позволит вести водный образ жизни для обычного наземного хищника. Этот же талант позволит также безопасно употреблять гнилое мясо.
Мясо можно взять, дважды нажав E (англ), и нести. Ваш размер определяет, сколько вы можете нести сразу. Есть талант, который позволяет вам нести больше за раз.
Рыба:

Рыба – это простой ИИ, служит источником пищи, который спавнится в океане и плавает. Они являются основным источником пищи Птеранодонов, Эласмозавров и Ихтиовенаторов. Эти существа также могут потреблять мясо, и с талантом Scavenger, даже гнилое мясо.
Вода:

Вода наполняется в пресноводном источнике. Соленую воду вообще нельзя пить. Внутренние озера истощаются по мере того, как их пьют, а это означает, что большое стадо в одном озере может осушить его после достаточного кол-ва времени. Озера будут наполняться медленно с течением времени, и дождь увеличит скорость, с которой они наполняются.
Воздух:

Пополнять запасы воздуха – это способность, необходимая только водным существам. Чтобы пополнить запас воздуха, они должны всплыть на поверхность и высунуть голову из воды, нажав клавишу Use – E (англ) для дыхания. Дыхание не может восполняться автоматически.
В то время как плавающие не Водные также имеют потребность в воздухе, если их голова погружается под воду, запас дыхания пополнится автоматически, если они высунут голову из воды.
Яйца:

Яйца являются источником пищи для Велоцирапторов в основном, но содержимое/состояние пищи может влиять на их комфорт, если они начнут его есть. Талант Egg Thief увеличивает качество пищи и повышает комфорт, которые вы получаете от яиц.
Отравление и насыщение:

Если вы едите неподходящий тип пищи для вашего существа, или гнилую пищу, вы получите пищевое отравление. Это можно вылечить с помощью цветов комфорта (желтые одуванчики) или синих кристаллов. Ваш значок еды будет заметно менять цвет, чем больше вы отравлены.
Если вы съедите предпочтительную пищу вашего существа, вы получите насыщение. Это синий контур вокруг вашего значка еды, который заполняется, когда вы едите свою любимую пищу. Насыщение убывает быстрей, чем ваша пища, позволяя вам оставаться дольше более сытым. Подходящая вам еда, которая есть в игре:
- Икона Рыбы: Рыба
- Значок Ребра: Мясо
- Значок растения: Растения вашего растительного яруса (Ака папоротники для мелких травоядных, деревья для Апатозавра)
- Водоросли: Морские Водоросли
Специальное питание
Некоторые предметы обеспечивают комфорт, а также здоровье, но они либо редко встречаются, либо находятся в определенных местах, до которых нелегко добраться.
1. Цветы комфорта:

Маленькие одуванчики, которые повышают ваш уровень комфорта. Редко встречающиеся, они обычно встречаются скоплениями в лесах.
2. Светящиеся / Жирные Цветы:

Обеспечивает большое насыщения (последнее, что я слышал), а также повышает ваш уровень комфорта. Очень редко можно найти, но легко заметить, когда они появляются.
3. Кристаллы:

Расположенные в пещерах, они обеспечивают различные эффекты, основательно на цвете:
– Синие кристаллы: комфорт и здоровье
– Оранжевые кристаллы: очки лидеров и немного еды
– Зеленые кристаллы: рост
4. Губки:

Они расположены в океане и могут быть на берегу во время отлива, если они находятся на мелководье. Они обеспечивают здоровье и повышают комфорт.
5. Цветы здоровья:

Высокие, пурпурные цветы/Иван Чай, обычно встречающиеся рядом с одуванчиком. Они восстанавливают минимальную часть здоровья, когда их съесть.
Запах
Для этого нажмите и удерживайте нужную клавишу (Проверьте настройки клавиш в управлении и поставьте настройки по умолчанию). Я использую Q для более быстрого взаимодействия. При удерживании кнопки, внизу начнут появляться облака ароматного дыма. Красное – это свежее мясо, и оно постепенно становится более оранжевым по мере разложения, что приводит к желтому цвету, когда оно полностью сгниет.
Кроме того, сама вода будет испускать синий аромат, помогая вам найти её. Смотрите выше рисунок для примеров мяса в различных стадиях свежести и источников пресной воды.
Принюхиваясь вы тратите силу способностей/абилити, поэтому помните об этом, поскольку вы можете потерять абилку своей способности, быстро атакуя или защищаясь, так же можно истощить абилку постоянно нюхая. Я обычно использую запах короткими очередями.

Сами существа имеют определенные цвета и оставляют после себя небольшие облака запаха. Это наиболее заметно на Апатозавре, и менее заметно на очень маленьких существах. Существует талант уменьшать ваши облака запаха и чтобы запах исчезал быстрее, а также талант, который увеличивает то, насколько хорошо вы видите облака запаха и на сколько они долго остаются после хозяина, для лучшего отслеживания.
Когда вы наводите курсор запаха на существо, вы можете его цвет запаха, в какую ветку талантов они вкачаны (например, на картинке выше: вы можете увидеть 3 разных Лурдузавров, каждый из которых имеет разные цвета из-за того, что оба они выбирают разные ветки талантов. Зеленый цвет – это вкачанная ветка скорости, а более светлый сине-белый пошел в основном в синюю, а также в остальные таланты дерева.
Друзья и группировка

Группировка/Группа/Пати – это главный фактор выживания и общения между другими игроками. Один игрок создает группу и становится ее “Альфой”. Приглашая игроков через список игроков, вы отправите им приглашение, и они могут принять или отклонить его. Если они согласятся, их значок появится на карте, где они находятся. Это можно отключить или включить – на “I” .
Пребывание в группе полезно тем, что оно обеспечивает вам приватный чат стада / стаи, а также повышает комфорт, когда вы находитесь рядом друг с другом. При более высоких классах дружбы вы получаете дружеский огонь, так что вы можете более безопасно поразить врага через союзника, не причинив ему вреда, забив того дискомфортом.
Дружба начинается в классе Е и доходит до класса А. Спаривание и уменьшение дружественного огня начинается с класса C.
Дружественный огонь работает следующим образом:
Класс S-100%
Класс А-75%
Класс В-50%
Класс С-25%
Со временем появится способ установить роли для группы и иметь возможность сразиться с кем-то равного ранга на роль Альфы. Этот раздел будет обновлен, когда это будет введено.
Групповые ограничения могут ставиться в настройках сервера, где количество существ одного типа может быть ограниченно по группам. Если в группе будет больше существ чем положено, то все члены начнут испытывать дискомфорт, пока группа не вернется к нормальному лимиту. Пример: Рекс может группироваться в пары с хатчлингами/малышами. Детеныши будут удалены из группы на период возраста саб-адолта ( 0.6 )
Видовые ограничения будут регулируемой серверной опцией (не присутствующей на Официальных серверах), где количество существ одного типа может присутствовать в игре и сколько вообще. Когда появится более подробная информация, я обновлю этот раздел.
Таланты

Таланты – это способности, которые позволяют вам адаптировать ваше существо к вашему стилю игры и увеличить его шансы на выживание.
Есть три основных дерева, каждое из которых имеет навыки, связанные с этим типом. Борьба/Красная, Синяя/Выживание и Зелёная, скорость/мобильность. Каждое дерево содержит 10 талантов, которые могут быть вложены в до 3 баллов вручную, а могут пойти до 5 баллов за счет использования унаследованных талантов и селекции. У вас должно быть вкачано опр. кол-во поинтов, прежде чем вы сможете прокачать следующий, и вы должны добавлять поинты в талант, прежде чем вы сможете прокачать следующий. Например, если вы хотите вкачать здоровье на 3/3, вам нужно иметь 3/3 талантов, которые смогут вам это обеспечить.
Бой

Боевое дерево сосредоточено вокруг борьбы и обороны. Боевые таланты включают в себя таланты для здоровья, исцеления, различных типов повреждений, таких как травмы, отбрасывания и повреждения, а также увеличение количества силы способности. Некоторые животные обладают особыми боевыми талантами, связанными с особыми способностями их вида, такими как захват Мозазавра или атака Юты, или топот Апатозавра и хлыст хвоста.
Выживание

Таланты выживания связаны с общей способностью вашего существа и приводят к тому, чтобы, ну…выжить. Такие таланты, как устойчивость к погоде, комфорт и стрессоустойчивость, запах и еда / вода. Некоторые виды обладают особыми талантами в этой категории, такими как водные виды и их способность к неуловимости. Это хорошее дерево для поддержки одногруппников, с талантами, которые увеличивают комфорт, который вы предоставляете союзникам, и в случае с Апатозавром, большое кол-во защиты от непогоды.
Мобильность/скорость

Таланты мобильности сосредоточены вокруг движения. Таланты включают скорость, расстояние прыжка, сопротивление падению высоты, выносливость, насколько хорошо вы поворачиваетесь, как быстро вы можете бежать вверх по холмам и другие навыки, связанные с движением. Некоторые виды имеют специальные навыки в этом дереве, такие как Апатозавр и Паразауролофус, имеющие поворот при топтании при вкачке таланта. У Птеранодонов есть очень специализированное дерево мобильности с несколькими связанными с талантами полёта.
Унаследованные Таланты

Унаследованные таланты работают в двух направлениях, и они варьируются в зависимости от того, как вы входите в игру. У них есть шанс появиться на определенных этапах роста, хотя вы можете не получить их на этой стадии роста, если вы не достигли опр. роста:
- 45 (таланты уровня 1),
- 0.6 (таланты уровня 2),
- 0.8 (таланты уровня 3),
- 1.0 (таланты уровня 4),
- 1.2 (таланты уровня 5).
Самостоятельный спавн против рождения из гнезда:
– Самостоятельный спавн: вы получаете случайные от 2 до 5 положительных талантов. Вы можете получить сумму +1 или +2, но довольно редко.
– Рождение из гнезда: вы получаете переменное количество черт, основанных на том, как устроены таланты ваших родителей, и потенциально несколько талантов рандомно. Инбридинг и стресс, в то время как в яйце вызывает негативные таланты, становятся более вероятными для наследования. Вы можете получить количество +1 или +2 за счет рождения, и с большей вероятностью получите больше талантов, чем нерестившийся молодняк.
Если у родителя есть 3/3 таланта “Good Parent”, это увеличивает шансы на его наследование. Хороший родитель также может увеличить шансы наследования талантов.
Разведение, гнездование и здоровье яиц

Чтобы размножаться, вы должны иметь самца и самку одного вида, в группе на уровне дружбы C как минимум. После спаривания самка вынашивает яйцо, а самец строит для нее гнездо. Только самец может построить гнездо, и он может построить гнездо для каждой из своих самок, и каждое гнездо должно поддерживаться.
Есть способы повредить яйцо еще до того, как оно будет отложено:
- Имея низкий комфорт теперь есть шанс повредить ваши вынашивающие яйца.
- Принимая удар, который повреждает ваши яйца, ситуация может стать плачевней.
- Когда яйцо получает повреждение,ему присваивается дополнительный, случайный, отрицательный признак наследования.
- Нельзя допускать инцест.
В настоящее время существует три различных способа, которыми игрок может быть приглашен в гнездо:
- В выборе динозавра есть такая вкладка как “Eggs”, там можно при заходе или респавне выбрать яйцо подходящего вида, если их будет несколько.
- Приходя на место обитания ваших тиммейтов, вы устаёте выращивать динозавра, вы можете получить приглашение в гнездо находясь рядом с ними и не используя респавн.
- Игроки с гнёздами могут спросить любого игрока, хотят ли они стать их детёнышем через список игроков, так же как и попросить игрока присоединиться к их группе.

Когда вы становитесь яйцом, вы можете контролировать ваше развитие. Значок в правом нижнем углу показывает ваше развитие, при этом яичный желток становится все меньше и меньше по мере роста (сравните выше и немного позже ниже). Ваш взгляд на окружающее яйцо также будет становиться все более и более ясным.

Чтобы вылупиться, вы должны полностью вырасти, а затем нажать клавишу способности Z.
После того, как вы вылупились, вы унаследуете случайный выбор статистики от обоих ваших родителей, а также унаследуете цвета от их скина, с возможностью появления скинов из меню выбора.
Дополнительную информацию об этом смотрите в разделе унаследованные таланты.
Некоторые советы по гнездованию:
- Только вложенные родителями таланты имеют шанс перейти к ребенку, а не получить эти таланты рандомно в процессе игры
- Наличие 3/3 в таланте увеличивает шансы на то, что он будет унаследован ребенком, поэтому чем старше вы, тем лучше ваши таланты и, следовательно, больше шансов на то, что ребенок унаследует таланты
- Наличие 3/3 “Good Parent” у обоих родителей увеличивает шансы на наследование таланта
- Самец должен предоставлять самке обильное питание и утоление жажды, так же находится рядом с ней.
Лучше всего посмотреть данный подробный гайд по гнездованию
[link]
Эффекты состояния

В игре есть много вещей, которые дадут вам бафф или дебафф, и в этом разделе я подробно рассмотрю их все. На изображении выше показаны некоторые из тех, с которыми вы столкнетесь в игре, и, как вы можете видеть, каждый из них подробно описывает, что не так и почему это происходит, и как это исправить. Более подробно я расскажу об этом ниже.
Негативные эффекты:

Талассофобия: вызвана тем, что она у наземных животных при заплыве далеко от берега. Это решается путем выхода обратно, на берег..Этот дебаф может резко снизить ваш комфорт, хотя есть таланты, которые уменьшают стресс, который вы получаете во время плавания – Aqua Affinity.
Высокое давление (только водные): эффект, вызванный слишком глубоким погружением в океан. Талант может уменьшить ощущение дискомфорта у вашего водного при заплыве на достаточно большую глубину – Pressure. Возвращение на поверхность снимет дебаф.
Кровотечение: вызвано укусом Акрокантозавра. Это предотвратит восстановление здоровья и комфорта до тех пор, пока кровотечение не спадёт. Спринт увеличивает кровотечение, а отдых лечит его быстрее всего, так же есть несколько талантов, которые могут помочь в хиле от кровотечения.
Запугивание: если существо использует талант запугивания, вы получите этот дебафф рядом с ним, если вы враг. Это приведет к быстрому снижению вашего комфорта, что может привести к летальному исходу, если ваш комфорт упадет достаточно низко. Выход за пределы досягаемости существа снимет дебафф.
Выброшенный на берег (только для водных): только воздействуя на водных существ, этот дебафф происходит, когда вы находитесь на земле или на мелководье. Это может довольно быстро уменьшить ваш комфорт, с помощью возвращения в воду дебафф можно убрать. Есть таланты, которые уменьшают стресс, который вы испытываете на суше, а так же ускорить перемещение по сухой поверхности – Beachgoer (скорость перемещения по суше/Ползун), Sunbather (уменьшение стресса на суше/Пляжник).
Травма: вызвана тяжелым травматическим уроном или падением. Этот дебафф замедляет вас, заставляя ваше существо хромать, если травма достаточно высока. Отдых и время – это единственный способ исцелить ящера.
Пищевое отравление: употребление тухлого мяса даст вам этот дебафф. Это снижает ваш комфорт, хотя следя за комфортом и иконкой еды можно выжить + для лечения съешьте одуванчиков.
Стихия: погода – это большой удар по комфорту, и чем сильнее шторм, тем опаснее он для вашего комфорта. Дождь и ветер являются основными причинами дебаффа, и попадание в укрытие может уменьшить и даже уберёт негативное воздействие. Это проявляется только тогда, когда вы начинаете терять -15 комфорт за тик. Суровая погода будет снижать ваш комфорт в целом, даже если этот бафф не появится.
Некрофобия: дебафф, который поражает только травоядных, это проявляется, если вы находитесь рядом с тушей, чем больше труп, тем больше дебафф. Он резко снизит ваш комфорт, пока вы находитесь рядом с тушей, от этого ваш травоядный может умереть (мой совет: уходите если видите тушу больше вас).
Перенаселенность: количество животных вашего типа на сервере превышает установленные лимиты сервера. Убейте остальных или подождите, пока они выйдут из пати / умрут, чтобы дебафф исчез. Этот дебафф снизит ваш комфорт и замедлит рост.
Положительные эффекты:

Здоровые травы: поедание определенных растений на карте даст вам этот бафф, и вы будете расти быстрее, быстрее исцеляться, чувствовать себя более комфортно и быстрее пополнять выносливость и способности.
Рядом с друзьями: вызвано нахождением в группе с союзниками. Это дает вам мощный плюс в комфорт, который, в свою очередь, повлияет на то, как быстро вы растете.
Ускоренный рост: во время плохой погоды скорость вашего роста увеличивается, а дискомфорт, который вам причиняют другие существа, уменьшается.
Перенасыщение: если вы едите пищу, которую предпочитает ваш ящер (см. раздел еда), вы можете получить этот бафф.
Адреналин: эффект даётся во время первого укуса/удара и длится 90 секунд, во время этого баффа у вас с врагом не начисляются % вражды.

Нейтральные Эффекты:

Хорошо поевший: Переедание вызывает этот бафф, который также может дать незначительный дебафф. Это снижает ваш комфорт, скорость передвижения и выносливость, но позволяет вам иметь больше здоровья и быстрее восстанавливаться. Вы также не должны беспокоиться о добычи пищи, так как у вас есть насыщение.
Вынашивание яиц: Будучи самкой, после спаривания вы можете получить такой дебафф. Ваша пища и вода расходуется быстрее, вы начнёте чувствовать себя менее комфотно. Чем больше яиц вы можете снести, тем сильнее эффект. Чтобы хоть немного его ослабить эффект, нужно вкачать – Good Parent.
Приливы
Приливы и отливы периодически могут появляться, а когда это происходит, вы можете наблюдать, что те места которые недавно были затоплены могут стать открытыми для прохождения. Прежде чем мигрировать на другой остров, нужно уметь определять когда это будет возможно, следует наблюдать за изменением кол-ва воды.
Приливы и отливы сильно варьируются в зависимости от карты, причем некоторые карты имеют более резкие изменения во время прилива и отлива, как показано ниже, в то время как другие карты имеют более минимальные изменения.
Пример высокого прилива:

Пример отлива:

Укрытие, Штормы И экологические опасности

Штормы будут появляться в разной степени тяжести. Это может быть от легкого ливня до почти полного затопления карты под эпическим ливнем.
Самые большие опасности в штормах-это торнадо, туман, молния, наводнение и стресс для комфорта у вашего ящера. Существует талант связанный с погодой, который уменьшает количество стресса, вы получаете его во время шторма и полные 3/3 этого таланта делают вас невосприимчивыми к молнии – Weather Resistance (но если вы находитесь рядом с партнером по стаду/стае, у которого нет 3/3 сопротивления погоде, и вы находитесь рядом с ними, когда они попадают под удар молнии, вы тоже можете получить удар и умереть независимо от ваших собственных талантов)

В игре есть статистика под названием Shelter State, которая показывает, насколько вы защищены от стихий. Например, находясь на утесе, вы можете получить 25% укрытия, а находясь в пещере, вы получаете 100%. Только 100% укрытия защищает вас от торнадо, что делает пещеры желательным выбором во время действительно сильных штормов. Это создает вторичную опасность…потенциальная возможность столкнуться с хищником в пределах пещеры.

Вы также можете увидеть процент шелтера, на шаре комфорта. Синее кольцо будет светиться снаружи, основываясь на том сколько у вас % укрытия. Пример выше.
Апатозавр может обеспечить защиту от непогоды для ближайших союзников. Есть талант, который с помощью которого они могут обеспечить защиту от шторма союзникам. Полная 3/3 делает союзников рядом с ними не целевыми для торнадо, но не мешает им быть подобранными, если Торнадо блуждает по дороге к ним. Апатозавры невосприимчивы к Торнадо после 0,8 роста, вне игрового баланса, так как они больше не могут поместиться в пещерах или обогнать приближающийся Торнадо.
Наводнения, это отличный шанс для водных настичь своих наземных жертв. Та же Моза, которая при росте 1.0 может захватить добычу меньше себя. Крупные потопы дают возможность водным пробраться на высокие места, которые расположены на суше. При отливе, советую отступить обратно в глубь или вы рискуете погибнуть на суше.

Несколько торнадо могут появиться в редких случаях, самое большее кол-во, что я видел, – это 3 сразу. Торнадо будет нацеливаться на игрока и пытаться достигнуть его и чем больше группа, тем более заманчивая цель. Только 100% укрытие может спасти вас от Торнадо и предотвратить смерть, как уже упоминалось ранее в этом разделе. Вполне целесообразно искать укрытие во время сильных штормов.
После шторма наступает туман, из-за которого трудно разглядеть и учуять что-либо вокруг. Это еще одна опасность и я часто нахожу ее даже более смертельной, чем сама буря, так как вы рискуете умереть с голоду, если у вас мало еды после бури.

Learn to be a better bird.
Contents
- Guide to Play Tropeognathus
- Introduction
- Camouflage Matters
- So You’re Ready to Eat Some Fish Now?
- Social Politics and You
- Trope Builds
- Rogue Gallery
- Frequently Asked Questions
- Outtro
Guide to Play Tropeognathus
Introduction
So you want to play as a Tropeognathus.
Fly into the air and look down across the world beneath you. Look at the different biomes, the many different dinosaurs that roam the land; and know one truth and one truth alone.
Each and every single one of those dinosaurs, wants to see you dead.
The carnivores roaming the land, the gentle Apas feasting on trees, the fish in the sea and yes- even other flyers in the air, would prefer if you didn’t exist. You are the dreaded Thunder Bird; the Storm Flyer; the Sky Rat.
Camouflage Matters
No amount of right coloring is ever going to make you utterly invisible to your foes. But then again, that’s not the point of camouflage either. Camouflage is about that split second of non-recognition that can be the difference between you getting away from a potential attacker or being overlooked. You can’t always decide what colors you have if you’re being nested in, but you can always darken the colors manually before 0.7.
So You’re Ready to Eat Some Fish Now?
- Yes, Tropeognathus is a fish eater.
- Yes, Tropeognathus was designed to be piscivorous.
- Yes, your food symbol on your screen is literally a fish.
But that does not mean eating fish is a good idea. The sad fact of the matter is, it is safer, easier and generally all-around better to eat spawn gores then it is to dive for fish. There are only certain spots on the two most-played current maps where fish can be readily gained; and most of them are common points for aquatics to travel through. It only takes one aquatic deciding they want to bite/drown you for you to never come back from that fishing trip again.
Social Politics and You
I’m going to say it like it is- Beasts of Bermuda is a social game. Your place within a servers social hierarchy is going to effect how you play. It’s going to effect who is most willing to go out of their way to give you eggs, it’s going to effect who is most likely to attack, or not attack you.
You will often find servers dominated by large clans, in many cases, these can be Trope clans, or Ptera clans; who seek to control the skies. You may be able to join them. But even if you do not; don’t despair. Even the largest of clan can be undermined, defeated or avoided. But it is important to keep in mind, because it will help determine your survival style.
Trope Builds
The fun thing about BoB is that there are many different ways to survive as any dino if you’re creative or skilled enough. The three builds I will show below are not the -only- ways to build a Trope, but they are solid, consistently effective ways to build a Trope to survive.
Combat Trope
You dream of spreading fear and terror throughout the server you play on. You long of glorious aerial combat- or land dinos running in fear to caves the moment they see your shadow cast upon the ground.
You dream, of being a combat Trope.
A combat Trope will firstly fill out their combat tree early game. However, from there you need to make a choice- at least for a time on what will be your main prey, other Flyers or land dinos. If you plan to fight other flyers, you should invest points more heavily into speed after combat, if land dinos, you’ll want to invest points more heavily into survival.
Early Game Talents
- Strong Legs
- Quick Takeoff
- Adrenaline
- Brace For Impact
- Persistence
- Brawler
- Stoic
- Sharp Teeth
- Healing
- Deadly Wings
Late Game Talents
- Long Runner
- Endurance
- Strong Wings
- Strong Bonds
- Strong Bones
- Constitution.
Deadly Wings is especially important for combat Tropes; with the deadliest ones having 5/3 in it from inherits.
Baby Snatch Trope
The thrill of battle does not call to you as strongly as others. No- your joys are more subtle. You like to creep up on an unsuspecting pack of Dinos. You like taking your time, waiting for that right moment; and then, right when that newborn dinosaur thinks itself safe and it’s parents have wandered just far enough away…..
You’re flying away with it into the sky.
Baby Snatcher Tropes focus primarily upon the Baby Snatcher talent to help them make off with newborn and juvenile dinosaurs. Their first priority will be getting baby Snatcher and maxing it out; and preferably getting inherits to it to increase it’s potential. Later, at higher stages of growth, they can build their Trope to be either speed or combat, as suits their preference and playstyle.
Early Game Talents
- Baby Snatcher
- Stoic
- Persistence
- Quick takeoff
- Strong Legs
- Aqua Affinity
- Strong Lungs
Late Game Talents
- Either speed or combat, as preferred.
Video Example of Quality Baby Snatcher Trope gameplay
The Speedy Trope
“Weeeeeeeeeeeeeeee” – New Trope Players trying speed and then running into a tree and dying moments later.
You don’t really much care for fighting, or snatching babies. Or perhaps your server is dominated by larger birds; whom you’d rather just avoid and outpace? Perhaps you just like flying for flyings sake?
Speed Trope might be right for you.
Early Game Talents
- Strong Legs
- Long Runner
- Strong Wings
- Endurance
- Quick Takeoff
- Swiftness
- Nimble Footed
- Weather resistance.
Late Game Talents
- Any as desired, provided you grow large enough, you could also become a combat or baby snatcher Trope.
Rogue Gallery
Other Dinos and how to deal with them
Velociraptor
Small, weak; but can be deadly in the right hands. With Wing Tear they can ground you easily. But Wing Beat tends to destroy them. Still, don’t get overconfident.
Pteranodon
The other bird in the sky. Their faster then you; but not as tanky. However, they are not to be underestimated. In the hands of skilled players, one Pteranodon can kill a Trope. The key to winning against Pteranodons, is to never give them the high ground. Their damage accelerates based off of how much speed they can get. If they can’t get above you, their damage is laughable at best.
Worst case scenario comes about and you have to retreat? Find a cave and bunker down. You’re better at face-to-face combat then they are. If you can’t get to one in time, dive into the ocean. Your a better swimmer and have more oxygen them they do by default. You’ll just have to hope nothing down there eats you.
Oryctodromeus
Small and fragile, but can be deadly. If they throw dirt into your face, you will find yourself unable to fly away quickly. Death will likely follow shortly.
Pachycephalosaurus
Their small and fragile, but less so then Velos and Ory’s. If you can catch one out on it’s own, a quick and decisive wing beat might cripple them and give you an easy win. But there’s only so many of their head butts you can take before your grounded; and on the ground? Pachy will win.
Parasaurolophus
Tanky and Stronger then they look. Provided they are fully grown and competent, you’ll most likely need a second Trope- or more to bring one down. Aim for leg hits to cause injury and slowly wear it down.
Lurdu
Difficult. If you are to hunt them, their similar in many ways to Para, but they are more capable of causing injury damage and they have the option of escaping into water.
Saichania
You probably won’t kill a full grown Sai, even with a full pack of Tropes at your back. Still, Sai players have an odd habit of afking near cliff edges. Push them off when you can.
Apatosaurus
Not much to you can do to them. Unless you’re a baby snatcher. Then their an excellent source of meat when they decide to nest.
Ichthyovenator
An excellent choice for prey. They have generally low health, don’t cause much injury damage, or cause much damage on land. Best killed before they can escape to water, but if you cause them enough injury damage before they get to it, you can dive after them and finish them off.
Megalosaurus
The Prey of Choice for any combat Trope worth his salt. The less they’ve built into combat, the easier they are to kill. You want to aim for leg hits to cripple them. A Meg that can’t run or turn properly, is a dead Meg.
Still, don’t underestimate them and don’t hunt a pack of Megs alone. If they get enough bites on you before you can take off into the air again, they will kill you.
Acrocanthosaurus
A large, dangerous carnivore. If you want to fight one, you want to fight them while their alone; while you preferably are not. Even then, it can be a challenge. If you and your pack are looking for a tough fight, go for it, but if not, stick to targets more in your weight class.
Tyrannosaurus rex
The Apex Predator of the terrestrial dinosaurs. Similar to above, if you insist on fighting one, you want to fight it while it’s alone. As a general thing, fighting an adult rex isn’t usually worth it. One bite is enough to cripple you and make you unable to fly; and the second will likely kill you outright.
But then again. There is nothing so glorious, as killing the Tyrant King as a bird. If you want to make this your Trope-goal. Then go for it, the Gods favor the bold.
Elasmosaurus, Mosasaurus, Kronosaurus
Unless they’ve beached themselves, you can’t really hope to kill them. They rule in the sea’s, you rule in the skies. Unless you make the mistake of going for fish to eat, they aren’t really your problem most of the time.
Tropeognathus
They will often be your biggest competitors, depending on the server. It will come down to numbers, size and skill. Fight hard, aim your wing beats well- and let the better Trope win.
Frequently Asked Questions
Where should I be on the map?
Depends. While your growing, you generally want to pick locations that other players aren’t going to be. Avoid large mountain caves (often called “Bird Towers” by the playerbase) as they may be inhabited already by larger Tropes that might want to eat you.
One of the main benefits of being a flyer is superior mobility across the map. Use it to your advantage, stay mobile, play smart.
A favorite tactic of mine is hiding ontop of certain tree’s. While doing so you’re all but invisible to most other dinosaurs.
Should I get points into GP?
Every Trope build can, theoretically benefit from having points into GP. However, if you should get it or not comes down to your own personal situation. You don’t -need- GP to grow, it just helps you grow faster. But that won’t help you if there aren’t enough people on your server that want Trope eggs.
How should I fight?
Wing beat is your bread and butter for both air and ground targets. It causes the most health and injury damage to your targets. For land foes, you want to dive down, use wing beat and then take off again.
Quick Takeoff can be essential for this. For without it, getting back into the air again while having injury damage may be impossible; and it’s a constant danger that you will be hit while going in for a Wing Beat.
You sure I shouldn’t eat fish?
Yes.
I want to be an Egg Thief Trope!
You’re not really great at it, as a general thing.
Ironically, it’s easier for you to grab babies then it is to grab eggs; and the larger you grow, the harder it’s going to be for you to sneak into someones nest to grab an egg. Leave egg-snatching to Velo’s and Ptera’s.
Outtro
Well, that’s just about everything that I can teach you.
To all those taking to the skies after reading this; I wish you good fortune. Many of you will die; possibly multiple times. But keep at it. Keep practicing, keep trying; and one day- other players will come to a horrible realization.
They cannot hide from the storm. You are the storm; and so long as you fly in the skies. There will be no shelter from you.
A guide to the basic mechanics and features of Beasts of Bermuda.
(I’m sure everyone knows this, but going to state it anyways)
The Game
Beasts of Bermuda is a game where you take control of one creature, be it land, sea, or air, and try to survive from Baby, to Adult, to Elder.
The game contains classic survival elements such as Eating, Drinking, Stamina, and hazards you have to deal with, be they Environmental or brought on by another player.
This Guide will cover as many topics as possible to help a Beginner, explaining mechanics, HUD elements, and what you need to do for basic survival.
Game Modes
There are three game modes in game:
Life Cycle: The default game mode, you begin as a baby, either spawned or hatched in, and receive points as you grow. You continuously grow, though growth slows down after 1.2.
Freeroam: You begin as an adult, and receive a set amount of points when you spawn in. There is no nesting, and you do not grow.
Combat: A deathmatch mode, usually takes place on small maps to promote swift player interaction. You gain a set amount of points at the beginning based on your creature’s weight class, with smaller creatures receiving more starting points. You also earn points by killing other players. The more points they have when you kill them, the more you earn for killing them.
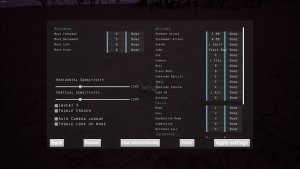
Character Screen and Skin Customization
This is your main information panel for the welfare of your creature. It displays:
- Health
- Stamina
- Ability Power
- Water
- Food
- Comfort Level
- Injury Amount
- Bleed Amount
- Venom Amount
- Total Points
- Growth Size
- Gender
- Carry weight (in terms of food you are carrying)
- Shelter Percentage
This screen will tell you pretty much everything you need to know, and will display any buffs or debuffs you have. (See Status Effects for more information)
Skin Customization is easy enough to explain. You can only change your skin if you are spawning into the game to start, not if you are bred. If you are hatched by parents, you will get a randomized skin using elements of your parent colors.
When spawning in, you choose your Skin Type (See Skins tab in picture above), each comes with different layers and markings you can customize, from fully customizable skins to semi-customizable. Some creatures have multiple mesh options, like head crest or no head crest on Utahraptor, and Scaled or feathered Tyrannosaurus Rex. (See selected Model tab in picture above)
You can save skins, and in the upper right corner of the character customization screen is a button called ‘Show Saved’ (See screenshot at the beginning of this section). Clicking on it will reveal your saved skins (See picture above), which you can name, allowing any number of skins for one creature that you can quickly load.
Comfort and Health
Comfort is a very important game mechanic, that affects how fast you grow, how fast your stamina and ability power recharge, and how well you heal. It is a indicator of how comfortable your animal is, taking in all accounts such as nearby allies, nearby enemies, the weather, and if you’ve eaten good or bad food.
One of the biggest ways you will find that you lose or gain comfort is through enemies and allies. A nearby friend is going to boost your comfort higher, while a nearby enemy is going to lower it. Eating specific plants will increase your comfort ‘bias’, which is the cap your comfort will sit at. This bias will decay over time. There are also talents that will increase your base comfort level, and that is permanent to your dinosaur.
Size does play a role here, a Velociraptor is going to be extremely stressed by a nearby Apatosaurus, while the Apatosaurus will barely notice the Velociraptor’s presence on its comfort. Equal sized animals will affect each other similarly and be a more equal encounter.
Taking the talent ‘Intimidation’ will increase how much comfort loss or gain you influence on others. There is also a talent that reduces how much stress you take from nearby enemies.
On the character screen, the color background of the player’s name is their comfort level. (See Talents section for a picture of this)
Comfort changes color at these levels:
Blue > 75 – 100
Green > 50 – 75
Yellow > 40 – 50
Orange > 30 – 40
Red > 0 – 30
You begin losing health at Orange levels, and the effect increases the lower your Comfort drops. This means it can be very damaging to stay near enemies, or to try and stay out of shelter during severe weather.
Ability Power and Stamina
Ability Power is what enables you to Attack, Scent or use any special abilities your creature has. This is a neat mechanic the game employs to make battles more strategic. If you spam bite and miss attacks, you will find yourself unable to attack again, rendering you needing to run until your ability power recharges, giving encouragement to land attacks properly.
Most creatures have 100 Ability Power, with a few exceptions having more base amount, and there is a Talent that increases the amount of Ability Power you have that is available for everyone to take. There are also talents that make your attacks use less Ability Power, and these two Talents can be used together to prolong your Ability Power.
Stamina is the same as in many other games, where Sprinting and Jumping depletes it and it recharges slowly, recharging faster if you Sit, and recharging fastest if you Sleep. There are several Talents affecting Stamina, from how much you have to how much it depletes as you run. There is also a Talent Carnivores can take that depletes Stamina of their prey upon biting.
Food, Water and Air
Land Creatures have two different stats, Food and Water. Aquatic Creatures have two as well, Food and Air. These are filled as you’d expect, by eating the required food for your creature, drinking water, or breathing air. To eat, drink, or breathe requires pressing the Use Key (Default E). Fish are eaten by attacking them. Having full food and water is very beneficial, because your speed of growth is scaled by the sum of your food, water, and comfort, divided by the sum of your max food, water, and comfort
The larger you get, the slower your food will drop (especially with the Food Talents in the Survival Tree), but also the more you have to eat to stay full. This means that, past a certain size, you are going to start struggling to stay fed, especially if there are other herbivores / carnivores around that might take your food. While your size does mean more health, more Talents, and over all a better chance of not being killed by someone, it does come with the drawbacks of higher upkeep on your food and water.
Also, the lower your food and water gets, the slower it depletes.
Over eating will increase your creature’s fatness, as well as give you the “Well Fed’ buff, which provides more health and faster healing at the cost of slower speed, slower stamina regen, and lowered comfort.
There are three different types of food: Fish, Plants, and Meat. These are eaten by Piscivores, Herbivores, and Carnivores.
Land Plants:
Almost every type of plant in game is edible. Your size does determine what you can or cannot eat. For example, a Pachycephalosaurus is going to be limited to small ground plants, while an Apatosaurus can eat entire trees. Certain plants offer more benefits. Special glowing plants provide more food than the average plant and increases your Comfort and can be scented as a green cloud. It is the only plant that has a scent.
Aquatic plants will give food poisoning to land herbivores if eaten, just as land plants will give food poisoning to aquatic herbivores when eaten. There is a talent called Botanist that offests this.
Plants can be picked up by double tapping E, and carried. Your size dictates how much you can carry at once.
Aquatic Plants:
Aquatic plants are seaweed and kelp, and both are edible to all creature, though will cause food poisoning in land animals that eat them. Land plants will similarly poison aquatic herbivores if they eat them, though the Botanist talent can offset this.
Special glowing plants provide more food than the average plant and increases your Comfort and can be scented as a green cloud. It is the only plant that has a scent.
Plants can be picked up by double tapping E, and carried. Your size dictates how much you can carry at once.
Meat:
Meat is obtained in two ways: killing other creatures, or finding the tiny random ones that spawn occasionally on the map. Meat will decay as it sits out, and this is visible by its texture, color, and the sound of flies as it begins to rot. Its scent color will change from red to yellow as well (See Scent Section). Eating rotten meat will poison you with food poisoning. Storing meat in a cave will slow down its decay rate.
Carnivores can eat fish, but they will suffer a negative comfort debuff when doing so. There is a Talent that will allow a Carnivore to more comfortably feed off of fish, allowing a Aquatic life style for a normally Terrestrial predator. That same Talent will also allow the safe consumption of Rotten Meat.
Meat can be picked up by double tapping E, and carried. Your size dictates how much you can carry at once. There is a Talent that lets you carry more at once. Storing meat in caves slows down how fast it decays.
Fish:
Fish are a simple-AI food source that spawns in the ocean and roams. They are the primary food source of Pteranodons, Elasmosaurus, and Icthyovenator. These creatures can also consume meat, and with the Scavenger Talent, even rotten meat.
Water:
Water is filled at a Freshwater source. Saltwater is unable to be drunk at all. Inland lakes will deplete as they are drunk, meaning a large herd at one lake could possibly drain it dry after enough time. Lakes will refill slowly over time, and Rain will increase the rate at which they refill.
Air:
Refilling an Air meter is a need only required by Aquatic creatures. To refill Air, they must surface and place their heads out of the water, pressing the use key to breathe. Breath is not automatic.
While swimming non-Aquatics also have a air need if their head goes underwater, this is refilled automatically by lifting their head above water.
Scent
Scent is done by holding down the required key (Check Keybindings for your Default setting). I rebind mine to Q for a easier time pressing it quickly. While holding it down, scent smoke clouds will begin to appear. Red is fresh meat, and it will gradually get more orange as it decays, leading to yellow when it is fully rotted.
On top of this, water itself will give off a blue scent, helping you locate it. See above picture for examples of meat in various stages of freshness, and fresh water sources.
Scent requires Ability Power to use, so be aware of that as you use it since you could impair your ability to attack or defend promptly if you drain all your Ability Power through scent. I tend to use Scent in short bursts.
Creatures themselves have specific colors, and leave small scent clouds behind. This is most noticeable on Apatosaurus, and less obvious on very small creatures. There is a Talent to make your scent clouds smaller and disappear faster, and also a Talent that increases how well you see Scent clouds and how long they last, for better tracking.
When you hover over a creature, you can see by the color they are what Talent tree they have gone down (For example, in the picture above: You can see 2 different Tyrannosaurus Rex, each is a different color due to both of them choosing different talent points. Blue is pure Survival rex, and the lighter Blue-purple has gone mostly Survival, and some Mobility tree and Combat Tree talents. You can also see the scent for Rex, which is a Cyan color.
Friends and Grouping
Grouping is a major draw to surviving and socializing for some players. One player creates a group, and becomes the ‘Alpha’ of the group. Inviting players via the Player List will send an invite to them, and they can accept or decline. If they accept, their icon will show up on the map where they are. This can be toggled off or on.
Being in a group is beneficial in that it provides you with a private herd / pack chat, as well as comfort boosts when near each other. At higher friendship grades, you get friendly fire reductions, so that you can more safely hit a enemy through a ally without hurting them as bad.
Friendship starts at E grade, and goes up to A grade. Mating and friendly fire reduction begins at C grade.
Friendly Fire Reduction works as follows:
- Grade A – 75%
- Grade B – 50%
- Grade C – 25%
In time, there will be a way to set roles for the group, and to be able to duel someone of equal rank for the role of Alpha. This section will be updated when this is introduced.
Group Limits will be an adjustable server option, where how many creatures of one type can be packed or herded up together. If more than that many creatures are in the Group, all members will begin to get discomfort until the group goes back to proper size. Example: Rex can group in pairs, with their hatchligns. Hatchlings are removed from group at sub-adult age ( 0.7 )
Species Limits will be an adjustable server option (Not present on Official servers), where how many creatures of one type can be present in the game at all. When more details are available I will update this section.
Talents
Talents are the abilities that let you adapt your creature to your playstyle, and increase its chances of survival.
There are three main trees, each with skills associated with that type. Combat, Survival, and Mobility. Each tree contains 10 talents, that can be invested in up to 3 points manually, and can go up to 5 points through the use of inherited talents and breeding. You must have points in the previous Talent on a tier before you can take a next one, and you must upgrade the previous Talent before you can upgrade the next one. For example, if you want 3/3 Health Upgrade, you have to have 3/3 out of the Talents that lead up to it.
The background of your talent tree and of your player avatar will reflect the tree you are most heavily invested in.
Colors will mix on the avatar background, so someone who has purple is a mix of Combat and Survival, while someone that is more brown is a mix of Combat and Mobility. You can see in the picture above a wide variety of skill choices by different players.
The Player List no longer shows what every player plays, as of the December 2018. Only players in your group will show as the creature they are playing, everyone else is anonymous and shows their Steam avatar. But my picture of the player list is still relevant to how the avatar colors work.
Combat
Combat tree is centered around fighting and defense. Combat Talents include Talents for health, healing, various damage types such as Injury, Knockback, and Damage, and increasing Ability Power amount. Some animals have special Combat Talents related to their species’ special ability, such as Mosasaurus Grab or Utah Pouncing, or Apatosaurus Stomp and Tailwhip
Survival
Survival Talents are related to the over all ability of your creature to, well…survive. Talents like Weather Resistance, Comfort and Stress Resistance, Scent, and Food / Water. Some species have specialized talents in this category, like Aquatics and their Elusiveness ability. This is a good support Tree, with Talents that increase the Comfort you provide allies, and in the case of Apatosaurus, how much weather protection you give allies.
Mobility
Mobility Talents are centered around movement. Talents include Speed, Jumping distance, Fall height resistance, Stamina, how well you turn, how fast you can run up hills and other movement related skills. Some species have specialized skills in this tree, such as Apatosaurus and Parasurolophus having a Turn While Stomping Talent. Pteranodons have a very specialized Mobility tree with several flight related Talents unique to them within it.
Inherited Talents
Inherited Talents works in two ways, and they vary based on how you enter the game. They have a chance to appear at specific growth stages, though you might not receive one at that growth stage if you did not inherit a Talent in that Tier.
- .45 (tier 1 talents),
- 0.6 (tier 2 talents)
- 0.8 (tier 3 talents)
- 1.0 (tier 4 talents)
- 1.2 (tier 5 talents)
Spawning fresh vs being bred:
Spawning in: You gain a random 2 to 4 Positive Talents, and 0 to 2 Negative Talents. You can inherit an amount of +1 or -1 in any Talent, and very rarely, +2
Bred in with two Parents: You get a variable amount of traits based on how your parents’ talents are arranged, and potentially a few wild card talents. Inbreeding and stress while an egg causes Negative Talents to become more likely to be inherited. You can receive an amount of +1 or +2 through breeding, and are more likely to get more Talents than a spawned juvenile
Breeding, Nesting and Egg Health
To breed, you must have a male and female of the same species, in a group at Friendship Level C at the minimum. After mating, the female carries the egg while the male builds the nest for her. Only the male can build the nest, and he can build a nest for each of his females, and each nest must be maintained.
There are ways the egg can be damaged even before it is laid:
- Having low comfort now has a chance to damage your gestating eggs.
- Taking a hit that causes you to play a high damage pain grunt now damages your eggs if you’re gestating eggs.
- When an egg takes damage, it gets assigned an additional, random, negative inheritance trait.
There are three different ways, currently, that a Player can be invited to the nest:
- The playerlist shows egg icons beside each player who owns one or more eggs. You can ask these players to become their hatchling in the same place you’d ask to join their group.
- Available eggs show up on the dinosaur selection screen under a new UI button labeled Eggs. Selecting one prompts the players if they’d like to allow you to possess their egg.
- Players with eggs can ask any player if they’d like to become their egg through the playerlist, much like asking a player to join their group.
When you become an egg, you can monitor how close you are to hatching. The icon in the lower right corner shows your development, with the egg yolk becoming smaller and smaller as you grow (Compare above, a fresh egg, to below). Your view of the egg’s surroundings will also become more and more clear.
To hatch, you must be fully grown, and then press the ability key.
Once Hatched, you will inherit a random selection of stats from both your parents, as well as inheriting colors from their own color selection, with the option of wild card colors popping up as well.
See Inherited Talents section for more information on this.
Status Effects
There are many things in game that will give you a buff or debuff, and in this section I will cover all of them in detail. The image above shows a few of the ones you will encounter in game, and as you can see each one details what is wrong and why it’s happening, and how to fix it. I’ll go into further details below.
Negative Effects
Thalassophobic: Caused by being a Terrestrial animal and swimming in the deep sea. This is solved by getting to shore. This can drop your comfort sharply, though there are talents that reduce how stressed you get while swimming.
High Pressure: A effect caused by going too deep into the ocean. Talents can reduce how deep you can go before you start feeling the stress of the pressure. Returning to the surface will remove the debuff.
Bleeding: Caused by an Acrocanthosaurus’s bite. It will prevent health and comfort from regenerating until the bleed heals. Sprinting increases bleed, while Resting heals it the fastest.
Intimidation: If a creature takes the Intimidation Talent, you will get this debuff near them if you are an enemy. It will cause your comfort to decrease rapidly, potentially causing you damage if your comfort drops low enough. Getting out of range of the creature will remove the debuff.
Beached: Only affecting Aquatic creatures, this debuff happens when you are on dry land or in water too shallow to swim in. This can quite rapidly reduce your comfort, and getting into the sea is the way to remove it. There are Talents that reduce how stressed you are on land.
Injury: Caused by heavy attacks or fall damage / pteranodon crashing. This debuff slows you down, making your creature limp if the Injury damage is high enough. Resting and time is the only way to heal it.
Food Poisoning: Eating rotten meat will give you this debuff. It drops your comfort, though eating specific comfort flowers around the map can help you heal it and survive.
The Elements: Weather is a big comfort hit, and the more severe the storm, the more dangerous it is on your comfort. Rain and wind are the main causes of the debuff, and getting into shelter can reduce and even remove it. This only shows up when you start losing -15 Comfort per tick. Severe weather is going to reduce your comfort in general, even if this buff is not showing up.
Positive Effects
Healthy Herbs: Eating specific plants around the map will give you this buff, and you will grow faster, heal faster, be more comfortable, and recharge stamina and abilities faster.
Near Friends: Caused by being in a group with allies. This gives you a powerful comfort boost that will in turn affect how fast you grow.
Enhanced Growth: During bad weather, your growth rate is increased, and the discomfort other creatures cause you is reduced.
Neutral Effects
Well-Fed: Eating over a specific amount will induce this buff, which also functions as a minor debuff. It drops your comfort, movement speed, and stamina but allows you more health, and heal faster. You also dont’ have to worry about eating for a while since you have some extra packed on
Carrying Eggs: As a Female after mating, you get this debuff while carrying eggs. Your food and water will reduce faster and you will be more uncomfortable. The more eggs you carry, the greater the effect
Tides
The Tide rises and falls periodically, and can cover or expose natural land bridges when they do. Timing when to cross to another island can be the difference between death at the jaws of an Aquatic or surviving, so learning when to tell low tide can save your creature’s life.
Storms And Environmental Hazards
Storms will appear in varying degrees of severity. This can be from a light rain shower, to almost the entire map flooding under an epic rainfall.
The biggest dangers in Storms is Tornadoes, Fog, Lightning, Flooding, and Stress to your Comfort. There is a Weather Talent that decreases how much Stress you get from storms, and a full 3/3 in that Talent makes you immune to Lightning (But if you are near a herd/pack mate that does not have 3/3 in Weather Resistance, and you are near them when they get hit by lightning, you can get hit too and die regardless of your own talents)
There is a Stat in game called Shelter State, which indicates how protected from the elements you are. Being up against a cliff can provide you with 25% shelter, for example, while being inside a cave gives you a full 100%. Only 100% shelter protects you from Tornadoes, making caves a desirable choice during really bad storms. This brings in a secondary danger…the potential of running into a predator in the confines of the cave.
Apatosaurus can provide weather protection to nearby allies. and there is a Talent they can invest in that will allow them to provide more shelter state to allies. A full 3/3 makes allies near them non-target-able by Tornadoes, but does not stop them from being picked up if a Tornado wanders their way. Apatosaurus are immune to Tornadoes after 0.8 growth, out of gameplay balance since they no longer can fit into caves or outrun a approaching Tornado.
Flooding means a Aquatic predator can get inland access they do not usually have, though they run the risk of beaching themselves far inland if the flood recedes while they’re still in there. This is an additional danger during a severe storm.
Multiple Tornadoes can spawn in rare circumstances, the most I have seen is 3 at once. Tornadoes will target a player and attempt to reach them, and the larger the group is, the more enticing a target. Only 100% shelter can prevent you from being targeted by a Tornado, and prevent you from being picked up by one. as mentioned earlier in this section. It is quite advisable to seek shelter during severe storms.
After a storm comes Fog, which makes it hard to see and scent anything around you. This is another hazard, and one I often find even more deadly than the storm itself, since you risk starvation if you are low on food after hiding from the storm and then cannot smell out any food.
More of this sort of thing:
In order to change keybinds, a player can visit the options menu and go to controls, which is found either on the Main Menu or by pressing Escape during regular gameplay.
The reset button will reset the keybinds to default values. These values are fully customizable.
The default keybinds and gameplay settings.
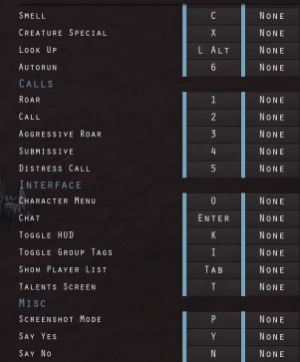
The rest of the keybinds.
- A = Left
- S = Backwards
- D = Right
- W = Forwards
- Spacebar = Jump
- Shift = Sprint
- Ctrl = Crouch
- Tab = Scoreboard
- K = Toggle HUD
- I = Toggle Pack Tags
- O = Toggle Character Screen
- E = Use Keybind
- Z = Special Ability
- R = Resting
- 1 = Roar
- 2 = Friendly Call
- 3 = Aggressive Call
- 4 = Submissive Call
- 5 = Distress Call
The use keybind depends on the players preferences, and can be edited in the settings.
The use key allows one to eat and drink. Double tapping the use key allows one to carry objects.
There are two keybinds for both crouch and jump. This allows more comfortable options to players who may want to use two of each of these keybinds. It is not necessary to keybind both of these for regular play.
The game does support controller play, and these keybinds work properly with a controller as well as with a keyboard, or even with a mouse with additional buttons.
A player is also able to, if using a controller, adjust the x and y axis sensitivities or invert the Y axis if they wish to do so.

Guide for Beast Of Bermuda’s Itchy!
Early Game
During the early game of itchy you want to stay clear of open water, and open land! You are too small and slow to escape anything that see’s you as their next meal, in the water you are easily out maneuvered and can’t rely on your handy dandy dart ability to escape any potential predators.
As always consider seeking out a group in the group finder, or global chat! They offer safety, food, and a growth boost!
Diet– Stay clear of fish if you can at this point if you can of course! Go for those gores, on the islands outside of the map, which I hope you are living at right?? Not many dangers live here and is a great spot for an early solo itchy!
Mid Game
What is the Mid Game? Mid Game is when you have gotten 3/3 dart and 3/3 swim speed! Strong Lungs is optional, I usually go with it though! If a mosa grabs you the last thing you want to worry about is drowning! With the new talent tree as well, strong lungs is right of top of the combat tree, which of course you’ll need to go through to get slippery!
Diet- Mid game itchy anything is fair game, fish, gores its what ever your heart desires!
Late Game
Late Game AKA 1.0+ You can be more bold now and consider hunting smaller aquatic creatures, or even other itchy’s! See gameplay tips below!
Tips You Need To Know To Succeed!
Tip 1- When hunting, dart is your OP ability, your mosa grab for reference! You are far faster then anything in the aquatic dimension! Excluding elasmo’s of course which give you a run for your money! Use this abiltiy when hunting or escaping You would be suprised of how many people I have seen die, because they lose their abilty to think, and don’t use their dart ability!
Tip 2- Don’t be afraid of mosa’s/kronos! Of course this doesn’t mean go up to them and give them a high five! What I am saying is, if you play it smart, mosa’s and krono’s can’t touch you! IE- darting away!
Tip 3- Be alert at all times! What do I mean by this, before you do something ALWAYS SEARCH FOR DANGER, such as a mosa awaiting you to enter the water! How do you do this? USE YOUR EARS!!! Anything you should be worried about IE Mosa’s and such make a ton of noise! If you know its there, either don’t go in the water, or if you can jump in too a spot deep enough for you to dart as soon as you hit the water! The mosa will not be able to grab you and you can escape easily!
Tip 4- Group up with others! Not much needed to be said here! You grow faster, have more protection, and of course, can hunt way easier!
Tip 5- Use your talent points wisely! See below!
Talent Points!
Now, I’m not gonna say all the obv one’s that everyone wants but can’t get because you don’t have all day to spend growing something to 2.0!
Now, at 1.2 you will have 25 total talent points! Here is what you should invest in, in order!
1. 3/3 weather res, I have heard of some itchy’s not investing in this, I however always do just to be safe, but its your choice! You could also do 3/3 resilience for comfort boost, if you plan on being solo for a long time!
2. 3/3 Aqua!
3. 3/3 Dart!
4. 3/3 strong lungs!
5. sneaky 2/3 or 3/3, 3/3 is good for land, 2/3 is good enough for the water! I personally always go 3/3 though!
6. 3/3 slippery!
Getting all 6 of these max is in total a little bit more then 25 talent points, of course you could not do sneaky 3/3 and get 3/3 slippery easily, but if you plan on growing to a decent size IE 1.4 or so I would get sneaky! Of course, you could get slippery 3/3 first and then sneaky, which I personally don’t do because I usually never get grabbed by a mosa as, I, as you should as well am always alert and do what is safe!
If you manage to get to a huge size, you will need to invest and strong bones, sharp teeth, persistence, and brawler! Health as well, basically all the combat ones, I would get strong bones first though so if things go awful you have a chance of being able to dart away! As, if you didn’t know, if you take a lot of injury damage IE from a krono or mosa dart/ grab, you won’t be able to dart away and are as good as dead! This helps prevent that awful situation!
Hunting
Hunting as a itchy is pretty simple, now I wouldn’t hunt anything on land at all honestly unless you can easily win IE hunting a juvie etc! Basically the water is where you want to be!
Now, once you find something literally all you have to do is swarm it with your group, and dart at it! Once you dart at it, can can also right click to do pretty much 2 bites with one dart!
Be alert at all times, if your hunting a krono and it stops moving and you hear it lunges up, be ready to dodge, if a mosa is pointing directly at you, dodge! If you are risky and confident you can wait for it to dart, dodge the mosa and get behind it and a*s ride it as long as you can! And when I say dodge I don’t mean swim around, I mean dart away lol, its really hard to dodge a dart w/ out darting your self!
Basically, DODGE AND WEAVE, A*s ride!
Tips- PLEASE PLEASE PLEASE, be alert of your stam and ability! You would be surprised of how many people forget about this in the heat of battle, get darted at, and surprise! You can’t dart away! They get injured, and are toast! IF YOUR FRIEND GETS GRABBED DART ASAP AT THE MOSA, THEY WILL BE FORCED TO DROP YOUR FRIEND AND THEY CAN GET AWAY AND GATHER THEMSELVES
As a group basically just swarm the thing to death!
Solo, first off, don’t hunt a 1.2 or so mosa by your self, .8 or below is doable but don’t be dumb! One grab and your done! Dart behind it, or through its body, all you need to do is stay clear of its mouth! Another tip, smaller Mosa’s lose air quickly, once they go up to get something, go to them and get a few tail hits in while its head above water!
Remember if you can avoid something you know are nervous about, trust your gut and dart away! Something is never worth your life, no matter how good the rewards are!
Hey there, thanks for checking our blog. I hope the information you found about Beasts of Bermuda – Guide For Itchy helped you. If you believe we forget something to add or want us to add extra on the post, please let us know via comment below. Thanks, and see you soon!