
- Manuals
- Brands
- Becker Manuals
- Car Stereo System
- Indianapolis Pro 7950
- Operation manual
-
Contents
-
Table of Contents
-
Bookmarks
Quick Links
GB
Operation Guide / Installation Guide
DK
Betjeningsvejledning / Monteringsvejledning
S
Bruksanvisning / Monteringsanvisning
Related Manuals for Becker Indianapolis Pro 7950
Summary of Contents for Becker Indianapolis Pro 7950
-
Page 1
Operation Guide / Installation Guide Betjeningsvejledning / Monteringsvejledning Bruksanvisning / Monteringsanvisning… -
Page 2: Table Of Contents
Contents Safety instructions Destination entry Explanation of navigation Selecting a country Dynamic route guidance Information regarding Entering a destination with TMC general road safety Selecting destination via post code What is dynamic route guidance? Arrangement of controls Entering the destination town Dynamic route guidance Anti-theft device Entering the destination…
-
Page 3
Contents Radio mode Interrupting TP announcements Scan search Switching on radio mode TP Announcement volume Fast forward / reverse Switching on Radio Menu Mode Display for receivable TMC stations 57 Random Play Selecting the FM waveband Telephone muting Track repeat Selecting the AM waveband MP3 settings menu CD mode… -
Page 4
Contents Telephone mode Service menu Installation Guide Requesting telephone mode Calling up / exiting service menu Prior to installation Mobile phone already connected CD Changer reset Symbols used in the Mobile phone has just been Bluetooth module reset installation guide connected Unit reset Safety instructions… -
Page 5: Safety Instructions
Safety instructions Operation of the unit is permitted only if the traffic conditions are suitable and you are absolutely sure that you, your passengers or other motorists are not endangered, obstructed or inconvenienced. In all cases, all applicable road traffic regulations must be obeyed. Destinations may only be entered when the vehicle is stationary.
-
Page 6: Information Regarding General Road Safety
Information regarding general road safety This car radio device is intended and approved for installation and operation in passenger cars, commercial vehicles and buses (vehicle classes M, N and O) whose electric system has a rated voltage of 12V. Installation and maintenance should only be carried out by specialists. Faulty installation or maintenance can result in the malfunctioning of the motor vehicle’s electronic systems.
-
Page 7: Arrangement Of Controls
Arrangement of controls Arrangement of controls 1 Left rotary control (INFO) 7 Select radio mode ( 2 On / off switch ( 8 Select navigation ( 3 Tone button ( 9 CD eject button ( 4 Switching between telephone/traffic 10 Right rotary control (OK) programme ( 11 Multifunction buttons…
-
Page 8: Anti-Theft Device
Anti-theft device Anti-theft device Entering the code number Note Attention: If the car radio is disconnected from the It is important to store the CODE The waiting time elapses only when the electrical supply source, the anti-theft CARD in a safe place outside of the ve- ignition and unit are switched on.
-
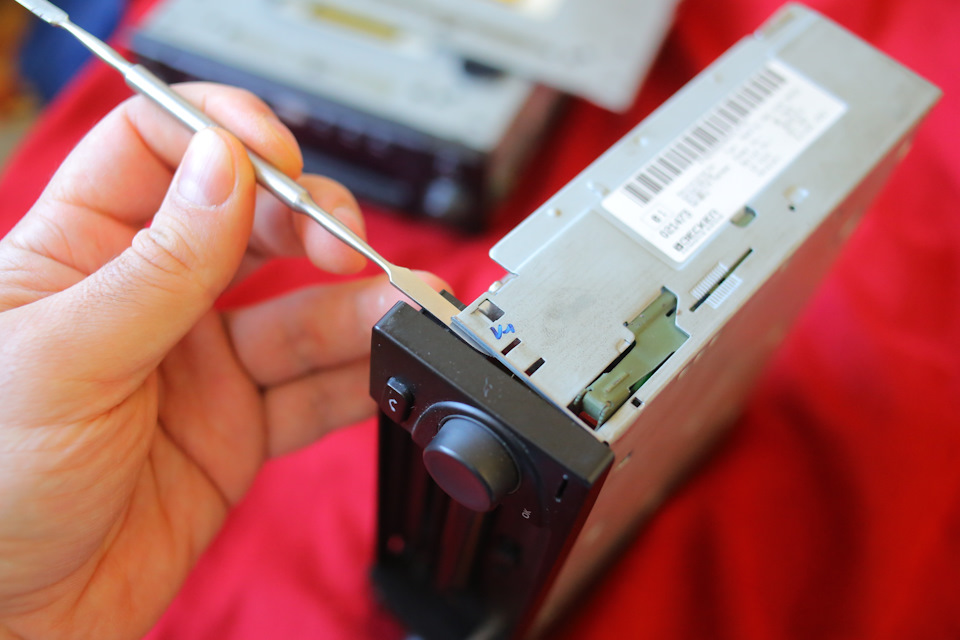
Page 9: Removing The Portable Panel
Anti-theft device Removing the portable panel The volume is limited to a maximum Attaching the portable panel level after the display has been folded As an effective anti-theft device, the Insert the portable panel into the lower down. After 20 seconds, an audible sig- portable panel (A) may be removed from left catch and then engage it in the nal indicates that the control component…
-
Page 10: General Operation
General operation General Operation Switching on/off Setting the volume Setting the bass Press the button and then the Press Turn the left-hand rotary control multifunction button. The volume increases or decreases. The unit can also be switched on/off via Activating the tone menu the vehicle ignition.
-
Page 11: Fader
General operation Fader Linear adjustment Switching loudness on / off Press the button and then the The tone adjustments for the current sig- Press the button and then the multifunction button. nal source (i.e. FM) can be reset to a multifunction button.
-
Page 12: Navigation Mode
We do not accept liability for errone- With the Becker Indianapolis Pro, the ous data provided by the navigation location is determined via the GPS re- system.
-
Page 13: Navigation Cds
Navigation mode Navigation CDs In addition to the countries listed above, Note: all the CDs also contain the complete You will be supplied with four naviga- For Norway, Sweden, Finland, the trunk road network of the digitised area tion CDs. Czech Republic and Denmark, non-veri- of Europe.
-
Page 14: Navigation With Four European Cds
Navigation mode Navigation with four European For example, you want navigation guid- ance from a town which is only covered by CD 2 to a town which is only covered Area covered by by CD 3. Select the country of destina- CD 1.
-
Page 15: General Instructions
Navigation mode General instructions Letter, numbers and symbols can be Notes: selected using the multifunction but- • If you know your way around the • During navigation mode, radio or CD tons . The individual town you are starting out from well can still be heard.
-
Page 16: Selecting Navigation
Navigation mode • By briefly pressing the left rotary Selecting navigation Note: control , additional information can Press The navigation CD must be loaded be requested during route guidance or when starting navigation mode for the the current position can be requested first time.
-
Page 17: Main Navigation Menu
Navigation mode Main navigation menu • LAST DESTINATIONS Destination entry A list of the last 50 destinations is dis- In the Main Navigation Menu, select played. With right rotary DESTINATION with the right rotary control , the desired destination can control and press the control to be selected.
-
Page 18: Entering A Destination
Navigation mode Entering a destination The complete entry can be deleted by If the complete location name has been entered or completed automatically; i.e. pressing multifunction button the location entered exists only once in more than 2 seconds. the country of destination, the unit will switch automatically to either the place The last location entered is displayed.
-
Page 19: Entering The Destination
Navigation mode If a definite entry is given, the system Selecting destination via post The display then shows either the desti- switches to the Road/ Centre Entry. If nation corresponding to the post code or, code there are no roads or only the centre is if the post code is shared among several The destination can also be selected via available for a particular town, the unit…
-
Page 20: Entering The Destination Town
Navigation mode Entering the destination town Already entered letters are displayed in- The road name most similar to the entry versely. To help, the road name most appears in capital letters in the road se- similar to the entry so far is displayed. lection list.
-
Page 21: Entering The Destination Town Centre
Navigation mode Entering the destination town Select the letters one after another by To accept the entry, press and hold the turning the right rotary control right rotary control for more than centre press to confirm. The selected letter 2 seconds or select the small tick appears enlarged at the right of the dis- and briefly press the right rotary play.
-
Page 22: Destination Input Via Coordinates
Navigation mode To confirm the entry, press and hold The navigation system then requests a Note: the right-hand rotary control name to be entered for the entered coor- By pressing the right rotary control more than 2 seconds. dinates. for more than 2 seconds without previ- Enter a name as described in “Storing ously entering a letter, a list of the pos- Select the small tick…
-
Page 23: Route Guidance
Navigation mode Route menu • HOUSE NUMBER Entering house number for The house number in the specified destination road destination road can be entered here. Select in the route HOUSE NUMBER This function is only possible if the in- menu with the right rotary control formation is contained on the Naviga- and press to confirm.
-
Page 24: Selecting Intersection For
Navigation mode Select ROUTE SETTINGS to choose Select ROUTE SETTINGS to choose • DYNAMIC ROUTE the route settings. the route settings. Dynamic route guidance is used to calculate the route, taking current traf- Select by turning the right rotary con- Select by turning the right rotary con- fic announcements into account.
-
Page 25: Storing A Destination In The Destination Memory
Navigation mode • RESTRICTIONS Storing a destination in the If you do not wish to enter a name of Provides options for avoiding bridges, your choice, press and hold the right ro- destination memory ferries, tunnels or toll roads tary control for more than 2 seconds It is not mandatory for navigation to to store the previously entered destina-…
-
Page 26: Deleting A Destination From The
Navigation mode Deleting a destination from the Route guidance calculation Stopover destination memory Stopover offers the possibility of enter- Select destination memory (see ing a stopover destination during the ac- page 38). tive route guidance. The message “Calculating route” indi- Entering a stopover cates that the distance is being calculat- ed;…
-
Page 27: P.o.i
Navigation mode • P.O.I. Deleting a stopover Detour function (see page 38) enables the selection of This function allows you to block route special destinations as stopovers via sections ahead from the nearest junction LOCAL AREA NEAR DESTINA- and to calculate a detour route when a , e.g.
-
Page 28: Deleting Traffic Jam
Navigation mode Deleting traffic jam Cancelling route guidance Explanation of navigation Press After entering the destination (address), the system calculates the route and an- nounces: “Ready to drive off”. You will receive the navigation recom- Press the multifunction button. The route guidance is cancelled when mendations by voice messages and the right rotary control is pressed…
-
Page 29
Navigation mode • “Please turn right after 300 metres.” Warning Note: Accident hazard At junctions and roundabouts, only Road traffic regulations always take the end of the road which is to be priority when a vehicle is being driven passed is displayed. in traffic. -
Page 30: Dynamic Route Guidance
Navigation mode • “Please follow the direction arrows.” Dynamic route guidance with What is dynamic route guidance? Dynamic route guidance is used to cal- culate the route, taking current traffic Note: announcements into account. Dynamic route guidance is not possible This display tells you that you are cur- The traffic announcements are transmit- in all countries.
-
Page 31: Dynamic Route Guidance
Navigation mode Dynamic route guidance Displaying traffic information Note: In the Route menu, Dynamic Route Current traffic announcements can be If no TMC station can be found, the dis- Guidance can be started by selecting displayed in text form. There are several play will show CURRENTLY START-DYN.
-
Page 32
Navigation mode Note: If no other traffic information is availa- ble, NO TRAFFIC MESSAGES RE- The scroll marks at the right edge of the Scroll marks on the right side of the dis- CEIVED is displayed. display indicate that additional traffic in- play indicate that more than 3 lines are Information menu: formation is available. -
Page 33: Information During
Navigation mode Information during route Requesting journey duration Displaying/changing settings and kilometres travelled during route guidance guidance Press the left rotary control During route guidance, press the left rotary control Press the left rotary control The destination, the distance and the es- Press the multifunction button.
-
Page 34
Navigation mode • DURATION: To change a setting select the required Changing ROUTE: Setting as to whether ETA, the current entry and press the right rotary Select ROUTE: from the settings and time or the remaining travel time control press the right rotary control should be displayed on the right side of the display during navigation. -
Page 35
Navigation mode Changing ETA: Changing DURATION: Changing MOTORWAY: FERRY: Select ETA: from the settings and Select DURATION: from the settings TOLL: press the right rotary control and press the right rotary control Select MOTORWAY: FERRY: from the settings and press the TOLL: right rotary control The setting… -
Page 36: Requesting Current Time
Navigation mode Changing SPEEDLIMITS: Requesting current time Calling up current position Select SPEEDLIMITS: from the set- During navigation, press the left rota- During route guidance, the current posi- tings and press the right rotary ry control tion can be requested. control By turning the right rotary control Press the…
-
Page 37: Calling Up Road List
Navigation mode With inactive route guidance, the infor- Calling up road list Note: mation menu can be requested by press- During route guidance, the list of roads After entering the destination, it will ing the left rotary control for the planned route can be called up. take some time until the route list is compiled.
-
Page 38: Destination Memory
Navigation mode Destination memory P.O.I. Using the right rotary control select a category and press the con- In the Main Navigation Menu, select Menu for selecting points of interest trol to confirm. DEST. MEMORY with the right rotary from a predetermined list. Points of in- control and press the control to terest include petrol stations, airports or…
-
Page 39
Navigation mode By pressing the left rotary control Selection TOWN information on the selected destina- Points of interest in a specified town tion is listed (i.e. a hospital). can be selected. Enter the point of interest and con- firm. Confirm the point of interest in the Confirm selection with the right ro- Using the right rotary control displayed list by pressing the right… -
Page 40: Points Of Interest (P.o.i.) Cd
Navigation mode Selection NATIONWIDE Points of interest (P.O.I.) CD The valid categories for the current points of interest CD are displayed. The following contains a general de- scription of the points of interest (or P.O.I.) CDs. Using the right rotary control The categories and points of interest There are two methods for selecting a select a category and press the con-…
-
Page 41
Navigation mode If the points of interest CD is inserted Then, turn the right rotary control If the point of interest was selected dur- during active navigation, the system re- to select the desired point of interest. ing active navigation, it will be treated as quests information on the location of the The point of interest is accepted by a stopover. -
Page 42: Terms Of Licence
Language ukenglish Use of the data is only permitted in this • ANIMATION specific Becker system. It is forbidden to The Animation display can be turned Select from extract or make further use of significant on or off.
-
Page 43: Setting Time
Navigation mode Setting time By pressing the right rotary control Saving position or multifunction button , the set In order to achieve correct navigation on time is accepted. routes with time-dependent traffic guid- ance, and to calculate the estimated time The program returns to the System Set- of arrival, it is necessary to set the GMT Set and confirm…
-
Page 44: Selecting A Game
Navigation mode The Destination Memory is then called Selecting a game Setting the language up automatically (see page 38). With the right rotary control , select the desired position in the Destination Set and confirm GAMES in the System Set and confirm LANGUAGE* in the Memory and press to confirm.
-
Page 45: Animation
Navigation mode Animation Switching announcement of Selecting the units of Whether ETA, the current time or the re- arrival time on /off measurement maining travel time should be displayed on the right side of the display during navigation, is a setting option here. Set and confirm ANNOUNCEMENT Set and confirm…
-
Page 46: Influencing The Calculation Of Eta
Navigation mode Influencing the calculation of • LOW-RISK Switching the speed limits With this setting the unit adjusts for display on/off drivers who may take longer for the If the speed limits display is ON, the sys- planned journey. This setting could be tem will inform you of the maximum used, for example, in areas of dense permissible speed limit for the route…
-
Page 47: Setting The Time Display
Navigation mode The distance to the next point at which Setting the time display for example a turn should be made is dis- played below the navigation arrow, which appears in reduced format. Set and confirm SPEEDLIMITS the System Settings menu. Set and confirm TIME INFORMA-…
-
Page 48: Radio Mode
Radio mode Radio mode Switching on radio mode The last selected station and level are To select the Medium Wave displayed. Long Wave ) and Short Press ) wavebands, repeatedly press Wave By pressing repeatedly, you can choose multifunction button until the The last selected waveband is called up.
-
Page 49: Dynamic Autostore (Fm-Das)
Radio mode Dynamic autostore (FM-DAS) Station search FM-DAS Requesting radio menu mode. Turn the right-hand rotary control to the left or right. The radio displays the receivable and If a programme has previously been se- identified stations in descending/ascend- lected that belongs to the particular sta- ing order.
-
Page 50: Scan Search
Radio mode Scan search Programme filtering for FM Programme type selection On the desired waveband ( (PTY) ) press the right rotary You have the option of filtering various Requesting radio menu mode. control stations from the FM DAS station list. Requesting radio menu mode.
-
Page 51: Turning Pty Display On / Off
Radio mode Turning PTY display on / off Storing: Calling up/storing MW, LW, 12 frequencies or programmes can be Selecting radio menu mode. SW stations stored per waveband. Storing: In each case up to 12 stations can be Find desired station. stored using the station buttons.
-
Page 52: Autostore Mw, Lw
Radio mode Autostore MW, LW Manual FM tuning Manual Tuning MW, LW, KW Select radio menu mode within the de- Selecting radio menu mode. Select radio menu mode within the de- sired waveband. Using the multifunction button sired waveband. select the level Stations Fix Press multifunction button Press the…
-
Page 53: Regionalisation
Radio mode Regionalisation Switching regionalisation on / The RDS diversity function is independ- Selecting radio menu mode. ent of region. As a result, the RDS diver- sity function can lead to the radio Afterward, select the desired regional switching between various regional pro- sub-programme (i.e.
-
Page 54: Switching Radio Text On / Off
Radio mode Switching radio text on / off Traffic programme (TP) Note Radio text cannot be displayed unless If an RDS Diversity station broadcasts Warning the selected station also transmits radio TP announcements, it is possible to in- Accident hazard text.
-
Page 55: Activating / Quitting The Tp Menu
Radio mode Direct programming enables a TP sta- Activating / quitting the TP Switching on: tion to be programmed that is not the FM Switching on TP menu. menu station being received. This means, for Activating: example, that a particular FM station can Press the button twice.
-
Page 56: Selecting Automatic Tracking
Radio mode Selecting automatic tracking Selecting / cancelling direct Switching mute on/off In all modes and wavebands, automatic programming Ensure that a TP or EON station is se- tracking can be turned on by pressing lected. Switching on TP menu. and holding the button for more than 2 seconds.
-
Page 57: Interrupting Tp Announcements
Radio mode Interrupting TP announce- This means that the volume can be Telephone muting raised by a fixed amount depending on ments If a telephone is installed in the vehicle the setting. A current TP announcement can be inter- and its mute control is linked to the car rupted.
-
Page 58: Cd Mode
CD mode CD mode Notes on compact discs (CD) • Before playing the CD, it should be If there is already a CD in the slot, press cleaned with a special, commercially button. If CD-changer/AUX Sound interruptions may occur if the CD available cleaning cloth, wiping from mode was selected last, the unit must be is soiled.
-
Page 59: Forward / Backward Track
CD mode Forward / backward track Scan search Fast forward / reverse terminates when the multifunction button skipping Pressing the multifunction but- is released. ton activates the scan search function. Turn right rotary control to right / left. Track repeat Through further turning of the right rota- “Track repeat”…
-
Page 60: Random Play
CD mode Random play CD settings menu Switching between Track/CD Text display Pressing the multifunction but- Press the button in CD mode. You can set here whether in the CD ton activates the random play func- menu the track display is provided by tion.
-
Page 61
CD mode Temperature protection circuit After a cool down period, the CD mode Notes on copy-protected CDs may be called up again. If the tempera- To protect the laser diode from exces- In some cases, problems may arise when ture is still too high, the unit will once sive heat, a temperature protection cir- attempting to play copy-protected CDs, again switch back to the previously se-… -
Page 62: Creating An Mp3/Wma Storage Medium
MP3 mode MP3 mode General notes on MP3 Creating an MP3/WMA For WMA, WMA 9 with a bit rate of 64 — 192 kbit/s is supported. For creat- storage medium The music that can be played when your ing WMA, we recommend using Win- unit is in MP3 mode is generally copy- •…
-
Page 63
MP3 mode • You can play CD-Rs (writeable CDs) Creating a playlist We used the freeware WINAMP in our and CD-RWs (rewritable CDs) on this trials for creating playlists. Other pro- Due to the number of MP3 files that can unit, grams may also be used to create playl- be saved on an MP3 CD, the MP3 CD… -
Page 64: Inserting /Ejecting Mp3 Cds
MP3 mode Inserting /ejecting MP3 CDs If there is already an MP3 CD in the slot, Also refer to the following sections un- der CD mode (Page 58): press the button. If CD-changer/ Inserting CDs: AUX mode was selected last, the unit •…
-
Page 65: Switching Between Folder
MP3 mode Switching between folder/ Changing folder/playlist Note: playlist multifunction button is only Press the right rotary control displayed when playlists are saved on Turn the right rotary control to se- If playlists are stored on the inserted the inserted MP3 CD. lect the desired folder or the desired MP3 CD, it is possible to switch be- playlist.
-
Page 66: Track Repeat
MP3 mode Fast forward / reverse Pressing the multifunction but- MP3 settings menu ton again deactivates the “Random Fast forward (audible) is activated by Press the button whilst in MP3 Play” function. pressing the multifunction but- mode. ton and fast reverse (audible) is acti- Track repeat vated pressing…
-
Page 67: Displaying Name Of Folder/Playlist
MP3 mode Switching between track/ID3 Audio playback via an optional tag display Apple™ iPod Here you can set whether in the MP3 menu the track display is provided by Notes: the numerical track display or by dis- • The iPod™, the iPod mini™ and the Press the multifunction button.
-
Page 68
The remote kit iPod™ comes with con- nection and operating instructions. More information can be found under www.becker.de. Note: If the connecting cable is attached to the Indianapolis Pro, it is not possible to at- tach a CD changer or a steering wheel remote control adapter. -
Page 69: Cd Changer Mode
CD changer mode CD changer mode Operational readiness of CD Selecting CD changer mode Changing/selecting CDs changer Press Activating CD changer mode. If the CD Changer mode was selected Press the right rotary control If a CD changer is connected to the car last, or if there is no CD or Navigation radio, the CD changer is ready for oper- CD inserted into the CD player, the unit…
-
Page 70: Cdc Settings Menu
CD changer mode For additional operating instructions, re- CDC settings menu Displaying number of tracks fer to CD mode (Page 58): and total playing time Press the button in CDC mode. • “Notes on compact discs (CD)” on Requesting CDC settings menu. page 58 •…
-
Page 71
CD changer mode Naming a CD Assigning/changing names: Deleting saved names: Requesting CDC settings menu. Requesting CDC settings menu. It is possible to assign a name to the CD Press the multifunction button. currently playing, change a previously Using the right rotary control , se- assigned name and delete stored names. -
Page 72: Cd Filter Function
CD changer mode CD filter function Filtering tracks: Silverstone 7860 and 2660 CD chang- You can filter out individual tracks on a ers. CD. These tracks are then not included The tracks to be filtered out of the cur- when the CD is played. rent CD can be selected using the right Note: rotary control…
-
Page 73: Telephone Mode
Bluetooth® wireless technology. Further information is available on the website www.becker.de. • The Indianapolis Pro cannot access the mobile phone’s number memory or the SIM card.
-
Page 74: Requesting Telephone Mode
Telephone mode Requesting telephone mode Mobile phone has just been Mobile phone not yet connected connected If there is no mobile phone connected to To start up telephone mode, press the the Indianapolis Pro, then the following If, while starting up telephone mode, an key once.
-
Page 75: Connecting Mobile Phone
Telephone mode Connecting mobile phone On the mobile phone, now enter the If a mobile phone with Bluetooth® wire- four-digit number displayed on the In- less technology is connected, the symbol The process of connecting a mobile dianapolis Pro next to is displayed in radio, CD, MP3 or Passkey: phone with Bluetooth®…
-
Page 76: Connecting Automatically
Telephone mode Connecting automatically Dialling numbers Notes: After switching on the Indianapolis Pro, • You can delete your entry by turning Note: the Indianapolis Pro attempts to connect the right rotary control to the left. to the mobile phone with Bluetooth® To use this function, a mobile phone with •…
-
Page 77: Number Is Busy
Telephone mode Press the right-hand rotary control Number is busy Call lists If the number called is busy, the busy Three call lists are available in the Indi- tone sounds and the following message anapolis Pro. In each list, the last 9 num- appears.
-
Page 78: Calling A Number From A Call List
Telephone mode • Numbers dialled Calling a number from a call list Deleting call lists (multifunction button You can establish a connection to one of You can delete all numbers from the in- This list contains the numbers you the numbers in the call lists directly. dividual call lists.
-
Page 79: Accepting A Call
Telephone mode Accepting a call Rejecting a call An incoming call is indicated by a ring- You can reject an incoming call. ing tone and a message in the display. If the caller transmits his/her phone number, this is also displayed. Press multifunction button The signals indicating a call are ended.
-
Page 80: User Settings
User settings User settings Opening / quitting User The user menu is requested by press- The GAL setting can be used to specify ing the button for longer than 2 the starting point for the volume increase Settings menu seconds. according to vehicle speed.
-
Page 81: Telephone Mute Function (Tel)
User settings Telephone mute function (Tel) Display brightness (Lum) LED setting If a telephone with hands-free operation With this function, the brightness of the This function can be used to switch the is installed, the call may be routed display can be set. LED function (flashes when the unit is through the speaker system.
-
Page 82: Setting Reception
User settings Setting reception optimisation • Mono — Setting for reception condi- • independ — The current audio tions in which reflections constantly source and the navigation announce- (M/S) occur — i.e., the unit is constantly set to ments can be set to different levels. In order to suppress reception-related in- mono.
-
Page 83: Aux Input (Aux)
User settings AUX input (Aux) Display compass (Cmp) Signal tone volume (BeV) This can be used to switch on the CD When the navigation is not active, it is The volume of signal tones (e.g. storage changer AF connections if no CD chang- possible to have a compass and the cur- confirmation) can be set using this func- er is connected.
-
Page 84: Service Menu
Service menu Service menu Calling up / exiting service Bluetooth module reset If a malfunction occurs that is associated menu with the Bluetooth module, you can per- The following information can be called form a reset here. Connected devices up whilst in the Service menu: and the call lists are deleted.
-
Page 85: Explanation
Explanations Explanation RDS SYSTEM DAS Seek Name level Stations Fix level This car radio is capable of receiving At the level DAS Seek Name all re- At the level Stations Fix frequen- RDS signals (RDS = Radio Data Sys- ceivable and identifiable RDS pro- cies can be assigned to the station but- tem) on the VHF bands.
-
Page 86
Explanations EDUCATE Education LIGHT M Light music Radio plays and literature DRAMA Classical music CLASSICS Culture, church, society CULTURE EASY M Musical entertainment VARIED Light entertainment SPORT Sport OTHER M Special music programmes Weather report WEATHER Financial information FINANCE Children’s programmes CHILDPRG SOCIAL Social reports… -
Page 87: Technical Terminology Glossary
Technical terminology glossary Technical terminology glossary Autostore CD-RW ID3-Tag With this function, the stations with the (Compact Disc ReWritable) “Contents” of an MP3 track. Contains strongest signals are stored in the auto- rewritable CD. information such as track, artists, album, store memory, sorted by reception qual- year and genre.
-
Page 88
Technical terminology glossary Reset Format for playlists supported by unit. Reset the system to factory defaults. (Windows Media Audio) Special compression process developed ® by Microsoft for compressing audio PTY identification Scan search (Programme Type identification) Plays receivable radio stations or CD data (i.e. -
Page 89: Index
Index Index Call lists ….. .77 Calling Animation …..45 DAS .
-
Page 90
Index Fader ……11 ID3 tag ….. . .62 Navigation CDs . -
Page 91
Index Station search FM ….. . .49 Radio Menu Mode ….48 Saving a destination . -
Page 92
Index Toll road ….. .25 Tone menu ….10 Unknown number . -
Page 93: Technical Data
• Supply voltage: 12 Volt • Loudspeaker impedance: min. 4 • CD Connection: Becker Silverstone 2630, Silverstone • Line out: 2640, Silverstone 2660 and Silver- 4 x analog Line Out (Va max 3Veff at stone 7860 CD changers can be con- 10 k ) nected.
-
Page 94: Notice
NOTICE Dear Listener, In conformance with current EC guidelines, any person may operate this radio receiver. This unit conforms to the current valid European or harmonised national standards. This designation is your guarantee that the unit conforms to the applicable specifications regarding electromagnetic compatibility.
-
Page 95: Correct Disposal Of This Product
Correct disposal of this product (waste for electrical and electronic equipment) (Applicable in European Union countries and other European countries with a separate collection scheme) The label on the product or on the accompanying literature indicates that at the end of its life it cannot be disposed of together with normal household waste.
-
Page 96: Installation Guide
Installation Guide 1.Installation Guide Prior to installation Before starting installation, please read this installation guide carefully. In particular, please pay attention to the safety and installation instructions. Symbols used in the installation guide denotes instructions which are important for your safety and the safety of others. denotes instructions which are important for the installation and function of the unit.
-
Page 97: Safety Instructions
Installation Guide Safety instructions Incorrect installation Incorrect installation may result in damage to the unit or to the vehicle. Specialist knowledge and skills are required to install the unit and its components. We strongly recommend that you have the unit installed by a specialist work- shop.
-
Page 98: Installation Instructions
Installation Guide Installation instructions Damage due to reverse polarity or short-circuit Incorrect cable connections and short-circuits can seriously damage the unit. Disconnect the vehicle battery before installing the unit. In order to avoid short-circuits and malfunctions, install the cables so that they cannot be pinched, kinked, chafed or detached.
-
Page 99: Connection Diagram For The Navigation System
Installation Guide Connection diagram for the navigation system Radio aerial Speedometer / speedometer cable signal Sound system / loudspeaker GPS antenna Indianapolis Pro Reverse signal Power supply Note: Connection options are described in detail on Page 123.
-
Page 100: Installation Of The Gps Antenna
Installation Guide Installation of the GPS antenna Risk of injury People with pacemakers should avoid physical contact with the magnetic antenna and should not carry the antenna on their person, as this may affect the function of the pacemaker. Keep the magnetic antenna away from data storage media (disks, credit cards, magnetic cards etc.) and electronic and precision engineering equipment, as this may cause data to be deleted.
-
Page 101
Installation Guide • Inside the vehicle The GPS antenna is not suitable for installation in vehicles with anti-glare windows (metalised thermo-glass or metal foil (can be seen on the window label — SIGLA SOL, SIGLA CHROM, SIGLA, KOOL-OF, SUNGATE, etc.) and vehicles with fine-meshed heating wires in the windows. Information on installation position When selecting the installation position, ensure that the antenna has a clear view in all directions, and that it is not covered by the windscreen wipers. -
Page 102
Installation Guide a. Secure the antenna to the base plate (1) with magnets. b. Remove protective strip from top of adhesive tape (2) and stick to the centre of the base plate underside. c. Remove protective strip from bottom of adhesive tape (2) and stick the antenna and base plate onto the vehicle console beneath the windscreen at the installation position. -
Page 103: Installation Of The Microphone
Installation Guide Installation of the microphone The microphone should be placed in the vehicle to allow optimal recognition of the speaker’s voice. Possible positions in the vehicle for the microphone can be seen in the following diagram. The installation position should be as far away from the loudspeakers, and as near to the speaker, as possible. If prob- lems occur, different positions should be tested.
-
Page 104
Installation Guide Connecting a microphone to the Indianapolis Pro Insert the plug on the microphone connecting cable (A) into the jack provided (with the stop spring facing upwards) on the rear of the Indianapolis Pro. Microphone connection… -
Page 105: Connection Of The Reverse Signal
Installation Guide Connection of the reverse signal The pick-up points for the reverse signal vary from vehicle to vehicle. If you are in any doubt, please contact your vehicle manufacturer or authorised specialist workshop. If the switch on the gearbox or shift linkage is accessible: •…
-
Page 106: Connection Of The Speed Signal (Gal) From The Speedometer/Speedometer Cable
Installation Guide Connection of the speed signal (GAL) from the speedometer/speedometer cable Accident hazard Incorrectly connected wiring may result in damage to or destruction of vehicle components and safety devices. If you are in any doubt, please contact your vehicle manufacturer or authorised specialist workshop. Electronic speedometer •…
-
Page 107
Installation Guide Mechanical speedometer with built-in speed sensor in the speedometer cable • Remove the signal from the speed sensor, extend and connect to socket A pin 1. GAL signal • Minimum requirement for the signal: 0 Hz — 4 kHz / square-wave signal (no inductive sensor) Low — level <… -
Page 108
Installation Guide Installing the speed sensor directly on the gearbox • Release the speedometer cable and screw speed sensor onto gear- box. Screw released speedometer cable onto the speed sensor and connect the wires. Cable connections for the speed sensor Brown earth (terminal 31) Black… -
Page 109: Installation/Removal Of The Unit
Installation Guide Installation/Removal of the unit • Installation: A universal bracket for DIN installation slots is integrated into this unit. An installation frame is not required. The unit is inserted into the installation slot and secured with the slides supplied. To install, complete all electrical connections.
-
Page 110: Using Gps For The First Time And Sensors
Installation Guide Using GPS for the first time, and sensors • Switch on the vehicle ignition to start using GPS for the first time and for the sensor test. Switching on the unit. Enter the code (see the operation guide for a detailed description). •…
-
Page 111
Installation Guide • When using the GPS for the first time, the vehicle must be parked outdoors, while ensuring that it has a clear view in all directions (not in the immediate vicinity of buildings). Information on the GPS reception is given in the right-hand part of the display. -
Page 112: Installation Of The Navigation Software
Installation Guide Installation of the Navigation Software • Press • Insert the Navigation CD to install the software for the navigation system. • After the navigation software has been installed, the adjacent dis- play appears. The language selection is then requested. •…
-
Page 113: Calibration
Installation Guide Calibration After commissioning, a calibration journey is required. During the jour- ney, the speed signal (GAL) is automatically adapted to the vehicle-spe- cific data and the gyro sensor is automatically adapted to the installation position of the unit. The distance to be covered depends on the type of vehicle and the local conditions.
-
Page 114
Installation Guide you should check the GPS reception conditions again (as under Serv- ice Mode in the Section Function test of the GPS antenna (GPS-INFO 116). As soon as the display with the request CALIBRATION RIDE CAN appears, the calibration journey can be started. START! A calibration journey can also be performed in a non-digitised area. -
Page 115: Service Mode
Installation Guide • Calibration has been completed successfully if the main navigation menu is displayed. • For correct navigation on routes with time-dependent traffic guid- ance, the time should be set correctly as described under “System settings” in the operation guide. Service Mode In Service Mode, various functions can be checked in detail and the cal- ibration can be modified.
-
Page 116
Installation Guide The following functions can be selected in the Service Mode: • GPS-INFO — Test of GPS Function • — Function to delete the calibration or to enter a CALIBRATION new calibration • — Calibration Journey Display CALIBRATION RIDE •… -
Page 117
Installation Guide Changing the calibration ( CALIBRATION Deleting the calibration: If the navigation system is removed from one vehicle and installed in another, the calibration must be performed again. However, to do so, the current calibration data must be deleted. In the Service Mode, select CALIBRATION with the right rotary… -
Page 118
Installation Guide Unit rotation corresponds to horizontal rotation. A positive val- ue means rotation of the front of the unit towards the driver (LHD). The unit inclination can now be selected in degrees by turning the right rotary control and pressing to confirm. Unit inclination corresponds to vertical inclination. -
Page 119
Installation Guide Enter the correct tyre size using the right rotary control and confirm the entry by pressing for more than 2 seconds. The letter “R” cannot be entered. 3 numbers must be entered be- fore and after the slashes. Insert a “0” before any missing num- bers. -
Page 120
Installation Guide Status of the calibration journey ( CALIBRATION RIDE In the Service Mode, select CALIBRATION RIDE with the right rota- ry control and press to confirm. The calibration status (i.e. ) and the type of positioning STATUS: 2 (i.e. ) are displayed. -
Page 121
Installation Guide • Engage the reverse gear for the reverse signal function test. The number value after must jump from REV. In order to quit the sensor test, press the button. The unit switches back to the Service Mode. Test language ( SPEECH TEST A test program is used to test the voice. -
Page 122
Installation Guide Demo Mode ( DEMO The Demo Mode is intended for demonstration purposes. A fixed loca- tion is given to the unit (Hamburg Werderstaße). • In the Service Mode, select with the right rotary control DEMO and press to confirm. Select between by briefly pressing the right rotary control… -
Page 123: Connections
LineOut right front Illumination (Terminal 58) Subwoofer LineOut Switched positive (Terminal 15) Socket C2 Earth (Terminal 31) 7-12 Specific connection for Becker CD changer Socket B Socket C3 Loudspeaker right rear + Loudspeaker right rear — AF – Telephone input Loudspeaker right front + Earth –…
Обновлено: 18.05.2023

Посмотреть инструкция для Becker Indianapolis Pro 7953 бесплатно. Руководство относится к категории Автомагнитолы, 3 человек(а) дали ему среднюю оценку 8.7. Руководство доступно на следующих языках: английский. У вас есть вопрос о Becker Indianapolis Pro 7953 или вам нужна помощь? Задайте свой вопрос здесь
Содержание
- Setting the bass
- Setting the treble
- Fader
- Setting the balance
- Linear adjustment
- Adjusting the volume of the subwoofer or centre speaker
- Switching loudness on / off
- Selecting a country
- Entering a destination
- Selecting destination via post code
- Entering the destination town
- Entering the destination town centre
- Destination input via coordinates
- Setting time
- Saving position
- Selecting a game
- Setting the language
- Animation
- Switching announcement of arrival time on /off
- Selecting the units of measurement
- Influencing the calculation of ETA
- Switching the speed limits display on/off
- Setting the time display
- Activating / quitting the TP menu
- Switching TP on / off
- Selecting automatic tracking
- Selecting / cancelling direct programming
- Switching mute on/off
- Interrupting TP announcements
- TP Announcement volume
- Display for receivable TMC stations
- Notes on compact discs (CD)
- Inserting / ejecting CDs
- Forward / backward track skipping
- Scan search
- Fast forward / reverse
- Track repeat
- Random play
- Setting the GAL (Gal)
- Telephone mute function (Tel)
- Display brightness (Lum)
- LED setting
- Setting reception optimisation (M/S)
- Setting navigation announcements (Nav)
- AUX input (Aux)
- Display compass (Cmp)
- Signal tone volume (BeV)
- RDS SYSTEM
- DAS Seek Qual. level
- DAS Seek Name level
- RDS Stations level
- Stations Fix level
- PTY (programme type)
- Prior to installation
- Symbols used in the installation guide
- Safety instructions
- Installation instructions
- Connection diagram for the navigation system
- Installation of the GPS antenna
- Installation of the microphone
- Connection of the reverse signal
- Connection of the speed signal (GAL) from the speedometer/speedometer cable
- Installation/Removal of the unit
- Using GPS for the first time, and sensors
- Installation of the Navigation Software
- Calibration
- Service Mode
- Connections
Нужна помощь?
У вас есть вопрос о Becker а ответа нет в руководстве? Задайте свой вопрос здесь Дай исчерпывающее описание проблемы и четко задайте свой вопрос. Чем детальнее описание проблемы или вопроса, тем легче будет другим пользователям Samsung Galaxy A7 предоставить вам исчерпывающий ответ.
Количество вопросов: 0
Технические характеристики Becker Indianapolis Pro 7953
Ниже вы найдете технические характеристики изделия и руководства по эксплуатации Becker Indianapolis Pro 7953.
| Бренд | Becker |
| Модель | Indianapolis Pro 7953 |
| Изделие | Автомагнитола |
| EAN | 4029627002125 |
| Язык | английский |
| Тип файла |
| Тип дисплея | — |
| Количество цветов экрана | Монохромный |
| Сенсорный экран | Нет |
Часто задаваемые вопросы
Не можете найти ответ на свой вопрос в руководстве? Вы можете найти ответ на свой вопрос ниже, в разделе часто задаваемых вопросов о Becker Indianapolis Pro 7953.
FM означает «частотная модуляция», AM — «амплитудная модуляция». Основная разница между FM- и AM-радиостанциями состоит в качестве звука.
Уровень звука выше 80 децибел может нанести вред слуху. Уровень звука выше 120 децибел может нанести прямое повреждение слуху. Вероятность повреждения слуха зависит от частоты и продолжительности прослушивания.
Если автомобильный радиоприемник не включен, на него не будет подаваться питание. Убедитесь, что красный провод подключен к контактному источнику питания, а желтый провод — к источнику питания постоянной мощности.
Для удаления отпечатков пальцев лучше всего использовать слегка влажную салфетку для уборки или мягкую чистую ткань. Пыль в труднодоступных местах лучше всего удаляется потоком сжатого воздуха.
Bluetooth — это способ обмена данными по беспроводной сети между электронными устройствами с помощью радиоволн. Расстояние между двумя устройствами обменивающимися данными в большинстве случаев составляет не более десяти метров.
К сожалению, у нас нет руководства для Becker Indianapolis Pro 7953, доступного в русский. Это руководство доступно в английский.
Похожие руководства по эксплуатации

Becker Indianapolis Pro 7950

Becker Indianapolis Pro 7951

Becker Indianapolis Pro 7952

Kicker CX600.1
Caliber MCD 795
ManualsPDF . ru

Посмотреть инструкция для Becker Indianapolis Pro 7951 бесплатно. Руководство относится к категории Автомагнитолы, 1 человек(а) дали ему среднюю оценку 6.8. Руководство доступно на следующих языках: английский. У вас есть вопрос о Becker Indianapolis Pro 7951 или вам нужна помощь? Задайте свой вопрос здесь
Содержание
- Setting the bass
- Setting the treble
- Fader
- Setting the balance
- Linear adjustment
- Adjusting the volume of the subwoofer or centre speaker
- Switching loudness on / off
- Selecting a country
- Entering a destination
- Selecting destination via post code
- Entering the destination town
- Entering the destination town centre
- Destination input via coordinates
- Setting time
- Saving position
- Selecting a game
- Setting the language
- Animation
- Switching announcement of arrival time on /off
- Selecting the units of measurement
- Influencing the calculation of ETA
- Switching the speed limits display on/off
- Setting the time display
- Activating / quitting the TP menu
- Switching TP on / off
- Selecting automatic tracking
- Selecting / cancelling direct programming
- Switching mute on/off
- Interrupting TP announcements
- TP Announcement volume
- Display for receivable TMC stations
- Notes on compact discs (CD)
- Inserting / ejecting CDs
- Forward / backward track skipping
- Scan search
- Fast forward / reverse
- Track repeat
- Random play
- Setting the GAL (Gal)
- Telephone mute function (Tel)
- Display brightness (Lum)
- LED setting
- Setting reception optimisation (M/S)
- Setting navigation announcements (Nav)
- AUX input (Aux)
- Display compass (Cmp)
- Signal tone volume (BeV)
- RDS SYSTEM
- DAS Seek Qual. level
- DAS Seek Name level
- RDS Stations level
- Stations Fix level
- PTY (programme type)
- Prior to installation
- Symbols used in the installation guide
- Safety instructions
- Installation instructions
- Connection diagram for the navigation system
- Installation of the GPS antenna
- Installation of the microphone
- Connection of the reverse signal
- Connection of the speed signal (GAL) from the speedometer/speedometer cable
- Installation/Removal of the unit
- Using GPS for the first time, and sensors
- Installation of the Navigation Software
- Calibration
- Service Mode
- Connections
Нужна помощь?
У вас есть вопрос о Becker а ответа нет в руководстве? Задайте свой вопрос здесь Дай исчерпывающее описание проблемы и четко задайте свой вопрос. Чем детальнее описание проблемы или вопроса, тем легче будет другим пользователям Samsung Galaxy A7 предоставить вам исчерпывающий ответ.
Количество вопросов: 0
Технические характеристики Becker Indianapolis Pro 7951
Ниже вы найдете технические характеристики изделия и руководства по эксплуатации Becker Indianapolis Pro 7951.
| Бренд | Becker |
| Модель | Indianapolis Pro 7951 |
| Изделие | Автомагнитола |
| EAN | 4029627002101 |
| Язык | английский |
| Тип файла |
| Тип дисплея | — |
| Количество цветов экрана | Монохромный |
| Сенсорный экран | Нет |
Часто задаваемые вопросы
Не можете найти ответ на свой вопрос в руководстве? Вы можете найти ответ на свой вопрос ниже, в разделе часто задаваемых вопросов о Becker Indianapolis Pro 7951.
FM означает «частотная модуляция», AM — «амплитудная модуляция». Основная разница между FM- и AM-радиостанциями состоит в качестве звука.
Уровень звука выше 80 децибел может нанести вред слуху. Уровень звука выше 120 децибел может нанести прямое повреждение слуху. Вероятность повреждения слуха зависит от частоты и продолжительности прослушивания.
Если автомобильный радиоприемник не включен, на него не будет подаваться питание. Убедитесь, что красный провод подключен к контактному источнику питания, а желтый провод — к источнику питания постоянной мощности.
Для удаления отпечатков пальцев лучше всего использовать слегка влажную салфетку для уборки или мягкую чистую ткань. Пыль в труднодоступных местах лучше всего удаляется потоком сжатого воздуха.
Bluetooth — это способ обмена данными по беспроводной сети между электронными устройствами с помощью радиоволн. Расстояние между двумя устройствами обменивающимися данными в большинстве случаев составляет не более десяти метров.
К сожалению, у нас нет руководства для Becker Indianapolis Pro 7951, доступного в русский. Это руководство доступно в английский.
Похожие руководства по эксплуатации
Becker Indianapolis Pro 7950

Becker Indianapolis Pro 7953
Becker Indianapolis Pro 7952
Kicker CX600.1
Caliber MCD 795
ManualsPDF . ru

Посмотреть инструкция для Becker Indianapolis Pro 7950 бесплатно. Руководство относится к категории Автомагнитолы, 6 человек(а) дали ему среднюю оценку 8.3. Руководство доступно на следующих языках: английский. У вас есть вопрос о Becker Indianapolis Pro 7950 или вам нужна помощь? Задайте свой вопрос здесь
Содержание
- Setting the bass
- Setting the treble
- Fader
- Setting the balance
- Linear adjustment
- Adjusting the volume of the subwoofer or centre speaker
- Switching loudness on / off
- Selecting a country
- Entering a destination
- Selecting destination via post code
- Entering the destination town
- Entering the destination town centre
- Destination input via coordinates
- Setting time
- Saving position
- Selecting a game
- Setting the language
- Animation
- Switching announcement of arrival time on /off
- Selecting the units of measurement
- Influencing the calculation of ETA
- Switching the speed limits display on/off
- Setting the time display
- Activating / quitting the TP menu
- Switching TP on / off
- Selecting automatic tracking
- Selecting / cancelling direct programming
- Switching mute on/off
- Interrupting TP announcements
- TP Announcement volume
- Display for receivable TMC stations
- Notes on compact discs (CD)
- Inserting / ejecting CDs
- Forward / backward track skipping
- Scan search
- Fast forward / reverse
- Track repeat
- Random play
- Setting the GAL (Gal)
- Telephone mute function (Tel)
- Display brightness (Lum)
- LED setting
- Setting reception optimisation (M/S)
- Setting navigation announcements (Nav)
- AUX input (Aux)
- Display compass (Cmp)
- Signal tone volume (BeV)
- RDS SYSTEM
- DAS Seek Qual. level
- DAS Seek Name level
- RDS Stations level
- Stations Fix level
- PTY (programme type)
- Prior to installation
- Symbols used in the installation guide
- Safety instructions
- Installation instructions
- Connection diagram for the navigation system
- Installation of the GPS antenna
- Installation of the microphone
- Connection of the reverse signal
- Connection of the speed signal (GAL) from the speedometer/speedometer cable
- Installation/Removal of the unit
- Using GPS for the first time, and sensors
- Installation of the Navigation Software
- Calibration
- Service Mode
- Connections
Нужна помощь?
У вас есть вопрос о Becker а ответа нет в руководстве? Задайте свой вопрос здесь Дай исчерпывающее описание проблемы и четко задайте свой вопрос. Чем детальнее описание проблемы или вопроса, тем легче будет другим пользователям Samsung Galaxy A7 предоставить вам исчерпывающий ответ.
Мне нужен код от модэли beker BE 7955
Привет. Я знаю код доступа модели Becker be7950 (код 63166), но сообщается, что логин был неправильным. Не могли бы вы помочь, пожалуйста?
Привет. Я знаю код доступа модели Becker be7950 (код 63166), но сообщается, что логин был неправильным. Не могли бы вы помочь, пожалуйста?
Количество вопросов: 3
Технические характеристики Becker Indianapolis Pro 7950
Ниже вы найдете технические характеристики изделия и руководства по эксплуатации Becker Indianapolis Pro 7950.
| Бренд | Becker |
| Модель | Indianapolis Pro 7950 |
| Изделие | Автомагнитола |
| EAN | 4029627002095 |
| Язык | английский |
| Тип файла |
| Тип дисплея | — |
| Количество цветов экрана | Монохромный |
| Сенсорный экран | Нет |
Часто задаваемые вопросы
Не можете найти ответ на свой вопрос в руководстве? Вы можете найти ответ на свой вопрос ниже, в разделе часто задаваемых вопросов о Becker Indianapolis Pro 7950.
FM означает «частотная модуляция», AM — «амплитудная модуляция». Основная разница между FM- и AM-радиостанциями состоит в качестве звука.
Уровень звука выше 80 децибел может нанести вред слуху. Уровень звука выше 120 децибел может нанести прямое повреждение слуху. Вероятность повреждения слуха зависит от частоты и продолжительности прослушивания.
Если автомобильный радиоприемник не включен, на него не будет подаваться питание. Убедитесь, что красный провод подключен к контактному источнику питания, а желтый провод — к источнику питания постоянной мощности.
Для удаления отпечатков пальцев лучше всего использовать слегка влажную салфетку для уборки или мягкую чистую ткань. Пыль в труднодоступных местах лучше всего удаляется потоком сжатого воздуха.
Bluetooth — это способ обмена данными по беспроводной сети между электронными устройствами с помощью радиоволн. Расстояние между двумя устройствами обменивающимися данными в большинстве случаев составляет не более десяти метров.
К сожалению, у нас нет руководства для Becker Indianapolis Pro 7950, доступного в русский. Это руководство доступно в английский.
Похожие руководства по эксплуатации
Becker Indianapolis Pro 7953
Becker Indianapolis Pro 7951
Becker Indianapolis Pro 7952
Kicker CX600.1

Soundstream VIR-7850
ManualsPDF . ru

Вернее ето будет Becker Trafiic Pro с телефоном и mp3 
Всем доброго времени, сразу скажу для етого нам понадобится донор Becker Trafiic Pro…
После покупки Becker Trafiic Pro, козалось ето идеальная магнитола для W124.Очень понравелось инвертированная подсветка дисплея, особено ночию!И вот нахожу другую магнитоллу, тоже от Harman/Becker…Becker Indianapolis Pro!Но там дисплей скучный да и по дизаину она мне не очень, у Trafiic Pro даже крутилка громкости приятнее…но ето субъективно.
В один день меня посещяет мысль поменять передние панели местами…а вдруг?

Делаем те же манипуляций с другой магнитоллой, и просто меняим ’’лицца’’местами всё встаёт «bolt on».
Теперь мы имеем новую магнитоллу Becker Indianapolis Trafiic Pro :D, грубо говоря у нас получился Traffic Pro но с подключением телефона и уже с mp3.
У моей Traffic Pro на панельке отслоилась глянцевая накладка, ето ихняя болезнь, но так даже лудще теперь она матовая в глаза не бросается.
А теперь о минусах и плюсах етой процедуры.
Минусы…
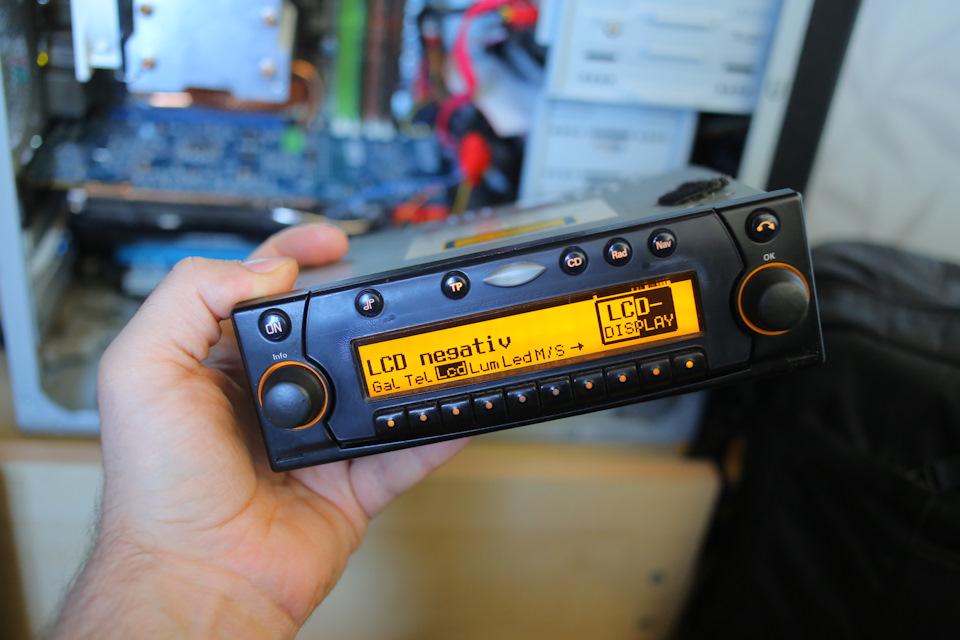
Тоесть когда включяем габариты на дисплее будет светлыи фон и темные символы

Но ето только при выборе автоматической подсветки, если поставять LCD на positiv то будет светлые символы-тёмныи фон…так и оставляем.
Кнопка телефона теперь у нас будет кнопка TP, как и в Indianapolis в ней устроены обе функций и телефона и TP.
Плюсы…у нас есть подключение телефона тоесть исключяем разные блоки и провода по салону и ето божественно!
Также имеем mp3!
И конечно же инвертированная подсветка!и вместе с мозгами от Indianapolis нам достаётся еше одна функция…когда включяем габариты подсветка притухает и еше мы можем регулировать её яркость!
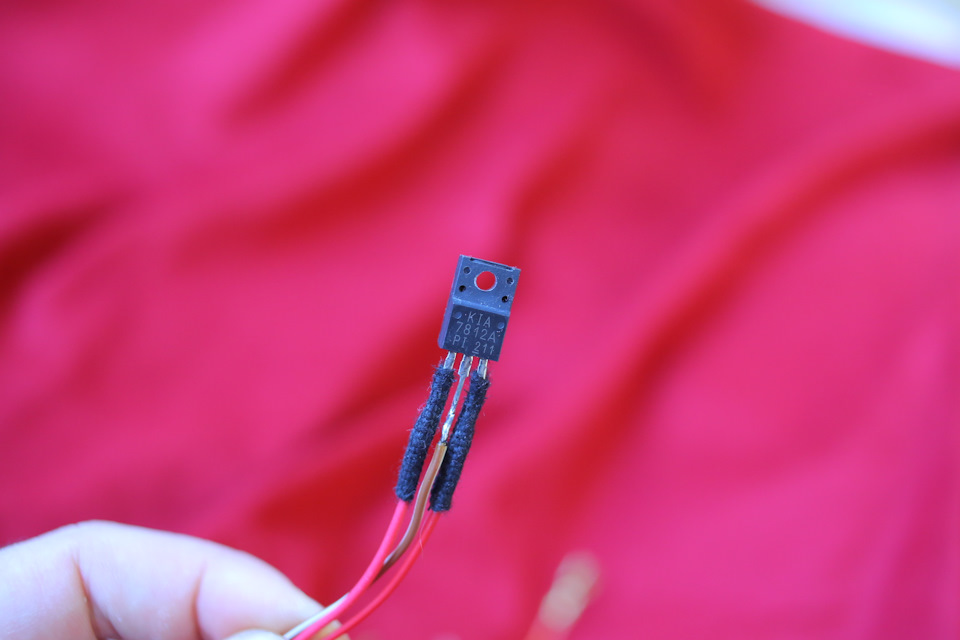
Но есть одно но!Я заметил что при включений габаритов и заведёном двигателе подсветка не притухала…именно на заведёном движке!Я решил ету задачу включением в цепь подсветки к магнетолле стабилизатора напряжения на 12в.
И еще важно!После первого пуска не доходя до набора кода магнитоллы подсведка тухнет!Без паники!ставим код(не забывая ставить код от Indianapolis)…лезем в настроику дисплея а именно «Lum»и видим там значение 31!Наченаем убовлять и она появляется навсегда!)…Ето будет только при обесточиваний магнитоллы.
Сама операция не сложная мне больше времени заняло написать етот текст))за орфографию не бейте больно, на русском почти не пишу.Всем Мира!
Торговая марка Becker хорошо известна владельцам преимущественно одной элитной марки. Речь идет о Мерседес и одной из первых штатных магнитол, установленных на этих машинах. В продаже или у владельцев можно найти ряд моделей, начиная с одних из первых кассетных версий, заканчивая мультимедийной моделью BE 7434. Данные устройства отличаются продуманным функциональным дизайном и надежностью исполнения, по интерфейсу подходят к BMW, Audi, Porsche. Наш обзор, в свою очередь, касается моментов, чем магнитола Becker на Мерседес отличается от подобных девайсов. В конце приводится небольшая инструкция по установке и распиновка.
Автомагнитола на мерседес
Когда речь идет об установке Becker, невозможно не упомянуть о доступных б/у устройствах. Они могут обеспечить автомобилистов некогда элитных марок отличным качеством звука при доступной стоимости. Устройства поддерживают радио, кассетный магнитофон, при этом можно подключить виртуальный CD-чейнджер, а также рулевое управление и автоотключение. Причем, как это характерно для элитной техники, в этот момент включается блокировка, для желающих украсть раритетный девайс.
О моделях, функциях и интерфейсах
Модель BE 1350 выпускалась в трех версиях Classic, Special, Exquisit. Соответственно, устанавливалась в автомобили с разной комплектацией. Предлагается и Traffic Pro, среди любителей стильных девайсов популярна Becker Mexico Retro, которая и сейчас доступна в продаже на сайте производителя.
Магнитола Becker 1350
BE 1350 и Traffic Pro имеют базовый набор функций, который считается достаточным для эксплуатации в настоящее время. Для обновленной Becker Mexico Retro имеет смысл перечислить набор современных функций:
- система речевого диалога;
- Bluethooth;
- телефон;
- интернет;
- картридер;
- навигация с помощью карт CF;
- синхронизация с iPod и смартфонами;
- система объемного звучания
Как обычно, любая штатная магнитола Becker выполняется только из высококачественных материалов.

Штатная автомагнитола
Подключение
Инструкция по эксплуатации BE 1350 предписывает такой алгоритм:
- при включении питания на экране появится надпись CODE с мигающей С;
- введите свой код разблокировки нажатием соответствующих клавиш с цифрами;
- вводимый код высвечивается на экране, при корректных цифрах нажмите после SC;
- магнитола должна заработать.
Для интересующихся приводим распиновку разъемов и дополнительную информацию из инструкции.
Как правило, эксплуатация не требует дополнительных действий. Если вы собираетесь отключать устройство, возможно, потребуется дополнительный ввод кода.
Мультимедийная магнитола
Используйте следующую распиновку:

- подключите к питанию;
- подключите CAN-шину;
- подключите оптоволоконный АГВ;
- настройте Мерседес Бенц COMAND.
Последняя рекомендация по настройке Мерседес Бенц COMAND не обязательна, но желательна, так как вы можете использовать расширенный набор мультимедийных возможностей. Речь идет о новейшей системе управления салоном, которая присутствует в некоторых машинах этой марки и существенно упрощает эксплуатацию.
Читайте также:
- Как удлинить вилку на иж
- Что может стучать в трамблере
- Нужна ли магнитола с экраном
- Амарок не работают стеклоподъемники
- Омега б не работает спидометр
После визита на СТО встал вопрос ввода кода, которого как оказалось у меня нет.
Первым делом кинулся прочитать мануал по магнитоле, запись там «введите код который указан на специальной карте». Супер! если бы она еще и была.
Вообщем расстроился жутко! Объездил всех электронщиков никто браться не захотел, да и суть процесса выпайки микрочипа, сброс и повторная прошивка как-то не впечатлила.
Решил воспользоваться гуглом, попал на сайт типа помощи по любому вопросу и тупо от фонаря написал модель серийник магнитолы.
На этом и забил им совсем заниматься. Решил подобрать что-нидь порпоще.
И к моему удивлению через пару часов на мыло приходит сообщение типа вам ответили! Захожу на сайт а там тип пишет вот тебе код! И О ЧУДО ОН ПОДОШЕЛ!
Вообщем кому интересно пишите подскажу где искал, у него кстати и для Рэно, ситроена, мерсов, бэшек… вообщем для многих серийных магнитол коды
Цена вопроса: 0 ₽
Пробег: 97 000 км
инструкцияBecker Indianapolis Pro 7950

Operation Guide / Installation Guide
Betjeningsvejledning / Monteringsvejledning
Bruksanvisning / Monteringsanvisning
Посмотреть инструкция для Becker Indianapolis Pro 7950 бесплатно. Руководство относится к категории автомагнитолы, 10 человек(а) дали ему среднюю оценку 8.2. Руководство доступно на следующих языках: английский. У вас есть вопрос о Becker Indianapolis Pro 7950 или вам нужна помощь? Задайте свой вопрос здесь
- Safety instructions
- Information regarding general road safety
- Arrangement of controls
- Anti-theft device
- General Operation
- Navigation mode
- Radio mode
- CD mode
- MP3 mode
- CD changer mode
- Telephone mode
- User settings
- Service menu
- Explanation
- Technical terminology glossary
- Index
- Technical data
- NOTICE
- Installation Guide
Нужна помощь?
У вас есть вопрос о Becker а ответа нет в руководстве? Задайте свой вопрос здесь Дай исчерпывающее описание проблемы и четко задайте свой вопрос. Чем детальнее описание проблемы или вопроса, тем легче будет другим пользователям Becker предоставить вам исчерпывающий ответ.
Владимир • 12-1-2022Нет комментариев
Эльчин • 10-11-2021Нет комментариев
Привет. Я знаю код доступа модели Becker be7950 (код 63166), но сообщается, что логин был неправильным. Не могли бы вы помочь, пожалуйста?

Посмотреть фото
Эльчин • 10-11-2021Нет комментариев
Привет. Я знаю код доступа модели Becker be7950 (код 63166), но сообщается, что логин был неправильным. Не могли бы вы помочь, пожалуйста?

Посмотреть фото
Tigran • 4-4-2023Нет комментариев
Код рвзблокировки BE 7950. Serial number 65010934
Марина • 27-8-2022Нет комментариев
После неправильно введённого кода заблокировала. Через сутки блокировка не отключилась.пишет Coge lait.
Количество вопросов: 5

Главная
| Becker | |
| Indianapolis Pro 7950 | 1658.867 | |
| автомагнитола | |
| 4029627002095 | |
| английский | |
| Руководство пользователя (PDF) |
Экран
| Тип дисплея | — |
| Количество цветов экрана | Монохромный |
| Сенсорный экран | Нет |
Порты и интерфейсы
Производительность
Мультимедиа
| Поддерживаемые форматы аудио | MP3, WMA |
показать больше
Не можете найти ответ на свой вопрос в руководстве? Вы можете найти ответ на свой вопрос ниже, в разделе часто задаваемых вопросов о Becker Indianapolis Pro 7950.
В чем разница между FM и AM?
Когда звук считается слишком громким?
Автомобильный радиоприемник не включается, что делать?
Как лучше всего выполнять чистку автомагнитола?
Инструкция Becker Indianapolis Pro 7950 доступно в русский?
Не нашли свой вопрос? Задайте свой вопрос здесь
sirius_65
Просто заглянул
- Сообщения
- 1
- Реакции
- 0
- Город
-
vaivara
- Авто
-
VW Passat 6 2.0 disel 2006
-
#1
люди помогите найти инструкцию на русском для becker indianapolis pro а то не получается ни навигацию запустить ни телефон может кто скинит на адресок Sirius_65@rambler.ru заранее большое спасибо.
lexa_na_Polo
Постоянный участник
- Сообщения
- 25
- Реакции
- 6
- Город
-
москва
- Авто
-
polo, 1.4 BUD 59кВт/80л.с. 2007г.