
Wireless Keyboard + Mouse Kits User’s Manual
A. FEDERAL COMMUNICATIONS COMMISSION (FCC) STATEMENT
This equipment has been tested and found to comply with the limits for a Class B digital device, Pursuant to Part 15 the
FCC rules. These limits are designed to provide reasonable protection against harmful interference in a residential
installation. This equipment generates, uses and can radiate radio frequency energy and, if not installed and used in
accordance with the instructions, may cause harmful interference to radio communications. However, there is no
guarantee that interference will not occur in a particular installation. If this equipment does cause harmful interference
will not occur in a particular installation. If this equipment does cause harmful interference to radio or television reception,
which can be determined by turning the equipment off and on, the user is encouraged to try to correct the interference
by one or more of the following measures:
● Reorient or relocate the receiving antenna.
● Increase the separation between the equipment and receiver.
● Connect the equipment into an outlet on a circuit different from that to which the receiver is connected.
● Consult the dealer or an experienced radio/TV technician for help.
This device complies with part 15 of the FCC rules. Operation is subject to the following two conditions: (1) This device
may not cause harmful interference, and (2) This device must accept any interference received, including interference
that may cause undesired operation.
Industry Canada Statement:
This device complies with RSS-210 of the Industry Canada Rules. Operation is subject to the following two conditions:
(1) This device may not cause harmful interference, and (2) this device must accept any interference received, including
interference that may cause undesired operation.
Ce dispositif est conforme à la norme CNR-210 d’Industrie Canada applicable aux appareils radio exempts de licence.
Son fonctionnement est sujet aux deux conditions suivantes: (1) le dispositif ne doit pas produire de brouillage
préjudiciable, et (2) ce dispositif doit accepter tout brouillage reçu, y compris un brouillage susceptible de provoquer un
fonctionnement indésirable.
WARNING:
Use only shielded cables to connect I/O devices to this equipment. You are cautioned that changes or modifications not
expressly approved by the party responsible for compliance could void your authority to operate the equipment.
CAUTION: AVOID PROLONGED USE OF THE KEYBOARD WITHOUT BREAKS.
Take regular breaks and keep a good posture. Consult your physician promptly if you notice any lost of motion or pain in
your wrist when using the keyboard.
IMPORTANT BATTERY INFORMATION
● Keep batteries out of reach of children.
● Insert the batteries in the proper direction as indicated by the positive (+) and negative (-) markings in the battery
compartment.
● Do not mix old and new batteries or batteries of different types (for example, carbon and alkaline batteries).
● Always remove old, weak, or worn-out batteries promptly and recycle or proper disposal of them in accordance with
Local and National Disposal Regulations.
● If a battery leaks, remove all batteries and recycle or dispose of them in accordance with the battery manufacture’s
instructions and Local and National Disposal Regulations. Before inserting new batteries, thoroughly clean the
compartment with a damp paper towel, or follow the battery manufacture’s recommendations for cleanup. If fluid from
the battery comes into contact with skin or clothes, flush skin with water immediately.
● Remove the batteries if your device is to be stored for an extended period of time without being used.
PRODUCT DISPOSAL INFORMATION
Dispose of this product in accordance with Local and National Disposal Regulations.

Wireless Keyboard + Mouse Kits User’s Manual
B. PRODUCT SPECIFICATION
1. Power requirement: 3V
2. Battery : Keyboard : 2 pieces of AAA Batteries
Mouse : 2 pieces of AAA Batteries
3. Battery life time : Keyboard : 900 hours reference (operating mode)
Mouse : 300 hours reference (operating mode)
4. Operation distance : Keyboard : 10 M without signal disturbance and no direction limit.
Mouse : 10 M without signal disturbance and no direction limit.
5. Mouse resolution : 1000 DPI
6. System OS support: Windows 2000/XP/Vista/Windows 7
7. Operating temperature : 0°C ~ +40°C
8. Storage temperature : -40°C ~ +65°C
Getting Started
Thank you for choosing this 2.4G Wireless keyboard and Mouse Kits. It operates with digital radio technology to ensure
no hinder communication between the keyboard, the mouse and your computer without connecting cable.
The transmission and receiving of keyboard and mouse are free from angle restriction.
Features
● Complies with Directive 1995/5/EC of the European Parliament and Commission.
● Complies with the mutual recognition of conformity 1999 for radio and telecommunications Equipment.
● Manufactured with environmental friendly recycled materials.
● Fully compliant with original USB version 2.0 and HID Version 1.11.
Preparing Keyboard, mouse and receiver
Before working with your new keyboard and mouse, look at the «Hardware Installation», and take a few one-time
preparations.
Hardware Installation
● Place the receiver at least 20 cm from other electrical devices (e.g. monitor) to achieve optimum performance.
● The distance between the keyboard, mouse and receiver should not exceed 10 M.
● Do not place the receiver on metal surfaces.
● Do not move optical mouse on following surface — Glass or any transparent materials
Dark surface
Mirror or reflecting surface
Mouse pad with too many colors
Rough surface.
Step 1: Connect the receiver
● Take out the Dongle inside of the mouse battery door.
● Plug the dongle connector into an USB port.
● SYSTEM will take around 10 sec to find your keyboard and mouse automatically.
Step 2: Insert batteries
Inserting batteries in mouse
The mouse requires two alkaline AAA batteries.
● Remove the battery compartment cover on the bottom of the mouse
● First push the battery puller in then insert two AAA batteries into battery compartment.
● Fix the battery compartment cover on the bottom of mouse again.
CAUTION: Risk of explosion if battery is replaced by an incorrect type. Dispose of used batteries according to
instructions. Refer to «Important Battery Information» for disposal instructions.
Inserting batteries in keyboard
The keyboard requires two alkaline batteries (AAA).
● Remove the battery compartment cover on the bottom of the keyboard by pushing it in the direction of arrow.
● Insert two AAA batteries.
Software Installation for Displaying Modes
This software supports Windows 2000/XP/Vista/Windows 7.
Install the software to display keyboard and mouse modes:
● Start the computer and insert the CD ROM.
● Start the «Setup «program from the CD ROM and follow the instruction on the screen.
Wireless Keyboard + Mouse Kits User’s Manual
Once you have installed the software, the following symbols will display on Windows taskbar.
The symbol is green when the respective mode is activated and light grey when it is deactivated.
Uppercase mode (Caps Lock)
Virtual numeric keypad (Num Lock)
Stop screen output (Scroll Lock)
Working with keyboard and mouse
The following sections contain information on using the keyboard and the mouse.
Mouse
In addition to two buttons, the mouse also has a wheel that can be used as follows:
● As a 3rd button: press on the wheel.
● For scrolling, e.g. in documents or on Internet pages: turn the wheel forward or back.
Keyboard
Function keys and Hotkeys definitions:
Combination Keys Function
Press Vista key to open Start Manu
Press Application key is same as Right Mouse key to open function Manu
Fn + Combine keys to skip to the forward title in the active player.
Fn + Combine keys to Start or Pause the soundtrack in active player.
Fn + Combine keys to end the soundtrack or video.
Fn + Combine keys to skip to the next title in the active player
Press this key to On/Off the volume.
Press this key to decreasing the volume.
Press this key to increasing the volume.
Low Battery Instruction
a. Keyboard battery indicator
The battery indicator on the screen shows you the status of the batteries. If the battery indicator lights up when a key is
pressed, the batteries are gradually becoming weaker. Replace them in the near time
b. Mouse battery indicator
The battery indicator on the screen shows you the status of the batteries. If the battery indicator lights up when you are
using the mouse, the batteries are gradually becoming weaker. Replace them in the near time.
Advice of using the keyboard
Inconvenient arrangement of the input and output devices, awkward arm movements or posture, or working with the
keyboard for lengthy periods without a break can lead to tenseness, fatigue, and damage to the locomotors system
(nerves, muscles, tendons, and joints).
You can considerably reduce the risk of this happening if you follow the advice given below.
● Position the keyboard so that you can use it without any noticeable strain. The keyboard should be level with the
upper part of you body. This prevents any tension in the shoulders and arms.
● The distance between the keyboard and the edge of the desk should be 5 to 10 cm.
● When typing, hold your hands and forearms so that they form as natural a line as possible. Do not turn your hands too
far to the left or right.
● Keep your wrists straight while typing. Do not angle your hands upwards or downwards.
● Do not rest your hands on the balls of your thumbs while typing, and do not strike the keys too hard.
● Relax your hands by occasionally taking a break from typing. During these breaks you should rest your hands on the
balls of your thumbs or place your arms on the armrests of your chair.
Cleaning the keyboard and the mouse
● Use disinfectant wipes to clean the keyboard and the mouse.
● Do not use any dissolvent, which may damage the surface of your keyboard and mouse.
Keyboard battery low indicator
Mouse battery low indicator

Wireless Keyboard + Mouse Kits User’s Manual
Troubleshooting and tips
The keyboard or mouse does not operate following installation or is not recognized.
● Make sure that the batteries have been inserted correctly according to the polarity and the receiver is well connected.
● Check that your USB port is configured properly.
● Make the connection between the receiver, keyboard and mouse. Follow “Hardware Installation”/“Step 3”/Connection.
● Make sure the batteries are not too weak.
● Remove the batteries from the device. Please press any button on the device several times to prevent any
unexpected failure after batteries being put in.
● Change the location of the receiver to have a best sensitivity.
● To determine whether the keyboard, mouse or computer causes the problem test the keyboard and mouse on another
computer if possible; or test another keyboard and mouse on your current computer.
If you are still unable to solve the problem, please contact your point of sale or your dealer.
If you need to exchange the keyboard, please note that you must return it to your dealer in its original packaging and
also a produce proof of purchase (receipt). Keep your receipt in a safe place after purchase.
 Доброго времени суток!
Беспроводная клавиатура, должен вам сказать, это крайне удобная вещь! 😉
Во-первых, вы не стеснены в расположении, всегда можете сдвинуть ее в сторону или убрать со стола, если понадобилось пространство.
Во-вторых, с ней можно «отсесть» подальше от ПК и использовать ее как пульт (например, весьма удобно в различных играх).
В-третьих, эта вещь универсальная, и ее можно подключить и к классическому ПК, и к ноутбуку, и к мобильному устройству под Андроид. Согласитесь, весьма не плохо?! ☝
В этой заметке приведу несколько примеров подключения беспроводной (радиочастотной и Bluetooth версий) клавиатуры к компьютеру с Windows и телефону с Android. Получится своего рода инструкция…
📌 Важно!
Если вы играете в динамичные игры, где важна каждая милисекунда — имейте ввиду, что беспроводные клавиатуры обладают большим инпут-лагом, чем проводные. Более подробно по этой теме тут: https://ocomp.info/kak-uluchshit-plavnost-v-igrah.html
⁕
Содержание статьи
- 1 Подключение клавиатуры: по шагам
- 1.1 Радиочастотная модель с адаптером (к компьютеру с Windows)
- 1.2 Bluetooth-версия (к компьютеру с Windows)
- 1.2.1 Если возникла ошибка «Повторите подключение устройства»
- 1.3 Bluetooth-версия (к телефону с Android)

→ Задать вопрос | дополнить
Подключение клавиатуры: по шагам
Радиочастотная модель с адаптером (к компьютеру с Windows)
Наиболее распространенная версия клавиатуры. Идеально подходит для классических компьютеров. В комплектацию этой версии клавиатуры входит небольшой адаптер (выглядит как мини-флешка), подключаемый к USB-порту.
Отмечу, что настройка радиочастотной клавиатуры — наиболее проста по сравнению со всеми остальными типами…
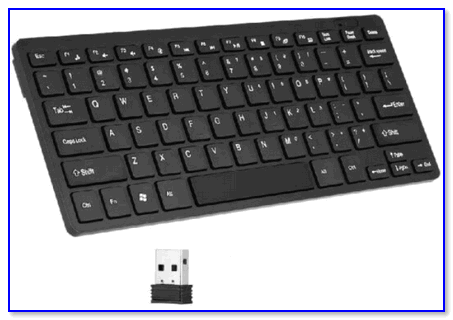
Типовая радиочастотная клавиатура с адаптером
Теперь о подключении…
1) Итак, первое действие: подключаем адаптер к USB-порту компьютера (ноутбука) и устанавливаем батарейку в клавиатуру.
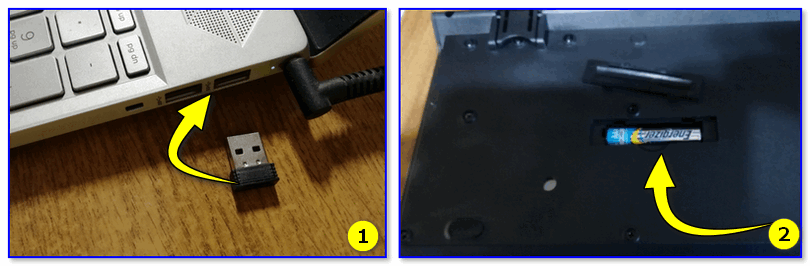
Подключение радиочастотной клавиатуры
2) Внимательно осматриваем корпус клавиатуры — на большинстве моделей есть спец. переключатель: его нужно перевести в режим «ON» (то бишь «включен»). См. пример ниже на скрине.
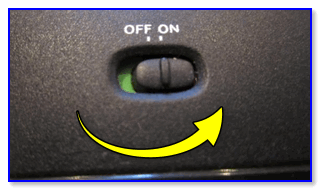
Переводим переключатель в положение ON
3) Включаем компьютер.
4) Открываем какой-нибудь редактор (Word, например) и пробуем нажать несколько клавиш. В подавляющем большинстве случаев — Windows автоматически распознает клавиатуру и с ней уже можно работать…
5) Если у вас необычная клавиатура (например, со спец. клавишами для геймеров) — может потребоваться обновить драйвер. Лучше всего использовать для этого ту версию драйвера, которая шла в комплекте к клавиатуре. Впрочем, можно обновить и с помощью спец. утилит.
*
Bluetooth-версия (к компьютеру с Windows)
Эти клавиатуры идут без спец. адаптера. Как правило, стоят они несколько дороже радиочастотных, зато их можно подключать к устройствам, у которых нет даже USB-порта (что очень удобно в некоторых случаях).
Пожалуй, единственная проблема с ними — более сложное сопряжение устройств между собой (в некоторых случаях приходится повозиться с этим Bluetooth соединением).
📌 Примечание!
Кстати, если вы сопрягаете клавиатуру с классическим ПК — возможно вам понадобится адаптер Bluetooth (встроенная версия есть далеко не на всех ПК). Более подробно об этом тут =>
*
Пример подключения
1) Сначала нужно нажать по значку Bluetooth в трее (рядом с часами) и выбрать опцию «Добавить устройство».
📌 В помощь! Пропал значок Bluetooth: как его добавить в трей рядом с часами [инструкция] — https://ocomp.info/propal-znachok-bluetooth.html
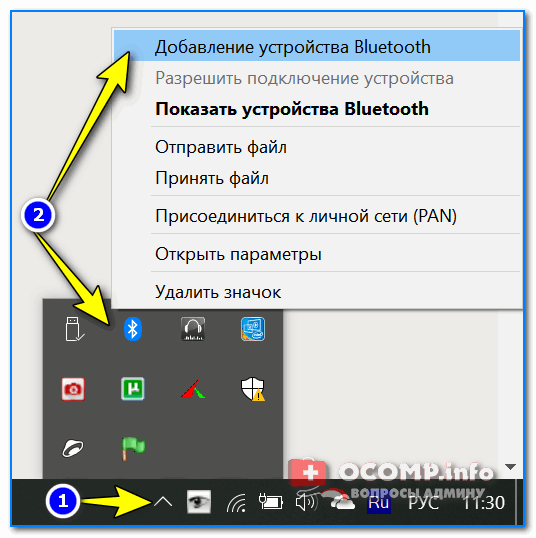
Добавление устройства Bluetooth
Кстати, если у вас ОС Windows 10/11 — можно зайти в параметры в раздел «Устройства» и начать сопряжение оттуда (см. два скриншота ниже).
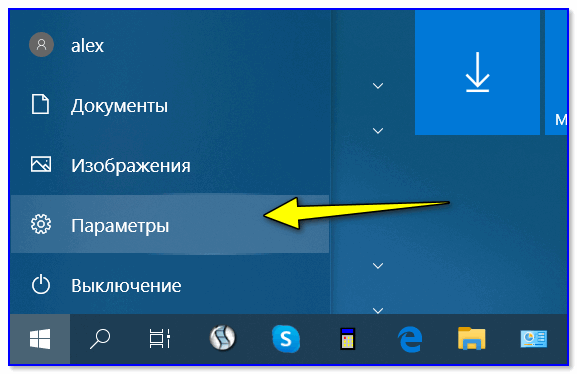
Параметры Windows 10
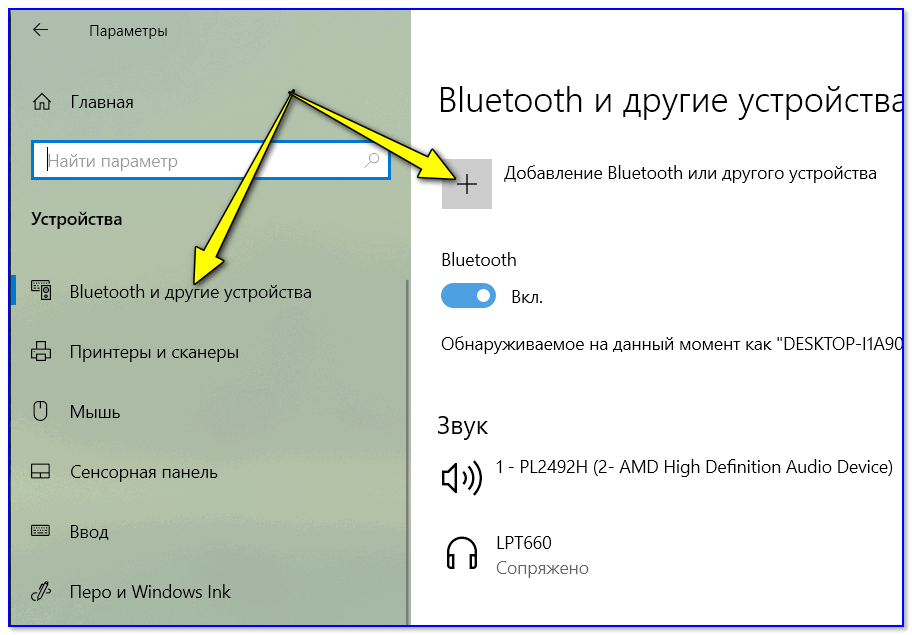
Добавление Bluetooth устройства
2) Далее установите батарейки в клавиатуру и включите ее (переведя режим переключателя в «ON»). После нажмите на кнопку «Connect» (это необходимо, чтобы клавиатура могла быть найдена компьютером).
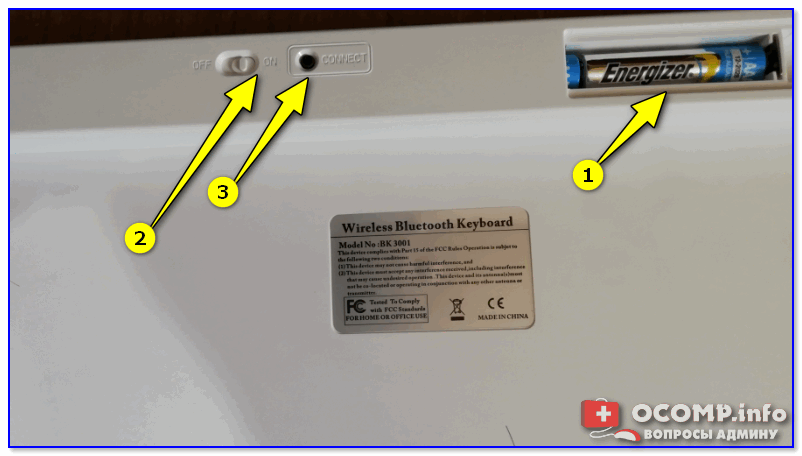
Включаем и жмем кнопку соединения на клавиатуре
3) Во всплывшем окне Windows выберите тип подключаемого устройства — «мыши, клавиатуры, перья и т.д.».
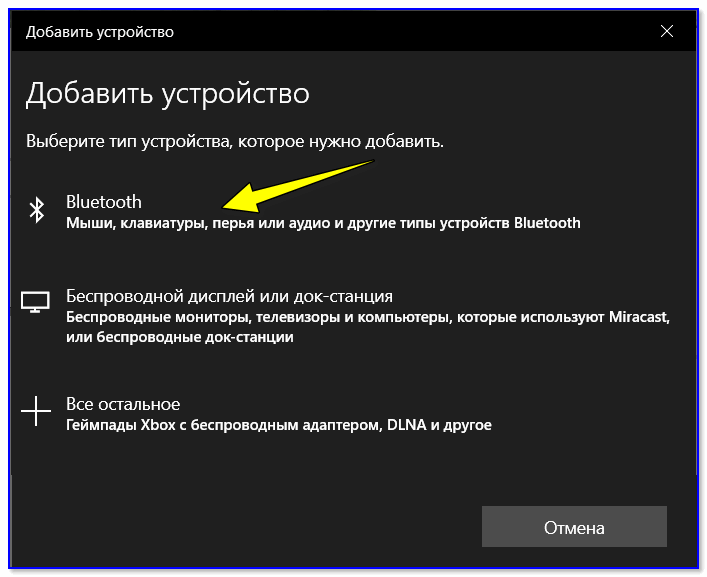
Выбор типа устройства — клавиатура или мышь
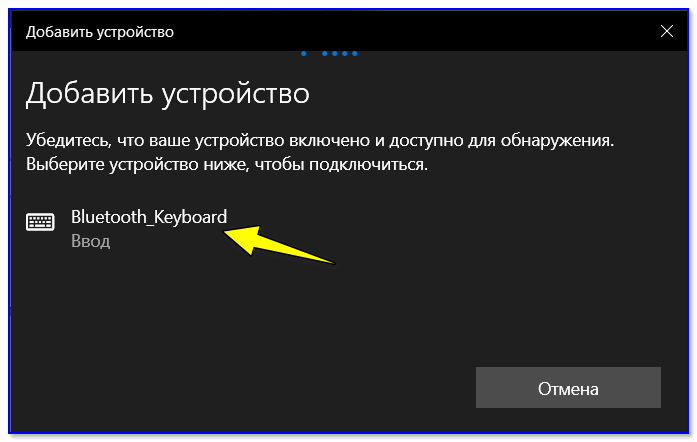
4) Если с клавиатурой все в порядке — в списке найденных устройств должна отобразиться «Bluetooth Keyboard» (либо просто модель устройства). Для сопряжения с ней — просто нажмите на нее ЛКМ.
Выбираем устройство
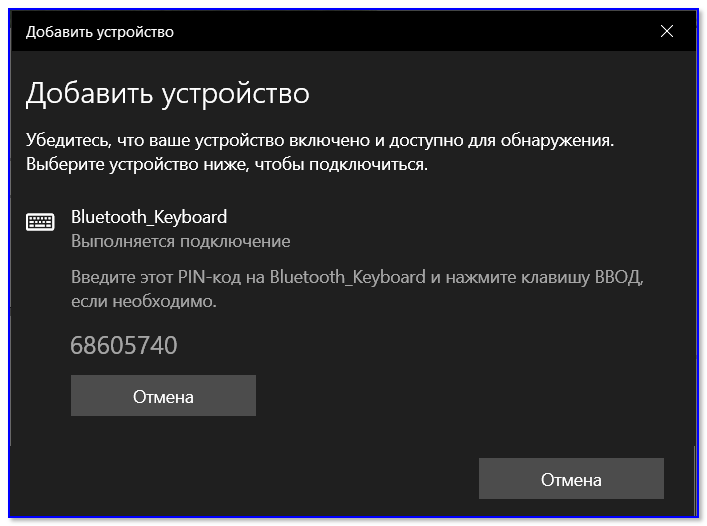
5) Далее нужно ввести PIN-код на клавиатуре и нажать Enter. Цифры нужно вводить те, которые расположены над буквами (не с цифрового блока справа).
Вводим на клавиатуре следующие цифры и жмем Enter
6) Если все прошло успешно — Windows сообщит, что устройство готово к использованию (пример на скриншотах ниже).

Ваше устройство готово к использованию!
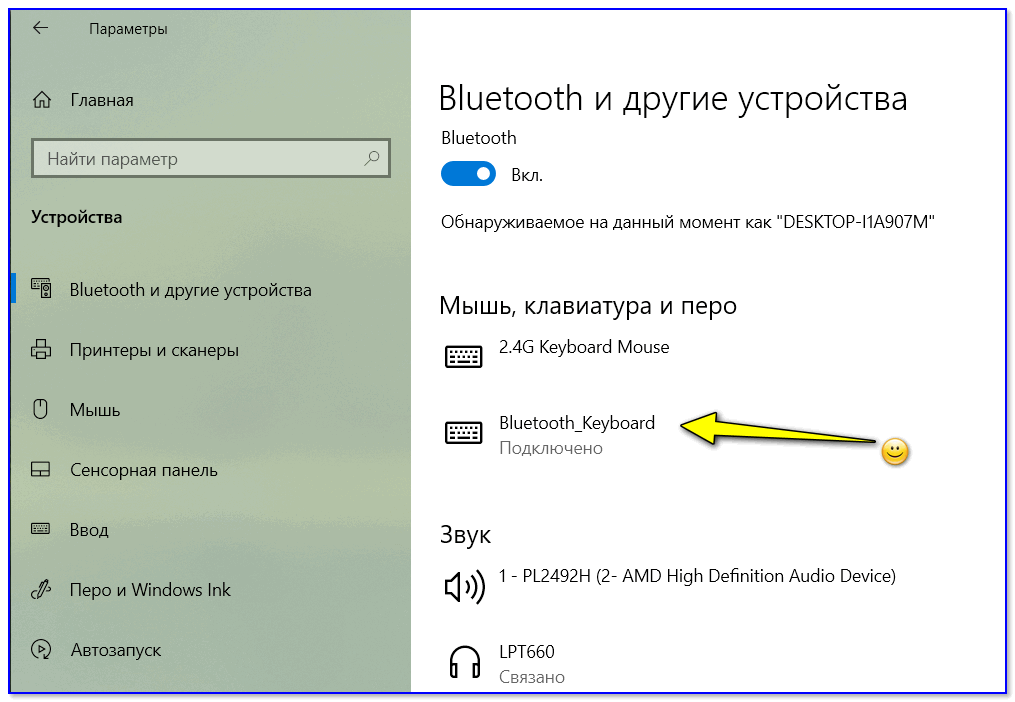
Клавиатура подключена!
*
Если возникла ошибка «Повторите подключение устройства»
Подобная ошибка возникает, обычно, в следующих случаях:
- вы неверно ввели PIN-код, отображавшейся в окне Windows (например, сделали это с цифрового блока);
- слишком долго вводили PIN-код (постарайтесь уложиться в 10-сек., после появления информационного окна);
- клавиатура находится слишком далеко от компьютера;
- батарейки сели и устройство не может корректно работать;
- есть проблемы с Bluetooth драйверами…
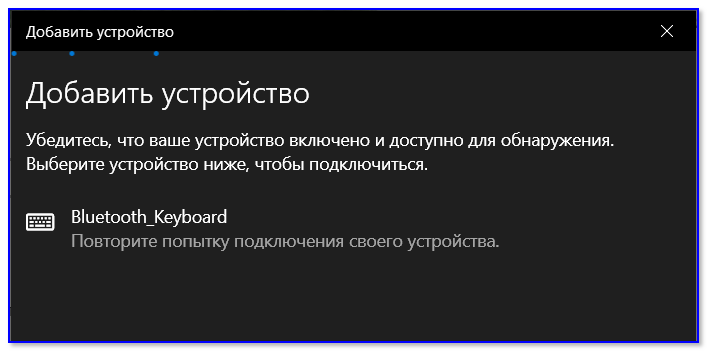
Если возникла ошибка — повторите подключение своего устройства
Для устранения ошибки порекомендовал бы попробовать: выключить клавиатуру и перезагрузить компьютер. Далее в списке подключенных Bluetooth устройств удалить всё неизвестное (и клавиатуры, если они там будут). Затем начать заново процедуру сопряжения.
*
Bluetooth-версия (к телефону с Android)
1) Первое действие стандартно: устанавливаем батарейки в клавиатуру, включаем ее и нажимаем кнопку «Connect» (начало сопряжения).
Включаем и жмем кнопку соединения на клавиатуре
2) Далее открываем настройки Андроид, переходим в раздел «Подключение устройства / Bluetooth».
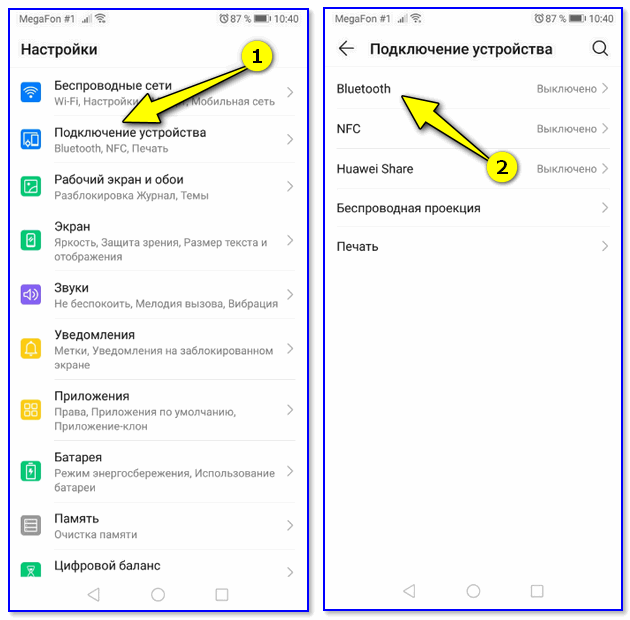
Открываем настройки Bluetooth на телефоне
3) Включаем Bluetooth и ждем, пока телефон найдет клавиатуру. Обратите внимание, что, если у вас на клавиатуре есть спец. режимы работы (например, для Windows, Android, и пр.) — в этот момент стоит нажать на спец. сочетание (в моем примере это Fn+W, см. скрины ниже).
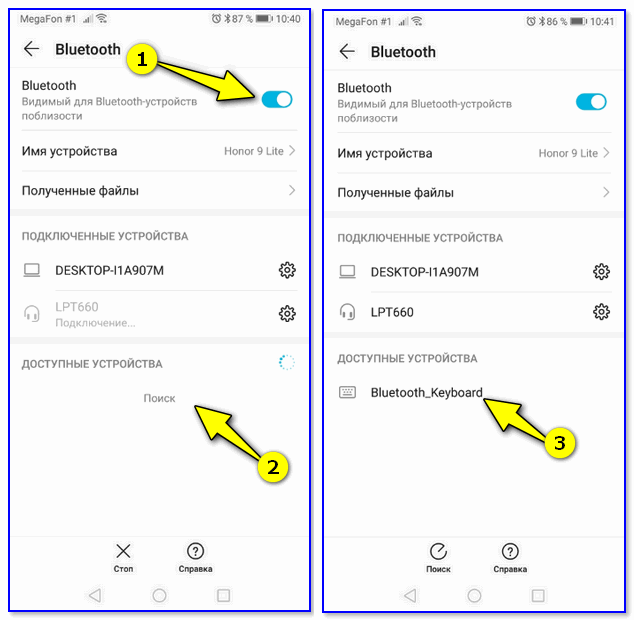
Поиск устройств
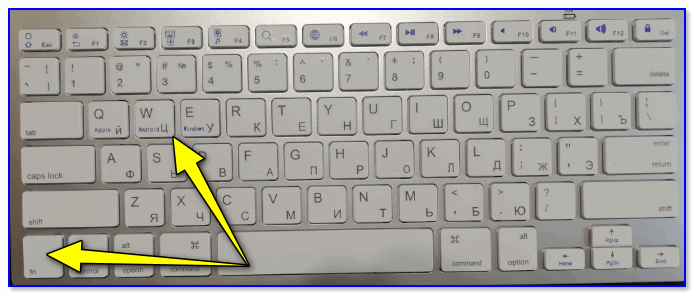
For Android — Fn+W
4) Далее на экране появится специальный код, который нужно ввести на клавиатуре и нажать Enter (кстати, цифры нужно использовать те, которые над буквами, т.к. цифровой блок на клавиатуре часто не работает при сопряжении).
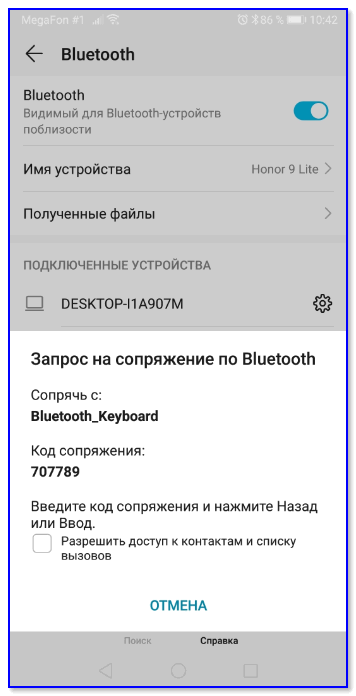
Запрос на сопряжение — введите код
5) Если сопряжение прошло успешно — Андроид сообщит, что клавиатура подключена и предложит выбрать раскладку. В своем примере, кстати, я использовал Google-документы — клавиатура работает, можно быстро набирать тексты даже на телефоне! 👇
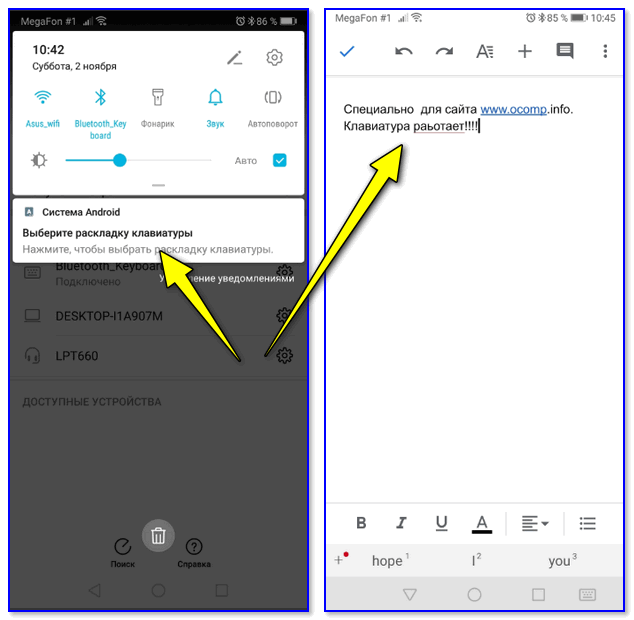
Проверка клавиатуры в Google-документах
⁕
На сим сегодня все…
Всем удачного подключения!
👋
Первая публикация: 06.11.2019
Корректировка заметки: 20.02.2022


Полезный софт:
-

- Видео-Монтаж

Отличное ПО для создания своих первых видеороликов (все действия идут по шагам!).
Видео сделает даже новичок!
-
- Ускоритель компьютера

Программа для очистки Windows от «мусора» (удаляет временные файлы, ускоряет систему, оптимизирует реестр).
Wireless Keyboard + Mouse Kits
B. PRODUCT SPECIFICATION
1. Power requirement: 3V
2. Battery : Keyboard : 2 pieces of AAA Batteries
Mouse : 2 pieces of AAA Batteries
3. Battery life time : Keyboard : 900 hours reference (operating mode)
Mouse : 300 hours reference (operating mode)
4. Operation distance : Keyboard : 10 M without signal disturbance and no direction limit.
Mouse : 10 M without signal disturbance and no direction limit.
5. Mouse resolution : 1000 DPI
6. System OS support: Windows 2000/XP/Vista/Windows 7
7. Operating temperature : 0°C ~ +40°C
8. Storage temperature : -40°C ~ +65°C
Getting Started
Thank you for choosing this 2.4G Wireless keyboard and Mouse Kits. It operates with digital radio technology to ensure
no hinder communication between the keyboard, the mouse and your computer without connecting cable.
The transmission and receiving of keyboard and mouse are free from angle restriction.
Features
● Complies with Directive 1995/5/EC of the European Parliament and Commission.
● Complies with the mutual recognition of conformity 1999 for radio and telecommunications Equipment.
● Manufactured with environmental friendly recycled materials.
● Fully compliant with original USB version 2.0 and HID Version 1.11.
Preparing Keyboard, mouse and receiver
Before working with your new keyboard and mouse, look at the «Hardware Installation», and take a few one-time
preparations.
Hardware Installation
● Place the receiver at least 20 cm from other electrical devices (e.g. monitor) to achieve optimum performance.
● The distance between the keyboard, mouse and receiver should not exceed 10 M.
● Do not place the receiver on metal surfaces.
● Do not move optical mouse on following surface —
Step 1: Connect the receiver
● Take out the Dongle inside of the mouse battery door.
● Plug the dongle connector into an USB port.
● SYSTEM will take around 10 sec to find your keyboard and mouse automatically.
Step 2: Insert batteries
Inserting batteries in mouse
The mouse requires two alkaline AAA batteries.
● Remove the battery compartment cover on the bottom of the mouse
● First push the battery puller in then insert two AAA batteries into battery compartment.
● Fix the battery compartment cover on the bottom of mouse again.
CAUTION: Risk of explosion if battery is replaced by an incorrect type. Dispose of used batteries according to
instructions. Refer to «Important Battery Information» for disposal instructions.
Inserting batteries in keyboard
The keyboard requires two alkaline batteries (AAA).
● Remove the battery compartment cover on the bottom of the keyboard by pushing it in the direction of arrow.
● Insert two AAA batteries.
Software Installation for Displaying Modes
This software supports Windows 2000/XP/Vista/Windows 7.
Install the software to display keyboard and mouse modes:
● Start the computer and insert the CD ROM.
● Start the «Setup «program from the CD ROM and follow the instruction on the screen.
Glass or any transparent materials
Dark surface
Mirror or reflecting surface
Mouse pad with too many colors
Rough surface.
User’s Manual
Мы стараемся максимально лояльно подходить к выбору способов доставки товаров из нашего магазина, чтобы наши клиенты получали необходимое качество по наименьшей цене.
Курьером по городу
Курьером (пн-пт). Курьер доставит товар в день заказа с 18 до 21.00 (при условии, что заказ сформирован до 18.00), либо вечером следующего дня (если заказ сформирован после 18.00).
Самовывозом
Вы можете забрать заказанный на сайте товар в любой день и удобное Вам время. Часы работы и контактный телефон магазина можно узнать здесь. Забронированный товар будет дожидаться Вас в течении двух рабочих дней.
|
Wireless Keyboard + Mouse Kits |
User’s Manual |
A. FEDERAL COMMUNICATIONS COMMISSION (FCC) STATEMENT
This equipment has been tested and found to comply with the limits for a Class B digital device, Pursuant to Part 15 the FCC rules. These limits are designed to provide reasonable protection against harmful interference in a residential installation. This equipment generates, uses and can radiate radio frequency energy and, if not installed and used in accordance with the instructions, may cause harmful interference to radio communications. However, there is no guarantee that interference will not occur in a particular installation. If this equipment does cause harmful interference will not occur in a particular installation. If this equipment does cause harmful interference to radio or television reception, which can be determined by turning the equipment off and on, the user is encouraged to try to correct the interference by one or more of the following measures:
●Reorient or relocate the receiving antenna.
●Increase the separation between the equipment and receiver.
●Connect the equipment into an outlet on a circuit different from that to which the receiver is connected.
●Consult the dealer or an experienced radio/TV technician for help.
This device complies with part 15 of the FCC rules. Operation is subject to the following two conditions: (1) This device may not cause harmful interference, and (2) This device must accept any interference received, including interference that may cause undesired operation.
Industry Canada Statement:
This device complies with RSS-210 of the Industry Canada Rules. Operation is subject to the following two conditions:
(1) This device may not cause harmful interference, and (2) this device must accept any interference received, including interference that may cause undesired operation.
Ce dispositif est conforme à la norme CNR-210 d’Industrie Canada applicable aux appareils radio exempts de licence. Son fonctionnement est sujet aux deux conditions suivantes: (1) le dispositif ne doit pas produire de brouillage préjudiciable, et (2) ce dispositif doit accepter tout brouillage reçu, y compris un brouillage susceptible de provoquer un fonctionnement indésirable.
WARNING:
Use only shielded cables to connect I/O devices to this equipment. You are cautioned that changes or modifications not expressly approved by the party responsible for compliance could void your authority to operate the equipment.
CAUTION: AVOID PROLONGED USE OF THE KEYBOARD WITHOUT BREAKS.
Take regular breaks and keep a good posture. Consult your physician promptly if you notice any lost of motion or pain in your wrist when using the keyboard.
IMPORTANT BATTERY INFORMATION
●Keep batteries out of reach of children.
●Insert the batteries in the proper direction as indicated by the positive (+) and negative (-) markings in the battery compartment.
●Do not mix old and new batteries or batteries of different types (for example, carbon and alkaline batteries).
●Always remove old, weak, or worn-out batteries promptly and recycle or proper disposal of them in accordance with Local and National Disposal Regulations.
●If a battery leaks, remove all batteries and recycle or dispose of them in accordance with the battery manufacture’s instructions and Local and National Disposal Regulations. Before inserting new batteries, thoroughly clean the compartment with a damp paper towel, or follow the battery manufacture’s recommendations for cleanup. If fluid from the battery comes into contact with skin or clothes, flush skin with water immediately.
●Remove the batteries if your device is to be stored for an extended period of time without being used.
PRODUCT DISPOSAL INFORMATION
Dispose of this product in accordance with Local and National Disposal Regulations.

|
Wireless Keyboard + Mouse Kits |
User’s Manual |
B. PRODUCT SPECIFICATION
1.Power requirement: 3V
2.Battery : Keyboard : 2 pieces of AAA Batteries
Mouse : 2 pieces of AAA Batteries
3. Battery life time : Keyboard : 900 hours reference (operating mode) Mouse : 300 hours reference (operating mode)
4. Operation distance : Keyboard : 10 M without signal disturbance and no direction limit. Mouse : 10 M without signal disturbance and no direction limit.
5.Mouse resolution : 1000 DPI
6.System OS support: Windows 2000/XP/Vista/Windows 7
7.Operating temperature : 0°C ~ +40°C
8.Storage temperature : -40°C ~ +65°C
Getting Started
Thank you for choosing this 2.4G Wireless keyboard and Mouse Kits. It operates with digital radio technology to ensure no hinder communication between the keyboard, the mouse and your computer without connecting cable.
The transmission and receiving of keyboard and mouse are free from angle restriction.
Features
●Complies with Directive 1995/5/EC of the European Parliament and Commission.
●Complies with the mutual recognition of conformity 1999 for radio and telecommunications Equipment.
●Manufactured with environmental friendly recycled materials.
●Fully compliant with original USB version 2.0 and HID Version 1.11.
Preparing Keyboard, mouse and receiver
Before working with your new keyboard and mouse, look at the «Hardware Installation», and take a few one-time preparations.
Hardware Installation
●Place the receiver at least 20 cm from other electrical devices (e.g. monitor) to achieve optimum performance.
●The distance between the keyboard, mouse and receiver should not exceed 10 M.
●Do not place the receiver on metal surfaces.
|
● Do not move optical mouse on following surface — |
Glass or any transparent materials |
|
Dark surface |
|
|
Mirror or reflecting surface |
|
|
Mouse pad with too many colors |
|
|
Rough surface. |
Step 1: Connect the receiver
●Take out the Dongle inside of the mouse battery door.
●Plug the dongle connector into an USB port.
●SYSTEM will take around 10 sec to find your keyboard and mouse automatically.
Step 2: Insert batteries
Inserting batteries in mouse
The mouse requires two alkaline AAA batteries.
●Remove the battery compartment cover on the bottom of the mouse
●First push the battery puller in then insert two AAA batteries into battery compartment.
●Fix the battery compartment cover on the bottom of mouse again.
CAUTION: Risk of explosion if battery is replaced by an incorrect type. Dispose of used batteries according to instructions. Refer to «Important Battery Information» for disposal instructions.
Inserting batteries in keyboard
The keyboard requires two alkaline batteries (AAA).
●Remove the battery compartment cover on the bottom of the keyboard by pushing it in the direction of arrow.
●Insert two AAA batteries.
Software Installation for Displaying Modes
This software supports Windows 2000/XP/Vista/Windows 7.
Install the software to display keyboard and mouse modes:
●Start the computer and insert the CD ROM.
●Start the «Setup «program from the CD ROM and follow the instruction on the screen.
Highlight all
Match case
Current View
Current View
Enter the password to open this PDF file:
File name:
—
File size:
—
Title:
—
Author:
—
Subject:
—
Keywords:
—
Creation Date:
—
Modification Date:
—
Creator:
—
PDF Producer:
—
PDF Version:
—
Page Count:
—
Preparing document for printing…
0%
Беспроводная комбинированная клавиатура и мышь msi K32

Обзор
клавиатура

- Зарядный порт USB Type-C
- Включение / выключение питания
- Зарядный кабель типа C
мышь

- Боковая кнопка 1
- Боковая кнопка 2
- Колесо прокрутки
- Переключатель DPI
Предустановка переключаемого DPI: 800/1200/1600 Макс. DPI: 1600
Заявление BSMI
- Замена батареи на батарею неправильного типа, которая может нарушить защиту (например,ampт.е. в случае некоторых типов литиевых батарей);
- Бросание батареи в огонь или горячую духовку, механическое раздавливание или разрезание батареи, что может привести к взрыву;
- Если оставить аккумулятор в окружающей среде с очень высокой температурой, это может привести к взрыву или утечке воспламеняющейся жидкости или газа;
- Батарея, находящаяся под воздействием чрезвычайно низкого давления воздуха, может привести к взрыву или утечке воспламеняющейся жидкости или газа.
Настоящим MSI заявляет, что радиооборудование типа 8ZA4 / 8ZB4 / D32 соответствует Директиве 2014/53/ЕС. Полный текст декларации о соответствии ЕС доступен по следующему адресу в Интернете: www.msi.com. MSI-EUROPE Эйндховен 5706 5692 ER Сын.
Заявление о соответствии FCC
Это устройство соответствует требованиям части 15 правил FCC. Эксплуатация возможна при соблюдении следующих двух условий:
- Это устройство не должно вызывать вредных помех, и
- Это устройство должно принимать любые помехи, включая помехи, которые могут вызвать сбои в работе.
Это оборудование было протестировано и признано соответствующим ограничениям для цифровых устройств класса B в соответствии с частью 15 правил FCC. Эти ограничения разработаны для обеспечения разумной защиты от вредных помех при установке в жилых помещениях. Это оборудование генерирует, использует и может излучать радиочастотную энергию и, если оно установлено и используется не в соответствии с инструкциями, может создавать вредные помехи для радиосвязи. Однако нет гарантии, что помехи не возникнут при конкретной установке.
Если это оборудование действительно создает недопустимые помехи для приема радио или телевидения, что можно определить путем включения и выключения оборудования, пользователю рекомендуется попытаться устранить помехи одним или несколькими из следующих способов:
- Изменить ориентацию или местоположение приемной антенны.
- Увеличьте расстояние между оборудованием и приемником.
- Подключить оборудование к розетке в цепи, отличной от той, к которой подключен приемник.
- Обратитесь за помощью к дилеру или опытному радио / телевизионному технику.
Любые изменения или модификации, не одобренные явным образом стороной, ответственной за соответствие требованиям, могут привести к аннулированию права пользователя на эксплуатацию устройства. Если вместе с продуктом поставляются экранированные интерфейсные кабели или указаны дополнительные компоненты или аксессуары, которые в другом месте определены для использования при установке продукта, они должны использоваться для обеспечения соответствия требованиям FCC.
Заявление FCC о радиационном воздействии
Это устройство соответствует пределам радиационного воздействия FCC, установленным для неконтролируемой среды, а также части 15 правил FCC RF. Это оборудование не должно располагаться рядом или работать совместно с какой-либо другой антенной или передатчиком. Конечным пользователям и установщикам должны быть предоставлены инструкции по установке антенны, и они должны рассмотреть возможность удаления заявления о недопустимости совместного размещения.
Заявление о соответствии ISED
Это устройство содержит не требующие лицензии передатчик (и) / приемник (и), которые соответствуют не требующим лицензии RSS Канады в области инноваций, науки и экономического развития. Эксплуатация возможна при соблюдении следующих двух условий:
- Это устройство не должно вызывать помех.
- Это устройство должно принимать любые помехи, включая помехи, которые могут вызвать сбои в работе устройства.
Заявление о воздействии радиочастотного излучения
Устройство соответствует исключению из стандартных ограничений оценки в разделе 2.5 RSS 102 и соответствует требованиям RSS-102 к радиочастотному облучению, пользователи могут получить канадскую информацию о радиочастотном воздействии и соответствии требованиям.
Характеристики
- Клавиатура: Вход: 5 В постоянного тока/0.5 А
- Мышь: Вход: 5 В постоянного тока/0.5 А
- Приемопередатчик: Вход: 5 В постоянного тока/30 мА
- Диапазон частот: 2.40385-2.47985 ГГц
- Выходная мощность клавиатуры <-3 дБм
- Выходная мощность мыши <-25 дБм
- Выходная мощность трансивера <-0.5 дБм
Документы / Ресурсы
Рекомендации

MSI — Перенаправление