Understanding ATEM Mini
Learn how to get started with live production today!
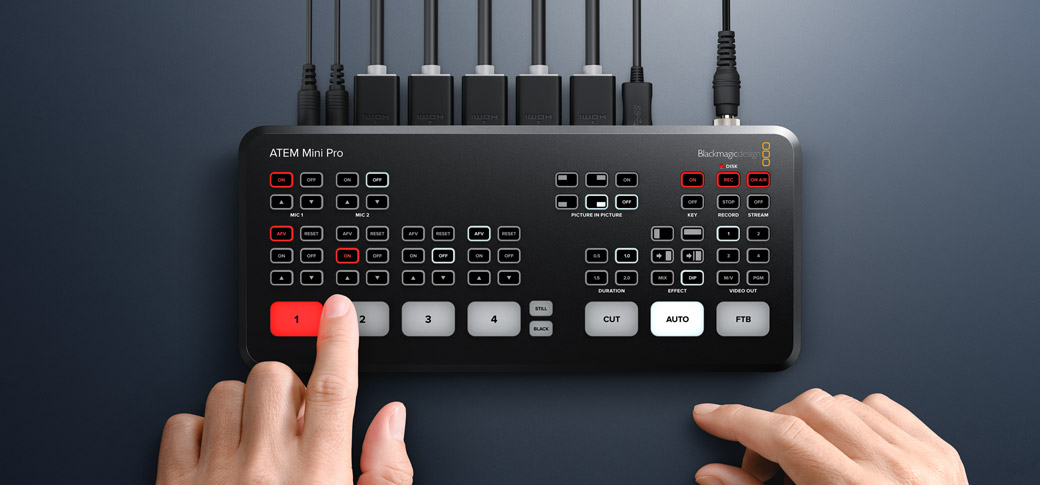
With ATEM Mini, it’s never been easier to get started with live streaming and multi camera video production! This section will show you how to connect and set up an ATEM Mini switcher so you can create your first live stream! ATEM Mini is a compact broadcast switcher that lets you switch 4 or 8 HDMI video sources depending on the model, plus 2 dedicated audio sources and the output looks like a regular USB webcam that you can use with video software. ATEM Mini’s built in control panel has all the controls you need to make switching programs easy. Then if you want more power, just run ATEM Software Control to get access to the full feature set of ATEM Mini to create incredible effects and titles.
Find Reseller
Step 1
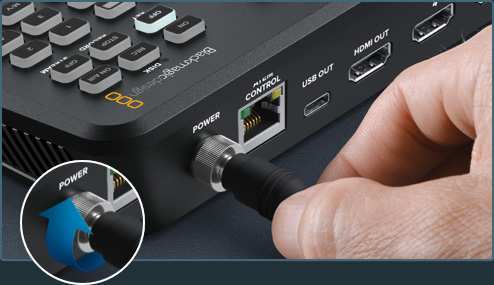
Connect Power
The first step is to plug in the power supply using the supplied power adapter. However most 12V power supplies will work fine, or even a 12V DC battery source will work fine. If you have a locking DC connector, then make sure to tighten it firmly.
Step 2
Connect Monitoring
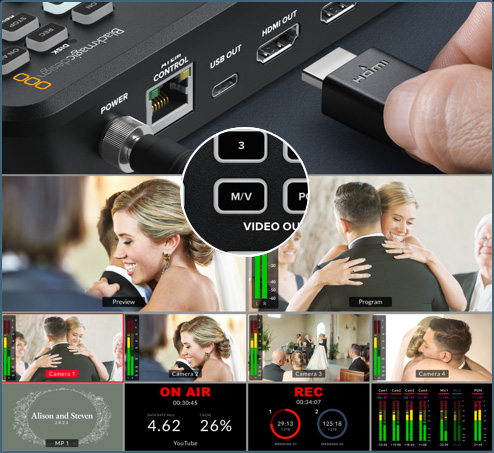
If you have an ATEM Mini Pro or Extreme, these models have a multiview so you can see it if you connect a monitor to the HDMI out. Make sure you press the M/V button on the video output selection. Now you can see all your sources as you plug in cameras!
ATEM Mini Pro and Extreme models include Multiview
Step 3
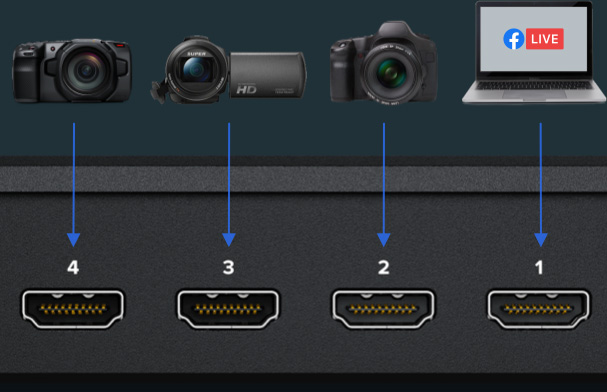
Plug in Video Sources
Next, plug your HDMI cameras and computers into ATEM Mini’s HDMI inputs. This gives you 4 or 8 different video sources depending on your model, to switch between when creating your program. All the HDMI inputs are standards converted so don’t worry about video settings!
Step 4
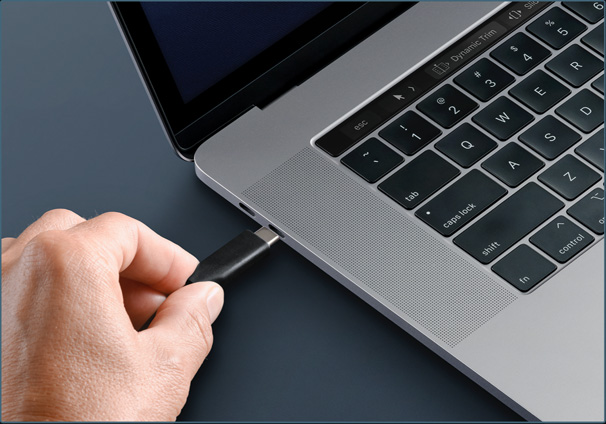
Connect a Computer
If you’re streaming, then all models use USB as a webcam. First connect the USB to a computer. Your computer will recognize ATEM Mini as a webcam and you can then select it as the webcam source in your streaming software, such as Skype.
Step 5
Stream Video
Skype is a good app for testing, so let’s configure it for ATEM Mini. In Skype audio and video settings select Blackmagic Design as the video and audio sources. You will see the ATEM Mini video in the preview window and you can make calls!

Switching Between Cuts and Effects Transitions
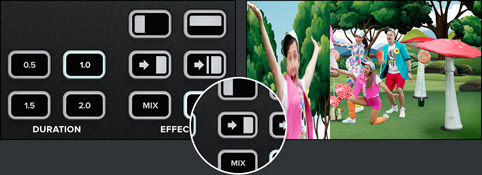
1. Press a transition button to select the transition you want to use.
2. Press the ‘auto’ button to perform the transition.
3. The input buttons show the new input on air.
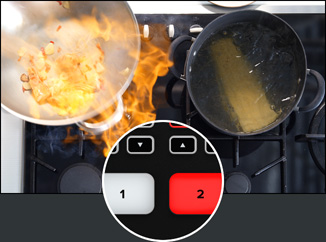
Now that you have your cameras connected, you can start switching your program! It’s as easy as just pressing the input buttons to switch between sources. You’ll see the cuts are smooth and professional looking. To transition with a video effect, simply press auto so selecting input buttons will use a nice transition. Because cut is the most popular transition, there are dedicated buttons for cut and auto transitions. You can change the type of auto transition that’s used by pressing the buttons above the AUTO button. You can choose between mix, dip, DVE push, DVE squeeze, and vertical and horizontal wipes. Of course there are a lot more transitions available when using ATEM Software Control!
Selecting the Best Transitions
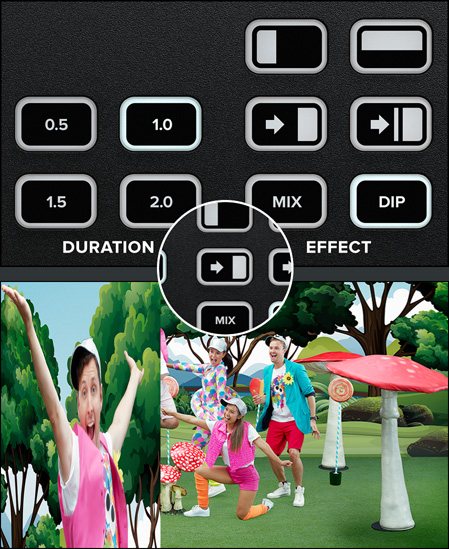
1. Set the transition effect type and duration.
2. Squeeze DVE transitions add excitement to your program.
3. Use a DVE squeeze to squeeze one source over another.
Before creating your first program, it’s worth thinking about the type of transitions available. From a creative point of view, a mix transition can feel very elegant as it gradually fades from one source into the next, while slower mix transitions can feel dreamy and gentle. A wipe transition will move a line across the original source revealing the next source and it has a different feel depending on the amount of soft edge you set in the wipe parameters. You can even set a wipe with a border that uses a color or even live video! DVE transitions are a lot of fun and they move the whole image during the transition, so they can feel crazy and exciting, making them perfect for kids shows!
Superimpose a Picture in Picture Overlay
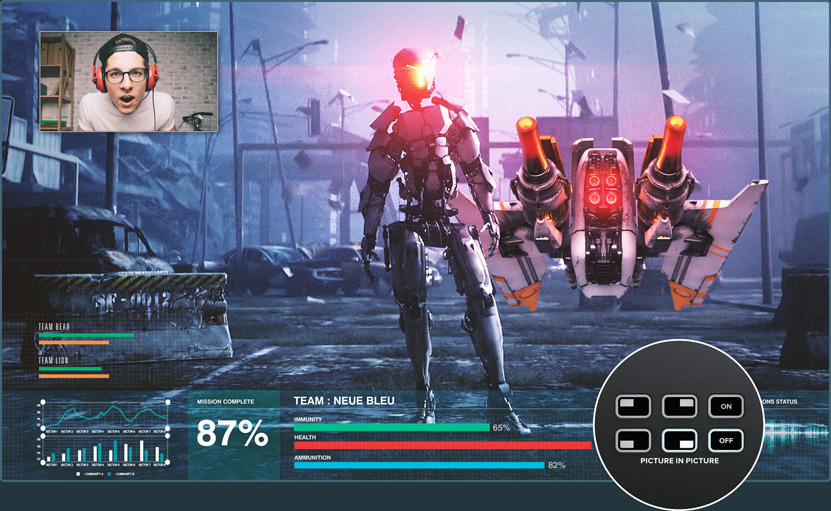
Picture in picture superimposes a video in a small box that you can position and customize over your main source. To do this you use the digital video effects processor, or DVE. The DVE uses input 1 for its default source, so if you’re broadcasting gameplay and want to superimpose your reactions, plug your camera into input 1. Make sure your game console uses one of the other inputs. To enable picture in picture just select it on the control panel. As the DVE uses the upstream keyer, you also need to turn off the key. There are buttons on the front panel to set the position of the DVE. You can also fully customize the position, borders and light source by using ATEM Software Control.
Voiceover or Narrate your Broadcast
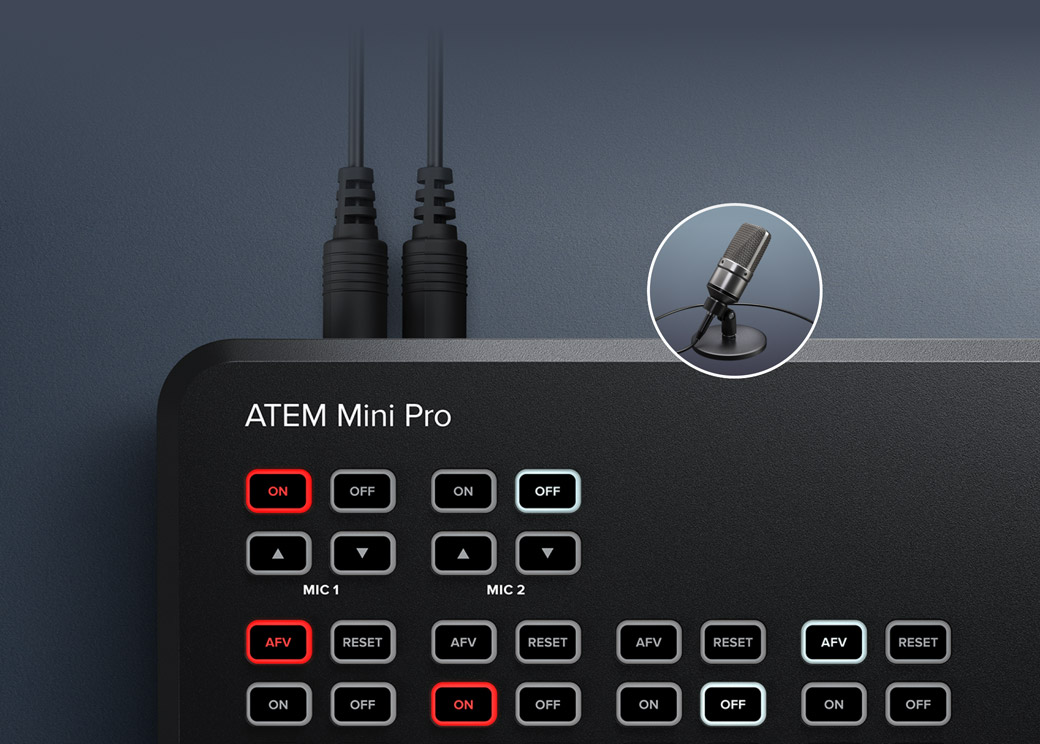
If you need to narrate or add commentary to your production, plug a microphone into one of the 3.5mm mic inputs. Or use two microphones for broadcasting interviews so you can individually control how loud or quiet they are. Above each video input button is the smaller audio control buttons where you can turn on and off each audio source. There are many types of microphones available, such as tiny, wireless collar microphones so the presenter can move freely without cables or larger desktop ones for presenters. Using dedicated microphones as well as using the audio page in the ATEM Software Control to add EQ and some compression can dramatically improve the clarity of presenters.
Extreme Power with ATEM Software Control
If you really want to access all the power of your ATEM Mini, then you can run ATEM Software Control and get access to many more features than are available on the front panel. There are pages that let you run the switcher and pallets that have settings for every feature in the switcher. There are also pages in the software for changing settings, uploading and managing graphics, mixing audio and controlling cameras. Just connect the USB to a Mac or PC and run the software, as it uses the same USB connection that the ATEM Mini’s webcam output uses. You can also use ATEM Software Control via ethernet if you have more than one operator working on the same job at the same time.
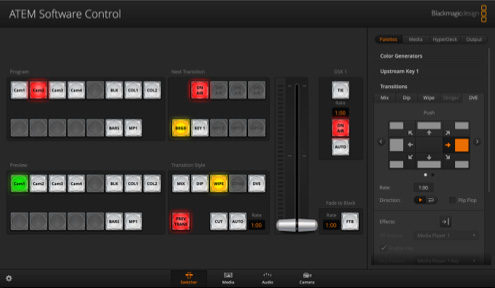
Switcher
Adjust switcher settings, make live cuts, adjust keys, apply transitions, overlay graphics and more.
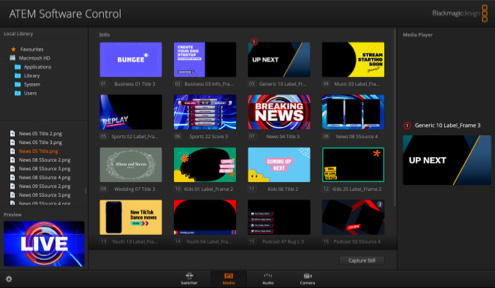
Media
Upload and manage up to 20 RGBA graphic files. Graphics can be used for transitions, as bugs, lower thirds and more.
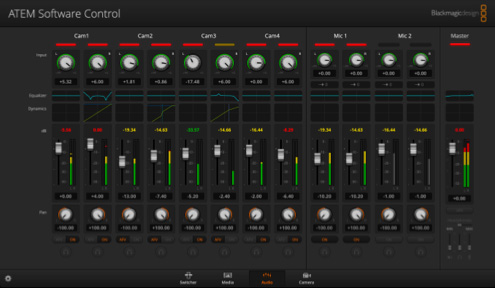
Audio
Professional multi channel Fairlight audio mixer with faders and meters for every input and the master level control.
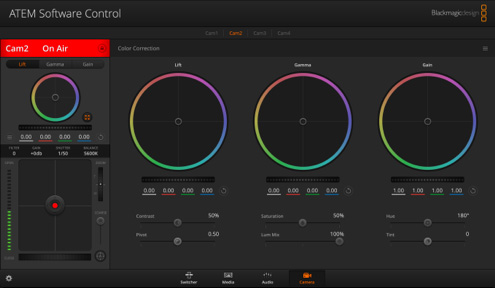
Camera Control
Control and color correct cameras via the HDMI connection to Blackmagic Pocket Cinema Camera 4K and 6K.
Managing Live to Air Graphics
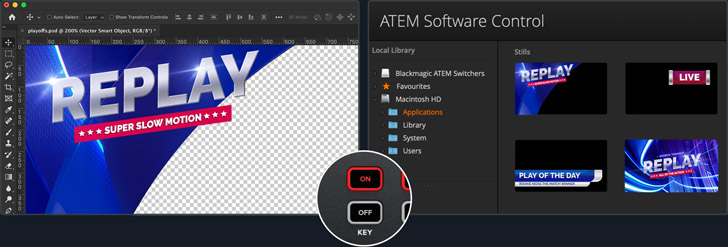
You can use any graphics software to create titles for ATEM Mini. If the graphic has an alpha channel, ATEM Mini will output the alpha as a key channel to allow graphics layering. Graphics with alpha channels can be created in software such as Photoshop. To use a still graphic, simply drag and drop it into one of the positions in the media pool in ATEM Software Control. Now go to the keyer settings in the switcher page, where you will need to set the media player source to be the still you just loaded. Then in the keyer settings, select the video and key sources to be the media player. Now turn on the keyer and you’ll get professional titles overlaid in real time on your live video.
Create Broadcast Quality Mastered Audio
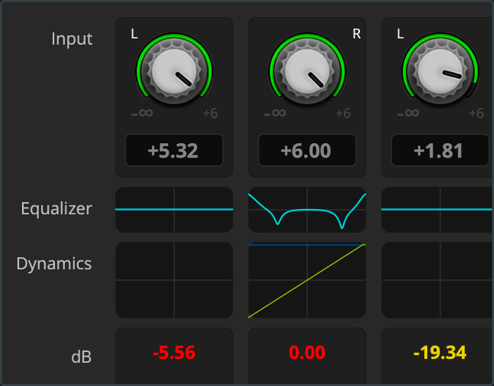
You can create professional mastered audio using the Fairlight audio mixer in ATEM Mini and controlled through ATEM Software Control. By clicking and dragging the mixer faders you can adjust the sound levels for each camera so they are louder or quieter, or adjust the microphone levels so voices are clearer and stand out. If a music player is plugged into the second mic input, you can even fade music in and out of your broadcast because each mic input has its own audio mixer inputs and effects! If you want to go even further, you can add Fairlight EQ, audio compression and limiting to tailor the sound of presenters to get them sounding clear and to keep the audio levels under control.
Assign HDMI Out for Monitoring!
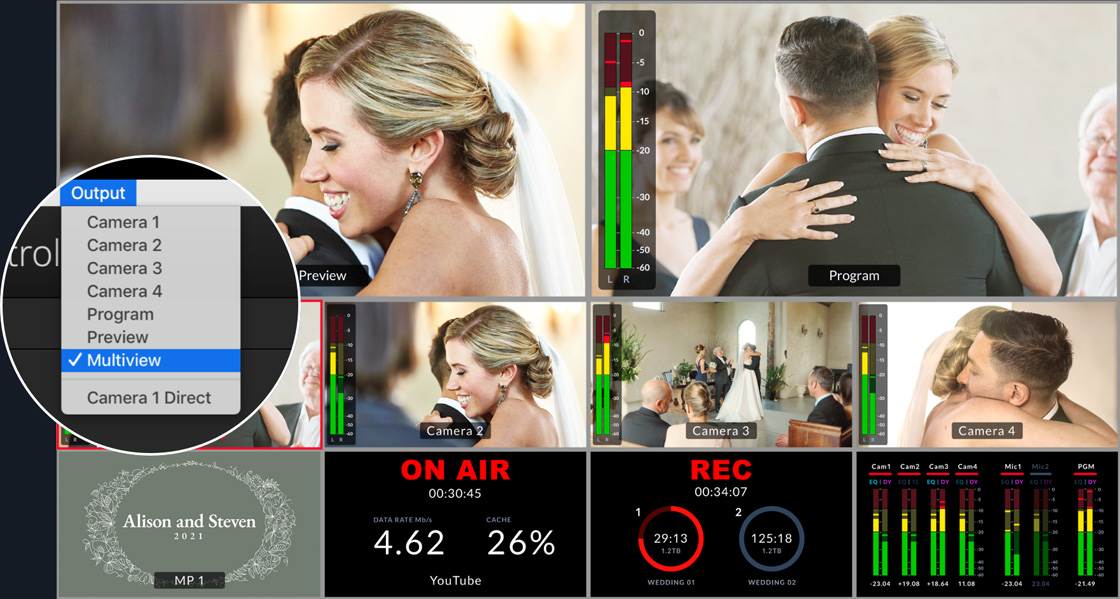
ATEM Mini Pro includes Multiview
The HDMI output of ATEM Mini can be changed, on professional switchers this is called an aux output. You can also loop a computer slide show and a projector through ATEM Mini, allowing access to the slide show as one of your sources. You can select preview out and set the switcher to program/preview switching to allow you to preview shots before going on air. On the ATEM Mini Pro models, you can even select a multiview out for full multi camera monitoring. Being able to see shots before using them on air means you eliminate mistakes. If you are broadcasting gameplay, input 1 can be set to zero latency allowing ATEM Mini to be looped between the console and the gamer’s monitor.
Record your Live Broadcast
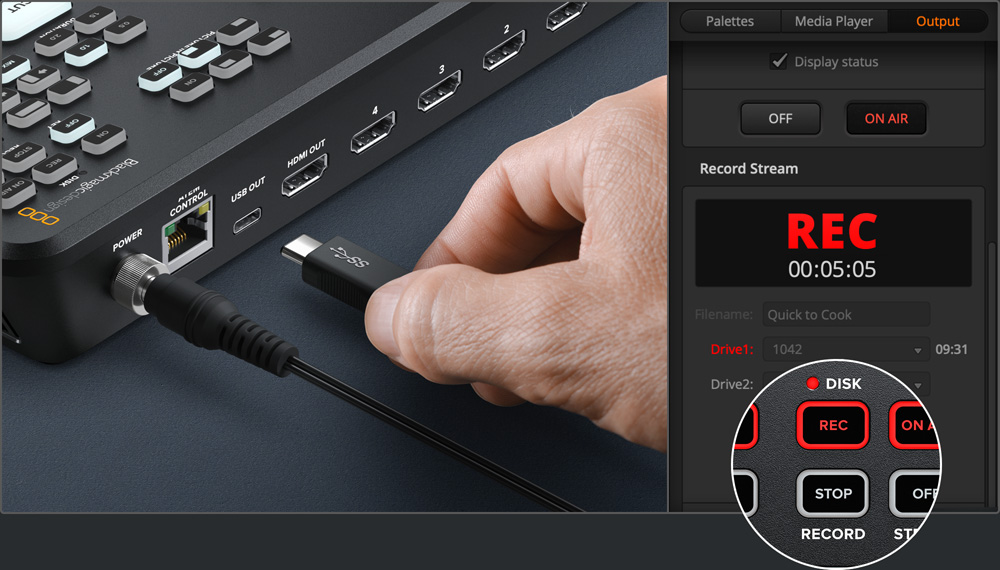
You can record using the HDMI output and recorders such as the Blackmagic Video Assist, allowing you to upload your television shows later, or to archive your production history. There are also loads of software tools for recording webcam video so you can use this software to record from the USB on a computer. However on ATEM Mini Pro and Extreme models, you get recording features built into the switcher itself! All you need to do is connect a USB flash disk and then press record on the front panel! ATEM Mini Pro and Extreme also support recording to more than one USB disk, such as a Blackmagic MultiDock, so you can keep recording to a second disk when the first disk becomes full.
Start Streaming Video via Ethernet
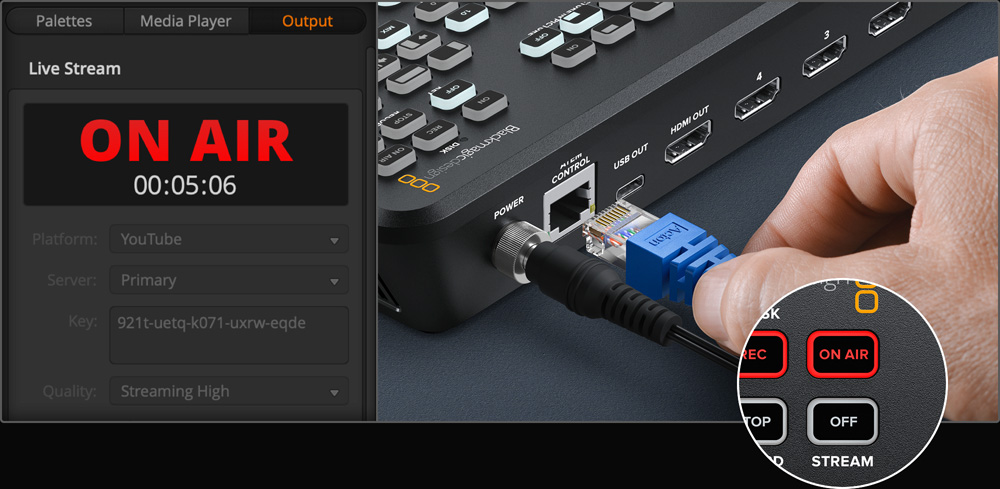
If you want to live stream and you have the Pro or Extreme models, you can stream direct using the ethernet connection. Once you have connected ethernet to the internet, first request a streaming key from the streaming service. In the ATEM Software Control switcher page output palette select the streaming service you want to use, and the server you want to use choosing the server closest to your location, and enter the streaming key. Generally select the highest quality, unless you have speed limited internet access. Now press the on‑air button on the panel and you should see your program video live on your streaming service. On this model you can see your streaming status in the multiview!
Remote Control Blackmagic Pocket Cinema Cameras
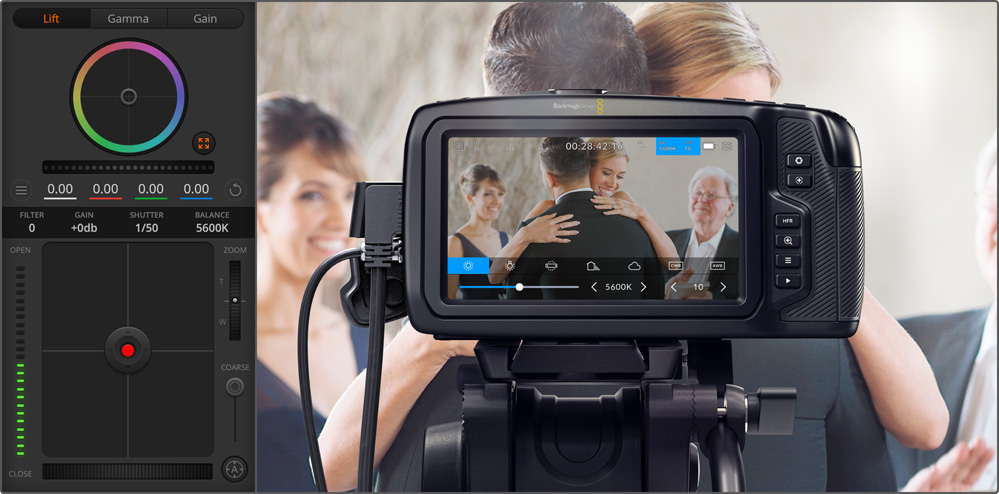
If you have Blackmagic Pocket Cinema Cameras then you can control them as studio cameras from ATEM Mini! Video and control is via the HDMI connection, so first plug the cameras in. Now you can go to the ATEM Software Control Camera page to get a CCU style interface where you can adjust and match your cameras. Move the main CCU control up and down to control the iris and left to right adjusts the black level. It’s the same as a broadcast CCU! There are also controls for color tint to balance the cameras. Plus you can set the focus, gain and shutter speed of the camera. To access DaVinci color correction, select the DaVinci icon to open up full color wheel primary corrector controls.
Build Complex Effects with Macros
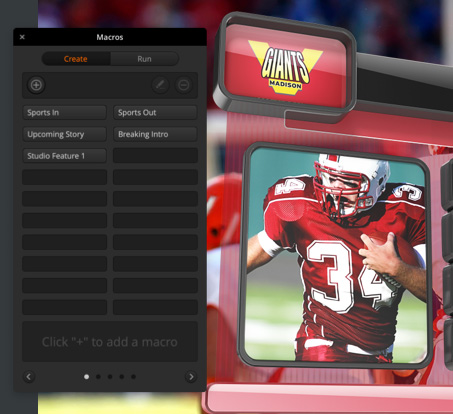
You can also use ATEM Software Control to build macros. Macros are useful for recording a sequence of switcher actions so you can repeat them with a single click of a mouse. For example you could record a combination of switcher actions that transition between several camera sources, switch a graphic to air, and adjust audio levels all in one single macro that can then be played at any time. Macros can be as simple or complex as you want and are extremely powerful when used in a live production. Your actions are automatically stored as an XML file that can be edited and combined together. To use a macro, just click run on the Macro palette in the software switcher settings!
The Next Step
Now it’s time to grow and learn more!
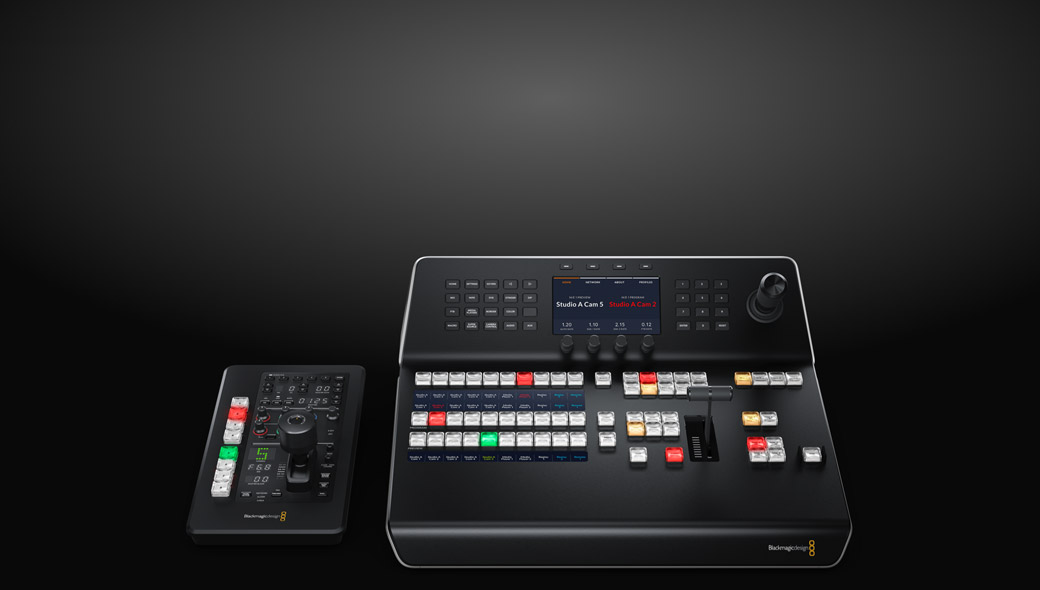
ATEM Camera Control Panel
ATEM 1 M/E Advanced Panel
ATEM hardware panels are external control panels that can be used for additional control over ATEM Mini. Even though ATEM Mini is an extremely powerful broadcast switcher all by itself, an external ATEM hardware panel gives you extra power. Connecting an ATEM hardware panel to ATEM Mini’s Ethernet port lets you operate the switcher from a different location such as a control room. That keeps ATEM Mini closer to the cameras and the HDMI cables short. Professional control, such as an ATEM 1 M/E Advanced Panel, has physical buttons and controls so it’s much faster to use. There are so many things ATEM Mini can do! It’s a great idea to check the ATEM Mini instruction manual to learn more!
- Manuals
- Brands
- Blackmagicdesign Manuals
- Mixer
- ATEM Mini
- Installation and operation manual
-
Contents
-
Table of Contents
-
Bookmarks
Quick Links
Installation and Operation Manual
ATEM Mini
March 2020
日本語
,
,
English,
Français, Deutsch, Español,
中文
, Русский, Italiano, Português and Türkçe.
한국어
Related Manuals for Blackmagicdesign ATEM Mini
Summary of Contents for Blackmagicdesign ATEM Mini
-
Page 1
Installation and Operation Manual ATEM Mini March 2020 日本語 English, Français, Deutsch, Español, 中文 , Русский, Italiano, Português and Türkçe. 한국어… -
Page 2
Languages To go directly to your preferred language, simply click on the hyperlinks listed in the contents below. English 日本語 Français Deutsch Español 中文 한국어 Русский 1074 Italiano 1227 Português 1380 Türkçe 1533… -
Page 3
ATEM Mini lets you start small, then expand your ATEM workflow as your projects grow. There really is no limit to what you can do! We hope you get years of use from ATEM Mini and have lots of fun with your live production! This instruction manual should contain all the information you’ll need for installing your… -
Page 4: Table Of Contents
Video Out Buttons ATEM Software Control Direct Streaming and Switcher Changing Switcher Settings Control via Ethernet Setting Audio Input and Using the Multiview on ATEM Mini Pro Output Behaviour ATEM Software Control Multiview Settings Switching Modes Labels Settings Using ATEM Software Control…
-
Page 5
ATEM 1 M/E Advanced Panel Using DHCP and Fixed IP Addresses Controlling HyperDecks with Manually Setting a Fixed IP Address ATEM 1 M/E Advanced Panel Changing ATEM Mini Network Settings Connecting ATEM 1 M/E Advanced Panel Changing the Hardware Panel Network Settings Using ATEM 1 M/E Setting the Switcher’s IP Location… -
Page 6: Getting Started
ATEM Mini and know exactly what each feature does. This section of the manual will show you how to get started with your ATEM Mini, including how to connect power, connect an HDMI video source, connect a microphone and plug into your computer so you can start broadcasting online.
-
Page 7: Plugging In Video Sources
Simply plug one end of the HDMI cable to your camera and the other end to any of ATEM Mini’s HDMI inputs. The first input you plug in will set the video format, so if the first video source you plug in is 1080p50, all other inputs will automatically be converted to 1080p50.
-
Page 8: Connect A Microphone
ATEM Mini Pro has a powerful multiview feature that lets you see all your inputs, plus program and preview outputs simultaneously on one screen. The multiview is the default source for the HDMI output. This means once your ATEM Mini Pro is connected to an HDMI television you can see all your inputs at once and know they are all working straight away.
-
Page 9: Connect Your Computer
With your Skype settings set correctly, perhaps try out a Skype call with a friend as a quick test to check your broadcast setup is working. That’s all you need to do and ATEM Mini is now ready to broadcast your video to the world live! Getting Started…
-
Page 10: Using Open Broadcaster
Open Broadcaster is another streaming platform that takes your program video and streams it live via your favourite video sharing application, like YouTube or Vimeo. For information on how to set up Open Broadcaster with your ATEM Mini, refer to the ‘Setting up Open Broadcaster’ section in this manual.
-
Page 11: Transition Styles And Dves
In the demonstration below ATEM Mini will switch from input 1 to input 2 using a mix transition: To perform a mix auto transition: Press the ‘mix’ button to select a mix transition. Now press a duration you want for the mix.
-
Page 12: Controlling Audio
Controlling Audio When setting up your production or during your broadast, you will likely want to control audio levels if the sound is too quiet or too loud. When an audio level is too loud it will clip. Clipping means the audio has increased beyond the maximum accepted level and when this happens it can distort and sound unpleasant.
-
Page 13: Using Picture In Picture
Using the Upstream Keyer ATEM Mini’s upstream keyer is used to superimpose graphics or blend one video layer over another using transparency. This means you can tell ATEM Mini to make an input source’s background color invisible using the chroma keyer, or only use a specific section of a graphic using a luma or linear key.
-
Page 14: Fade To Black
Dedicated buttons on the control panel let you switch sources to the HDMI output, start/stop streaming and start/stop recording. With ATEM Mini Pro, you also have the choice of streaming via the webcam output or direct streaming via Ethernet. At any time, you can record your broadcast to an external disk via USB-C and use the dedicated record buttons on ATEM Mini Pro to start and stop recording.
-
Page 15: Stream Buttons
One of the most exciting new features on ATEM Mini Pro is the multiview. This powerful feature displays a multiview on the HDMI video output that shows a comprehensive overview of your production. All 4 HDMI input sources, the program and preview outputs, plus important…
-
Page 16: Recording Using The Record Buttons
Setting the HDMI Output using the Video Out Buttons The video out buttons on the right side of your ATEM Mini Pro are used to switch sources to the HDMI output. The default output source is the multiview and you can read more about this powerful feature later in this section.
-
Page 17: Direct Streaming And Switcher Control Via Ethernet
If you are setting up a broadcast on your channel that you will regularly use, these settings will be stored in your ATEM Mini Pro and you can then plug into any internet connection at any time and broadcast directly from the unit.
-
Page 18
‘public’ so anyone can watch. Set the child protection to the appropriate setting. Click ‘create stream’. An auto generated stream key will appear in the stream settings, click ‘copy’ to copy the stream key. Additional Features on ATEM Mini Pro… -
Page 19
Press the ‘on air’ button on ATEM Mini Pro, or click on the on air button in the live stream palette. YouTube Studio is now ready to start broadcasting. It may take a few moments for the memory buffer to initiate. -
Page 20
When your production has finished, press the ‘off’ streaming button on ATEM Mini Pro to stop your broadcast. To configure your settings for Twitch: Log into your Twitch account. Click on your Click on ‘creator dashboard’. account avatar in the top right corner. -
Page 21: Using The Multiview On Atem Mini Pro
You will now see your broadcast on your channel and the live indicator will appear at the top of the window. NOTE If you are using additional ATEM control panels with your ATEM Mini, then you might need a dedicated IP address. For more information, refer to the ‘connecting to a network’ section.
-
Page 22
However they don’t always have to be cameras as you could also have a computer’s video output or a HyperDeck disk recorder connected to ATEM Mini Pro’s inputs and you can monitor them in the input views. -
Page 23
Prior to recording, the on air status indicator will display ‘off’ to let you ‚ know ATEM Mini Pro is standing by and ready to broadcast. When streaming begins, the indicator will display a bright red ‘on air’ status until streaming is stopped. -
Page 24
0dB the audio will clip. Clipping means the audio will distort and you will need to decrease the level using ATEM Mini Pro’s audio level buttons or the audio mixer in ATEM Software Control. You can read more about ATEM Software Control in the next section of this manual. -
Page 25: Atem Software Control
ATEM Software Control is a powerful software control panel that gives you a lot more control over your ATEM Mini. Once you start using ATEM Software Control you will quckly see just how much your ATEM Mini can actually do.
-
Page 26
If you connect an HDMI monitor, for example Blackmagic Video Assist, to ATEM Mini’s HDMI output you can output the preview signal and monitor the selected input before switching it to air. For more information, refer to the ‘setting the HDMI output source’… -
Page 27: Using Atem Software Control
The media manager allows you to upload graphics to the media pool in ATEM Mini. Your ATEM Mini has memory for graphics that’s called the media pool and holds up to 20 still graphics with alpha channel that can be assigned to a media player for use in your production.
-
Page 28: Audio Mixer
ATEM switcher. ATEM Mini includes a built in audio mixer that lets you use the embedded HDMI audio from your cameras, media servers and other inputs without the need for an external audio mixer. This is perfect when using your ATEM Mini on location or in small spaces within modern OB vehicles as you don’t have to find room for an external audio mixer.
-
Page 29: Using The Software Control Panel
Camera control lets you control Blackmagic Pocket Cinema Camera 4K and 6K with ATEM Mini Using the Software Control Panel The switcher window is the main control interface for the switcher. During live production, the switcher window can be used to select sources and take them to air.
-
Page 30
Program Bus Source Select Buttons The program bus source select buttons are used to hot switch background sources to the program output. The source currently on air is indicated by a button that is illuminated red. Preview Bus Source Select Buttons In program preview switching mode, the preview bus source select buttons are used to select a background source on the preview output, this source is sent to the program bus when the next transition occurs. -
Page 31
Fader Bar The fader bar is used as an alternative to the AUTO button and allows the operator to manually control the transition with a mouse. The AUTO button illuminates red for the duration of the transition and the ‘rate’ display updates to indicate the number of frames remaining as the transition progresses. -
Page 32: Processing Palettes
It ensures all layers in ATEM Mini are faded down together. A fade to black cannot be previewed. You can also set the audio mixer to fade the audio with your fade to black by selecting the ‘audio follow video’…
-
Page 33
ATEM Mini’s control panel. The software and ATEM Mini’s control panel work together and mirror all settings, so you can use any combination you like! -
Page 34: Media Player Tab
For more information refer to the ‘HyperDeck Control’ section of this manual. Output Tab The output tab lets you capture a still image from the program output. When using ATEM Mini Pro, this tab also contains additional options for you to live stream, record your stream and set the timecode generator.
-
Page 35
The data rate used by the quality setting will change depending on the video standard ATEM Mini Pro is running at. For example, if you select Streaming High quality and are running at 1080p24 then it would use the 6 Mb/s data rate. -
Page 36
Record Stream If you are recording your stream via USB-C on ATEM Mini Pro, this palette is where you can control your disks and start and stop recording. You can also set a file name and trigger record in all cameras when connected to Blackmagic Pocket Cinema Camera 4K and 6K. -
Page 37: Preparing Media For Recording
Display status Enable this feature by clicking the display status checkbox in the record options. The display status will appear in ATEM Software Control at the bottom right side of the user interface and shows the recording status. When recording, the record indicator will illuminate red and displays the current drive and record time remaining.
-
Page 38
Formatting Media on a Windows computer The format dialog box can format a drive in the exFAT format on a Windows PC. Make sure you back up anything important from your drive as you will lose everything on it when it is formatted. -
Page 39: Timecode Generator
To confirm the change and set the timecode running, click ‘set’. Time of Day When ATEM Mini Pro is connected to your computer, the unit will sync time of day timecode with your computer. The unit has a built in clock that can continue running for approximately 6 days, so once you disconnect ATEM Mini Pro from your computer, the time of day timecode will continue until the battery is depleted.
-
Page 40: Using The Audio Mixer
Using the Audio Mixer The audio tab is used to mix audio sources connected to ATEM Mini via HDMI and mic audio. Cameras and external mic audio sources are listed along the top of the audio mixer along with the master audio output for the USB webcam program output to your computer.
-
Page 41
Audio Balance The audio mixer supports stereo audio from each audio source. If you wish to change the left and right audio channel balance for a camera or other audio source, adjust the knob to the desired balance point. The audio meter for Cam1 is shown in gray to indicate that its audio will not be used as neither of its ON or AFV buttons are enabled. -
Page 42: Shaping Your Audio Mix Using Advanced Fairlight Controls
Shaping your Audio Mix using Advanced Fairlight Controls ATEM Mini has advanced Fairlight audio controls that let you enhance and refine the quality of sound on each input and master output, including input level controls, a 6 band parametric equalizer and powerful dynamics settings.
-
Page 43
The first item you will notice is the graph along the top of the window with numbered indicators from 1 to 6. These numbered indicators are adjustable handles that correspond to bands 1 to 6. Each band of the 6 band parametric equalizer has a column of settings. These settings will differ based on which band you are controlling, and what filter type you are using. -
Page 44
Range Presets The frequency range for each band is defined by the range preset buttons. For example, low is labeled ‘L’ and covers the frequency range from 30 to 395 Hz. As a quick example of how the range presets define the frequency range, select a notch filter from the band filter dropdown list, and then click on each range preset. -
Page 45
A description for each filter type is provided below. Bell High Shelf Low Shelf This filter is used to increase Lets you increase or decrease Lets you increase or decrease or decrease a range of the level of volume for higher the level of volume for lower frequencies surrounding frequencies along the graph. -
Page 46
Common Dynamics Settings The expander/gate, compressor and limiter share common settings that let you shape how each function affects the audio. For example the level at which the function initiates, how long the function is applied, the strength of the function, etc. The settings available differ depending on the dynamics control you are using. -
Page 47
Make Up The make up setting lets you increase the overall signal in combination with compression settings. With loud parts of the audio reduced using compression, you can now use the make up control to boost the overall sound without clipping. Limiter The limiter prevents peaks of the signal from exceeding a set maximum level. -
Page 48: Fairlight Controls Workflow Guide
Fairlight Controls Workflow Guide This section describes a basic workflow to help you get started using the Fairlight controls to refine and enhance your audio mix. Generally, the first step to optimizing your mix is to normalize all the inputs so they are all at their maximum strength without clipping.
-
Page 49: Navigating The Browse Window
Keep reading this section for information on how to use the media page in ATEM Software Control. Navigating the Browse Window The browse window is a simplified file browser that lets you navigate your computer to look for graphics files. All attached drives on your computer are displayed, and you can select folders from them.
-
Page 50: Atem Media Pool
Browsing and loading files Loading a still is as easy as dragging it from the browse window and dropping it into an empty slot in the media pool. When dropping a still into a slot, a progress indicator will show the loading status. You can drop multiple files into the media pool, even if the first images have not yet completed loading, as they will continue to load one after the other.
-
Page 51: Creating A Tga File With An Alpha Channel
loaded in the media player, ATEM Software Control will automatically detect the key image in the alpha channel and load it as the linear key source. This means your TGA graphic will key beautifully straight away with perfect transparency. Creating a TGA File with an Alpha Channel Below is a demonstration showing how to create a title in Photoshop with an alpha channel.
-
Page 52
You will now see an alpha channel appear underneath the RGB color channels. The alpha channel contains a greyscale version of the combined color channels in your graphic. Don’t forget to click on the alpha channel’s ‘eye’ icon to make sure it is selected so it will be included when the TGA file is saved. -
Page 53
Your TGA file is saved. Now you can open ATEM Software Control and load the file into the media pool. From there, drop the graphic into the media player and the alpha channel you saved will automatically be loaded into the media player key source. The key source uses the greyscale image in the alpha channel to tell the linear keyer transparency values for the graphic. -
Page 54: Using Camera Control
When controlling cameras, the ATEM switcher control works by broadcasting camera control packets via all the HDMI inputs of your ATEM Mini. So this means you can connect an HDMI input of your ATEM Mini to the camera’s HDMI connector and the camera will detect the control packets in the HDMI signal and allow you to control features in the camera.
-
Page 55
Camera Settings The camera settings button near the bottom left of the master wheel lets you adjust detail settings for each camera’s picture signal. Each camera controller displays the channel status so you know which camera is on air. Use the color wheels to adjust each YRGB channel’s lift, gamma and gain settings. -
Page 56
Iris/Pedestal Control The iris/pedestal control is located within the cross hairs of each camera controller. The control illuminates red when its camera is on air. To open or close the iris, drag the control up or down. Holding the shift key allows only iris adjustments. -
Page 57
Click on the auto focus button or drag the manual focus adjustment left or right to focus a compatible lens. Manual Focus Adjustment When you want to adjust the focus on your camera manually, you can use the focus adjustment located at the bottom of each camera controller. Drag the wheel control left or right to manually adjust focus while viewing the video feed from the camera to ensure your image is nice and sharp. -
Page 58: Davinci Resolve Primary Color Corrector
DaVinci Resolve Primary Color Corrector If you have a color correction background, then you can change your camera control from a switcher style CCU interface to a user interface that’s more like a primary color corrector on a post production color grading system. Blackmagic cameras feature a DaVinci Resolve primary color corrector built in.
-
Page 59
Color Wheels Click and drag anywhere within the color ring Note that you don’t need to drag the color balance indicator itself. As the color balance indicator moves, the RGB parameters underneath change to reflect the adjustments being made to each channel. -
Page 60
Saturation Setting The Saturation setting increases or decreases the amount of color in the image. The default setting is 50%. Hue Setting The Hue setting rotates all hues of the image around the full perimeter of the color wheel. The default setting of 180 degrees shows the original distribution of hues. Raising or lowering this value rotates all hues forward or backward along the hue distribution as seen on a color wheel. -
Page 61: Using Macros
Macros are recorded using the macros window in ATEM Software Control, and are stored inside your ATEM Mini. You can run all your recorded macros using the software control panel.
-
Page 62
Recording Macros Macros need to be recorded comprehensively, in clearly defined sequences from start to finish without error. This is because your macro will record every setting, press of a button, and switcher action you perform. When you run a macro, all the switcher actions you recorded in that macro will be repeated precisely. -
Page 63
Now that your macro is recording, you can start performing your switcher actions. While recording, the create macro button will change to a ‘record’ button. When you have completed your switcher actions, click on the ‘record’ button to stop recording. Click on the bars button in the program panel on the switcher page. -
Page 64
If your macro was successful, you should see your ATEM switcher perform a mix from color bars to color 1 using a 3 second transition, pause for 2 seconds, then perform another 3 second mix transition to black, all by clicking one button in the macros window! Your ATEM switcher will also display an orange border around your software control panel to indicate a macro is playing. -
Page 65
The image shows how a macro button appears in the macros window after it has been recorded. To run a macro, click on the ‘run’ button to enter the run page. Now you can load and/or run the macro by clicking on the macro button. -
Page 66
Macros Window Create Page Edit macro button: First select the macro you want to edit, Create macro button: then click on the edit macro button to edit Click this button to open the name and description of the macro. the create macro popup window. -
Page 67: Changing Switcher Settings
Clicking on the switcher settings ‘gear’ icon will open the settings window where you can change general switcher settings, audio, label, HyperDeck and remote settings. These settings are divided into tabs. If you are using ATEM Mini Pro, you will also have a multiview settings tab. Changing switcher settings…
-
Page 68: Setting Audio Input And Output Behaviour
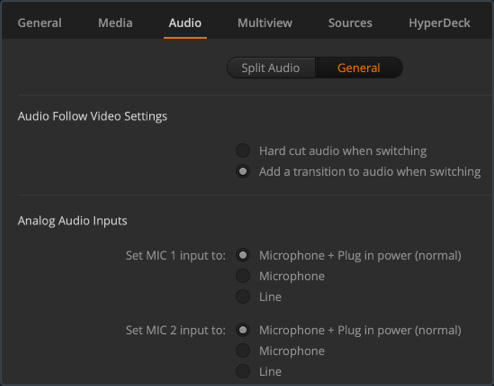
Supported Video Input Standards 1080p59.94 1080p50 1080p29.97 1080p25 1080p24 1080p23.98 720p59.94 720p50 Setting Audio Input and Output Behaviour The ‘audio’ tab lets you control the nature of the audio follow video feature plus set the mic inputs to mic or line level audio. Microphones typically have weaker signals compared to line outputs from other audio devices.
-
Page 69: Multiview Settings
Multiview Settings If you are using ATEM Mini Pro, the multiview settings allow you to set the multiview orientation. You can swap the position of the multiview preview and program views by clicking on the toggle button located between them.
-
Page 70: Labels Settings
Labels Settings Label settings The input labels settings let you customize the name of each input using a long and short name. The short name will appear on the switcher input buttons on the software panel. If you are using an additional ATEM broadcast panel, the long and short labels allow for the short label to fit into the broadcast panel’s smaller display.
-
Page 71: Setting The Hdmi Output Source
1 direct for a low latency loop output when gaming. ATEM Mini Pro also has a powerful multiview feature which is the default HDMI output source. The multiview lets you monitor all your input sources and outputs on one single screen. You can read more about the multiview in the ‘additional features on ATEM Mini Pro’…
-
Page 72
Saving your Settings Go to the menu bar in ATEM Software Control and select File>Save As. A window will open asking for a file name and destination folder. After you have made your selection, click Save. You’ll now see the Save Switcher State panel containing checkboxes for all the available settings on each block of your ATEM switcher. -
Page 73: Preference Settings
Live production can be a busy and exciting time and you’re always working in the moment, which means you can easily forget to back up your saved files when the production is over. If you have settings you want to keep, save them to your computer and an external drive, such as a USB drive.
-
Page 74
A warning will appear asking you to confirm the action. Click ‘change’. ATEM Software control will now close and restart in your selected language. You can change the language for ATEM Software Control in the ATEM Software Control preferences. Button Mapping In the mapping preferences, you can assign inputs to specific buttons on the preview and program rows. -
Page 75: Atem Mini Setup Settings
When ATEM Software Control is installed on your computer, a setup utility called ATEM Setup will also be installed. This setup utility lets you update your ATEM Mini, name the unit, change network settings and provides panel settings including program preview and cut bus switching modes, plus keyer related switching settings.
-
Page 76: Updating Your Atem Mini
Configure Page Panel Settings Switching Mode This setting lets you set ATEM Mini to use program preview or cut bus switching modes. Refer to the ‘Switching Modes’ section for more information. Picture in Picture Keyer This setting lets you choose to keep the picture in picture on screen indefinitely so you can switch content underneath it, or tie it to the next transition so when you perform the transition, picture in picture will transition off screen with it.
-
Page 77: Setting Up Open Broadcaster
About Page The about page tells you which version of ATEM software is installed on your computer. To change the name of your ATEM Mini, click in the ‘label’ edit box, type in a new name and click ‘save’ Setting up Open Broadcaster…
-
Page 78
YouTube and click ‘OK’. Click the ‘copy’ button next to the stream key. Copy the stream key that you will now paste into You will now see the video from your ATEM Mini in Open Broadcaster. the Open Broadcaster streaming preview window. -
Page 79: Using Adobe Photoshop With Atem
You are now broadcasting live on YouTube with Open Broadcaster. When your broadcast is finished and you have pressed the fade to black button on ATEM Mini, you can end the stream by clicking ‘end stream’. NOTE Due to the nature of internet streaming there can often be a delay, so it’s important to watch the stream on YouTube and confirm your program has finished before clicking ‘end stream’…
-
Page 80: Using Multiple Control Panels
Using Multiple Control Panels ATEM Mini and ATEM Mini Pro have multiple ways they can be controlled and you can use this software control panel as well as a range of hardware control panels. In fact, if you connect your ATEM Mini to a network that has other computers connected, you can run multiple copies of this software control panel.
-
Page 81
ATEM hardware panel and multiple computers running ATEM Software Control. If you are using 4 Blackmagic Pocket Cinema Camera 4Ks or 6Ks with ATEM Mini, you can even connect an ATEM Camera Control Panel and control all 4 cameras via HDMI using an external hardware control panel. -
Page 82: Connecting To A Network
Ethernet cable. However your ATEM supports full Ethernet IP protocols so you can place your ATEM Mini and external ATEM control panel on your network or anywhere on the planet using the internet. Connecting to a network means you have enormous flexibility with how you control your switcher.
-
Page 83: Manually Setting A Fixed Ip Address
IP address, have their own identifying number in the last field so they won’t conflict with each other. Below is an example showing ATEM Mini and an ATEM 1 M/E Advanced Panel set to conform to a network using a fixed IP address.
-
Page 84: Changing Atem Mini Network Settings
NOTE If ATEM 1 M/E Advanced Panel is not connecting to your ATEM Mini and displays a message saying it is looking for the switcher, you will need to tell the panel where your switcher is on the network. This is simply typing your ATEM Mini’s IP address into the panel’s switcher IP settings.
-
Page 85: Changing The Hardware Panel Network Settings
ATEM Mini Pro is set to use DHCP by default, so if you are connecting an ATEM hardware panel and ATEM Mini Pro to a network that supports DHCP, you can set the panel to ‘DHCP on’…
-
Page 86: Setting The Switcher’s Ip Location On The Panel
‘save changes’ button to confirm them Setting the Switcher’s IP Location on the Panel To set ATEM Mini’s IP location on ATEM 1 M/E Advanced Panel so the panel can find ATEM Mini and communicate, simply follow these steps: Changing the Switcher’s IP location on ATEM 1 M/E Advanced Panel…
-
Page 87: Atem Software Control Via The Network
NOTE Changing the switcher IP address on your panel does not change the IP address of ATEM Mini itself. It just changes where the control panel is looking to find the switcher. ATEM Software Control via the Network Lastly, if you want to use ATEM Software Control as well as an ATEM 1 M/E Advanced Panel, you need to ensure your computer is connected and working on your network.
-
Page 88: Connecting Atem Mini Pro To An Internet Router
Connecting ATEM Mini Pro to an Internet Router On ATEM Mini Pro, connecting to an internet router via Ethernet lets you stream your broadcast over Ethernet while using the USB-C connector to record to an external drive. To set up direct streaming via Ethernet, first enter the stream details in ATEM Software Control.
-
Page 89: Getting A Stream Key
Click on ‘create stream’. Copy the stream key. Now you can paste the stream key into ATEM Software Control’s ‘live stream’ options which saves the key in your ATEM Mini Pro. Twitch Log into your Twitch account. Click on your account avatar in the top right corner.
-
Page 90: Keying Using Atem Mini
Keying using ATEM Mini Keyers are a powerful production tool that allow the arrangement of visual elements from different sources on the same video image. To do this, multiple layers of video or graphics are stacked on top of the background video.
-
Page 91: Linear Key
Targa image file, or downloaded direct to the media pool, you can select pre multiplied in the keyer and you should have a great key! Photoshop documents are pre multiplied by nature, so you should always use the pre multiplied settings on the ATEM switcher when keying them. Keying using ATEM Mini…
-
Page 92: Performing An Upstream Luma/Linear Key
Adjust the gain value until the edge softness is desirable but the background video luminance or brightness is not affected. Invert Key Inverts the key signal. Flying Key Enables/disables DVE effects. Keying using ATEM Mini…
-
Page 93
Use the drop down controls labeled fill source and key source to specify the fill and key sources. If performing a luma key, select the same source for both fill and key. Adjust the key parameters to refine the key. Downstream Keyer Settings Keying using ATEM Mini… -
Page 94: Chroma Key
The image you plan to display on top of your background video. In the case of a chroma key, this is video of the meteorologist in front of the green screen. Key/Cut In the case of a chroma key the key/cut signal is generated from the fill signal. Keying using ATEM Mini…
-
Page 95: Performing A Chroma Key
Performing a Chroma Key ATEM Mini features an advanced chroma keyer with detailed chroma sampling and adjustment options. These controls help you achieve the best key, improving the blend of foreground and background so you can create a more convincing visual effect.
-
Page 96
Adjust the spill slider to remove colored tint from the edges of foreground elements. For example, green reflections bouncing off a green screen. Flare Suppression Flare suppression removes overall green tint evenly across all foreground elements. Keying using ATEM Mini… -
Page 97: Pattern Key
In a pattern key the key or cut signal is generated using the switcher’s internal pattern generator. The internal pattern generator can create 18 shapes that can be sized and positioned to produce the desired key signal. Combining a background with a fill and pattern key Keying using ATEM Mini…
-
Page 98
Expand the upstream key palette and select pattern from the key types bar. Select the fill source. Select the key pattern. Adjust the key parameters to refine the key. For a description of pattern key parameters, refer to the table below. Keying using ATEM Mini… -
Page 99
If you need to reset the position, navigate to the ‘pattern type’ setting, change it to another pattern, and then return to your chosen pattern to rest the position to its default. Keying using ATEM Mini… -
Page 100: Dve Key
DVE Key DVEs, or digital video effects, are used to create picture-in-picture boxes with borders. ATEM Mini has 1 channel of 2D DVE that allows scaling, rotation, borders and offers a drop shadow. Combining a background, DVE fill and DVE key/cut Background A full screen image.
-
Page 101
Both the border and drop shadow, if available, are affected by changes to this setting. Altitude Adjusts the distance of the light source from the DVE or picture in picture. Both the border and drop shadow, if available, are affected by changes to this setting. Keying using ATEM Mini… -
Page 102: Performing Upstream Keyer Transitions
Take the upstream keyer on or off the program output by clicking the ‘on air’ button. You will notice this is also reflected by the ‘key’ button on ATEM Mini’s control panel. Changing the ‘on air’ setting in the LCD menu also changes the state of the ‘on air’…
-
Page 103
Downstream keyers can be transitioned using their own transition buttons or by using the DSK TIE buttons to link the transition with the main transition. Keying using ATEM Mini… -
Page 104
To return the mask to the default settings, select ‘reset mask’ and press the set button. Keying using ATEM Mini… -
Page 105: Hyperdeck Control
ATEM Mini is connected to. Enable remote control on HyperDeck Studio Mini by setting the ‘remote’ setting to ‘on’ using the LCD menu. Plug the HDMI output of a HyperDeck Studio Mini into one of your ATEM Mini’s HDMI inputs HyperDeck Control…
-
Page 106
ATEM Software Control switcher settings, or using the system control soft buttons or LCD menu on an ATEM hardware panel. If you want to record the output from your ATEM Mini to a HyperDeck, plug your switcher’s HDMI output into the HDMI input of the HyperDeck. Don’t forget to route the program output to the HDMI output. -
Page 107: Controlling Hyperdecks With Atem Software Control
Auto Roll You can set a HyperDeck disk recorder to automatically roll video when it is switched to the program output. For example, you can cue a HyperDeck to the point you want your source to begin, then roll the source by pressing its input button on the mix effects program row. As HyperDecks must buffer a couple of frames before commencing playback, the actual cut will be delayed a preset number of frames to ensure a clean transition.
-
Page 108
In addition to the text color, each HyperDeck’s selection button also has a tally indicator. Green Outline Indicates a HyperDeck that is currently switched to the preview output. Red Outline Indicates a HyperDeck that is currently switched to the program output, meaning it is currently live to air. -
Page 109: Controlling Hyperdecks With External Hardware Panels
If you are using an external ATEM hardware panel, you can control any connected HyperDecks using the hardware panel. Once you have connected your HyperDecks to your ATEM Mini as described in the ‘connecting HyperDecks’ section, you can use the system control buttons and LED menu on your panel to set up and control each HyperDeck.
-
Page 110
Assigning an input to a HyperDeck In the first menu page, you’ll see the ‘HyperDeck’ indicator in the bottom left corner, and an ‘input’ indicator. Use the control knob under the ‘HyperDeck’ indicator to cycle through the available HyperDecks. Once you have selected a HyperDeck, simply rotate the knob under the ‘input’ indicator to select which input that HyperDeck is connected to on your switcher. -
Page 111: Controlling Hyperdecks With Atem 1 M/E Advanced Panel
While in this menu, press the LCD soft button above the ‘auto roll’ indicator to turn the auto roll feature on. The indicator text will illuminate blue when auto roll is on. The auto roll feature lets you set a HyperDeck disk recorder to automatically roll video when it is switched to the program output.
-
Page 112
Use the third and fourth pages of the ‘media players’ LCD menu for more HyperDeck controls, including play, stop, loop playback, and forward and reverse skip for moving between clips. In the fourth menu page, press the ‘record’ button to record the program output of your switcher to your HyperDeck. -
Page 113: Connecting Atem 1 M/E Advanced Panel
Connecting ATEM 1 M/E Advanced Panel ATEM Mini is designed to be controlled using its own built in control panel, but if you have a larger production that is more complex and have many sources, graphics and intricate keys to handle, or you need to operate your ATEM Mini from a separate location, an ATEM 1 M/E Advanced Panel can help you.
-
Page 114: Using Atem 1 M/E Advanced Panel
Using ATEM 1 M/E Advanced Panel ATEM 1 M/E Advanced Panel Using the Control Panel Mix Effects The program bus, preview bus and source names display are used together to switch sources on the program and preview outputs. ATEM Mix Effects Source Name Displays The source name displays use labels to represent the switcher’s external inputs or internal sources.
-
Page 115
Program Bus The program bus is used to hot switch background sources to the program output. The source currently on air is indicated by a button that is illuminated red. A blinking red button indicates that the shifted source is on air. Pressing the SHIFT button will display the shifted source. Preview Bus The preview bus is used to select a source on the preview output. -
Page 116
AUTO The AUTO button will perform the selected transition at the rate specified in the auto rate setting located in the LCD ‘home’ menu. The transition rate for each transition type is set in the LCD menu, and is displayed when the corresponding transition style button is selected. The AUTO button illuminates red for the duration of the transition and the fader bar indicator illuminates with sequential LEDs to indicate the progress of the transition. -
Page 117
Transition Control and Upstream Keyers ON AIR The ON AIR indicator buttons above each keyer are labelled ON and indicate which of the upstream keys are currently on air. These can also be used to immediately cut a key on or off air. -
Page 118
M/E Buttons As some ATEM switchers have multiple M/Es you can select which one you want to control using the M/E buttons. When an M/E is selected, the LCD menu will change to show the settings that correspond to that M/E panel. Press the M/E buttons numbered 1 to 4 to select an M/E panel to control Fade to Black The FTB button will fade the program output to black at the rate specified in the FTB rate… -
Page 119
For example, to change the border softness on a wipe transition Press the ‘wipe’ button. Press the right arrow button next to the LCD to move to the third page of settings. Rotate the control knob under the ‘softness’ setting to change the softness of the wipe transition border. -
Page 120: Performing Transitions Using Atem 1 M/E Advanced Panel
Joystick Control Button Mapping ATEM software and hardware control panels support button mapping so you can assign your most important sources, especially cameras, to the most accessible buttons in the program and preview rows. Occasional sources can be assigned to less prominent buttons. Button mapping is set independently for each control panel so button mapping set on a software control panel will not affect the button mapping set on a hardware control panel.
-
Page 121
Cut Transitions The cut is the most basic transition that can be performed on the switcher. In a cut transition the program output is immediately changed from one source to another. Program output for a cut transition. A cut transition can be performed directly from the program bus, or using the CUT button in the transition control block. -
Page 122
To perform a cut transition using the CUT button On the preview bus, select the video source that you want on the program output. The program output will remain unchanged. In the transition control block, press the CUT button. The sources selected on the program and preview buses are exchanged to indicate that the video source that was on preview is now on program and vice versa. -
Page 123
At the end of the transition, sources selected on the program and preview buses are exchanged to indicate that the video source that was on preview is now on program and vice versa. Each transition type has its own independent transition rate allowing you to perform faster transitions by simply selecting the transition type and pressing the AUTO button. -
Page 124
Press the ‘mix’ button and set the transition rate using the LCD menu Mix Transition Parameters Rate The mix transition rate in seconds : frames. Dip Transitions A DIP is similar to a mix in that it is a gradual transition that transitions from one source to another. -
Page 125
Press the ‘dip’ button in the transition control block, then set the dip source and transition rate using the LCD menu Dip transition parameters Rate The dip transition rate in seconds and frames. Dip Source The dip source is any video signal in the switcher that will be used as the intermediate picture for the dip transition, usually a color generator or media player. -
Page 126
Press a source button in the source select row to select a source for the wipe border. Hold the shift button down to select a shifted source, such as a color generator or media player. Press a source button in the source select row to select a source for the wipe border, such as a camera or media player. -
Page 127
Reverse Reverse changes the progression of closed patterns such as circles, diamonds and boxes so that the pattern closes in from the edges of the screen toward the center. FlipFlop When FlipFlop mode is toggled on, the transition changes between normal to reverse every time the transition is executed. -
Page 128
DVE key parameters Enable key Enables/disables the DVE key. The DVE key is enabled when the button is illuminated. PreMult Select the DVE key as a pre-multiplied key. Clip The clip level adjusts the threshold at which the key cuts its hole. Decreasing the clip level reveals more of the background. -
Page 129
Press the ‘effect’ soft button in the LCD menu to open the effect settings, and set the effect to a graphic wipe by selecting the graphic wipe icon using the ‘effect’ soft control knob. The default direction is left to right, but you can change the direction by selecting ‘reverse direction’. -
Page 130
Graphic wipe images The graphic wipe feature requires a static graphic that is used as a moving border for a horizontal wipe. This graphic should be a vertical ‘banner’ type graphic that is no more than 25% of the total screen width. Graphic wipe screen width requirements If the switcher is operating at 1080p then the graphic should be no wider than 1080p… -
Page 131: Recording Macros Using Atem 1 M/E Advanced Panel
Recording Macros using ATEM 1 M/E Advanced Panel You can record and run macros using an ATEM 1 M/E Advanced Panel independently of ATEM Software Control. All actions on the ATEM Software Control switcher page can be performed using your hardware panel. If you need to arrange graphics in the media pool, or adjust camera settings, simply access those settings using ATEM Software Control.
-
Page 132
Press the wipe button in transition control to ensure the macro records the wipe transition selection. In the ‘wipe’ LCD menu, set the rate to 2:00 seconds. Press the ‘auto’ button in transition control to perform the wipe transition from color bars to color 1. -
Page 133: Using Atem Camera Control Panel
Using ATEM Camera Control Panel Traditionally, camera control units, or CCUs, have been designed for mounting inside a desk with independent units for each camera. ATEM Camera Control Panel is a portable solution that can be placed on a desk or solid surface with 4 CCUs built in so you can control all four Blackmagic Pocket Cinema Cameras at once.
-
Page 134
If you are using the camera control panel with just your switcher and a computer on a shared network, connect the panel to your switcher, then the spare Ethernet port to your computer. After connecting the camera control panel to your ATEM equipment, you should see the lights on the panel illuminate and the LCDs on each CCU will display their respectively assigned cameras. -
Page 135: Changing Network Settings
DHCP so your panel determines the best IP address, or disable DHCP and set the IP address manually. NOTE ATEM Mini Pro doesn’t have a fixed IP address because it is designed to use the DHCP. When connecting ATEM Mini Pro directly to ATEM Camera Control Panel, we recommend setting a manual IP address.
-
Page 136
To set the camera control panel’s IP address: If you want the panel to automatically set a compatible IP address, select the DHCP setting by pressing the ‘on’ soft button. If you know your network’s IP address, you can navigate to the next setting page and check the panel’s IP address setting to confirm it has selected an address compatible with your network. -
Page 137: Camera Control Panel Layout
Camera Control Panel Layout Each CCU on your camera control panel is exactly the same with the same controls. The menu settings are primarily controlled using the left CCU’s LCD and soft buttons. Each CCU has exactly the same controls. LCD Menu Settings Pressing the ‘home’…
-
Page 138
Now when switching your live production, you can press the ‘bank’ soft button to swap between banks A and B, which lets you instantly access camera control for cameras that have been assigned to dedicated CCUs. This is a faster and more organized way of controlling cameras compared to swapping between multiple cameras on each CCU during production. -
Page 139
Settings Pressing the ‘settings’ button on the home screen opens all settings for your camera control panel. Navigate through the pages of settings by pressing the arrow soft button. The network settings, including DHCP and IP address settings, are the first pages in the sequence. These settings are described in the section that shows how to change network settings when connecting the camera control panel to your ATEM switcher. -
Page 140
adjusting RGB values of the lift, or the shadows. The black/flare button lets you adjust the RGB values for the gamma, or mid tones, by holding down the button and adjusting the lift RGB knobs. The color balance controls let you make fine adjustments to the red, green, blue channels for the master gain/white, gamma and pedestal/black levels There is also a custom control that will be uniquely assignable in a future update. -
Page 141: Controlling Cameras
Other buttons and knobs in this section of the CCU are for adjusting the sensitivity of the joystick control, setting the coarse level, locking and unlocking the CCU and more. Details on all the features are provided in the following section. Controlling Cameras This section describes all the features on each CCU and a general overview on how to approach camera control.
-
Page 142
Scene Files The numbered buttons along the top of each CCU let you quickly store and recall up to 5 scene file presets. For example, once you have arranged all your settings for a camera and you are set up for broadcast, you can then save all the parameters for each camera and recall them later. It’s a very fast process! To store a scene file: Press the ‘store’… -
Page 143
NOTE While this feature is very powerful and helpful, please use with care as it affects all cameras, including the camera switched to the program output. We recommend enabling ‘recall all’ for specific setups prior to air and then immediately disabling the feature until you need it again. -
Page 144
Absolute Control In absolute control mode, the settings are always synchronized to their corresponding controls. NOTE When the panel is in absolute control mode, it’s worth keeping in mind that if a control’s setting is changed using ATEM Software Control or a different CCU, the next adjustment on the original controller will result in an initially harsh settings change as it snaps back to its originally set position. -
Page 145
White and Black Balance Controls The two rows of color balance knobs are used to adjust the color balance of the white and black levels, also known as gain and pedestal. Turn the red, green and blue knobs clockwise or counter clockwise to make changes. -
Page 146
Located around the collar of the joystick’s handle is a ring wheel that controls the pedestal level. The ring wheel has small ridges built in for firm control and a position indicator is located on the top of the knob to show the physical positioning of the wheel. Turn the wheel clockwise to increase the master black level, or counter clockwise to decrease. -
Page 147
Iris and Master Black Active Once your levels are set and you want to lock them so they are not accidentally changed, press the ‘iris/MB active’ button. This enables a lock on the gain and master black so that any accidental movements of the joystick will not affect your settings. The ‘Iris/MB active’ button label will illuminate red when the lock is active. -
Page 148: Using Audio
The audio is mixed using the control buttons on your ATEM Mini, or via the Audio tab of ATEM Software Control and output over USB webcam and HDMI outputs as embedded digital audio.
-
Page 149: Using A Third Party Audio Mixer Control Surface
Using a Third Party Audio Mixer Control Surface Using an Audio Mixer Control Surface Connecting a hardware audio mixer control surface to your ATEM Mini provides you with the ability to use both hands and adjust multiple audio levels at the same time.
-
Page 150
Launch ATEM Software Control and it will automatically look for your control surface using the first port on the first MIDI device that it finds. Click on the Audio tab in ATEM Software Control to display the ATEM audio mixer. Try sliding the gain faders up and down on your hardware control surface and verify that the audio mixer faders show a corresponding increase and decrease in the software on your computer screen. -
Page 151: Help
Getting Help The fastest way to obtain help is to go to the Blackmagic Design online support pages and check the latest support material available for your ATEM Mini. Blackmagic Design online support pages The latest manual, software and support notes can be found at the Blackmagic Design support center at www.blackmagicdesign.com/support.
-
Page 152: Regulatory Notices
Regulatory Notices Disposal of Waste of Electrical and Electronic Equipment Within the European Union. The symbol on the product indicates that this equipment must not be disposed of with other waste materials. In order to dispose of your waste equipment, it must be handed over to a designated collection point for recycling.
-
Page 153: Safety Information
Safety Information This equipment is suitable for use in tropical locations with an ambient temperature of up to 40ºC. Use only at altitudes not more than 2000m above sea level. No operator serviceable parts inside. Refer servicing to your local Blackmagic Design service centre.
-
Page 154: Warranty
Warranty 12 Month Limited Warranty Blackmagic Design warrants that this product will be free from defects in materials and workmanship for a period of 12 months from the date of purchase. If a product proves to be defective during this warranty period, Blackmagic Design, at its option, either will repair the defective product without charge for parts and labor, or will provide a replacement in exchange for the defective product.
ВИДЕОМИКШЕР BLACKMAGIC ATEM MINI PRO ISO
Надоело делать трансляции на вэбкамеру?
Хочешь поднять свой уровень в несколько раз?
В этом маленьком обзоре я расскажу тебе как подготовить трансляцию при помощи видеомикшера BLACKMAGIC ATEM MINI PRO ISO. Ты узнаешь как пользоваться пультом, как подключить и как настроить трансляцию.
Кстати эта штука может ещё и записывать, а что может быть лучше обзора, который на практике показывает работу техники?
Смотри наш обзор в соц сетях, ставь лайки и не забудь подписаться.
Если тебя заинтересовал BLACKMAGIC ATEM MINI PRO ISO, но ты еще не готов к покупке, он доступен в прокат — https://pixel24.ru/rent/catalog/view/id/54153
Ну, а если ты готов к покупке, то карточка товара удобно расположилась внизу
Смотреть руководство для Blackmagic Design ATEM mini Pro ISO ниже. Все руководства на ManualsCat.com могут просматриваться абсолютно бесплатно. Нажав кнопку «Выбор языка» вы можете изменить язык руководства, которое хотите просмотреть.
MANUALSCAT | RU
Вопросы и ответы
У вас есть вопрос о Blackmagic Design ATEM mini Pro ISO, но вы не можете найти ответ в пользовательском руководстве? Возможно, пользователи ManualsCat.com смогут помочь вам и ответят на ваш вопрос. Заполните форму ниже — и ваш вопрос будет отображаться под руководством для Blackmagic Design ATEM mini Pro ISO. Пожалуйста, убедитесь, что вы опишите свои трудности с Blackmagic Design ATEM mini Pro ISO как можно более детально. Чем более детальным является ваш вопрос, тем более высоки шансы, что другой пользователь быстро ответит на него. Вам будет автоматически отправлено электронное письмо, чтобы проинформировать вас, когда кто-то из пользователей ответит на ваш вопрос.
Добрый день! У меня atem mini pri iso. Через выход Tape-c пишем на SSD, эзернет сигнал идет на комп для сриминга, хотели еще одну видеосигнал на Лед Экран вывезти. Как сделать так можете подсказать?
Ерзат2021-11-26
Добрый день. Можно ли назначить кнопкам на клавиатуре переключение камер (или переназначить кнопки)
Юрий2021-10-13
Задать вопрос о Blackmagic Design ATEM mini Pro ISO
- Бренд:
- Blackmagic Design
- Продукт:
- контроллеры
- Модель/название:
- ATEM mini Pro ISO
- Тип файла:
- Доступные языки:
- китайский, Корейский Язык

