- Manuals
- Brands
- BMW Manuals
- Motorcycle
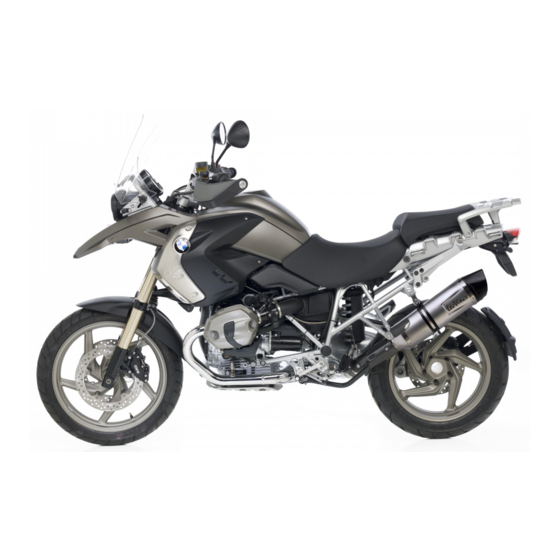
- R 1200 GS —
- Rider’s manual
-
Contents
-
Table of Contents
-
Troubleshooting
-
Bookmarks
Related Manuals for BMW R 1200 GS
Summary of Contents for BMW R 1200 GS
-
Page 1
Rider’s Manual R 1200 GS BMW Motorrad The Ultimate Riding Machine… -
Page 2
Motorcycle data/dealership details Motorcycle data Dealership details Model Person to contact in Service department Vehicle identification number Ms/Mr Phone number Colour code Date of first registration Dealership address/phone number (com- Registration number pany stamp) -
Page 3
The right to modify designs, equipment and accessories is reserved. Errors and omissions excepted. © 2010 BMW Motorrad Not to be reproduced either wholly or in part without written permission from BMW Motorrad, After Sales. Printed in Germany. -
Page 4: Fuel
2.2 bar, one-up, tyre cold 2.5 bar, two-up and/or with luggage, tyre cold Tyre pressure, rear 2.5 bar, one-up, tyre cold 2.9 bar, two-up and/or with luggage, tyre cold BMW recommends *01418520391* Order No.: 01 41 8 520 391 02.2010, 2nd edition *01418520391*…
-
Page 5
We congratulate you on your choice of a motorcycle from We hope that you will enjoy rid- BMW and welcome you to the ing your BMW and that all your community of BMW riders. journeys will be pleasant and Familiarise yourself with your new safe. -
Page 6: Table Of Contents
Standard warnings ..24 Equipment ….7 BMW Motorrad Integral Warnings issued by the on- Technical data .
-
Page 7
Front-wheel stand ..124 Brake system with BMW Bulbs ….. . 125 Wheels and tyres . -
Page 8
11 Service ….161 BMW Motorrad service ..162 BMW Motorrad service quality ….. 162… -
Page 9: General Instructions
General instructions Overview ……6 Abbreviations and symbols ..6 Equipment .
-
Page 10: Overview
BMW optional ex- overview of your motorcycle. All tras originally ordered. Indicates the end of an maintenance and repair work on item of information.
-
Page 11: Equipment
(DIN). Versions for individual items of custom equipment. This countries may differ. Rider’s Manual describes option- Currency al extras (OE) offered by BMW and selected optional accessor- The high safety and quality ies (OA). This explains why the standards of BMW motorcycles…
-
Page 13: General Views
General views General view, left side ….11 General view, right side … . . 13 Handlebar fitting, left .
-
Page 15: General View, Left Side
General view, left side Adjuster, spring preload, front ( Adjustment of windscreen Adjuster for headlight beam throw (underneath the instrument panel) Clutch-fluid reservoir 116) Type plate (on frame, be- hind side cover) Seat lock ( Power socket ( Adjuster for damping char- acteristic, rear suspension Engine oil level indicator 109)
-
Page 17: General View, Right Side
General view, right side Adjuster for spring preload, rear ( Fuel filler neck ( Brake-fluid reservoir, front 114) Vehicle Identification Num- ber (VIN) (on steering-head bearing) Air filter (behind right side panel) ( 131) Engine-oil filler neck 110) Brake-fluid reservoir, rear 115)
-
Page 18: Handlebar Fitting, Left
Handlebar fitting, left Control for the odometer Operation of the clock with on-board com- puter Operating the on-board computer ( with BMW Motorrad In- tegral ABS II Operating the ABS with Automatic Stability Control Operating ASC ( with Electronic Suspen-…
-
Page 19
Headlight flasher and high- beam headlight (… -
Page 20: Handlebar Fitting, Right
Handlebar fitting, right Emergency off switch (kill switch) ( Starter button ( with heated handlebar grips Grip heating control Flashing turn indicators, right ( Hazard warning flashers Cancel button, flashing turn indicators ( Pushbutton, cancel hazard warning flashers (…
-
Page 21: Underneath The Seat
Underneath the seat Rider’s Manual Battery ( 135) Standard toolkit ( 108) Payload table (in tool tray) Tyre pressures table (in tool tray) Helmet holder (…
-
Page 22: Instrument Panel
Instrument panel Speedometer Rev. counter Telltale lights ( Warning lights ( Multifunction display Ambient-light brightness sensor (for adapting the brightness of the instru- ment lighting) with anti-theft alarm (DWA) Anti-theft alarm telltale light (see the instructions for use for the anti-theft alarm) Control for the odometer Operation of the clock The instrument-cluster…
-
Page 23: Headlight
Headlight Low-beam headlight High-beam headlight Side light…
-
Page 25: Status Indicators
Status indicators Standard status indicators ..22 Status indicators with on-board computer ……23 Status indicators with tyre pressure monitoring (RDC) .
-
Page 26: Standard Status Indicators
Standard status Telltale lights level, before the reading is up- dated. indicators Gear indicator Multifunction display The gear engaged or for neutral appears on the display. If no gear is engaged, the ‘neutral’ telltale light also lights up. Flashing turn indicators, Engine temperature gauge left reading…
-
Page 27: Status Indicators With On
1 is shown briefly consult a specialist workshop, serviced at a date in advance after the Pre-Ride Check com- preferably an authorised BMW of the forecast due date. If the pletes. In this example the read- Motorrad dealer.
-
Page 28: (Rdc)
Standard warnings Mode of presentation Status-indicator panel of Tyre-pressure readout the on-board computer The figures shown in the Warnings are indicated by the tyre-pressure readings are ‘General’ warning light 1 show- Status indicators temperature-compensated (see ing in combination with a warning with tyre pressure the section entitled «Engineering word, for example 2 or in com-…
-
Page 29
The possible warnings are listed on the next page. -
Page 30
Warnings, overview Warning light Status indicators Meaning EWS ! Lights up yellow appears on Electronic immobiliser active ( the display FUEL ! Lights up yellow appears Fuel down to reserve ( on the display Lights up yellow Appears on the dis- Engine in emergency-operation mode play Flashes red… -
Page 31
Refuelling ( 85). placed, preferably by an au- mode. thorised BMW Motorrad dealer. You can continue to ride, but Engine in emergency- bear in mind that the usual en- Fuel down to reserve operation mode gine power might not be avail- The «General»… -
Page 32
BMW Motorrad Top up the engine oil. the engine or the ABS. This can dealer. result in dangerous situations. Possible cause: If possible, do not continue your Insufficient engine oil The engine-oil pressure is insuffi- journey. pressure cient. -
Page 33: Warnings Issued By The On
The LED rear light must be with on-board computer replaced. Consult a specialist Bulbs defective workshop, preferably an author- The «General» warning light ised BMW Motorrad dealer. shows yellow. Front light bulb defective LAMPS ! appears on the dis- LAMPF ! appears on the dis- play.
-
Page 34
Warnings, overview Warning light Status indicators Meaning Appears on the dis- Engine-oil level too low ( play Check Oil pears on the dis- play Appears on the dis- Ice warning ( play… -
Page 35: Abs Warnings
Seek the advice of a specialist ABS warnings workshop, preferably an author- The detailed descriptions relating ised BMW Motorrad dealer. Mode of presentation to BMW Motorrad Integral ABS with BMW Motorrad Integral start on page ( 90), and you Ice warning ABS II…
-
Page 36
Warnings, overview Warning light Status indicators Meaning Flashes Self-diagnosis not completed ( Lights up ABS deactivated ( Lights up ABS fault (… -
Page 37: Asc Warnings
The detailed descriptions relating lead to an ABS fault ( 91). The ABS warning light to BMW Motorrad ASC start on Have the fault rectified as comes on. page ( 92), and you will find…
-
Page 38
an overview listing the possible warnings on the next page. -
Page 39
Warnings, overview Warning light Status indicators Meaning Quick-flashes yel- Appears on the dis- ASC intervention ( play Quick-flashes yel- Appears on the dis- Off-road ASC intervention ( play Slow-flashes Self-diagnosis not completed ( Slow-flashes Self-diagnosis in off-road mode not completed ( Appears on the dis- ASC deactivated ( play… -
Page 40
The «General» warning light Pull away slowly. The ASC workshop, preferably an author- quick-flashes yellow. warning light must go out with- ised BMW Motorrad dealer. in a few metres. The off-road ASC symbol appears on the display. If the ASC warning light contin-… -
Page 41: Rdc Warnings
The rider has switched off the Have the fault rectified as ASC system. quickly as possible by a with Automatic Stability Con- specialist workshop, preferably trol an authorised BMW Motorrad Activating ASC function dealer. 61). RDC warnings ASC fault The «General» warning light…
-
Page 42
The detailed descriptions relating to BMW Motorrad RDC start on page ( 94), and you will find an overview listing the possible warnings on the next page. -
Page 43
Warnings, overview Warning light Status indicators Meaning Lights up yellow Tyre symbol ap- Tyre pressure close to limit of permitted pears on the dis- tolerance ( play. The critical tyre pressure flashes. Flashes red Tyre symbol ap- Tyre pressure outside permitted toler- pears on the dis- ance ( play. -
Page 44
Measured tyre pressure is close Check the tyre for damage and authorised BMW Motorrad to the limit of permitted toler- to ascertain whether the mo- dealer. ance. torcycle can be ridden with the… -
Page 45
RDC specialist workshop, preferably toms. Under these circum- readings. Assume that a per- an authorised BMW Motorrad stances: manent fault has not occurred dealer. Have the fault rectified by a unless the ‘General’ warning… -
Page 46: Anti-Theft Alarm Warnings
Seek the advice of a specialist ing light 1 showing after the Pre- workshop, preferably an author- Ride Check and relate to the ca- ised BMW Motorrad dealer. pacity of the internal battery that supplies power to the anti-theft alarm.
-
Page 47
Warnings, overview Warning light Status indicators Meaning DWALO ! appears Anti-theft alarm battery weak ( on the display DWA ! Lights up yellow appears on Anti-theft alarm battery flat ( the display… -
Page 48
Seek the advice of a specialist proportion of its original capa- workshop, preferably an author- city. There is no assurance of ised BMW Motorrad dealer. how long the anti-theft alarm can remain operational if the motor- cycle’s battery is disconnected. -
Page 49: Operation
Front and rear seats ….71 BMW Motorrad Integral ABS ..59 Helmet holder ….. . 73 Automatic Stability Control ASC .
-
Page 50: Ignition Switch And Steering Lock
Pre-ride check is performed. Electrically powered accessor- with topcase ies remain operational for a lim- If you wish you can arrange to with BMW Motorrad Integral ited period of time. have the cases and the top- ABS II The battery can be recharged case fitted with locks that can via the socket.
-
Page 51: Electronic Immobiliser Ews
You can obtain replacement/extra unit has recognised the key as keys only through an authorised «authorised» for your motorcycle. BMW Motorrad dealer. The keys are part of an integrated security A spare key attached to system, so the dealer is under an…
-
Page 52: Clock
Clock reading appears on the display. Setting clock with on-board computer Attempting to set the clock while riding the motorcycle with tyre pressure monitoring can lead to accidents. (RDC) Set the clock only when the mo- torcycle is stationary. Switch on the ignition. Press and hold down the but- without on-board computer ton until the hours number 3…
-
Page 53: Odometer And Tripmeters
Odometer and with on-board computer tripmeters with tyre pressure monitoring Select the readings (RDC) Switch on the ignition. without on-board computer without tyre pressure monitor- ing (RDC) Repeatedly press the button until the value you want ap- pears in panel 3. The following values can be dis- played: Press button 1.
-
Page 54
without on-board computer with on-board computer without tyre pressure monitor- ing (RDC) with tyre pressure monitoring (RDC) The residual-range readout 1 in- dicates how far you can ride with the fuel remaining in the tank. This reading is not displayed until Press and hold down button 1 fuel level has dropped to reserve. -
Page 55: On-Board Computer
The calculated range is an Ambient temperature approximate value. Con- sequently, BMW Motorrad re- commends that you should not try to use the full residual range before refuelling. On-board computer with on-board computer The following values can be dis- Select the readings…
-
Page 56
drops below this threshold for Average consumption the first time. Average speed Press and hold down button 1 until the average-speed reading Average consumption 1 is cal- is reset. culated by dividing the distance covered since the last reset by Average speed 1 is calculated the corresponding amount of fuel on the basis of the time elapsed… -
Page 57
Range when the motorcycle is on the move. The calculated range is only an approximate reading. Consequently, BMW Motorrad recommends that you should not try to use the full range before refuelling. Oil level Press and hold down button 1… -
Page 58: Tyre Pressure Monitoring Rdc
In this Repeatedly press button 1 un- case, consult your authorised The readings mean: til the tyre-pressure readings BMW Motorrad dealer. : Oil level is correct. appear on the display. CHECK Tyre pressure : Check the oil level the next time you stop for fuel.
-
Page 59: Lights
ing on the right is the rear tyre When the engine is not Parking light — — pressure. appears dir- running you can switch on Switch off the ignition. ectly after the ignition is switched the lights by switching on the ig- on, because the sensors do not nition and either switching on the transmit tyre pressures until the…
-
Page 60: Turn Indicators
Turn indicators Operating flashing turn indicators Switch on the ignition. The turn indicators are can- celled automatically after you have ridden for approxim- ately 10 seconds, or covered a distance of about 200 m. Press left section of switch 1 Press button 2 to switch on to switch on the auxiliary head- the right flashing turn indicator.
-
Page 61: Emergency Off Switch
Emergency off switch If you press a turn-indicat- or button with the ignition (kill switch) switched on, the turn-indicator function is activated instead of the hazard warning flashers, and remains active until you release the button. The hazard warning flashers recommence flashing as soon as the button is released.
-
Page 62: Operating Grip Heating
is low, grip heating is switched off to ensure the battery’s start- ing capability. Normal operating position The handlebar grips have two- (run) stage heating. Stage two is for heating the grips quickly: it is ad- Engine switched off. visable to switch back to stage You cannot start the engine Set switch 1 to the desired one as soon as the grips are…
-
Page 63: Bmw Motorrad Integral Abs
Integral function ensures that comes on. the rear wheel is also braked and ABS control remains active for with Automatic Stability Con- with BMW Motorrad Integral the rear wheel. ABS control for trol ABS II the rear wheel is not deactivated…
-
Page 64: Automatic Stability Control Asc
ASC function The off-road ASC symbol Operation remains visible or continues Switch on the ignition. The BMW Motorrad ASC sys- to flash. You have the option of de- tem can be deactivated and ac- The off-road ASC function is…
-
Page 65: Seat Height
Seat height To switch off ASC, press and The ASC symbol no longer hold down button 1 until the shows; if ASC self-diagnos- Adjusting seat height ASC symbol changes status. is has not completed the ASC Remove the front seat ( 72).
-
Page 66: Windscreen
Windscreen Clutch Adjusting windscreen Adjusting clutch lever If the position of the clutch fluid reservoir is changed, air can enter the clutch system. Do not twist the handlebar fitting or the handlebars. Attempting to adjust the clutch lever while riding the The front seat can work motorcycle can lead to accidents.
-
Page 67: Brakes
Mirrors between the clutch lever and handbrake lever unless the mo- the handlebar grip. torcycle is at a standstill. Adjusting mirrors Turn adjusting screw 1 counter-clockwise to reduce the span between the clutch lever and the handlebar grip. The adjusting screw is easi- er to turn if you push the clutch lever forward.
-
Page 68: Handlebars
Slacken nut 2. workshop, preferably an author- Turn the mirror arm to the ap- ised BMW Motorrad dealer. propriate position. Tighten the nut to the spe- Spring preload cified tightening torque, while Setting…
-
Page 69
It is essential to set spring pre- Spring preload at front load of the rear suspension to wheel suit the load carried by the mo- torcycle. Increase spring preload Spring preload at setting 3 when the motorcycle is heavily (For riding on gravel tracks loaded and reduce spring preload and similar and with load) accordingly when the motorcycle… -
Page 70: Damping
If you want to increase spring preload, turn knob 1 in the dir- ection indicated by the HIGH arrow. Basic setting of spring preload, rear without Electronic Suspen- sion Adjustment (ESA) You can ascertain the current Your motorcycle’s hand- Turn the knob as far as it setting by counting the num- ling will suffer if you do not will go in the LOW direction,…
-
Page 71
An increase in spring preload Adjust the damping character- Basic setting of rear-sus- requires firmer damping, a re- istic, using the tool from the pension damping charac- duction in spring preload re- on-board toolkit to turn adjust- teristic quires softer damping. ing screw 1. -
Page 72: Electronic Suspension Adjustment
Electronic Suspension Calling up settings function display, and spring pre- load in panel 2. Adjustment ESA Switch on the ignition. with Electronic Suspension Ad- The setting shows briefly, then justment (ESA) disappears automatically. Possible adjustments Adjust the suspension damping Electronic Suspension Adjust- ment ESA provides a convenient Switch on the ignition.
-
Page 73
Repeatedly press button 1 until then automatically disappears from the display. the setting you want to use appears on the display. Adjust spring preload If a road-riding mode has been Start the engine. selected the following can be displayed: You cannot adjust spring preload while the motor- COMF : comfort mode… -
Page 74: Tyres
The riding modes you can select ling characteristics and increase Tyre pressure, front also change accordingly. the rate of tyre wear. Always check that the tyre pres- Predominantly smooth ter- sures are correct. 2.5 bar (two-up and/or with rain luggage, tyre cold) At high road speeds, tyre Uneven terrain valves installed perpen-…
-
Page 75: Front And Rear Seats
BMW Headlight beam-throw Motorrad dealer. adjustment Headlight beam throw and spring preload Headlight beam throw is gener- ally kept constant when spring preload is adjusted to suit load. Spring preload adjustment might not suffice only if the motorcycle Neutral position is very heavily loaded.
-
Page 76
Install the front seat Turn the key clockwise in seat Turn the key counter-clockwise lock 1 and hold it in this pos- in seat lock 1 and hold it in this Position the front seat with ition while pressing down the position while pressing down mounts 4 in holders 5 on left front part of rear seat 2. -
Page 77: Helmet Holder
Engage the rear seat in The helmet catch can mounts 6. scratch the panelling. Press down firmly on the front Make sure the lock is out of the of the rear seat until it engages way when you hook the helmet with an audible click.
-
Page 79: Riding
Riding Safety instructions ….76 Checklist ……78 Starting .
-
Page 80: Safety Instructions
When riding over with case the year. Your authorised BMW kerbs and similar obstacles, bear Ensure that the case volumes Motorrad dealer will be glad to in mind that your motorcycle’s on the left and right are equal.
-
Page 81
with tank rucksack Settings of the spring-strut and Payload of cases shock-absorber system Note the maximum permissible Imbalanced load payload of the tank rucksack and the speed limit for riding Loose clothing see label in case with a tank rucksack on the Insufficient tyre pressure Maximum permissible motorcycle. -
Page 82: Checklist
Risk of poisoning Stop the engine immediately if Tampering it misfires. Exhaust fumes contain carbon Tampering with motor- Use only unleaded fuel. monoxide, which is colourless cycle settings (e.g. elec- Comply with all specified main- and odourless but highly toxic. tronic engine management unit, tenance intervals.
-
Page 83: Starting
BMW Motorrad Integral slightly when starting the engine. the side stand. ABS II At ambient temperatures below ABS self-diagnosis is 0 °C, disengage the clutch after…
-
Page 84
ABS II The engine starts. CHECK! appears on the dis- BMW Motorrad Integral ABS per- Consult the troubleshooting play. forms self-diagnosis to ensure its chart below if the engine re- operability. Self-diagnosis is per- If the ‘General’ warning light does fuses to start. -
Page 85: Running In
The ABS warning light ASC self-diagnosis BMW Motorrad ASC performs completed flashes. self-diagnosis to ensure its op- erability. Self-diagnosis is per- The ASC symbol no longer ABS self-diagnosis formed automatically when you shows. completed switch on the ignition. If an indicator showing an ASC…
-
Page 86: Off-Roading
Enduro reading 0…200 km) tend stopping distance by a attachment kit available from significant margin. <6500 min (Odometer your authorised BMW Motorrad Apply the brakes in good time. reading 200…400 km) dealer. <7500 min (Odometer Tyres Rims reading 400…600 km)
-
Page 87: Brakes
After off-roading The brake pads will wear Air filter element more rapidly if you ride fre- BMW Motorrad recommends Engine damage due to quently on unsurfaced tracks or checking the following after riding clogged air filter element. poor roads. the motorcycle off-road:…
-
Page 88
ABS II situations: To optimise stopping distance, Riding in the rain or through BMW Motorrad Integral ABS pre- apply the front brakes rapidly and puddles of water. vents the front wheel from lock- keep on increasing the force you ing up. -
Page 89: Parking Your Motorcycle
Parking your Refuelling On a gradient, the motorcycle should always face uphill; se- motorcycle Fuel is highly flammable. A lect 1st gear. naked flame close to the Side stand fuel tank can cause a fire or ex- Centre stand Switch off the engine. plosion.
-
Page 90
onto the road surface. This could Recommended fuel cause a fall. grade Do not overfill the fuel tank. Premium plus unleaded Leaded fuel will destroy the 98 ROZ/RON catalytic converter. 91 AKI Use only unleaded fuel. Refuel with fuel of the grade alternative fuel grade stated below;… -
Page 91: Secure The Motorcycle For Transport
Usable fuel capacity approx. 20 l Reserve fuel approx. 4 l Press the fuel tank cap down The motorcycle can topple Risk of damaging compon- firmly to close. and fall on its side. ents. Remove the key and close the Make sure that the motorcycle Take care not to trap protective cap.
-
Page 92
At the rear, secure the straps to the rear footrests on both sides and tighten the straps. Tighten all the straps uniformly; the motorcycle’s suspension should be compressed as tightly as possible front and rear. -
Page 93: Engineering Details
Integral ABS ……90 Electronic engine management with BMW Motorrad ASC ….92 Tyre pressure monitoring RDC ..94 Electronic Suspension Adjustment ESA .
-
Page 94: Brake System With Bmw Motorrad Integral Abs
Do not attempt burn-outs. is maintained irrespective of the with BMW Motorrad Integral condition of the road surface. How does ABS work? ABS II What are the effects of…
-
Page 95
Motorrad Integral ABS? tual circumstances, the system pulled. Within the limits imposed by reacts instantly and adjusts brak- physics, the BMW Motorrad In- Rear wheel lift ing force accordingly to achieve tegral ABS ensures directional optimum braking. Under very severe and sudden stability on any surface. -
Page 96: Electronic Engine Management With
Motorrad ASC of maintenance. iary stand, engine idling or with In order to ensure that the BMW with Automatic Stability Con- a gear engaged. Motorrad Integral ABS is always trol…
-
Page 97
Self-diagnos- Motorrad ASC? ity for assessing road and traffic is has to complete before fault BMW Motorrad ASC is designed conditions and adopting his or messages can be issued. as an assistant system for the her style of riding accordingly. -
Page 98: Asc
15 minutes after the The BMW Motorrad ASC is un- tyres, with the result that ASC motorcycle comes to a stop. able to control a situation of this…
-
Page 99: Electronic Suspension Adjustment
In order to ensure rapid adjust- The tyre-pressure readings the value in the table. ment at ambient temperatures shown by the multifunction below 0 °C, BMW Motorrad re- display are temperature- commends adjusting the sus- compensated; the reference tyre pension to the setting for two-up…
-
Page 100
Off-road settings um. It can be used, for example, The Enduro ESA developed spe- in terrain where the likelihood of cially for the R 1200 GS incor- having to negotiate bumps and porates the road-riding modes holes in the ground necessit-… -
Page 101: Accessories
Accessories General instructions ….98 Power sockets ….. . 98 Case .
-
Page 102: General Instructions
BMW motorcycles Power sockets are shut down proved by BMW for this purpose. without constituting a safety haz- automatically under the following Genuine BMW parts and ac- ard. Country-specific official au-…
-
Page 103: Case
remains operational if the igni- Opening cases tion is subsequently switched off. The power sockets are switched off approximately 15 after the ig- nition is switched off, in order to prevent overloading of the on- board electrics. Cable routing The cables from the power sock- Push yellow button 4 down ets to the auxiliary devices must and at the same time open the…
-
Page 104
Adjusting case volume Remove the cases Open the case and remove all its contents. Closing the carry handle while the case lock is in Turn key 1 in the case lock to line with the forward direction of right angles with the forward travel can result in damage to the direction of travel. -
Page 105
Take a firm grip of the handle and lift the case out of the holder. Installing cases Open locking lever 4. Fully open latching flap 6, if ne- cessary pulling up red release lever 5. Open locking lever 4. Pull red release lever 5 up. Latching flap 6 pops up. -
Page 106: Topcase
carriers 7, noting the locking Opening topcase lever at the side. Close locking lever 4. Close the carry handle. Turn key 1 in the topcase lock Turn the key parallel with the to the vertical position. Push latching flap 6 down as direction of travel and remove.
-
Page 107
Closing the carry handle while the topcase lock is horizontal can result in damage to the locking tongue. Make sure that the topcase lock is vertical when you close the carry handle. Close carry handle 3. The handle engages with an Push yellow button 4 forward Engage pivot lever 1 at the audible click. -
Page 108
Removing topcase Installing topcase Pull red lever 4 back as far as it will go. Turn key 1 in the topcase lock Fully open latching flap 5, if Latching flap 5 pops up. to the vertical position. necessary pulling red release Fully open latching flap 5. -
Page 109: Luggage Carrier
Luggage carrier Extra-large luggage platform By removing the luggage carrier with the rear seat removed and cases (OA) installed, you have a large, flat luggage platform to which you can secure bulky items of luggage in various ways. Engage the topcase in front Push latching flap 5 fully When loading, make sure that holders 6 of the topcase carrier…
-
Page 110
Remove screws 1 on left and Place the luggage rack in posi- right. tion. Remove screw 2. Install screw 2 with the sleeve and the washer and tighten to Remove the sleeves and wash- the specified torque. ers. Install screws 1 with the Remove the luggage carrier. -
Page 111: Maintenance
Maintenance General instructions ….108 Toolkit ……108 Engine oil .
-
Page 112: General Instructions
Some of the work calls for spe- plain tips cial tools and a thorough know- Replacing turn indicat- ledge of motorcycle technology. or bulbs, front and rear If you are in doubt consult a spe- 128). cialist workshop, preferably your authorised BMW Motorrad deal-…
-
Page 113: Engine Oil
Extension for hook wrench Switch off the engine when it is Hook wrench BMW Motorrad has assembled at operating temperature. Adjusting spring preload a tools service set that is ideal Make sure the ground is level for front wheel ( 65).
-
Page 114
110). If the oil level is above the MAX mark: Have the oil level corrected by a specialist workshop, preferably an authorised BMW Motorrad dealer. Check the oil level in oil-level Wipe the area around the filler indicator 1. neck clean. -
Page 115: Brake System
0.5 l (Difference Have the brakes checked by a between MIN and MAX) specialist workshop, preferably an authorised BMW Motorrad Checking engine oil level dealer. 109). Install the cap of the oil filler Check the front brake pad neck.
-
Page 116
Have the brake pads replaced by a specialist workshop, preferably an authorised BMW Motorrad dealer. Visually inspect the brake pads Brake-pad wear limit, Checking rear brake pad to ascertain their thickness. -
Page 117
Have the brake pads replaced by a specialist workshop, preferably an authorised BMW Motorrad dealer. Shaft 1 with three marker rings 2 Brake-pad wear limit, Brake-pad wear is between the brake pads. -
Page 118
MIN mark. (Brake-fluid reservoir horizontal, motorcycle up- right) If the brake fluid level drops be- low the permitted level: Have the defect rectified as quickly as possible by a spe- cialist workshop, preferably an authorised BMW Motorrad dealer. -
Page 119
(for example replacing brake pads or changing brake fluid). Consult a specialist workshop, preferably an authorised BMW Motorrad dealer. -
Page 120: Clutch
If the pressure point is not clearly perceptible: Have the clutch checked by a specialist workshop, preferably Check the clutch fluid level in Brake fluid level, rear an authorised BMW Motorrad reservoir 1. dealer. Wear of the clutch causes Checking clutch fluid level DOT4 brake fluid the fluid level in the clutch fluid reservoir to rise.
-
Page 121: Rims And Tyres
Do not attempt to top up the wear marks. an authorised BMW Motorrad system with fluids of any kind. dealer. Tyres have wear indicators Have the defect rectified as…
-
Page 122: Wheels
Tyre recommendation calculations. Any change in these (RDC) For each size of tyre BMW influencing variables, caused for Motorrad tests and classifies example by a switch to wheels as roadworthy certain makes.
-
Page 123
Remove securing screws 2 of sensor. Be sure to draw the rim that could be scratched in the left and right brake calipers. attention of the authorised BMW the process of removing the Motorrad dealer or specialist brake calipers. workshop to the fact that the wheel is fitted with an RDC sensor. -
Page 124
BMW Motorrad Integral ABS II Release axle clamping screw 2. Remove spacing bushing 4 from the left-hand side of the Remove quick-release axle 3, front-wheel hub. while supporting the wheel. Remove screw 1 and remove the ABS sensor from its bore. -
Page 125
Roll the front wheel into posi- with BMW Motorrad Integral threads can suffer damage. tion between the front forks. ABS II Always have the security of the fasteners checked by a specialist workshop, preferably an author- ised BMW Motorrad dealer. -
Page 126
Make sure that the sensor bedded. cable is routed correctly. with BMW Motorrad Integral Make sure that the sensor ABS II cable is routed as shown here. Install securing screws 2 on… -
Page 127
Parts of the exhaust system The wheel studs for the ised BMW Motorrad dealer. can be hot. cross-spoked wheel (op- tional extra) and the cast alumini- Do not touch hot parts of the Seat the rear wheel on the um wheel differ in length. -
Page 128: Front-Wheel Stand
BMW Motorrad Centre the front-wheel stand Tightening sequence: tight- front-wheel stand. relative to the front wheel and en in diagonally opposite push it against the front axle.
-
Page 129: Bulbs
Bulbs in the section entitled «Technical data». General instructions A warning appears in the multi- Replacing low-beam/high- function display if a bulb is de- beam headlight bulb fective. If the brake or rear light The positions of the plug, fails, the symbol is accompan- the spring retainer and the ied by the ‘General’ warning light, bulb might not be as illustrated…
-
Page 130
cover 2 by turning the cover Replace the defective bulb. counter-clockwise. Do not touch the glass of new bulbs with your fingers. Use a clean, dry cloth to hold the bulbs when handling them. Dirt deposits, in particular oil and grease, interfere with heat radi- ation from the bulb. -
Page 131
Replacing parking-light bulb Make sure the ground is level and firm and place the motor- cycle on its stand. Switch off the ignition. Turn the handlebars all the way to the right Install plug 3. Pull the bulb out of the bulb socket. -
Page 132
Bulb for parking light W5W / 12 V / 5 W Install bulb carrier 1 in the Remove screw 1. headlight housing. Replacing turn indicator bulbs, front and rear Make sure the ground is level Install the bulb in the bulb and firm and place the motor- socket. -
Page 133
Bulbs for flashing turn indicators, front RY10W / 12 V / 10 W with LED turn indicators LED / 12 V Bulbs for flashing turn indicators, rear Turn bulb 2 counter-clockwise Working from the inboard side, and remove it from the bulb insert the glass into the bulb RY10W / 12 V / 10 W housing. -
Page 134
LEDs. Consult a specialist workshop, preferably an authorised BMW Disconnect plug 2. Replace fuse 4 for right head- Motorrad dealer. light or fuse 5 for left headlight, as applicable. -
Page 135: Air Filter
Air filter Remove the air filter Make sure the ground is level and firm and place the motor- cycle on its stand. Remove the front seat ( 72). Connect plug 2. Remove screw 1. Remove two screws 2. Pull the side panel at 3 out of the retainer and remove.
-
Page 136
Installing air filter Push out both retainers 1 by Position the air intake pipe on pressing at rear. the air filter housing and push it Insert air filter 3 into the air fil- into holder 2. Pull the intake air pipe out of ter housing at the top. -
Page 137: Jump Starting
Hold the fuel-tank cover in po- Push side cover 1 into the two Cylinders not synchronised. sition and install two screws 5. mounts. Make sure the throttle-valve Install the front seat ( 72). cable is correctly routed. Check that the throttle-valve Jump starting cable is seated in guide 4 of The wires leading to the…
-
Page 138
A short-circuit can res- The spring-strut screw can ult if the crocodile clips be used as an alternative to of the jump leads are accident- the battery’s negative terminal. ally brought into contact with the Run the engine of the donor motorcycle. -
Page 139: Battery
If you switch on the igni- BMW Motorrad has de- tion and the multifunction Compliance with the points be- veloped a float charger spe- display and telltale lights fail to…
-
Page 140
Remove the front seat ( 72). electrics. with your motorcycle’s electron- Remove the rider’s manual, if Use BMW chargers with the ics. If this happens, disconnect applicable. part numbers 71 60 7 688 864 the battery from the on-board (220 V) or, as applicable, systems and connect the charger 71 60 7 688 865 (110 V). -
Page 141
If you want to have the date set Then remove the protective consult a specialist workshop, Engage the retainer at the bot- cap and disconnect positive preferably an authorised BMW tom, push it over the battery lead 1. Motorrad dealer. and install screw 3. -
Page 142
Slip the holder underneath the tank cover and install screws 1. Insert the rider’s manual, if ap- plicable. Install the front seat ( 72). Setting clock ( 48). -
Page 143: Care
Care Care products ….. 140 Washing motorcycle ….140 Cleaning easily damaged compon- ents .
-
Page 144: Care Products
Apply the brakes in good time Washing motorcycle until the brake discs and brake BMW Motorrad recommends pads have dried out. that you use BMW insect re- mover to soften and wash off insects and stubborn dirt on…
-
Page 145: Cleaning Easily Damaged
Do not use cleaning agents. agents, the surfaces can be dam- aged. Chrome Do not use cleaning agents that Use plenty of water and BMW contain alcohol, solvents or ab- shampoo to clean chrome, par- Use only proprietary motorcycle rasives to clean plastic parts.
-
Page 146: Paint Care
BMW Motorrad recommends ever, as otherwise the paint can Take care not to bend the fins applying only BMW car wax or be affected or become discol- when cleaning the radiator. products containing carnauba oured. Substances of this nature wax or synthetic wax.
-
Page 147: Restoring Motorcycle To Use
BMW Motorrad dealer. Com- bine work for laying up/restoring to use with a BMW service or inspection. Restoring motorcycle to use Remove the protective wax coating.
-
Page 149: Technical Data
Technical data Troubleshooting chart … . . 146 Riding specifications ….159 Threaded fasteners ….147 Engine .
-
Page 150: Troubleshooting Chart
Troubleshooting chart Engine does not start or is difficult to start Possible cause Remedy Emergency off switch (kill switch) Kill switch in operating position Side stand Retract the side stand ( Gear engaged and clutch not disengaged Select neutral or pull clutch lever ( Clutch pulled before ignition was switched on Switch on the ignition, then pull the clutch lever No fuel in tank…
-
Page 151: Threaded Fasteners
Threaded fasteners Front wheel Value Valid Brake caliper to slider tube M8 x 32 — 10.9 30 Nm Clamp screw of quick-release axle M8 x 35 19 Nm Quick-release axle in axle holder M24 x 1.5 50 Nm Rear wheel Value Valid Rear wheel to wheel carrier…
-
Page 152
Mirror arm Value Valid Mirror to adapter Locknut, M10 x 1.25 — 4.8 22 Nm Mirror adapter to clamping block M10 x 14 — 4.8 25 Nm Frame Value Valid Luggage carrier to rear frame M6 x 35, Replace screw 8 Nm Micro-encapsulated… -
Page 153: Engine
Engine Engine design Four-stroke opposed twin, air-cooled with oil- cooled exhaust ports, installed longitudinally, two overhead camshafts and four radially positioned valves per cylinder, electronic engine manage- ment. Displacement 1170 cm Cylinder bore 101 mm Piston stroke 73 mm Compression ratio 12.0 : 1 Nominal output 81 kW, at engine speed: 7750 min…
-
Page 154: Fuel
Premium unleaded (slight power- and consumption-related restrictions) 95 ROZ/RON 89 AKI with regular unleaded (RON 91) Regular unleaded (power- and consumption-re- lated restrictions) 91 ROZ/RON 87 AKI Usable fuel capacity approx. 20 l Reserve fuel approx. 4 l BMW recommends BP fuels…
-
Page 155: Engine Oil
Engine oil Engine oil, capacity max 4.0 l, with filter change of products recommended by BMW Motorrad and generally admissible viscosity classes Castrol GPS SAE 10W-40, API SG / JASO MA ~-20 °C SAE 5W-40, API SF / ACEA A2, or better ~-20 °C…
-
Page 156: Clutch
Clutch Clutch type Single-plate dry clutch Transmission Gearbox type Helical 6-speed gearbox with integral reaction damper, claw-action shift by sliding sleeves Gearbox transmission ratios 1,737, Primary transmission ratio 2.375 (38:16 teeth), 1st gear 1.696 (39:23 teeth), 2nd gear 1.296 (35:27 teeth), 3rd gear 1.065 (33:31 teeth), 4th gear 0.939 (31:33 teeth), 5th gear 0.848 (28:33 teeth), 6th gear…
-
Page 157: Rear-Wheel Drive
2.910 (32:11 teeth) Running gear Front wheel Type of front suspension BMW Telelever, with anti-dive top fork bridge, leading link pivot-mounted on engine and tele- scopic forks, central spring strut supported by leading link and front frame Spring strut, front, type Central spring strut with coil spring and twin-tube gas-filled shock absorber;…
-
Page 158: Brakes
Rear wheel Type of rear suspension Cast-aluminium single swinging arm with BMW Motorrad Paralever Type of rear suspension Central spring strut with coil spring, adjustable re- bound damping and hydraulically adjustable spring preload with Electronic Suspension Adjustment (ESA) Central spring strut with coil spring, electrically…
-
Page 159: Wheels And Tyres
Wheels and tyres Recommended tyre sets You can obtain an up-to-date list of approved tyres from your authorised BMW Motorrad dealer or on the Internet at «www.bmw-motorrad.com». Front wheel Front wheel, type Cast wheel with 5 double spokes, MT H2…
-
Page 160: Electrics
Electrics Electrical rating of on-board socket with extra socket max 5 A, Total for all sockets Fuses Electronic fuses protect the circuits. If an elec- tronic fuse trips and de-energises a circuit, the circuit is active as soon as the ignition is switched on after the fault has been rectified.
-
Page 161: Frame
Bulb for tail light/brake light LED / 12 V Bulbs for flashing turn indicators, front RY10W / 12 V / 10 W with LED turn indicators LED / 12 V Bulbs for flashing turn indicators, rear RY10W / 12 V / 10 W with LED turn indicators LED / 12 V Frame…
-
Page 162: Dimensions
Dimensions Length of motorcycle 2210 mm, Across luggage carrier Height of motorcycle 1450 mm, To top of windscreen when lowered, at DIN unladen weight with lowered suspension 1420 mm, To top of windscreen when lowered, at DIN unladen weight Width of motorcycle 940 mm, Across handlebars Front-seat height 850…870 mm, At unladen weight…
-
Page 163: Weights
Weights Unladen weight 229 kg, DIN unladen weight, ready for road 90 % load of fuel, without optional extras Permissible gross weight 440 kg Maximum payload 211 kg Riding specifications Top speed >200 km/h…
-
Page 165: Service
Service BMW Motorrad service … . 162 BMW Motorrad service quality ..162 BMW Motorrad mobility services — roadside assistance ….162 BMW Motorrad service network .
-
Page 166: Bmw Motorrad Service
To ensure that your BMW is al- BMW Motorrad mobility ably an authorised BMW Motor- ways in optimum condition, BMW rad dealer.
-
Page 167: Network
BMW Service place to look after you and your vice is approaching, on the basis The BMW Service is carried out motorcycle in more than 100 of the programmed values. once a year; the extent of servi- countries.
-
Page 168: Ance Work
Confirmation of maintenance work BMW Pre-delivery BMW Running-in Check Check Completed Completed Odometer reading Next service at the latest or, if logged beforehand, Odometer reading Stamp, signature Stamp, signature…
-
Page 169
BMW Service BMW Service BMW Service Completed Completed Completed Odometer reading Odometer reading Odometer reading Next service Next service Next service at the latest at the latest at the latest or, if logged beforehand, or, if logged beforehand, or, if logged beforehand,… -
Page 170
BMW Service BMW Service BMW Service Completed Completed Completed Odometer reading Odometer reading Odometer reading Next service Next service Next service at the latest at the latest at the latest or, if logged beforehand, or, if logged beforehand, or, if logged beforehand,… -
Page 171
BMW Service BMW Service BMW Service Completed Completed Completed Odometer reading Odometer reading Odometer reading Next service Next service Next service at the latest at the latest at the latest or, if logged beforehand, or, if logged beforehand, or, if logged beforehand,… -
Page 172
BMW Service BMW Service BMW Service Completed Completed Completed Odometer reading Odometer reading Odometer reading Next service Next service Next service at the latest at the latest at the latest or, if logged beforehand, or, if logged beforehand, or, if logged beforehand,… -
Page 173: Confirmation Of Service
Confirmation of service The table is intended as a record of maintenance and repair work, the installation of optional accessories and, if appropriate, special campaign (recall) work. Item Odometer Date reading…
-
Page 174
Item Odometer Date reading… -
Page 175
Position on the motorcycle, 17 Accessories Overview, headlights, 19 General instructions, 98 Warning, charge current, 28 Replacing auxiliary-headlight Air filter BMW Motorrad service, 162 bulbs, 130 Installation, 132 Brake fluid Replacing fuses for auxiliary Position on the motorcycle, 13 Reservoir, front, 13… -
Page 176
Electrics Frame Case Technical data, 156 Technical data, 157 Operation, 99 Emergency off switch (kill Front-wheel stand Checklist, 78 Installing, 124 switch), 16, 57 Clock, 22 Fuel Engine Adjusting, 48 Filler neck, 13 Starting, 79 Control, 14, 18 Fill-level indicator, 22 Technical data, 149 Clutch Refuelling, 85… -
Page 177
Telltale lights, 22 High-beam headlight Lights Control, 14 Auxiliary headlights, 55 Underneath the seat, 17 Switching on, 55 Headlight flasher, 55 Grip heating Control, 16 Telltale light, 22 Parking light, 55 Horn, 14 Switching on high-beam headlight, 55 Handlebar fittings Switching on low-beam General view, left side , 14 Idle… -
Page 178
Mirrors Seat Parking, 85 Adjusting, 63 Adjusting seat height, 61 Parking light, 55 Mobility services, 162 Lock, 11 Power socket, 11 Motorcycle Removing and installing, 71 Notes on use, 98 Laying up, 142 Service, 162 Pre-ride check, 80 Service-due indicator, 23 Restoring to use, 143 Side light Multifunction display, 18… -
Page 179
Topcase Table of tyre pressures, 17 Technical data Operation, 102 Technical data, 155 Brakes, 154 Torques, 147 Top speed, 77 Bulbs, 156 Transmission Clutch, 152 Technical data, 152 Dimensions, 158 Vehicle identification number, 13 Transportation Electrics, 156 Lashing, 87 Engine, 149 Troubleshooting chart, 146 Warning lights, 18 Engine oil, 151… -
Page 180
Installing rear wheel, 123 Remove the front wheel, 119 Removing rear wheel, 122 Technical data, 155 Windscreen Adjuster, 11 Adjusting, 62…
Не можете найти ответ на свой вопрос в руководстве? Вы можете найти ответ на свой вопрос ниже, в разделе часто задаваемых вопросов о BMW R 1200 GS (2016).
Как перевести мили в километры?
В чем разница между топливом E10 и E5?
Какова рекомендуемая частота замены масляного фильтра в двигателе BMW?
Как часто следует менять масло в двигателе BMW?
Как удалить ржавчину с устройства BMW мотоцикл?
Инструкция BMW R 1200 GS (2016) доступно в русский?
Не нашли свой вопрос? Задайте свой вопрос здесь
- Manuals
- Brands
- BMW Manuals
- Motorcycle
- R1200GS
- Service manual
-
Contents
Table of Contents -
Bookmarks
Quick Links
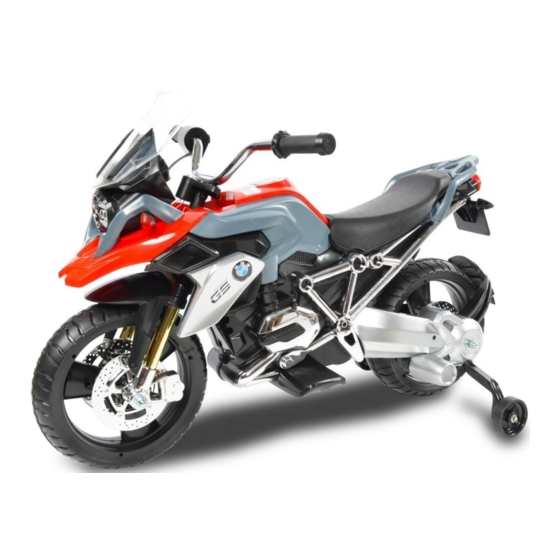
BMW R1200GS Motorcycle (W348)
Customer Service Guide
MMXV © Copyright Rollplay
1
Related Manuals for BMW R1200GS
Summary of Contents for BMW R1200GS
-
Page 1
BMW R1200GS Motorcycle (W348) Customer Service Guide MMXV © Copyright Rollplay… -
Page 2: Table Of Contents
Customer Service Guide Contents I) Check Battery ………………………………….II) Check Wiring Condition ……………………………..………………………. III) Windshield Replacement ……………………………………………..….…. 9 IV) Gearbox Replacement ……………………………………………………… 10 V) Warning Stickers ……………………………………………..…….………… 14 VI) Schematic diagram ……………..…………….…..….………..…………. 17 VII) Exploded View ………………………..…..….……….……..……..… 18 CAUTION : Disconnect the battery before proceeding with the following steps.
-
Page 3: I) Check Battery
Customer Service Guide I) Check Battery Operation: Use a Flat head screwdriver to unlock and remove the seat. Locate the battery harness, unplug the connector, and then use a volt-meter to check the condition of the battery. Step (1) Turn and unlock this plastic knob Step (2) Unlock position…
-
Page 4
Customer Service Guide I) Check Battery Step (3) Lift up the seat cover from the rear end Step (4) Unplug the battery connector underneath the seat… -
Page 5
Customer Service Guide I) Check Battery Step Reading Judgment: 6.0 V ~ 6.5 V – Good condition 5.6 V ~ 5.9 V – Recharge battery 5.5 V – Recharge battery. If after the stipulated recharging time the voltage has not increased, then replace the battery. -
Page 6: Ii) Check Wiring Condition
Customer Service Guide II) Check Wiring Connection Operation: There are two wiring connections that should be checked. A. Motor/Gearbox : Turn over the vehicle and locate the Gearbox harness at the bottom. Step (1) The motor harness is near the rear wheel Step (2) Check the white connectors.
-
Page 7
Customer Service Guide II) Check Wiring Connection B. Handlebar/Sounds : Disassemble the windshield and check the two connections per the below procedures. Use a flat screwdriver to remove the bracket next to the windshield Step (1) Release the latch at the front Step (2) -
Page 8
Customer Service Guide II) Check Wiring Connection Step (3) Lift up the whole windshield Check for any loose connections on the handlebars. Step (4) Reverse the above procedures to reassemble the vehicle. -
Page 9: Iii) Windshield Replacement
Customer Service Guide III) Windshield Replacement Operation: Follow the procedure (IIb) to detach the windshield, and then unplug the two connectors to remove it completely for replacing. Replace the Handlebar sub-assembly with a new one. Reverse above procedures to re-assemble the vehicle…
-
Page 10: Iv) Gearbox Replacement
Customer Service Guide IV) Gearbox Replacement Operation: Follow below steps to replace the gearbox. Use the two plastic wrenches to remove the nuts at both sides Step (1) Step (2) Unscrew the motor cover on the left side of rear wheel.
-
Page 11
Customer Service Guide IV) Gearbox Replacement Step (3) Hold and pull out the motor cover as shown. There are two latches help to hold the cover in place Step (4) -
Page 12
Customer Service Guide IV) Gearbox Replacement Slide the rear axle out from the opposite side of the gearbox. There is no need to remove it completely, just enough to release the gearbox. Step (5) Step (6) Remove the gearbox from the rear wheel assembly. -
Page 13
Customer Service Guide IV) Gearbox Replacement Unplug the motor connector (white) Step (7) Replace the gearbox with a new/good one Step (8) Reverse above procedures to re-assemble the vehicle… -
Page 14: V) Warning Stickers
Customer Service Guide V) Warning Stickers Operation: Check and re-put the damaged warning stickers after repairing. Bottom side of car body (underneath of rear fender)
-
Page 15
Customer Service Guide V) Warning Stickers Bottom side of Seat… -
Page 16
Customer Service Guide V) Warning Stickers Battery harness… -
Page 17: Vi) Schematic Diagram
Customer Service Guide VI) Wiring Schematic…
-
Page 18: Vii) Exploded View
Customer Service Guide VII) Exploded View…
-
Page 1
Rider’s Manual (US Model) R 1200 GS BMW Motorrad The Ultimate Riding Machine… -
Page 2
Motorcycle/Retailer Data Motorcycle data Retailer Data Model Contact in Service Vehicle identification number Ms./Mr. Color number Phone number First registration Retailer’s address/phone number Registration number (company stamp) -
Page 3
We congratulate you on your tance. choice of a motorcycle from BMW and welcome you to the community of BMW riders. We wish you many miles of Familiarize yourself with your safe and enjoyable riding… -
Page 4: Table Of Contents
2 Overviews … . . 9 Electronic immobilizer Starting off with BMW General view, left side . . . 11 EWS ….37 Integral ABS .
-
Page 5
….134 Paint care ….116 BMW Motorrad service 7 Maintenance ..85 Protective wax quality . -
Page 7: General Instructions
General instructions Overview……6 Abbreviations and symbols ..6 Equipment ….. . 6 Technical data .
-
Page 8: Overview
EWS Electronic immobilizer. procedures. Should you want to sell your Indicates the end of an BMW one day, please also re- DWA Anti-theft alarm. item of information. member to turn over the Rid- ABS Anti-Lock Brake Sys- er’s Manual to the new owner;…
-
Page 9: Technical Data
(OE) offered by BMW and se- Versions for individual lected optional accessories countries may differ. (OA). This explains why the Currentness of this manual may also contain de- scriptions of equipment which manual you have not ordered. Please The high safety and quality…
-
Page 11: Overviews
Overviews General view, left side ..11 General view, right side ..13 Underneath seat ….15 Left handlebar fitting .
-
Page 13: General View, Left Side
General view, left side Adjusting front spring preload ( Onboard socket (SZ) Adjustable windshield Headlight range adjust- ment ( Clutch fluid reservoir Type plate Filler neck, engine oil Luggage rack ( Seat lock ( 10 Onboard socket ( 11 Adjusting rear damping 12 Display for engine oil lev- el (…
-
Page 15: General View, Right
General view, right side Fill location for fuel Brake-fluid reservoir, front ( Vehicle Identification Number Air filter (under tank cov- er) ( 106) Adjuster, spring preload, rear ( Brake-fluid reservoir, rear…
-
Page 17: Underneath Seat
Underneath seat Left and right helmet holder ( Battery ( 111) Toolkit Seat mount (…
-
Page 18: Left Handlebar Fitting
Left handlebar fitting Tripmaster button ( Pushbutton, horn Button for left turn indi- cator and hazard warning flashers ( 46) ( Switch, high-beam head- light and headlight flash- er (…
-
Page 19: Handlebar Fitting, Right
Handlebar fitting, right Emergency ON/OFF switch ( Pushbutton, starter Button for right turn indi- cator and hazard warning flashers ( 46) ( Off button for turn indica- tor and hazard warning flashers ( 47) ( Heated hand grips switch…
-
Page 20: Instrument Cluster
Instrument cluster Speedometer Tachometer Warning and indicator lights ( Multifunction display Indicator light for anti- theft alarm and sensor for instrument cluster lighting Clock setting and Trip- master operation (…
-
Page 21: Headlight
Headlight Low-beam headlight High-beam headlight Parking lights…
-
Page 23: Status Indicators
Status indicators Multifunction display … 22 Warning and indicator lights..22 ABS warning lamp ..22 Function indicators … . 22 General warning indicators .
-
Page 24: Multifunction Display
Multifunction display Warning and indicator ABS warning lamp lights In some countries a different display of the ABS warning lamp is possible. Alternative display of ABS warning lamp. Function indicators Fuel capacity Fuel gauge ( The horizontal bars un- Warning symbol display Indicator light, left turn der the gas pump sym- region (…
-
Page 25: General Warning Indicators
Engine temperature The lateral bars under the temperature symbol show the engine temperature level. General warning indi- cators Display General warnings are dis- played by means of texts and symbols in the multifunction display. In some cases, an additional general warning lamp lights up red or yellow.
-
Page 26
Overview of warning indicators Display Meaning Lights up yellow The warning Electronic immobilizer is active EWS! indicated Lights up yellow Flashes Fuel down to reserve ( Lights up yellow Is indicated Engine electronics ( Lights up red Is indicated Engine oil pressure insufficient Lights up red Is indicated Battery charge current insufficient… -
Page 27
Have the defective key re- engine runs in emergency op- Reserve fuel quantity placed, preferably by an erating mode. authorized BMW Motorrad 1.1 gal Continued driving is pos- retailer. Refueling ( sible, however the accus- tomed engine performance… -
Page 28
Checking engine oil level The battery is not being BMW Motorrad retailer. charged. Topping off engine oil Continued driving is possi- ble until the battery is dis- charged. However, the en-… -
Page 29
General warning lamp by a specialized workshop, Defective bulb symbol lights up yellow. preferably an authorized with arrow pointing to BMW Motorrad retailer. the front is displayed. Defective bulb symbol A defective bulb places with two arrows is dis- Rear bulb defective your safety at risk be- played. -
Page 30: Abs Warning Indicators Oe
Battery symbol with note The warning indicators in this shop, preferably an autho- is displayed. chapter are described using rized BMW Motorrad retail- display 1. The anti-theft alarm battery no longer has its full capacity. The operation of the anti-theft…
-
Page 31
Overview of warning indicators Display Meaning Lights up red Brake switch defective ( Flashes 1x per Pull-away test not completed ( second Flashes 4x per Self-diagnosis not completed ( second Lights up red Lights up ABS warning lamps defective ( Lights up red Flashes 1x per ABS function not available (… -
Page 32
The ing. Without servo-assisted ing, resulting in accidents. BMW Integral ABS detects brakes, considerably greater Avoid hard braking whenever the braking request of the force is required to brake. -
Page 33
However, bear in mind that braking whenever possible, tion, the wheels may neither the ABS function as functions of the BMW Inte- lock up during very hard brak- nor the power braking as- gral ABS may have failed. ing, resulting in accidents. -
Page 34
Worn brake pads can ABS warning lamp flash- preferably an authorized considerably increase es four times per sec- BMW Motorrad retailer. the braking distance, and ond. therefore lead to accidents. Brake fluid level in wheel Without the ABS func- Brake early. -
Page 35
Inform a specialized work- Brake early. shop, preferably an autho- rized BMW Motorrad retail- If these criteria are satis- fied, you can continue rid- ing. However, bear in mind ABS error that a loss of brake fluid that… -
Page 37: Operation
Operation Helmet holder ….49 Mirrors ……50 Ignition switch and steering lock .
-
Page 38: Ignition Switch And Steering Lock
( Do not switch off the ignition while the motorcycle is being With OE BMW Motorrad Inte- ridden. gral ABS: Turn key to position 1. Turn key to position 2. Parking lights and all func- Light switched off.
-
Page 39: Electronic Immobilizer Ews
On level ground, always turn cle. You can also have your Battery can be recharged the handlebars to the left to authorized BMW Motorrad re- via the onboard socket. set the steering lock. tailer disable particular keys, Turn handlebars to full left…
-
Page 40: Hazard Warning Flashers
Replacement and spare keys tive again. are only available through an Hazard warning flashers in authorized BMW Motorrad re- operation. tailer.The keys are part of an Left/right turn indicator integrated security system, so lights flash.
-
Page 41: Tripmaster
Switching off hazard Tripmaster warning flashers Tripmaster operation Press Tripmaster button 1 once briefly. Press turn-indicator cancel The operation of the Tripmas- button 3. ter described in the following Hazard warning flashers are can also be carried out with switched off. the button 1 in the instrument Alternative: Press button for cluster as an alternative.
-
Page 42: Resetting Tripmeter
Switch on ignition. Select desired tripmeter. The determined residual range is an approximate reading.BMW Motorrad there- fore recommends that you do not try to use the full remain- ing range before refueling. Range remaining 1 is dis- played after reserve level is reached.
-
Page 43: Emergency On/Off Switch
Do not operate the emergen- the heated hand grips can operated with the ignition cy ON/OFF switch while rid- drain the battery if you are switched on, the BMW ing. riding at low engine speeds. Integral ABS continues to If the battery is inadequate- function.
-
Page 44: Clock
grips are switched off to en- Minutes reading 3 starts to sure starting capability. flash. Press button 1. The minute increments by one each time you press the button. Press and hold button 1 un- til display changes. The display stops flashing. Clock setting ended.
-
Page 45: Clutch
Bring windshield into de- the motorcycle can lead to Brakes sired position by rotating it accidents. Adjusting handbrake forward or back. Adjust the clutch lever only lever when the motorcycle is sta- The windshield can be tionary. Changing the position of set to six positions.
-
Page 46: Lights
Switching on high-beam Lights headlight Switching on side lights The side lights switch on au- tomatically when the ignition is switched on. The side lights are a strain on the battery. Do not leave the ignition switched on longer than Turn adjusting screw 1 absolutely necessary.
-
Page 47: Headlight
BMW workshop, preferably an Motorrad retailer. authorized BMW Motorrad Press and hold left turn indi- Ordinary adhesive tape retailer.
-
Page 48: Turn Indicators
Headlight range adjust- ment A Neutral position Press left-hand turn indica- tor button 1. B Position with heavy pay- load After driving for approx. Headlight range adjust- ten seconds or after cov- ment Turn indicators ering a distance of approx. 650 ft (200 m), the turn in- In the case of very high pay- Switching on left-hand…
-
Page 49: Front And Rear Seats
Switching off turn indica- Press right-hand turn indi- Turn key 1 in seat lock cator button 2. clockwise while pressing down on front region of After driving for approx. Press turn-indicator cancel passenger seat 2. ten seconds or after cov- button 3.
-
Page 50
Insert passenger seat 2 into Turn key 1 in seat lock Install driver’s seat 1 into rear locking device. counterclockwise while front locking device. pressing down on rear Press down firmly on front Press down firmly on rear region of driver’s seat 3. region of passenger seat 2. -
Page 51: Helmet Holder
Removing driver’s seat Installing passenger seat Turn driver’s seat over. Helmet holder Helmet holder under seat If both seat rods are not in the same position, the driver’s seat can come loose from the locking device and Insert seat rods 1 and 2 into wiggle.
-
Page 52: Mirrors
Adjusting mirror arm Mirrors Spring preload Adjusting mirrors Adjusting spring preload The spring preload on the front wheel must be adapt- ed to the nature of the terrain. Uneven terrain requires a high spring preload, flat terrain re- quires a lower spring preload. The spring preload on the rear wheel must be adapted Slide the protective cap 1…
-
Page 53
Spring preload at position 9 (For offroad use) Adjusting spring preload for rear wheel Your motorcycle’s han- dling will suffer if you do not match the spring-preload and damping-characteristic settings. To reduce spring preload, To increase spring preload, Adjust the damping char- turn spring retainer in di- turn handwheel 1 in direc- acteristic to suit the spring… -
Page 54: Shock Absorbers
Turn handwheel toward Make sure the ground is right in arrow direction level and firm and park the HIGH (H) all the way to stop. motorcycle. Shock absorbers Adjusting damping The damping must be adapt- ed to the spring preload. An increase in spring preload re- To increase absorption, turn quires firmer damping, a re-…
-
Page 55: Tires
Tire pressure for front wheel Tires — passenger or luggage Checking tire pressures 36.3 psi (With tire cold) Incorrect tire pressure Tire pressure for front wheel worsens handling of the — passenger + luggage motorcycle and can lead to 36.3 psi (With tire cold) accidents.
-
Page 57: Riding
Starting ….. . . 58 Starting off with BMW Integral ……61 Running in .
-
Page 58: Safety Instructions
Your authorized cle. cause loss of consciousness BMW Motorrad retailer will be Do not exceed the gross with fatal consequences. glad to advise you and has weight limit and observe the Do not inhale exhaust fumes.
-
Page 59: Catalytic Converter
tion system when the engine Risk of fire Tampering with the con- is running. trol unit of the electronic Temperatures at the exhaust are high. engine-management sys- Catalytic converter Flammable materials If misfiring causes unburned (e.g. hay, leaves, grass, Tampering with con- fuel to enter the catalytic con- clothing and luggage, etc.) trol unit of electronic…
-
Page 60: Checklist
Tread depth and tire pres- neutral or if you pull the clutch performed. ( sure with a gear engaged. Switch With OE BMW Motorrad Inte- Firm seating of cases and on the ignition before you gral ABS: luggage pull the clutch. When the…
-
Page 61
tion mode. Self-diagnosis The engine starts. is performed as soon as the Consult the troubleshooting brake levers are in their fully chart if the engine refuses released positions for the first to start. ( 120) time. During this period, nei- Pre-ride check ther the ABS function nor the power braking assistance is… -
Page 62
ABS self-diagnosis If it was not possible to end If the general warning self-diagnosis: The BMW Integral ABS per- light cannot be dis- Release the brake lever as forms self-diagnosis and a played, several malfunctions soon as possible. -
Page 63: Starting Off With Bmw Integral Abs Oe
ABS pull-away test Try to do most of your rid- Brake pads ing during this initial period After starting off, the BMW New brake pads must «bed on twisting, fairly hilly roads, Integral ABS checks the ABS down» and therefore do not avoiding high-speed main sensors.
-
Page 64: Driving Offroad
For offroad use, you can able as optional equipment. extreme heeling angels. switch off the BMW Integral Avoid extreme heeling an- ABS( 76). gels.
-
Page 65
Spring preload and damping Spring preload and damping values that have been changed for offroad use reduce handling characteristics on paved surfaces. Before returning to on-road use, reset correct spring preload and correct damping. -
Page 67: Parking Your Motorcycle
Slowly lean the motorcycle On a grade, the motor- Parking your motorcy- to the side until its weight cycle should always face is taken by the stand and uphill; select 1st gear. Placing on side stand dismount to the left. When you prop the If the ground is soft or motorcycle on the…
-
Page 69
An extended side stand Unlock steering lock. can catch on the ground when the motorcycle is mov- With OE BMW Motorrad Inte- gral ABS: ing and lead to a fall. Retract the side stand before Brake servo assistance moving the vehicle. -
Page 71
Excessive movements Placing on center could result in the cen- stand ter stand retracting, and the motorcycle would topple as a If the ground is soft or result. uneven, there is no guar- Do not sit on the motorcycle antee that the motorcycle will while it is resting on the cen- rest firmly on the stand. -
Page 73
Pushing off center stand Unlock steering lock. With OE BMW Motorrad Inte- gral ABS: Brake servo assistance is not available when the ignition is off; the motorcycle can start to roll. Especially on inclines, switch on the ignition and wait for the ABS self-diagnosis. -
Page 74: Refueling
Make sure the ground is Normal unleaded Refueling level and firm and park the 91 ROZ Fuel is highly flammable. motorcycle. Usable fuel quantity Fire at the fuel tank can 5.3 gal result in fire and explosion. Reserve fuel quantity Do not smoke.
-
Page 75: General Brake System
Salt on brakes Dirt or mud on brakes General brake system The full braking effect When the motorcycle Descending mountain can be delayed if the is ridden on loose sur- passes motorcycle is ridden on salt- faces or muddy roads, the There is a danger of the covered roads and the brakes brakes may fail to take effect…
-
Page 76: Brake System With Bmw
The electronic controller in ly shorter braking distances longitudinal and lateral sta- the BMW Integral ABS regu- which BMW Integral ABS per- bilizing forces are lost, and a lates braking-force distribu- mits must not be used as an fall can result.
-
Page 77
Rear wheel lift in the event of a fault in the ing. Without servo-assisted Even during severe braking, BMW Integral ABS, the brake brakes, considerably greater a high level of tire grip can circuits concerned only have force is required to brake. -
Page 78
Stop motorcycle. Stop motorcycle. to build up brake pressure, Switch off the ignition. Switch ignition off and on BMW Motorrad recommends again. setting a larger lever path at Deactivation of ABS func- the handbrake lever. tion is canceled. -
Page 79: Accessories
Accessories General instructions … 78 Onboard socket ….78 Luggage ….. . 79 Case .
-
Page 80: General Instructions
BMW motor- General instructions Onboard socket cycles without presenting a BMW Motorrad recommends Ratings safety risk. Nor is this guaran- the use of parts and acces- tee provided when the official sories for your motorcycle approval of a specific coun- that are approved by BMW try has been granted.
-
Page 81: Luggage
ational if the ignition is subse- Hold down locking device 2 Luggage quently switched off. Approx. and fold out carrying han- Correct loading 15 minutes after switching dle 3. Overloading and uneven off the ignition and/or during the restart operation, the on- loading can diminish the riding stability of the motorcy- board socket is switched off…
-
Page 82
If the case handle is fold- Removing case ed down when the slot of the case lock is oriented in the direction of travel, the lock tab can be damaged. Before folding down the case handle, make sure that the slot of the case lock is per- pendicular to the direction of travel. -
Page 83
A red bar shows in the viewing window 7. Remove case from mount by its handle. Mounting case Open fastening lever 4. Pivot red release lever 1 down while pressing on locking flap 2. The locking flap 2 clicks into place. -
Page 84: Luggage Rack
If the case wobbles or Removing luggage rack does not lock, adjust Make sure the ground is the mushroom-headed level and firm and park the fastener 5 to the proper motorcycle. height. Removing passenger seat Fold carrying handle down. Turn key parallel to direction With OA Case: of travel and remove.
-
Page 85
Installing luggage rack Make sure the ground is level and firm and park the motorcycle. Place luggage rack 2 into position. Install screws 1 with re- spective sleeves and wash- ers. Installing passenger seat… -
Page 87: Maintenance
Maintenance General instructions … 86 Engine oil ….. 86 General brake system ..87 Brake pads .
-
Page 88: General Instructions
CD-ROM (RepROM), only check the oil level after a which you can obtain from longer trip. your authorized BMW Motorrad retailer. Read off the oil level The warning on insuffi- from the engine oil level cient engine oil pressure display 1.
-
Page 89: General Brake System
Replace engine oil filler If the oil level is below the by an authorized BMW Motor- neck cap. MIN mark: rad retailer. Topping off engine oil General brake system…
-
Page 90: Brake Pads
Brake pads by a specialized workshop, preferably an authorized Checking front brake pad BMW Motorrad retailer. thickness With OE BMW Motorrad Inte- Continuing to use brake gral ABS: pads beyond the mini- Switch on the ignition. mum pad thickness leads to…
-
Page 91
Have the brake pads re- placed by a specialized workshop, preferably an authorized BMW Motorrad retailer. Rear brake pad thickness Brake disk must not be vis- ible through bore hole of inner brake pad. -
Page 92: Brake Fluid
BMW Motorrad retailer. A low fluid level in the In the event of brake pad brake reservoir can al- With OE BMW Motorrad Inte- wear, the brake fluid lev- low air to penetrate the brake el in the brake-fluid reservoir gral ABS: system.
-
Page 93
A low fluid level in the pad wear. falls. brake reservoir can al- Front brake fluid level low air to penetrate the brake With OE BMW Motorrad In- system. This significantly re- tegral ABS: duces braking efficiency. Brake fluid level must not Brake early. -
Page 94: Clutch
Brake early. With OE BMW Motorrad In- Clutch tegral ABS: Have the fault remedied Checking clutch opera- Brake fluid level must not as quickly as possible tion drop (Vehicle is standing by a certified workshop, Pull the clutch lever. straight)
-
Page 95: Tires
BMW Motorrad retailer. Measure the tire tread The clutch system is depth in the main tread filled with a special hy- grooves with wear indicating draulic fluid that does not re- marks.
-
Page 96: Rims
Visually inspect the rims for legally required minimum tires defects. tread depth: Have damaged rims For every size of tire, BMW Replace tire. checked and, if necessary, Motorrad has tested certain replaced by a specialized makes and approved those it…
-
Page 97: Removing Front Wheel
BMW Motorrad retailer have been removed. With OE BMW Motorrad Inte- or on the Internet at Remove mounting bolts 1 gral ABS: www.bmw-motorrad.com. of brake calipers on left and When pulling off left brake right.
-
Page 98: Installing Front Wheel
Roll front wheel forward to remove. During the following work, parts of the front brake, in particular of the BMW Integral ABS, can be damaged. Take care not to damage the Remove axle clamping brake system, in particular the screw 4.
-
Page 99
Ease brake calipers onto brake pads, and rims. brake disks. With OE BMW Motorrad Inte- With OE BMW Motorrad Inte- gral ABS: gral ABS: When installing the wheel, The cable of the ABS make sure not to damage… -
Page 100: Installing Rear Wheel
The pressure point must be retailer. clearly perceptible. Roll the rear wheel onto the rear wheel support. With OE BMW Motorrad Inte- Place the rear wheel on the gral ABS: rear wheel support. Switch on the ignition. Wait for ABS self-diagnosis to complete.
-
Page 101: Lamps
Mount wheel bolts 1 and rear light level. Failure of the tighten diagonally to appro- rear light is nevertheless indi- priate tightening torque. cated in the display. Rear wheel on wheel carrier A defective bulb places Tightening sequence: Diag- your safety at risk be- onally cause it is easier for other 44 lb/ft…
-
Page 102
posits, in particular oil and grease, interfere with heat ra- diation from the bulb. Over- heating and therefore short service life of the bulbs are the consequence. Replacing low-beam bulb If it is not standing firm- Remove cover 1 by turning Detach top and bottom of ly, the motorcycle could counterclockwise. -
Page 103
Low-beam headlight bulb- standard designation Halogen bulb H7 Low-beam headlight bulb — voltage 12 V Low-beam headlight bulb — wattage 55 W Insert spring clip 4 into Install cover 6. Make sure catch. the word TOP is pointing Replacing high-beam bulb If it is not standing firm- ly, the motorcycle could… -
Page 104
Turn handlebars to the right. High-beam headlight bulb — standard designation Halogen bulb H7 High-beam headlight bulb — voltage 12 V High-beam headlight bulb — wattage 55 W Detach top and bottom of spring clip 3 from catch and Remove cover 1 by turning fold to the side. -
Page 105
Turn handlebars to the right. Insert spring clip 4 into Install cover 6. Make sure catch. the word TOP is pointing Remove bulb holder 1 from headlight housing. Replacing parking light Remove bulb from bulb bulb socket. Replace defective bulb. If it is not standing firm- Parking light bulb standard ly, the motorcycle could… -
Page 106
Insert bulb holder 1 into Remove screws 1. Press bulb 3 into its socket headlight housing. and turn it counterclockwise Pull lamp housing 2 rear- to remove. ward from retaining brack- Replacing brake light ets. Replace defective bulb. and tail light bulbs Tail light/brake light bulb standard designation If it is not standing firm-… -
Page 107
Replacing turn indicator bulbs If it is not standing firm- ly, the motorcycle could topple in the course of the operations described below. Make sure that the motorcy- cle is steady on its stand. Make sure the ground is Insert bulb 3 into socket. Pull screw connection side level and firm and park the of lens out from mirror… -
Page 108: Air Filter
Replace defective bulb. Air filter Front turn indicator bulb Removing air filter standard designation Make sure ground is level R10W and firm and place motorcy- Front turn indicator bulb cle on its center stand. voltage Removing driver’s seat 12 V Front turn indicator bulb wattage 10 W…
-
Page 109
Remove intake snorkel 2. Open quick-release fasten- Remove three mounting ers 2. screws 5. Pull out bottom end of air Open quick-release fas- Remove tank cover 6. filter 3. tener 3 from the inside by turning and removing from Installing air filter bracket. -
Page 110
Press bottom of air filter in- Install mounting screws 5. to air filter housing, making sure not to bend its layers in the process. Make sure that the throttle valve cable is seated in the Press front of side panel 4 guide 4 of the intake mani- into bracket. -
Page 111: Jump Starting
the other end to the pos- second lead from the posi- itive terminal of the donor tive terminals. battery. Place protective cover back Then connect one end of onto terminal. black jumper lead to nega- To start the engine, do tive terminal of donor bat- not use start sprays or tery, and other end to neg-…
-
Page 112
Additional terminals of the disconnected If the battery is not information is available at your battery. disconnected, the authorized BMW Motorrad re- Charging the battery via onboard electronics (clock tailer. the onboard socket is etc.) will drain the battery. -
Page 113: Removing Battery
charged. The onboard socket charger terminal clips from Removing driver’s seat is switched off when this the battery terminals. happens. In the case of longer pe- riods when the motor- Comply with the operating cycle is not being used, the instructions of the charger.
-
Page 114: Installing Battery
Remove screw 4 from bat- Hook battery retaining strap Slide protective cover 2 for tery retaining strap. underneath and slide over positive battery terminal into battery. place. Unhook retaining strap and remove. Attach negative battery ca- ble 1. Lift battery up and out, us- ing tilting movements if it is Switch on ignition.
-
Page 115: Care
Care Care products ….114 Washing your motorcycle ..114 Cleaning sensitive motorcycle parts ……115 Paint care .
-
Page 116: Care Products
BMW Motorrad recommends Brake early until the brakes care products available at that you use BMW Insect Re- are dry or braked until dry. your authorized BMW Mo- mover to soften and wash off Warm water intensifies torrad retailer.
-
Page 117: Cleaning Sensitive Motorcycle Parts
Clean plastic parts with water cooling. Windshield and BMW plastic care emul- For example, use a garden sion. This includes in particu- Clean off dirt and insects with hose with low water pressure. lar:…
-
Page 118: Paint Care
Paint care rad recommends removing lubricant. Washing the motorcycle tar spots with BMW Tar Re- Coat bare metal and regularly will help counteract mover. Then add a protective chrome-plated parts with the long-term effects of wax coating to the paint at an acid-free grease (e.g.
-
Page 119: Returning Motorcycle To
Returning motorcycle to use Remove the protective wax coating. Clean the motorcycle. Install a charged battery. Before starting: Observe checklist.
-
Page 121: Technical Data
Technical data Troubleshooting chart ..120 Threaded fasteners … 121 Engine ….. . . 122 Riding specifications .
-
Page 122: Chart
Troubleshooting chart Engine does not start at all or is very difficult to start. Possible cause Remedy Emergency ON/OFF switch activated. Emergency ON/OFF switch in operating posi- tion. Side stand extended and gear engaged. Retract side stand ( 58). Gear engaged and clutch not operated. Place transmission in neutral or disengage clutch( 58).
-
Page 123: Threaded Fasteners
Threaded fasteners Activity Type of threaded fastener Tightening torques Front wheel Brake caliper on slider tube M8 x 32 — 10.9 22 lb/ft Clamping screw for quick-release M8 x 35 14 lb/ft axle Quick-release axle in axle mount M24 x 1.5 37 lb/ft Rear wheel Rear wheel on wheel carrier…
-
Page 124: Engine
Engine Type Engine design Longitudinally oriented two-cylinder, four- stroke boxer motor with overhead camshaft, air cooling, oil-cooled exhaust ports, and electronic fuel injection Technical data Effective displacement 1170 cc Cylinder bore 4 in Piston stroke 2.9 in Compression ratio 11.0:1 Rated output 101 hp, At: 7000 min With OE Power reduction:…
-
Page 125
Engine oils of the API classification SF or bet- ter. Engine oils of the ACEA classification A2 or better. BMW Motorrad recommends not using synthetic oils for the first 6,000 miles (10,000 km). Ask your BMW Motorrad retailer for engine oils suitable for your motorcycle. -
Page 126: Riding Specifications
Permissible viscosity classes SAE 5 W-30 -4…68 °F, Operation at low temperatures SAE 10 W-40 14…86 °F, Operation at moderate tempera- tures SAE 15 W-40 or SAE 20 W-40 >32 °F, Operation at high temperatures SAE 5 W-50 or SAE 10 W-50 >-4 °F, Use high-quality and synthetic oils.
-
Page 127: Clutch
Clutch Clutch design Single dry plate with high-leverage pressure plate Transmission Transmission design Fully helical 6-speed transmission with inte- grated torsional vibration damper, claw shift- ing via sliding sleeves Gear ratios Gear ratio in 1st gear 2.277 (41:18 teeth) Gear ratio in 2nd gear 1.583 (38:24 teeth) Gear ratio in 3rd gear 1.259 (34:27 teeth)
-
Page 128: Rear-Wheel Drive
Shaft drive with bevel gears Gear ratio of rear-wheel drive 2.82:1 Running gear Front suspension design BMW Telelever, tilt decoupled, leading link centrally mounted in main frame/on engine, with externally seated suspension strut Total suspension travel of front suspension 7.5 in, On wheel…
-
Page 129: Brakes
Brakes Front wheel brake Front brake design Hydraulic two-disk brake with 4-piston fixed calipers and floating brake disks Front brake pad Sintered metal Rear wheel brake Rear brake design Hydraulic disk brake with 2-piston floating caliper and fixed brake disk Rear brake pad Organic Wheels and tires…
-
Page 130
Tire pressures Tire pressure for front wheel — single rider 31.9 psi, With tire cold Tire pressure for front wheel — passenger or 36.3 psi, With tire cold luggage Tire pressure for front wheel — passenger + 36.3 psi, With tire cold luggage Tire pressure for rear wheel — single rider 36.3 psi, With tire cold… -
Page 131: Electrical System
Electrical system Rated load of onboard socket Fuses All circuits are electronically protected, so plug-in fuses are no longer necessary. If an electronic fuse trips and de-energizes a cir- cuit, the circuit is active as soon as the ig- nition is switched on after the fault has been rectified.
-
Page 132
Bulbs High-beam headlight bulb — standard designa- Halogen bulb H7 tion High-beam headlight bulb — voltage 12 V High-beam headlight bulb — wattage 55 W Low-beam headlight bulb- standard designa- Halogen bulb H7 tion Low-beam headlight bulb — voltage 12 V Low-beam headlight bulb — wattage 55 W Parking light bulb standard designation… -
Page 133: Frame
Frame Frame design Two-part steel tube frame and load-bearing drive unit Location of type plate Left side under side cover Location of vehicle identification number (VIN) Upper midsection of frame front Dimensions Overall length 87 in Maximum width 36 in, Across mirrors Maximum height 54.3 in, In DIN normal-load position;…
-
Page 134: Weights
Weights Unladen weight 496 lbs, DIN unladen weight, ready for road, 90 % full tank of gas, without OE Permissible gross weight 937 lbs Max. load 441 lbs…
-
Page 135: Service
Service BMW Motorrad service ..134 BMW Motorrad service quality ….. . . 134…
-
Page 136: Bmw Motorrad
You can contact your autho- outstanding quality of service. money in the long run. rized BMW Motorrad retailer To ensure that your BMW is for information on the proce- always in optimum condition, dures included in BMW ser- BMW Motorrad recommends…
-
Page 137: Bmw Motorrad Service Card — On-The-Spot Breakdown
BMW Motorrad service certain time, others depend network With all new BMW motorcy- on the distance covered by cles, the BMW Motorrad Ser- With its worldwide service the motorcycle. vice Card protects you in the…
-
Page 138: Schedules
(40 000 km, 60 000 the distance it has covered. km, 80 000 km etc.)) if this Your authorized BMW Motor- distance is covered within a rad retailer will be happy to year. supply a copy of the current…
-
Page 139: Confirmation Of Maintenance Work
Carried out properly in Carried out properly in accordance with work- accordance with work- shop specifications. shop specifications. at miles: Brake fluid changed Without BMW Inte- gral ABS With BMW Integral Wheel circuit Control circuit Date, stamp, signature Date, stamp, signature…
-
Page 140
BMW Service BMW Service BMW Service BMW Annual In- BMW Annual In- BMW Annual In- spection spection spection BMW Service BMW Service BMW Service BMW Inspection BMW Inspection BMW Inspection Carried out properly in Carried out properly in Carried out properly in… -
Page 141
BMW Service BMW Service BMW Service BMW Annual In- BMW Annual In- BMW Annual In- spection spection spection BMW Service BMW Service BMW Service BMW Inspection BMW Inspection BMW Inspection Carried out properly in Carried out properly in Carried out properly in… -
Page 142
BMW Service BMW Service BMW Service BMW Annual In- BMW Annual In- BMW Annual In- spection spection spection BMW Service BMW Service BMW Service BMW Inspection BMW Inspection BMW Inspection Carried out properly in Carried out properly in Carried out properly in… -
Page 143
BMW Service BMW Service BMW Service BMW Annual In- BMW Annual In- BMW Annual In- spection spection spection BMW Service BMW Service BMW Service BMW Inspection BMW Inspection BMW Inspection Carried out properly in Carried out properly in Carried out properly in… -
Page 144: Service
Confirmation of service The table is intended as proof of maintenance, warranty and repair work, the installed optional accessories and any special campaign (recall) work carried out. Work carried out at miles: Date…
-
Page 145
Work carried out at miles: Date… -
Page 146
Brake lever Commissioning, 117 Abbreviations and symbols, 6 Adjusting handbrake Confirmation of maintenance Accessories lever, 43 work, 137 General instructions, 78 Brake pads Currentness of this manual, 7 check front, 88 Check rear, 89 Battery Driver’s seat Running in, 61 Battery, 129 Adjusting, 48 Brakes… -
Page 147
Engine oil Immobilizer Handlebar fittings Warning indicator, 25 Checking fluid level, 11, 86 General view, left , 16 Indicator lights, 18 Engine oil-pressure warning General view, right, 17 Instrument cluster indicator, 26 Hazard warning flashers, 16, Lighting sensor, 18 Technical data, 123 Overview, 18 Topping up, 11 Switching off, 39… -
Page 148
Lights Spark plugs Pre-ride check, 59 Switching off parking technical data, 129 light, 45 Speedometer, 18 Switching on high-beam Starter, 17 Rear shock absorber system headlight, 44 Steering lock Adjusting, 11, 52 switching on low-beam Locking, 37 Rear suspension preload headlight, 44 Storing, 116 Adjusting, 13, 51… -
Page 149
Transmission, 125 Switching on left, 46 Wheels and tires, 127 Switching on right, 46 Tires Type plate, 11 Approved tires, 94 Checking air pressure, 53 Warning indicators, 22 checking tread depth, 93 Display, 23 Inflation pressures, 4, 128 Warning lamps, 18 Running in, 62 Wheels Technical data, 127… -
Page 150
The right to modify designs, equipment and accessories is reserved. Errors and omissions except- © 2005 BMW Motorrad Not to be reproduced either wholly or in part without writ- ten permission from BMW Motorrad, After Sales. -
Page 151
Tire pressure for rear wheel — passenger or luggage 42.1 psi, With tire cold Tire pressure for rear wheel — passenger + luggage 42.1 psi, With tire cold BMW Motorrad Order No.: 01 47 7 698 847 BMW recommends 08.2005 3. -
Page 152
Information on BMW Motorrad Integral ABS How does ABS work? resulting in a danger of falling. ensure driving stability when The maximum braking force Before this situation occurs, contact with the road surface which can be transferred to the ABS intervenes and is restored. -
Page 153
ON/OFF During driving-safety training Field observations by BMW switch, the light and all elec- courses an unusually high Motorrad show that no com- tronic systems remain… -
Page 154
This optimally utilizes the rider to brake the motor- A fault in the BMW Motorrad the dynamic load increase on cycle. Integral ABS is indicated by a the front wheel. At the same… -
Page 155
• Always brake with the front How important is regular How is the BMW Motorrad maintenance? Integral ABS designed? and rear brakes Any technical system is The BMW Motorrad Integral • In clear situations, carry out always only as good as… -
Page 156
Please attach this sticker to the inside back cover page of your Rider’s Manual Reporting Safety Defects individual problems between you, your dealer, or BMW of North If you believe that your vehicle has America, LCC. a defect which could cause a crash… -
Page 157
– the handlebar lever can easily shop, preferably by an autho- dlebar lever») be moved forward out of the rized BMW Motorrad retailer. • Always check the smooth rest position. movement of the clutch and brake lever before driving off. -
Page 158
BMW Motorrad Order No: 01 49 7 714 317 04/2008…
-
102, or their threads can suffer damage. Always have the security of the fasteners checked by a specialist workshop, prefer- ably an authorised BMW Mo- torrad dealer. Roll the rear wheel into po- sition at the rear-wheel ad- apter. Seat the rear wheel on the rear-wheel adapter. The wheel studs for the cross-spoked wheel (optional extra) and the cast aluminium wheel differ in length. Mixing up…
-
107, BMW R 1200 GS 2005 Switch off the ignition. Turn the handlebars all the way to the right. Pull bulb carrier 1 out of the headlight housing. Remove the bulb from the bulb socket. Replace the defective bulb. Parking light bulb, standard designation T8/4 Parking light bulb, voltage 12 V Parking light bulb, power 5W Install the bulb in the bulb socket. Install bulb carrier 1 in the hea…
-
45, BMW R 1200 GS 2005 Adjusting windscreen Slacken clamping screws 1 on left and right. Pivot the windscreen for- ward or back to the desired position. You can set the wind- screen to any of six dif- ferent positions. Make sure that clamping screws 1 on left and right are symmetrically positioned. Tighten the clamping screws. Clutch Adjusting the clutch lever If the position of the clutch fluid reservoir is changed,…
-
128, BMW R 1200 GS 2005 Riding specifications Speeds Top speed >200 km/h Acceleration 0-100 km/h 3.4 s Clutch Clutch, type Single dry plate with high-leverage pressure plate Transmission Gearbox, type Fully helical 6-speed gearbox with integral reaction damper, claw-action shift by sliding sleeves Gear ratios 1st gear transmission ratio 2.277 (41:18 teeth) 2nd gear transmission ratio 1.583 (38:2…
-
149, BMW R 1200 GS 2005 Transmission starting the engine, 58 Technical data, 126 Tripmaster, 22 Operation, 39 Resetting the tripmeter, 40 Residual range, 40 Selecting readings, 39 Troubleshooting chart, 122 Turn indicators Left, 16 Right, 17 Switching off, 17, 47 Switching on left, 46 Switching on right, 47 Type plate, 11 Tyres Approved tyres, 95 checking tread depth, 94 Checking tyre pressures, 53 Inflatio…
-
53, Spring preload Adjusting spring preload It is essential to set spring preload of the front suspen- sion to suit the terrain. In- crease spring preload for rid- ing in rough terrain and re- duce if the terrain is level. It is essential to set spring preload of the rear suspen- sion to suit the load carried by the motorcycle. Increase spring preload when the mo- torcycle is heavi…
-
27, Mode of presentation Meaning Appears on the display, accom- panied by the let- ters DWA. Anti-theft alarm battery weak ( 29) Lights up yellow Appears on the display, accom- panied by the let- ters DWA. Anti-theft alarm battery flat ( 29) 3 25 z Status indicators
… -
147, Engine Starting, 58 Technical data, 123 Temperature gauge, 22, 23 Warning, engine electron- ics, 26 Engine oil Checking fluid level, 11, 86 Technical data, 124 Topping up, 11 Warning, engine oil pres- sure, 27 Equipment, 7 EWS Warning, 26 F Final drive Technical data, 127 Frame Technical data, 131 Front seat Adjusting, 49 Holders, 15 Installation, 48 Removal, 48 Fuel Quantity reading, 22 …
-
31, A defective bulb places your safety at risk be- cause it is easier for other users to oversee you and your motorcycle. Replace defective bulbs as soon as possible; always carry a complete set of spare bulbs if possible. A combination of the bulb de- fects described above has occurred. See the fault descriptions above. Anti-theft alarm battery weak Battery symbol appears on the displa…
-
120, Paint care Washing the motorcycle regularly will help counteract the long-term effects of substances that damage the paint, especially if your motorcycle is ridden in areas with high air pollution or natural sources of dirt, for example tree resin or pollen. Remove particularly aggressive substances immediately, however, as otherwise the paint can be affected or be…
-
17, Underneath the seat 1 Helmet holders, left and right ( 50) 2 Battery ( 112) 3 Toolkit 4 Seat holders ( 49) 2 15 z General views
…