- Manuals
- Brands
- Lamtec Manuals
- Industrial Equipment
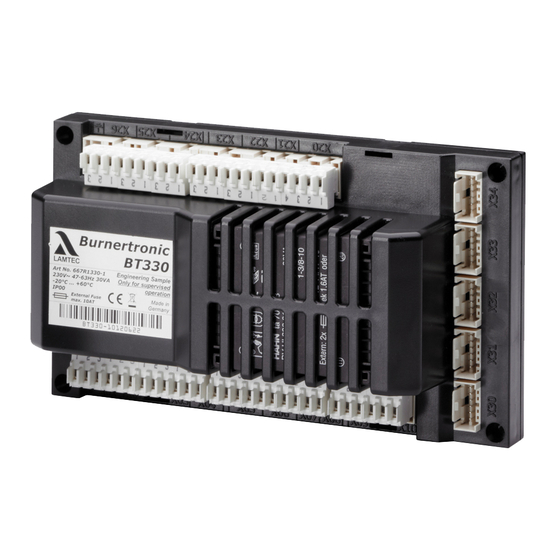
- BurnerTronic BT320
- Quick reference
-
Contents
-
Table of Contents
-
Bookmarks
Quick Links
Quick Refernce for
Endusers
Sensors uad Systems
for Combustion Engineering
BurnerTronic BT300
BT320…BT340
Related Manuals for Lamtec BurnerTronic BT320
Summary of Contents for Lamtec BurnerTronic BT320
-
Page 1
Quick Refernce for BurnerTronic BT300 Endusers BT320…BT340 Sensors uad Systems for Combustion Engineering… -
Page 3: Table Of Contents
Table of Contents Table of Contents GENERAL INFORMATION ……..4 Validity of these Instructions.
-
Page 4
Table of Contents Manual Menu Path …………24 Settings Menu Path . -
Page 5: General Information
General Information General Information Validity of these Instructions This manual is valid for the burner control system BurnerTronic BT300 in any configuration. The information contained in this document refer to the software versions BT300 v 3.0.0.0 and v 3.1 and UI300 v 3.1. If you use any other software version as mentioned previously some of the described functions may not be available or some available functions are not described in this manual.
-
Page 6: Safety
LAMTEC GmbH & Co. KG is not liable for damages occurring as a result of non-compliance with the above instructions. Compliance with the above instructions shall not entail any ex- tension to the warranty and liability provisions of LAMTEC GmbH &…
-
Page 7: Safety Instructions — Common Information
Safety Safety Instructions — Common Information The following symbols are used in this document to draw the user’s attention to important safe- ty information. They are located within the chapter where the information is required. It is es- sential that the safety information is adhered to, and that applies, in particular, to the warnings. DANGER! This draws the user’s attention to imminent danger.
-
Page 8: For Your Safety
The BT300 is a safety device! The device must not be opened, interfered with or modified. LAMTEC assumes no liability for damages arising as a result of unauthorised interference! • After commissioning and after each maintenance action check the exhaust gas values across the entire power range.
-
Page 9: Security Advice — Mounting
For Your Safety standards (by checking device parameters via operating elements or using remote-control software after commissioning). To verify settings you should also refer to manufacturer’s documentation of the combustion plant. Protecting the parameters in level 1 by setting a password will prevent any unauthorised change.
-
Page 10: Installation Notes
For Your Safety Installation Notes • Lay high-voltage ignition cable always separately and in safe distance from device and other cables. • Only trained, qualified personnel may open the BurnerTronic’s cover. • Observe local and national regulations when wiring the electric cables inside the burner. •…
-
Page 11: Commissioning Notes
For Your Safety Commissioning Notes • Check all safety functions during commissioning! • There is no feature to prevent RASTx connector plugs being transposed. Therefore en- sure the correct assignment of the plant’s plugs prior to commissioning. • Check electromagnetic emissions specific to the application. •…
-
Page 12: Basic Device
For Your Safety 3.5.2 Basic Device Check the following items prior to commissioning: • Valves must be assigned correctly to valve outputs on BT300. • Correct setting of time parameters (especially safety and pre-ventilation times). • Flame sensor functioning well in case of flame blow-off during operation (incl. flame-out response time) or when parasitic light is present during pre-ventilation period and also at a missing flame formation while end of safety period starts.
-
Page 13: Checking Burner Sequencer Part
For Your Safety 3.6.3 Checking Burner Sequencer Part Check the following: • Correct setting of time parameters (especially safety and pre-ventilation periods). • Whether an ionisation flame sensor or a corresponding flame scanner is used since only these are capable of running in continuous operation. •…
-
Page 14: Functional Description
Functional Description Functional Description BT300 combines the benefits of an electronic fuel/air ratio control system with up to three mo- torised actuator elements and optional modules like an analogue output for speed control of the combustion air fan with an electronic burner control unit. The leakage test, flame monitor- ing system, power control unit and (optional) CO/O controller for control and optimisation of an oil or gas-fired forced-draught burner are all integrated.
-
Page 15: Operating Control And Displays
Operating Control and Displays Operating Control and Displays UI300 User Interface Display BACK key Cursor keys ENTER key Fig. 5-1 User Interface Display The display shows in pictograms: • the menu structure • operating status • parameters • error messages Back key Jump to previous window.
-
Page 16: Menu Functions
Operating Control and Displays Menu Functions The menu is divided into three paths: INFO MANUAL SETTINGS INFO Select INFO path for information about the following: • Burner • Faults/Fault history • Software version • Display of check sums • Serial number •…
-
Page 17: Main Menu
Operating Control and Displays Main Menu INFORMATION menu path [selected] Display of fuel type Bar graph of internal firing-rate in % (0 — 100) MANUAL menu path Access level 2 SETTINGS menu path Window number Fig. 5-2 Main menu 1. Use cursor keys to select a menu and press ENTER to confirm.
-
Page 18: Recall Fault History
Operating Control and Displays 2. Use keys to select menu and press ENTER to confirm. The display shows the «Display operating hours» menu window. Pictogram operating hours Total number of operating hours (device connected to mains voltage) No. of operating hours, oil operation No.
-
Page 19: Software Version
Operating Control and Displays Error code-display pictogram Fault code (Last 10 faults are stored, no. 01 is the latest fault) Diagnostic code 1 Diagnostic code 2 No. of operating hours when fault has oc- cured Fig. 5-8 Fault history menu NOTICE! Information concerning fault and diagnostic codes you may find in the list of fault codes.
-
Page 20: Display Of Check Sums
Operating Control and Displays 5.4.4 Display of Check Sums Display check sum 1. Use cursor keys to select menu and press ENTER to confirm. The display shows «CRC16 check sums» menu. Check sums pictogram Check sum, access level 0 Check sum, access level 1 Check sum, access level 2 Check sum, access level 4 Fig.
-
Page 21: Positions Of Actuators
Operating Control and Displays 5.4.6 Positions of Actuators Display positions of actuators 1. Use the cursor keys to select menu and press ENTER to confirm. The display shows the «Actuators» menu. Actuator pictogram Actuator channel 1 (oil) Actuator channel 2 (air) Actuator channel 3 (oil) Optional channel (OFF;…
-
Page 22
Operating Control and Displays Digital inputs pictogram Jump to next page Fuel selection oil [no] Fuel selection gas [yes] Burner start [yes] — terminal X10 Fig. 5-14 Page 1 of inputs menu NOTICE! Signals of points 3 and 4 are «logical» signals and not «physical» ones. Background informa- tion: Some signals may have more than one source (terminal, LSB, field buses, parameters). -
Page 23: Digital Outputs
Operating Control and Displays NOTICE! Signals of points 4 and 5 in Fig. 5-15 Page 2 of inputs menu are «logical» signals, not «physi- cal». The BT320/330 supports either oil or gas operation, but cannot be switched. Therefore no separate signals for the oil or gas safety interlock chain are generated. The signal on ter- minal X06 is thus generally known as burner‘s safety interlock chain.
-
Page 24
Operating Control and Displays Call up 2 page of outputs 1. Use the cursor keys to select the next page and press ENTER to confirm. The display shows «Page 2 digital outputs» menu: Digital outputs pictogram Jump to previous page Jump to next page Oil valve 1 [on] — terminal X01 Oil valve 2 [off] — terminal X02… -
Page 25: Manual Menu Path
Operating Control and Displays Manual Menu Path MANUAL Select MANUAL path to carry out actions as follows: Switching burner ON and OFF Presetting of burner firing-rate Display MANUAL menu 1. Use cursor keys to select path and press ENTER to confirm. The display shows the «Manual operation»…
-
Page 26: Settings Menu Path
Operating Control and Displays Settings Menu Path Display SETTINGS menu 1. Use cursor keys to select menu and press ENTER to confirm. The display shows the menu overview. Password pictogram (selected) Delete curves Display program settings Firing-rate controller settings Configuration of read-out actuator outputs Password settings Curve settings…
-
Page 27: Program Sequence
Operating Control and Displays 5.6.2 Program Sequence Configure program sequence 1. Use cursor keys to select menu and press ENTER to confirm. The display shows the program sequence overview. Duration of pre-ventilation [selected] Pilot burner oil operation Duration of post-ventilation Valve leakage test Pilot burner gas operation Fig.
-
Page 28
Operating Control and Displays UI300 pictogram BT300 pictogram Cancel (backwards) Parameter number UI300 Parameter number UI300 Transfer by pressing ENTER (flashing) Value for UI300 Fig. 5-27 Secure data transfer Value for BT300 NOTICE! Apply value only if the values for UI300 and BT300 are identical! The parameter value must be confirmed by pressing ENTER within the countdown (8 s)! 5. -
Page 29
Operating Control and Displays Pictogram UI300 Pictogram BT300 Parameter number UI300 Parameter number BT300 Pictogram apply parameters Value BT300 Value UI300 Fig. 5-29 Display of invalid data transfer Set duration of post-ventilation 1. Use cursor keys to select menu and press ENTER to confirm. -
Page 30
Operating Control and Displays NOTICE! You require access level 2 to make settings in this function! Accept or discard the entry! Activate valve leakage test prior to ignition 1. Use cursor keys to select menu and press ENTER to confirm. 2. -
Page 31
Operating Control and Displays Valve leakage test period 1. Use cursor keys to select menu and press ENTER to confirm. The display shows the valve leakage test period menu. Valve leakage test period pictogram Set valve leakage test period Press ENTER to accept settings Fig. -
Page 32
Operating Control and Displays Pilot burner in oil operation pictogram Activate pilot burner in oil operation Press ENTER to accept settings Fig. 5-36 Pilot burner in oil operation menu NOTICE! You require access level 2 to make settings in this function! Accept or discard the entry! Configuration of actuating outputs 1. -
Page 33
Operating Control and Displays 2. Use cursor keys to set firing-rate point and press ENTER to confirm. Set-point channel 1 is chosen (displayed inversely). 3. Use cursor keys to set channels’ actuator position. 4. Use cursor keys to switch to next channel. 5. -
Page 34
Operating Control and Displays NOTICE! During multi-stage operation, the following points are available: Ignition point 1 (first stage), 1 2 (valve switch-on point, second stage), 1 2 (valve switch-off point, second stage) 2 (second level), 2 3 (valve switch-on point, third stage), 2 … -
Page 35
Operating Control and Displays Set staged oil operation — transition from 1 to 2 stage Display valve switch-on point, 2 stage Setpoint, air damper position Actual value, air damper position Fig. 5-41 Transition from 1 to 2 stage 1. Select the setpoint for the air damper position and press ENTER to confirm. -
Page 36
Operating Control and Displays The display shows the confirmation prompt: Back to previous menu Deleting values [selected] Proceed with deleting values Fig. 5-43 Confirmation prompt of deleting curves menu 2. Press ENTER The curve values will be deleted. The display shows the values deleted menu. Values deleted Fig. -
Page 37: Other Displays
Operating Control and Displays 5.6.3 Other Displays No connection between UI300 and BT300 UI300 User Interface pictogram No connection symbol BT300 burner control Fig. 5-46 No connection Display shown e.g. when using LSB remote software and communication between BT300 and UI300 is temporarily unavailable.
-
Page 38: Leakage Test For Main Gas Valves
Leakage Test for Main Gas Valves Leakage Test for Main Gas Valves Calculation Example An (approximate) formula for calculating the leakage test monitoring facility is summarised be- low: Definitions: GDW: gas pressure monitor gas-side safety shut-off device burner-side safety shut-off device barometric air pressure <…
-
Page 39: Leakage Test With Ventilation Via Roof
Leakage Test for Main Gas Valves Leakage Test with Ventilation Via Roof The leakage test checks whether or not the main gas valves are leakproof. For this purpose the gas pressure of the supply is analysed. As leakage test section (space between the two main valves) burns empty whenever the burn- er is switched off, this part is usually pressureless at start-up (gas pressure >…
-
Page 40
Leakage Test for Main Gas Valves Fig. 6-1 Leakage test process diagram… -
Page 41: Exhaust Of Test Line Over The Roof
Leakage Test for Main Gas Valves Exhaust of Test Line Over the Roof NOTICE! Consider diameter of gas line in the roof ventilation. For ventilation, plug X02 is activated for 3 s. Make sure that this period is sufficient even for smallest ventilation line diameter! Fig.
-
Page 42: Technical Data
Technical Data Technical Data Technical Data BT300 Function Power supply: 230 V +10/-15 % 47-63 Hz 115 V +10/-15 % 47-63 Hz (on request) Maximum backup-fuse: 10 A slow-blow To be used only in a grounded power line network! Power consumption: max.
-
Page 43: Actuators 662R550
Technical Data Environmental Conditions Storage: Climatic conditions Class 1K3 according to DIN EN 60721-3 Mechanic conditions Class 1M2 according to DIN EN 60721-3 Temperature range -20 … +70 °C (no condensation) Electronic safety: Degree of protection (DIN EN 60529): BT300 – IP40 housing IP20 terminals UI300 –…
-
Page 44: Actuators 662R5001
Technical Data NOTICE! Damaging the 0,8 Nm actuator by opening the actuator. If you open the actuator at another part as the cover of the electric connection, you will dam- age the actuator. Do not open the actuator but at the cover of the electric connection. Actuators 662R5001…
-
Page 45
Technical Data Environmental conditions 662R5001…/662R5003…/662R5009… Repeat frequency 2,5 kHz Electrical safety Protection class 2 as per DIN EN 60730 NOTICE! Damage of the actuator due to opening the actuators housing. You will damage the actuator, if you open the actuator’s housing at another (this affects actu- ators with 1,2, 3,0 and 9,0 Nm). -
Page 46
Technical Data… -
Page 48
The information in this publication is subject to technical changes. LAMTEC Meß- und Regeltechnik LAMTEC Leipzig GmbH & Co. KG Presented by: für Feuerungen GmbH & Co. KG Wiesenstraße 6 Portitzer Straße 69 D-69190 Walldorf D-04425 Taucha Phone: +49 (0) 6227 / 6052-0…
|
Detail Specifications: 1522/1522189-burnertronic_bt320.pdf file (28 Dec 2022) |
Accompanying Data:
Lamtec BurnerTronic BT320 Control Systems, Control Unit PDF Quick Reference (Updated: Wednesday 28th of December 2022 05:42:32 PM)
Rating: 4.3 (rated by 79 users)
Compatible devices: ETAMATIC S, CMS, 663R0932, VMS Series, FMS 4, ETAMATIC, ETAMATIC V, ETAMATIC OEM.
Recommended Documentation:
Text Version of Quick Reference
(Ocr-Read Summary of Contents, UPD: 28 December 2022)
-
18, Lamtec BurnerTronic BT320 17 5 Operating Control and Displays 2. Use keys to select menu and press ENTER to confirm. The display shows the «Display operating hours» menu window. Display burner start-ups 1. Use keys in System Information menu to select menu and press ENTER to confirm. The display shows the «Start-up counter» menu window. 5.4.2 Recall Fault History Display burner faults 1. …
-
27, Lamtec BurnerTronic BT320 26 5 Operating Control and Displays 5.6.2 Program Sequence Configure program sequence 1. Use cursor keys to select menu and press ENTER to confirm. The display shows the program sequence overview. Set pre-ventilation period 1. Use cursor keys to select menu and press ENTER to confirm. The display shows the pre-ventilation period menu. NOTICE! Pre-ventilation starts…
-
19, 18 5 Operating Control and Displays NOTICE! Information concerning fault and diagnostic codes you may find in the list of fault codes. For fault analysis a fault code and diagnostic code D1 or D2 is required. 5.4.3 Software Version Display software version 1. Use cursor keys to select menu and press ENTER to confirm. The display shows the «Softw…
-
39, 38 6 Leakage Test for Main Gas Valves 6.2 Leakage Test with Ventilation Via Roof The leakage test checks whether or not the main gas valves are leakproof. For this purpose the gas pressure of the supply is analysed. As leakage test section (space between the two main valves) burns empty whenever the burn- er is switched off, this part is usually pressureless at start-up (gas …
-
15, Lamtec BurnerTronic BT320 14 5 Operating Control and Displays 5 Operating Control and Displays 5.1 UI300 User Interface Display The display shows in pictograms: • the menu structure • operating status • parameters • error messages Back key Cursor keys ENTER keys Fig. 5-1 User Interface 1 Display 2 BACK key 3 Cursor keys 4 ENTER key Jump to previous window. You navigate in the menu using cursor k…
-
33, 32 5 Operating Control and Displays 2. Use cursor keys to set firing-rate point and press ENTER to confirm. Set-point channel 1 is chosen (displayed inversely). 3. Use cursor keys to set channels’ actuator position. 4. Use cursor keys to switch to next channel. 5. Use cursor keys to set actuators’ position in the selected firing-rate point. NOTIC…
-
44, 43 7 Technical Data NOTICE! Damaging the 0,8 Nm actuator by opening the actuator. If you open the actuator at another part as the cover of the electric connection, you will dam- age the actuator. Do not open the actuator but at the cover of the electric connection. 7.3 Actuators 662R5001… / 662R5003… Function 662R5001… 662R5003… 662R5009… Floating ti…
-
37, 36 5 Operating Control and Displays 5.6.3 Other Displays No connection between UI300 and BT300 Display shown e.g. when using LSB remote software and communication between BT300 and UI300 is temporarily unavailable. Termination Fig. 5-46 No connection 1 UI300 User Interface pictogram 2 No connection symbol 3 BT300 burner control Fig. 5-47 Termination 1 Communication error pictogram co…
-
3, 2 Table of Contents Table of Contents 1 GENERAL INFORMATION . . . . . . . . . . . . . . . . . . . . . . . . . . . . . . . . . . . . . . 4 1.1 Validity of these Instructions. . . . . . . . . . . . . . . . . . . . . . . . . . . . . . . . . . . . . . . . . . . . . . . . . 4 1.2 Life Cycle. . . . . . . . . . . . . . . . . . . . . . . . . . . . . . . . . . . . . .…
-
45, 44 7 Technical Data NOTICE! Damage of the actuator due to opening the actuators housing. You will damage the actuator, if you open the actuator’s housing at another (this affects actu- ators with 1,2, 3,0 and 9,0 Nm). Repeat frequency 2,5 kHz Electrical safety Protection class 2 as per DIN EN 60730 Environmental conditions 662R5001…/662R5003…/662R5009…
… -
10, Lamtec BurnerTronic BT320 9 3 For Your Safety 3.3 Installation Notes • Lay high-voltage ignition cable always separately and in safe distance from device and other cables. • Only trained, qualified personnel may open the BurnerTronic’s cover. • Observe local and national regulations when wiring the electric cables inside the burner. • Tighten the screw terminals of the BT300 using a tighte…
Recommended Instructions:
WT 210, 830 Series, GP17500E, TPS-6X Series, KTG600


-
Planetary Steer AxleASM-0910E SERVICE MANUALOctober 2019Knuckle DesignsPSS165PSS166PSC204PSC205PSOC205PSC353PSC594PSC822PSC824PSTC824PSC825PSC826PSC1044PSC1045PSC1485PSC1614PSC1615PSC1617PSC1764PSC1794PSC1875PSC1876PSC4564PSC4565PSC5494 …
PSS165 38
-
Totally Integrated Power – SENTRONAir Circuit Breakerssiemens.com/lowvoltageConfigu-ration ManualEdition10/2014PH_01_2014_umschlag_en.indd 3PH_01_2014_umschlag_en.indd 3 30.01.2015 08:10:1730.01.2015 08:10:17© Siemens AG 2015 …
3wl 64
-
© 2021 TROTEC GmbH TRT-KA-VSC206-TC-004VSC2061 23546https://hub.trotec.com/?id=41280Die aktuelle Version der Bedienungsanleitung und die EU-Konformitätserklärung können Sie unter folgendem Link herunterladen: You can download the current version of the operating manual and the EU declaration of conformity via the following link:Vous pouvez télécharger la dernière version du manuel d’ut …
VSC206 7
Additional Information:
Operating Impressions, Questions and Answers:
ИНН/КПП: 7724811817/773401001
Юридический адрес:123308, г. Москва, ул. Мневники, д.3, корп.1, этаж 2, пом.1, ком.201
Телефон: +7(499)390-69-47, + 7 926 096 52 37
[email protected]
Склад:: 143005, Московская область,Одинцовский район, г. Одинцово ул. Чистяковой, 30.
Lamtec Manuals and Guides:
The main types of Lamtec BurnerTronic BT320 instructions: user guide — rules of useing and characteristics, service manual — repair, diagnostics, maintenance, operation manual — description of the main functions of Lamtec BurnerTronic BT320 equipment, etc.
Most of the instructions, that you can see on the site are uploaded by our users. If you have available a manual or document for Lamtec BurnerTronic BT320, which is currently not on the site or present in a different language version, we ask you to upload your document on website, using the «uploading form» available to all registered users.
 |
[Page 1] Lamtec BurnerTronic BT320 Quick Refernce for Endusers BurnerTronic BT300 BT320…BT340 Sensors uad Systems for Combustion Engineering |
 |
[Page 2] Lamtec BurnerTronic BT320 … |
 |
[Page 3] Lamtec BurnerTronic BT320 2 Table of Contents Table of Contents 1 GENERAL INFORMATION . . . . . . . . . . . . . . . . . . . . . . . . . . . . . . . . . . . . . . 4 1.1 Validity of these Instructions. . . . . . . . . . . . . . . . . . . . . . . . . . . . . . . . . . . . . . …. |
 |
[Page 4] Lamtec BurnerTronic BT320 3 Table of Contents 5.5 Manual Menu Path . . . . . . . . . . . . . . . . . . . . . . . . . . . . . . . . . . . . . . . . . . . . . . . . . . . . . . . . 24 5.6 Settings Menu Path . . . . . . . . . . . . . . . . . . . . . . . . . . . . . . . . . . …. |
 |
[Page 5] Lamtec BurnerTronic BT320 4 1 General Information 1 General Information 1.1 Validity of these Instructions This manual is valid for the burner control system BurnerTronic BT300 in any configuration. The information contained in this document refer to the software versions B… |
 |
[Page 6] Lamtec BurnerTronic BT320 5 2 Safety 2 Safety 2.1 German Law on Device Safety The German Law on Device Safety regulates the following: Note the instructions for use! Use the device only in compliance with the instructions, which are contained in this document for BT300 (pu… |
 |
[Page 7] Lamtec BurnerTronic BT320 6 2 Safety 2.2 Safety Instructions — Common Information The following symbols are used in this document to draw the user’s attention to important safe- ty information. They are located within the chapter where the information is required. It is… |
 |
[Page 8] Lamtec BurnerTronic BT320 7 3 For Your Safety 3 For Your Safety Please observe the safety instructions to avoid personal injury and damage to property and the environment! The BT300 is a safety device! The device must not be opened, interfered with or modified. LAMTEC as… |
 |
[Page 9] Lamtec BurnerTronic BT320 8 3 For Your Safety standards (by checking device parameters via operating elements or using remote-control software after commissioning). To verify settings you should also refer to manufacturer’s documentation of the combustion plant. Protect… |
 |
[Page 10] Lamtec BurnerTronic BT320 9 3 For Your Safety 3.3 Installation Notes • Lay high-voltage ignition cable always separately and in safe distance from device and other cables. • Only trained, qualified personnel may open the BurnerTronic’s cover. • Observe local and na… |
 |
[Page 11] Lamtec BurnerTronic BT320 10 3 For Your Safety 3.5 Commissioning Notes • Check all safety functions during commissioning! • There is no feature to prevent RASTx connector plugs being transposed. Therefore en- sure the correct assignment of the plant’s plugs prior t… |
 |
[Page 12] Lamtec BurnerTronic BT320 11 3 For Your Safety 3.5.2 Basic Device Check the following items prior to commissioning: • Valves must be assigned correctly to valve outputs on BT300. • Correct setting of time parameters (especially safety and pre-ventilation times). • Fl… |
 |
[Page 13] Lamtec BurnerTronic BT320 12 3 For Your Safety 3.6.3 Checking Burner Sequencer Part Check the following: • Correct setting of time parameters (especially safety and pre-ventilation periods). • Whether an ionisation flame sensor or a corresponding flame scanner is used s… |
 |
[Page 14] Lamtec BurnerTronic BT320 13 4 Functional Description 4 Functional Description BT300 combines the benefits of an electronic fuel/air ratio control system with up to three mo- torised actuator elements and optional modules like an analogue output for speed control of the co… |
 |
[Page 15] Lamtec BurnerTronic BT320 14 5 Operating Control and Displays 5 Operating Control and Displays 5.1 UI300 User Interface Display The display shows in pictograms: • the menu structure • operating status • parameters • error messages Back key Cursor keys ENTER keys Fig… |
 |
[Page 16] Lamtec BurnerTronic BT320 15 5 Operating Control and Displays 5.2 Menu Functions The menu is divided into three paths: INFO Select INFO path for information about the following: • Burner • Faults/Fault history • Software version • Display of check sums • Serial nu… |
 |
[Page 17] Lamtec BurnerTronic BT320 16 5 Operating Control and Displays 5.3 Main Menu 1. Use cursor keys to select a menu and press ENTER to confirm. 5.4 Information Menu Path 1. Use cursor keys to select path and press ENTER to confirm. The display shows a menu overview. 5…. |
 |
[Page 18] Lamtec BurnerTronic BT320 17 5 Operating Control and Displays 2. Use keys to select menu and press ENTER to confirm. The display shows the «Display operating hours» menu window. Display burner start-ups 1. Use keys in System Information menu to select menu … |
 |
[Page 19] Lamtec BurnerTronic BT320 18 5 Operating Control and Displays NOTICE! Information concerning fault and diagnostic codes you may find in the list of fault codes. For fault analysis a fault code and diagnostic code D1 or D2 is required. 5.4.3 Software Version Display softwar… |
 |
[Page 20] Lamtec BurnerTronic BT320 19 5 Operating Control and Displays 5.4.4 Display of Check Sums Display check sum 1. Use cursor keys to select menu and press ENTER to confirm. The display shows «CRC16 check sums» menu. 5.4.5 Serial Number Display serial number 1. U… |
 |
[Page 21] Lamtec BurnerTronic BT320 20 5 Operating Control and Displays 5.4.6 Positions of Actuators Display positions of actuators 1. Use the cursor keys to select menu and press ENTER to confirm. The display shows the «Actuators» menu. NOTICE! The assignment of chann… |
 |
[Page 22] Lamtec BurnerTronic BT320 21 5 Operating Control and Displays NOTICE! Signals of points 3 and 4 are «logical» signals and not «physical» ones. Background informa- tion: Some signals may have more than one source (terminal, LSB, field buses, parameters). … |
 |
[Page 23] Lamtec BurnerTronic BT320 22 5 Operating Control and Displays NOTICE! Signals of points 4 and 5 in Fig. 5-15 Page 2 of inputs menu are «logical» signals, not «physi- cal». The BT320/330 supports either oil or gas operation, but cannot be switched. Theref… |
 |
[Page 24] Lamtec BurnerTronic BT320 23 5 Operating Control and Displays Call up 2 nd page of outputs 1. Use the cursor keys to select the next page and press ENTER to confirm. The display shows «Page 2 digital outputs» menu: Call up 3 rd page of outputs 1. Use the curs… |
 |
[Page 25] Lamtec BurnerTronic BT320 24 5 Operating Control and Displays 5.5 Manual Menu Path MANUAL Select MANUAL path to carry out actions as follows: 1 Switching burner ON and OFF 2 Presetting of burner firing-rate Display MANUAL menu 1. Use cursor keys to select path and pres… |
 |
[Page 26] Lamtec BurnerTronic BT320 25 5 Operating Control and Displays 5.6 Settings Menu Path Display SETTINGS menu 1. Use cursor keys to select menu and press ENTER to confirm. The display shows the menu overview. 5.6.1 Enter Password Display menu password entry 1. Use cursor … |
 |
[Page 27] Lamtec BurnerTronic BT320 26 5 Operating Control and Displays 5.6.2 Program Sequence Configure program sequence 1. Use cursor keys to select menu and press ENTER to confirm. The display shows the program sequence overview. Set pre-ventilation period 1. Use cursor keys… |
 |
[Page 28] Lamtec BurnerTronic BT320 27 5 Operating Control and Displays NOTICE! Apply value only if the values for UI300 and BT300 are identical! The parameter value must be confirmed by pressing ENTER within the countdown (8 s)! 5. Accept or discard the entry. NOTICE! The followin… |
 |
[Page 29] Lamtec BurnerTronic BT320 28 5 Operating Control and Displays Set duration of post-ventilation 1. Use cursor keys to select menu and press ENTER to confirm. The display shows the post-ventilation period menu. 2. Use cursor keys to select number you wish to change. 3…. |
 |
[Page 30] Lamtec BurnerTronic BT320 29 5 Operating Control and Displays NOTICE! You require access level 2 to make settings in this function! Accept or discard the entry! Activate valve leakage test prior to ignition 1. Use cursor keys to select menu and press ENTER to confirm. … |
 |
[Page 31] Lamtec BurnerTronic BT320 30 5 Operating Control and Displays Valve leakage test period 1. Use cursor keys to select menu and press ENTER to confirm. The display shows the valve leakage test period menu. 2. Use cursor keys to select the number you wish to change. 3. … |
 |
[Page 32] Lamtec BurnerTronic BT320 31 5 Operating Control and Displays NOTICE! You require access level 2 to make settings in this function! Accept or discard the entry! Configuration of actuating outputs 1. Use cursor keys to select menu and press ENTER to confirm. The display… |
 |
[Page 33] Lamtec BurnerTronic BT320 32 5 Operating Control and Displays 2. Use cursor keys to set firing-rate point and press ENTER to confirm. Set-point channel 1 is chosen (displayed inversely). 3. Use cursor keys to set channels’ actuator position. 4. Use cursor keys to … |
 |
[Page 34] Lamtec BurnerTronic BT320 33 5 Operating Control and Displays NOTICE! During multi-stage operation, the following points are available: Ignition point , 1 (first stage), 1 2 (valve switch-on point, second stage), 1 2 (valve switch-off point, second stage) … |
 |
[Page 35] Lamtec BurnerTronic BT320 34 5 Operating Control and Displays Set staged oil operation — transition from 1 st to 2 nd stage 1. Select the setpoint for the air damper position and press ENTER to confirm. The actuators move to these positions. The setpoint position for the… |
 |
[Page 36] Lamtec BurnerTronic BT320 35 5 Operating Control and Displays The display shows the confirmation prompt: 2. Press ENTER . The curve values will be deleted. The display shows the values deleted menu. UI300 display settings NOTICE! Value= 0 cannot be entered for the screen s… |
 |
[Page 37] Lamtec BurnerTronic BT320 36 5 Operating Control and Displays 5.6.3 Other Displays No connection between UI300 and BT300 Display shown e.g. when using LSB remote software and communication between BT300 and UI300 is temporarily unavailable. Termination Fig. 5-46 No connect… |
 |
[Page 38] Lamtec BurnerTronic BT320 37 6 Leakage Test for Main Gas Valves 6 Leakage Test for Main Gas Valves 6.1 Calculation Example An (approximate) formula for calculating the leakage test monitoring facility is summarised be- low: This means for a maximum gas flow rate of 50 m 3 … |
 |
[Page 39] Lamtec BurnerTronic BT320 38 6 Leakage Test for Main Gas Valves 6.2 Leakage Test with Ventilation Via Roof The leakage test checks whether or not the main gas valves are leakproof. For this purpose the gas pressure of the supply is analysed. As leakage test section (space… |
 |
[Page 40] Lamtec BurnerTronic BT320 39 6 Leakage Test for Main Gas Valves Fig. 6-1 Leakage test process diagram |
 |
[Page 41] Lamtec BurnerTronic BT320 40 6 Leakage Test for Main Gas Valves 6.3 Exhaust of Test Line Over the Roof NOTICE! Consider diameter of gas line in the roof ventilation. For ventilation, plug X02 is activated for 3 s. Make sure that this period is sufficient even for smallest … |
 |
[Page 42] Lamtec BurnerTronic BT320 41 7 Technical Data 7 Technical Data 7.1 Technical Data BT300 Function Power supply: 230 V +10/-15 % 47-63 Hz 115 V +10/-15 % 47-63 Hz (on request) Maximum backup-fuse: 10 A slow-blow To be used only in a grounded power line network! Power con… |
 |
[Page 43] Lamtec BurnerTronic BT320 42 7 Technical Data 7.2 Actuators 662R550… DANGER! Danger by electrical shock! If you don’t shut BurnerTronic down befor opening the cover, you may get in contact with con- ducting parts. This may cause an electrical shock. You may open Burne… |
 |
[Page 44] Lamtec BurnerTronic BT320 43 7 Technical Data NOTICE! Damaging the 0,8 Nm actuator by opening the actuator. If you open the actuator at another part as the cover of the electric connection, you will dam- age the actuator. Do not open the actuator but at the cover of the… |
 |
[Page 45] Lamtec BurnerTronic BT320 44 7 Technical Data NOTICE! Damage of the actuator due to opening the actuators housing. You will damage the actuator, if you open the actuator’s housing at another (this affects actu- ators with 1,2, 3,0 and 9,0 Nm). Repeat frequency 2,5 kHz El… |
 |
[Page 46] Lamtec BurnerTronic BT320 45 7 Technical Data |
 |
[Page 47] Lamtec BurnerTronic BT320 … |
 |
[Page 48] Lamtec BurnerTronic BT320 The information in this publication is subject to technical changes. DLT1206-13-aEN-008 Copyright© 2011 LAMTEC LAMTEC Meß- und Regeltechnik für Feuerungen GmbH & Co. KG Wiesenstraße 6 D-69190 Walldorf Phone: +49 (0) 6227 / 6052-0 Fax: … |