Products:
- Burris Eliminator III LaserScope 4-16×50 (Fixed Switch)
- Burris Eliminator III LaserScope 4-16×50 (Upgraded Software)
The Eliminator III® LaserScope™ is the most innovative and effective hunting riflescope in the world. Combining outstanding optics, pinpoint laser rangefinding, and precision trajectory compensation for the exact ammunition you choose for your hunt, it eliminates most of the variables and guesswork that often cause hunters to go home empty-handed. In one fast sequence the Eliminator III determines the distance to your
target, factors in your trajectory, and illuminates the perfect holdover. It’s that simple. The Eliminator III significantly extends the range and accuracy of your favorite long-range rifle. No other riflescope combines this level of quality, technology, accuracy, repeatability, speed, and effectiveness. It will greatly increase the distance at which you can make an ethical shot. Congratulations and thank you for choosing the Eliminator III LaserScope by Burris.
I. MOUNTING THE ELIMINATOR III LASERSCOPE
- Select a Weaver-style or Picatinny-style mounting base. We recommend the use of Burris Xtreme Tactical Bases, as they were designed to accommodate the Eliminator III LaserScope.
- Read the manufacturer’s directions regarding the installation of mounts before beginning.
- Clean the mounting area of the rifle with a chemical that removes grease and oil. Pay special attention to screw holes. Use the same chemical to clean the mounts. Do not allow the cleaning chemical to come in contact with the stock or scope lenses.
- After installing the base, position the scope so it offers the proper eye relief. To do this, shoulder the rifle as you would in the field. Position the scope as far forward as possible while achieving a full field of view.
- Note the two slots in the base or bases you will use to attach the scope. With the mount clamps fully open, place the mount bolts into the slots on the base. Now match up the Eliminator III scope slots and place over the two mount bolts—rocking the scope side to side until the scope is flush with the base. The mount clamps should grip the lip of the base and the lip of the rail on the underside of the scope. Finger tighten only.
- With hex nuts slightly loosened, push the scope forward, and then firmly tighten both hex nuts to 50 to 70 in./lbs.

Burris Eliminator III LaserScope Instruction Manual
Eyepiece Focusing
The eyepiece can be focused so the reticle appears sharp and black to any individual’s eye. Follow this procedure to quickly adjust the focus:
- Point the scope at the sky or a plain wall, and take a quick glance through the scope. If the reticle appears sharp and black, no further adjustment is necessary.
- If the reticle does not appear sharp and black, take quick glances through the scope while rotating the eyepiece focus ring until the reticle pattern is sharp and black.
NOTE: Do not look through the eyepiece as you turn the focus ring. Your eyes will adjust to the out-of-focus condition.
Parallax/Focus Adjustment
Parallax is the apparent movement of the reticle in relation to the target when the eye is not directly in line behind the center of the scope. Images from different distances focus in front of or behind the scope’s reticle. Parallax is more noticeable with higher magnification scopes. Parallax is adjusted by rotating the parallax adjustment ring located on the objective bell. When the scope is set parallax-free for the distance you are viewing, you should be able to move your head side-to-side or up and down without seeing the reticle move appreciably in relation to the target.
II. SIGHTING-IN THE ELIMINATOR III
Do all shooting in a safe, authorized area. Use proper eye and hearing protection, and follow all safety rules. Select the ammunition you intend to use in the field, and use it to sight in the firearm.
- Bore sight your scope, or place a target about two feet square at 25 yards. Fire a shot at the bullseye. After removing the adjustment caps, make the necessary adjustments to the Windage and Elevation knobs. Remember, with a click adjustment value of 1/8 inch at 100 yards it will require four clicks to move the same 1/8-inch distance at 25 yards (32 clicks will move bullet strike 1 inch at 25 yards).
NOTE: The click value is indicated on top of the adjustment knob. - Place a target at 100 yards (or meters) if shooting a centerfire cartridge, or at 50 yards if shooting rimfires, slugs, muzzleloaders or 300 BlackOut subsonic loads.
- Three shot groups are suggested to determine point of impact (POI). After the first group is fired, adjust the scope again. This adjustment should bring the approximate center of the group to coincide with the bullseye. Shoot additional groups as necessary.
- Put a pen or other small object into the small hole located on the dial. Keeping a firm grip or pressure on the knob, turn the dial back to zero. Only the numbered dial should move—do not allow the entire knob to move or else you will alter your windage and elevation settings.
- After making the adjustments, replace the adjustment caps. They protect your scope from dust and moisture.
III. FAMILIARIZE YOURSELF WITH ELIMINATOR OPERATIONS & ELECTRONICS

Burris Eliminator III LaserScope Instruction Manual
Battery Installation or Replacement
Unload the gun. Unscrew the battery cap on the left side of the scope. Install a lithium CR123 battery. Reinstall the battery cover.
NOTE: A sticker on the underside of the battery cover contains basic set-up instructions.
LaserScope Battery Life
Battery life is nominally rated at 5,000 cycles. This will vary depending on the quality of the battery and the temperatures at which the unit is operated. Batteries will lose power potential in colder temperatures.

Burris Eliminator III LaserScope Instruction Manual
Start the Electronics
Press one of the On/Range buttons on the lower front of the scope to start the electronics. There is one on either side, just behind the Objective Bell. Look through the scope. It should display
two things: the Y (yards) or M (meters) indication, along with the battery status indicator. The indicators will stay on for 8 seconds.

Burris Eliminator III LaserScope Instruction Manual

Burris Eliminator III LaserScope Instruction Manual
Reticle Displays
Having started the electronics, aim at a target using the center crosshair. Press either On/Range button again and you will get one of the following three displays sets.
- The scope will display the Range to your target and a 10 MPH Windage Offset at the top. The scope will also illuminate a Holdover Dot on the lower crosshair post. After 10 seconds, the unit, range, and battery status will go off. The Holdover Dot and Windage Offset will continue to be displayed for the entire 90 seconds, or until you press an On/Range button again. Changing magnification during this 90 second period will cause the dot to move and the Windage Offset value to change to the appropriate value for that specific magnification.

Burris Eliminator III LaserScope Instruction Manual
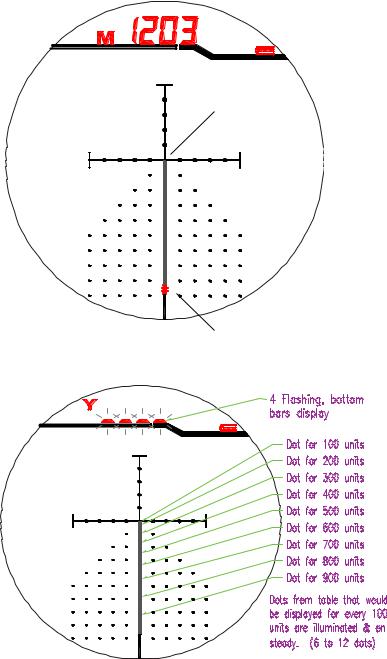
- A range is successfully taken, but the distance is beyond the limits of the selected cartridge. The scope displays the “Too Far” pattern along with the correct range. The “Too Far” pattern is the center (“Zero”) dot on steady and the bottom-most four dots flashing. Everything except the dots will go out after 10 seconds; the dots will remain for the entire 90 seconds.

Burris Eliminator III LaserScope Instruction Manual
- A range is not successfully taken. This may happen because the target is beyond the range capability of the scope (either too far or too close), or the range cannot be correctly determined for other reasons. To indicate this result the scope will flash the bottom segments of the four range digits (_ _ _ _) and display the “Range Fault” pattern for the selected table. For centerfire cartridges, the “Range Fault” pattern
illuminates dots in 100-unit intervals out to 1,200 units (100-1,200 yards or meters) using the currently selected Table. Many Tables are not capable of reaching 1,200 units. If this is the case, the Dot
Pattern will end at the highest 100 unit available. For rimfires, slugs, muzzleloaders, or 300 BlackOut subsonic loads, the “Range Fault” pattern illuminates dots in 25-unit intervals out to 300 units (100-300 yards or meters) using the currently selected Table. Many Tables are not capable of reaching 300 units. If this is the case, the Dot Pattern will end at the highest 25 unit available. This display also will be corrected for the actual magnification setting. Everything except the dots will go out after 10 seconds; all the dots will remain for the entire 90 seconds.


Burris Eliminator III LaserScope Instruction Manual
Automatic Angle & Magnification Compensation
The range displayed is the Line Of Sight (LOS) distance to the target. The Eliminator III LaserScope has a built-in angle sensor and internally converts the LOS to horizontal distance for drop compensation. No matter what the uphill or downhill angle of your shot, the Eliminator III automatically calculates the correct aiming point. In the Eliminator III, both the holdover and windage are corrected for your actual magnification setting. The best aiming accuracy and resolution is at maximum magnification (as on any variable power, rear focal plane scope). However, if you want to use a lower magnification the scope will still
function, giving the correct Holdover Dot and Windage Offset for your specific magnification setting, range, and cartridge.
Eliminator III with Remote Cable Switch
The remote cable switch on select Eliminator III models allows the shooter to activate the on/range button from any position they desire. The flexible cable switch has a length of 14 to 24 inches to accommodate various mounting positions. Connection ports are located on each side of the LaserScope for convenient and comfortable operation by right- and left-handed shooters.
Installing the Remote Cable Switch
- Choose to install the Remote Cable Switch on the right or left side of the LaserScope. Remove the cap from the On/Range button on the desired side by rotating the cap counterclockwise.
- Attach the Remote Cable Switch by inserting the connector on the end of the cable and rotating clockwise. Do not cross-thread. Make sure the connector is fully engaged (approximately 1.5 turns).
- To secure the Remote Cable Switch in your desired mounting position, remove the protective cover from the back of the pad to expose the adhesive backing and firmly press the pad into place.
The Remote Cable Switch functions exactly like the On/Range Button. Pressing it will start the electronics; pressing it again will range your target.
IV. PROGRAM THE ELIMINATOR FOR YOUR SPECIFIC CARTRIDGE
There are well over 6,000 ballistic curves or “Tables” available for use in the scope. We designate a ballistic curve by specifying the drop in inches at 750 yards when zeroed at 100 yards or 250 yards when zeroed at 50 yards, and the Ballistic Coefficient (BC) for your chosen bullet. A bullet’s BC is a number used in ballistic equations to specify how fast the bullet slows down. This scope accommodates BCs down to .06 and up to .9 BC. There is more information on the effect of BC in the “For Those New To Shooting Beyond 750 Yards” section of the user guide (page 19).
Create Your Ballistic Table
It is helpful to determine your Ballistic Table first so programming is fast and easy. Follow these steps to build your Ballistic Table.
- Select unit: Y (yards) or M (meters).
- Select Zero Distance: “1” (100-yard zero) or “0” (50-yard zero).
- Determine Drop Number and BC.
Your Drop Number is the bullet drop in inches at 750 yards when zeroed at 100 yards, or 250 yards when zeroed at 50 yards. You cannot use a 50-yard zero if you are shooting a centerfire cartridge nor a 100 yard zero if you are shooting a rimfire, slug, muzzleloader or a 300 BlackOut subsonic load as the ballistic tables are not configured for cross compatibility. You must use a 100-yard zero for centerfire cartridges and
use the 50-yard zero only for shorter range, low velocity ammunition such as rimfires, slugs, muzzleloaders or 300 BlackOut subsonic loads. You will also need to know your bullet’s Ballistic Coefficient
(BC). We use the commonly available G1 BCs. What you see published in advertisements and loading manuals is assumed to be G1unless stated otherwise.
There are several ways to determine your correct Drop Number and BC.
a. For factory loads, the Cartridge List that came with your scope provides the sea level Drop Number and BC for most of the currently available factory ammo.
b. Visit our website under “Ballistics Services” to find this information: http://ballistics.burrisoptics.com/
c. Factory ammo websites sometimes provide this information.
d. Handloading manuals always provide bullet BC data.
e. The Drop Number and/or BC may appear on the ammo box.
f. Ballistics Software Programs can provide this info.
g. Use the Cartridge List to estimate your drop number and BC by finding similar loads.
h. Measure your actual bullet drop. If you zeroed at 100 yards you must measure your drop at 750 yards; if you zeroed at 50 yards you must measure your drop at 250 yards.*
*NOTE: The correct Drop Number is best determined by actually measuring your drop. All other methods provide approximate numbers that will get you “on paper” at 750 yards — typically correct ±3 inches at that distance. Then, just correct the few inches needed from there by adjusting the Drop Number programmed into the scope.
4. Create Table. Your selected unit of measure (“Y”ards or “M”eters), zero distance, Drop Number, and BC are combined to give you a Table. Put a “1” after the unit of measure letter if you are using a 100-yard zero; put a “0” after the unit of measure letter if you are using a 50-yard zero. Next, enter the three-digit Drop Number, followed by the two-digit BC (without the decimal).

Burris Eliminator III LaserScope Instruction Manual
Altitude Compensation
Your bullet’s flight will be affected by air pressure, which is primarily determined by altitude. Both the Drop Number and the BC need to be altered for altitude changes over 1,000 feet. The Drop and BC numbers in the Cartridge List are sea level values. There is a compensation number for 750-yard or 250- yard Drop and for BC for every 1,000 feet of elevation change (Change/K Ft.). As altitude increases and air gets thinner, the effective BC gets larger, while the Drop gets smaller. The following example assumes you are shooting .308 Win., Federal POWER-SHOK ammunition, 150 grain with a softpoint bullet.

Burris Eliminator III LaserScope Instruction Manual
Programming the Eliminator III
There are four arrows on the left of the scope used for Scope Programming: Forward, Up, Back, and Down

Burris Eliminator III LaserScope Instruction Manual
Enter Set-up Mode:
- To enter Set-Up mode, push and hold the Forward button first, then press one of the On/ Range buttons and hold them both down simultaneously for six seconds, then release. The first number that appears for two seconds is the software version. Next, the display shows the currently selected Y (yards) or M (meters) and previously selected Ballistic Table. On new scopes the reading will be “Y 1137 43,” which is the factory-shipped Ballistic Table. If another Ballistic Table has been previously selected, the designation for that Ballistic Table is displayed.

Burris Eliminator III LaserScope Instruction Manual
- With the currently selected Table displayed you have 30 seconds to click the Forward button again to enter the Table Select mode. The “T” (for Table Select) will be on steady; the unit (Y or M) will be flashing when you enter Table Select mode. Press the Up button to select Y (yards) or the Down button to select M (meters). When your measurement unit of choice is flashing, press and release the Forward button to confirm your choice and advance to Zero Distance selection.

Burris Eliminator III LaserScope Instruction Manual
- The “T” is still on steady, your Unit (Y or M) is on steady, and a “1” will be flashing. “1” represents a 100-yard zero; you can press the Down button to select “0” which represents a 50-yard zero. When the Zero Distance you want is flashing, press and release the Forward button to confirm your choice and advance to Drop Number selection.

Burris Eliminator III LaserScope Instruction Manual
- The “T” is still on steady, your Unit (Y or M) is on steady, your Zero Distance (1 or 0) is on steady, and the Drop Number will now be flashing. Press the Up button to increase the number, or the Down button to decrease it. When the Drop Number you want is flashing, press and release the Forward button to confirm your Drop Number selection and advance to BC selection.
- The “T” is still on steady, your Unit (Y or M) is on steady, your Zero Distance (1 or 0) is on steady, and the selected Drop Number is also on steady. The two-digit BC selection will now be flashing. Your real BC is preceded by a decimal point, but the decimal is not entered here. Press the Up button to increase the BC number, or the Down button to decrease it. When the BC Number you want is flashing in the display, press and release the Back button to load your choice.The scope will automatically return to shooting mode with your Table in operation and stored permanently (until you select another).

Burris Eliminator III LaserScope Instruction Manual
The scope will remember your selection even if it is turned off, or the battery gets removed and replaced. Incidentally, hitting the Back button at anytime in the process will return you to shooting mode.
- You are now ready to go shooting! For optimum accuracy, verify point of impact by shooting a group at 750 yards (or 250 yards if you zeroed at 50 yards). Depending on the exact ammo performance, your gun’s barrel length, the elevation, and any extreme temperatures, you might need to increase or decrease your Drop Number by a digit or two for exacting performance.


Verifying Your Table Selection
For long-range shooting, verify the actual bullet drop at 750 yards* (686 meters). Set the scope at maximum+ magnification. If your group is low, increase the Drop Number by the number of inches it is low. (If you are 2 inches low with a 200 Drop Number, change your Drop Number to 202.) If the group is high, decrease the Drop Number by the number of inches it is high. (If you are 2 inches high with a 200 Drop Number, change your Drop Number to 198.) The change needed will be measured in inches regardless of the units set. The BC from the Cartridge List with altitude compensation should not need changing during 750-yard verification.
*You can go through this same process to verify your Table for low velocity ammunition as well by verifying your actual bullet drop at 250 yards (228 meters). Just remember, if you zeroed your scope at 50 yards, you will verify your Table at 250 yards; if you zeroed at 100 yards, you will need to verify at 750 yards.
Often it is difficult to find a suitable place to target shoot at 750 yards, whereas 400, 500, or 600 yards may be easier to locate. Use the chart below to make adjustments to your Drop Number when verifying calibration at these distances.

Burris Eliminator III LaserScope Instruction Manual
When fine-tuning your bullet placement at 750 yards, first adjust your Drop Number until the center of your group coincides with the center of your target. For fine-tuning your BC value, it is best to shoot at an intermediate range (400 or 500 yards) or an extreme range (900 or 1,000 yards). If the center of your group is low at intermediate ranges or high at extreme ranges, then increase your BC. If the center of your
group is high at intermediate ranges or low at extreme ranges, then decrease your BC. You will want to record the sight-in altitude and verified Drop Number on the stick-on labels provided with your scope. You will also want to record the Drop Number and BC correction per 1,000 feet.

Burris Eliminator III LaserScope Instruction Manual
Taking the label you wrote your values on, peel it off and stick it to the shelf above the battery cap.
NOTE: You will want one decimal place for the Drop Number correction and three places on the BC correction—just round accordingly after doing your arithmetic. Note that – / K ft is equal to minus per thousand feet up and + / K ft is equal to plus per thousand feet up.
Windage Compensation with the Eliminator III
The ranging and holdover calculation for your specific cartridge is done automatically. At the same time, the Eliminator III determines the correct Windage Offset at the measured range. After a range is
obtained, two numbers separated by a decimal will appear at the top right of the display. This is your correct Windage Offset for a 10 MPH crosswind. On the reticle there is a series of horizontal dots that do not illuminate. At full magnification the dots are MILs spaced at one MIL apart. At lower magnification you still use the dots to compensate for windage but the dots are no longer one MIL apart. The two-digit Windage Offset number indicates how many dots to hold into the wind for a 10 MPH wind. A Windage Offset value of 1.5 is telling you to hold 1.5 dots into the wind. The Windage Offset value will always be based on a 10 MPH wind. For a 5 MPH wind, cut the value in half. For a 20 MPH wind, simply double it. To use the value for other wind speeds, divide the actual crosswind by 10 (just move the decimal point one digit to the left) then multiply the value by that number.

Burris Eliminator III LaserScope Instruction Manual

Burris Eliminator III LaserScope Instruction Manual
The Windage Offset calculations work on any magnification. The Windage Offset value will display for a full 90 seconds or until you press the On/Range button or change magnification.
IMPORTANT: The Eliminator III does not measure wind speed. The Windage Offset value is always based on a 10 MPH wind. The scope is pulling this value from the table, according to the programmed load data. Wind estimation must be done by the shooter; once again, the scope does not measure wind speed.
NOTE: Compensating for wind is one of the most difficult tasks of long-range shooting. Wind changes from moment to moment and the wind between you and your target is not necessarily the same as where you are. Art and experience are still very much involved in deciding the average crosswind value. Don’t forget that only the wind perpendicular to your line of sight counts as crosswind.
ELIMINATOR III ESSENTIALS
• The holdover and windage features of this scope work on all magnification settings.
• The crosshair center must be used for ranging.

Burris Eliminator III LaserScope Instruction Manual
• An illuminated aiming dot will remain lit for approximately 90 seconds. If you fail to shoot before the dot goes out, you will need to re-range using the center crosshair.
• During normal operation, the brightness of the reticle illumination can be increased by pressing the Up button, and decreased by pressing the Down button.
• If you are unable to determine the distance to a target, check for obstacles between the scope and the target, such as grass, twigs, leaves, rain or snow, and mist or other airborne debris. It’s also wise to check for a dirty objective lens, poor target quality due to lack of reflection, low battery life, or anything that’s making your hold unsteady.
• The parallax adjustment does slightly affect rangefinding reliability. Set parallax for the approximate range for best results at long ranges.
• If you have programmed the scope for a particular cartridge and the range to the target cannot be determined, the scope will display four horizontal lines in the range display area along with 100-yard increment Holdover Dots, so the reticle is still usable.

Burris Eliminator III LaserScope Instruction Manual
• If the Eliminator III seems to be working improperly, it likely needs a new battery. First, disconnect the existing battery, reinstall it, and check for function. If this doesn’t solve the issue, install a new battery.
• If the Eliminator III LaserScope gets a distance reading that is beyond the capability of the reticle’s drop compensation for the selected Drop Number, the bottom four dots will flash, signifying to you that the target is out of range. To estimate how far out you can expect drop and wind compensation to work, see the following chart:
| BCs | APPROXIMATE MAX RANGE | ||||||||||||||||
| 0,9 | 750 | 800 | 825 | 860 | 890 | 930 | 955 | 990 | 1025 | 1090 | 1135 | 1200 | 1200 | 1200 | 1200 | 1200 | 1200 |
| 0,85 | 750 | 800 | 825 | 850 | 885 | 925 | 950 | 985 | 1020 | 1085 | 1130 | 1200 | 1200 | 1200 | 1200 | 1200 | 1200 |
| 0,8 | 750 | 800 | 825 | 850 | 880 | 920 | 945 | 980 | 1015 | 1080 | 1125 | 1190 | 1200 | 1200 | 1200 | 1200 | 1200 |
| 0,75 | 750 | 795 | 820 | 850 | 875 | 915 | 940 | 975 | 1010 | 1075 | 1120 | 1175 | 1200 | 1200 | 1200 | 1200 | 1200 |
| 0,7 | 750 | 795 | 820 | 850 | 875 | 910 | 935 | 970 | 1005 | 1055 | 1110 | 1150 | 1200 | 1200 | 1200 | 1200 | 1200 |
| 0,65 | 750 | 795 | 820 | 845 | 870 | 905 | 930 | 965 | 1000 | 1045 | 1095 | 1140 | 1200 | 1200 | 1200 | 1200 | 1200 |
| 0,6 | 750 | 795 | 820 | 845 | 870 | 900 | 925 | 960 | 995 | 1030 | 1080 | 1135 | 1190 | 1200 | 1200 | 1200 | 1200 |
| 0,55 | 750 | 790 | 815 | 840 | 865 | 890 | 920 | 955 | 990 | 1020 | 1070 | 1120 | 1175 | 1200 | 1200 | 1200 | 1200 |
| 0,5 | 750 | 790 | 815 | 840 | 860 | 880 | 915 | 950 | 985 | 1010 | 1060 | 1100 | 1155 | 1200 | 1200 | 1200 | 1200 |
| 0,45 | 750 | 790 | 810 | 835 | 855 | 775 | 910 | 940 | 970 | 1000 | 1050 | 1090 | 1130 | 1200 | 1200 | 1200 | 1200 |
| 0,4 | 750 | 790 | 810 | 830 | 850 | 870 | 900 | 930 | 955 | 980 | 1020 | 1070 | 1110 | 1165 | 1200 | 1200 | 1200 |
| 0,35 | 750 | 785 | 805 | 825 | 845 | 865 | 885 | 915 | 945 | 955 | 1000 | 1040 | 1080 | 1130 | 1180 | 1200 | 1200 |
| 0,3 | 750 | 785 | 800 | 820 | 840 | 855 | 875 | 900 | 925 | 945 | 980 | 1015 | 1050 | 1090 | 1135 | 1200 | 1200 |
| 0,25 | 750 | 780 | 795 | 815 | 830 | 845 | 865 | 885 | 910 | 930 | 960 | 985 | 1020 | 1050 | 1088 | 1200 | |
| 0,2 | 750 | 780 | 790 | 805 | 825 | 840 | 855 | 870 | 890 | 910 | 930 | 960 | 980 | 1015 | 1050 | ||
| 0,19 | 750 | 780 | 790 | 805 | 820 | 835 | 850 | 865 | 885 | 905 | 925 | 950 | 970 | ||||
| 0,18 | 750 | 775 | 785 | 800 | 815 | 835 | 850 | 865 | 880 | 900 | 920 | 940 | |||||
| 0,17 | 750 | 775 | 785 | 800 | 815 | 830 | 845 | 860 | 875 | 895 | 915 | ||||||
| 0,16 | 750 | 775 | 780 | 800 | 810 | 825 | 840 | 855 | 870 | 890 | |||||||
| 0,15 | 750 | 770 | 780 | 795 | 805 | 820 | 835 | 850 | 865 | ||||||||
| 230 | 220 | 210 | 200 | 190 | 180 | 170 | 160 | 150 | 140 | 130 | 120 | 110 | 100 | 90 | 80 | 70 |
TECHNICAL NOTES
What Cartridges Will The Scope Accommodate?
Most commercially available cartridges that work with the scope are listed in the Cartridge List that comes with the scope. For low-velocity centerfire cartridges with high Drop Numbers, your rifle must be able to shoot a projectile with 230 inches of drop or less at 750 yards when zeroed at 100 yards. Virtually all modern centerfire rifle cartridges can do this. With low BC bullets, it takes high Muzzle Velocity (MV) to get there. For handloaders, a list of sea level BC and MV combinations that drop the maximum 230 inches when zeroed at 100 yards are shown in the chart below.
| BCs | 0,15 | 0,16 | 0,17 | 0,18 | 0,19 | 0,2 | 0,25 | 0,3 | 0,35 | |
| MV | FFP | 4136 | 3929 | 3755 | 3608 | 3418 | 3371 | 2986 | 2755 | 2492 |
| MPS | 1216 | 1198 | 1145 | 1100 | 1061 | 1027 | 910 | 840 | 760 |
| BCs | 0,35 | 0,4 | 0,45 | 0,5 | 0,55 | 0,6 | 0,65 | 0,7 | 0,75 | |
| MV | FFP | 2601 | 2492 | 2410 | 2347 | 2297 | 2256 | 2222 | 2194 | 2710 |
| MPS | 793 | 760 | 735 | 715 | 700 | 688 | 688 | 669 | 661 |
For flat shooting centerfire cartridges, the scope cuts off at a 65- inch drop at 750 yards when zeroed at 100 yards.
For rimfires, slugs, muzzleloaders, and the 300 BlackOut subsonic loads, the scope supports a 50 yard sight-in with 250 yard drops from 6 inches to 100 inches.
Long-Range Shooting (Beyond 750 yards)
The factors that influence a bullet in flight at extreme ranges are many and their relationships are complex. Ballistics software programs will get you close, but nothing beats firing five shot groups with the actual ammo at 750 yards. This will provide you with the most precise information possible in order to program your Eliminator III LaserScope. If you intend to shoot at game at 1,000 yards and beyond, it would be irresponsible not to confirm accuracy at range for your entire shooting system. If you need to change point of impact (POI) at a range beyond 750 yards, try changing your BC. Increasing BC will raise POI. With high BC bullets, it takes more BC change to make a difference then it does for low BC bullets. Consider changing the Zero for small changes at extreme distances. A click of elevation will only change the POI .125 inches at 100 yards, but will change the POI 1.25 inches at 1,000 yards. The .125 at 100 yards is unlikely to make a difference, even on a ground squirrel. The 1.25 at 1,000 may be more meaningful, if your groups are small enough to find it. Note that a click also changes the POI .94 inches at 750 yards, so you may also want to try a new Drop Number.
For Those New To Shooting Beyond 750 Yards
Here are a few additional things to keep in mind:
- High BC is much more important than high muzzle velocity at long range. The concept of Point-Blank Range uses long zero distance and very high Muzzle Velocity (MV) to shoot flat enough to stay within 3 or 4 inches of your aiming line of sight. That technique breaks down somewhere around 350 yards. No cartridge shoots flat enough at these longer distances to even consider not compensating for drop. High BC bullets are usually a little heavier and have a little lower MV than low BC loads for the same caliber. The lower MV gives them a little more arc and puts them at a disadvantage in PointBlank Range discussions. The Eliminator III LaserScope handles drop for you at the press of a button and eliminates any consideration of Point-Blank distance. At distances of 750 yards and longer, high BC bullets have several important advantages:
- Higher BCs will actually shoot flatter at extended ranges than a low BC/high MV. This will extend the range the scope can compensate for the bullets drop.
- The high BC bullet is also less affected by the wind Even with the solid knowledge of the effects of a 10 MPH crosswind the scope provides, wind will be the limiting factor for field accuracy. For example: a .30-06, 190-grain bullet with a .6 BC launched at 2,700 FPS has 74 inches of drift from a 10 MPH crosswind at 1,000 yards. That is about 1/3 of what a 125-grain bullet with a .25 BC launched at 3,200 FPS has with its 193 inches of drift. Whatever your error in estimating average crosswind, you will have only 1/3 as much error on the target with the higher BC bullet. A 150-grain bullet with a .4 BC at 3,000 FPS will drift 110 inches. That is about half as much as that .25 BC load. Varmint shooters can expect similar results going from a .15 to a .2 BC.
- High BC bullets also retain more energy to bring game down. From the above combinations at 1,000 yards, the .6 BC bullet hits with 877 ft./lb., the .4 BC with 470 ft./lb. and the .25 BC has only 221 ft./lb..
Go for those high BC bullets if you have not already done so.
- Use high-quality ammo. Everything affects bullet flight at these ranges. Once you find a load that shoots well in your rifle, buy or reload a good quantity. Odds are you will need to buy premium ammo or handload very carefully. If you change bullets, even to one of the same weight and manufacturer, you need to re-zero and re-verify at range. Even the lot number could make a noticeable difference
beyond 1,000 yards. Bullets with dented or dinged points should be used for fowling shots, close-in work or practice. - Practice shooting in crosswind conditions.
- Consider getting and carrying a good wind/pressure gauge.
Specifications
Operating Temperature:
-15° to +122° Fahrenheit
-10° to +50° Celsius
Laser Effective Range:
Deer: 50 yards to 750 yards
Reflective Target: 50 yards to 1,200+ yards
Storage Temperature:
-13° to +158° Fahrenheit
-25° to +70° degrees Celsius
Ranging Accuracy:
Less than 100 yards: +/-1 yard
100 – 550 yards: +/-2 yards
More than 550 yards: +/-3 yards
Angle Ranging Compensation: + 45° / -45°
Storage
As with any electronic device, it is always a good idea to remove the battery when storing for a long period of time. During storage or transportation, be sure that the On/Range button is not inadvertently depressed, thereby running the battery down when not in use.
Scope Use, Service, & Care
Your Burris scope will provide a lifetime of service if given the reasonable care and treatment it deserves. The only maintenance required is occasional cleaning of the outside of the scope and the exterior lenses.
Cleaning
What should I use to clean my optics?
- NEVER use ammonia-based cleaners, such as Windex, to clean your lenses. These types of cleaners can and will remove your lens coatings.
- Carefully remove any debris before cleaning the lenses, to prevent scratching.
- Use an air can or soft brush to remove dirt or dust from the lenses.
- Then use a cotton-tipped swab with rubbing alcohol applied to remove any debris remaining along the edge of the optics.
- With another cotton-tipped swab and alcohol, start at the center of the lens and make a circular motion. Increase the circle size each time until you reach the edge of the lens. Multiple swabs may be needed.
- Next use a clean cotton-tipped swab (with no alcohol) to remove any remaining residue from the lens.
For in-field cleaning, we recommend using a lens pen or soft brush. Always use scope caps to protect from debris and scratches on the lens.
Checklist Before Returning A Scope
A significant number of scopes are returned to Burris each year that are found to function perfectly. To avoid unnecessary delays and expenses we encourage you to check for the following conditions:
Insufficient windage adjustment
- Base mounting holes drilled out of alignment with center of bore
- Barrel threaded into receiver at an angle
Insufficient elevation adjustment
- Receiver diameter out of specification
- Barrel threaded in at an angle
Grouping or accuracy
- Barrel or chamber-throat erosion
- Stock warpage
- Stock bedding problem
- Loose mount
- Heavy trigger-pull solution: consult with a gunsmith
Focus or image not clear
- Object too close
- Eyepiece out of focus
- Parallax set to incorrect yardage

Mounting The Eliminator III
™
LaserScope
1. Select a Weaver-style or Picatinny-style mounting base. If a
two-piece base is selected for a long action bolt rifle, the front
base should be a reversible base
which will need to be mounted with
the extension pointed to the rear. We
recommend the use of Burris Xtreme Tactical
Bases as they were designed to accommodate the
Eliminator III LaserScope.
2. Read the manufacturer’s directions regarding the installation of
mounts before beginning.
3. Clean the mounting area of the rifle with a chemical that removes
grease and oil. Pay special attention to screw holes. Use the same
chemical to clean the mounts. Do not allow the cleaning
chemical to come in contact with the stock or scope lenses.
4. After installing the base, position the scope so it offers the proper
eye relief. To do this, shoulder the rifle as you would in the field.
Position the scope as far forward as possible while achieving a full
field of view.
5. Note the two slots in the base or basses you will use to attach the
scope. With the mount clamps open fully, place the Mount Bolts
into those slots on the base. Now match up the Eliminator III
scope slots and place over the two
mount bolts — rocking the scope side
to side until the scope is flush with
the base. The mount clamps should
grip the lip of the base and the lip of
the rail on the underside of the
scope, as shown at right.
Finger-tighten only.
6. With hex nuts slightly loosened,
push the scope forward and
then firmly tighten both hex
nuts to 50 to 70 inch/pounds.
Eyepiece Focusing
1. Aim the Eliminator III LaserScope in a safe direction toward the
sky or a light colored wall. Glance through the scope and notice if
the reticle or crosshair is sharply focused. Most users will find that
no adjustment is necessary. If the reticle is not in sharp focus,
rotate the eyepiece focus ring until the reticle appears in sharp
focus. Double check your focus by taking quick glances through
the scope and make any fine tuning adjustments as necessary.
Sighting In
Do all shooting in a safe, authorized area. Use proper eye and hearing
protection and follow all safe shooting rules. Select the ammunition
you intend to use in the field and use it to sight in the firearm as well.
1. Bore sight your scope, OR place a target about two feet square
at 25 yards. Fire a shot at the bull’s-eye. Make the necessary
adjustments to the Windage and Elevation knobs. Remember,
with a click adjustment value of 1/8 inch at 100 yards it will require
four clicks to move the same 1/8 inch distance at 25 yards (32
clicks will move bullet strike 1 inch at 25 yards). Note the click
value indicated on a label under one of the adjustment caps.
2. Make adjustments on the scope by turning the adjusting screws
the necessary number of clicks. NOTE: The reticle is centered at
the factory. This permits adjusting the reticle equally in all
directions from the center position. Three shot groups are
suggested to determine the actual point of impact.
3. After the first group is fired, adjust the scope again. This adjust-
ment should bring the approximate center of the group to
coincide with the bullseye. Shoot additional groups as necessary.
4. Place the target at 100 yards or (meters if you will be using
meters.) Make the necessary adjustments so your group
coincides with the bull’s-eye. It is important that you sight in
exactly dead center at 100 yards for accurate calibration. DO
NOT sight in one, two, or three inches high at 100 yards.
5. Align the dial to read “0” without allowing the knob top to turn.
6. After making the adjustments, replace the adjustment caps. They
protect your scope from dust and moisture..
LaserScope
TM
Rail (rear)
The Eliminator III LaserScope is the most innovative and effective hunting
riflescope in the world. Combining outstanding optics, pinpoint laser range
finding, and precision trajectory compensation for the exact ammunition
you choose for your hunt, it eliminates most of the variables and guesswork
that often cause hunters to go home empty-handed. In one fast sequence
the Eliminator III determines the distance to your target, factors in your
trajectory and illuminates the perfect holdover. It’s that simple.
The Eliminator III significantly extends the range and accuracy of long
range capable gun and ammo combinations, making it the perfect optic
for your favorite long range rifle. No other riflescope combines this level
of quality, technology, accuracy, repeatability, speed, and effectiveness. It
will greatly increase the distance at which you can make an ethical shot.
Congratulations and thank you for choosing the Eliminator III
LaserScope by Burris.
Mounting & Sighting-In
Eliminator III
™
LaserScope User’s Guide
1
Rear Mount
Base
![]()
Rear Mount
Base
LaserScopeTM Rail (rear)
Eliminator III™ LaserScope User’s Guide
The Eliminator III LaserScope is the most innovative and effective hunting riflescope in the world.Combining outstanding optics, pinpoint laser range finding, and precision trajectory compensation for the exact ammunition you choose for your hunt, it eliminates most of the variables and guesswork that often cause hunters to go home empty-handed. In one fast sequence the Eliminator III determines the distance to your target, factors in your trajectory and illuminates the perfect holdover. It’s that simple.
The Eliminator III significantly extends the range and accuracy of long range capable gun and ammo combinations, making it the perfect optic for your favorite long range rifle. No other riflescope combines this level of quality, technology, accuracy, repeatability, speed, and effectiveness. It will greatly increase the distance at which you can make an ethical shot. Congratulations and thank you for choosing the Eliminator III LaserScope by Burris.
Mounting & Sighting-In
Mounting The Eliminator III™ LaserScope
1. Select a Weaver-style or Picatinny-style mounting base. If a two-piece base is selected for a long action bolt rifle, the front base should be a reversible base
which will need to be mounted with the extension pointed to the rear. W recommend the use of Burris Xtreme T Bases as they were designed to acc Eliminator III LaserScope.
2. Read the manufacturer’s directions regarding the installation of mounts before beginning.
3. Clean the mounting area of the rifle with a chemical that removes grease and oil. Pay special attention to screw holes. Use the same chemical to clean the mounts. Do not allow the cleaning chemical to come in contact with the stock or scope lenses.
4. After installing the base, position the scope so it offers the proper eye relief. To do this, shoulder the rifle as you would in the field. Position the scope as far forward as possible while achieving a full field of view.
5. Note the two slots in the base or basses you will use to attach the scope. With the mount clamps open fully, place the Mount Bolts into those slots on the base. Now match up the Eliminator III scope slots and place over the two
mount bolts — rocking the scope side to side until the scope is flush with the base. The mount clamps should grip the lip of the base and the lip of the rail on the underside of the scope, as shown at right. Finger-tighten only.
6.With hex nuts slightly loosened, push the scope forward and then firmly tighten both hex nuts to 50 to 70 inch/pounds.
Eyepiece Focusing
1. Aim the Eliminator III LaserScope in a safe direction toward the sky or a light colored wall. Glance through the scope and notice if the reticle or crosshair is sharply focused. Most users will find that no adjustment is necessary. If the reticle is not in sharp focus, rotate the eyepiece focus ring until the reticle appears in sharp focus. Double check your focus by taking quick glances through the scope and make any fine tuning adjustments as necessary.
Sighting In
Do all shooting in a safe, authorized area. Use proper eye and hearing protection and follow all safe shooting rules. Select the ammunition you intend to use in the field and use it to sight in the firearm as well.
1.Bore sight your scope, OR place a target about two feet square at 25 yards. Fire a shot at the bull’s-eye. Make the necessary adjustments to the Windage and Elevation knobs. Remember, with a click adjustment value of 1/8 inch at 100 yards it will require four clicks to move the same 1/8 inch distance at 25 yards (32 clicks will move bullet strike 1 inch at 25 yards). Note the click value indicated on a label under one of the adjustment caps.
2.Make adjustments on the scope by turning the adjusting screws the necessary number of clicks. NOTE: The reticle is centered at the factory. This permits adjusting the reticle equally in all directions from the center position. Three shot groups are suggested to determine the actual point of impact.
3.After the first group is fired, adjust the scope again. This adjustment should bring the approximate center of the group to coincide with the bullseye. Shoot additional groups as necessary.
4.Place the target at 100 yards or (meters if you will be using meters.) Make the necessary adjustments so your group coincides with the bull’s-eye. It is important that you sight in exactly dead center at 100 yards for accurate calibration. DO NOT sight in one, two, or three inches high at 100 yards.
5.Align the dial to read “0” without allowing the knob top to turn.
6.After making the adjustments, replace the adjustment caps. They protect your scope from dust and moisture..
1

ELIMINATOR III™ LASERSCOPE
On/Range Switch (One on each side)
1. Battery Installation or Replacement
Unload the gun. Unscrew the battery cap on the left side of the scope. Install a lithium CR123 battery. Reinstall the battery cover. NOTE: A sticker on the underside of the battery cover contains basic set-up instructions.
2. LaserScope Battery Life:
Battery life is nominally rated at 5000 cycles. This will vary depending on the quality of the battery and the temperatures at which the unit is operated. Batteries lose a good deal of their power potential in colder temperatures.
3. Start the electronics
Press one of the main switch buttons (On/Range buttons) on the lower front of the scope. There is one on either side, just behind the Objective Bell. Either button will work. Look through the scope. It should show two things: the Yards (Y) or Meters (M) indication illuminated along with the battery status indicator. The indicators will stay on for 8 seconds.
4. Electronic Basics
Having started the electronics, aim at a target. Press either On/Range button again and you will get one of the following 3 displays sets:
1.The scope will display the range to your target, and a 10 MPH windage offset at the top. The scope will also illuminate a hold over dot on the lower crosshair post. The dot display will be corrected for the actual magnification setting. After 10 seconds the unit, range, and battery status will go off, but the Hold Over Dot and Windage will continue to be displayed for an additional 80 seconds, or until you press an On/Range button again.
2.A range is successfully taken, but the distance is beyond the limits of the selected Cartridge. The scope displays the “Too Far” code along with the correct range. The “Too Far” code is; the Center (“Zero”) Dot on steady, and bottom most 4 Dots will be flashing. Everything except the Dots will go out after ten seconds. The Dots will remain for the entire 90 sec.
Setup and Brightness
Control Switches
Battery Cover
|
X96 Reticle |
||||||||||||||||||||||||||||||||
|
Distance |
Windage |
|||||||||||||||||||||||||||||||
|
Offset |
||||||||||||||||||||||||||||||||
Hold Over Dot
2
3.A range is not successfully taken (RANGE FAULT). This may happen because the target is beyond the range capability of the scope on either the high side or the low side, or the range cannot be correctly determined for other reasons. To indicate this result the scope will flash the bottom segments of the four range digits (_ _ _ _) and display the “Range Fault, Dot Pattern” for the selected table. The “Range Fault, Dot Pattern” is a display of the Dots that would be illuminated for measurements of 100 unit intervals out to 1200 units (100, 200, 300, 400, 500, 600, 700, 800, 900, 1000, 1100, and 1200 yards or meters) using the currently selected Table. Many Tables are not capable of reaching 1200 units. If this is the case, the Dot list will end at the highest 100 unit available. This display also will be corrected for the actual magnification setting. Again, everything except the Dots will go out after ten seconds. All the Dots will remain for the entire 90 sec.
The range displayed is the Line Of Sight (LOS) distance to the target. The Eliminator III LaserScope has a built-in angle sensor and it internally converts the LOS to horizontal distance for drop compensation (Rifleman’s rule). The horizontal distance is mostly what affects a bullet’s trajectory, so no matter what the uphill or downhill angle, the Eliminator III automatically calculates the correct aiming point.
In the Eliminator III, both the hold over and windage are corrected for your actual magnification setting. The best aiming accuracy and resolution is at maximum magnification (as on any variable power scope). If however, you are moving around and want to use a lower magnification for finding targets quickly in the larger Field Of View (FOV), the scope will still function: giving the correct hold over and windage hold for your specific magnification setting, range, and cartridge’s ballistics.
5. Set Up the Eliminator For Your Specific Cartridge
There are well over 4000 ballistic curves or Tables available for use in the scope. You will need to select the correct one. This is not as difficult as it sounds. We designate a ballistic curve by specifying the drop in inches at 750 yards when zeroed at 100 yards and the Ballistic Coefficient (BC) for your chosen bullet. A bullet’s BC is a number used in ballistic equations to specify how fast the bullet slows down. Essentially it tells how slippery it is. Long pointy front ends and boat tails give a bullet a higher BC. The Sectional Density of the bullet (grains per unit area of the bore) also affects its BC. Heavier bullets of a given diameter tend toward better, higher, BCs. This scope accommodates BCs down to .15 and up to .9 BC. There is more information on the affect of BC at the end of these instructions in the section called For Those New To Shooting Beyond 750 Yards and on our website.
Center Dot
4 Flashing Dots
3
 Loading…
User Manual for Burris Optics 4-16×50 Eliminator III Laser Rangefinder RiflescopeClick to enlarge the picture Contents of the user manual for the Burris Optics 4-16×50 Eliminator III Laser
|
|||||||||||||||||||||
|
User manual for the Burris Optics 4-16×50 Eliminator III Laser contain basic instructions that need to be followed during installation and operation. Before starting your appliance, the user manual should be read through carefully. Follow all the safety instructions and warnings, and be guided by the given recommendations. User manual is an integral part of any Burris Optics product, and if it is sold or transferred, they should be handed over jointly with the product. Following the instructions for use is an essential prerequisite for protecting health and property during use, as well as recognition of liability on the part of the manufacturer for possible defects should you make a warranty claim. Download an official Burris Optics user manual in which you will find instructions on how to install, use, maintain and service your product. And do not forget – unsuitable use of a Burris Optics product will considerably shorten its lifespan! |
|||||||||||||||||||||
Product descriptionWhen every second counts the Burris Optics 4-16×50 Eliminator III Laser Rangefinder Riflescope eliminates the need to waste time switching between your rangefinder and rifle — just tap, adjust your aim, and pull the trigger. Optically, it is outfitted with a wide and versatile zoom range and an objective that has excellent low-light capabilities for accurate target identification at dawn and dusk, or under a heavy canopy. Index matched, multi-coated optics further boost the low-light abilities while also improving color rendition and contrast.The laser rangefinder accurately ranges targets from 50 to 1200 yards, and is complemented with a built-in inclinometer that measures the upward or downward angle relative to the target. A bullet drop compensation system that uses the measured range, angle, and the user-inputted information on the cartridge in use, to activate and illuminate a adjusted aim point on the reticle. The scope can be programmed for hundreds of commercial loads or, if shooting custom rounds, users may choose a commercial load with specs most closely matching the custom rounds.Designed to withstand the rigors of the wild, the housing is made of durable and lightweight 6061 T6 aluminum with a scratch and corrosion-resistant matte-black anodized finish. Its one-piece main-tube is nitrogen-filled and O-ring sealed to give it waterproof and fogproof performance. For a solid connection, the scope mounts on standard Picatinny/Weaver rail systems. This version of the Eliminator replaces the fixed switch previously located on the housing behind the objective bell with a remote pressure pad switch and coiled cable to eliminate the need to move the support hand off the rifle to activate the rangefinder.
UPC: 000381001191 In the Box Burris Optics 4-16×50 Eliminator III Laser Rangefinder/Riflescope (X96 Reticle, Remote Switch) Table of Contents |
|||||||||||||||||||||
Upload User Manual Have you got an user manual for the Burris Optics 4-16×50 Eliminator III Laser Rangefinder Riflescope in electronic form? Please send it to us and help us expand our library of instruction manuals. To upload the product manual, we first need to check and make sure you are not a robot. After that, your «Submit Link» or «Upload File» will appear.   Please enter here the link to the user manual of this product:
Enter here the file with the user manual of this product from your computer/phone: 0%
Technical parametersBurris Optics 200119 Specs
|


| Request for user manual |
|
You can’t find the operation manual you are looking for? Let us know and we will try to add the missing manual:
I’m looking for a manual / Request for manual Current requests for instruction manuals: Nxcam … alesis-recital-pro-88-key-digtal-pino-… Biometric/Sycees Digital (1 Gun) Gun Safe, installation instructions…. Binocular Konus Tornado 7×50 2325… Manual for graphic design studio I purchased … |
![]()
Товары для охоты и активного отдыха
+7(499)130-29-14 ЗВОНИТЕ
Часы работы ПН-ПТ с 10-00 до 18-00
заказы через сайт принимаются круглосуточно
МИНИМАЛЬНАЯ СУММА ЗАКАЗА 3000р