В данной статье рассмотрим создание калькулятора с применением плагина с ограниченным бесплатным функционалом. Конечно платный функционал намного интереснее, но для многих сложных расчетов (будь-то ипотечный кредит или расчет стоимости отеля в зависимости от даты заезда или просто расчет платных услуг с различными условиями) вполне подходит.
Самый подходящий плагин с невероятными возможностями:

Главное преимущество данного плагина состоит в том, что все расчеты можно производить с помощью JavaScript. С одной стороны это определенная сложность, с другой стороны это огромная гибкость в сложных расчетах с зависимыми данными.
Так же у плагина имеются предустановленные стили (дизайны) формы. А по умолчанию используется просто чистая форма, при встраивании которой берутся стили темы сайта.
Как создать калькулятор с непростыми условиями расчетов
- Прописываем идентификатор будущей формы, жмем создать
- Переходим в настройки формы
- Добавляем нужные нам поля

5. В самих полях есть много параметров, самые используемые:
- значение по умолчанию
- диапазон
- допустимый макс./мин.
- отображение дополнительных скрытых (зависимых) полей, в случае выбора пунктов определенных полей (чекбоксов или радиобаттон)
- скрытие полей
4. Оранжевый цветом выделено главное поле итоговых рассчетов, именно в нем можно прописывать расчеты с помощью JavaScript. Каждая ячейка имеет уникальное имя Fieldname1. Для удобства, в самом начале написания кода я создаю список переменных с удобочитаемым именем.
Так же именно в этом поле есть отличный встроенный редактор кода

На заметку. полноценно JS использовать не получится. Может я чего-то не доглядел, но у меня не вышло воспользоваться конструкцией switch case.
Представленные шаблоны стилей плагина находятся по следующему пути: /public_html/wp-content/plugins/calculated-fields-form/templates

Мне очень понравился один из стилей, единственно что мне нужно было, так это вычленить из стиля оформление кнопки, что я и сделал. Следующим этапом оставалось придумать каким образом этот стиль теперь подключить.
Добавить свой стиль дублировав папку понравившегося стиля у меня не получилось. В этой папке есть ini файл, в котором определено название класса и описание стиля. Модификация ini файла не привела к успеху, да и сомнителен такой способ, т.к. при обновлении плагина, все наши правки неминуемо слетят.
Выход найден:
- Берем понравившийся стиль
- Модифицируем его
- Удаляем из всех селекторов имя класса стиля со всего кода
(смотрим в FAQ плагина и читаем какие селекторы на что влияют)

- копируем оставшийся код и вставляем его в поле пользовательского стиля, которое находится в настройках формы

Думаю легко догадаться, что шаблоны стилей можно посмотреть и выбрать из них понравившиеся моменты. Незначительные правки можно прямо в стиле переопределить, как я и поступил с выводом итогового расчета увеличив размер и цвет текста.

В завершении хотелось бы сказать, что бесплатных функций более, чем достаточно, но всё же не хватает кнопки отправить расчеты формы менеджеру. Здесь есть небольшой лайфак, калькулятор позволяет добавить кнопку печати расчета, ну и в целом при желании с этими расчетами клиент может сам прийти в офис для предметного разговора.
Если у вас появились вопросы, пишите в комментариях, чем смогу помогу.

Обычно в тексте описания я пишу какую-то вводную мысль, вроде «этот плагин вам нужен за тем-то за тем-то», или «есть такая вот проблема и плагин из этой статьи ее решает». Во-первых, такой подход мне несколько наскучил, а во-вторых, вариантов проблем которые потенциально может решить наш сегодняшний подопытный слишком много — введение получится просто невменяемых размеров, поэтому я его опущу в этой статье.
Также я назову плагин на обзоре сразу — это Calculated Fields. Обычно я этого не делаю чтобы держать небольшую интригу, но не сегодня, потому что чтобы с ним разобраться в любом случае придется почитать эту статью, а еще желательно посмотреть видео про него (есть в конце статьи). Итак, поехали.
- Calculated Fields: устнановка и активация
- Calculated Fields: настройки
- Как происходит расчет?
- Плагин в репозитории
- Видео по статье
Calculated Fields: устнановка и активация
Как я уже сказал, плагин с помощью которого можно создать калькулятор на WordPress называется Calculated Fields. Он доступен в публичном репозитории WordPress, поэтому процесс его установки и настройки мало чем отличается от других размещенных там плагинов:
- Вы можете скачать плагин из репозитория на официальном сайте WordPress и загрузить его из административной панели в разделе «Плагины»;
- Либо вы можете перейти в раздел «Плагины», воспользоваться кнопкой «Добавить новый» и поиском по репозиторию и найти в нем Calculated Fields (на момент написания этой статьи у него порядка 60.000 активных установок). Когда нашли, устанавливаем и активируем.
Calculated Fields: настройки
Что ж, переходим к настройкам плагина. Я не буду пошагово создавать какой-то определённый калькулятор, так как уже сделал это в моем видео-обзоре этого плагина (еще один и последний раз напоминаю, что видео находится в самом низу статьи), вместо этого я сделаю подробный обзор настроек плагина со всеми нужными для работы с ним пояснениями.
Первое — после установки и активации, наш плагин появляется в административной панели и имеет отельную вкладку. Стоит упоминания, так как с большинством плагинов приходится мучиться и искать настройки плагина (во вкладке настройке, из раздела плагины и тд). Давайте посмотрим как выглядят настройки:

- Серая стрелочка — где находятся настройки;
- Синяя стрелочка — ваши калькуляторы (по умолчанию плагином создается 5 различных форм, демонстрирующую большинство возможностей плагина);
- Красная стрелочка — добавление нового калькулятора (что бы добавить его, нужно назвать элемент, выбрать категорию (опционально) и нажать кнопку «добавить»).
Теперь, когда мы прошлись по первой странице и поняли как добавить новый калькулятор, давайте перейдем к странице (настройкам) калькулятора. Выглядит она следующим образом:
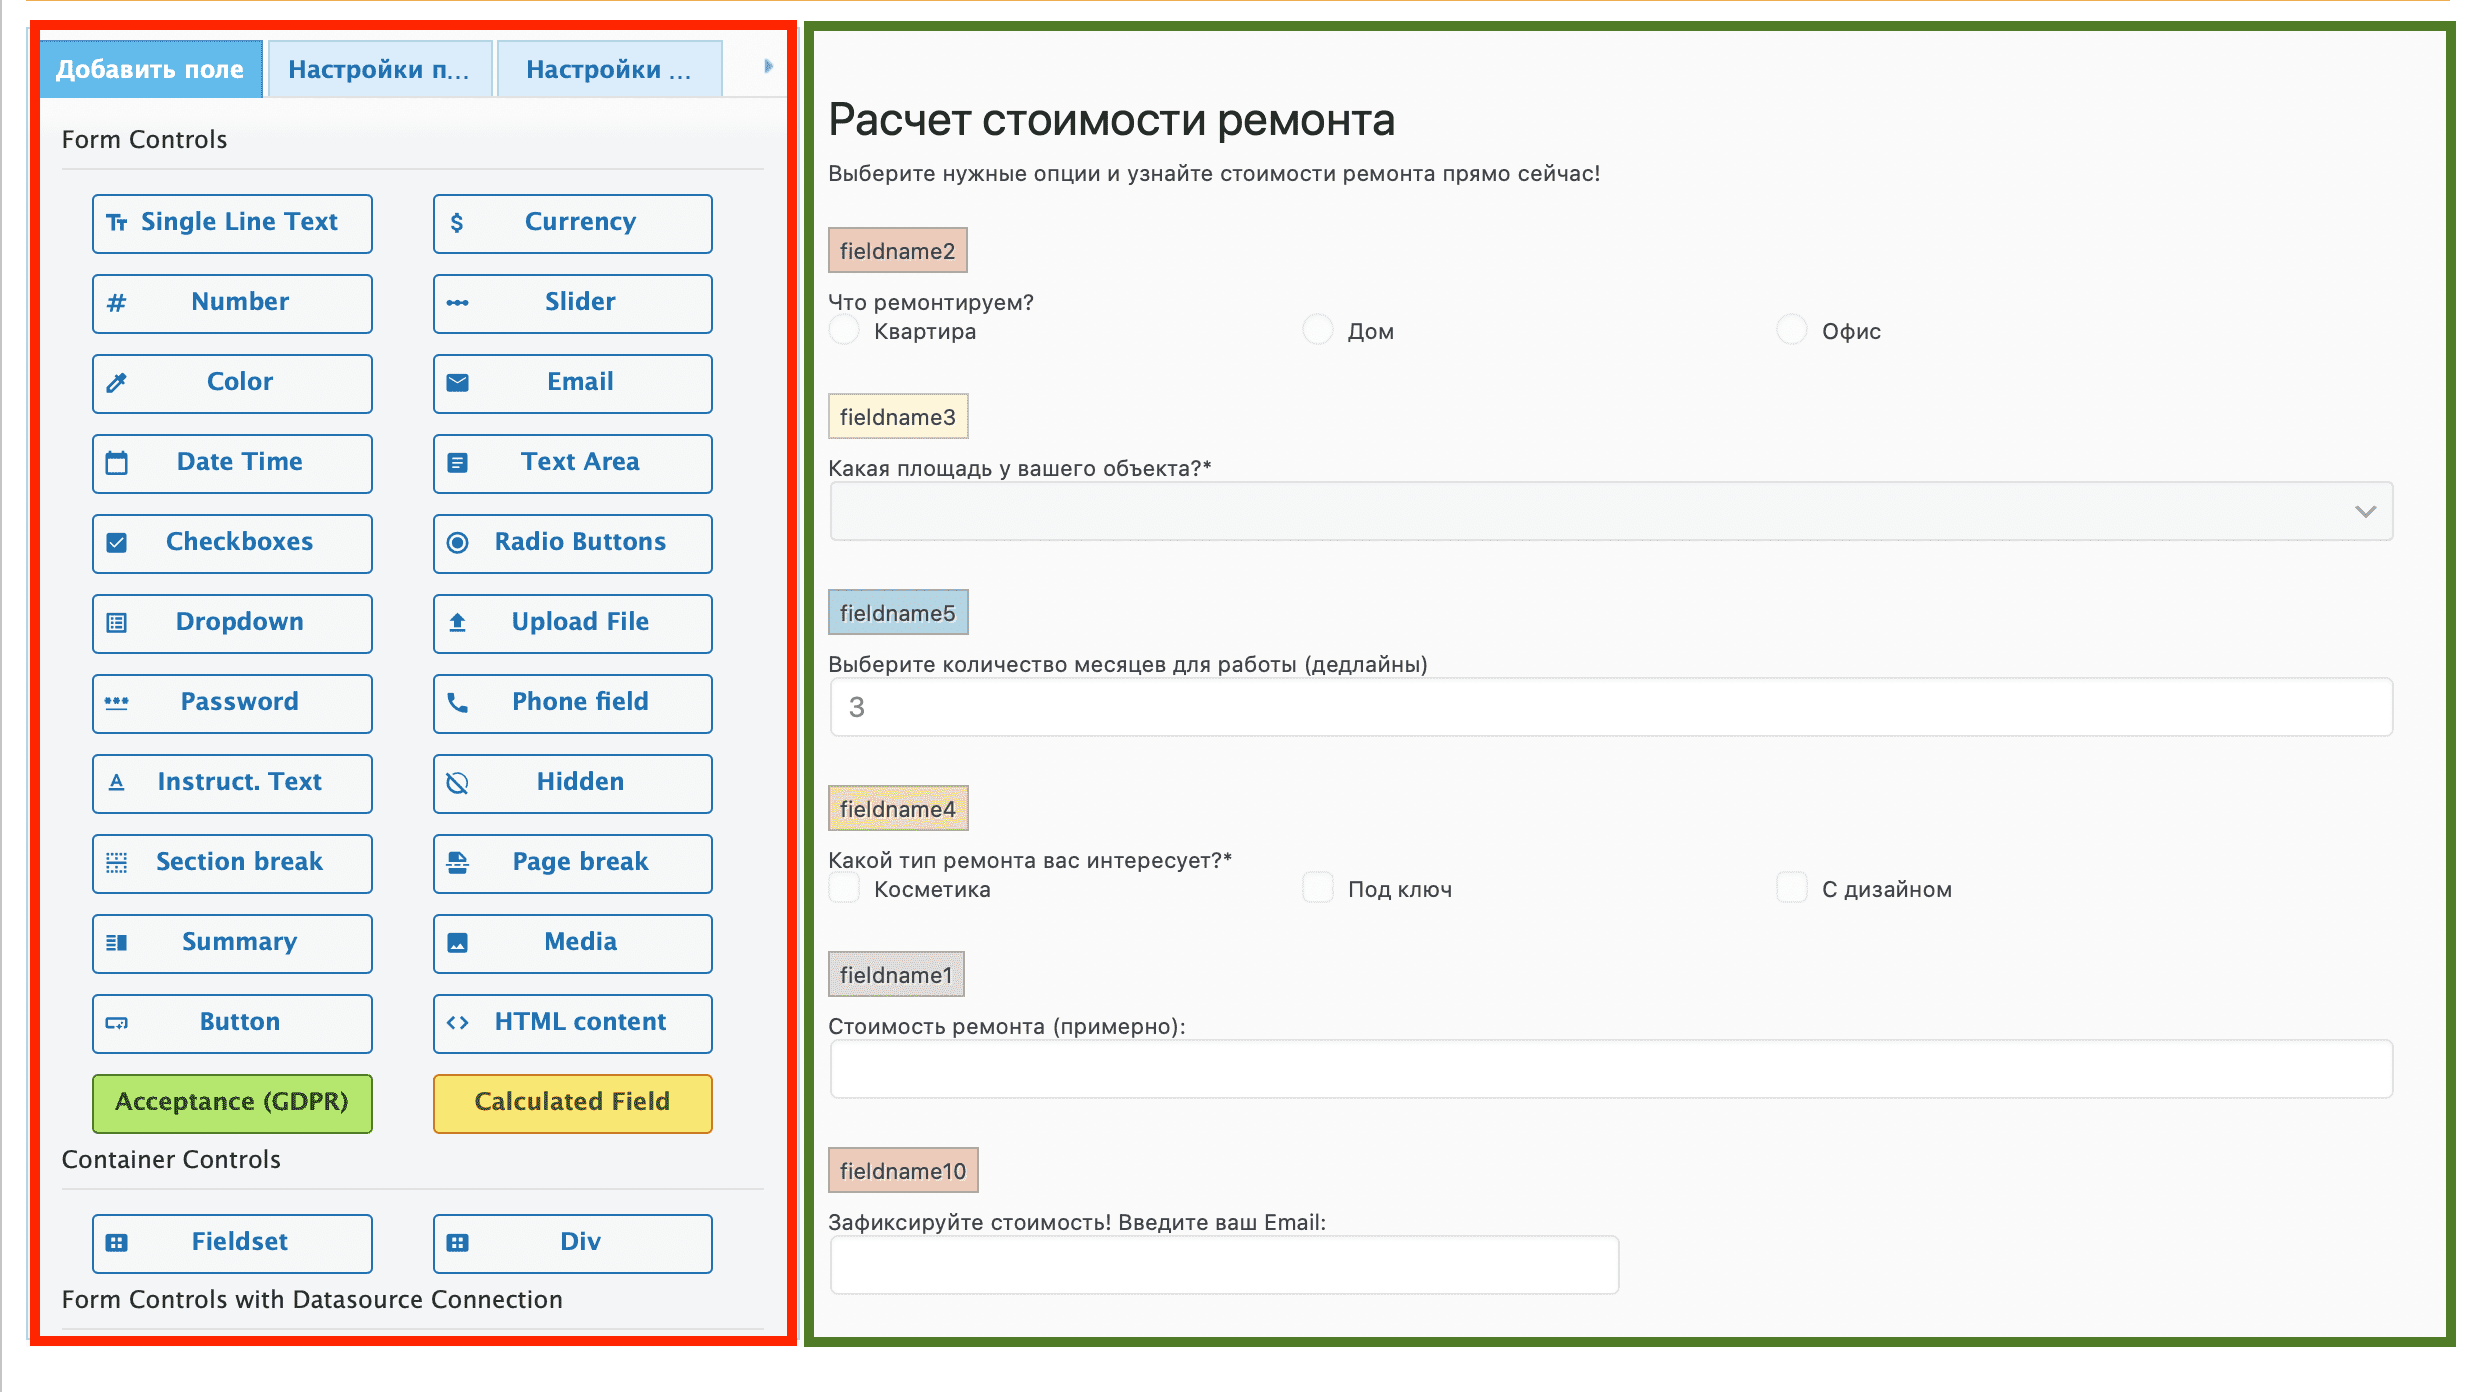
Самое время упомянуть: форма калькулятора создается методом «драг энд дроп», иными словами, простым перетаскиванием элементов внутри рабочей области. При этом к самим внутренним элементам нужно применять свои собственные настройки: заголовок, подпись, значение и значение значения (разберемся с тем что это такое чуть-чуть позже).
Красным на картинке выше выделена область, где можно найти все возможные элементы для добавления в ваш калькулятор. Их действительно много, что означает широкий набор возможностей и не может не радовать. Давайте вкратце разберем основные элементы доступные для добавления в калькулятор:
- Number — это поле с помощью которого вы можете предложить пользователю ввести число, внутри можно настроить диапазон числа (например: от 0 до 100), сделать это поле типом «range» (например: от 10 до 20 в диапазоне от 0 до 100) и добавить другие настройки;
- Checkboxes — добавляет чекбоксы в форму. Можно выбрать их количество, значения и значения значения (например: В чекбоксе можно выбрать «да» и «нет», а их значения будут равны «0» и «1» соответсвенно). Кроме этого чекбоксы можно настроить на одиночный выбор, либо множественный;
- Dropdown — добавляет выпадающий список, настройки внутри похожи на настройки Checkboxes;
- Radio Buttons — добавляет опциональный выбор. В отличие от Checkboxes, тут нельзя настроить множественный выбор. Второе отличие от Checkboxes — внешний вид. При этом остальные настройки остаются такими же как у Checkboxes;
- Slider — аналог ввода числа (упомянутого выше), но в приятном виде слайдера. Настройки такие же как у поля Number;
- Page Break — создает разрыв страницы (калькулятор делится на количество страниц, равное количеству добавленных разрывов). Полезная штука, что бы ваш калькулятор не выглядел бесконечным;
- Summary — это поле которое показывает результат вычислений. Есть несколько настроек: отключить показ результата до полного прохождения всех шагов в калькуляторе, возможность ввести свое число из фронтэнда для пользователя и тд. Самая важная вещь в настройках — это алгоритм вычислений, его мы разберем чуть позже;
- Email, Phone, Button, GDPR — эти элементы нужны, если вы хотите попросить (или предложить) пользователя отправить результат вычислений вам (вместе с контактными данными пользователя).
Вроде бы я не упустил ничего важного (если так — обязательно спросите меня в комментариях к статье). Остальные поля нужны для очень специфичных калькуляторов, которые я не пытался создавать в процессе подготовки материала (и даже представить себе не смог).
Зеленым на картинке выше показа область, где вы собственно и можете упомянутым методом «драг энд дроп» создавать калькулятор. Нажав на элемент внутри, вы можете открыть его настройки. Что бы удалить элемент, вам также нужно нажать на него и в правом нижнем углу элемента нажать на иконку «крестик».
Теперь давайте рассмотрим не самые заметные настройки. Точнее будет сказать не рассмотрим, а просто сделаем небольшое замечание о том, где найти кое-какие дополнительные настройки. Давайте уже перейдем к ним:
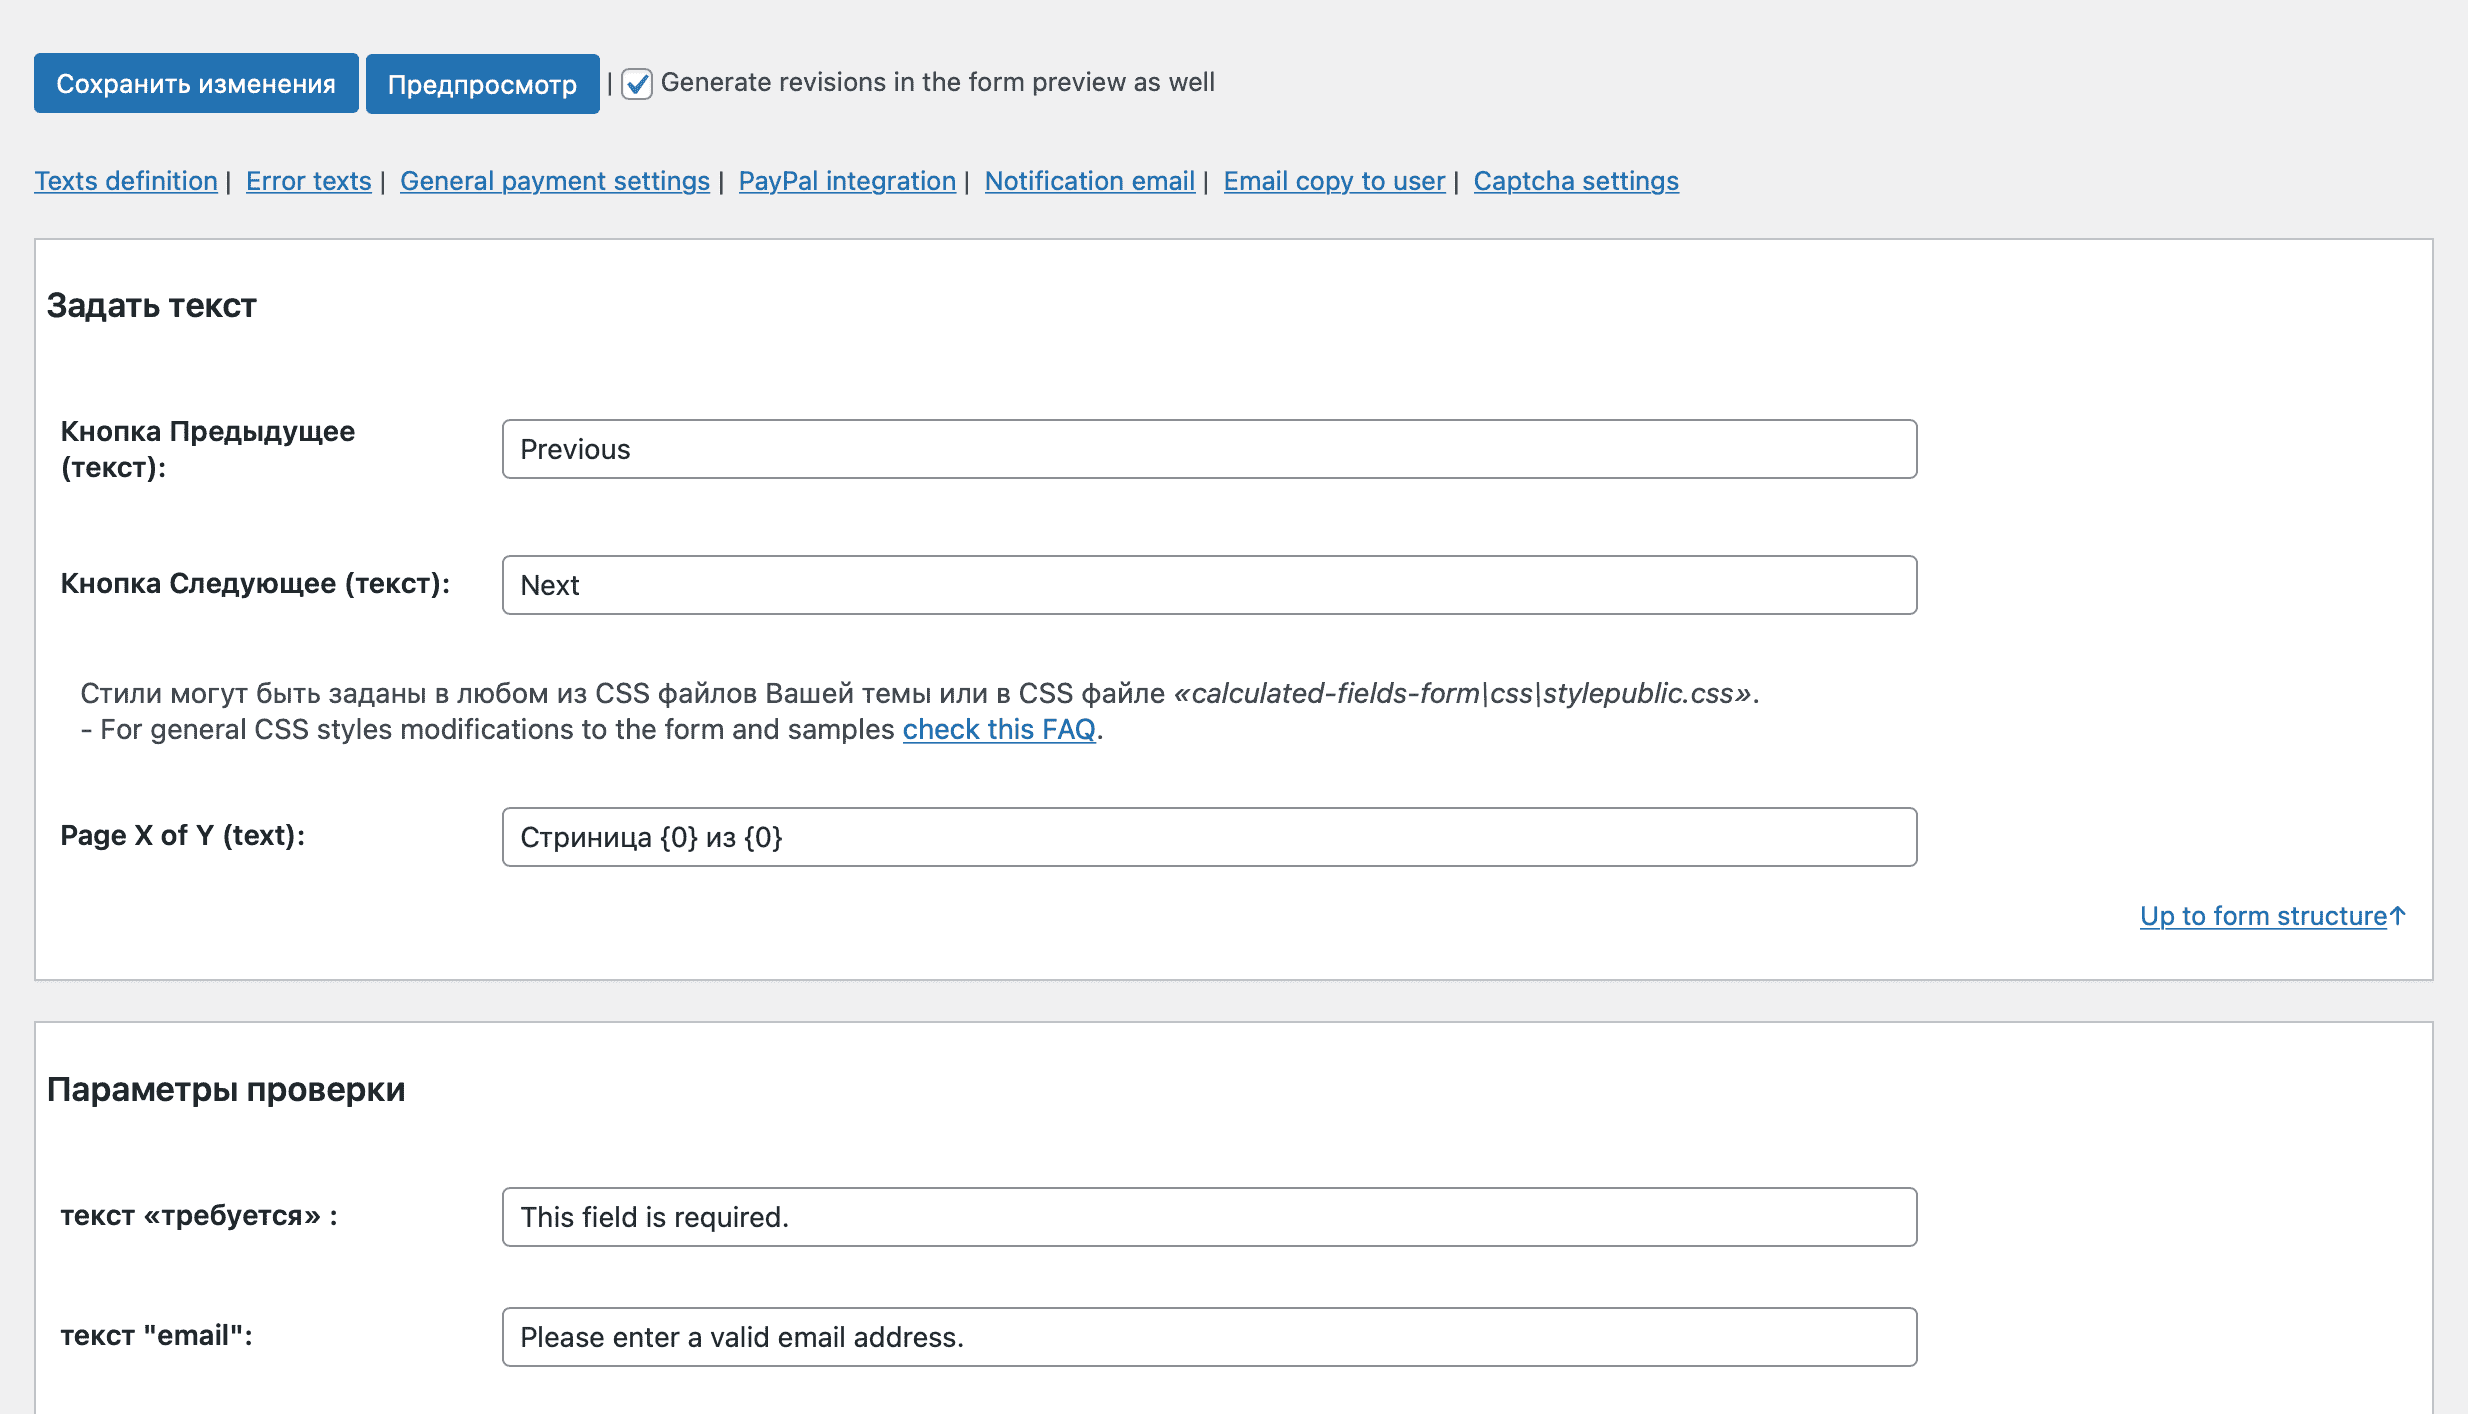
В самом верху (этот скрин сделан ниже предыдущего на странице настроек плагина) находятся кнопки сохранения и предпросмотра. Воспользуйтесь ими, что бы не потерять созданный калькулятор и просмотреть внесенные изменения без выхода со страницы настроек соответсвенно.
Далее у нас вся оставшаяся часть настроек связана с переводом. Это очень удобно и означается что вам не придётся пользоваться специальными плагинами для перевода этого.
В самом же низу страницы находятся платные опции (весь описанный выше и далее функционал бесплатные). Они все связаны с деньгами — добавления оплаты в калькулятор и другие подобные опции.
Как происходит расчет?
Я решил выделить это небольшое пояснение в отдельную главу ввиду ее практической важности. Выше я уже упомянул, что математические операции доступны в элементе «Summary». Без его добавления не появится расчет. Вот так выглядят его настройки:
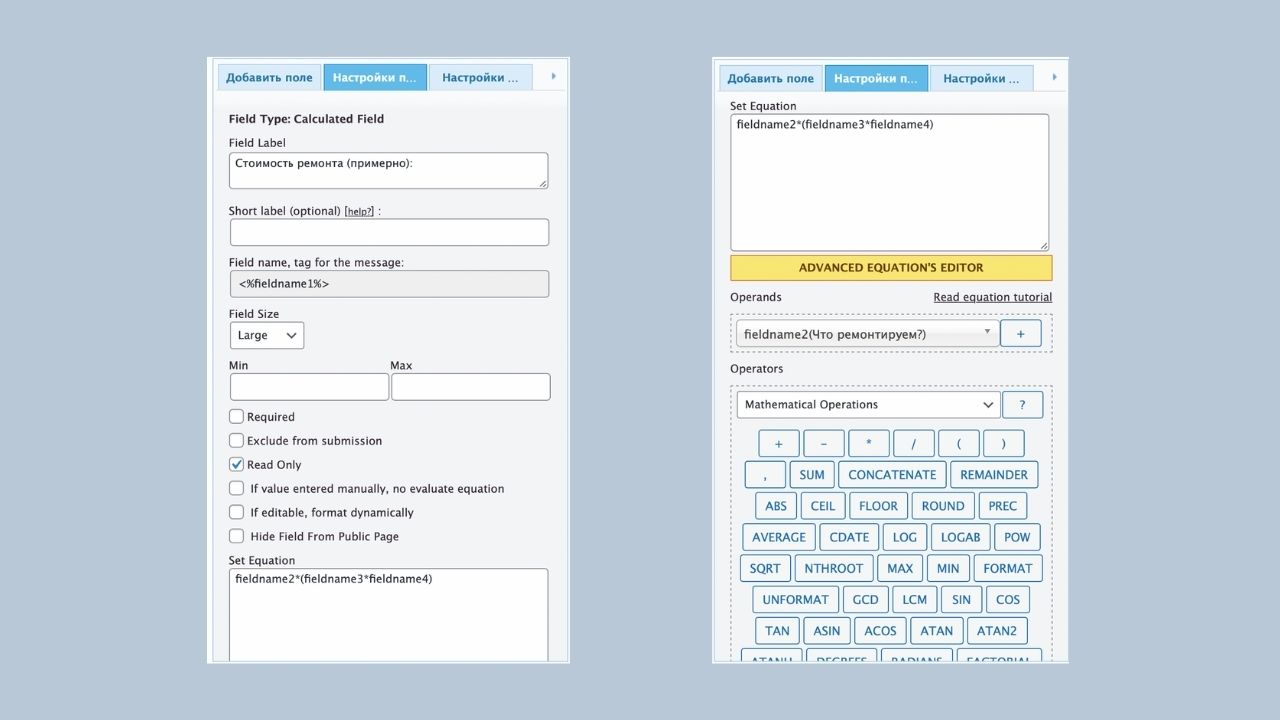
Слева мы можем видеть общие настройки поля по порядку: заголовок, подпись, название поля (техническое), размер, максимально и минимальное значение, чекбоксы кастомизации и в самом низу — поле вычисления. Давайте подробнее разберем последнюю настройку, если ее можно такой назвать.
Для упрощенного понимания: в это поле нам требуется ввести названия других полей (которые вы хотите чтобы участвовали в конечном расчете) и между ними поставить какие-то знаки математических операций. Пример того что мы вписываем в это поле:
- Возьмем за a, b, c и d наши поля;
- Мы хотим что бы все числа умножилась между собой, в этом случае нам требуется вписать такую формулу в поле «Summary»:
- a*b*c*d;
- Никаких равно нам вписывать не нужно, плагин все посчитает сам и выведен на экран во фронтэнде.
Давайте разберем пример со всеми теми же переменными, но только теперь мы хотим множество a и b складывалось с множеством c и d. В этом случае пример будет выглядеть так:
- (a*b)+(c*d)
Таким образом можно сделать вывод: внешний вид математического примера, который нужно вписать в поле «Summary», должен выглядеть также, как и реальный математический пример, где переменные — это названия других полей, которые участвуют в вычислении. Все доступные операции можно увидеть на второй картинке в изображении выше. Большая часть их них понятны:
- * — умножение;
- / — деление;
- + — сложение;
- – — вычитание;
- ( и ) — взятие в скобки;
- ROUND — округление;
- SIN/COS — синус и косинус соответсвенно.
С остальными я предлагаю вам разобраться самим в случае необходимости. И на этом все, надеюсь что видео внизу поможет вам разобраться с остальными нюансами плагина и его настроек. Подписывайтесь на блог, что бы не пропускать свежие статьи и новости (сделать это можно в верху сайдбара справа). Удачи!
Плагин в репозитории
Calculated Fields Form
Видео по статье
The «Calculated Fields Form» plugin allows you to create web forms with calculated fields, whose values are dynamically calculated based on other fields’ values in the web form.
The possibilities are unlimited. For example, you can create forms with financial calculations, date operations to create reservation forms, and calculate the product prices. The plugin includes text operations for editing, translation, or advertising services. There are more advanced operations available such as determining the distance between addresses or generating graphs. The resulting forms are 100% mobile responsive.
The most impressive thing is that you don’t need to hire a programmer to create the forms. With basic knowledge, you will have a professional form in just five minutes.
Creating a form is all visual. The «Calculated Fields Form» plugin includes a form editor with multiple controls. Such as text fields, numeric fields, currency fields, slider controls, email fields, radio buttons, checkboxes, container fields, page breaks to create multipage forms, QR code reader (thanks to the Html5-QRCode project), recording, and most importantly, calculated fields.
The form editor includes a list of controls, a property bar to easily edit field properties, a dashboard where you can design your forms, and the attributes for form configuration. Also, the plugin comes with multiple predefined layouts to change the forms’ appearance. If there are not enough predefined layouts for your project, there is a style editor to customize the form’s design.
The «Calculated Fields Form» plugin includes integration with popular page builders:
- Classic WordPress Editor
- Gutenberg Editor
- Elementor
- Page Builder by SiteOrigin
- Beaver Builder
- WPBakery Page Builder
- DIVI Builder
For other editors, it is possible to insert the form into the pages via its shortcode. Each web form has an associated shortcode that allows you to insert it wherever you want.
Features
Main features:
- Visual form builder with an intuitive and interactive interface.
- Includes general-purpose controls such as radio buttons, checkboxes, menu lists, date fields, slider controls, numeric fields, text currency fields, etc.
- Includes calculated fields whose values result from operations involving other form fields.
Insert as many calculated fields in the form as you need. - Contains an advanced formula editor associated with the calculated fields with syntax highlighting and error detection.
- Features many operations modules: mathematical operations, operations with dates, financial operations, distance operations, text management, operations for calling remote services, etc. The calculated fields can identify numbers and prices within the values of the fields.
- Distributed with several predefined forms that you can use as a starting point for your projects.
- Includes several design templates.
- Supports multi-pages forms by inserting page break controls between fields belonging to different pages.
- Allows the grouping of fields inside container controls (Div and Fieldset).
- Possible to define dependency rules between fields in the form, which is very useful in the design of wizards.
Other features:
- From the plugin configuration page, it is possible to duplicate a form by pressing the «Clone» button associated with it. By cloning a form, you can reuse the work already done.
- Includes a troubleshooting and optimization area.
- Allows you to disable forms in the indexing process to improve the speed of the website.
- Includes a version control in the forms to recover previous versions.
Predefined forms:
«Calculated Fields Form» is distributed with five predefined sample forms.
- Simple Calculator Operations
- Calculation with Dates (bookings with check-in and check-out dates)
- Ideal Weight Calculator
- Pregnancy Calculator
- Lease Calculator
You can clone a sample form to implement your project, or create a new form from scratch.
Calculated Fields Form Commercial
The free version of the «Calculated Fields Form» plugin includes only basic functionality. Other distributions (Professional, Developer, and Platinum) are available with advanced functionalities, such as sending notification emails, integration with payment gateways and external services, controls for database’s connection (and connection to other data sources), complex operations, and many other features.
Features of the Professional version:
- Includes all the features of the free version of the plugin.
- Submit the data collected by the forms and store it on the website for review.
- Send notification emails with the data collected by the form, as well as confirmation emails to the users.
- Integrate the form with PayPal and calculate the amount to be charged through a calculated field.
Payments allow SCA (strong customer authentication), compatible with the new payment services (PSD 2) — Directive (EU). - Export and import forms between different WordPress sites.
- Different mechanisms to protect forms, such as captcha, WordPress nonces, and honeypot fields.
- Associate «Thank You» page with the form, where you can show a summary of the form’s submission.
- Dashboard widget to show the last week’s submissions.
- Cache the forms to increase the rendering speed.
- Export the information submitted by the forms to a CSV file and use it with third-party tools such as Excel, OpenOffice, LibreOffice, or any other spreadsheet editor.
Features of the Developer version:
- Includes all the features of the free and Professional version of the plugin.
- Advanced controls that connect to different data sources (databases, CSV files, posts, taxonomies, user information, and JSON objects).
- Financial operations module.
- Date and time operations module.
- Distance and travel time operations module uses «Google Maps».
- Chart.js operations module to generate charts with the form data. Uses the ChartJS.org library.
- A script that allows the developer to save the data collected by the form in an external database.
Includes add-ons to extend the form features and make use of third-party plugins and external services
- Server-Side Equations add-on: define server-side equations.
- Verification Code add-on: verifies the user’s email by sending him a verification code and blocking the form’s submission until the verification code is entered.
- WooCommerce add-on: integrate forms with WooCommerce products and calculate their prices, dimensions, and weight at the runtime.
- SalesForce add-on: integrate the form with the SalesForce service.
- WebHooks add-on: send the information collected by the form to a WebHook URL to open countless possibilities. By connecting your form to services such as Zapier, Microsoft Flow, IFTTT, Workato, and others, you can connect to hundreds of third-party services (e.g. Zoho CRM, Dropbox, Mailchimp, Google Drive, Facebook, Twitter, etc.).
- User Permissions add-on: control the forms’ access, as well as allowing users to access and edit their data.
- User Registration Form add-on: build a user registration form that captures the user’s basic information and metadata.
- reCAPTCHA add-on: replace the basic captcha with Google reCAPTCHA to protect the forms.
Features of the Platinum version:
- Includes all the features of free, Professional, and Developer versions of the plugin.
- Unique Fields Values add-on: verifies that the values entered by users have not been used in previous submissions.
- Easy Digital Downloads add-on: integrate the forms into Easy Digital Downloads products and calculate their prices at the runtime.
- Google Analytics add-on: generate usage reports in «Google Analytics» for the users’ actions.
- PayPal Pro add-on: enable the payer’s credit card details to be entered directly through the website without any redirection to the PayPal website.
- PayPal Checkout add-on: enable PayPal Checkout integration. Supports more payment methods than PayPal Standard.
- Upload Files add-on: add uploaded files to the media library and extend the file types accepted by WordPress.
- DropBox Integration add-on: copy or move the uploaded files to a DropBox account.
- ip2location add-on: identify the users’ data using the ip2location databases.
- Google Places add-on: transform form fields into autocomplete address fields.
- Autocomplete Places add-on: transform form fields into autocomplete address fields by using the Photon API.
- Signature add-on: convert form fields into «Signature» fields, allowing the users to sign the form with a mouse or touchscreen.
- iCal add-on: send iCal file in the notification emails to import the events into most popular calendars like Outlook and Google Calendar.
- CSV Generator add-on: export the information collected by the form to CSV files and attach these to the notification emails.
- PDF Generator add-on: generate PDF files with the information collected by the forms and attach them to the notification emails.
- WebMerge add-on: integrate the forms with FormStack documents (formerly WebMerge) to generate PDF and Office documents at runtime with the information collected by the web forms.
- Sendinblue Contact add-on: integrate the forms with Sendinblue to add/update contacts with the information collected by the web forms.
- PrintFriendly add-on: generate PDF files with the PrintFriendly API and attach the resulting files to the notification emails.
- Mailchimp add-on: add new members to the MailChimp account.
- Mautic add-on: add new contacts (or update existing ones) into the Mautic Service.
- HubSpot add-on: add/update contacts in HubSpot, using the information collected by the form.
- Emma add-on: add new members to the Emma service.
- Twilio add-on: send notification messages (SMS) in the forms’ submissions.
- MailPoet add-on: add new subscribers to MailPoet’s Mailing Lists (MailPoet versions 2 and 3).
- AffiliateWP add-on: integrate the forms with the AffiliateWP plugin.
- Authorize.Net add-on: accept payments via Authorize.Net from the form.
- Stripe add-on: accept payments via the Stripe payment gateway from the form.
- Skrill Payments Integration add-on: integrate with the Skrill Moneybookers payment gateway.
- TargetPay (iDeal) add-on add-on: integrate with iDeal, the popular Dutch payment method.
- Mollie (iDeal) add-on: accept payments via iDeal.
- RedSys / Servired / Sermepa add-on provides: a secure interface for accepting credit card payments from most banks in Spain.
- PayTM add-on: a secure interface for accepting payments with credit cards, debit cards, net banking, wallets, and EMI.
- SagePay add-on: a secure interface for accepting payments via SagePay.
- Sage Payment add-on: a secure interface for accepting payments through a secure SSL checkout system for both bankcard and virtual check transactions.
- eWay add-on: integrate with eWay payment gateway. eWay is a popular payment gateway in countries like Australia, New Zealand, Singapore, Hong Kong, and Malaysia.
Please keep the plugin updated. Updates contain bug fixes as well as new features. The WordPress directory distributes the updates for the free version of the plugin. But for commercial versions, it would be necessary to register your copy of the plugin. The following link describes the registration process: CLICK HEREThis section mainly contains notes on features of the form builder that are too detailed to include in the main description.
Conditional rules
It is possible to show or hide form fields (dependent fields) based on the options selected in checkbox fields, radio buttons, the options selected in dropdown menus, or the result of calculated fields.
The value of a dependent field is zero when it is hidden/disabled. The plugin excludes the disabled form fields from the submission.
Additional details about the use of dependencies
Predefined values
The predefined values in the fields have two possible uses:
1- To fill the field by default. This makes it easier for the end-user to enter values.
2- Hint of the values to be entered in the field (like «Enter your name»). To use the predefined value as a placeholder, you must tick the «Hide predefined value on click» checkbox. The value will disappear once the user starts filling in the field. The calculated fields’ equations ignore placeholders.
The «User Instructions» attribute
The «User instructions» attribute in the field settings allows you to instruct the user on how to fill in the field. By default, the instructions appear as smaller text on the public website. But they can be configured as tooltips.
Adding CSS layout keywords
The «Add CSS layout keywords» attribute in the fields settings allows you to apply CSS styles to fields. You must only enter the name of the CSS class names, and not their definitions.
You can define the CSS classes via the «Customize Form Design» attribute in the «Form Settings» tab. This attribute contains a CSS editor with syntax highlighting and error checking.
If you want to assign several class names to the field, separate them by space characters.
The plugin includes multiple predefined classes that you can assign to the form fields.
More information about the form’s design can be found by reading the following post in the plugin’s blog:
Customizing the form’s design
The classes listed below allow you to align two, three, or four fields on the same line:
column2
column3
column4
For example, if you want to put two fields on the same line, give both fields the class name «column2».
There are other variants for displaying several fields on the same line, such as container fields (Div or Fieldset). Container fields allow you to select the number of columns in your configuration. The following post describes all the alternatives for positioning the fields in the form:
Formatting the form (distributing the fields in columns)
Multi-page form
To create multi-page forms, you must insert «Page break» controls between fields belonging to different pages.
When the user presses the «Next Page» button, the plugin validates the fields in the current form. If there is any validation error (such as an unfilled required field), the plugin stops the «Next page» action.
Hidden calculated fields
Calculated fields include a checkbox in the configuration that allows them to be hidden from the public website. This feature is essential in those fields that are used to calculate intermediate values or when we want to show the results only in emails or thank you pages.
Equation / Formula format for calculated fields
Below, some possible formulas are included as examples, but the possibilities are endless.
-
With simple mathematical operations:
fieldname1 + fieldname2 fieldname1 * fieldname2 fieldname1 / fieldname2 fieldname1 - fieldname2 fieldname1 - fieldname2 -
With mathematical operations involving multiple fields and grouped fields:
fieldname1 * (fieldname2 + fieldname3) -
With rounding operations. Round the result to two decimal places:
PREC(fieldname2 / fieldname3, 2) -
There are infinite number of formulas that can be created using complex structures. For example, the following formula includes conditional statements:
(function () { if (100 < fieldname3) return fieldname1 + fieldname2; if (fieldname3 <= 100) return fieldname1 * fieldname2; })(); -
For complex formulas/equations you must use the function format with return statement to return the result to the calculated field:
 (function () {
    var result = 0;
    /* Your code here */
    return result;
}) ();
Operations and operators to use in equations/formulas
One of the «Calculated Fields Form» strengths is the ability to use any valid JavaScript code to implement the equations/formulas.
However, the plugin includes a wide variety of operations and operators to simplify the development process.
Mathematical Operations and Operators
Conditional Operations
Field Handling Operations
Operations for interacting with external services
Operations for handling URLs and query strings
In addition to the operation modules listed above, the Developer and Platinum versions of the plugin include additional modules:
Date Time Operations
Financial Operations
Distance and Travel Time Operations
Operations to generate charts
Controls available in the form generator of the «Calculated Fields Form»
The complete list of controls is available from this link: CLICK HERE
Create JavaScript variables from parameters received by «GET» or «POST», «SESSION» variables, or «COOKIES» to use in the equations
The plugin includes the shortcode [CP_CALCULATED_FIELDS_VAR] to generate JavaScript variables from parameters received by «GET» or «POST», «SESSION» variables, or «COOKIES»:
[CP_CALCULATED_FIELDS_VAR name="..."]
In the shortcode, you must replace the «…» symbols with the name of the parameter or variable. It will be the same name for the JavaScript variable.
For example:
[CP_CALCULATED_FIELDS_VAR name="varname"]
You can use the variables generated through the shortcode [CP_CALCULATED_FIELDS_VAR] in the formulas of the calculated fields: fieldname1*varname
The complete list of parameters accepted by the variables shortcode is available at the following link: CLICK HERE
Tips for calculating prices
One of the most frequent uses of our plugin is for price calculation. When displaying the price of a product, you may want to split the form into two pages. The first page would request the information needed to calculate the price, and the second page would include the calculated field with the final price. Also, you could use the «Instruct. Text» fields to indicate the terms, conditions, and validity period of the offer.
Note that you can make the «Instruct. Text» fields dependent on the calculated value. This allows you to vary the text displayed to the user depending on the calculated price, as the terms, conditions, or offers often depend on the transaction amount.
ClassicPress
This plugin is compatible with ClassicPress.
Add-ons
The add-ons are only distributed with the Developer and Platinum versions of the plugin.
The plugin lists the add ons in the «Add-ons area» of the settings page. To enable the add-ons, you must tick their corresponding checkbox and press the «Activate/Deactivate Add-ons» button.
Server-Side Equations add-on — included in the Developer and Platinum versions of the plugin
Define equations with PHP code on the server-side. The calculated fields call the server-side equations via AJAX.
CLICK HERE for additional information
Verification Code add-on — included in the Developer and Platinum versions of the plugin
The «Verification Code» add-on allows verifying the users’ emails by sending a verification code and blocking the form’s submission until a valid code is entered.
CLICK HERE for additional information
Unique Fields Values add-on — included in the Platinum version of the plugin
The «Unique Fields Values» add-on verifies that the values entered by users have not been used in previous submissions. It allows to enter simple and complex verification rules (one or multiple fields separated by comma symbols).
CLICK HERE for additional information
WooCommerce add-on — included in the Developer and Platinum versions of the plugin
Integrate the forms created by the «Calculated Fields Form» with WooCommerce products and calculate their prices, weights, dimensions, and more at the runtime.
CLICK HERE for additional information
Easy Digital Downloads add-on — included in the Platinum version of the plugin
Integrate forms created by the «Calculated Fields Form» with the Easy Digital Downloads products, and calculate their price dynamically at the runtime.
CLICK HERE for additional information
SalesForce add-on — included in the Developer and Platinum versions of the plugin
Add new leads to a SalesForce account using the data collected by the forms.
CLICK HERE for additional information
WebHook add-on — included in the Developer and Platinum versions of the plugin
Post the information collected by the forms to WebHook URLs.
Through connecting the forms created by the plugin with services like Zapier, Microsoft Flow, Workato, or IFTTT (and many others), you will have access to hundreds of third-party services, like Zoho CRM, Dropbox, Mailchimp, Evernote, Google Drive, Facebook, Twitter, and more than 300 services https://zapier.com/zapbook/apps/, https://flow.microsoft.com/, https://ifttt.com/discover
CLICK HERE for additional information
User Permissions add-on — included in the Developer and Platinum versions of the plugin
Control access to forms. Access can be restricted to registered users, users with certain roles, or to specific users.
The add-on adds a new shortcode to the plugin to list the data submitted by the logged-in user (it is possible to insert the new shortcode into the user’s profile) and assign user permissions to edit their information or delete an entry.
Limit the number of submissions (e.g. one submission per form/user).
CLICK HERE for additional information
User Registration Form add-on — included in the Developer and Platinum versions of the plugin
Build user registration forms. The form can collect basic user information and metadata required by other plugins.
CLICK HERE for additional information
reCAPTCHA add-on — included in the Developer and Platinum versions of the plugin
Protect forms using Google reCAPTCHA instead of the basic captcha distributed with the plugin, as reCAPTCHA is more visual and intuitive than traditional captchas.
CLICK HERE for additional information
Google Analytics add-on — included in the Platinum version of the plugin
Generate usage reports in «Google Analytics» for the users’ actions.
CLICK HERE for additional information
PayPal Pro add-on — included in the Platinum version of the plugin
Allow the user to enter their credit card details directly on your website without redirecting them to the PayPal website. Once the user has filled the form fields and clicked the submit button, the payment is processed and the posted data (excluding the credit card information) is stored in the WordPress database.
CLICK HERE for additional information
PayPal Checkout add-on — included in the Platinum version of the plugin
Implements the PayPal Checkout integration. Supports more payment methods than PayPal Standard.
CLICK HERE for additional information
Upload Files add-on — included in the Platinum version of the plugin
Every commercial version of the plugin includes the «Upload File» control to upload files from the form. However, the «Upload Files» add-on allows the uploaded files to be added to the Media Library and be accessed from the pages and posts of the website.
WordPress restricts the file types that can be uploaded. The «Uploads Files» add-on allows the list of accepted files to be extended.
CLICK HERE for additional information
DropBox Integration add-on — included in the Platinum version of the plugin
Copy or move files uploaded through the forms to a DropBox account.
CLICK HERE for additional information
ip2location add-on — included in the Platinum version of the plugin
Use the ip2location databases to identify additional user information based on their IP. Address such as country, city, coordinates, weather station, time zone, ZIP code, etc.
CLICK HERE for additional information
Google Places add-on — included in the Platinum version of the plugin
Transform fields into autocomplete address fields calling the Google Places API.
CLICK HERE for additional information
Autocomplete Places add-on — included in the Platinum version of the plugin
Transform fields into autocomplete address fields by calling the Photon API.
CLICK HERE for additional information
Signature add-on — included in the Platinum version of the plugin
Transform fields into «Signature» fields to allow the users to sign the form with their mouse or touchscreens.
CLICK HERE for additional information
iCal add-on — included in the Platinum version of the plugin
Send the users iCal files attached to the confirmation emails to import events into the most popular calendars like Outlook and Google Calendar.
CLICK HERE for additional information
CSV Generator add-on — included in the Platinum version of the plugin
Export the information collected by the form to CSV files and attach them to the notification emails.
CLICK HERE for additional information
PDF Generator add-on — included in the Platinum version of the plugin
An experimental add-on that generates PDF files with the information collected by the forms and attaches them to the notification emails.
CLICK HERE for additional information
WebMerge add-on — included in the Platinum version of the plugin
Integrate the forms with the FormStack Documents service (formerly WebMerge) to generate PDF and Office documents with the information collected from the form.
CLICK HERE for additional information
Integrate the form with the Silverpop service (now: IBM Watson Campaign Automation) CLICK HERE for additional information
Sendinblue Contact add-on — included in the Platinum version of the plugin
It adds/updates Sendinblue contacts with the information collected from the form.
CLICK HERE for additional information
PrintFriendly add-on — included in the Platinum version of the plugin
Send the information collected by the forms to PrintFriendly and attach the resulting PDF files to the notification emails.
CLICK HERE for additional information
Mailchimp add-on — included in the Platinum version of the plugin
Add new members to the MailChimp lists with the information collected by the form.
CLICK HERE for additional information
Mautic add-on — included in the Platinum version of the plugin
Add/update contacts in the Mautic service with information collected by the forms.
CLICK HERE for additional information
HubSpot add-on — included in the Platinum version of the plugin
Add/update HubSpot contacts with information collected by the forms.
CLICK HERE for additional information
Emma add-on — included in the Platinum version of the plugin
Connect the forms to the Emma service to add new members to Emma groups.
CLICK HERE for additional information
Twilio add-on — included in the Platinum version of the plugin
Send notification messages (SMS) through Twilio in the form’s submissions.
CLICK HERE for additional information
MailPoet add-on — included in the Platinum version of the plugin
Adds subscribers to MailPoet Mailing Lists (MailPoet versions 2 and 3).
CLICK HERE for additional information
AffiliateWP add-on — included in the Platinum version of the plugin
Integrate the forms with the «AffiliateWP» plugin.
CLICK HERE for additional information
Authorize.Net add-on — included in the Platinum version of the plugin
The Authorize.net Server Integration Method (Authorize.net SIM) is a hosted payment processing solution that handles all of the steps in processing a transaction.
CLICK HERE for additional information
Stripe add-on — included in the Platinum version of the plugin
The Stripe Payments add-on (www.stripe.com) provides a way to accept all major cards from customers around the world.
CLICK HERE for additional information
Skrill Payments Integration add-on — included in the Platinum version of the plugin
An interface for accepting payments through secure pages.
You can accept cards, more than 20 local payment methods, and over 80 direct bank transfer connections with a single integration.
CLICK HERE for additional information
TargetPay (iDeal) add-on — included in the Platinum version of the plugin
Integrate with iDeal, the most popular Dutch payment method. The integration is made via TargetPay: https://www.targetpay.com/info/ideal?setlang=en
CLICK HERE for additional information
Mollie (iDeal) add-on — included in the Platinum version of the plugin
Integrate with iDeal, the popular Dutch payment method.
CLICK HERE for additional information
RedSys / Servired / Sermepa add-on — included in the Platinum version of the plugin
A secure interface for accepting credit card payments through most banks in Spain (Sabadell, Banco Popular, BBVA, Santander, Bankia-Caixa, Bankinter, etc.)
CLICK HERE for additional information
PayTM add-on — included in the Platinum version of the plugin
A secure interface for accepting payments through credit cards, debit cards, net banking, wallets, and EMI. With over 100 million PayTM users in India, your customers will appreciate the option to pay with their trusted PayTM Wallet.
CLICK HERE for additional information
SagePay add-on — included in the Platinum version of the plugin
A secure interface for accepting payments through SagePay.
CLICK HERE for additional information
Sage Payment add-on — included in the Platinum version of the plugin
An interface for accepting payments through a secure SSL-checkout system for both bank cards and virtual check transactions. All authorized and approved transactions will be delivered to your current bank card and/or virtual check batches, viewable within the Virtual Terminal for order processing and settlement.
CLICK HERE for additional information
eWay add-on — included in the Platinum version of the plugin
eWay is a popular payment gateway in countries like Australia, New Zealand, Singapore, Hong Kong, and Malaysia. The eWay add-on implements the integration with the «eWay Responsive Shared Page» for accepting credit card payments, even Paypal and digital wallets via eWay.
CLICK HERE for additional information
Одним из наиболее распространенных типов плагинов в каталоге WordPress.org является конструктор форм. Из форм гравитации, форм кальдеры, клубнелуковиц ниндзя, Отправить запрос 7 и т. д., выбор у вас почти безграничен. Однако не все конструкторы форм одинаковы. Каждый разработчик фокусируется на немного различном пользовательском опыте и наборе функций. Это затрудняет выбор оптимального варианта. Если вы ищете плагин с условной логикой, который может обрабатывать столько же сложных формул, сколько и вычислений, Вычисляемые поля формы выделяется среди других.

Вычисляемые поля формы
Форма Calculated Fields не только выделяется своей полезностью, но также является одним из лучших плагинов, совместимых с Gutenberg (редактором блоков WordPress), расположенным в репозитории плагинов. Одно только это стоит проверить, потому что, хотя редактор блоков включен по умолчанию, не все плагины, которые вы найдете, интегрированы в новую экосистему.
Плагин также полностью совместим с классическим редактором (и конструкторами страниц, такими как Дива, для начала), поэтому независимо от того, как вы создаете свой сайт, форма вычисляемых полей будет работать с ним. Мы упоминаем об этом, потому что вы не всегда уверены, что данный плагин будет работать повсеместно. Итак, поскольку CFF был протестирован с редактором блоков, классическим редактором и построителями страниц, мы подумали, что об этом стоит упомянуть.
Некоторые из функций, о которых стоит упомянуть, — это именно то, что вы можете рассчитать с помощью плагина. Поскольку это не просто плагин для Контактная форма, у вас будут очень конкретные варианты использования. Некоторые из наиболее важных функций включают в себя
- конструктор визуальных форм
- представление и хранение баз данных
- условные и логические правила
- неограниченное количество вычисляемых полей
- принять оплату из самой формы (через PayPal) после выполнения необходимых расчетов
- несколько типов полей (радио, раскрывающийся список, флажок и т. д.)
- зависимые поля
- многостраничные формы
- несколько предопределенных шаблонов
- сортировать по значению
- отключить форму для поисковых систем
- простые или расширенные варианты расчета (обычные математические и троичные операторы)
Конфигурация
Установка SBB проста. Доступ к репозиторию WordPress плагины.org, скачать плагин SBB , затем загрузите его из пункта меню Плагины — Добавить новые в панели управления WP. После этого вы заметите новую опцию формы рассчитанные поля в вашей боковой панели.
 Если вы заметили, что из 4 представленных вам вариантов, только один является действительной ссылкой на настройки. Ссылка на документации открывается на веб-сайт разработчика и базу знаний. Ссылкаонлайн-помощь позволяет получить доступ к форуму поддержки WP.org. Обновление … ну нужно обновление Niveau перейти от бесплатной версии к премиум-версии.
Этот плагин, обладающий такой большой мощностью, довольно прост в использовании, требуется настроить только одну страницу настроек / параметров. Это действительно впечатляет. Конечно, фактические параметры устанавливаются форма за формой, но многие плагины вычисляемых полей могут быть ошеломляющими, и первоначальная простота этого делает его доступным.
Создать формы

Бесплатная версия (о которой мы поговорим здесь) поставляется с образцами форм 5, из которых вы можете дублировать и редактировать свои собственные спецификации или, если они окажутся нужными, использовать как есть.
- Простые операции
- Расчет с датами (для календаря бронирования и т. Д.)
- Калькулятор идеального веса
- Калькулятор беременности
- Арендный калькулятор
Вы видите каждый из них сразу после загрузки этой страницы. Вы можете добавить короткий код прямо в любое место, где отображаются короткие коды, и вы занимаетесь бизнесом. Вы также можете нажать Cloner дублировать форму и изменять уже выполненные расчеты с помощью кнопки Параметры .
Под этим списком находится кнопка Новая форма , который при использовании просто добавляет новую опцию в конец списка форм выше.
Независимо от того, сколько форм вы хотите, просто пометьте
Редактирование форм
Какую бы форму вы не хотели редактировать, нажмите Параметры переводит вас в визуальный редактор этой формы. Поскольку мы начали новый, мы собираемся взглянуть на чистый холст.
 Все, что вам нужно сделать, это нажать на элемент слева, и он появится справа. На этом этапе вы можете перетащить его в желаемое место формы.
 Щелкните в новом поле справа. Вкладка слева изменится с Добавить поле для настройки поля .
 Каждое поле имеет немного другую страницу параметров, но универсальная страница ном du поле, метка для сообщения . Не говоря уже о тупой метке, это переменная, которую вы вставите для ссылки на значение этого поля во всех добавляемых вами вычислениях.
Когда вы закончите настройку всех необходимых вам полевых настроек, Параметры du формаобъясняется достаточно хорошо. Вы настроите общие параметры формы, такие как выравнивание, сохранение файлов cookie, создание шаблона, CSS и т. Д.
 Когда вы достигнете этой точки (или в любое время раньше), Вы должны нажать Сохранить изменения . Если вы этого не сделаете, вы проиграете Toute настройки, которые вы сделали. В конструкторе форм вычисляемых полей нет автоматической записи . Итак, что бы вы ни делали, нажимайте Сохранить изменения .
Это вернет вас на главную страницу, но вы сможете снова быстро отредактировать. Это намного проще, чем потерять свой прогресс при настройке расчета. (В этом случае учитесь на наших ошибках.)
Дополнительные параметры формы — текст и проверка
Под кнопкой Сохранить изменения, вы найдете вторичный набор параметров и опций формы.

Многие люди будут очень мало использовать эти настройки. Вы настраиваете текст метки под Определите тексты , выбирая, что пользователи видят на кнопках и нумерации страниц Прецеденты et после .
С параметры проверки , вы определяете, нужно ли вам проверять записи (это настоящее электронное письмо? Он поместил текст в числовое поле?) или нет. Если вы решите, что хотите использовать проверку (скорее всего, так и сделаете), вы можете использовать этот раздел для редактирования альтернативного текста, который увидят ваши пользователи. Как правило, текст по умолчанию работает и сообщает пользователю, какая информация действительна для расчета.
В некоторых случаях вам может потребоваться конкретизация или использование жаргона или отраслевых терминов, и именно тогда это поле настроек становится наиболее полезным. Однако, скорее всего, вы не будете его использовать и, вероятно, ничего не должны менять. Это классный случай если не сломано, не чини .
Конечный продукт
Найти? Продукт? Это математическая шутка. Потому что мы делаем расчеты.
В любом случае, когда вы нажмете «Сохранить» и увидите свою форму во всей красе, вы должны увидеть что-то похожее на это в конструкторе форм:

И как-то так на живом сайте:

Последняя форма выше использовала шаблон 2, определенный на вкладке Параметры du форма .
Используйте с Гутенбергом
Выше мы упоминали, что форма вычисляемых полей совместима с редактором блоков. Поэтому мы хотели уделить немного времени, чтобы показать вам, как легко использовать их вместе. Для начала вам все равно нужно будет выполнить те же шаги, что и выше, чтобы создать формы и получить вычисления в нужных местах.
После этого откройте в редакторе блоков пост или страницу, в которую нужно вставить форму. Нажмите кнопку с кружком +, чтобы добавить новый блок, перейдите к разделу Форма Расчетные поля И нажмите Вставить SBB .

Затем посмотрите правую часть экрана под настройками блокировки. Вы можете использовать раскрывающееся меню Виды для выбора нужной вам формы. Затем блок CFF будет обновляться в реальном времени.

Чтобы внести изменения в форму, вы всегда должны использовать построитель визуальных форм выше. Но вставка и стилизация с помощью редактора блоков настолько проста.
Резюме
Как видите, плагин Formular Fields Form может делать невероятно мощные вещи. Даже в бесплатной версии. Если вы решите выполнить обновление, вы получите еще более надежные функции, но для многих бесплатная версия будет достаточно мощной, чтобы выполнять все вычисления и условия, необходимые их пользователям. Как мы уже говорили выше, в репозитории есть почти бесконечное количество плагинов форм, но мы считаем, что вычисляемая форма поля один из лучших вариантов . Особенно, если вы не покупаете строителя Контактная форма.
Приветствую читателей, в статье про калькулятор для вордпресс сайтов. Владельцам коммерческого ресурса на wordpress необходим простой в настройке калькулятор стоимости продукции. Протестировал около десятка вариантов, я разочаровался что не могу найти простое решение проблемы, потому что:
- Встраивание функции через изменение function сложное, нестабильные и неудобное
- Платные просят помесячную оплату
- Сервисы часто отказывают в работе
- Бесплатные лагают
Бесплатный плагин WPcalc
Обратившись к хорошему знакомому, посоветовал для вордпресс плагин WPcalc. Это единственное вменяемое решение, остальное вытягивание денег. Устанавливаете и переходим к настройке первого калькулятора на сайте вордпресс.
Основная настройка
Сделаем для расчёта стоимости линолеума, то есть длину умножаем на ширину и на цену 1 квадратного метра за определённый сорт. Заходим в wpcalc и добавляем новый пункт, тут же появляется первое поле зададим длину.

- Сам WPcalc
- Для добавления нового калькулятора нажимаем Add New
- пишем название (на сайте не отображается)
- Заголовок раздела, если не хотите его отображать снимите галочку (первый длинна второй ширина)
- Тип отображения их пять: checkbox, радио кнопка, ввод числа, селект (выбор из предложенного) и вывод результата
- Длинна поля в долях. Например если хотим сделать чтобы дина и ширина были в одну строчку, выставляем у обоих 1/2 то есть на каждое поле по половине пространства.
- Правило, нам нужно number (числа), если будут введены буквы, то калькулятор выдаст ошибку
- Placeholder заполняет поле когда в нём нет значений. Value уже введённое значение, что даёт неудобство, пользователю приходится стирать и печатать свои значения, не советую заполнять
- Add new field, добавляет новое поле в вордпресс.
С цифровыми полями разобрались теперь надо прописать тип линолеума и цену за каждый квадратный метр. Для этого жмём кнопку Add new field и добавляем, например, «выбор расцветки»

- Для выбора задаем параметр select
- Value — то что будет считаться в калькуляторе, Text — отображаемый текст
- какой пункт будет выделен по умолчанию
- Чтобы добавить ещё форму (черный например), жмём эту ссылку
Все параметры задали, вывод и подсчёт производиться добавлением нового Field, просто надо выставить result, смотрим ниже.

В параметре Item type выставляем Result. В разделе Formula вводим формулу для расчёта, у нас все три значения перемножаются, пример станет такого вида field_1*field_2*field_3. Чтобы вывести посчитанное на экран нужно применить комбинацию {result} в поле результата, я для примера выставил ещё пару строк. В общем калькулятор настроен и готов к работе, в правой колонке сохраняем результат и копируем шорт код.
При вводе формулы элементы помечаем с нижним подчеркиванием и номером раздела. На странице инструмента в wordpress.org есть дополнения по применению математических операторов.

Идём в любую запись или страницу вордпресс, и в удобном месте вставляем шорткод. Перейдя на сайт увидим результат работы. Подсчёт идёт автоматически, при корректном заполнении всех форм.

Можно рассчитать любую задачу, например стоимость работ по отделке помещения, так же рассчитать площадь и умножить на цену квадрата. Все простые математические действия доступны.
Советуем прочитать:
- Как сделать пагинацию в вордпресс
- Создание календарей
- Без кодирования вставляем таблицы в статьи
Внешний вид
У данного инструмента есть настройка визуально части, перейдя в раздел style, найдёте несколько параметров исполнения, которых хватит для создания отличного и красивого дизайна, разбирать не будем, всё понятно интуитивно.

Остальные плагины расчёта услуг
Приведён список других инструментов для расчёта различных услуг:
-
Calculated Fields Form, сложен в освоении и продвинутые функции доступны в платной версии. Поддерживает процедуры с процентами и сложными многоступенчатыми формулами. Его разбор в видео.
-
Responsive Mortgage Calculator, направлен на расчёт ипотечных, кредитный и банковских услуг, заявляет о поддержке elementor
- Wp-crestor-calculator, старый плагин, которому на момент написания статьи уже 5 лет на русском языке, хорошо подойдёт для измерения стоимости строительных работ.
У наших читателей возникали вопросы, как сделать калькулятор подсчёта стоимости доставки. Скажу честно таких вариантов нет, есть для woocommerce, от компании СДЭК и почты России. Но под woocommerce не корректно поддерживается РФ, а от транспортных компаний, сырые, недоделанные и направленные на принуждении использовать их услуги.
Онлайн инструмент со своими характеристиками
Онлайн калькуляторы, сейчас существует два варианта, остальные не дотягивают, ограничиваясь несколькими характеристиками. Не дают гибкости и уверенности что работоспособности.
Calccreator популярен для ландшафтного дизайна
Знаменитый сервис calccreator.com не предлагает интеграции с их сервером, большая направленность на подсчёт строительных и ландшафтных работ. Настраиваете необходимые поля, по внешнему виду, функционалу и формулам. Далее скачиваем готовый скрипт и подсоединяем его на ресурс с любой CMS в том числе и wordpress. Отмечу что в платной версии раз в 10 больше возможностей.
 Но у calccreator умеренная цена, оплачиваете период пользования, можете создать хоть 1000 калькуляторов, но по окончании срока подписки, они не блокируются, а продолжают действовать и доступны для изменения.
Ucalc умеет считать время
Поставил ucalc на второе место, из-за агрессивного использования и вытягивания денег из пользователей. Очень скудный бесплатный интерфейс, не дающий нормально настроить подсчёт, с ограничением математических функций. Однако есть отлично сделанный плагин для вордпресс, связывающий аккаунт на сервисе с сайтом. Имеет отличительный подсчёт времени, которого нет у остальных. Есть настройки внешнего вида полей с ползунами, то есть настраивать рамки простым перетаскиваем ползунков.
 В статье разобрали самый лучший калькулятор для вордпресс WpCalc, сочетающий в себе простоту и интуитивно понятный интерфейс. Творите если будут вопросы задавайте, всегда рады оказать помощь.
Нажмите, пожалуйста, на одну из кнопок, чтобы узнать понравилась статья или нет.

Иногда бывает требуется создать калькулятор для простейших или не очень расчетов чего бы то ни было, например калькулятор объема бетона для строительного сайта, или нечто более сложное — форму для вычисления стоимости изготовления рекламы, калькулятор количества облицовочного кирпича и пр. Тут на помощь приходит плагин Calculated Fields Form, основное назначение которого создание разнообразных форм для вычислений.
Плагин Calculated Fields Form скачало/установило более 10К пользователей, а последнее обновление было совсем недавно в июне 2015. Плагин развивается и функционал очень неплох.
Выпускается в двух видах — платном и бесплатном (ссылка ниже). Главное отличие — в платном есть возможность организации формы отправки полученных данных администратору!!! Достаточно важная возможность — клиент производит расчет и отправляет результат менеджеру, который выставит счет и пр.

Особенности установки — ставится из админки или копированием файлов в каталог плагинов на сайте.
Настройки Calculated Fields Form
Искать настройки стоит по пути «Настройки»-«Calculated Fields Form«, тут производится не только настройка плагина, но и управление всеми созданными калькуляторами. Изначально для примера уже есть пять штук, которые можно использовать для изучения. Новые калькуляторы добавляются либо путем клонирования, либо просто через «ADD».
Каждое поле калькулятора детально настраивается, практически все параметры, настроек очень много.
Оформление калькулятора настройка внешнего вида Calculated Fields Form.
В самом плагине присутствует с десяток вариантов оформления, права стоит отметить, что ни один особо не приглянулся, нодля разнообразия вполне подойдет. Как минус или особое внимание стоит обратить на заголовок формы — он отмечен тегом H1, что не есть хорошо с точки зерния SEO.
Добавление в записи и страницы
Добавление плагина производится шоткодом, который можно посмотреть в настройках последнего.
Вывод
Плагин калькулятор Calculated Fields Form очень пригодится для улучшения функционала сайта, особенно там где необходимо дать возможность пользователю провести какие бы то ни было шаблонные вычисления стоимости или объема продукции/услуги. Еще один вариант создания полезного контента, подойдет далеко не для всех типов сайтов.
Нао сказать, что текущие задачи не позволили как следует погонять плагин и порешать более сложные задачи, например зависимость значений от логического условия, но это не огорчает — все еще впереди.
| Берем в репозитории WordPress Calculated Fields Form | ссылка |
| Оффсайт проекта |

How it works?
From the dashboard/configuration area the process is as follows:
- Insert data fields into the form
- Insert a calculated field and define the calculation rule on it to store the calculated value
- Configure the general form processing, email and PayPal settings if needed
- Publish the form from a post or page (go to edit posts or pages).
From the end user (visitor) point of view, the process is as follows:
- The user fills the data fields
- The calculated fields (if any) will automatically show the calculated value
- If the form Processing is enabled:
- If PayPal integration isn’t enabled:
- The user clicks «submit» and you (the website owner or administrator) receive a notification email with the data posted by the user.
- The user receives an automatic «confirmation/thank you» email.
- The user is redirected to a «confirmation/thank you» page into your WordPress website
- If PayPal integration is enabled:
- The user clicks «submit» and is automatically sent to PayPal for the payment
- In background (transparent to the user): The request is saved into the local database and mark as «un-paid»
- The user completes the payment at PayPal
- In background (transparent to the user): Upon completed the payment, you (the website owner or administrator) receive a notification email with the data posted by the user.
- In background (transparent to the user): The request is marked as «paid».
- The user receives an automatic «confirmation/thank you» email.
- The user returns to a «confirmation/thank you» page into your WordPress website
- If PayPal integration isn’t enabled:
Installation
To install the WordPress plugin follow these steps:
- Download the plugin to your computer.
- Go to the plugins section in WordPress
- If has been installed another version of the plugin, deactivate it, and then press the corresponding «Delete» button.
- Press the «Add New» button at top of section.
- Press the «Upload Plugin» button, and select the zipped file downloaded in the first step.
- Finally, install and activate the plugin.
Inserting the CFF on Page
Each form has a shortcode associated with it, which you can see both in the form list and when you edit them.

Form shortcodes support several attributes, such as:
-
id, represents the id of the form you want to load.
[CP_CALCULATED_FIELDS id="1"] -
class, allows you to assign a CSS class name to the form and customize its design.
[CP_CALCULATED_FIELDS id="1" class="class-name"] -
iframe, accepts the values 1 or 0. Allows you to load the form inside an iframe tag or directly on the web page.
[CP_CALCULATED_FIELDS id="1" iframe="1"]
Form shortcodes also support personalized attributes, which the plugin converts into globally scoped javascript variables that you can use from equations associated with calculated and DS fields.
[CP_CALCULATED_FIELDS id="1" custom_attr="234"]
From the equation, you can use the custom_attr variable. Ex. custom_attr*fieldname1
To publish the form on your website, all you need to do is paste its shortcode into a page’s content. Additionally, the plugin includes modules for the most popular page builders, such as
Gutenberg, Classic Editor, Elementor, Page Builder by SiteOrigin, Beaver Builder, DIVI, among others.
- Configure the settings at the administration menu >> Settings >> Calculated Fields Form.
- To insert a form into some pages or posts, use the specific CFF block, widget or icon:
Using the Gutenberg Editor

Using the WordPress Classic Editor
Using Elementor
Using Page Builder by SiteOrigin
Using Beaver Builder
Using DIVI Builder
- After doing that, the tag [CP_CALCULATED_FIELDS id=»1″] will be inserted into your content. The «id» is optional, if not specified the first form will be used. When you preview the content in the public website that tag will be replaced by the reservation form:
Note: To assign a classes names to the forms, use the «class» attribute with the classes names separated by blank characters: [CP_CALCULATED_FIELDS id=»1″ class=»class-a class-b class-c»]
- The Claculated Fields Form includes multiple predefined designs.


Register the plugin
The «CFF» is completely functional even without be registered. But after registering the plugin, the updates are received directly into WordPress.
For registering the plugin follows the steps below:
- Go to the settings page of the plugin through the menu option: «Settings/Calculated Fields Form»
- Enter the email address used to purchase the plugin, in the attribute: «Enter the email address of buyer»
- Press the «Register» button.

After registering the plugin the updates are notified in the «Updates» section of WordPress.
Managing Forms
After going to the WordPress administration menu >> Settings >> Calculated Fields Form you will see the list of forms like in the following image:

For each form you will see the following options:
- ID: Identification number of the form, useful when publishing an specific contact form.
- Form Name: Name to identify the form. Visible only from the admin area.
- Update: Updates the form name.
- Settings: For managing the form settings.
- Clone: Duplicate/clone a form.
- Messages: Printable list of messages (both paid and unpaid).
- Delete: Deletes the form and all its messages and settings.
- Shortcode: An alternative way for publishing the form.
After clicking the «Settings» button you will jump to a new page with the form builder a other configuration options as explained below.
Check the submissions
Professional Version
Developer Version
Platinum Version

Press the «Messages» button, corresponding to the form. The messages screen displays the list of submissions, and a filtering section to reduce the submissions by form, a time interval, or a text in the data
From the messages screen it is possible remove a submission, or submissions group, change its status to paid/unpaid, editing the entry data, but from this screen is possible export all submissions to a CSV file
Editing an entry
Professional Version
Developer Version
Platinum Version

For editing the information associated to an entry in the list press the corresponding «Edit» button. The action will load a form with the fields in raw mode, not associated to the form’s structure, to modify them freely.
Export the submissions to a CSV File
Professional Version
Developer Version
Platinum Version

For exporting the submitted information to a CSV file, press the «Messages» button corresponding to the form, and press the «Export to CSV» button, select the location where will be saved the CSV and that’s all. The first row of CSV file allows identify each of fields, the text used to identify the field will be the short label, defined in the field, or the label in case that the short label is not defined.
Related Information….
Import/Export Forms
Professional Version
Developer Version
Platinum Version

The «Calculated Fields Form» allows exporting the forms created in a WordPress website to be imported in other websites(*). The feature is really thankfully for owners or developers of multiple websites to avoid implementing the same form once and once again.
Note(*): Both websites must be using the same version of the plugin to have a compatible exported file.
To export a form:
- Go to the settings page of the plugin through the menu option: «Settings/Calculated Fields Form»
- Select the form from the list: «Export this form structure and settings» (in the «Import/Export Area»), and press the «Export» button.
- Finally, select a location in your computer to save the exported file.
To import a form:
- Go to the same area mentioned in the previous section.
- Choose the previously exported file (.cpfm) that contains the form’s structure and settings.
- Finally, press the «Import» button.
The new form will appear in the list of forms. To modify it use the related «Settings» button.
The Form Builder
The Form Builder lets you to add/edit/remove fields into the form and also to specify the validation rules for your form (required fields, email fields, etc…).

Form title and predefined designs
The «Form Settings» tab allows define the form’s title and description, as the placement of labels with respect the fields (at top, at left, aligned to the right).
In the «Form Settings» tab is possible to enable the autocompletion of fields, evaluate dynamically the equations (or evaluate the equations through a «Calculate» button). In case of evaluate the equations dynamically it is possible configure the form to evaluate the equations in the onchange events, or in the onchange and keyup events.
Furthermore in the forms settings tab it is possible configure the form’s design. The plugin includes multiple predefined designs.
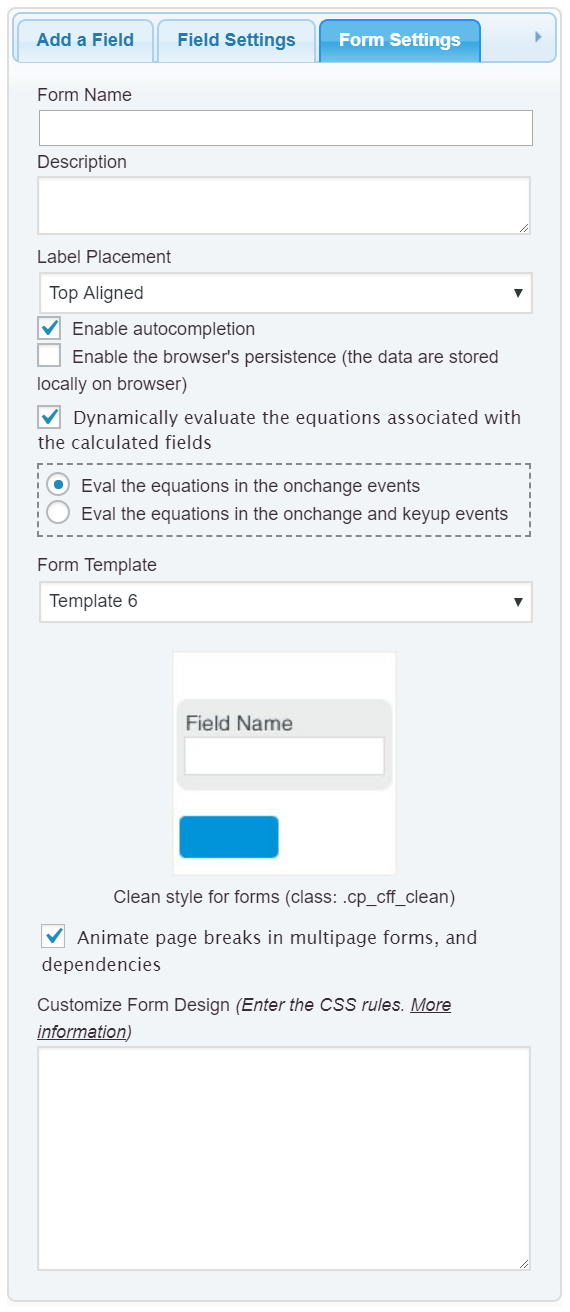
Customize the form’s design:
If the browser’s persistence option is ticked the plugin will store the data entered by the users, locally in their browsers (only compatible with the browsers with support for the localStorage object) until the form be submitted. So, if an user that is filling the form closes the tab, the next time the user visit the webpage the form’s fields will be prefilled with the data stored in his browser.
Through the «Customize Form Design» attribute in the «Form Settings» tab, it is possile to enter the CSS rules to apply to the form and customize its appearance.
Related Information….
Distributing fields in columns
Another alternative to distribute the fields in columns would be to assign class names to them.
Related Information….
The following field types are currently available:
- Single Line Text: Classic text input.
- Currency: A classic input field for currency values, that allows separator for thousands, and currency symbols.
- Number: This field can validate if only digits or a valid number was entered.
- Slider: Numeric field whose value is modified sliding a handle.
- Color: Color picker control.
- Email: This field validates that the email address has a valid format.
- Date/Time: Date-picker. Can be setup also to show also a selectable year and month, for example for birth date fields, and time fields.
- Text area: Allows the users to enter multi-line texts.
- Checkboxes: Classic checkboxes, select one or more on a group.
- Radio Buttons: Radio buttons, select one of many.
- Dropdown: Classic select / dropdown field.
- Upload File: For uploading files.
- Password: A field that shows * instead the typed letters. You can also add a confirm password validation.
- Phone field: Supports international formats line ###-###-#####. The format is configurable.
- Instruct. Text: Informative field to display instructions for users.
- Hidden: A hidden field.
- Section Break: Includes a line and text to separate groups of fields.
- Page Break: Useful for creating multi-page forms. The «page break» marks the start of a new page in the form builder
- Summary: Displays a summary of form fields with their labels and values.
- Media: Allows you to insert images, audios or videos.
- Recording: In devices with video camera and/or microphone, it allows recording the user.
- Button: Insert a button in the form. The buttons supported are: common button, calculate button, reset, or printing form (the submit button is inserted from the form settings).
- HTML Content: General purpose field to include HTML tags in the form.
- Acceptance (GPDR): Required field to confirm that the user accepts the terms and conditions of the website.
- Calculated field: It’s highlighted with a different color since it’s a special field that can calculate its value from the data entered in other fields. This field is explained in detail below.
Container Fields
The form builder includes some container controls. The container controls allow to insert another controls in them:
- Fieldset Container: Allows insert a fieldset control in the form, with a legend.
- Div Container: Inserts a container very useful for grouping related controls, and not modifies the appearance of the form.
Using the container fields to distribute the fields in columns
Related Information….
DataSource Fields
Developer Version
Platinum Version
In addition to the above, the following fields are available only in the Developer and Platinum versions of the plugin:
- RecordSet DS: A hidden field that gets its values from one of following datasources — MySQL Database, CSV file, JSON structure, or form submission fields. The «RecordSet DS» fields are used as intermediary to populate other fields in the form, reducing the number of connections to server side to get the records.
- DataTable DS: Loads the Recordset DS records into HTML tables by using the DataTables JS library.
- Line Text DS: An input field that gets its default values from one of following datasources — MySQL Database, Posts information, Taxonomies information or Users information.
- Number DS: An input field that gets its default values from one of following datasources — MySQL Database, Posts information, Taxonomies information or Users information.
- Email DS: An input field for Email address that gets its default values from one of following datasources — MySQL Database or Users information.
- Text Area DS: A text area field that gets its default values from one of following datasources — MySQL Database, Posts information.
- Checkboxes DS: Checkboxes for selecting one or more options into the same field that gets its options from one of following datasources — MySQL Database, CSV, Posts information, Taxonomies information or Users information.
- Radio Btns DS: Radiobuttons for selecting one option between the options available for the field that gets its options from one of following datasources — MySQL Database, CSV, Posts information, Taxonomies information or Users information.
- Drop-down DS: A select / drop down list for selecting one of the values listed that gets its options from one of following datasources — MySQL Database, CSV, Posts information, Taxonomies information or Users information.
- Date Time DS: Date Time field whose invalid and valid dates can be loaded from a RecordSet DS field.
- Hidden DS: A hidden field that gets its value from one of following datasources — MySQL Database, Posts information, Taxonomies information, or Users information.
Related Information….
Editing the field settings in the Form Builder

When you click a field already added, you can edit its details and validation rules. The following properties are useful:
- Field Label: Label for the field in the public form and into the email.
- Field tag for the message: In addition to the general <%INFO%> tag, you can use this tag to show the field value into a specific tag of the email.
- Specific settings: The settings depends of the field type, for example the format of the phone number, the date format, etc…
- Validation rule: The validation rules depends of the field type, example: required, only digits, valid email, valid number, etc…
- Predefined value: Pre-filled value for the field, if any.
- Instructions for user: This text will appear in a smaller form below the field. It’s useful for giving instructions to the user.
- Add CSS layout keywords: Customize the look & feel. If used, this field must contain the name of the CSS class and not the styles rules directly.
The plugin includes predefined classes that you can assign to the fields through the «Add CSS Layout Keywords» attribute:
hide to hide the field by default.
ignorefield hides the field, but unlike the hide class, ignorefield disables the field so that it does not affect the equations.
Other features in the form builder:
- Equal fields validation: Use it for example to confirm if the email or password typed in two different fields are the same. This is valid for «Single Line Text», «Password» and «Email» fields.
- Dependent fields: Use this feature for show/hide fields (any field type) based in the selection made on other fields (checkboxes, radiobuttons or select/drop-down fields).
Related Information….
calculated fields settings:
When clicking over a calculated field in the form builder the following settings will appear:

In addition to the general fields settings there are three additional settings:
- Set Equation: To enter the equation/formula used for the calculation.
- Operands: To select the fields from the form that will be used in the calculations. Click the «+» button for adding a field into the equation/formula.
- Operators: Operators and functions supported for the formula…
If you are implementing a complex equation, you can press the «ADVANCED EQUATION’S EDITOR» button in the field’s settings, to load a javascript editor with auto-completion, colors code for reserved words, errors detection and more:

Note for advanced users: The JavaScript ternary operator is also supported: (condition ? value_if_true : value_if_false). See the «Ideal Weight Calculator» for a sample.
For DataSource controls
Developer Version
Platinum Version
This is a step by step about the use of datasource controls
- Insert in the form the control with access to external datasources (these controls are represented with the DS at the end of its names)
- Select the control in the form, and pays attention to the «Define Datasource» section.
There are different datasources: MySQL Database, CSV file, Recordset, Post Type, Taxonomy, User Data, and Forms Submissions.
- MySQL Database, allows populate the field with the data stored in database.
- CSV, allows populate the field with the data stored in a CSV file (Datasource available only in fields with multiple entries: DropDown DS, Checkbox DS, Radio Button DS).
- Recordset, allows populate the fields from the records stored in a «RecordSet DS» field.
- Post Type, allows populate the field with the information associated to a specific post type (like the products names in a Woocommerce, etc.)
- Taxonomy, allows populate the field with the information of taxonomies.
- User Data, to get the information of WordPress users.
- JSON, read records from objects array.
- And finally the Forms Submissions, to read other forms’ submissions.
Note: Depending of control selected will be available all available datasources, or not.
So, suppose we want populate the field with the data stored in a database table.
- Select Database, from the list of datasources.
- If the database is different that used by WordPress, will be required enter the Host’s address, the authentication data to connect to the database (username and password), and the name of database(a host can include multiple databases). There is a button for testing the database connection.
Note: If the database is the same used by WordPress, leave empty the fields above.
Now its time to define the query to database
- Enter the name of table’s column, that store the control’s values. If you are using the Drop-down DS control, it has multiple options; each option of drop-down list includes a value and text; in this option you determine the column in the table that includes the values of options.
- Enter the column’s name that stores the control’s texts. Similar to the previous step, but in this case the column stores the texts of the options (in case of checkbox or radio buttons, this column contain the label of options)
- Type the table name, a database can include multiple tables, you should identify the table you are using.
- Type a condition if required. If you want filtering the values to display in the control, type the condition in this attribute. For example, suppose you want load the data of posts that are public, the condition in this case would be: post_status=’publish’, where post_status is the name of column, and publish is the value for filtering.
- The «Order by» is used to order the query results by the values in columns, and not by the order that data were stored in database. For example, suppose you want populate the control with the users names of WordPress, and you want order the results alphabetically, in this case the «order by» would be: display_name ASC, where display_name is the column’s name, and will be ordered in ascending way.
- Limit, enter an integer number to reduce the number of query results.
If your query is very complex, and you prefer create it manually; selects the option «Custom Query», but in this case you should type all the query. Pay attention because you should use alias in the «SELECT» clause, to indicate the colum used to get the values, and the column used to get the texts. For example, a hypothetical query:
SELECT column1 AS value, column2 AS text FROM tablename WHERE column3 > 5 ORDER BY column2 ASC LIMIT 5
The use of database as datasource, allows filtering the information to populate the fields with the values on other fields in the form, or javascript variable. The use of variables are only accepted in the «Condition» section («WHERE» clause), and requires the format: <%varname%>. For example, to get the title of a post, filtering by its ID, if the id is defined through the fieldname3 field, the «Condition» attribute of the query would be: ID=<%fieldname3%>
Related Information….
Constants to use in the queries
Besides the variables, the plugin allows the use of some constants in the queries. The constants must be enclosed between curly brackets, for example: {user.id}
Assuming you want to insert a «DropDown DS» field where the texts of the choices are the posts’ titles, and the values of choices are their IDs, but only for the posts belonging to the logged user, in this case the query to associate with the «DropDown DS» field would be:
SELECT ID as value, post_title as text FROM {wpdb.posts} WHERE post_author={user.id}
In the previous query the constants: wpdb.posts corresponds to the name of the posts table in your WordPress, and user.id to the id of logged user.
The complete list of constants:
blog.id, the id of the current blog (useful in multisite WordPress installations)
wpdb.prefix, prefix used by WordPress in the name of database’s tables, for example, the text «wp_» into the table’s name «wp_posts»
wpdb.comments, the name of Comments table
wpdb.commentmeta, the name of Comment Metadata table
wpdb.links, the name of Links table
wpdb.options, the name of Options table
wpdb.postmeta, the name of Post Metadata table
wpdb.posts, the name of Posts table
wpdb.terms, the name of Terms table
wpdb.term_relationships, the name of Term Relationships table
wpdb.term_taxonomy, the name of Term Taxonomy table
wpdb.termmeta, the name of Term Meta table
wpdb.usermeta, name of User Metadata table
wpdb.users, the name of Users table
wpdb.blogs, the name of Multisite Blogs table
wpdb.blog_versions, the name of Multisite Blog Versions table
wpdb.site, the name of Multisite Sites table
wpdb.sitecategories, the name of Multisite Sitewide Terms table
wpdb.sitemeta, the name of Multisite Site Metadata table
user.id, the id of the current user
user.login, the username of the current user
user.nicename, the URL-friendly name for the current user
user.email, the email address of the current user
user.url, the URL associated to the current user
user.display_name, the user’s name that is shown on the site for the current user
user.first_name, the first name of current user
user.last_name, the last name of current user
How to use CSV files as datasource?
The CSV files can be used as data sources for fields with multiple choices (DropDown DS, Radio Btns DS, Checkboxes DS). The initial steps are similar to the previous section, but selecting the «CSV» option as data-source instead of selecting «Database».
A comma-separated values (CSV) file stores tabular data (numbers and text) in plain text. Each line of the file is a data record. Each record consists of one or more fields, separated by commas. The use of the comma as a field separator is the source of the name for this file format.
For CSV files, the plugin includes the attributes:
Select CSV file: allows to select between a local or online file. For local files, the field displays a file field for selecting the CSV file. For online files the field displays a text field for entering the URL to the CSV file.
Use headline: tick the checkbox if the first line of CSV file is a headline to identify the data in the next records.
Delimiter: enter the delimiter symbol used as the field separator on each record.
Press the «Import CSV» button to import the records into the form. This action will feed the lists «Select column for texts» and «Select column for values», that are used for selecting which fields will be used texts and values of the choices in the DS field.
Where the value is equal to: allows filtering the rows to include in the field. The value entered in the attribute must be equal to the value in the column selected for the field’s values. It is possible to use the values in other fields in the form, or variables, for filtering the rows, similar to the «Database» datasource.
Using Recordset as datasource.
- Select the recordset option from the list of data sources.
- Select the «RecordSet DS» field from the list of recordsets.
- Type the property in the record to be used as the value of the DS field.
- Type the property in the record to be used as the value of the DS field.
-
Enter the conditions for filtering.
This clause require additional instructions, that are explained with an example:
Assuming the values in the «RecordSet DS» fields, selected as datasource, is a list of records with the structure:
{
	'First Name' : 'John',
	'Last Name' : 'Smith',
	'Birth Date' : '1th Jan, 2001'
}
and you want populate a «Line Text DS» field with the «Birth Name» of the user «John Smith»
Type the property name: Birth Date in the «value» attribute.
Enter the properties for filtering in the condition field (pay attention to the use of the reserved word «record» in the conditions):
record[‘First Name’]==’John’&&record[‘Last Name’]==’Smith’
Tips: Javascript is casesensitive, please, be careful with the properties names.
In the conditions can be used the following comparison operators:
equal to: ==
non equal to: !=
less than: <
less than or equal to: <=
bigger than: >=
bigger than or equal to: >=
And the logical operators:
and: &&
or: ||
Related Information….
Create dependencies between fields
Some fields, like radio groups, checkboxes and drop-down menu, allow dependencies in function to the option selected.
For example, suppose your form includes a radio-group control with multiple choices: — House, — Car, — Electrodomestics, and each of them, uses different attributes. The house requires fields for address, number of rooms, etc; the car requires a field for trademark, model, etc. and finally the electrodomestics, will need type of electrodomestic,and more. So, if you want display the fields, depending of choice selected:
- Select the radio group fied in the form editor.
- Press the «Show dependencies» link, in the choices area.
- and select the field to display if the choice is selected. If you need associate multiple fields to the choice, press the plus button and select the new fields.
The calculated fields allow dependencies too, but in function to its value. For example, if you are designing a form for selling electrodomestics, and you want display additional fields for finance the purchase, if the amount is bigger than or equal to $1000usd. In this case:
- Select the calculated field.
- In the «Define dependencies» section, select a rule in the «if the value is» dropdown, and enter the value in the input box.
- Select the field to display in case that the rule be valid. Using the «plus» buttons it is possible define multiple rules, or associate more than one field to the same rule.
Create dependencies with other fields. It is possible create dependencies with Dropdown fields, checkboxes, radio buttons, and calculated fields. To define dependencies with other fields, would be necessary to use Calculated Fields as auxiliary fields. Simply, should to use the field as part of the equation associated with the calculated field, and create dependencies rules in function to the equation’s result. The auxiliary fields are not relevant in the form’s interface, to hide them, tick the checkbox: «Hide Field From Public Page»
Related Information….
Settings area of the forms
For each form you will be able to edit the following settings:
Form Builder: Already explained in the previous sections (see above).
Define Texts

Area were define the texts for the general elements in the form
- Submit button label: The caption of submit button.
- Previous button label: The caption of the previous button.
- Next button label: The caption of next button.
- Captcha label: The title of Captcha section.
- Refresh captcha: The message to refresh the Captcha code.
- Security code label: Label to recommend entering the Captcha code.
- Captcha required: Error message if the Captcha is empty.
- Captcha error: Error message if the Captcha is wrong.
- Payment options: Payment option text.
- Coupon code label: Label used in the coupon section.
- Page X of Y: Label of pages in a multi-page form. Uses the format: Page {0} of {0}
Validation Settings:

This area contains the «texts» used for the validations. You can easily translate them to other languages.
- is required: Error message for required field.
- is email: Error message for email format.
- is valid date (mm/dd/yyyy): Error message for date format.
- is valid date (dd/mm/yyyy): Error message for date format.
- is number: Error message if the value is not a number.
- only digits: Error message if the value has not only digits.
- under maximum: Error message if the value is not in the correct interval.
- over minimum: Error message if the value is not in the correct interval.
Submit button and thank you page:
Professional Version
Developer Version
Platinum Version

- Display submit button?: Adds a submit button to the form.
- Thank you page (after sending the message): After the completing the payment (or after submit the form if the payment option is disabled) the user may be redirected to a page into your website (usually a «thank you» page). Type the page address into this field.
Related Information….
- DOC: Displaying Form Summary in the Thanks Page
- DOC: Displaying the list of submissions
PayPal Payment Configuration:
Professional Version
Developer Version
Platinum Version


- Enable Paypal Payments: Allows to enable/disable the PayPal payment option.
- PayPal mode: Select here if you want to process real payments (production mode) or you want to test the form with the PayPal Sandbox.
- PayPal email: The email of the PayPal that will receive the payments.
- Request cost: Select the field on the form that contains the amount to be paid. In most cases it will be a calculated field but it can be also a classic field.
- Currency: The currency, example: USD, EUR, GBP, etc…
- A $0 amount to pay means: Select «skip payment» for accepting 100% discount codes or select «let the user enter any amount» for accepting donations or open payment amounts. The «Base Amount» attribute has precedence over this attribute.
- Base Amount: Allows to define a minimum amount to be charged through the form.
- PayPal product name: The name that will appear to the customer at PayPal. It is possible to define the name of the product through a field in the form. For example, for defining the product name with the value entered in the fieldname3 field, should be entered the special tag <fieldname3> as the value of this attribute.
- PayPal language: The language that will be used for the PayPal payment. It’s any PayPal supported language.
- Payment frequency: Select here if you will be requesting a one-time payment or a recurrent/subscription payment.
For recurring payments it is possible define a first payment different to the recurring payments, and delay the first payment to offer a trial period.
- Discount Codes: Use this section to define the accepted discount codes and the discount percent. A 100% discount means that the payment isn’t required.
Form Processing / Email Settings:
Professional Version
Developer Version
Platinum Version
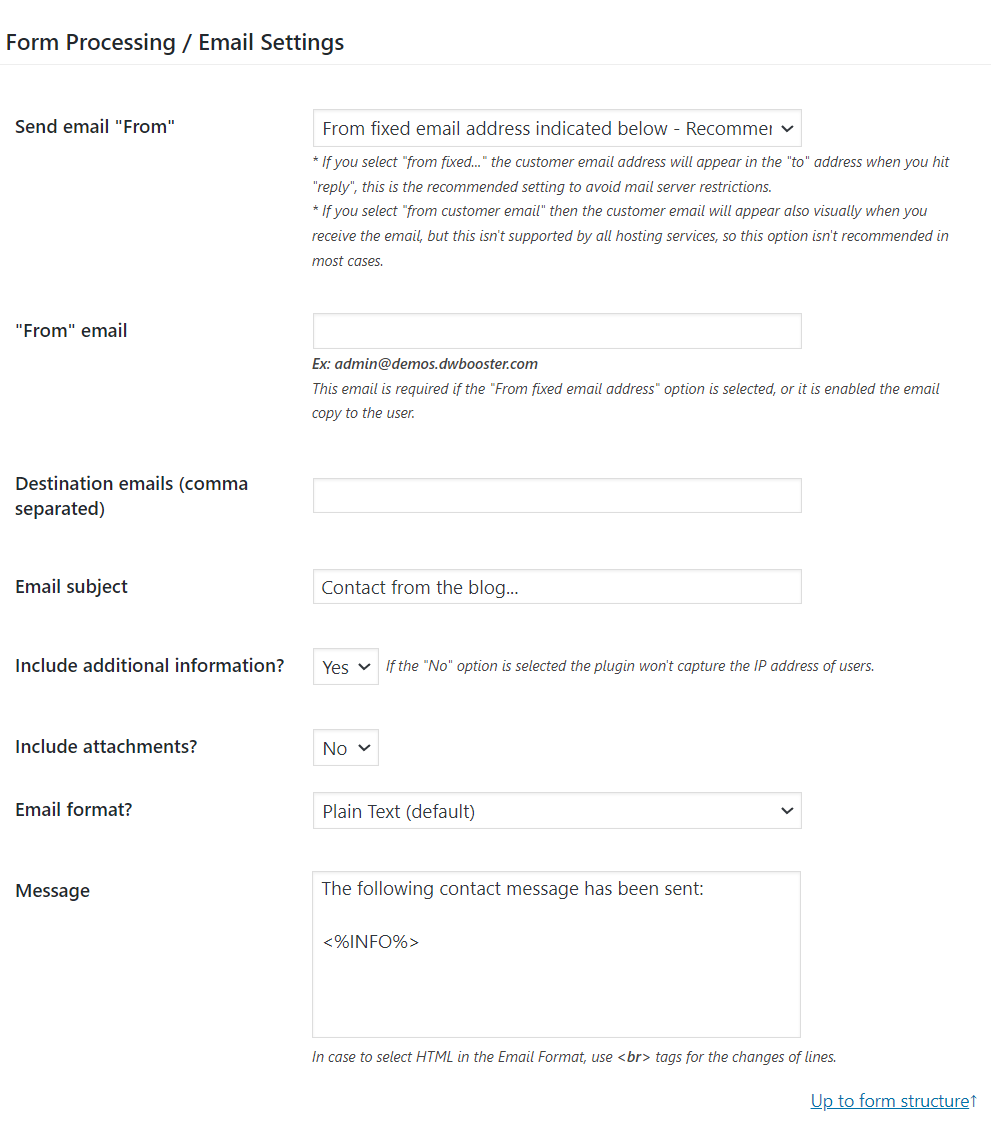
- «from» email: The email used as from in the notifications.
It is strongly recommended the use of an email address in the website’s domain. The main emails services (as Gmail, Hotmail, Yahoo, MSN, etc.) check the correspondence between the email address in the «Sender» header on emails, and the domains that send the emails. If the correspondence fails, the emails can be managed as Spam or as a «Phishing» email, in whose case would be deleted for security reasons.
- Destination emails (comma separated): List of administrators that will receive the email notification. To allow selecting the destination emails dynamically with a field in the form, enter the special tag of the field, for example: <%fieldname1%>
- Email subject: Subject of the notification email sent after completing the payment.
- Include additional information?: Optional information about the user IP and browser.
- Email format? Select if the email will be sent as plain-text or HTML-formatted.
- Message: Content of the notification email that you will receive. Keep the tag <%INFO%>, it will be replaced automatically with the form data send by the user.
Related Information….
Email Copy to User:
Professional Version
Developer Version
Platinum Version
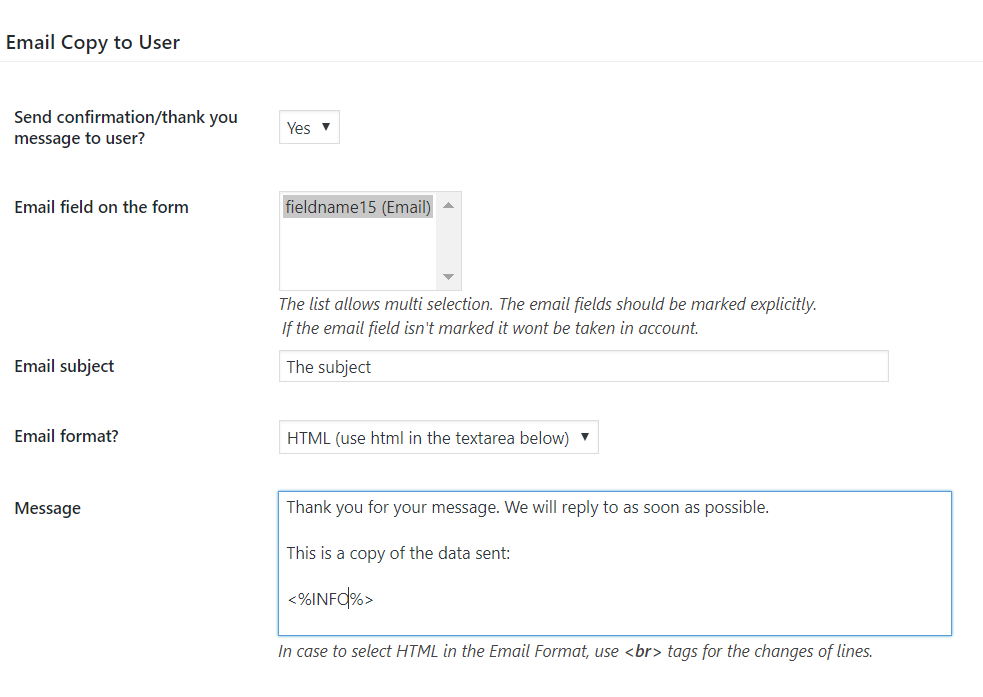
- Send confirmation/thank you message to user?: Select if you want to sent the «confirmation/thank you» message to the user.
- Email field on the form: Select here the field that contains the user’s email on the form.
- Email subject: Subject of the email sent to the user after payment
- Email format? Select if the email will be sent as plain-text or HTML-formatted.
- Message: Content of the email sent to the user after payment. The tag <%INFO%> will be replaced by the information sent using the form, if needed.
Related Information….
Captcha Settings:
Professional Version
Developer Version
Platinum Version

- Use Captcha Verification?: Select if the captcha image will be used.
- Width: Width of the captcha image.
- Height: Height of the captcha image.
- Chars: How many characters will appear in the captcha image.
- Min font size: Minimum size used for the font (randomized).
- Max font size: Maximum size used for the font (randomized).
- Preview: Preview for checking how the captcha image will look.
- Noise: Amount of noise to make it stronger.
- Noise Length: Length of the noise to modify its look.
- Background: Background color.
- Border: Border color.
- Font: Base font used to render the text. Four options already included.
Related Information….
- DOC: reCAPTCHA add-on
Displaying Form Summary in the Thanks Page
Professional Version
Developer Version
Platinum Version
- Go to the thanks page
- Press the icon indicated in the next image, to insert a shortcode with format [CP_CALCULATED_FIELDS_RESULT]


The shortcode to insert in the thanks page allows a total control over the content to display with it.
In case to display all fields submitted with the form, is as simple as insert the shortcode: [CP_CALCULATED_FIELDS_RESULT]. But what to do if you want include in the thanks page only some of submitted fields, and not all?
The shortcode allows define the «fields» attribute, to select the fields names to include in the thanks page, separated by the comma symbol. For example, suppose the form has three fields: fieldname1, fieldname2, and fieldname3, but we want include only the fieldname1, and fieldname3, and exclude the fieldname2, in this case the shortcode would be:
[CP_CALCULATED_FIELDS_RESULT fields="fieldname1,fieldname3"]
But in some cases, we need more control over the content to display. By default, the shortcode is replaced by pairs of label-value for each field included in the thanks page. But what happen if you want display the label of fieldname1 in bold, or use a different label for the fieldname2, that the label used in the form?. In this case you should use the shortcode like a tag: [CP_CALCULATED_FIELDS_RESULT]…[/CP_CALCULATED_FIELDS_RESULT], and its content would be common HTML tags, with the field names using the same format that in the notification emails: <%fieldname#%>, to display only the label <%fieldname#_label%>, and to display only the value <%fieldname#_value%>. So, in this case the shortcode would be:
[CP_CALCULATED_FIELDS_RESULT]
<p><%fieldname1_label%>:<%fieldname1_value%></p>
<p>New Label: <%fieldname2_value%></p>
<p><%fieldname3%></p>
[/CP_CALCULATED_FIELDS_RESULT]
To get the complete list of tags to include in the thank you page, read the «SPECIAL TAGS IN THE NOTIFICATION EMAILS» section .
The shortcode accepts too the if_latest attribute, whose accepted values are: 0 or 1 (0 by default) to replace the shortcode, only if it corresponds to the latest submitted form. This attribute should be used in combination with the formid attribute described in the next section.
[CP_CALCULATED_FIELDS_RESULT formid="3" if_latest="1"]
The if_paid attribute in the result shortcode will display the submitted information, only if its payment status is paid
[CP_CALCULATED_FIELDS_RESULT if_paid="1"]
Associate a same thank you page with multiple forms
The forms’ structures can be very different, and an unique shortcode wouldn’t be sufficient to represent all forms. An option would be insert a different summary shortcode for each form, defining the attribute: «formid» indicating the form’s id, in each of shortcodes, in whose case the plugin will replace only the shortcode corresponding to the form that has been submitted:
[CP_CALCULATED_FIELDS_RESULT fields="fieldname1,fieldname3" formid="1"]
[CP_CALCULATED_FIELDS_RESULT fields="fieldname8,fieldname9,fieldname14" formid="2"]
[CP_CALCULATED_FIELDS_RESULT formid="4"]
[CP_CALCULATED_FIELDS_RESULT formid="5"]
<p><%fieldname1_label%>:<%fieldname1_value%></p>
<p>New Label: <%fieldname2_value%></p>
<p><%fieldname3%></p>
[/CP_CALCULATED_FIELDS_RESULT]
Related Information….
- DOC: Special tags to use with the Results shortcode
- DOC: Displaying the list of submissions
Displaying the list of submissions
Professional Version
Developer Version
Platinum Version
- To display the list of summaries insert the shortcode [CP_CALCULATED_FIELDS_RESULT_LIST]
This shortcode is similar to [CP_CALCULATED_FIELDS_RESULT]. With this shortcode it is possible to display all submitted fields or controlling the fields and format of the summary.
However the [CP_CALCULATED_FIELDS_RESULT_LIST] requires the formid attribute with the form’s id, or multiple forms ids separated by commas. For example: [CP_CALCULATED_FIELDS_RESULT_LIST formid=»1″] or [CP_CALCULATED_FIELDS_RESULT_LIST formid=»1,2,3″]
Or at least a submission’s id: [CP_CALCULATED_FIELDS_RESULT_LIST submission=»123″]
There are other attributes supported by the [CP_CALCULATED_FIELDS_RESULT_LIST] shortcode, but these are optional:
- submission: the list of submissions ids separated by comma. [CP_CALCULATED_FIELDS_RESULT_LIST formid=»1″ submission=»8,20,230″]
-
from: a text with date format (yyyy-mm-dd) to display the list of submissions from a specific date. [CP_CALCULATED_FIELDS_RESULT_LIST formid=»1″ from=»2018-04-09″]
The from attribute accepts relative dates, like from=»+3weeks -1day», from=»-1year», etc.
-
to: a text with date format (yyyy-mm-dd) to display the list of submissions until a specific date. [CP_CALCULATED_FIELDS_RESULT_LIST formid=»1″ to=»2018-04-09″]
The to attribute accepts relative dates, like to=»+2months +15days», to=»-1week», etc.
- order: used for ordering the submissions in ascending or descending order. The accepted values are: ASC and DESC. [CP_CALCULATED_FIELDS_RESULT_LIST formid=»1″ from=»2018-01-01″ to=»2018-04-09″ order=»DESC»]
- limit: used to display a specific number of submissions. [CP_CALCULATED_FIELDS_RESULT_LIST formid=»1″ limit=»10″]
- events_per_page: allows paginate the submissions list. [CP_CALCULATED_FIELDS_RESULT_LIST formid=»1″ events_per_page=»10″]
To display the submissions list only to users with specific roles, it is possible to use the role attribute in the shortcode with one or multiple roles names separated by comma. [CP_CALCULATED_FIELDS_RESULT_LIST formid=»1″ role=»administrator»]
For controlling the format of submissions’ summaries it is possible to insert the shortcodes with a content, similar to:
[CP_CALCULATED_FIELDS_RESULT_LIST formid="1"]
<p><%fieldname1_label%>:<%fieldname1_value%></p>
<p>New Label: <%fieldname2_value%></p>
<p><%fieldname3%></p>
[/CP_CALCULATED_FIELDS_RESULT_LIST]
The complete list of tags to include in the shortcode is avalialbe in the «SPECIAL TAGS IN THE NOTIFICATION EMAILS» section .
The if_paid attribute in the shortcode for the list of results will display only those submissions with payment status: paid
[CP_CALCULATED_FIELDS_RESULT_LIST formid="1" if_paid="1"]
Displaying the submissions list using datatable
To display the submissions list using datatable are required some specific attributes:
layout with the table value
table_head with the list of columns’ labels, separated by comma symbols
table_fields with the list of forms’ fields, separated by comma symbols
view_details accepts the values 1 or 0 to display or not an additional column with a button to option a popup with submission details
order_by_column_index allows sorting the table rows by a column. It accepts the column index (starting at zero). The order_by_column_index attribute can be combined with the order attribute. The order attribute accepts the values asc and desc for sorting the rows in ascending or descending order, respectively.
Ex.
[CP_CALCULATED_FIELDS_RESULT_LIST formid="1" layout="table" table_head="id, Column A, Column B, Column C" table_fields="itemnumber,fieldname1,fieldname2,fieldname3" view_details="1"]The controls of datatable are in English by default, to translate the controls’ texts to another language, create a .js file with an object as its content similar to the following one (of course, with the texts translated)
{
    "decimal":        "",
    "emptyTable":     "No data available in table",
    "info":           "Showing _START_ to _END_ of _TOTAL_ entries",
    "infoEmpty":      "Showing 0 to 0 of 0 entries",
    "infoFiltered":   "(filtered from _MAX_ total entries)",
    "infoPostFix":    "",
    "thousands":      ",",
    "lengthMenu":     "Show _MENU_ entries",
    "loadingRecords": "Loading...",
    "processing":     "Processing...",
    "search":         "Search:",
    "zeroRecords":    "No matching records found",
    "paginate": {
        "first":      "First",
        "last":       "Last",
        "next":       "Next",
        "previous":   "Previous"
    },
    "aria": {
        "sortAscending":  ": activate to sort column ascending",
        "sortDescending": ": activate to sort column descending"
    }
}
And finally, pass the file’s URL as the table_language_url attribute of [CP_CALCULATED_FIELDS_RESULT_LIST] shortcode
Ex.
[CP_CALCULATED_FIELDS_RESULT_LIST formid="1" layout="table" table_head="id, Column A, Column B, Column C" table_fields="itemnumber,fieldname1,fieldname2,fieldname3" table_language_url="https://wwww.website.com/path/lang.js"]Related Information….
- DOC: Special tags to use with the Results List shortcode
Create JavaScript variables to be used in the equations
— From GET, or POST parameters, SESSION variables, or COOKIES
All Versions of the Plugin
Gutenberg block to create variables

WordPress classic editor

The icon with the «X» symbol, that appears when editing the contents of pages or posts, inserts a shortcode in the content with the structure:
[CP_CALCULATED_FIELDS_VAR name="..."]
The … symbol should be replaced by the parameter or variable name, and will be the same name of the javascript variable. For example: [CP_CALCULATED_FIELDS_VAR name=»varname»]
To restrict the source of variable, define the attribute «from» in the shortcode with any of following values: get, post, session, or cookie. For example, to create the javascript variable: varname, only if exist a session variable with the same name, insert the shortcode: [CP_CALCULATED_FIELDS_VAR name=»varname» from=»session»]
The shortcode: [CP_CALCULATED_FIELDS_VAR] accepts two other attributes:
Definig default values
The «default_value» attribute allows to define the value used by default if there is not a parameter with the specified name, or session variable or cookie:
[CP_CALCULATED_FIELDS_VAR name="varname" default_value="mydefault"]
If there is not a parameter, or session variable, or cookie, with the name «varname», the plugin will create a global javascript variable with the name: «varname», and value: «mydefault».
Create direct variables
The attribute: «value», allows to create a javascript variable with the name defined as attribute, and the value in the attribute: «value».
[CP_CALCULATED_FIELDS_VAR name="varname" value="myvalue"]
After insert the shortcode to create the javascript variable, a valid equation would be: fieldname1*varname
Create a direct variable through the Forms Shortcode
There is another way to create global variables to be used in the equations, directly from the form’s shortcode. All attributes in the shortcode, except the «id» that identifies the form, are converted in javascript variables with global scope, whose names correspond to the variable name, and their values, the attributes’ values:
[CP_CALCULATED_FIELDS id="1" varname="varvalue"]
It is possible create multiple variables, defining multiple attributes.
The variables created through the form’s shortcode have a particularity, for each global variable will be created another one with the structure: <variable name>_arr, for example: if the shortcode is:
[CP_CALCULATED_FIELDS id=»1″ varname=»varvalue»]
The plugin will create two varaibles, the global variable: varname whose value would be varvalue, and the varname_arr variable, whose value is a hash with the varvalue as one of their items.
How to access to the value of the varname_arr?
Simply should be called the varname_arr variable, using as the index, the form_identifier constant: fieldname1*varname_arr[ form_identifier]
Pay attention to this way to access to the variables generated through the form shortcode. If there are multiple shortcodes inserted in the same page, and all of them define a same variable, accessing to the variable name through the scheme: <variable name>_arr[ form_identifier], each form will have its own value for the variable, because the global variable <variable name> will have only the latest value defined.
Add-Ons
The list of add-ons available in the plugin, appear in the «Add-ons area» of settings page of the plugin. For enabling the add-ons, simply should tick the corresponding checkboxes, and press the «Activate/Deactivate Addons» button.
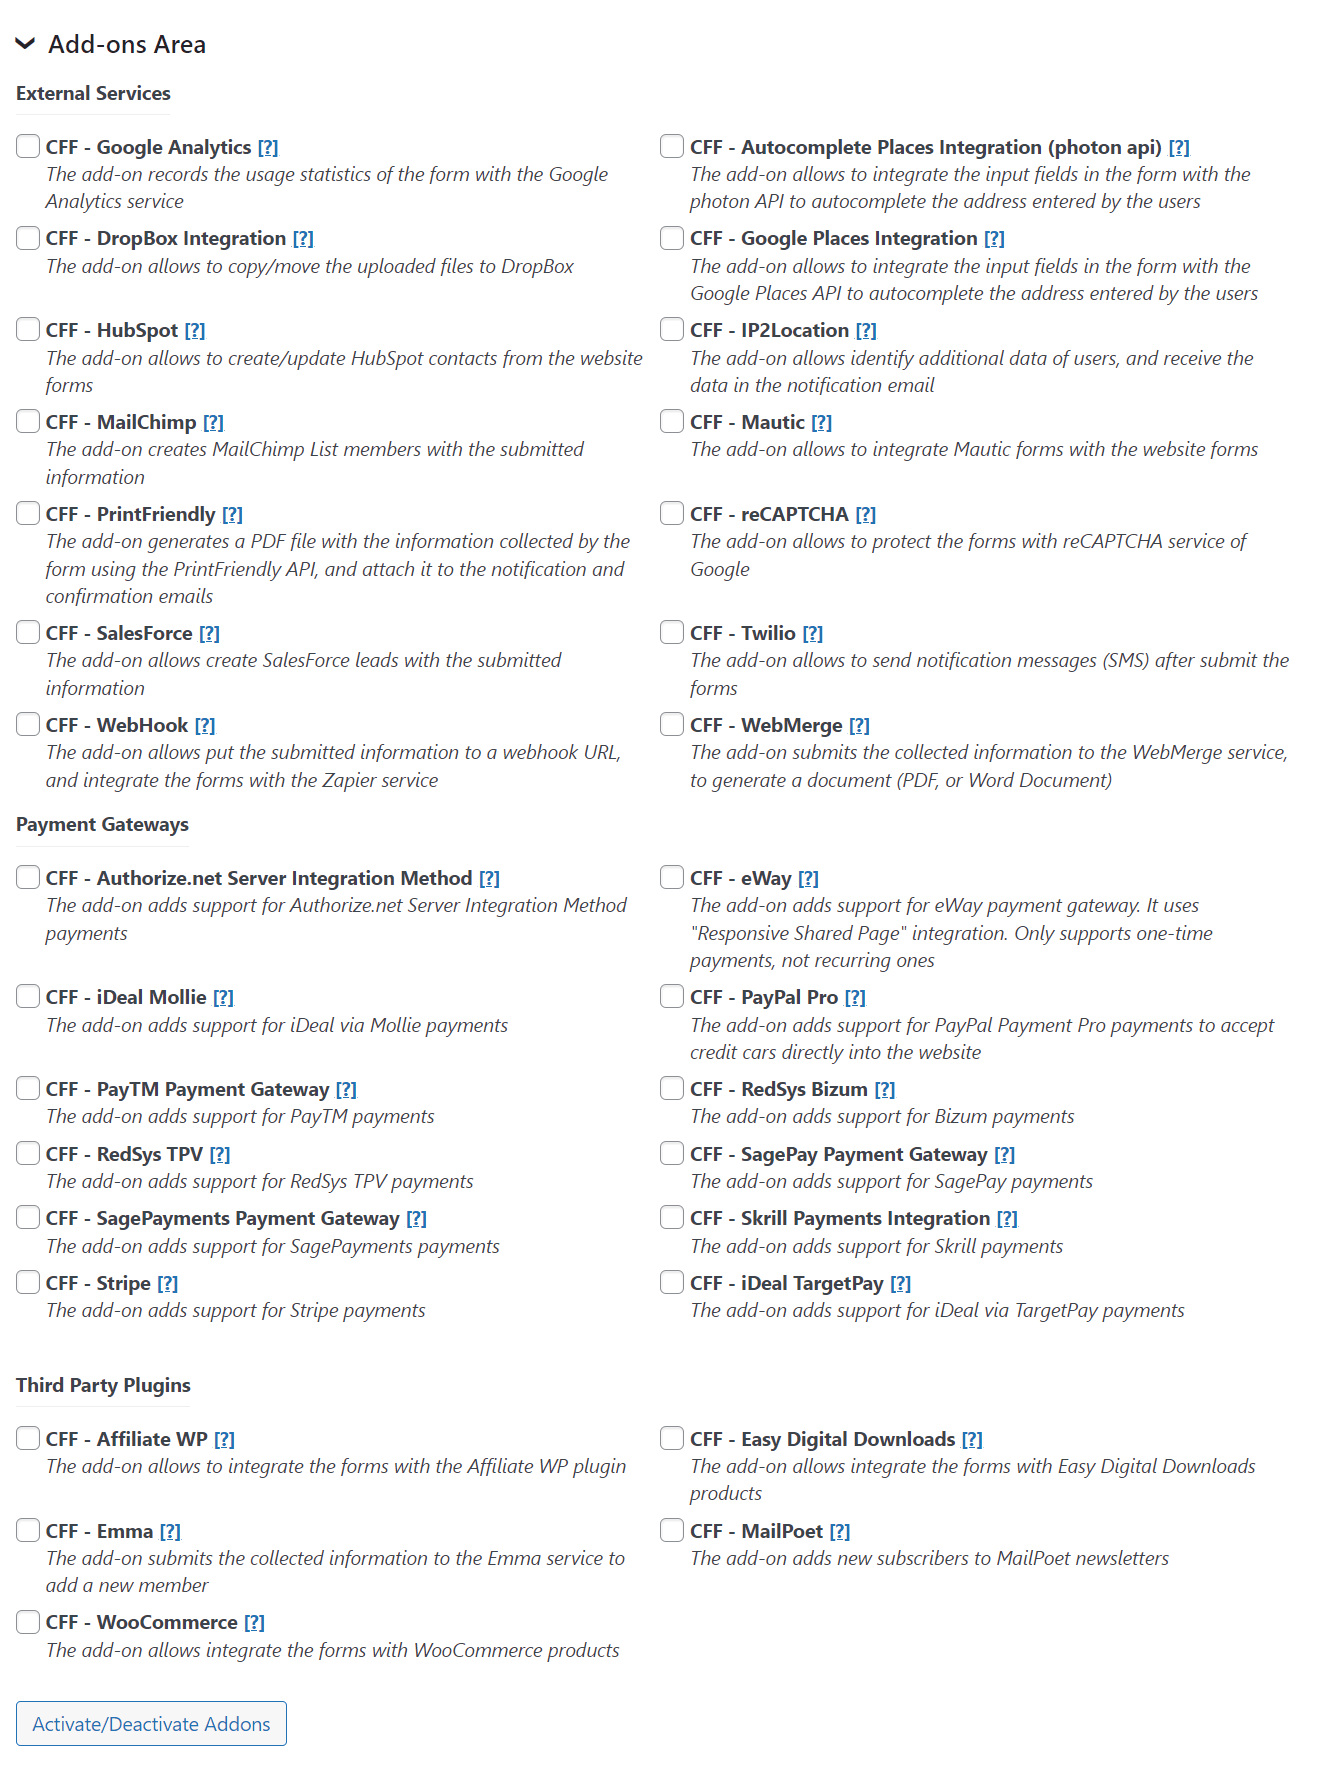
Server Side Equations add-on
Developer Version
Platinum Version
The Server Side Equations add-on allows to define equations in the server side to protect the business logic, and call them with AJAX from the public form.
The server side equations are defined from the settings page of the plugin, through the «Server Side Equations section».
The server side equations are shared by all forms in the website, reducing the development time.
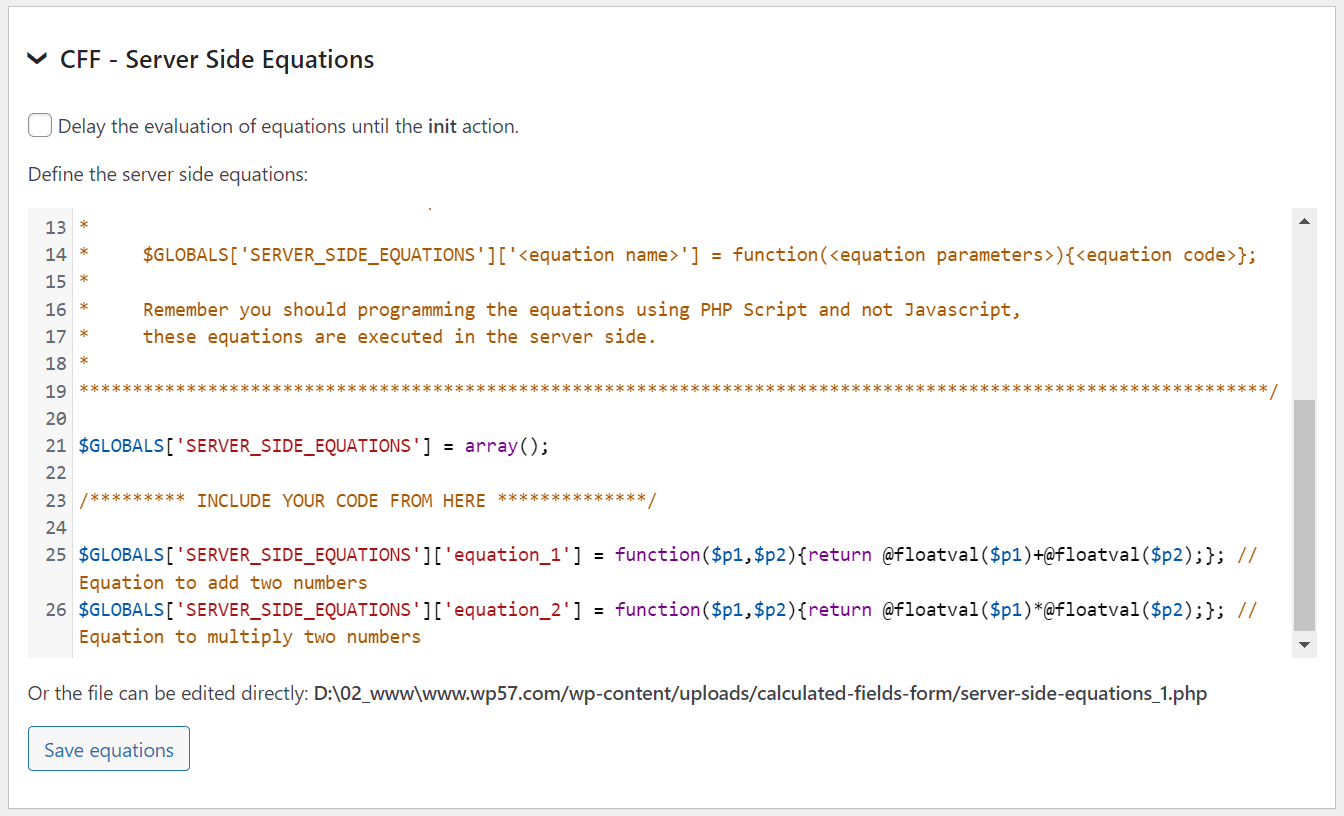
Server Side Equations Structure
The server side equations are implemented with PHP programming language. The equations should be entered below the line of comment: INCLUDE YOUR CODE FROM HERE.
The equations should be defined into the GLOBAL array: «SERVER_SIDE_EQUATIONS», where the items’ indexes are the names of the equations, and the items values are functions definitions with the code of the equations.
For example, assuming you want to implement an equation that calculate the square root of a number, a possible equation would be:
$GLOBALS['SERVER_SIDE_EQUATIONS']['square_root_equation'] = function($number){return sqrt($number);};
The file with the equations can be edited directly with the text editor of your choice. The files with the equations are located in the «/wp-content/plugins/calculated-fields-form/addons/serverside.addon/» directory, and their names have the structure: server-side-equations_#.php
Pay attention: The plugin includes a mechanism to prevent overwrites the «server-side-equations_#.php» file in the update process. However, I recommend to copy the file into the «/wp-content/uploads/calculated-fields-form» directory, and the plugin would use this copy of the file instead.
The server-side equation must always return a result.
How the equations are called?
The add-on includes a new operations module with the operation: SERVER_SIDE for calling the server side equations using AJAX.
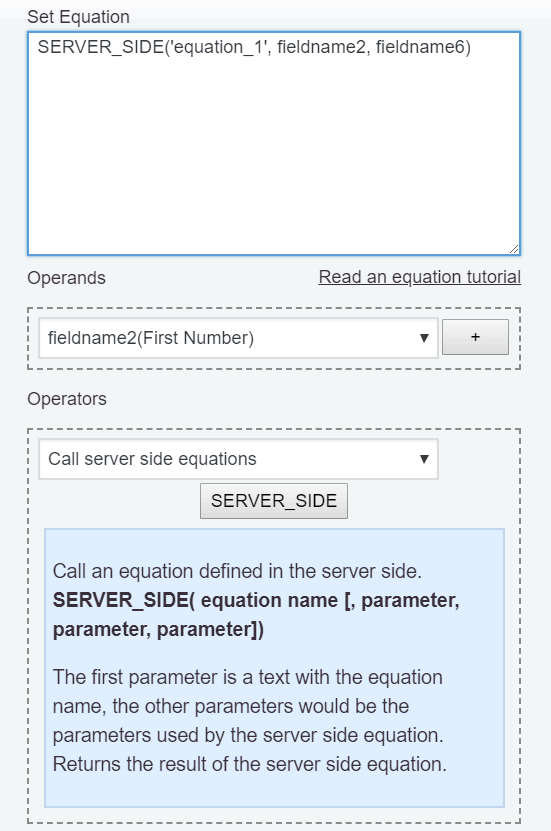
The «SERVER_SIDE» operation requires at least one parameter, the name of the server side equation (following with the previous example, the first parameter would be: ‘square_root_equation’) and the other parameters would be the parameters required by the server side equation.
SERVER_SIDE('square_root_equations',4)

the result would be 2
To get the square root of a field in the form, for example, the fieldname1, the equation would be:
SERVER_SIDE('square_root_equations',fieldname1)
Calculating the final price with a server side equation
The Server Side Equations add-on includes a new section in the form’s settings to allow calculate the final price through a server side equation, after the form be submitted.
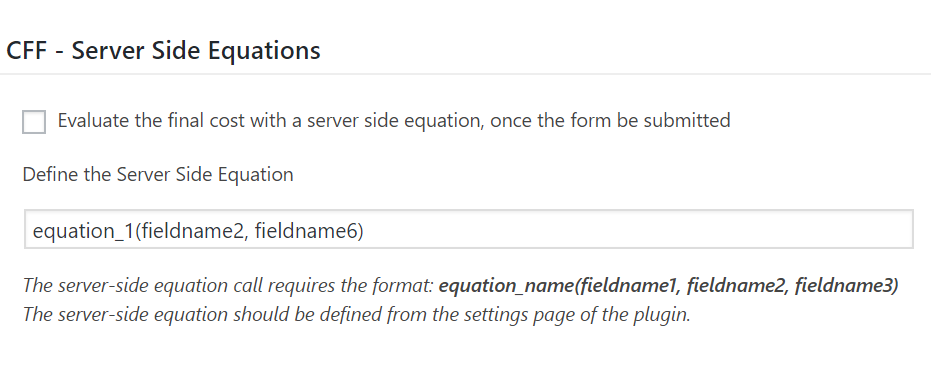
To calculated the final price with a server side equation:
Tick the checkbox: «Evaluate the final cost with a server side equation, once the form be submitted»
Enter the server side equation call with the format: equation_name(fieldname1, fieldname2, fieldname3)
Related Information….
Users Permissions add-on
Developer Version
Platinum Version
The new add-on: «Users Permissions», allows restrict the access to the forms, and associate the submitted information to the submitter.
The options to restrict the access to the form are: Only for registered users, for registered users with specific roles, or allow the access to the form only to specific users.
With the «Users Permissions» add-on it is possible restrict the number of submissions to only one by user.
The add-on includes a new shortcode: [CP_CALCULATED_FIELDS_USER_SUBMISSIONS_LIST], to display the list of submissions belonging to an user. If the shortcode is inserted without attributes, the list of submissions will include those entries associated to the logged user. This shortcode accepts the attributes: id, for the user’s id, and login, for the username (the id attribute has precedence over the login), in whose case the addon will list the submissions of the user selected, furthermore it is possible restrict the list to a specific form using the attribute: formid=»#», where # should be replaced by the form’s id. Additionally, it is possible to decide the number of items per page (10 by default), defining the «events_per_page» attribute through the shortcode, ex: [CP_CALCULATED_FIELDS_USER_SUBMISSIONS_LIST events_per_page=»20″]
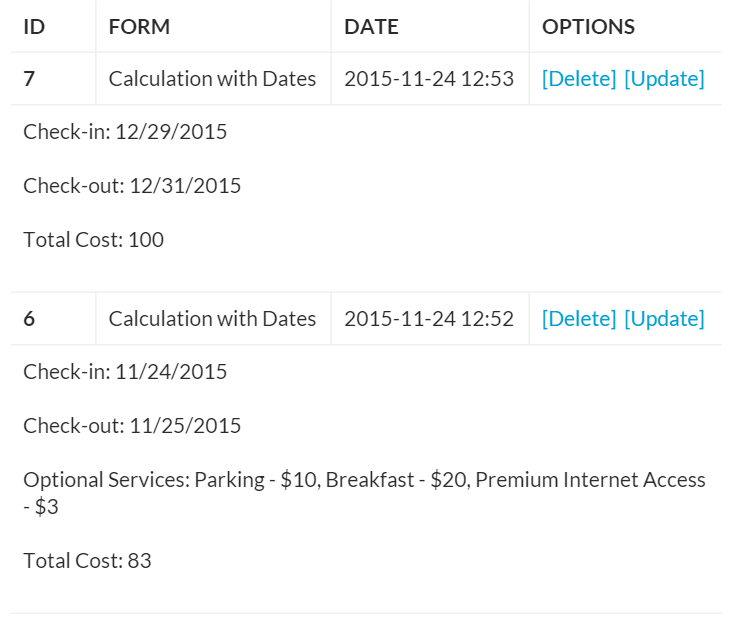
Pay attention: If the page with the shortcode is visited by an user with administrator role, then he/she will have access to the other users’ submissions and will have permission to edit or delete them.
Other attributes supported by the [CP_CALCULATED_FIELDS_USER_SUBMISSIONS_LIST] shortcode:
-
from: a text with date format (yyyy-mm-dd) to display the list of submissions from a specific date. [CP_CALCULATED_FIELDS_USER_SUBMISSIONS_LIST from=»2018-04-09″]
The from attribute accepts relative dates, like from=»+3weeks -1day», from=»-1year», etc.
-
to: a text with date format (yyyy-mm-dd) to display the list of submissions until a specific date. [CP_CALCULATED_FIELDS_USER_SUBMISSIONS_LIST to=»2018-04-09″]
The to attribute accepts relative dates, like to=»+2months +15days», to=»-1week», etc.
- order: used for ordering the submissions in ascending or descending order. The accepted values are: ASC and DESC. [CP_CALCULATED_FIELDS_USER_SUBMISSIONS_LIST from=»2018-01-01″ to=»2018-04-09″ order=»DESC»]
- limit: used to display a specific number of submissions. [CP_CALCULATED_FIELDS_USER_SUBMISSIONS_LIST limit=»10″]
The add-on allows to define the summary of the submitted data that will displayed in the list of submissions. Enter the summary’s structure in the «Summary» attribute. In the summary can be use all the special tags, available for the notification emails, and the thank you pages.
Note, that it is possible to define the structure of data directly through the shortcode, and this takes precedence over the «Summary» attribute. Ex:
[CP_CALCULATED_FIELDS_USER_SUBMISSIONS_LIST]
<p><b><%fieldname1_label%></b>: <i><%fieldname1_value%></i></p>
[/CP_CALCULATED_FIELDS_USER_SUBMISSIONS_LIST]
The add-on allows to assign permissions for «edit» or «delete» the entries. Actually, the submissions are not deleted, or its data modified from these actions, the real control over the data is only for the website’s administrator. In the first case, the submission will be disabled, and will be hidden from the list of user’s submissions, but the submission is always accessed by the website administrator through the messages section, and if the data are edited, the original entry will be disabled, and a new entry is generated and associated to the user.
There are other features included by this add-on, the «Messages» section is modified to include in the list of submissions the name of the submitter, furthermore, includes a new input field for filtering the events by users.
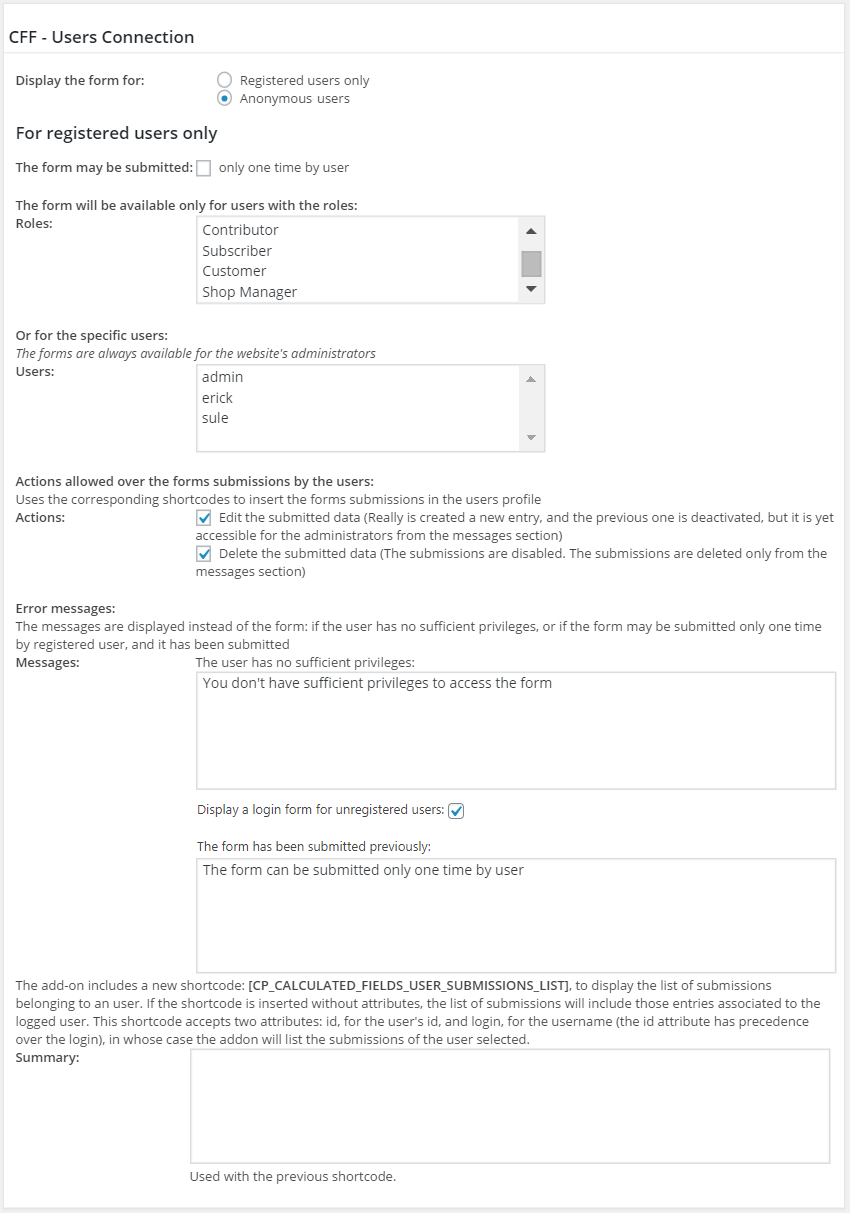
Related Information….
Users Registration Form add-on
Developer Version
Platinum Version
The new add-on: «User Registration Form», allows allows register new users through a form created with the Calculated Fields Form plugin.
The add ons allows even create the users’ metadata required by other plugins.
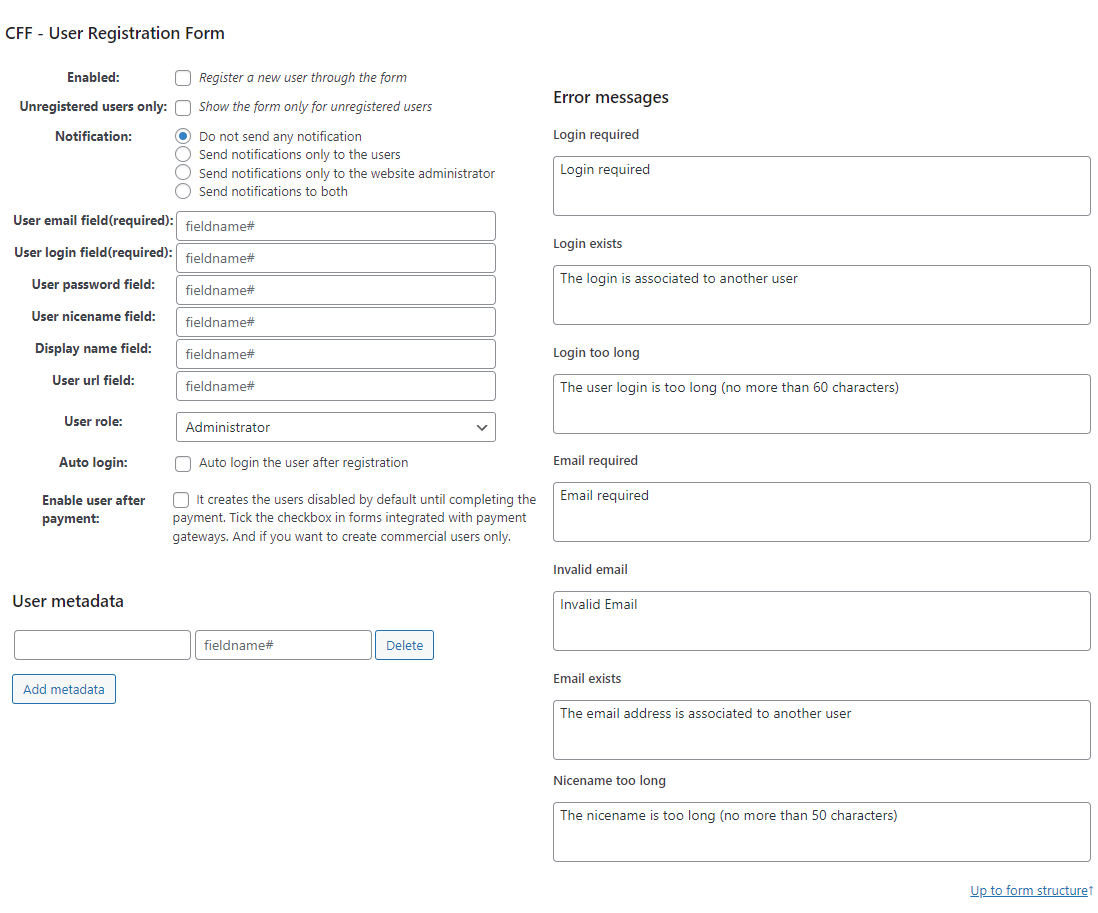
Add-on settings
Enabled: Allows to enable/disable the users registration through the form.
Notification: Send a notification email to the new user, the website’s administrator, both, or to none of them.
User email field(required): name of field in the form for the user’s email.
User login field(required): name of field in the form for the user’s login.
User password field: name of field in the form for the user’s password. If there is not a field for password it is generated dynamically.
User nicename field: name of field in the form for the user’s nicename.
Display name field: name of field in the form for the user’s display name.
User url field: name of field in the form for the URL to the user’s webpage.
User role: select the role to apply the new users.
Auto login: auto login of users after registration.
Enable user after payment: creates the users disabled by default until completing the payment. Tick the checkbox in forms integrated with payment gateways. And if you want to create commercial users only.
User metadata section. Allows to add pairs of input boxes for entering the metadata name, and the field’s name corresponding to the user’s metadata.
Login required: Error message to display if the login is empty.
Login exists: Error message to display if there is an user with the same login.
Login too long: Error message to display if the login is longer than 60 characters.
Email required: Error message to display if the email is empty.
Email invalid: Error message to display if the value entered by the user has no valid email format.
Email exists: Error message to display if there is an user with the same email.
Nicename too long: Error message to display if the nicename is longer than 50 characters.
Verification Code add-on
Developer Version
Platinum Version
The «Verification Code» add-on allows verifying the user’s email by sending a verification code and blocking the form’s submission until the verification code is entered.

When the user presses the submit button, the add-on will send to his/her email a verification code and will open a dialog to validate it.
The form’s submission is blocked until the user enters a valid code through the dialog.
To activate the add-on, go to the settings page of the plugin through the menu option «Calculated Fields Form», tick the «CFF — Verification Code» add-on, and press the «Activate/Deactivate addons» button.
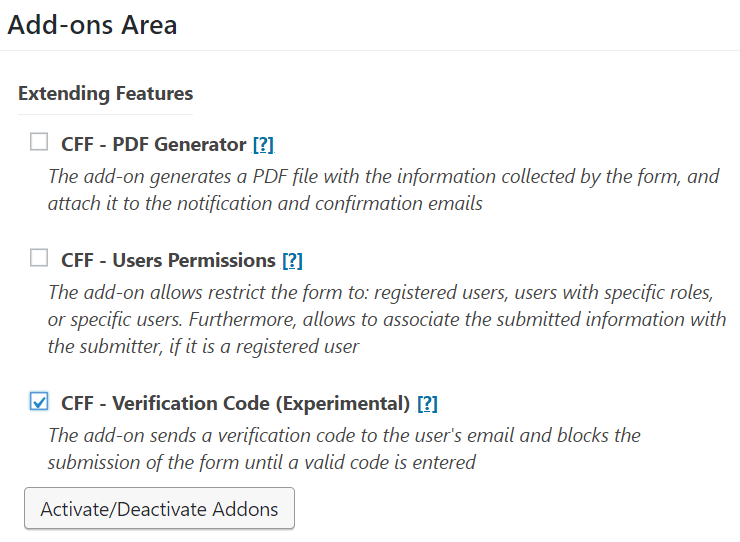
The add-on includes a new section in the form’s settings to configure it.
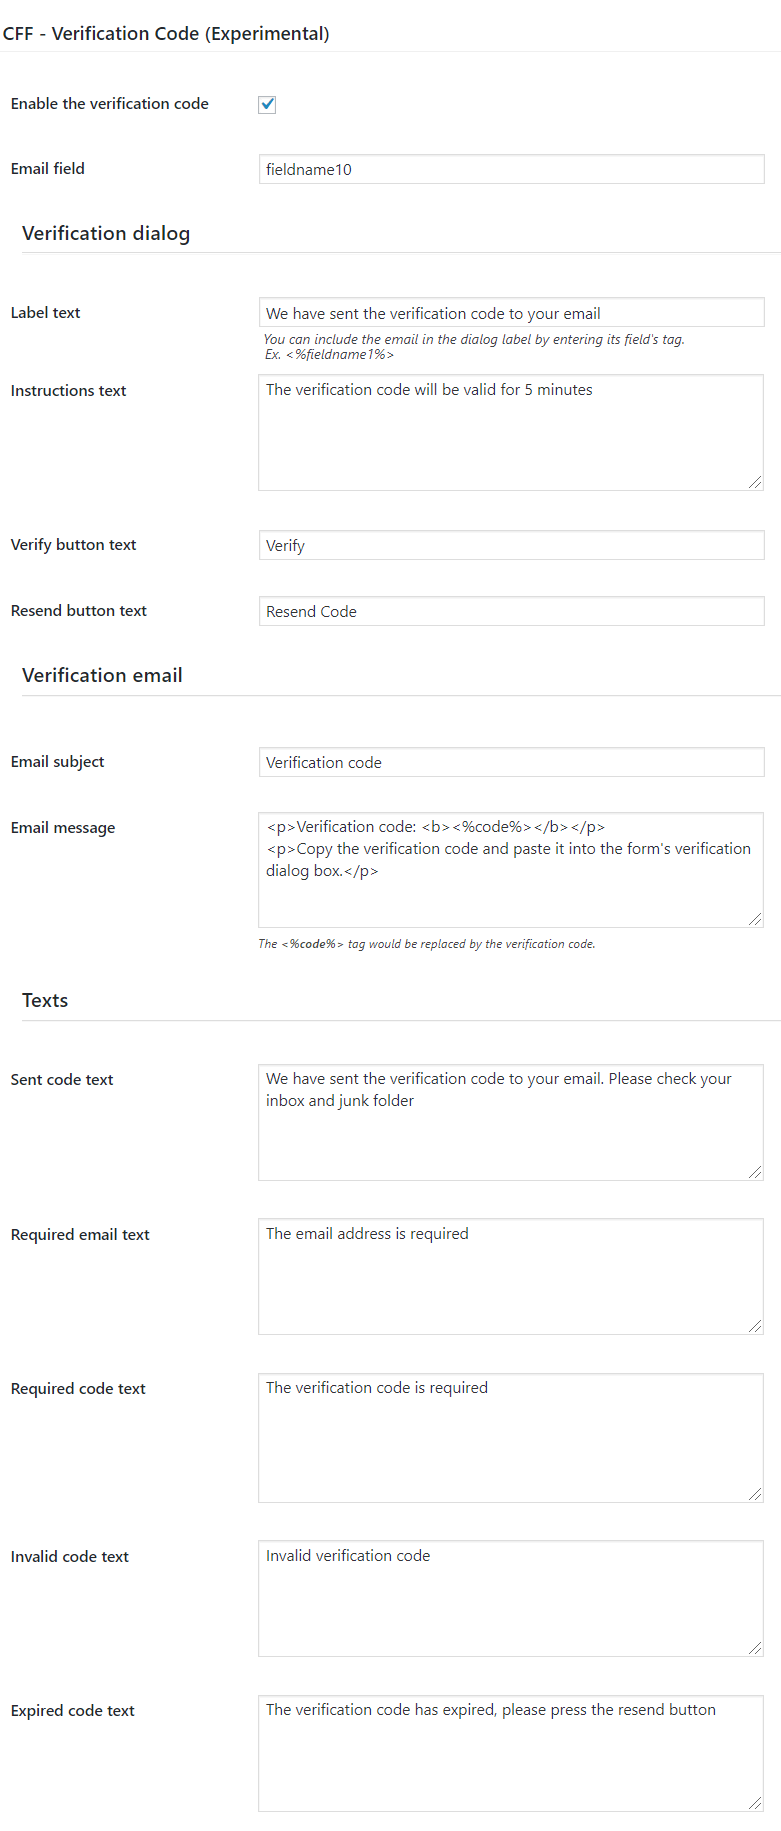
Verification Code Settings:
- Enable the verification code: enable/disable the verification code add-on into the form.
- Email field: the name of the email field in the form (fieldname#).
- Label text: title of validation dialog. In the label, you can enter the field’s tag (Ex. <%fieldname1%>) to allow the user to know the email address where the plugin sent the verification code.
- Instructions text: text on dialog with the instructions for users.
- Verify button text: text of verify button.
- Resend button text: text of resending button.
- Email subject: subject of the email with verification code.
- Email message: text of the email with verification code. The <%code%> tag would be replaced by the verification code.
- Sent code text: confirmation text.
- Required email text: the error message to display if the email is empty.
- Required code text: the error message to display if the verification code is empty.
- Invalid code text: the error message to display if the verification code entered by the user is incorrect.
- Expired code text: the verification code expires after 5 minutes. Enter the error message to display if the verification email entered by the user has expired.
Unique Fields Values add-on
Platinum Version
The «Unique Fields Values» add-on verifies that the values entered by users have not been used in previous submissions. It allows to enter simple and complex verification rules (one or multiple fields separated by comma symbols).
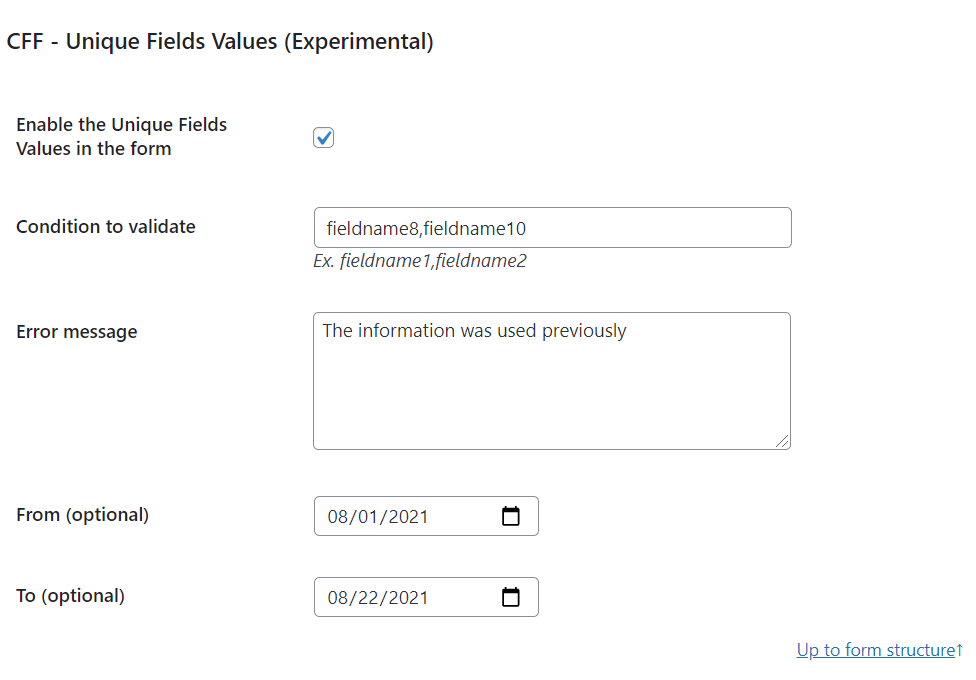
When the user presses the submit button, the add-on verifies the previous submissions. If the field value (or combination of fields values) was used before, the add-on opens an alert with the error message. If everything is OK, the form is submitted properly.
To activate the add-on, go to the settings page of the plugin through the menu option «Calculated Fields Form», tick the «CFF — Unique Fields Values» add-on, and press the «Activate/Deactivate addons» button.

The add-on includes a new section in the form’s settings to configure it.
Unique Fields Values Settings:
- Enable the Unique Fields Values in the form: enable/disable the add-on into the form.
- Condition to validate: the field’s name (fieldname#) or fields’ names separated by commas.
- Error message: error to display if there is a previous submission with the same field’s value or fields’ values.
- From (optional): allows configuring a time interval where verify the submissions.
- To (optional): allows configuring a time interval where verify the submissions.
Upload add-on
Platinum Version
The «Upload Files» add-on allows to add the uploaded files through the forms to the Media Library, and access to them from the pages and posts of website.
Furthermore, it allows to include the support of new mime types, than files format supported by default by WordPress.
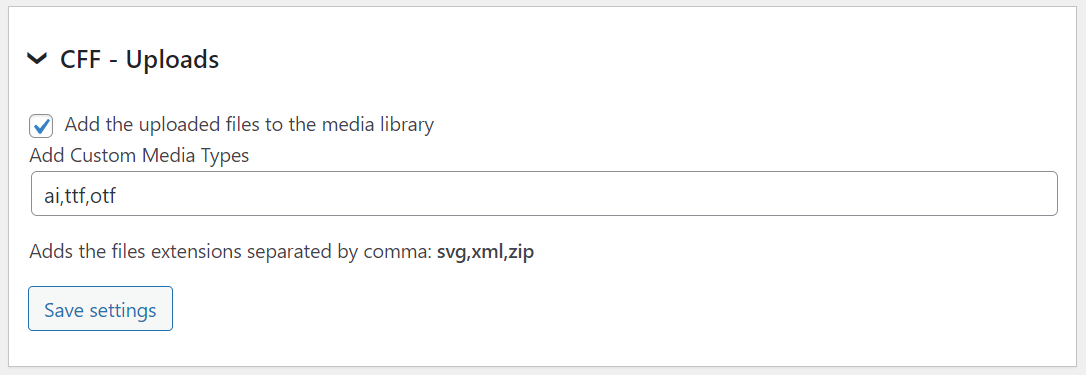
To add the uploaded files to the «Media Library» ticks the checkbox: «Add the uploaded files to the media library».
WordPress supports some specific mime types, for supporting new mime types, you simply should enter the files’ extensions separated by comma.
Signature add-on
Platinum Version
(Platinum version of the plugin)

The add-on converts the form fields selected in «Signature» fields, allowing the users to sign with the mouse or directly in the touchscreens.

To activate the add-on, simply visit the plugin page through the menu option: «Settings/Calculated Fields Form», tick the checkbox: «CFF-Signature», and press the «Update» button.
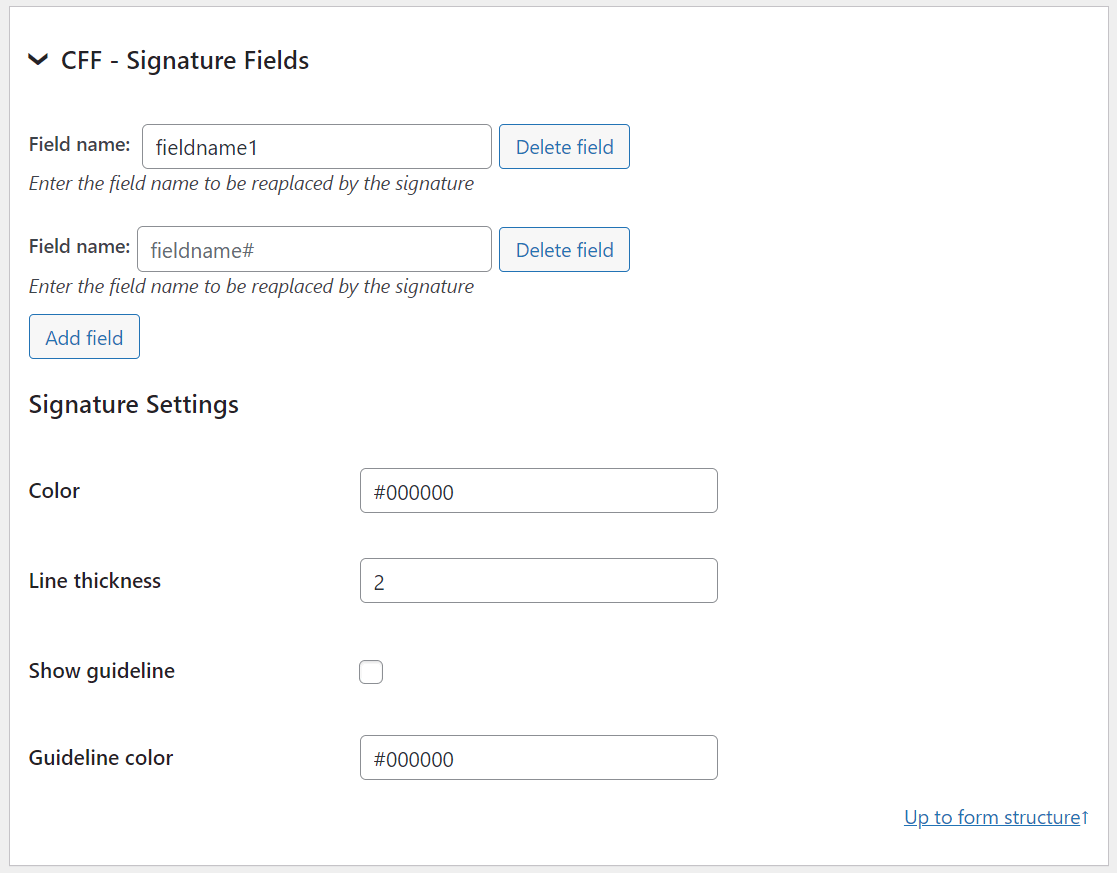
From the form’s settings, selects the fields to convert in Signature fields. It is possible convert multiple fields in the form in signature fields.
Signature settings:
Color: the color code for signatures. For example: #000000
Line thickness: an integer number defining the line thickness of the signature.
Show guideline: checkbox to include or not a guideline in the signature fields.
Guideline color: the color code for guideline. For example: #000000
iCal add-on
Platinum Version

With the iCal addon the users will receive an iCal file as part of the confirmation email after the form submission. The iCal file allows to be imported into most popular calendars like Outlook and Google Calendar.
To activate the new iCal attachment add-on, simply visit the plugin page through the menu option: «Settings/Calculated Fields Form», tick the checkbox: «CFF — iCal Export Attached», and press the «Activate/Deactivate addons» button.
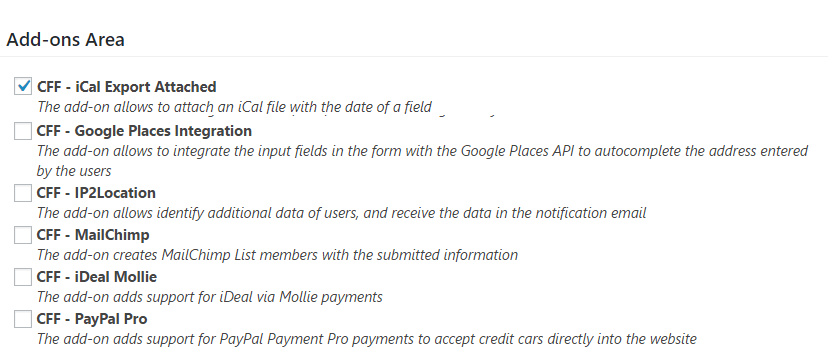
With the add-on activated go to the form settings page and at the bottom of that page you can configure the iCal file that will be attached into the emails. You will need to specify the ID of the field that contains the date and you can modify the iCal content and time conversion settings if needed.
In the settings area the following information is needed to activate and setup the addon:
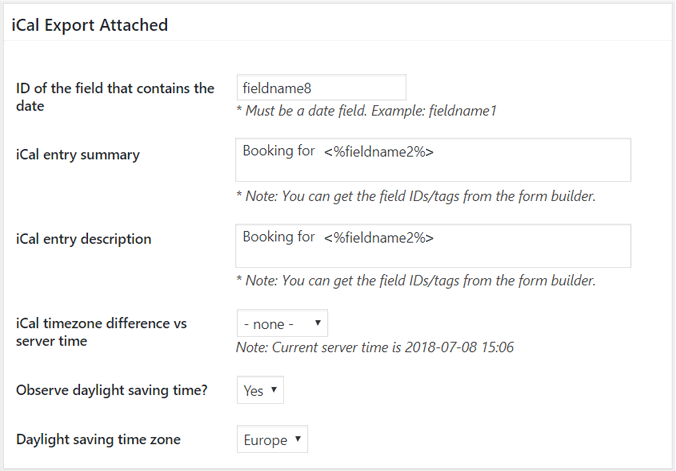
- ID of the field that contains the date: ID of the field that contains the date, must be a date field. Example: fieldname1. If empty the iCal won’t be generated.
- iCal entry summary: Summary of the iCal event. You can get the field IDs/tags from the form builder to customize this field with the submitted data.
- iCal entry description: Description of the iCal event. You can get the field IDs/tags from the form builder to customize this field with the submitted data.
- iCal timezone difference vs server time: If you see differences in the selected and imported dates in the calendar then use this field to adjust that difference.
- Observe daylight saving time?: Indicates if the daylight saving time will be taken in account.
- Daylight saving time zone: If the daylight saving time will be used then indicate here the zone used as reference.
When enabled, after clicking the Calculated Fields Form submit button, an iCal file will be generated and attached to the emails.
CSV Generator add-on
Platinum Version
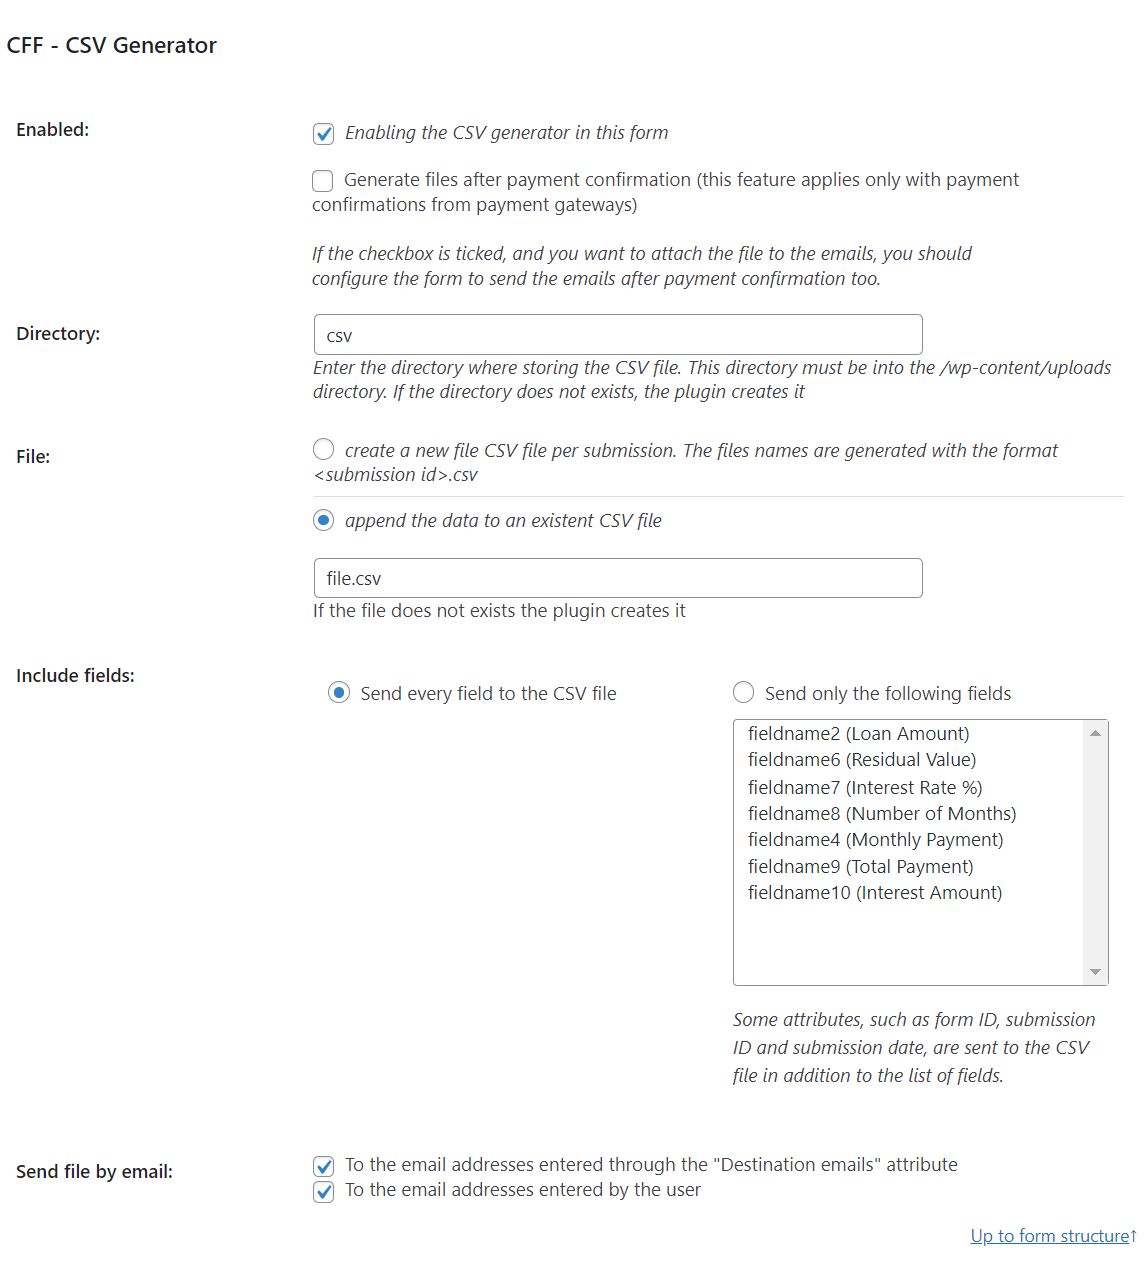
The CSV Generator add-on allows to export dynamically the information collected by the form to a CSV file, and send it as attachment in the notification emails.
To activate the CSV Generator add-on, visit the plugin page through the menu option: «Settings/Calculated Fields Form», tick the checkbox: «CFF — CSV Generator», and press the «Activate/Deactivate addons» button.
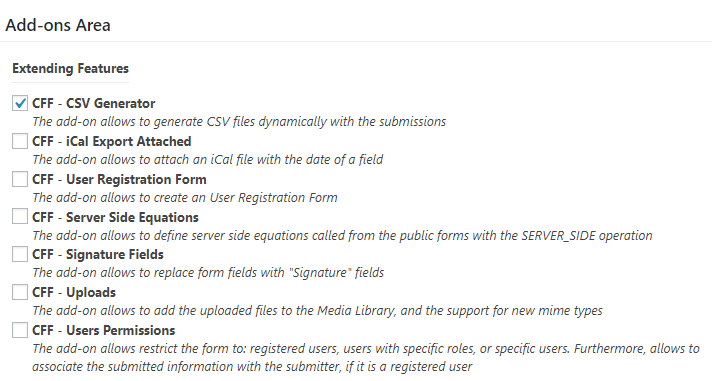
After activated the add-on go to the form settings, pressing the «Settings» button associated to the form, and configure the add-on as follows:
- Enabled: for enabling the CSV generator in the form.
- Generate files after payment confirmation: generates the CSV file or appends the submission to an existing file after receiving the payment confirmation from the payment gateway.
- Directory: enter the directory where storing the CSV file. This directory must be into the /wp-content/uploads directory. If the directory does not exists, the plugin creates it.
- File: allows configure the add-on to generate a new CSV file per submission, or for appending the a new row to an existing CSV file.
- File box: enter the file’s name if the «append» choice is selected.
- Include fields: allows to select the fields to export to the CSV file (every collected field or only some of them).
- Send file by email: allows to configure the add-on for attaching the files to the notification emails and the copies to the users or not.
Related Information….
PDF Generator add-on
Platinum Version
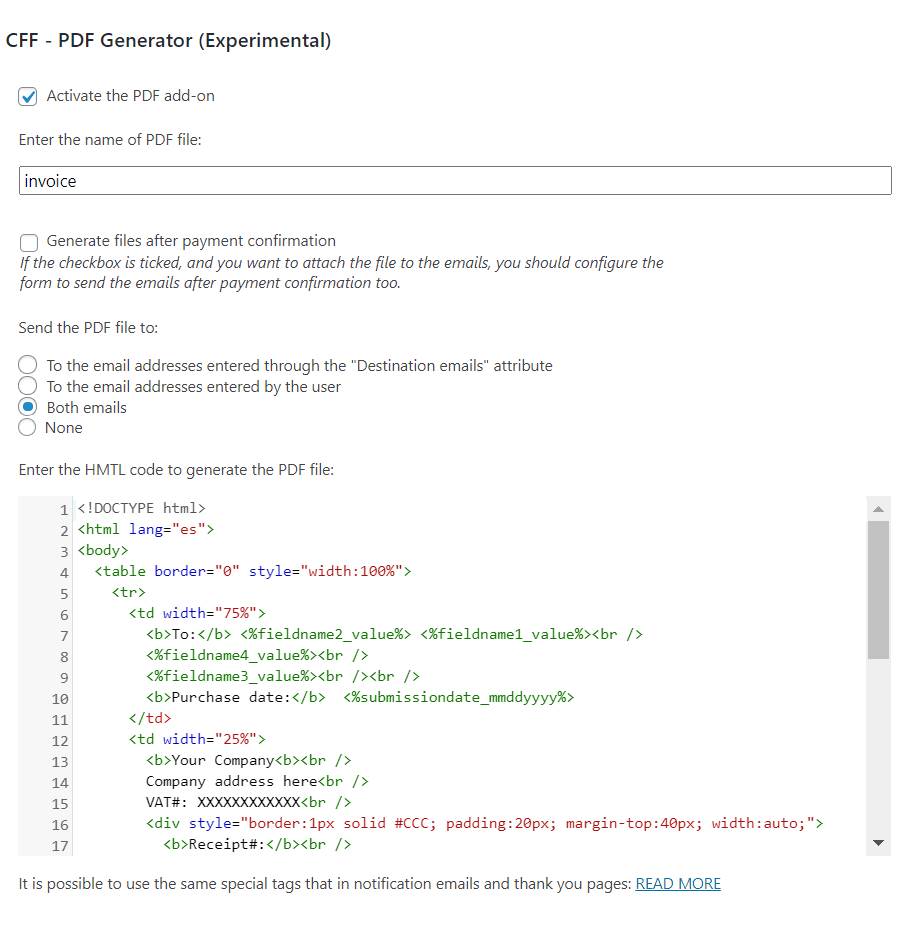
The PDF Generator is an experimental addon based on the dompdf api that allows to generate PDF files with the information collected by the forms, and send them as attachment of notification emails.
To activate the add-on, simply visit the plugin page through the menu option: «Settings/Calculated Fields Form», tick the checkbox: «CFF-PDF Generator», and press the «Activate/Deactivate Addons» button

The PDF Generator add on shown a new section in the form’s settings for entering the HTML code with the file’s structure, and input box for entering the file name.
Note: into the file’s structure you can use the same special tags supported by the thank you pages and notification emails.
The add-on attaches the PDF files to the notification emails. However, it is possible to include the tag: <%pdf_generator_url%> into the notification emails and thank you pages. The tag would be replaced with the URL to the PDF file.
Related Information….
WooCommerce add-on
Developer Version
Platinum Version
The developer version of the plugin includes the WooCommerce add-on, to integrate the forms created by the «Calculated Fields Form» with the WooCommerce products. The add-on inserts an additional metabox in the WooCommerce products, with multiple settings fields:
- Enter the ID of the form: Allows select the form that will be associated to the product.
- Calculate the product price through the form: Allows calculate the price of the products through the form.
- Minimum price allowed: The minimum price applied to a product.
- Activate the summary: Allows customize the fields included in the cart page of WooCommerce.
- Summary title: Enter the summary title.
- Field for weight: Enter the form’s field corresponding to the product’s weight.
- Field for length: Enter the form’s field corresponding to the product’s length.
- Field for width: Enter the form’s field corresponding to the product’s width.
- Field for height: Enter the form’s field corresponding to the product’s height.
- Field for quantity: Enter the form’s field corresponding to the product’s quantity. It will be associated to the quantity box of the product.
- Field for visual price: This attribute is optional. If you want the price to display in the products’ pages be different to the default price, or the calculated price, enter the corresponding form’s field. The visual price won’t be the real product’s price, and won’t added to the cart or orders.
- Summary: Define the summary, are accepted all special tags supported by the notification emails and the thank you page.
Note: If you want calculate the price of products through the form, will be required that you select the field of the price in the attribute: «Request cost» in the form’s settings.
Note 2: The fields for weight, length, width, and height, can be required to calculate the shipping cost by the «WooCommerce Table Rate Shipping» plugin.
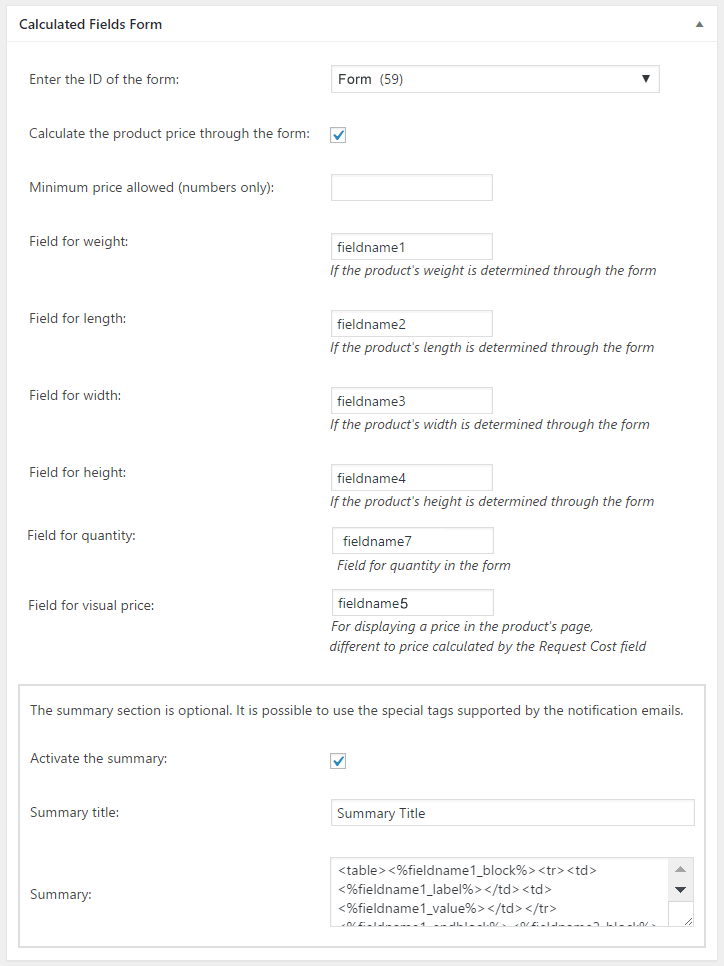
The add-on generates two global variables, for the id and price of the product where the form is inserted, called: woocommerce_cpcff_product and woocommerce_cpcff_product_price respectively.
For example, to duplicate the regular price of the product, insert a calculated field in the form with the following code as its equation:
woocommerce_cpcff_product_price*2
Related Information….
Easy Digital Download add-on
Platinum Version
The Platinum version of the plugin includes the Easy Digital Downloads add-on, to integrate the forms created by the «Calculated Fields Form» with the Easy Digital Downloads products. The add-on inserts an additional metabox in the EDD products, with multiple settings fields:
- Enter the ID of the form: Allows to select the form that will be associated to the product.
- Calculate the product price through the form: Allows calculate the price of the products through the form.
- Minimum price allowed: The minimum price applied to a product.
- Activate the summary: Allows customize the fields included in the cart page of Easy Digital Downloads.
- Summary title: Enter the summary title.
- Summary: Define the summary, are accepted all special tags supported by the notification emails and the thank you page.
Note: If you want calculate the price of products through the form, will be required that you select the field of the price in the attribute: «Request cost» in the form’s settings.
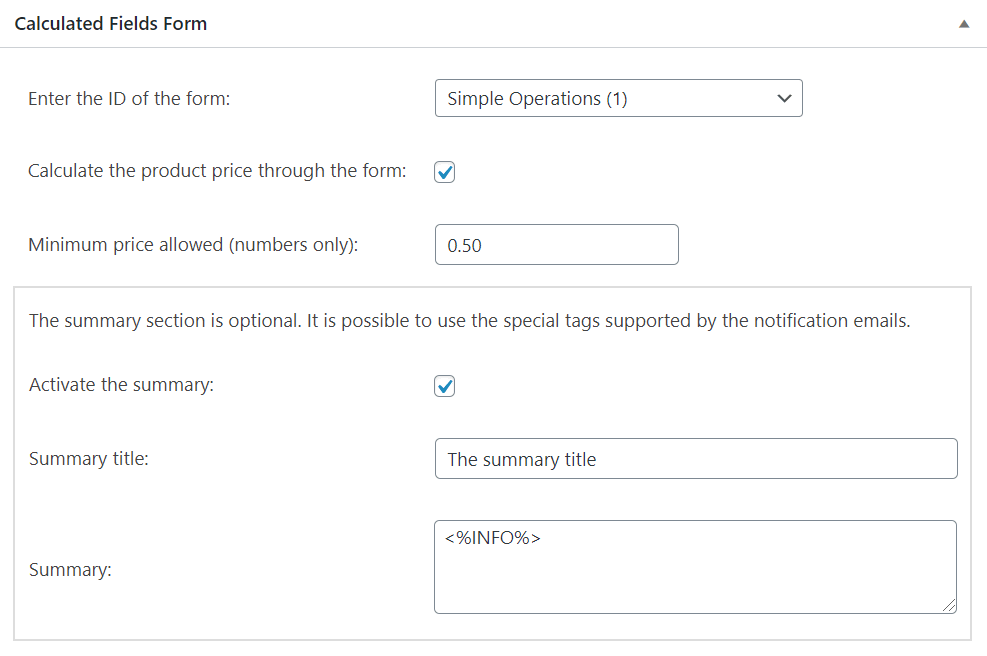
Some considerations:
- The form will be included only in the products pages, and not in the list of products inserted through the [downloads] and [edd_downloads] shortcodes.
- It is not recommended the use of the add-on in products where is enabled variable pricing.
- The form disables the AJAX submission.
- After purchases the users will be redirected to the checkout page.
- Every purchase will be added as a separated item in the shopping cart, disabling the quantity box.
- Replaces the label of the purchase button, with the label of the submit button in the form’s settings.
Related Information….
MailPoet add-on
Platinum Version
![]()
The platinum version of the plugin includes the «MailPoet» add-on. It allows to add new subscribers to the MailPoet Mailing Lists (MailPoet Version 2 and MailPoet Version 3) with the information collected by the forms. The add-on adds a new metabox in the form’s settings, to create the relationship between the form’s fields and the data required by MailPoet:

- Firstname field: enter the name of the field in the form that collect the user’s first name (this attribute is optional).
- Lastname field: enter the name of the field in the form that collect the user’s last name (this attribute is optional).
- Email field: enter the name of the field in the form that collect the email (this attribute is required). It is possible to define multiple fields for emails to subscribe multiple users to MailPoet
- Mailing lists: this section includes an option for each mailing list active in MailPoet. It is possible pre-select the mailing list(s) to associate with the form, or allow the users select the mailing list by teirself. If the option to allow the users take the decision is selected, it is necessary insert a «HTML Content» field in the form, and enter in its content a DIV tag with an unique ID, and enter this ID into the «container» box, furthermore, it is possible configure the mailing lists as required fields in the form.
AffiliateWP add-on
Platinum Version
![]()
The platinum version of the plugin includes the «AffiliateWP» add-on. AffiliateWP is a WordPress plugin that gives the affiliate marketing tool needed to grow a business and make more money.
The add-on is enabled through the settings page of the plugin, ticking the «CFF — Affiliate WP» checkbox and pressing the «Activate/Deactivate addons» button.
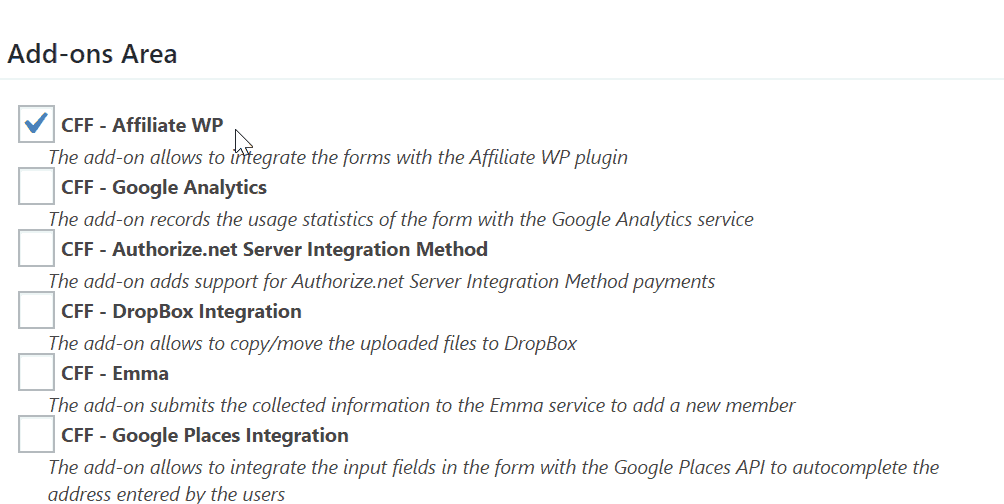
The add-on allows to integrate the forms with the AffiliateWP plugin. It adds a new metabox in the form’s settings, to activate the integration and define the description to use with referrals:
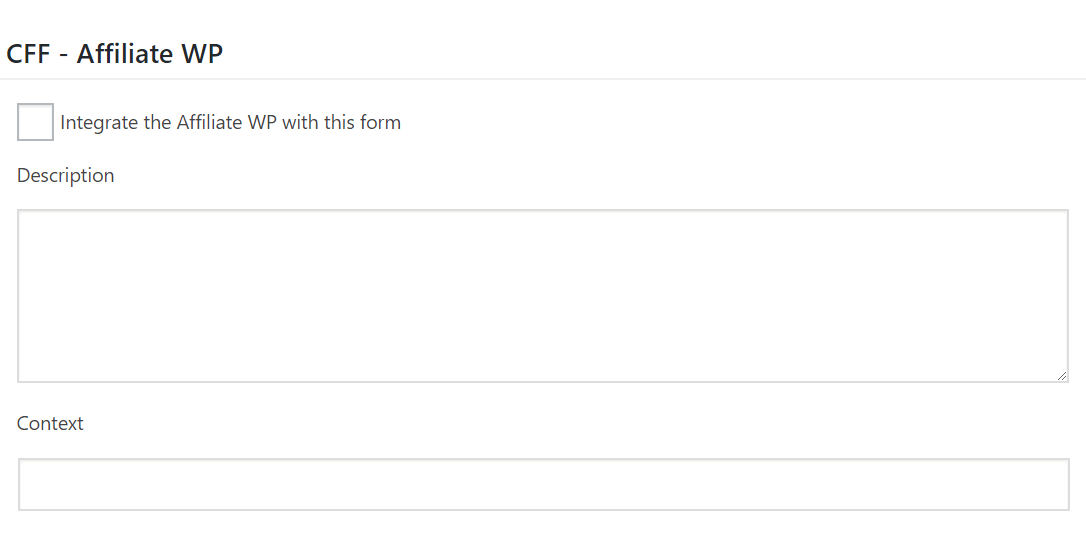
- Integrate the Affiliate WP with this form: Tick the checkbox to integrate the AffiliateWP plugin with the current form.
- Description: Enter the text to use as description of referrals in AffiliateWP.
It is possible to use the special tags supported by the notification emails and the thank you pages with the referrals’ descriptions. - Context: Enter the text to use as the context for the referral.
Google Analytics add-on
Platinum Version
![]()
* Google Analytics is a third party service not related to our company.
The platinum version of the plugin includes the «Google Analytics» add-on to generate the usage reports in «Google Analytics» about the interactions of users with the form. The add-on adds a new metabox in the forms settings, to configure the events and exceptions that are sent to «Google Analytics» and when:
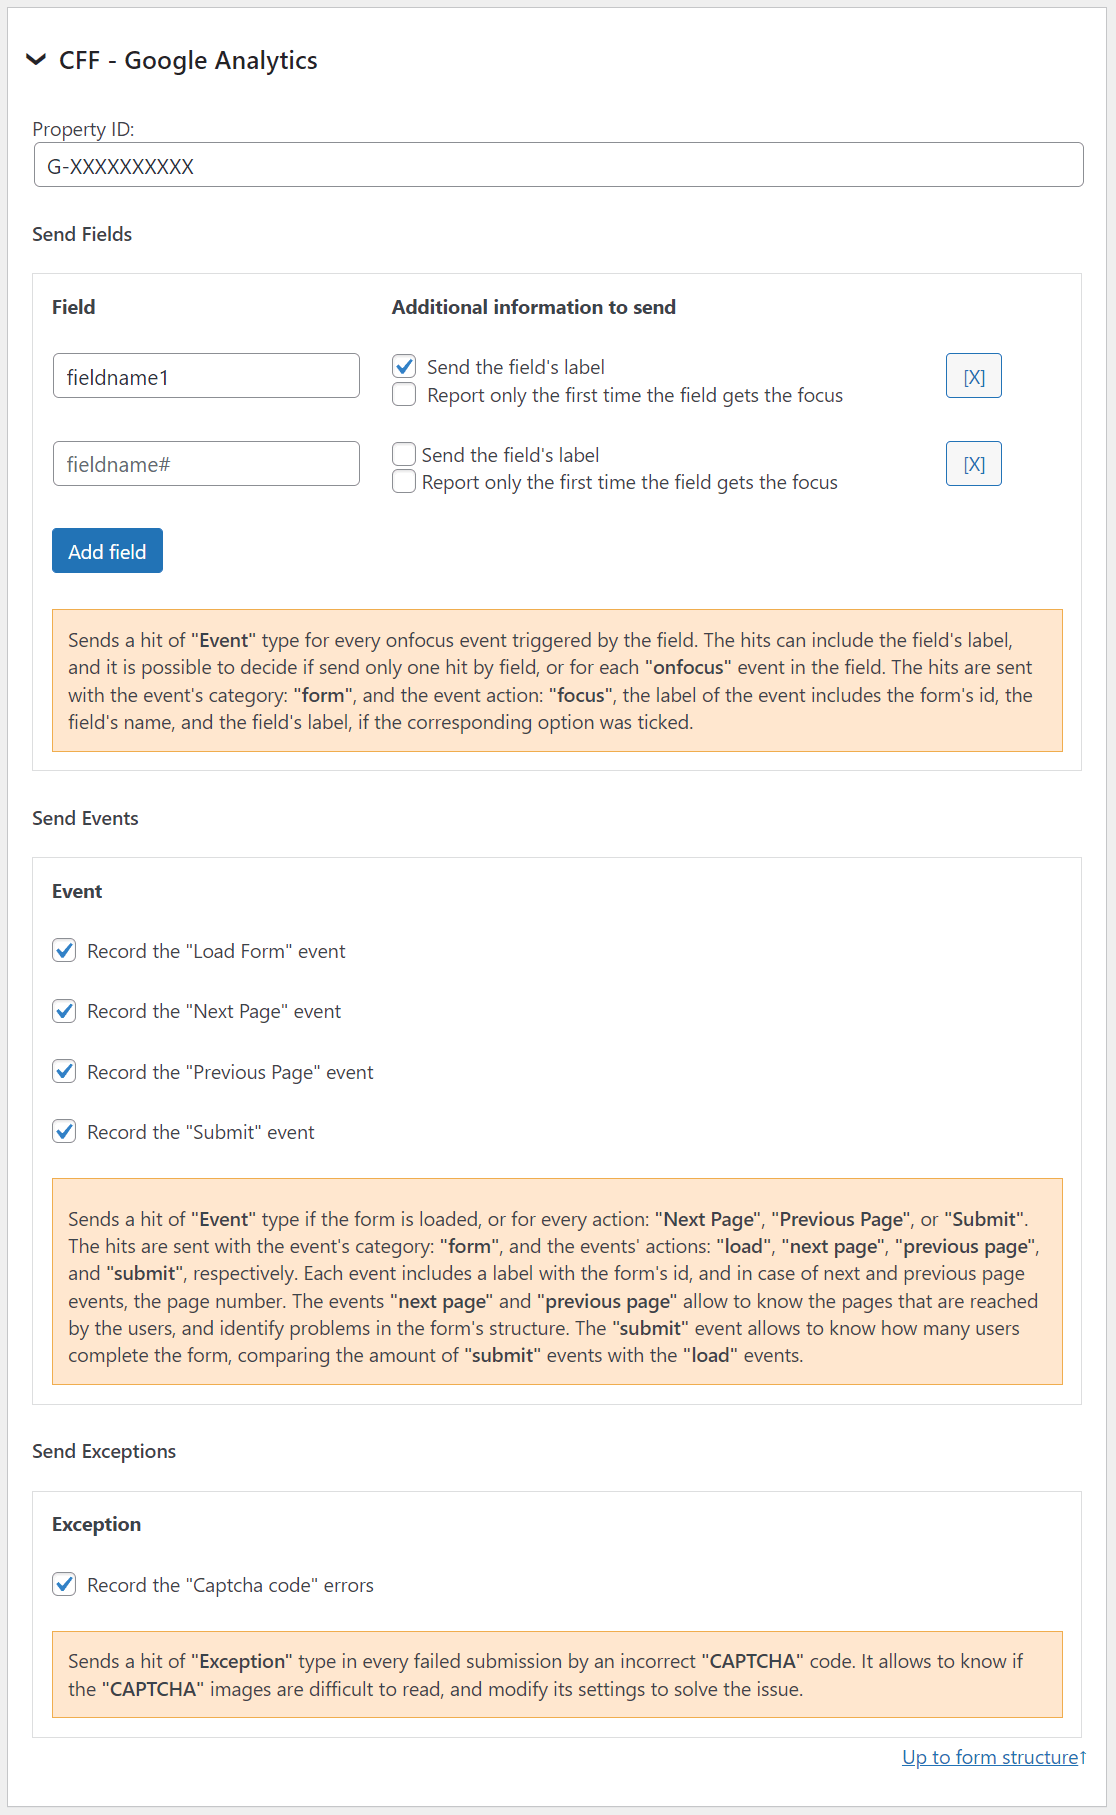
- Enter the property ID: property ID generated in Google Analytics.
- Send Fields section: enter the form’s fields (fieldname#), and select the information to be sent to Google Analytics, and when.
Sends a hit of «Event» type for every onfocus event triggered by the field. The hits can include the field’s label, and it is possible to decide if send only one hit by field, or for each «onfocus» event in the field. The hits are sent with the event’s category: «form», and the event action: «focus», the label of the event includes the form’s id, the field’s name, and the field’s label, if the corresponding option was ticked.
- Send Events section: tick the checkbox corresponding to each event to be reported to Google Analytics.
Sends a hit of «Event» type if the form is loaded, or for every action: «Next Page», «Previous Page», or «Submit». The hits are sent with the event’s category: «form», and the events’ actions: «load», «next page», «previous page», and «submit», respectively. Each event includes a label with the form’s id, and in case of next and previous page events, the page number. The events «next page» and «previous page» allow to know the pages that are reached by the users, and identify problems in the form’s structure. The «submit» event allows to know how many users complete the form, comparing the amount of «submit» events with the «load» events.
- Send Exceptions section: tick the checkbox corresponding to the exceptions to be reported to Google Analytics.
Sends a hit of «Exception» type in every failed submission by an incorrect «CAPTCHA» code. It allows to know if the «CAPTCHA» images are difficult to read, and modify its settings to solve the issue.
Google Places add-on
Platinum Version
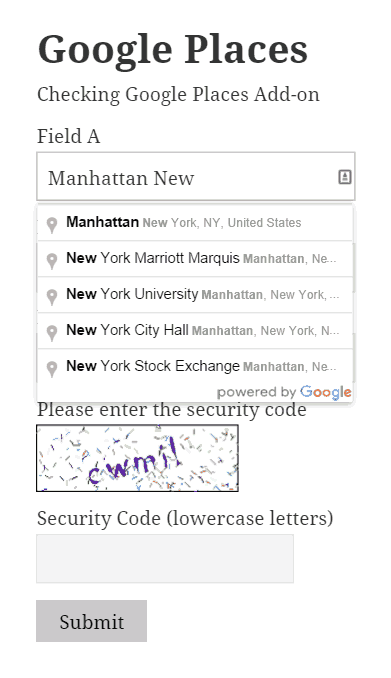
The add-on integrates the input fields in the form with the Google Places API to autocomplete the address entered by the users. The user only need to start typing the address, and the add-on displays a list of addresses matching with the typed text.
* Google Places is a third party service not related to our company. Google Places may charge for their service.
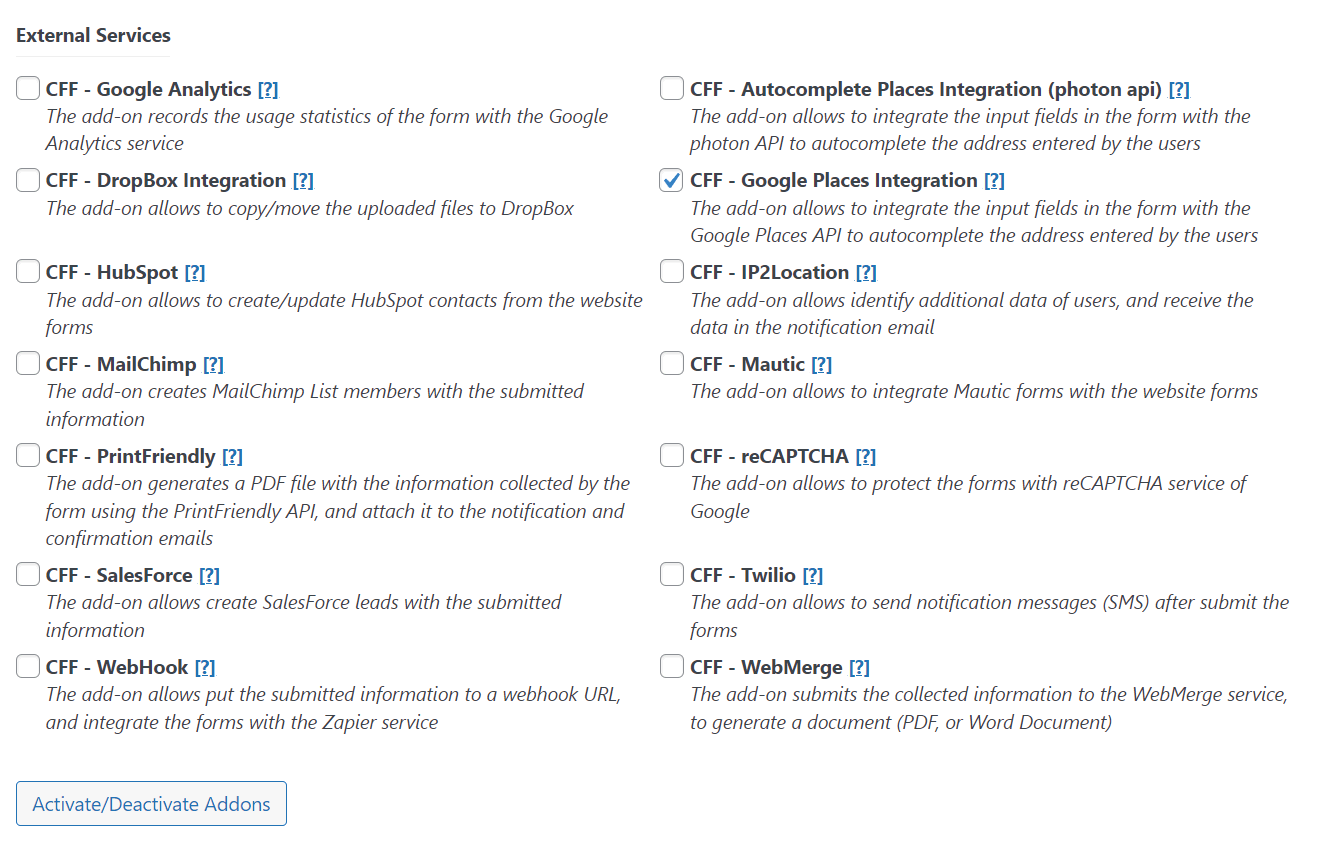
To activate the add-on, simply visit the plugin page through the menu option: «Settings/Calculated Fields Form», tick the checkbox: «CFF-Google Places», and press the «Update» button…
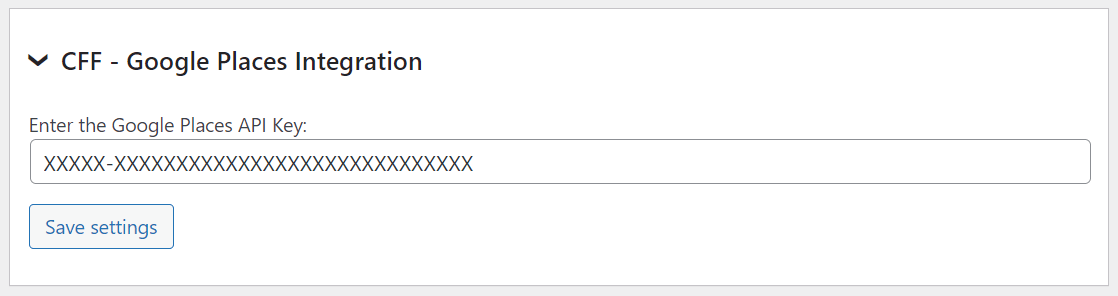
…the plugin displays a new dialog for entering the Google API Key.
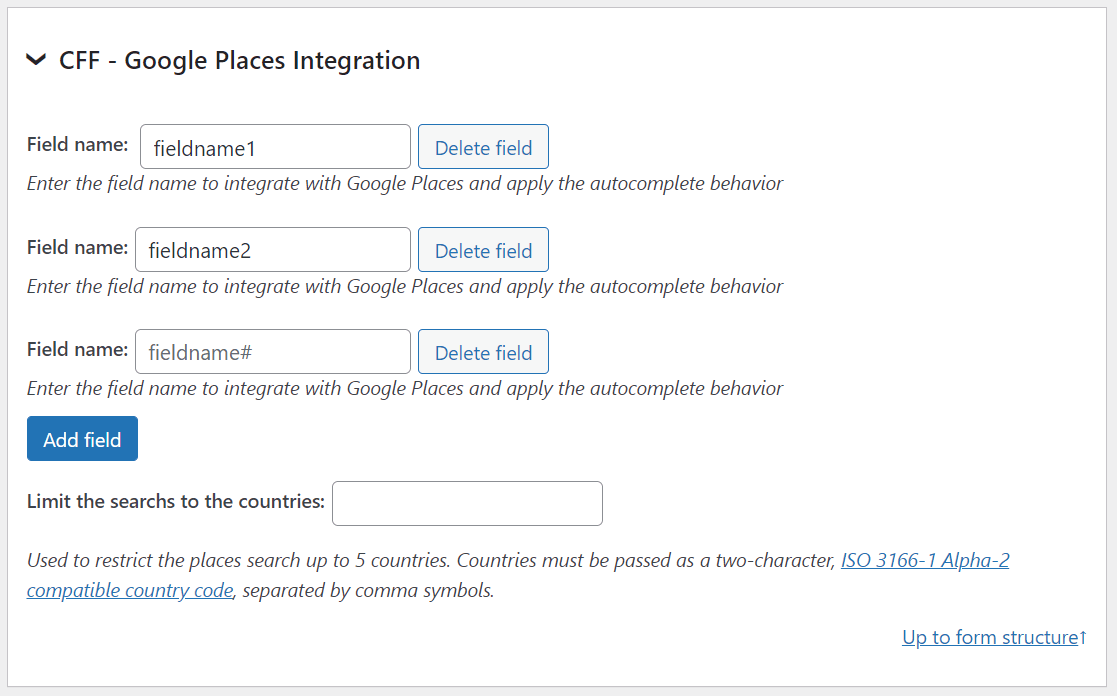
From the form’s settings, selects the fields to associate with the Google Places API. It is possible apply the Google Places API to multiple fields in the form.
Furthermore it is possible restrict the search to one or multiple countries (maximum 5). The countries must be passed as as a two-character code, separated by comma.
Related Information….
Autocomplete Places add-on
Platinum Version
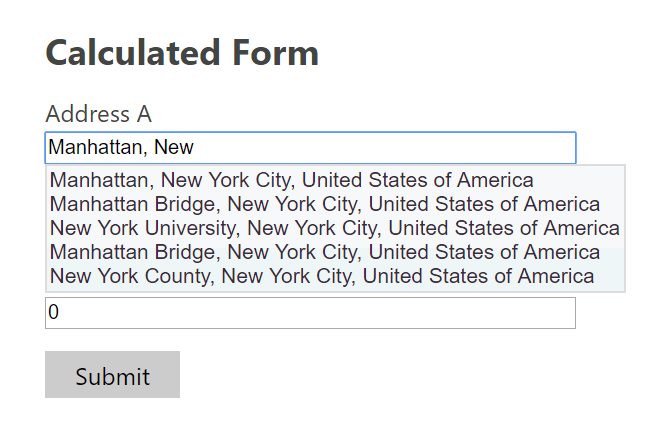
The add-on integrates the input fields in the form with the Photon API to autocomplete the address entered by the users. The user only need to start typing the address, and the add-on displays a list of addresses matching with the typed text.
* If you are using the default URL photon.komoot, it is a third party service not related to our company, and they decide the terms and conditions for the use of the API.

To activate the add-on, simply visit the plugin page through the menu option: «Settings/Calculated Fields Form», tick the checkbox: «CFF-Autocomplete Places Integration», and press the «Activate/Deactivate Addons» button…

…the plugin uses by default the photon.komoot api, however if you prefer to use your own photon installation, enter its URL in this section.
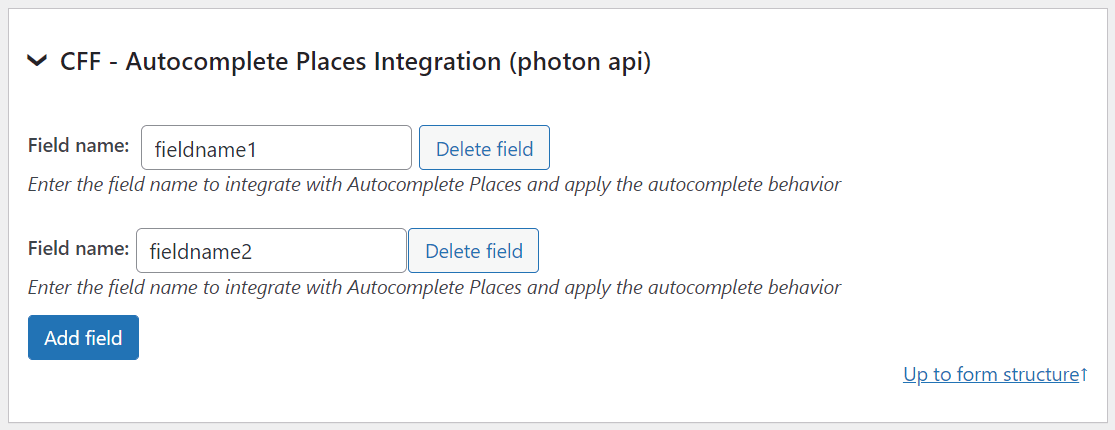
From the form’s settings, selects the fields to associate with the Autocomplete Places. It is possible apply the Autocomplete Places to multiple fields in the form.
Related Information….
reCAPTCHA add-on
Developer Version
Platinum Version
The add-on allows to protect the forms using the Google reCAPTCHA instead of the captcha distributed with the plugin. reCAPTCHA is more visual and intuitive than the traditional captcha, with just a single click the users confirm they are not a robot.
reCAPTCHA (its official name is No CAPTCHA reCAPTCHA) as they define themselves:
reCAPTCHA is a free service that protects your website from spam and abuse. reCAPTCHA uses an advanced risk analysis engine and adaptive CAPTCHAs to keep automated software from engaging in abusive activities on your site. It does this while letting your valid users pass through with ease.
reCAPTCHA offers more than just spam protection. Every time our CAPTCHAs are solved, that human effort helps digitize text, annotate images, and build machine learning datasets. This in turn helps preserve books, improve maps, and solve hard AI problems.
To use reCAPTCHA in your forms, activate the add-on in the the settings page of the plugin, through the menu option: «Settings/Calculated Fields Form», tick the checkbox: «CFF — reCAPTCHA», and press the «Update» button.
* Google reCaptcha is a third party service not related to our company.
The activation of reCAPTCHA displays a new section for entering the site key, and the secret key, two keys provided by Google reCAPTCHA to protect the website, and validate the forms submissions respectively.
If the site key and secret key were generated for an invisible reCAPTCHA, it si possible to tick the «Is it a key for invisible reCAPTCHA?» checkbox in the add-on settings to insert reCAPTCHA as invisible.
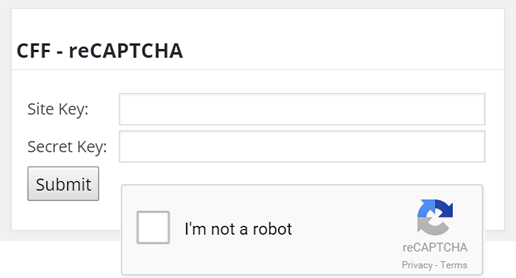
…through the form’s settings it is possible to select the language to apply (English by default).
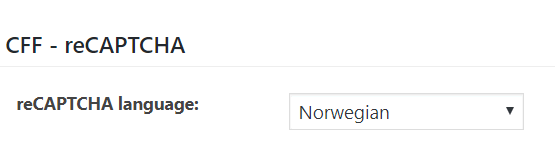
Related Information….
- DOC: Captcha section in the form’s settings
SalesForce add-on
Developer Version
Platinum Version
The add-on allows create new leads in the SalesForce account with the data submitted by the forms (https://www.salesforce.com).
* SalesForce is a third party service not related to our company. SalesForce may charge for their service.
To create new leads in SalesForce with the data submitted by a form, be sure that the SalesForce account has enabled the Web-to-lead option, and then go to the form’s settings:
- Enter the OID (Organization ID)
- For debugging the lead creation, tick the «Enabling debug» option, and enter the email address where receive the information. For production, untick the debugging option.
- Press the «Add attribute» button, select the Lead attribute, and enter a fixed text, or the name of the field in the form (fieldname#)
Note: The Add-on includes the list of predefined attributes of Leads, but it is possible to enter custom attributes too.
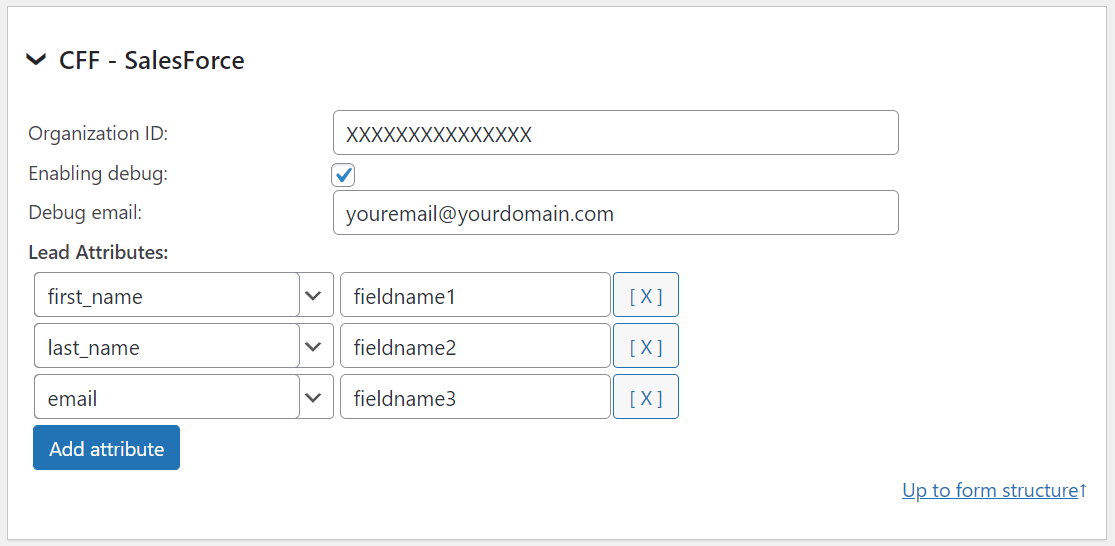
Related Information….
WebHook add-on
Developer Version
Platinum Version
The add-on allows posting the submitted information by the forms to WebHooks URLs. With the WebHook add-on it is possible integrate the forms created by the plugin with services like Zapier, Microsoft Flow, or IFTTT. Zapier, Microsoft Flow, and IFTTT connect services as important and popular as Zoho CRM, Dropbox, Mailchimp, Evernote, Google Drive, Facebook, Twitter, and more than 300 services(Zapier apps, Microsoft Flow, IFTTT)
Use this add-on is as simple as entering the WebHooks URLs, through the CFF-WebHook section in the forms settings, and tick the checkbox for sending to the webhook all fields submitted by the form, or define only some of fields. To associate multiple WebHooks to the form, simply press the «Add new url» button, and define the data for the new webhooks.
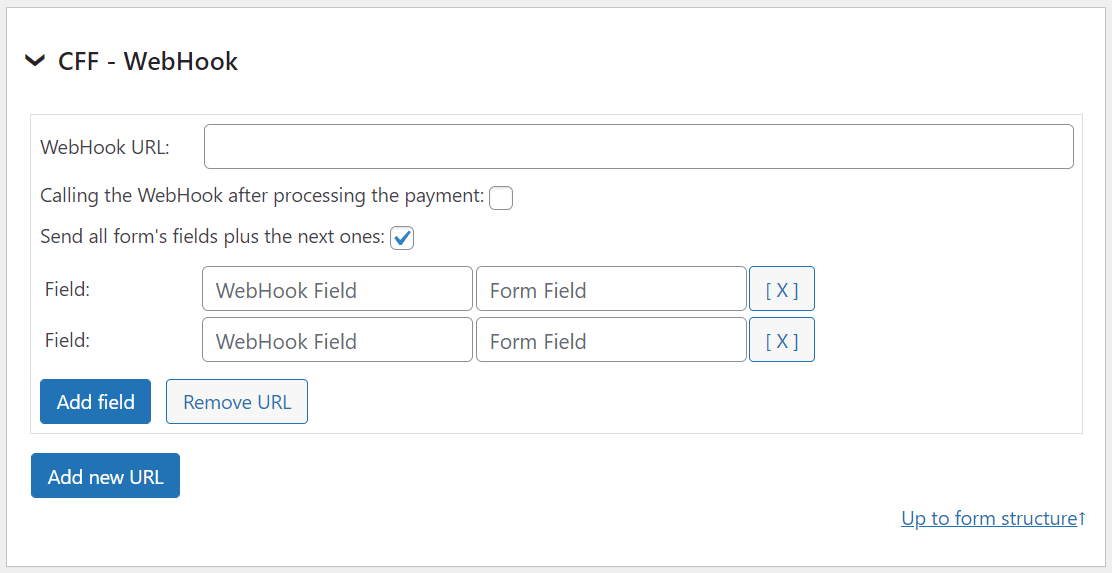
Note: Concerning to Zapier service, select Webhook as the Trigger app, and «Catch Hook» as the trigger for this app. For Microsoft Flow, select Request

* Zapier is a third party service not related to our company. Zapier may charge for their services.
* Microsoft Flow is a third party service not related to our company. Microsoft Flow may charge for their services.
* IFTTT is a third party service not related to our company. IFTTT may charge for their services.
Additional details reading a case of use in the following blog post: WebHook Add On
Related Information….
WebMerge add-on
Platinum Version
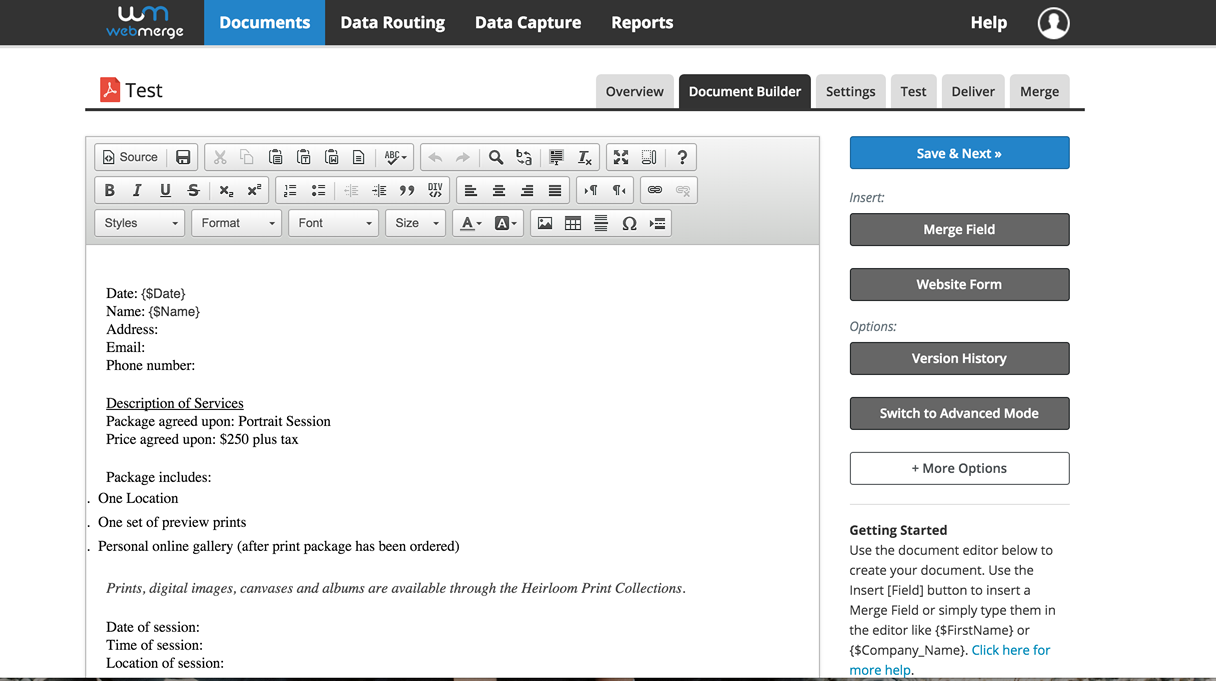
The add-on sends the information collected by the form to the FormStack documents service (formerly WebMerge) to generate a PDF file or Office document at runtime. Furthermore the generated document can be send to the user (https://www.webmerge.me/)
* FormStack documents is a third party service not related to our company. FormStack documents may charge for their service.

To activate the add-on, simply visit the plugin page through the menu option: «Settings/Calculated Fields Form», tick the checkbox: «CFF-WebMerge», and press the «Update» button…
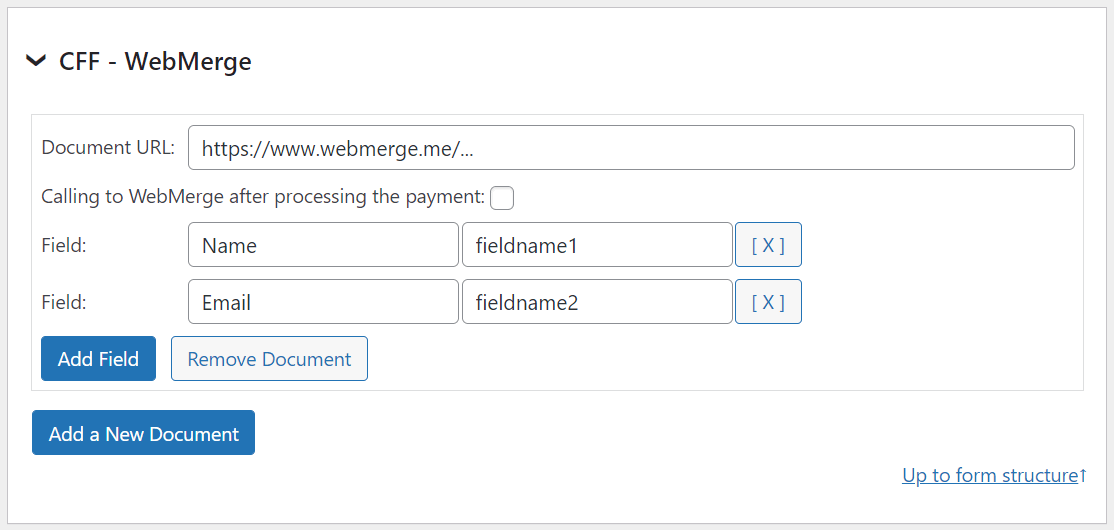
After activate the WebMerge add on, the form settings will include a new section for entering the URL to the FormStack document, and the correspondence between the variables in the document, and fields in the form.
Pressing the «Add a New Document» button it is possible to associate multiple documents to a same form, and pressing the «Add Field» button it is possible associate multiple variables and form fields to a document.
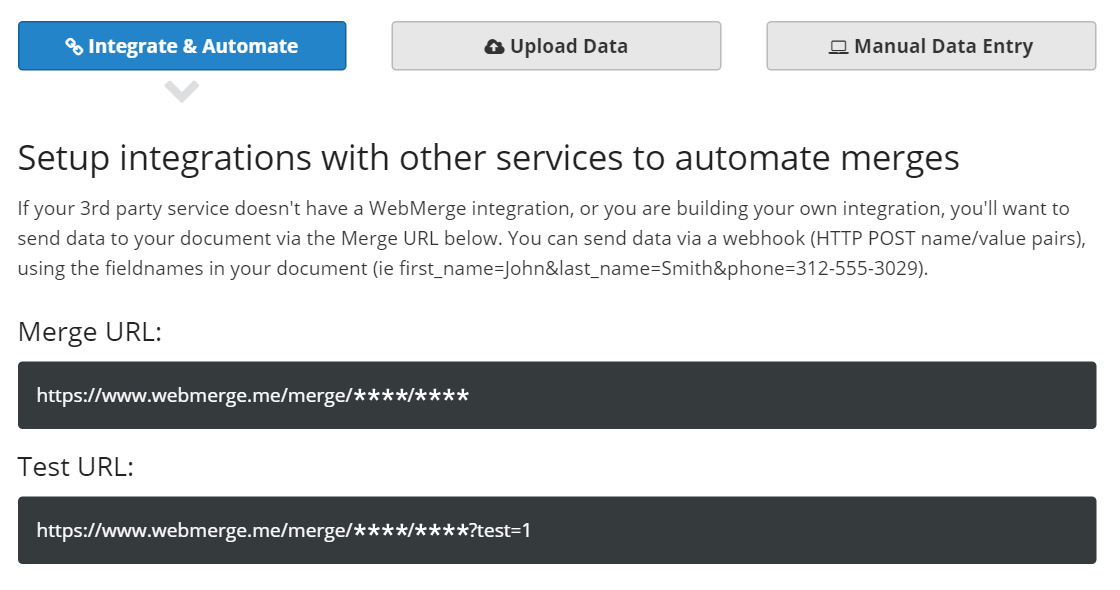
Each document in FormStack has its own URL with the corresponding ID and Key code.
Additional details reading a case of use in the following blog post: Generating PDF files at runtime with the information collected by the form
Using the WebMerge or WebHook add-on to integrate the form with Silverpop (Today IBM Watson Campaign Automation)
https://www.silverpop.com
-
In Silverpop (SP), build and publish a landing page form with all fields you want to use.
From the web form properties, find the block of code labeled «External form post»
-
If the form tag has a structure similar to:
<form method=»post» action=»http://mycompany.mkt9999.com/subgroup/myform» pageId=»12345678″ siteId=»123456″ parentPageId=»12345678″>Enter as the WebMerge (FormStack) document the URL (or the WebHook URL in the case of WebHook add-on): http://mycompany.mkt9999.com/myform?pageId=12345678&siteId=123456&parentPageId=12345678
-
Copy the «name» attributes of every field in the form, including the «hide» fields, to create the correspondence between the fields in the Silverpop form, and the name of fields in the form created with our plugin.
For example, in the tag:
<input type=»text» name=»Last Name» id=»control_COLUMN4″ class=»textInput defaultText» style=»margin: 0 3px 5px 3px; height: 20px; width: 294px;»>
the field’s name would be: Las Name


Related Information….
Sendinblue Contact add-on
Platinum Version

Sendinblue is a SaaS solution for relationship marketing that offers a cloud-based marketing communication software suite with email marketing, transactional email, marketing automation, customer-relationship management, landing pages, Facebook ads, retargeting ads, SMS marketing, and more.
The add-on adds/updates Sendinblue contacts with the information collected by the form.
* Sendinblue is a third party service not related to our company. Sendinblue may charge for their service.
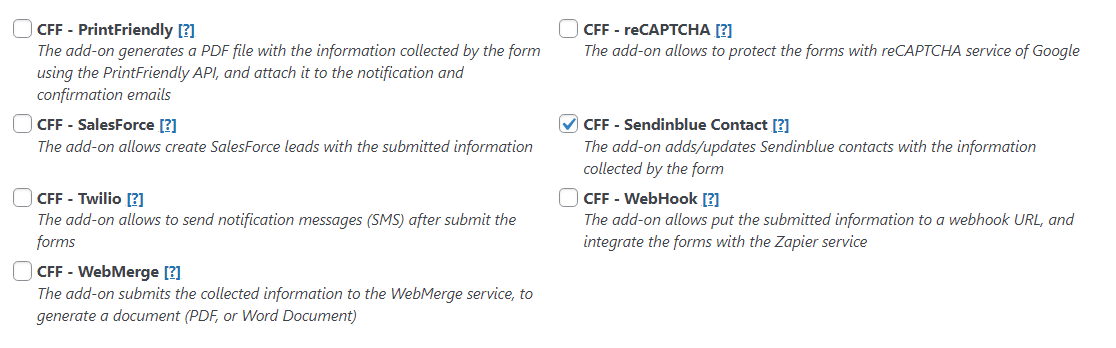
To activate the add-on, simply visit the plugin page through the menu option: «Calculated Fields Form/Addons», tick the checkbox: «CFF-Sendinblue Contact», and press the «Activate/Deactivate Addons» button…
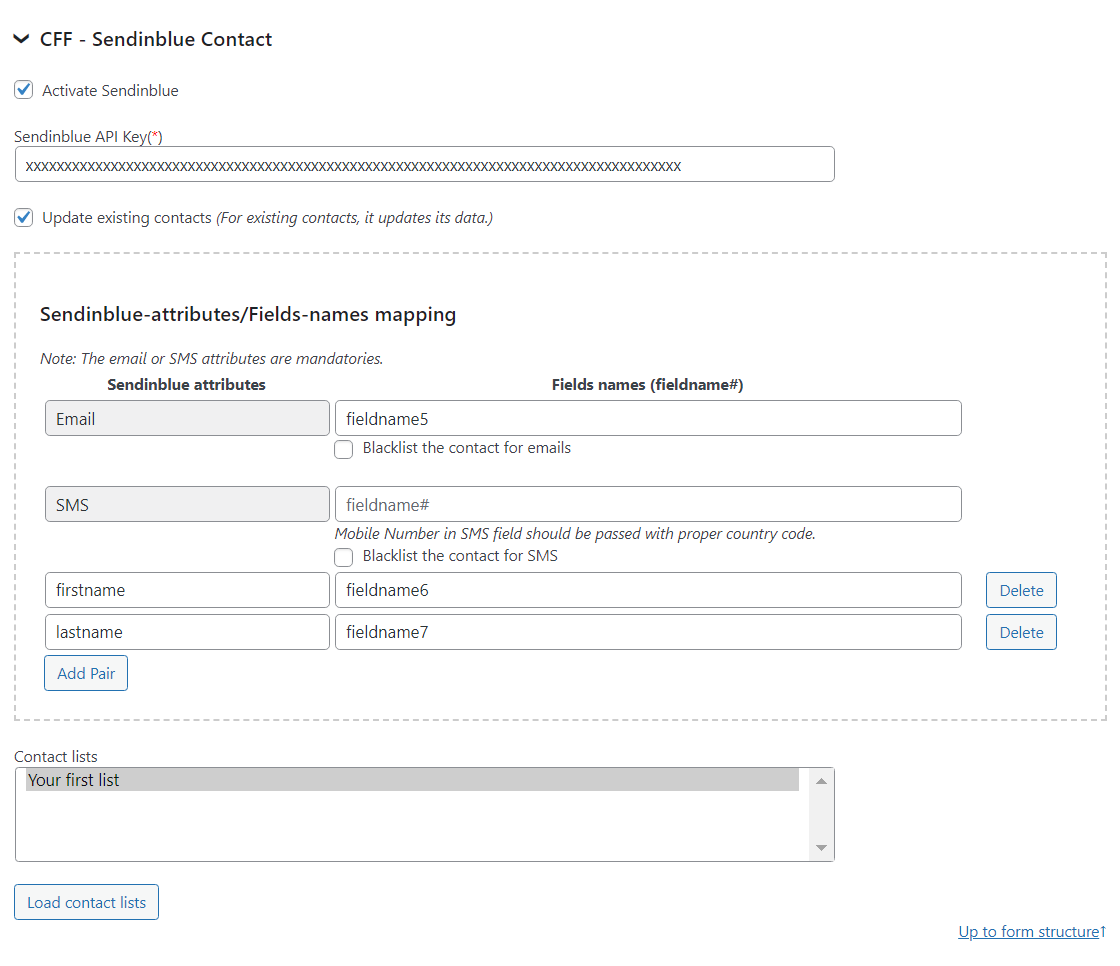
After activate the Sendinblue add on, the form settings will include a new section for entering the Sendinblue API Key and mapping the Sendinblue attributes and form fields.
Sendinblue Contact Settings
- Activate Sendinblue: Activate/Deactivate Sendinblue in the form.
- Sendinblue API Key: Enter the Sendinblue API Key.
- Update existing contacts: Tick the checkbox to update the existing contact entries.
- Sendinblue-attributes/Fields-names mapping: Enter Sendinblue attributes, and fields’ names in fieldname# format.
- Contact lists: Select the contact lists where adding the contact.
PrintFriendly add-on
Platinum Version

The add-on integrates the form with the PrintFriendly API to generate a PDF file after the form be submitted, and attach the resulting file to the notification emails (https://www.printfriendly.com/)
* PrintFriendly is a third party service not related to our company. PrintFriendly may charge for their service.
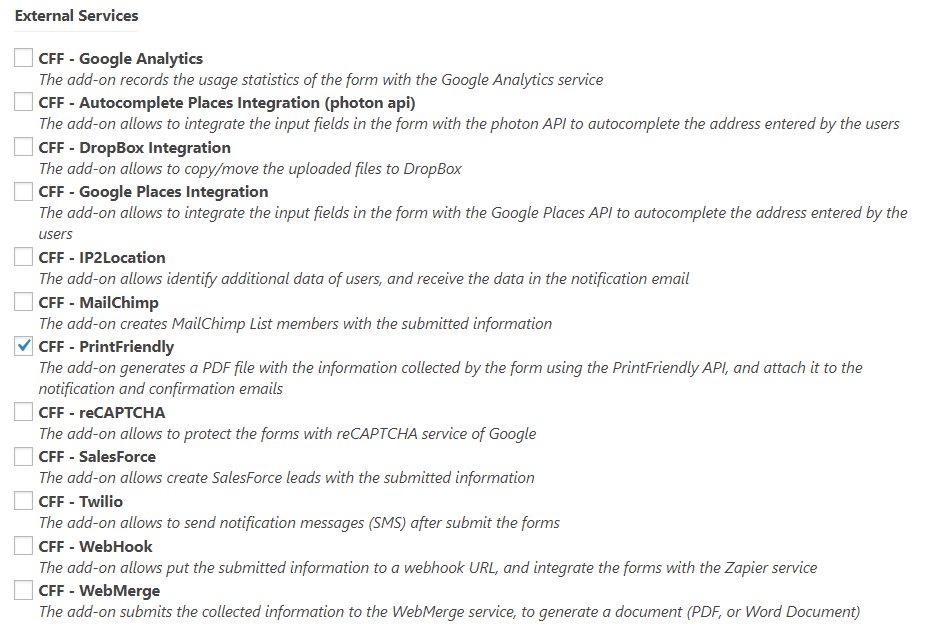
To activate the add-on, simply visit the plugin page through the menu option: «Settings/Calculated Fields Form», tick the checkbox: «CFF-PrintFriendly», and press the «Activate/Deactivate Addons» button…
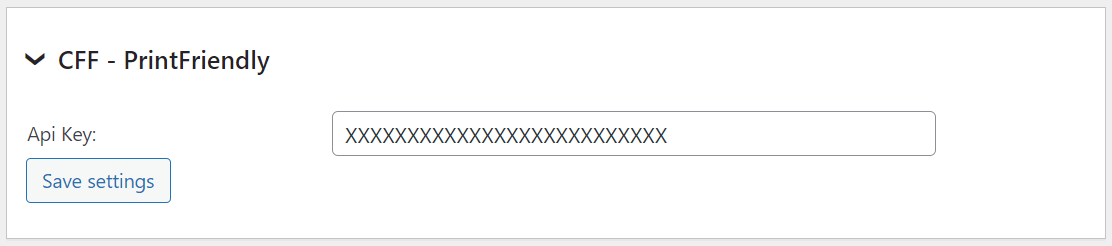
After activate the add-on will be shown a new section in the settings page of the plugin for entering the PrintFriendly API Key.
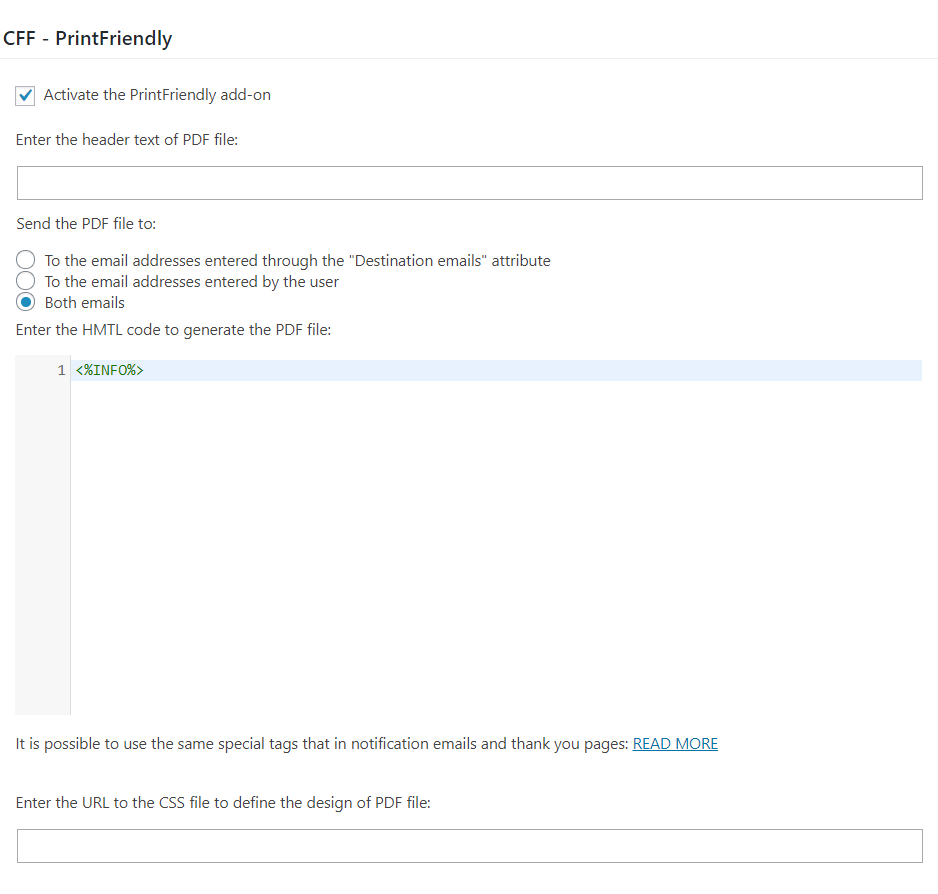
The PrintFriendly add on shown a new section in the form’s settings for entering the HTML code with the file’s structure, and input box for entering the text to display as header, and another input box for entering the URL to the CSS file to define the file’s design.
Note: into the file’s structure you can use the same special tags supported by the thank you pages and notification emails.
Related Information….
DropBox Integration add-on
Platinum Version
The «DropBox Integration» add-on allows to copy or move the uploaded files through the forms to a DropBox.
* DropBox is a third party service not related to our company.
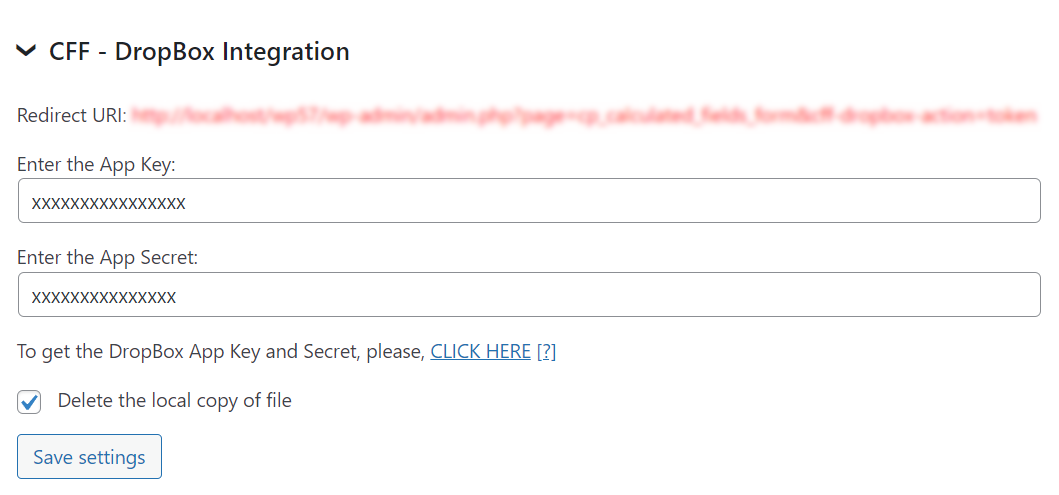
Enter the App Key and App Secret of your DropBox App.
To remove the copies of files from the WordPress website, tick the checkbox: «Delete the local copy of file».
Note: To copy the files to the DropBox account is required create a DropBox App, and generate a token access.
Access your account, to the reserved area where configure an App: https://www.dropbox.com/developers/apps/create
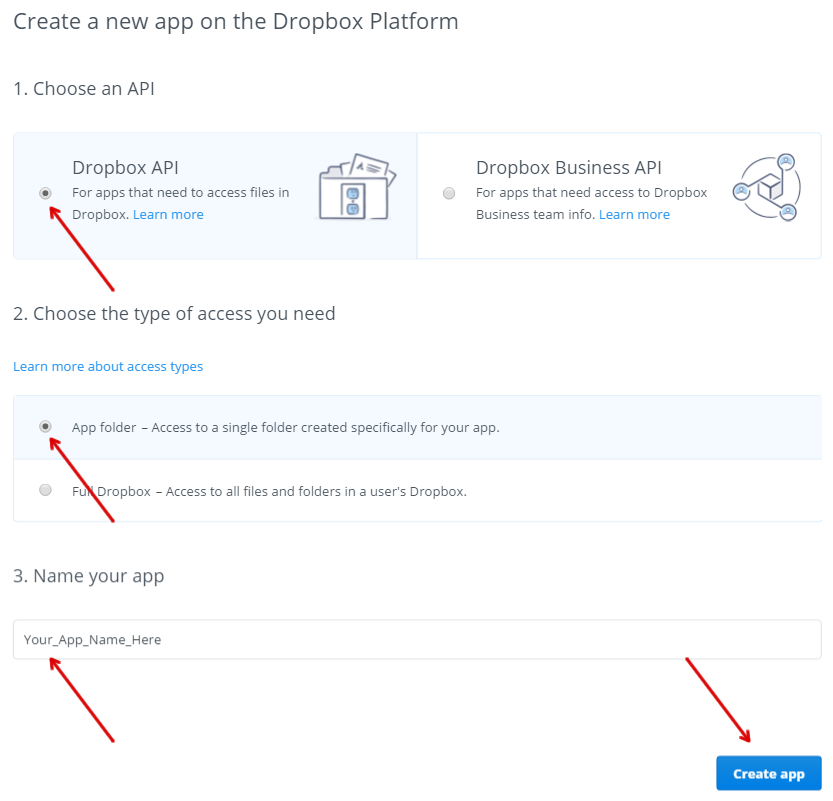
- Select the «Dropbox API» option.
- Select the «App folder» option.
- Enter the application name.
- Press the «Create app» button.
In the next screen enter the Redirect URI
And copy the App Key and Secret and enter them in the add-on attributes.
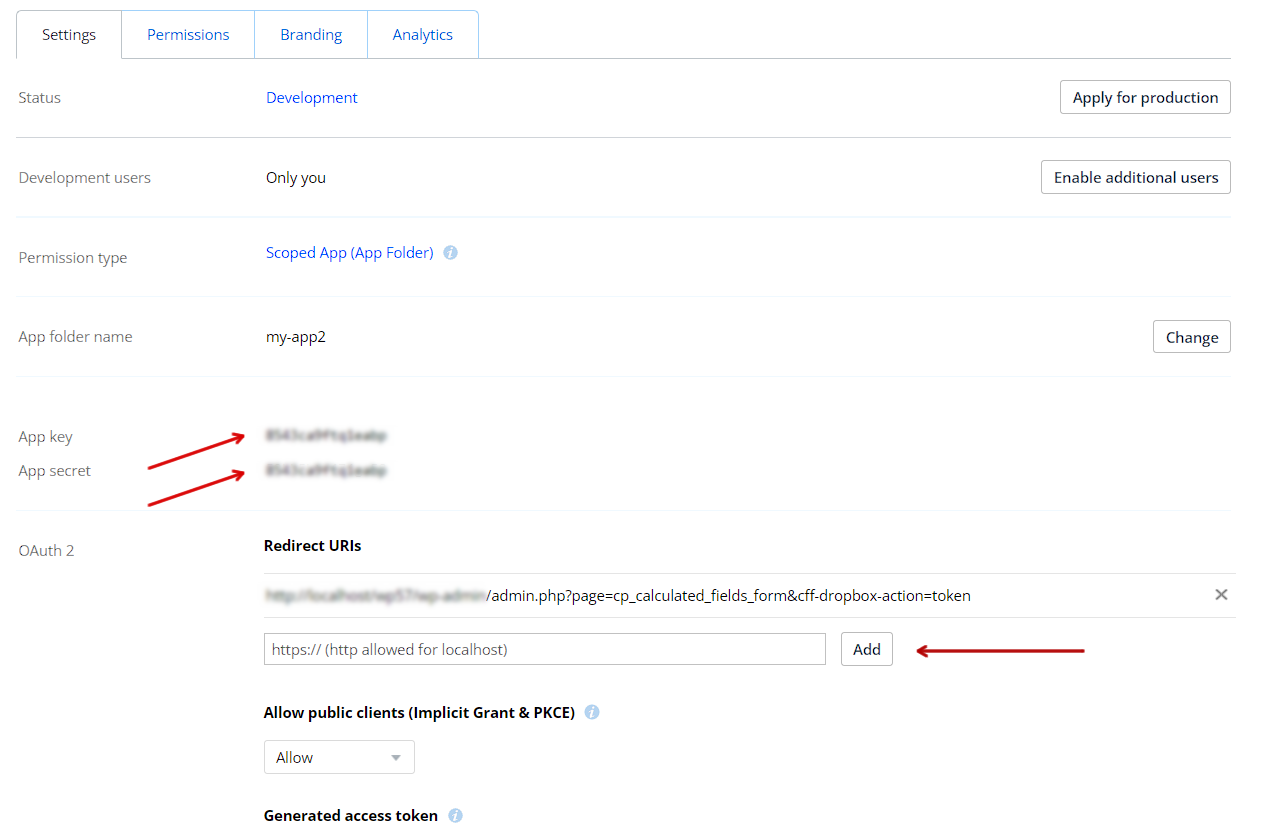
Finally, select the required persmissions from the permissions tab.
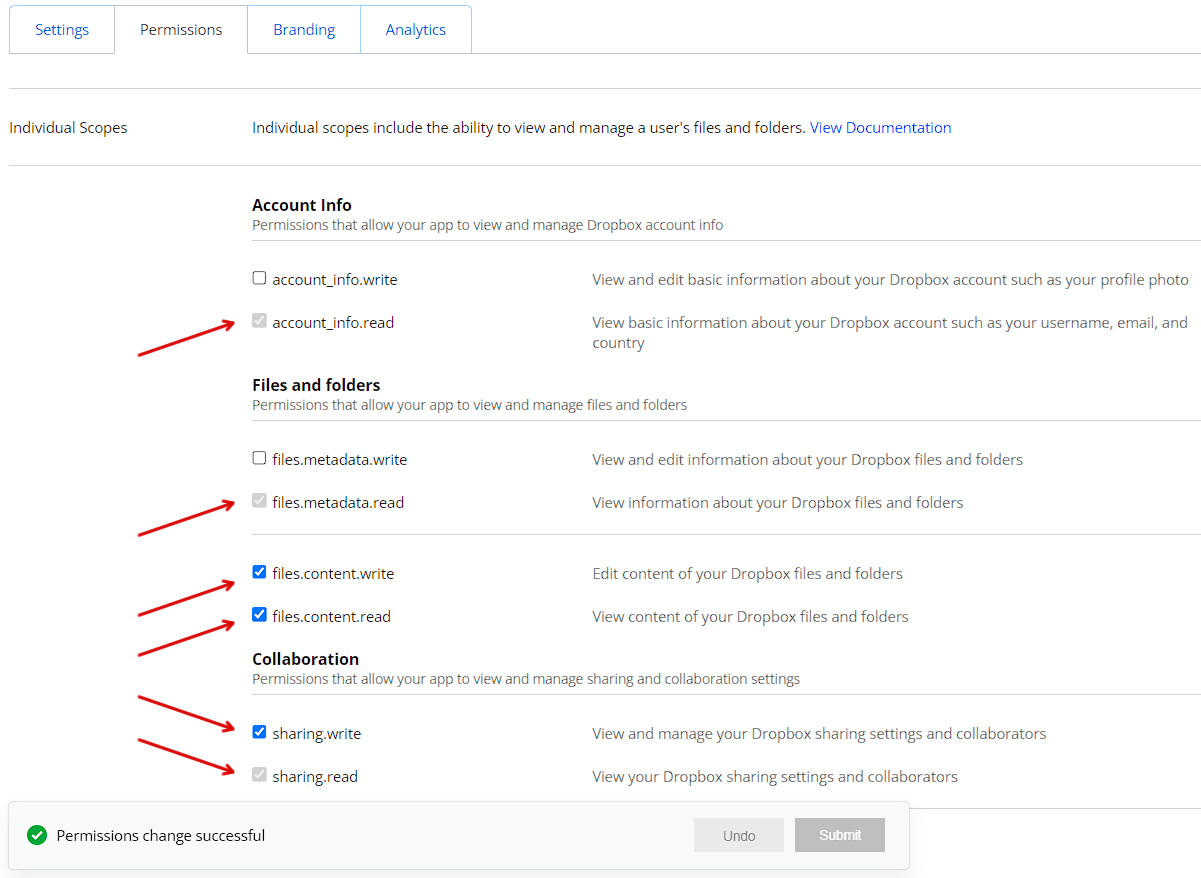
ip2location add-on
Platinum Version
The add on integrates the Calculated Fields Form with the ip2location databases to identify additional information of users based on their IP, as: Country, City Name, Coordinates, Weather Station, Time Zone, ZIP Code, etc…
* ip2location is a third party service not related to our company. ip2location may charge for their databases.
Note: Requires PHP 5.3 and over.
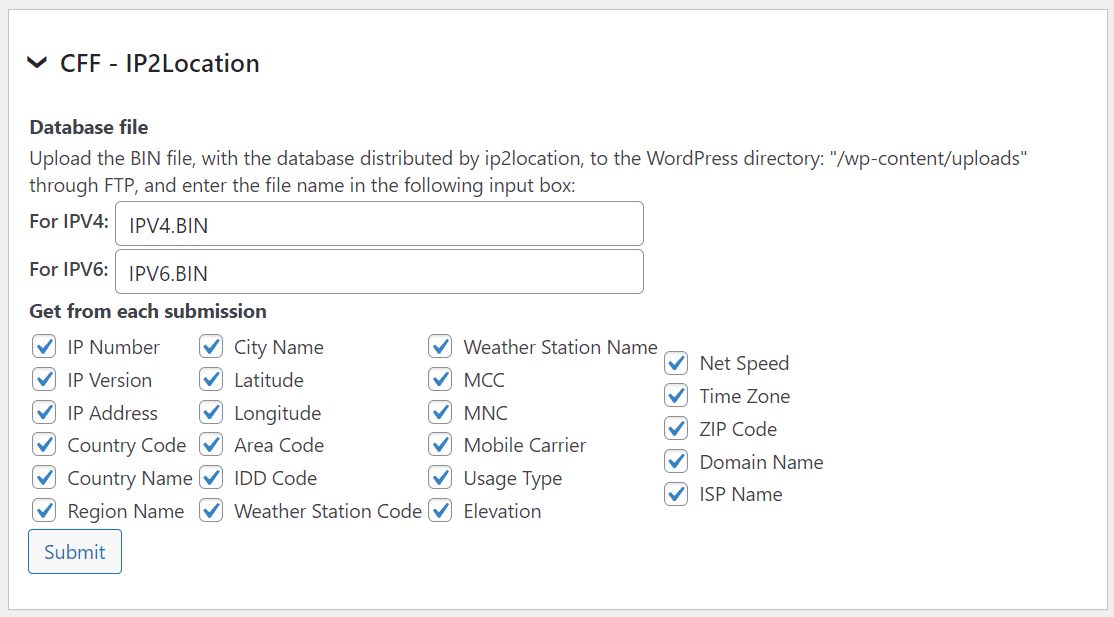
Uplods the ip2location database’s files to the correct location in the webserver (/wp-content/uploads/), and then, enters the files’ names in the add on settings
Tick the checkboxes of the information you want get of users.
If has been selected the option to include the users information in the notification emails, and the add-on is enabled, the notification email will include all extracted data.
MailChimp add-on
Platinum Version
![]()
The add-on creates new members in the MailChimp service with the information collected by the forms in the website: www.mailchimp.com.
MailChimp is an online email marketing solution to manage subscribers, send emails, and track results.
* MailChimp is a third party service not related to our company. MailChimp may charge for their service.
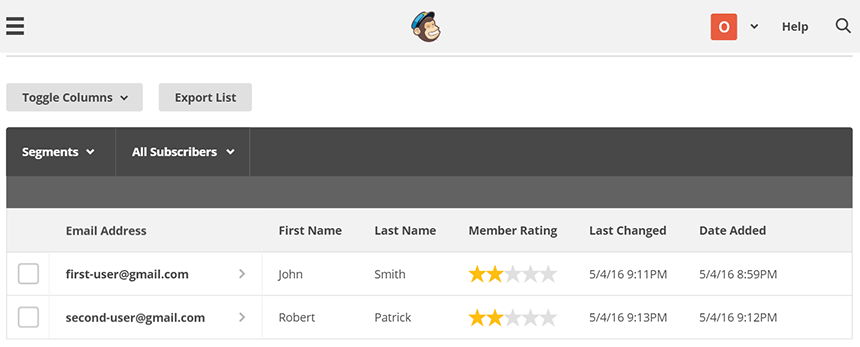
To activate the add-on, simply visit the plugin page through the menu option: «Settings/Calculated Fields Form», tick the checkbox: «CFF-MailChimp», and press the «Update» button…
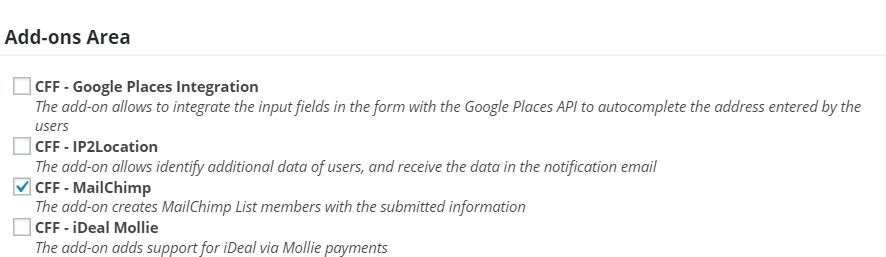
After activate the MailChimp add-on, the form settings will include a new section to create the correspondence between the signup form associated to a list in MailChimp, and the form fields in the form created with the «Calculated Fields Form» plugin.
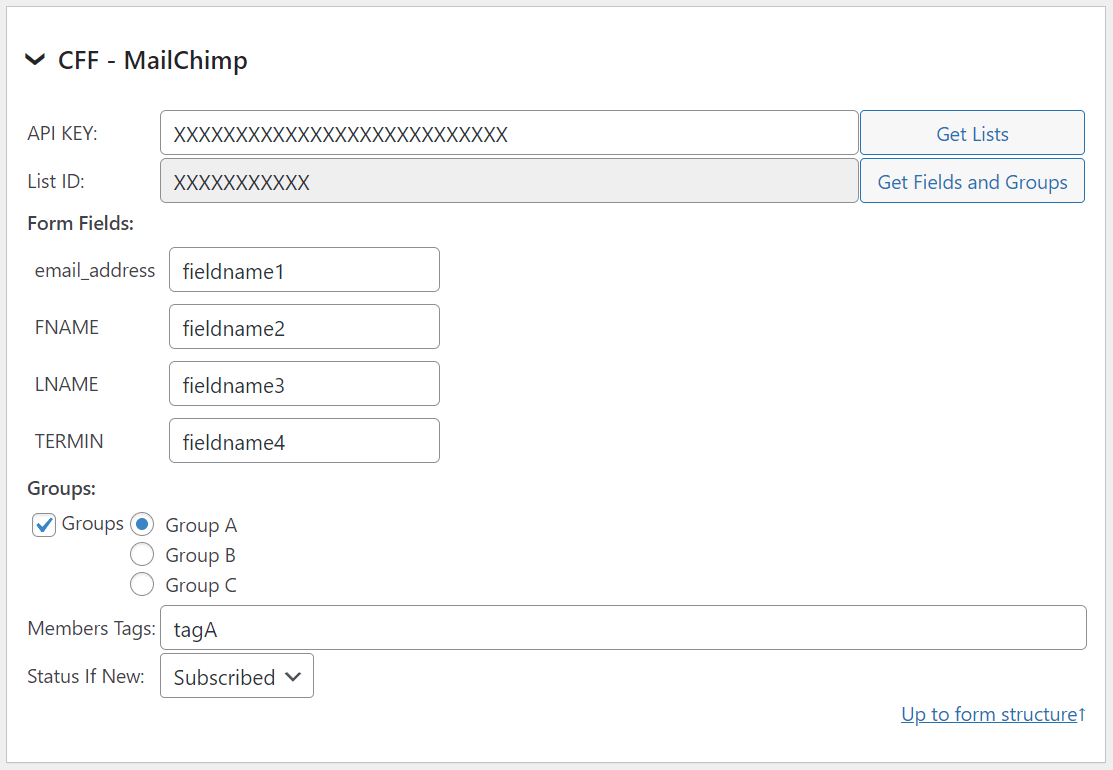
- Enter the API Key.
- Press the «Get Lists» button. The action generates a list with all «Lists» associated to the MailChimp account.
- Select the list and press the «Get Fields and Groups» button. The action displays multiple input fields, for connecting the fields in the form with the fields in the signup form of to the list, and the interests groups defined in MailChimp, that are displayed in the public form too to be selected by the users.
- Enter multiple tags separated by comma signs, in case you want to assign tags to the new members.
- Selects the status of new members. If pending is selected MailChimp will send an email to the new members with a confirmation link, and they would be added to the campaings only after visiting the confirmation links.
Related Information….
Mautic add-on
Platinum Version

The add-on creates new contacts (or update the existent ones) in the Mautic website with the information collected by the forms in the website.
Mautic offers the first open marketing cloud, enabling companies to connect all their digital properties and channels into a seamless customer experience.
* Mautic is a third party service not related to our company. Mautic may charge for their service.
To activate the add-on, simply visit the plugin page through the menu option: «Settings/Calculated Fields Form», tick the checkbox: «CFF-Mautic», and press the «Activate/Deactivate addons» button…

After activate the Mautic add-on, the form settings will include a new section to create the relationship between the fields in the Mautic form and the fields in the form created with the «Calculated Fields Form» plugin.
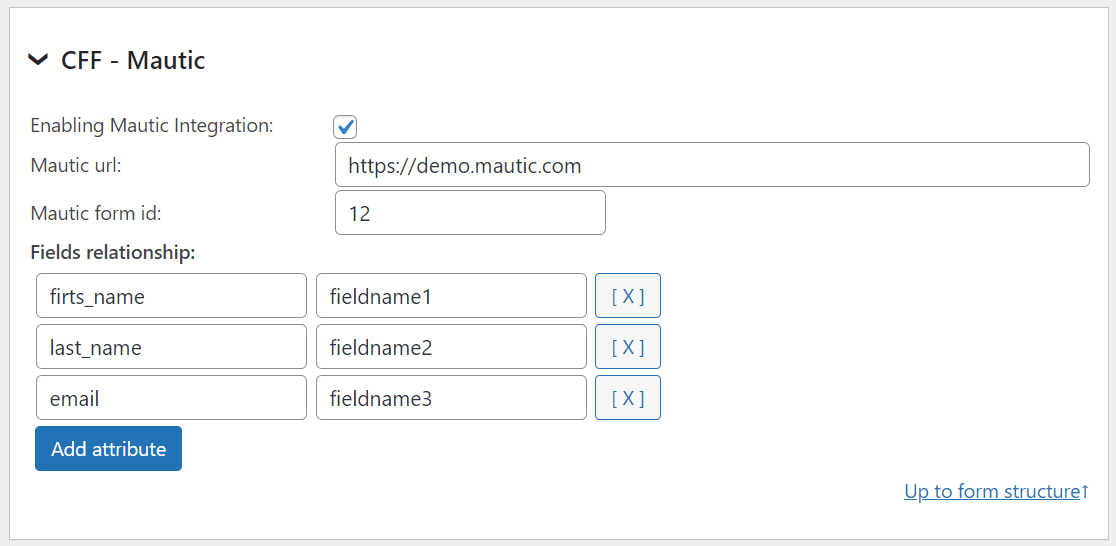
- Enable the integration with the Mautic form.
- Enter the URL to the Mautic website.
- Enter the id of the Mautic form.
- Press the «Add Attribute» button to create display the pair of box for entering the name of the field in the Mautic form at left, and the name of the field in the CFF form at rigth (Repeat the process for every pair of fields).
HubSpot add-on
Platinum Version

The add-on creates/updates contacts in the HubSpot website with the information collected by the forms on the website.
HubSpot is a developer and marketer of software products for inbound marketing and sales.
* HubSpot is a third party service not related to our company. HubSpot may charge for their service.
To activate the add-on, simply visit the plugin page through the menu option: «Settings/Calculated Fields Form», tick the checkbox: «CFF-HubSpot», and press the «Activate/Deactivate addons» button…

After activate the HubSpot add-on, the form settings will include a new section to create the relationship between the HubSpot attributes and the fields in the form created with the «Calculated Fields Form» plugin.
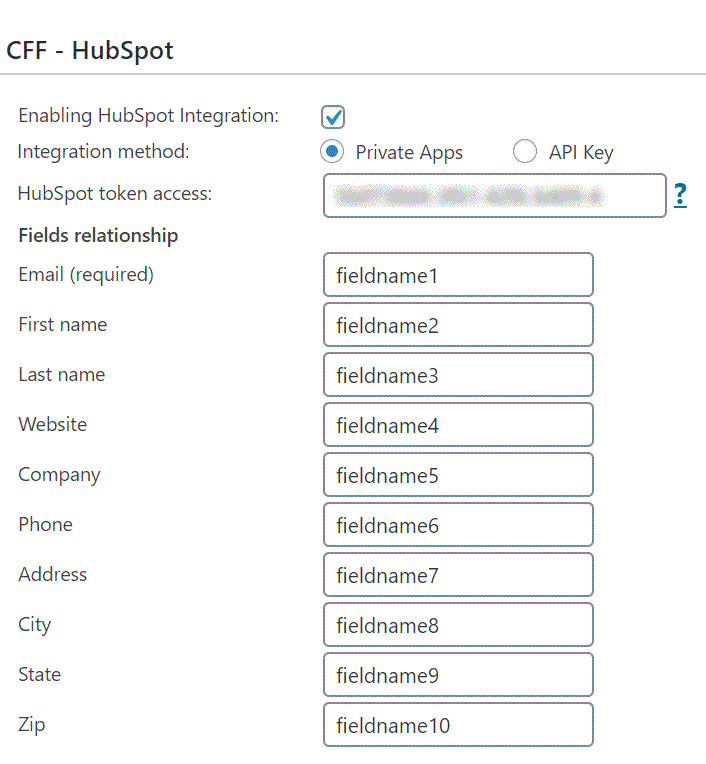
- Enable the integration with the HubSpot form.
- Select the integration mechanism. The possible alternatives are Private Apps or API Key. The API Key integration method will be disabled in the next months.
- Enter the HubSpot Access Token for the Private Apps mechanism or the Api Key.
- Enter the fields’ names corresponding to the attributes to populate in the HubSpot contact.
Related Information….
Emma add-on
Platinum Version
Emma’s digital marketing platform makes it easy to create beautifully designed emails that drive results. It helps to plan, execute, and optimize campaigns to hit the business goals faster.
The add-on adds new members to the Emma’s digital marketing platform with the information collected by the forms in the website.

* Emma is a third party service not related to our company. Emma may charge for their service.
To activate the add-on, simply visit the plugin page through the menu option: «Settings/Calculated Fields Form», tick the checkbox: «CFF-Emma», and press the «Update» button…
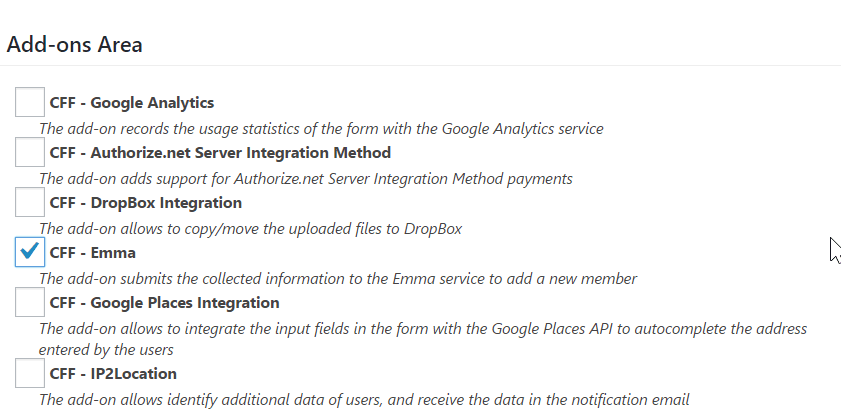
After activate the Emma add-on, would be available a new section for entering the «Account ID», «Public API Key», and «Private API Key» associated to the Emma account.
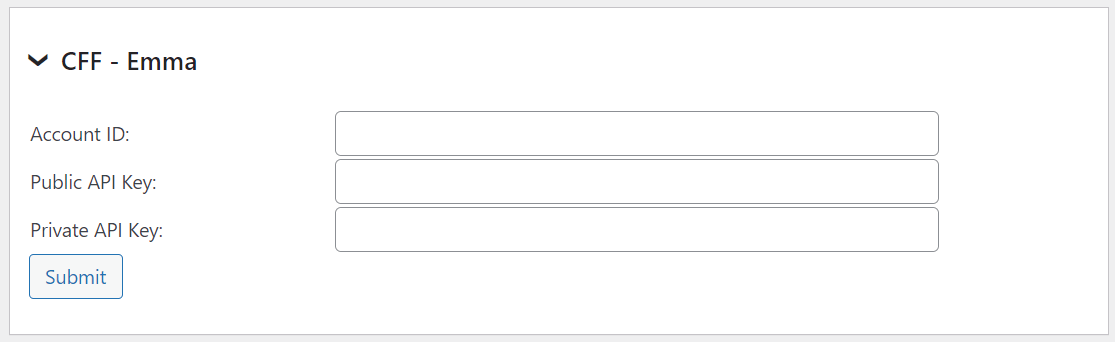
The Emma add-on includes a new section in the form’s settings to create the relationship between the Emma fields and form’s fields (press the «Get Fields» button to get the complete fields list), and select the Emma groups where to add the new members (press the «Get Groups» button to get the complete list of groups).
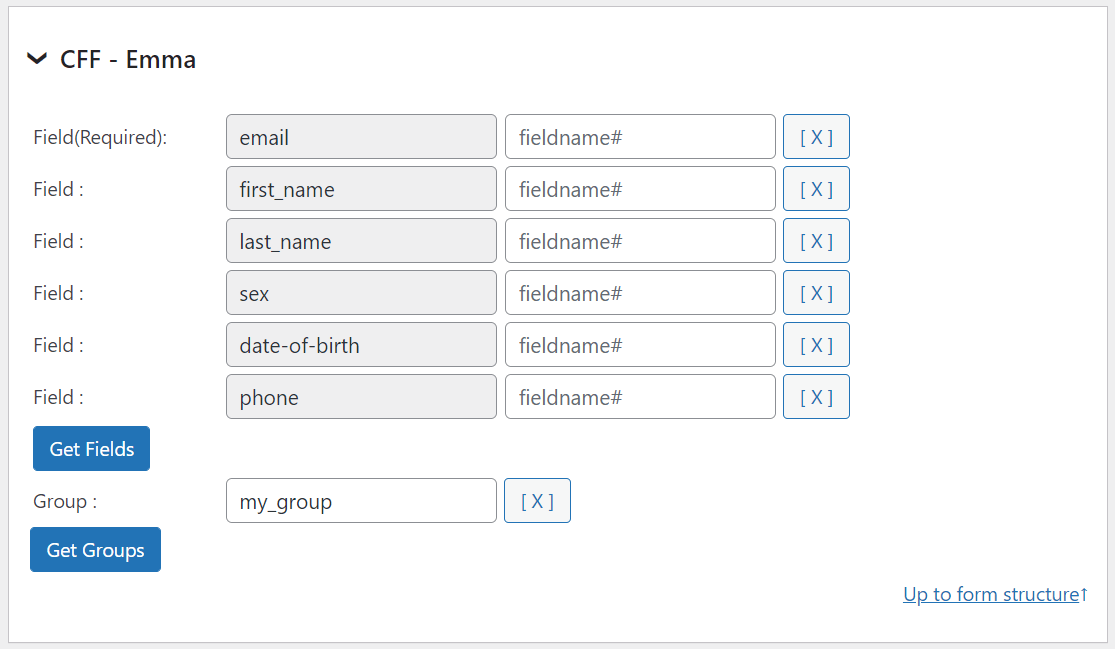
Twilio add-on
Platinum Version
The Twilio service allows sending messages (SMS) to mobile phones around the world.
The add-on integrates the forms with the Twilio service for sending notification messages (SMS) after submit the forms.

* Twilio is a third party service not related to our company. Twilio may charge for their service.
To activate the add-on, simply visit the plugin page through the menu option: «Settings/Calculated Fields Form», tick the checkbox: «CFF-Twilio», and press the «Activate/Deactivate addons» button…

After activate the Twilio add-on, would be available a new section section in the form’s settings for entering the required data.
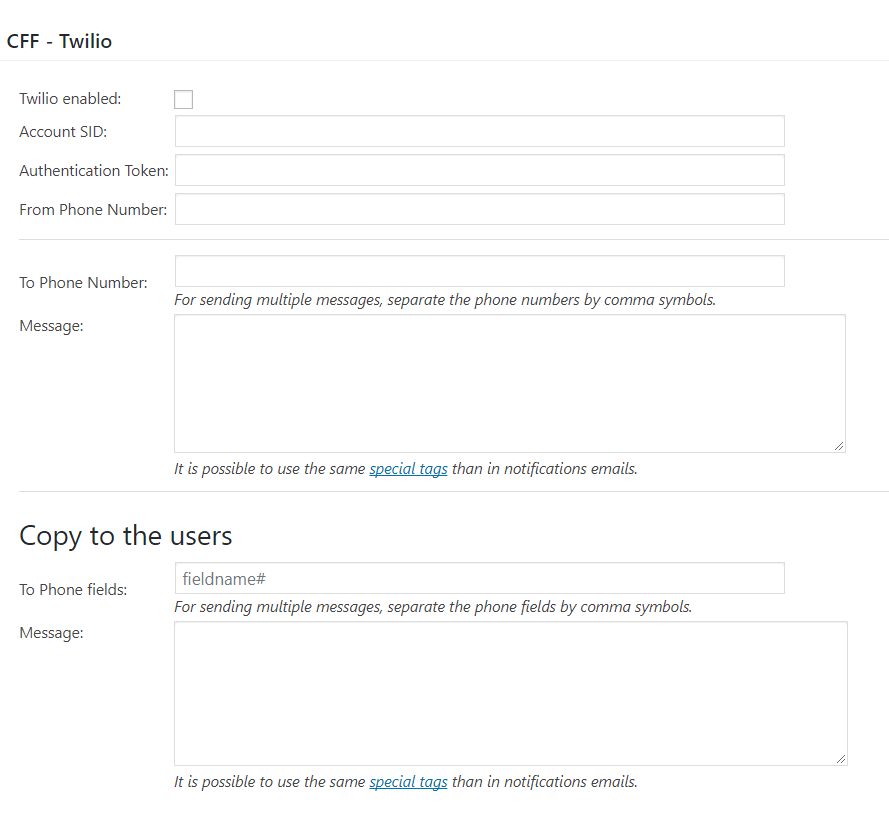
The add-on settings are:
Twilio enabled: for enabling/disabling the integration with the form.
Account SID: enter the Account SID provided by Twilio.
Authentication Token: enter the Authentication Token provided by Twilio.
From Phone Number: enter the phone number used as the «Origin» of SMS (enter a valid phone number including the country code).
To Phone Number: enter the phone numbers (separated by comma symbols) where to send the SMS (enter a valid phone number including the country code).
Message: enter SMS content (it is possible to use the same special tags than in the notification emails).
For sending a SMS to the phone number entered through the form
To Phone fields: enter the names of phone fields inserted in the form (fieldname#, separated by comma symbols).
Message: enter SMS content (it is possible to use the same special tags than in the notification emails).
PayPal Pro add-on
Platinum Version
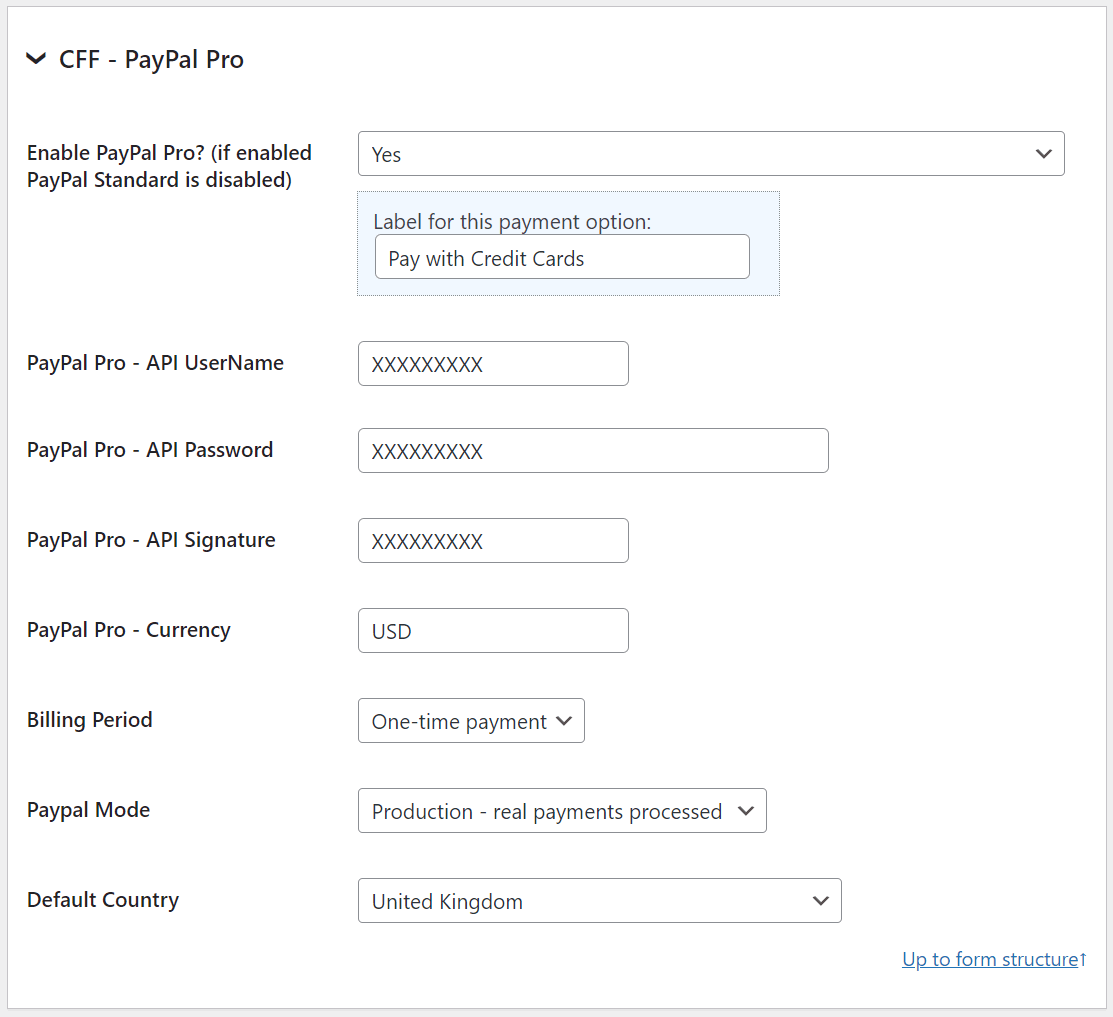
With Payment Form for PayPal Pro you can insert a form into a WordPress website and use it to process credit card payments directly into your website without navigating to an external payment page.
You can check the differences betwen PayPal Pro and PayPal Standard at https://www.paypal.com/webapps/mpp/compare-business-products
For integrating PayPal Pro you must have a PayPal Pro account. In addition to that a SSL connection is also needed, the SSL connection isn’t a technical requirement since the plugin can work without it but anyway it is strongly recommended for accepting credit cards into your website, otherwise the transactions won’t be secure.
In the settings area the following information is needed to activate and link the PayPal Pro account to the form:
- Enable PayPal Pro: Select «Yes» to enable PayPal Pro.
- PayPal Pro — API UserName: The API Username provided by PayPal into your account.
- PayPal Pro — API Password: The API Password provided by PayPal into your account.
- PayPal Pro — API Signature: The API Signature provided by PayPal into your account.
- PayPal Pro — Currency: The currency for the payments, a valid PayPal currency code, example: USD, CAD, AUD, GBP, …
- Paypal Mode: Select «Sandbox» for testing purposes and «Production» for charging real payments.
When enabled, the form on the public website will display an additional set of fields to request the data needed to process the payment, like for example the billing address, credit card details. This info is only for the payment processing, as mentioned it won’t be stored into the website for security reasons.
After the submission Once the payment is processed and the posted data (excluding the credit card related information) is saved into the WordPress database.
PayPal Checkout add-on
Platinum Version
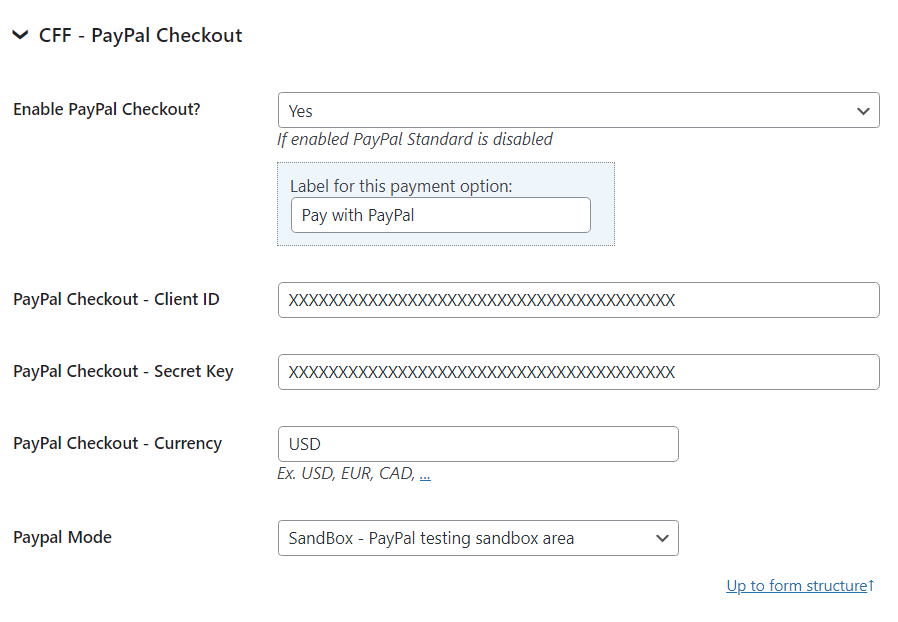
PayPal Checkout is a more versatile payment gateway integration than PayPal Standard. It supports additional payment methods and allows users to complete the payment process before submitting the form.
For integrating PayPal Checkout you need a PayPal Client ID and Secret Key. To get these credentials:
- Log in to the Developer Dashboard with your PayPal account.
- Under the DASHBOARD menu, select My Apps & Credentials.
- Make sure you’re on the Sandbox tab to get the API credentials you’ll use while you’re developing code. After you test and before you go live, switch to the Live tab to get live credentials.
To activate PayPal Checkout in your form, go to the menu option «Calculated Fields Form > Addons», tick the «CFF — PayPal Checkout» checkbox, and press the «Activate/Deactivate Addons» button.
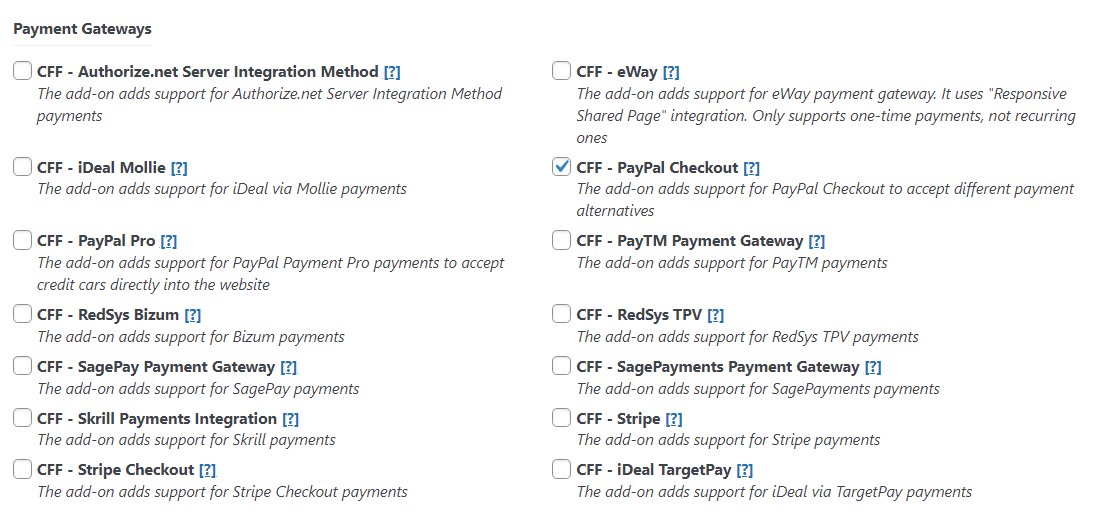
After activating the add-on, a new section will be displayed in the form settings for integration with PayPal Checkout. Go to the plugin settings and fill in the following attributes:
- Enable PayPal Checkout: Select «Yes» option.
- PayPal Checkout — Client ID: Client ID provided by PayPal into your account.
- PayPal Checkout — Secret Key: Secret Key provided by PayPal into your account.
- PayPal Checkout — Currency: The currency for the payments, a valid PayPal currency code, example: USD, CAD, AUD, GBP, …
- Paypal Mode: Select «Sandbox» for testing purposes and «Production» for charging real payments.
Please note that you must have selected the field containing the price through the «Request cost» attribute in the payment configuration section.
The form on the public website will display an additional set of buttons with the available payment methods. They may vary from user to user depending on their country or the device used to fill in the form.
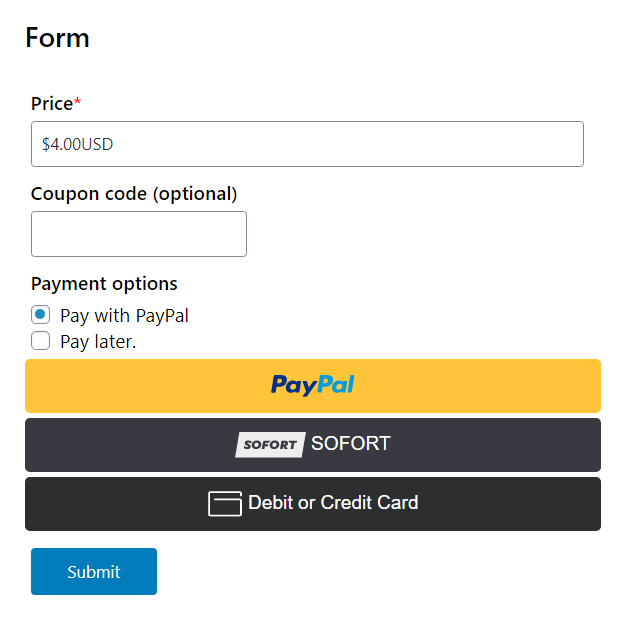
Authorize.Net Server Integration Method (www.authorize.net) add-on
Platinum Version

The Authorize.net Server Server Integration Method (Authorize.net SIM) is a hosted payment processing solution that
handles all of the steps in processing a transaction, including:
- Collecting customer payment information through a secure, hosted form
- Generating a receipt to the customer
- Securely transmitting to the payment processing networks for settlement
- Funding of proceeds to the merchant’s bank account
- Securely storing cardholder information
Authorize.net SIM is an ideal integration solution because merchants are not required to collect,
transmit, or store sensitive cardholder information to process transactions. Additionally,
Authorize.net SIM does not require merchants to purchase and install a SSL or TLS digital certificate,
reducing the complexity of securely handling and storing cardholder information,
simplifying compliance with the Payment Card Industry (PCI) Data Security Standard. For more information go to www.authorize.net
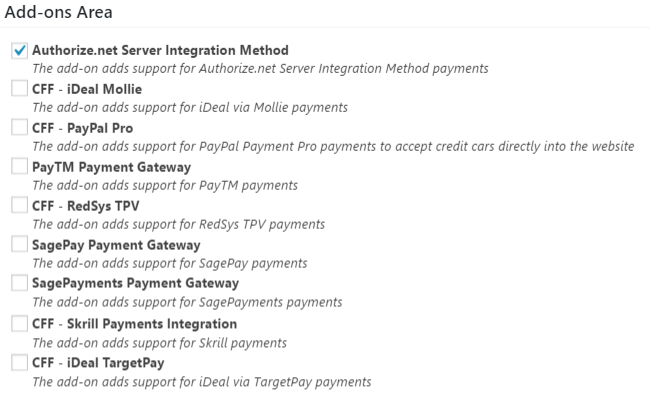
To activate the add-on, simply visit the plugin page through the menu option: «Settings/Calculated Fields Form», tick the checkbox: «CFF-Authorize.net Server Integration Method», and press the «Activate/Deactivate addons» button
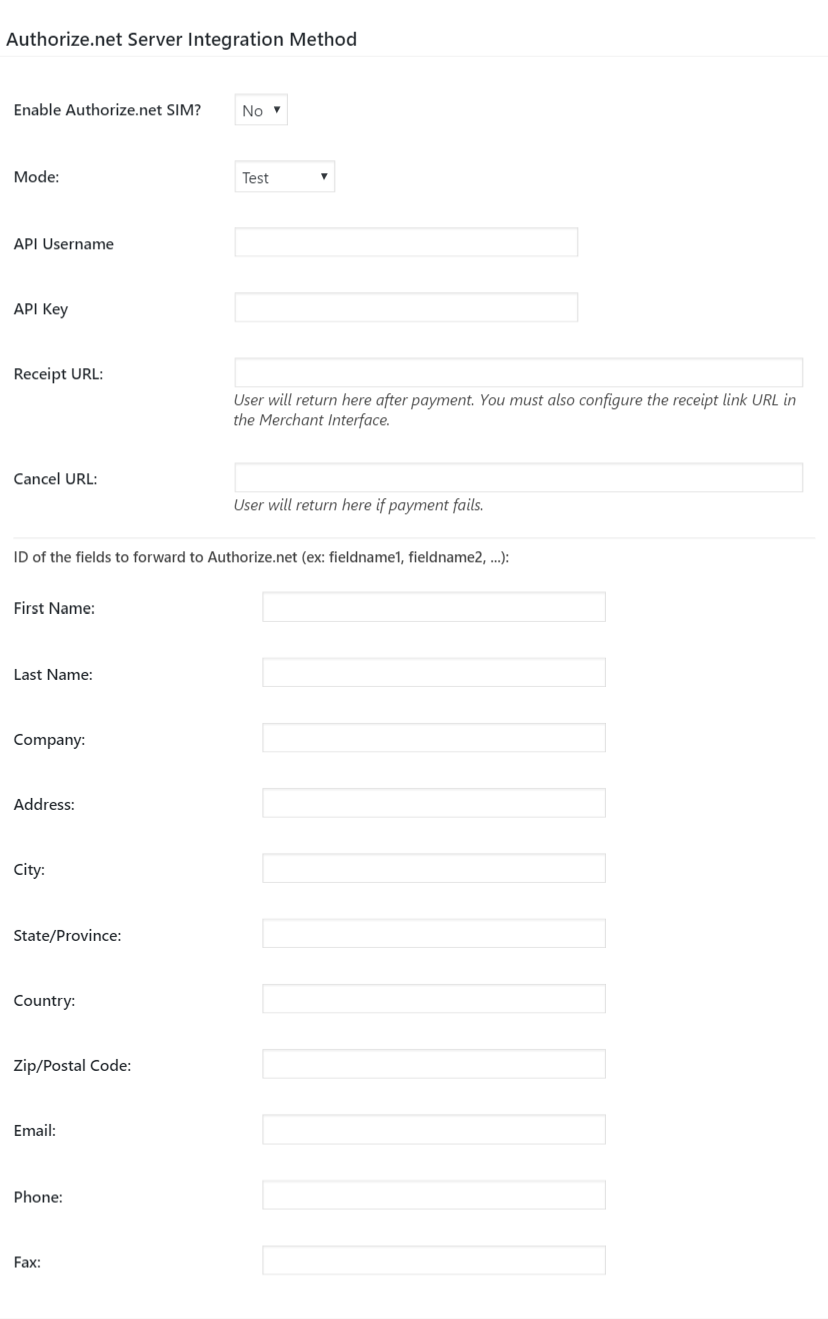
In the settings area the following information is needed to activate and link the Authorize.net Server Integration Method account to the form:
Enable Authorize.net SIM?: Select «Yes» to enable the Authorize.net Server Integration Method payment.
Mode: Change the mode between «test» for testing purposes and «production» for accepting real payments.
API Username: Change this value with API Username received from Authorize.net.
API Key: Change this value with API Key received from Authorize.net.
Receipt URL: User will return here after a successfull payment. Important!: You must also configure the receipt link URL in the Merchant Interface.
Cancel URL: User will return here if payment fails.
In addition to the above required setting fields there are other fields to link the form fields to the Authorize.net payment form, like for example the client name, address, phone, email, … These fields are optional. To link the fields you can indicate the ID of the field on the form that contains the related info. Sample values: fieldname1, fieldname2, ..
When enabled, the customer will be redirected to the Authorize.net Server Integration Method payment form after the submision. The process will be similar to the way PayPal Standard works.
Stripe (www.stripe.com) add-on
Platinum Version
![]()
The Stripe Payments addon provides a way to accept all major cards from customers around the world on web. This addon requires SSL on your website to be able to carry the transaction in a secure way. Credit card data is entered directly in the website without navigating to an external page.
To activate the add-on, simply visit the plugin page through the menu option: «Settings/Calculated Fields Form», tick the checkbox: «CFF-Stripe Payment Integration», and press the «Activate/Deactivate add-ons» button…
In the settings area the following information is needed to activate and link the stripe account to the form:

- Enable Stripe?: Select «Yes» to enable the stripe Payments Integration.
- Integration type: Cassic, or SCA versions for European sellers.
- Payment mode?: Sandbox for testing, or production mode.
- Stripe.com Publishable Key: Publishable Key you will find into your Stripe account.
- Stripe.com Secret Key: Secret Key you will find into your Stripe account.
- Language? The language of the Stripe interface.
- Ask for billing address? Tell Stripe to ask the billing address.
- Payment frequency? Select «one-time payments» or recurrent (subscription) payments.
- Trial period length in days for subscription payments: If recurrent payments is selected put here the trial period length in days if any.
- Plan name for subscription payments: If recurrent payments is selected put here the plan name for subscription payments.
- Subtitle for payment panel: Text to display in the pop-up dialog.
- URL of logo image: Image to load in the pop-up dialog.
- Metadata fields: fields’ names separated by comma symbols.
When enabled, after clicking the Calculated Fields Form submit button, a Stripe floating panel will be displayed to ask for the credit card data and process the transaction and after that the form submission will continue as usual keeping the customer all the time into your website.
Stripe Checkout (www.stripe.com) add-on
Platinum Version
![]()
The Stripe Payments addon provides a way to accept all major cards from customers around the world on web. The Stripe checkout accepts every payment method enabled in your Stripe account.
To activate the add-on, simply visit the plugin page through the menu option: «Settings/Calculated Fields Form», tick the «CFF-Stripe Checkout» checkbox, and press the «Activate/Deactivate add-ons» button…
The add-on includes a new section in the form settings to configure the Stripe Checkout integration:
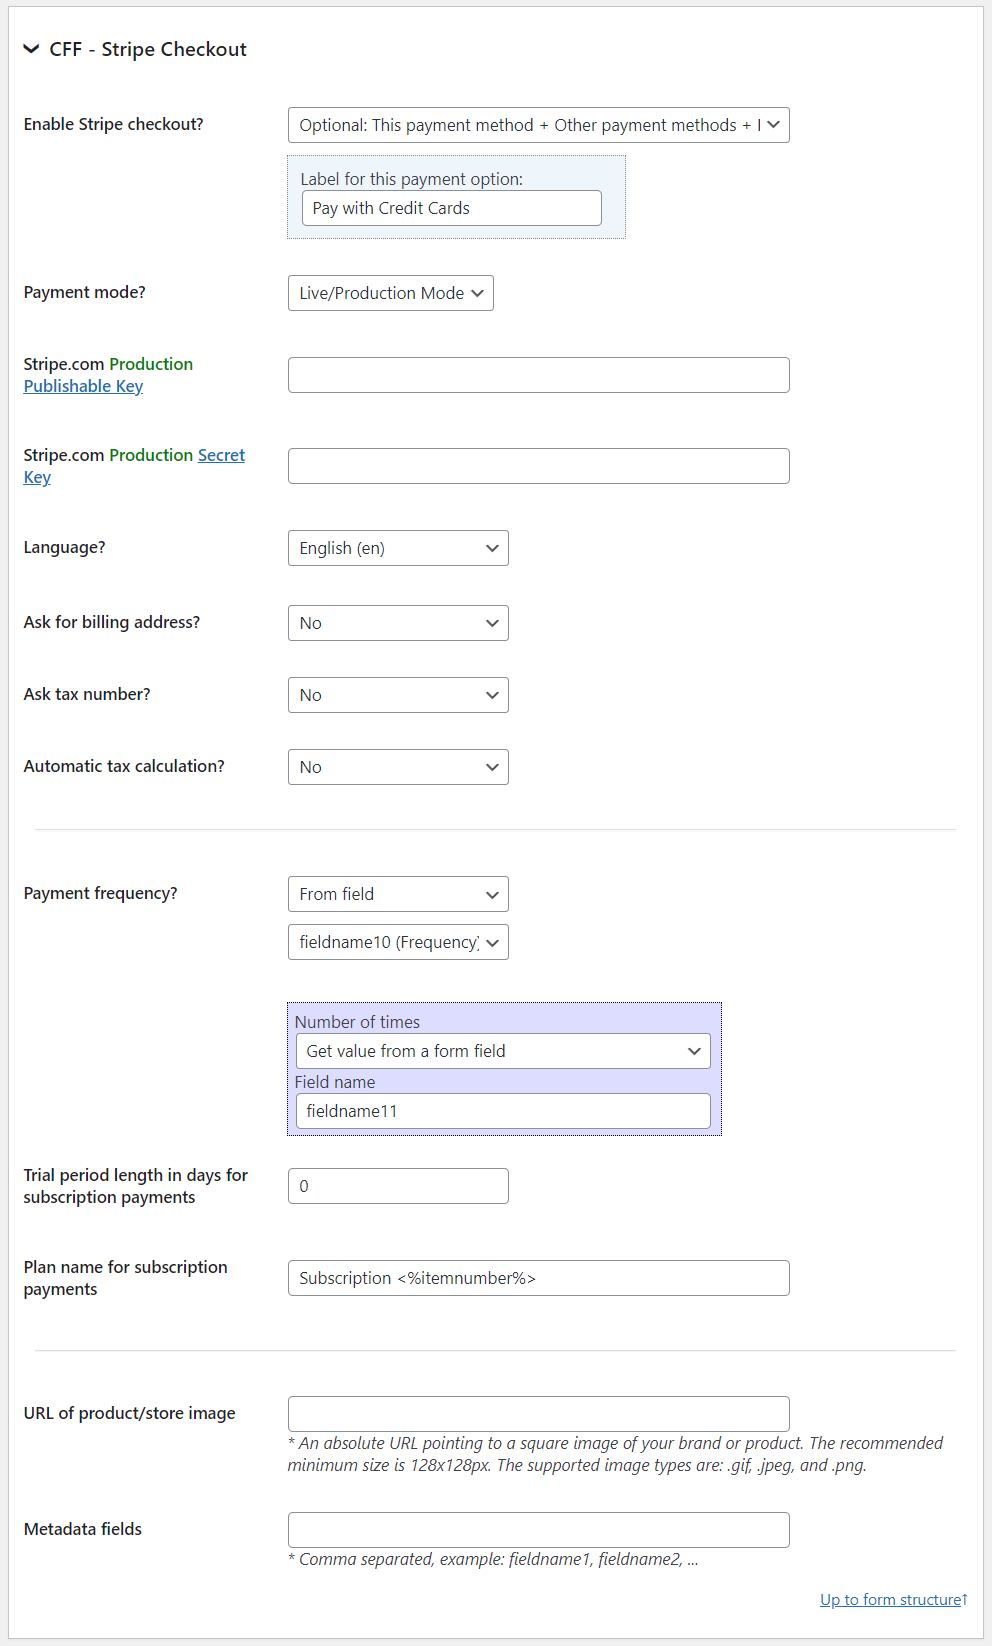
- Enable Stripe Checkout?: Select «Yes» to enable the stripe Payments Integration.
- Payment mode?: Sandbox for testing, or production mode.
- Stripe.com Publishable Key: Publishable Key you will find into your Stripe account.
- Stripe.com Secret Key: Secret Key you will find into your Stripe account.
- Language? The language of the Stripe interface.
- Ask for billing address? It tells Stripe to ask the billing address.
- Ask tax number? It tells Stripe to ask payer tax number.
- Automatic tax calculation? It tells Stripe to apply taxes based on the payer’s country.
- Payment frequency? Select «one-time payments» or recurrent (subscription) payments.
- Trial period length in days for subscription payments: If recurrent payments is selected put here the trial period length in days if any.
- Plan name for subscription payments: If recurrent payments is selected put here the plan name for subscription payments.
- URL of product/store image: Image to load in the checkout page.
- Metadata fields: fields’ names separated by comma symbols.
When enabled, after clicking the Calculated Fields Form submit button, the plugin opens the Stripe Checkout page to complete the payment.
Skrill (www.Skrill.com) add-on
Platinum Version

The Skrill Payments addon provides a secure interface for accepting payments through a secure page. You can accept cards, more than 20 local payment methods and over 80 direct bank transfer connections with a single integration. Form more information go to https://www.skrill.com/en/merchants/
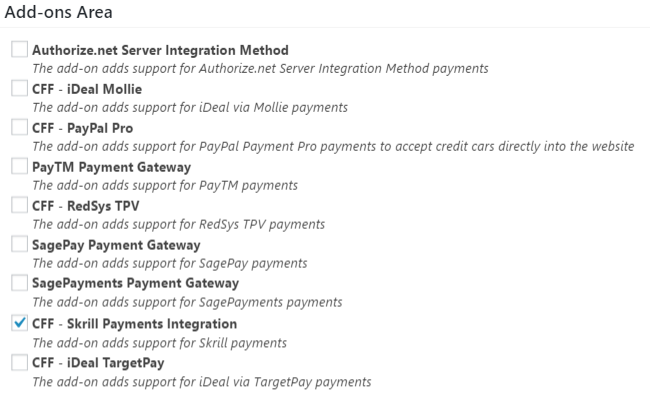
To activate the add-on, simply visit the plugin page through the menu option: «Settings/Calculated Fields Form», tick the checkbox: «CFF-Skrill Payment Integration», and press the «Activate/Deactivate addons» button.
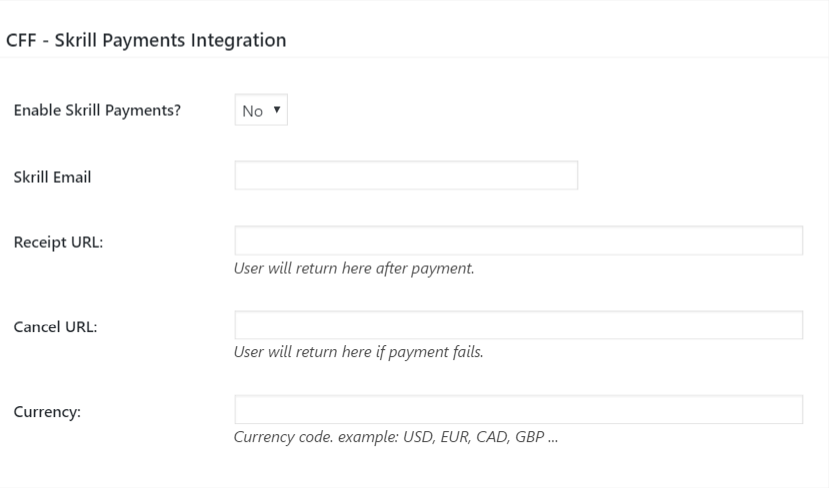
In the settings area the following information is needed to activate and link the Skrill account to the form:
Enable Skrill Payments?: Select «Yes» to enable the Skrill Payments Integration.
Skrill Email?: Emai linked to the Skrill merchant account, this will be the account that will receive the payments.
Receipt URL: User will return here after a successfull payment.
Cancel URL: User will return here if payment fails.
Currency: Currency code for the received payment. example: USD, EUR, CAD, GBP ….
When enabled, the customer will be redirected to the Skrill hosted payment form payment form after the submision. The process will be similar to the way PayPal Standard works.
TargetPay (iDeal) add-on
Platinum Version

The TargetPay addon provides integration with iDeal, the most popular Dutch payment method. The integration is made via TargetPay: https://www.targetpay.com/info/ideal?setlang=en
With TargetPay you can set up iDEAL payments for your website easily. Acting as a «Payment Service Provider» it aggregates payments for a large number of webstores. The iDEAL platform combines the online banking systems of 10 of the largest Dutch banks (ABN AMRO, ASN Bank, Bunq, ING, Knab, Rabobank, RegioBank, SNS Bank, Triodos Bank and van Lanschot) into one payment method.
After the consumer selects the iDEAL payment method the consumer’s bank is selected. The actual payment then takes place in the bank’s trusted online banking environment for which security is guaranteed by the bank. Through iDEAL buyer and seller are guaranteed a transparent transaction without hidden fees or other unpleasant surprises.
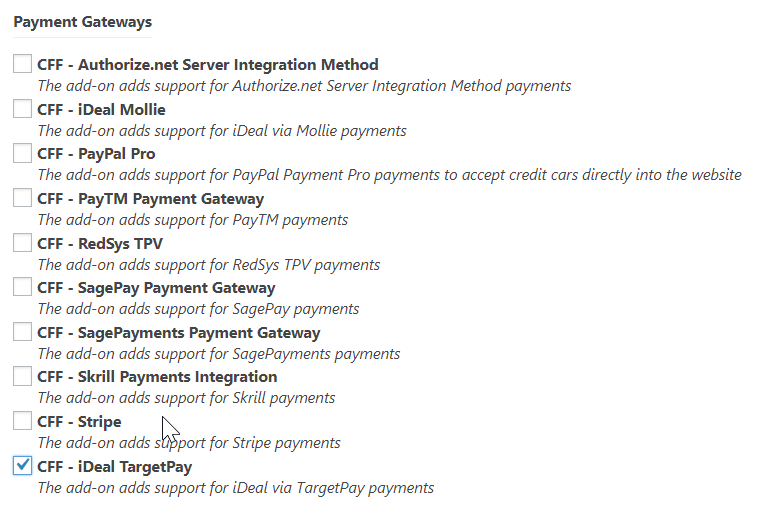
To activate the add-on, simply visit the plugin page through the menu option: «Settings/Calculated Fields Form», tick the checkbox: «CFF-iDeal TargetPay», and press the «Activate/Deactivate Addons» button.
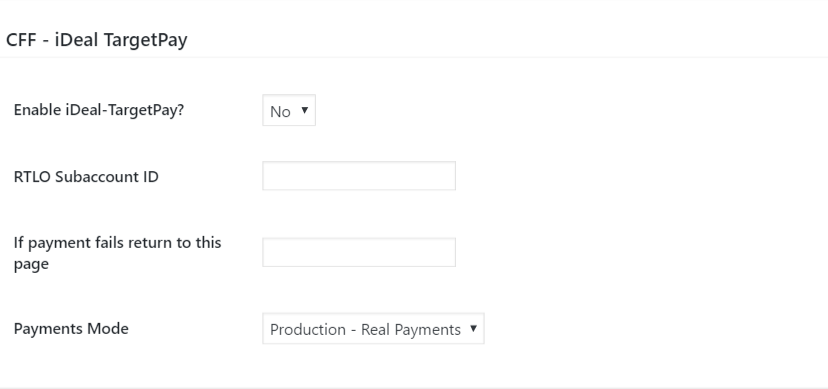
In the settings area the following information is needed to activate and link the iDeal-TargetPay account to the form:
Enable iDeal-TargetPay?: Select «Yes» to enable the iDeal-TargetPay payment option for the form.
RTLO Subaccount ID: Change this value with the account ID received from iDeal-TargetPay.
If payment fails return to this page: Return page if the payment fails or is cancelled before completing it.
Payments Mode: Change the mode between «test» for testing purposes and «production» for accepting real payments.
When enabled, the customer will be redirected to the iDeal-TargetPay payment form after the submision. The process will be similar to the way PayPal Standard works.
Mollie (iDeal) add-on
Platinum Version
![]()
The Mollie addon provides integration with iDeal, the most popular Dutch payment method. The integration is made via Mollie: www.mollie.com.
You’re easily connected to iDEAL through Mollie without the dreaded technical and administrative hassle. The iDEAL platform combines the online banking systems of 10 of the largest Dutch banks (ABN AMRO, ASN Bank, Bunq, ING, Knab, Rabobank, RegioBank, SNS Bank, Triodos Bank and van Lanschot) into one payment method.
After the consumer selects the iDEAL payment method the consumer’s bank is selected. The actual payment then takes place in the bank’s trusted online banking environment for which security is guaranteed by the bank. Through iDEAL buyer and seller are guaranteed a transparent transaction without hidden fees or other unpleasant surprises.

To activate the add-on, simply visit the plugin page through the menu option: «Settings/Calculated Fields Form», tick the checkbox: «CFF-iDeal Mollie», and press the «Update» button…
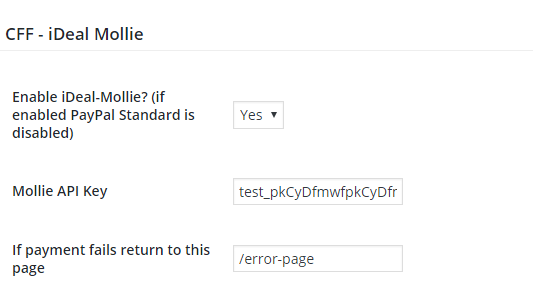
In the settings area the following information is needed to activate and link the Mollie — iDeal account to the form:
Enable iDeal-Mollie?: Select «Yes» to enable the Mollie — iDeal addon.
Mollie API Key: The API Username provided by Mollie for your account, it may be the test key or the production key.
If payment fails return to this page: If the payment fails the customer is redirected to the page indicated in this field.
When enabled, the customer will be redirected to the Mollie — iDeal payment form after the submision. The process will be similar to the way PayPal Standard works.
RedSys / Servired / Sermepa add-on
Platinum Version
![]()
The RedSys / Servired / Sermepa addon provides a secure interface for accepting credit card payments through most banks in Spain (Sabadell, Banco Popular, BBVA, Santander, Bankia, Caixa, Bankinter, etc…). You can read more about RedSys at www.redsys.es.
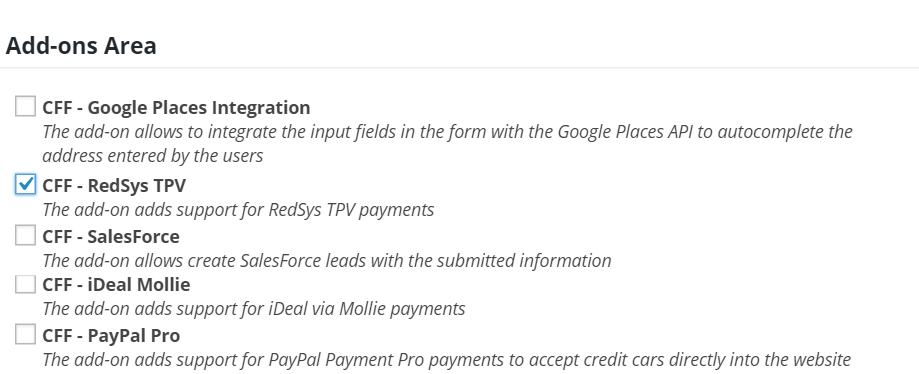
To activate the add-on, simply visit the plugin page through the menu option: «Settings/Calculated Fields Form», tick the checkbox: «CFF-RedSys TPV», and press the «Update» button…
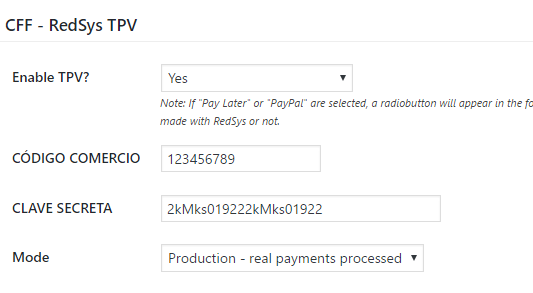
In the settings area the following information is needed to activate and link the RedSys account to the form:
Enable TPV: Select «Yes» to enable the RedSys TPV. If «Pay Later» or «PayPal» are also selected in this option, a radiobutton will appear in the form to select if the payment will be made with RedSys, with PayPal or if the form will be submitted without payment.
CÓDIGO COMERCIO: The API Username provided by RedSys or your bank.
CLAVE SECRETA: The API Password provided by RedSys or your bank.
Mode: Select «Sandbox» for testing purposes and «Production» for charging real payments.
When enabled, the customer will be redirected to the RedSys payment form after the submision. The process will be similar to the way PayPal Standard works.
RedSys Bizum add-on
Platinum Version
![]()
With Bizum you can send and receive money in less than 5 seconds. Securely, using only your phone number. You can read more about Bizum at bizum.es
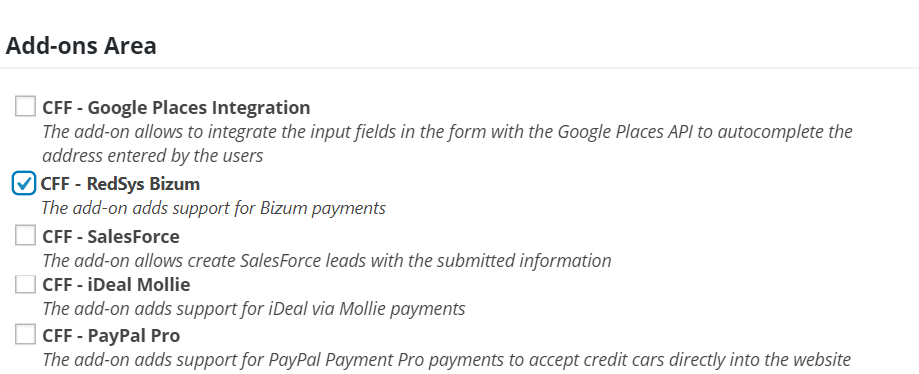
To activate the add-on, simply visit the plugin page through the menu option: «Settings/Calculated Fields Form», tick the checkbox: «CFF-RedSys Bizum», and press the «Activate/Deactivate Addons» button…
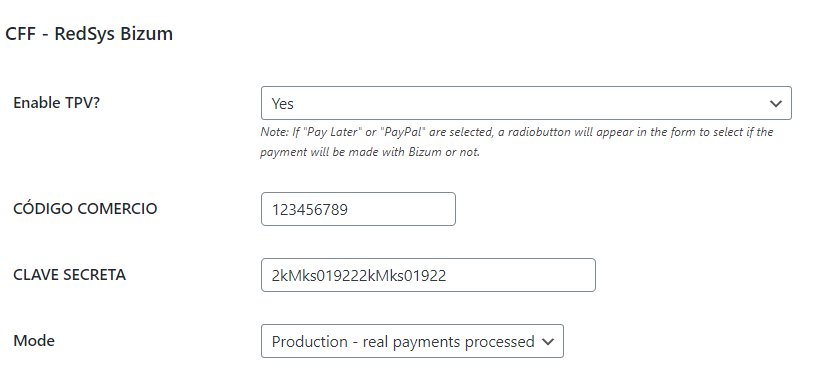
In the settings area the following information is needed to activate and link the RedSys account to the form:
Enable TPV: Select «Yes» to enable the RedSys Bizum. If «Pay Later» or «PayPal» are also selected in this option, a radiobutton will appear in the form to select if the payment will be made with Bizum, with PayPal or if the form will be submitted without payment.
CÓDIGO COMERCIO: The API Username provided by RedSys Bizum or your bank.
CLAVE SECRETA: The API Password provided by RedSys Bizum or your bank.
Mode: Select «Sandbox» for testing purposes and «Production» for charging real payments.
SagePay add-on
Platinum Version

The SagePay addon provides a secure interface for accepting payments through SagePay. You can read more about SagePay at www.sagepay.co.uk.
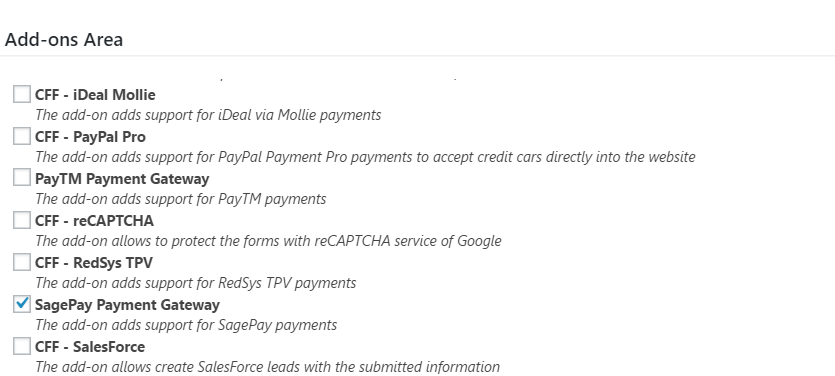
To activate the add-on, simply visit the plugin page through the menu option: «Settings/Calculated Fields Form», tick the checkbox: «CFF-SagePay», and press the «Update» button…
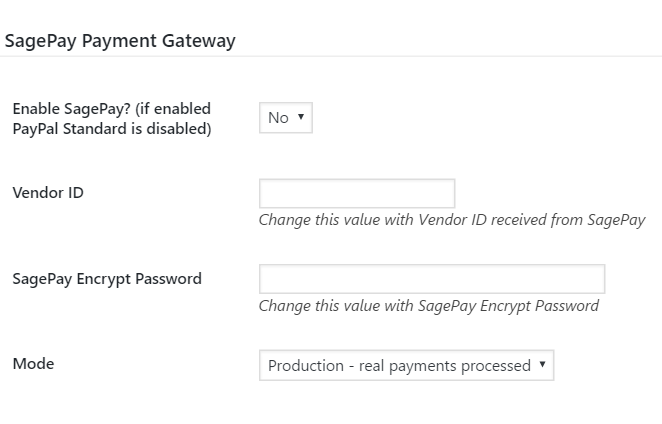
In the settings area the following information is needed to activate and link the SagePay account to the form:
Enable SagePay?: Select «Yes» to enable the SagePay payment gateway.
Vendor ID: The Vendor ID provided by SagePay.
SagePay Encrypt Password: The SagePay Encrypt Password provided by PayTM.
Mode: Select «Sandbox» for testing purposes and «Production» for charging real payments.
When enabled, the customer will be redirected to the SagePay payment form after the submision. The process will be similar to the way PayPal Standard works.
Sage Payment add-on
Platinum Version

The SagePayments addon provides a secure interface for accepting payments through a secure SSL checkout system for both bankcard and virtual check transactions. All authorized and approved transactions will be delivered into your current bankcard and/or virtual check batches viewable within the Virtual Terminal for order processing and settlement. You can read more about Sage Payment Solutions at http://www.sage.com/us/sage-payment-solutions/accept-payments. The integration implemented in this addon is for Sage Payment Solutions >> Shopping ExpressPay
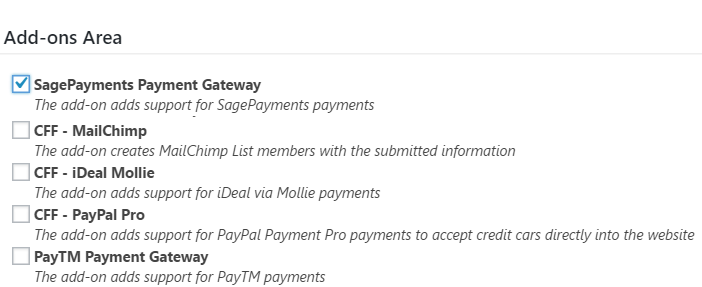
To activate the add-on, simply visit the plugin page through the menu option: «Settings/Calculated Fields Form», «CFF-SagePayments Payment Gateway», and press the «Update» button.
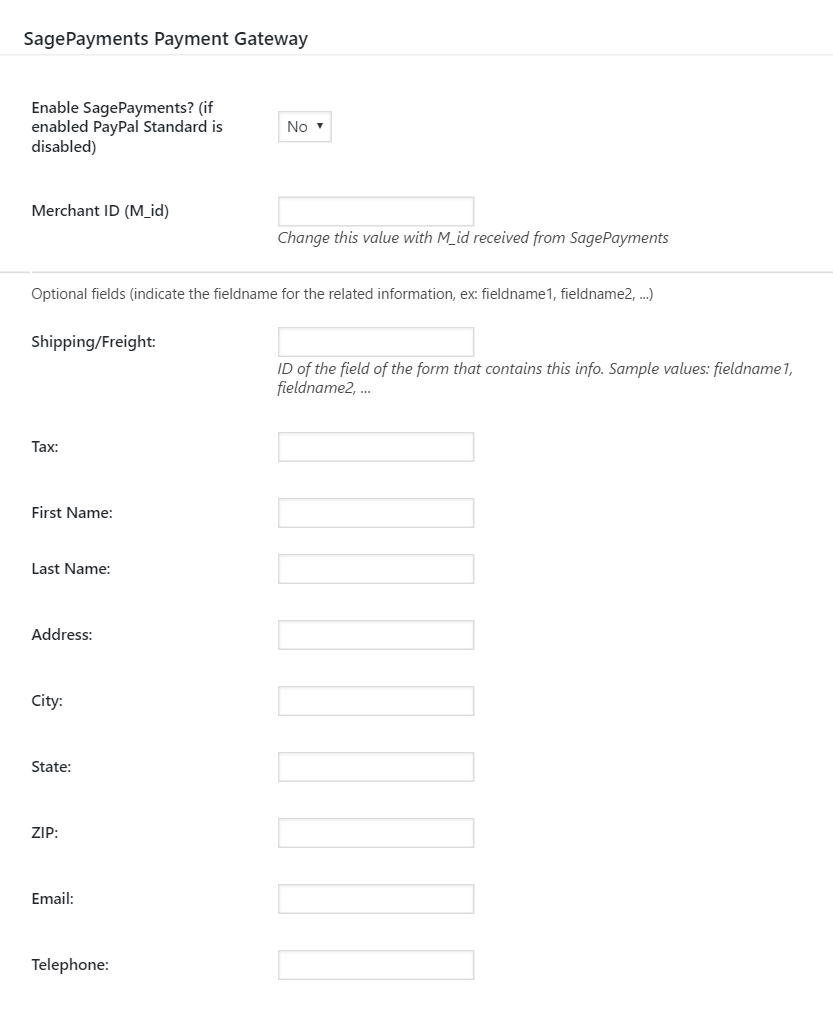
In the settings area the following information is needed to activate and link the Sage Payment Solutions >> Shopping ExpressPay account to the form:
Enable SagePayments?: Select «Yes» to enable the SagePayments TPV.
Merchant ID (M_id): Change this value with M_id received from SagePayments.
In addition to the mentioned two required setting field there are other fields to link the form fields to the Sage Payment Solutions payment form, like for example the client name, address, phone, email, tax and shipping cost. These fields are optionals and to link the fields you can indicate the ID of the field on the form that contains the related info. Sample values: fieldname1, fieldname2, …
When enabled, the customer will be redirected to the Sage Payment Solutions payment form after the submision. The process will be similar to the way PayPal Standard works.
PayTM add-on
Platinum Version

The PayTM addon provides a secure interface for accepting payments through credit card, debir cards, net banking, wallet and EMI. With over 100mn Paytm users in India, your customers will love the option to pay with their trusted Paytm Wallet. You can read more about PayTM at paywithpaytm.com.
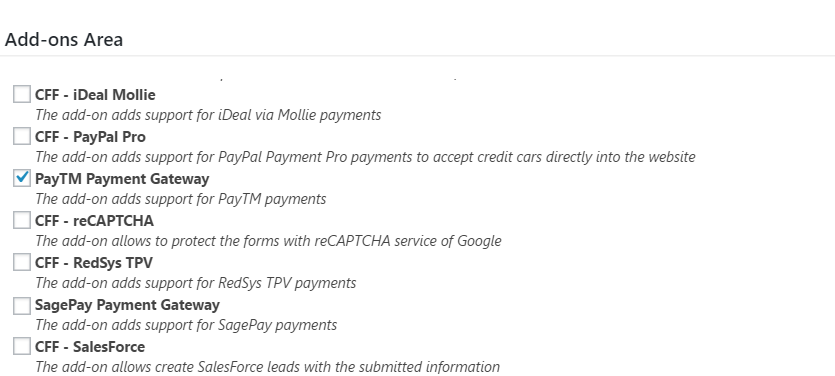
To activate the add-on, simply visit the plugin page through the menu option: «Settings/Calculated Fields Form», tick the checkbox: «CFF-PayTM», and press the «Update» button…

In the settings area the following information is needed to activate and link the PayTM account to the form:
Enable PayTM?: Select «Yes» to enable the PayTM payment gateway.
Merchant ID: The Merchant ID provided by PayTM.
Merchant Key: The Merchant Key provided by PayTM.
Website Name: The Website Name provided by PayTM.
Industry Type ID: The Industry Type ID provided by PayTM.
Mode: Select «Sandbox» for testing purposes and «Production» for charging real payments.
When enabled, the customer will be redirected to the PayTM payment form after the submision. The process will be similar to the way PayPal Standard works.
eWay add-on
Platinum Version

The eWay addon provides secure payments with eWay payment gateway. eWay is popular payment gateways in countries like Australia, New Zealand, Singapore, Hong Kong, and Macau. The eWay add-on implements the integration with the «eWay Responsive Shared Page» for accepting credit card payments, even Paypal and digital wallets via eWay.
Note: the current version of the add-on only supports one-time payments and not recurring payments.
To activate the add-on, simply visit the plugin page through the menu option: «Calculated Fields Form», tick the checkbox: «CFF-eWay», and press the «Activate/Deactivate Addons» button…
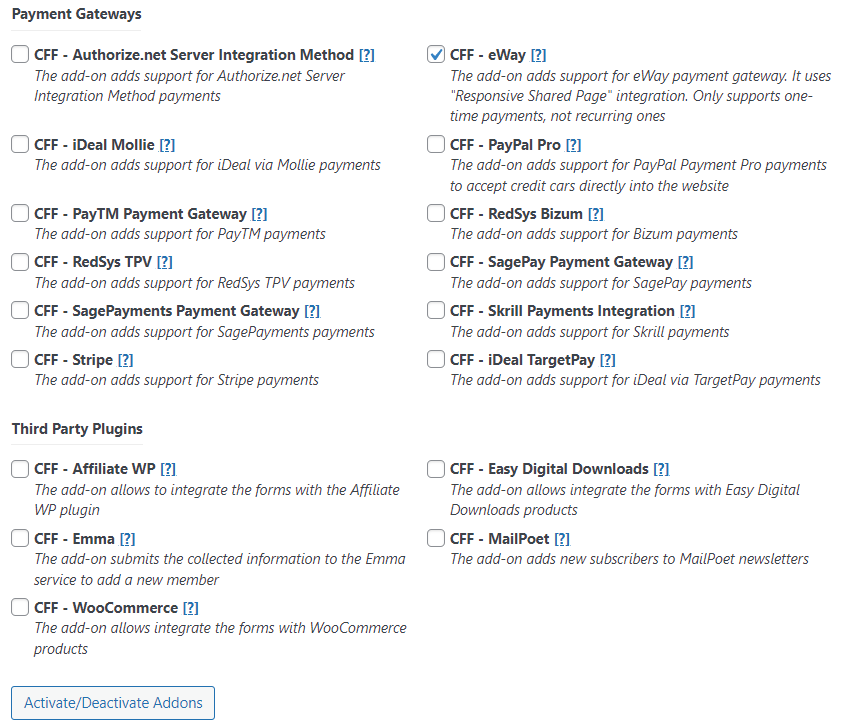
After activating the add-on, it will appear a new section in the form’s settings to integrate the eWay payment gateway with the form.
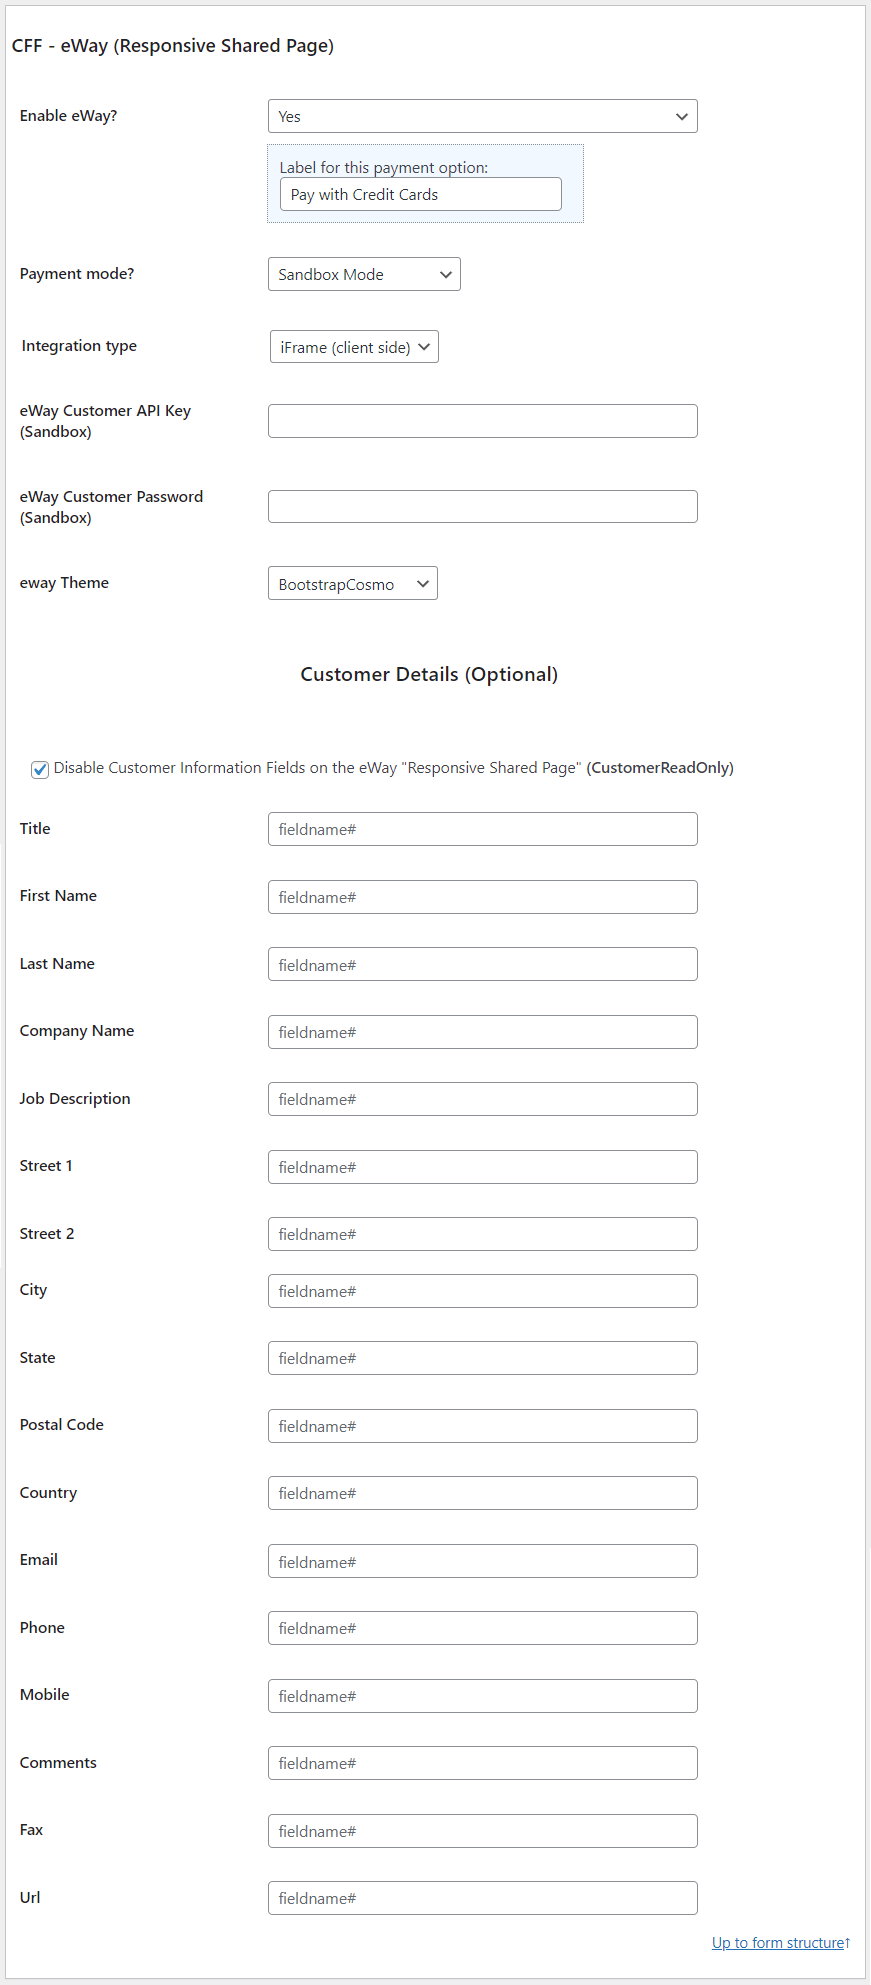
The settings area includes the following attributes list:
Enable eWay?: Select «Yes» to enable the eWay payment gateway. The attribute includes other options to activate multiple payment gateways in the form or pay later alternative.
Payment Mode: Select between the production eWay account or the sandbox one for testing the integration.
Integration Type: Possible values «iFrame», «Shared Page». The «Shared Page» option redirects the user to eWay to complete the payment after submitting the form. The «iFrame» option allows completing the payment on the website.
eWay Customer API Key: API Key provided by eWay.
eWay Customer Password: eWay integration password.
To get your account API keys and API Password Goto My Account —> API Key. A form that you can get API key and Password for payment acquirer.If you not able to see your password generate a new one with ‘Generate Password’ Button.

eWay Theme: Select the theme to apply the eWay Responsive Shared Page.
The list of customer data and the corresponding fields in the form. This section is optional, the customer attributes are:
Title
First Name
Last Name
Company Name
Job Description
Street 1
Street 2
City
State
Postal Code
Country
Email
Phone
Mobile
Comments
Fax
Url
It is possible to disable the customer details section on the eWay Shared Page by ticking the «Disable Customer Information Fields on the eWay Responsive Shared Page» checkbox.
Equations Format for Calculated Fields
The equations allowed by the plugin «Calculated Fields Form» are really powerful tools.
From the following versions of the plugin:
- 1.0.139 Free
- 5.0.153 Pro
- 5.0.180 Developer
- 10.0.196 Platinum
It is possible to use the __ME__ constant in the equations for referring to the value of the calculated field that is being calculated. For example, if the calculated field is editable, and you want get the maximum number among the value typed by the user in the field, and the sum of other two fields in the form: fieldname1+fieldname2, the equation would be as simple as: MAX(fieldname1+fieldname2,__ME__).
In previous versions of the plugin was needed to implement some tricks for accessing the value of the calculated field from its equation.
Access to the fields from the equations is as simple as including their names, like, fieldname1+fieldname2
The plugin takes the values of the fields and pre-processes them to extract the numbers to use in the mathematical operations. However, sometimes it is necessary to get the fields’ values without pre-processing. In these cases, you should use the «|r» modifier (for raw) as part of the field’s name,
Ex. fieldname1|r
For dropdown, radio buttons, and checkbox fields, where it is possible to select the information to submit between the choices’ values and texts, the use of the «|v» modifier allows you to access the information to submit from the equations.
Ex. fieldname1|v
And finally the «|n» modifier. Each time a field’s name appears in an equation, the plugin replaces it by the corresponding field’s value in the evaluation process. However, sometimes with need to use the fields’ names and not their values. In these cases, the use of the «|n» modifier is essential because it says the plugin you want to use the fields’ names.
Ex. getField(fieldname1|n).choices({texts:[‘A’, ‘B’], values:[1,2]});
![]() Need more controls or operations?
Need more controls or operations?
Install the CP BLOCKS plugin, and visit the Marketplace:
— with buttons
— testimonial blocks
— additional features
…and more

It is possible create simple equations like follow:
With simple mathematical operations:
All Versions of the Plugin
fieldname1+fieldname2
fieldname1*fieldname2
fieldname1/fieldname2
fieldname1—fieldname2
or mathematical equations with multiple fields and fields grouping included.
fieldname1*(fieldname2+fieldname3)
The equations may include a group of more specific operations
some of them available as buttons in the plugin’s interface, the other operations should be typed manually in the equation’s editor:
sum(x,y,z,….)
Returns the sum of values passed by parameter
sum(3,10,11) returns 24
If the last parameter is a function, calls the function with each of the numbers, and sums the results.
Sum of squares:
sum(1,2,3,4, function(x){return POW(x,2)}) returns 30
Sum even numbers:
sum(1,2,3,4, function(x){if(x%2 == 0) return x;}) returns 6
sigma(n,m,callback)
Applies the summation from x=n to m, passing x to the callback function.
sigma(1, 4, function(x){return 2*x+1;}) returns 24
sigma(1, 3, function(x){return x*(x+1);}) returns 20
concatenate(x,y,z,….)
Returns a text with all parameters concatenated
concatenate(1, 2, 3) returns 123
average(x,y,z,….)
Returns the average of values passed by parameter
average(3,10,11) returns 8
The average operation accepts arrays of numbers: average([3,10],11) = 8
factorial(x)
Returns the factorial of x, or null if x is not an integer greater than 0
factorial(4) returns 24
remainder(x,y)
The remainder is the integer left over after dividing one integer by another to produce an integer quotient (integer division)
remainder(7,2) returns 1
tobase(number,from_base,to_base)
Converts a number from a base to another
tobase(5, 10, 2) returns 101
tobase(‘AF’, 16, 10) returns 175
abs(x)
Returns the absolute value of x
If the value of fieldname1 is -7.25, the result of: abs(fieldname1) would be 7.25
acos(x)
Returns the arccosine of x, in radians
If the value of fieldname1 is 0.5, the result of: acos(fieldname1) would be 1.0471975511965979
asin(x)
Returns the arcsine of x, in radians
If the value of fieldname1 is 0.5, the result of: asin(fieldname1) would be 0.5235987755982989
atan(x)
Returns the arctangent of x as a numeric value between -PI/2 and PI/2 radians
If the value of fieldname1 is 2, the result of: atan(fieldname1) would be 1.1071487177940904
atan2(x,y)
Returns the arctangent of the quotient of its arguments
If the value of fieldname1 is 8 and fieldname2 is 4, the result of: atan2(fieldname1,fieldname2) would be 1.1071487177940904
ceil(x)
Returns x, rounded upwards to the nearest integer.
The ceil operation accepts a second parameter, that is optional, for rounding upwards the main number to the nearest multiple of this parameter.
If the value of fieldname1 is 1.4, the result of: ceil(fieldname1) would be 2
ceil(2.3, 0.5) = 2.5
cos(x)
Returns the cosine of x (x is in radians)
If the value of fieldname1 is 3, the result of: cos(fieldname1) would be -0.9899924966004454
radians(x)
Converts an angle in degrees to radians (x is in degrees)
If the value of fieldname1 is 90, the result of: radians(fieldname1) would be 1.5707963267948966
degrees(x)
Converts an angle in radians to degrees (x is in radians)
If the value of fieldname1 is 1.5707963267948966, the result of: degrees(fieldname1) would be 90
exp(x)
Returns the value of E^x
If the value of fieldname1 is 1, the result of: exp(fieldname1) would be 2.718281828459045
scientifictodecimal(x)
Returns the decimal representation of x
scientifictodecimal(3.5e4) = 35000
decimaltoscientific(x)
Returns the exponential representation of x
decimaltoscientific(35000) = 3.5e+4
fractiontodecimal(x)
Returns the decimal representation of x
fractiontodecimal(«2/5») = 0.4
decimaltofraction(x)
Returns the fraction representation of x
decimaltofraction(0.4) = «2/5»
fractionsum(x,y)
Sums fractional numbers passed by parameter, returning the result also as fractional number
fractionsum(«2/4″,»2/6») = «5/6»
fractionsub(x,y)
Subtracts fractional numbers passed by parameter, returning the result also as fractional number
fractionsub(«2/4″,»2/6») = «1/6»
fractionmult(x,y)
Multiplies fractional numbers passed by parameter, returning the result also as fractional number
fractionmult(«2/4″,»2/6») = «1/6»
fractiondiv(x,y)
Divides fractional numbers passed by parameter, returning the result also as fractional number
fractiondiv(«2/4″,»2/6») = «3/2»
floor(x)
Returns x, rounded downwards to the nearest integer.
The floor operation accepts a second parameter, that is optional, for rounding downwards the main number to the nearest multiple of this parameter.
If the value of fieldname1 is 1.6, the result of: floor(fieldname1) would be 1
floor(2.6, 0.5) = 2.5
log(x)
Returns the natural logarithm (base E) of x
If the value of fieldname1 is 2, the result of: log(fieldname1) would be 0.6931471805599453
logab(x,y)
Returns the logarithm of x base y
If the value of fieldname1 is 2, and the value of fieldname2 is 10, the result of: logab(fieldname1,fieldname2) would be 0.30102999566398114
max(x,y,z,…,n)
Returns the number with the highest value
If the value of fieldname1 is 5 and fieldname2 is 10, the result of: max(fieldname1, fieldname2) would be 10
min(x,y,z,…,n)
Returns the number with the lowest value
If the value of fieldname1 is 5 and fieldname2 is 10, the result of: min(fieldname1, fieldname2) would be 5
FORMAT(n, config)
Formats the number passed as the first parameters, based on the configuration object passed as second parameter.
The configuration object accepts the attributes:
prefix: information to include at the beginning of the number. Ex. $
suffix: information to include at the end of the number. Ex. usd
decimalsymbol: symbol to use for decimals. Ex. the dot (.)
groupingsymbol: symbol to use for grouping thousands. Ex. the comma (,)
currency: boolean that indicates the number represents a currency value. Ex. true
FORMAT(-1234.56, {prefix:»$», suffix:» usd», groupingsymbol:»,», decimalsymbol:».», currency:true}) = «-$1,234.56 usd»
pow(x,y)
Returns the value of x to the power of y
If the value of fieldname1 is 4 and fieldname2 is 3, the result of: pow(fieldname1, fieldname2) would be 64
random()
Returns a random number between 0 and 1
round(x)
Rounds x to the nearest integer.
The round operation accepts a second parameter, that is optional, for rounding the main number to the nearest multiple of this parameter.
If the value of fieldname1 is 2.5, the result of: round(fieldname1) would be 3
round(2.3, 0.5) = 2.5
sin(x)
Returns the sine of x (x is in radians)
If the value of fieldname1 is 3, the result of: sin(fieldname1) would be 0.1411200080598672
sqrt(x)
Returns the square root of x
If the value of fieldname1 is 9, the result of: sqrt(fieldname1) would be 3
nthroot(x,y)
Returns the y root of x
nthroot(27,3) = 3
tan(x)
Returns the tangent of an angle
If the value of fieldname1 is 90, the result of: tan(fieldname1) would be -1.995200412208242
gcd(x,y)
Returns the greatest common divisor between x and y
If the value of fieldname1 is 16, and the value of the fieldname2 is 12 the result of: gcd(fieldname1,fieldname2) would be 4
lcm(x,y)
Returns the least common multiple between two numbers
If the value of fieldname1 is 3, and the value of the fieldname2 is 5 the result of: lcm(fieldname1,fieldname2) would be 15
Pay special attention to the next two operations. The first of them, very extended its use in equations for calculations the cost of products and services, and the other one to obtain a date.
prec(x,y)
Return the x number with y decimal digits
If the value of fieldname1 is 10.33323, the result of: prec(fieldname1,2) would be 10.33
If the value of fieldname1 is 10.3365, the result of: prec(fieldname1,2) would be 10.34
If the value of fieldname1 is 10, the result of: prec(fieldname1,2) would be 10.00
The prec operation supports a third parameter to return the first parameter without decimal places if it is an integer number:
PREC(3,2)=3.00
PREC(3,2,true)=3
cdate(x, format)
Returns the number x formatted like a Date, the second parameter defines the format of the output date (‘mm/dd/yyyy’, ‘dd/mm/yyyy’). The number represents the number of days from Jan 1, 1970
If fieldname1 is a date field, and its value is 3/11/2013: cdate(fieldname1+10) would be 13/11/2013
Sample valid equations:
To calculate the monthly payment in a lease calculator:
The fields implied are:
Load amount: fieldname1
Residual value: fieldname2
Interest rate %: fieldname3
Number of months: fieldname4
The corresponding equation for monthly payment is:
prec((fieldname1*fieldname3/1200*pow(1+fieldname3/1200,fieldname4)-fieldname2*fieldname3/1200)/(pow(1+fieldname3/1200,fieldname8)-1),2)
There is a huge number of equations that can’t be recreated with simple mathematical operators, or the operations listed above.
Pay attention to the following sample:
In your form there are four fields: fieldname1, fieldname2, fieldname3 and the calculated field: fieldname4, but the value of fieldname4 is dependent of fieldname3 value, that is:
The value of fieldname4 will be: fieldname1+fieldname2, if the value of fieldname3 is greater than 100, or will be: fieldname1*fieldname2, if the value of fieldname3 is less than or equal to 100. Neither of previous operations, by itself, can calculate the value of fieldname4.
To solve complex cases like this, the «Calculated Fields Form» plugin allows entering javascript code directly in the equation editor, like the following sample:
(function(){
if(fieldname3 > 100) return fieldname1+fieldname2;
if(fieldname3 <= 100) return fieldname1*fieldname2;
})();
For complex equations where is required to define blocks of javascript code, you must use the following format:
(function(){
//Your code here
})();
and the return the value of that function will be the value assigned to the calculated field:
return fieldname1+fieldname2;
Pay attention, the plugin removes the changes of lines from the equations at runtime. So, if the equation is defined with the «function» format:
(function(){
//Your code here
})();
It is really important to include the semicolon symbols (;) at the end of the code lines, furthermore, if the equation is really complex, and you want to include comments for future references, should be used the format for multiple lines comments: /* comment here */, but never the format for single line of comments: // comment here
Related Information….
Logical Module
All Versions of the Plugin
The logical module includes the following operations:
IF(condition, value if true, value if false)
Checks whether a condition is met, and returns one value if true, and another if false.IF(logical_test, value_if_true, value_if_false)
If the value of fieldname1 is 10 and the value of fieldname2 is 20, the result of:
IF(fieldname1 < fieldname2, fieldname1, fieldname2)
would be 10
AND(x,y,z,….)
Checks whether all arguments are true, and return true if all values are true, and false in another way. AND(logical1,logical2,…)
Suppose there are three fields, fieldname1, fieldname2 and fieldname3, with values: 10, 20 and 30 respectively, so:
AND( fieldname1<100, fieldname2<100, fieldname3<100)
would be true
but
AND( fieldname1<100, fieldname2<100, fieldname3<25)
is
false, because the fieldname3 is bigger than 25
OR(x,y,z,….)
Checks whether any of arguments is true, and return true if any of values is true, and false if all values are false. OR(logical1,logical2,…)
Suppose there are three fields, fieldname1, fieldname2 and fieldname3, with values: 10, 20 and 30 respectively, so:
OR( fieldname1<100, fieldname2<100, fieldname3<25)
is true, because at least the two initial conditions are true, inclusive if the third condition fails.
but
OR( fieldname1<5, fieldname2<5, fieldname3<25)
is false, because the three conditions fail
NOT(x)
Changes false to true, or true to false.NOT(logical)
NOT(true)
return false
NOT(false)
return true
IN(x,[x,y,z,….])
Checks whether the term is included in the second argument, the second argument may be a string or strings array. IN(term, string/array)
IN(10,[10,20,30,40])
Return true
IN(‘world’, ‘hello world’)
Return true
Financial Module
Developer Version
Platinum Version
The module includes a pack of functions to improve the implementation of financial equations. Distributed with the Developer or Platinum versions of the plugin.
CALCULATEPAYMENT(x,y,z)
Calculates the Financed Payment Amount
Three parameters: amount, months, interest rate (percent)
Ex: CALCULATEPAYMENT(25000, 60, 5.25)
Result: 474.65
CALCULATEAMOUNT(x,y,z)
Calculates the Financed Amount
Three parameters: months, interest rate (percent), payment
Ex: CALCULATEAMOUNT(60, 5.25, 474.65)
Result: 25000.02
CALCULATEMONTHS(x,y,z)
Calculates the Months Financed
Three parameters: amount, interest rate (percent), payment
Ex: CALCULATEMONTHS(25000, 5.25, 474.65)
Result: 60
CALCULATEINTEREST(x,y,z)
Calculates the Financed Interest Rate
Three parameters: amount, months, payment
Ex: CALCULATEINTEREST(25000, 60, 474.65)
Result: 5.25
CALCULATEACCRUEDINTEREST(x,y,z)
Calculates the Accrued Interest
If your money is in a bank account accruing interest, how much does it earn over x months? Three parameters: principle amount, months, interest rate (percent)
Ex: CALCULATEACCRUEDINTEREST(25000, 60, 5.25)
Result: 7485.806648756854
CALCULATEAMORTIZATION(x,y,z,date)
Creates an amortization Schedule
Create an amortization schedule. The result should be an array whose length in the number of months. Each entry is an object. Four parameters: principle amount, months, interest rate (percent), start date (optional Date object)
Ex: CALCULATEAMORTIZATION(25000, 60, 5.25, new Date(2011,11,20) )
Result:
[
{
principle: 24634.725
interest: 109.375
payment: 474.65
paymentToPrinciple: 365.275
paymentToInterest: 109.375
date: Tue Dec 20 2011 00:00:00 GMT+0100 (Romance Daylight Time)
},
{
principle: 24267.851921874997
interest: 217.151921875
payment: 474.65
paymentToPrinciple: 366.873078125
paymentToInterest: 107.776921875
date: Fri Jan 20 2012 00:00:00 GMT+0100 (Romance Daylight Time)
},
…
]
The CALCULATEAMORTIZATION is the operation with most complexity in the «Calculated Fields Form» and requires its own section.
The CALCULATEAMORTIZATION operation returns a list of objects. For example:
CALCULATEAMORTIZATION(25000, 60, 5.25, new Date(2011,11,20) )

	Result:
		[
			{
				principle: 24634.725
				interest: 109.375
				payment: 474.65
				paymentToPrinciple: 365.275
				paymentToInterest: 109.375
				date: Tue Dec 20 2011 00:00:00 GMT+0100 (Romance Daylight Time)
			},
			{
				principle: 24267.851921874997
				interest: 217.151921875
				payment: 474.65
				paymentToPrinciple: 366.873078125
				paymentToInterest: 107.776921875
				date: Fri Jan 20 2012 00:00:00 GMT+0100 (Romance Daylight Time)
			},
			...
		]
- principle: how much remains to pay.
- interest: is the accumulated of interest paid until this date.
- payment: is the monthly payment (payment of interests and payment of principle).
- paymentToPrinciple: is the part of payment that is considered as payment of principle.
- paymentToInterest: is the part of payment that is considered as payment of interest.
- date: is the date of payment.
In the following example, we explain the use of the CALCULATEAMORTIZATION operation: the fieldname1 represents the principle amount, fieldname3 the number of months, and the fieldname2 the interest rate.
So, the value returned by CALCULATEAMORTIZATION(fieldname1,fieldname3,fieldname2) cannot by assigned directly to the calculated field, or will be displayed a text like: [object],[object],…… Therefore, we’ll need to create a formatted string, with HTML tags, to display the CALCULATEAMORTIZATION results in an understandable format.
(function(){
var r = CALCULATEAMORTIZATION(fieldname1,fieldname3,fieldname2),
str = »;if(r.length)
{
str = ‘<table cellpadding=» 10″ >’;
str += ‘<tr>’;
str += ‘<td>Date</td>’;
str += ‘<td>Interest</td>’;
str += ‘<td>Payment</td>’;
str += ‘<td>Payment to Interest</td>’;
str += ‘<td>Payment to Principle</td>’;
str += ‘<td>Principle</td>’;
str += ‘</tr>’;
for(var i = 0, h = r.length; i < h; i++)
{
str += ‘<tr>’;
str += ‘<td>’+GETDATETIMESTRING( new Date(r[i][‘date’]), ‘yyyy-mm-dd’)+'</td>’;
str += ‘<td>’+PREC(r[i][‘interest’],2)+'</td>’;
str += ‘<td>’+PREC(r[i][‘payment’],2)+'</td>’;
str += ‘<td>’+PREC(r[i][‘paymentToInterest’],2)+'</td>’;
str += ‘<td>’+PREC(r[i][‘paymentToPrinciple’],2)+'</td>’;
str += ‘<td>’+PREC(r[i][‘principle’],2)+'</td>’;
str += ‘</tr>’;
}
str += ‘</table>’;
}
jQuery(‘.result-here’).html( str );
})()
The first step will be store the list of objects returned by the CALCULATEAMORTIZATION operation, in a local variable, and create another variable to store the amortization data, but with an HTML format:
var r = CALCULATEAMORTIZATION(fieldname1,fieldname3,fieldname2),
str = '';
The equation validates if the previous operation returns a value, because if the CALCULATEAMORTIZATION was called with wrong values can return an empty array:
if(r.length)
{
...
}
I’ve decided display the results of CALCULATEAMORTIZATION operation in a tabular format because is easier to understand. The first element in the result is the tag to open the table: <table>, and the row with the column names:
str = '<table cellpadding=" 10" >';
str += '<tr>';
str += '<td>Date</td>';
str += '<td>Interest</td>';
str += '<td>Payment</td>';
str += '<td>Payment to Interest</td>';
str += '<td>Payment to Principle</td>';
str += '<td>Principle</td>';
str += '</tr>';
Now, it is the moment to create each row of the table with the values of monthly amortization.
for(var i = 0, h = r.length; i < h; i++)
{
    str += '<tr>';
    str += '<td>'+GETDATETIMESTRING( new Date(r[i]['date']), 'yyyy-mm-dd')+'</td>';
    str += '<td>'+PREC(r[i]['interest'],2)+'</td>';
    str += '<td>'+PREC(r[i]['payment'],2)+'</td>';
    str += '<td>'+PREC(r[i]['paymentToInterest'],2)+'</td>';
    str += '<td>'+PREC(r[i]['paymentToPrinciple'],2)+'</td>';
    str += '<td>'+PREC(r[i]['principle'],2)+'</td>';
    str += '</tr>';
}
The previous code has its particularities. By default the dates returned by the CALCULATEAMORTIZATION operation have the complete format including hours and seconds, In this form the information about hours and seconds is not relevant, so, it is preferred to use a short date format: yyyy-mm-dd. The date string will be formatted with the GETDATETIMESTRING operation, included in the Date module of developers version of the plugin (the second parameter is the format to use):
str += '<td>'+GETDATETIMESTRING( new Date(r[i]['date']), 'yyyy-mm-dd')+'</td>';
Another particularity is the use of the PREC operation. By default the CALCULATEAMORTIZATION returns the numeric values with all its decimals digits, for example: 366.873078125, but for humans it is common to identify the money representation with two decimal digits. So, I’ve used the PREC operation with the number 2 as the second parameter.
str += '<td>'+PREC(r[i]['interest'],2)+'</td>';
After creating all table rows, it is time to close the table, and print the results:
str += '</table>';
If you display the result directly in the calculated field, you will see a weird text (or very hard to understand) because the input fields in HTML are not able to display tables, in this case I’ve preferred to show the result in an «HTML Content» field. I’ve inserted an «HTML Content» field in the form, and entered a DIV tag as its content with the class name: result-here <div class=»result-here»></div>. Then, using jQuery to display the table with the results into the DIV tag:
jQuery('.result-here').html( str );
The complete equation is:
(function(){
var r = CALCULATEAMORTIZATION(fieldname1,fieldname3,fieldname2),
str = »;if(r.length)
{
str = ‘<table cellpadding=» 10″ >’;
str += ‘<tr>’;
str += ‘<td>Date</td>’;
str += ‘<td>Interest</td>’;
str += ‘<td>Payment</td>’;
str += ‘<td>Payment to Interest</td>’;
str += ‘<td>Payment to Principle</td>’;
str += ‘<td>Principle</td>’;
str += ‘</tr>’;
for(var i = 0, h = r.length; i < h; i++)
{
str += ‘<tr>’;
str += ‘<td>’+GETDATETIMESTRING( new Date(r[i][‘date’]), ‘yyyy-mm-dd’)+'</td>’;
str += ‘<td>’+PREC(r[i][‘interest’],2)+'</td>’;
str += ‘<td>’+PREC(r[i][‘payment’],2)+'</td>’;
str += ‘<td>’+PREC(r[i][‘paymentToInterest’],2)+'</td>’;
str += ‘<td>’+PREC(r[i][‘paymentToPrinciple’],2)+'</td>’;
str += ‘<td>’+PREC(r[i][‘principle’],2)+'</td>’;
str += ‘</tr>’;
}
str += ‘</table>’;
}
jQuery(‘.result-here’).html( str );
})()
PRESENTVALUE(x,y,z)
Returns the present value of an investment
The present value is the total amount that a series of future payments is worth now. It requires three parameters: The interest rate per period, the total number of payment periods, the payment made each period and cannot change over the life of the annuity, and two optional parameters: The future value of the loan or investment and the due parameter (0 — the payment is due at the end of the period; 1 — the payment is due at the beginning of the period.)
Ex: PRESENTVALUE(0.08,5,100)
Result: 399.27
FUTUREVALUE(v,w,x,y,z)
Returns an investment based on an interest rate and a constant payment schedule. Five parameters: The interest rate for the investment, the number of payments for the annuity, the amount of the payment made each period, the present value of the payments (if this parameter is omitted, it assumes to be 0), parameter that indicates when the payments are due (if this parameter is omitted, it assumes to be 0. The possible values are: 0 — Payments are due at the end of the period, 1 — Payments are due at the beginning of the period)
Ex: FUTUREVALUE(7.5/12,24,-250,-5000,1)
NPER(RATE,PMT,PV,FV,TYPE)
Returns the number of periods for an investment based on periodic, constant payments and a constant interest rate
Rate is the periodic interest rate (%).
PMT, the payment made each period; it cannot change over the life of the annuity. Typically, pmt contains principal and interest but no other fees or taxes.
PV, the present value, or the lump-sum amount that a series of future payments is worth right now.
FV (optional), the future value, or a cash balance you want to attain after the last payment is made. If fv is omitted, it is assumed to be 0 (the future value of a loan, for example, is 0).
Type (optional), the number 0 or 1 and indicates when payments are due.
Ex: NPER(12/12, -100, -1000, 10000, 1)
Result: 59.67386567429457
PMT(Rate,NPer,PV,FV,TYPE)
Returns the periodic payment for an annuity with constant interest rates
Rate is the periodic interest rate.
NPer is the number of periods in which annuity is paid.
PV is the present value (cash value) in a sequence of payments.
FV (optional) is the desired value (future value) to be reached at the end of the periodic payments.
Type (optional) is the due date for the periodic payments. Type=1 is payment at the beginning and Type=0 is payment at the end of each period.
Ex: PMT(1.99/12,36,25000)
Result: -715.96
IPMT(Rate,Period,NPer,PV,FV,TYPE)
Calculates the periodic amortizement for an investment with regular payments and a constant interest rate
Rate is the periodic interest rate (%).
Period is the period, for which the compound interest is calculated.
NPer is the number of periods in which annuity is paid.
PV is the present value (cash value) in a sequence of payments.
FV (optional) is the desired value (future value) to be reached at the end of the periods.
Type (optional) is the due date for the periodic payments. Type=1 is payment at the beginning and Type=0 is payment at the end of each period.
Ex: IPMT(5,5,7,15000)
Result: -352.9735
PPMT(Rate,Period,NPer,PV,FV,TYPE)
Returns for a given period the payment on the principal for an investment that is based on periodic and constant payments and a constant interest rate
Rate is the periodic interest rate (%).
Period is the amortizement period. P = 1 for the first and P = NPer for the last period.
NPer is the number of periods in which annuity is paid.
PV is the present value (cash value) in a sequence of payments.
FV (optional) is the desired value (future value) to be reached at the end of the periods.
Type (optional) is the due date for the periodic payments. Type=1 is payment at the beginning and Type=0 is payment at the end of each period.
Ex: PPMT(8.75/12,1,36,5000,8000,1)
Result: -350.99
PVIF(Rate,Periods)
Calculates the today value per currency received at a future date
Rate is interest rate per period (%).
Periods is the number of periods.
Ex: PVIF(5,10)
Result: 0.6139
FVIFA(Rate,Periods)
Calculates the future value interest factor of annuity
Rate is interest rate per period (%).
Periods is the number of periods.
Ex: FVIFA(5,17)
Result: 25.8404
NPV(Rate,Values)
Calculates the net present value of an investment based on a discount rate and a series of periodic cash flows.
Rate is the discount rate of the investment over one period (%).
Values is the array of values representing payments and income.
Ex: NPV(10,[-10000,3000,4200,6800])
Result: 1188.44
XNPV(Rate,Values,Dates)
Calculates the capital value (net present value)for a list of payments which take place on different dates
Rate is the internal rate of return for the payments (%).
Values and Dates refer to a series of payments and the series of associated date values. The first pair of dates defines the start of the payment plan. All other date values must be later, but need not be in any order. The series of values must contain at least one negative and one positive value (receipts and deposits).
Ex: XNPV(9,[-10000,2750,4250,3250,2750],[‘1/1/2008’, ‘3/1/2008′, ’10/30/2008’, ‘2/15/2009’, ‘4/1/2009’])
Result: 2068.65
IRR(Values,Guess)
Internal Rate of Return (IRR)
The Internal Rate of Return (IRR) is a financial function that returns the internal rate of return (IRR) for a series of cash flows that occur at regular intervals.
Values is an array of cash values.
Guess (optional) is a guess that can be input for the internal rate of return (%). The default is 10.
Ex: IRR([-10000,2000,2500,5000,1000])
Result: 0.01996530806985132
XIRR(Values,Dates,Guess)
Calculates the internal rate of return for a list of payments which take place on different dates
The calculation is based on a 365 days per year basis, ignoring leap years.
Values and Dates refer to a series of payments and the series of associated date values. The first pair of dates defines the start of the payment plan. All other date values must be later, but need not be in any order. The series of values must contain at least one negative and one positive value (receipts and deposits).
Guess (optional) is a guess that can be input for the internal rate of return (%). The default is 10.
Ex: XIRR([-10000,2000,2500,5000,1000],[’01/01/2001′, ’01/02/2001′, ’03/15/2001′, ’05/12/2001′, ’08/10/2001′],10)
Result: 0.1948184751
MIRR(Values,Dates,Guess)
Calculates the modified internal rate of return on an investment based on a series of periodic cash flows and the difference between the interest rate paid on financing versus the return received on reinvested income.
Values is the array of values containing the income or payments associated with the investment.
Financing Rate is the interest rate paid on funds invested (%).
Reinvestiment Return Rate is the return (as a percentage) earned on reinvestment of income received from the investment (%).
Ex: MIRR([-120000, 39000, 30000, 21000, 37000, 46000], 10, 12)
Result: 12.61
Formats a Number
One parameters: number
Ex:NUMBERFORMAT(-2530023420269.123456)
Result: -2,530,023,420,269
Ex: NUMBERFORMAT(25000.123456, {precision:2})
Result: 25,000.12
Format Currency
Formats a number to a certain currency. Two parameters: number, settings (optional). If settings option is a string it is treated as a currency name. If it is an object it is used as currency settings.
Ex: NUMBERFORMAT(25000.123456, ‘USD’)
Result: $25,000.12
The settings of format can be overridden with the «options» parameter.
Ex: NUMBERFORMAT(-25000.123456, ‘GBP’, { negative: ‘()’, precision: 3, thousand: » })
Result: £(25000.123)
Format a Percent
Formats a number with a certain precision. Two parameters: number, settings («percent» is a format)
Ex: NUMBERFORMAT(25000.123456, ‘percent’)
Result: 25,000%
Create a Currency
You may create a currency. The library comes with «USD», «GBP», and «EUR» currency formats and «number» and «percent» numeric formats. Two parameters: key, settings
Ex: ADDFORMAT(‘Dollars’, { before: », after: ‘ Dollars’, precision: 0, thousand: ‘,’, group: 3, decimal: ‘.’, negative: ‘-‘ })
Result: true
Ex: NUMBERFORMAT(25000.123456, ‘Dollars’)
Result: 25,000 Dollars
REMOVEFORMAT(x)
Removes a Currency
To remove a currency. One parameter: key
Ex: REMOVEFORMAT(‘Dollars’)
Result: true
Related Information….
Date Time module
Developer Version
Platinum Version
The Date Time module includes a group of operations to manage dates and times. Distributed with the Developer or Platinum versions of the plugin.
DATEOBJ(x,y)
Gets the date object from a string representation of date. DATEOBJ( date_string, format )
DATEOBJ(‘2013-05-21’, ‘yyyy-mm-dd’)
Result: date object
YEAR(x,y)
Gets the year from an string representation of date. YEAR( date_string, format )
YEAR(‘2013-05-21’, ‘yyyy-mm-dd’)
Result: 2013
MONTH(x,y)
Gets the month from a string representation of date. MONTH( date_string, format )
MONTH(‘2013-05-21’, ‘yyyy-mm-dd’)
Result: 5
MONTHNAME(date_string,format,locale)
Gets the month name from a string representation of date. MONTHNAME( date_string, format, locale )
The locale parameter is optional. The operation uses the client language by default.
Accepted locale values:
ar-SA Arabic (Saudi Arabia)
bn-BD Bangla (Bangladesh)
bn-IN Bangla (India)
cs-CZ Czech (Czech Republic)
da-DK Danish (Denmark)
de-AT Austrian German
de-CH «Swiss» German
de-DE Standard German (as spoken in Germany)
el-GR Modern Greek
en-AU Australian English
en-CA Canadian English
en-GB British English
en-IE Irish English
en-IN Indian English
en-NZ New Zealand English
en-US US English
en-ZA English (South Africa)
es-AR Argentine Spanish
es-CL Chilean Spanish
es-CO Colombian Spanish
es-ES Castilian Spanish (as spoken in Central-Northern Spain)
es-MX Mexican Spanish
es-US American Spanish
fi-FI Finnish (Finland)
fr-BE Belgian French
fr-CA Canadian French
fr-CH «Swiss» French
fr-FR Standard French (especially in France)
he-IL Hebrew (Israel)
hi-IN Hindi (India)
hu-HU Hungarian (Hungary)
id-ID Indonesian (Indonesia)
it-CH «Swiss» Italian
it-IT Standard Italian (as spoken in Italy)
ja-JP Japanese (Japan)
ko-KR Korean (Republic of Korea)
nl-BE Belgian Dutch
nl-NL Standard Dutch (as spoken in The Netherlands)
no-NO Norwegian (Norway)
pl-PL Polish (Poland)
pt-BR Brazilian Portuguese
pt-PT European Portuguese (as written and spoken in Portugal)
ro-RO Romanian (Romania)
ru-RU Russian (Russian Federation)
sk-SK Slovak (Slovakia)
sv-SE Swedish (Sweden)
ta-IN Indian Tamil
ta-LK Sri Lankan Tamil
th-TH Thai (Thailand)
tr-TR Turkish (Turkey)
zh-CN Mainland China, simplified characters
zh-HK Hong Kong, traditional characters
zh-TW Taiwan, traditional characters
MONTHNAME(«2023-02-06», «yyyy-mm-dd»)
Result: February
MONTHNAME(«2023-02-06», «yyyy-mm-dd»,»de»)
Result: Februar
DAY(x,y)
Gets the days from a string representation of date. DAY( date_string, format )
DAY(‘2013-05-21’, ‘yyyy-mm-dd’)
Result: 21
WEEKDAY(x,y)
Gets the week day from a string representation of date. WEEKDAY( date_string, format )
WEEKDAY(‘2013-10-27’, ‘yyyy-mm-dd’)
Result: 1 Sunday is the day number one
WEEKDAYNAME(date_string,format,locale)
Gets the week day name from a string representation of date. WEEKDAYNAME( date_string, format, locale )
The locale parameter is optional. The operation uses the client language by default.
Accepted locale values:
ar-SA Arabic (Saudi Arabia)
bn-BD Bangla (Bangladesh)
bn-IN Bangla (India)
cs-CZ Czech (Czech Republic)
da-DK Danish (Denmark)
de-AT Austrian German
de-CH «Swiss» German
de-DE Standard German (as spoken in Germany)
el-GR Modern Greek
en-AU Australian English
en-CA Canadian English
en-GB British English
en-IE Irish English
en-IN Indian English
en-NZ New Zealand English
en-US US English
en-ZA English (South Africa)
es-AR Argentine Spanish
es-CL Chilean Spanish
es-CO Colombian Spanish
es-ES Castilian Spanish (as spoken in Central-Northern Spain)
es-MX Mexican Spanish
es-US American Spanish
fi-FI Finnish (Finland)
fr-BE Belgian French
fr-CA Canadian French
fr-CH «Swiss» French
fr-FR Standard French (especially in France)
he-IL Hebrew (Israel)
hi-IN Hindi (India)
hu-HU Hungarian (Hungary)
id-ID Indonesian (Indonesia)
it-CH «Swiss» Italian
it-IT Standard Italian (as spoken in Italy)
ja-JP Japanese (Japan)
ko-KR Korean (Republic of Korea)
nl-BE Belgian Dutch
nl-NL Standard Dutch (as spoken in The Netherlands)
no-NO Norwegian (Norway)
pl-PL Polish (Poland)
pt-BR Brazilian Portuguese
pt-PT European Portuguese (as written and spoken in Portugal)
ro-RO Romanian (Romania)
ru-RU Russian (Russian Federation)
sk-SK Slovak (Slovakia)
sv-SE Swedish (Sweden)
ta-IN Indian Tamil
ta-LK Sri Lankan Tamil
th-TH Thai (Thailand)
tr-TR Turkish (Turkey)
zh-CN Mainland China, simplified characters
zh-HK Hong Kong, traditional characters
zh-TW Taiwan, traditional characters
WEEKDAYNAME(«2023-02-06», «yyyy-mm-dd»)
Result: Monday
WEEKDAYNAME(«2023-02-06», «yyyy-mm-dd»,»de»)
Result: Montag
WEEKNUM(x,y)
Gets the week number from a string representation of date, a year has 53 weeks.WEEKNUM( date_string, format )
WEEKNUM(‘2013-10-27’, ‘yyyy-mm-dd’)
Result: 43
HOURS(x,y)
Gets hours from a string representation of datetime. HOURS( datetime_string, format )
HOURS(‘2013-10-27 01:21’, ‘yyyy-mm-dd hh:ii’)
Result: 1
MINUTES(x,y)
Gets minutes from a string representation of datetime. MINUTES( datetime_string, format )
MINUTES(‘2013-10-27 01:22’, ‘yyyy-mm-dd hh:ii’)
Result: 22
SECONDS(x,y)
Gets seconds from a string representation of datetime. SECONDS( datetime_string, format )
SECONDS(‘2013-10-27 01:22:56’, ‘yyyy-mm-dd hh:ii:ss’)
Result: 56
NOW()
Gets a date object with the current day-time information. NOW()
NOW()
Result: 2013-10-27 01:42:19
TODAY()
Gets a date object with the current day information, without the time part.TODAY()
EOMONTH(date_obj, number)
Get the last day of the month. The number parameter is optional.
EOMONTH(DATEOBJ(«2021-03-04»))
Result: Mar 31 2021
EOMONTH(DATEOBJ(«2021-03-04»), 4)
Result: Jul 31 2021
EOMONTH(DATEOBJ(«2021-03-04»), -3)
Result: Dec 31 2020
NETWORKDAYS(date_one, date_two, date_format, holidays, holidays_format)
Obtains the difference in days between two dates ignoring weekends (Saturdays and Sundays) and holidays.
NETWORKDAYS(date_one, date_two, date_format, holidays, holidays_format)
If holidays format is ignored, the plugin uses date_format.
NETWORKDAYS(«10/1/2012», «3/1/2013», «mm/dd/yyyy»)
Result: 110
NETWORKDAYS(«10/1/2012», «3/1/2013», «mm/dd/yyyy», [«12/24/2012», «12/31/2012»], «mm/dd/yyyy»)
Result: 108
DATEDIFF(date_one, date_two, date_format, return)
Gets the difference between two dates strings representation
DATEDIFF(date_one, date_two, date_format, return)
The function returns an object, whose value depends on the ‘return’ argument
Possible values of return argument:
d — returns the number of days between two dates
m — returns the number of months between two dates, and remaining days
y — returns the number of years between two dates, remaining months, and remaining days
DATEDIFF(‘2013-10-27’, ‘2012-06-22’, ‘yyyy-mm-dd’, ‘y’)[‘months’]
Result: 4
Since the third parameter tells the plugin the starting point for calculating the date difference, the resulting object for the operation:
DATEDIFF(‘2013-10-27’, ‘2012-06-22’, ‘yyyy-mm-dd’, ‘y’)
It would be:
{
"years": 1,
"months": 4,
"days": 5,
"hours": 0,
"minutes": 0,
"seconds": 0
}
One year, four months, and five days more.
However, the resulting object for the operation:
DATEDIFF(‘2013-10-27’, ‘2012-06-22’, ‘yyyy-mm-dd’, ‘m’)
It would be:
{
"years": -1,
"months": 16,
"days": 5,
"hours": 0,
"minutes": 0,
"seconds": 0
}
In this case, the value of the «years» property is -1 because the operation tells the plugin to use «months» as the starting point to calculate the difference. So, instead of 1 year and four months, the resulting object indicates the difference is sixteen months and five days.
Similarly, the resulting object for the third example:
DATEDIFF(‘2013-10-27’, ‘2012-06-22’, ‘yyyy-mm-dd’, ‘d’)
It would be:
{
"years": -1,
"months": -1,
"days": 492,
"hours": 0,
"minutes": 0,
"seconds": 0
}
DATETIMESUM(date_string, format, number, to_increase, ignore_weekends <optional>)
Increases the date-time string representation in the number of seconds, minutes, hours, days, months, or years, passed as parameter.
ignore_weekends is an optional parameter that applys only on days increment. It ignores the Saturdays and Sundays in the sum.
DATETIMESUM( date_string, format, number, to_increase )
DATETIMESUM(‘2013-10-27’, ‘yyyy-mm-dd’, 6, ‘d’)
Result: The date object representation of 2013/11/01, Saturday.
DATETIMESUM(‘2013-10-27’, ‘yyyy-mm-dd’, 6, ‘d’, true)
Result: The date object representation of 2013/11/04, Monday.
GETDATETIMESTRING(datetime_object, format)
Returns the string representation of a date object
GETDATETIMESTRING(TODAY(), ‘yyyy-mm-dd’)
Result: 2013-10-27
DECIMALTOTIME( decimal, format, time format )
Converts a decimal number to a time format text. The operation requires three parameters, the decimal number, character indicating the decimal representation («y» for years, «m» for months, «d» for days, «h» for hours, «i» for minutes, and «s» for seconds), text for time format («h:i:s»).
DECIMALTOTIME(938405,»s»,»d days, h hours, i minutes, and s seconds»)
Result: 10 days, 20 hours, 40 minutes, and 5 seconds
TIMETODECIMAL( time text, time format, output format )
Converts a time text to a decimal number. The operation requires three parameters, the text with time representation, the time format representation («h:i:d»), character with the output format («y» for years, «m» for months, «d» for days, «h» for hours, «i» for minutes, and «s» for seconds).
TIMETODECIMAL(«20:40:5″,»h:i:s»,»s»)
Result: 74405
DISTANCE MODULE
Developer Version
Platinum Version
The distance module integrates the Calculated Fields Form with the Google Maps (Distributed with the Developer or Platinum versions of the plugin):
DISTANCE(Address A, Address B, Unit System, Travel Mode)
Returns the distance between two addresses, in the unit system passed as parameter, and with the travel mode selected. Returns the FAIL text if at least one of addresses is invalid, or it is not possible access to Google.
The addresses A and B are posts addresses, or post codes.
The allowed values for Unit System are: km for kilometters, or mi for miles, km is the value by default.
The allowed values for Travel Mode are: DRIVING, BICYCLING, TRANSIT, WALKING, or STRAIGHT.
DRIVING is the value by default, and STRAIGHT determines the straight line between the addresses.
DISTANCE( ‘33122’, ‘32801’, ‘mi’, ‘DRIVING’) would be 240
TRAVELTIME( Address A, Address B, Return as Text, Travel Mode, Avoid Highways, Avoid Tolls )
Returns the distance between two addresses, in the unit system passed as parameter, and with the travel mode selected. Returns the FAIL text if at least one of addresses is invalid, or it is not possible access to Google.
The addresses A and B are posts addresses, or post codes.
The allowed values for Return as Text are: 1 to get values in text format as 11 min, or 0 to get the value in seconds, zero is the default value.
The allowed values for Travel Mode are: DRIVING, BICYCLING, TRANSIT, or WALKING, DRIVING is the value by default.
The allowed values for Avoid Highways and Avoid Tolls are: 1 or 0, zero as the default value.
TRAVELTIME(‘Murray BMCC, 70 Murray St, New York, NY 10007, USA’, ‘384-386 Broadway, New York, NY 10013, USA’,1,’WALKING’) Result: 13 min
LATLNG( address )
Returns an array with the pair of values [latitude,longitude] corresponding to the address.
LATLNG(‘Murray BMCC, 70 Murray St, New York, NY 10007, USA’) Result: [40.7144859, -74.0106983]
DMSTODD( value in degrees, minutes and seconds format )
Converts degrees, minutes and seconds to decimal degrees.
If value of v is 40°40’58.1″N DMSTODD(v) would be: 40.682806
Tip: You must use your personal key for Google API. Please, insert a shortcode for the variable: «google_api_key» in the webpage as: [CP_CALCULATED_FIELDS_VAR name=»google_api_key» value=»<your key>»]
The API Key can be passed directly in the form’s shortcode, as follows: [CP_CALCULATED_FIELDS id=»1″ google_api_key=»<your key>»]
Related Information….
MANAGING FIELDS MODULE
All Versions of the Plugin
The managing fields module allows to process the fields objects:
getField( # or fieldname# )
Returns the internal representation of a field object.
The getField operation can be used only in the context of the equations.
For example, if there is the slider field: fieldname1, to assing it a value, for example:50, enter as part of the equation associated to the calculated field the piece of code:
getField(1).setVal(50);
If you want pass the field’s name with the format: fieldname#, the correct would be use:
getField(‘fieldname’+’1’).setVal(50);
Or in the equation’s context: getField(fieldname1|n).setVal(50);
The getField operation is more important than it appears at first glance. It allows to use in the equations fields that belong to other forms inserted in the same page.
For example, assuming you have inserted the form with id=1 in the page and assigned it a unique class name:
[CP_CALCULATED_FIELDS id=»1″ class=»form-a»]
Now, you want to insert a second form on the page containing with a calculated field, in whose equation you want to use the value of the field field fieldname123 of the first form, for example to duplicate its value.
For this hypothetical case, the equation of the calculated field of the second form can be implemented as follows:
getField(fieldname123|n, ‘.form-a’).val()*2
ELEMENTINFO( selector, info )
Get element information. It returns the value, text, or HTML of the element. The selector parameter is any valid dom selector, like «h1.post-title», and the info parameter is any of the values «text», «html», or «value»
Ex.
ELEMENTINFO(«h1.post-title», «text»);
If the selector does not exist, the operation returns null.
IGNOREFIELD( # or fieldname#, form object or form id or consecutive form number )
Set the field in the ignore state. Its value in the equations would be zero, furthermore, it would be excluded from the form’s submission. The second parameter is optional.
IGNOREFIELD(1);
IGNOREFIELD(‘fieldname1|n’);
IGNOREFIELD(‘fieldname’+’1’);
ACTIVATEFIELD( # or fieldname#, form object or form id or consecutive form number )
Activates a field that was ignored previously. The second parameter is optional.
ACTIVATEFIELD(1);
ACTIVATEFIELD(‘fieldname1|n’);
ACTIVATEFIELD(‘fieldname’+’1’);
HIDEFIELD( # or fieldname#, form object or form id or consecutive form number )
Hide a field explicitly. Unlike IGNOREFIELD, this operation hides the field but does not deactivate it. The hidden fields participate in the equations and are submitted to the server. The second parameter is optional.
HIDEFIELD(1);
HIDEFIELD(‘fieldname1|n’);
HIDEFIELD(‘fieldname’+’1’);
SHOWFIELD( # or fieldname#, form object or form id or consecutive form number )
Show a field explicitly. If the field was hidden by a dependency or by the IGNOREFIELD operation, it must be displayed by the ACTIVATEFIELD operation. The second parameter is optional.
SHOWFIELD(1);
SHOWFIELD(‘fieldname1|n’);
SHOWFIELD(‘fieldname’+’1’);
VALIDFORM( form object or selector, silent )
Checks if the values of the form fields are valid or not. The first parameter would be a form object or a selector with the reference to the form. If this is null, or not passed to the operation, the plugin validates the first form on the page. The second parameter is a boolean (true or false), and allows us to validate the form without displaying error messages.
VALIDFORM();
VALIDFORM(«cp_calculatedfieldsf_pform_1», true);
VALIDFIELD( field name or number, form object or selector, silent )
Checks if the field value is valid or not. The first parameter is required. It is the name of the field to validate (Ex. fieldname123|n) or its numeric components (Ex. 123). The second parameter would be a form object or a selector with the reference to the form. If this is null, or not passed to the operation, the plugin validates the field in the first form on the page. The third parameter is a boolean (true or false), and allows us to validate the field without displaying error messages.
VALIDFIELD(fieldname1|n);
VALIDFIELD(fieldname1|n, «cp_calculatedfieldsf_pform_1», true);
ENABLEEQUATIONS(form)
Allows to enable dynamic evaluation of equations. Accepts an optional parameter: form object, jQuery object or selector. If the parameter is omitted, enables evaluation of equations on all forms on the page.
ENABLEEQUATIONS();
ENABLEEQUATIONS(form);
DISABLEEQUATIONS(form)
Allows to disable dynamic evaluation of equations. Accepts an optional parameter: form object, jQuery object or selector. If the parameter is omitted, disables evaluation of equations on all forms on the page.
DISABLEEQUATIONS();
DISABLEEQUATIONS(form);
EVALEQUATIONS(form)
Evaluates the form equations. The form object is optional. If the form object is omitted, the plugin evaluates each equation in each form on the page.
EVALEQUATIONS(form);
EVALEQUATIONS();
EVALEQUATION(form, ‘fieldname#’)
Evaluate specific equation. Requires two parameters, the form object and the field name, or the numeric part of the field name.
EVALEQUATION(form, ‘fieldname1’);
EVALEQUATION(form, 1);
GOTOFIELD( field, form object )
Jumps to a field in the form.
field, integer number corresponding to the number component in the field name or the field name (required parameter).
form object, an optional parameter corresponding to the form where the field is.
In the context of the equation, call the operation passing only the number component in the field name,
Ex. GOTOFIELD(2);
But if the operation is called from the onclick event of a button, the form object is required,
Ex. GOTOFIELD(«fieldname2», this.form);
GOTOPAGE( page, form object )
Jumps to a page in a multipage form.
page, integer corresponding to the page index, starting at zero (required parameter).
form object, optional parameter corresponding to the multipage form.
In the context of the equation, call the operation passing only the page index,
Ex. GOTOPAGE(2);
But if the operation is called from the onclick event of a button, the form object is required,
Ex. GOTOPAGE(2, this.form);
COPYFIELDVALUE( # or fieldname#, form object or form id or consecutive form number )
Copies the field value to the clipboard. Supports input and textarea tags.
The first parameter is required, it would be the numeric part of the field name or the field name.
The second parameter would be a form object, or a selector with the form reference. If the second parameter is not passed, the plugin will copy the value of the field in the first form of the page.
Ex. COPYFIELDVALUE(1); — or — COPYFIELDVALUE(«fieldname1»);
PRINTFORM( true or false )
Print the form area.
The parameter is optional. In multipage forms, the true parameter makes all pages available for printing.
Ex. PRINTFORM(); — or — PRINTFORM(true);
![]() Need more controls or operations?
Need more controls or operations?
Install the CP BLOCKS plugin, and visit the Marketplace:
— with buttons
— testimonial blocks
— additional features
…and more
THIRD-PARTY CONNECTION MODULE
All Versions of the Plugin
The Third-party Connection module allows the integration with third-party functions.
cffProxy(Function, First parameter, Second parameter, …)
Works as proxy for calling the function passed as the first parameter, and the remaining parameters are passed as parameters of third-party function.
The first parameter is the third-party function (it is required). The cffProxy operation pass to this third-party function a callback as the last parameter. This callback should be called from the code of the third-party function, and receives as parameter the value generated by the third-party function.
cffProxy( function(a, b, callback){callback(a+b);}, 4, 5) the result is 9
Related Information….
SERVER SIDE MODULE
Developer Version
Platinum Version
This operations module is distributed with the «Server Side Equations add-on» and includes the SERVER_SIDE operation for calling the server side equations with AJAX:
SERVER_SIDE(Equation Name, First parameter, Second parameter, …)
Returns the result of the server side equation.
The first parameter is required, it is a text with the equation’s name, for example: ‘square_root_equation’.
The rest of parameters in the operation are passed as parameters of the server side equation.
SERVER_SIDE( ‘square_root_equation’, 4) is equal to 2
Related Information….
CHART.JS MODULE
Developer Version
Platinum Version
The Chart.js module allwos to includes charts generated with the Chart.js API in the forms (Distributed with the Developer or Platinum versions of the plugin):
CFFCHART(canvas tag id, object with the data and options, field object)
It is a proxy for the Chart method in the Chart.js API. The functions accepts the same parameters in the Chart function.
The first parameter is the id of the canvas tag where the chart would be generated.
The second parameter is a plain object with the labes, datasets, and options, required by Chart.js. Click here for the API Documentation.
The third parameter (optional) is the object representation of the field to be populated with the chart image encoded as base64.
CFFCHART(‘canvas_id’, {type:’bar’, data:{labels:[‘Label A’, ‘Label B’], datasets:[{data:[fieldname1, fieldname2]}]}})
CFFCHART(‘canvas_id’, {type:’bar’, data:{labels:[‘Label A’, ‘Label B’], datasets:[{data:[fieldname1, fieldname2]}]}}, getField(fieldname4|n))
Note: The second parameter accepts the version attribute to decide the ChartJS API version to use. Ex:
CFFCHART(‘canvas_id’, {version:’3.7.1′, type:’bar’, data:{labels:[‘Label A’, ‘Label B’], datasets:[{data:[fieldname1, fieldname2]}]}});
It is possible to register ChartJS plugins by passing an objects list with the plugins’ URLs and a callback function to call after loading the plugin:
CFFCHART("my-chart", {
    type: "bar",
    data: {
        labels: ["Foo", "Bar"],
        datasets: [{
                label: "bad",
                data: [5, 25],
                backgroundColor: "rgba(244, 143, 177, 0.6)"
            }, {
                label: "better",
                data: [15, 10],
                backgroundColor: "rgba(255, 235, 59, 0.6)"
            }, {
                label: "good",
                data: [10, 8],
                backgroundColor: "rgba(100, 181, 246, 0.6)"
            },
        ],
    },
    options: {
        indexAxis: "y",
        plugins: {
            stacked100: {
                enable: true
            },
            "datalabels" : false
        },
    },
    register_plugins:[
        {
            "url":"https://cdn.jsdelivr.net/npm/chartjs-plugin-stacked100@1.0.0",
            "callback":function(){Chart.register(ChartjsPluginStacked100.default);}
        }
    ]
});
The process would be as follows:
* Insert a «HTML Content» field in the form with the canvas tag as its content:
<canvas id=»canvas_id»></canvas>
* Uses the CFFCHART operation as part of the equation:
(‘canvas_id’, {type:’bar’, labels:[‘Label A’, ‘Label B’], datasets:[{data:[fieldname1, fieldname2]}]})
Related Information….
More information with a detailed description of parameters and practical demos in the post of the plugin’s blog: Chart Generation
URL Module
All Versions of the Plugin
The URL module includes the following operations:
getURL
Returns the current page’s URL
getURL()
getBaseURL
Returns the base URL of the current page
getBaseURL()
getURLHash
Returns # followed by the fragment identifier of the current page URL, or empty text. getURLHash accepts an optional parameter to removes the hash (#) symbol
Ex. https://www.website.com/page#position
getURLHash() returns #position
getURLHash(true) returns position
getURLPath
Returns the initial / symbol followed by the path of the current page URL, or empty text. getURLPath accepts an optional parameter to removes the leading and trailing slash (/) symbols
Ex. https://www.website.com/pages/page1/
getURLPath() returns /pages/page1/
getURLPath(true) returns pages/page1
getURLParameters(url)
Returns a plain object with the URLs parameters. The operation accepts an URL as optional parameter
getURLParameters()
getURLParameter(parameter_name, default_value)
Returns the value of an URL parameter. The operation accepts two parameters: the parameter name and the dafault value. The default value would be returned if the URL parameter does not exist. If not default value is passed as parameter, and the URL parameter does not exist, the operation returns null
If the page’s url is: http://www.website.com/?username=john
getURLParameter(‘username’, »)
returns john
getReferrer()
Returns the URL of referrer.
generateURL(url, parameters, hash)
Generates an URL given their components. The operation accepts three parameters: the base URL (required parameter), a plain object for the URL parameters (optional parameter), a text with the hash (optional parameter).
generateURL(«http://www.website.com», {«param1″:»value1», «param2″:»value2»}, «bookmark»)
returns the URL http://www.website.com?param1=value1¶m2=value2#bookmark
redirectToURL(url, object)
Redirects the user. The operation accepts two parameters: the URL and a plain object for the parameters
redirectToURL(‘http://www.website.com/’,{username: ‘john’})
Handling of Files and Their Properties
All Versions of the Plugin
The Handling Files module includes the following operations:
PDFPAGESNUMBER
Returns the pages number in a PDF file. It receives the «Upload File» field name or the numeric component of the field name and returns the number of pages.
Ex. PDFPAGESNUMBER(fieldname123|n); or PDFPAGESNUMBER(123);
If the Upload File field accepts multiple files, the operation result would be an array with the number of pages on files.
IMGDIMENSION
Returns an object with two attributes: width and height of an image. It receives the «Upload File» field name or the numeric component of the field name and returns an object with the dimensions of the image selected.
Ex. IMGDIMENSION(fieldname123|n); or IMGDIMENSION(123);
If the Upload File field accepts multiple files, the operation result would be an array objects, one of the per selected file.
VIEWFILE
Displays the files into a tag. Pass the «Upload File» field name or the numeric component of the field name and the tag id where display the files.
Ex. VIEWFILE(fieldname123|n, «tag-id»); or VIEWFILE(123, «tag-id»);
If the Upload File field accepts multiple files, the operation will include multiple viewers.
Related Information….
Text Operations
All Versions of the Plugin
The Text Operations module includes the following operations:
WORDSCOUNTER
WORDSCOUNTER(text)
Returns the number of words in text.
Ex. WORDSCOUNTER(fieldname123|r);
CHARSCOUNTER
CHARSCOUNTER(text, ignore blank characters)
Returns the number of characters in text. The second parameter allows ignoring blank characters in the text.
Ex. CHARSCOUNTER(fieldname123|r); or CHARSCOUNTER(fieldname123|r, true);.
INTEXT
INTEXT(to search, text, case insensitive)
Returns the number of times the word, character, phrase, or regular expression appears in the text. The search can be case-sensitive or case-insensitive (optional parameter, case-sensitive by default).
Ex. INTEXT(fieldname12|r, fieldname34|r); or INTEXT(fieldname12|r, fieldname34|r, true);.
Location Operations
All Versions of the Plugin
The Location Operations module includes the following operations:
COUNTRY
COUNTRY(timezone/country id)
It returns an array of country names based on the time zone (Europe/Berlin) or country id (DE). The parameter is optional. If the parameter is empty, the operation returns the visitor country.
Ex. COUNTRY(‘MX’);
Returns: [‘Mexico’]
REGION
REGION(timezone/country id)
It returns an array of region names based on the time zone (Europe/Berlin) or country id (DE). The parameter is optional. If the parameter is empty, the operation returns the visitor region.
Ex. REGION(Europe/Berlin);
Returns: [‘Europe’]
TIMEZONE
TIMEZONE(country id)
Returns an array of timezones based on country id (MX). The paramater is optional. If the parameter is empty, the operation returns the visitor timezone.
Ex. TIMEZONE(‘GB’);
Returns [‘Europe/Belfast’, ‘Europe/London’].
Troubleshoot Area & General Settings

The «Troubleshoot Area & General Settings» section, allows correct some possible issues, or conflicts with third party plugins, and define the general settings.
- Script load method: Changes the script load method if the form doesn’t appear in the public website.
- Character encoding: Updates the charset, if you are getting problems displaying special/non-latin characters. After updated you need to edit the special characters again.
- Captcha image doesn’t load: Tick the checkbox if the captcha code is not load, for calling the directly its script.
- Activate Javascript Cache: Allows caching the javascript files of the plugin.
- Activate Forms Cache: Stores the forms in cache to improve the website’s performance.
- Allows to access the forms directly: This option allows to access the forms directly without inserting its shortcode on pages. It makes possible to insert the forms in other websites using iframes.
- Allows to access the forms from AMP pages: If the website generates AMP pages, enabling this option guarantees the forms be accessible from the AMP pages too.
- Modify the eMails Headers: If the notification emails are not send to the users, tries checking this checkbox, but if it is not sufficient, install and activate a SMTP plugin.
- The emails contain invalid characters: If the notification emails include weird characters, tries checking this checkbox to encode the notification emails as ISO-8859-2 and base64.
- Do not loading the forms with crawlers: The forms are not loaded when website is being indexed by search engine crawlers.
- Enter an unique field name: The name of the field that will be created to protect the forms against the spam bots. Adds a hidden text field to the forms to trap the spam bots.
- Protect the forms with nonce: Protects the form with one-time security tokens to ensure the data received come from the forms generated by the plugin.
Filters and Actions
The plugin calls the following list of filters and actions:
- cpcff_pre_form: Filters applied before generate the form, is passed as parameter an array with the forms attributes, and return the list of attributes, modified or not.
- cpcff_the_form: Filters applied after generate the form, is passed as parameter the HTML code of the form with the corresponding <LINK> and <SCRIPT> tags, and returns the HTML code to include in the webpage.
- cpcff_delete_form: Action called after delete a form, passing the form’s id as parameter.
- cpcff_clone_form: Action called after cloning a form, passing two parameters, the original form’s id, and the id of the new form.
- cpcff_export_addons: Filters applied when the form is exported, to export the add-ons settings too. Passes two parameters, an array with all the add-ons settings, and the id of the form that is being exported.
- cpcff_import_addons: Action called when a form is imported, to import the add-ons settings. Passes two parameters, an array with all the add-ons settings, and the id of the form that was imported.
- cpcff_valid_submission: Filters applied for checking if the form’s submission is valid or not, returns a boolean.
- cpcff_redirect: Filters applied to decide if the website should be redirected to the thank you page after submissions, passes a boolean as parameter, and returns a boolean too.
- cpcff_csv_query: Allows modify the query of messages, passing the query as parameter, returns the new query.
- cpcff_price: The filter allows modify the calculated prices. Passes two parameters to the filter: the calculate price, and an array with the list of fields and their values. The cpcff_price filter is called before applying the coupon discounts.
- cpcff_get_option: Filters applied before returning a form option. Passes three parameters to the filter: The value of option, the name of option and the form’s id, returns the new option’s value.
- cpcff_messages_query: Allows modify the query of messages, passing the query as parameter, returns the new query.
- cpcff_process_data: Action called after be submitted the form, and processed the information in the server side.
- cpcff_payment_processed: Action called after receive the payment confirmation, passing as parameter the information collected by the form.
- cpcff_file_uploaded: Action called after upload a file through the form. It is passed as parameter the object returned by the wp_handle_upload function.
- cpcff_custom_tags: Action called after special tags are replaced in the notification emails and thank you pages. It receives two parameters: the text, and post id.
- cpcff_update_submission: Action called when a submission is updated, the submission ID is passed as parameter.
- cpcff_delete_submission: Action called when a submission is deleted, the submission ID is passed as parameter.
- cpcff_messages_filters: Additional filtering options, allows to add new fields for filtering the events in the messages screen.
- cpcff_messages_list_header: Action called to include new headers in the table of events in the messages screen.
- cpcff_message_row_data: Action called to add related data to the events in the messages screen, the row is passed as parameter.
- cpcff_message_row_buttons: Filter called to modify the buttons of events in the messages screen. The callback function receives two parameters, the HTML code of buttons, and the row.
- cpcff_script_after_validation: Action called in the generation of javascript code to validate the forms data before submission.
- cpcff_summary: Filters applied after generate the summary in the thank you pages. Passes the summary as parameter.
- cpcff_send_notification_email: Filter called before sending the notification email. It returns true or false to send the email or not. The callback function requires three parameters: boolean, submission object, form object.
- cpcff_send_confirmation_email: Filter called before sending the copy to user email. It returns true or false to send the email or not. The callback function requires three parameters: boolean, submission object, form object.
- cpcff_notification_email_attachments: Filter applied when the files are attached to the notification emails. To the callback function are passed four parameters: the attachments list, the submitted data, the form’s id and the submission’s id.
- cpcff_confirmation_email_attachments: Filter applied when the files are attached to the «Copy to the user» emails. To the callback function are passed four parameters: the attachments list, the submitted data, the form’s id and the submission’s id.
Tips and Tricks
Set the value to a slider control programmatically
- Assign a class name to the slider field, for example: my-field (the class names are assigned to the fields through the attribute: «Add Css Layout Keywords»)
- Insert a «HTML Content» field in the form with the piece of code below as its content:
<SCRIPT> function setSliderValue( clss, value ) { var id = fbuilderjQuery('.'+clss+' input').attr( 'id' ); var fId = id.match(/_d+$/); fbuilderjQuery.fbuilder.forms[fId].getItem(id).setVal(value); } </SCRIPT> - Finally, if the equation associated to the calculated field is for example: fieldname1+fieldname2, modify it as follows:
(function(){
var v = fieldname1+fieldname2;
setSliderValue('my-field', v);
return v;
})()
(*) With the «Managing Fields» operations module the process is very simple, assuming the slider field is the fieldname1 and you want assign it the value: 50, include as part of the equation the piece of code:
getField(1).setVal(50);
Create relationships between date fields
Assuming there are two date fields: fieldname1, and fieldname2
-
To define as the «min» attribute of of the fieldname2 field the date selected in the fieldname1 field:
Insert a «HTML Content» field in the form with the following piece of code as its content:
<script> fbuilderjQuery(document).on( 'change', '[id*="fieldname1_"].hasDatepicker', function (){ fbuilderjQuery('[id*="fieldname2_"].hasDatepicker').datepicker('option','minDate',this.value); }); </script> -
To define as the «max» attribute of of the fieldname2 field the date selected in the fieldname1 field:
Insert a «HTML Content» field in the form with the following piece of code as its content:
<script> fbuilderjQuery(document).on( 'change', '[id*="fieldname1_"].hasDatepicker', function (){ fbuilderjQuery('[id*="fieldname2_"].hasDatepicker').datepicker('option','maxDate',this.value); }); </script> -
For selecting in the fieldname2 field, the date selected in the fieldname1 field plus a number of days (in the code below, 3 days after):
Insert a «HTML Content» field in the form with the following piece of code as its content:
<script>
fbuilderjQuery(document).on(
'change',
'[id*="fieldname1_"].hasDatepicker',
function (){
var d = fbuilderjQuery(this).datepicker('getDate');
d.setDate(d.getDate()+3);
fbuilderjQuery('[id*="fieldname2_"].hasDatepicker').datepicker('setDate',d); });
</script>
Create new validation rules
In some situations is required that the fields values have a specif format, or maybe allow to enter only a list of values. In these cases the current validation rules (digits, numbers, max value, min value, text length, required) are not sufficient, and would be needed new rules. This section describes how to create a new validation rule, and assing it to a field.
Assuming you need restricts the values of the fieldname1 field as US Zipcode, with the formats: #####-#### or #########, the regular expression used to validate the field’s value is: /^d{5}([-]?d{4})?$/
Insert a «HTML Content» field in the form, with the piece of code below as its content:
<SCRIPT>
fbuilderjQuery(document).one('showHideDepEvent', function(){
	fbuilderjQuery
	.validator
	.addMethod(
		"zipcode",
		function(v,e)
		{
			return this.optional(e) || /^d{5}([-]?d{4})?$/.test(v);
		}
	);
	fbuilderjQuery.validator.messages['zipcode'] = 'The  zipcode is invalid';
	fbuilderjQuery('[id*="fieldname1_"]').addClass('zipcode');
});
</SCRIPT>
The previous code adds a new method to the «validator» object, applied to all input fields with the class name «zipcode», the method returns true if the input field is optional, or its value satisfies the format of an US zipcode. With the instruction: fbuilderjQuery.validator.messages[‘zipcode’] = ‘The zipcode is invalid’; is defined the error message to display when the validation rule fails. The last instruction assign the class name: zipcode to the fieldname1 field, to apply on it the new validation rule.
Storing Data in a Different Database
The Developers version of the «Calculated Fields Form» plugin, allows storing the data submitted in a database different to the own plugin database.
To use this feature are required some basic skills, because should be edited the «cp_calculatedfieldsf_insert_in_database.php» file included in the code of plugin.
This file is a mockup to integrate the plugin with other MySQL database. The file should be modified manually because each database has its own structure, and gives to the users a total control on the process.
The file’s edition:
Open the file with the text editor your choice. There are some text editors, widely recommended for code editing, like: Notepad++, Sublime Text, Vim, Atom, UEditor.
The first section of file allows defining the constants needed for connecting with the database, and its authentication:
define( 'DATABASE_HOST', '' );
define( 'DATABASE_USER', '' );
define( 'DATABASE_PASS', '' );
define( 'DATABASE_NAME', '' );
define( 'DATABASE_TABLE', '' );
The name of constants are auto-descriptives:
- DATABASE_HOST: hosname or IP of database server.
- DATABASE_USER: username for database’s authentication.
- DATABASE_PASS: password for database’s authentication.
- DATABASE_NAME: database name.
- DATABASE_TABLE: table name.
The plugin checks if the constants have been defined, before for running the insertion queries.
The second section to be edited by the developers, is the creation of the variables to use in the queries. The file includes some variables as a guide of section:
$field1 = mysqli_escape_string( $db_link, $params[ 'fieldname%' ] );
$field2 = mysqli_escape_string( $db_link, $params[ 'fieldname%' ] );
$field3 = mysqli_escape_string( $db_link, $params[ 'fieldname%' ] );
I’ll explain this section with an example. Suppose you want store in the «my_users» table, the firstname, lastname, and email of the user, submitted through the form, and the corresponding fields in the form for these information are: fieldname1, fieldname2, and fieldname3, respectively. So, the variables are created like follow:
$field1 = mysqli_escape_string( $db_link, $params[ 'fieldname1' ] );
$field2 = mysqli_escape_string( $db_link, $params[ 'fieldname2' ] );
$field3 = mysqli_escape_string( $db_link, $params[ 'fieldname3' ] );
In the previous code has been created a varaible for each field in the form. All fields are included in the $params array.
After create the variables, is time to generate the insertion queries. The plugin includes a mockup for a hypotetical insertion query, that must be replaced with the structure of your database and the fields created previously.
mysqli_query( $db_link, "INSERT INTO `".DATABASE_TABLE."` (field1, field2, field3) VALUES ('$field1', '$field2', '$field3');" );
Returning to the previous example. If the columns of the table are: firstname, lastname, and email, respectively, the query should be modified like follow:
mysqli_query( $db_link, "INSERT INTO `".DATABASE_TABLE."` (firstname, lastname, email) VALUES ('$field1', '$field2', '$field3');" );
Pay attention, if the type of data in a column of table is a numeric value, should be removed the quotes around the variable name. For example, suppose the form includes a DropDown field for the year of birth, that evidently is a numeric value, I will assume this is the fieldname4. So, you should create a new variable for the new field:
$field4 = mysqli_escape_string( $db_link, $params[ 'fieldname4' ] );
and modify the insertion query too:
mysqli_query( $db_link, "INSERT INTO `".DATABASE_TABLE."` (firstname, lastname, email, year) VALUES ('$field1', '$field2', '$field3',$field4);" );
The $field4 variable is not closed between quotes.
A last tip: It is possible create as many insertion queries as needed, even can use the table name directly without use the constant defined in the first section.
Pay attention: The plugin includes a mechanism to prevent overwrites the «cp_calculatedfieldsf_insert_in_database.php» file in the update process. However, I recommend to copy the file into the «/wp-content/uploads/calculated-fields-form» directory, and the plugin would use this copy of the file instead.
A simpler alternative would be to use the «Database Queries for Calculated Fields Form» plugin.
Related Information….
Populate a Form by Default
The plugin adds a consecutive number to each form inserted in a webpage to prevent conflicts between different copies of a same form, starting in «1». The process will be explained in an example. I will suppose your form includes only one form created with the «Caculated Fields Form», and the form includes three fields: — a numeric field (fieldname1), a DropDown field (fieldname2), a checkbox field (fieldname3), and a single text field (fieldname4). Furthermore, the form fields should be prefilled with the values: 3 for the fieldname1, the choice with the value 4 in the fieldname2, tick the choices with the values: 1, and 2 for the fieldname3, and the «qwerty» text in the fieldname4, follows the steps below:
- Enable the text tab in the content’s editor of your webpage. If are inserted HTML tags with the «Visual» tab enabled, the symbols «<» and «>» are encoded as «<» and «>» respectively.
- Inserts a pair of <SCRIPT>…</SCRIPT>, with the piece of code:
<SCRIPT>
cpcff_default = { 1 : {} };
cpcff_default[1][ 'fieldname1' ] = 3;
cpcff_default[1][ 'fieldname2' ] = 4;
cpcff_default[1][ 'fieldname3' ] = [1,2];
cpcff_default[1][ 'fieldname4' ] = "qwerty";
</SCRIPT>
Pay attention to the values of the fieldname3 and fieldname4. The fieldname3 is a checkbox, as it is possible select multiple choices, should be assigned an array of values. For the fieldname4, whose value is a text, it should be closed with quotes or double quotes.
Populate the form B with the data submitted by the form A
The process will be explained with an example. Assuming will be populated the fields: fieldname3, and fieldname7 in the form B with the values of the fields: fieldname1, and fieldname2 submitted by the form A:
Note: I’m assuming here the form B is the unique form inserted in the thank you page, or at least the first one. For this reason in the next code the index or attribute in the cpcff_default variable is 1 (cpcff_default = { 1 : {} };)
- Inserts the shortcode corresponding to the form B in the thank you page associated to the form A. For example if the id of the form B is 34, the shortcode would be: [CP_CALCULATED_FIELDS id=»34″]
- Inserts into the same page, the shortcode to manage the submitted data, including the javascript tags with the code to populate the form B:
[CP_CALCULATED_FIELDS_RESULT]
<PRE style="display:none;"><SCRIPT>
cpcff_default = { 1 : {} };
cpcff_default[1][ 'fieldname3' ] = '<%fieldname1_value%>';
cpcff_default[1][ 'fieldname7' ] = '<%fieldname2_value%>';
</SCRIPT></PRE>
[/CP_CALCULATED_FIELDS_RESULT]
A particular case: If there are two forms in the thank you page, and you want populate the fields: fieldname3, and fieldname7 of the first form in the page, and the fields: fieldname2, and fieldname3 in the second form, the piece of code to use would be:
[CP_CALCULATED_FIELDS_RESULT]
<SCRIPT>
cpcff_default = { 1 : {},2 : {} };
cpcff_default[1][ 'fieldname3' ] = '<%fieldname1_value%>';
cpcff_default[1][ 'fieldname7' ] = '<%fieldname2_value%>';
cpcff_default[2][ 'fieldname2' ] = '<%fieldname1_value%>';
cpcff_default[2][ 'fieldname3' ] = '<%fieldname2_value%>';
</SCRIPT>
[/CP_CALCULATED_FIELDS_RESULT]
As you can see in the previous examples, the indices (or attributes) in the cpcff_default variable don’t have relationship with the forms’ ids. These indices (or attributes) indicate the possition of the form in the page, the first form, index 1, second form, index 2, and so on.
Create New Predefined Template
The «Caculated Fields Form» plugin includes multiple predefined templates to be used in the forms. The template is selected from the «Form Settings» tab, in the toolbar of the form builder, but can occur that the predefined templates are not sufficient to create a form with the look and feel you want.
The template’s module in our plugin, can be extended easily to create new designs, to be used in the forms of website.
Into the «/wp-content/plugins/calculated-fields-form/templates» directory there are multiple folders, a folder for each template. The folders names have not restrictions, you simply should create a new folder for the custom template, with the name you want.
The only one required file in a template is the «config.ini» file, whose structure is:
prefix="cp_cff_custom"
file="style.css"
title="Custom Template"
thumbnail="thumbnail.jpg"
description="This is my custom template"
The description of attributes:
- prefix: Classname, applied to the form’s container. Its value should be unique for all templates on website (required attribute).
- file: Name to the CSS file with the styles to define the appearance of form.
- title: Name of the template, displayed in the dropdown list on form settings.
- thumbnail: Name of image file, displayed when the template is selected (the image file should be stored in the template directory).
- description: Description to display when the template is selected.
To implement a custom template to apply your forms, creates a new directory for the template into the path «/wp-content/uploads/calculated-fields-form/templates», for example «/wp-content/uploads/calculated-fields-form/templates/custom-template». Into the new directory, create a config.ini file with the template properties (described above), and the .css file with the custom design. Finally, select the new template from the «Form Template» attribute in the «Form Settings» tab. More information in the following post of the plugin’s blog:
BLOG: How do I create a new template to use with my forms?
Printing a Form
For printing only the form, but not the rest of page, please, follows the steps below:
-
Inserts a «HTML Content» field in the form, and enter as its content the piece of code:
<SCRIPT> function printForm(){ var w = window.open(null, 'Print_Page', 'scrollbars=yes'); jQuery('#fbuilder input').each(function () { var e = jQuery(this); e.text(e.val()).attr('value', e.val()); if (e.hasClass('large')) e.css('width', '100%'); if (typeof e.prop('checked') != 'undefined' && e.prop('checked')) e.attr('CHECKED', e.prop('checked')); }); var html = jQuery('#fbuilder').html(); jQuery('#fbuilder TEXTAREA').each(function () { var e = jQuery(this).parent().html(); html = html.replace(e, jQuery(this).val()); }); jQuery('#fbuilder SELECT').each(function () { var e = jQuery(this).parent().html(); html = html.replace(e, jQuery(this).find('option:selected')[0].text); }); w.document.write(html); w.document.close(); w.print(); } </SCRIPT> - Inserts a button field in the form and call the function defined previously from its onclick event:
printForm();
Related Information….
![]()
There is a better solution for printing the forms that preserves their structures and designs. It is distributed as part of the CP BLOCKS plugin.
В современном интернете важную роль играет удобство и интерактивные элементы. Хорошим стимулом к подаче заявки на услугу или покупке является калькулятор для WordPress, но таких возможностей мало в связи со сложностью разработки.
Содержание
- Плагин WPCalc рассчитает стоимость работы или услуги
- Платный вариант плагина
- Видео инструкция
- Бесплатные формулы для калькулятора в WordPress
- Примеры других калькуляторов
- Онлайн сервисы калькуляторов на русском языке
- UCalc настраиваемый под любые цели
- Calccreator
Плагин WPCalc рассчитает стоимость работы или услуги
Использую в WordPress плагин WPCalc давно, потому что настройка расчета стоимости сводиться к созданию формулы и внешнего вида. Устанавливаем и активируем из административной панели поиском по плагинам.
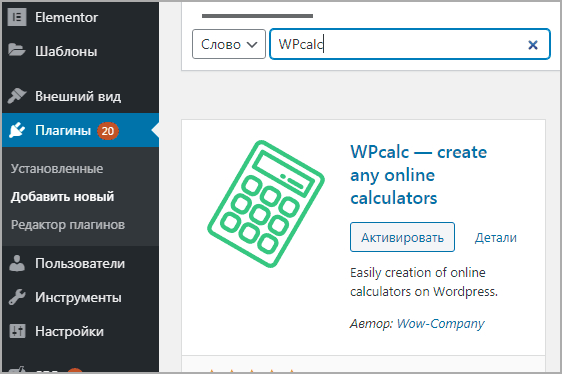
Появится новый раздел в меню WPCalc заходим в него, нажимаем Add New.
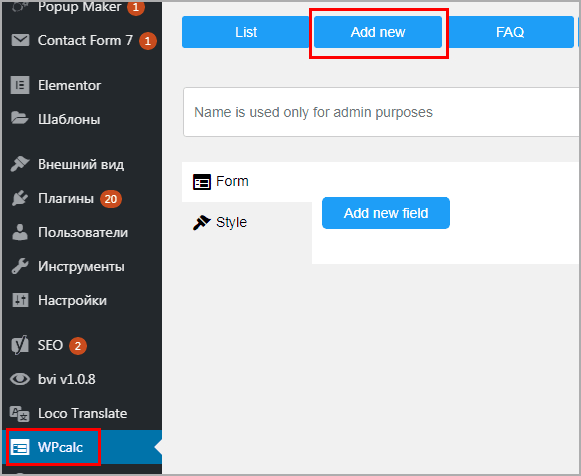
Появится строчка с надписью Add new fields, она добавляет элемент в пример вычисления формулы, которую будем писать дальше. Сделаем калькулятор для подсчета наливных полов, выведем четыре поля:
- Длина
- Ширина
- Прайс за 1 квадратный метр
- Возможность выбора опции снятие старой заливки
Логика такая: находим площадь, умножаем на стоимость работы за 1 кв м, и прибавляем цену за снятие старого материала (исходя из площади). Первой зададим длину.
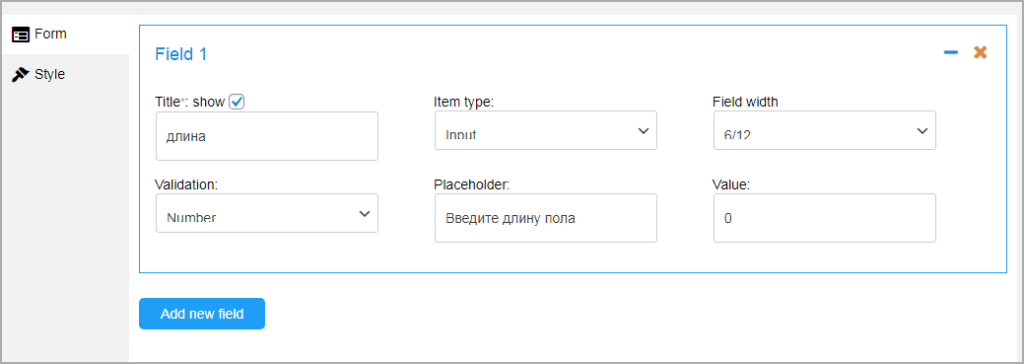
- Раздел Title задает заголовок, можно не показывать и снять выделение чекбокса
- Item type – тип показывает как будет показана функция, нужно чтобы пользователь вводил цифры, значит выставляем input
- Field width – сколько места занимает строчка ввода по горизонтали, выставлю 6/12 чтобы рядом прописать еще раздел ширины
- Validation – выставляем number, все что не имеет числового значения расценивается ошибкой
- Placeholder – заполнитель текстовой области, написал «введите длину
- Value – значение по умолчанию, записал 0
- По аналогии создаем еще один fields ширины, должно получится так.
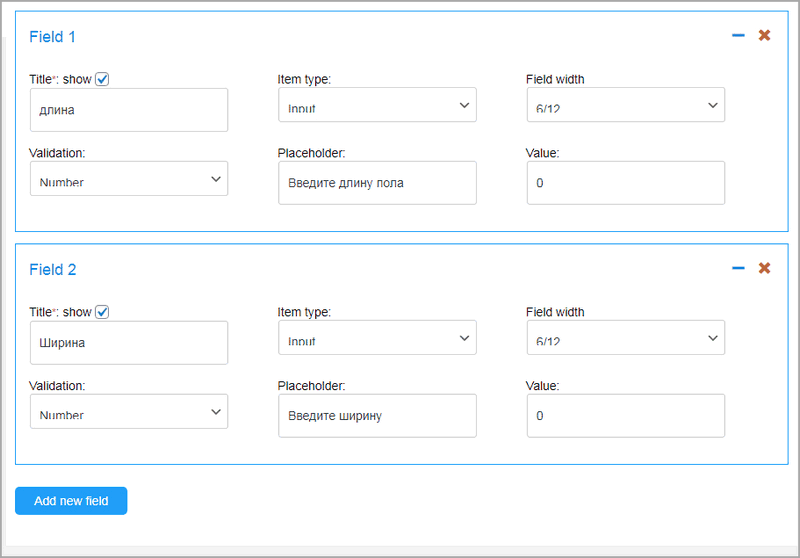
Добавим новый раздел, он будет статичным, с заранее заданной ценой услуги по демонтажу старого покрытия. Снова нажимаю синюю кнопку, ввожу данные.
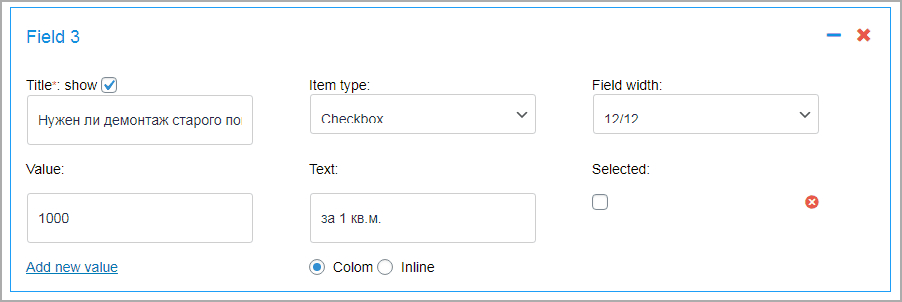
Обозначил Item type как Checkbox, с помощью галочки. Размер 12/12, value 1000, то есть тысяча рублей будет браться за очистку 1 квадратного метра пола. Selecte оставил не отмеченным, чтобы услуга по выравниванию по умолчанию не прибавлялась.
Следующий шаг настройка формулы, создаем раздел, выставляем параметры.
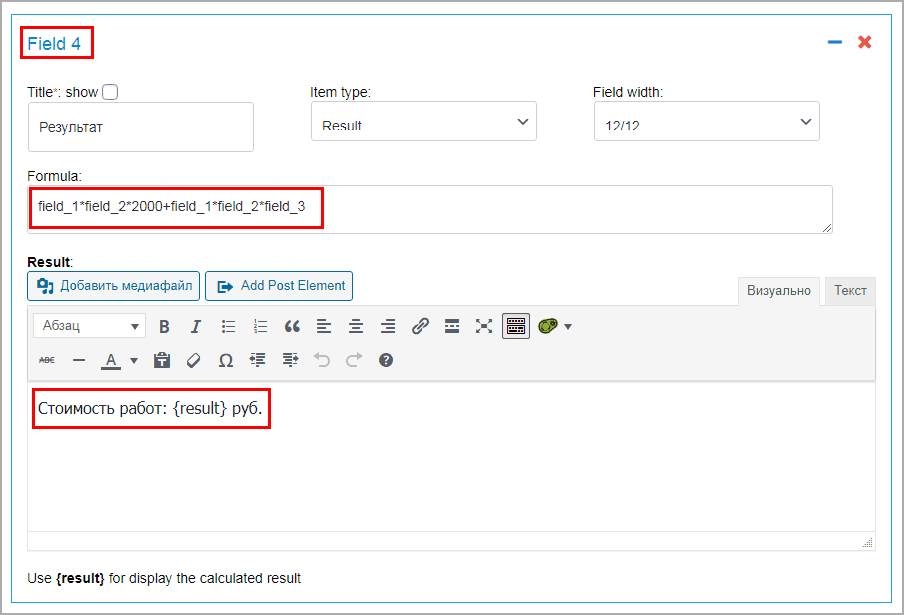
В тайтле написал результат, выводить не стал. В поле item type выставил Result. В разделе formula пишем принцип вычисления. У каждого окна есть название в данном случае Field 4. Цифра показывает номер объекта, оно не повторяется в рамках одного калькулятора. 1 — длина, 2 — ширина, 3 — стоимость за очистку.
Записываем элемент в формулу через нижнее подчеркивание, например field_1.
Смотрите на логику, сначала вычисляю цену заливки – узнаю площадь, умножаю длину на ширину и сразу на цену за квадратный метр, для примера 2000. Далее прибавляю очистку, если она нужна, с помощью плюса. Снова нахожу площадь и умножаю на стоимость дополнительной работы. Если чекбокс не будет отмечен, то программа выдаст, что второе слагаемое равно нулю.
В разделе делаем окончательный расчет оператором {result}, перед ним написал текст. Нажимаем на сохранить, копируем шорткод калькулятора для вставки на сайт WordPress.
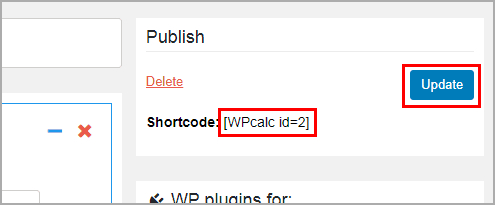
Создаем запись или страницу в WordPress, вставляем шорткод, выбираем предварительный просмотр.
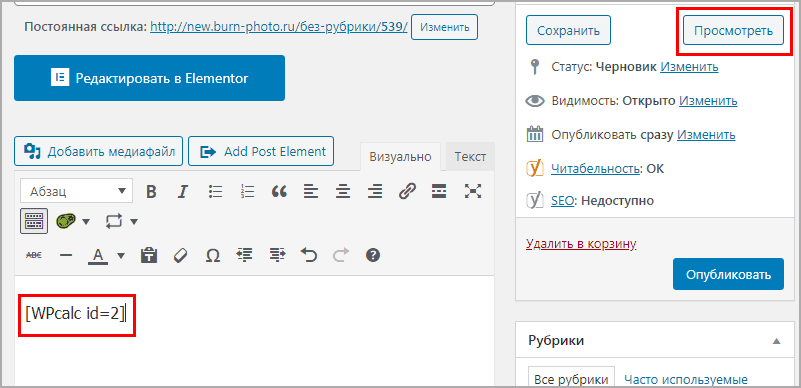
На странице отобразиться калькулятор, проверим. Введу данные и посчитаю самостоятельно совпадают ли цифры.

Расчет прошел успешно, при отметке чекбокса цифра стала 18000, что соответствует заданным параметрам вычисления. Для разнообразия внешнего вида перейдите в раздел style, настройте оформление и сохраняйте.
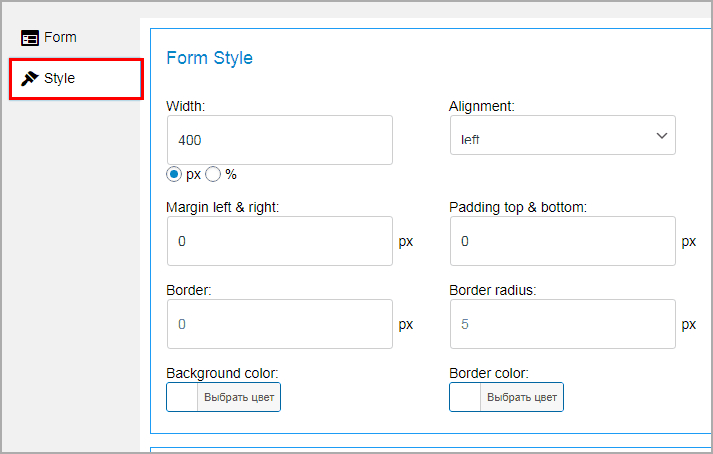
Платный вариант плагина
В платном варианте есть несколько дополнительных функций:
- Неограниченное количество форм
- Больше стилей
- Интеграция с Mailchimp и Getresponse
- Отправка писем с результатом расчета пользователю и админу
- Добавить адрес электронной почты в базу данных
- Добавить форму после публикации контента
- Виджет с формой
- Копирование и экспорт списка контактов в .xls, .csv
Есть база знаний, функционал не ограничен простыми операторами, есть логарифмы, остатки. Существует форум поддержки, информация располагается во вкладке FAQ.
Калькулятор совместим со всеми плагинами типа elementor, woocommerce. Он имеет свой шорткод, а вставить его просто.
Чтобы рассчитать стоимость доставки и расстояние придется использовать WooCommerce (советую прочитать как подключить Robokassa) и дополнения от систем доставки таких как DPD или СДЕК, других вариантов к сожалению нет.
Видео инструкция
Чтобы процесс создания понять лучше, записал свое видео.
Русские разработчики позаботились о пользователях как платных, так и бесплатных тарифов. На неофициальном сайте есть все расчеты с формулами, какие отрасли затронуты:
- Кредитные сделки
- Процентные операции
- Ландшафтное направление
- Наука
- Красота
- Питание
- Конвертеры
- Строительство
Можете подобрать расчет, внести порядок действий в калькулятор. На данный момент число конфигураций почти 520 версий.

Стоит внести свои характеристики и настроить вывод, остальное за системой. Отмечу что справка на сайте на русском языке.
Примеры других калькуляторов
Приведу три варианта дополнений для WordPress. Но предупрежу, что обращать на них внимания не стоит, потому что большинство устарело или имеют узкую специализацию.
- WPCC – не обновлялся 6 лет, имеет простую панель, не совместим с новыми версиями PHP
- Responsive Mortgage Calculator – калькулятор разрабатывался для недвижимости особенно ипотечные сделки
- Calculated Fields Form – предоставляет необходимые возможности доступные только в платной версии. Огромный плагин WordPress, разобраться сложно, для простых задач используйте мой вариант
Онлайн сервисы калькуляторов на русском языке
В интернете есть сервисы для калькуляторов, большинство платные, имеет русский перевод. Покажу несколько вариантов.
UCalc настраиваемый под любые цели
Сервис UCalc стал популярным, потому что имеет модуль для синхронизации с вордпресс. Бесплатная версия не даст создать крутой калькулятор, но для простых задач подойдет идеально.

Выделю рекламу платных услуг на каждом этапе использования, но это бизнес. Есть два отличных момента это наличие ползунков – выбор числа сделать не из списка, а на шкале перемещения. Второй наличие счетчика времени.
Calccreator
Calccreator предоставляет отличную цену. Недорогая подписка, зато пользуетесь всеми инструментами без ограничения. Во время действия платного аккаунта, можно создать неограниченное число калькуляторов. После прохождения срока подписки проекты не блокируются, а даются в том же режиме, с разницей что нельзя добавлять и изменять уже имеющиеся.

Можно за один месяц создать максимум калькуляторов и ставить на сайты клиентов. Скрипты проверены с WordPress, совместимость подтверждаю.
Закончу статью мы разобрались как сделать калькулятор на CMS WordPress, показал варианты, дал аналоги в виде дополнительных модулей и онлайн решения.
Пожалуйста, оцените материал:
Подробные видеоинструкции WordPress на тему: «Calculated fields form для wordpress»:
Создание калькулятора и опроса на WordPress: Плагин Calculated Fields Form

Создание калькулятора и опроса на WordPress: Плагин Calculated Fields Form
Calculated Fields Form – WordPress plugin

Calculated Fields Form – WordPress plugin
Calculated Fields Form: Plugin Overview and Review

Calculated Fields Form: Plugin Overview and Review
[WP плагин #6] Calculated Fields Form — универсальный калькулятор для WordPress

[WP плагин #6] Calculated Fields Form — универсальный калькулятор для WordPress
Бесплатный калькулятор для Вордпресс

Бесплатный калькулятор для Вордпресс
Перейти к содержанию
На чтение 1 мин Просмотров 101 Опубликовано 21.06.2022
🔥 Инстуркция к плагину:
Мой блог:
Я на оф.сайте WordPress:
Мои плагины:
Лучший хостинг для ваших сайтов (сам пользуюсь):
Самые качественные ссылки на ваш сайт:
Это видео посвящено созданию калькулятора и/или опроса на WordPress с помощью плагина Calculated Fields Form. Мы сделаем обзор основных настроек и фишек плагина, посмотрим пример созданного мной калькулятора и создадим точно такой же… И все в одном видео!
#калькулятор #yrokiwp #плагин #yrokiwp #учебка #обучение про не работает wordpress.