перейти к содержанию
Руководство пользователя вязальной машины SENTRO
Пожалуйста, обратите внимание:
- Видео нужен интернет, если нет интернета, смотрите инструкцию.
- На последней странице описан метод использования ткача пушистых мячей.
Продукт закончилсяview

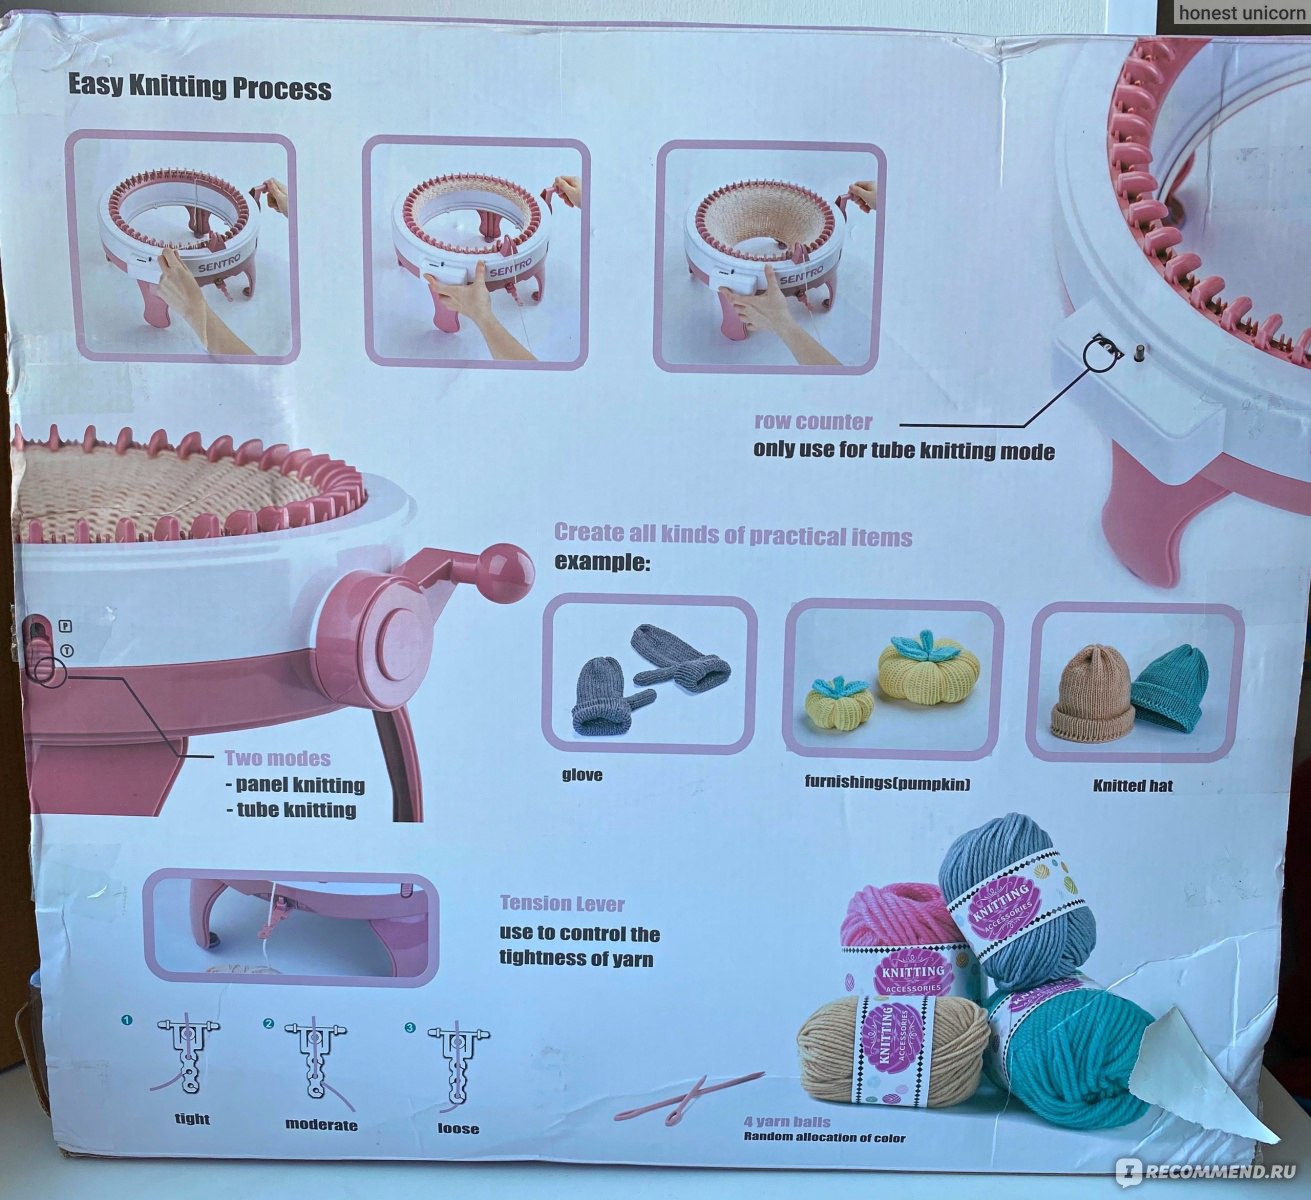
Кольцо / трубчатое переплетение: (шапка, бумажник, трубчатый шарф и т. Д.)

- Измените передачу на передачу P и поверните против часовой стрелки, пока белое вязание крючком не застрянет в нитенаправителе.
- Затем оставьте пряжу длиной 30 см в середине машины и повесьте пряжу на белое вязание крючком; покачайте ручку по часовой стрелке и повесьте пряжу поперек пряжи. Наконец, выйдите из нитенаправителя.

- Поместите пряжу в рычаг натяжения.

- Переключите передачу на Т-образную и затем потрясите ручку по часовой стрелке.
Примечание: В первые три-четыре круга вязания ручку следует встряхивать с постоянной скоростью, чтобы игла не упала. - Циклическая отделка
- Когда вязание достигнет желаемой длины, перестаньте двигать ручку, когда белое вязание крючком переместится вправо от нитенаправителя.
- После того, как 30 см пряжа взята, она обрезается, пряжа вынимается из ниточного отверстия натяжного рычага, пропускается швейная игла, затем пряжа вытягивается вертикально, и ручка встряхивается, чтобы машина холостой ход без пряжи.


- Швейная игла изношенной пряжи один раз натягивается на рукав для нити, который прошел через вязание крючком, затем проходит через петлю рукава для нити, затем затягивается и, наконец, завязывается узлом. Вы можете добавить аксессуары, например, шарики для волос, по своему вкусу. Вязаная шапка готова.


Плоское плетение (шарф, свитер и т. Д.)

- Повторите 1, 2 и 3 шага кругового переплетения.
- Переключите передачу на передачу P, покачайте ручку по часовой стрелке, пока ручка не перестанет двигаться, затем остановите ее против часовой стрелки и повторите вязание по часовой стрелке и против часовой стрелки, попеременно встряхивая ручку.
- Закройте пятую ступень замыкания кольца.
Примечание: Если в процессе плетения плоского листа у вас часто падает игла, проверьте, не изменили ли вы направление, когда ручку машины встряхивают до упора.
Изменить цвет пряжи или режим проводки
Соедините новую и старую пряжу вместе и убедитесь, что они не соскальзывают. Обрежьте лишнюю нить, выньте пряжу из нитенаправителя и натяжного рычага, сначала вручную затяните пряжу, встряхните ручку, пока узел не войдет в машину, затем поместите пряжу во впускное отверстие и затяните в контроллере , избегайте образования узлов на нитенаправителе и натяжном рычаге.
ПОДБРАТЬ ВЫПАДАЮЩУЮ СТРОЧКУ
- Машина может выпустить стежок и распутать несколько рядов, прежде чем вы это заметите. В этом случае крючок может быть полезен для снятия пропущенных стежков.
- Поверните рукоятку машины, чтобы вязать до последней петли перед выпавшей петлей. Проведенный стежок должен быть немного сбоку от нитенаправителя. Этот крюк должен находиться в поднятом положении.
- Вы увидите петлю, в которой начинается выпавший стежок, а над петлей у вас будет «лестница» — со ступеньками, соответствующими каждому выпавшему стежку — между стежками.
- Проденьте крючок спереди назад через петлю.
- Зацепите первую перекладину лестницы на крючок и протяните ее через отверстие свободного стежка. Затем зацепите следующую перекладину, протяните ее и продолжайте этот шаг с каждой перекладиной, пока не проведете петлю обратно до соответствующей петли вязальной машины.
- Перенести петлю с крючка на крючок вязальной машины.
Примечание:
- В процессе плетения обращайте внимание на плотность шерсти, иначе игла может упасть. Как только это произойдет, ослабьте или затяните шерсть. Если вы используете более тонкую пряжу, проденьте последовательно через три линейных отверстия. (Не рекомендуется использовать слишком густую шерсть)

- Во время работы не трясите ручку слишком сильно и не работайте на слишком высокой скорости, в противном случае машина будет повреждена или игла упадет.
- Используйте присоску, чтобы закрепить машину, добавьте немного воды под присоску, и сила адсорбции будет сильнее. Рекомендуется держать машину за руку, чтобы избежать тряски машины во время работы и падения иглы.
- Изделие подходит для пряжи 1.5-4.5 мм.
- Когда ручка не двигается, пожалуйста, не поворачивайте сильно, пожалуйста, проверьте, не слишком ли тугая или слишком толстая линия, если вы не понимаете, пожалуйста, свяжитесь со мной.

Руководство по использованию Fluff Ball Weaver


Выставки продуктов Fluff Ball Weaver

Видеоурок:
Шапка: https://www.youtube.com/watch?v=GQKGkH4xWKA
Квартира: https://www.youtube.com/watch?v=_O2npMrNRbY
Носки: https://www.youtube.com/watch?v=wISyV8YA1ZI
Перчатки: https://www.youtube.com/watch?v=WjlyMWpxn0k
Свитер: https://www.youtube.com/watch?v=CWPCH75QT20
Падение иглы: https://www.youtube.com/watch?v=cgz758TeJh0
Документы / Ресурсы
Рекомендации
Итак, я постараюсь написать как можно более содержательный отзыв, ибо на просторах российского интернета информации об этой вязальной машинке почему-то крайне мало.
Для начала — о том, почему я вообще решила приобрести именно Sentro: лично меня утомляет вязать большие полотна, мне всегда было интереснее работать с деталями, поэтому понадобилась машинка, способная именно ускорить процесс. Варианты по типу «Ивушки» я отбросила сразу, так как с ними, конечно, дело идёт быстрее, но не так быстро, как хотелось бы. Да, и, честно говоря, посмотрев несколько обзоров на Ютубе, я поняла, что у меня просто не хватит терпения разбираться в тонкостях их работы. Мне нужно было что-то попроще. Разновидности машинок-мельниц я много раз наблюдала у девочек-блогеров, но в своих роликах они показывали либо шапки, либо снуды, изготовленные на такого типа машинках, то есть те вещи, которые вяжутся исключительно по кругу. Каково же было моё удивление, когда однажды я увидела, что аппараты вроде Sentro вяжут ещё и прямое полотно! Тогда я однозначно решила: нужно брать, но, дабы не переплачивать (ибо на известных маркетплейсах машинки этой фирмы и аналоги стоят от 5 тысяч рублей), выбрала вариант б/у:

Если я правильно понимаю, производитель позиционирует эту машинку как игрушку. Пожалуй, соглашусь с тем, что у ребёнка она точно вызовет восторг: выглядит мило, полностью выполнена из пластика, не содержит мелких деталей, что делает её безопасной для использования с детьми:

У моей машинки — 48 петель, она как раз идеальна для вязания шапок и снудов. Насколько мне известно, существуют ещё и мини-версии. В наборе вместе с самой машинкой — пластмассовые крючок и игла, а также отвёртка и несколько мотков пряжи. Есть ещё и инструкция, разумеется, но лично мне в ней мало что было понятно, ибо там вообще нет текста на русском языке и нарисовано всего несколько картинок. Сам аппарат состоит из мельницы, ножек на присосках (которые очень хорошо держат машинку на поверхности), ручки, нитеводителя и счётчика рядов. Не тяжёлая.
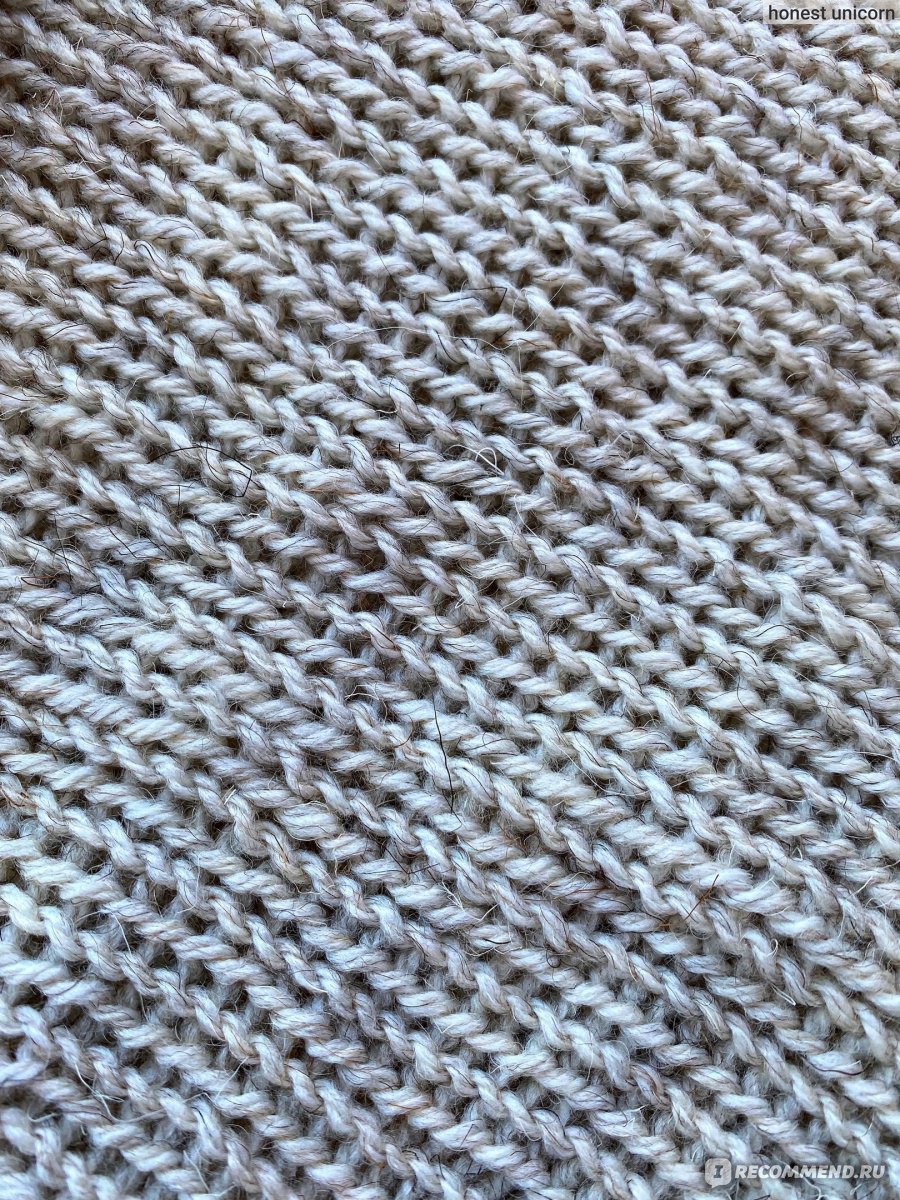
Теперь самое важное: Sentro вяжет только лицевой гладью. Всё. Больше никаких вариантов. Почему-то многие, приобретая машинку, этого не знают и сильно расстраиваются. Если другие ручные машинки, типа той же «Ивушки», дают возможность поэкспериментировать с узорами и видами плетений, то тут — никаких шансов на креативность. Здесь уже возникает вопрос: стоит ли отдавать деньги за прибор, который стоит в несколько раз дороже вышеупомянутой «Ивушки», но не имеет такого же функционала? Решайте сами.
Кривить душой не буду — вяжет машинка действительно очень быстро и качественно. Важно лишь следить за тем, чтобы нить не соскакивала с крючков. Кстати, пряжа подойдёт не любая: нужна не слишком толстая и скользящая, иначе машинка будет стопориться, а ручка — прокручиваться (как с этим бороться — расскажу чуть дальше). Сами крючки также выполнены из пластика, но очень плотного и надёжного, так что можно не бояться, что со временем они отвалятся:

Теперь, для наглядности, покажу, как выглядит изделие, связанное на моей машине с 48-ю крючками. Ширина — около 20 см:


Получается, что для вязания по кругу вы просто протягиваете нить в крючки по принципу «через один» и крутите ручку. Всё! Остальное машинка делает сама. Для снятия готового изделия существуют несколько способов, о которых рассказано тут:
[ссылка]
Сразу о видеоуроках: их на русском языке практически нет, а, если есть, то сняты они не очень качественно. Почему-то дамы, работающие на Sentro и её аналогах, предпочитают не раскрывать секреты эксплуатации и показывают, преимущественно, только готовые изделия. Есть ещё на просторах нашего интернета мадам, никнейм которой называть не буду, но ни упомянуть не могу: она больше всех снимает коротенькие видео конкретно о машинке Sentro, но рассказывает через губу таким надменным тоном, будто делает одолжение. При этом, специально упоминает далеко не всё, хамит в комментариях и требует, чтобы те, кто хочет знать больше информации, подписывались на её платный телеграм-канал за 1000 рублей. Неплохо так, да? Мол, вот вам затравочка, ребята, а за всё остальное — давайте денежку, иначе не поделюсь своими «бесценными» знаниями. Там ещё какие-то мастер-классы есть, вроде. Спасибо, конечно, но — нет, разберёмся сами. Неприятненько.
Объяснить текстом, как вяжется прямое полотно, очень трудно, гораздо лучше именно посмотреть, как это делается. Но, всё же, попробую: необходимо переключить специальную кнопку на панели машинки и, при наборе нити на крючки, не завершать круг полностью, а начинать прокручивать ручку в обратную сторону. Важно, чтобы края полотна заканчивались на одних и тех же крючках. Сразу предупрежу, что первое время придётся понервничать: в отличие от вязки по кругу, прямое полотно создаётся сложнее, нужно приноровиться. Это — единственное более-менее понятное видео, которое мне удалось найти, здесь девушка вяжет на аналоге:
[ссылка]
Возможно, когда-нибудь я и сама сподоблюсь заснять видеоуроки, а пока же рандомно расскажу о других нюансах, которые также необходимо знать перед покупкой и во время использования:
1. Машинка очень (!) громко трещит. Лично для меня это имеет принципиальное значение, поскольку в доме маленький ребёнок. За счёт того, что внутри крутятся пластмассовые шестерёнки, происходит характерный шум, и за закрытой дверью от него не спрячешься.
2. Ручка машинки периодически может прокручиваться и заедать. Иногда это связано с неправильным подбором нити (об этом я уже упоминала выше), а иногда — с тем, что просто пришло время машинку смазать. В этом нет ничего сложного, хотя я, признаюсь, в первый раз очень переживала, что не соберу аппарат обратно. Но, к счастью, внутри машинка устроена также просто, как и снаружи: все детали тоже выполнены из пластика. Раскручиваете панель входящей в набор отвёрткой, смазываете всё маслом (я вообще обычным растительным делала) и проблема решена. Главное, не переборщите с количеством масла, иначе оно поначалу будет оставаться на рабочей нити и уже связанных участках изделия.
3. Некоторые жалуются на хандрящий счётчик рядов, встроенный в панель машины. Лично у меня он работает, как часы, но, думаю, приобрести запасной не помешает.
4. Иногда рабочая нить проскальзывает мимо крючка, из-за чего, как следствие, нарушается целостность полотна. Поэтому крутить на скорости света не рекомендую — лучше внимательно следить за тем, чтобы вязка шла без погрешностей, распускать и переделывать будет муторно.
5. Нитедержатель машины хорошо справляется со своей работой, в нём есть три отверстия под пряжу разной толщины.
6. Я пробовала вязать в две нити — узор получается также хорошо, машина не путает пряжу и не спотыкается.
7. Для понимания: для вязания снуда длиной около метра вам понадобится не больше часа времени, учитывая сшивание. То есть с одной из главных своих функций — быстрой скоростью — Sentro справляется на отлично.
8. Последнее — скорее, минус. Я уже не раз упомянула, что машинка целиком сделана из пластмассы. Внешний корпус выглядит достаточно надёжно, но вот пластиковые шестерёнки внутри доверия, если честно, не внушают. Поэтому мне очень интересно, как долго эта машинка прослужит без замены деталей, найти которые не так просто (лучше искать на Алиэкспресс, однако некоторые умудряются ремонтировать из подручных материалов).
Подводя итоги: конкретно я об этой покупке ни капли не жалею. Минусы, как и у любого устройства, у неё есть, но, мне кажется, что и они, в данном случае, относительны. Если вам также, как и мне, важна скорость и «промышленные» масштабы — можно приобретать. Если же вас смущает отсутствие разнообразия узоров вязки — поищите другие варианты, коих, к счастью, немало. Но, стоить они будут, конечно же, совсем других денег. Хотя, опять же: больше 5-ти тысяч рублей конкретно за эту пластиковую игрушку? Думаю, данный ценник удовлетворит не всех, я бы больше 2,5 за неё не отдала, что, собственно, и сделала. Покупать такую в подарок рукодельнице точно не советую — вкусовщина, всё-таки. А вот для детей — другое дело, во всяком случае, отзывы говорят о том, что ребятишки могут играть в неё часами. Есть, что добавить? С удовольствием почитаю ваши комментарии и отвечу на вопросы!
-
Last Updated: November 12, 2022 -
Accessory, Knitting, Popular Posts, Yarn
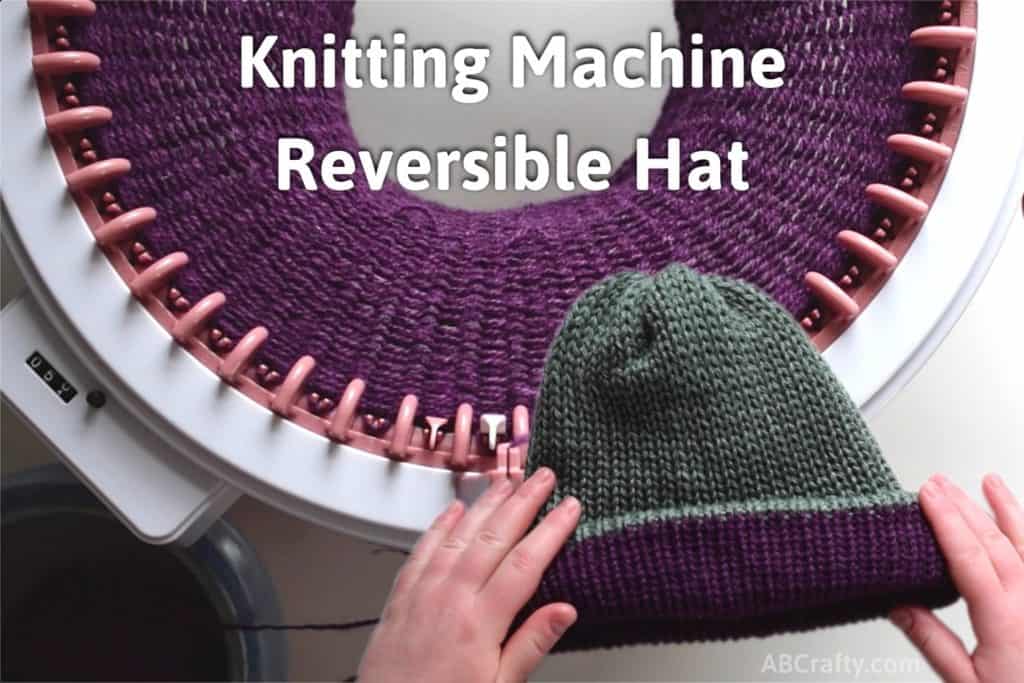
Learn how to use a Sentro knitting machine to make a quick and easy reversible knit hat. It’s a quick and easy craft project – from start to finish it only takes about an hour to knit an entire beanie.
If you want a bit more of a challenge, try making this Loom Knit Hat.
Table of Contents
Note: Some links in this post may contain affiliate links, which means at no cost to you, I may earn a commission.
What is a Sentro Knitting Machine?
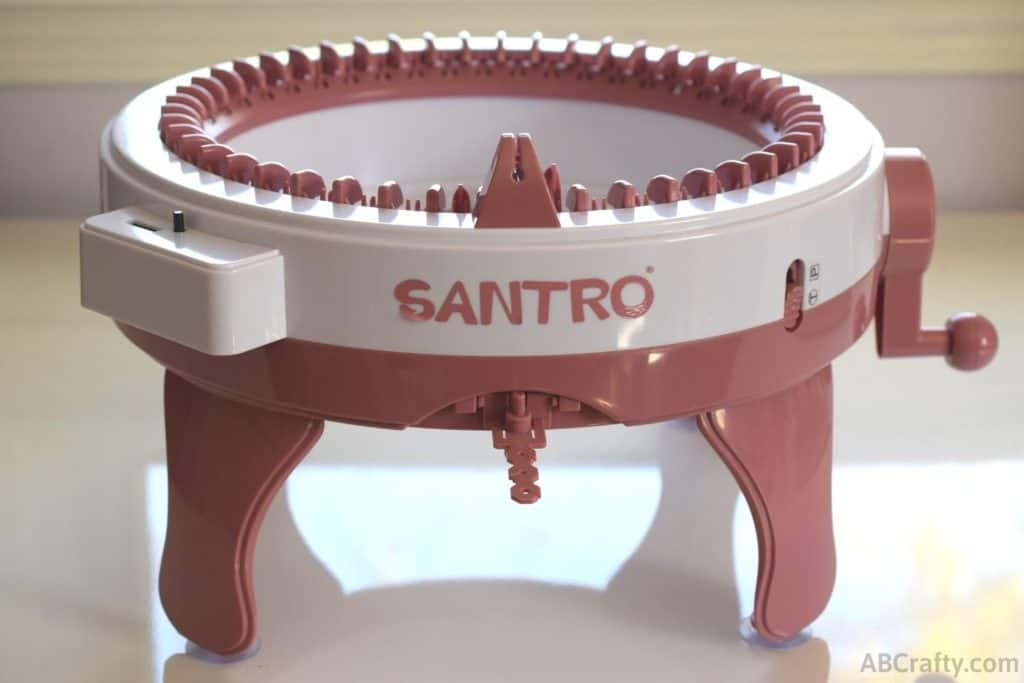
I personally opted for the Sentro machine because of the price, but there are various machines out there including the Addi Knitting Machine (Amazon link) and the one Michael’s carries – the Knit Quick Loops and Threads Knitting Machine (see my full guide to find the best one for you). I’m also pretty convinced the Loops and Threads machine is the same as the Sentro (without the row counter) so unless you have a Michael’s coupon, then I’d say go with the Sentro.
Be sure to get the one with the row counter though as I’ve found it extremely helpful. It automatically keeps track of the number of knit rows so you don’t have to use stitch markers.
Don’t forget to pin it so you can come back to it!

Materials to Make a Reversible Knit Hat on the Sentro Knitting Machine
- Sentro Knitting Machine (I have the 48 needle knitting machine – linked here)
- Yarn in two contrasting colors (Use a worsted weight or thinner – I used 3 strands at a time of fingering weight alpaca yarn in purple and light green)
- Plastic Needle (this comes with the machine)
- Scissors
- Yarn Bowl, optional (these are great options to keep your yarn organized while knitting)
Video Instructions
How to Use a Sentro Knitting Machine to Knit a Tube
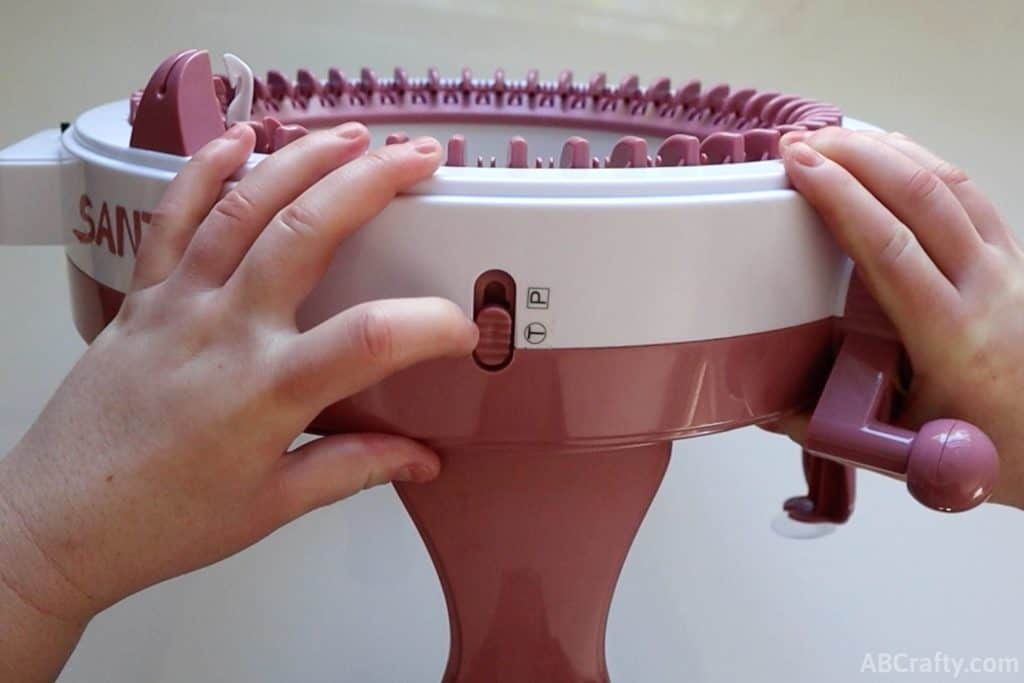
Select the Correct Setting
All projects on a circular knitting machine will start the same way, regardless of which machine you have (this is the one I’m using). To start, clear your row counter by pressing on the black button next to the counter. Also make sure the machine is set to “T” for “Tube.”
How to Knit the First Row on a Sentro Knitting Machine
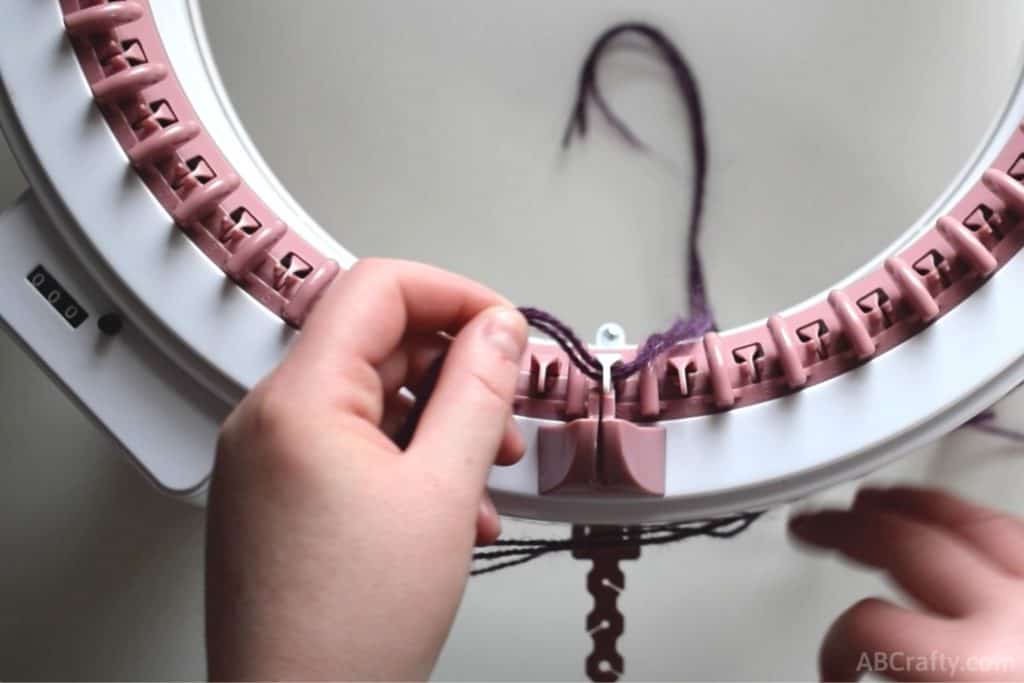
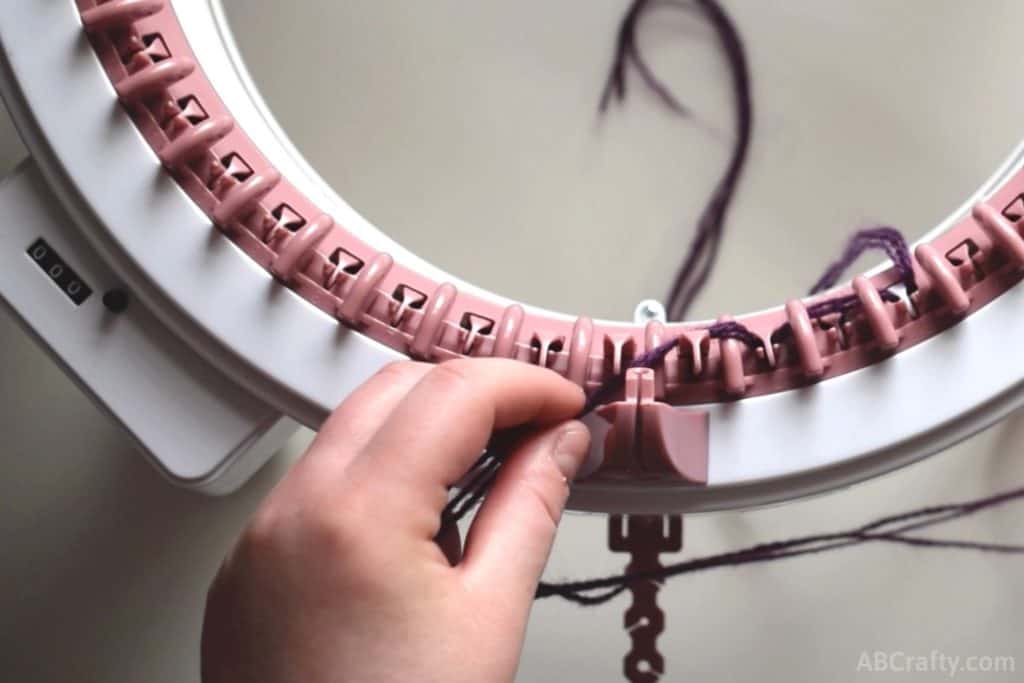
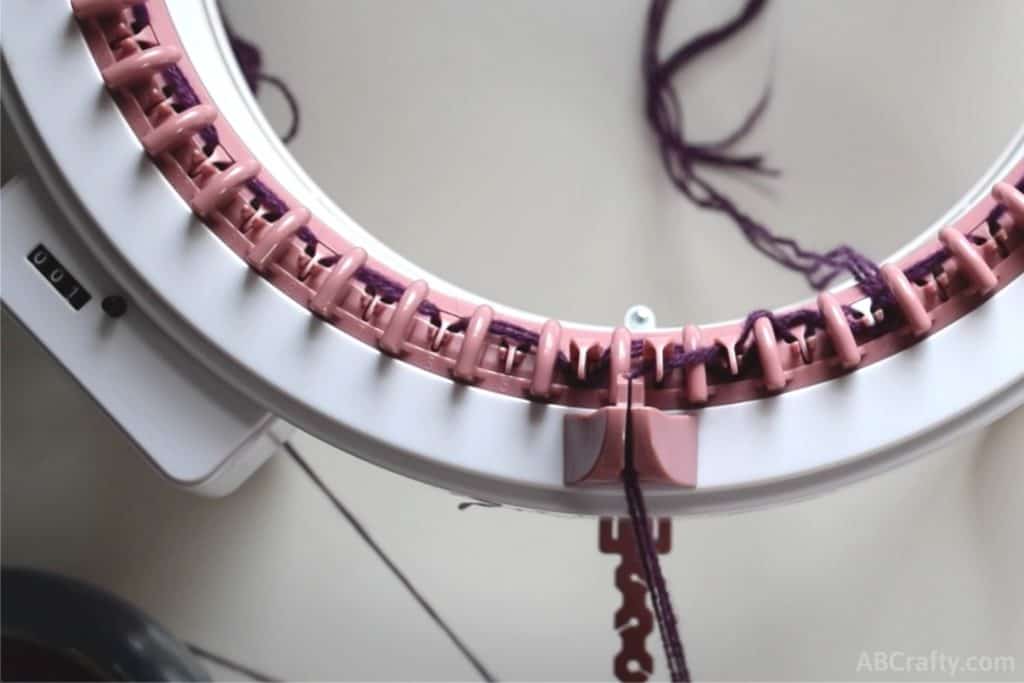
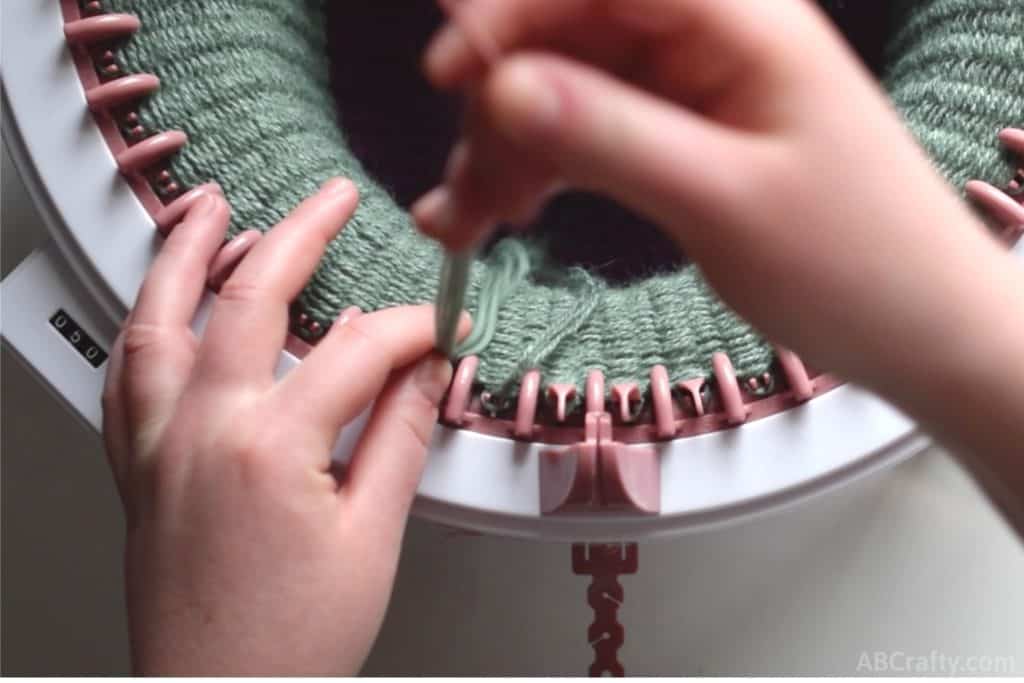
The first round is different from all the rest with the first 3-4 rounds being the most important. To start the first round you want to find the white needle and place it in front of the yarn holder on the machine. This will cause the white needle to lift up.
Measure roughly a foot of yarn and allow that end to hang into the middle of the machine. Pass the yarn in front of the white needle, moving from right to left.
Note: The white needle is used as your starting and ending point so you can make sure you knit a complete row.
I used 3 strands of yarn at once (this is similar to the one I used), but if you’re using a thicker yarn, you only need to use one strand at a time. (If you need to use two strands, but only have 1 ball, you can make a two-stranded ball with a yarn winder).
Turn the crank on the knitting machine slightly so that the next needle moves in front of the yarn holder. Then pass the yarn behind this needle.
Tip: To keep the yarn organized and not rolling everywhere, I’m using a yarn bowl. Mine is ceramic from a local shop, but these are great options.
You can also see my full guide to the best yarn bowls.
Turn the crank again to move the next needle in front of you and up. Pass the yarn in front of this needle.
Again, turn the crank slightly again and pass the yarn behind the next needle.
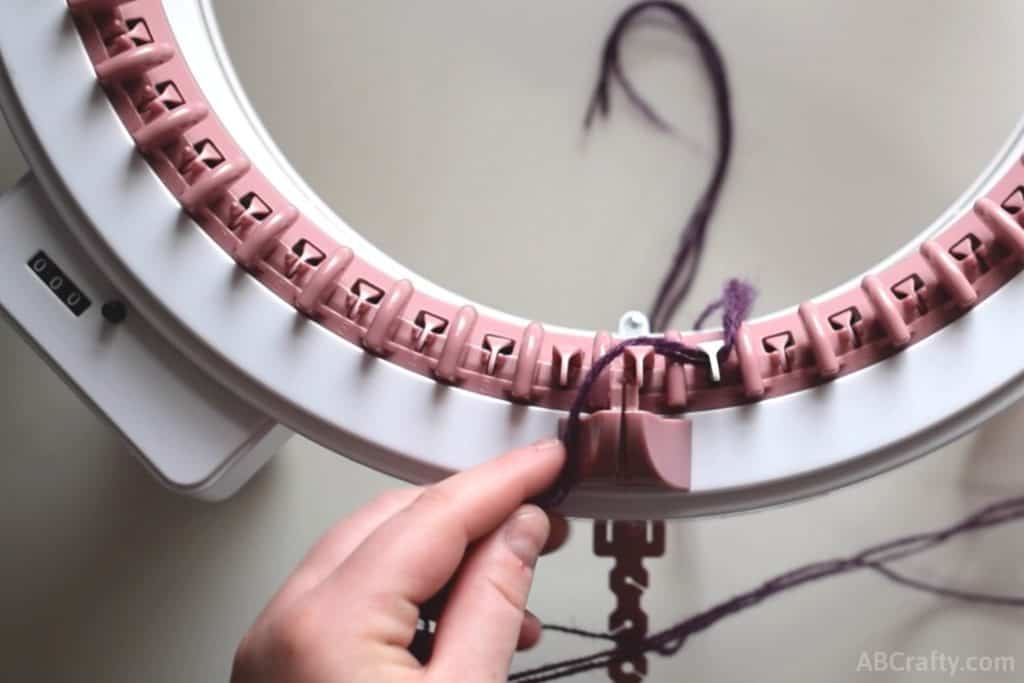
Notice how as you continue to pass the yarn in front and behind the needles of the knitting machine that the needles to the right pull the yarn down. This “locks” the yarn in place. Make sure this happens as you work along the machine, otherwise it is considered a dropped stitch.
Continue this pattern of alternating passing the yarn in front and behind of the needles.
Tip: The needles are also numbered so you can use those numbers to remember to place the yarn in front or behind (for example, all odds will be behind, while evens will be in front).
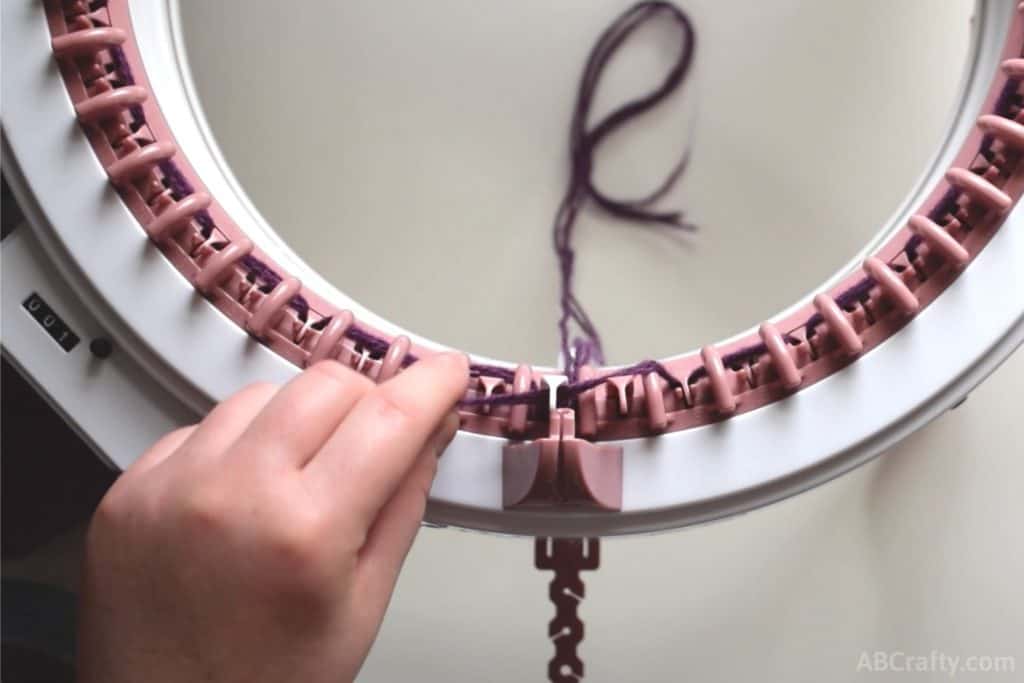
Once you get to the white needle again, pass the yarn again in front of the white needle.
You’ll also see the counter now will read “001” as you reach the white needle.
How to Knit the Next Few Rows on a Sentro Knitting Machine
You have now completed your first row on the Sentro knitting machine.
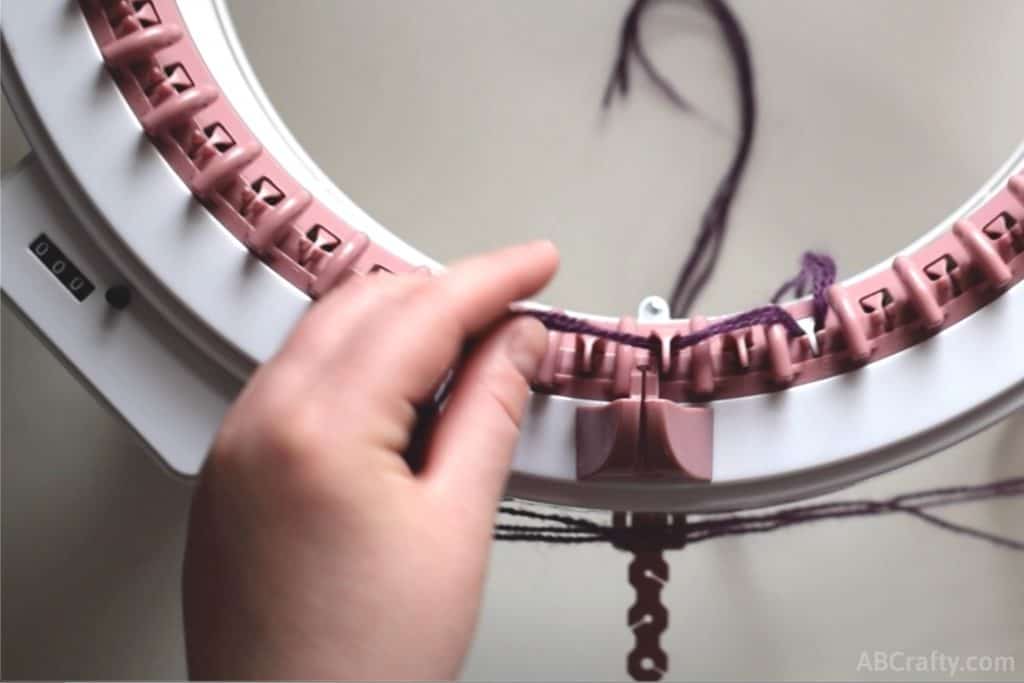
From now on you do not need to pass the yarn behind the needles. You will simply put the yarn in front of the needles. Continue to work slowly and slowly crank the knitting machine while you make sure the yarn is in front of the needles and that each needle pulls the yarn into the machine.
After you finish the second row with the yarn only in front of the needles, you no longer have to hold the yarn yourself.
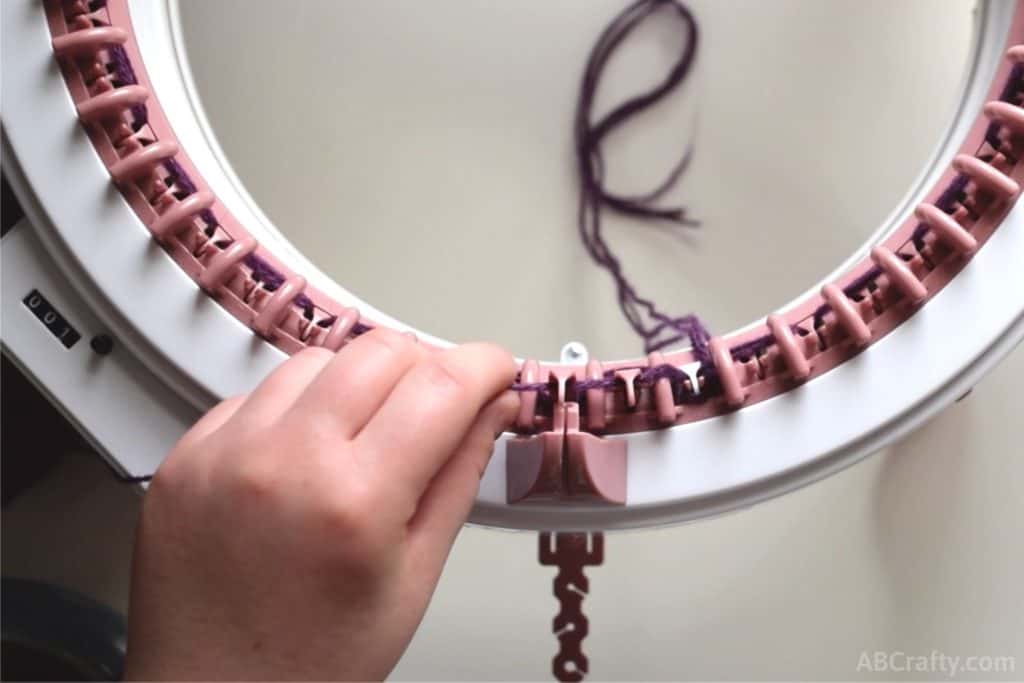
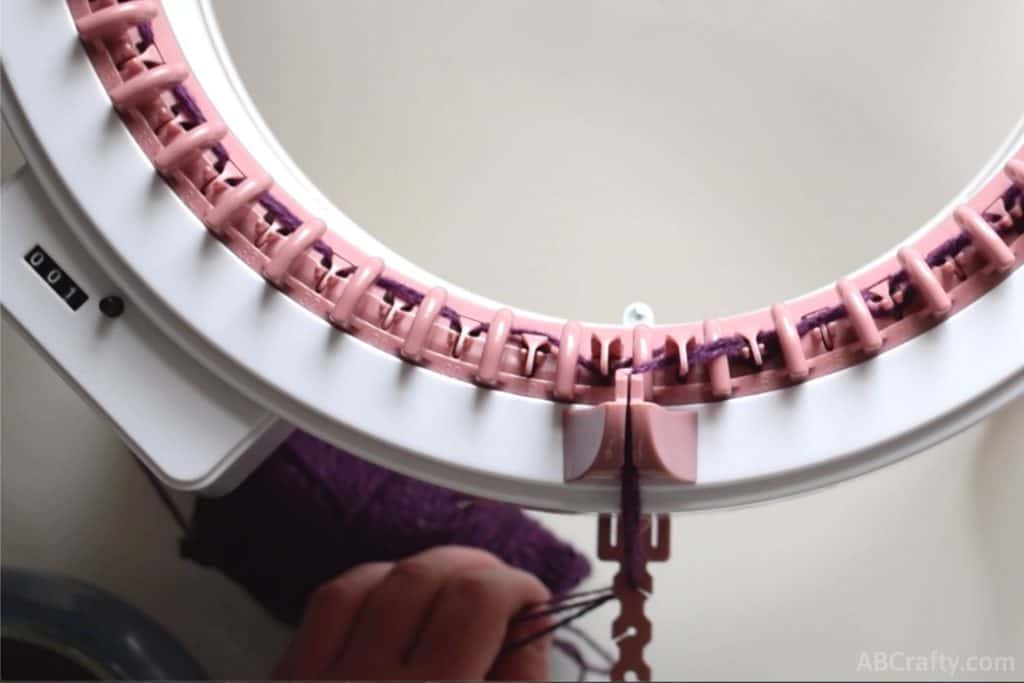
Pull the yarn through the yarn holder. I like to do this by holding the yarn in front and in back of the holder and pushing it down so it almost “snaps” into place.
This is what the yarn and knitting machine should look like with the yarn in the holder.
(The reason the counter still says 1 is because I accidentally pressed the clear button while knitting the first row of yarn.
Place the Yarn in the Sentro Knitting Machine Tensioner
After pulling the yarn through the holder, you can then place it through the yarn tensioner. This is the part that sticks out of the Sentro knitting machine with the 3 holes in it. Each hole provides a different amount of tension. You’ll want different tension for different yarns and projects.
Note: You can see the yarn bowl I’m using in the bottom left. I ended up using another bowl for the other ball of yarn since they didn’t both fit. Here are some great options similar to mine. You can also see my guide to the best yarn bowls.
Once you have the yarn set, you can crank the knitting machine carefully for the next few rounds. Keep an eye out for any dropped stitches. These first 3-4 rows are the most important. After the first 3-4 rounds you can then start moving more quickly.
And that’s all there is to using the Sentro knitting machine to knit in a tube! From there it’s simply a matter of what project you want to make. For this I continued on to make a reversible knit hat.
Get the latest DIY tutorials, reviews, and crafting updates
You’ll never be spammed and can unsubscribe at any time
You May Also Like…
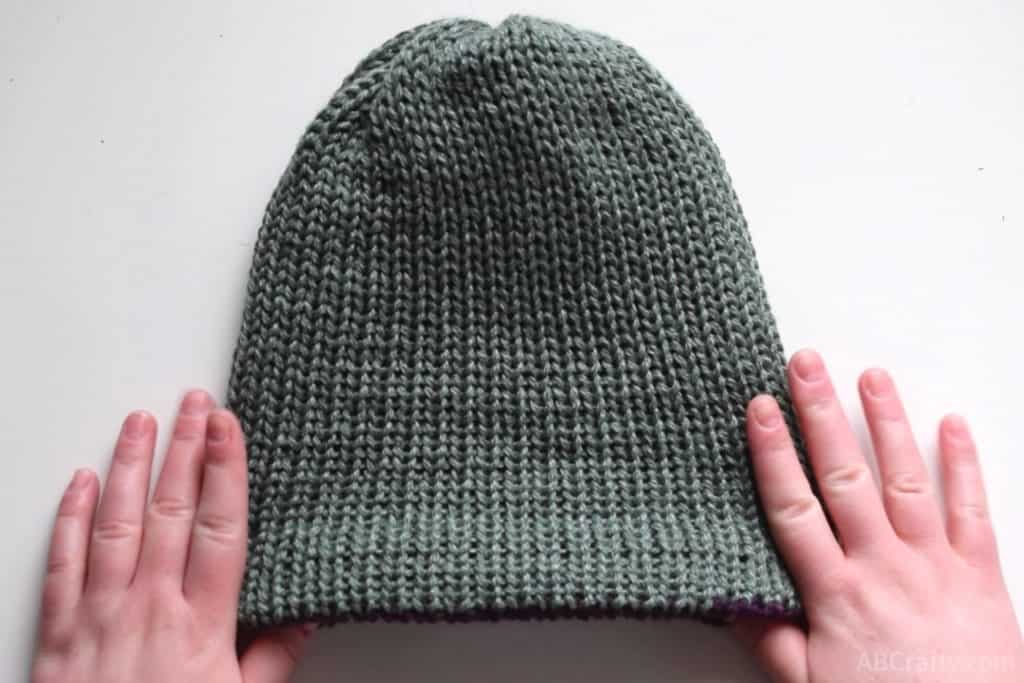
How to Knit a Reversible Beanie on a Sentro Knitting Machine
Continuing with the instructions above, knit a total of 50 rows onto the Sentro knitting machine using a single color of yarn. After your 50 rows, end with the white needle to the right. Then cut the end so that you have about a foot of extra yarn.
Note: As a reminder, I had thinner yarn (fingering weight) so I used 3 strands at once – this is similar to the one I used.
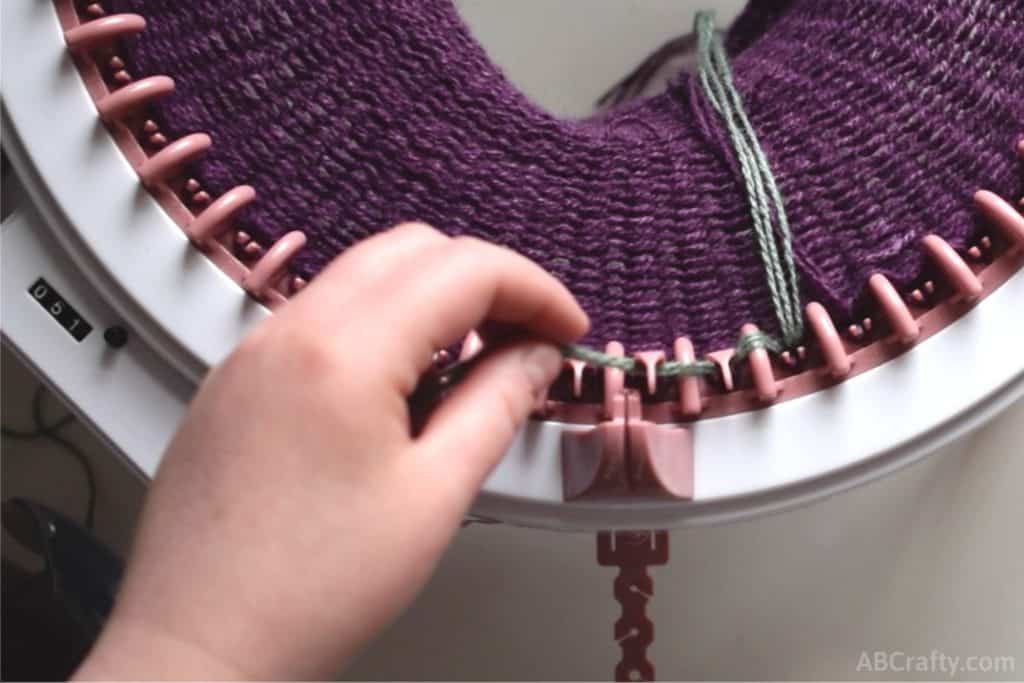
How to Change Colors of Yarn on a Sentro Knitting Machine
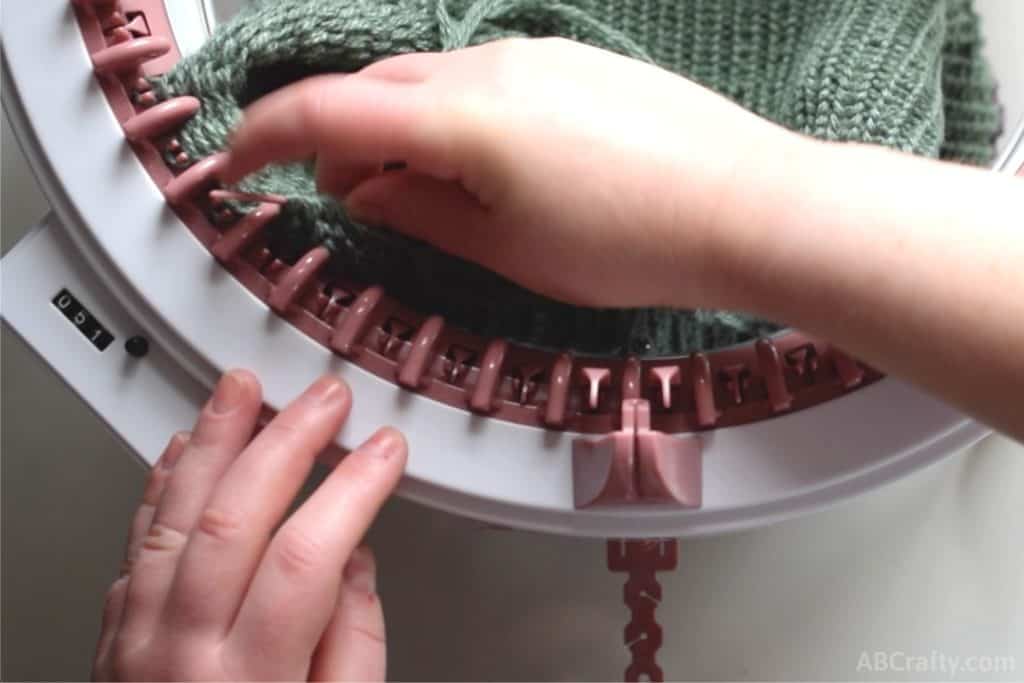
Remove the purple yarn from the tensioner and yarn holder. Place it towards into the middle of the knitting machine between the white needle and the needle to the left of it.
Then with your next color (I used the same yarn, but in a light green color), measure out a foot of yarn and again put that end towards the middle. Pass the rest of the yarn in front of the next needle.
Choosing any two of these colors, you really can’t go wrong.
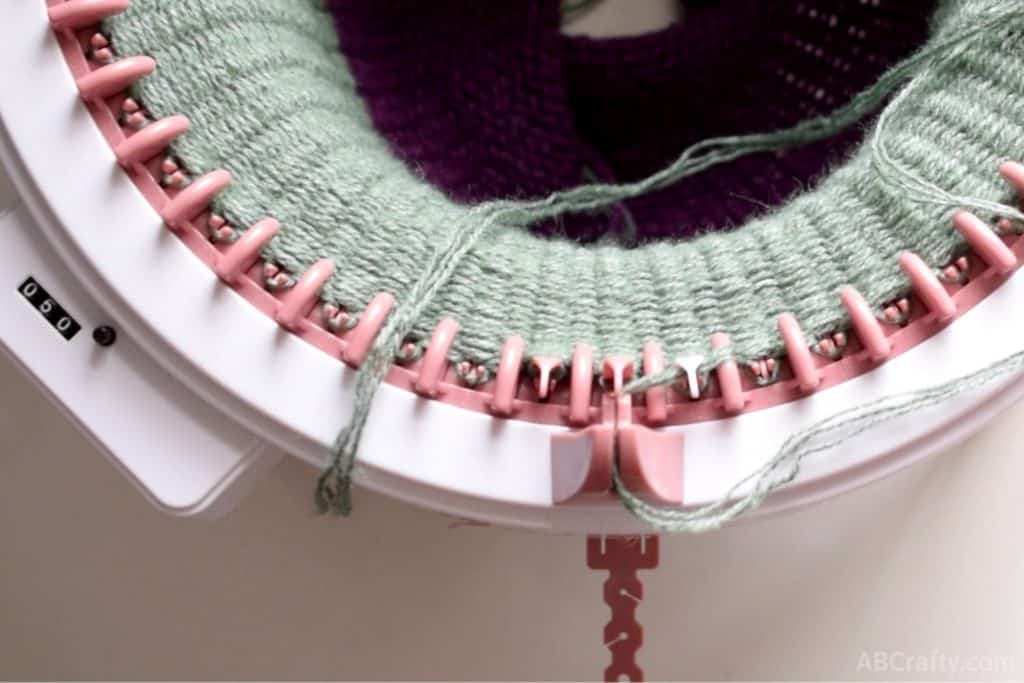
Hold the yarn while you have it pass in front of each needle for the next row. Because you’re starting with new yarn it’s a good idea to be careful with this first row to make sure you don’t have any dropped stitches.
Now is also a good time to reset the counter to 0 so you can count it to 50 or you can keep it going and have it count to 100.
Knit another 50 rows with this new color and again end the last row with the yarn passing in front of the white needle.
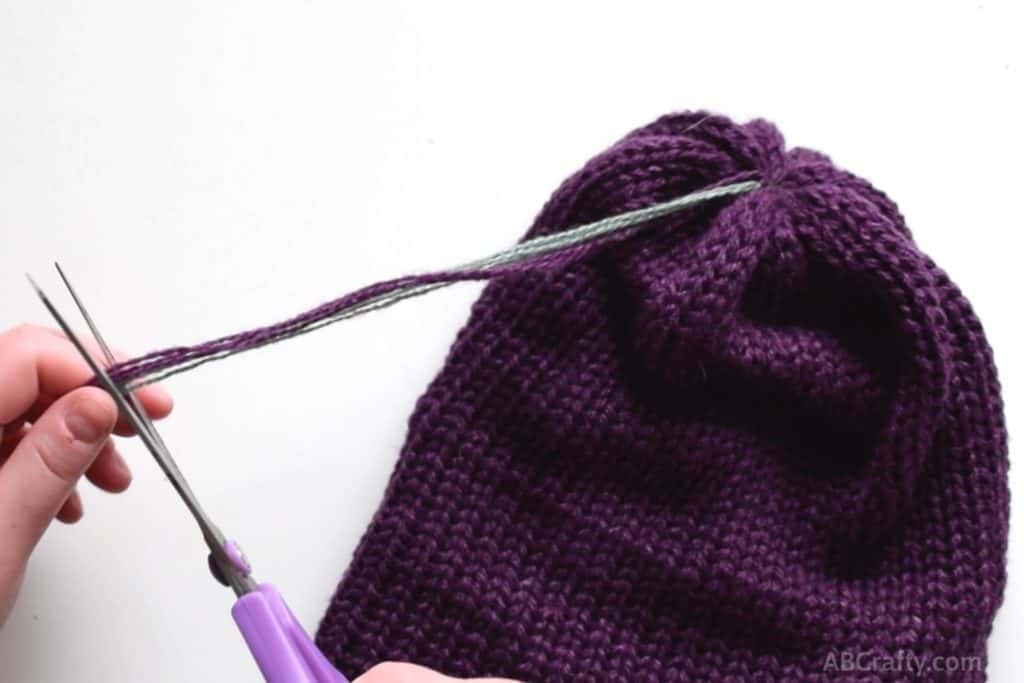
To make sure you have enough extra yarn, measure the yarn around the Sentro knitting machine and cut it. Or you can measure about 2 feet extra.
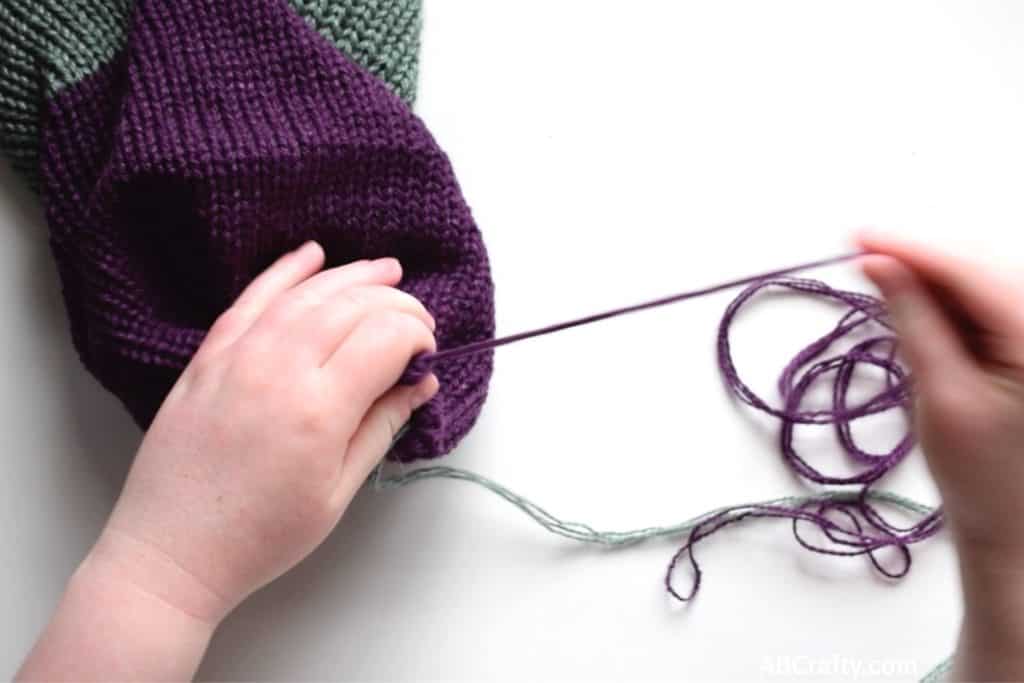
How to Remove the Hat from the Sentro Knitting Machine
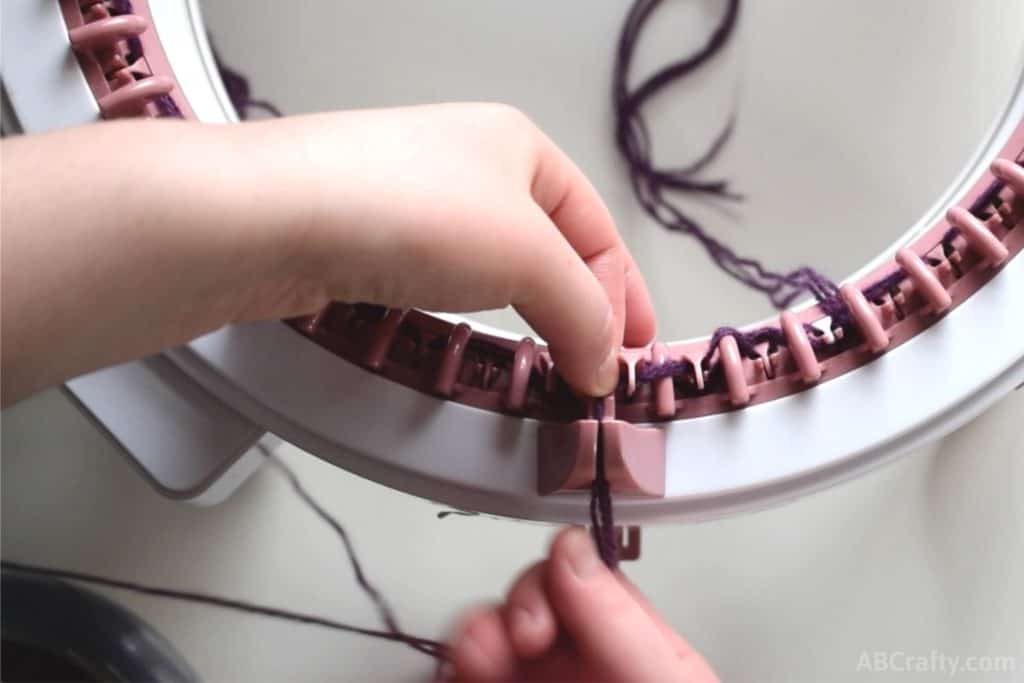
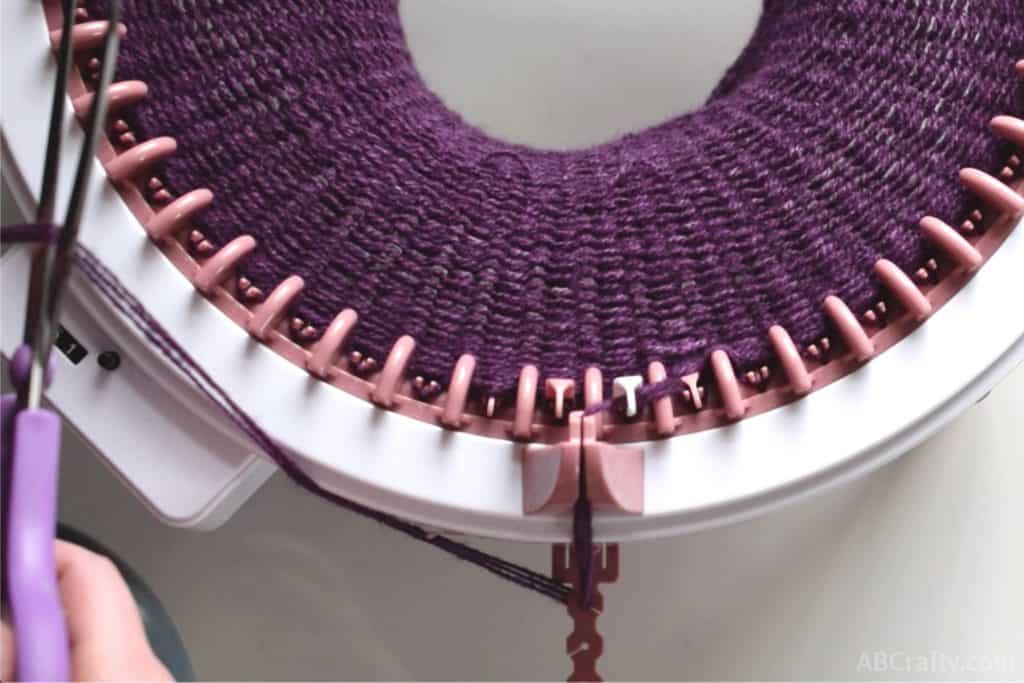
Thread your plastic needle with the yarn.
Then crank the machine a full row around. This will allow the machine to finish the last row.
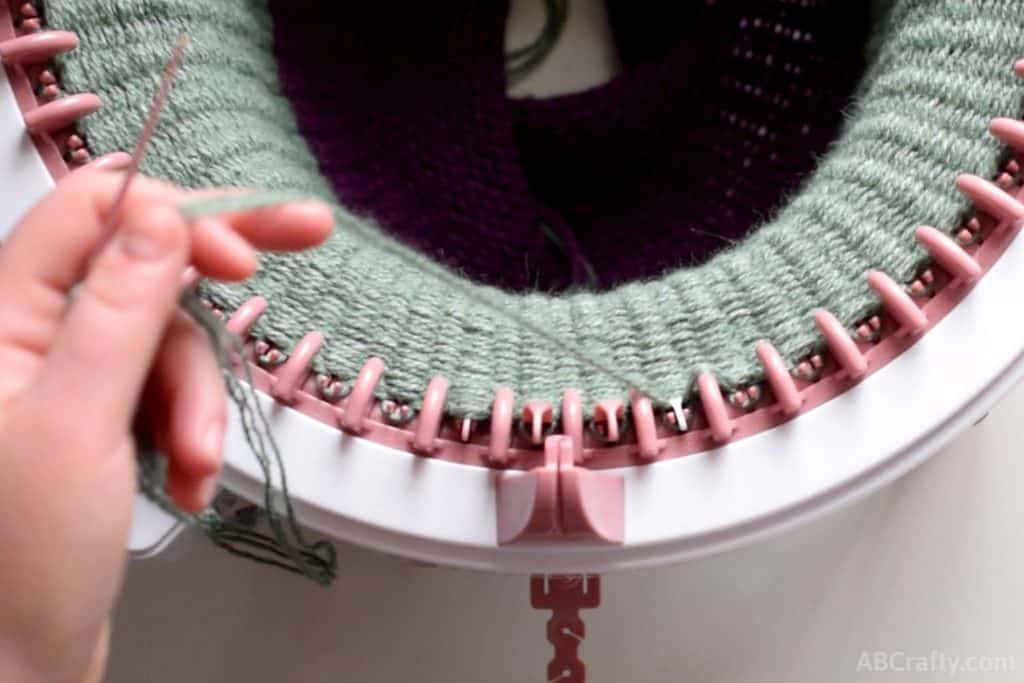
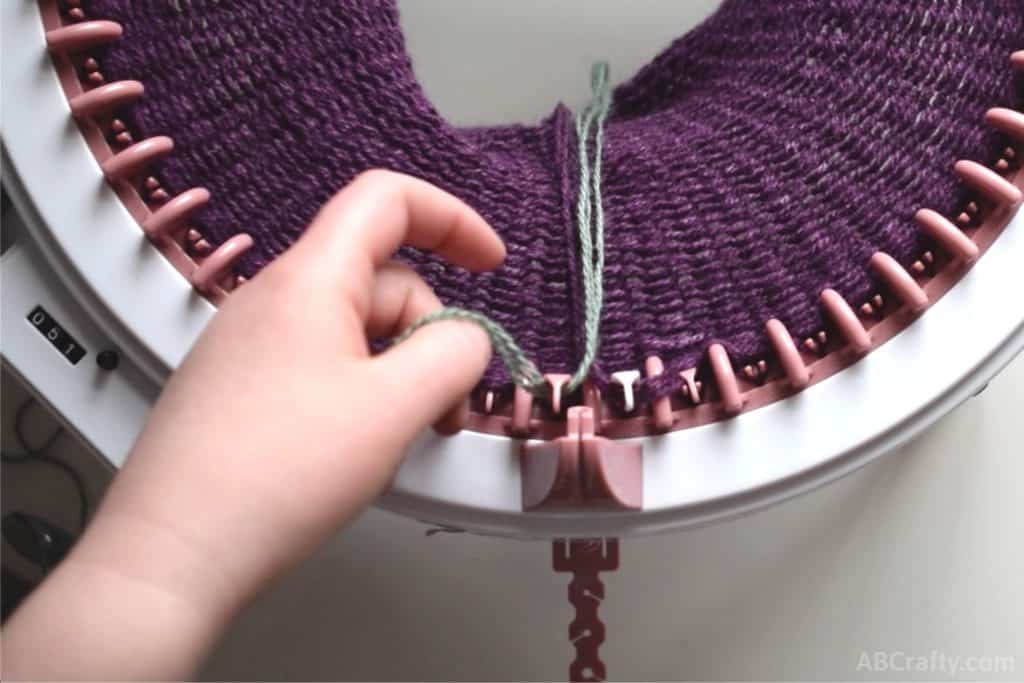
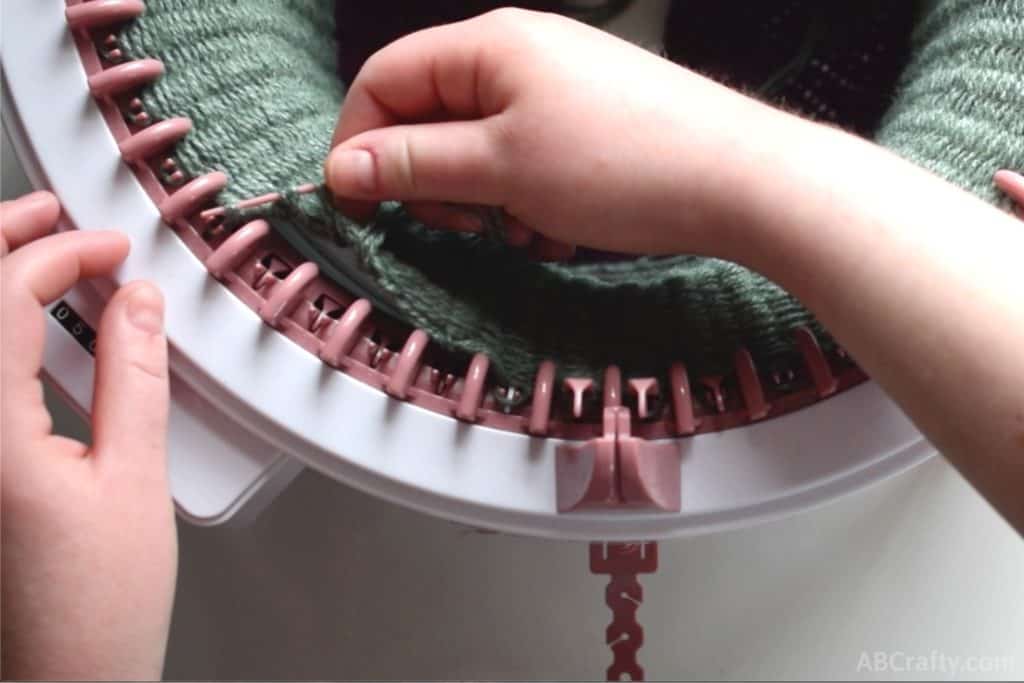
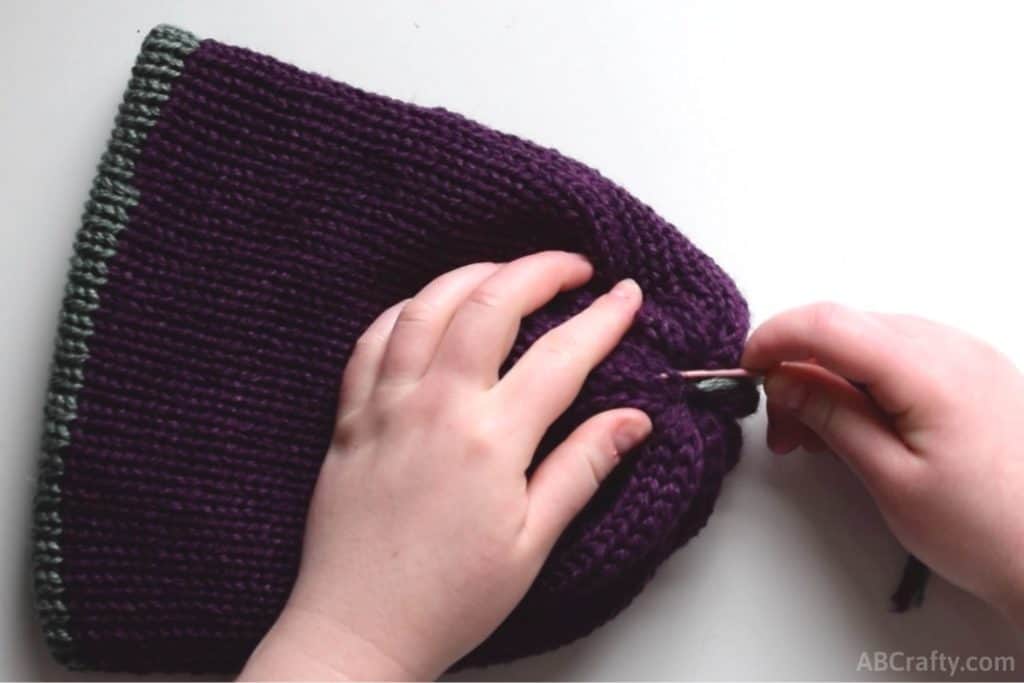
Starting with the needle to the left of the white needle, push the plastic needle through the loop. Move from the middle of the machine to the outside.
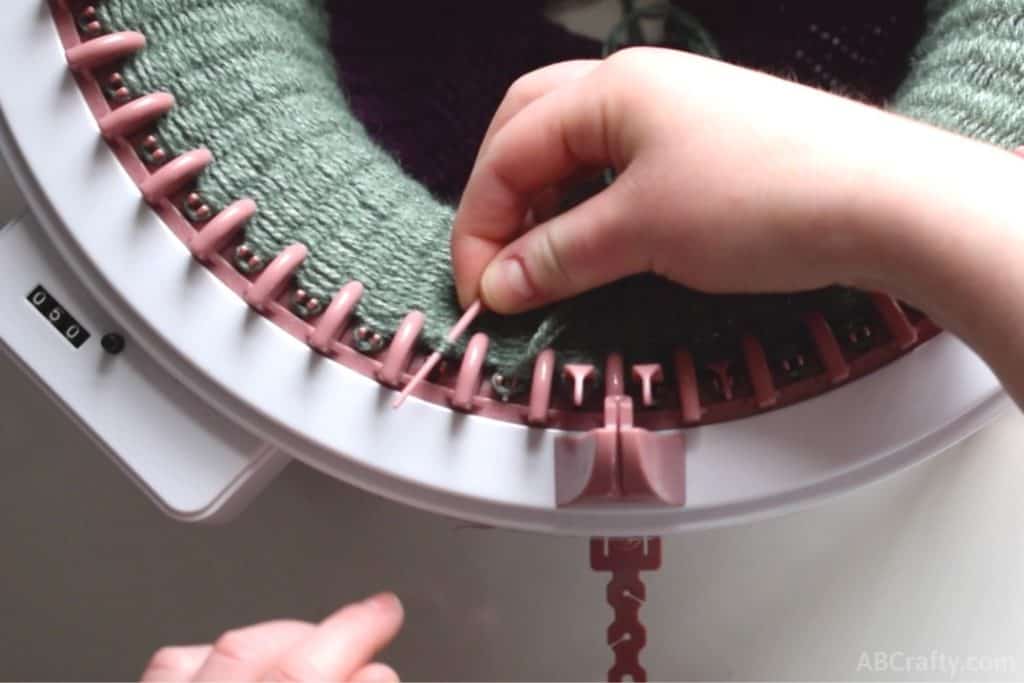
Pull the yarn through the loop.
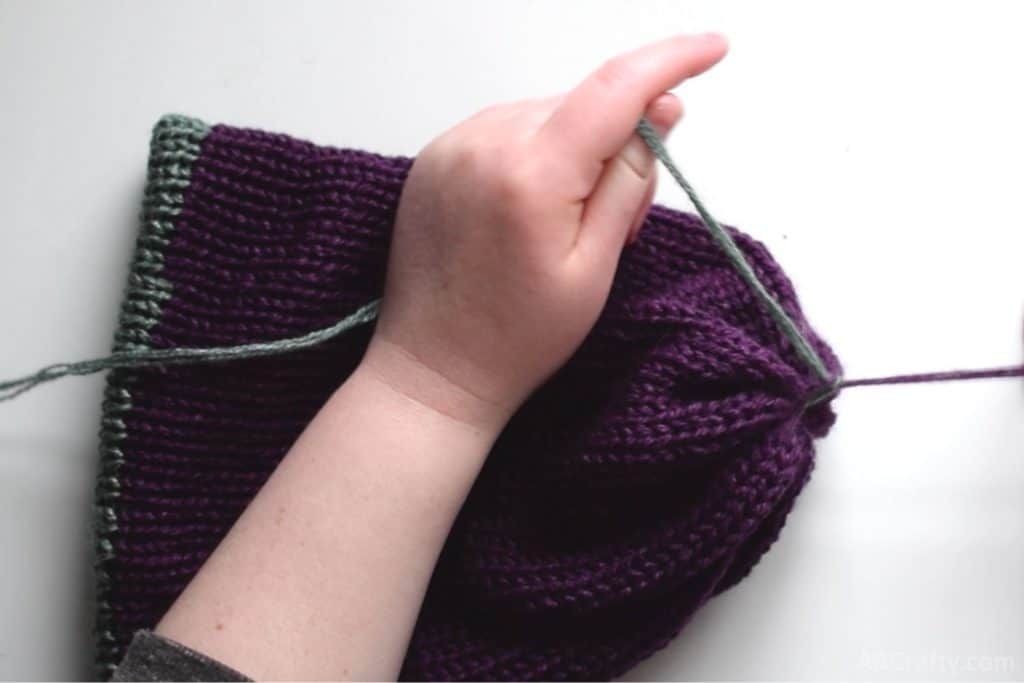
Continue needle by needle lifting the loops onto the plastic needle. After you get a few of them done, you’ll have more room to work and can lift up a few loops at once. However, be careful not to drop any loops.
Finish up gathering all of the loops, but keep it relatively loose as we’ll close the opening in a bit.
How to Finish the Reversible Hat
Pull the project inside out and find the ends of the yarn from when you changed colors.
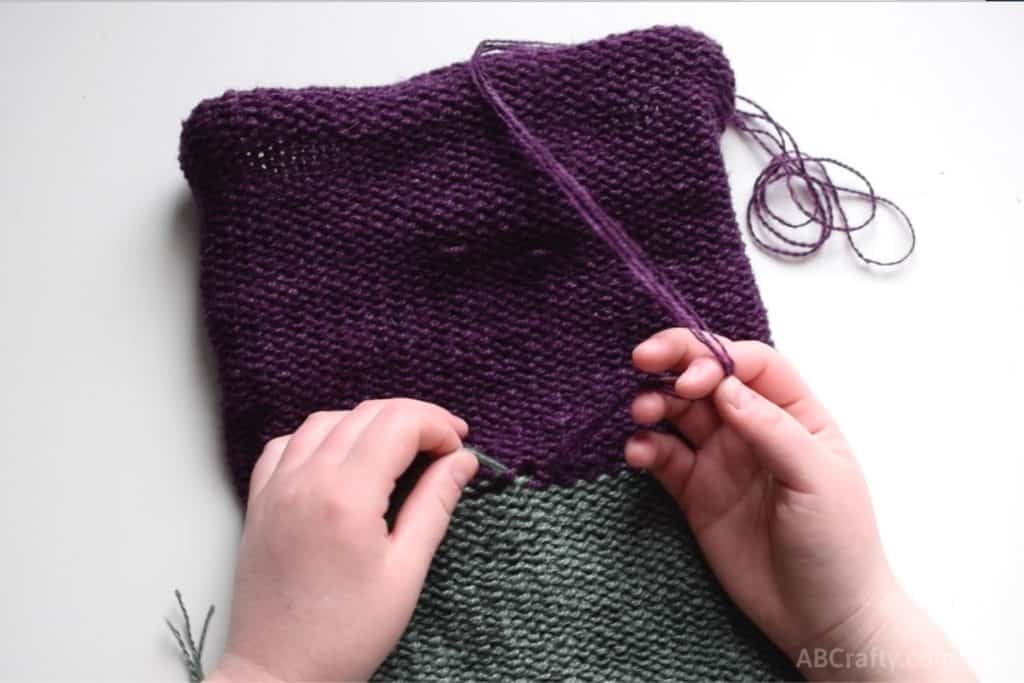
Tie the ends into a secure knot. In doing so, you’re closing the loop of that stitch so make sure it’s not too tight or too loose so that the stitch matches the others.
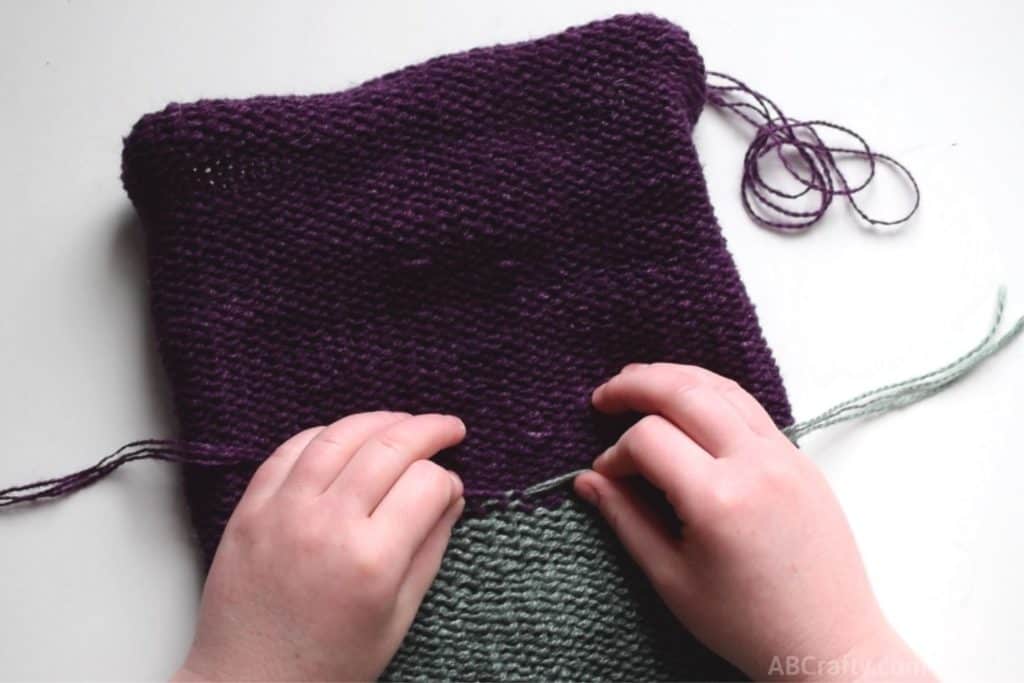
Once secure, cut off the ends.

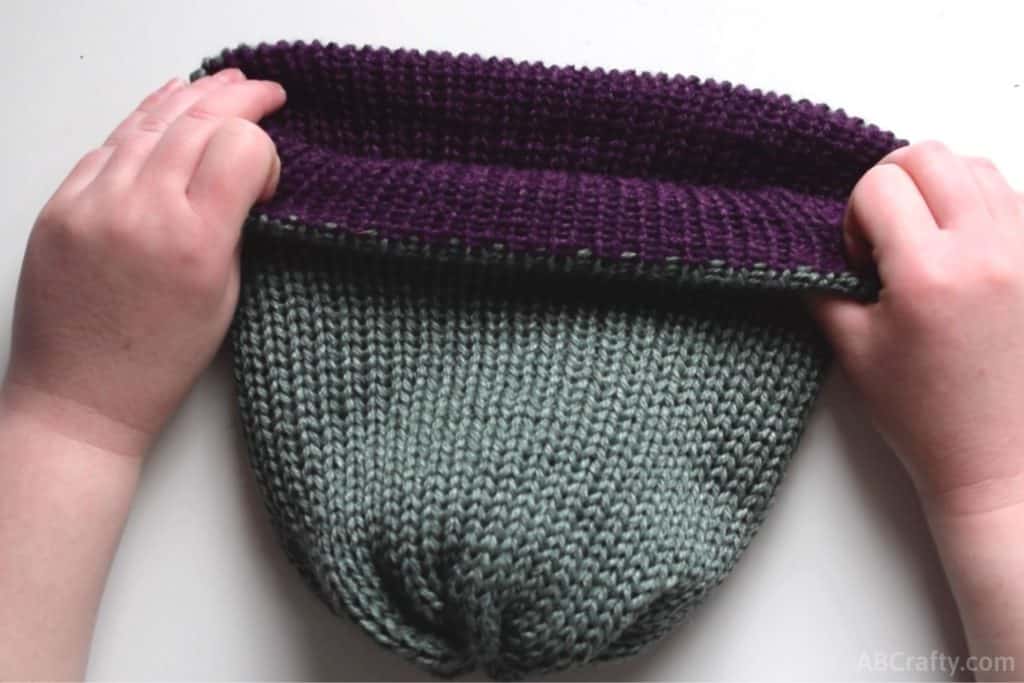
Pull the knit tube partially right side out so that the ends of each color meet.
You’re now going to close those ends, but it it’s easiest to do them one at a time. Start with the one on the inside and pull on the end of the yarn so that edge starts to close. Carefully pull it tight and move the stitches to form a tight circle.
Tip: Be very careful here as you do not want to break the yarn. However you want to make sure the circle is tight so as not to let any air in when worn.
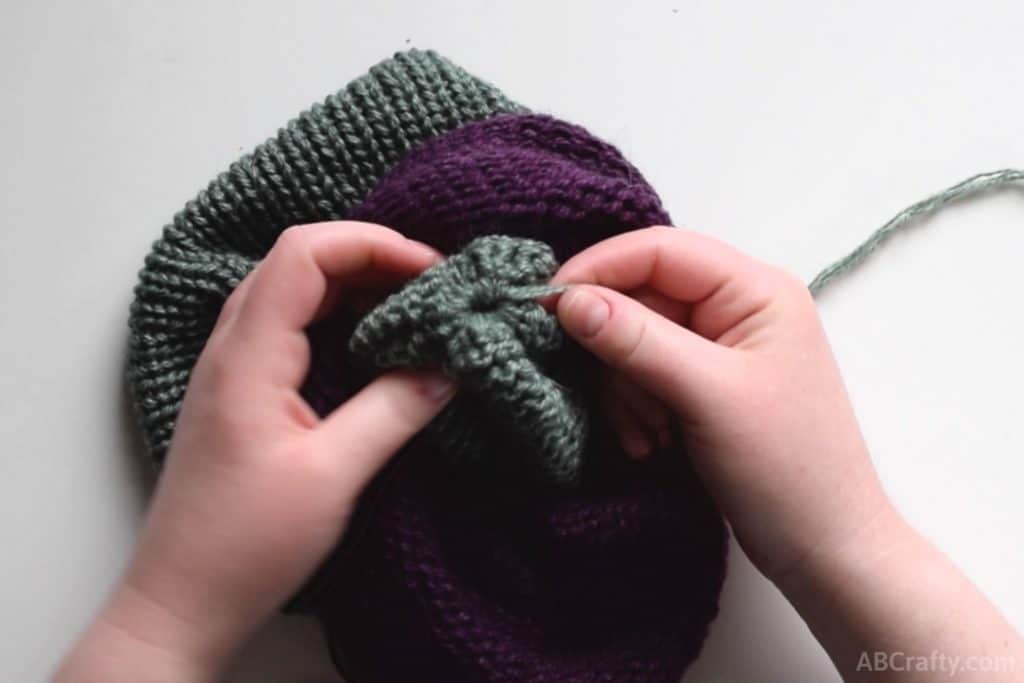
After you have the hole closed on the inside edge, keep the end of the yarn outside and close the end of the other color. (See the green yarn hanging out while I pull on the purple yarn)
Once you close both sides, tie the ends of both colors together into a secure knot.
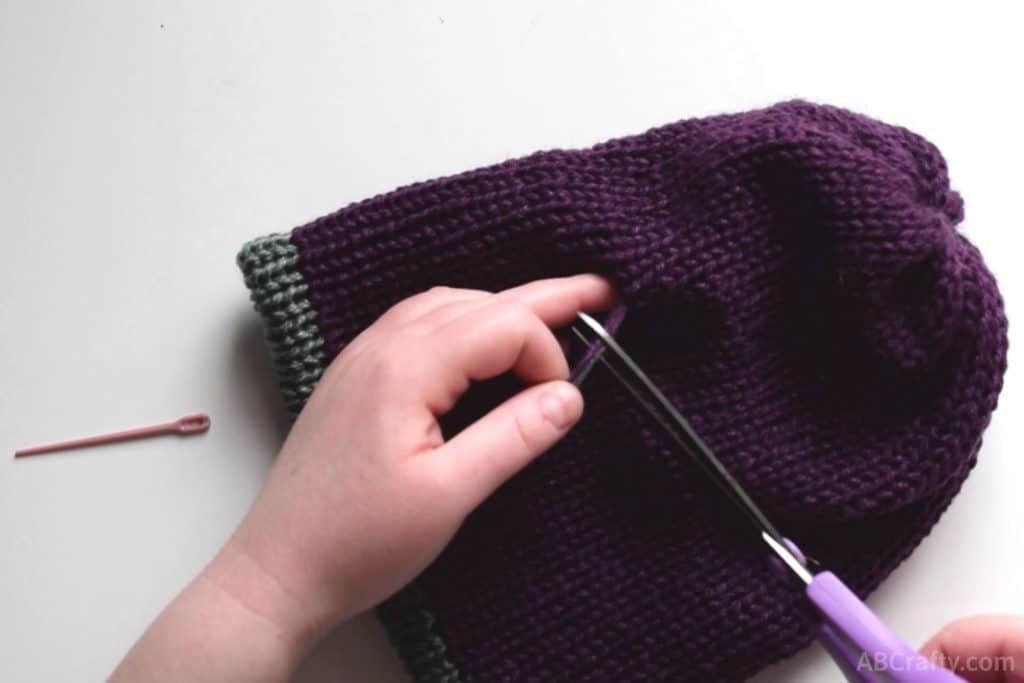
Cut the yarn to a more manageable length and thread it onto the plastic needle.
Sew into the knit hat between the two layers.
Come out part way through the knit beanie and cut off the excess so that the rest of the yarn is hidden between the layers.
Get the latest DIY tutorials, reviews, and crafting updates
You’ll never be spammed and can unsubscribe at any time
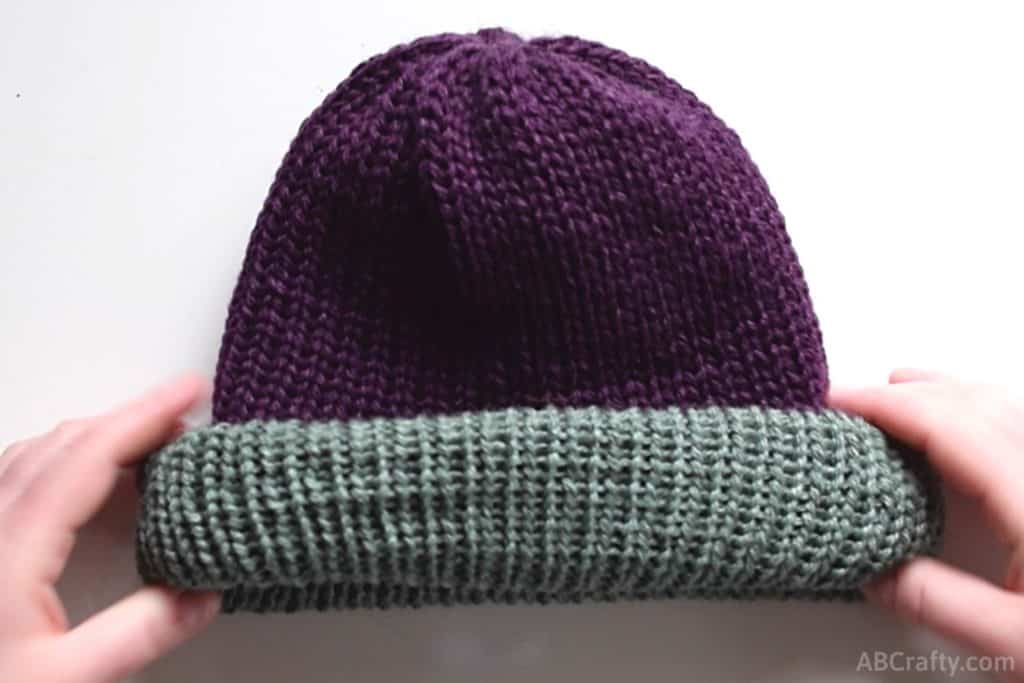
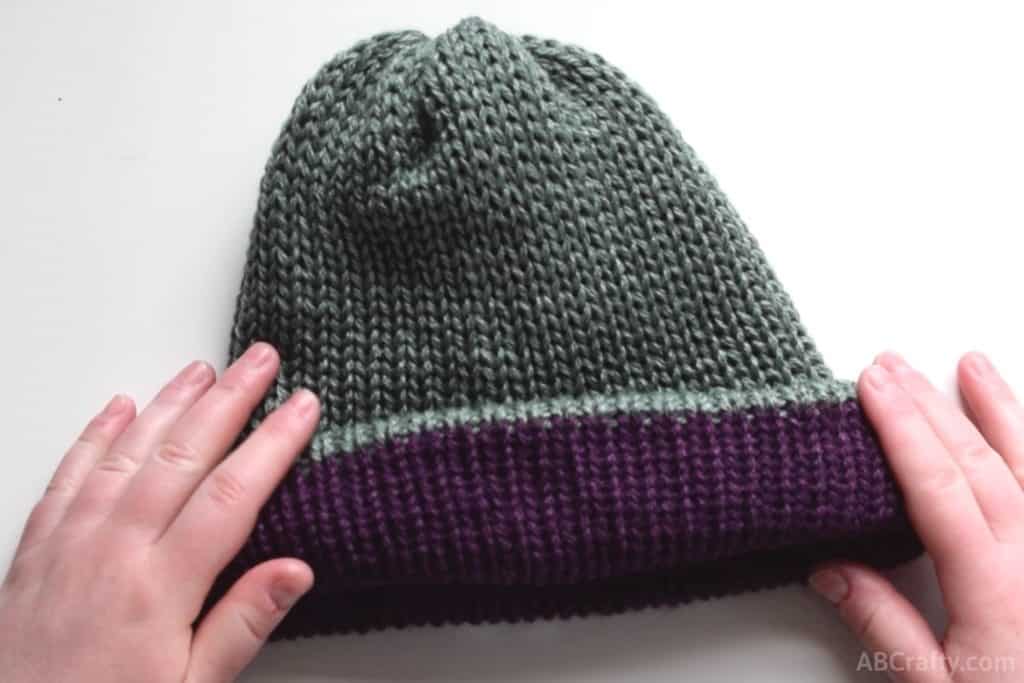
You can either wear it as a solid color or flip the brim up for fun contrasting brim.
Here’s each side as a solid color.
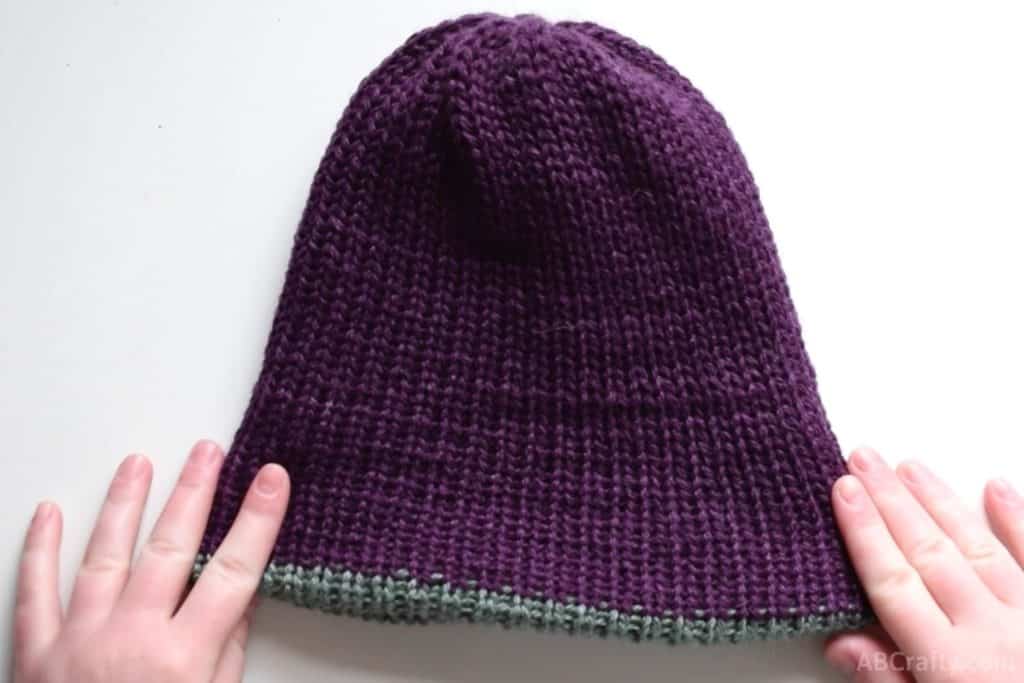
You can reverse it throughout the day to whatever color you’d like, or you can pull just the brim back.
Here’s each color with its contrasting brim.
Frequently Asked Questions About Sentro Knitting Machines
Which size of Sentro knitting machine should I get?
What’s the difference between a Sentro Knitting Machine and the Loops and Threads or Addi Knitting Machine?
I’m convinced there’s little difference between the Sentro and Loops and Threads Knitting Machines other than the color. However, unlike the other two, the Addi Knitting Machine has some metal and therefore more durable. All three machines are hand crank knitting machines, but I’ve seen modifications in which people add motors to them.
So if you plan to continually use the machine it may be worth it to spend the $200+ on the Addi Machine. But if you only plan to use it for hobby crafting, I’d say go for the Sentro or the Knit Quick Loops and Threads machine. The Sentro is around $50 and the Loops and Threads is around $75, but with a coupon you can get it for much cheaper (please only get it with a coupon!). And to see all types of machines, here’s my full guide to knitting machines.
- Sentro Knitting Machine (48 needle): Amazon Link
- Addi Knitting Machine: Amazon Link
- Knit Quick Loops and Threads Knitting Machine: Michael’s Link
Is the counter worth it?
Absolutely! I’m not someone who likes to keep track of things (I tend to get overexcited and count rows too soon and therefore mess up the count) so I find it extremely helpful to have the counter. This means I don’t have to worry about it other than making sure I remember to actually look at the counter!
More Fiber Arts Projects to Try
- Use a knitting loom to make a double-brim hat
- Make pom poms to attach to your hats
- Use your scrap pieces of yarn from the knit beanie to add to a wet felted coin purse
- Learn how to make your own piece of wool fabric with this guide on all things wet felting
- Use yarn in a different way to make a glow in the dark galaxy dream catcher
- Learn how to use a yarn winder to make a ball of yarn
- Learn how to use a yarn swift to unwind a hank of yarn
- Learn how to use a niddy noddy to measure yarn and make a hank
- Check out my guide to the best yarn bowls
- Blend your own wool with a drum carder that you can use to spin your own yarn
Get the latest DIY tutorials, reviews, and crafting updates
You’ll never be spammed and can unsubscribe at any time
More Craft Projects and Ideas
14 thoughts on “Sentro Knitting Machine Reversible Hat”
-

I’m having some issues wirh tension. I use the middle tension fuide, but my work came out very loose, and looking more like rib stitch than stockinette. I used category 4 acrylic yarn. How can I fix this?
-
If it’s too loose, use the tightest tension setting. You can also loop it through more of the loops for even higher tension (e.g down the first, up the second, and back down the third).
-
-
Thanks for the tutorial. I was having trouble findingone that wasn’t on YouTube.
-
You’re welcome! Glad you like it
-
-
If I make a single layer hat my edge rolls up. How can I correct that?
-
Yes, that is what happens when making a single layer. One of my favorite hats I’ve knit is like that and I love how it looks – it’s simply a different style of hat that has a rolled up brim.
If you would prefer a different style and it’s already made, you can fold the bottom of the brim to the inside and sew it to from the inside so that you’ll have a double brim. Another option is to crochet a row along the bottom. Both of these will prevent the hat from rolling up.-
How do you make a hat big enough for an adult with the 48 needle machine? I made one today with DK yarn and it’s really only big enough for a small child. It was tight on my 13 yo, so I’m thinking it would fit a 5-8 year old at most. Would using a worsted yarn really make that much difference in size? If I hand knit a hat in worsted, I’m casting on 90+ stitches, so I just can’t work out how a machine knit hat in worsted will fit an adult, but every tutorial I read or watch says they’re using a 48 needle machine. I’m so confused! Haha
-
Starting with the concern about the number of stitches vs when using needles – it’s all about the gauge of the knitting machine, which will translate to the stitches per inch. You can try making a sample on the machine and with your needles using the same yarn and you’ll see you’re likely getting many more stitches per inch by hand. The machine will likely create a more loose knit. For reference, I just measured the beanie from this tutorial and it’s 3 stitches per inch and 5 rows per inch.
Then for the concern on the size, it’s likely more about the tension. Try casting on more loosely and keeping the tension loose. When you cast on more tightly and keep the tension high, you’ll make a tighter knit unintentionally. My recommendation is to make some swatches using different tension and test using the DK vs worsted yarn until you get the combination that gives you the fewest stitches per inch. The goal is to get 2 stitches per inch or fewer (without stretching it).
-
Thank you so much for your reply, this is so helpful! ❤
-
You’re very welcome, glad it helped!
-
-
-
-
-
Do you happen to know how many yards of yarn are in 120 rows on the 48 needle knitting machine?
-
It depends on the thickness of the yarn you use and the tension of the machine. It could be anywhere from 200 yards-600+ yards.
-
-
Any idea as to how many inches 150 rows is suppose to be my counter does not work
-
It depends on the yarn you use and the amount of tension you use. But you can ultimately decide on however long you’d like it to be – mine was roughly 11 inches.
Another option is using a separate row counter – here’s an example.
-


