-
Contents
-
Table of Contents
-
Bookmarks
Quick Links
Use and Care Manual
For Household Use Only
Notice d’utilisation et d’entretien
Usage domestique uniquement
Manual de instrucciones y cuidado
Sólo para uso doméstico
Automatic Coffee Center
TCA 6001 UC
Related Manuals for Bosch TCA6001UC — Benvenuto B20 Gourmet Coffee Machine
Summary of Contents for Bosch TCA6001UC — Benvenuto B20 Gourmet Coffee Machine
-
Page 1
Use and Care Manual For Household Use Only Notice d’utilisation et d’entretien Usage domestique uniquement Manual de instrucciones y cuidado Sólo para uso doméstico Automatic Coffee Center TCA 6001 UC… -
Page 2
Use and Care Manual ….. . . READ THIS MANUAL thoroughly for important safety and operating instructions before using this appliance. Notice d’utilisation et d’entretien . -
Page 3: Table Of Contents
….. Eliminating minor malfunctions yourself ..BOSCH Small Appliance Warranty … .
-
Page 4: Important Safeguards
d IMPORTANT SAFEGUARDS WARNING: A risk of fire and electric shock exists in all electrical appliances and may cause personal injury or death. When using electrical appliances, basic safety precautions should always be followed, including the following: 1. Read all instructions. 2.
-
Page 5
d CAUTION This appliance is designed for domestic use and for processing normal quantities of food and not for industrial use. Any servicing other than cleaning and user maintenance should be performed by an authorized service representative. q Do not immerse base in water or try to disassemble. q To reduce the risk of fire or electric shock, do not open the enclosure. -
Page 6: Overview
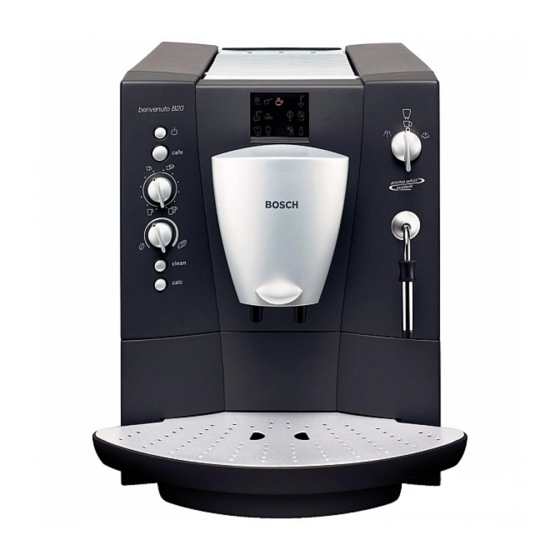
Overview Controls 1 Power switch 2 Function selector coffee/steam/hot water 3 Display with symbols d button 5 2 button 6 Rotary knob for adjusting the filling quantity 7 Rotary knob for adjusting the coffee strength 8 + button 9 4 descaling button Appliance components 10 Document holder…
-
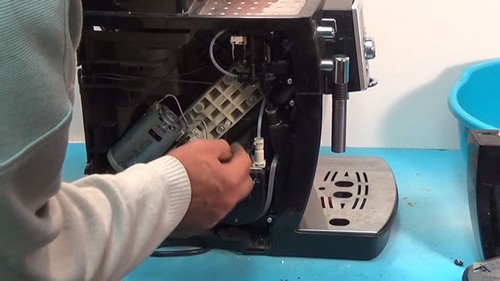
Page 7
Appliance components 14 Right cover of the appliance 15 Door for brewing unit 16 Ground coffee duct with cover = cleaning tablet duct 17 Rotary knob for degree of ground coffee 18 Bean container with aroma cover 19 Cup shelf (pre warming function) 20 Left cover of the appliance 21 Detachable water tank… -
Page 8: Before Using Your Appliance For The First Time
Before using your appliance for the first time Fill the respective containers with pure water and General preferably espresso or coffee beans for fully automatic machines only. Do not use coffee beans which have been glazed, caramelised or treated with other addi tives containing sugar.
-
Page 9: Controls
Controls Power switch 1 The power switch 1 on the rear of the appliance switches the power supply on or off. When the power switch 1 has been switched on, the illuminated ring on button d 4 is lit green. The ap pliance is in stand by»…
-
Page 10
Turn to coffee Turn to water Brewing unit Change filter Descale appliance Clean appliance The appliance has been programmed ex works with standard settings for optimum operation. Button d 4 Button d 4 switches on the appliance or switches it to stand by»… -
Page 11
Rotary knob for adjusting the filling quantity The amount of liquid is adjusted with rotary knob Small 2 small espresso espresso 2 espresso Espresso Small 2 small coffee coffees Coffee 2 coffees Large 2 large coffees coffee 2 XXL coffee coffees i Outlet 12 has two nozzles for filling 2 cups. -
Page 12: Preparation
Preparation This fully automatic espresso/coffee machine grinds General fresh coffee for each brewing process. Preferably use espresso or coffee beans for fully automatic machines. Store or deep freeze in cool, air tight and sealed containers. Deep frozen coffee beans can also be ground. Do NOT use very oily or very dark roasted coffee beans — Risk of malfunction.
-
Page 13: Using Ground Espresso/Coffee Powder
q Open the right cover of the appliance 14. q Press the 2 button 5. q While the grinding unit is running, turn the knob to select the degree of grinding: the smaller the dots the finer the ground coffee. i The new setting will not become apparent until the second or third cup is brewed.
-
Page 14: Steam For Frothing Milk
q Push down sleeve a on nozzle 13. Steam for frothing milk q Fill the cup approx. full of milk. q Immerse nozzle 13 approx. 1 cm into the milk. q Slowly rotate function selector 2 to =. i The appliance now heats up for approx. 20 se conds.
-
Page 15: Preparing Hot Water
q Place an appropriate cup under the nozzle 13. Preparing hot water q Push down sleeve a on nozzle 13. q Rotate function selector 2 to 0 and fill the cup. WARNING Risk of scalding! When the function selector is set to 0, the nozzle may spurt slightly.
-
Page 16
q Simultaneously hold down + 8 button and 4 9 descaling button for at least 3 seconds until k is indicated on the display. The number of illuminated rings around control buttons 4, 5, 8 and 9 symbolise the selected water hardness (see diagram). q Press 4 9 descaling button until the illuminated rings for the desired water hardness light up. -
Page 17
i Appliance rinses automatically (approx. 2 min.), water runs into the receptacle and may be slightly discolored, do not drink. q As soon as g lights up, rotate function selector 2 back to Changing the filter q j andkilluminate switch appliance to «Standby». -
Page 18: Removing The Filter
Removing the filter q Switch appliance to «Standby». q Unscrew the filter with the screw in aid in an anti clockwise direction. q Simultaneously hold down the + button 8 and 4button 9 for at least 3 sec. q Select the desired water hardness by pressing the 4button 9 (e.g.
-
Page 19: System Messages
System messages4. Meaning Remedial action Note: Note:…
-
Page 20: Cleaning The Appliance
Meaning Remedial action Door for brewing unit 15 is Close door for brewing unit 15. is lit not closed. Coffee cannot be brewed. Set function selector 2 to is lit Fault. See chapter Eliminating minor faults yourself». flash Note: Coffee cannot be brewed while the e, i symbols are lit on display 3 or f, b flash on display 3.
-
Page 21: Cleaning Program
Note: If the appliance is switched on in a cold state with button d 4 or is set to stand by» after brewing coffee, the appliance is automatically rinsed. The system therefore cleans itself. If the illuminated ring on the + 8 button is lit red Cleaning program and the l is indicated on display 3 when the appliance is switched on, the appliance must be…
-
Page 22: Cleaning The Nozzle
Start cleaning program q Completely fill water tank 21. q Hold down button + 8 for at least 3 se conds. If h flashes occasionally on display 3, see Eliminating minor faults yourself». q Empty and re insert tray 24 and coffee dregs tray Note: The appliance is automatically cleaned, a lights up on display 3.
-
Page 23: Descaling The Appliance
q Set function selector to q Wipe the outside of the nozzle after it has cooled down. q Dismantle the nozzle to clean thoroughly. Proceed as follows: q Unscrew the nozzle with a coin. q In particular, clean the tip of the nozzle with a brush and pointed implement.
-
Page 24
WARNING Risk of injury! CAUTION Start descaling program 4 9 for at least 3 seconds… -
Page 25
q Place an appropriately large receptacle under nozzle 13. q Set function selector 2 to 0. Note: The appliance is automatically descaled, 3 lights up aon display. Descaling solution flows at intervals into the receptacle. Wait for the next symbolg on display 3 (approx. 10 minutes). q Set function selector 2 to Note:The appliance is automatically descaled, a lights up on display 3. -
Page 26: Eliminating Minor Malfunctions Yourself
Eliminating minor malfunctions yourself Fault Cause Remedial action down…
-
Page 27
Fault Cause Remedial action Note: ijkl ijkl If faults cannot be eliminated, always call the Hotline! -
Page 28: Bosch Small Appliance Warranty
BOSCH Small Appliance Warranty…
-
Page 29
Généralités ……. . . Mise en service ……Remplissage du système . -
Page 30: Conservez Ces Instructions
MISES EN GARDE IMPORTANTES AVERTISSEMENT: tous les appareils électriques s’assortissent d’un risque d’incendie et de choc électrique ; ils peuvent être source d’accidents parfois graves voire mortels. Lorsque vous utilisez des appareils électriques, veuillez toujours respecter les précau tions de sécurité fondamentales, y compris les suivantes: 1.
-
Page 31
d PRUDENCE… -
Page 32
Vue d’ensemble Eléments de commande 1 Interrupteur principal 2 Sélecteur de fonctions (café, vapeur, eau chaude) 3 Ecran (affichage des symboles) 4 Touche d 5 Touche de prélèvement 2 6 Bouton rotatif servant à régler la quantité 7 Bouton rotatif servant à… -
Page 33
Pièces de l’appareil 14 Couvercle droit de l’appareil 15 Porte d’accès à l’unité de passage 16 Compartiment pour café en poudre, avec couvercle = compartiment pour comprimé de nettoyage 17 Bouton rotatif servant à régler le degré de mouture du café 18 Réservoir de café… -
Page 34: Généralités
Avant la première utilisation Généralités Mise en service prêt à fonctionner d 4 d 4 2 5 Remarque : Remplissage du système…
-
Page 35
Eléments de commande Interrupteur principal 1 L’interrupteur principal 1 situé au dos de l’appareil per met d’allumer et d’éteindre ce dernier. Après enclenchement de l’interrupteur principal 1, l’anneau lumineux de la touche d 4 s’allume en vert. L’appareil se trouve en mode Veille. PRUDENCE Pendant la marche de l’appareil, n’actionnez pas l’interrupteur principal. -
Page 36
Ouverture eau Unité de passage Changer de filtre Détartrer l’appareil. Nettoyer l’appareil A la fabrication, l’appareil a été programmé sur des réglages standard lui permettant de fonctionner optimalement. Touche d 4 La touche d 4 sert à enclencher l’appareil, à le mettre en veille. -
Page 37
Bouton servant à régler la quantité versée Le bouton rotatif 8 6 sert à régler la quantité de liquide. 2 Petits Petit expressos expresso Expresso 2 Expresso 2 Petits Petit cafés Café 2 Café Café 2 Grands Grand cafés café 2 Cafés Café… -
Page 38: Généralités
Préparation du café Généralités N’UTILISEZ PAS Un conseil : Utilisation de grains pour expresso / pour café Un conseil:…
-
Page 39: Réglage Du Moulin
q Le bouton rotatif de réglage de la finesse de mou Réglage du moulin3. ture 17 permet de régler la finesse de la poudre de café. PRUDENCE Ne modifiez le réglage de la finesse de mouture que pendant que le moulin tourne ! Vous risqueriez sinon d’endommager l’appareil.
-
Page 40: Vapeur Servant À Chauffer Des Boissons
Remarque : le bas Vapeur servant à chauffer des boissons lentement AVERTISSEMENT Risque de vous ébouillanter ! Remarque : Un conseil :…
-
Page 41: Vapeur Pour Faire Mousser Le Lait
q Déplacez la douille a de la buse 13 vers le haut. Vapeur pour faire q Plongez la buse 13 dans le liquide à échauffer. mousser le lait q Amenez lentement le sélecteur de fonctions 2 sur la position =. i L’appareil chauffe maintenant pendant env.
-
Page 42: Réglage De La Dureté De L’eau
Le bon réglage de la dureté de l’eau joue un rôle Réglage de la dureté important pour le programme de détartrage. de l’eau / En présence d’adoucisseurs d’eau externes, installés Mise en place du dans le réseau d’eau domestique, ou si vous utilisez filtre4.
-
Page 43
PRUDENCE Remarque : Mise en place du filtre Remarque :… -
Page 44
Changement du filtre q jetks’allument — Amenez l’appareil sur la «Veille» (Stand by). q Sous la buse 13, placez un récipient ayant une contenance de 17 oz. (0.5 litre) minimum. q Avec l’accessoire de vissage, dévissez le filtre en tournant en sens inverse des aiguilles d’une mon tre. -
Page 45
Enlèvement du filtre Important… -
Page 46
Messages du système L’appareil affiche des messages sur l’écran 3. Signification Remède Manque d’eau. Versez de l’eau fraîche et propre dans le réservoir d’eau 21. allumé Remarque : il reste toujours une petite quantité d’eau dans le réservoir d’eau 21. Le réservoir d’eau 21 manque Mettez le réservoir d’eau 21 ou n’a pas été… -
Page 47
Signification Remède Remarque: vous ne pouvez pas… -
Page 48: Nettoyage Quotidien
Nettoyage AVERTISSEMENT Nettoyage quotidien Risque d’électrocution ! Avant de nettoyer l’appareil, débranchez la fiche mâle de la prise de courant. PRUDENCE N’utilisez jamais de produits récurants. Ne plongez jamais l’appareil dans l’eau. N’utilisez jamais de nettoyeur à vapeur! q Essuyez les surfaces de l’appareil avec un essuie tout humide.
-
Page 49
AVERTISSEMENT Risque de blessures! PRUDENCE… -
Page 50
Lancement du programme de nettoyage q Remplissez complètement le réservoir d’eau 21. q Maintenez la touche de nettoyage + 8 ap puyée pendant 3 secondes minimum. Si maintenant, dans des cas rares, le symbole h clignote sur l’écran 3, reportez vous à la section intitulée «Remédier soi même aux petites pannes»… -
Page 51: Nettoyage De La Buse
PRUDENCE Nettoyage de la buse Nettoyez la buse après chaque utilisation. q Placez un récipient approprié sous la buse 13. q Amenez brièvement le sélecteur de fonctions 2 sur la position 0. AVERTISSEMENT Risque de vous ébouillanter ! Après avoir réglé le sélecteur sur 0, des projections peuvent sortir.
-
Page 52
Détartrage5. Si, appareil sous tension, l’anneau lumineux de la touche de détartrage 49 s’allume en rouge et si le symbole k s’affiche sur l’écran 3, vous devrez détartrer l’appareil sans délai. Si vous ne dé tartrez pas l’appareil conformément aux instructions, vous risquez de l’endommager. -
Page 53
Lancer le programme de détartrage pendant 3 secondes minimum Remarque : Remarque :… -
Page 54
q Videz le bac 24 et le bac à marc de café 23 puis remettez les en place. q Rincez le réservoir d’eau 21, remplissez le d’eau fraîche jusqu’au repère max puis remettez le en place. q Videz le récipient de récupération puis remettez le sous la buse 13. -
Page 55
Remédier soi même les petites pannes Dérangement Cause Remède mais n’ajoutez pas… -
Page 56
Dérangement Cause Remède Le programme Système trop chaud. Réglez le sélecteur de détartrage ou celui de fonctions 2 sur de nettoyage ne démarre 0 puis prélevez env. pas. une tasse d’eau chaude. Le symbole h clignote 5 fois sur l’écran 3. Le programme Filtre actif. -
Page 57
Garantie Bosch Small Appliance… -
Page 58
Llenar el sistema ……Observaciones generales ….. Utilizar café… -
Page 59: Instrucciones Importantes
INSTRUCCIONES IMPORTANTES DE SEGURIDAD ADVERTENCIA: Existe peligro de incendios o descargas eléctricas en todos los elec trodomésticos pudiendo causar lesiones personales o la muerte. Cuando se utilizan electrodomésticos, deben respetarse precauciones básicas de se guridad, incluyendo las siguientes: 1. Lea todas las instrucciones. 2.
-
Page 60
d CUIDADO Este electrodoméstico fue diseñado para el uso doméstico y para procesar cantidades normales de alimentos y no para el uso industrial. Todo servicio que difiera de la limpie za y el mantenimiento propio del usuario debe realizarlo personal de servicio autoriza q No sumerjir la base en agua ni tratar de desarmarla. -
Page 61: Vista General
Vista general Elementos de mando 1 Interruptor de red 2 Mando selector de funciones (café, vapor, agua caliente) 3 Pantalla de visualización (con símbolos) 4 Tecla d 5 Tecla de extracción 2 6 Mando giratorio para ajustar la cantidad de agua 7 Mando giratorio para dosificar la cantidad de…
-
Page 62
Elementos del aparato 14 Tapa derecha 15 Recipiente para guardar los granos de café con tapa 16 Recipiente (pozo) para el café en polvo = Recipiente para las pastillas de detergente 17 Mando regulador del grado de molido 18 Grupo de escaldado 19 Bandeja portatazas con función de precalentamiento… -
Page 63: Antes De Usar Por Primera Vez La Cafetera
Antes de usar por primera vez la cafetera Cargar sólo agua limpia y preferentemente mezclas Observaciones de café en grano para café expreso o aptas para su generales elaboración en cafeteras en los correspondientes depósitos o recipientes. No utilizar granos de café glaseados, caramelizados o tratados con cualquier otro tipo de aditivo con contenido de azúcar, dado que pueden obstruir el molinillo.
-
Page 64: Llenar El Sistema
Llenar el sistema Elementos de mando Interruptor de red 1 CUIDADO Mando selector de funciones 2 ADVERTENCIA ¡Peligro de quemadura!
-
Page 65
Pantalla de visualización 3 Tecla d 4 bloqueada… -
Page 66
Tecla de extracción 2 5 Pulsando la tecla de extracción 2 5 se puede tomar café expreso (café fuerte) o café normal. El anillo luminoso verde destella durante dicha operación. Mediante una nueva pulsación de la tecla de extrac ción 2 5 se pone fin a la extracción de café. Mando giratorio para ajustar la cantidad de agua 6 Con el mando giratorio 6… -
Page 67: Observaciones Generales
Preparación del café Esta cafetera muele el café necesario individualmente Observaciones para cada ciclo de escaldado, elaborando así siempre generales un café de óptima calidad. Se aconseja utilizar preferentemente mezclas de café en grano para café expreso o aptas para su elaboración en cafeteras. Guardar el café…
-
Page 68: Ajustar El Molinillo
Ajustar el molinillo CUIDADO Utilizar café expreso en polvo/café normal en polvo una o dos CUIDADO…
-
Page 69: Vapor Para Preparar Espuma De Leche
Advertencia: 13 hacia Vapor para preparar abajo. espuma de leche lentamente ADVERTENCIA ¡Peligro de quemadura! Advertencia: Consejo práctico:…
-
Page 70: Vapor Para Calentar Líquidos
q Desplazar el manguito a de la boquilla 13 hacia Vapor para calentar arriba. líquidos q Sumergir la boquilla 13 profundamente en el recipiente con el líquido que se desea calentar. q Colocar el mando selector de funciones 2 lentamente en la posición =. i El aparato ejecuta un ciclo de calentamiento de aprox.
-
Page 71: Preparar Agua Caliente
q Colocar una taza de tamaño adecuado debajo de Preparar agua caliente la boquilla 13. q Desplazar el manguito a de la boquilla 13 hacia abajo. q Colocar el mando selector de funciones 2 en la posición 0 y llenar la taza ADVERTENCIA ¡Peligro de quemadura! Tras colocar el mando en la…
-
Page 72
q El aparato tiene que estar en la modalidad «Standby». q Pulsar simultáneamente las teclas + 8 y 4 9, como mínimo durante 3 segundos, hasta que aparezca en la pantalla de visualización 3 el símbolo k. El número de los anillos luminosos que se ilumina en torno a las teclas 4, 5, 8 y 9 indica el grado de dureza del agua ajustado (véase la imagen). -
Page 73
Montar el filtro q El aparato tiene que estar en la modalidad «Standby» (Preparada). q Colocar un recipiente con una capacidad mínima de 17 oz. (0,5 litros) debajo de la boquilla 13. q Montar el filtro tal como se muestra en las ilustra ciones. -
Page 74
Cambiar el filtro q j k Extraer el filtro… -
Page 75
¡Atención! q La capacidad del filtro está agotada tras realizar 13.2 gallones (50 litros) (en la pantalla de visualización aparece la indicación j) o haber transcurrido aprox. dos meses. El filtro debe ser sustituido. q ¡No montar el filtro en caso de activarse en pantalla la leyenda k. -
Page 76: Indicaciones Del Sistema
Indicaciones del sistema El aparato muestra indicaciones en la pantalla de visualización 3. Significado Manera de subsanar Falta agua. Llenar agua limpia, fría en el depósito de agua 21. se ilumina Advertencia: En el deposito de agua 21 siempre queda una mínima cantidad de agua residual.
-
Page 77
Significado Manera de subsanar Advertencia:… -
Page 78: Programa De Limpieza
Limpiar el aparato4. Limpieza diaria ADVERTENCIA ¡Peligro de descargas eléctricas! Antes de iniciar la limpieza del aparato, extraer el cable de conexión de la red eléctrica. CUIDADO ¡No utilizar agentes agresivos ni abrasivos! ¡No sumergir nunca el aparato en agua! ¡No utilizar limpiadoras de vapor! q Limpiar el cuerpo exterior del aparato con un paño húmedo.
-
Page 79
Introducir las pastillas de detergente sólo tras pedirlo el sistema. ADVERTENCIA ¡Peligro de lesiones! CUIDADO… -
Page 80
Arrancar el programa de limpieza q Llenar completamente el depósito de agua 21. q Pulsar la tecla de limpieza + 8 como mínimo durante 3 segundos. En caso de que destellara el símbolo h en la pantalla de visualización 3, deberá… -
Page 81
CUIDADO Limpiar la boquilla La boquilla de vaporización 13 deberá limpiarse inmediatamente después de concluir su uso. q Colocar un recipiente de tamaño adecuado debajo de la boquilla 13. q Colocar el mando selector de funciones 2 brevemente en la posición 0. ADVERTENCIA ¡Peligro de quemadura! Tras colocar el mando en la… -
Page 82
Descalcificación de la máquina5. Si estando conectado el aparato se ilumina el anillo luminoso rojo de la tecla de descalcificación 4 9 y aparece en la pantalla de visualización 3 el símbolok, deberá procederse inmediatamente a la descalcificación del aparato. En caso de no efectuar la descalcificación de la máquina de conformidad a las instrucciones de uso, ésta puede resultar dañada. -
Page 83
CUIDADO Arrancar el programa de descalcificación 4 9 como mínimo durante 3 segundos… -
Page 84
Advertencia: Advertencia: «max» Advertencia:… -
Page 85
q Colocar el mando selector de funciones 2 en la posición stellen. Advertencia: El aparato ejecuta automáticamente un ciclo de enjuague. En la pantalla de visualización 3 se ilumina el símbolo a. El agua fluye a intervalos en la bandeja 24. Aguarde a que aparezca el siguiente símbolo f en la pantalla de visualización 3 (aprox. -
Page 86
Pequeñas averías de fácil solución Avería Posible causa Forma de subsanarla No es posible tomar agua La boquilla 13 está Limpiar a fondo caliente o vapor. obstruida. la boquilla 13. La espuma generada es El manguito a de la Desplazar el manguito a insuficiente o sale líquida. -
Page 87
Advertencia: ijkl ijkl En caso de no poder subsanar las averías con ayuda de estos consejos, deberá ponerse en contacto con la Línea de atención al cliente. -
Page 88
Garantía…
инструкцияBosch Benvenuto B20 TCA6001

pt Instruções de serviço
el
da Brugsanvisning
no Bruksanvisning
sv Bruksanvisning
fi Käyttöohje
hu
bg
ar
Internet: http://www.bosch-hausgeraete.de
Посмотреть инструкция для Bosch Benvenuto B20 TCA6001 бесплатно. Руководство относится к категории кофеварки, 56 человек(а) дали ему среднюю оценку 8.4. Руководство доступно на следующих языках: -. У вас есть вопрос о Bosch Benvenuto B20 TCA6001 или вам нужна помощь? Задайте свой вопрос здесь
Главная
Не можете найти ответ на свой вопрос в руководстве? Вы можете найти ответ на свой вопрос ниже, в разделе часто задаваемых вопросов о Bosch Benvenuto B20 TCA6001.
Как часто следует очищать кофеварку от накипи?
Какой лучший способ очистки кофеварки от накипи?
Как долго можно хранить кофе в зернах?
Как лучше всего хранить кофе?
Как помол сказывается на вкусе кофе?
Инструкция Bosch Benvenuto B20 TCA6001 доступно в русский?
Не нашли свой вопрос? Задайте свой вопрос здесь
Note: If the appliance is switched on in a cold state
with button d 4 or is set to stand by» after brewing
coffee, the appliance is automatically rinsed. The
system therefore cleans itself.
If the illuminated ring on the + 8 button is lit red
and the l is indicated on display 3 when the
appliance is switched on, the appliance must be
cleaned as quickly as possible.
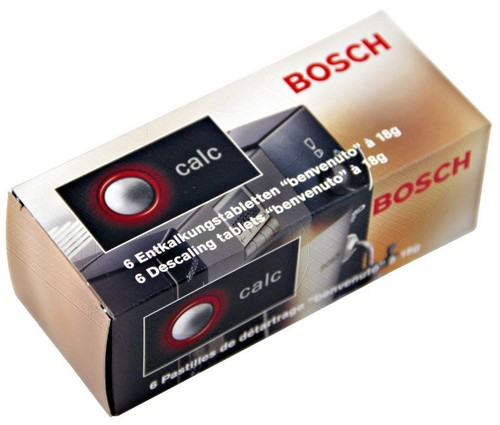
Clean the appliance with the enclosed cleaning tablet.
Do not drop in the cleaning tablet until you
are prompted to do so.
d
Risk of injury!
Do not place the tablet in mouth. Keep
under lock and key and out of the
reach of children. Avoid contact with
skin and eyes. Do not drink liquid.
If tablet comes into contact with eyes,
immediately wash eyes with plenty of
water and consult a doctor.
If a tablet is swallowed, seek medical
advice immediately and produce
packaging or label.
These tablets have been specially developed for this
appliance and are available from customer service
(order no. 31 0655).
d
Never interrupt the cleaning program!
Never use descaling tablets or other
descaling agents.
i While the cleaning program is running
approx. 15 minutes processes and
instructions are indicated on display 3.
i The illuminated ring on the button + 8 flashes
while the cleaning program is running.
WARNING
CAUTION
d
d
21
Все инструкции для кофемашин Bosch закачаны на Google Диск. Скачать можно абсолютно бесплатно, без каких либо регистраций и SMS. Инструкции по эксплуатации с пометкой (ALL) — являются мультиязычными, (ENG) — на английском языке, (RUS) — на русском языке. Для удобства вы можете просматривать руководство по эксплуатации кофемашины, прямо в окне браузера. А также нажав в новом открывшемся окне сверху на соответствующий значок «скачать».
Прежде чем скачать инструкцию посмотрите этот ролик, который научит вас как выполнять все необходимые чистки кофемашин Bosch практически любой модели TES.
Bosch CTL 636E (Встраиваемая, новая модель) (RUS)
Bosch TCA 5201 / 52.. (Benvenuto Classic) (RUS)
Bosch TCA 5309 / 53.. (Benvenuto Classic) (ALL)
Bosch TCA 5401 / 54.. (Benvenuto Classic) (RUS)
Bosch TCA 5601 / 56.. (Benvenuto Venezia Collection) (ALL)
Bosch TCA 5802 / 58.. (Benvenuto Classic) (ALL)
Bosch TCA 6001 (Benvenuto B20) (RUS)
Bosch TCA 6301 / 63.. (Benvenuto B30) (RUS)
Bosch TCA 6401 / 64.. (Benvenuto B40) (ALL)
Bosch TCA 6701 / 67.. (Benvenuto B60 / B65) (ALL)
Bosch TCA 6801 / 68.. (Benvenuto B70 / B75) (ALL)
Bosch TCC 78K750 / Bosch TCC 78K751 (Встраиваемая)
Bosch TES 50129RW / 501.. (VeroCafe) (ALL)
Bosch TES 50221RW / 502.. (VeroCafe) (ALL)
Bosch TES 50321RW / 503.. (VeroCafe) (ALL)
Bosch TES 55236RW / 552.. (VeroCappuccino 200) (ALL)
Bosch TES 556M1RU / 556.. / 559.. (VeroCappuccino 600 / 900) (ALL)
Bosch TES 71221RW / 712.. / 715.. (VeroBar AromaPro 100 / 300) (ALL)
Bosch TES 80329RW / 803.. / 805.. / 807.. (VeroSelection 300 / 500) (ALL)
Bosch TIS 30129RW / 30321RW (VeroCup 100 / 300) (ALL)
Мы ремонтируем кофемашины всех брендов
Практически все пользователи кофемашин начинают искать инструкцию, когда что-то пошло не так. Появились посторонние звуки, перестала молоть кофемолка или чего хуже вообще не включается. В некоторых случаях стоит сразу позвонить сервисным инженерам, коими мы являемся. Профессиональный ремонт кофемашин Bosch в Москве это вид деятельности, которым мы занимаемся не один год. Обратившись в нашу компанию, вы получите не только бесплатную консультацию, но и квалифицированный ремонт.
Находясь в условиях регулярной эксплуатации, кофемашина нуждается в заботе. Даже технически продуманная и дорогостоящая модель из линейки производителя Bosch требует планомерного ухода. Обеспечить его не трудно за счет профессиональных средств, направленных на решение таких проблем, как отложение накипи и кофейный масел.
Bosch
Особенности кофемашин Bosch
Большинство аппаратов производителя оснащены автоматической системой оповещения. На дисплее прибора появляется уведомление о том, что технике нужна очистка. Кофемашина издает звуковой сигнал и загорается индикатор. Появление сигнала не свидетельствует о том, что устройство окончательно загрязнилось. Автоматическое оповещение срабатывает после приготовления определенного количества порций (около 250).
Инструкция пользователя рекомендует применять для очистки жидкости или таблетки для удаления накипи и маслянистого налета. В частности, это касается моделей Bosch TCZ-8001, Bosch 311769 и Benvenuto classic. Для них категорически запрещено применение народных средств ухода, таких, как уксус или лимонная кислота. Вследствие подобного «самолечения» со временем выйдут из строя уплотнители и запчасти блока заварки кофе.
Кофемашина Bosch
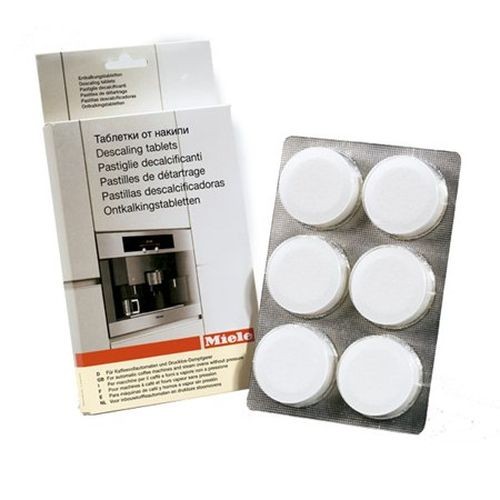
Таблетки для очистки кофемашины Bosch
В арсенале производителя есть таблетки TCZ8002 с двойным действием. Это средство для ухода, которое растворяет накипь и препятствует коррозии внутренних частей аппарата. Очистка проходит бережно и быстро. В упаковке поставляется 3 таблетки (по 40 г). Идеально подходит для прибора Bosch TCZ-8001, встраиваемых кофемашин, кофеавтоматов Benvenuto classic, Тассимо и Vero.
Таблетки TCZ8001 выполняют функцию защиты от кофейного налета, растворяют эфирные масла и бережно очищают стенки кофемашины. Подобная очистка особо актуальна для кофейных машин эспрессо. Концентрированный напиток чаще оставляет жировые отложения на рабочих частях прибора. Средство подходит для любой кофемашины марки Bosch. В упаковке поставляется 10 универсальных таблеток, за одно применение используется 1 таблетка.
Таблетки для кофемашины
Очистка от накипи
Кофемашина нуждается в регулярной очистке от накипи. Инструкция пользователя допускает применение специальной таблетки BOSCH TCZ8002, чтобы бережно очистить заварочный отсек и нагревательные элементы кофеаппарата. Средство оптимизирует процесс автоматической очистки и максимально быстро снимает минеральные отложения. В магазине также можно найти универсальные порошки для удаления накипи.
Средства для чистки кофемашины Bosch имеют химический состав. Поэтому использовать средство нужно исключительно по инструкции, придерживаясь всех мер предосторожности. Планомерная защита от накипи защитит вашу кофемашину об поломок, дорогостоящего ремонта и быстрого износа.
Ручная очистка
Инструкция по очистке кофемашины Bosch
У большинства устройств легендарной марки есть автоматизированная система очистки. Пользователю нужно лишь прислушиваться к сигналам своего помощника и вовремя запускать очистку. Запаситесь таблетками от накипи и жирового налета. В процессе очистке следует контролировать длительность процедуры, соблюдать пропорции средств и следовать инструкциям.

Кофе с круассаном
Учитывайте технические особенности прибора и обеспечивайте максимальную циркуляцию воды в системе во время очистки. Придется слить не 3 и не 4 чашки жидкости, прежде чем вы добьётесь ожидаемого эффекта. Перед очисткой вынимайте из аппарата фильтр. Если вы применяете таблетки, то средство нужно закладывать в емкость для заваривания кофе (заварочный блок).
В резервуар для воды заливается теплая жидкость. Она способствует поэтапному растворению таблетки. нажимайте на кнопку приготовления напитка и очищайте аппарат до получения отфильтрованной прозрачной воды из сопла кофемашины.