-
Contents
-
Table of Contents
-
Bookmarks
Quick Links
Cookie Press and
Cake & Food Decorator
840113300
Cleaning . . . . . . . . . . . . . . . . . . . 7
Recipes . . . . . . . . . . . . . . . . . . . . 9
In USA: 1-800-851-8900
In Canada: 1-800-267-2826
Related Manuals for Hamilton Beach Cookie Press and Cake & Food Decorator
Summary of Contents for Hamilton Beach Cookie Press and Cake & Food Decorator
-
Page 1
Cookie Press and Cake & Food Decorator 840113300 Important Safeguards ..2 Know Your Cookie Press ..2 Operating Instructions ..4 Cleaning . -
Page 2: Important Safeguards
IMPORTANT SAFEGUARDS When using this appliance, basic safety precautions should always be followed, including the following: 1. Read all instructions. 2. To prevent damage to the motor, do not immerse motor in water or other liquids. 3. Do not allow dough or batter to run into the hollow shaft, as damage to the motor may occur.
-
Page 3
Discs and Tips Regular Discs Use discs with stiff dough to prepare cookies, candies, crackers, etc. Ribbon Heart Snowman Tree Star Decorator Tip Use decorator tip with soft dough to prepare appetizers, candies, and desserts; to fill pasta; and to garnish casseroles and desserts. -
Page 4: Operating Instructions
Operating Instructions To Assemble and Fill BEFORE FIRST USE: Wash all parts (except motor) in hot, sudsy water, rinse, and dry thoroughly. Wipe motor with damp cloth and dry thoroughly. 1. Twist the battery cover counterclock- wise and lift it to remove.
-
Page 5
7. With barrel pointing up, squeeze trigger until mixture reaches disc or tip. Release trigger. Turn cookie press over and it is ready to use. To Use Discs All Discs except Ribbon Disc 1. When making cookies, mints, etc., line up several ungreased, uncoated (without non-stick surface) baking… -
Page 6
Ribbon Disc 1. To make cookies, crackers, etc., line up several ungreased, uncoated bak- ing sheets on work surface. 2. Hold cookie press at a 45 degree angle to baking sheet. 3. Squeeze trigger continuously. • When dough starts to come through the disc, move the unit to form a 3-inch strip. -
Page 7: Cleaning
Operating Tips and Tricks 1. Ingredients (onion, green pepper, meat, tuna, seafood, cheese, nuts, hard cooked eggs, cereal, oatmeal, chocolate chips, raisins, etc.) must be very finely chopped, minced, or grated before being added to dough or mixtures. 2. Packaged ingredients (chopped nuts, shredded cheese, grated coconut, etc.) must be very finely chopped or grated again before…
-
Page 8
Questions & Answers 1. How long will the batteries last? A set of 4 alkaline batteries will last through 35 to 40 regular barrels of stiff dough. 2. How many cookies will one barrel make? Approximately 4 dozen cookies can be made, depending on the disc and how fast you move the cookie press. -
Page 9: Recipes
Recipes Appetizers Helpful Hints • Vary garnishes using: sprigs of parsley, fresh dill weed, and watercress; pimento or olive slivers; chopped chives or nuts. • Use vegetables, crackers, fried potato skins, etc. as bases for canapes. Crabmeat Canapes 1 can (6 oz.) crabmeat, drained 1 8 oz.
-
Page 10
Cheddar Crackers ⁄ cup butter or margarine, softened ⁄ cup vegetable shortening 1 pound sharp cheddar cheese, finely grated Place butter and shortening in large mixing bowl. Cream together on medium high speed. Add cheese and mix well using medium speed. Combine flour, salt, mustard, and cayenne in separate bowl. -
Page 11
Chicken Manicotti 8 manicotti tubes, cooked ⁄ cup butter or margarine ⁄ pound mushrooms, sliced 2 cups cooked chicken, finely chopped ⁄ cup parsley, finely minced ⁄ cup fresh white bread crumbs ⁄ cup onion, finely chopped Place butter in large fry pan; melt over medium heat. Add mushrooms, saute 5 minutes. -
Page 12
Cookies Helpful Hints • Decorate cookies before baking by brushing them with slightly beaten egg white and adding one of the following: 1. Sprinkle with white or colored granulated sugar. 2. Place a nut or chocolate chip on center of cookie. 3. -
Page 13
Gingerbread Cookies ⁄ cup brown sugar ⁄ cup shortening ⁄ cup light molasses 1 egg 2 cups all-purpose flour ⁄ teaspoons cinnamon 1 teaspoon baking powder Place brown sugar and shortening in large mixing bowl. Beat on medium speed until thoroughly creamed. Add molasses and egg to sugar/shortening mixture, beat until well blended. -
Page 14
Sugar & Spice ⁄ cup butter or margarine, softened ⁄ cup shortening ⁄ cup sugar ⁄ cup brown sugar 3 eggs 1 teaspoon vanilla 3 tablespoons milk Place butter, shortening, and sugars in large mixing bowl. Cream together until fluffy. Add eggs, vanilla, and milk. Beat until mixed. Combine baking powder, flour, cinnamon, nutmeg, allspice, cloves, and salt. -
Page 15
Cream Puffs 1 cup water ⁄ cup butter or margarine ⁄ teaspoon salt Place water, butter, and salt in medium saucepan; bring to boil; remove from heat. Stir in flour all at once. Beat well until mixture leaves the sides of the pan. Cool 1 minute. -
Page 16
Candy Helpful Hints • Flavors may be varied by substituting any liqueur, cordial or extract. • Vary mint colors by using different foods colors. For example: Pink: 2-3 drops red. Pale Yellow: 4-5 drops yellow. Chocolate Kisses 1 package (12 oz.) semisweet chocolate pieces ⁄… -
Page 17
Frostings Orange Frosting ⁄ cup butter or margarine, softened 4 cups sifted powdered sugar 2 tablespoons sour cream ⁄ teaspoon salt Place butter in large mixing bowl. Cream thoroughly on medium high speed. Add sugar, sour cream, orange peel, orange juice and salt. Beat until smooth and creamy. -
Page 18: Customer Service
This product is warranted to be free from defects in material and workmanship for a period of two (2) years for Hamilton Beach Portfolio products or one (1) year for Hamilton Beach products from the date of original purchase, except as noted below. During this period, we will repair or replace this product, at our option, at no cost.

Впервые перевод инструкции на русский + ФОТО
Заказала с сайта Buyincoins.com. Пришел в мятой оригинальной упаковке, с инструкцией на 9 языках кроме русского. Купить можно тут.
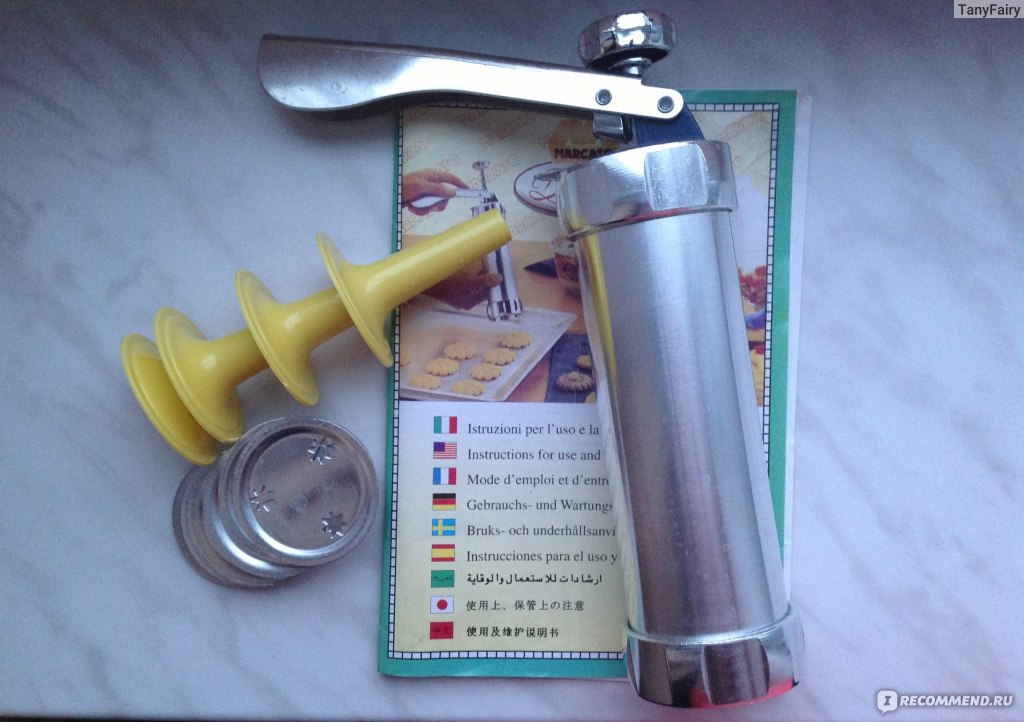
Внешний вид:
Товар состоит из машинки для создания печенья, 20 разных форм для печенья и 4 насадок для крема.
Размер машинки 21х 5,5 см, диаметр форм и насадок 5 см. Материал: алюминий.
А теперь самое главное, т.к. нигде в интернете нет инструкции на русском, я взяла эту ответственность на себя. Очень надеюсь, что старалась не зря:) Скажу сразу что еще машинку в деле не опробовала.
Перевод инструкции:
Итак, на первой странице нарисована машина и цифрами отмечены ее детали.
Части списка.
1.ручка
2.шток поршня
3.рычаг
4.подъемник
5.регулятор
6.поршень
7.насадка
8.цилиндр
9.закрывающееся кольцо
Когда используете машинку в первое время, мойте все детали в горячей воде с моющим средством и высушите полотенцем. Чтобы поднять шток поршня поверните ручку на 180 градусов и потяните вверх(рис.1)
Основной рецепт теста:
500г. муки
250г. сахара
250г. масла
1 стакан молока
2 ч.л. какао(необязательно)
3 желтка
щепотку соли
Высыпьте муку в емкость вместе с сахаром и солью. Добавьте желтки в центр(рис.2) и смешайте тесто вилкой. Добавьте масло предварительно растопленное на водяной бане(рис.3) и замесите тесто руками до тех пор пока оно не станет однородным и мягким (рис.4)
Как сделать печенье.
Отвинтите закрывающее кольцо(рис.5) и поднимите поршень. Заполните весь цилиндр частью готового теста(рис.6). Вставьте нужную насадку в закрывающее кольцо(рис.7). Возвышенная часть насадки должна быть обращена вниз. Ввинтите закрывающее кольцо в цилиндр(рис. . Смажьте противень равномерно(рис. 9 ) Выберите размер печенья путем вращения регулятора(рис.10). Поз.1 — маленькие Поз.2 — большие. Поверните ручку так, чтобы подъемник на рычаге встретился с насечками на стержне. Качайте рычаг до тех пор пока тесто не выйдет из отверстий насадки равномерно. Удалите это первое тесто так, чтобы насадка осталась чистой. Теперь поместите машинку на противень и толкайте рычаг вниз(рис.11) Поднимите рычаг и подвиньте машинку, чтобы сделать другие печенья (рис.12). Предварительно нагрейте духовку приблизительно до 180 градусов. Разместите противень с печеньем в духовке и выпекайте около 20 минут(рис.13) Вытащите противень и дайте ему остыть.
Уход за машинкой
Никогда не мойте машинку в посудомойке.
Читать все отзывы 1
Смотрите также
-

Силиконовая форма для вафель с AliExpress: дешево и сердито или нерентабельно и грустно?! Есть ли смысл заказывать форму из Китая? Подробности внутри отзыва! + 3 РЕЦЕПТА ВАФЕЛЬ: ВЕНСКИЕ, СЫРНЫЕ И БАНАНОВЫЕ!
Всем привет! Если вам нравится простая и вкусная домашняя выпечка, а также интересные приспособления, облегчающие ее приготовление, тогда добро пожаловать в отзыв!
-
отличная мельничка за 8 баксов
Здравствуйте, дорогие читатели, всем хорошего настроения и удачного дня! Заказывала на ибей себе такую мельницу для соли и перца, давно хотела такую, в магазинах у нас намного дороже, да и они все какие-то маленькие. Цена около 8 баксов, ссылку нашла вам, смотрите здесь , доставка бесплатная.
-
Лучшая для кухни и для походов
Привет! Дам сейчас Вам «дельный» совет, чтобы все ваши ножи в доме и не только были всегда наточены и чтобы пальцы при этом остались целыми — всего лишь нужно купить украсть отобрать вот эту маленькую и очень яркую точилкуКитай как всегда выручает, «копеечная» по стоимости (чуть больше 200 рублей…
-
Неплохой пресс для симпатичных печенюшек.
Летом купила на Алиэкспрессе для изготовления печенюшек вот такой пресс. Дочка очень любит различную выпечку и ее радует разнообразие форм. Поэтому купила этот прибор, чтобы ребенок с удовольствием выбирал понравившуюся печеньку и с удовольствием кушала. Пресс пришел в картонной коробке.
-
ПРИЧЕСКА на 5+(подробное использование)
В продаже имеются такие легкие калачики, сделанные из материала по качеству напоминающего паралон-губку.Цветовая гамма разнообразна:кремовые,коричньевые и черные.Это необходимо чтобы при равномерном распределении волос по колачику через просветы не бросался в глаза колачик.
-
чудо- находка для игры с кинетическим песком!
Приехал к нам с дочкой недавно долгожданный набор формочек для печенья, но мы его используем по другому назначению для кинетического песка. Ребёнок очень любит играть с кинетическим песком вот и решила приобрести их, но конечно при желании можно помыть и делать с ребёнком печенье, а потом вместе…
-
Аппетитные печеньки, дети оценят по достоинству + фото, рецепт
Здравствуйте, ВСЕ. Вдохновившись отзывом Svetlinka (надеюсь автор не будет возражать), я решила заказать формочки для печенья на Алиэкспресс — стараюсь печь для ребенка сама, все таки печенье более натуральное получается, чем покупные кондитерские изделия (тешу себя надеждой).
-
Создаем уникальные handmade печеньки с надписями!
Всем привет! Печеньки! Как много в этом звуке для сердца моего слилось… Сегодня хочу поделиться классной находкой для тех, кто любит домашнее печенье — наборным штампом.
-
Чем заменить пергамент для выпечки? МНОГОРАЗОВЫМ пергаментом! Все фишки, так называемой, тефлоновой бумаги, ФОТО
Добрый день! Пергаментами для запекания я пользуюсь давно, покупаю их в хозяйственных магазинах. Продаются они рулонами в картонных коробочках. Минус их в том, что они одноразовые. Как-то раз на Алиэкспресс увидела их многоразового собрата и сразу решила приобрести.


Популярные отзывы
-
Очень достойный мусс
Мусс для создания локонов средство полезное, когда нет желания или времени бороться с натурой своих волос, вытягивая и разглаживая их после каждого мыться, делая ровное полотно из вьющегося пушащегося веника.
-
Напитывает и увлажняет тонкие волосы, посмотрим что насчет объема — обновленная версия кондиционера
Всем здравствуйте! Кондиционер TRESemme BEAUTY-FULL VOLUME для создания объема в обновленной версии разработан специально для тонких волос. Он является частью серии, состоящей из шампуня, кондиционера и маски.
-
Ollin professional Мусс CURL для эластичной фиксации для создания локонов
Приветствую заглянувших! Сегодня о Муссе Ollin professional CURL для эластичной фиксации для создания локонов Что обещает производитель: Состав: Мои впечатления: Состав не могу назвать полезным для волос, но и вредного ничего не нашла, присутствует отдушка, но она стоит после консерванта(самого …
-
Комплекс для печени от NATUROTEKA при синдроме Жильбера и проблемах с желчным. Натуральное и эффективное средство
Всем привет! Закончив курс лечения желчного, пропив Урсофальк, Омега 3 и всевозможные спазмолитики, я решила, что этого мало. После того, как выяснилось, что у меня ещё и синдром Жильбера, я теперь особенно трепетно отношусь к своей печени. Захотелось мне её как-то ещё поддержать.
-
Знакомство с маркой не задалось. Больше не куплю и не рекомендую
Привет всем заглянувшим! С маркой TRESemme я ранее не была знакома, помню только, что у них была какая-то красивая реклама, которая намекала, что это якобы профессиональный бренд. Ну в общем тот же закос, как в своё время был к Syoss.
-
Все таки это больно. Прокол ушей ребёнку 10 лет системой-75. Плюсы и минусы
Здравствуйте! Дочка с 9 лет говорила что хочет проколоть уши. Но она жуткая трусишка, поэтому решились только через год и выбрали прокол системой-75 по отзывам наиболее безопасно и безболезненно. Так ли это рассказываю в отзыве. Мне прокалывали уши пистолетом в 12 лет, было это в середине 1990-х.
-
Отличное дополнение к новогоднему подарку! 500 рублей за холст, который останется с вами надолго
Всех с наступившим 2023 годом!) Сегодня хочу рассказать об отличной вещи, которая может стать как и дополнением к основному подарку, так и выступать в роли самого подарка. Речь пойдет о холсте для влюблённых. Цена и место покупки: 496 рублей на маркетплейсе WB Артикул: 93132589 Комплектация.
-
Отличная профессиональная стайлинг-пудра по привлекательной цене!
Возможно, существуют счастливицы, чьи волосы прекрасно выглядят и без салонной укладки, но я не из их числа. Однако недавно я нашла способ сделать свои волосы объемными, и обходится он мне в сущие копейки! Но давайте обо всем по порядку СТОИМОСТЬ И ГДЕ КУПИТЬ Пудры для волос не новое изобретение.
-
Когда вкусно, тогда вкусно! Печенюшка такая нежная и рассыпчатая! Суфлешечка мягкая. А сверху — хрустящая шоколадная глазурь, которая тает во рту, а не в руках. М-м-м… Остановите меня!
Здравствуйте! Наконец-то я познакомилась с протеиновыми вкусняшками от Fit Kit. Сегодня расскажу, что я думаю о печенье Fit Kit Protein Cake «Клубничный крем» Место покупки: маркетплейс ОЗОН Цена 1 печенья: я заказывала на Озон набор из 10 шт за 1127 рублей.
-
Когда в душе мрачно от стресса, но хочется яркости. Способ немного отвлечься с помощью творчества.
Одно время в сети магазинов «Fix Price» стали массово продавать блокноты для создания гравюр Kid’s Fantasy . Я купила их сразу несколько с различными узорами. И как оказалось не зря, блокноты активно раскупали. Изделие состоит из 16 плотных картонных листов, скреплённых пружиной.


Cookie Press and
Cake & Food Decorator
840113300
Important Safeguards . . . . . . . . 2
Know Your Cookie Press . . . . . . 2
Operating Instructions . . . . . . . . 4
Cleaning . . . . . . . . . . . . . . . . . . . 7
Recipes . . . . . . . . . . . . . . . . . . . . 9
Customer Service . . . . . . . . . . . 18
In USA: 1-800-851-8900
In Canada: 1-800-267-2826
2
IMPORTANT SAFEGUARDS
When using this appliance, basic safety precautions should always be followed, including the following:
1.
Read all instructions.
2.
To prevent damage to the motor, do not immerse motor in water or other liquids.
3.
Do not allow dough or batter to run into the hollow shaft, as damage to the motor may occur.
4.
Do not operate the cookie press with damaged batteries, motor, or after the appliance malfunctions or is dropped or damaged in any manner.
5.
Remove batteries when the cookie press is not in use and before cleaning.
6.
Avoid contact with moving parts.
7.
Close supervision is necessary when used by or near children.
8.
The use of attachments not recommended or sold by Hamilton
Beach/Proctor-Silex may damage the cookie press.
9.
For household use only.
10.
Do not use outdoors.
11.
Do not use appliance for other than intended purpose.
SAVE THESE INSTRUCTIONS!
Know Your Cookie Press
Parts and Features
1. Feet
2. Barrel Cap
3. Disc or Tip
4. Pusher Plate
5. Gear
6. Rod
7. Barrel (tube)
8. Hollow Shaft
9. Motor
10. Button/Trigger
11. Battery Cover/Compartment
Discs and Tips
Regular Discs
Use discs with stiff dough to prepare cookies, candies, crackers, etc.
Ribbon
Heart Jewel
Diamond
Snowman
Car Tulip
Shell
Tree
Star Sparkler
Gingerbread
Man
Decorator Tip
Use decorator tip with soft dough to prepare appetizers, candies, and desserts; to fill pasta; and to garnish casseroles and desserts.
Filler Tip
Use filler tip with thin mixtures to fill pastries.
3
4
Operating Instructions
To Assemble and Fill
BEFORE FIRST USE:
Wash all parts (except motor) in hot, sudsy water, rinse, and dry thoroughly. Wipe motor with damp cloth and dry thoroughly.
1.
Twist the battery cover counterclockwise and lift it to remove. Insert four
AA alkaline batteries into the battery compartment (see diagram on unit).
Replace the battery cover by placing it off-center (to the right) and twisting to the left until it clicks.
4.
Insert the rod into the hollow shaft.
Then, line up the ridges on the inside of the barrel with the notches on the pusher plate. Slide the barrel onto the motor. Turn the barrel clockwise and lock it into place.
2.
Turn the gear on the rod so that one or two threads can be seen above the gear.
5.
Fill barrel with desired mixture; press food down lightly to remove air pockets.
NOTE:
Cookie dough must be freshly made. Cookie dough that has been refrigerated overnight is not recommended.
3.
Attach the pusher plate to the rod on the end that’s nearest the gear.
6.
Select desired disc or tip and place on filled barrel. Place barrel cap on barrel and turn clockwise to lock into place.
7.
With barrel pointing up, squeeze trigger until mixture reaches disc or tip.
Release trigger.
Turn cookie press over and it is ready to use.
To Refill Barrel:
1.
Unit will indicate it is empty by making a clicking noise.
2.
Remove barrel cap, disc or tip, and rod/pusher plate.
3.
Follow steps 3–7 on pages 4 and 5.
To Use Discs
All Discs except Ribbon Disc
1.
When making cookies, mints, etc., line up several ungreased, uncoated
(without non-stick surface) baking sheets on work surface.
2.
Stand cookie press upright on baking sheet; hold with one hand.
3.
Squeeze trigger continuously; touch baking sheet with 3 barrel cap feet for each cookie, mint, etc.
5.
Space cookies two inches apart, mints one inch apart on uncoated baking sheet.
NOTE:
Cookie/mint shapes and sizes may vary until you develop your own rhythm. As with any new appliance, practice with the cookie press to achieve the best results.
4.
To make uniform cookies quickly and easily, establish a rhythm by counting. For example, “one thousand one” – touch baking sheet.
“One thousand two” – lift unit and move. “One thousand three” – touch baking sheet, etc.
Alternative method:
Squeeze then release trigger for each cookie, mint, etc.; lift and repeat.
5
6
Ribbon Disc
1.
To make cookies, crackers, etc., line up several ungreased, uncoated baking sheets on work surface.
2.
Hold cookie press at a 45 degree angle to baking sheet.
3.
Squeeze trigger continuously.
• When dough starts to come through the disc, move the unit to form a 3-inch strip.
• Two-thirds of the way down each strip, release trigger but continue to move unit.
• Touch dough with finger or rubber spatula to break flow of dough.
Move unit to start next strip.
4.
When baked. remove cookies, crackers, etc. from baking sheet.
Place on cooling rack.
To Use Decorator Tip
Mounds:
Using a circular motion, make mounds of the desired size and height.
Uses: Appetizers, vegetables, desserts, garnishes, candies, etc.
Rosettes:
Gradually lift unit straight up until mixture is desired shape and height.
Uses: Garnishes, appetizers, candies, etc.
Zigzag lines:
Make a series of small “S” movements to desired width. Uses:
Appetizers, borders, garnishes, etc.
Strips:
Move unit in a straight line until mixture is desired length. Uses:
Desserts, borders, cookies, pasta. Moving the unit faster produces a thin strip; moving it slower produces a wide strip.
To Use Filler Tip
Use the filler tip to fill foods such as donuts, cream puffs, and éclairs.
1.
Arrange foods to be filled on baking sheet.
2.
Assemble and fill cookie press with filling mixture.
3.
Hold unit parallel to work surface.
4.
Holding food in one hand, insert filler tip into one side of food. Squeeze trigger for several seconds, then release. Remove tip from food.
Operating Tips and Tricks
1.
Ingredients (onion, green pepper, meat, tuna, seafood, cheese, nuts, hard cooked eggs, cereal, oatmeal, chocolate chips, raisins, etc.) must be
very finely
chopped, minced, or grated before being added to dough or mixtures.
2.
Packaged ingredients (chopped nuts, shredded cheese, grated coconut, etc.) must be
very finely
chopped or grated again before using.
3.
Measure flower by lightly spooning it into measuring cups, then leveling it off with a straight-edge knife.
4.
Sift brown sugar and powdered sugar before measuring to remove lumps and ensure a smooth dough.
5.
Dough and mixtures should be pliable before use to extrude easily.
6.
If cookie dough is sticky, refrigerate
10-15 minutes before using.
7.
Spoon soft mixture into barrel and press food down lightly.
8.
Shape stiff dough into small balls, drop into barrel and press dough down lightly to eliminate large air pockets.
9.
The cookie press may be operated when barrel is partially filled.
10.
Once dough or mixtures have been loaded into barrel, they should be used immediately.
11.
Discs may be changed at any time whole the barrel is loaded by simply removing the barrel cap. Do not touch trigger while changing discs.
12.
The number of cookies, crackers, mints, etc. made from one recipe will depend on the size of the cookies, crackers, etc. pressed.
The faster you move the unit, the smaller the cookies.
13.
When using the decorator tip, release the trigger before you finish making the desired shape, but continue to move the unit.
14.
Stop the flow of dough or mixture from the decorator tip by quickly pushing the decorator tip in and out of the food one time.
15.
For best results, use baking sheets that do not have a non-stick surface
(uncoated).
Cleaning
1.
Disassemble and wash all parts except motor in hot, soapy water.
Rinse and dry thoroughly.
• Do NOT wash in an automatic dishwasher.
• Use a bottle brush to clean the inside of the barrel.
2.
Remove batteries. Wipe motor with a damp cloth or sponge.
Dry thoroughly.
3.
Do not immerse motor in water.
Do not disassemble of attempt to lubricate the motor.
4.
It is recommended that the cookie press be stored with the batteries removed.
7
8
Questions & Answers
1. How long will the batteries last?
A set of 4 alkaline batteries will last through 35 to 40 regular barrels of stiff dough.
2. How many cookies will one barrel make?
Approximately 4 dozen cookies can be made, depending on the disc and how fast you move the cookie press.
3. Can you use regular AA batteries in the cookie press instead of alkaline batteries?
Regular batteries will not provide as much power and will not last as long as alkaline batteries.
4. Why won’t cookies and mints cut off properly?
The dough must be the right consistency – stiff and pliable – not crumbly or very soft. Also, the 3 barrel cap feet must touch the baking sheet in order to form a cookie or mint. As the unit is lifted from the cookie sheet, the flow of dough is cut, forming a cookie or mint. Be sure to use uncoated, ungreased baking sheets.
5. Can you decorate a cake with the cookie press?
The cookie press can be used to make attractive borders, edges, and garnishes on cakes and many other desserts. Stiff icings/frostings work best.
6. Can you use the cookie press when the barrel is not full?
Yes. Be sure to follow the assembly and filling instructions on page 4 and 5.
7. Why won’t the cookie press push the dough when the barrel is full?
The gear must be turned so that 1–2 threads are showing on the rod (see step 2 on page 4).
8. Why does the cookie press run backwards?
The batteries are inserted incorrectly.
See step 1 on page 4 and the diagram inside the battery compartment for correct battery placement.
Recipes
Appetizers
Helpful Hints
• Vary garnishes using: sprigs of parsley, fresh dill weed, and watercress; pimento or olive slivers; chopped chives or nuts.
• Use vegetables, crackers, fried potato skins, etc. as bases for canapes.
Crabmeat Canapes
• The following recipes are only a starting point for the wide variety of appetizers that can be prepared.
Use these ideas as a guide when creating your own variations.
1 can (6 oz.) crabmeat, drained
1 8 oz. package cream cheese, softened
2 tablespoons toasted almonds, very finely chopped
2 teaspoons green onions, very finely chopped
2 teaspoons Worcestershire sauce
Canape bases (crackers, cucumber slices, etc.)
Place crabmeat, cream cheese, almonds, onions, and Worcestershire sauce in food processor or blender. Process until mixture is smooth. Assemble and fill cookie press with mixture. Using the decorator tip, make mounds, rosettes, zigzags, or lines on canape bases. Garnish as desired.
Makes 7–8 dozen canapes.
* Cooked lobster, shrimp, or tuna may be substituted for crabmeat.
Deviled Eggs
12 large eggs, hard-cooked
6 tablespoons mayonnaise
1 tablespoon sugar
1 ⁄
2 tablespoon prepared spicy brown mustard
1
1
⁄
4 teaspoon salt
⁄
8 teaspoon pepper
Cut eggs in half lengthwise. Remove yolks and place in food processor. Process until finely chopped. Add mayonnaise, sugar, mustard, salt, and pepper. Process until smooth. Arrange egg whites on serving plate or tray. Blot tops of eggs with paper towel to remove any excess moisture. Assemble and fill cookie press with yolk mixture. Using decorator tip, fill egg whites with mixture. Garnish as desired.
Makes 24 deviled eggs.
9
Cheddar Crackers
1
⁄
2 cup butter or margarine, softened
1 ⁄
2 cup vegetable shortening
1 pound sharp cheddar cheese, finely grated
2 1 ⁄
2 cups all purpose flour
1 tablespoon salt
1 tablespoon dry mustard
1 ⁄
8 teaspoon cayenne pepper
Place butter and shortening in large mixing bowl. Cream together on medium high speed. Add cheese and mix well using medium speed. Combine flour, salt, mustard, and cayenne in separate bowl. Add to the cheese mixture in three (3) additions, mixing well after each addition. Use low speed. Assemble and fill cookie press with dough; use ribbon disc. Make 3 inch ribbons on greased, uncoated baking sheet. Bake at 350°F for 10-12 minutes, or until edges are just starting to turn brown. Carefully remove from baking sheet. Cool on wire rack. Sprinkle with paprika if desired.
Makes 8-9 dozen crackers.
Entrees
Helpful Hints
• Mashed potatoes make attractive borders or toppings for meat, seafood, or vegetable casseroles; stews; or shepherd’s pie. Prepare mashed potatoes as usual, making sure they have a smooth thick consistency. Two cups will fill barrel. Use decorator tip.
• Butter rosettes are an elegant addition to dinner parties and buffets.
They also add an artistic touch to pancakes and waffles at a festive brunch.
• Use whipped butter or margarine directly from the refrigerator; 8 oz. will fill barrel. Refrigerate or freeze rosettes until serving.
• Cream cheese rosettes are an attractive replacement for butter on baked potatoes and other vegetables.
• Whip cream cheese until fluffy; 12 oz.
fills barrel. Use decorator tip.
Three Cheese Stuffed Shells
1 package (12 oz.) jumbo shell pasta (about 30), cooked
2 containers (15 oz. each) ricotta cheese
1 package (8 oz.) mozzarella cheese, finely shredded
1 ⁄
2 cup grated Parmesan cheese
2 eggs, slightly beaten
1
1
1
1
⁄
2 teaspoon salt
⁄
2 teaspoon pepper
⁄
2 teaspoon basil
⁄
4 teaspoon garlic powder
1 jar (313 ⁄
4 oz.) spaghetti sauce
Grated Parmesan cheese
Combine ricotta, mozzarella, and Parmesan cheese, eggs, salt, pepper, basil, and garlic powder in a large mixing bowl. Mix until well blended. Assemble and fill cookie press with cheese mixture; use decorator tip. Fill shells. Pour thin layer of spaghetti sauce into a 13 x 9 inch baking pan. Arrange filled shells in a single layer over sauce. Top with remaining sauce. Sprinkle with Parmesan cheese. Bake at
350°F for 30-40 minutes.
Makes 30 shells (10 servings)
10
Chicken Manicotti
8 manicotti tubes, cooked
1 ⁄
4 cup butter or margarine
1 ⁄
2 pound mushrooms, sliced
2 cups cooked chicken, finely chopped
1 ⁄
2 cup parsley, finely minced
1 ⁄
2 cup fresh white bread crumbs
1 ⁄
4 cup onion, finely chopped
2 eggs, slightly beaten
1 teaspoon salt
1 teaspoon thyme
1 teaspoon Worcestershire sauce
1 ⁄
8 teaspoon pepper
3 cups tomato sauce
Grated Parmesan cheese
Place butter in large fry pan; melt over medium heat. Add mushrooms, saute 5 minutes. Place in food processor or blender; process until smooth. Combine mushrooms, chicken, parsley, bread crumbs, onion, eggs, salt, thyme,
Worcestershire sauce and pepper in large mixing bowl. Mix until well blended.
Assemble and fill cookie press with mixture; use decorator tip. Insert tip into one end of manicotti tube; squeeze trigger several times; at same time pull unit back out of manicotti tube. When one end of manicotti tube is filled, turn tube around and fill other end. Pour thin layer of tomato sauce into 13 x 9 inch baking pan.
Arrange filled manicotti tubes in single layer over sauce. Top with remaining sauce. Sprinkle with Parmesan cheese. Bake at 350°F for 30-40 minutes.
Makes 8 manicotti (4 servings)
Twice-Baked Potatoes
8 medium (6-8 oz. each) Russet potatoes, washed and dried
1 ⁄
4 cup butter or margarine
1 teaspoon salt
1 ⁄
8 teaspoon pepper
1 ⁄
4
1 ⁄
2 cup milk
Prick potato skins with fork. Bake at 425°F for 60 minutes or until fork tender.
With sharp knife, slice lengthwise to remove top fourth from each potato. Use spoon to carefully scoop out potatoes to form 6 shells, set aside. Scrape potato from top quarter, then discard top. Place shells on ungreased baking sheet.
Place potatoes, butter, salt, and pepper in large mixing bowl. Beat until fluffy on high speed. Add 1 ⁄
4 cup milk, beating until smooth. If potatoes ar too stiff, add remaining 1 ⁄
4 cup milk. Mixture should be smooth. Assemble and fill cookie press with potato mixture; use decorator tip. To fill shells, hold until above potato shell; squeeze trigger continuously while moving the unit around shell to fill. Repeat with remaining shells. Sprinkle potatoes with paprika. Bake at 425°F for 10-12 minutes or until tops are golden.
Makes 6 potatoes (6 servings).
Variations:
Bacon/Onion: Add 4 oz. bacon, cooked, drained and finely crumbled;
1 tablespoon onions finely minced.
Cheese: Add 4 oz. sharp Cheddar cheese, finely grated; 1 ⁄
4 cup parsley, finely chopped or 1 tablespoon caraway seeds.
Sour Cream/Chives: Substitute 1/2 cup sour cream for butter and milk; add 2 tablespoons finely chopped chives.
11
Cookies
Helpful Hints
• Decorate cookies
before
baking by brushing them with slightly beaten egg white and adding one of the following:
1. Sprinkle with white or colored granulated sugar.
2. Place a nut or chocolate chip on center of cookie.
3. Decorate with small pieces of candied fruit, chopped nuts, coconut or chocolate sprinkles.
When using this egg white glaze, you may need to increase baking time about 1 minute.
• Decorate cookies
after
baking by:
1. Placing a small amount of jam or color frosting on top.
2. Brushing tops with sugar glaze then sprinkling with chopped nuts, coconut, decorative candy bits, etc.
3. Rolling warm cookies in powdered sugar.
4. Dipping half of cookie in melted semi-sweet chocolate then sprinkling with ground nuts.
5. Brushing with thin glaze. Combine
1 cup powdered sugar, 4-5 teaspoons hot milk, and 1/2 teaspoon vanilla. Mix well.
• Make sandwich cookies. Assemble and fill cookie press with desired frosting; use decorator tip. Make a small rosette in center of half of the cookie and press together gently.
Basic Spritz Cookies
1 ⁄
2 cup butter or margarine, softened
1 ⁄
2 cup vegetable shortening
3 ⁄
4 cup granulated sugar
1 large egg
2 teaspoons vanilla
2 cups all-purpose flour
1
⁄
4 teaspoon baking powder
1 ⁄
4 teaspoon salt
Place butter and shortening in large mixing bowl. Cream together on medium high speed. Add sugar gradually. Beat until light and fluffy, about 5 minutes. Add egg and vanilla; mix well using medium speed. Combine flour, baking powder and salt in separate bowl. Add to butter/sugar mixture in three (3) addition. Dough will be stiff. Assemble and fill cookie press with dough; using desired disc. Press cookies on ungreased, uncoated baking sheet. Bake at 375°F 10-12 minutes or until lightly brown around the edges. Do not overbake.
Makes 6-7 dozen cookies.
Variations:
This recipe may varied in flavor and color by using different spices and/or extracts, or by adding food coloring to the dough in Step 3. The following variations will give you a good start.
Orange: Substitute 2 tablespoons orange extract for the vanilla; add 1 tablespoon
finely
grated orange peel.
Raspberry-Nut: Substitute 1 1 ⁄
2 teaspoons coconut extract for the vanilla;
2 tablespoons
seedless
red raspberry jam. Sprinkle with chopped nuts before baking.
12
Gingerbread Cookies
1 ⁄
2 cup brown sugar
1 ⁄
2 cup shortening
1 ⁄
4 cup light molasses
1 egg
2 cups all-purpose flour
1 1 ⁄
2 teaspoons cinnamon
1 teaspoon baking powder
1
1
1
1
1
1 teaspoon ginger
⁄
2 teaspoon baking soda
⁄
2 teaspoon ground cloves
⁄
2 teaspoon nutmeg
⁄
4 teaspoon mace
⁄
8 teaspoon salt
Place brown sugar and shortening in large mixing bowl. Beat on medium speed until thoroughly creamed. Add molasses and egg to sugar/shortening mixture, beat until well blended. Combine flour, cinnamon, baking soda, baking powder, ginger, cloves, nutmeg, mace, and salt in a separate bowl. Gradually add flour mixture to sugar/shortening mixture, beat until thoroughly blended. Assemble and fill cookie press with dough. Use gingerbread man disc. Press cookies on ungreased, uncoated baking sheet. Bake at 350°F for 10-12 minutes.
Makes 5-6 dozen cookies.
Applesauce Cookies
1 ⁄
2 cup butter or margarine, softened
1 ⁄
2 cup granulated sugar
1 cup brown sugar, firmly packed
1 large egg
1 cup unsweetened applesauce
1 ⁄
2 cup wheat germ
1
3 1 ⁄
2 cups all-purpose flour
1 teaspoon baking soda
1 teaspoon cinnamon
1 1 ⁄
2 teaspoons pumpkin pie spice
⁄
2 teaspoon salt
Place butter in large mixing bowl and cream thoroughly on medium high speed.
Add sugars gradually. Beat until light and fluffy. Add egg, applesauce, and wheat germ. mix well using medium speed. Combine flour, baking soda, cinnamon, pumpkin pie spice, and salt in a separate bowl. Add to applesauce mixture in three (3) additions; mixing well after each addition. Dough will be soft. Assemble and fill cookie press with dough; using decorator tip. Make 1 1 ⁄
2 inch mounds,
2 inches apart on ungreased, uncoated baking sheet. Bake at 400°F for 9-11 minutes or until lightly browned around the edges. Do not overbake. Brush with a thin glaze.
Makes 6-7 dozen cookies.
13
Sugar & Spice
1 ⁄
2 cup butter or margarine, softened
1 ⁄
2 cup shortening
3 ⁄
4 cup sugar
3 ⁄
4 cup brown sugar
3 eggs
1 teaspoon vanilla
3 tablespoons milk
1 teaspoons baking powder
4 cups flour
1 ⁄
2 teaspoon cinnamon
1 ⁄
2 teaspoon nutmeg
1 ⁄
4 teaspoon allspice
1 ⁄
8 teaspoon ground cloves
Pinch of salt
Place butter, shortening, and sugars in large mixing bowl. Cream together until fluffy. Add eggs, vanilla, and milk. Beat until mixed. Combine baking powder, flour, cinnamon, nutmeg, allspice, cloves, and salt. Gradually add to better/sugar mixture. Beat until mixed. Assemble and fill cookie press with dough; use selected discs. Press cookies on ungreased, uncoated baking sheet. Bake at 325°F for 12 to 15 minutes.
Makes 10 dozen cookies.
Desserts
Helpful Hints
• For a festive touch, garnish desserts, such as sheet cakes, cold souffles, tortes, cream pies, puddings, shortcakes, gelatin, cobblers, fruit cups, etc., with sweetened whipped cream.
• Sweetened whipped cream cheese rosettes and borders are attractive when used to decorate desserts, such as carrot cake. Whip cream cheese until fluffy; add sugar;
12 oz. fills barrel.
• Mints make attractive cake decorations.
• Use the above ideas as guides when creating your own garnishes.
Frozen Yogurt Pie
2 containers (8 oz. each) vanilla yogurt
1 container (8 oz.) whipped topping
1 8-inch graham cracker or cookie pie crust
Place yogurt in large mixing bowl. Lightly fold in whipped topping. Assemble and fill cookie press with yogurt mixture; use decorator tip. Spoon remaining yogurt mixture into pie crust; make surface smooth. Decorate pie using cookie press.
Freeze until firm. Remove pie from freezer 10-15 minutes before serving.
Makes 1 pie (8 servings).
Variations:
Berry: Substitute strawberry, raspberry, or other berry yogurt for vanilla yogurt.
Lemon: Substitute lemon yogurt for vanilla yogurt; add 1 tablespoon finely grated lemon peel to yogurt.
14
Cream Puffs
1 cup water
1 ⁄
2 cup butter or margarine
1 ⁄
4 teaspoon salt
1 cup all-purpose flour
4 large eggs
Place water, butter, and salt in medium saucepan; bring to boil; remove from heat.
Stir in flour all at once. Beat well until mixture leaves the sides of the pan. Cool 1 minute. Add eggs, one at a time, beating well after each addition. Mixture should be smooth and glossy. Assemble and fill cookie press with cream puff mixture; use decorator tip. Make 1 1/2 inch mounds, 2 inches apart on greased baking sheet. Bake at 450°F for 15 minutes. Reduce to 350°F and continue to bake for 30 minutes or until puffs are golden brown with dry, rigid sides. Make a slit in the side of puff with a small sharp knife. Cool on wire rack. Fill centers per directions.
Makes 12 large cream puffs.
Cream Puff Variation:
Miniature Cream Puffs:
Make 1-inch mounds, 2 inches apart, on greased baking sheet. Bake at 450°F for
15 minutes; reduce to 350°F and continue baking 10 minutes or until puffs are golden brown with dry, rigid sides. Fill centers with vanilla cream or cut tops off and fill with meat, cheese or seafood fillings.
Makes 42 miniature cream puffs.
Eclairs
Prepare cream puff mixture. Using decorator tip, make 3-inch long strips, 2 inches apart, on greased baking sheet. Bake at 450°F for 15 minutes; reduce to 350°F and continue baking for 30 minutes or until eclairs are golden brown with dry, rigid sides. Make a slit in the side of each eclair with a small, sharp knife. Cool on wire rack. Fill centers. Spread tops with chocolate or vanilla frosting.
Makes 12-15 eclairs.
Vanilla Cream
1 cup sugar
6 tablespoons all-purpose flour
1 ⁄
4 teaspoon salt
1 1 ⁄
2 cups milk
4 egg yolks, slightly beaten
1 ⁄
4 cup butter or margarine
1 tablespoon vanilla
1 ⁄
2 cup heavy cream, whipped
Combine sugar, flour and salt in medium saucepan. Stir in milk. Cook, stirring constantly, over low heat until mixture thickens (about 5 minutes). Add egg yolks and cook, stirring constantly, 3 minutes. Do not allow to boil. Remove from heat, stir in butter and vanilla. Chill. Fold in whipped cream. Assemble and fill cookie press with vanilla cream; use filler tip. Fill cream puffs, miniature puffs or eclairs.
Makes 3 cups vanilla cream; fills about 12 medium puffs or eclairs, or about
36 miniature puffs.
15
Candy
Helpful Hints
• Flavors may be varied by substituting any liqueur, cordial or extract.
• Vary mint colors by using different foods colors. For example: Pink: 2-3 drops red. Pale Yellow: 4-5 drops yellow.
• Chocolate Kisses may be held several weeks by storing in covered plastic containers. Place waxed paper on bottom of container; arrange single layer of candies in container; cover with another sheet of waxed paper. Repeat until container is filled.
Store in cool, dry place. Do not refrigerate.
Chocolate Kisses
1 package (12 oz.) semisweet chocolate pieces
1 ⁄
4 cup almond flavored liqueur
1
⁄
8 teaspoon salt
1 can (14 oz.) sweetened condensed milk
Crystallized lilacs (optional)
Melt chocolate pieces in double boiler. Remove from heat. Stir in liqueur, salt and sweetened condensed milk in one addition. Beat until smooth; cover with plastic wrap. Let stand at room temperature overnight. Assemble and fill cookie press with chocolate mixture; use decorator tip. On waxed-paper-lined baking sheet, make mounds 1 inch in diameter and 3/4 inch in height. Top with crystallized lilacs, if desired. Allow to stand several hours or overnight, until Kisses can be easily removed from baking sheets with spatula.
Makes 7 dozen Kisses.
Variations:
Chocolate stars: Make rosettes instead of mounds.
Mints
1 package (3 oz.) cream cheese, softened
1 tablespoon light corn syrup
1 ⁄
2 teaspoon peppermint extract
1-2 drops green food color
3-4 cups powdered sugar
Place cream cheese, corn syrup, extract and food color in large mixing bowl.
Cream thoroughly on medium high speed. Add sugar gradually. Beat until thoroughly mixed. Dough will be smooth. Form into a ball. Assemble and fill cookie press with mint dough; use desired disc. Make mints on ungreased, uncoated baking sheet. Allow mints to “firm up” (about 20-30 minutes) before attempting to arrange on plate or to serve.
Makes 5-6 dozen mints.
16
Frostings
Orange Frosting
1 ⁄
2 cup butter or margarine, softened
4 cups sifted powdered sugar
2 tablespoons sour cream
1 ⁄
8 teaspoon salt
2 tablespoons freshly grated orange peel
1 tablespoon orange juice
Place butter in large mixing bowl. Cream thoroughly on medium high speed. Add sugar, sour cream, orange peel, orange juice and salt. Beat until smooth and creamy. NOTE: Add extra orange juice, if frosting is to stiff. Assemble and fill cookie press; use decorator tip.
Makes 3 cups frosting.
Variations:
Chocolate: Increase powdered sugar to 4 1 ⁄
2 cups and sour cream to 6 tablespoons. Add three (3) 1 oz. squares unsweetened chocolate, melted. Omit orange peel and juice.
Professional Frosting
2 cups solid vegetable shortening
1 ⁄
2 cup milk
2 pounds powdered sugar
2 teaspoons vanilla
Food color (optional)
Place vegetable shortening in large mixing bowl. Beat on high speed 3 minutes until creamy. Add milk; beat on low speed, until well blended. Gradually add powdered sugar. Beat on high speed 1 minute.Add vanilla and food color. Beat on high speed 1 minute, until light and fluffy. Assemble and fill cookie press with frosting; use decorator tip.
Makes 5 cups frosting.
Convenience Foods
Helpful Hints
• To save time, use one of the many prepared cheese or meat spreads when making appetizers.
• Create a professional-looking cake in minutes by decorating any cake with ready-made frosting.
• Defrost whipped topping in refrigerator; 3-4 ounces of topping fills barrel.
Use to decorate a wide variety of desserts.
• Make quick sugar cookies in fun shapes by using “commercially prepared” refrigerated dough or sugar cookie mixes (omit water).
• Fill donuts with seedless jelly or vanilla cream for a special breakfast treat. Use filler tip.
17
Customer Service
If you have a question about your cookie press, call our toll-free customer service number. Before calling, please note the model and type numbers and fill in that information below. These numbers can be found on the base of the motor, around the shaft. This information will help us answer your question much more quickly.
MODEL: ______________ TYPE: ________________
LIMITED WARRANTY
This product is warranted to be free from defects in material and workmanship for a period of two (2) years for Hamilton Beach Portfolio products or one (1) year for Hamilton Beach products from the date of original purchase, except as noted below. During this period, we will repair or replace this product, at our option, at no cost. THE FOREGOING WARRANTY
IS IN LIEU OF ANY OTHER WARRANTY, WHETHER EXPRESS OR IMPLIED, WRITTEN
OR ORAL INCLUDING ANY WARRANTY OF MERCHANTABILITY OR FITNESS FOR A
PARTICULAR PURPOSE. ANY LIABILITY IS EXPRESSLY LIMITED TO AN AMOUNT
EQUAL TO THE PURCHASE PRICE PAID, AND ALL CLAIMS FOR SPECIAL, INCIDENTAL
AND CONSEQUENTIAL DAMAGES ARE HEREBY EXCLUDED. There is no warranty with respect to the following, which may be supplied with this product: glass parts, glass containers, cutter/strainer, blades, and/or agitators. This warranty extends only to the original consumer purchaser and does not cover a defect resulting from abuse, misuse, neglect, use for commercial purposes, or any use not in conformity with the printed directions. This warranty gives you specific legal rights, and you may also have other legal rights which vary from state to state, or province to province. Some states or provinces do not allow limitations on implied warranties or special, incidental or consequential damages, so the foregoing limitations may not apply to you.
If you have a claim under this warranty, DO NOT RETURN THE APPLIANCE TO THE
STORE! Please call our CUSTOMER SERVICE NUMBER. (For faster service please have model, series, and type numbers ready for operator to assist you.)
CUSTOMER SERVICE NUMBERS
In the U.S. 1-800-851-8900
In Canada 1-800-267-2826
Web site address: www.hamiltonbeach.com
KEEP THESE NUMBERS FOR FUTURE REFERENCE!
H
AMILTON
840113300
B
EACH
P
ROCTOR
-S
ILEX
, I
NC
.
263 Yadkin Road Southern Pines, North Carolina 28387
P
ROCTOR
-S
ILEX
C
ANADA
, I
NC
.
Picton, Ontario K0K 2T0
Web site address: www.hamiltonbeach.com
18
3/03

|
Cookie Press and |
|
Cake & Food Decorator |
|
Important Safeguards . . . . . . . . 2 |
|
Know Your Cookie Press . . . . . . 2 |
|
Operating Instructions . . . . . . . . 4 |
|
Cleaning . . . . . . . . . . . . . . . . . . . 7 |
|
Recipes. . . . . . . . . . . . . . . . . . . . 9 |
|
Customer Service . . . . . . . . . . . 18 |
|
In USA: 1-800-851-8900 |
|
In Canada: 1-800-267-2826 |
|
840113300 |

IMPORTANT SAFEGUARDS
When using this appliance, basic safety precautions should always be followed, including the following:
1.Read all instructions.
2.To prevent damage to the motor, do not immerse motor in water or other liquids.
3.Do not allow dough or batter to run into the hollow shaft, as damage to the motor may occur.
4.Do not operate the cookie press with damaged batteries, motor, or after the appliance malfunctions or is dropped or damaged in any manner.
5.Remove batteries when the cookie press is not in use and before cleaning.
6.Avoid contact with moving parts.
7.Close supervision is necessary when used by or near children.
8.The use of attachments not recommended or sold by Hamilton Beach/Proctor-Silex may damage the cookie press.
9.For household use only.
10.Do not use outdoors.
11.Do not use appliance for other than intended purpose.
SAVE THESE INSTRUCTIONS!
Know Your Cookie Press
Parts and Features
1. Feet
2. Barrel Cap
3. Disc or Tip
4. Pusher Plate
5. Gear
6. Rod
7. Barrel (tube)
8. Hollow Shaft
9. Motor
10. Button/Trigger
11. Battery Cover/Compartment
2

Discs and Tips
Regular Discs
Use discs with stiff dough to prepare cookies, candies, crackers, etc.
|
Ribbon |
Heart |
Jewel |
Diamond |
|
Tree |
Star |
Sparkler |
Gingerbread |
|
|
Man |
||||
Decorator Tip
Use decorator tip with soft dough to prepare appetizers, candies, and desserts; to fill pasta; and to garnish casseroles and desserts.
Filler Tip
Use filler tip with thin mixtures to fill pastries.
3

Operating Instructions
To Assemble and Fill
BEFORE FIRST USE: Wash all parts (except motor) in hot, sudsy water, rinse, and dry thoroughly. Wipe motor with damp cloth and dry thoroughly.
1. Twist the battery cover counterclockwise and lift it to remove. Insert four AA alkaline batteries into the battery compartment (see diagram on unit). Replace the battery cover by placing it off-center (to the right) and twisting to the left until it clicks.
2. Turn the gear on the rod so that one or two threads can be seen above the gear.
3. Attach the pusher plate to the rod on the end that’s nearest the gear.
4. Insert the rod into the hollow shaft. Then, line up the ridges on the inside of the barrel with the
notches on the pusher plate. Slide the barrel onto the
motor. Turn the barrel clockwise and lock it into place.
5. Fill barrel with desired mixture; press food down lightly to remove air pockets. 
 NOTE: Cookie dough must be freshly made. Cookie dough that has been refrigerated overnight is not recommended.
6.Select desired disc or tip and place
 on filled barrel. Place barrel cap on barrel
and turn clockwise to lock into place.
4

7. With barrel pointing up, squeeze trigger until mixture reaches disc or tip. Release trigger. Turn cookie press over and it is ready to use.
To Refill Barrel:
1.Unit will indicate it is empty by making a clicking noise.
2.Remove barrel cap, disc or tip, and rod/pusher plate.
3.Follow steps 3–7 on pages 4 and 5.
To Use Discs
All Discs except Ribbon Disc
|
1. When making |
5. Space cookies two inches apart, |
|
cookies, mints, |
mints one inch apart on uncoated |
|
etc., line up several |
baking sheet. |
|
ungreased, uncoated |
NOTE: Cookie/mint shapes and |
|
(without non-stick |
sizes may vary until you develop |
|
surface) baking |
your own rhythm. As with any new |
|
sheets on work |
appliance, practice with the cookie |
|
surface. |
press to achieve the best results. |
2.Stand cookie press upright on baking sheet; hold with one hand.
3.Squeeze trigger continuously; touch baking sheet with 3 barrel cap feet for each cookie, mint, etc.
4.To make uniform cookies quickly and easily, establish a rhythm by counting. For example, “one thousand one” – touch baking sheet. “One thousand two” – lift unit and move. “One thousand three” – touch baking sheet, etc.
Alternative method: Squeeze then release trigger for each cookie, mint, etc.; lift and repeat.
5

Ribbon Disc
1.To make cookies, crackers, etc., line up several ungreased, uncoated baking sheets on work surface.
2.Hold cookie press at a 45 degree angle to baking sheet.
3.Squeeze trigger continuously.
•When dough starts to come through the disc, move the unit to form a 3-inch strip.
•Two-thirds of the way down each strip, release trigger but continue to move unit.
•Touch dough with finger or rubber spatula to break flow of dough. Move unit to start next strip.
4.When baked. remove cookies, crackers, etc. from baking sheet. Place on cooling rack.
To Use Decorator Tip
Mounds: Using a circular motion, make mounds of the desired size and height. Uses: Appetizers, vegetables, desserts, garnishes, candies, etc.
Rosettes: Gradually lift unit straight up until mixture is desired shape and height. Uses: Garnishes, appetizers, candies, etc.
Zigzag lines: Make a series of small “S” movements to desired width. Uses: Appetizers, borders, garnishes, etc.
Strips: Move unit in a straight line until mixture is desired length. Uses: Desserts, borders, cookies, pasta. Moving the unit faster produces a thin strip; moving it slower produces a wide strip.
To Use Filler Tip
Use the filler tip to fill foods such as donuts, cream puffs, and éclairs.
1.Arrange foods to be filled on baking sheet.
2.Assemble and fill cookie press with filling mixture.
3.Hold unit parallel to work surface.
4.Holding food in one hand, insert filler tip into one side of food. Squeeze trigger for several seconds, then release. Remove tip from food.
6
 Loading…
You can only view or download manuals with
Sign Up and get 5 for free
Upload your files to the site. You get 1 for each file you add
Get 1 for every time someone downloads your manual
Buy as many as you need
Cookie Press and
Cake & Food Decorator
840113300
Important Safeguards . . . . . . . . 2
Know Your Cookie Press . . . . . . 2
Operating Instructions . . . . . . . . 4
Cleaning . . . . . . . . . . . . . . . . . . . 7
Recipes . . . . . . . . . . . . . . . . . . . . 9
Customer Service . . . . . . . . . . . 18
In USA: 1-800-851-8900
In Canada: 1-800-267-2826