Описание
Безопасный совместный доступ к общим файлам
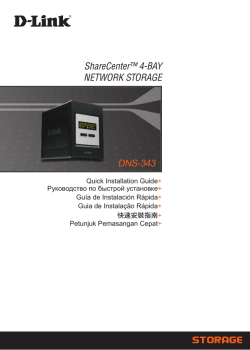
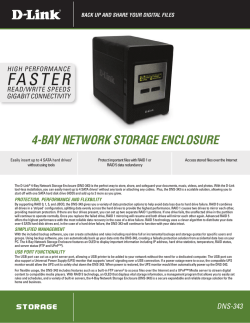
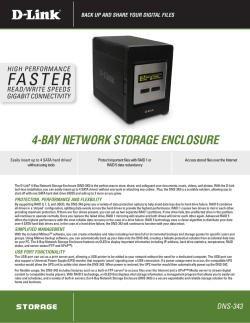
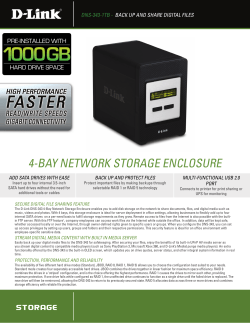
Сетевой дисковый массив DNS-343 с 4 отсеками для жестких дисков SATA предоставляет пользователям возможность совместного использования документов, файлов и цифрового фото-, видео- и музыкального контента. 4 отсека позволяют добавить до 4-х дисков SATA в зависимости от потребностей пользователя, что делает DNS-343 идеальным решением для офиса. Также возможен удаленный доступ к файлам через Интернет, благодаря встроенному FTP-серверу. При этом сотрудники компании, находясь за пределами офиса, могут получать доступ к файлам. При настройке DNS-343 можно задать различные привилегии доступа пользователям, группам пользователей и определенным папкам. Эти функции сетевой безопасности являются незаменимыми в офисной сети, позволяя сотрудникам доступ только к тем файлам, которые им необходимы непосредственно для выполнения работы.
Доступ к медиа-контенту через медиаплееры, поддерживающие UPnP AV
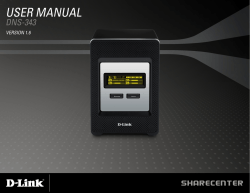
DNS-343 позволяет создать резервную копию медиафайлов. Благодаря встроенному медиасерверу UPnP AV, DNS-343 дает возможность передавать цифровой контент на совместимые медиаплееры (например, плееры серии MediaLounge D-Link). Кроме того, DNS-343 оснащен экраном OLED, отображающим в реальном времени используемый диск, статус сервера и другую информацию.
Защита, производительность и надежность
В DNS-343 доступны 5 различных режимов работы с жесткими дисками (Standard, JBOD, RAID 0, RAID 1 и RAID 5), позволяющих пользователям выбрать необходимую конфигурацию. В режиме Standard для использования доступны четыре отдельных жестких диска. Режим JBOD объединяет все диски в один. Режим RAID 0 обеспечивает высокую производительность за счет разделения записи и чтения между жесткими дисками. При использовании режима RAID 1 содержимое одного жесткого диска дублируется на другой, что обеспечивает максимальную надежность. Если один из жестких дисков выходит из строя, другой продолжает функционировать в полном объеме. При использовании режима RAID 5 данные распределяются на три и более диска, что обеспечивает эффективность и надежность хранения данных.
Характеристики
Стандарты
Поддерживаемые типы жестких дисков*
Интерфейсы устройства
Дисплей
Дисплей OLED 256х64
Управление дисками
Управление устройством
Совместное использование файлов
Сертификаты
Заказ
DNS-343 Сетевой дисковый накопитель с четырьмя отсеками для жестких дисков
Изображения
DNS-343/Ax
Вид спереди
Вид сзади
Загрузки
Смотрите также
-
Contents
-
Table of Contents
-
Bookmarks
Quick Links
Document Created by Nick Schuster
Related Manuals for D-Link ShareCenter DNS-343
Summary of Contents for D-Link ShareCenter DNS-343
-
Page 1
Document Created by Nick Schuster… -
Page 2: Table Of Contents
Device Page — Workgroup …………22 OLED Display Page …………..57 Device Page — Active Directory ………….23 Disk Diagnostics Page …………..58 Advanced Section …………….24 Status Section …………….59 RAID Page ……………….25 Device Information Page …………..60 Users / Groups Page …………..27 D-Link DNS-343 User Manual…
-
Page 3
Contacting Technical Support ……..92 Connecting a UPS to the DNS-343 ……….61 Hard Drive Information Page …………62 Warranty …………93 Log Page ………………63 Support Section …………….64 Registration…………97 Schedule Downloads Section …………65 Scheduling Settings Page …………66 Scheduling List Page …………..67 BitTorrent Section …………….68… -
Page 4: Product Overview
• CAT5 Ethernet Cable Please Note: Using a power supply with a different voltage than the one included with the DNS-343 will cause damage and void the warranty for this product. If any of the above items are missing, please contact your reseller.
-
Page 5: Introduction
™ server for their network. The USB port can also be used for UPS monitoring to help keep your DNS-343 running in the event in event of a power outage. Another feature is Remote Replication. This feature allows users to back up their files remotely, quickly, and reliably.
-
Page 6: Features
Speed results will vary depending on the benchmark utility, hard drive configuration, and the network environment used for testing. D-Link cannot guarantee full compatibility or proper playback with all codecs. Playback capability depends on the codec support of the UPnP AV media player.
-
Page 7: Hardware Overview
Next Button Use this button to display the System Information (system state), HD Status (hard drive state) and Server Status (server status state) on the OLED. Press the button once to alternate between the different Status screens. D-Link DNS-343 User Manual…
-
Page 8: Rear Panel (Connections)
1 x USB 2.0 (Type A) connector. USB Host port for Print Server or USB UPS monitoring. Gigabit Ethernet Port Use the Gigabit Ethernet Port to connect the DNS-343 to the local network. Cooling Fans The cooling fans are used to cool the hard drives and feature speed control. When the unit is first powered on the fans rotate at a low speed and rotate at a high speed when the temperature rises above 49 °C.
-
Page 9: Using The Oled
Using the OLED The DNS-343 ShareCenter Quattro 4-Bay Network Storage Enclosure features an OLED that enables the administrator to easily view information about the DNS-343. The ™ OLED display screen displays information about the network connection status and the number of hard drives installed and the bay ID’s they are installed in. The OLED has…
-
Page 10: Installation
This section provides unpacking and installation information for the DNS-343. Open the shipping carton for the DNS-343 and carefully unpack its contents. If this is the first time using the DNS-343 or if a new hard disk is installed, use the Easy Search utility located on the Installation CD and follow the instructions for setting up, configuring and formatting the new drive.
-
Page 11
SATA connectors on the bottom edge inside the drive bay of the DNS-343. Gently push the drive in until it connects. When a drive is inserted properly, you will feel it “seat” into the connector. Some hard drives that are thin or oddly shaped may need to be guided carefully into position. -
Page 12: Configuration
IP address of 169.254.x.x. It is recommended to use the included D-Link Easy Search Utility when accessing and configuring the DNS-343 for the first time. If you want to change the IP address before logging in or are unable to connect to the DNS-343 IP address, you can use the Easy Search Utility provided on the product CD to locate the device on your network and make any needed changes.
-
Page 13: Getting Started
Getting Started To run the Easy Search Utility, insert the DNS-343 CD into your CD-ROM drive: Step 1 — Click Easy Search Utility. Step 2 — Select the listed DNS-343 and click the Configuration button. This will launch the computer’s default web browser and direct it to the IP address listed for the device.
-
Page 14
192.168.0.0 subnet. Your computer should have an IP address of 192.168.0.x where x equals a number from 1 to 31 or 33 to 254. When logging into the DNS-343 for the first time, you will be asked to choose a drive configuration (Basic or Custom) and format the drives. -
Page 15
Click Restart to restart the DNS-343. Step 10 — When the restart is complete, the login screen will appear: Note: After logging in to the DNS-343 for the first time it is recommended to add a password to the admin account. (See Step 3) -
Page 16: Web User Interface
Web User Interface The DNS-343 web UI defaults to the Setup page. The main categories for configuration are located in the menu tabs at the top of the page. These categories include: • Setup — Contains the DNS-343 setup Wizard, LAN Setup, Time and Date settings and Device settings.
-
Page 17: Wizard Page
Wizard Page The DNS-343 has a setup Wizard that allows you to quickly configure some of the basic device settings. 1. When running the DNS-343 setup wizard, the welcome screen details the five 2. It is recommended you set an admin password here. Enter the new password steps of the wizard.
-
Page 18
Enter the Workgroup, Name and Description for your DNS-343, or leave the default values. Click Next to continue. 7. If your DNS-343 will be connected to an Active Directory network, click the 8. When the wizard completes, click Back to go back and make changes or click Active Directory radio button. -
Page 19
10. The DNS-343 will restart. 11. When the login prompt appears, login using the new administrator password. D-Link DNS-343 User Manual… -
Page 20: Lan Page
LAN Page The Local Area Network settings for the DNS-343 are configured on the LAN Setup page. Link Speed: The LAN Link Speed is set to Auto by default, but can be manually set to 100Mbps or 1000Mbps. DHCP Client:…
-
Page 21: Time And Date Page
Time and Date Page The Time and Date of the DNS-343 can be set manually or be configured automatically using an NTP Server. Time Zone: Choose the Time Zone of where you are located from the drop-down menu. NTP Server: Tick the Enable NTP Server check box to enable NTP.
-
Page 22: Device Page — Workgroup
The name can be used to access your device from a web browser instead of using an IP address, for example, http://dlink-xxxxxx. This is useful when there is more then one DNS-343 on the network. By default the device name is d-link-xxxxxx, where xxxxxx is the last six digits of the MAC Address.
-
Page 23: Device Page — Active Directory
AD Server Name: Input the name of the Active Directory Server in this field. When the Windows user attempts to access the DNS-343 at login time, the DNS- 343 will connect to the 2003 AD Server and attempt to authenticate the given user with the given password.
-
Page 24: Advanced Section
Remote Backup: This option allows you to backup files on the DNS-343 to one or more remote NAS devices in order to prevent data loss in the event of a failure. You can securely backup or recover your data over an encrypted SSH connection.
-
Page 25: Raid Page
RAID Page The DNS-343 supports the following configuration types: Standard, where each drive is a unique volume, JBOD, which combines both drives in a linear fashion to create one volume, RAID 1 and RAID 5 with a Basic Configuration and a combination of RAID 0/JBOD, RAID 1/JBOD and RAID 5/JBOD for Custom Configuration.
-
Page 26
Carry out the following to configure the RAID settings on the DNS-343: Re-configure All Click Re-configure All Existing Hard Drive(s) to setup Existing Hard the RAID configuration. Drive(s): Note: All data will be lost when changing the drive configuration. The following screen appears showing the disks installed in the system. This screen also allows the administrator to choose a RAID configuration type for this device. -
Page 27: Users / Groups Page
These are used for user access and read/write privileges for specified folders on the network drive (using the Network Access menu), or to setup FTP access and privileges. When the DNS-343 is connected to a Workgroup up to 64 users and 10 groups can be created.
-
Page 28: Quotas Page
Quotas Page The DNS-343 supports storage quotas for both groups and individual users. Assigning a quota to a group or user will limit the amount of storage they are located. By default, users and groups do not have a quota.
-
Page 29: Network Access Page (Smb)
DNS-343 you may try to improve performance by setting Oplocks to No(off). Map Archive: When enabled, the file attribute ”Archive” will be copied as the file is being stored on the DNS-343. Certain backup software attach this attribute to files that are being stored as backups.
-
Page 30
2) Open Configuration — This configuration is the default configuration of the DNS-343. It allows for open access to anyone who wants to access the shared storage without the need to enter a username and a password. -
Page 31: Network Access Page (Nfs)
Lists all defined access rules. To modify an access rule, click the icon. To remove an access rule, click icon. Note: To allow NFS access to anyone on the network, enter an IP address 192.168.0.0/24 where 192.168.0.0 is the IP subnet of the network. D-Link DNS-343 User Manual…
-
Page 32: Ftp Server Page
FTP Server Page The DNS-343 is equipped with a built in FTP Server. The server is easy to configure and allows users access to important data whether they are on the local network or at a remote location. The FTP server can be configured to allow user access to specific directories, and will allow up to 10 users to access the DNS-343 at a time.
-
Page 33
21 to some other port as listed in the Port section of the web UI. Also, please make sure to open the corresponding port on your router and forward that port from your router to the DNS-343. D-Link DNS-343 User Manual… -
Page 34: Ftp Server Behind A Router
FTP Server behind a Router If you are behind a router, you will need to forward the FTP port from the router to the DNS-343. Additional filtering and firewall settings may need to be modified on your router to allow FTP Access to the DNS-343 from the Internet. Once the port has been forwarded on the router, users from the internet will access the FTP server through the WAN IP address of the router.
-
Page 35: Ftp Over Tls
Below we’ll examine FTP over over TLS. For this example we’ll use FireFTP. FireFTP is an open-source, cross platform FTP client for Mozilla Firefox users who want to use FTP or FTPS. Step 1: From the Tools menu click FireFTP to open the application in Mozilla Firefox. Step 2: Go to the Quick Connect drop down menu and choose Create an Account. D-Link DNS-343 User Manual…
-
Page 36
Step 3: Account Name: Enter a name for this FTP connection here. Host: Enter the IP of the DNS-343 in here. Login: Enter the user’s username in here. Password: Enter the user’s password in here. Step 2: Go to the Connection Tab and set the Security function to Auth TLS (Best). -
Page 37
The second warning should look like this. Click on the “Add exception…” button to accept the security change. Step 7: The next step is to get the certificate for the connection. Click on the “Get Certificate” button to acquire the certificate. D-Link DNS-343 User Manual… -
Page 38
Select the newly added FTP connection and click on the Connect option if it has not already connected by itself. If you can see your files on the right block from the DNS-343, the connection has been established successfully. D-Link DNS-343 User Manual… -
Page 39: Upnp Av Server Page
When content is added or deleted from the available folders, click the Refresh button and the DNS-343 will scan for file updates. While the update scan is underway, the AV media will not be available for use by clients on the network.
-
Page 40
After enabling the iTunes server on the DNS-343, launch iTunes. When iTunes detects the DNS-343, select it and you will be prompted to enter the iTunes server password if required. Select the DNS-343. When prompted, enter in the iTunes server password. Click Media stored on the DNS-343 will then be available for use in iTunes. -
Page 41: Dhcp Server Page
DHCP Server Page The DNS-343 can be used as a DHCP Server. As a DHCP server, it can be used to serve IP addresses to devices on your local network, however, this feature should not be enabled if you already have a DHCP server, such as a router on your local network.
-
Page 42: Remote Backup Page
Remote Backup Page The Remote Backup window allows you to backup the files stored on the DNS-343 to one or more remote NAS devices in order to prevent data loss in the event of a failure. The Remote Backup feature has several benefits: 1.
-
Page 43: Remote Backup — Source
Remote Backup — Source If configuring the DNS-343 to be a Source device, configure the parameters as described below: Remote Backup Type a password that will be used by the destination Settings: NAS device to authenticate with the DNS-343 before copying the files.
-
Page 44: Remote Backup — Destination
Remote Backup — Destination If configuring the DNS-343 to be a Destination device, configure the parameters as described below: Source IP: Type the IP address of the NAS device that is storing the files you want to backup. Password: Type the password that has been setup on the source device for the Remote Backup feature.
-
Page 45: Add-Ons Page
In this section you will be able to install application and language packs to further enhance the functionality of your DNS-343. This powerful new feature on the DNS-343 allows users to customize the interface and usability of this unit. Adding features to the unit now only requires an Add-on installation as soon as new features are available.
-
Page 46: Language Pack
Language Pack After the loading a language pack you must activate it on the Add-ons page. After activating a language pack the interface of the DNS-343 will change to the language loaded. Below is an example of a running Chinese language pack.
-
Page 47: Maintenance Section
Firmware Upgrade: A new firmware upgrade may be available for your DNS-343. It is recommended to keep your DNS-343 firmware up-to-date to maintain and improve the functionality and performance of your storage device. Email Alerts:…
-
Page 48: Admin Password Page
Admin Password Page The Admin menu allows you to set a password for the admin account. It is recommended to set an admin account password when first configuring the DNS-343. User Name: The administrator user name is admin, and this cannot be changed.
-
Page 49: System Page
System Page The DNS-343 System menu provides options for system restarts, saving and loading configuration settings, and setting idle times. Restart: Click Restart to reboot the DNS-343. Restore Defaults: Click Restore to reset the DNS-343 to its factory default settings. This will erase all previous configuration changes.
-
Page 50: Firmware Upgrade Page
Firmware Upgrade Page The DNS-343 Firmware Upgrade menu makes it simple to check for new firmware releases and upload them to the device. Firmware Upgrade: This section provides a link to check for new firmware on the D-Link support website.
-
Page 51: Oled Firmware Upgrade
OLED Firmware Upgrade The latest firmware for the DNS-343 have a function to verify if the OLED Firmware is up to date or not. When the OLED Firmware is out dated, after the firmware update, the user will be prompted to up date the OLED firmware automatically. The following steps starts off like a normal firmware update but add the OLED update too.
-
Page 52
The latest firmware evaluates the current OLED firmware and will prompt you to upgrade it, if it’s out dated. If prompted to upgrade, click the Start button. This will start the OLED firmware Upgrade. D-Link DNS-343 User Manual… -
Page 53
After the update has been completed, you’ll be prompted to please remove the power cord from the DNS-343, wait for 5 seconds and then insert the power cord to the DNS-343 again. After this, updating the Firmware and the OLED Firmware will be complete. -
Page 54: E-Mail Alerts Page
E-Mail Alerts Page With the DNS-343 E-Mail Alerts, you can configure e-mails to be sent alerting you to certain operational conditions and drive status conditions. These alerts can prove helpful with the management and safeguarding of important data. The Alert Settings section contains the configuration settings for the your e-mail account and alert preferences.
-
Page 55
S.M.A.R.T. Test S.M.A.R.T. information and result will be sent. Result: System Temperature An alert will be sent if the DNS-343 device temperature Exceeded: exceeds the set threshold. After the alert has been sent, the DNS-343 will power off for safety. -
Page 56: Power Management Page
1. BitTorrent is disabled and/or all download seeds are stopped. 2. There is no read/write access to the UPnP AV or iTunes server. 3. No one is using the easy search utility to discover the D-Link NAS or mapping/disconnecting a drive. D-Link DNS-343 User Manual…
-
Page 57: Dynamic Dns Page
The LCD Display settings allow the administrator to change the time it takes for the OLED screen on the front of the DNS-343 to power off. Click on the drop-down box below to change the time it takes for the OLED screen to power off. Click the Save Settings button to apply the settings.
-
Page 58: Disk Diagnostics Page
To run the S.M.A.R.T test, select the hard drive you wish to perform the S.M.A.R.T test on. Then select whether to run a Quick or Extended S.M.A.R.T test. Then press “Start” to run the test. D-Link DNS-343 User Manual…
-
Page 59: Status Section
Status Section System Info: View a summary of system information here. Hard Drive Info: View a summary of hard drive information here. Logs: Use this option to view the NAS system logs and the FTP logs. D-Link DNS-343 User Manual…
-
Page 60: Device Information Page
Device Information Page View a summary of system information here. LAN Info: Displays the local network settings of the DNS-343. Device Info: Displays the workgroup, name, description and current temperature of the DNS-343. Printer Info: Displays information for a connected USB printer.
-
Page 61: Connecting A Ups To The Dns-343
When a UPS (Uninterrupted Power Supply) USB management connection is connected to the DNS-343, the Status screen hides the printer information and displays information about the UPS connected. The screenshot on the right-hand side shows the Status screen when a UPS is attached to the DNS-343. The following parameters…
-
Page 62: Hard Drive Information Page
Hard Drive Information Page This section will display a summary of the hard drive(s) currently installed in the DNS-343. The summary will include information such as the hard drive manufacturer, model, serial number, temperature, total capacity size, and status. The “Status” of the hard drive will display the health of the hard drive. If your hard drive is healthy, the status will display “Normal”.
-
Page 63: Log Page
Log Page Use the Log window to view a summary of the System and FTP Log Events on the DNS-343. Choose System Log from the drop-down menu to view the System Log events. Choose FTP Log from the drop-down menu to view FTP Log events.
-
Page 64: Support Section
Support Section The DNS-343 Support page provides a menu of Support topics explaining the features of the device. D-Link DNS-343 User Manual…
-
Page 65: Schedule Downloads Section
Schedule Downloads Section Scheduling Settings: Configure download and backup schedules here. Schedule List: The Schedule List will display all completed, active, and pending scheduled downloads and backups. D-Link DNS-343 User Manual…
-
Page 66: Scheduling Settings Page
By default all local backups and file/folder downloads are in Overwrite mode, meaning that identical files in the destination folder will be overwritten by the source files. Ticking Incremental Backup will have the DNS-343 compare identical file names at the source and destination. Files will only be overwritten if the source file is more recent.
-
Page 67: Scheduling List Page
Current download statistics, such as % completed and download speed, are displayed for each event. A refresh button is also provided to produce updated listings at any time. Download Success. Download Fail. Download has not yet occurred. Waiting. Link File. The file is downloading. D-Link DNS-343 User Manual…
-
Page 68: Bittorrent Section
BitTorrent is a peer-to-peer file sharing protocol used for distributing large amounts of data. Downloads: Here you can download files using the built in BitTorrent download manager. Settings: Here you can configure your BitTorrent download manager settings. Support: Here you can find support for this section. D-Link DNS-343 User Manual…
-
Page 69: Downloads Page
Once you have added a torrent file and clicked the Start button, the Stop button will now be available. In the event that you need to pause the download on your DNS-343 you can click the Stop button and later resume the download again by clicking Start.
-
Page 70: Settings Page
Seed until the torrent is removed from your BitTorrent download manager manually or you can choose to have the files automatically stop seeding at a specific percentage or after a specific amount of time has passed. D-Link DNS-343 User Manual…
-
Page 71: Knowledge Base
Mapping a Drive You can use the D-Link Easy Search Utility to map drives to your computer. Insert the DNS-343 CD into your CD-ROM drive. 1. Click Easy Search Utility. The Easy Search Utility will load and detect any DNS- 2.
-
Page 72: Yahoo! Widget Configuration
Yahoo! Widget Configuration D-Link provides an added feature to the sharecenter called a Yahoo! Widget. What is a Yahoo Widget? Yahoo! Widgets are free application platforms that can be used in Microsoft Windows and Mac OS X. The engine uses a JavaScript runtime environment combined with an XML interpreter to run small applications referred to as widgets, and hence is part of a class of software applications called widget engines.
-
Page 73: Yahoo! Widget Display
Yahoo! Widget Display The D-Link Widget is mainly used for monitoring the activities taking place on your sharecenter. System: In the System window information about your Computer, Sharecenter, IP Address, Firmware Version and Current Operational Temperature are displayed. Hard Drive: In the Hard Drive window information about the storage space of your Sharecenter is displayed.
-
Page 74: Usb Print Server
USB Print Server The DNS-343 features a built-in USB print server, giving users the ability to share a printer on their local network. Connect a USB printer to the USB port on the back of the DNS-343. It is important to ensure that any of the printer manufacturer’s drivers are already installed on any computer you want to print from.
-
Page 75
5. Select “Browse for a printer” and click Next to continue. 6. Select Double-click “DNS-343” from the Shared Printers list to expand the tree. 7. Select the available USB printer, and click Next to continue. 8. The following printer driver messages will appear: Click Yes to continue. -
Page 76
10. Insert the print driver CD or browse to the appropriate directory. wizard. If the driver is not in the list, select Have Disk. 11. Select the appropriate driver file, and click Open to continue. 12. Click OK to continue. D-Link DNS-343 User Manual… -
Page 77
13. Verify the driver is correct, and click OK to continue. 14. The wizard will install the printer drivers, and return a completion screen. Click Finish. 15. The printer should now appear as an available printer. D-Link DNS-343 User Manual… -
Page 78: Storing Non-English Character Files
Replacing a Hard Drive: Please make sure the power is off before replacing a hard drive. After you install the new drive, turn on the DNS-343 and then connect to the Web UI. The DNS-343 will prompt you to format the new drive. Refer to page 12.
-
Page 79: What Is Raid
Because the data is stored on multiple disks, RAID 1 lack of fault tolerance means that if one drive fails, all provides fault tolerance and protection, in addition to data in the array will be lost. performance advantages. D-Link DNS-343 User Manual…
-
Page 80
If there are 4 x 80GB disks in the array, the arrays capacity will be 240GB (3 x 80GB). Implementing RAID 5 on the DNS-343 allows it to continue operating even if one of the disks fails. The diagram below indicates the operation of RAID 5:… -
Page 81: Raid 1 Recovery — Setting Up Raid 1
Click the Next button. A message will pop-up. Click OK. Step 2: Auto-Rebuild is a feature that will allows the DNS-343 to initiate the Rebuilding phase automatically. The Rebuilding phase will occur when one or more hard drives fail and is replaced by a new one.
-
Page 82
Step 4: RAID configuration will initiate and formatting of the hard drives will commence. After the RAID 1 configuration you’ll be prompted to click the Restart button. Do so and the RAID 1 configuration is complete. D-Link DNS-343 User Manual… -
Page 83: Raid 1 Recovery — Auto Rebuilding
Step 1: After the new hard drive is inserted into the DNS-343 go to ADVANCED > RAID and you’ll now have the option to start the Auto Rebuilding process if Auto Rebuild was disabled from the beginning.
-
Page 84
STATUS > SYSTEM INFO and monitor the Sync Time Remaining to know how far the Rebuilding process is. Alternatively you can also use your Yahoo! Widget to monitor the progress of the Rebuilding process. D-Link DNS-343 User Manual… -
Page 85: Quotas — Configuration
To add a quota for a user: Step 1: Click the Notepad icon of the user you want to add a quota to. Step 2: Type the quota amount (MB) that the user will have for each volume and click Apply. D-Link DNS-343 User Manual…
-
Page 86
The user, their amount of storage used, and their storage limit are displayed. Step 3: Click Enabled to turn quota monitoring on. Once enabled, the status will change to Started. D-Link DNS-343 User Manual… -
Page 87
To add a quota for a group: Step 1: Click the Notepad icon of the group you want to add a quota to. Step 2: Type the quota amount (MB) that the group will have for each volume and click Apply. D-Link DNS-343 User Manual… -
Page 88
The group, the amount of storage used and the storage limit are displayed. Step 3: Click Enabled to turn quota monitoring on. Once enabled, the status will change to Started. D-Link DNS-343 User Manual… -
Page 89: Download Scheduling
Highlight an available DNS-343 and click Configuration to access the web-based utility. The DNS-343 login screen will appear. Type admin for the username and leave the password field blank by default or your new password and click on the Applications button. The DNS-343’s Download Scheduling configuration page will appear.
-
Page 90: Technical Specifications
• Management through a web browser (Internet Explorer 6 or Firefox 1.0 or • USB Port (for Print Server/UPS Monitoring function) higher) • Power Connector • E-Mail alerts • Syslog • Easy Search Utility • Yahoo! Widget D-Link DNS-343 User Manual…
-
Page 91: D-Link Dns-343 User Manual
• Packaging: 9.52” x 10.94” x 10.04” (242 x 278 x 255 mm) Weight • Item: 5.95 lbs (2.7 kg) • Packaging: 8.86 lbs (4.02 kg) Certifications • FCC Class B, CE, CSA Warranty • 1-year limited warranty D-Link DNS-343 User Manual…
-
Page 92: Contacting Technical Support
• Serial Number (s/n number located on the label on the bottom of the device). You can find software updates and user documentation on the D-Link website as well as frequently asked questions and answers to technical issues. For customers within the United States:…
-
Page 93: Warranty
Period or ninety (90) days, whichever is longer, and is subject to the same limitations and exclusions. If a material defect is incapable of correction, or if D-Link determines that it is not practical to repair or replace the defective Hardware, the actual price paid by the original purchaser for the defective Hardware will be refunded by D-Link upon return to D-Link of the defective Hardware.
-
Page 94
• The customer must submit with the product as part of the claim a written description of the Hardware defect or Software nonconformance in sufficient detail to allow D-Link to confirm the same, along with proof of purchase of the product (such as a copy of the dated purchase invoice for the product) if the product is not registered. -
Page 95
Damage that occurs in shipment, due to act of God, failures due to power surge, and cosmetic damage; Any hardware, software, firmware or other products or services provided by anyone other than D-Link; and Products that have been purchased from inventory clearance or liquidation sales or other sales in which D-Link, the sellers, or the liquidators expressly disclaim their warranty obligation pertaining to the product. -
Page 96
No part of this publication or documentation accompanying this product may be reproduced in any form or by any means or used to make any derivative such as translation, transformation, or adaptation without permission from D-Link Corporation/D-Link Systems, Inc., as stipulated by the United States Copyright Act of 1976 and any amendments thereto. -
Page 97: Registration
Registration Product registration is entirely voluntary and failure to complete or return this form will not diminish your warranty rights. D-Link DNS-343 User Manual…
Как работать с NAS D-Link DNS-343: как создать и настроить RAID массив, как настроить подключение по сети, добавить новую сетевую папку, и как восстанавливать данные с устройства?
Компания D-Link на сегодняшний день известна во всем мире своими маршрутизаторами и модемами, но помимо, производит устройства хранения для домашнего и офисного использования, такие как сетевое хранилище (NAS).
По большей части это оборудование соответствует стандарту и мало чем отличается от устройств от других производителей, и также, как и все NAS подвержено риску потери информации в случае повреждения или отказа оборудования.
Не зависимо от производителя все устройства NAS, как и жесткие диски, используемые с обычными компьютерами и ноутбуками, подвержены повреждению или отказу. И к сожалению, рано или поздно, это случается с каждым кто ежедневно пользуется компьютером.
Как и в случае с другими устройствами NAS, D-Link предоставляет возможность использовать множество томов, объединять несколько дисков в один, организовать сетевой доступ к хранилищу, обеспечивая при этом надежность хранения данных.
Сетевое хранилище объединяет накопители в RAID массивы, которые хоть и являются более безопасным хранилищем информации, но все же не исключают ее потери.
Восстановлении информации с NAS, используя различные программы для восстановления данных, не всегда бывает успешным. Некоторое программное обеспечение, может предоставить лишь частичный успех. А другие и вовсе повредить оставшуюся на дисках информацию. Чтобы этого избежать нужно правильно подобрать софт для восстановления.
Как создать RAID массив на NAS устройстве D-link
Для начала давайте разберем как создать RAID на NAS устройстве от D-link. При первом запуске, система предложит его настроить. Одним из этапов настройки будет создание массива из подключенных накопителей.
Для создания RAID массива на этом этапе настройки выберите нужный тип, в моем случае это RAID 5 из трех дисков, и затем нажмите Далее.
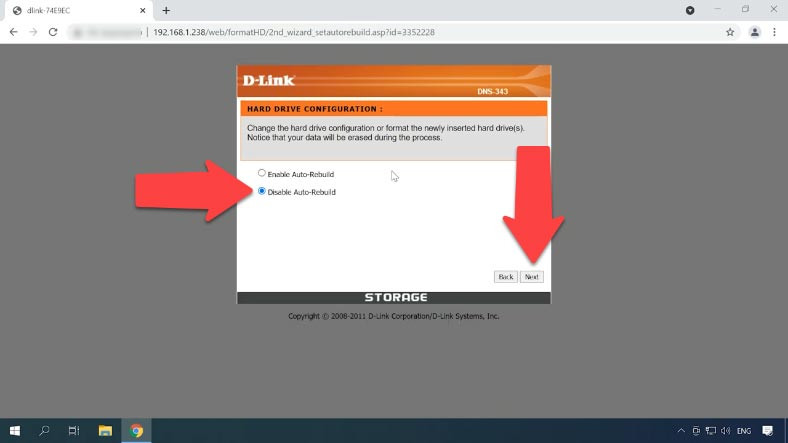
В следующем окне будет предложено включить авторебилд, жмем Далее для продолжения.
Затем нужно выбрать файловую систему, здесь предложено на выбор только две файловых системы EXT2 и 3. Выбираем более стабильную EXT3 и жмем по кнопке Next (Далее).
После начнется процесс инициализации и форматирования дисков. Если на данных накопителях хранится важная информация не забудьте сделать ее копию, так как восстановить ее после форматирования будет не просто.
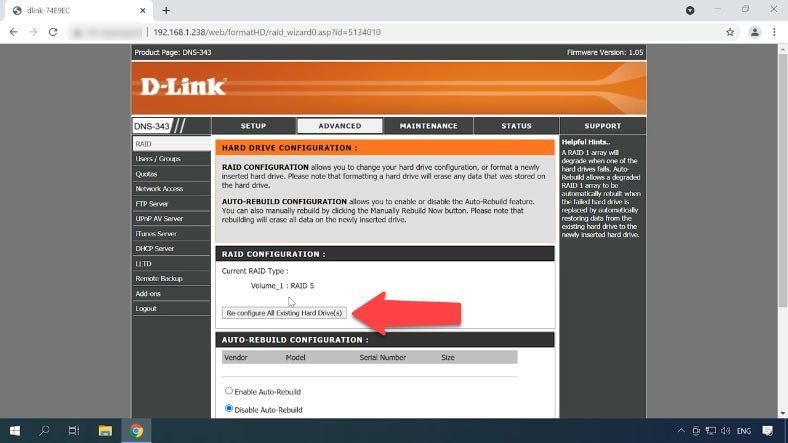
Закончив форматирование тома, система предложит перезагрузить устройство. RAID создан. Для того чтобы перенастроить, изменить уровень RAID или задать другой объём, кликните по кнопке реконфигурации.
Для изменения уровня RAID выберите его из списка и настройте по ранее представленной инструкции. Если нужно изменить его объём выберите расширенные настройки, затем тип массива, включить или выключить авторебилд, выбрать файловую систему, и на следующем этапе можно задать нужный объём – Далее.
Ждем окончания процесса инициализации. По завершению устройство будет готово к работе.
Как создать сетевую папку
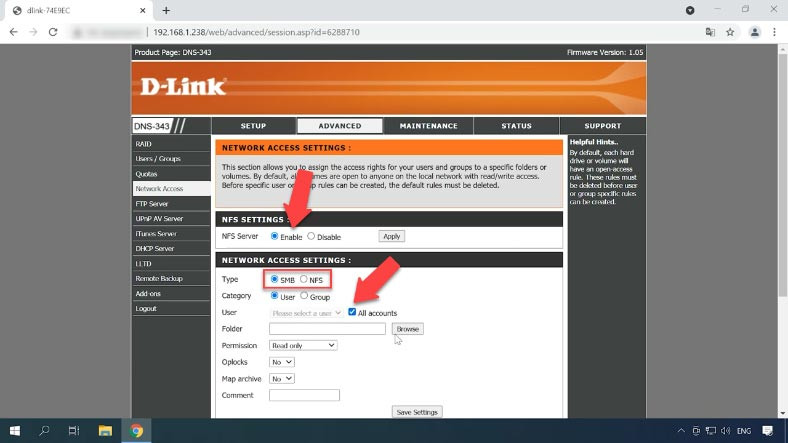
Теперь можно создать новую сетевую папку и настроить сетевой доступ. Для этого откройте вкладку Дополнительные (Advanced) – Сетевой доступ.
Выберите тип доступа к папке SMB или NFS, выберите пользователей данного каталога, можно выбрать всех.
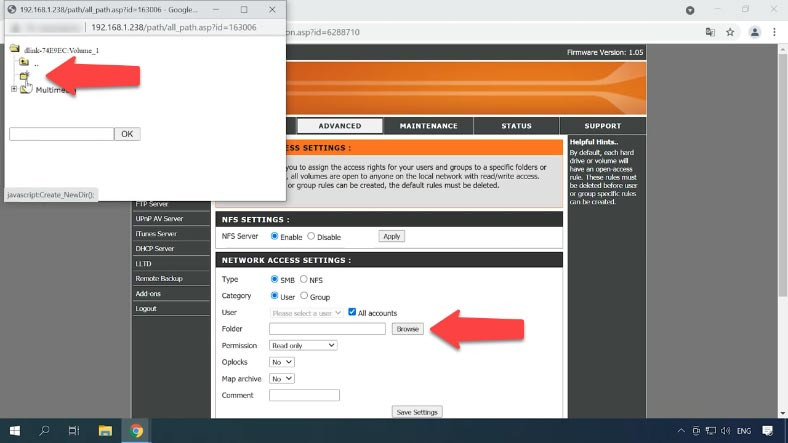
Затем жмем по кнопке Browse, переходим по пути где надо создать новую папку, жмем по значку Создать новую, задаем имя – Ок.
Осталось добавить разрешение чтение и записи и сохранить настройки, после чего папка станет доступна по сети. Подключаемся к ней по FTP и записываем данные.
Как восстановить данные с RAID NAS D-link DNS-343
Существует множество обстоятельств, которые могут привести к потере данных. Человеческая ошибка, форматирование и перезапись информации, перегрев, сбои питания, аппаратные и программные сбои, механические неисправности, выход из строя одного накопителя является чрезмерной нагрузкой на другие диски, при несвоевременной замене может привести к потере данных.
Если вы не можете получить доступ к данным, хранящимся на вашем сетевом диске, то можно использовать специально ПО для восстановления данных. Большинство NAS устройств форматирует жесткие диски с использованием файловой системы Linux, при подключении их напрямую к ПК с операционной системой Windows их не удастся прочесть без сторонних приложений. Поскольку в сетевых устройствах (NAS), системы управления RAID основаны на двух технологиях Linux RAID: mdadm и LVM, то программа обязана поддерживает обе эти технологии. Лучше всего выбрать комплексное решение для восстановления с NAS. Которое поможет восстановить файлы при различных сценариях и поддерживает большинство популярных файловых систем, и типов RAID.
Достаньте диски из NAS и подключите их к ПК. После загрузки ПК, к которому вы подключаете диски, ОС может попросить вас инициализировать их или «форматировать», не делайте этого, так как в результате восстановить данные будет непросто.
В случае с RAID 5 данные можно вернуть с нерабочего NAS даже при поломке одного диска. Если на материнской плате ПК, к которому вы подключаете диски, недостаточно SATA или разъёмов питания, можно подключить на 1 диск меньше.
Полную версию статьи со всеми дополнительными видео уроками смотрите в источнике. А также зайдите на наш Youtube канал, там собраны более 400 обучающих видео.
Инструкции и Руководства для D-Link DNS-343.
Мы нашли 7
инструкции доступные для бесплатного скачивания:
Инструкция по применению, Руководство пользователя, Спецификация, Техническая спецификация
D-Link DNS-343 Quick Installation Guide
Бренд:
D-Link
Категория:
NAS & storage servers
Размер:
3 MB
Страниц:
92
Язык(и):
Английский, Испанский, Индонезийский, Португальский, Русский
Открыть в новой вкладке
D-Link DNS-343 storage enclosure Datasheet
Бренд:
D-Link
Категория:
HDD/SSD enclosures
Размер:
166 KB
Язык(и):
Английский
Открыть в новой вкладке
D-Link DNS-343 User’s Manual
Бренд:
D-Link
Размер:
164 KB
Язык(и):
Английский
Открыть в новой вкладке
Dlink DNS-343-2TB Owner’s Manual
Бренд:
D-Link
Категория:
Networking
Размер:
7 MB
Страниц:
97
Язык(и):
Английский
Открыть в новой вкладке
D-Link DNS-343 Manuel du propriétaire
Бренд:
D-Link
Размер:
12 MB
Язык(и):
Французский
Открыть в новой вкладке
D-Link Tool Storage DNS-343 User manual
Бренд:
D-Link
Размер:
9 MB
Страниц:
85
Язык(и):
Английский
Открыть в новой вкладке
D-Link DNS-343-1TB Specifications
Бренд:
D-Link
Размер:
3 MB
Страниц:
2
Язык(и):
Английский
Открыть в новой вкладке
21 Октября 2021
arrow-right
Created with Sketch.
Андрей Мареев
430
В избр.
Сохранено
В этой статье тестируем NAS устройство от фирмы D-Link, модель DNS-343. Расскажем, как создать RAID массив, настроить сетевое подключение, как добавить новую сетевую папку, и как восстановить с него данные.
Компания D-Link на сегодняшний день известна во всем мире своими маршрутизаторами и модемами, но помимо, производит устройства хранения для домашнего и офисного использования, такие как сетевое хранилище (NAS).
По большей части это оборудование соответствует стандарту и мало чем отличается от устройств от других производителей, и также, как и все NAS подвержено риску потери информации в случае повреждения или отказа оборудования.
Не зависимо от производителя все устройства NAS, как и жесткие диски, используемые с обычными компьютерами и ноутбуками, подвержены повреждению или отказу. И к сожалению, рано или поздно, это случается с каждым кто ежедневно пользуется компьютером.
Как и в случае с другими устройствами NAS, D-Link предоставляет возможность использовать множество томов, объединять несколько дисков в один, организовать сетевой доступ к хранилищу, обеспечивая при этом надежность хранения данных.
Сетевое хранилище объединяет накопители в RAID массивы, которые хоть и являются более безопасным хранилищем информации, но все же не исключают ее потери.
Восстановлении информации с NAS, используя различные программы для восстановления данных, не всегда бывает успешным. Некоторое программное обеспечение, может предоставить лишь частичный успех. А другие и вовсе повредить оставшуюся на дисках информацию. Чтобы этого избежать нужно правильно подобрать софт для восстановления.
Как создать RAID массив на NAS устройстве D-link
Для начала давайте разберем как создать RAID на NAS устройстве от D-link. При первом запуске, система предложит его настроить. Одним из этапов настройки будет создание массива из подключенных накопителей.
Для создания RAID массива на этом этапе настройки выберите нужный тип, в моем случае это RAID 5 из трех дисков, и затем нажмите Далее.
В следующем окне будет предложено включить авторебилд, жмем Далее для продолжения.
Затем нужно выбрать файловую систему, здесь предложено на выбор только две файловых системы EXT2 и 3. Выбираем более стабильную EXT3 и жмем по кнопке Next (Далее).
После начнется процесс инициализации и форматирования дисков. Если на данных накопителях хранится важная информация не забудьте сделать ее копию, так как восстановить ее после форматирования будет не просто.
Закончив форматирование тома, система предложит перезагрузить устройство. RAID создан. Для того чтобы перенастроить, изменить уровень RAID или задать другой объём, кликните по кнопке реконфигурации.
Для изменения уровня RAID выберите его из списка и настройте по ранее представленной инструкции. Если нужно изменить его объём выберите расширенные настройки, затем тип массива, включить или выключить авторебилд, выбрать файловую систему, и на следующем этапе можно задать нужный объём — Далее.
Ждем окончания процесса инициализации. По завершению устройство будет готово к работе.
Как создать сетевую папку
Теперь можно создать новую сетевую папку и настроить сетевой доступ. Для этого откройте вкладку Дополнительные (Advanced) — Сетевой доступ.
Выберите тип доступа к папке SMB или NFS, выберите пользователей данного каталога, можно выбрать всех.
Затем жмем по кнопке Browse, переходим по пути где надо создать новую папку, жмем по значку Создать новую, задаем имя — Ок.
Осталось добавить разрешение чтение и записи и сохранить настройки, после чего папка станет доступна по сети. Подключаемся к ней по FTP и записываем данные.
Как восстановить данные с RAID NAS D-link DNS-343
Существует множество обстоятельств, которые могут привести к потере данных. Человеческая ошибка, форматирование и перезапись информации, перегрев, сбои питания, аппаратные и программные сбои, механические неисправности, выход из строя одного накопителя является чрезмерной нагрузкой на другие диски, при несвоевременной замене может привести к потере данных.
Если вы не можете получить доступ к данным, хранящимся на вашем сетевом диске воспользуйтесь программой для восстановления данных с RAID — Hetman RAID Recovery.
Большинство NAS устройств форматирует жесткие диски с использованием файловой системы Linux, при подключении их напрямую к ПК с операционной системой Windows их не удастся прочесть без сторонних приложений. Поскольку в сетевых устройствах (NAS), системы управления RAID основаны на двух технологиях Linux RAID: mdadm и LVM. Hetman RAID Recovery поддерживает обе эти технологии и в большинстве случаев может автоматически собирать такие RAID.
Это комплексное решение для восстановления данных с NAS, которое поможет восстановить файлы при различных сценариях. Программа поддерживает большинство популярных файловых систем, и типов RAID.
Достаньте диски из NAS и подключите их к ПК с операционной системой Windows. После загрузки операционной системы ПК, к которому вы подключаете диски, может попросить вас инициализировать их или «форматировать», не делайте этого, так как в результате восстановить данные будет непросто.
Утилита имеет автоматический расширенный механизм сканирования, предназначенный для обнаружения и восстановления данных NAS в различных сценариях потери данных.
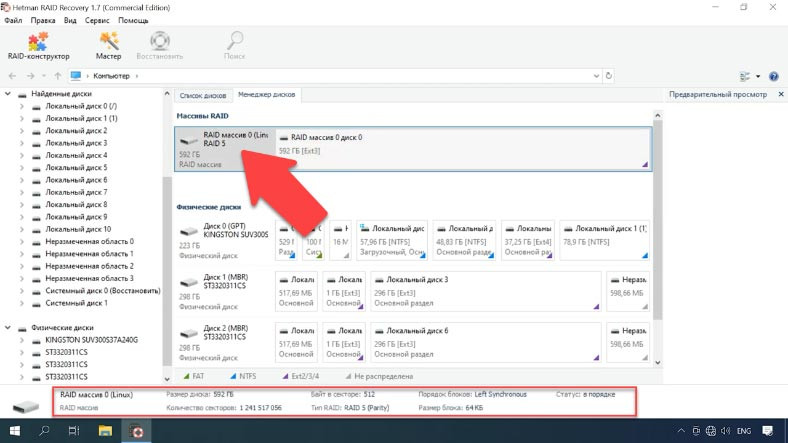
Программа в автоматическом режиме считает нужную информацию с накопителей из которых состоял разрушенный RAID и соберет его. RAID-масив будет отображаться в менеджере дисков, а краткая информация о нем — внизу окна программы, проверьте правильно ли утилита ее определила.
Для восстановления кликните по дисковому массиву правой кнопкой мыши и нажмите Открыть. Затем выберите тип анализа, и запустите сканирование.
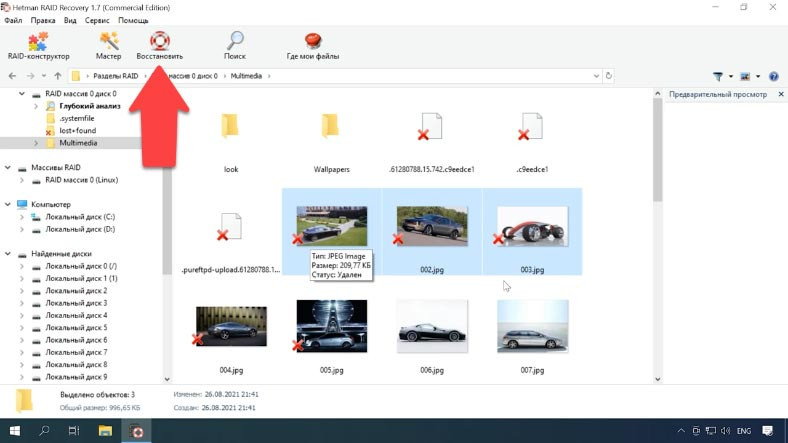
Программа без труда собрала из накопителей разрушенный RAID и нашла все файлы, которые на нем хранились. Утилита отображает даже те, которые ранее были удалены, они отмечены здесь красным крестиком.
Отметьте все что нужно вернуть и нажмите «Восстановить», затем укажите папку куда их сохранить. По завершении — все данные которые вы отметили будут лежать в указанном каталоге.
В случае с RAID 5 данные можно вернуть с нерабочего NAS даже без наличия одного диска. Если на материнской плате ПК, к которому вы подключаете диски, недостаточно SATA или разъёмов питания, можно подключить на 1 диск меньше.
Полную версию статьи со всеми дополнительными видео уроками смотрите в источнике. А также зайдите на наш Youtube канал, там собраны более 400 обучающих видео.
Блог проекта
Расскажите историю о создании или развитии проекта, поиске команды, проблемах и решениях
Написать
Личный блог
Продвигайте свои услуги или личный бренд через интересные кейсы и статьи
Написать


