 16:22
16:22
Антенна Dual Bester + Роутер Kroks Rt Cse5 sHW и Теле2 4G
 04:39
04:39
How to setup D Link DVX 2002F , DPH -150S
 02:55
02:55
Настройка телефона — D-link DPH-150S
 03:52
03:52
D-Link DPH-150S(E)/F3A
 00:23
00:23
Перевод звонка с D-LINK DPH-150S
 01:49
01:49
D-Link DPH-540 Wifi VOIP Phone
Руководство по быстрой установке D-Link DPH-400S 2
Системные требования
• Сеть Ethernet 10/100 Мбит/с
• Internet Explorer
TM
6.0 или Mozilla Firefox
TM
1.0 и
выше
Комплект поставки
• IP-телефон D-Link DPH-400SE (с PoE) или DPH-
400S (без поддержки PoE)
• Телефонная трубка
• Шнур телефонной трубки
• CD-диск
• Руководство по быстрой установке
• Адаптер питания
(выходная мощность: 5В/2A,
входная мощность:100~240В переменного тока)
• Кабель
Ethernet 5 категории
• Комплект винтов для настенного монтажа
• Гарантийный талон
D-Link
Если что-либо из перечисленного отсутствует, пожалуйста,
обратитесь к поставщику.
©2007 D-Link Systems, Inc. Все права защищены. Торговые марки или зарегистрированные
торговые марки являются собственностью их владельцев. Программное обеспечение и
спецификации могут изменяться без уведомления.

3 Руководство по быстрой установке D-Link DPH-400S
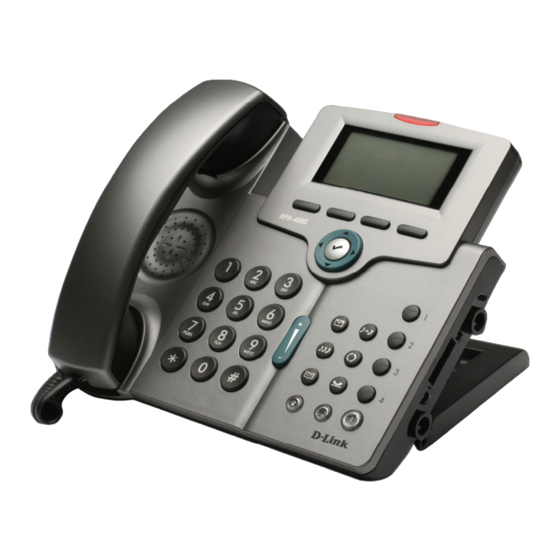
Обзор устройства
Телефонный аппарат DPH-400S позволяет совершать
звонки, используя сеть Интернет или корпоративную сеть
вместо традиционной телефонной сети общего
пользования (ТфОП). Телефон может совершать VoIP-
звонки и передавать данные между пользователями сети.
Серия телефонов DPH-400S включает модели: DPH-
400SE (с PoE), DPH-400S (без PoE) и DPH-400EDM
(модуль расширения клавиш).
Передняя панель
2
3
4
6
7
1
5
8
9
10
11
12
14
13
15
16
17
20
18
19

Руководство по быстрой установке D-Link DPH-400S 4
N
o
Наименование
Описание функции
0
Базовое устройство
IP-телефон
1
Рычаг для
телефонной трубки
Для размещения телефонной трубки
(верхний конец — динамик)
2
Рычажный
переключатель
Для снятия и повешения
телефонной трубки
3
Фиксатор
Фиксирует телефонную трубку от
падения, при установке телефона на
уровне 60
o
или на стене.
4
Динамик
Для звонка и общения в режиме
громкой связи
5
Нижний кредл
Для размещения телефонной трубки
(приемник – нижний конец)
6
Разъем для
телефонной трубки
Разъем RJ-9 расположен с левой
стороны IP-телефона
7
Разъем для
проводной гарнитуры
Разъем RJ-9 с диаметром 2.5мм
расположен с левой стороны
телефона
8
Индикатор сообщения
Красный индикатор указывает на
ожидание сообщения.
9
Графический дисплей
Экран для отображение настроек,
номера телефона, статусе звонка и
так далее. Он поддерживает
разрешение 128 x 64 пикселей.
10
Функциональные
клавиши
Клавиши используются для выбора
пунктов меню или управления.
Каждая функциональная клавиша
зависит от соответствующего
контента на экране.
11
Клавиша OK [P]
Обычно используется для
подтверждения настройки или
набора телефонного номера
12
Навигационные
клавиши
Сюда входят 4 клавиши со
стрелками 3456, используемые
для навигации по пунктам на экране.

5 Руководство по быстрой установке D-Link DPH-400S
13
Цифровые
клавиши 1,2,3,4
Эти клавиши могут использоваться
для выбора линий или
программируемых функций. Зеленый
индикатор, соответствующий каждой
клавише, указывает на статус
линии/вызова.
14
Клавиша SPKR
Клавиша SPKR используется для
активации/деактивации режима
громкой связи. Зеленый индикатор
указывает на то, что телефон
работает в режиме громкой связи.
15
Клавиша MUTE
Клавиша MUTE используется для
активации/деактивации передачи
голоса из этого IP-телефона.
Красный индикатор указывает на то,
что данная функция включена.
16
Клавиша
гарнитуры
Клавиша гарнитуры используется
для активации/деактивации
проводной гарнитуры. Зеленый
индикатор указывает на включение
данной функции.
17
Клавиша XFR
Для переадресации вызова на
другой IP-телефон.
Клавиша REDIAL
Для автоматического набора
последнего набранного номера.
Клавиша HOLD
Удержание текущего звонка и
получение нового вызова.
Повторное нажатие отключает
функцию удержания.
Клавиша MSG
Доступ к голосовым сообщениям для
поиска сообщения
Клавиша CONF
Объединение нескольких текущих
телефонных соединений в
конференцию.

Обзор боковой панели, Разъем для телефонной трубки разъем для гарнитуры
Страница 6
- Изображение
- Текст
Руководство по быстрой установке D-Link DPH-400S 6
Адресная книга
Для входа в телефонную книгу для
совершения вызовов или
редактирования. При нажатии на
кнопку на экране появится
телефонная книга.
18
Клавиша регулировки
громкости
Используется для регулировки
громкости: при бездействии
телефона регулируется громкость
звонка. При общении регулируется
громкость телефонной
трубки/динамика/гарнитуры.
19
[1], [2]…[9], [*], [0], [#]: Цифровая
клавиатура для набора номеров
20
Отверстие микрофона
Маленькое отверстие для режима
громкой связи расположено на
передней панели IP-микрофона.
Обзор боковой панели
Разъем для
телефонной трубки
Разъем для
гарнитуры

Описание функции порта, Порты и индикаторы, Задняя панель
Наименова ние описание функции порта
- Изображение
- Текст
7 Руководство по быстрой установке D-Link DPH-400S
Задняя панель
Порты и индикаторы
No
Наименова
ние
Описание функции порта
1
Кнопка Reset
Восстанавливает параметры настройки,
заданные по умолчанию
2
Link/Activity
Отображает статус соединения на портах WAN
и LAN
3
Порт WAN
Порт Ethernet 100/10 Мбит/с с разъемом RJ-45
для подключения к IP сети
4
Порт LAN
Порт Ethernet 100/10 Мбит/с с разъемом RJ-45
для подключения компьютера или ноутбука
5
Разъем
питания
Если требуется источник питания, то,
пожалуйста, используйте стандартный адаптер
питания из комплекта поставки (5 В
постоянного тока/ 2000mА)
6
Источник
питания
(опционально)
Этот переключатель доступен только на
моделях с поддержкой PoE. Существует два
доступных источника питания: из адаптера
питания или PoE (питание через Ethernet). По
умолчанию используется адаптер. Перед
установкой, пожалуйста, установите
переключатель в нужное положение. По
умолчанию переключатель настроен на
адаптер питания.

Руководство по быстрой установке D-Link DPH-400S 8
Таблица ниже описывает статус индикаторов на IP-телефоне:
Индикатор
Цвет
Статус
Описание
MSG
Красный
Выключен
Нет новых сообщений
Мигает
Новое голосовое сообщение
Клавиши
выбора
VoIP-линии
1,2,3,4
Зеленый
Выключен
Линия неактивна. Телефон в
режиме ожидания.
Постоянный
Линия активна (набор
номера или во время
вызова)
Мигает
Входящий вызов при другом
входящем вызове
Клавиша
SPKR
Зеленый
Выключен
Динамик не используется
Постоянный
Режим набора номера без
снятия трубки или режим
громкой связи
Клавиша
MUTE
Красный
Выключен
Микрофон включен
Постоянный
Микрофон выключен
Клавиша
гарнитуры
Зеленый
Выключен
Гарнитура не используется
Постоянный
Режим набора номера без
снятия трубки или режим
громкой связи с
использованием гарнитуры
Все
индикаторы
для статуса
системы
Зеленый
Выключен
Нормальный режим работы
Постоянный
Во время загрузки системы
Мигает
Неудачная загрузка системы
или критическая ошибка

9 Руководство по быстрой установке D-Link DPH-400S
Установка
Подключение к сети и к компьютеру
Следуйте схеме ниже для подключения портов телефона
к различным устройствам.
Если коммутатор Ethernet switch поддерживает функцию PoE
(питание через Ethernet,то телефон может получать питание
по порту LAN. При этом адаптер питания не требуется.

Руководство по быстрой установке D-Link DPH-400S 10
Начало работы
При успешной регистрации IP-телефона DPH-400SE/DPH-
400S на SIP-сервере можно начать работу с телефоном. Для
начала, пожалуйста, обратитесь к настройкам параметров
LCM.
Настройка параметров LCM
Действие
Описание
Восстановит
ь параметры
настройки,
заданные по
умолчанию
(из меню)
1. Нажмите кнопку “Config”.
è
На экране появится поле
ввода номера линии
2. Используйте клавиатуру для
ввода номера линии.
è
Admin
3. Используйте навигационные
клавиши для выбора пункта
Admin, чтобы войти в меню
администратора. Нажмите
клавишу
для
подтверждения выбора
è
На экране появится поле
ввода пароля администратора
4. Используйте клавиатуру для
ввода пароля администратора и
нажмите клавишу
для
подтверждения. Отметьте, что
пароль по умолчанию такой
1234.
è
Reset
5. Выберите пункт Reset
è
На экране появится
сообщение с просьбой
подтвердить выбор

Комментарии
Для ознакомления с инструкцией необходимо нажать на ссылку «ЗАГРУЗИТЬ», чтобы скачать pdf файл. Если есть кнопка «ПРОСМОТР», то можно просто посмотреть документ онлайн.
Для удобства, Вы можете сохранить данную страницу с файлом руководства по эксплуатации в свой список «избранное» прямо на сайте (доступно для зарегистрированных пользователей).
Смотрите инструкцию для похожих моделей:

Вы можете задать вопрос посетителям сайта по модели D-LINK DPH-400SE. Если Вы являетесь её пользователем, то пожалуйста оставьте, по возможности развёрнутый отзыв:
-
Contents
-
Table of Contents
-
Troubleshooting
-
Bookmarks
Quick Links
Table of Contents
D-Link DPH-400S(SE) User Manual
1
Related Manuals for D-Link DPH-400S
Summary of Contents for D-Link DPH-400S
-
Page 1
Table of Contents D-Link DPH-400S(SE) User Manual… -
Page 2: Table Of Contents
Review missed phone calls ………….19 …………….53 ……..20 HONEBOOK IEWING HONE ETTING NFORMATION View information about the IP Phone ……….20 TROUBLESHOOTING …………..54 ADVANCED OPERATIONS…………22 CONTACTING TECHNICAL SUPPORT ……..55 …………..22 ETWORK ETTINGS …………24 DVANCED PERATIONS 3-way conference call…………..24 D-Link DPH-400S(SE) User Manual…
-
Page 3: Product Overview
• Wall-mounting template sheet • D-Link Warranty Guide Caution: Using a power supply with a different voltage rating than the one included with the DPH-400S(SE) will cause damage and void the warranty for this product. System Requirements • 10/100Mbps Ethernet network environment •…
-
Page 4: Introduction
Introduction The DPH-400S(SE) IP Phone is an Internet Telephony desktop phone that connects to a digital network rather than the traditional PSTN line. Basically, it needs to be connected to a LAN enterprise network and works as an office phone. Like a traditional office telephone, it can deliver good voice quality and perform a great number of PBX-equivalent call features.
-
Page 5
When you receive a call, the caller’s phone number is shown on the screen if the caller didn’t choose to hide his number and if the network supports the Caller ID feature. The IP Phone will display both the Caller ID and the User ID of the caller if it is available. D-Link DPH-400S(SE) User Manual… -
Page 6: Features And Specifications
-Supports VAD (Voice Auto Detection) and CNG (Comfort Noise Generation) -Supports AGC (Automatic Gain Control) -Volume adjustable for Handset, Headset, Speakerphone and Speakerphone Ring output. -Support G.165 16ms line Echo Cancellation (AEC). -Adaptive Jitter Buffering function supported. D-Link DPH-400S(SE) User Manual…
-
Page 7
This equipment complies with the requirements relating to electromagnetic compatibility, EN55022 class B for ITE and EN 50082-1. This meets the essential protection requirements of the European Council Directive 89/336/EEC on the approximation of the laws of the Member States relating to electromagnetic compatibility. D-Link DPH-400S(SE) User Manual… -
Page 8: Hardware Overview
1,2,3,4 Number keys This Speaker key is used to turn on and off the hands-free dial or talk feature. A green LED is associated to indicate its status. Speaker key D-Link DPH-400S(SE) User Manual…
-
Page 9
Handset/Speaker/Headset output volume is adjusted. Volume Control key [1], [2]…[9], [*], [0], [#]: The numeric keypad is used for dialing numbers. Built-in Microphone The built-in microphone is on the front edge of the IP phone. D-Link DPH-400S(SE) User Manual… -
Page 10: Leds And Lcd Screen Indicators
When system booting failed or critical error The following figure shows the format of the LCD screen. There are 4 soft keys used to operate the LCD display. The display format will be different for other menus or status settings. D-Link DPH-400S(SE) User Manual…
-
Page 11
2. When you enable DND, “*DND* “ is displayed instead of the Date & Time on the top of the LCD Screen. 3. When you enable Phone Lock, “ PHONE LOCKED….” Is displayed on the LCD Screen. You can input user password or administrator password to unlock the phone. D-Link DPH-400S(SE) User Manual… -
Page 12: Rear View And Connections
Section 1 — Product Overview Rear View and Connections Part Name Description of function Wall-Mount Hole Used to mount the phone on the wall. D-Link DPH-400S(SE) User Manual…
-
Page 13
RJ-45 10/100Mbps Ethernet port for connecting to an IP network RJ-45 10/100Mbps Ethernet port for connecting to a PC or Notebook PC port Power Jack If a power source from a power adapter is required, please use the power adaptor supplied in the package (5VDC/2A). D-Link DPH-400S(SE) User Manual… -
Page 14: Installation
Set up the stand and place the phone on the desk (see steps below). Step 1 Step 2 Step3 ° ° ° Angle Angle Angle Use the handset cord to connect the handset to the handset port on the left side of the phone. D-Link DPH-400S(SE) User Manual…
-
Page 15
Connect the external power adapter to the phone. For the DPH-400SE, if your Ethernet switch supports PoE (Power over Ethernet), the phone can be powered through the LAN port, so there is no need to connect the power adapter. Finally, connect the power adapter to a power outlet. D-Link DPH-400S(SE) User Manual… -
Page 16: Configure Your Ip Phone For Service
The menu to configure your IP Phone is as follows: You can navigate through the menu with the navigator control keys . The following sections will describe how you can setup your IP Phone through this menu. D-Link DPH-400S(SE) User Manual…
-
Page 17: General Operations
The Mute key lights red. At this point, you can speak and the other party will not hear anything. Adjust the voice During a conversation, if the voice volume is too low or too high, you may adjust it. volume during a conversation Press the volume control key to adjust the volume. D-Link DPH-400S(SE) User Manual…
-
Page 18: Call Record
Use the navigator control keys to review the different dialed calls. You may choose to redial the number (using the Dial soft key). Press the Cancel soft key to exit the menu. Press the left navigator control key 2 times to exit the Configuration menu. D-Link DPH-400S(SE) User Manual…
-
Page 19: Review Received Calls
Use the keypad to enter a line number (1-4) and confirm with the OK key calls Select the item Call Record to enter the Call logs menu. Press the OK key to confirm the selection. Call Record D-Link DPH-400S(SE) User Manual…
-
Page 20: Viewing Phone Setting Information
Use the navigator control keys to select the item 5.Info and confirm with the OK key to enter the Info Phone menu. Info Use the navigator control keys to choose the information you would like to review. Press the left navigator control key 3 times to exit the Configuration menu. D-Link DPH-400S(SE) User Manual…
-
Page 21
The following information can be reviewed from the LCD screen of your IP Phone: Company Model Name Firmware Number MAC Address IP Address Subnet Mask Default Gateway DHCP Status DNS Server SIP Proxy Server SIP Outbound Proxy Registrar Server Outbound Registrar Register Status Service Number D-Link DPH-400S(SE) User Manual… -
Page 22: Advanced Operations
“1234” for the Admin Password and confirm with the OK key The LCD screen displays the Admin Setting menu. Select the item Network and then the item Network Type. Select Static IP. The LCD screen prompts you the enter the IP address of your IP Phone. D-Link DPH-400S(SE) User Manual…
-
Page 23
The LCD screen prompts you to select On or Off for the DHCP feature. Select On and press the OK key to confirm. Press the left arrow key 5 times to exit the menu. Select Yes and press the OK key to save the settings. D-Link DPH-400S(SE) User Manual… -
Page 24: Advanced Call Operations
Use the keypad to dial the phone number. You may also choose a phone number from the phonebook or from your speed dial list. The IP phone will call the other party. D-Link DPH-400S(SE) User Manual…
-
Page 25
You may talk with the transfer target prior to letting them join the conference. When you are ready to start the conference, press the Conference key The LCD screen will show that the two calls are in a conference. D-Link DPH-400S(SE) User Manual… -
Page 26: Call Hold
Use the keypad to dial the phone number. You can also choose a phone number from the phonebook or from your speed dial list. The call will be transferred automatically to the other party. You can hang up the phone. D-Link DPH-400S(SE) User Manual…
-
Page 27: Call Transfer (Attended Transfer)
Dial the transfer target phone number. You can talk with the transfer target prior to transferring the call. When you are ready to transfer the call, press the transfer key. You can hang up the phone. D-Link DPH-400S(SE) User Manual…
-
Page 28: Phonebook
Find the number you would like to delete, then press the Del soft key. Press the Phonebook key Dial a Phonebook number Find the number you would like to dial using the navigator control keys, then press the Dial soft key to dial the number. D-Link DPH-400S(SE) User Manual…
-
Page 29: Speeddial
If you want to add a new number, find an empty position, then press the Edit soft key to enter the new number. If you want to edit an existing number, find the number you would like to edit using the navigator control keys, then press the Edit soft key to edit the number. D-Link DPH-400S(SE) User Manual…
-
Page 30: Speeddial (Delete A Number)
Pick up the handset or press a line button (if you want to dial hands-free). Dial a Press the SPD (SpeedDial) soft key. SpeedDial number Enter the SpeedDial number you would like to dial using the keypad. D-Link DPH-400S(SE) User Manual…
-
Page 31: Caller Blocking
If you want to add a new number, find an empty position, then press the Edit soft key to enter the new number. If you want to edit an existing number, find the number you would like to edit using the navigator control keys, then press the Edit soft key to edit the number. D-Link DPH-400S(SE) User Manual…
-
Page 32: Caller Blocking (Delete A Number)
You may directly enter the desired number using the keypad or use the navigator control keys to browse all the blocked Caller ID numbers. Find the number you would like to delete, then press the Del soft key. D-Link DPH-400S(SE) User Manual…
-
Page 33: Call Forward
Enter the phone number and confirm with the OK key Forward Number Note: If you select No Answer Forward, you will also be prompted to enter the timeout value (No Answer Time) in seconds before redirecting the call to the forward number. D-Link DPH-400S(SE) User Manual…
-
Page 34: Auto Answer
Use the navigator control keys to select the item 6.DND and press the OK key to enter the Do Not Disturb menu. Use the navigator control keys to turn on or off the DND feature and confirm with the OK key D-Link DPH-400S(SE) User Manual…
-
Page 35: Phone Lock
Use the navigator control keys to select the item 10.Phone Lock and press the OK key to enter the Phone Lock menu. Phone Lock Use the navigator control keys to turn the phone lock On or Off. D-Link DPH-400S(SE) User Manual…
-
Page 36: Reset To Factory Default Settings
Use the keypad to enter the Admin password and confirm by pressing the OK key . The default settings password is 1234. Select the item 8.Reset. The LCD screen prompts you to confirm the selection. Reset Select Yes and confirm by pressing the OK key to reset the settings. D-Link DPH-400S(SE) User Manual…
-
Page 37: Configuration
Section 5 — Configuration CONFIGURATION Web-based Configuration This section will show you how to configure your new D-Link IP Phone using the web-based configuration interface. The default network settings are the following: Default IP address/ Subnet mask: 192.168.1.10 / 255.255.255.0 Default Gateway: 192.168.1.1…
-
Page 38: Information
The INFORMATION page displays a summary overview of your IP Phone, including the device software version and a summary of your Internet configuration. Click on the Reboot button to reboot the system. Click on the Logout button to logout system and close the browser window. D-Link DPH-400S(SE) User Manual…
-
Page 39: Setup
EAP-TLS, or OFF. you only need to input the 802.1x Identity 802.1x Type and 802.1x Password. If you select EAP-TLS, you need to select the CA and Private key file and upload them to the phone. D-Link DPH-400S(SE) User Manual…
-
Page 40
Click on the Logout button to logout and close the browser window. Note: You have to reboot your phone in order to enable any changed network settings. Please go to the Information page to reboot your Phone. D-Link DPH-400S(SE) User Manual… -
Page 41
Set the Time Format Time Zone Set the Time Zone Click Save Settings to save changes in this page. Click Cancel to discard all changes in this page. Click Logout to logout and close the browser window. D-Link DPH-400S(SE) User Manual… -
Page 42: Phone Settings
Lock or unlock the phone Enable Call Waiting Turn on/off Call Waiting Enable CLIP Turn on/off CLIP Enable CLIR Turn on/off CLIR Enable Hold Reminder Turn on/off Hold Reminder Enable Silence Turn on/off Silence Suppression Suppression D-Link DPH-400S(SE) User Manual…
-
Page 43
Click on the Save Settings button to save changes in this page. Click on the Cancel button to discard all changes in this page. Click on the Logout button to logout and close the browser window. D-Link DPH-400S(SE) User Manual… -
Page 44
Section 5 — Configuration EDM SETTINGS After you connect the DPH-400EDM to DPH-400S(SE), you will be able to see this EMD setting page on the web-based configuration interface. This setting page shows that DPH-400EDM supports a maximum of 22 speed dial settings and 22 feature keys settings. -
Page 45: Sw Upgrade
HTTP/TFTP/FTP. Here is the description of each field from the screen: Select Firmware You can download the latest firmware from D-Link’s website. Click Browse to find the file on your computer. Click Upload to load the new firmware to the phone, and wait a moment, don’t close…
-
Page 46
Hint: If there are errors when you update the software and the phone doesn’t work, please hold the first soft key when rebooting. Then you can see the hint on the LCD screen. The phone will update the software from 192.168.1.11 after pressing the navigator OK key. D-Link DPH-400S(SE) User Manual… -
Page 47: Sip
Phone Number User Name User Name Authorized ID Authorized ID Authorized Password Authorized Password The called phone will show Enable Caller ID your display name Display Name Display Name Locating SIP Server Enable Locating SIP Server D-Link DPH-400S(SE) User Manual…
-
Page 48
Click on the Save Settings button to save changes in this page. Click on the Cancel button to discard all changes in this page. Click on the Logout button to logout and close the browser window. D-Link DPH-400S(SE) User Manual… -
Page 49
Click on the Save Settings button to save changes in this page. Click on the Cancel button to discard all changes in this page. Click on the Logout button to logout and close the browser window. D-Link DPH-400S(SE) User Manual… -
Page 50
“Prefix Entry Type” is “Add” Prefix Entry Setting mode, the “Prefix Entry Replace” will be added to the “Prefix Entry Pattern”. For example, the “Prefix Entry Pattern” is 220 and the “Prefix Entry Replace” is 210. When D-Link DPH-400S(SE) User Manual… -
Page 51
The following are a description of the syntax used for each pattern: Symbol Description 0, 1, 2, 3, 4, 5, 6, 7, 8 ,9 Digit symbol Wildcard matching any symbol *, #, . Other keypad symbol 0 or more of the preceding symbol or [] expression D-Link DPH-400S(SE) User Manual… -
Page 52
: Lets you dial any 5-digit number starting with 42 or any 8-digit number starting with a 0 followed by 2 or 3. 4X+9 : Let’s you dial any n-digit number starting with 4 and ending with 9. D-Link DPH-400S(SE) User Manual… -
Page 53: Phonebook
Then press on the “Dial” button in order to start dialing. Click on the Save Settings button to save changes in this page. Click on the Logout button to logout and close the browser window. D-Link DPH-400S(SE) User Manual…
-
Page 54: Troubleshooting
I cannot connect to the Check if the Ethernet cable is properly connected. configuration website of the IP Check the IP address of the IP phone. Check if your firewall/NAT settings are correct. phone D-Link DPH-400S(SE) User Manual…

Руководство по быстрой установке D-Link DPH-400S 12
Просмотр
пропущенных
телефонных
вызовов
1. Нажмите кнопку “Config”.
è
На экране появится поле
ввода номера линии
2. Используйте клавиатуру для
ввода номера линии.
è
Call
Record
3. Используйте навигационные
клавиши для выбора пункта Call
Record, чтобы войти в меню
журнала вызовов. Нажмите
клавишу
для
подтверждения выбора
è
Missed
Calls
4. Выберите пункт Missed Calls
(пропущенные вызовы) и
подтвердите выбор пункта с
помощью клавиши
.
5. Используйте навигационные
клавиши для отображения
пропущенных. Если номер вам
известен, то можно набрать его
(с помощью функциональной
клавиши “Redial”).
6. Нажмите функциональную
клавишу “Cancel” для выхода из
меню.
Настройка телефона через web-браузер
IP-телефон поддерживает настройку через web-интерфейс. Для
настройки можно использовать web-браузер, такой как Microsoft™
Internet Explorer. IP-адрес IP-телефона по умолчанию:
192.168.1.10 /
255.255.255.0
Ip-Телефон D-Link DPH-400SE инструкция на русском языке, характеристики
Технические характеристики
| Тип | проводной телефон |
| Категория | VoIP |
| Громкая связь (спикерфон) | есть |
| Дисплей | есть |
| Автоответчик | есть |
| Конференц-связь | есть |
| Голосовая почта | есть |
| Количество мелодий звонка | 10 |
| Телефонная книга | есть, 100 номеров |
| Быстрый набор | 4 номеров |
| Расположение | на базе |
| Тип | монохромный |
| Сетевые порты | 2 x Ethernet 10/100 |
| Протоколы VoIP | SIP v2 |
| Голосовые кодеки | G.711 A-law, G.711 µ-law, G.726 |
| Расположение кнопок | на базе |
| Цвет | серебристый |
| Размеры базового блока (ШxВxГ) | 145x195x211 мм |
| Вес базового блока | 1000 г |