-
Contents
-
Table of Contents
-
Troubleshooting
-
Bookmarks
Quick Links
S/M NO.: WF55900200
DAEWOO ELECTRONICS CO., LTD.
612-1, AHYEON-DONG, MAPO-GU,
SEOUL, KOREA.
C.P.O. BOX 8003 SEOUL KOREA
TELEX: DWELEC K28177-8
CABLE:»DAEWOOELEC»
FAX: (02) 364-5588
TEL: (02) 360-7381-7389
PRINTED DATE: NOV. 1995
Programmable Washing Machine
DWF-5590DP
DWF-5590D
Series
Caution
: In this Manual, some parts can be changed for improving, their
performance without notice in the parts list. So, if you need the
latest parts information,please refer to PPL(Parts Price List) in
Service Information Center (http://svc.dwe.co.kr).
DAEWOO ELECTRONICS CO., LTD.
Summary of Contents for Daewoo DWF-5590DP Series
Господа!!! Может кто знает где находится клапан
слива воды из бака у стиралки Daewoo DWF 5590DP.
Проблема: после набора воды и запуска стирки
не перекрывается клапан бочка и вода
уходит.
Потратил полдня так и не нашел.
Заранее спасибо.
Регистрация: 29.10.2005
Москва
Сообщений: 4132
А на какой высоте подключён к канализации шланг слива?
Регистрация: 14.02.2007
Самара
Сообщений: 1786
Запомните раз и навсегда -никакого клапана там нет и не было.А то что у вас происходит -классический самослив.Конец шланга должен быть не ниже уровня воды в барабане стиралки и не должен герметично соединятся с канализацией.Сколько раз такое было,приходил-перевешывал шланг на ванную и брал за это деньги.Многие с пеной у рта пытались доказать -вот 2-5-8 лет все работало,а теперь нет.Привожу в качестве аргумента закон о сообщающихся сосудах.Читайте инструкцию.
2 ЖАХ
В инструкции обязательно должно быть написано про минимальную высоту подключения шланга слива. А также и про его максимальную длину
В том-то и дело что в инструкции про это ни-ни.
«Cливной шланг должен быть направлен в емкость для слива воды (например в ванну) или подсоеденен к вертикально установленной каналазационной трубе.»
До этого машинка была подключена к сифону под раквиной, на высоте приблизительно 2/3 от
уровня воды в барабане и вода в барабане держалась на уровне меток(т.е выше слива на 10-15см).
Что-то не могу себе представить чтобы конструкцией не был предусмотрен обратный клапан.
Нет там обратного клапана.
Так что же получается если нет клапана то, чтобы подключить к канализации нужно
шланг где-то поднять на уровень воды в баке?
Регистрация: 29.10.2005
Москва
Сообщений: 1075
Стандартная рекомендация. Сливной шланг должен быть подсоединен к канализационному стояку 40-50 мм на высоте 70-100 см. Не выше и не ниже. И стояк должен быть не тоньше 40мм.
Можно еще в ванну. Но тут уж ничего дополнительно не скажешь — только закрепить, чтобы напором не скинуло с бортика.
А если шлангом сделать петлю на высоту тех же 70-100 см и потом в канализацию?
Регистрация: 29.10.2005
Сообщений: 1163
ЖАХ написал :
А если шлангом сделать петлю на высоту тех же 70-100 см и потом в канализацию?
Так оно по нармальному и делается. Взади стиралки есть крючок для закрепления петли.
Левша1 написал :
А то что у вас происходит -классический самослив.
Эт точно.
Левша1 написал :
Конец шланга должен быть не ниже уровня воды в барабане стиралки
Вот это ерунда, смотри про петлю.
Регистрация: 29.10.2005
Москва
Сообщений: 1075
ЖАХ написал :
А если шлангом сделать петлю на высоту тех же 70-100 см и потом в канализацию?
Ребята, рекомендация дана именно для предотвращения самослива. На высоте 70-100 см должен быть переход диаметра на гораздо больший. Это даст возможность разорвать струю.
Регистрация: 29.10.2005
Москва
Сообщений: 99412
Спасибо всем!!!
Буду думать.
А мне недавно DAEWOO DWF-5590DP досталась по наследству, инструкции нет. Подключил, пробую без белья. Стирку делает, откачивает воду, а потом загорается и моргает «LE», пищит и ни на что не реагирует, кроме выкл. Попробовал просто полоскание вкл. прополоскала и то же. Центрифугу — загудела и сразу «LE».
Что делать?
Sologon
«LE» — А не открыта ли дверца? Такой код.
Блин, не думал что у ней такое. Дверца сверху и всё такое. А заработала!!!!!!!!!! Спасибо !!!!!!!! Ещё бы кто помог разобраться с управлением. Всё по не нашему. Кучка предустановок, а что означают ф. разберёшь.
Sologon написал :
А заработала!!!!!!!!!! Спасибо !!!!!!!!
Вообще-то я тролль, так что не стоит благодарностей, то что я пишу — исключительно для привлечения внимания к собственной персоне.
Перезвоните мне
Для жителей Москвы и Московской области, Санкт-Петербурга и Ленинградской области
Отправляя заявку онлайн, вы получаете скидку 10% на ремонт
Ваше имя
Тект ошибки
Ваш телефон
Тект ошибки
Чтобы мы могли с вами связаться
Нажимая на кнопку, я даю согласие на обработку своих персональных данных
Ваша заявка отправлена!
В течение 15 минут менеджер свяжется с Вами.

DAEWOO ELECTRONICS CO., LTD.
612-1, AHYEON-DONG, MAPO-GU, SEOUL, KOREA.
C.P.O. BOX 8003 SEOUL KOREA TELEX: DWELEC K28177-8 CABLE:»DAEWOOELEC»
FAX: (02) 364-5588 TEL: (02) 360-7381-7389
|
S/M NO.: WF55900200 |
PRINTED DATE: NOV. 1995 |
Service Manual
Programmable Washing Machine
DWF-5590DP
DWF-5590D
Series
DAEWOO ELECTRONICS CO., LTD.

TABLE OF CONTENTS
|
1. SPECIFICATIONS………………………………………………………………………………………………………………………………………………… |
2 |
|
2. FEATURE AND TECHNICAL EXPLANATION ……………………………………………………………………………………………………….. |
3 |
|
FEATURE OF THE WASHING MACHINE……………………………………………………………………………………………………………….. |
3 |
|
WATER CURRENTS TO ADJUST THE UNBALANCED LOAD………………………………………………………………………………….. |
3 |
|
FUNCTION FOR SOAK WASH ………………………………………………………………………………………………………………………………. |
3 |
|
AUTOMATIC WATER SUPPLY SYSTEM FOR BLANKET WASH ……………………………………………………………………………… |
3 |
|
PULSATOR SYSTEM…………………………………………………………………………………………………………………………………………….. |
4 |
|
AUTOMATIC DRAINING TIME ADJUSTMENT ………………………………………………………………………………………………………… |
4 |
|
SOFTENER DISPENSER ……………………………………………………………………………………………………………………………………….. |
5 |
|
AUTOMATIC UNBALANCE ADJUSTMENT …………………………………………………………………………………………………………….. |
6 |
|
CIRCULATING-WATER COURSE AND LINT FILTER ………………………………………………………………………………………………. |
6 |
|
RESIDUAL TIME DISPLAY …………………………………………………………………………………………………………………………………….. |
7 |
|
DRAIN MOTOR …………………………………………………………………………………………………………………………………………………….. |
7 |
|
GEAR MACHANISM ASS’Y …………………………………………………………………………………………………………………………………… |
8 |
|
PRINCIPLE OF BUBBLE GENERATOR…………………………………………………………………………………………………………………… |
8 |
|
FUNCTIONAL PRINCIPLE OF BUBBLE WASHING MACHINE…………………………………………………………………………………. |
9 |
|
3. STRUCTURE OF THE WASHING MACHINE ………………………………………………………………………………………………………. |
10 |
|
4. FUNCTION OF THE CONTROL PANEL………………………………………………………………………………………………………………. |
11 |
|
5. DIRECTIONS FOR INSTALLATION AND USE…………………………………………………………………………………………………….. |
13 |
|
HOW TO INSTALL THE WASHING MACHINE ………………………………………………………………………………………………………. |
13 |
|
HOW TO CONNECT THE INLET HOSE ………………………………………………………………………………………………………………… |
14 |
|
HOW TO INSTALL THE DRAIN HOSE (FOR DWF-5590D SERIES, NON-PUMP) …………………………………………………….. |
15 |
|
HOW TO INSTALL THE DRAIN HOSE (FOR DWF-5590DP SERIES, PUMP)……………………………………………………………. |
16 |
|
HOW TO CLEAN DRAIN FILTER (DWF-5590DP SERIES, PUMP ONLY) …………………………………………………………………. |
17 |
|
6. PROCEDURE OF FULL-AUTOMATIC WASHING……………………………………………………………………………………………….. |
18 |
|
7. DIRECTIONS FOR DISASSEMBLY AND ADJUSTMENT…………………………………………………………………………………….. |
20 |
|
GEAR MACHANISM ……………………………………………………………………………………………………………………………………………. |
20 |
|
DRAIN MOTOR …………………………………………………………………………………………………………………………………………………… |
21 |
|
BRAKE ADJUSTMENT ………………………………………………………………………………………………………………………………………… |
21 |
|
8. TROUBLE SHOOTING GUIDE ……………………………………………………………………………………………………………………………. |
22 |
|
CONCERNING WATER SUPPLY………………………………………………………………………………………………………………………….. |
22 |
|
CONCERNING WASHING……………………………………………………………………………………………………………………………………. |
23 |
|
CONCERNING DRAINING …………………………………………………………………………………………………………………………………… |
24 |
|
CONCERNING SPINNING …………………………………………………………………………………………………………………………………… |
25 |
|
CONCERNING OPERATION………………………………………………………………………………………………………………………………… |
26 |
|
9. PRESENTATION OF THE P.C.B. ASS’Y ……………………………………………………………………………………………………………… |
27 |
|
CONCERNING ERROR MESSAGE ………………………………………………………………………………………………………………………. |
27 |
|
CONVENIENT TEST FUNCTION…………………………………………………………………………………………………………………………… |
28 |
|
MINUTE EXPLANATION DIAGRAM FOR EACH PARTS…………………………………………………………………………………………. |
29 |
|
APPENDIX …………………………………………………………………………………………………………………………………………………………….. |
43 |
|
WIRING DIAGRAM (FOR DWF-5590DP SERIES)…………………………………………………………………………………………………… |
43 |
|
WIRING DIAGRAM (FOR DWF-5590D SERIES) …………………………………………………………………………………………………….. |
44 |
|
PARTS LIST (FOR DWF-5590DP SERIES) …………………………………………………………………………………………………………….. |
45 |
|
PARTS DIAGRAM (FOR DWF-5590DP SERIES) ……………………………………………………………………………………………………. |
48 |
|
PARTS LIST (FOR DWF-5590D SERIES) ………………………………………………………………………………………………………………. |
51 |
|
PARTS DIAGRAM (FOR DWF-5590D SERIES)………………………………………………………………………………………………………. |
54 |
|
P.C.B. PARTS LIST ……………………………………………………………………………………………………………………………………………… |
57 |
|
CIRCUIT DIAGRAM …………………………………………………………………………………………………………………………………………….. |
62 |
|
BARE PCB (TOP) ………………………………………………………………………………………………………………………………………………… |
63 |
|
BARE PCB (BOTTOM)…………………………………………………………………………………………………………………………………………. |
64 |
1

1. SPECIFICATIONS
SPECIFICATIONS
|
NO |
ITEM |
SPECIFICATIONS |
|||
|
1 |
POWER SOURCE |
AC 220~240V/50Hz |
AC 110~127V/60Hz |
||
|
2 |
POWER CONSUMPTION |
INPUT: 380W, OUTPUT: 210W |
|||
|
3 |
MACHINE WEIGHT |
38kg (GROSS WEIGHT: 43kg) |
|||
|
4 |
DIMENSION (WxHxD) |
550x885x550 mm |
|||
|
5 |
WASHING COURSE |
FULL AUTOMATIC 8 OF COURSES (SOAK, SPEED, |
|||
|
BLANKET, FUZZY, DRY, SILK, STRONG, NIGHT) |
|||||
|
6 |
WATER CONSUMPTION |
NORMAL 146L |
|||
|
7 |
WATER LEVEL SELECTOR |
HIGH(52L), MID(44L), LOW(36L), E.LOW(28L) |
|||
|
8 |
OPERATING WATER PRESSURE |
0.3~8kg/cm2 (2.9N/cm2~78.4N/cm2) |
|||
|
9 |
REVOLUTION PER MINUTE |
SPIN: 775R.P.M., WASH: 145R.P.M. (FOR 60Hz) |
|||
|
10 |
PULSATOR |
6 WINGS (ø 350mm) |
|||
|
11 |
WATER LEVEL CONTROL |
ELECTRICAL SENSOR |
|||
|
12 |
OUTER CABINET |
PCM(PRE-COATED METAL SHEET) |
|||
|
13 |
ANTI-NOISE PLATE |
§ |
|||
|
14 |
GEAR MACHANISM ASS’Y |
HELICAL GEAR FOR LOW NOISE |
|||
|
15 |
LINT FILTER |
§ |
|||
|
16 |
SOFTENER INLET |
§ |
|||
|
17 |
FUNCTION FOR SOAK WASH |
§ |
|||
|
18 |
ALARM SIGNAL |
§ |
|||
|
19 |
RESIDUAL TIME DISPLAY |
§ |
|||
|
20 |
AUTO. WATER SUPPLY |
§ |
|||
|
21 |
NEW WATER FLOW |
WATER FLOW TO ADJUST THE UNBALANCED LOAD |
|||
|
22 |
TRANSPARENT WINDOW |
§ |
|||
|
23 |
FUNCTION FOR BUBBLE |
§ |
|||
|
24 |
MAXIMUM MASS OF TEXTILE |
5.5kg |
|||
2
2. FEATURE AND TECHNICAL EXPLANATION
FEATURE AND TECHNICAL EXPLANATION
FEATURE OF THE WASHING MACHINE
1)The first air bubble washing system in the world.
2)Quiet washing through the innovational low-noise design.
3)The wash effectiveness in much more enhanced because of the air bubble washing system.
4)The laundry detergent dissolves well in water because of the air bubble washing system.
5)The adoption of the water currents to adjust the unbalanced load.
6)One-touch operation system.
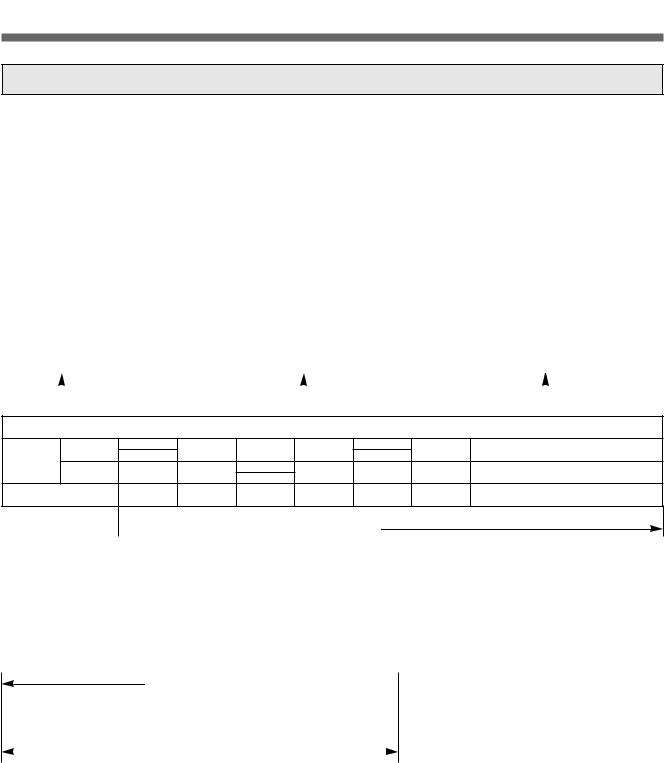
WATER CURRENT TO ADJUST THE UNBALANCED LOAD
It is a function to prevent eccentricity of the clothes after wash by rotating pulsator C.W and C.C.W for 20 seconds. (But, the DRY & SILK course have no operation of the water currents to adjust the unbalanced load.)
EFFECT
It reduces vibration and noise effectively while spinning.
WATER FLOW
|
WASH |
I |
DRAIN |
SPIN |
FILL |
RINSE 1 |
I |
DRAIN |
SPIN |
FILL |
RINSE 2 |
I |
DRAIN |
… |
|||
MOTOR C.W
SIGNAL C.C.W
|
TIME (SEC.) |
0.3 |
0.5 |
0.3 |
0.5 |
0.3 |
0.5 |
 20 SEC. (About 13 Times)
FUNCTION FOR SOAK WASH
DISPLAY THE RESIDUAL TIME
When the SOAK WASH is selected, the total wash time increases because 30 minutes for soak process are added to the time of main process.
PROGRESS
SOAK PROCESS 
 MAIN PROCESS
|
FILL |
WASH |
STOP |
WASH |
STOP |
WASH |
STOP |
|||||||
|
• |
2′ |
I |
8′ |
2′ |
I |
8′ |
2′ |
I |
8′ |
||||
|
30 Minutes |
|||||||||||||
NOTE: ‘ I ’ mark indicates the operation of the water currents to adjust the unbalanced load.
AUTOMATIC WATER SUPPLY SYSTEM FOR BLANKET WASH
The water level would be lowered because the blanket absorbs water at the beginning of washing. Therefore, after 30 seconds, the operation is interrupted to check the water level, and then the water is supplied again until the selected water level is reached.
3
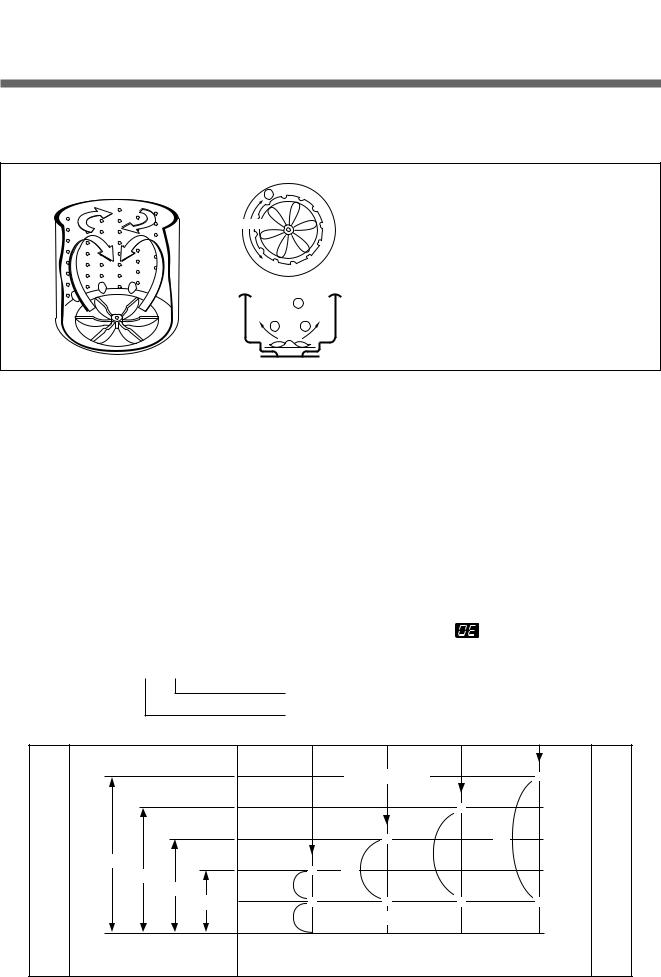
Residual drain time.
The time remembered by micom.
PULSATOR SYSTEM
When the new shaped pulsator is rotated C.W C.C.W at a high speed, it makes the ‘heart-shaped’ water currents as shown below.
C
Rotate
 B
B
A A
WATER CURRENTS
AWater is pushed up near the tub wall by rotation on the pulsator.
BWater is pulled down in the middle of the tub by rotation of the pulsator
CWater currents is generated by rotation of the pulsator.
AUTOMATIC DRAINING TIME ADJUSTMENT
This system adjusts the draining time automatically according to the draining condition.
|
Good draining |
The washer begins spin process after drainage. |
||
|
Draining |
|||
|
Bad draining |
Draining time is prolonged. |
||
|
condition |
|||
|
No draining |
Program is stopped and gives the alarm. |
||
FUNCTIONAL PRINCIPLE
1) The micom can remember the time from the beginning of drain to reset point when the pressure switch reaches to «OFF» point.
|
Drain Time |
Movement of the program |
|
|
Less than 4 minutes |
Continue draining. |
|
|
More than 4 minutes |
Program stops and gives the alarm with the |
blinked on display lamp. |
2) In case of continuous draining, residual drain time is determined by micom. Draining time as a whole=D + 60
(T sec.)
|
D |
(mm) |
W |
||||||
|
TRIP POINTS |
* |
345 |
||||||
|
R |
A |
|||||||
|
A |
* |
290 |
T |
|||||
|
I |
E |
|||||||
|
N |
D4 |
235 |
R |
|||||
|
I |
* |
L |
||||||
|
N |
T4 |
D3 |
||||||
|
G |
* |
D2 |
180 |
E |
||||
|
T3 |
D1 |
|||||||
|
T2 |
V |
|||||||
|
T |
T1 |
* |
* |
* |
* |
60 |
E |
|
|
I |
60 |
RESET POINTS |
L |
|||||
|
M |
0 |
|||||||
|
E |
E. LOW |
LOW |
MED |
HIGH |
T1=D1+60 (Sec.) T2=D2+60 (Sec.) T3=D3+60 (Sec.) T4=D4+60 (Sec.)
4
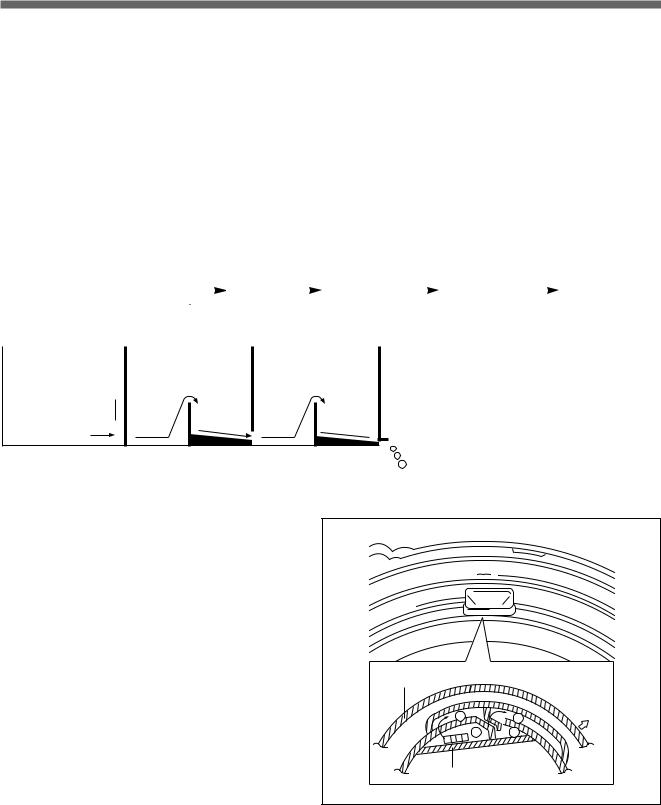
SOFTENER DISPENSER
This is the device to dispense the softener automatically by centrifugal force.
This is installed inside the auto-balancer.
FUNCTIONAL PRINCIPLE
1)Softener stays in room (A) when poured into softener inlet.
2)Softener moves from (A) to (B) by centrifugal force during intermittent spin process.
3)Softener flows from (B) to (C) during rinse process next to intermittent spin.
4)Softener moves from (C) to (D) by centrifugal force during second intermittent spin. After spin process is finished, the softener is added into the tub through softener outlet.
FLOW OF THE SOFTENER
|
Wash |
Intermittent |
Hold |
Intermittent |
Rinse |
Spin |
|||||||||
|
Spin |
Spin |
|||||||||||||
|
Normal |
Centrifugal |
Flow in |
Centrifugal |
Flow in |
||||||||||
|
force |
force |
|||||||||||||
|
Course |
(A) |
(B) |
(C) |
(D) |
||||||||||
|
FLOW OF THE SOFTENER INSIDE OF THE BALANCER |
||||||||||||||
|
Room inside |
A |
B |
C |
D |
||||||||||
|
the balancer |
||||||||||||||
Centrifugal force  Flowing by weight
NOTE: Softener moves into the next room when r.p.m. of the tub is more than 100 r.p.m.
HOW TO CHECK MOVEMENT
Pour a reasonable amount of «MILK» into softener dispenser and operate the washer with no load. In final rinse cycle, make sure that the milk is added into the tub through softener outlet.
Balancer
Softener
B outlet
D
A C
Softener inlet
5
AUTOMATIC UNBALANCE ADJUSTMENT
This system is to prevent abnormal vibration during intermittent spin and spin process.
FUNCTIONAL PRINCIPLE
1)When the lid is closed, the safety switch contact is «ON» position.
2)In case that wash loads get uneven during spin, the outer tub hits the safety switch due to the serious vibration, and the spin process is interrupted.
3)In case that P.C.B. ASS’Y gets «OFF» signal from the safety switch, spin process are stopped and rinse process is started automatically by P.C.B. ASS’Y.
4)If the safety switch is operated due to the unbalance of the tub, the program is stopped and the alarm is given.
Contact of safety switch Lid closing
Lid opening
|
Contact lever A |
|
|
Position of |
|
|
unbalanced |
|
|
load(OFF) |
Normal(ON) |
NOTE:
The alarm finished when you close the lid after opening it. Check the unbalance of the wash load and the installation condition.
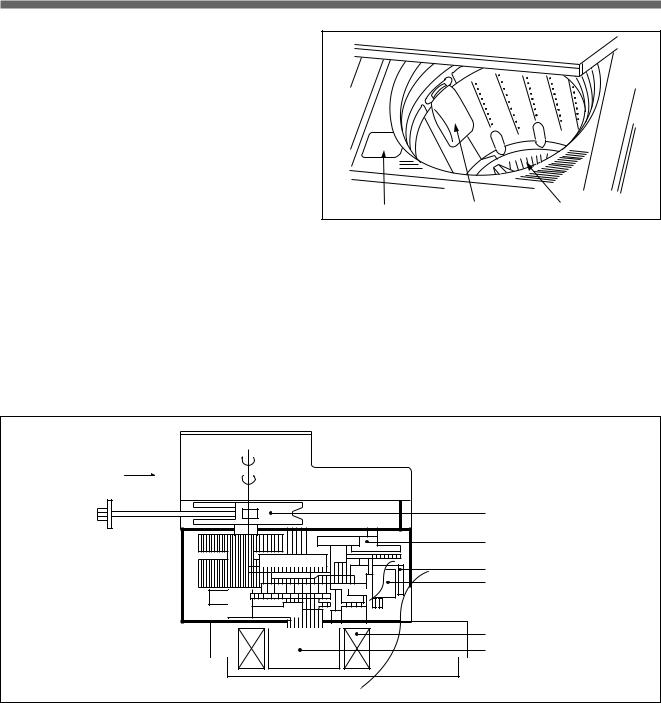
CIRCULATING-WATER COURSE AND LINT FILTER
CIRCULATING-WATER
The washing and rinsing effects have been improved by adopting the water system in which water in the tub is circulated in a designed pattern.
When the pulsator rotates during the washing or rinsing process, the water below the pulsator vanes creates a water currents as shown in figure.
The water is then discharged from the upper part of the tub through the water channel.
About 40L/min. water is circulated at the ‘high’ water level, standard wash load and standard water currents.
Tub
Filter
Outer tub
Water
channel
Pulsator
6
LINT FILTER
Much lint may be obtained according to the kind of clothes to be washed and some of the lint may also sticks to the clothes.
To minimize this possibility a lint filter is provided on the upper part of the tub to filter the wash water as it is discharged from the water channel. It is good to use the lint filter during washing.
|
Bleach inlet |
Filter |
Pulsator |
HOW TO CLEAN THE LINT FILTER
1)Pull the filter frame upward.
2)Turn the lint filter inside out, and wash the lint off with water.
3)Return the filter as it was, and fix the filter frame to the slot.
RESIDUAL TIME DISPLAY
When the START/HOLD button is pressed, the residual time (min.) is displayed on the time indicator, and it will be counted down according to the process.
When operation is finished, the TIME INDICATOR will light up  .
.
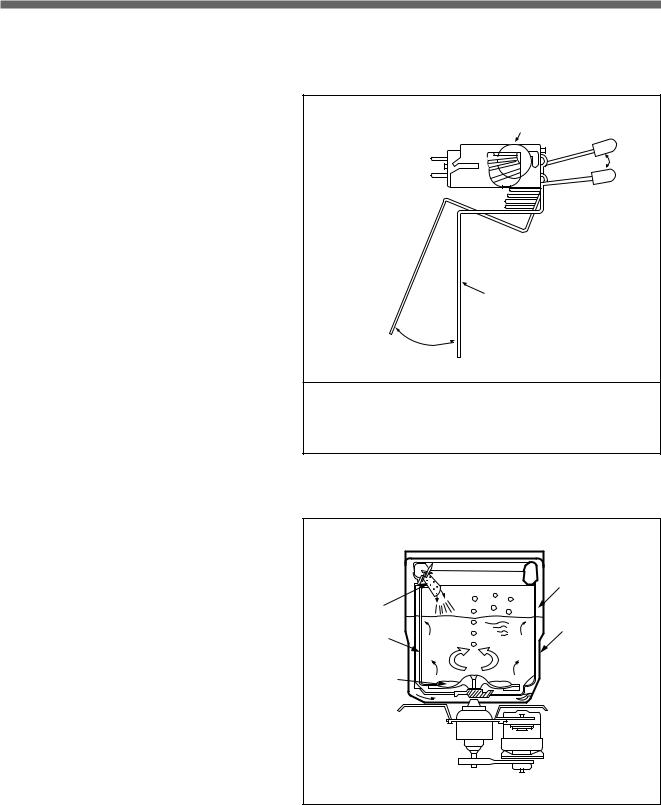
DRAIN MOTOR
STRUCTURE
Pull
Loosen
Pulley
Lever
Inductive ring
Magnet
Coil of motor
Magnet of motor
FUNCTIONAL PRINCIPLE
1)When the DRAIN MOTOR connected to the power source (AC 220V), the DRAIN MOTOR rotates with 900 r.p.m and revolves the pulley by gear assembly for reducing.
2)When the pulley is rotated, the pulley winds the wire to open the drain valve.
3)Therefore, rotation of pulley is changed to the linear moving of wire.
4)The wire pulls the brake lever of Gear Mechanism Ass’y within 5 seconds.
5)After the wire pulled, gear assembly is separated from motor and condition of pulling is held by operation of the lever.
6)When the power is turned off, the drain valve is closed because the wire returns to original position.
7
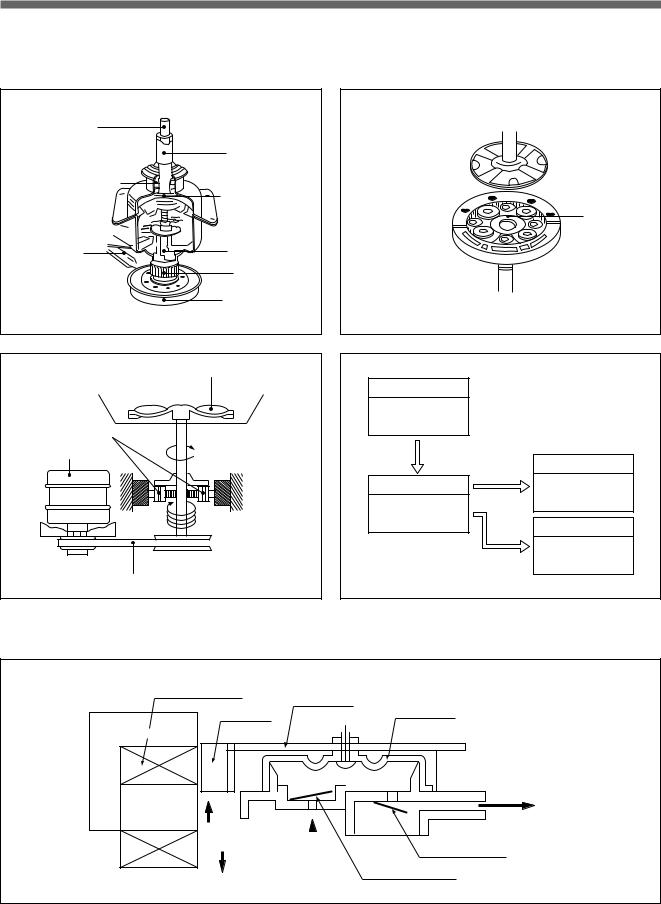
GEAR MECHANISM ASS’Y
The proper water currents is made by the rotation of pulsator at a low speed (about 145 r.p.m) to prevent the damage to the small sized clothes.
Pulsator shaft
|
Spinner shaft |
|
|
Inner clutch spring |
|
|
Planetary gear |
|
|
Brake lever |
Clutch spring |
|
Clutch boss |
|
|
Spinner pulley |
Sun gear
Planetary gear
 Internal gear
Pulsator
|
Planetary |
|
|
Motor |
1 revolution |
5.2 revolutions

 Spinner
pulley
V-belt
PRINCIPLE OF BUBBLE GENERATOR
STRUCTURE
|
Motor |
||
|
1490 r.p.m. |
||
|
60(Hz) |
||
|
V.belt |
Pulsator |
|
|
Planetary |
||
|
Gear |
||
|
Spinner Pulley |
145 r.p.m. |
|
|
1/5.2 |
||
|
775 r.p.m. |
Tub |
|
|
Directly |
775 r.p.m. |
|
|
Bobbin & coil |
Armature |
|
Magnet |
Bellows |
|
Trans core |
Air out hole
|
Protector A |
|||
|
Air in hole |
|||
|
Protector B |
|||
8
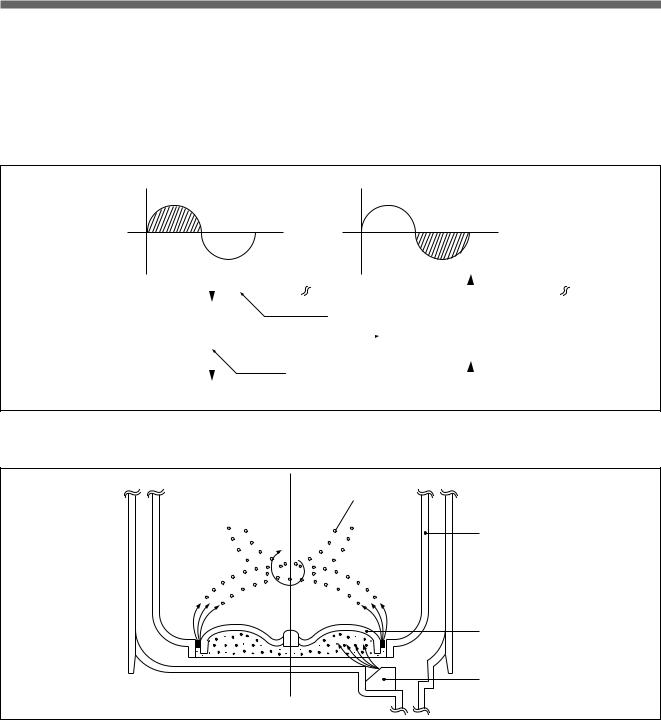
PRINCIPLE OF INTAKE & OUTLET OF THE AIR
INTAKE : ARMATURE moves up, and BELLOWS inhales the air. At the same time, protector B is open and A is close. OUTLET: ARMATURE moves down, and BELLOWS exhausts the air. At the same time, protector B is close and A is
open.
FUNCTIONAL PRINCIPLE OF TRANS & MAGNET
•The phase of A.C electric power changes to 60 cycle/second.
•The magnetic pole of trans core is changed by the change of the phase of A.C electric power.
•The core repeats push and pull (3600 times/min.) of the armature magnet.
|
N |
Pan spring |
N |
||||||||||||
|
NS |
NS |
|||||||||||||
|
Trans core |
||||||||||||||
|
S |
Magnet |
S |
||||||||||||
FUNCTIONAL PRINCIPLE OF BUBBLE WASHING MACHINE
CROSS SECTION
Air bubble
Tub
 Outer tub
Pulsator
Nozzle
FUNCTIONAL PRINCIPLE
Bubble generator supplies the air from the bottom of outer tub to the inner space of pulsator, the air is dispersed by the rotation of pulsator. Air-bubble is created by the centrifugal force, and rises up.
9
![]()
3. STRUCTURE OF THE WASHING MACHINE
STRUCTURE OF THE WASHING MACHINE
|
• HOT WATER TAP |
• COLD WATER TAP |
After using the washer, close the water tap and turn off the power.
• SOFTENER INLET
Pour softener into the softener inlet just before wash and it will be added into the tub automatically just before the final rinse.
•BLEACH INLET
•CONTROL PANEL
•SCREW COVER
•TUB
After using the washer, close the water tap and turn off the power.
 • GUIDE
DRAIN HOSE
• POWER SWITCH
• HOOK HOLE
• LINT FILTER
• DRAIN HOSE
• HANDLE
• POWER CORD
•ADJUSTABLE LEGS
ACCESSORIES
|
Inlet Hose |
Water Tap |
Drain Hose |
Hose Fixture |
Drain Hose |
Guide Drain Hose |
|
(2 Pcs) |
Adapter (2 Pcs) |
Clamp |
In case of screw-shaped
inlet hoses, water tap adapters will not be provided.
10

4. FUNCTION OF THE CONTROL PANEL
FUNCTION OF THE CONTROL PANEL
CONTROL PANEL
It has micom sensor.
As the buttons are pressed, the lamps indicating
the selection of you desired washing program will light up.
|
Power Switch |
Cancel Button |
||||
|
• Press this switch to turn the |
• With this button, you can arbitrarily |
||||
|
choose course by proper |
|||||
|
power ON or OFF. |
|||||
|
combination with the right three |
|||||
|
• After turning off the power, |
buttons. |
||||
|
• If you want the washer to operate |
|||||
|
wait for more than 3 |
|||||
|
differently from presetting time or to |
|||||
|
seconds and then turn it on |
|||||
|
POWER |
operate separately among the three |
||||
|
again. |
|||||
|
stages, you first push this button |
|||||
|
and other buttons sequentially. |
|||||
DAEWOO AUTOMATIC
WASHER
AERO FUZZY & AIR POWER
DRY CLEANING EFFECT
CANCEL WASH
Display
•The “TIME” part lamp indicates the residual time and the number of rinsing and spinning times until wash is over.
•The “COURSE”, “TEMP”, and “LEVEL” part lamps are turned on according to the buttons of the control panel.
|
TIME |
COURSE |
TEMP.LEVEL |
|||||
|
SOAK WASH RINS |
SPIN FUZ. |
DRY |
SILK |
SOAK |
HOT H. |
||
|
D |
WARM |
M. |
|||||
|
MIN. TIME |
MIN. |
SPEE |
STRO |
NIGHT |
BLAN |
L. |
|
|
* |
COLD |
||||||
|
D |
S. |
||||||
|
* |
|||||||
|
RINSE |
SPIN |
COURSE WASH |
TEMP |
|||
Start/Hold Button
•Press this button to begin operation or to stop operation temporarily.
•Operation and temporary stop are repeated as it is pressed.
START/HOLD
WATER LEVEL
Wash Selector
•The above three buttons can be used to bring the three washing stages under control.
Course Selection Button
•This button is used to select the washing course according to the type of the clothes being washed.
•You can choose one of the eight courses by pressing this button until your desired course indicator light comes on.
Temperature Selection Button
•This button is used to select the water temperature according to the clothes being washed.
•Press this button until your desired temperature indicator light comes on, and it will repeat following signs:
COLD ¤A WARM ¤A HOT
Water Level Selector
•This selector is used to select the washing water level according to the size of the wash load.
11

5. DIRECTION FOR INSTALLATION AND USE
DIRECTION FOR INSTALLATION AND USE
TO INSTALL THE WASHING MACHINE
SELECTION OF THE INSTALLING PLACE
Install the washer on a horizontal solid floor.
If the washer is installed on an unsuitable floor, it could make considerable noise and vibration.
Never install in these places
•The place where it would be exposed to direct sunlight.
•The place nearby a heater or heat appliance.
•The place where it would be supposed to be frozen in winter.
•The kitchen with coal gas and a damp place like a bathroom.
•The proper installation of the washing machine can increase the wash effectiveness and the life of it.
|
INSTALLATION OF THE UNDER BASE COVER |
After installing the washing machine, close the under-base cover. |
!The packing box opened, there is a under-base cover at the bottom of the back.
@Push the under-base cover into the end, which decreases the noise made by this washer.
HOW TO INSTALL ON AN INCLINED PLACE
If the washer is installed on an unsuitable floor, it could make considerable noise and vibration, and could cause a malfunction.
Use the height adjust rubber to adjust the washing machine so that it sits properly.
|
!Height Setting |
@Check the Horizontal Status |
||||
|
• After controlling the height by |
• Check the position of tub above |
||||
|
turning the adjustable legs, let the |
the center of the washer. |
||||
|
washer put down to the ground. |
|||||
NOTES:
The opening must not be obstructed by carpeting when the washing machine is installed on a carpeted floor.
13
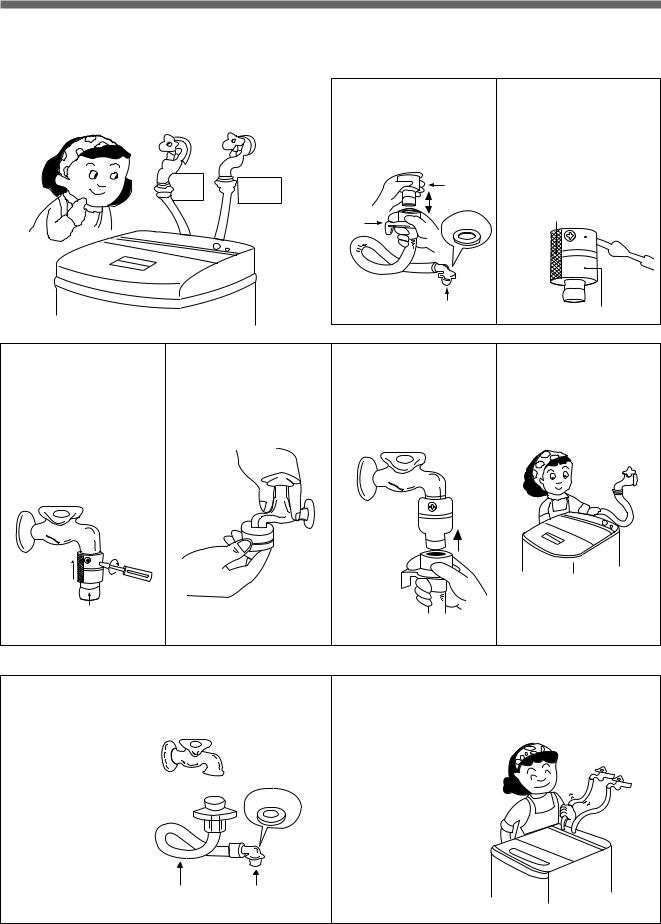
HOW TO CONNECT THE INLET HOSE
IN INSTALLING THE INLET HOSE
Be careful not to mistake in supplying hot and cold water.
In using only one water tap, connect the inlet hose to the cold water inlet.
|
Hot |
Cold |
|
|
Water |
||
|
Water |
||
!Pull down the collar of the inlet hose to separate it from the water tap adapter.
|
Water Tap |
||
|
Adapter |
||
|
Collar |
Rubber |
|
|
packing |
||
Connector C
@Loosen the four screw at the water tap adapter, but don’t loosen the screws until they are separated from the water tap adapter.
Tape
 Connector A
Tap 
Adapter
Connector B
#Connect the water tap adapter to the water tap, and tighten the four screws evenly while pushing up the adapter so that the rubber packing can stick to the water tap tightly.
@
!
Connector B
$Remove the tape, and screw connector B into connector A tightly.
%Connect the inlet hose to the water tap adapter by pulling down the collar of the hose end.
Collar
^Connect the connector C of the inlet hose to the water inlet of the washer by turning it clock-wise to be fixed tightly.
•Please check the rubber packing inside the connector C of the inlet hose.
• FOR SCREW-SHAPED TAP
!Connect the inlet hose to the water tap by screwing the connector D tightly.
Connector D
Hose
Rubber
Packing
Connector C
@Connect the connector C of the inlet hose to the water inlet of the washer by turning it clockwise to be fixed tightly.
•Please check the rubber packing inside the connector C of the inlet hose.
14

HOW TO USE THE DRAIN HOSE (FOR DWF-5590D SERIES)
NOTE IN USING THE DRAIN HOSE
!In case that it goes over a doorsill.
Don’t let the height of the drain hose exceed 20cm from the ground.
@Inhose.case of extending the drain Don’t let the total length exceed 3m.
#Be careful that the end of the drain hose is not immersed in water.
15

HOW TO INSTALL THE DRAIN HOSE (FOR DWF-5590DP SERIES)
NOTE IN USING THE DRAIN HOSE
Never forget to install drain hose before operating this washing machine.
There are a drain hose, a hose clamp, a hose fixture and a hose guide in the washing machine.
|
!Connect the drain hose to the |
@Insert the hose fixture into hook |
|
drain outlet at the back side of |
hole at the side of the body, |
|
the washing machine, and |
and fix the drain hose by |
|
fasten it tightly with the clamp |
inserting it into the hose fixture. |
|
supplied. |
Drain Output
Hook Hole
Drain hose
Hose Fixture
Drain Hose
Hose Clamp
|
$Hook the drain hose to the |
Or, connect the drain hose to a |
|
|
standpipe of a diameter greater than |
||
|
edge of the tub, paying |
||
|
attention that there are no |
that of the drain hose and at a height |
|
|
bends or constractions along |
of min. 70cm. |
|
|
the drain hose. |
70cm min
#Attach the hose guide, included in the accessory kit, to guide the drain hose over the tub or standpipe.
Pull Hose through 
|
Flex. Hose |
55 mox |
|
Guide |
|
|
apart |
%Position the washing machine next to the wall.
MUST be ventilated
NOTES:
1.Keep the drain hose fixed tightly in the hose fixture, or let the highest point of the drain hose be more than 1m above the floor.
If not so, the water in the washer could be drained during operation
2.Be sure that the height of the drain hose must be less than 1.5m above the floor. If not so, the water in the washer could not drain.
3.The hose guide MUST be fitted to the drain hose. The drain hose sould not extend more than 55mm from the end of the hose guide. This is to prevent ‘SYPHONING’.
If necessary the drain hose can be trimmed to length.
16
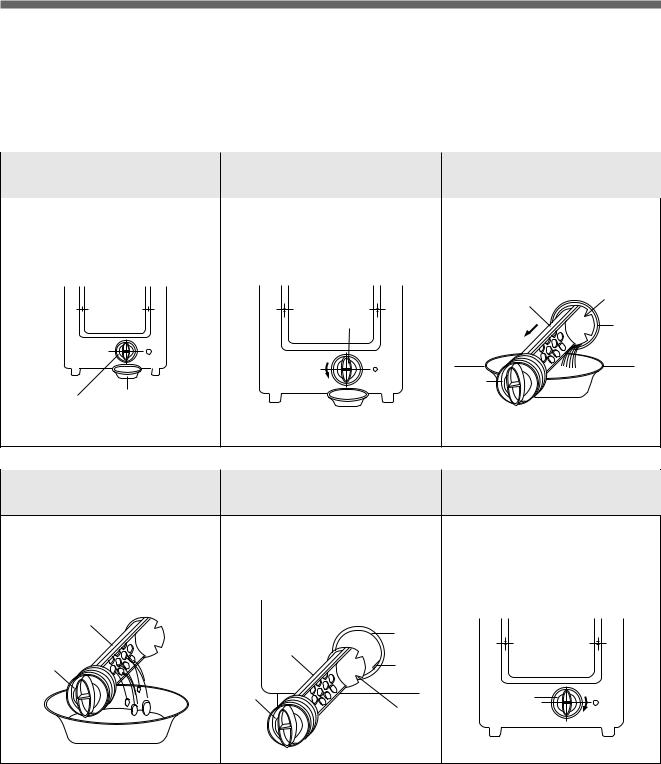
HOW TO CLEAN DRAIN FILTER (FOR DWF-5590DP SERIES)
In this washer machine, the drain filter is equipped at the back side of it.
This drain filter is to screen the foreign stuffs such as threads, coins, pins, buttons etc..
And this should be cleaned frequently (every 5 times of use) for its smooth operation.
Drain problem could be caused if the drain filter is not cleaned at proper time.
Please keep it clean.
In case you clean the drain filter, please follow the instructions as below.
|
!Remove the |
@ Unscrew the cap. |
#Release the filter |
|
|
remained water |
assembly |
||
|
• Put down the remained water in |
• Turn the cap counter clockwise. |
• Pull out the filter assembly off the |
|
|
the hose. And put a container |
case of the main body. |
||
|
under the filter to collect water. |
|||
|
FILTER |
SLIT |
||
|
CAP |
CASE |
||
|
CAP |
|||
|
FILTER CONTAINER |
|
$Remove the |
%Put the filter |
^ Lock the cap. |
|
foreign stuffs |
assembly back |
|
|
• Clean the drain filter removing the |
• Put in the filter along the guiding |
• Turn the cap clockwide tightly. |
|
foreign stuffs. |
prominence of the case. Please |
|
|
note the right position of the filter |
||
|
adjusting the groove to the guide |
||
|
rib. |
||
|
FILTER |
||
|
CASE |
||
|
FILTER |
||
|
CAP |
GUIDE |
|
|
RIB |
||
|
CAP |
CAP |
|
|
SLIT |
NOTES: During the operation, the «OE» signal means drain error can be displayed on the control panel. In this case, the main cause of that problem is the blocking of the drain filter.
If you clean the drain filter following above instructions, you could continue the normal operation of the washing machine to reset the program, please turn the power off and on again.
17

6. PROCEDURE OF FULL-AUTOMATIC WASHING
PROCEDURE OF FULL-AUTOMATIC WASHING
Prepare for washing.
¡Ø
Pressing the power switch
¡Ø
Put the clothes into the tub.
¡Ø
Select the washing course.
|
¤ Full-Automatic |
¤ŁSelect the Course |
¤ØProcedure of |
|||||||||||||||||
|
Pressing the Button |
|||||||||||||||||||
|
BLANKET |
|||||||||||||||||||
|
This selection is effective |
BLANKET |
START/HOLD |
|||||||||||||||||
|
for blanket, curtain, |
|||||||||||||||||||
|
SOAK |
WASH |
RINS |
SPIN |
||||||||||||||||
|
carpet, etc.. |
|||||||||||||||||||
|
* 3 kg’s limitation |
|||||||||||||||||||
|
MIN. |
TIME |
MIN. |
for one-time-wash. |
COURSE |
|||||||||||||||
|
FUZZY |
START/HOLD |
||||||||||||||||||
|
This selection is for |
|||||||||||||||||||
|
FUZZY |
|||||||||||||||||||
|
(SENSOR) |
general washing. |
||||||||||||||||||
|
DRY |
This selection is effective |
DRY |
|||||||||||||||||
|
for delicate clothes. |
Put the exclusive |
||||||||||||||||||
|
SOAK |
WASH |
RINS |
SPIN |
||||||||||||||||
|
* Just follow the washing |
detergent, dryten of |
||||||||||||||||||
|
procedure. |
26g into the tub for |
||||||||||||||||||
|
* 1.5kg’s limitation |
dilution with water. |
||||||||||||||||||
|
MIN. |
TIME |
MIN. |
for one-time-wash. |
COURSE |
|||||||||||||||
|
SILK |
|||||||||||||||||||
|
This selection is effective for |
SILK |
||||||||||||||||||
|
some clothes made of silk. |
Put the exclusive |
||||||||||||||||||
|
SOAK |
WASH |
RINS |
SPIN |
||||||||||||||||
|
* Do not put in the wash marked |
detergent, dryten of |
||||||||||||||||||
|
with ‘dry-cleaning’. |
26g into the tub for |
||||||||||||||||||
|
* 1kg’s limitation for one-time- |
dilution with water. |
||||||||||||||||||
|
MIN. |
TIME |
MIN. |
wash. |
COURSE |
|||||||||||||||
|
STRONG |
STRONG |
START/HOLD |
|||||||||||||||||
|
The selection is effective |
|||||||||||||||||||
|
SOAK |
WASH |
RINS |
SPIN |
for blue-jean, climbing |
|||||||||||||||
|
clothes, ruck-sack, sports |
|||||||||||||||||||
|
MIN. |
TIME |
MIN. |
wear, etc.. |
||||||||||||||||
|
COURSE |
|||||||||||||||||||
|
NIGHT |
NIGHT |
START/HOLD |
|||||||||||||||||
|
This selection is for a |
|||||||||||||||||||
|
SOAK |
WASH |
RINS |
SPIN |
night-washing housewife |
|||||||||||||||
|
who has no opportunity at |
|||||||||||||||||||
|
day time. |
|||||||||||||||||||
|
MIN. |
TIME |
MIN. |
COURSE |
||||||||||||||||
|
SOAK |
|||||||||||||||||||
|
This course is used to |
SOAK |
START/HOLD |
|||||||||||||||||
|
increase the wash effect by |
|||||||||||||||||||
|
SOAK WASH |
RINS |
SPIN |
|||||||||||||||||
|
keeping the clothes soaked |
|||||||||||||||||||
|
sufficiently in the wash |
|||||||||||||||||||
|
MIN. |
TIME |
MIN. |
water. |
COURSE |
|||||||||||||||
|
SPEED |
SPEED |
START/HOLD |
|||||||||||||||||
|
This selection is effective |
|||||||||||||||||||
|
SOAK |
WASH |
RINS |
SPIN |
||||||||||||||||
|
for washing light or less |
|||||||||||||||||||
|
MIN. |
TIME |
MIN. |
dirty wash. |
COURSE |
|||||||||||||||
*As far as putting the power plug out, the selections for hot and cold water are remembered after washing. At next washing time, the remembered lamp will light on.
18
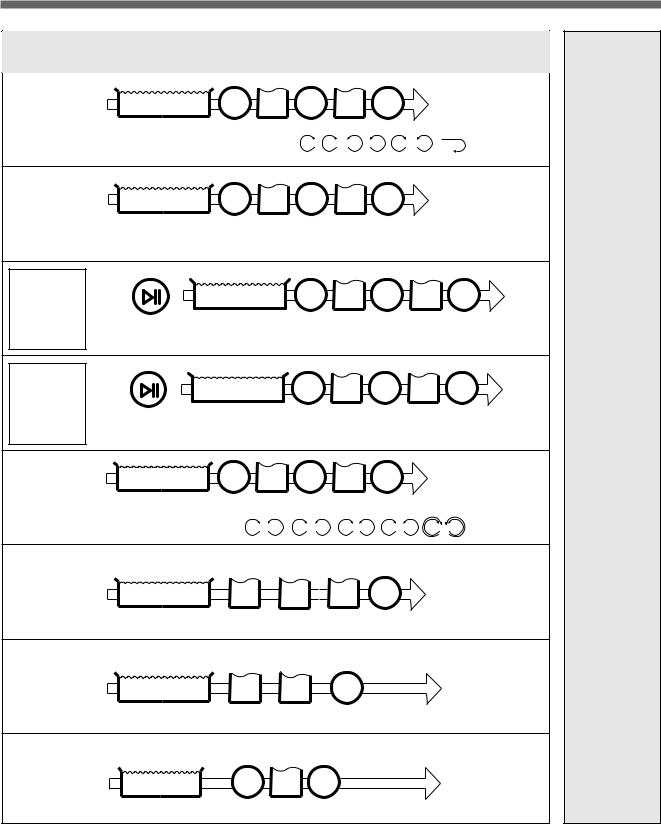
¤ŒProcedure of Washing (Washing machine does it automatically.)
|
Water inlet and |
SPIN |
RINSE |
SPIN |
RINSE |
SPIN |
|||||
|
wash for 14 minutes. |
||||||||||
|
A Blanket course’s water flow is |
R |
R |
L |
L |
R |
L |
||||
|
Water inlet and |
SPIN |
RINSE |
SPIN |
RINSE |
SPIN |
|||||
|
wash for 14 minutes. |
||||||||||
|
Artificial brain computer controls full procedure proper to wash load |
||||||||||
|
automatically. |
||||||||||
|
Buzzer signal to |
START/HOLD |
|||||||||
|
notify you can put |
Water inlet and |
SPIN |
RINSE |
SPIN |
RINSE |
SPIN |
||||
|
the sensible |
wash for 6 minutes. |
|||||||||
|
clothes into the |
||||||||||
|
diluted water with |
A part of dotted line is decreasing rotation velocity. |
|||||||||
|
Dryten. |
Because protect clothes from damage. |
|||||||||
|
Buzzer signal to |
START/HOLD |
|||||||||
|
notify you can put |
Water inlet and |
SPIN |
RINSE |
SPIN |
RINSE |
SPIN |
||||
|
the sensible |
wash for 4 minutes. |
|||||||||
|
clothes into the |
||||||||||
|
diluted water with |
A part of dotted line is decreashing rotation velocity. |
|||||||||
|
Dryten. |
Because protect clothes from damage. |
|||||||||
|
Water inlet and |
SPIN |
RINSE |
SPIN |
RINSE |
SPIN |
|||||
|
wash for 14 minutes. |
||||||||||
|
A strong course’s water flow is R |
L |
R |
L |
R L |
R |
L |
R |
L |
|
Water inlet and |
RINSE |
RINSE |
RINSE |
SPIN |
|
|
wash for 30 minutes. |
|||||
|
Water inlet and |
RINSE |
RINSE |
SPIN |
|
|
wash for 44 minutes. |
||||
|
Water inlet and |
SPIN |
RINSE |
SPIN |
|
|
wash for 10 minutes. |
||||
After Washing: • Close the water tap and separate it from the inlet-hose.
If not so, the autovalve is out of order by the water pressure.
• Take off plug.
End of washing informed by buzzer.
After 10 minutes later from the end of the washing the power switch is turned off
automatically.
19
Инструкция Стиральная Машина Daewoo Dwf-5590 Dp
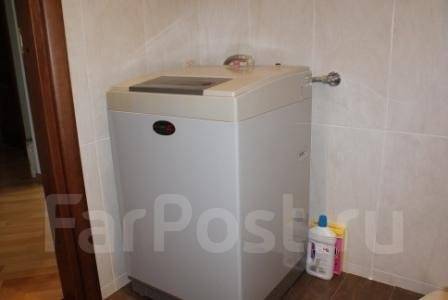
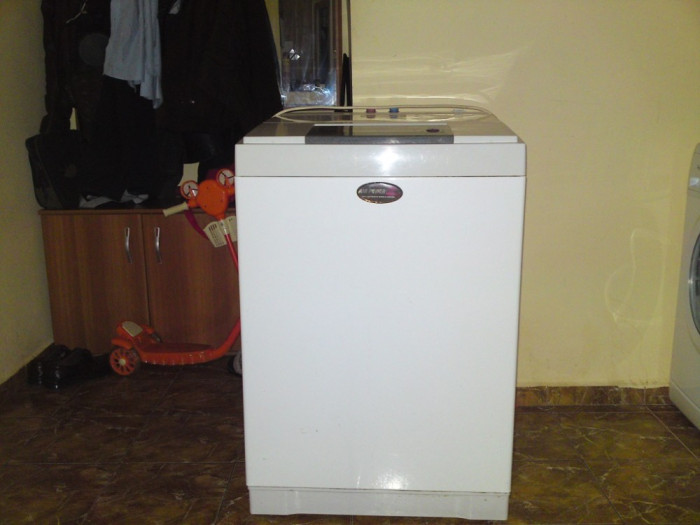
Другими отличиями воздушно-пузырьковых машин Daewoo от машин с фронтальной и верхней загрузкой «европейского» типа является меньший вес (30…47 кг), низкий уровень шума (55 дБ во время отжима, 46 дБ во время стирки и 43 дБ во время стирки по программе «Suit» (костюм)), короткое (51 мин) время стирки. Типичный внешний вид стиральных машин Daewoo показан на рис. 1. 1, 2 — краны холодной и горячей воды, 3 — отделение для стирального порошка, 4 — фильтр-уловитель волокон, 5 — шнур питания…

Стиральная машина DAEWOO DWF-5590DP. Мануал на эту машинку такой же жуткий, как и само изделие. Все, что могу сказать.
РУССКИЕ ИНСТРУКЦИИ БЕСПЛАТНО Электрические схемы и сервис- мануалы стиральных машин DAEWOO. DAEWOO DAEWOO DWF-5590DP.
Боле 150 схемы, инструкции, учебное пособие и сервис мануал холодильников, микроволновой печи, стиральный машин DAEWOO DWF- 5590DP.
Здесь представлен список схем и сервис-мануалов импортных стиральных машин под заказ. Большой архив схем и сервис-мануалов импортных стиральных машин с описанием работы, техническими данными, монтажными схемами, книги по ремонту стиральных машин, а также другие интересные книги, журналы и сборники можно бесплатно скачать в нашей Библиотеке. Поиск на странице: Ctrl+F (вводите название фирмы или цифровое значение модели). Электрические схемы и сервис-мануалы стиральных машин DAEWOO DAEWOO DW-2500 DAEWOO DW-2510 DAEWOO DW-3600 DAEWOO DW-3610 DAEWOO DW-3620 (P) DAEWOO DW-5014 DAEWOO DWD-F1011 DAEWOO DWD-F1012 DAEWOO DWD-F1013 DAEWOO DWD-F1211 DAEWOO DWD-F1212 DAEWOO DWD-F1213 DAEWOO DWF-1089 DAEWOO DWF-1089 DAEWOO DWF-1094 DAEWOO DWF-1095XE/PX DAEWOO DWF-1098 DAEWOO DWF-170M DAEWOO DWF-200MV DAEWOO DWF-201M DAEWOO DWF-204MV DAEWOO DWF-4220 DAEWOO DWF-4230 DAEWOO DWF-5020 DAEWOO DWF-5030 DAEWOO DWF-5510 DAEWOO DWF-5510 DAEWOO DWF-5511 DAEWOO DWF-5550 SERIES DAEWOO DWF-5590D DAEWOO DWF-5590DP DAEWOO DWF-6500 (P) DAEWOO DWF-7094 DAEWOO DWF-750 DAEWOO DWF-7560 DAEWOO DWF-7588 DAEWOO DWF-7589 DAEWOO DWF-7590 DAEWOO DWF-8088 DAEWOO DWF-8089 DAEWOO DWF-8094 DAEWOO DWF-928 DAEWOO DWM-500 DAEWOO DWM-500M DAEWOO DWM-501M DAEWOO DWM-502M DAEWOO DWM-503M DAEWOO DWM-6210 DAEWOO DWM-7510 DAEWOO DWM-7510


Cтиральныt машинs « Daewoo », возможные неисправности. схемы стиральных машин «Ardo» · Инструкции по эксплуатации. Вид воздушно- пузырьковой стиральной машины Daewoo : DWF 5586 DP, D, W, F.
Полное название стиральной машины Daewoo DWF-5590DP Люди!Есть у кого мануал к стиралке DAEWOO DWF 5590 DP?Скиньте.
Сегодня, например, можно уви деть стиральные машины, не име. Daewoo приведены в таблице. Литература. 1. Патент DWF 5590DP. DWF 5585DP.
Скачать электрические схемы, сервис-мануалы импортных стиральных машин: D
Комментарии (1)Просмотров (660)