-
Contents
-
Table of Contents
-
Troubleshooting
-
Bookmarks
Quick Links
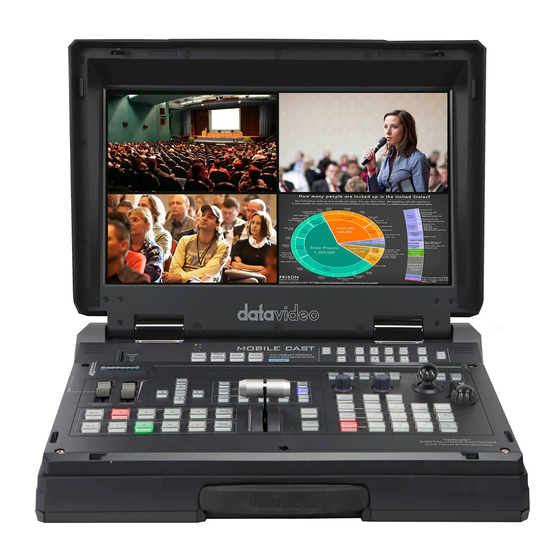
4 CHANNEL HD/SD
HDBASET PORTABLE
VIDEO STREAMING STUDIO
HS-1600T MKII
Instruction Manual
Related Manuals for Datavideo HS-1600T MKII
Summary of Contents for Datavideo HS-1600T MKII
-
Page 1
4 CHANNEL HD/SD HDBASET PORTABLE VIDEO STREAMING STUDIO HS-1600T MKII Instruction Manual… -
Page 2: Table Of Contents
Table of Contents FCC COMPLIANCE STATEMENT ………………….5 WARNINGS AND PRECAUTIONS …………………..5 WARRANTY ………………………..6 ……………………..6 TANDARD ARRANTY ……………………..6 HREE ARRANTY DISPOSAL……………………….7 CHAPTER 1 INTRODUCTION ………………….8 ……………………….8 EATURES ……………………..9 YSTEM IAGRAM CHAPTER 2 CONNECTIONS AND CONTROLS …………….. 10 ……………………..
-
Page 3
Load Memory ………………………. 30 Save Memory ………………………. 30 Factory Default ……………………..30 ……………………….30 ETUP PGM Out Res……………………….. 31 MV Out Res……………………….31 Output Format ……………………..32 Save Setup ……………………….32 Language ……………………….32 MB and KBD Software ……………………32 ………………………. -
Page 4
SERVICE AND SUPPORT ……………………84 Disclaimer of Product & Services The information offered in this instruction manual is intended as a guide only. At all times, Datavideo Technologies will try to give correct, complete and suitable information. However, Datavideo Technologies cannot exclude that some information in this manual, from time to time, may not be correct or may be incomplete. -
Page 5: Fcc Compliance Statement
7. This product should only be operated from the type of power source indicated on the marking label of the AC adapter. If you are not sure of the type of power available, consult your Datavideo dealer or your local power company.
-
Page 6: Warranty
When the product exhibits a distinct change in performance, indicating a need for service. Warranty Standard Warranty Datavideo equipment are guaranteed against any manufacturing defects for one year from the date of purchase. The original purchase invoice or other documentary evidence should be supplied at the time of any request for repair under warranty.
-
Page 7: Disposal
State Drive, SD Card, USB Thumb Drive, Lighting, Camera module, PCIe Card are covered for 1 year. The three-year warranty must be registered on Datavideo’s official website or with your local Datavideo office or one of its authorized distributors within 30 days of purchase.
-
Page 8: Chapter 1 Introduction
PIP, WIPE Generator and Tally. The HS-1600T MKII has a Joystick that allows the user to Pan, Tilt and Zoom the PTC-150T camera. In addition, the HS-1600T MKII also allows the user to adjust the PTC-150T’s Focus, IRIS and other settings.
-
Page 9: System Diagram
1.2 System Diagram…
-
Page 10: Chapter 2 Connections And Controls
Note: The HDBaseT port is designed using Neutrik’s etherCON A series connector system, which is optimized for pro audio and video network applications. Prior to using the HS-1600T MKII, you will need to first acquire the EtherCON A series connector to make your own Ethernet cable. Please visit Neutrik’s official home page…
-
Page 11
3. HDBaseT OUT The HDBaseT OUT port allows you to deliver video directly to HDBaseT devices such as the HBT-11 HDBaseT Receiver Box (Contact your local Datavideo office or visit our official website for more information). Note that the maximum video transmission distance is 60 meters. -
Page 12
11. Stream Port The stream port allows the user to establish direct connection between the notebook computer and the HS-1600T MKII in order to access the built-in NVS-31 or connect the NVS-31 to any local area network. Note: See the… -
Page 13: Switcher Keyboard Panel
2.2 Switcher Keyboard Panel Volume Focus / IRS / Switcher Transition PIP/Keyer PAN/TILT/ZOOM Control White Balance Settings Effects Program/Preview Transition Control Camera Presets Switcher Settings Volume Control Menu browsing buttons Volume adjustment sliders RESET button Headphone jack User Memory Audio meter Shift button Headphone volume control knob Transition Effects…
-
Page 14
Switcher Settings Menu browsing buttons Press the MENU button to gain access to the menu; use the up/down/left/right arrow buttons to browse through the menu and press ENTER button to select an option or MENU button again to exit. Reset Button Mode 1 –… -
Page 15
MIX Enable/Disable Button A MIX, also known as a dissolve, is a transition wherein the Program video is replaced by the Preview video at a smooth rate, and at the same time. Pressing the MIX button enables the MIX transition effect and automatically disables the WIPE button. -
Page 16
Split Activation Button After activating the PIP window, pressing the Split button will split the PROGRAM output display into two with the program out view on the left and the PIP view on the right. To select the Split source, i.e. the program out view, please see Split Source Section… -
Page 17
White Yellow Cyan Green Magenta Red Blue Black BLK button: Pressing the BLK button places a black screen on the PROGRAM view. Preview Output Preview Source Row Pressing the number buttons along the PREVIEW row selects the Preview video source. BKG button: Pressing the BKG button will set the Preview OUT to a Matte background, which will be displayed on the Program OUT monitor upon the next transition. -
Page 18
The button LED will be turned ON when selected. STR Button Pressing this button enters the HS-1600T MKII into STORE MODE. When activated, this allows the current camera position to be stored in a chosen Channel Preset Button by pressing the corresponding preset button. -
Page 19
FOCUS / IRIS / White Balance Focus Adjustment To manually control the FOCUS setting, first press the MANUAL button to enter the manual mode. The button LED will be turned ON to indicate that the manual mode is enabled. The FOCUS dial can then be rotated to set the focus. If the MANUAL button is disabled (OFF), the camera is in AUTO FOCUS mode. -
Page 20
Joystick – PAN / TILT PAN – Move the joystick left or right to pan the selected PTZ camera from left to right or vice versa. TILT – Move the joystick up or down to tilt the selected PTZ camera up or down. Note: Before attempting to use the joystick to PAN or TILT a selected camera, first make sure the LOCK button is not enabled. -
Page 21: Monitor Control Panel
2.3 Monitor Control Panel Power Switches the HS-1600T MKII Monitor Power ON / OFF BLUE Press this button to eliminate the red and green component of input signals. Only the blue component of an input is displayed on the screen. This allows adjustments of chroma and phase. (Phase adjustment is effective with NTSC signals).
-
Page 22: Record/Stream Panel
Aspect Ratio Button Sets the Aspect Ratio to 16:9 / 4:3 Volume Control Adjusts the speaker / headphone volume up / down. MUTE Mutes the audio from the internal speakers or headphone socket. 2.4 Record/Stream Panel RECORD Press the RECORD button to start enable video record mode. See Section 6.4 for details.
-
Page 23
Note that you should only use Class 10 SD card or above. See the Appendix, Recommended SD Cards, for a list of SD cards recommended by Datavideo. Note: Do not remove SD card while it is being written as doing so may result in corrupted video files. -
Page 24: Chapter 3 Switcher Osd Menu
Blue Black Transition Type The HS-1600T MKII provides two types of transition effect, which are cross dissolve (MIX) and WIPE. The default setting is MIX. Transition Speed The Transition Speed allows the user to set the MIX or WIPE effect duration, in frames. If the Transition Speed is set to a value of 60 then the transition will take effect over a period of 1 second if the progressive video is chosen and 2 seconds if the interlaced video is chosen.
-
Page 25: Wipe Effect
Wipe Effect On the HS-1600T MKII, there are three wipe effects available for the user to choose. The three wipe effects are HORIZONTAL, VERTICAL and CENTER. The default is Horizontal.
-
Page 26: Pip Source
Main Sub-Menu Options or Values Default Value Background Color Bar PIP Size 1-100% Position X -50% — +50% Position Y -50% — +50% Black Input 2 Input 1 Input 2 Split Source Input 3 Input 4* Background Color Bar Small Small Border Size Middle…
-
Page 27: Position Y
Position Y Adjusting Position Y moves the PIP window vertically. Pressing the up or down arrow button allows the user to either increment or decrement Position Y by 10. Press and hold the up or down arrow buttons to change the value at an accelerated rate. Split Source After the PIP window is activated, pressing the Split button will split the PROGRAM output display into two with the program out view on the left and the PIP view on the right.
-
Page 28: Lumakey
Bot – Adjusts the position of the bottom edge of the PIP window. 3.4 Lumakey Keyer of the HS-1600T MKII provides the user with the capability of luma keying. Note: When PIP and Lumakey features are enabled at the same time, the lumakey source will be the upper layer and the PIP source will be the lower layer.
-
Page 29: Audio
OFF. HDMI Input In this option, you can select the audio source. Selection of input 1-4 allows the HS-1600T MKII to play the enabled audio source. If “Follow” is selected, the audio will enter Audio follow Video mode, i.e. playback of the audio of the output video.
-
Page 30: User Mems
2 to 3 seconds after “Reset” is selected. 3.7 Setup In the “Setup” menu, the user can change the output resolution, reset the HS-1600T MKII to its Factory Default values, choose the preferred OSD menu language, upgrade firmware and view the current firmware versions (Mainboard and Keyboard).
-
Page 31: Pgm Out Res
Main Sub-Menu Options or Values Default Value 1080p/30 1080p/25 1080i/60 1080i/59.94 1080i/50 720p/60 720p/59.94 720p/50 Output Format YUV444 YUV422 Save Setup [Save] Language English Simplified Chinese Traditional Chinese MB Software Version KBD Software Version PGM Out Res. In PGM Out RES., the user is allowed to select an appropriate PROGRAM output resolution. The available resolutions are listed as follows: …
-
Page 32: Output Format
1080i/60 1080i/59.94 1080i/50 720p/60 720p/59.94 720p/50 Once done, simply go to “Save Setup” to confirm the selected output resolution. Note: The new resolution will be effective once selected. If you have selected a resolution that is not supported by the monitor, you will not be able to view the OSD menu.
-
Page 33: Camera Ch. Setup
Main Sub-Menu Options Values Joystick Pan Normal Reverse Joystick Tilt Normal Reverse Memory Speed 1-18 Operator Power On/Standby R-Gain 0-255 B-Gain 0-255 Tally LED Green Camera CH. Setup By selecting Yes/No, you will be able to enable/disable the camera setup. PTC-150T-01/02/03 The PTC-150T-01/02/03 options will allow you to configure basic settings of the respective cameras.
-
Page 34: Chapter 4 Monitor
Chapter 4 Monitor The HS-1600T MKII’s built-in monitor can be configured via an on screen menu. Press the MENU button to display the Main Menu list on the monitor. This section covers the Menu options in the order that they appear on the monitor.
-
Page 35: Main Adjust
Main Options Sub Options Values Values OSD TIMOUT 5-120 SEC FRAME RATIO 80 / 90 / 0FF 4:3 MARK LINE ON / OFF CENTRAL MARK ON / OFF SPECIAL FUNCTION CINEMA ZONE MARK ON / OFF AUDIO CHANNEL L* AUDIO CHANNEL R* EXIT FACTORY RESET EXIT…
-
Page 36: Special Function
4.2 Firmware Update Procedure (Monitor) From time to time Datavideo may release new firmware to either add new features or to fix reported bugs in the current HS-1600T MKII Monitor firmware. Customers can update the firmware themselves if they wish or they can contact their local dealer or reseller for assistance should they prefer this method.
-
Page 37
UPGRADE on the front of the monitor button panel. 5. Reboot HS-1600T MKII and the update will start automatically. 6. The HS-1600T MKII Monitor will reboot itself at the end of the process. Note: The USB port can also be used to power the connected USB LED light. -
Page 38: Chapter 5 Applications
5.1 Placing a logo on the video using the lumakey function The HS-1600T MKII allows the user to place a logo on the video using the lumakey function. First of all, create a 1920×1080 (16:9) logo against a black or white background on a laptop. Once the logo is created, please follow the steps outlined as follows to insert the logo layer.
-
Page 39
SET DVIP SET IR PTZ INFO. OUTPUT: OFF ESCAPE 6. Set the DVIP baud to 38400 [SET DVIP] DVIP BAUDRATE: 38400 ESCAPE 7. Connect the PTC-150T to the HS-1600T MKII, which should automatically assign an IP to the PTC- 150T. -
Page 40: Chapter 6 Video Streaming And Recording
DHCP network. 1. Connect the NVS-31 MARK II’s stream port to the network via an Ethernet cable. 2. Turn on the HS-1600T MKII’s power and the NVS-31 MARK II will also be turned ON in the DHCP mode by default.
-
Page 41: Connecting To A Non-Dhcp Network (Static Ip)
NVS-31 MARK II to the default IP, please follow the steps outlined below: 1. Connect the NVS-31 MARK II’s stream port to the network via an Ethernet cable. 2. Turn on the HS-1600T MKII’s power and the NVS-31 MARK II will also be turned ON in the DHCP mode by default.
-
Page 42
Push the Record and Stream buttons simultaneously while turning on the device’s power. Wait for about five seconds and release the button push as soon as you see the RECORD and STREAM button LEDs light up. Reboot the PC. If the problem persists, try the following: … -
Page 43
Note: Please write down the IPv4 address previously entered as it may be needed after you are done with streaming or recording. The NVS-31 MARK II should now be connected with an IP address of 192.168.1.60. If the NVS-31 MARK II still cannot connect, simply restore the NVS-31 MARK II to the factory defaults. -
Page 44: Advanced Troubleshooting
Reconnect the PC and the NVS-31 MARK II to the network. Restore the PC’s original network settings. Shut down the HS-1600T MKII; wait for approximately five seconds before turning the HS-1600T MKII back ON. You should be able to access the NVS-31 MARK II through the fixed IP address.
-
Page 45: Web User Interface
6.2 Web User Interface By now, we have obtained the IP addresses of the PC and the NVS-31 MARK II. Enter the NVS-31 MARK II’s IP address into the address bar of a browser then hit the ENTER button. Login by entering the user name as well as the password into a pop-up dialogue box as shown below.
-
Page 46: Operation Mode
Operation Mode Click the Operation Mode tab on the tool bar to open the operation mode configuration page on which the user will be allowed to customize various stream and record settings. The NVS-31 MARK II offers the following operation modes: …
-
Page 47
Four streaming protocols available on the NVS-31 MARK II are RTSP, RTMP, HLS, and TS. See Section for instructions on each individual stream setup. Note that once your video streams are set up, click “Apply” button to apply the new stream settings. Click “Start Stream”… -
Page 48
Resolution The first step of encoder setup is to adjust the image size. It is best to either match your original video source or scale it down. For example, capture at HD 720 and stream at HD 720. Or capture at HD 720 and stream at 540 (high). -
Page 49
2M 1M 512K 256K Encoder Mode The Encoder Mode sets the video bitrate mode for your video stream. The available modes are listed as follows: High (8M) Medium (4M) Low (2M) Tip: You can also switch between different bitrate modes by pressing the Bitrate button in the H.264 Encoder button group. -
Page 50
Level ID Max. Video Max Frame Size Max decoding speed in Resolution, Frame Rate Bitrate in in macroblocks macroblocks per second (Max Stored Frames) kbits/s 4000 19800 352×480@30.0 (7) 352×576@25.0 (6) 2.2 (SD) 4000 1620 20250 352×480@30.7 (12) 352×576@25.6 (10) 720×480@15.0 (6) 720×576@12.5 (5) 10000… -
Page 51: Record Mode
30 25 20 15 10 5 3 2 1 Record Mode The NVS-31 MARK II’s record engine allows you to record your program on the SD card. See Appendix for a list of recommended SD cards. The record parameters shown in the diagram below will be discussed in detail in this section.
-
Page 52
File Name Enter the name of your record file. Resolution Recording resolution is the number of pixels (dots) used to create an image. Higher resolutions use more pixels to create an image. This means that greater amounts of detail can be expressed in the image, but larger files sizes and a greater amount of storage (i.e. -
Page 53
8M 6M 4M 2M 1M 512K 256K Recommended video bitrates 720P or lower – 8 – 10 mbps 1080P or higher – 15 mbps or higher Encoder Mode The Encoder Mode sets the video bitrate mode for your recording. The available modes are listed as follows: … -
Page 54
Level Max. Video Max Frame Size Max decoding speed in Resolution, Frame Rate Bitrate in kbits/s in macroblocks macroblocks per second (Max Stored Frames) 352×288@7.5 (2) 6000 320×240@20.0 (7) 352×288@15.2 (6) 11880 320×240@36.0 (7) 352×288@30.0 (6) 2000 11880 320×240@36.0 (7) 352×288@30.0 (6) 4000 19800… -
Page 55: Cg Layer
200 120 100 60 50 30 25 20 15 10 5 3 2 1 The CG function allows the user to place a textual or picture layer on top of the video. The CG settings are shown in the diagram below.
-
Page 56: Cg Type
CG Type You may select to place a text (Text) or graphic (Picture) CG object on your video from the drop-down menu. Text After setting the CG type to Text, you will be allowed to enter the text that you want to place on the video.
-
Page 58: Network Setting
Network Setting In network settings, you can either manually enter the IP address or set the device to DHCP mode which allows the router to automatically assign the IP address to the NVS-31 MARK II. DHCP In DHCP mode, the router automatically assigns the IP address to the device. If you want to manually configure the network settings, disable this option.
-
Page 59: Firmware Update
Manual If you’ve selected “Manual”, the Date and Time fields will appear showing the device’s system date and time values. A calendar will appear after the Date field is clicked. Simply click a day to set the date. Set the time in the Time field. Time Zone Click the drop-down menu to select a time zone for your device.
-
Page 60: Other Option
UI). This ensures the page is always displaying the most up-to-date information. Vertical On this page, you will be able to change your stream video orientation. Crop: Designed for HS-1600T MKII product series allowing 16:9 video output and left/right image crop.
-
Page 61: Operations
Rotate: Designed for video production; if the camera is placed upside down, this mode will reverse it. 6.3 Operations In this section, we will discuss how you can play the video using different streaming protocols and how to place texts on your video. Video Streaming The NVS-31 MARK II provides the user with different video streaming options such as RTSP, TS, RTMP, and HLS.
-
Page 62
3. Click the Start Stream button to generate the RTSP URL. 4. Based on your settings, the device will automatically generate the RTSP URL rtsp://root:root@192.168.1.82:556/session0.mpg. 5. To view the RTSP video stream, enter the RTSP URL into the client device. 6. -
Page 63
Follow the steps below to obtain the TS URL: 1. On the web UI, click “Operation Mode” “Stream” to open the stream settings page. 2. Select TS from Stream Type drop-down menu. 3. Enter the TS URL. Note that the TS URL shown below is only for illustration purpose. 4. -
Page 64
7. As shown in the diagram below, enter the stream URL then click Play to start streaming. Follow the steps below to obtain the HLS URL: 1. On the web UI, click “Operation Mode” “Stream” to open the stream settings page. 2. -
Page 65
3. Click the Start Stream button to start the stream. 4. Based on your settings, the device will automatically generate a .m3u8 stream URL: http://192.168.1.82/hls/2/session0.m3u8 5. Enter the HLS URL into the client device. 6. Open VLC then click Open Network Stream (shown in the diagram below). 7. -
Page 66: Rtmp
8. You can also play .m3u8 stream URL using the devices listed as follows: iPhone, iPad and MacBook: Use Safari to open the .m3u8 stream URL. Windows 10: Use Microsoft Edge to open the .m3u8 stream URL. RTMP In the RTMP mode, the NVS-31 MARK II can send up to two data streams to multiple CDNs or media servers that support the Real-Time Messaging Protocol.
-
Page 67: Text Overlay Video
12. To stop live streaming, simply click the Stop Stream button. Text Overlay Video The HS-1600T MKII’s built-in video streaming server not only allows you to stream and record your program, it also features a CG tool that is capable of overlaying text on the video currently being broadcast.
-
Page 68
Follow the steps below to overlay text on the video: Open the CG settings page. Set the CG layer. Select the CG Type. If Text is selected, enter the overlay text in the Text field, otherwise browse for the picture file on the disk. -
Page 69: Stream And Record Buttons
6.4 Stream and Record Buttons The RECORD, STREAM, VERTICAL and BITRATE buttons on the front panel of the HS-1600T MKII give the user certain controls of the record and stream functions. In this section, we will cover operations of these four buttons in detail.
-
Page 70: Bitrate Button
When the RECORD, STREAM, VERTICAL and BITRATE buttons turn solid white, it indicates that the NVS-31 MARK II’s factory defaults have been successfully restored. 6.6 Firmware Update Datavideo usually releases new firmware containing new features or reported bug fixes from time to time. See…
-
Page 71: Chapter 7 Appendices
Appendix 1 Tally Outputs The HS-1600T MKII has a D-sub 15 pin female tally output port. These connections provide bi-colour tally information to a number of other Datavideo products, such as the ITC-100 eight channel talkback system and the TLM range of LCD Monitors. The ports are open collector ports and as such do not provide power to tally light circuits.
-
Page 72: Appendix 2 Firmware Upgrade
USB Cable x 1 Update Procedure 1. On the PC, copy the two HS-1600T MKII firmware binary files to the root directory of a USB thumb drive. After the files are successfully copied, safely remove the USB thumb drive from the PC.
-
Page 73
LED color (green) of the preview row buttons. Approximately 5 seconds after the HS-1600T MKII is rebooted, you will see a startup screen on the monitor with old mainboard version (V1.5) displayed at the bottom right corner. At this point, the BLK button will start flashing green. -
Page 74: Monitor
Note 3: There is no guarantee that the HS-1600T MKII supports all USB disks. When you see all buttons of the program and preview rows illuminate pink or greenish pink, this indicates that the disk file read error has occurred. Please try using other USB flash drive brands.
-
Page 75
4. After double clicking the firmware file, you will see the loading prompt as shown below, indicating that the file is being uploaded to the NVS-31. 5. After the file has been successfully uploaded, you will see a file upload success message. Click the Update button to start the firmware update process. -
Page 76: Appendix 3 Recommended Sd Cards
Appendix 3 Recommended SD Cards You should only use Class 10 SD card or above. In this appendix, you will find a list of SD cards recommended by Datavideo. Recommended SD Cards Brand Model Pictures Kingston SDHC I C10 SANDISK Extreme…
-
Page 77
Recommended SD Cards Brand Model Pictures SANDISK Extreme SDHC C10 16GB ADATA Premier Pro microSDXC I UHS-I U3 Class 10 with SD adapter 64GB SANDISK ULTRA® SDHC™/SDXC™ UHS-I 128 GB… -
Page 78: Appendix 4 Frequently-Asked Questions
Appendix 4 Frequently-Asked Questions This section describes problems that you may encounter while using HS-1600T MKII. If you have any questions, please refer to related sections and follow all suggested solutions. If problem still exists, please contact your distributor or the service center.
-
Page 79: Appendix 5 Tips For Establishing An Hdbaset Compliance Environment And Ethernet Cable Selection
Appendix 5 Tips for Establishing an HDBaseT Compliance Environment and Ethernet Cable Selection Tips for Establishing an HDBaseT Compliance Environment HDBaseT alliance defines the maximum number of cables in a bundle use case to be six cables per bundle. Table below defines the maximum number of cables in a bundle as a function of cable type & the overlapping length.
-
Page 80
its best connection quality. Generally speaking, the outdoor UV resistant Ethernet cable is coated with the black PE skin. 2. If there is any interference source at the customer side such as the radio interference, it is highly recommended to adopt the SFTP* to prevent the Ethernet cable from interference. *SFTP: The SFTP (Shielded and Foiled Twisted Pair) is an Ethernet cable with foil shielding around the individual twisted wires and an overall shield which can be a flexible braid. -
Page 81: Appendix 6 Dimensions
Appendix 6 Dimensions All measurements in millimeters (mm)
-
Page 82: Appendix 7 Specifications
Appendix 7 Specifications Model Name HS-1600T MKII Product Name 4-Channel HD/SD HDBaseT Portable Video Streaming Studio Video Standard HD & SD 1080p 50/59.94/60Hz 1080i 50/59.94/60Hz Video Format 720p 50/59.94/60Hz 576i/p 50Hz 480i/p 59.94Hz Input Routable / Crosspoint 3 x HDBaseT…
-
Page 83
Model Name HS-1600T MKII Product Name 4-Channel HD/SD HDBaseT Portable Video Streaming Studio AAC-LC Streaming Audio Encode Configurable bit rate ranging from 32Kbps to 384Kbps Sample rate: 48KHz, 16bit TS over TCP/UDP (unicast & multicast) Streaming Protocol RTSP over HTTP/TCP/UDP (RTSP Elementary Streaming) -
Page 84: Service And Support
Aug-03.2020 Datavideo Technologies Co., Ltd. All rights reserved 2020 Version E2…
Посмотреть инструкция для DataVideo HS-1600T бесплатно. Руководство относится к категории без категории, 1 человек(а) дали ему среднюю оценку 7.5. Руководство доступно на следующих языках: английский. У вас есть вопрос о DataVideo HS-1600T или вам нужна помощь? Задайте свой вопрос здесь
Не можете найти ответ на свой вопрос в руководстве? Вы можете найти ответ на свой вопрос ниже, в разделе часто задаваемых вопросов о DataVideo HS-1600T.
Инструкция DataVideo HS-1600T доступно в русский?
Не нашли свой вопрос? Задайте свой вопрос здесь
Datavideo HS-1600T MARK II
628 448 ₽
4-канальная портативная студия потокового видео HD / SD HDBaseT
- 4 видеовхода (3 RJ-45 и 1 HDMI) и 4 видеовыхода (3 HDMI+HDBaseT)
- Аудиовходы: 2 аналоговых XLR-входа и 2 аналоговых RCA-входа (L/R)
- Создано на основе технологии HDBaseT
- Встроенное устройство записи H.264 под SD-карты
- Потоковое вещание в Facebook Live, YouTube, Twitch и т. п.
- Монитор с задней светодиодной подсветкой 17,3”
-
Рабочая схема
-
Характеристики
Рабочая схема

Характеристики
| Стандарт видео | HD и SD |
| Формат видео | 1080p 50 / 59,94 / 60 Гц
1080i 50 / 59,94 / 60 Гц 720p 50 / 59,94 / 60 Гц 576i / p 50 Гц 480i / p 59,94 Гц |
| Маршрутизируемый вход / точка пересечения | Нет данных |
| Видео входы | 3 порта HDBaseT
1 разъем HDMI |
| Компьютерный графический интерфейс | 1 через HDMI |
| Выход с понижающим преобразованием | да |
| Видео выходы |
2 порта HDMI PGM 1 разъем HDBaseT (RJ-45) 1 x потоковый порт (RJ-45) |
| Аудиовходы |
2 x балансных XLR |
| Аудио выход |
1x стерео наушники |
| Поддержка цифрового встроенного звука | Вход 2 канала
Выход 2 канала |
| Калибровка задержки звука | Нет данных |
| Переключение A + V |
Нет данных |
| USK |
1x поддержка USK Lumakey |
| DSK | Нет данных |
| Картинка в картинке | 1 |
| Вставка логотипа | Нет данных |
| Встроенный аудиомикшер | 4 канала |
| Встроенный монитор |
17,3 дюйма HD TFT со светодиодной подсветкой 1920×1080 пикселей |
| Встроенный домофон и счетчик | Нет данных |
| Кодирование потокового видео |
H.264 / AVC, основной / высокий профиль, настраиваемая скорость передачи данных до 10 Мбит / с |
| Кодирование потокового аудио |
AAC-LC |
| Потоковый протокол |
TS через TCP / UDP (одноадресная и многоадресная) |
| Потоковое управление | Веб-интерфейс для настройки и управления системой |
| Файловая система записи |
FAT, exFAT, NTFS |
| Формат файла записи |
MP4 |
| Управление настройками записи |
Веб-интерфейс для настройки и управления системой |
| Размер (ДхШхВ) | 455 х 355 х 134 мм |
| Вес | 17,2 фунта (7,8 кг), усиленный пластиковый корпус |
| Сила | 48 В постоянного тока, 4,16 А |
| Рабочая температура. Спектр | 0 ~ 40 ° С |
| дополнительные аксессуары | CB-60/61/62 |
| Что в коробке | |
|---|---|
| Содержание | 1 продукт HS-1600T Mark II 1 переключатель AD, 56 В постоянного тока со шнуром переменного тока 1 карточка с благодарностью 3 кабеля Ethernet (55 дюймов / 140 см) |
| Особые примечания | |
| Требования к кабелю | Требуется твердый сердечник, экранированный кабель категории 6 для подключения к сети Ethernet |
-
Contents
-
Table of Contents
-
Troubleshooting
-
Bookmarks
Quick Links
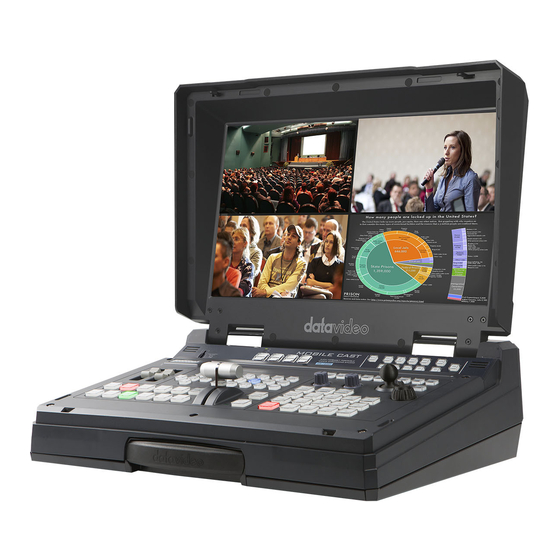
4 CHANNEL HD/SD
HDBASET PORTABLE
VIDEO STREAMING STUDIO
HS-1600T
Instruction Manual
Related Manuals for Datavideo HS-1600T
Summary of Contents for Datavideo HS-1600T
-
Page 1
4 CHANNEL HD/SD HDBASET PORTABLE VIDEO STREAMING STUDIO HS-1600T Instruction Manual… -
Page 2: Table Of Contents
Table of Contents FCC COMPLIANCE STATEMENT………………….5 WARNINGS AND PRECAUTIONS ………………….5 WARRANTY ……………………….6 ……………………..6 TANDARD ARRANTY …………………….. 6 HREE ARRANTY DISPOSAL ……………………….. 7 CHAPTER 1 INTRODUCTION ………………….. 8 ……………………..8 EATURES ……………………9 YSTEM IAGRAM CHAPTER 2 CONNECTIONS AND CONTROLS ………………10 ……………………..
-
Page 3
Load Memory ……………………..29 Save Memory ……………………..29 Factory Default ……………………..29 ……………………….. 29 ETUP PGM Out Res……………………..30 MV Out Res……………………..30 Output Format ……………………..31 Save Setup ……………………… 31 Language ……………………….. 31 MB and KBD Software……………………31 …………………….. -
Page 4
SERVICE AND SUPPORT ……………………96 Disclaimer of Product & Services The information offered in this instruction manual is intended as a guide only. At all times, Datavideo Technologies will try to give correct, complete and suitable information. However, Datavideo Technologies cannot exclude that some information in this manual, from time to time, may not be correct or may be incomplete. -
Page 5: Fcc Compliance Statement
7. This product should only be operated from the type of power source indicated on the marking label of the AC adapter. If you are not sure of the type of power available, consult your Datavideo dealer or your local power company.
-
Page 6: Warranty
When the product exhibits a distinct change in performance, indicating a need for service. Warranty Standard Warranty Datavideo equipment are guaranteed against any manufacturing defects for one year from the date of purchase. The original purchase invoice or other documentary evidence should be supplied at the time of any request for repair under warranty.
-
Page 7: Disposal
State Drive, SD Card, USB Thumb Drive, Lighting, Camera module, PCIe Card are covered for 1 year. The three-year warranty must be registered on Datavideo’s official website or with your local Datavideo office or one of its authorized distributors within 30 days of purchase.
-
Page 8: Chapter 1 Introduction
PIP, WIPE Generator and Tally. The HS-1600T has a Joystick that allows the user to Pan, Tilt and Zoom the PTC-150T camera. In addition, the HS-1600T also allows the user to adjust the PTC-150T’s Focus, IRIS and other settings.
-
Page 9: System Diagram
1.2 System Diagram…
-
Page 10: Chapter 2 Connections And Controls
A series connector system, which is optimized for pro audio and video network applications. Prior to using the HS-1600T, you will need to first acquire the EtherCON A series connector to make your own Ethernet cable. Please visit Neutrik’s official home page…
-
Page 11
Tally output port can connect other Datavideo peripheral devices such as ITC-100, ITC-200, AM-100 or other monitor models, allowing the peripheral device to communicate with the HS-1600T or send tally signal to be displayed on the monitor. Appendix 1 for physical pin connections and Section 3.5… -
Page 12: Switcher Keyboard Panel
8. Power Switch Power switch ON/OFF 9. DC IN DC in socket connects the supplied 48V / 190W PSU. The connection can be secured by screwing the outer fastening ring of the DC In plug to the socket. 10. Stream Port The stream port allows the user to establish direct connection between the notebook computer and the HS- 1600T in order to access the built-in NVS-31 or connect the…
-
Page 13
Switcher Settings Volume Control Menu browsing buttons Volume adjustment sliders RESET button Headphone jack User Memory Audio meter Shift button Headphone volume control knob Transition Effects Camera Presets WIPE transition effect selection Channel Selection Buttons MIX Enable/Disable button Preset Buttons WIPE transition effect Enable/Disable STR Button PIP/Keyer… -
Page 14
Each Wipe button consists of black and white colors. The white represents the current Program image and the black represents the WIPE-IN image. The HS-1600T provides 3 WIPE presets with the Horizontal and Vertical WIPEs selectable on the control panel. The Center WIPE can be selected from the menu (Start). -
Page 15
PIP / Keyer Enable/Disable Buttons for PIP Keyer Picture in Picture puts the selected Sub Video Source in a window on the Main Program view, with control over window size and placement. For PIP configuration, please refer to the section. PIP PGM: Shows the configured PIP on the PGM output after transition, however, the PIP cannot be previewed on the QUAD split view display. -
Page 16
Transition Control T-Bar (Manual Transition) T-Bar is used for manual transition. The T-Bar can be either all the way up, all the way down or anywhere in between. When the T-Bar is pushed to halfway between the topmost position and the bottommost position, the keyboard functions will be disabled. -
Page 17
Preview Output Preview Source Row Pressing the number buttons along the PREVIEW row selects a video source. BKG button: Pressing the BKG button will set the Preview OUT to a Matte background, which will be displayed on the Program OUT monitor upon the next transition. The BKG color can be configured … -
Page 18
The button LED will be turned ON when selected. STR Button Pressing this button enters the HS-1600T into STORE MODE. When activated, this allows the current camera position to be stored in a chosen Channel Preset Button by pressing the corresponding preset button. -
Page 19
White Balance Push Auto Push once to automatically adjust the camera white balance setting. MWB (Manual White Balance) Push to enable manual white balance setting. ATW (Force Automatic White Balance) Push to enable automatic white balance setting. PAN / TILT / ZOOM Speed Selection Buttons The speed at which the selected camera moves can be chosen by pressing one of the three speed buttons. -
Page 20: Monitor Control Panel
OSD menu is opened. 2.3 Monitor Control Panel Power Switches the HS-1600T Monitor Power ON / OFF BLUE Press this button to eliminate the red and green component of input signals. Only the blue component of an input is displayed on the screen.
-
Page 21: Record/Stream Panel
ZOOM This feature is designed for use with HD-SDI and HDMI sources above 720p resolution. Press this button to zoom in to the video on the display. This is strictly a zooming function and does not alter the native aspect ratio of the source pixels to fill the screen. The ZOOM button allows you to toggle the Pixel Zoom feature between zoom x1, x2, x4 and x8.
-
Page 22
Note that you should only use Class 10 SD card or above. See the Appendix, Recommended SD Cards, for a list of SD cards recommended by Datavideo. Note: Do not remove SD card while it is being written as doing so may result in corrupted video files. -
Page 23: Chapter 3 Switcher Osd Menu
Blue Black Transition Type The HS-1600T provides two types of transition effect, which are cross dissolve (MIX) and WIPE. The default setting is MIX. Transition Speed The Transition Speed allows the user to set the MIX or WIPE effect duration, in frames. If the Transition Speed is set to a value of 60 then the transition will take effect over a period of 1 second if the progressive video is chosen and 2 seconds if the interlaced video is chosen.
-
Page 24: Wipe Effect
Wipe Effect On the HS-1600T, there are three wipe effects available for the user to choose. The three wipe effects are HORIZONTAL, VERTICAL and CENTER. The default is Horizontal. WIPE Border Size The WIPE Border Size generally allows the user to select an appropriate border width.
-
Page 25: Pip Source
Main Sub-Menu Options or Values Default Value Input 4* Background Color Bar PIP Size 1-100% Position X -50% — +50% Position Y -50% — +50% Black Input 2 Input 1 Input 2 Split Source Input 3 Input 4* Background Color Bar Small Small Border Size…
-
Page 26: Position X
Position X Adjusting Position X moves the PIP window horizontally. Pressing the up or down arrow button on the control panel allows the user to either decrement or increment Position X by 1. To change the value at an accelerated rate, simply press and hold the up or down arrow button. Position Y Adjusting Position Y moves the PIP window vertically.
-
Page 27: Lumakey
Bot – Adjusts the position of the bottom edge of the PIP window. 3.4 Lumakey Keyer of the HS-1600T provides the user with the capability of luma keying. Note: When PIP and Lumakey features are enabled at the same time, the lumakey source will be the upper layer and the PIP source will be the lower layer.
-
Page 28: Transparency
OFF. HDMI Input In this option, you can select the audio source. Selection of input 1-4 allows the HS-1600T to play the enabled audio source. If “Follow” is selected, the audio will enter Audio follow Video mode, i.e. playback of the audio of the output video.
-
Page 29: User Mems
2 to 3 seconds after “Reset” is selected. 3.7 Setup In the “Setup” menu, the user can change the output resolution, reset the HS-1600T to its Factory Default values, choose the preferred OSD menu language, upgrade firmware and view the current firmware versions (Mainboard and Keyboard).
-
Page 30: Pgm Out Res
Main Sub-Menu Options or Values Default Value 1080p/60 1080p/59.94 1080p/50 1080p/30 1080p/25 MV Out Res. 1080i/60 1080i/59.94 1080i/50 720p/60 720p/59.94 720p/50 Output Format YUV444 YUV422 Save Setup [Save] Language English Simplified Chinese Traditional Chinese MB Software Version KBD Software Version PGM Out Res.
-
Page 31: Output Format
1080p/30 1080p/25 1080i/60 1080i/59.94 1080i/50 720p/60 720p/59.94 720p/50 Once done, simply go to “Save Setup” to confirm the selected output resolution. Note: The new resolution will be effective once selected. If you have selected a resolution that is not supported by the monitor, you will not be able to view the OSD menu.
-
Page 32: Camera Ch. Setup
Main Sub-Menu Options Values 1080p/50 Mirror Mode Joystick Pan Normal Reverse Joystick Tilt Normal Reverse Memory Speed 1-18 Operator Power On/Standby R-Gain 0-255 B-Gain 0-255 Tally LED Green Camera CH. Setup By selecting Yes/No, you will be able to enable/disable the camera setup. PTC-150T-01/02/03 The PTC-150T-01/02/03 options will allow you to configure basic settings of the respective cameras.
-
Page 33
Power: Select ON to start powering the selected camera; select Standby to enter the camera into power standby mode. R-Gain/B-Gain: The red and blue components can be adjusted, ranging from 0 to 255. Tally LED: You can either turn the tally light off or enable the red or green tally light. -
Page 34: Chapter 4 Monitor
Chapter 4 Monitor The HS-1600T’s built-in monitor can be configured via an on screen menu. Press the MENU button to display the Main Menu list on the monitor. This section covers the Menu options in the order that they appear on the monitor.
-
Page 35: Main Adjust
Main Options Sub Options Values Values OSD TIMOUT 5-120 SEC FRAME RATIO 80 / 90 / 0FF 4:3 MARK LINE ON / OFF CENTRAL MARK ON / OFF SPECIAL FUNCTION CINEMA ZONE MARK ON / OFF AUDIO CHANNEL L* AUDIO CHANNEL R* EXIT FACTORY RESET EXIT…
-
Page 36: Special Function
4.2 Firmware Update Procedure (Monitor) From time to time Datavideo may release new firmware to either add new features or to fix reported bugs in the current HS-1600T Monitor firmware. Customers can update the firmware themselves if they wish or they can contact their local dealer or reseller for assistance should they prefer this method.
-
Page 37
UPGRADE on the front of the monitor button panel. 5. Reboot HS-1600T and the update will start automatically. 6. The HS-1600T Monitor will reboot itself at the end of the process. Note: The USB port can also be used to power the connected USB LED light. -
Page 38: Chapter 5 Applications
5.1 Placing a logo on the video using the lumakey function The HS-1600T allows the user to place a logo on the video using the lumakey function. First of all, create a 1920×1080 (16:9) logo against a black or white background on a laptop. Once the logo is created, please follow the steps outlined as follows to insert the logo layer.
-
Page 39
SET RS422 SET DVIP SET IR PTZ INFO. OUTPUT: OFF ESCAPE 6. Set the DVIP baud to 38400 [SET DVIP] DVIP BAUDRATE: 38400 ESCAPE 7. Connect the PTC-150T to the HS-1600T, which should automatically assign an IP to the PTC-150T. -
Page 40: Chapter 6 Video Streaming And Recording
1. Connect the NVS-31’s stream port to the network via an Ethernet cable. 2. Turn on the HS-1600T’s power and the NVS-31 will also be turned ON in the DHCP mode by default. 3. Connect the laptop to the same network that the NVS-31 is connected to and download the free IP Finder utility program.
-
Page 41: Default Fixed Ip
NVS-31 to the default IP, please follow the steps outlined below: 1. Connect the NVS-31’s stream port to the network via an Ethernet cable. 2. Turn on the HS-1600T’s power and the NVS-31 will also be turned ON in the DHCP mode by default.
-
Page 42
Temporarily shut down the anti-virus software or firewall. Make sure no other devices are connected to the LAN (wired or wireless) because this may result in IP conflicts. After trying all methods and if the problem still exists, the NVS-31 video streaming server offers the fixed IP feature that allows you to establish direct connection to the NVS-31. -
Page 43
The NVS-31 should now be connected with an IP address of 192.168.1.60. If the NVS-31 still cannot connect, simply restore the NVS-31 to the factory defaults. Turn off the switcher. Push the Record and Stream buttons simultaneously while turning on the switcher’s power. Wait for about five seconds and release the button push as soon as you see the RECORD and STREAM button LEDs light up. -
Page 44: Advanced Troubleshooting
Reconnect the PC and the NVS-31 to the network. Restore the PC’s original network settings. Shut down the HS-1600T; wait for approximately five seconds before turning the HS-1600T back You should be able to access the NVS-31 through the fixed IP address.
-
Page 45: Status
Status You will see the Status page immediately after logging into the NVS-31 web UI. On the Status page, you will be able to view the Operation Mode, Video Resolution, Stream Settings (RTSP/RTMP(S)/HLS/SRT/TS), Record Settings, Record Media and Messages. Note: The NVS-31 web UI does not update automatically so to learn the latest device status, please refresh the page manually.
-
Page 46: Operation Mode
REC_UP_PROG_START_ERR Recorder Start Failed REC_UP_PROG_BUFF_ERR Recorder Buffer Error REC_RUN_DISK_FULL Disk Full REC_RUN_ENC_BUFF_ERR Encoder Buffer Error REC_RUN_PROG_WRITE_ERR Recorder Write Failed REC_RUN_PROG_BUFF_ERR Recorder Buffer Error REC_STOP_DISK_EXIT_ERR Unmount Disk Failed REC_STOP_PROG_EXIT_ERR Recorder Stop Failed Operation Mode Click the Operation Mode tab on the tool bar to open the operation mode configuration page. The NVS-31 offers the following operation modes: …
-
Page 47
In the Stream Only mode, settings such as Resolution, Frame Rate, Profile, Video Bitrate (bps), Audio Bitrate (bps), GOP and Stream Type can be configured. Five stream types are available on the NVS-31 and they are RTSP, RTMP(S), HLS, SRT and TS. See Section 6.3 for details. -
Page 48
Click the “Apply” button to apply the new record settings. Click the “Start” button to start recording and the “Stop” button to stop recording. -
Page 49: Stream And Record Settings
Stream and Record Settings In the section, you will be introduced various setting options of stream and record functions. Stream Encoder Settings Bitrate Mode The bitrate mode sets the video bitrate mode for your video stream. The available modes are high, mid and low. Note: You are allowed to switch between different bitrate modes by pressing the Bitrate button on the Record/Stream panel.
-
Page 50
Profile Profile sets the H.264 encoding profile for your stream. The available options are Baseline, Main, and High. Typically, High profile provides the best image quality and is suitable in most instances. However, depending on the decoder used when viewing the stream, such as with mobiles devices, a Main or Baseline profile may be required. -
Page 51
GOP pattern with longer GOP length encodes video very efficiently. Shorter GOP lengths usually work better with video that has quick movements, but they do not compress the data rate as much. Depending on your applications, the NVS-31 offers the user 16 GOP sizes ranging from 1 to 180. -
Page 52
Video Only Enable this option if you just want to stream the video without the audio. RTSP Username/Password The account and password are root by default. Stream Type – RTMP(S) RTMP URL Enter the RTMP URL obtained from any live streaming platform such as Ustream. -
Page 53
Video Only Enable this option if you just want to stream the video without the audio. Stream Type – SRT SRT Port The SRT port is 9001 by default. Play URL A stream URL will be generated after the Start button is clicked. -
Page 54
60+fps – Anything higher than 30fps is mainly used to create slow motion video or to record video game footage. Profile Profile sets the H.264 encoding profile for your recorder. The available options are Baseline, Main, and High. Typically, High profile provides the best image quality and is suitable in most instances. -
Page 55: Storage
The activation time is approximately 2 to 3 seconds. Storage The web UI of the HS-1600T’s built-in video streaming server (NVS-31) also displays storage device information, allowing the user to view the SD card status. The Status page of the web UI is shown in…
-
Page 56
Display of the manufacturer’s information. Note that you should only use Class 10 SD card or above. See the Appendix, Recommended SD Cards, for a list of SD cards recommended by Datavideo. Product Display of the name of the SD card. -
Page 57
The CG function on the HS-1600T’s built-in video streaming server allows the user to place a textual layer on top of the video. The CG settings on the CG page are shown in the diagram below. CG Settings CG Enable/Disable Select ON/OFF from this drop-down menu to enable/disable the CG overlay function. -
Page 58: System
Select the font size of your CG overlay text. System The system page of the HS-1600T’s built-in video streaming server allows the user to configure several network and system related settings such as DHCP enable/disable, static IP address, subnet mask, default gateway, primary and secondary DNS, and etc.
-
Page 60
Network Settings DHCP IP Assignment Select an option from this drop-down menu: Enable (DNS AUTO) Enable Disable Static IP Address The static IP field will be activated for the user to manually enter an IP address once the DHCP is disabled. -
Page 61
HLS Preview Here you will be able to enable/disable HLS preview. Click the Submit button to save the new settings. Time Setting Type In this drop-down menu, you can either select to allow the device to retrieve the time automatically from the Network Time Protocol (NTP) server or manually select a time zone from the Time Zone drop-down menu. -
Page 62
You will see the calendar on the left after clicking the Date field. Simply click a day to set the date. Click the Submit button to save the new settings. Firmware Update NVS-31 Firmware Update Click the Browse button to search for the latest firmware file saved on the PC’s hard disk. -
Page 63: File Repair
File Repair The system may crash while the recording is in progress. If this happens, your record file may be damaged. To repair a damaged file, go the File Repair page to run the file repair process. 1. Open the “File Repair” page and click the “File List” drop-down menu to select the damaged MP4 file.
-
Page 64: Operations
4. After the NVS-31 successfully reboots, you will see the repaired file with the file name of the damaged file appended of the word “new”. 6.3 Operations In this section, we will discuss how you can play the video using different streaming protocols and how to place texts on your video.
-
Page 65
Follow the steps below to obtain the RTSP URL: 1. Open the stream settings page 2. Select RTSP 3. Click the Start button to generate the RTSP URL. 4. Based on your settings, the device will automatically generate the RTSP URL. 5. -
Page 66
Follow the steps below to obtain the TS URL: 1. Open the stream settings page 2. Select TS. 3. Enter the TS port number which is 12345 by default. 4. In the TS IP field, enter your PC’s IP address such as 192.168.1.66. 5. -
Page 67
7. Open VLC then click Open Network Stream (shown in the diagram below). 8. As shown in the diagram below, enter the stream URL then click Play to start streaming. Follow the steps below to obtain the HLS URL: 1. Open the stream settings page 2. -
Page 68
4. Based on your settings, the device will automatically generate a .m3u8 stream URL as shown below. 5. Before streaming the video via HLS, enter the HLS URL into the client device. 6. Open VLC then click Open Network Stream (shown in the diagram below). 7. -
Page 69
8. You can also play .m3u8 stream URL using the devices listed as follows: iPhone, iPad and MacBook: Use Safari to open the .m3u8 stream URL. Windows 10: Use Microsoft Edge to open the .m3u8 stream URL. Follow the steps below to obtain the SRT URL: 1. -
Page 70: Rtmp(S)
6. As shown in the diagram below, enter the stream URL then click Play to start streaming. RTMP(S) In the RTMP(S) mode, the NVS-31 can only send one data stream to one CDN or media server that supports the Real-Time Messaging Protocol or the Real-Time Messaging Protocol over an TLS/SSL connection.
-
Page 71
In the following section, we will show you how to set up an RTMP(S) stream to Youtube. The step-by- step account setup is outlined as follows: 1. First of all, you have to obtain Server URL and Stream name/key from Youtube. 2. -
Page 72: Text Overlay Video
Tip: You are allowed to stream audio or video only. Text Overlay Video The HS-1600T’s built-in video streaming server not only allows you to stream and record your program, it also features a CG tool that is capable of overlaying text on the video currently being broadcast.
-
Page 73: Stream And Record Buttons
Before you start reading this section, first check the streaming button row located to the right of the SD card slot. If your HS-1600T is a four button model, feel free to skip the two button section. Two Button Model The RECORD and STREAM buttons on the front panel of the HS-1600T give the user certain controls of the record and stream functions.
-
Page 74: Stream Button
Stop recording While recording, the RECORD button is solid red. Press and hold the RECORD button for approximately 2 seconds. When the record function is terminating, the RECORD button turns from solid red, then blinking red and finally to solid white. …
-
Page 75: Four Button Model
Four Button Model The RECORD, STREAM, RECORD+STREAM and BITRATE buttons on the front panel of the HS-1600T give the user certain controls of the record and stream functions. In this section, we will cover operations of these two buttons in detail.
-
Page 76: Record Button
Record/Stream functions Record function is Stream function is Blinking Red are activating or resetting activating or resetting activating or resetting simultaneously Record/Stream functions Stream function Solid Red Record function activated are activated activated simultaneously Record Button Press the RECORD button to start/stop recording. Start recording …
-
Page 77: Record+Stream Button
When the STREAM button is solid white, this indicates that the stream function has been successfully terminated. Record+Stream Button Start recording/streaming simultaneously When idle, the RECORD+STREAM button is solid white. Press and hold the RECORD+STREAM button for approximately 2 seconds. …
-
Page 78: Restoring Factory Defaults
The two buttons turn solid white a few seconds after displaying the operation mode. Switching operation modes Follow the steps below to switch to the next operation mode: First make sure the stream and record functions are in idle state, i.e. STREAM and RECORD buttons are solid white.
-
Page 79: Four Button Model
NVS-31’s factory defaults have been successfully restored. 6.6 Firmware Update Datavideo usually releases new firmware containing new features or reported bug fixes from time to time. This section outlines the firmware upgrade process which should take approximately 10 minutes to complete.
-
Page 80: Recovery Mode
The firmware update is complete when the RECORD and STREAM buttons turn solid white. Formatting the SD Card You are also allowed to format the SD card on the HS-1600T. Follow the steps below to format your SD card. …
-
Page 81: Chapter 7 Appendices
Appendix 1 Tally Outputs The HS-1600T has a D-sub 15 pin female tally output port. These connections provide bi-colour tally information to a number of other Datavideo products, such as the ITC-100 eight channel talkback system and the TLM range of LCD Monitors. The ports are open collector ports and as such do not provide power to tally light circuits.
-
Page 82: Appendix 2 Firmware Upgrade
USB Cable x 1 Update Procedure 1. On the PC, copy the two HS-1600T firmware binary files to the root directory of a USB thumb drive. After the files are successfully copied, safely remove the USB thumb drive from the PC.
-
Page 83
LED color (green) of the preview row buttons. Approximately 5 seconds after the HS-1600T is rebooted, you will see a startup screen on the monitor with old mainboard version (V1.5) displayed at the bottom right corner. At this point, the BLK button will start flashing green. -
Page 84: Monitor
Note 3: There is no guarantee that the HS-1600T supports all USB disks. When you see all buttons of the program and preview rows illuminate pink or greenish pink, this indicates that the disk file read error has occurred. Please try using other USB flash drive brands.
-
Page 85
4. After double clicking the firmware file, you will see the loading prompt as shown below, indicating that the file is being uploaded to the NVS-31. 5. After the file has been successfully uploaded, you will see a file upload success message. Click the Update button to start the firmware update process. -
Page 86: Appendix 3 Recommended Sd Cards
Appendix 3 Recommended SD Cards You should only use Class 10 SD card or above. In this appendix, you will find a list of SD cards recommended by Datavideo. Recommended SD Cards Brand Model Pictures Kingston SDHC I C10 SANDISK Extreme…
-
Page 87
Recommended SD Cards Brand Model Pictures SANDISK Extreme SDHC C10 16GB ADATA Premier Pro microSDXC I UHS-I U3 Class 10 with SD adapter 64GB SANDISK ULTRA® SDHC™/SDXC™ UHS-I 128 GB… -
Page 88: Appendix 4 Frequently-Asked Questions
Appendix 4 Frequently-Asked Questions This section describes problems that you may encounter while using HS-1600T. If you have any questions, please refer to related sections and follow all suggested solutions. If problem still exists, please contact your distributor or the service center.
-
Page 89: Appendix 5 Tips For Establishing An Hdbaset Compliance Environment And Ethernet Cable Selection
Appendix 5 Tips for Establishing an HDBaseT Compliance Environment and Ethernet Cable Selection Tips for Establishing an HDBaseT Compliance Environment HDBaseT alliance defines the maximum number of cables in a bundle use case to be six cables per bundle. Table below defines the maximum number of cables in a bundle as a function of cable type & the overlapping length.
-
Page 90
1. If customers want to establish an HDBaseT compliance environment outdoors, it is recommended that customers can use the UV resistant Ethernet cable to make sure that the Ethernet cable achieves its best connection quality. Generally speaking, the outdoor UV resistant Ethernet cable is coated with the black PE skin. -
Page 91: Appendix 6 Dimensions
Appendix 6 Dimensions All measurements in millimeters (mm)
-
Page 92: Appendix 7 Specifications
Appendix 7 Specifications Model Name HS-1600T Product Name 4-Channel HD/SD HDBaseT Portable Video Streaming Studio Video Standard HD & SD 1080p 50/59.94/60/30/25Hz 1080i 50/59.94/60Hz Video Format 720p 50/59.94/60Hz 576i/p 50Hz 480i/p 59.94Hz Input Routable / Crosspoint 3 x HDBaseT Video Input…
-
Page 93
Model Name HS-1600T Product Name 4-Channel HD/SD HDBaseT Portable Video Streaming Studio TS over TCP/UDP (unicast & multicast) Streaming Protocol RTSP over HTTP/TCP/UDP (RTSP Elementary Streaming) RTMP (Publish) Streaming Control Web browser UI for configuration and control Socket commands Recording File System… -
Page 94
Notes… -
Page 95
Notes… -
Page 96: Service And Support
Jun-12.2020 Datavideo Technologies Co., Ltd. All rights reserved 2020 Version E7…
Смотреть руководство для DataVideo HS-1600T ниже. Все руководства на ManualsCat.com могут просматриваться абсолютно бесплатно. Нажав кнопку «Выбор языка» вы можете изменить язык руководства, которое хотите просмотреть.

MANUALSCAT | RU
Вопросы и ответы
У вас есть вопрос о DataVideo HS-1600T, но вы не можете найти ответ в пользовательском руководстве? Возможно, пользователи ManualsCat.com смогут помочь вам и ответят на ваш вопрос. Заполните форму ниже — и ваш вопрос будет отображаться под руководством для DataVideo HS-1600T. Пожалуйста, убедитесь, что вы опишите свои трудности с DataVideo HS-1600T как можно более детально. Чем более детальным является ваш вопрос, тем более высоки шансы, что другой пользователь быстро ответит на него. Вам будет автоматически отправлено электронное письмо, чтобы проинформировать вас, когда кто-то из пользователей ответит на ваш вопрос.
Задать вопрос о DataVideo HS-1600T
- Бренд:
- DataVideo
- Продукт:
- без категории
- Модель/название:
- HS-1600T
- Тип файла:
- Доступные языки:
- английский