
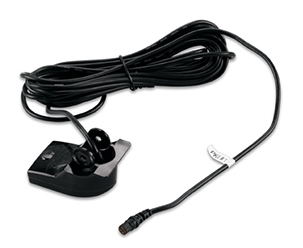
Garmin ClearVü
Transducer Transom/
Trolling Motor Mount
Installation Instructions
Important Safety Information
 WARNING
See the Important Safety and Product Information guide in the chartplotter or fishfinder product box for product warnings and other important information.
You are responsible for the safe and prudent operation of your vessel. Sonar is a tool that enhances your awareness of the water beneath your boat. It does not relieve you of the responsibility of observing the water around your boat as you navigate.
 CAUTION
Failure to install and maintain this equipment in accordance with these instructions could result in damage or injury.
Always wear safety goggles, ear protection, and a dust mask when drilling, cutting, or sanding.
NOTICE
When drilling or cutting, always check what is on the opposite side of the surface.
This equipment should be installed by a qualified marine installer.
To obtain the best performance and to avoid damage to your boat, you must install the Garmin® device according to these instructions.
Read all installation instructions before proceeding with the installation. If you experience difficulty during the installation, contact Garmin Product Support.
Tools Needed
•Drill and drill bits
•Number 2 Phillips screwdriver
•Masking tape
•Marine sealant
Preparing the Transducer for Long-Term Exposure to Water
NOTICE
Do not use acetone or acetone-based products on the transducer. Acetone damages the plastic transducer housing.
When you install a transducer on a boat that spends a significant amount of time in the water, you should coat the transducer and mounting hardware with a water-based antifouling paint to prevent marine growth.
1Lightly sand the transducer and mounting hardware with a fine-grit abrasive pad.
2Wipe the transducer and mounting hardware with isopropyl alcohol.
3Apply water-based anti-fouling paint to the transducer and mounting hardware.
Mounting Consideration
To ensure peak performance with the lowest noise and interference, you should route the transducer cable away from ignition wires, house batteries and wires, trolling motor batteries and wires, and high-energy wires such as radar, audio amplifier, and autopilot pump wires.
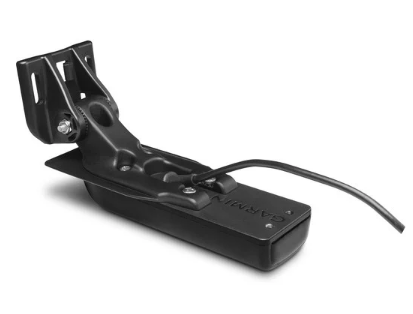
Installing the Transducer on a Transom
Mounting Location Considerations
•The transducer should be mounted parallel to the water line.
•The transducer should be mounted as close to the center of the boat as possible.
•If your propeller moves clockwise when the boat moves, the transducer should be mounted on the starboard side.
•If your propeller moves counter-clockwise when the boat moves, the transducer should be mounted on the port side.
•The transducer should not be mounted behind strakes, struts, fittings, water intake or discharge ports, or anything that creates air bubbles or causes the water to become turbulent.
The transducer must be in clean (non-turbulent) water for optimal performance.
•The transducer should not be mounted in a location where it might be jarred when launching, hauling, or storing.
•On single-drive boats, the transducer must not be mounted in the path of the propeller.
The transducer can cause cavitation that can degrade the performance of the boat and damage the propeller.
•On boats with outboard or inboard/outboard motors, the transducer should be mounted at least 38 cm (15 in.) from the propeller.
•On twin-drive boats, the transducer should be mounted between the drives, if possible.
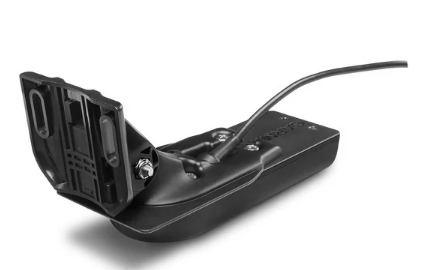
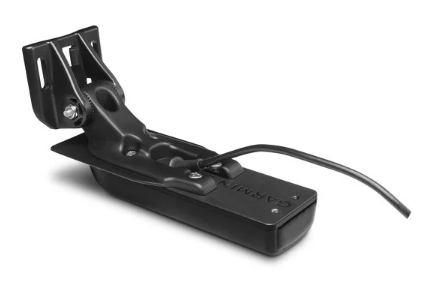
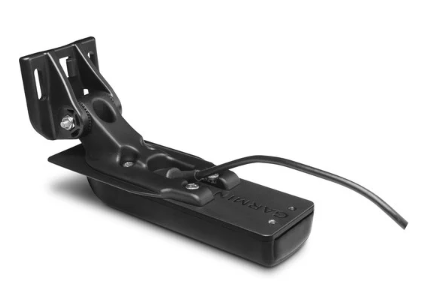
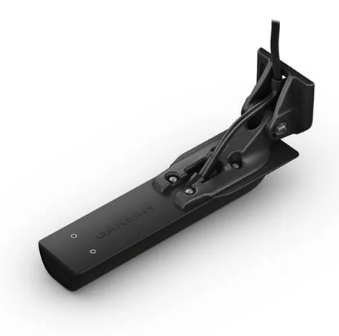
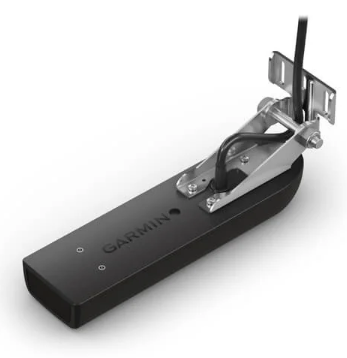
Assembling the Transducer with a Transom Mount Bracket
1 Attach the mount to the transducer with the included
ÀÁ
star washers , and screws .
ÂÃ
2 Attach the mount to the bracket with the bolt , rubber
Ä Å washer , flat washer , and lock nut .
Æ Ç È
NOTE: The bolt should be tight enough to hold the transducer in place when the boat moves at high speed, but loose enough to allow the transducer to pivot out of the way if the transducer hits an obstruction.
|
February 2017 |
Printed in Taiwan |
190-02116-02_0A |

Installing the Transom-Mount Hardware
NOTICE
If you are mounting the bracket on fiberglass with screws, it is recommended to use a countersink bit to drill a clearance counterbore through only the top gel-coat layer. This will help to avoid cracking in the gel-coat layer when the screws are tightened.
The cables connected to the transducer should not be cut, because cutting the transducer cables voids your warranty.
|
1 |
Cut out the template. |
|
2 |
With the template À aligned vertically on the transom at the |
|
installation location (Mounting Consideration, page 1), place |
the bottom corner of the template on the edge of the
Á
transom.
3 Mark the center location of the two holes of the template. 4 Remove the template from the transom.
5Wrap a piece of tape around a 4 mm (5/32 in.) bit at 18 mm (7/10 in.) from the point of the bit, to avoid drilling the pilot holes too deep.
6If you are installing the bracket on fiberglass, place a piece of tape over the pilot-hole location to reduce cracking of the gel coat.
7Using the 4 mm (5/32 in.) bit, drill the pilot holes approximately 18 mm (7/10 in.) deep at the marked locations.
8Apply marine sealant to the included 20 mm screws, and attach the transducer assembly to the transom.
9 Route the cable under the transom mount cable hook.
10If you must route the cable through the transom, choose a pilot-hole location well above the waterline and mark it.
11Place a cable clamp on the transducer cable, approximately halfway between the transducer and the top of the transom or the pass-through pilot hole.
12Mark the pilot-hole location for the cable clamp, and using a 3.2 mm (1/8 in.) bit, drill a pilot hole approximately 10 mm (3/8 in.) deep.
13Apply marine sealant to the included 12 mm screw, and attach the cable clamp to the transom.
14If you marked a pilot hole in step 7, choose the appropriate drill bit to drill a pass-through hole completely through the transom:
•If you have the 4-pin cable, use a 16 mm (5/8 in.) drill bit.
•If you have the 8-pin cable, use a 25 mm (1 in.) drill bit. 15Route the transducer cable to the sounder:
•If you are routing the cable using a pass-through hole, push it through the pass-through hole, and install the cable-entry cover (Installing the Cable-Entry Cover, page 2).
•If you are not routing the cable using a pass-through hole, route the cable up and over the top of the transom.
You should avoid routing the cable close to electrical wires or other sources of electrical interference.
Installing the Cable-Entry Cover
If you routed the cable through the transom after you installed the transducer, you should install the cable-entry cover to keep water from entering your boat.
1 Place the cable-entry cover over the hole and the cable,
À
with the opening pointing downward, and mark the location of the two pilot holes.
2Remove the cable-entry cover, and, using a 3.2 mm (1/8 in.) bit, drill the pilot holes approximately 10 mm (3/8 in.) deep.
3Fill the pass-through hole with marine sealant so it covers the cable completely and there is excess sealant around the hole and the cable.
4Place the cable-entry cover over the hole and the cable, with the opening pointing downward.
5Apply marine sealant to the included 12 mm M4 screws, and attach the cable-entry cover to the transom.
6 Wipe away all excess marine sealant.
Testing the Installation
NOTICE
You should check your boat for leaks before you leave it in the water for an extended period of time.
Because water is necessary to carry the sonar signal, the transducer must be in the water to work properly. You cannot get a depth or distance reading when out of the water. When you place your boat in the water, check for leaks around any screw holes that were added below the water line.
Testing the Transom-Mount Transducer Installation
NOTICE
When adjusting the depth of the transducer, make the adjustments in small increments. Placing the transducer too deep can adversely affect the performance of the boat and put the transducer at risk of striking underwater objects.
Test the transom-mount transducer installation in open water free of obstacles. Pay attention to your surroundings as you test the transducer.
1 With the boat in the water, turn on the chartplotter.
2
 Loading…
Датчик gt52hw tm инструкция по установке
Ни один зарегистрированный пользователь не просматривает эту страницу.

Автор: Kreator
Создана 15 Марта 2016

Автор: Тоха 52
Создана 24 Ноября

Автор: Pioner
Создана 8 Сентября

Автор: Филимон
Создана 16 Марта 2020

Автор: ВаНо
Создана 25 Января 2017

Автор: Виктор_DV
Создана 7 часов назад
Автор: Филимон
Создана 28 Декабря 2012
Источник
GARMIN STRIKER (Просматривают: 22)


Mif16RUS
Подскажите плиз, Striker 7SV Plus работает ли с датчиком GT52HW-TM? Если да, то правильно я понимаю, что гнезда питания/датчика сзади у 7SV и 7SV PLUS одинаковые? Одинаковая ли планка крепления эхолотов?
И еще вот вопрос: рисуем карту с помощью квидро, уровень воды в водохранилищах разный, за сезон уровень запросто может упасть на пару метров. Есть в этом квикдро корректировка уровня воды +- ?
Rock14
Подскажите по датчикам отличия, вижу в продаже модели 7-ки с датчиками:
GT20-TM
GT52HW-TM
CV20-TM
CV52HW-TM
может какие еще есть для 7-ки
GT20 и СV 20 это датчики нижнего сканирования. функционал одинаков только реализация разная
GT52 и CV 52 аналогично.
Датчики СV продаются только в США. в другие страны поставляются датчки GT.
Причина это решение американского суда от том что датчик GT копия технологии лоуренс. по этому поменяли наименование датчика и немного изменили функционал
———- Сообщение добавлено в 14:57 ———- Предыдущее сообщение размещено в 14:54 ———-
Подскажите плиз, Striker 7SV Plus работает ли с датчиком GT52HW-TM? Если да, то правильно я понимаю, что гнезда питания/датчика сзади у 7SV и 7SV PLUS одинаковые? Одинаковая ли планка крепления эхолотов?
И еще вот вопрос: рисуем карту с помощью квидро, уровень воды в водохранилищах разный, за сезон уровень запросто может упасть на пару метров. Есть в этом квикдро корректировка уровня воды +- ?

Isn56
GT20 и СV 20 это датчики нижнего сканирования. функционал одинаков только реализация разная
GT52 и CV 52 аналогично.
Датчики СV продаются только в США. в другие страны поставляются датчки GT.
Причина это решение американского суда от том что датчик GT копия технологии лоуренс. по этому поменяли наименование датчика и немного изменили функционал
———- Сообщение добавлено в 14:57 ———- Предыдущее сообщение размещено в 14:54 ———-
да можно внести поправку как в плюс так и в минус. пару страниц назад был ответ на такой же вопрос
Планки эхолотов у 7 одинаковые у девяток пишут что вроде два варианта (первый с жестким креплением и вращение только вверх вниз. Второй предпалагает вращение еще и враво/влево как на 7 ках)
———- Сообщение добавлено в 14:28 ———- Предыдущее сообщение размещено в 14:25 ———-
Подскажите по датчикам отличия, вижу в продаже модели 7-ки с датчиками:
GT20-TM
GT52HW-TM
CV20-TM
CV52HW-TM
может какие еще есть для 7-ки
Еще есть датчик gt51 морской, но он негуманных денег стоит. 
———- Сообщение добавлено в 14:33 ———- Предыдущее сообщение размещено в 14:28 ———-
Не знаю как на страйках, на эхомапе плюс такие изменения:
Изменения с версии 7.00 до 7.30:
Обновлен Flasher для рынка подледного лова.
Исправлена ошибка загрузки в демонстрационном режиме.
Ошибка загрузки в демо редиме  в чем она выражалась и как выглядила?
И важный вопрос откатитывать обновления можно на предыдущии версии?
Источник
Обзор основных датчиков от Garmin

Здесь дается подробный гид по датчикам от Garmin, наиболее распространенным на рынке РФ. Этими датчиками комплектуются по умолчанию самые распространенные модели эхолотов. В конце статьи приведена удобная таблица с исчерпывающими характеристиками рассмотренных датчиков.
Разные датчики используют разные виды эхолокации. Прежде чем переходить к самим датчикам, уместно напомнить о них. Ниже приведен краткий обзор, а за подробностями с картинками отсылаем к нашей статье “Простыми словами о современных эхолокационных технологиях”.
- Классический сонар. Старая добрая технология, луч имеет форму конуса. Преимущество ее в том, что рыба, проходящая под лодкой, отображается на экране в виде хорошо видимой дуги. Недостаток же состоит в том, что донные структуры прорисовываются нечетко из-за конической формы луча. Обычно работает на частотах 50-80-200 кГц. Чем выше частота, тем сильнее сигнал затухает в воде (это фундаментальное свойства ультразвуковых колебаний), и тем меньше дальность, на которую распространяется ультразвуковой сигнал. Кроме того, чем выше частота, тем уже конус соответствующего ей луча. Характерная ширина конуса для частоты 50 кГц около 60°, для частоты 200 кГц около 15°.
- Нижнее сканирование. Луч в форме “дольки лимона”, очень узкий (порядка одного градуса) в направлении движения лодки и широкий (обычно около 50°) в поперечном направлении. Обычно работает на частотах 455-800 кГц. Преимущество такой формы луча в том, что все донные структуры, находящиеся под лодкой, прорисовываются с фотографической точностью, например, становятся видны все ветки на затопленном дереве, или корма и нос лежащей на дне лодки. Недостаток же данной технологии в том, что рыба видна не как четко видимая дуга, а как небольшое, трудно различимое пятнышко. Так как нижнее сканирование работает на более высоких частотах, то и затухает этот сигнал быстрее, и нижнее сканирование работает на мЕньших по сравнению с классической эхолокацией глубинах. Изображение на экране более четкое на более высокой частоте, но и глубина сканирования на более высокой частоте меньше.
- Боковое сканирование. То же самое, что и нижнее сканирование, но луча два, и светят они не вниз, а по бокам. В результате на экране видом сверху рисуется полоса дна шириной несколько десятков метров, со всеми объектами, находящимися на дне. Боковое сканирование позволяет за один проход обследовать полосу дна шириной до 200 метров, обнаружить все интересные объекты: коряги, камни, участки дна различной твердости, не только непосредственно под лодкой, но и на десятки метров по сторонам.
- CHIRP. Ультразвуковой сигнал излучается не на одной частоте, скажем, 455 кГц, а в некотором диапазоне частот, скажем, 430-475 кГц. В результате обработки отраженного мультичастотного сигнала можно получить более качественное изображение, лучше разделять цели, четче отрисовывать форму подводных структур. Технология CHIRP может использоваться как в классической эхолокации, там и в нижнем и боковом сканированиях.
Двухлучевой датчик (dual beam transducer)
Один из самых простых датчиков, которым комплектуется самый бюджетный GPS-эхолот от Garmin: Striker Plus 4. В нем нет нижнего сканирования, только двухлучевой классический сонар. Технологии CHIRP тут тоже нет. Работает на частотах 77/200 кГц. Углы конусов: 45°/15°. Максимальная глубина (здесь и ниже она указывается для пресной воды, для моря глубину нужно уменьшать в 1.5-2 раза): 1900фт. Выпускается с 4-штырьковым разъемом для серии Striker и с 8-штырьковым разъемом для некоторых других эхолотов. Благодаря компактному размеру может быть использован без затруднений и для зимней рыбалки (а попросту – без проблем пролезет в 130-ю лунку, но ему необходим кронштейн для расположения датчика подо льдом в горизонтальном положении).
GT20-TM
Этот датчик сочетает в себе двухлучевой классический сонар без CHIRP и нижнее сканирование c CHIRP. Классический сонар работает на частотах 77/200 кГц, нижнее сканирование на частотах 455/800 кГц (хотя строго говоря на нижнем сканировании у этого датчика реализована технология CHIRP, так что сигналы излучаются в некотором диапазона частот вокруг 455 и 800 кГц). Углы конусов: 45°/15°. Максимальная глубина: 1900фт на частоте 77 кГц для классического сонара и 750фт для нижнего сканирования. Этим датчиком с 4-штырьковым разъемом комплектуются эхолоты Striker Plus/Vivid 4cv, 5cv, 7cv. Есть вариант этого датчика и с 8-штырьковым разъемом. Датчик GT20-TM имеет приличный размер, около 15 см в длину, что затрудняет его использование в зимней рыбалке, придется сооружать складной кронштейн, или купить специальный зимний датчик. Одно время у этого датчика был аналог – CV20-TM. Много копий было сломано в интернетах на тему, какой датчик лучше, какой хуже. Об отличиях этих датчиков можно почитать здесь. Но в настоящее время тема сравнения датчиков потеряла актуальность, так как CV20-TM больше не выпускается.
GT24UHD-TM
Как и GT20-TM, объединяет в себе классический сонар и нижнее сканирование. Отличие в том, что классический сонар тут однолучевой, но зато с CHIRP, работает на частоте 150-240кГц. Нижнее сканирование, тоже с CHIRP, работает только в диапазоне 760-880 кГц. Выше частоты – значит четче картинка. Но и выше частоты – значит меньше глубина. Классический сонар работает до 800фт, нижнее сканирование – до 200 фт. Этим датчиком комплектуются эхолоты-картплоттеры Garmin Echomap UHD 63cv и 73cv. Разъем 8-штырьковый.
Далее пошли датчики, сочетающие в себе и классический сонар, и нижнее сканирование, и боковое сканирование.
GT52HW-TM
Однолучевой классический сонар, но с CHIRP (150-240кГц, 24°/16°), нижнее и боковое сканирование с CHIRP (425-485)/(790-850) кГц. Максимальная глубина: 800фт/классика, 500фт/нижнее, 500фт/боковое сканирование. Таким датчиком комплектуются эхолоты Garmin Striker Plus/Vivid 7sv, 9sv. Обратите внимание на относительно небольшую глубину работы датчика. Это происходит из-за того, что классический сонар работает только на частоте 200кГц. Этот датчик отлично подходит для рыбалки на небольших глубинах в пресной воде, но совершенно не годится для моря. См. ниже датчик GT51-TM. Из-за размера датчика использование его на зимней рыбалке затруднительно.
GT54UHD-TM
Этим датчиком комплектовались в 2020 году приборы серии Echomap UHD и Echomap Ultra. Сейчас он снят с производства, однако кое-где еще можно заказать старые приборы, поэтому включим его в обзор. Датчик GT54 похож на GT52HW-TM, но нижнее сканирование работает только на высокой частоте 800кГц (а не на 455 и 800 как в GT52), а боковое – на частотах 455 и 1100 кГц (а не на 455 и 800, как в GT52). В результате на более высоких частотах получаем более качественную, чем на GT52HW-TM картинку, но уже совсем небольшую дальность. Глубины работы: классический сонар: 800 фт; нижнее сканирование 200 фт; боковое сканирование на 455 кГц 500 фт; боковое сканирование на 1100 кГц всего 125 фт. Хороший датчик для ловли в теплой пресной воде на малых глубинах.
GT56UHD-TM
В настоящее время именно этим датчиком комплектуются эхолоты-картплоттеры Garmin Echomap UHD 73sv, 93sv и вся серия Garmin Echomap Ultra. Датчик дорогой, сочетает в себе максимальное количество доступных частот, но приборы с ним теперь тоже подорожали.
В этом датчике также имеется и классический сонар, и нижнее сканирование, и боковое сканирование. Классический сонар с CHIRP работает по-прежнему в диапазоне частот 150-240 кГц, а вот нижнее и боковое сканирование с CHIRP работают теперь в трех диапазонах: 455 кГц (425-485 кГц), 800 кГц (790-850 кГц), 1000 кГц (940-1100 кГц). Это дает полный выбор необходимых частот в разных условиях при рыбалке в пресных не слишком глубоких водоемах. Глубины работы: классический сонар 800 фт; нижнее сканирование 400 фт (на 455кГц), 200фт (на 1мГц); боковое сканирование 500 фт (на 455мГц), 200 фт (1 мГц). Напомним, что все данные о глубине даются для пресной воды, в соленой воде их надо делить на 1.5-2.
Морской датчик GT51M-TM
Все вышеперечисленные датчики конструировались для использования в пресной воде. Для рыбалки в глубоких соленых водоемах инженеры Garmin разработали специальный датчик GT51-TM. Он работает на более низких частотах (как мы помним, чем ниже частота, тем слабее затухает ультразвуковой сигнал, что актуально для морей), и излучает сигналы большей мощности. Таким образом достигается большая глубина работы датчика, но в ущерб качеству изображения. Классический сонар с CHIRP работает в диапазоне 80-160 кГц, нижнее и боковое сканирование с CHIRP – в диапазонах 260 кГц (245-275 кГц) & 455 кГц (445-465 кГц). Глубины: классический сонар 1800 фт; нижнее сканирование: 1,000 фт; боковое сканирование: 750 фт. Датчик имеет очень внушительные размеры и большой вес. Поэтому датчик GT51M-TM комплектуется не пластиковым, как все предыдущие датчики, а металлическим кронштейном для крепления к транцу. Датчик GT51M-TM входил в комплект поставки эхолотов Garmin Echomap Plus 74sv, 94sv. Четверка в номере как раз и означала, что эхолот предназначен производителем для рыбалки в соленой воде. Сейчас эти эхолоты сняты с производства, но их еще можно найти в складских остатках. Рыбачите на море? Это ваш выбор.
Датчик для зимней рыбалки Dual Beam IF
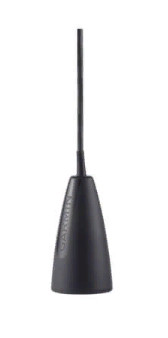
Этим датчиком не комплектуется ни один эхолот от Garmin, он предназначен исключительно для зимней рыбалки. Заказывать его придется отдельно. Датчик имеет форму конуса, кабель к эхолоту выходит из вершины, в основании конуса находится излучающий элемент. Датчик просто опускается в лунку и висит подо льдом, для его использования не нужны никакие кронштейны. В датчике имеется двухлучевой классический сонар без CHIRP, частоты 77/200 кГц, углы конусов 45°/15°, максимальная глубина 1900 фт в пресной воде. Выпускается вариант только с 4-штырьковым разъемом.
В заключение стоит добавить, что подключение разнопиновых датчиков и эхолотов, например, 4-пинового зимнего датчика и 12-пинового эхолота серии Echomap, возможно с помощью дополнительных переходников.
Источник

Garmin ClearVü
Transducer Transom/
Trolling Motor Mount
Installation Instructions
Important Safety Information
WARNING
See the Important Safety and Product Information guide in the
chartplotter or fishfinder product box for product warnings and
other important information.
You are responsible for the safe and prudent operation of your
vessel. Sonar is a tool that enhances your awareness of the
water beneath your boat. It does not relieve you of the
responsibility of observing the water around your boat as you
navigate.
CAUTION
Failure to install and maintain this equipment in accordance with
these instructions could result in damage or injury.
Always wear safety goggles, ear protection, and a dust mask
when drilling, cutting, or sanding.
NOTICE
When drilling or cutting, always check what is on the opposite
side of the surface.
This equipment should be installed by a qualified marine
installer.
To obtain the best performance and to avoid damage to your
boat, you must install the Garmin
®
device according to these
instructions.
Read all installation instructions before proceeding with the
installation. If you experience difficulty during the installation,
contact Garmin Product Support.
Tools Needed
• Drill and drill bits
• Number 2 Phillips screwdriver
• Masking tape
• Marine sealant
Preparing the Transducer for Long-Term Exposure to
Water
NOTICE
Do not use acetone or acetone-based products on the
transducer. Acetone damages the plastic transducer housing.
When you install a transducer on a boat that spends a
significant amount of time in the water, you should coat the
transducer and mounting hardware with a water-based anti-
fouling paint to prevent marine growth.
1
Lightly sand the transducer and mounting hardware with a
fine-grit abrasive pad.
2
Wipe the transducer and mounting hardware with isopropyl
alcohol.
3
Apply water-based anti-fouling paint to the transducer and
mounting hardware.
Mounting Consideration
To ensure peak performance with the lowest noise and
interference, you should route the transducer cable away from
ignition wires, house batteries and wires, trolling motor batteries
and wires, and high-energy wires such as radar, audio amplifier,
and autopilot pump wires.
Installing the Transducer on a Transom
Mounting Location Considerations
• The transducer should be mounted parallel to the water line.
• The transducer should be mounted as close to the center of
the boat as possible.
• If your propeller moves clockwise when the boat moves, the
transducer should be mounted on the starboard side.
• If your propeller moves counter-clockwise when the boat
moves, the transducer should be mounted on the port side.
• The transducer should not be mounted behind strakes, struts,
fittings, water intake or discharge ports, or anything that
creates air bubbles or causes the water to become turbulent.
The transducer must be in clean (non-turbulent) water for
optimal performance.
• The transducer should not be mounted in a location where it
might be jarred when launching, hauling, or storing.
• On single-drive boats, the transducer must not be mounted in
the path of the propeller.
The transducer can cause cavitation that can degrade the
performance of the boat and damage the propeller.
• On boats with outboard or inboard/outboard motors, the
transducer should be mounted at least 38 cm (15 in.) from
the propeller.
• On twin-drive boats, the transducer should be mounted
between the drives, if possible.
Assembling the Transducer with a Transom Mount
Bracket
1
Attach the mount
À
to the transducer
Á
with the included
star washers
Â
, and screws
Ã
.
2
Attach the mount to the bracket
Ä
with the bolt
Å
, rubber
washer
Æ
, flat washer
Ç
, and lock nut
È
.
NOTE: The bolt should be tight enough to hold the
transducer in place when the boat moves at high speed, but
loose enough to allow the transducer to pivot out of the way if
the transducer hits an obstruction.
February 2017
Printed in Taiwan 190-02116-02_0A
![]()
© 2023
Manualzz provides technical documentation library and question & answer platform.Its a community-based project which helps to repair anything.
About us
DMCA / GDPR
Пожаловаться
FixFr.com
Skip navigation links
Support
Support Center Aviation Support Marine Support Navionics Support
Account Orders Sign Out Sign In
0 Total items in cart: 0