-
Bookmarks
Quick Links
Contents
Connections
Playback
Settings
Tips
Appendix
AVR-X3600H
INTEGRATED NETWORK AV RECEIVER
Owner’s Manual
1
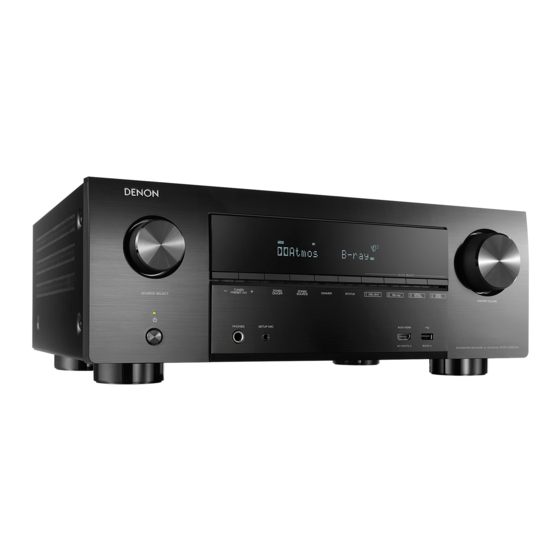
Front panel
Display
Rear panel
Remote
Index
Related Manuals for Denon AVR-X3600H
Summary of Contents for Denon AVR-X3600H
-
Page 1
Contents Connections Playback Settings Tips Appendix AVR-X3600H INTEGRATED NETWORK AV RECEIVER Owner’s Manual Front panel Display Rear panel Remote Index… -
Page 2
Contents Connections Playback Settings Tips Appendix Accessories Connecting a TV Connection 1 : TV equipped with an HDMI connector and Inserting the batteries compatible with the ARC (Audio Return Channel) / eARC Operating range of the remote control unit (Enhanced Audio Return Channel) Features Connection 2 : TV equipped with an HDMI connector and High quality sound… -
Page 3
Contents Connections Playback Settings Tips Appendix Playback Listening to Internet Radio Listening to Internet Radio Basic operation Playing back files stored on a PC or NAS Turning the power on Playing back files stored on a PC or NAS Selecting the input source Getting the HEOS App Adjusting the volume HEOS Account… -
Page 4
Contents Connections Playback Settings Tips Appendix Convenience functions Quick select plus function Adding to HEOS Favorites Calling up the settings Playing back HEOS Favorites Changing the settings Deleting a HEOS Favorites Panel lock function Adjusting the volume of each channel to match the input source Disabling all key button operations (Channel Level Adjust) Disabling all button operations except VOLUME… -
Page 5: Input Assign
Contents Connections Playback Settings Tips Appendix Settings Video Picture Adjust Menu map HDMI Setup Menu operations Output Settings Audio On Screen Display Center Level Adjust 4K Signal Format Subwoofer Level Adjust TV Format Surround Parameter Inputs Restorer Input Assign Audio Delay Source Rename Volume Hide Sources…
-
Page 6
Contents Connections Playback Settings Tips Appendix Manual Setup HEOS Account Amp Assign You have not signed in Speaker Config. You have already signed in Distances General Levels Language Crossovers Bass ZONE2 Setup Front Speaker Zone Rename Network Quick Select Names Information Trigger Out Connection… -
Page 7
Contents Connections Playback Settings Tips Appendix Tips Appendix Tips About HDMI Troubleshooting Video conversion function Power does not turn on / Power is turned off Playing back a USB memory devices Operations cannot be performed through the remote control unit Playing back a Bluetooth device Display on this unit shows nothing Playing back a file saved on a PC or NAS… -
Page 8
Playback Settings Tips Appendix Thank you for purchasing this Denon product. To ensure proper operation, please read this owner’s manual carefully before using the product. After reading this manual, be sure to keep it for future reference. Accessories Check that the following parts are supplied with the product. -
Page 9
Contents Connections Playback Settings Tips Appendix Inserting the batteries NOTE 0 To prevent damage or leakage of battery fluid: 0 Do not use a new battery together with an old one. Remove the rear lid in the direction of the arrow and 0 Do not use two different types of batteries. -
Page 10
Contents Connections Playback Settings Tips Appendix Features DTS:X (v p. 294) High quality sound This unit is equipped with the DTS:X decoder technology. DTS:X brings the home theater experience to new heights with its immersive object With discrete circuit technology, the power amplifier provides based audio technology which removes the bounds of channels. -
Page 11
Contents Connections Playback Settings Tips Appendix Audyssey LFC™ (Low Frequency Containment) (v p. 176) High performance Audyssey LFC™ solves the problem of low frequency sounds disturbing people in neighboring rooms or apartments. Audyssey 4K 60Hz input/output supported LFC™ dynamically monitors the audio content and removes the low frequencies that pass through walls, floors and ceilings. -
Page 12
Contents Connections Playback Settings Tips Appendix Digital video processor upscales analog video signals (SD HDMI connections enable connection to various digital AV resolution) to HD (720p/1080p) and 4K (v p. 188) devices (8 inputs, 3 outputs) Up to 1080p Up scaling This unit is equipped with a 4K video upscaling function that allows analog video or SD (Standard Definition) video to be output via HDMI at 4K (3840 ×… -
Page 13
Contents Connections Playback Settings Tips Appendix Playback of DSD and FLAC files via USB and networks The device is equipped with a AirPlay ® function in addition to network functions such as Internet radio etc. (v p. 115) This unit supports the playback of high resolution audio formats such as DSD (5.6 MHz) and FLAC 192 kHz files. -
Page 14
This is useful when you want to let the BGM propagate throughout convenience. the whole house. z Download the appropriate “Denon 2016 AVR Remote” App for your iOS or Energy-saving design Android devices. This unit needs to be connected to the same LAN or Wi-Fi (wireless LAN) network that the iPad, iPhone or Android™… -
Page 15
Contents Connections Playback Settings Tips Appendix HEOS provides streaming music from your favorite online music Easy operation sources “Setup Assistant” provides easy-to-follow setup instructions First select the language when prompted. Then simply follow the instructions displayed on the TV screen to set up the speakers, network, etc. -
Page 16
Contents Connections Playback Settings Tips Appendix Part names and functions Front panel For details, see the next page. Front panel Display Rear panel Remote Index… -
Page 17
Contents Connections Playback Settings Tips Appendix C SOURCE SELECT knob This selects the input source. (v p. 82) D Remote control sensor This receives signals from the remote control unit. (v p. 9) E Display This displays various pieces of information. (v p. 19) F MASTER VOLUME knob i o Q0 Q1 This adjusts the volume level. -
Page 18
Contents Connections Playback Settings Tips Appendix N SETUP MIC jack This is used to connect the supplied Sound calibration microphone. (v p. 200) O AUX1-HDMI connector This is used to connect HDMI output compatible devices such as video camcorders and game consoles. (v p. 71) P USB port (T) This is used to connect USB storages (such as USB memory devices). -
Page 19
Contents Connections Playback Settings Tips Appendix Display Q0 Q1 A Input mode indicators E Tuner reception mode indicators These light according to the audio input mode settings of each input These light up according to the reception conditions when the input source. -
Page 20
Contents Connections Playback Settings Tips Appendix G Volume indicator H MUTE indicator This blinks while the sound is muted. (v p. 83) I Information display The input source name, sound mode, setting values and other information are displayed here. J Input signal indicators The respective indicator will light corresponding to the input signal. -
Page 21
Contents Connections Playback Settings Tips Appendix Rear panel For details, see the next page. Front panel Display Rear panel Remote Index… -
Page 22
Contents Connections Playback Settings Tips Appendix B TRIGGER OUT jack Used to connect devices equipped with the trigger function. (v p. 79) C RS-232C connector Used to connect home automation controller devices fitted with RS-232C connectors. Consult the owner’s manual of the home automation controller for more information about serial control of this unit. -
Page 23
Contents Connections Playback Settings Tips Appendix G Video connectors (VIDEO) Used to connect devices equipped with video connectors. “Connecting a set-top box (Satellite tuner/cable TV)” (v p. 69) “Connecting a DVD player or Blu-ray Disc player” (v p. 70) H HDMI connectors Used to connect devices equipped with HDMI connectors. -
Page 24
Contents Connections Playback Settings Tips Appendix L SIGNAL GND terminal Used to connect a ground wire for the turntable. (v p. 72) M Speaker terminals (SPEAKERS) Used to connect speakers. (v p. 36) N PRE OUT connectors Used to connect a subwoofer with built-in amplifier or an external power amplifier. -
Page 25
Contents Connections Playback Settings Tips Appendix Remote control unit A ZONE SELECT buttons These switch the zone (MAIN ZONE, ZONE2) that is operated through the remote control unit. “Playback in ZONE2” (v p. 157) “Menu operations” (v p. 163) B Input source select buttons These selects the input source. -
Page 26
Contents Connections Playback Settings Tips Appendix G BACK button This returns to the previous screen. H System buttons These perform playback related operations. Tuning up / Tuning down buttons (TUNE +, –) These select either FM broadcast or AM broadcast. (v p. 93) I QUICK SELECT buttons (1 –… -
Page 27
Contents Connections Playback Settings Tips Appendix M POWER button (X) This turns the power on/off. “Turning the power on” (v p. 82) “Playback in ZONE2” (v p. 157) N ECO Mode button (G) This switches to ECO Mode. (v p. 232) O VOLUME buttons (df) These adjusts the volume level. -
Page 28
Contents Connections Playback Settings Tips Appendix o Contents o Cables used for connections Provide necessary cables according to the devices you want to Speaker installation connect. Connecting speakers Connecting a TV Speaker cable Connecting a playback device Connecting a USB memory device to the USB port Connecting FM/AM antennas Subwoofer cable Connecting to a home network (LAN) -
Page 29
Contents Connections Playback Settings Tips Appendix Speaker installation Determine the speaker system depending on the number of speakers you Place the FRONT left and right speakers an are using and install each speaker and subwoofer in the room. FL/FR equal distance from the main listening position. Speaker installation is explained using this example of a typical (Front speaker left/ The distance between each speaker and your TV… -
Page 30
Contents Connections Playback Settings Tips Appendix Place the FRONT HEIGHT left and right speakers FHL/FHR directly above the front speakers. Mount them as (Front height speaker close to the ceiling as possible and aim them left/right): towards the main listening position. Mount the TOP FRONT left and right speakers on TFL/TFR the ceiling slightly in front of your main listening… -
Page 31
Contents Connections Playback Settings Tips Appendix About Dolby Atmos Enabled speakers Dolby Atmos Enabled speakers reflect the sound off the ceiling to allow the sound to come from over your head by using a special upward- pointing speaker that is placed on the floor. You can enjoy the Dolby Atmos 3D sound even in an environment where speakers cannot be installed on the ceiling. -
Page 32
Contents Connections Playback Settings Tips Appendix Height speakers layout 0 This unit is compatible with Dolby Atmos and DTS:X which offers an even wider and deeper surround sensation. 0 The “Speaker Virtualizer” must be set to “On” for Dolby Atmos playback with 5.1- channel speaker configurations or less. -
Page 33
Contents Connections Playback Settings Tips Appendix o When 7.1-channel speakers are installed using o When 5.1-channel speakers are installed surround back speakers SW C SW C z1 22° — 30° z2 120° Listening position z1 22° — 30° z2 90° — 110° z3 135° — 150° 0 When using a single surround back speaker, place it directly behind the listening position. -
Page 34
Contents Connections Playback Settings Tips Appendix o Layout including height speakers and ceiling n Ceiling speaker layout example speakers Combination of 5.1-channel layout and top front/top rear speakers. n Height speaker layout example Combination of 5.1-channel layout and front height/rear height speakers. -
Page 35
Contents Connections Playback Settings Tips Appendix n Dolby Atmos Enabled speaker layout example Combination of 5.1-channel layout and front Dolby/surround Dolby speakers. Front panel Display Rear panel Remote Index… -
Page 36
Contents Connections Playback Settings Tips Appendix Connecting speakers Here we connect the speakers in the room to this unit. Before connecting speakers NOTE NOTE 0 Disconnect this unit’s power plug from the power outlet before connecting the 0 Carry out the following settings when using a speaker with an impedance of 4 – 6 speakers. -
Page 37
Contents Connections Playback Settings Tips Appendix o Connecting the speaker cables o Connecting the subwoofer Carefully check the left (L) and right (R) channels and + (red) and – Use a subwoofer cable to connect the subwoofer. Two subwoofers can (black) polarities on the speakers being connected to this unit, and be be connected to this unit. -
Page 38
Contents Connections Playback Settings Tips Appendix o About the cable labels (supplied) for channel identification The channel display section for speaker terminals on the rear panel is color-coded for each channel to be identifiable. Attach the cable label corresponding to each speaker to each speaker cable. This makes it easy to connect the correct cable to the speaker terminals on the rear panel. -
Page 39
Contents Connections Playback Settings Tips Appendix Attach the cable label for each channel to its speaker cable as shown in the diagram. Refer to the table and attach the label to each speaker cable. Then, make connection so that the color of the speaker terminal matches that of the cable label. -
Page 40
Contents Connections Playback Settings Tips Appendix Speaker configuration and “Amp Assign” settings This unit has a built-in 9-channel power amplifier. In addition to the basic 5.1-channel system, a variety of speaker systems can be configured by changing the “Amp Assign” settings to suit the application, such as 7.1-channel systems, bi-amp connections and 2-channel systems for multi-zone playback. (v p. -
Page 41
Contents Connections Playback Settings Tips Appendix 0 In addition to the connections described in p.42 — 61, this unit allows for various speaker connections with the “Amp Assign” setting. Also refer to the menu screen in “View Terminal Config.” on the “Amp Assign” setting screen, which shows how to make connections in your environment. -
Page 42
Contents Connections Playback Settings Tips Appendix Connecting 5.1-channel speakers This serves as a basic 5.1-channel surround system. Front panel Display Rear panel Remote Index… -
Page 43
Contents Connections Playback Settings Tips Appendix Connecting 7.1-channel speakers o Example connections when using surround back speakers This 7.1-channel surround system is the same as a basic 5.1-channel system but with surround back speakers. SBR SBL 0 When using a single surround back speaker, connect it to the SURROUND BACK L terminal. -
Page 44
Contents Connections Playback Settings Tips Appendix o Example connections when using ceiling speakers This 7.1-channel surround system is the same as a basic 5.1-channel system but with ceiling speakers. TMR TML 0 Set “Floor” — “Layout” to “5ch” and “Height Sp” to “2ch” in the menu when connecting in this configuration. (v p. 210) 0 The top front or top rear speakers can be connected instead of the top middle speakers. -
Page 45
Contents Connections Playback Settings Tips Appendix o Example connections when using height speakers This 7.1-channel surround system is the same as a basic 5.1-channel system but with front height speakers. 0 Set “Floor” — “Layout” to “5ch” and “Height Sp” to “2ch” in the menu when connecting in this configuration. (v p. 210) 0 The rear height speakers can be connected instead of the front height speakers. -
Page 46
Contents Connections Playback Settings Tips Appendix o Example connections when using Dolby Atmos Enabled speakers This 7.1-channel surround system is the same as a basic 5.1-channel system but with front Dolby speakers. FDR FDL 0 Set “Floor” — “Layout” to “5ch” and “Dolby Sp” to “2ch” in the menu when connecting in this configuration. (v p. 210) 0 The surround Dolby speakers can be connected instead of the front Dolby speakers. -
Page 47
Contents Connections Playback Settings Tips Appendix Connecting 9.1-channel speakers This system, which is based on a 5.1-channel system, plays back up to 9.1-channels at the same time. You can connect speakers for up to 11-channels for MAIN ZONE. When you connect speakers for 10 or more channels, the output speakers automatically switch according to the input signal and sound mode. -
Page 48
Contents Connections Playback Settings Tips Appendix o Example connection when using two sets of ceiling speakers TRR TRL TRR TRL HEIGHT 1 HEIGHT 2 z You can change the combination of the HEIGHT1 and HEIGHT2 channels in the settings. (v p. 53) 0 Set “Height”… -
Page 49
Contents Connections Playback Settings Tips Appendix o Example connection when using one set of height speakers SBR SBL FHR FHL HEIGHT 1 z The rear height speakers can be connected instead of the front height speakers. In this case, set the height speakers to be connected under “Height” — “Layout” in the menu. -
Page 50
Contents Connections Playback Settings Tips Appendix o Example connection when using two sets of height speakers FHR FHL RHR RHL HEIGHT 1 HEIGHT 2 z You can change the combination of the HEIGHT1 and HEIGHT2 channels in the settings. (v p. 53) 0 Set “Height”… -
Page 51
Contents Connections Playback Settings Tips Appendix o Example connection when using one set of Dolby Atmos Enabled speakers SBR SBL FDR FDL HEIGHT 1 z The surround Dolby or back Dolby speakers can be connected instead of the front Dolby speakers. In this case, set the Dolby Atmos Enabled speakers to be connected under “Height”… -
Page 52
Contents Connections Playback Settings Tips Appendix o Example connection when using two sets of Dolby Atmos Enabled speakers FDR FDL SDR SDL HEIGHT 1 HEIGHT 2 z You can change the combination of the HEIGHT1 and HEIGHT2 channels in the settings. -
Page 53
Contents Connections Playback Settings Tips Appendix Channels output from the HEIGHT1 and HEIGHT2 speaker terminals can be changed to the following patterns according to the speaker systems being used. Set this from “Amp Assign” in the menu. (v p. 208) Combination of height speakers to be used Connected terminals Number of height/… -
Page 54
Contents Connections Playback Settings Tips Appendix Connecting 11.1-channel speakers This system, which is based on a 5.1-channel system, plays back up to 11.1-channels at the same time. You can connect speakers for 11-channels for MAIN ZONE by using an external power amplifier. o Example connection when using two sets of ceiling speakers HEIGHT 2 TRR TRL… -
Page 55
Contents Connections Playback Settings Tips Appendix o Example connection when using two sets of height speakers HEIGHT 2 RHR RHL Power amplifier 0 Set “Height” — “Height Sp” to “4ch” in the menu when connecting in this configuration. (v p. 211) SBR SBL FHR FHL HEIGHT 1 z You can change the combination of the HEIGHT1 and HEIGHT2 channels in the… -
Page 56
Contents Connections Playback Settings Tips Appendix o Example connection when using two sets of Dolby Atmos Enabled speakers HEIGHT 2 SDR SDL Power amplifier 0 Set “Height” — “Dolby Sp” to “4ch” in the menu when connecting in this configuration. (v p. 211) SBR SBL FDR FDL HEIGHT 1… -
Page 57
Contents Connections Playback Settings Tips Appendix The combination of the HEIGHT1 and HEIGHT2 channels can be changed to the following patterns according to the speaker system being used. Set this from “Amp Assign” in the menu. (v p. 208) Combination of height speakers to be used Connected terminals Number of height/ Number of Dolby… -
Page 58
Contents Connections Playback Settings Tips Appendix Connecting 7.1-channel speakers: Bi-amp connection of front speakers This system plays back 7.1-channels. You can use the bi-amp connection for front speakers. Bi-amp connection is a method to connect separate amplifiers to the tweeter terminal and woofer terminal of a speaker that supports bi-amplification. This connection enables back EMF (power returned without being output) from the woofer to flow into the tweeter without affecting the sound quality, producing a higher sound quality. -
Page 59
Contents Connections Playback Settings Tips Appendix Connecting 7.1-channel speakers: Second pair of front speakers This system enables switching playback between front speakers A and B as desired. You can connect speakers for up to 9-channels for MAIN ZONE. When you connect speakers for 8 or more channels, the output speakers automatically switch according to the input signal and sound mode. -
Page 60
Contents Connections Playback Settings Tips Appendix Connecting multi-zone speakers o 7.1-channel playback (MAIN ZONE) + 2-channel playback (ZONE2) This type of configuration plays back 7.1-channels in MAIN ZONE and 2-channels in ZONE2. You can connect speakers for up to 9-channels for MAIN ZONE. When you connect speakers for 8 or more channels, the output speakers automatically switch according to the input signal and sound mode. -
Page 61
Contents Connections Playback Settings Tips Appendix o 5.1-channel playback (bi-amp connection of front speakers: MAIN ZONE) + 2-channel playback (ZONE2) This type of configuration plays back 5.1-channels in MAIN ZONE and 2-channels in ZONE2. You can use the bi-amp connection for front speakers in MAIN ZONE. -
Page 62
Contents Connections Playback Settings Tips Appendix o Connecting an external power amplifier You can use this unit as a pre-amp by connecting an external power amplifier to the PRE OUT connectors. By adding a power amplifier to each channel, the realness of the sound can be further enhanced. Select the terminal to use and connect the device. -
Page 63
Contents Connections Playback Settings Tips Appendix Connecting a TV Connect a TV to this unit so that the input video is output to the TV. You can also enjoy audio from the TV on this unit. How to connect a TV depends on the connectors and functions equipped on the TV. ARC (Audio Return Channel) / eARC (Enhanced Audio Return Channel) function plays TV audio on this unit by sending the TV audio signal to this unit via HDMI cable. -
Page 64
Contents Connections Playback Settings Tips Appendix Connection 1 : TV equipped with an HDMI connector and compatible with the ARC (Audio Return Channel) / eARC (Enhanced Audio Return Channel) Use an HDMI cable to connect a TV that is compatible with the ARC / eARC function to this unit. Set “HDMI Control”… -
Page 65
Contents Connections Playback Settings Tips Appendix 0 When using the ARC / eARC function, connect to the HDMI MONITOR 1 connector. 0 eARC function settings may be required depending on the eARC function-compatible television you are using. Make sure eARC is set to on if this setting exists on your television. -
Page 66
Contents Connections Playback Settings Tips Appendix Connection 2 : TV equipped with an HDMI connector and incompatible with the ARC (Audio Return Channel) / eARC (Enhanced Audio Return Channel) Use an HDMI cable to connect the TV to this unit. To listen to audio from TV on this unit, use an optical cable to connect the TV to this unit. -
Page 67
Contents Connections Playback Settings Tips Appendix Connection 3 : TV equipped without an HDMI connector Use a component video cable to connect the TV to this unit. To listen to audio from TV on this unit, use an optical cable to connect the TV to this unit. OPTICAL COMPONENT VIDEO Front panel… -
Page 68
Contents Connections Playback Settings Tips Appendix Connecting a playback device This unit is equipped with three types of video input connectors (HDMI, component video and composite video) and three types of audio input connectors (HDMI, digital audio and audio). Select input connectors on this unit according to the connectors equipped on the device you want to connect. If the device connected to this unit is equipped with an HDMI connector, it is recommended to use HDMI connections. -
Page 69
Contents Connections Playback Settings Tips Appendix Connecting a set-top box (Satellite tuner/cable TV) This explanation uses the connection with a satellite tuner/cable TV STB as an example. Select the input connectors on this unit to match the connectors on the device that you want to connect to. (HDMI incompatible device) Satellite tuner / Satellite tuner /… -
Page 70
Contents Connections Playback Settings Tips Appendix Connecting a DVD player or Blu-ray Disc player This explanation uses the connection with a DVD player or Blu-ray Disc player as an example. Select the input connectors on this unit to match the connectors on the device that you want to connect to. (HDMI incompatible device) (HDMI incompatible device) Blu-ray Disc player… -
Page 71
Contents Connections Playback Settings Tips Appendix Connecting a video camcorder or game console This explanation uses the connection with a video camcorders as an example. Connect a playback device to this unit, such as a video camcorder or game console. Video camcorder HDMI Front panel… -
Page 72
Contents Connections Playback Settings Tips Appendix Connecting a turntable This unit is compatible with turntables equipped with a moving magnet (MM) phono cartridge. When you connect to a turntable with a low output moving coil (MC) cartridge, use a commercially available MC head amp or a step-up transformer. If you set this unit’s input source to “Phono”… -
Page 73
USB memory device 0 Denon does not guarantee that all USB memory devices will operate or receive power. When using a portable USB hard disk drive (HDD) which came with an AC adapter, use that device’s supplied AC adapter. NOTE 0 USB memory devices will not work via a USB hub. -
Page 74
Contents Connections Playback Settings Tips Appendix Connecting FM/AM antennas Connect the antenna, tune in to a broadcast and then move the antenna to AM loop antenna the location where there is least noise. Then use tape, etc. to fix the (supplied) antenna in this location. -
Page 75
Contents Connections Playback Settings Tips Appendix o AM loop antenna assembly o Using the AM loop antenna Suspending on a wall Put the stand section through the bottom of the loop Suspend directly on a wall without assembling. antenna from the rear and bend it forward. Insert the projecting part into the square hole in the stand. -
Page 76
Contents Connections Playback Settings Tips Appendix Connecting to a home network (LAN) This unit can connect to a network using a wired LAN or wireless LAN. Wired LAN You can connect this unit to your home network (LAN) to enable various types of playback and operations as described below. -
Page 77
Contents Connections Playback Settings Tips Appendix Wireless LAN 0 When using this unit, we recommend you use a router equipped with the following When connecting to the network via wireless LAN, connect the external functions: antennas for Bluetooth/wireless connectivity connection to the rear panel 0 Built-in DHCP server and stand them upright. -
Page 78
Contents Connections Playback Settings Tips Appendix Connecting an external control device REMOTE CONTROL jacks When this unit is installed in a location where the remote control signals cannot reach (installation in a cabinet etc.), it can still be controlled by the remote control by connecting a remote control receiver unit (sold separately). -
Page 79
Contents Connections Playback Settings Tips Appendix TRIGGER OUT jack When a device with TRIGGER IN jack is connected, the connected device’s power on/standby can be controlled through linked operation to this unit. The TRIGGER OUT jack outputs a maximum 12 V DC/150 mA electrical signal. 12 V DC/150 mA trigger-compatible device NOTE 0 Use a monaural mini-plug cable for connecting the TRIGGER OUT jack. -
Page 80
Contents Connections Playback Settings Tips Appendix Connecting the power cord After completing all the connections, insert the power plug into the power outlet. Power cord (supplied) To household power outlet (AC 120 V, 60 Hz) Front panel Display Rear panel Remote Index… -
Page 81
Contents Connections Playback Settings Tips Appendix o Contents Playback network audio/service Listening to Internet Radio Basic operation Playing back files stored on a PC or NAS Turning the power on Getting the HEOS App Selecting the input source AirPlay function Adjusting the volume Spotify Connect function Turning off the sound temporarily (Muting) -
Page 82: Input Source
Contents Connections Playback Settings Tips Appendix Basic operation Turning the power on POWER Press POWER X to turn on power to the unit. 0 You can press the input source select button when the unit is in standby mode to Input source turn on the power.
-
Page 83
Contents Connections Playback Settings Tips Appendix Adjusting the volume Playback a DVD player/Blu-ray Disc player Use VOLUME df to adjust the volume. The following describes the procedure for playing DVD player/Blu-ray Disc player. 0 The variable range differs according to the input signal and channel level setting. Prepare for playback. -
Page 84
Contents Connections Playback Settings Tips Appendix Playing a USB memory device Playing back music files stored on a USB memory device. Only USB memory devices conforming to mass storage class standards can be played on this unit. This unit is compatible with USB memory devices in “FAT32” or “NTFS” format. -
Page 85
Contents Connections Playback Settings Tips Appendix Playing files stored on USB memory Browse the music on your USB memory device and devices select something to play. Insert a “FAT32” or “NTFS” formatted USB memory 0 When you select something to play you will be asked how you want to device into the USB port. -
Page 86
Nature 01 — Various Artists 2:45 -2:21 0 Note that Denon will accept no responsibility whatsoever for any problems arising with the data on a USB memory device when using this unit in conjunction with the USB memory device. 0 When a USB memory device is connected to this unit, the unit loads all of the files on the USB memory device. -
Page 87
Contents Connections Playback Settings Tips Appendix o Operations accessible through the option menu “Adjusting the volume of each channel to match the input source (Channel Level Adjust)” (v p. 122) “Adjusting the tone (Tone)” (v p. 123) “Displaying your desired video during audio playback (Video Select)”… -
Page 88
Contents Connections Playback Settings Tips Appendix Listening to music on a Bluetooth device Music files stored on Bluetooth devices such as smartphones, digital music players, etc. can be enjoyed on this unit by pairing and connecting this unit with the Bluetooth device. POWER X Communication is possible up to a range of about 98.4 ft/30 m. -
Page 89
Contents Connections Playback Settings Tips Appendix Playing music from Bluetooth device Select this unit when its name appears in the list of devices displayed on the screen of the Bluetooth In order to enjoy music from a Bluetooth device on this unit, the Bluetooth device. -
Page 90
Contents Connections Playback Settings Tips Appendix Pairing with other Bluetooth devices NOTE 0 To operate the Bluetooth device with the remote control of this unit, the Bluetooth Pair a Bluetooth device with this unit. device needs to support the AVRCP profile. 0 The remote control of this unit is not guaranteed to work with all Bluetooth devices. -
Page 91
Contents Connections Playback Settings Tips Appendix Reconnecting to this unit from a Bluetooth device After pairing is completed, the Bluetooth device can be connected without performing any operations on this unit. This operation also needs to be performed when switching the Bluetooth device for playback. -
Page 92
Contents Connections Playback Settings Tips Appendix Listening to FM/AM broadcasts You can use the built-in tuner of this unit to listen to FM broadcasts and AM broadcasts. Make sure the FM antenna and AM loop antenna are connected to this unit first. -
Page 93
Contents Connections Playback Settings Tips Appendix Listening to FM/AM broadcasts Use o p to select “FM” or “AM”, then press ENTER. When listening to an FM broadcast. Connect the antenna. (“Connecting FM/AM antennas” (v p. 74)) When listening to an AM broadcast. Press TUNER to switch the input source to “Tuner”. -
Page 94
Contents Connections Playback Settings Tips Appendix o Operations accessible through the option Tuning in by entering the frequency menu (Direct Tune) “Tuning in by entering the frequency (Direct Tune)” (v p. 94) You can enter the receiving frequency directly to tune in. “Changing the tune mode (Tune Mode)”… -
Page 95
Contents Connections Playback Settings Tips Appendix Changing the tune mode (Tune Mode) Tuning in to stations and presetting them automatically (Auto Preset You can change the mode for tuning into FM and AM broadcasts. If you Memory) cannot tune in automatically with “Auto” mode, change the mode to “Manual”… -
Page 96
Contents Connections Playback Settings Tips Appendix Presetting the current broadcast Channel Default settings 92.10 / 92.30 / 92.50 / 92.70 / 93.10 / 93.50 / 93.70 / 94.10 station (Preset Memory) 1 – 8 94.30 / 94.50 / 94.70 / 94.90 / 95.10 / 95.30 / 95.50 / 95.70 Your favorite broadcast stations can be preset so that you can tune them 9 –… -
Page 97
Contents Connections Playback Settings Tips Appendix Specify a name for the preset Use ui to select a name label, then press ENTER. broadcast station (Preset Name) The screen that lets you edit the Preset Name is displayed. If you select “Set Defaults”, then the unit returns to displaying the You can set the name to the preset broadcast station or change it. -
Page 98
Contents Connections Playback Settings Tips Appendix Skipping preset broadcast stations To set the stations you want to skip by stations (Preset Skip) A Use o p to select the group of broadcast stations you want to skip. Perform auto preset memory to save all the broadcasting stations that can B Use ui to select the broadcast station you want to skip. -
Page 99
Contents Connections Playback Settings Tips Appendix Cancelling Preset Skip While the “Preset Skip” screen is displayed, use o p to select a group containing a broadcast station to cancel the skip for. Use ui to select a broadcast station to cancel the skip for. -
Page 100: Internet Radio
Contents Connections Playback Settings Tips Appendix Listening to Internet Radio Internet Radio refers to radio broadcasts distributed over the Internet. Internet Radio stations from around the world can be received. The Internet Radio station list on this unit the database service provided by TuneIn Radio service.
-
Page 101
Contents Connections Playback Settings Tips Appendix Listening to Internet Radio 0 The display switches between track title and radio station name etc. each time the main unit’s STATUS is pressed. Press INTERNET RADIO. You can also press R (HEOS Music). Use ui to select “TuneIn NOTE Internet Radio”, then press ENTER. -
Page 102
Contents Connections Playback Settings Tips Appendix Playing back files stored on a PC or NAS This unit can play back music files and playlists (m3u, wpl) from DLNA compatible servers including PCs and NAS devices on your network. Supported file formats: For details, see “Playing back a file saved on a PC or NAS”… -
Page 103
Contents Connections Playback Settings Tips Appendix Playing back files stored on a PC or Browse the music on your PC/NAS and select something to play. Use this procedure to play music files or playlists stored on DLNA files servers on your local network. 0 When you select something to play you will be asked how you want to queue up your music. -
Page 104
Contents Connections Playback Settings Tips Appendix Use ui to select the “Play Now” or “Play Now & 0 The display switches between track title, artist name, and album title each time the Replace Queue”, then press ENTER. main unit’s STATUS is pressed. Playback starts. -
Page 105
Contents Connections Playback Settings Tips Appendix o Operations accessible through the option menu “Adjusting the volume of each channel to match the input source (Channel Level Adjust)” (v p. 122) “Adjusting the tone (Tone)” (v p. 123) “Displaying your desired video during audio playback (Video Select)”… -
Page 106
Contents Connections Playback Settings Tips Appendix Getting the HEOS App You can use many online music streaming services from the HEOS App. Depending upon your geographical location, there are several options to choose from. For more information about which services are available in your area please visit http://www.HEOSbyDenon.com Download the HEOS App for iOS or Android by searching App Store, Google Play store or Amazon Appstore for “HEOS”. -
Page 107
Contents Connections Playback Settings Tips Appendix o Changing your HEOS Account HEOS Account HEOS Accounts can be registered in “HEOS Account” (v p. 231) in the Tap the “Music” tab. menu of this unit or by tapping “Music” tab — “Settings” icon a in the HEOS App. -
Page 108
Selecting a room/device Rooms Music Now Playing Tap the “Rooms” tab, and select “Denon AVR-X3600H” if there are multiple HEOS devices. 0 Tap the Pencil icon e at the top right to switch edit mode. You can change the displayed name. -
Page 109
Contents Connections Playback Settings Tips Appendix o Selecting the music track or station from music sources Music Tap the “Music” tab and select a music source. 0 All music services displayed may not be available in your location. This Phone USB Music Music Servers Playlists… -
Page 110
Contents Connections Playback Settings Tips Appendix Browse the music to play. Album Now Playing After selecting a music track or radio station the app will Artist Album automatically change to the “Now Playing” screen. 10 Tracks,60 Mins.,2014 Track 01 0 When you select a music track to play you will be asked how you want to Rooms queue up your music. -
Page 111
Contents Connections Playback Settings Tips Appendix Listening to the same music in multiple Rooms Rooms rooms Drag one room into another to group them Drag one room into another to group them Dining Dining The HEOS system is a true multi-room audio system that automatically Song Name 1 Song Name 1 synchronizes audio playback between multiple HEOS devices so that the… -
Page 112
Contents Connections Playback Settings Tips Appendix o Ungrouping rooms Rooms Rooms Press and hold your finger on room that you want to Drag one room into another to group them Drag one room into another to group them remove from the group. Dining Dining Song Name 1… -
Page 113
Contents Connections Playback Settings Tips Appendix o Grouping all rooms (party mode) Rooms Rooms You can easily group 16 rooms together into Party Mode by using a Drag one room into another to group them Drag one room into another to group them «pinch»… -
Page 114
Contents Connections Playback Settings Tips Appendix o Ungrouping all rooms Rooms Rooms You can easily ungroup all of your rooms and exit Party Mode by using Drag one room into another to group them Drag one room into another to group them a «spread»… -
Page 115
Contents Connections Playback Settings Tips Appendix AirPlay function Music files stored on your iPhone, iPod touch, iPad or iTunes can be Router played on this unit via the network. This unit 0 Source input will be switched to “HEOS Music” when AirPlay playback is started. 0 You can stop AirPlay playback by choosing other input source. -
Page 116
Contents Connections Playback Settings Tips Appendix Playing songs from your iPhone, iPod Playing iTunes music with this unit touch or iPad Install iTunes 10, or later, on a Mac or Windows PC that If you update your “iPhone/iPod touch/iPad” to iOS 4.2.1 or later, you can is connected to the same network as this unit. -
Page 117
A circle is displayed to the right of AirPlay 2 compatible devices. playback and then adjust it to a suitable level. Play a song from your iPhone, iPod iPhone Denon xxxxxxxx touch or iPad on multiple synced Speakers devices (AirPlay 2) Songs from an iPhone, iPod touch or iPad operating iOS 11.4 or later can… -
Page 118
Contents Connections Playback Settings Tips Appendix Spotify Connect function Spotify is the world’s most popular streaming service. If you subscribe to Playing Spotify music with this unit Spotify Premium, you can control your new speaker with your phone or tablet. Because Spotify is built-in to your speaker, you can still take calls or Download the “Spotify App”… -
Page 119
Contents Connections Playback Settings Tips Appendix Convenience functions This section explains how to use convenient functions that can be used for each input source. These functions can only be set in the MAIN ZONE. MAIN (HEOS Music) OPTION uio p ENTER Front panel Display… -
Page 120
Contents Connections Playback Settings Tips Appendix Playing back HEOS Favorites Adding to HEOS Favorites Press R (HEOS Music). While content is playing, press OPTION. The option menu screen is displayed. Use ui to select “HEOS Favorites”, then press ENTER. Use ui to select “Add to HEOS Favorites”, then press ENTER. -
Page 121
Contents Connections Playback Settings Tips Appendix Deleting a HEOS Favorites While the HEOS Favorites content list is displayed, use ui to select the item you want to remove from HEOS Favorites, then press OPTION. Use ui to select “Remove from HEOS Favorites”, then press ENTER. -
Page 122
Contents Connections Playback Settings Tips Appendix Adjusting the volume of each channel Use o p to adjust the volume. to match the input source (Channel –12.0 dB – +12.0 dB (Default: 0.0 dB) Level Adjust) Use uio p to select “Exit”, then press ENTER. The volume of each channel can be changed while listening to music. -
Page 123
Contents Connections Playback Settings Tips Appendix Adjusting the tone (Tone) Select “On” in step 3 and press i to select the sound range to be adjusted. Adjusts the tonal quality of the sound. Bass: Adjust bass. Press OPTION. Treble: Adjust treble. An option menu screen is displayed. -
Page 124
Contents Connections Playback Settings Tips Appendix Displaying your desired video during If you selected “On” in step 3, press i and select audio playback (Video Select) “Source”. Use o p to select the input source for video you want This unit can display video from a different source on TV during audio to play back, then press ENTER. -
Page 125
Contents Connections Playback Settings Tips Appendix Adjusting the picture quality for your Use o p to select the picture mode. viewing environment (Picture Mode) No picture quality adjustment is done (Default): with this unit. n Supported input sources : The standard mode suited for most CBL/SAT / DVD / Blu-ray / Game / AUX1 / Standard: living room viewing environments. -
Page 126
Contents Connections Playback Settings Tips Appendix o Stopping the All Zone Stereo mode Playing the same music in all zones (All Zone Stereo) During playback in All Zone Stereo mode, press OPTION. You can play back the music being played back in MAIN ZONE An option menu screen is displayed. -
Page 127
Contents Connections Playback Settings Tips Appendix Selecting a sound mode This unit allows you to enjoy various kinds of surround and stereo playback modes. Disc formats such as Blu-ray Disc and DVD, as well as being supported by digital broadcasting, and even by streaming movies and music from internet-based subscription services. -
Page 128
Contents Connections Playback Settings Tips Appendix o Switching the sound mode Selecting a sound mode Press MOVIE, MUSIC or GAME to display a list of the sound modes that can be selected. Each time you press MOVIE, MUSIC or GAME, Press MOVIE, MUSIC or GAME to select a sound mode. -
Page 129
Contents Connections Playback Settings Tips Appendix GExampleH When MOVIE is pressed Direct playback Sound recorded in source is played as is. MOVIE SOUND Press PURE to select “Direct”. Stereo Direct playback begins. Dolby Audio — Dolby Surround DTS Neural:X Multi Ch Stereo Mono Movie Virtual 0 While DSD signals are played back, “DSD Direct”… -
Page 130
Contents Connections Playback Settings Tips Appendix Pure Direct playback Auto surround playback This mode detects the type of input digital signal, and automatically This mode is for playback with higher sound quality than in Direct playback selects the corresponding mode for playback. mode. -
Page 131
Contents Connections Playback Settings Tips Appendix Description of sound mode types Dolby sound mode Sound mode type Description Dolby Atmos Please select this mode to play content encoded with Dolby Atmos. If you have selected a different sound mode previously, please select again this mode for Dolby Atmos content play back. It decodes Dolby Atmos content and its positioning data in real time and outputs audio from the appropriate speakers, creating natural audio images regardless of the speaker layout. -
Page 132
Contents Connections Playback Settings Tips Appendix DTS sound mode Sound mode type Description DTS Surround This mode can be selected when playing sources recorded in DTS. This mode is suitable for playing discs recorded in DTS-ES. DTS ES Dscrt6.1 The surround back channel added using the discrete method is played as an independent channel. Since all channels are independent, the 360-degree spacial expressiveness and sound localization are enhanced. -
Page 133
Contents Connections Playback Settings Tips Appendix Sound mode type Description IMAX DTS This mode is automatically activated when playing back IMAX Enhanced content featuring a DTS bitstream. (v p. 167) Also this mode is selectable when “Surround Parameter” — “IMAX” is set to “On” in the menu and a 48 kHz sampling frequency DTS 5.1 channel signal is being input. -
Page 134: Pcm Multi-Channel Sound Mode
Contents Connections Playback Settings Tips Appendix PCM multi-channel sound mode Sound mode type Description Multi Ch In This mode can be selected when playing multi-channel PCM/DSD sources. Original sound mode Sound mode type Description Multi Ch Stereo This mode is for enjoying stereo sound from all speakers. Rock Arena This mode simulates the expansive sound of a live concert in an arena.
-
Page 135: Pure Direct
Contents Connections Playback Settings Tips Appendix Stereo sound mode Sound mode type Description Stereo This mode plays 2-channel stereo audio with no additional surround sound processing. Sound is output from the front left and right speakers, and subwoofer if connected. When multi-channel signals are inputted, they are mixed down to 2-channel audio and are played back with no additional surround sound processing.
-
Page 136
Contents Connections Playback Settings Tips Appendix Sound mode that can be selected for each input signal The following sound modes can be selected using the MOVIE, MUSIC and GAME buttons. Adjust the sound field effect with the menu “Surround Parameter” to enjoy surround sound the way you like it. (v p. 165) Input signal Sound mode MOVIE button… -
Page 137
Contents Connections Playback Settings Tips Appendix Input signal Sound mode MOVIE button MUSIC button GAME button Multi-channel z5 Stereo Dolby Digital Dolby Digital Dolby Digital + Dolby Surround z6 Dolby Digital Plus Dolby Digital Plus + Dolby Surround z6z7 Dolby Digital Plus Dolby Atmos z6z8 Dolby TrueHD Dolby TrueHD + Dolby Surround z6z7… -
Page 138
Contents Connections Playback Settings Tips Appendix Input signal Sound mode MOVIE button MUSIC button GAME button DTS Surround DTS ES Dscrt 6.1 z6 DTS ES Mtrx 6.1 z6 DTS 96/24 DTS + Dolby Surround z6 DTS + Neural:X z6 DTS + Virtual:X z4 IMAX DTS z9 IMAX DTS + Neural:X z6z9 IMAX DTS + Virtual:X z4z9… -
Page 139
Contents Connections Playback Settings Tips Appendix Input signal Sound mode MOVIE button MUSIC button GAME button DTS:X DTS:X DTS:X MSTR DTS:X + Virtual:X z4 IMAX DTS z10 IMAX DTS + Neural:X z6z10 IMAX DTS IMAX DTS + Virtual:X z4z10 IMAX DTS:X z10 IMAX DTS:X IMAX DTS:X + Virtual:X z4z10 Multi Ch In… -
Page 140
Contents Connections Playback Settings Tips Appendix Input signal Sound mode MOVIE button MUSIC button GAME button Multi Ch Stereo Mono Movie Rock Arena Multi-channel z5 Jazz Club Matrix Video Game Virtual z5 The sound mode that can be selected differs depending on the audio format of the input signal and the number of channels. For details, see “Types of input signals, and corresponding sound modes”… -
Page 141
Contents Connections Playback Settings Tips Appendix o Views on the display DD+ + DSu DVD A Shows a decoder to be used. In the case of the Dolby Digital Plus decoder, “W” is displayed. B Shows a decoder that creates sound output. “V”… -
Page 142
Contents Connections Playback Settings Tips Appendix HDMI Control function A recent addition to the HDMI standard is CEC (Consumer Electronics Control), which allows control signals from one device to communicate with another device via the HDMI cable connection. Setting procedure Enable the HDMI Control function of this unit. -
Page 143
Contents Connections Playback Settings Tips Appendix Smart Menu function This function can be used to configure the settings of this unit, select an o Now Playing input source and set Tuner and Internet Radio stations using the TV remote control. Enjoy content from the input source currently selected on this unit. -
Page 144: Quick Select Plus
Contents Connections Playback Settings Tips Appendix o Setup Menu Displays a setup menu for configuring the settings of this unit. o Quick Select Calls up the “Quick Select” items registered to this unit. NOTE 0 If the “HDMI Control” or “Smart Menu” settings have been changed, always reset the power to connected devices after the change.
-
Page 145
Contents Connections Playback Settings Tips Appendix Sleep timer function You can have the power automatically switched to standby once a set time has elapsed. This is convenient for viewing and listening while going to sleep. The sleep timer function can be set for each zone. MAIN ZONE2 SLEEP… -
Page 146
Contents Connections Playback Settings Tips Appendix o Checking the remaining time Using the sleep timer Press SLEEP when the sleep timer is in operation. The remaining time appears on the display. Press MAIN or ZONE2 to select the operating zone with the remote control. -
Page 147
Contents Connections Playback Settings Tips Appendix Quick select plus function Settings such as the input source, volume level and sound mode can be registered to the QUICK SELECT 1 — 4 buttons. You can simply press one of the registered QUICK SELECT buttons in MAIN subsequent playbacks to switch to the group of saved settings in a batch. -
Page 148
Contents Connections Playback Settings Tips Appendix Calling up the settings Press MAIN or ZONE2 to select the operating zone with the remote control. The button for the selected zone is lit. Press QUICK SELECT. The Quick Select settings registered to the button you pressed are called up. -
Page 149
Contents Connections Playback Settings Tips Appendix Changing the settings Press MAIN or ZONE2 to select the operating zone with the remote control. The button for the selected zone is lit. Set the items below to the settings you want to register. -
Page 150
Contents Connections Playback Settings Tips Appendix Panel lock function To prevent accidental operation of this unit, you can disable operation of Disabling all key button operations the buttons on the front panel. TUNER PRESET CH – STATUS Press X while you press and hold TUNER PRESET CH + and ZONE2 SOURCE with the unit in standby mode. -
Page 151
Contents Connections Playback Settings Tips Appendix Canceling the Panel lock function Press X while you press and hold TUNER PRESET CH + and ZONE2 SOURCE with the unit in standby mode. Press TUNER PRESET CH + or TUNER PRESET CH – to select “FP LOCK zOff”. -
Page 152: Remote Control Unit
Contents Connections Playback Settings Tips Appendix Remote lock function When connecting an IR receiver, enable the Remote lock function. When Disabling the sensor function of the the function is enabled, you can not perform operations with the remote remote control unit control unit.
-
Page 153
This unit Switch the “Network Control” setting to “Always On”. (v p. 229) Check the IP address of this unit with “Information”. (v p. 224) Network/Information Friendly Name Denon AVR-X3600H DHCP Connection Wired (Ethernet) IP Address 192.168.100.19 zzzzzz-000000 MAC Address (Ethernet) -
Page 154
Contents Connections Playback Settings Tips Appendix Enter the IP address of this unit in browser’s address box. For example, if the IP address of this unit is “192.168.100.19”, enter “http://192.168.100.19”. http://192.168.100.19 File Edit View Favorites Tools Help When the top menu is displayed on the web browser, click on the menu item you want to operate. -
Page 155
Contents Connections Playback Settings Tips Appendix Playback in ZONE2 (Another room) You can operate this unit to enjoy video and audio in a room (ZONE2) that is different from the room where this unit is placed (MAIN ZONE). You can simultaneously play back the same source in both the MAIN ZONE and ZONE2. You can also play back separate sources in the MAIN ZONE and ZONE2. -
Page 156
Contents Connections Playback Settings Tips Appendix o Connection 2: Connecting using a speaker o Connection 3 : Connection using an external output terminal amplifier (ZONE2) When “Assign Mode” is set to “ZONE2” in the menu, ZONE2 audio is The audio signals of this unit’s ZONE2 audio output connectors are output from the HEIGHT2 speaker terminal. -
Page 157
Contents Connections Playback Settings Tips Appendix Playback in ZONE2 Press ZONE2 to set the operating zone to ZONE2 with the remote control. The ZONE2 button lights. Press POWER X to turn on the ZONE2 power. POWER ZONE2 The ( indicator on the display lights. Power in ZONE2 can be turned on or off by pressing ZONE2 ON/OFF on the main unit. -
Page 158
Contents Connections Playback Settings Tips Appendix o Adjusting the volume (ZONE2) Use VOLUME df to adjust the volume. At time of purchase, “Volume Limit” is set to “70 (–10 dB)”. (v p. 237) 0 Turn MASTER VOLUME after pressing ZONE2 SOURCE on the main unit to adjust the volume. -
Page 159
Contents Connections Playback Settings Tips Appendix Menu map When using menu operations, connect this unit to a TV and operate this unit while viewing the TV. The recommended settings are configured for this unit by default. You can customize this unit based on your existing system and your preferences. Setting items Detailed items Description… -
Page 160
Contents Connections Playback Settings Tips Appendix Setting items Detailed items Description Page Input Assign Changes input connector assignment and the audio input mode. Source Rename Changes the display name for input source. Hide Sources Removes from the display input sources that are not used. Source Level Adjusts the playback level of the audio input. -
Page 161
Contents Connections Playback Settings Tips Appendix Setting items Detailed items Description Page 【When the user is signed out the HEOS Account】 I have a HEOS Account Selects to sign in. Create Account Creates new HEOS Account. Forgot Password If you forgot your password, we’ll send you an email with instructions about how to reset HEOS Account 【When the user is signed in the HEOS Account】… -
Page 162
Information Shows information about this unit settings, input signals, etc. Usage Data Selects whether or not to send anonymous usage data to Denon. Save & Load Save and restore device settings by using a USB memory device. Setup Lock Protects settings from inadvertent changes. -
Page 163
Contents Connections Playback Settings Tips Appendix Menu operations MAIN Press MAIN on the remote control unit to set the operating zone to the MAIN ZONE. The MAIN button lights. Press SETUP. The menu is displayed on the TV screen. Use ui p to select the menu to be set or operated, then press ENTER. -
Page 164
Contents Connections Playback Settings Tips Appendix Audio Make audio-related settings. Center Level Adjust Subwoofer Level Adjust Adjusts the center channel volume to clarify the dialog for all sources. Adjusts the subwoofer channel volume for all input sources. o Center o Subwoofer 1 / Subwoofer 2 Adjusts the volume output from the center channel. -
Page 165
Contents Connections Playback Settings Tips Appendix o Loudness Management Surround Parameter This sets whether to output as specified in “Dynamic Compression” or You can adjust the surround audio sound field effects to match your output directly without compressing the dynamic range of audio preferences. -
Page 166
Contents Connections Playback Settings Tips Appendix o Dynamic Compression o Dialog Control Compress dynamic range (difference between loud and soft sounds). Adjust the volume of dialog in movies, vocals in music, etc. so these can be heard more easily. Automatic dynamic range compression Auto: on/off control according to source. -
Page 167
Contents Connections Playback Settings Tips Appendix o Speaker Virtualizer o IMAX The Speaker Virtualizer enhances the surround and height speaker Sets the audio mode for IMAX playback. channels to create an enveloping virtual surround effect. Auto Automatically enables the IMAX mode (Default): when IMAX content is detected. -
Page 168
Contents Connections Playback Settings Tips Appendix o IMAX Audio Settings o Low Pass Filter You can configure special IMAX audio settings to recreate the Set the low pass filter cutoff frequency of the LFE signal during IMAX conditions of an IMAX theater. playback. -
Page 169
Contents Connections Playback Settings Tips Appendix o Delay Time o Room Size Adjust the audio delay time against video to extend the sound field Determine size of acoustic environment. image. Small: Simulate acoustics of a small room. 0 ms – 300 ms (Default: 30 ms) Simulate acoustics of a medium-small Medium small: room. -
Page 170
Contents Connections Playback Settings Tips Appendix o Speaker Select o Subwoofer Makes settings for the speakers outputting sound. Turn subwoofer output on and off. Floor: Plays back without height speakers. The subwoofer is used. (Default): Floor & Height Plays back with height speakers. (Default): Off: The subwoofer is not used. -
Page 171
Contents Connections Playback Settings Tips Appendix Restorer 0 This item can be set with analog signals or PCM signal (Sample Rate = Compressed audio formats such as MP3, WMA (Windows Media Audio) 44.1/48 kHz) is input. and MPEG-4 AAC reduce the amount of data by eliminating signal 0 This item default setting for “HEOS Music”… -
Page 172
Contents Connections Playback Settings Tips Appendix o Adjust Audio Delay The timing mismatch between the picture and sound needs to be Compensates for incorrect timing between video and audio. corrected manually. 0 ms – 500 ms (Default : 0 ms) 0 Audio Delay for game mode can be set when “Video Mode”… -
Page 173
Contents Connections Playback Settings Tips Appendix o Power On Level Volume Define the volume setting that is active when the power is turned on. Set the MAIN ZONE (room where the unit is located) volume setting. Last Use the memorized setting from the last o Scale (Default): session. -
Page 174
Contents Connections Playback Settings Tips Appendix o MultEQ ® XT32 Audyssey ® MultEQ ® XT32 compensates for both time and frequency Set Audyssey MultEQ XT32, Audyssey Dynamic EQ , Audyssey ® ® characteristics of the listening area based on Audyssey ®… -
Page 175
Contents Connections Playback Settings Tips Appendix o Dynamic EQ o Reference Level Offset Solves the problem of deteriorating sound quality as volume is Audyssey Dynamic EQ ® is referenced to the standard film mix level. It decreased by taking into account human perception and room makes adjustments to maintain the reference response and surround acoustics. -
Page 176
Contents Connections Playback Settings Tips Appendix o Dynamic Volume o Audyssey LFC™ Solves the problem of large variations in volume level between TV, Adjusts the low frequency band to prevent bass and vibration from movies and other content (between quiet passages and loud being conveyed to neighboring rooms. -
Page 177
Contents Connections Playback Settings Tips Appendix o Speaker Selection Graphic EQ Select whether to adjust tones for individual speakers or for all Uses the graphic equalizer to adjust the tone of each speaker. speakers. All: Adjust all speaker tones together. 0 Speakers for which “Graphic EQ”… -
Page 178
Contents Connections Playback Settings Tips Appendix o Curve Copy Copy the Flat correction curve created in Audyssey ® Setup. 0 “Curve Copy” is displayed after Audyssey ® Setup has been performed. 0 “Curve Copy” cannot be used when using headphones. o Set Defaults The “Graphic EQ”… -
Page 179
Contents Connections Playback Settings Tips Appendix Video Make video-related settings. o Picture Mode Picture Adjust Select the desired picture mode according to the video content and Picture quality can be adjusted. your viewing environment. The standard mode suited for most living Standard: room viewing environments. -
Page 180
Contents Connections Playback Settings Tips Appendix o Contrast Adjust picture contrast. 0 The two special adjustment modes, “ISF Day” and “ISF Night”, should be used by a certified technician to adjust the color calibration to match the installation -50 – +50 (Default : 0) conditions. -
Page 181
Contents Connections Playback Settings Tips Appendix o HDMI Pass Through HDMI Setup Selects how this unit will transmit HDMI signals to the HDMI output in Make settings for HDMI Audio Out, HDMI Pass Through and HDMI standby power mode. Control settings. Transmits the selected HDMI input NOTE through this unit’s HDMI output when this… -
Page 182
Contents Connections Playback Settings Tips Appendix o Pass Through Source o RC Source Select Sets the HDMI connector that inputs HDMI signals when in standby. Set whether to allow this unit to be turned on by the input source select button on the remote control when this unit is on standby. -
Page 183
Contents Connections Playback Settings Tips Appendix o HDMI Control o ARC You can link operations with devices connected to HDMI and On the TV connected to the HDMI MONITOR 1 connector, set whether compatible with HDMI Control. to receive sound from the TV via HDMI. Use HDMI Control function. -
Page 184
Contents Connections Playback Settings Tips Appendix o TV Audio Switching o Power Off Control Sets automatic switching to the “TV Audio” input when a TV connected Links the power standby of this unit to external devices. via HDMI sends an appropriate CEC control command to this unit. If power to a connected TV is turned off independently of the input source, power Select the “TV Audio”… -
Page 185
Contents Connections Playback Settings Tips Appendix o Power Saving o Smart Menu If “TV Speaker” is set as the audio output setting of your TV, this unit is This function can be used to configure the settings of this unit, select automatically set to standby mode to reduce power consumption. -
Page 186
Contents Connections Playback Settings Tips Appendix o HDMI Video Output Output Settings Select the HDMI monitor connector to be used. Makes settings for video output. The presence of a TV connected to the Auto(Dual) HDMI MONITOR 1 or HDMI MONITOR 2 (Default): connector is detected automatically, and 0 This can be set when “HDMI”, “COMP”… -
Page 187
Contents Connections Playback Settings Tips Appendix o Video Mode o Video Conversion Configure the video processing method to match the type of video The input video signal is converted automatically in conjunction with content. the connected TV. (v p. 276) Auto Process video automatically based on The input video signal is converted. -
Page 188
Contents Connections Playback Settings Tips Appendix o Resolution o Sharpness Set the output resolution. You can set “Resolution” separately for Enables the sharpness feature which enhances the edges of images HDMI output of the analog video input and HDMI input. when up-scaling video to 4K. -
Page 189
Contents Connections Playback Settings Tips Appendix o Progressive Mode On Screen Display Set an appropriate progressive conversion mode for the source video Select the on-screen display user interface preferences. signal. o Volume The video signal is automatically Auto detected and the appropriate mode is (Default): Sets where to display the volume level. -
Page 190
Contents Connections Playback Settings Tips Appendix o Now Playing 4K Signal Format Sets the display time for the playback display when the input source is Set the 4K signal format to be played back by this unit when the TV or “HEOS Music”… -
Page 191
Contents Connections Playback Settings Tips Appendix GRelation between the “4K Signal Format” setting and supported resolutionsH 0 When setting this to “Enhanced”, we recommend using a “Premium High Speed HDMI Cable” or “Premium High Speed HDMI Cable with Ethernet” that 4K Signal Format Support Color… -
Page 192
Contents Connections Playback Settings Tips Appendix TV Format Set the video signal format to be output for the TV you are using. o Format NTSC Select NTSC output. (Default): PAL: Select PAL output. 0 “Format” can also be set by the following procedure. However, the menu screen is not displayed. -
Page 193
Contents Connections Playback Settings Tips Appendix Inputs Perform settings related to input source playback. You do not have to change the settings to use the unit. Make settings when needed. Input Assign 0 By default, each item is set as follows. By making connections as indicated by the input sources printed on the Input connector INPUT… -
Page 194
Contents Connections Playback Settings Tips Appendix n TV set top box/satellite users please note o DIGITAL When using the digital audio output on a TV/satellite box: Set this to change the digital audio input connectors assigned to the To play the video signal assigned to “HDMI” combined with the audio input sources. -
Page 195
Contents Connections Playback Settings Tips Appendix o INPUT MODE o Set Defaults Set the audio input modes for each input source. The “Input Assign” settings are returned to the default settings. It is normally recommended to set the audio input mode to “AUTO”. AUTO Automatically detect input signal and (Default):… -
Page 196
Contents Connections Playback Settings Tips Appendix Source Rename Hide Sources Changes the display name of the input source. Remove from the display input sources that are not used. Once changed, the name is displayed on the display and menu screens Show Use this source. -
Page 197
Contents Connections Playback Settings Tips Appendix Speakers The acoustic characteristics of the connected speakers and listening room are measured and the optimum settings are made automatically. This is called “Audyssey ® Setup”. You do not have to perform Audyssey Setup when you have already performed “Speaker Calibration” in “Setup Assistant”. ®… -
Page 198
Contents Connections Playback Settings Tips Appendix o About the main listening position NOTE The main listening position is the position where listeners would 0 Make the room as quiet as possible. Background noise can disrupt the room measurements. Close windows and turn off the power on electronic devices normally sit or where one would normally sit alone within the listening (radios, air conditioners, fluorescent lights, etc.). -
Page 199
Contents Connections Playback Settings Tips Appendix Procedure for speaker settings Attach the Sound calibration microphone to the supplied microphone stand or own tripod and install it (Audyssey Setup) ® at the main listening position. When installing the Sound calibration microphone, point the tip of Preparation the microphone toward the ceiling and adjust the height to match the height of the ears of a listener in a seated position. -
Page 200
Contents Connections Playback Settings Tips Appendix Connect the Sound calibration microphone to the Select “Start”, then press ENTER. SETUP MIC jack of this unit. Audyssey ® Setup can also make the following settings. Amp Assign The signals output from the HEIGHT1 and HEIGHT2 speaker terminals can be switched in accordance with your speaker environment. -
Page 201
Contents Connections Playback Settings Tips Appendix When the following screen is displayed, select “Begin When the detected speaker is displayed, select “Next” Test” and then press ENTER. and then press ENTER. Start the measurement of the first position. Audyssey Setup Speaker Detection Audyssey Setup Select “Begin Test”… -
Page 202
Contents Connections Playback Settings Tips Appendix Move the Sound calibration microphone to position 2, Repeat step 8, measuring positions 3 to 8. select “Continue”, then press ENTER. The measurement of the second position starts. Measurements can be made in up to eight positions. 0 To skip measuring the fourth and subsequent listening position, press o to select “Complete”… -
Page 203
Contents Connections Playback Settings Tips Appendix When the analysis and storage ends, unplug the Sound Perform the settings for Audyssey Dynamic EQ ® calibration microphone from the SETUP MIC jack on the Audyssey Dynamic Volume ® main unit and then press “Next”. The following screen is displayed during the analysis. -
Page 204
Contents Connections Playback Settings Tips Appendix Select “Details” and press ENTER to verify the measurement results. Subwoofers may measure a greater reported distance than the actual distance due to added electrical delay common in subwoofers. NOTE 0 Do not change the speaker connection or subwoofer volume after Audyssey ®… -
Page 205
Contents Connections Playback Settings Tips Appendix Error messages An error message is displayed if Audyssey ® Setup could not be completed due to speaker placement, the measurement environment, etc. If an error message is displayed, check the relevant items and perform the necessary measures. Be sure to turn off the power before checking speaker connections. Examples Error details Measures… -
Page 206
Contents Connections Playback Settings Tips Appendix o Subwoofer level error message and how to Select “SW Level Matching” and then press ENTER. adjust Adjust the volume control on your subwoofer so that The optimal level of each subwoofer channel for Audyssey ®… -
Page 207
Contents Connections Playback Settings Tips Appendix Retrieving Audyssey ® Setup settings If you set “Restore…” to “Restore”, you can return to Audyssey Setup ® measurement result (value calculated at the start by MultEQ XT32) even ® when you have changed each setting manually. Audyssey Setup Your AV receiver can automatically measure the acoustics of your room then optimize your speakers using the included… -
Page 208
Contents Connections Playback Settings Tips Appendix Manual Setup Amp Assign Select the power amplifier usage method to match your speaker system. Perform when setting the speakers manually or when changing settings o Assign Mode made in Audyssey ® Setup. If you add or remove a speaker after performing Audyssey Setup, you ®… -
Page 209
Contents Connections Playback Settings Tips Appendix Settings to assign all power amplifier Setting to assign the power amplifiers in within this unit to MAIN ZONE to play this unit for front speaker bi-amp back up to 9.1-channels. connection to 2-channels. You can connect speakers for up to 11.1- You can connect speakers for up to 9.1- 9.1ch:… -
Page 210
Contents Connections Playback Settings Tips Appendix o Floor Setting to assign the power amplifiers n Layout within this unit for connecting the second set of front speakers. Select the floor speakers location. You can switch between the desired 5ch & SB This layout combines a surround back combination of front speakers A and (Default):… -
Page 211
Contents Connections Playback Settings Tips Appendix o Height n Height Sp Select the number of the height speakers and ceiling speakers used in MAIN ZONE. None: Uses no height and ceiling speakers. Uses a set of (two) height speakers or (Default): ceiling speakers. -
Page 212
Contents Connections Playback Settings Tips Appendix n Layout Select the height, ceiling, or Dolby Atmos Enabled speaker location. The layouts that can be selected differ depending on the combinations of “Assign Mode” and “Floor” — “Layout” in the menu. (“ Assign Mode ”… -
Page 213
Contents Connections Playback Settings Tips Appendix Settings AUDIO OUT connectors Height Sp Dolby Sp NOTE Layout HEIGHT 1 HEIGHT 2 Front Dolby & Top Rear Front Dolby Top Rear Front Dolby & Rear Height Front Dolby Rear Height Front Height & Surr. Dolby Front Height Surround Dolby Front Height &… -
Page 214
Contents Connections Playback Settings Tips Appendix o Pre-out Speaker Config. When “Assign Mode” is set to “11.1ch”, selects the PRE OUT Select whether or not speakers are present, playback capacity for low connector the external power amplifier used in MAIN ZONE. bass frequencies and speaker size. -
Page 215
Contents Connections Playback Settings Tips Appendix o Center o Surround Set the presence and size of the center speaker. Set the presence and size of the surround speakers. Use a large speaker that can adequately Use a large speaker that can adequately Large: Large: play back very low bass frequencies. -
Page 216
Contents Connections Playback Settings Tips Appendix o Surr. Back o Front Height Set the presence, size and number of surround back speakers. Set the presence and size of the front height speakers. Use a large speaker that can adequately Use a large speaker that can adequately Large: Large: play back very low bass frequencies. -
Page 217
Contents Connections Playback Settings Tips Appendix o Top Middle o Surround Dolby Set the presence and size of the top middle speakers. Set the presence and size of the surround Dolby speakers. Use a large speaker that can adequately Use a large speaker that can adequately Large: Large: play back very low bass frequencies. -
Page 218
Contents Connections Playback Settings Tips Appendix o Rear Height Distances Set the presence and size of the rear height speakers. Set distance from listening position to speakers. Use a large speaker that can adequately Measure beforehand the distance from the listening position to each Large: play back very low bass frequencies. -
Page 219
Contents Connections Playback Settings Tips Appendix o Set the distance o Dolby Speaker Setup Set the distance between the Dolby Atmos Enabled speaker and the 0.0 ft – 60.0 ft / 0.00 m – 18.00 m ceiling. 3.0 ft — 11.0 ft / 0.90 m — 3.30 m (Default: 6.0 ft / 1.80 m) 0 The speakers that can be selected differ depending on the “Amp Assign”… -
Page 220
Contents Connections Playback Settings Tips Appendix Levels Set the volume of the test tone to be the same at the listening position when it is output from each speaker. o Test Tone Start A test tone is output from the selected speaker. While listening to the test tone, adjust the volume output from the selected speaker. -
Page 221
Contents Connections Playback Settings Tips Appendix o Set the crossover frequency Crossovers 40 Hz / 60 Hz / 80 Hz / 90 Hz / 100 Hz / 110 Hz / 120 Hz / 150 Hz / Set in accordance with the lower limit frequency of the base frequencies 180 Hz / 200 Hz / 250 Hz (Default: 80 Hz) that can be played back through each speaker. -
Page 222
Contents Connections Playback Settings Tips Appendix o LPF for LFE Bass Set LFE signal playback range. Set this when you want to change the Set subwoofer and LFE signal range playback. playback frequency (low pass filter point) of the subwoofer. o Subwoofer Mode 80 Hz / 90 Hz / 100 Hz / 110 Hz / 120 Hz / 150 Hz / 180 Hz / 200 Hz / 250 Hz (Default: 120 Hz) -
Page 223
Contents Connections Playback Settings Tips Appendix Front Speaker Set the front speaker A/B to use for every sound mode. Front speaker A is used. (Default): Front speaker B is used. A+B : Both front speakers A and B are used. 0 This can be set when “Assign Mode”… -
Page 224
Contents Connections Playback Settings Tips Appendix Network To use this unit by connecting it to a home network (LAN), you must configure network settings. If you set up your home network (LAN) via DHCP, set “DHCP” to “On”. (Use the default setting.) This allows this unit to use your home network (LAN). When assigning an IP address to each device manually, you need to assign an IP address to this unit using the “IP Address”… -
Page 225
2. Check that your iOS device is connected to the wireless LAN (Wi- o Scan Networks Fi) router and select “Denon AVR-X3600H” from “SET UP NEW Select the network you wish to connect to from the list of possible AIRPLAY SPEAKER…” at the bottom of the Wi-Fi configuration networks shown on the TV screen. -
Page 226
Contents Connections Playback Settings Tips Appendix o WPS Router o Manual Use a WPS-compatible router to connect using the push button Enter the name (SSID) and password of the network you wish to method. connect to. 1. Select “Push Button” on the TV screen. 1. -
Page 227
DHCP function is set to “On” in the 2. Connect the wireless LAN of the PC or tablet used to “Denon AVR-X3600H” default settings of this unit. -
Page 228
Contents Connections Playback Settings Tips Appendix o DHCP o Default Gateway Selects how to connect to the network. When connected to a gateway (router), input its IP address. Configure the network settings o DNS (Default): automatically from your router. Enter the DNS address indicated in the documentation supplied by Off: Configure the network settings manually. -
Page 229
Home Theater /Living Room / Family Room / Guest Room / 0 When using the web control function, Denon 2016 AVR Remote App or HEOS Kitchen / Dining Room / Master Bedroom / Bedroom / Den / App, use with the “Network Control”… -
Page 230
Contents Connections Playback Settings Tips Appendix o Internet Access Diagnostics Checks whether this unit has access to the Internet (WAN). Used to check the network connection. o Physical Connection Failed to connect to the Internet. Check Error: the Internet connection environment or Checks the physical LAN port connection. -
Page 231
Contents Connections Playback Settings Tips Appendix HEOS Account Make HEOS Account-related settings. HEOS Account is needed in order to use HEOS Favorites. The menu displayed differs depending on the status of the HEOS Account. You have not signed in You have already signed in o I have a HEOS Account o Signed in As If you already have a HEOS Account, enter the current account name… -
Page 232
Contents Connections Playback Settings Tips Appendix General Make various other settings. Language Set the language for display the menu on the TV screen. Configure the ECO Mode and auto standby mode settings. English / Français / Español (Default: English) o ECO Mode This mode can reduce the power consumption and heat generation of this unit when power on. -
Page 233
Contents Connections Playback Settings Tips Appendix Power savings are always active, regardless of volume or input signal. 0 When the unit is switching between the different power saving states in “ECO Mode: Auto”, you may notice a click noise from the inside of this unit, this is Gives you the best balance between normal. -
Page 234
Contents Connections Playback Settings Tips Appendix o Power On Default o On Screen Display Set the mode to ECO when the power is on. Display the power consumption of this unit using a meter on the TV screen. The ECO Mode will be set to the previous Last setting before the power was switched Always display the meter on the TV… -
Page 235
Contents Connections Playback Settings Tips Appendix o Auto Standby n ZONE2 When there are no operations for a certain period of time as set here, Set so the unit power automatically switches to standby. the power is automatically shut off even if there is audio or video input. n MAIN ZONE Switches ZONE2 the standby state after 8 hours:… -
Page 236
Contents Connections Playback Settings Tips Appendix o Lch Level ZONE2 Setup Adjust the left channel output level. Makes settings for audio playback with ZONE2. -12 dB – +12 dB (Default : 0 dB) o Rch Level 0 Values set for “Volume Limit” and “Power On Volume” are displayed according to the setting specified for the volume “Scale”. -
Page 237
Contents Connections Playback Settings Tips Appendix o HDMI Audio o Volume Limit Selects the audio signal format for playing an HDMI source in ZONE2. Make a setting for maximum volume. Through The HDMI audio signal is passed through 60 (-20 dB) / 70 (-10 dB) / 80 (0 dB) (Default): this unit to the device in ZONE2. -
Page 238
Contents Connections Playback Settings Tips Appendix o Mute Level Zone Rename Set the amount of attenuation when muting is on. Change the display title of each zone to one you prefer. Full The sound is muted entirely. MAIN ZONE / ZONE2 (Default): The default setting is restored for the edited -40 dB :… -
Page 239
Contents Connections Playback Settings Tips Appendix Trigger Out Front Display Select the conditions for activating trigger out. Makes settings related to the display on this unit. For details about how to connect the TRIGGER OUT jack, see “TRIGGER o Dimmer OUT jack”… -
Page 240
Contents Connections Playback Settings Tips Appendix o Auto-Update Firmware Turns on Automatic Updates so that futures updates are automatically Checks for the latest firmware information about updates and upgrades, downloaded and installed when this unit is in standby mode. updates the firmware, and sets up the notification message display for upgrades. -
Page 241
Contents Connections Playback Settings Tips Appendix o Allow Update o Upgrade Notification Enable or disable updates and upgrades for this unit. When the latest Upgrade firmware is available, a notification message is displayed on the TV screen at power on. Enables this unit to receive updates and The notification message is displayed for about 40 seconds when the (Default):… -
Page 242
If the error continues, check the network environment. 0 Information regarding the “Update” function and “Add New Feature” will be announced on the Denon website each time related plans are defined. See the Denon website for details about upgrades. -
Page 243
Contents Connections Playback Settings Tips Appendix o Video Information Show the HDMI input/output signals and HDMI monitor information for Show information about this unit settings, input signals, etc. MAIN ZONE. o Audio HDMI Signal Info. Resolution / HDR / Color Space / Pixel Depth Show the audio information for MAIN ZONE. -
Page 244
Usage Data Displays and sets notifications. To help us improve our products and customer service, Denon collects Also, sets whether or not to display the notification when the power is anonymous information about how you use this unit (such as frequently turned on. -
Page 245
Contents Connections Playback Settings Tips Appendix Save & Load Setup Lock Save and restore device settings by using a USB memory device. Protect settings from inadvertent changes. o Lock 0 Use a USB memory device that has at least 128 MB of free space and is formatted to FAT32. -
Page 246
Contents Connections Playback Settings Tips Appendix Reset Returns settings to the factory default. Initialization can be performed for all unit settings or for Network settings only. o All Settings All settings are reset to the factory default values. o Network Settings Only network settings are reset to the factory default values. -
Page 247
Contents Connections Playback Settings Tips Appendix Limiting the operating zone with the remote control ZONE2 operations can be disabled using the remote control. Press and hold ZONE2 and SETUP. The MAIN and ZONE2 buttons blink. ZONE2 o Canceling the settings Press and hold ZONE2 and SETUP while configuring the setting. -
Page 248
Contents Connections Playback Settings Tips Appendix o Contents Troubleshooting Power does not turn on / Power is turned off Tips Operations cannot be performed through the remote control unit I want the volume not to become too loud by mistake Display on this unit shows nothing I want to keep the volume at the same level when I turn the power No sound comes out… -
Page 249
Contents Connections Playback Settings Tips Appendix Tips I want the volume not to become too loud by mistake Set the volume upper limit for “Volume Limit” in the menu beforehand. This prevents children or others from increasing the volume too much by mistake. You can set this for each zone. -
Page 250
Contents Connections Playback Settings Tips Appendix I want to set the optimized listening environment after changing the configuration/position of the speakers or changing a speaker to a new Perform Audyssey ® Setup. This automatically makes the optimized speaker settings for the new listening environment. (v p. 197) I want to combine a desired video with the current music Set “Video Select”… -
Page 251
Contents Connections Playback Settings Tips Appendix Troubleshooting If a problem should arise, first check the following: 1. Are the connections correct? 2. Is the set being operated as described in the owner’s manual? 3. Are the other devices operating properly? 0 If steps 1 to 3 above do not improve the problem, restarting the device may improve the problem. -
Page 252
Contents Connections Playback Settings Tips Appendix Power does not turn on / Power is turned off Power does not turn on. Check whether the power plug is correctly inserted into the power outlet. (v p. 80) Power automatically turns off. The sleep timer is set. -
Page 253
Contents Connections Playback Settings Tips Appendix Operations cannot be performed through the remote control unit Operations cannot be performed through the remote control unit. Batteries are worn out. Replace with new batteries. (v p. 9) Operate the remote control unit within a distance of about 23 ft/7 m from this unit and at an angle of within 30°. (v p. 9) Remove any obstacle between this unit and the remote control unit. -
Page 254
Contents Connections Playback Settings Tips Appendix No sound comes out No sound comes out of speakers. Check the connections for all devices. (v p. 36) Insert connection cables all the way in. Check that input connectors and output connectors are not reversely connected. Check cables for damage. -
Page 255
Contents Connections Playback Settings Tips Appendix Desired sound does not come out The volume does not increase. The maximum volume is set too low. Set the maximum volume using “Limit” on the menu. (v p. 173) Appropriate volume correction processing is performed according to the input audio format and settings, so the volume may not reach the upper limit. No sound comes out with the HDMI connection. -
Page 256
Contents Connections Playback Settings Tips Appendix No sound is produced from subwoofer. Check the subwoofer connections. Turn on the subwoofer’s power. Set “Speaker Config.” — “Subwoofer” in the menu to “1 spkr” or “2 spkrs”. (v p. 215) When “Speaker Config.” — “Front” in the menu is set to “Large”, depending on the input signal and the sound mode, no sound may be output from the subwoofer. -
Page 257
Contents Connections Playback Settings Tips Appendix Audyssey MultEQ ® XT32, Audyssey Dynamic EQ ® , Audyssey Dynamic Volume ® and Audyssey LFC™ cannot be selected. These cannot be selected when you have not performed Audyssey Setup. (v p. 197) ® Switch to a sound mode other than “Direct”… -
Page 258
Contents Connections Playback Settings Tips Appendix Sound is interrupted or noise occurs During playback from the Internet radio or USB memory device, sound is occasionally interrupted. When the transfer speed of the USB memory device is slow, sound may occasionally be interrupted. The network communication speed is slow or the radio station is busy. -
Page 259
Contents Connections Playback Settings Tips Appendix No video is shown on the TV No picture appears. Check the connections for all devices. (v p. 64) Insert connection cables all the way in. Check that input connectors and output connectors are not reversely connected. Check cables for damage. -
Page 260
Contents Connections Playback Settings Tips Appendix No video from an input source such as a game console is shown on the TV. When special video signals are input from a game console, etc., the Video Conversion function may not function. Connect the input connector to the monitor output connector of the same type. -
Page 261
Contents Connections Playback Settings Tips Appendix The menu screen is not displayed on the TV The menu screen or status information screen is not displayed on the TV. The menu screen is only displayed on this unit and a TV connected with an HDMI cable. If this unit is connected to a TV using a different video output connector, operate while watching the display on this unit. -
Page 262
Contents Connections Playback Settings Tips Appendix AirPlay cannot be played back The AirPlay icon is not displayed on iTunes / iPhone / iPod touch / iPad. This unit and PC / iPhone / iPod touch / iPad are not connected to the same network (LAN). Connect it to the same LAN as this unit. (v p. 76) The firmware on iTunes / iPhone / iPod touch / iPad is not compatible with AirPlay. -
Page 263
Contents Connections Playback Settings Tips Appendix USB memory devices cannot be played back USB memory device is not recognized. Disconnect and reconnect the USB memory device. (v p. 73) Mass storage class compatible USB memory devices are supported. This unit does not support a connection through a USB hub. Connect the USB memory device directly to the USB port. The USB memory device must be formatted to “FAT32”… -
Page 264
Contents Connections Playback Settings Tips Appendix Bluetooth cannot be played back Bluetooth devices cannot be connected to this unit. The Bluetooth function in the Bluetooth device has not been enabled. See the Owner’s Manual of the Bluetooth device to enable the Bluetooth function. Bring the Bluetooth device near to this unit. -
Page 265
Contents Connections Playback Settings Tips Appendix The Internet radio cannot be played back A list of broadcasting stations is not displayed. The LAN cable is not properly connected, or the network is disconnected. Check the connection status. (v p. 76) Perform the network diagnostic mode. -
Page 266
Contents Connections Playback Settings Tips Appendix Music files on PC or NAS cannot be played back Files stored on a computer cannot be played. Files are stored in a non-compatible format. Record in a compatible format. (v p. 280) Files that are copyright protected cannot be played on this unit. The USB port of this unit cannot be used for connection to a computer. -
Page 267
Contents Connections Playback Settings Tips Appendix Various online services cannot be played Various online services cannot be played. The online service may have been discontinued. The HDMI Control function does not work The HDMI Control function does not work. Check that “HDMI Control” in the menu is set to “On”. (v p. 183) You cannot operate devices that are not compatible with the HDMI Control function. -
Page 268
Contents Connections Playback Settings Tips Appendix Cannot connect to a wireless LAN network Cannot connect to the network. The network name (SSID), password and encryption setting have not been set up correctly. Configure the network settings according to the setting details of this unit. -
Page 269
Contents Connections Playback Settings Tips Appendix When using HDMI ZONE2, the devices does not function properly When using MAIN ZONE, video output is interrupted in HDMI ZONE2. With the same input source selected for MAIN ZONE and ZONE2, when you operate MAIN ZONE, video may be interrupted in HDMI ZONE2. When using HDMI ZONE2, no video or audio is output from the TV in ZONE2. -
Page 270
Contents Connections Playback Settings Tips Appendix Update/upgrade error messages If an update/upgrade is interrupted or fails, an error message appears. Display Description Connection failed. Please check your network, then try The network connection is unstable. again. Connection to the server failed. Check your network environment and try the update again. -
Page 271: Resetting Factory Settings
Contents Connections Playback Settings Tips Appendix Resetting factory settings If the indicators are incorrect or the unit cannot be operated, restarting the unit may improve the problem. We recommend restarting the unit before returning the settings to the default settings. (v p. 251) If the operations are not improved by restarting the unit, follow the steps below.
-
Page 272: Resetting Network Settings
Contents Connections Playback Settings Tips Appendix Resetting network settings If network contents cannot be played or the unit cannot connect to the network, restarting the unit may improve the problem. We recommend restarting the unit before returning the settings to the default settings. (v p. 251) If the operations are not improved by restarting the unit, follow the steps below.
-
Page 273
Contents Connections Playback Settings Tips Appendix About HDMI HDMI is an abbreviation of High-Definition Multimedia Interface, which is an AV digital interface that can be connected to a TV or amplifier. This unit supports input and output of 3D (3 dimensional) video signals With the HDMI connection, high definition video and high quality audio of HDMI. -
Page 274
Contents Connections Playback Settings Tips Appendix Auto Lip Sync ARC (Audio Return Channel) This function can automatically correct delay between the audio and This function transmits audio signals from the TV to this unit through video. the HDMI cable and plays back the audio from the TV on this unit Use a TV that is compatible with the Auto Lip Sync function. -
Page 275
Contents Connections Playback Settings Tips Appendix o Supported audio formats Copyright protection system In order to play back digital video and audio such as BD video or DVD 2-channel Linear 2-channel, 32 kHz – 192 kHz, 16/20/24 bit video via HDMI connection, both this unit and the TV or player must to support the copyright protection system known as HDCP (High- Multi-channel 7.1-channel, 32 kHz –… -
Page 276
Contents Connections Playback Settings Tips Appendix Video conversion function This unit automatically converts the input video signals as shown in the diagram before outputting them to the TV. This unit HDMI-compatible TV Video device Output Input (IN) (MONITOR OUT) Output HDMI signal HDMI signal HDMI connector… -
Page 277
Contents Connections Playback Settings Tips Appendix This unit can convert the input video signals to the resolution that is set for “Resolution” in the menu before outputting them to the TV. (v p. 188) HDMI Output signal Input signal 480i/576i 480p/576p 720p 1080i… -
Page 278
Contents Connections Playback Settings Tips Appendix Playing back a USB memory devices This unit is compatible with MP3 ID3-Tag (Ver. 2) standard. This unit can show the artwork that was embedded by using MP3 ID3-Tag Ver. 2.3 or 2.4. This unit is compatible with WMA META tags. If the image size (pixels) of an album artwork exceeds 500 ×… -
Page 279
Contents Connections Playback Settings Tips Appendix Playing back a Bluetooth device o Maximum number of playable files and folder The limits on the number of folders and files that can be displayed by This unit supports the following Bluetooth profile. this unit are as follows. -
Page 280
Contents Connections Playback Settings Tips Appendix Playing back a file saved on a PC or NAS This unit is compatible with MP3 ID3-Tag (Ver. 2) standard. This unit can show the artwork that was embedded by using MP3 ID3-Tag Ver. 2.3 or 2.4. This unit is compatible with WMA META tags. -
Page 281
Contents Connections Playback Settings Tips Appendix Playing back Internet Radio Personal memory plus function The most recently used settings (input mode, HDMI output mode, sound o Playable broadcast station specifications mode, tone control, channel level, MultEQ ® XT32, Dynamic EQ, Dynamic Volume, Restorer and audio delay, etc.) are saved for each input source. -
Page 282
Contents Connections Playback Settings Tips Appendix Sound modes and channel output S This indicates the audio output channels or surround parameters that can be set. D This indicates the audio output channels. The output channels depend on the settings of “Speaker Config.”. (v p. 214) Channel output Front Dolby Surround… -
Page 283
Contents Connections Playback Settings Tips Appendix Channel output Front Dolby Surround Back Dolby Surround Sound mode Atmos Dolby Atmos Atmos Front Surround Front Height Top Front Top Middle Top Rear Rear Height Center Back Subwoofer Enabled Enabled Enabled Multi Ch Stereo Rock Arena Jazz Club Mono Movie… -
Page 284
Contents Connections Playback Settings Tips Appendix Sound modes and surround parameters Surround Parameter Loudness Dynamic Speaker Sound mode Frequency Dialog Control IMAX Audio Compression Virtualizer Cinema EQ Management Delay Time Effect Level Room Size DTS Neural:X IMAX Effects Settings Direct/Pure Direct (2-channel) Direct/Pure Direct (Multi-channel) DSD Direct (2-channel) DSD Direct (Multi-channel) -
Page 285
Contents Connections Playback Settings Tips Appendix Audyssey Surround Parameter Center Subwoofer Tone Restorer Level Level Dynamic Dynamic Audyssey High Pass Low Pass Subwoofer Speaker Sound mode MultEQ ® XT32 Adjust Adjust Filter Filter Mode Select Volume LFC™ Subwoofer z13z14z15 z16z17 z16z17 z16z17 Sz19… -
Page 286
Contents Connections Playback Settings Tips Appendix z1 During playback in Pure Direct mode, the surround parameters are the same as in Direct mode. z2 This item can be selected when a Dolby Digital, Dolby Digital Plus, Dolby TrueHD or Dolby Atmos signal is played. z3 This item can be selected when a Dolby Digital, Dolby Digital Plus, Dolby TrueHD, Dolby Atmos, DTS:X or DTS signal is played. -
Page 287
Contents Connections Playback Settings Tips Appendix Types of input signals, and corresponding sound modes F This indicates the default sound mode. S This indicates the selectable sound mode. 2-channel signal Multi-channel signal Dolby Dolby Dolby NOTE Sound mode Analog / (Super Dolby Dolby… -
Page 288
Contents Connections Playback Settings Tips Appendix Multi-channel signal 2-channel signal Dolby Dolby Dolby Sound mode NOTE (Super Dolby Dolby IMAX IMAX DTS ES DTS ES (Super Analog / multi- Digital Digital Digital DTS:X DTS-HD (-HD) Audio Atmos TrueHD DTS:X Express Dscrt6.1 Mtrx6.1 Audio… -
Page 289
Contents Connections Playback Settings Tips Appendix z1 This item can be selected when using any of the Surround Back, Front Height, Top Front, Top Middle, Top Rear, Rear Height, Front Dolby, Surround Dolby or Back Dolby speaker. z2 The default sound mode for the AirPlay playback is “Direct”. z3 This can be selected when the Dolby Atmos signal contains the Dolby TrueHD signal. -
Page 290
Contents Connections Playback Settings Tips Appendix Explanation of terms o Audyssey Audyssey LFC™ (Low Frequency Containment) Audyssey LFC™ solves the problem of low frequency sounds disturbing Audyssey Dynamic EQ ® people in neighboring rooms or apartments. Audyssey LFC™ dynamically Audyssey Dynamic EQ ®… -
Page 291
Contents Connections Playback Settings Tips Appendix o Dolby Dolby Digital Dolby Digital is a multi-channel digital signal format developed by Dolby Dolby Atmos Laboratories. Introduced first in the cinema, Dolby Atmos brings a revolutionary sense of A total of 5.1-channels are played: 3 front channels (“FL”, “FR” and “C”), 2 dimension and immersion to the Home Theater experience. -
Page 292
Contents Connections Playback Settings Tips Appendix Dolby Speaker Technology (Dolby Atmos Enabled speakers) Speaker Virtualizer A convenient alternative to speakers built into the ceiling, Dolby Atmos Dolby Atmos height virtualization is a digital signal processing solution that Enabled speakers employ the ceiling above you as a reflective surface for leverages Dolby’s deep understanding of human audio perception to reproducing audio in the height plane above the listener. -
Page 293
Contents Connections Playback Settings Tips Appendix o DTS DTS-ES™ Discrete 6.1 DTS-ES™ Discrete 6.1 is a 6.1-channel discrete digital audio format Dialog Control adding a surround back (SB) channel to the DTS digital surround sound. Gives you control of the listening experience. You can lift the dialog out Decoding of conventional 5.1-channel audio signals is also possible from the background sounds when clarity and intelligibility are desired. -
Page 294
Contents Connections Playback Settings Tips Appendix DTS-HD High Resolution Audio DTS Neural:X DTS-HD High Resolution Audio is an improved version of the conventional Enables an immersive audio experience for older content. DTS Neural:X DTS, DTS-ES and DTS 96/24 signals formats, compatible with sampling can upmix your stereo, 5.1 or 7.1 content to take full advantage of all frequencies of 96 or 48 kHz and up to 7.1-channels of discrete digital speakers in your surround sound system. -
Page 295
Contents Connections Playback Settings Tips Appendix o Audio THIS SOFTWARE IS PROVIDED BY THE COPYRIGHT HOLDERS AND CONTRIBUTORS “AS IS” AND ANY EXPRESS OR IMPLIED WARRANTIES, INCLUDING, BUT NOT LIMITED TO, THE IMPLIED Apple Lossless Audio Codec WARRANTIES OF MERCHANTABILITY AND FITNESS FOR A This is a codec for lossless audio compression method developed by PARTICULAR PURPOSE ARE DISCLAIMED. -
Page 296
Contents Connections Playback Settings Tips Appendix MPEG (Moving Picture Experts Group), MPEG-2, MPEG-4 Speaker impedance These are the names for digital compression format standards used for This is an AC resistance value, indicated in Ω (ohms). the encoding of video and audio. Video standards include “MPEG-1 Greater power can be obtained when this value is smaller. -
Page 297
Contents Connections Playback Settings Tips Appendix o Video o Network AirPlay ISF (Imaging Science Foundation) is an organization that certifies video AirPlay sends (plays) contents recorded in iTunes or on an iPhone/iPod technicians who are then qualified to carry out calibration and adjustment touch/iPad to a compatible device via the network. -
Page 298
Contents Connections Playback Settings Tips Appendix o Others WPA-PSK/WPA2-PSK (Pre-shared Key) This is a simple authentication system for mutual authentication when a HDCP preset character string matches on the wireless LAN access point and When transmitting digital signals between devices, this copyright client. -
Page 299
Contents Connections Playback Settings Tips Appendix Trademark information Manufactured under license from Audyssey Laboratories™. U.S. and Apple, AirPlay, iPad, iPad Air, iPad Pro and iPhone are trademarks of foreign patents pending. Audyssey MultEQ ® XT32, Audyssey Dynamic Apple Inc., registered in the U.S. and other countries. ®… -
Page 300
Contents Connections Playback Settings Tips Appendix The terms HDMI, HDMI High-Definition Multimedia Interface, and the For DTS patents, see http://patents.dts.com. Manufactured under HDMI Logo are trademarks or registered trademarks of HDMI Licensing license from DTS, Inc. DTS, the Symbol, DTS and the Symbol together, Administrator, Inc. -
Page 301
Contents Connections Playback Settings Tips Appendix Specifications o Audio section Power amplifier Rated output: Front: 105 W + 105 W (8 Ω/ohms, 20 Hz – 20 kHz with 0.08 % T.H.D.) 135 W + 135 W (6 Ω/ohms, 1 kHz with 0.7 % T.H.D.) Center: 105 W (8 Ω/ohms, 20 Hz –… -
Page 302
Contents Connections Playback Settings Tips Appendix Analog Input sensitivity: 200 mV Frequency response: 10 Hz – 100 kHz — +1, –3 dB (Direct mode) S/N: 100 dB (IHF–A weighted, Direct mode) Distortion: 0.008 % (20 Hz – 20 kHz) (Direct mode) Rated output: 1.2 V Digital… -
Page 303
Contents Connections Playback Settings Tips Appendix o Video section Color component video connector Input/output level and impedance: Y signal — 1 Vp-p, 75 Ω/ohms signal — 0.7 Vp-p, 75 Ω/ohms signal — 0.7 Vp-p, 75 Ω/ohms Frequency response: 5 Hz – 60 MHz — 0, –3 dB o Tuner section [FM] [AM]… -
Page 304
Contents Connections Playback Settings Tips Appendix o Wireless LAN section Network type (wireless LAN standard): Conforming to IEEE 802.11a/b/g/n (Wi-Fi ® compliant) Security: WEP 64 bit, WEP 128 bit WPA/WPA2-PSK (AES) WPA/WPA2-PSK (TKIP) Used frequency range: 2.4 GHz, 5 GHz z1 The Wi-Fi CERTIFIED Logo and the Wi-Fi CERTIFIED On-Product Logo are registered trademarks of the Wi-Fi Alliance. -
Page 305
Contents Connections Playback Settings Tips Appendix o Bluetooth section Communications system: Bluetooth Specification Version 4.1 Transmission power: Bluetooth Specification Power Class 1 Maximum communication range: Approx. 98.4 ft/30 m in line of sight Used frequency range: 2.4 GHz Modulation scheme: FHSS (Frequency-Hopping Spread Spectrum) Supported profiles: A2DP (Advanced Audio Distribution Profile) 1.2… -
Page 306
Contents Connections Playback Settings Tips Appendix Dimensions (Unit : in. (mm)) 17 1/8 (434) 2 3/8 (60) 1 7/8 (45) 13 5/8 (344) 1 7/8 (45) Weight: 26 lbs 11 oz (12.1 kg) Front panel Display Rear panel Remote Index… -
Page 307
Contents Connections Playback Settings Tips Appendix Index Bi-amp …………58 Firmware Update ………. 240 Bluetooth device ……….89 FM/AM antenna ……..74, 93 v Numerics Blu-ray Disc player ……..70, 83 Front panel …………. 16 11.1-channel ……….54 3D …………..273 4K ………….. -
Page 308: Table Of Contents
Contents Connections Playback Settings Tips Appendix Input Assign ……….193 NAS …………. 102 Rear panel …………21 Input settings ……..160, 193 Network settings ………. 224 Remote control unit ……..25 Input signal ……….. 287 Resetting factory settings ……271 Input source ………..
-
Page 309
Contents Connections Playback Settings Tips Appendix Tips ………….. 249 Web control ……….153 Troubleshooting ……….. 251 Wi-Fi settings ……….225 TV …………64, 66, 67 Wired LAN ……….76, 224 Wireless LAN ……… 77, 225 USB memory device …….. 73, 84 ZONE2 ……….. -
Page 310
3520 10688 00AD Copyright © 2019 D&M Holdings Inc. All Rights Reserved.

PDF инструкция · 321 страниц(ы) английский
инструкцияDenon AVR-X3600H

.
AVR-X3600H
INTEGRATED NETWORK AV RECEIVER
Owner’s Manual
Contents Connections Playback Settings Tips Appendix
1
Front panel Display Rear panel Remote Index
Посмотреть инструкция для Denon AVR-X3600H бесплатно. Руководство относится к категории приемники, 4 человек(а) дали ему среднюю оценку 7.3. Руководство доступно на следующих языках: английский. У вас есть вопрос о Denon AVR-X3600H или вам нужна помощь? Задайте свой вопрос здесь
- Connection 1 : TV equipped with an HDMI connector and
- Connection 2 : TV equipped with an HDMI connector and
- Connection 3 : TV equipped without an HDMI connector
- synced devices (AirPlay 2)
- 4K Signal Format
- ZONE2 Setup
- When using HDMI ZONE2, the devices does not function properly
- v p. 291)
- (v p. 167)
- v p. 294)
- v p. 294)
- v p. 294)
- v p. 176)
- v p. 198)
- v p. 188)
- v p. 155)
- v p. 115)
- v p. 88)
- v p. 126)
- v p. 82)
- v p. 181)
- v p. 183)
- (v p. 229)
- v p. 82)
- v p. 9)
- v p. 19)
- v p. 83)
- v p. 96)
- v p. 157)
- v p. 157)
- v p. 239)
- v p. 147)
- (v p. 200)
- v p. 71)
- (v p. 73)
- v p. 195)
- v p. 216)
- v p. 174)
- v p. 145)
- v p. 83)
- (v p. 195)
- (v p. 157)
- v p. 77)
- (v p. 79)
- v p. 66)
- v p. 67)
- v p. 69)
- v p. 70)
- v p. 78)
- v p. 76)
- v p. 69)
- “Connecting a DVD player or Blu-ray Disc player” (v p. 70)
- “Connection 1 : TV equipped with an HDMI connector and
- Audio Return Channel)” (v p. 64)
- v p. 66)
- v p. 69)
- “Connecting a DVD player or Blu-ray Disc player” (v p. 70)
- v p. 80)
- v p. 74)
- “Connecting a set-top box (Satellite tuner/cable TV)” (v p. 69)
- v p. 70)
- “Connecting a turntable” (v p. 72)
- v p. 72)
- v p. 36)
- “Connecting the subwoofer” (v p. 37)
- v p. 62)
- v p. 156)
- “Connection 3 : TV equipped without an HDMI
- connector” (v p. 67)
- “Connecting a set-top box (Satellite tuner/cable TV)” (v p. 69)
- “Connecting a DVD player or Blu-ray Disc player” (v p. 70)
- v p. 157)
- v p. 163)
- v p. 82)
- “Playback in ZONE2” (v p. 157)
- (v p. 96)
- v p. 83)
- “Turning off the sound temporarily (Muting) (ZONE2)” (v p. 158)
- v p. 244)
- v p. 93)
- v p. 147)
- v p. 127)
- v p. 9)
- v p. 145)
- v p. 82)
- “Playback in ZONE2” (v p. 157)
- v p. 232)
- “Adjusting the volume” (v p. 83)
- v p. 158)
- v p. 163)
- v p. 167)
- v p. 298))
- v p. 215)
- (v p. 208)
- v p. 208)
- v p. 282) for the sound
- v p. 210)
- v p. 210)
- v p. 212)
- v p. 210)
- (v p. 212)
- v p. 210)
- v p. 212)
- v p. 211)
- v p. 212)
- v p. 210)
- v p. 53)
- v p. 211)
- v p. 212)
- v p. 210)
- v p. 53)
- v p. 211)
- v p. 212)
- v p. 210)
- v p. 53)
- v p. 208)
- v p. 211)
- v p. 57)
- v p. 211)
- v p. 57)
- v p. 211)
- v p. 57)
- v p. 208)
- v p. 212)
- v p. 212)
- v p. 212)
- v p. 64)
- v p. 66)
- v p. 67)
- v p. 183)
- “Connecting a set-top box (Satellite tuner/cable TV)” (v p. 69)
- “Connecting a DVD player or Blu-ray Disc player” (v p. 70)
- v p. 71)
- “Connecting a turntable” (v p. 72)
- v p. 193)
- v p. 181)
- v p. 84).
- v p. 92))
- (v p. 225)
- v p. 224)
- v p. 173)
- v p. 127)
- v p. 278) for details.
- (Channel Level Adjust)” (v p. 122)
- v p. 123)
- Select)” (v p. 124)
- “Playing the same music in all zones (All Zone Stereo)” (v p. 126)
- v p. 22)
- v p. 90)
- (Channel Level Adjust)” (v p. 122)
- “Adjusting the tone (Tone)” (v p. 123)
- Select)” (v p. 124)
- “Playing the same music in all zones (All Zone Stereo)” (v p. 126)
- v p. 229)
- antennas” (v p. 74))
- “Tuning in by entering the frequency (Direct Tune)” (v p. 94)
- “Changing the tune mode (Tune Mode)” (v p. 95)
- Memory)” (v p. 95)
- Memory)” (v p. 96)
- Name)” (v p. 97)
- “Skipping preset broadcast stations (Preset Skip)” (v p. 98)
- v p. 122)
- v p. 123)
- v p. 124)
- v p. 126)
- v p. 93))
- v p. 281) for details.
- “Adding to HEOS Favorites” (v p. 120)
- v p. 122)
- v p. 123)
- v p. 124)
- “Playing the same music in all zones (All Zone Stereo)” (v p. 126)
- v p. 280).
- (Channel Level Adjust)” (v p. 122)
- v p. 123)
- Select)” (v p. 124)
- “Playing the same music in all zones (All Zone Stereo)” (v p. 126)
- v p. 231) in the
- v p. 229)
- v p. 181)
- v p. 175)
- v p. 181)
- (v p. 187)
- (v p. 181)
- v p. 123)
- v p. 171)
- v p. 174)
- v p. 175)
- v p. 176)
- v p. 177)
- v p. 167)
- (v p. 167)
- v p. 216)
- v p. 165)
- corresponding sound modes” (v p. 287).
- corresponding sound modes” (v p. 287).
- v p. 167)
- corresponding sound modes” (v p. 287).
- v p. 167)
- corresponding sound modes” (v p. 287).
- v p. 183)
- v p. 183)
- v p. 185)
- v p. 185)
- v p. 149)
- v p. 82)
- v p. 83)
- v p. 127)
- v p. 174)
- v p. 171)
- v p. 122)
- v p. 124)
- v p. 125)
- v p. 186)
- v p. 126)
- (v p. 238)
- v p. 76)
- (v p. 229)
- (v p. 224)
- v p. 155)
- v p. 156)
- v p. 156)
- v p. 208)
- v p. 237)
- (v p. 237)
- (v p. 238)
- v p. 220)
- v p. 220)
- v p. 284).
- v p. 222)
- v p. 187)
- v p. 187)
- v p. 173)
- v p. 173)
- “Explanation of terms” (v p. 290).
- v p. 123)
- v p. 175)
- v p. 197)
- v p. 174)
- (v p. 177)
- v p. 187)
- v p. 194)
- v p. 179)
- v p. 179)
- v p. 181), “ HDMI
- Control ” (v p. 183))
- v p. 142)
- v p. 193)
- v p. 181),
- v p. 183))
- v p. 181), “ HDMI
- v p. 183))
- v p. 142)
- v p. 183)
- (v p. 183)
- v p. 194)
- (v p. 183)
- v p. 183)
- v p. 183)
- v p. 194)
- v p. 188),
- v p. 188), “ Progressive Mode ” (
- v p. 189), “ Aspect
- v p. 189))
- v p. 187), “ i/p Scaler ” (
- v p. 187),
- v p. 188), “ Sharpness ” (
- v p. 188), “ Progressive
- v p. 189), “ Aspect Ratio ” (
- v p. 189))
- v p. 187), “ i/p Scaler ” (
- v p. 187), “ Resolution ” (
- v p. 188),
- v p. 188), “ Progressive Mode ” (
- v p. 189), “ Aspect
- v p. 189))
- v p. 188)
- v p. 243)
- v p. 243)
- v p. 276)
- v p. 188)
- v p. 187)
- (v p. 187)
- (v p. 187)
- (v p. 187)
- v p. 183), “ ARC ” (
- v p. 183))
- (v p. 193)
- v p. 208)
- (v p. 174)
- v p. 200).
- v p. 208))
- v p. 205). Check any related items, and
- (v p. 206).
- v p. 174)
- (v p. 223)
- v p. 208), “Floor” — “ Layout ” (
- v p. 210))
- v p. 208), “ Speaker
- v p. 214))
- v p. 122)
- v p. 222)
- v p. 222)
- v p. 214)
- v p. 214)
- v p. 168)
- v p. 215)
- v p. 214)
- v p. 168)
- v p. 168)
- v p. 210)
- v p. 225)
- (v p. 76)
- v p. 173)
- (v p. 173)
- v p. 237)
- (v p. 173)
- v p. 237)
- (v p. 173)
- OUT jack” (v p. 79).
- v p. 270)
- v p. 270)
- v p. 76)
- v p. 245)
- factory settings” (v p. 271), and for details on resetting the network settings to
- v p. 272).
- v p. 173), “ Volume Limit ” (
- v p. 237))
- v p. 173), “ Power On
- Volume ” (v p. 237))
- v p. 222)
- v p. 164)
- v p. 175)
- v p. 176)
- v p. 197)
- v p. 124)
- v p. 196)
- v p. 126)
- v p. 187)
- v p. 80)
- v p. 145)
- v p. 235)
- v p. 298)
- v p. 36)
- v p. 82)
- v p. 9)
- v p. 9)
- v p. 9)
- v p. 163)
- v p. 239)
- v p. 130)
- v p. 36)
- v p. 36)
- v p. 36)
- v p. 82)
- v p. 83)
- v p. 83)
- v p. 193)
- v p. 173)
- v p. 64)
- v p. 181)
- v p. 142)
- v p. 194)
- v p. 214)
- v p. 208)
- v p. 167)
- v p. 216)
- v p. 215)
- v p. 215)
- v p. 222)
- v p. 222)
- v p. 69)
- v p. 197)
- v p. 129)
- v p. 171)
- v p. 129)
- v p. 237)
- v p. 74)
- v p. 74)
- v p. 74)
- v p. 83)
- v p. 232)
- v p. 76)
- v p. 225)
- v p. 64)
- v p. 193)
- v p. 82)
- v p. 193)
- v p. 243)
- v p. 275)
- v p. 276)
- (v p. 275)
- v p. 244)
- (v p. 128)
- v p. 192)
- v p. 76)
- v p. 116)
- v p. 73)
- v p. 84)
- v p. 278)
- v p. 76)
- v p. 281)
- v p. 227)
- v p. 227)
- v p. 227)
- v p. 101)
- v p. 280)
- v p. 224)
- v p. 76)
- v p. 280)
- v p. 183)
- v p. 142)
- v p. 142)
- v p. 142)
- (v p. 64)
- v p. 226)
- (v p. 226)
- v p. 157)
- v p. 157)
- v p. 237)
- v p. 251)
- v p. 245)
- v p. 246)
- v p. 251)
- v p. 245)
- v p. 246)
- v p. 188)
- v p. 214)
- v p. 283)
- v p. 222)
- v p. 216)
- v p. 170)
- v p. 286)
- v p. 286)
- v p. 168)
- v p. 175)
- v p. 215)
- v p. 215)
- v p. 174)
- v p. 222)
- v p. 214, 222)
- v p. 289)
- v p. 289)
- v p. 167)
- v p. 167)
- v p. 167)
- 11.1-channel
- 3D
- 4K
- 5.1-channel , 42
- 7.1-channel , 43
- 9.1-channel
- AirPlay
- All Zone Stereo
- Audio formats , 278, 280, 281
- Audio settings , 164
- Audyssey Dynamic EQ®
- Audyssey Dynamic Volume®
- Audyssey LFC™
- Audyssey MultEQ® XT32
- Audyssey settings , 199
- Audyssey Sub EQ HT™
- Audyssey® Setup
- Auto sound mode
- Auto Standby
- Bi-amp
- Firmware Update
- Input Assign
- NAS
- Network settings
- Rear panel
- Tips
- Web control

Главная
| Denon | |
| AVR-X3600H | AVRX3600HBKE2 | |
| приемник | |
| 4951035069745 | |
| английский | |
| Руководство пользователя (PDF), Техническая спецификация (PDF) |
Аудио
| Тип ресивера | Объемный звук |
| Выходные звуковые каналы | 9.2 канала |
| Pre-out подключение | Да |
| Pre-out каналы | 11.2 |
| Диапазон частот | 20 — 20000 Hz |
| Выходная мощность на канал (20-20кГц@8 Ом) | 105 W |
| Динамическая мощность на канал (6 Ом) | 180 W |
Технические характеристики
| Аудио декодеры | DTS-HD Master Audio, Dolby Atmos, Dolby Surround, Dolby TrueHD |
| Звуковой усилитель | Да |
| Цвет товара | Черный |
| Пульт дистанционного управления | Да |
| Поддержка Multi-Room Streaming (MRS) | Да |
| AirPlay | Да |
| HDCP | Да |
| Версия HDCP | 2.2 |
| Графический интерфейс пользователя | Да |
| Реверсивный звуковой канал | Да |
| ECO режим | Да |
| Таймер засыпания | Да |
| Док-станция для Apple | Нет |
| Дисплей | — |
Форматы файлов
| Поддерживаемые форматы аудио | AAC, ALAC, FLAC, MP3, WAV, WMA |
Радио
| Интернет-радио | Да |
| Поддерживаемые интернет-радио службы | Amazon Music, Deezer, Pandora, Spotify, Tidal, TuneIn |
| Поддерживаемые диапазоны радио | AM, FM |
| Поддержка RDS | Да |
Сеть
| Подключение Ethernet | Да |
| Wi-Fi | Да |
| Bluetooth | Да |
Входные соединения
| Количество портов Ethernet LAN ( RJ-45) | 1 |
| Вход HDMI | 8 |
| Композитный видео вход | 3 |
| Компонентный видео вход (YPbPr/YCbCr) | 2 |
| Цифровой оптический аудио вход | 2 |
| Цифровой коаксиальный аудио вход | 2 |
Выходные соединения
Видео
| Увеличение масштаба видео | Да |
| Поддерживаемые видеоформаты | 480i, 576i |
| 3D | Да |
Энергопитание
| Потребляемая мощность (в обычном режиме) | 600 W |
| Потребляемая мощность (в режим ожидания) | 0.1 W |
Вес и размеры
| Ширина | 434 mm |
| Глубина | 379 mm |
| Высота | 167 mm |
| Вес | 12100 g |
Данные об упаковке
| Размеры упаковки (ШхГхВ) | 519 x 478 x 242 mm |
| Масса брутто | 14600 g |
Содержимое упаковки
| Руководство пользователя | Да |
| Батарейки в комплекте | Да |
| FM антенна | Да |
| AM антенна | Да |
| Поставляемые кабели | Кабель переменного тока |
Устройства хранения данных
Оптический привод
| Встроенный оптический привод | Нет |
Порты и интерфейсы
| Тип подключения колонок | Винтовая клемма |
показать больше
Не можете найти ответ на свой вопрос в руководстве? Вы можете найти ответ на свой вопрос ниже, в разделе часто задаваемых вопросов о Denon AVR-X3600H.
Когда звук считается слишком громким?
Могут ли устройства разных марок подключаться друг к другу при помощи Bluetooth?
Как лучше всего выполнять чистку приемник?
Какой вес Denon AVR-X3600H?
Какая высота Denon AVR-X3600H?
Какая ширина Denon AVR-X3600H?
Какая толщина Denon AVR-X3600H?
Инструкция Denon AVR-X3600H доступно в русский?
Не нашли свой вопрос? Задайте свой вопрос здесь
3-04-2020, 23:09
Время прочтения:
Содержание:
- 1 Что представляет собой Denon AVR-X3600H?
- 2 Дизайн, соединения и управление
- 3 Функции
- 4 Качество работы
- 5 9.2-канальный AV-ресивер Denon AVR-X3600H – заключение
- 6 Вердикт
Что представляет собой Denon AVR-X3600H?
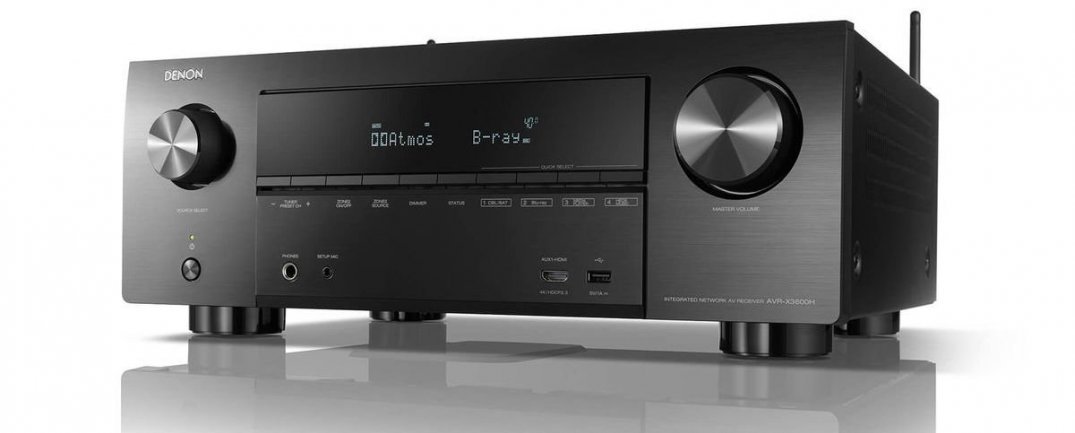
Модель Denon AVR-X3600H – это AV-ресивер средней категории с девятью каналами усиления, 11.2 каналами процессинга и столькими же каналами предварительного усиления. Он способен воспроизводить форматы Dolby Atmos и DTS:X, а также оснащен автоматическим эквалайзером Audissey MultEQ XT32. Среди других функций – поддержка eARC, AirPlay 2, IMAX Enhanced, голосовое управление посредством Alexa, Siri и Google Assistant, а также наличие системы «мультирум» Denon HEOS. Дополнительно в ресивере используется технология Dolby Atmos Hieght Virtualizer, имитирующая верхние каналы, и имеются продвинутые многозональные функции.
По сравнению с предшествующей моделью AVR-X3500 в новинке сделан шаг вперед с применением нового алюминиевого теплоприемника и трансформатора питания. Также здесь мы видим увеличение с семи каналов усиления в Х3500 до девяти каналов в Х3600. С такой же конструкцией, питанием, теплоприемником и двумя дополнительными каналами усиления, как и в модели более высокого класса X4500H, рассматриваемый в данном обзоре ресивер имеет значительно более высокое качество звука, чем его предшественник.
И все это великолепие можно приобрести по цене менее чем 70 тыс. руб. Нет ли здесь подвоха? Попробуем разобраться.
Дизайн, соединения и управление
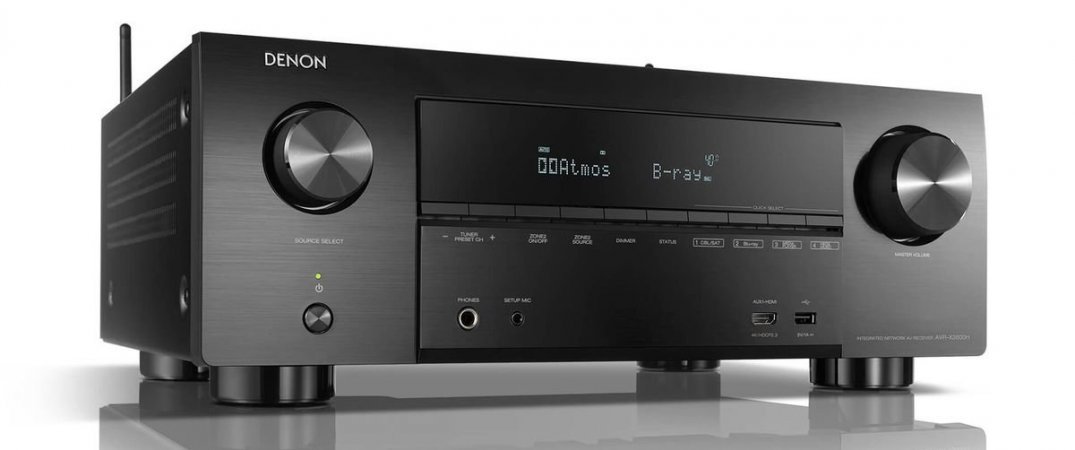
Внешний вид Denon X3600H вполне традиционный и выполнен в дизайне, привычным для последних десятилетий. Лицевая часть с большим дисплеем в центре имеет отделку с эффектом отшлифованного металла. Под дисплеем находится панель такого же размера. Создается впечатление что это крышка, под которой расположены соединения и кнопки управления, как в более дорогих моделях Denon, но в случае с Х3600Н это просто декорация.
Информация на дисплее хорошо читается, к тому же его яркость регулируется, и его можно вовсе отключить. Непосредственно под ним находятся кнопки управления тюнером, зонами и кнопки быстрого выбора источника сигнала. Ниже расположены выходы для наушников и микрофона, а также входы HDMI и USB.
На левой стороне передней панели размещена вращающаяся ручка выбора источника сигнала с кнопкой питания под ней, а на правой – большая ручка громкости. Весь корпус опирается на широкие поглощающие вибрацию ножки. Дизайн выполнен в аккуратном классическом стиле. Может он и немного устарел, но претензий не вызывает.
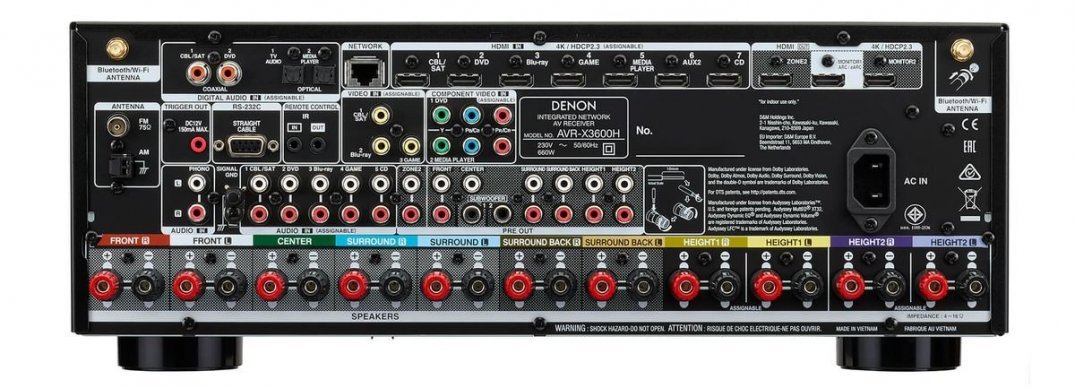
На задней стороне расположены основные соединения. Как и во всех моделях Denon, они сгруппированы в логические блоки, а выходы для колонок имеют цветовую кодировку. Для удобства прилагается набор стикеров для кабелей, что облегчает процесс подключения. Семь входов HDMI расположены на самом верху (восьмой находится спереди), а рядом установлены три выхода HDMI, центральный из которых поддерживает технологию eARC/ARC. Все порты HDMI соответствуют стандарту защиты данных HDСP 2.3 и имеют версию 2.0b, способную передавать сигнал 4K частотой 60р в форматах HDR10, HLG и Dolby Vision. Под ними в центре расположены три композитных и два компонентных входа.
В Х3600Н также предусмотрены два оптических и два коаксиальных цифровых аудиовхода, пять аналоговых входов RCA и один вход фонокорректора. Также имеется триггерный выход на 12 Вт, RS232C, инфракрасный вход-выход, выход для антенн AM/FM и сетевое соединение Ethernet.
Пожалуй, самой важной особенностью задней панели является наличие 11.2 выходов предварительного усиления (pre out), позволяющие либо подключить 2-канальный усилитель для создания полной конфигурации 7.2.4 или усилить все действующие каналы. В обоих случаях будут задействованы все 11.2 внутренних каналов процессинга.
И, наконец, нижняя полоса задней панели отведена под клеммы для колонок в цветной кодировке. Они подходят для штекеров типа «лопатка», «банан» и для голых проводов.
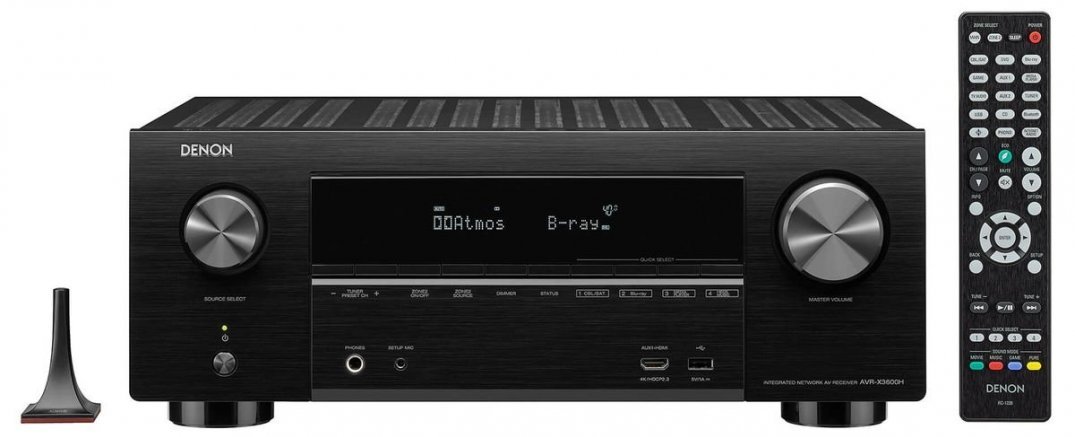
Пульт управления X3600H сделан из пластика и имеет внушительную длину с кнопками, расположенными в логическом порядке. Единственное наше замечание касательно него заключается в отсутствии подсветки, что странно для устройства, предназначенного для использования в домашнем кинозале. Тем не менее, пульт удобно сидит в руке и прост в управлении.
Функции
Denon AVR-X3600H – это ресивер со множеством функций и девятью каналами усиления (135 Вт на канал при нагрузке 6 Ом на частоте 1 кГц и при коэффициенте гармонических искажений 0,7% на двух каналах или 105 Вт на канал при нагрузке 8 Ом, частоте 20 Гц – 20 кГц, THD 0,08% на двух каналах). Количество каналов процессинга составляет 11.2, так же, как и количество каналов предварительного усиления, что позволяет использовать внешний усилитель для создания конфигурации 7.2.4 Atmos.
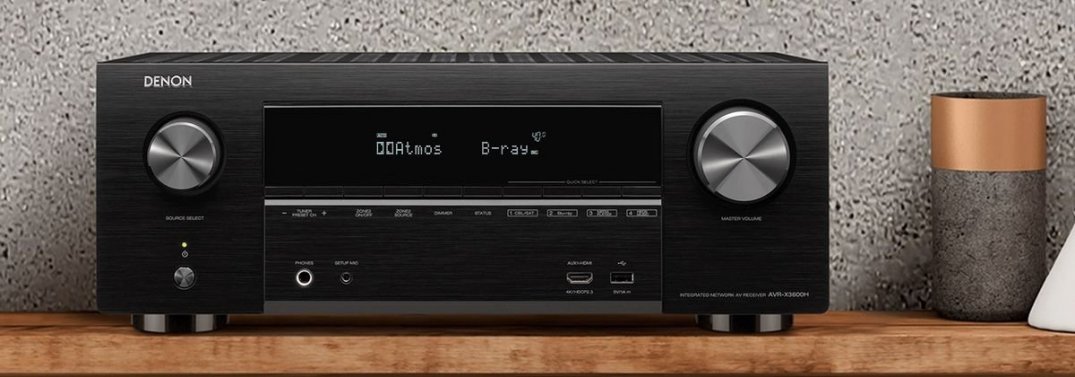
Что касается поддерживаемых аудиоформатов, то в списке присутствует объемный звук Dolby Atmos и DTS:X, однако нет Auro-3D, отведенного для X4500H и более дорогих моделей. Далее, имеются DTS: VirtualX и новая технология Dolby Atmos Height Virtualization, создающая эффект наличия верхних колонок для тех, у кого нет возможности потолочного монтажа в своей комнате. Она работает со всеми пространственными конфигурациями от 2.1 до 7.1. Также поддерживается формат IMAX Enhanced, суть которого заключается в использовании специального кодека DTS для усиления низкочастотных и верхних звуковых эффектов.
Для улучшения качества аудио в X3600H используется 32-разрядный преобразователь ADM D/A, а также включена поддержка различных несжатых файлов высокого разрешения: ALAC, FLAC и WAV качеством до 24-бит/192 кГц. Стоит отметить и способность воспроизводить файлы DSD частотой 2,8/5,6 мГц через вход USB или по сети.
Что касается автоматического эквалайзера, то в Х3600Н установлен Audyssey MultEQ XT32, включающий функции Dynamic Volume, Dynamic EQ, LFC и Sub EQ HT. Если вы хотите применить к нему дополнительные настройки, то вы можете вручную оптимизировать Audyssey с помощью редактора MultEQ Editor, приобретаемого за отдельную плату в качестве приложения для iOS или Android.
Переходим к соединениям видео. Все разъемы HDMI имеют версию 2.0b и соответствуют стандарту HDCP 2.3. Они поддерживают разрешение 4K/60p, цветовую дискретизацию 4:4:4 и форматы Dolby Vision, HLG и HDR10. Однако в этом списке отсутствует HDR10+. С помощью функции eARC (улучшенный реверсивный аудиоканал) Х3600Н может принимать несжатое объемное аудио из приложений в телевизоре. Ресивер также поддерживает технологию ALLM (автоматический переход в режим низкой задержки входящего сигнала), обеспечивающую бесперебойное воспроизведение игр на экране совместимого телевизора. Х3600Н также обеспечивает полную поддержку технологии калибровки ISFccc с возможностью тонкой настройки дневного и ночного режима просмотра.
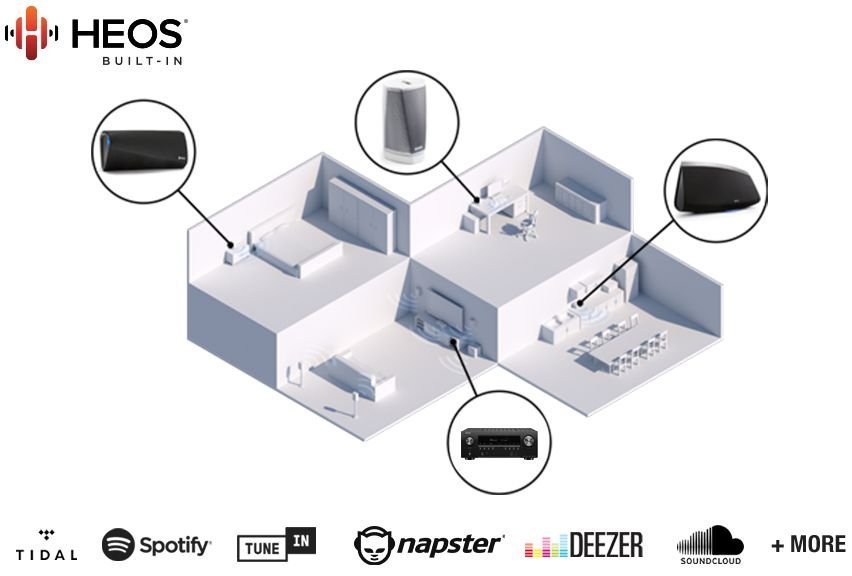
Как и следует ожидать, Х3600Н способен работать с голосовыми помощниками Amazon Alexa, Google Assistant и Apple Siri. Они позволяют осуществлять управление отдельными функциями, например, выбор источника сигнала, регулировка громкости и переход к следующей композиции. Встроенная технология HEOS обеспечивает воспроизведение музыки из стриминговых платформ Spotify, Amazon Music, TuneIn, SoundCloud, Tidal и других. Она также позволяет добавить к вашей конфигурации дополнительные беспроводные колонки для установки по всему дому. Организовав с их помощью многокомнатную и многозонную систему, вы получаете множество вариантов прослушивания и просмотра различного контента в различных комнатах. Мы не будем останавливаться на этом, так как вы сами сможете ознакомиться с этой технологией на официальном сайте Denon. Если вы не сторонник голосового управления, то вы сможете управлять Х3600Н также и с помощью сторонних приложений типа Control4.
Качество работы
Если дизайн AV-ресиверов мало изменился за последние годы, то в отношении электроники, процессоров, компонентов, источников питания и настроек аудиопараметров этих устройств произошел настоящий скачок. И Х3600Н с вполне доступной для своего уровня ценой ниже 70 тыс. руб. – наглядное тому подтверждение.
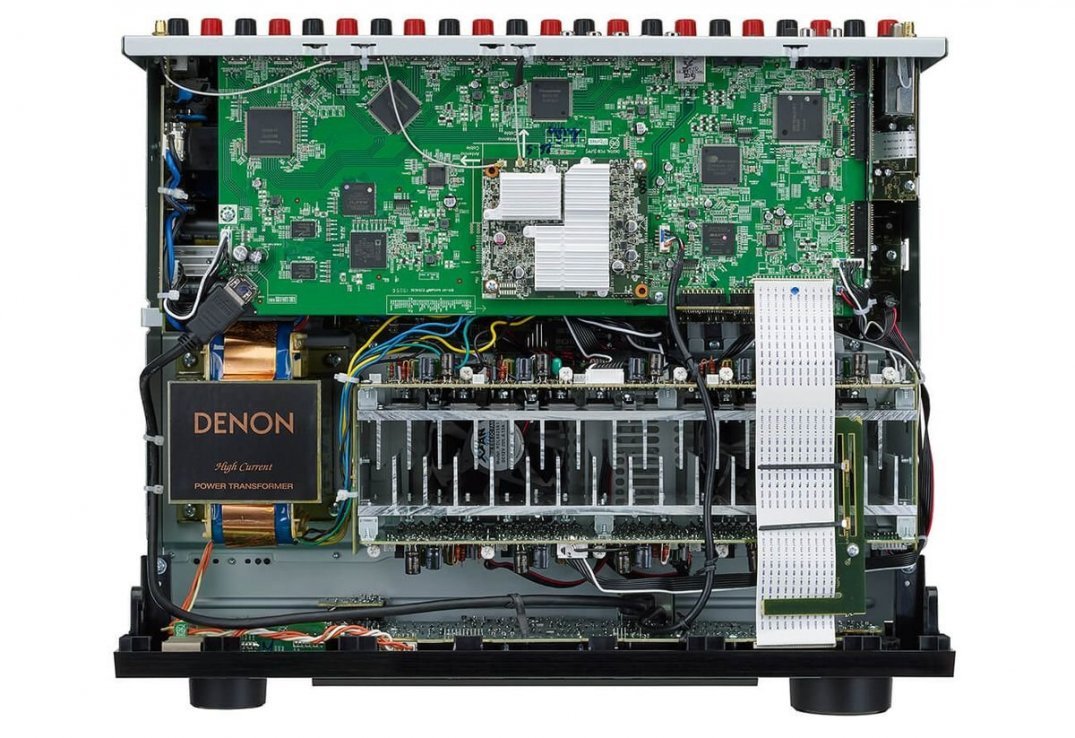
Мы начали с прослушивания музыки в двухканальной конфигурации и сразу же были впечатлены качеством этого ресивера. Наш набор оборудования, включающий колонки MK MP300 формата «левая-центральная-правая», пространственные колонки Т300 и сабвуферы МК Х12, нельзя назвать топовым, но он прекрасно подходит для тестирования домашних аудиосистем. И Х3600Н проявил себя отлично на разных уровнях громкости под этой 4-омной нагрузкой.
Альбом 2011 года New Blood Питера Гэбриела получил в свое время большую ротацию, и Denon прекрасно справился с передачей масштабных оркестровых композиций. В лучшей среди них – Red Rain – голос солиста с хрипотцой занимает центральное место в звуковой сцене, а остальное пространство заполняют инструменты. Басы звучат плотно, а струнные – звонко, но не резко. Х3600Н создал удивительно объемный концертный эффект и нам даже пришлось перепроверить, действительно ли музыка играла в режиме стерео.
Быстрая и ритмичная композиция Tribute to J.B. Family в исполнении The Last Minister, в которую великолепно вписан голос Джеймса Брауна, звучит удивительно широко и насыщенно, и Х3600Н так и тянет вас пуститься в пляс.
Какую бы музыку мы не включали на ресивере, она буквально оживает и полностью оправдывает наши высокие ожидания. Его мощности достаточно, чтобы на приличной громкости музыка ощущалась с комфортом и не срывалась. Режим стерео проявил себя великолепно, сохраняя естественность вокала и покрывая всю амплитуду частот без искажений. Нас реально впечатлила функция процессинга ресивера, точно и четко передающая звуковые эффекты.
Для тестирования многоканальных источников мы использовали третий сезон «Очень странных дел». Звуковая дорожка в конфигурации 5.1 была воспроизведена с отличной динамикой и с таким ощущением, что она вовсе не сжималась, хотя и была обработана в формате Dolby Digital Plus. Просмотр доставил нам большое удовольствие от ясных диалогов и широкой звуковой сцены с подчеркнутыми спецэффектами.
Denon также великолепно проявил себя и при воспроизведении «Затерянных в космосе» в формате Atmos из Netflix, заставив нас ощутить приятное чувство погружения благодаря верхним каналам. Мы не смогли найти каких-то замечаний к работе ресивера и не испытали никаких проблем при увеличении громкости с нашей системой МК.
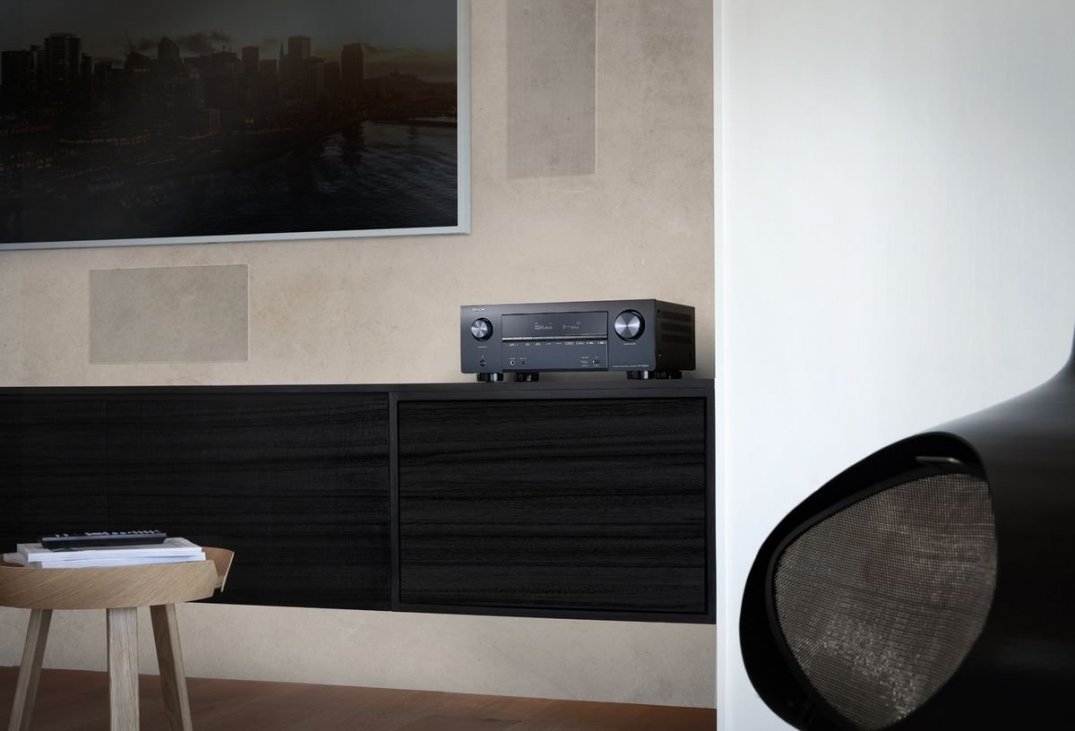
Х3600Н также впечатлил нас и при воспроизведении «Рокетмена» на диске Blu-ray 4K в формате Dolby Atmos. Музыкальные композиции прозвучали ярко и насыщенно с удивительно точной локализацией эффектов по всему акустическому пространству, таких как выкрики из толпы, овации зала и удары по клавишам при исполнении Bennie and the Jets. Мы насладились невероятно объемным звуком с глубоким эффектом погружения и великолепной динамикой. И только на достаточно большой громкости ресивер начинал испытывать некоторое напряжение ввиду нехватки запаса мощности и ограниченности усилителя. И здесь мы имеем ввиду очень большую громкость, которая вызовет дискомфорт даже у музыкального фаната. На таком предельном напряжении вы начинаете ощущать компрессию усилителей, однако подавляющее большинство пользователей вряд ли будет эксплуатировать ресивер в таком режиме. Плюс, у Х3600Н есть еще одно важное преимущество – это его резерв усиления и производительности в виде 11.2 каналов процессинга.
Еще раз хотим отметить отличное управление звуковыми эффектами и их точную локализацию в пространстве данным ресивером. Голоса воспроизводятся великолепно, будь то сцены, насыщенные диалогами, или вокал, с легкими и быстрыми переходами в широкой амплитуде громкости. Х3600Н действительно впечатлил нас своей способностью создавать звуковые сцены, передающие происходящее на экране с удивительной реалистичностью и синхронностью.
Обычно мы сравниваем качество AV-ресиверов с флагманской моделью Denon X8500H, и, хотя Х3600Н в два раза меньше, легче и в несколько раз дешевле, он порадовал нас своим высоким качеством. Да, он мог бы иметь и более высокий запас мощности, но это единственный параметр, в котором он явно уступает X8500H. Отличное воспроизведение пространственных эффектов, качественная обработка звука и широкие возможности настроек резко выделяют Х3600Н в своей «весовой категории».
9.2-канальный AV-ресивер Denon AVR-X3600H – заключение
Denon AVR-X3600H – это не просто замена своему предшественнику X3500, а реальный шаг вперед с использованием новых компонентов, функций и усилением мощности. В плане качественных характеристик он гораздо ближе к более высокому по классу X4500H.
X3600H отличает качественная сборка и широкий набор функций, присущих современным домашним кинотеатрам, включая поддержку 4K/60p/4:4:4 с видеоформатами Dolby Vision, HDR10 и HLG и поддержку объемных аудиоформатов Dolby Atmos и DTS:X. В этом списке отсутствует Auro-3D, но для подавляющего большинства пользователей этот стандарт не актуален.
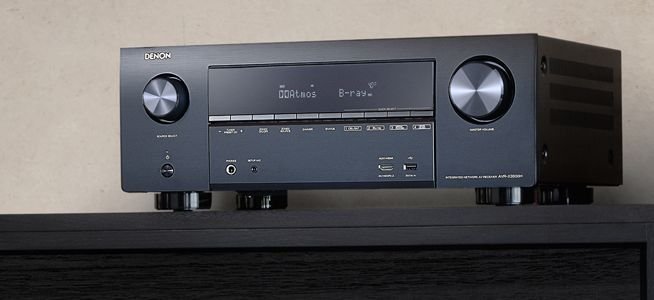
В X3600H увеличено количество каналов усиления до девяти по сравнению с семью у предшественника X3500, плюс он имеет 11.2 каналов декодирования и процессинга и 11.2 каналов предварительного усиления, что дает возможность подключить отдельный двухканальный усилитель и создать конфигурацию 7.2.4 Atmos. В нем используется новая технология воспроизведения виртуальных верхних каналов, которая реалистично имитирует наличие потолочных колонок.
Качество работы этого ресивера серьезно впечатляет, и его можно приобрести по вполне разумной для такого уровня цене. Он обладает достаточной мощью для создания широкой и глубокой звуковой сцены с отличной динамикой и плавными переходами на уровнях громкости, комфортных для большинства пользователей. Но как только вы приближаетесь к предельным значениям громкости, запас мощности X3600H иссякает. Однако найдется весьма немного меломанов, которые регулярно пользуются ресиверами в таком режиме. И, как мы уже отметили, при желании вы можете использовать 11.2 каналов предварительного усиления для увеличения мощности.
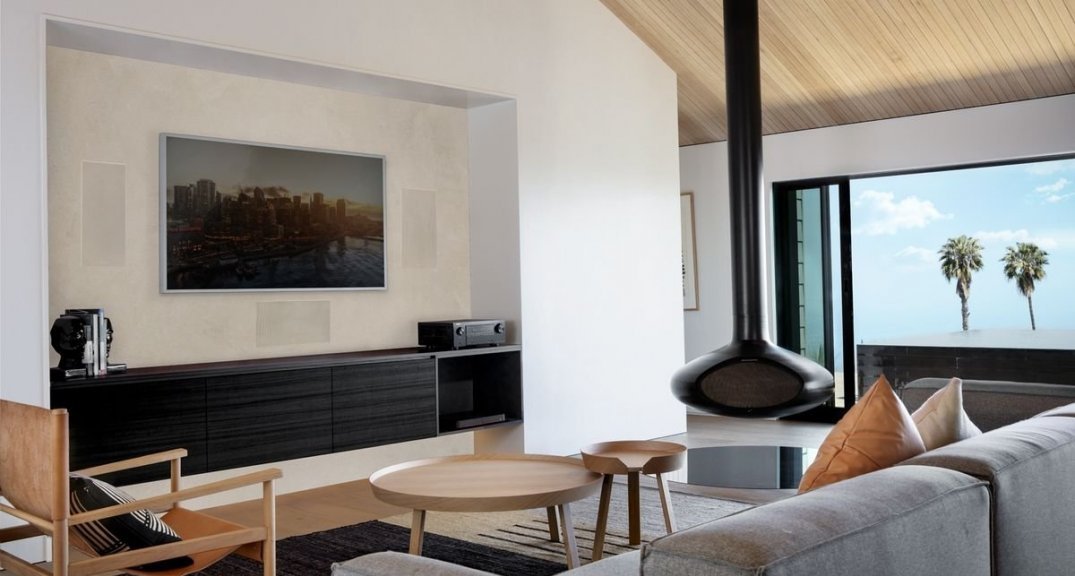
11.2-канальный процессинг Х3600Н работает великолепно и отлично передает звуковые эффекты. Данный ресивер имеет прекрасное соотношение «цена-качество» и заслуживает нашей самой положительной рекомендации.
Вердикт
Аргументы «за»
- Отличное качество звука
- Великолепная работа форматов DTS:X и Dolby Atmos
- Ресивер прекрасно справляется с функцией музыкального проигрывателя
- Наличие 11.2 каналов процессинга и предварительного усиления
- Отличное качество сборки
- Легкость управления
- Великолепное сочетание «цена-качество»
Аргументы «против»
- Нет поддержки HDR10+
- При загрузке всех каналов ресивер может испытывать недостаток мощности
- Пульт управления не имеет подсветки
Оценки по 10-бальной шкале
Общая оценка – 9
| Качество звука | 9 |
| Функциональность | 9 |
| Соединения | 9 |
| Качество сборки | 9 |
| Соотношение «цена-качество» | 9 |
Нашли ошибку? Выделите ее и нажмите ctrl+enter
Комментариев: 0
- 100
- 1
- 2
- 3
- 4
- 5
Поделиться в соц.сетях
Особенности и достоинства AV-ресивера Denon AVR-X3600H
AVR-X3600H – AV-ресиверы от именитого японского бренда Denon с 9.2-канальной конфигурацией. Аппараты имеют на борту девять дискретных усилителей, благодаря чему способны декодировать музыку 3D-звучания форматов DTS:X и DolbyAtmos с максимально возможной конфигурацией каналов 7.2.2 (7.2.4 – при наличии дополнительных стереомощников).
Основные характеристики
AV-ресиверы работают на предельной мощности 180 Вт на каждом канале. Автокалибровка выполняется через систему Audyssey MultEQ XT32. Для коррекции АЧХ поддерживается Audyssey Dynamic EQ, для оптимизации громкости – Dynamic Volume, для оптимизации низких частот – LFC, а для работы с сабвуферами предусмотрена технология Sub EQ HT.
Декодеры
Ресиверы работают с DTS Virtual:X и технологией DolbyAtmos Height Virtualization, что позволяет имитировать саунд потолочной акустики в домашних кинотеатрах без использования специализированных спикеров. Система поддерживает IMAX Enhanced с кодеками DTS, что гарантирует идентичный звук и изображение, что кинотеатры IMAX. Наличие апскейлера обеспечивает повышенное разрешение любых видео до формата 4K.
Коммутация
Аппараты оснащены восемью HDMI-входами с поддержкой 4K/60 Гц, HDCP 2.3 и стандартов HDR-видео. Система может работать в автоматическом игровом режиме ALLM вместе с приставами Xbox One. Один выход HDMI поддерживает возврат eARC для трансляции 3D-аудио (DolbyAtmos и др.) напрямую с TV-панелей. Система имеет MM-фонокорректор, блок с цифровыми входами и 11.2-канальный PreOut, а подключение спикеров осуществляется через винтовые клеммы.
Модель Denon AVR-X3600H имеет мощную систему цифровой обработки DSP, справляющаяся с 11.2-канальными сигналами, при этом каждый канал оборудован 32-битными ЦАП AKM AK4458VN. Аппараты имеют функцию стримера при поддержке FLAC/ALAC/WAV (192 кГц) и DSD (5.6 МГц) при подключении через локальную сеть или USB-разъём. Система оснащена модулями Bluetooth и Wi-Fi, поддерживается протокол AirPlay2. Ресиверы могут применяться в экосистемах HEOS, что гарантирует организацию беспроводных мультирум-инсталляций с управлением отдельными HEOS-устройствами через одно приложение.
Также поддерживается работа с потоковыми сервисами TuneIn, SpotifyConnect, Deezer, Tidal и пр. Управление устройствами AVR-X3600H от компании Denon осуществляется через дистанционный пульт, мобильное приложение или голосовыми помощниками Siri, Alexa, GoogleAssistant.
Ключевые особенности
- Дискретные усилители по 180 Вт
- Технологии DolbyAtmos, IMAX Enhanced, DTS:X
- Соединение через каналы Wi-Fi, Bluetooth, Airplay2, HEOS
- Возможность голосового управления через GoogleAssistant, Alexa, Siri
- HDMI-входы с протоколами HDCP, 4K, HDR, DolbyVision, HLG
Купить AV-ресивер Denon AVR-X3600H можно в нашем интернет-магазине Sound Systems с официальной гарантией, быстрой доставкой по самой привлекательной цене.
9.2-канальный AV-ресивер с видео 4K Ultra HD и встроенной технологией HEOS
Обновите свой домашний кинотеатр с помощью Denon AVR-X3600H. Высокая мощность в 180 Вт на канал обеспечивает захватывающее и динамичное звучание. Ресивер поддерживает новейшие форматы окружающего звучания: Dolby Atmos, Dolby Atmos Height, DTS:X и DTS Virtual:X. Изображение на экране телевизора или проекторе также будет с наилучшим качеством благодаря поддержке видео 4K и технологий Dolby Vision, HDR10 и HLG.
Благодаря 8 входам HDMI и 3 выходам с поддержкой eARC и HDCP 2.3 вы можете подключать новейшие телевизоры, проигрыватели Blu-ray и игровые приставки. USB на передней панели обеспечивает воспроизведение звука в форматах MP3 и Hi-Res (файлы WAV, FLAC, ALAC и DSD 2,8 / 5,6 МГц). Потоковая передача популярных музыки через Spotify, Deezer, Tidal и др. доступна как по беспроводной сети Wi-Fi, так и со смартфонов через Bluetooth, Apple AirPlay 2. AVR-X3600H также поддерживает функцию голосового управления через Amazon Alexa, Google Assistant или Apple Siri. Мощный DSP способен обрабатывать 11,2 канала, что позволяет расширить систему с помощью дополнительного усилителя мощности.
При всей сложности используемых технологий, процесс подключения и настройки ресивера очень прост. Программа-ассистент по установке Denon гарантирует, что вы быстро и правильно настроите систему. Каждое помещение индивидуально как по дизайну, так и по акустическим свойствам — вот почему Denon использует технологию калибровки помещений премиум-класса Audyssey, которая в процессе настройки измеряет и оптимизирует звук всей акустической системы, чтобы обеспечить по-настоящему захватывающее звучание.
Основные характеристики
- 9.2-канальный AV-ресивер с мощностью 180 Вт на канал и 11.2-канальным процессингом и выходом предусилителя: Девять мощных усилителей обеспечивают точный и динамичный звук Denon
- Технология IMAX Enhanced: настоящие впечатления от кинотеатра IMAX у вас дома
- Поддержка технологий объемного звучания Dolby Atmos, Dolby Atmos Height Virtualization, DTS:X and DTS Virtual:X с 11.2 канальным процессингом:Наслаждайтесь захватывающим трехмерным звуком с акустикой 7.2.4 и дополнительным 2-канальным усилителем
- 8 HDMI входов с поддержкой HDCP 2.3 и 3 выхода HDMI: Вы можете подключить до восьми устройств одновременно и вывести изображение на два экрана — проектор или телевизор в первой зоне и на монитор во второй зоне
- Расширенный обратный аудио канал (eARC):Поддерживает новейшие форматы объемного звука Dolby Atmos и DTS:X при использовании телевизора как источника звука через кабель HDMI
- Новейшие технологии улучшения изображения 4K Upscaling, Dolby Vision, HDR10, HLG: Обеспечат высочайшее качество видео с исключительной яркостью, контрастностью и цветом
- Программы настройки звука Audyssey MultEQ XT, Dynamic Volume and Dynamic EQ, LFC и Sub EQ HT: Автоматическая настройка звука всей системы с учетом акустических характеристик вашей комнаты
- Удобная программа настройки Denon Setup Assistant с графическим интерфейсом: Простая и правильная настройка системы
- Поддержка AirPlay2, Bluetooth, Internet Radio, Spotify, Amazon Music, Tidal, Deezer: Доступ к широкому кругу популярных сервисов потоковой музыки
- Встроенная сетевая мультирум технология HEOS:Подключайте потоковые музыкальные серверы и управляйте музыкой по всему дому
- Встроенный Wi-Fi и Bluetooth®: Стабильное подключение к беспроводной сети даже в городских условиях
- Аудио высокого разрешения в форматах DSD (2.8/5.6MHz), FLAC, ALAC и WAV: Звук самого высокого качества для энтузиастов домашнего звука
- Подключение игровых приставок: Поддержка режима Auto Low Latency Mode (ALLM) для вывода изображения без задержек
- Голосовое управление через Amazon Alexa, Google Assistant и Apple Siri: Управлять AVR-X3600H и беспроводными музыкальными службами теперь можно с помощью голосовых команд
Мощный 9-канальный усилитель
Благодаря дискретным усилителям для каждого канала AVR-X3600H обеспечивает высокую мощность в 180 Вт на канал и уверенную работу даже с акустикой с низким импедансом. AVR-X3600H поддерживает форматы объемного звука Dolby Atmos, Dolby Atmos Height Virtualization, DTS:X и DTS Virtual: X, а также обработку и масштабирование видео до формата 4K для источников HDMI.
Потрясающий объемный звук
Погрузитесь в настоящий трехмерный звук с Dolby Atmos, DTS:X, Dolby Atmos Height Virtualization и DTS Virtual:X.
IMAX Enhanced
IMAX Enhanced — это новейшие технологии от DTS, которая устанавливает новый стандарт качества изображения, звука и четкости домашнего кинотеатра. Смотрите более четкие и яркие картинки, почувствуйте потрясающий звук и получите настоящие эмоции от кинотеатра IMAX.
Dolby Atmos
Погрузитесь в пространство звука с Dolby Atmos. Используя 9 активных каналов, настройте систему объемного звучания Dolby Atmos 5.2.4 или 7.2.2. Воспользуйтесь двумя выходами предусилителя AVR-X3600H для настройки системы объемного звучания Dolby Atmos 7.2.4 с использованием внешнего двухканального усилителя для питания 2 дополнительных динамиков объемного звучания для максимально возможного качества домашнего кинотеатра. Технология виртуализации Dolby Atmos Height обеспечивает объёмный окружающий звук без верхних каналов в конфигурации 7.2, 5.2 или 2.2.
DTS: X
Глубокое погружение в звук и высокая реалистичность переносят вас в мир ваших любимых фильмов. DTS: X придает вашим фильмам, играм и музыке реализм, не имеющий аналогов в традиционном объемном звучании. Технология DTS Virtual:X обеспечивает объемной звук без использования верхних или потолочных каналов, создавая виртуальные эффекты верхних каналов в конфигурациях акустики 7.2, 5.2 или 2.2.
Изображение в формате 4K ULTRA HD
Наслаждайтесь любимыми фильмами, шоу и играми с наилучшим качеством изображения.
Поддержка EARC
AVR-X3600H имеет 8 входов HDMI и 3 выхода с поддержкой 4K Ultra HD 60Hz и технологий улучшения изображения Dolby Vision, HDR10 и HLG для исключительно четких и ярких кадров.
Расширенный обратный аудиоканал eARC поддерживает передачу многоканального звука напрямую с телевизора на AV-ресивер через кабель HDMI.
Продвинутая видео секция
Сертифицированный Imaging Science Foundation, AVR-X3600H имеет полный набор средств управления калибровкой видео (для использования специалистом ISF), а также режимы ISF Day и ISF Night. Наслаждайтесь полной совместимостью с новейшими телевизорами HD и Ultra HD, проигрывателями Blu-ray и игровыми консолями.
Простая и быстрая настройка
Прилагаемое руководство по быстрому запуску AVR-X3600H содержит простые и четкие инструкции по началу работы. После подключения телевизора к AVR-X3600H через HDMI на экране телевизора появится программа-помощник по настройке Denon, который шаг за шагом проведет вас по всей процедуре подключения и настройки системы. Цветная схема акустических клемм делает процесс подключения акустических систем простым и быстрым.
Audyssey MultEQ XT32
Оптимизируйте качество звука вашей системы с программой Audyssey MultEQ XT32. С помощью прилагаемого измерительного микрофона MultEQ XT32 анализирует звук каждого динамика в системе динамика (включая сабвуферы) в восьми точках измерения и рассчитывает точные цифровые фильтры с учетом акустических особенностей акустики и помещения. Audyssey Dynamic Volume сглаживает резкие скачки громкости (например, телевизионные рекламные ролики), позволяя вам установить более низкую громкость, сохраняя при этом чистый диалог, музыку и звук. Audyssey Dynamic EQ обеспечивает чистоту всего диапазона на любом уровне прослушивания, а Audyssey Low Frequency Containment использует передовые психоакустические алгоритмы для обеспечения баланса всего диапазона, включая глубокие басы. Audyssey Sub EQ HT обеспечивает индивидуальную настройку для каждого сабвуфера при парном подключении. Дополнительно доступно профессиональное приложение Audyssey MultEQ Editor позволяющее энтузиастам и профессионалам еще более точно настроить звук всей системы.
Сетевые подключения
Для воспроизведения потоковой музыки через Bluetooth, Wi-Fi и AirPlay 2, Denon AVR-X3600H оснащен усовершенствованной сетевой картой с двумя антеннами для надежной связи даже в загруженных городских условиях. Благодаря встроенной технологии HEOS вы можете воспроизводить одну и ту же мелодию в каждой комнате или выбирать разные песни для каждой подключенной комнаты — выбор за вами. HEOS поддерживает бесплатные и платные версии приложений Spotify, Deezer, Amazon Music, TuneIn, iHeart Radio, Sound Cloud, SiriusXM, Tidal и другие.
Управление через смартфон
Бесплатное приложение Denon AVR Remote для iOS и Android делает использование AVR-X3600H еще удобнее — изменение громкости, выбор трека или источника — всем можно управлять через смартфон. Загрузите приложение Denon AVR Remote и приложение HEOS на свой смартфон или планшет для управления музыкой во всем доме.
Кнопки быстрого выбора
На передней панели Denon AVR-X3600H имеются четыре кнопки быстрого выбора, которые позволяют сохранить пользовательские настройки звука для каждого источника. Переключаясь между ТВ, проигрывателем Blu-ray или игровой приставкой, AVR-X3600H изменит настройки эквалайзера для этого источника. Кнопки быстрого выбора также есть на пульте управления AV-ресивера.
Подключение Smart TV
Управляйте Denon AVR-X3600H с помощью пульта телевизора с помощью функции HDMI CEC. Эта технология обеспечивает быстрый доступ к источникам, режимам объемного звучания, меню настройки AV-ресивера и четырем кнопкам быстрого выбора.
Передовая обработка звука
Для обеспечения оптимальной точности и самого широкого динамического диапазона с минимальными искажениями Denon AVR-X3600H оснащен усовершенствованным топовым 32-разрядным цифроаналоговым преобразователем AKM AK4458VN от японской компании Asahi Kasei Microdevices. Наслаждайтесь максимально четким, точным и трехмерным звуком как при просмотре кино, так и при прослушивании музыки.
DSP
Невероятная вычислительная мощность AVR-X3600H включает в себя усовершенствованную микросхему DSP (Digital Sound Processor) для обработки звука. Процессор с 4-ям ядрами, работающими на частоте 300 МГц, способен обрабатывать более одного миллиарда вычислений в секунду.
Мультирум
С Denon AVR-X3600H можно смотреть кино с 7,2-канальным объемным звуком в одной комнате и отдельным источником и музыкальным потоком в другой. Смотрите фильм в зале, пока дети слушают музыку в соседней комнате. Используйте акустические кабели или выходы предусилителя для вывода звука на вторую зону.
Аудио высокого разрешения
На борту AVR-X3600H находится новейший 32-разрядный цифро-аналоговый преобразователь AK4458, который обеспечивает воспроизведение аудио высокого разрешения, включая файлы в формате ALAC, FLAC и WAV с частотой дискретизации до 24бит/196кГц, и даже файлов DSD 2,8 / 5,6 МГц. Воспроизведение файлов в формате Hi-Res возможно как с запоминающих устройств через порт USB на передней панели, так и через вашу локальную сеть.
Вход фонокорректора
В течение почти 50 лет Denon разрабатывает и производит проигрыватели виниловых дисков и фонокорректоры. AVR-X3600H позволяет подключить проигрыватель напрямую к ресиверу, без необходимости подключать отдельный стерео-усилитель.
Два выхода для сабвуфера
AVR-X3600H оснащен двумя выходами для сабвуфера для сглаживания низких частот и более равномерного распределения звука в помещении. Нет слышимых пиков или провалов — просто мощный, заполняющий комнату бас.
Управление голосом
Используя внешний динамик или телефон, работой ресивера можно управлять с помощью голосовых команд через Amazon Alexa, Google Assistant или Apple Siri. Попросите воспроизвести вашу любимую музыку, увеличьте громкость, перейдите к следующей дорожке, переключите входы и многое другое. Как из голосовых сервисов выбрать — выбор за вами.
Alexa
Управляйте ресивером с помощью Amazon Alexa и своего голоса. Изменение громкости, переход к следующему треку, переключение входов для различных источников звука и многое другое — «Просто скажите это». Бесплатное приложение для смартфонов HEOS Home Entertainment также может использовать голосовые команды Amazon Alexa для управления вашими AV-ресивером и устройствами HEOS.
Google assistant
Запустив музыку в приложении HEOS, вы можете попросить Помощника Google управлять громкостью, воспроизводить, приостанавливать, пропускать дорожки и многое другое.
Встроенная сетевая технология HEOS
Наслаждайтесь высококачественной музыкой через потоковые сервисы Spotify, TuneIn, Deezer Amazon Prime Music, iHeartRadio, SiriusXM, Soundcloud, Tidal, Napster, Deezer и др. Управляйте всем этим с помощью бесплатного приложения HEOS.
Интеграция в систему автоматизации Умный дом
Denon AVR-X3600H имеет функции внешнего управления по IP для легкой настройки и совместимости со оборудованием других производителей и предлагает сертификацию Control4 SDPP (Simple Device Detection Protocol) для полной интеграции с оборудованием домашней автоматизации Control4. На задней панели находится гнездо для инфракрасного пульта дистанционного управления для совместимости пульта ДУ с другими компонентами системы домашнего кинотеатра. Теперь также есть возможность удаленного мониторинга для устранения неполадок.
Системы домашней автоматизации Crestron Connected
Благодаря встроенной поддержке Crestron в Denon AVR-X3600H он обеспечивает бесперебойную связь с решениями для домашней автоматизации Crestron, предоставляя установщикам простое и удобное решение для домашнего кинотеатра, а домовладельцам позволяет полностью контролировать свою домашнюю технику.