- Manuals
- Brands
- Denon Manuals
- Stereo Receiver
- AVR-X550BT
- Owner’s manual
-
Bookmarks
Quick Links
Contents
Connections
Playback
Settings
Tips
Appendix
AVR-X550BT
AV SURROUND RECEIVER
Owner’s Manual
1
Front panel
Display
Rear panel
Remote
Index
Related Manuals for Denon AVR-X550BT
Summary of Contents for Denon AVR-X550BT
-
Page 1
Contents Connections Playback Settings Tips Appendix AVR-X550BT AV SURROUND RECEIVER Owner’s Manual Front panel Display Rear panel Remote Index… -
Page 2
Contents Connections Playback Settings Tips Appendix Accessories Connecting a playback device Inserting the batteries Connecting a set-top box (Satellite tuner/cable TV) Operating range of the remote control unit Connecting a DVD player or Blu-ray Disc player Features Connecting a game console or video camcorder High quality sound Connecting a USB memory device to the USB port High performance… -
Page 3
Contents Connections Playback Settings Tips Appendix Listening to FM/AM broadcasts Sleep timer function Listening to FM/AM broadcasts Using the sleep timer RDS search Quick select plus function PTY search Calling up the settings TP search Changing the settings Radio Text Settings Tuning in to stations and presetting them automatically (Auto Preset) -
Page 4
Contents Connections Playback Settings Tips Appendix Tips Inputs Input Assign Tips Source Level Troubleshooting Input Select Resetting factory settings Speakers Appendix Auto Setup Procedure for speaker settings (Auto Setup) About HDMI Error messages Playing back a USB memory devices Manual Setup Playing back a Bluetooth device Speaker Config. -
Page 5
Playback Settings Tips Appendix Thank you for purchasing this Denon product. To ensure proper operation, please read this owner’s manual carefully before using the product. After reading this manual, be sure to keep it for future reference. Accessories Check that the following parts are supplied with the product. -
Page 6
Contents Connections Playback Settings Tips Appendix Inserting the batteries NOTE 0 To prevent damage or leakage of battery fluid: 0 Do not use a new battery together with an old one. Remove the rear lid in the direction of the arrow and 0 Do not use two different types of batteries. -
Page 7
Contents Connections Playback Settings Tips Appendix Features High quality sound High performance With discrete circuit technology, the power amplifier provides 4K 60Hz input/output supported identical quality for all 5-channels (90 Watts x 5-channels) For optimum realism and stunning dynamic range, the power amplifier 4K 60p 4K 60p section features discrete power devices (not integrated circuitry). -
Page 8
Contents Connections Playback Settings Tips Appendix HDMI connections enable connection to various digital AV Wireless connection with Bluetooth devices can be carried out devices (5 inputs, 1 output) easily (v p. 42) This unit is equipped with 5 HDMI inputs and 1 HDMI output enabling connection to various HDMI compatible devices such as Blu-ray Disc You can enjoy music simply by connecting wirelessly with your players, game consoles and HD video camcorders. -
Page 9
Power ON/OFF, volume, mute, and source selection. z Download the appropriate “Denon 500 Series Remote” for your iOS or Android devices. In order to use “Denon 500 Series Remote”, your iOS or Android device needs to be paired with this unit in advance. -
Page 10
Contents Connections Playback Settings Tips Appendix Part names and functions Front panel For details, see the next page. Front panel Display Rear panel Remote Index… -
Page 11
Contents Connections Playback Settings Tips Appendix D Remote control sensor This receives signals from the remote control unit. (v p. 6) E Display This displays various pieces of information. (v p. 13) o Q0 F MASTER VOLUME knob This adjusts the volume level. (v p. 39) G Tuner preset channel buttons (TUNER PRESET CH +, –) These select preset broadcast stations. -
Page 12
Contents Connections Playback Settings Tips Appendix M SETUP MIC jack This is used to connect the supplied Sound calibration microphone. (v p. 89) N USB port (T) This is used to connect USB storages (such as USB memory devices) and the USB cable supplied. (v p. 33) Q2 Q3 K QUICK SELECT buttons With a single press of any of these buttons, you can call up various… -
Page 13
Contents Connections Playback Settings Tips Appendix Display A Input mode indicators D Sleep timer indicator These light according to the audio input mode settings of each input This lights when the sleep mode is selected. (v p. 66) source. (v p. 85) E Volume indicator B Decoder indicators F MUTE indicator… -
Page 14
Contents Connections Playback Settings Tips Appendix Rear panel For details, see the next page. Front panel Display Rear panel Remote Index… -
Page 15
Contents Connections Playback Settings Tips Appendix C HDMI connectors Used to connect devices equipped with HDMI connectors. “Connection 1 : TV equipped with an HDMI connector and compatible with the ARC (Audio Return Channel)” (v p. 26) “Connection 2 : TV equipped with an HDMI connector and incompatible with the ARC (Audio Return Channel)”… -
Page 16
Contents Connections Playback Settings Tips Appendix Remote control unit A Input source select buttons These select the input source. (v p. 38) B Channel/page search buttons (CH/PAGE df) These select radio stations registered to presets or switch pages. (v p. 53) C MUTE button (:) This mutes the output audio. -
Page 17
Contents Connections Playback Settings Tips Appendix F BACK button This returns to the previous screen. G Channel level button (CH LEVEL) Adjusting the volume of the speakers. (v p. 65) H System buttons These perform playback related operations. Tuning up / Tuning down buttons (TUNE +, –) These select either FM broadcast or AM broadcast. -
Page 18
Contents Connections Playback Settings Tips Appendix M POWER button (X) This turns the power on/off. (v p. 38) N ECO Mode button (G) This switches to ECO Mode. (v p. 95) O VOLUME buttons (df) These adjust the volume level. (v p. 39) P OPTION button This displays the option menu on the TV screen. -
Page 19
Contents Connections Playback Settings Tips Appendix o Contents o Cables used for connections Provide necessary cables according to the devices you want to Connecting speakers connect. Connecting a TV Connecting a playback device Connecting a USB memory device to the USB port Speaker cable Connecting an FM/AM antenna Connecting the power cord… -
Page 20
Contents Connections Playback Settings Tips Appendix Connecting speakers Install speakers and connect them to this unit. (“Speaker installation” (v p. 20), “Speaker connection” (v p. 22)) Speaker installation Determine the speaker system depending on the number of speakers you Place the FRONT left and right speakers an are using and install each speaker and subwoofer in the room. -
Page 21
Contents Connections Playback Settings Tips Appendix o When 5.1-channel speakers are installed 0 Use the illustration below as a guide for how high each speaker should be installed. The height does not need to be exactly the same. Surround speaker Front speaker GViewed from the sideH 1 22°… -
Page 22
Contents Connections Playback Settings Tips Appendix o Connecting the speaker cables Speaker connection Carefully check the left (L) and right (R) channels and + (red) and – Here we connect the speakers in the room to this unit. (black) polarities on the speakers being connected to this unit, and be This section explains how to connect them using typical examples. -
Page 23
Contents Connections Playback Settings Tips Appendix o Connecting the subwoofer Use a subwoofer cable to connect the subwoofer. Two subwoofers can be connected to this unit. The same signal is output from the respective subwoofer terminals. Front panel Display Rear panel Remote Index… -
Page 24
Contents Connections Playback Settings Tips Appendix Standard speaker configuration and connection This serves as a basic 5.1-channel surround system. Sound modes such as Dolby Pro Logic g are supported. Front panel Display Rear panel Remote Index… -
Page 25
Contents Connections Playback Settings Tips Appendix Connecting a TV Connect a TV to this unit so that the input video is output to the TV. You can also enjoy audio from the TV on this unit. How to connect a TV depends on the connectors and functions equipped on the TV. ARC (Audio Return Channel) function plays TV audio on this unit by sending the TV audio signal to this unit via HDMI cable. -
Page 26
Contents Connections Playback Settings Tips Appendix Connection 1 : TV equipped with an HDMI connector and compatible with the ARC (Audio Return Channel) Use an HDMI cable to connect a TV that is compatible with the ARC function to this unit. Set “HDMI Control”… -
Page 27
Contents Connections Playback Settings Tips Appendix Connection 2 : TV equipped with an HDMI connector and incompatible with the ARC (Audio Return Channel) Use an HDMI cable to connect the TV to this unit. To listen to audio from TV on this unit, use an optical cable to connect the TV to this unit. OPTICAL HDMI Front panel… -
Page 28
Contents Connections Playback Settings Tips Appendix Connection 3 : TV equipped without an HDMI connector Use a video cable to connect the TV to this unit. To listen to audio from TV on this unit, use an optical cable to connect the TV to this unit. OPTICAL VIDEO Front panel… -
Page 29
Contents Connections Playback Settings Tips Appendix Connecting a playback device This unit is equipped with two types of video input connectors (HDMI and composite video) and three types of audio input connectors (HDMI, digital audio and audio). Select input connectors on this unit according to the connectors equipped on the device you want to connect. If the device connected to this unit is equipped with an HDMI connector, it is recommended to use HDMI connections. -
Page 30
Contents Connections Playback Settings Tips Appendix Connecting a set-top box (Satellite tuner/cable TV) This explanation uses the connection with a satellite tuner/cable TV STB as an example. Select the input connectors on this unit to match the connectors on the device that you want to connect to. (HDMI incompatible device) Satellite tuner / Satellite tuner /… -
Page 31
Contents Connections Playback Settings Tips Appendix Connecting a DVD player or Blu-ray Disc player This explanation uses the connection with a DVD player or Blu-ray Disc player as an example. When connecting a 4K / HDCP 2.2 compatible player, connect to either the HDMI 3, HDMI 4 or HDMI 5 input connector. DVD player / Blu-ray Disc player… -
Page 32
Contents Connections Playback Settings Tips Appendix Connecting a game console or video camcorder This explanation uses the connection with a game console as an example. Connect a playback device to this unit, such as a game console or video camcorder. Game console HDMI Front panel… -
Page 33
USB memory device 0 Denon does not guarantee that all USB memory devices will operate or receive power. When using a portable USB hard disk drive (HDD) which came with an AC adapter, use that device’s supplied AC adapter. NOTE 0 USB memory devices will not work via a USB hub. -
Page 34
Contents Connections Playback Settings Tips Appendix Connecting an FM/AM antenna Connect the antenna, tune in to a broadcast and then move the antenna to AM loop antenna the location where there is least noise. Then use tape, etc. to fix the (supplied) antenna in this location. -
Page 35
Contents Connections Playback Settings Tips Appendix o AM loop antenna assembly o Using the AM loop antenna Suspending on a wall Put the stand section through the bottom of the loop Suspend directly on a wall without assembling. antenna from the rear and bend it forward. Insert the projecting part into the square hole in the stand. -
Page 36
Contents Connections Playback Settings Tips Appendix Connecting the power cord After completing all the connections, insert the power plug into the power outlet. Power cord (supplied) To household power outlet (AC 230 V, 50/60 Hz) Front panel Display Rear panel Remote Index… -
Page 37
Contents Connections Playback Settings Tips Appendix o Contents Convenience functions Convenience functions Basic operation HDMI control function Turning the power on Adjusting the volume of each channel to match the input source (Ch Level Adjust) Selecting the input source Sleep timer function Adjusting the volume Quick select plus function Turning off the sound temporarily (Muting) -
Page 38
Contents Connections Playback Settings Tips Appendix Basic operation Turning the power on POWER Press POWER X to turn on power to the unit. Input source 0 You can press the input source select button when the unit is in standby mode to select turn on the power. -
Page 39
Contents Connections Playback Settings Tips Appendix Adjusting the volume Playback a DVD player/Blu-ray Disc player Use VOLUME df to adjust the volume. The following describes the procedure for playing DVD player/Blu-ray Disc player. 0 The variable range differs according to the input signal and channel level setting. Prepare for playback. -
Page 40
Contents Connections Playback Settings Tips Appendix Playing a USB memory device Playing back music files stored on a USB memory device. Only USB memory devices conforming to mass storage class standards can be played on this unit. This unit is compatible with USB memory devices in “FAT16” or “FAT32”… -
Page 41
PAGE d f the list display Music NOTE 0 Note that Denon will accept no responsibility whatsoever for any problems arising with the data on a USB memory device when using this unit in conjunction with the USB OPTION Option memory device. -
Page 42
Contents Connections Playback Settings Tips Appendix Listening to music on a Bluetooth device Music files stored on Bluetooth devices such as smartphones, digital music players, etc. can be enjoyed on this unit by pairing and connecting this unit with the Bluetooth device. Communication is possible up to a range of about 10 m. -
Page 43
Bluetooth device that was Turn on Bluetooth from your mobile device’s connected. settings menu, then select “Denon AVR-X550BT” when it appears in the device list. 0 Enter “0000” when the password is requested on the screen of the Bluetooth Cancel device. -
Page 44
Contents Connections Playback Settings Tips Appendix Operation buttons Function NOTE Playback / Pause 0 To operate the Bluetooth device with the remote control of this unit, the Bluetooth Skip to previous track / Skip to next track device needs to support the AVRCP profile. 0 The remote control of this unit is not guaranteed to work with all Bluetooth devices. -
Page 45
Contents Connections Playback Settings Tips Appendix Pairing with other Bluetooth devices 0 This unit can be paired with a maximum of 8 Bluetooth devices. When a 9th Pair a Bluetooth device with this unit. Bluetooth device is paired, it will be registered in place of the oldest registered device. -
Page 46
Contents Connections Playback Settings Tips Appendix Reconnecting to this unit from a Bluetooth device After pairing is completed, the Bluetooth device can be connected without performing any operations on this unit. This operation also needs to be performed when switching the Bluetooth device for playback. -
Page 47
Contents Connections Playback Settings Tips Appendix Listening to FM/AM broadcasts You can use the built-in tuner of this unit to listen to FM broadcasts and AM broadcasts. Make sure the FM antenna and AM loop antenna are connected to this unit first. -
Page 48
Contents Connections Playback Settings Tips Appendix Listening to FM/AM broadcasts Press MODE to select the tune mode. AUTO Automatically search for and tune to a Connect the antenna. (“Connecting an FM/AM (Default) : receivable radio station. antenna” (v p. 34)) Manually change the frequency one Press FM or AM to switch the input source to “FM”… -
Page 49
Contents Connections Playback Settings Tips Appendix o Operations accessible through the option RDS search menu RDS (works only on the FM band) is a broadcasting service which allows “RDS search” (v p. 49) a station to send additional information along with the regular radio “PTY search”… -
Page 50
Contents Connections Playback Settings Tips Appendix PTY search Press OPTION when the input source is “FM”. The option menu screen is displayed. Use this function to find RDS stations broadcasting a designated program type (PTY). Use ui to select “PTY Search”, then press ENTER. PTY identifies the type of RDS program. -
Page 51
Contents Connections Playback Settings Tips Appendix TP search Radio Text TP identifies programs that carry traffic announcements. RT allows RDS stations to send text messages that appear on the display. This allows you to easily find out the latest traffic conditions in your area “Radio text”… -
Page 52
Contents Connections Playback Settings Tips Appendix Tuning in to stations and presetting them automatically (Auto Preset) A maximum of 56 radio stations can be automatically preset. Press OPTION when the input source is “FM”. The option menu screen is displayed. Use ui to select “Auto Preset”, then press ENTER. -
Page 53
Contents Connections Playback Settings Tips Appendix Presetting the current broadcast Channel Default settings 87.50 / 89.10 / 98.10 / 108.00 / 90.10 / 90.10 / 90.10 / station (Preset Memory) 1 – 8 90.10 MHz 522 / 603 / 999 / 1404 / 1611 kHz, Your favorite broadcast stations can be preset so that you can tune them 9 –… -
Page 54
Contents Connections Playback Settings Tips Appendix Skipping preset broadcast stations Cancelling Preset Skip (Preset Skip) While the “Preset Skip” screen is displayed, use ui to Perform auto preset memory to save all the broadcasting stations that can select a group of a broadcast stations to cancel the be received in the memory. -
Page 55
Contents Connections Playback Settings Tips Appendix Convenience functions This section explains how to use convenient functions that can be used for each input source. OPTION uio p ENTER Front panel Display Rear panel Remote Index… -
Page 56
Contents Connections Playback Settings Tips Appendix Performing repeat playback (Repeat) Performing random playback (Random) n Supported input sources : USB / Bluetooth n Supported input sources : USB / Bluetooth While content is playing, press OPTION. The option menu screen is displayed. While content is playing, press OPTION. -
Page 57
Contents Connections Playback Settings Tips Appendix Adjusting the tone (Tone) Select “On” in step 3 and press i to select the sound range to be adjusted. Adjusts the tonal quality of the sound. Bass: Adjust bass. Press OPTION. Treble: Adjust treble. The option menu screen is displayed. -
Page 58
Contents Connections Playback Settings Tips Appendix Optimizing the night time listening Use o p to select “Night Mode”, then press ENTER. volume (Night Mode) Low : Set the adjusted value to low. Compress dynamic range (difference between loud and soft sounds). Medium : Set the adjusted value to middle. -
Page 59
Contents Connections Playback Settings Tips Appendix Displaying your desired video during audio playback (Video Select) This unit can display video from a different source on TV during audio playback. You can set this for each input source. n Supported input sources : USB / FM / AM / Bluetooth Press OPTION during audio playback. -
Page 60
Contents Connections Playback Settings Tips Appendix Selecting a sound mode This unit allows you to enjoy various kinds of surround and stereo playback modes. Multi-channel audio formats are provided on popular movie and music disc formats such as Blu-ray and DVD, as well as being supported by digital broadcasting, and even by streaming movies. -
Page 61
Contents Connections Playback Settings Tips Appendix o Description of sound mode types Dolby sound mode Sound mode type Description Dolby PLg This mode can be selected when the Dolby PLg decoder is used to play back 2-channel sources in 5.1-channel surround sound with an enveloping surround sound experience. -
Page 62
Contents Connections Playback Settings Tips Appendix Original sound mode Sound mode type Description Multi Ch Stereo This mode is for enjoying stereo sound from all speakers. Virtual This mode lets you experience an expansive surround sound effect when playing back through just the front (L/R) speakers only, and when listening with stereo headphones. -
Page 63
Contents Connections Playback Settings Tips Appendix o Views on the display A Shows a decoder to be used. In the case of the Dolby Digital decoder, “ ” is displayed. In the case of the Dolby Digital Plus decoder, “ ”… -
Page 64
Contents Connections Playback Settings Tips Appendix HDMI control function A recent addition to the HDMI standard is CEC (Consumer Electronics Control), which allows control signals from one device to communicate with another device via the HDMI cable connection. Setting procedure Enable the HDMI control function of this unit. -
Page 65
Contents Connections Playback Settings Tips Appendix Adjusting the volume of each channel to match the input source (Ch Level Adjust) The volume of each channel can be changed while listening to music. You can set this for each input source. Press CH LEVEL. -
Page 66
Contents Connections Playback Settings Tips Appendix Sleep timer function You can have the power automatically switched to standby once a set time has elapsed. This is convenient for viewing and listening while going to sleep. SLEEP Front panel Display Rear panel Remote Index… -
Page 67
Contents Connections Playback Settings Tips Appendix o Checking the remaining time Using the sleep timer Press SLEEP when the sleep timer is in operation. The remaining time appears on the display. Press SLEEP and display the time you want to set. o To cancel the sleep timer The SLEEP indicator lights up on the display and the sleep timer starts. -
Page 68
Contents Connections Playback Settings Tips Appendix Quick select plus function Settings such as the input source, volume level and sound mode can be registered to the QUICK SELECT 1 — 4 buttons. You can simply press one of the registered QUICK SELECT buttons in subsequent playbacks to switch to the group of saved settings in a batch. -
Page 69
Contents Connections Playback Settings Tips Appendix Calling up the settings Changing the settings Press QUICK SELECT. Set the items below to the settings you want to register. The Quick Select settings registered to the button you pressed are called up. A Input source (v p. -
Page 70
Contents Connections Playback Settings Tips Appendix Menu map When using menu operations, connect this unit to a TV and operate this unit while viewing the TV. The recommended settings are configured for this unit by default. You can customize this unit based on your existing system and your preferences. Setting items Detailed items Description… -
Page 71
Contents Connections Playback Settings Tips Appendix Setting items Detailed items Description Page Input Assign Changes input connector assignment. Source Level Adjusts the playback level of the audio input. Input Select Sets the audio input mode and decode mode. Inputs Auto Setup The acoustic characteristics of the connected speakers and listening room are measured and the optimum settings are made automatically. -
Page 72
Contents Connections Playback Settings Tips Appendix Setting items Detailed items Description Page Language Changes the language of the display on the TV screen. Configures the ECO Mode and Auto Standby energy-saving functions. Bluetooth Configures the Bluetooth settings. Front Display Makes settings related to the display on this unit. General Firmware Update the firmware of this unit. -
Page 73
Contents Connections Playback Settings Tips Appendix Menu operations Press SETUP. The menu is displayed on the TV screen. Use ui to select the menu to be set or operated, then press ENTER. Use o p to change to desired setting. Press ENTER to enter the setting. -
Page 74
Contents Connections Playback Settings Tips Appendix Audio Make audio-related settings. o Mode Surr.Parameter Set the sound mode according to the input signal. You can adjust the surround audio sound field effects to match your n Dolby PLg Mode preferences. The items (parameters) that can be adjusted depend on the signal being Switches to the sound mode suitable for input and the currently set sound mode. -
Page 75
Contents Connections Playback Settings Tips Appendix o Dynamic Comp. o Low Frequency Compress dynamic range (difference between loud and soft sounds). Adjust the low frequency effects level (LFE). Automatic dynamic range compression Auto: -10 dB – 0 dB (Default : 0 dB) on/off control according to source. -
Page 76
Contents Connections Playback Settings Tips Appendix o Panorama o Dimension The front sound field is expanded further towards the back to create a Shift sound image center to front or rear to adjust playback balance. seamlessly inclusive sound impression. 0 – 6 (Default : 3) Use “Panorama”. -
Page 77
Contents Connections Playback Settings Tips Appendix o Subwoofer Restorer Turn subwoofer output on and off. Compressed audio formats such as MP3, WMA (Windows Media Audio) and MPEG-4 AAC reduce the amount of data by eliminating signal The subwoofer is used. (Default): components that are hard for the human ear to hear. -
Page 78
Contents Connections Playback Settings Tips Appendix o Limit Audio Delay Make a setting for maximum volume. Compensates for incorrect timing between video and audio. 60 (–20 dB) / 70 (–10 dB) / 80 (0 dB) 0 ms – 200 ms (Default : 0 ms) Off (Default) 0 “Audio Delay”… -
Page 79
Contents Connections Playback Settings Tips Appendix o Mute Level Room EQ Set the amount of attenuation when muting is on. Set whether to use the equalizer or not. Full The sound is muted entirely. Use “Room EQ”. (Default): –40 dB : The sound is attenuated by 40 dB down. -
Page 80
Contents Connections Playback Settings Tips Appendix Video Make settings for HDMI Audio Out, HDMI PassThrough and HDMI Control settings. NOTE 0 When “HDMI PassThrough” and “HDMI Control” is set to “On”, it consumes more standby power. (“HDMI PassThrough” (v p. 80), “HDMI Control” (v p. 81)) If you are not using this unit for an extended period, it is recommended that you unplug the power cord from the power outlet. -
Page 81
Contents Connections Playback Settings Tips Appendix Pass Source HDMI Control You can link operations with devices connected to HDMI and compatible Sets the HDMI connector that inputs HDMI signals when in standby. with HDMI Control. Last The most recently used input source will go (Default): into standby mode. -
Page 82
Contents Connections Playback Settings Tips Appendix TV Audio Switching On the TV connected to the HDMI MONITOR connector, set whether to Sets automatic switching to the “TV Audio” input when a TV connected via receive sound from the TV via HDMI. HDMI sends an appropriate CEC control command to this unit. -
Page 83
Contents Connections Playback Settings Tips Appendix Pow.Off Control Links the power standby of this unit to external devices. If power to a connected TV is turned off independently of the input source, power to (Default): this unit is automatically set to standby. With an input source being selected that is equipped “HDMI”, when you turn the power Video:… -
Page 84
Contents Connections Playback Settings Tips Appendix Inputs Perform settings related to input source playback. You do not have to change the settings to use the unit. Make settings when needed. Input Assign 0 By default, each item is set as follows. By making connections as indicated by the input sources printed on the DVD/ Input source… -
Page 85
Contents Connections Playback Settings Tips Appendix o Decode Mode Input Select Set the audio decode mode for input source. Set the audio input mode and decode mode of each input source. It is normally recommended to set the audio input mode to “Auto”. But The input modes available for selection may vary depending on the input we recommend changing it to “PCM”… -
Page 86
Contents Connections Playback Settings Tips Appendix Speakers The acoustic characteristics of the connected speakers and listening room are measured and the optimum settings are made automatically. This is called “Auto Setup”. You do not have to perform “Auto Setup” when you have already performed “Speaker Setup” in “Setup Assistant”. To set up the speakers manually, use “Manual Setup”… -
Page 87
Contents Connections Playback Settings Tips Appendix NOTE 0 Make the room as quiet as possible. Background noise can disrupt the room measurements. Close windows and turn off the power on electronic devices (radios, air conditioners, fluorescent lights, etc.). The measurements could be affected by the sounds emitted by such devices. -
Page 88
Contents Connections Playback Settings Tips Appendix Procedure for speaker settings (Auto Mount the Sound calibration microphone on a tripod Setup) and place it in the main listening position. When installing the Sound calibration microphone, point the tip of the microphone toward the ceiling and adjust the height to match the Preparation height of the ears of a listener in a seated position. -
Page 89
Contents Connections Playback Settings Tips Appendix Connect the Sound calibration microphone to the Select “Next”, then press ENTER. SETUP MIC jack of this unit. Select “Begin Test”, then press ENTER. Measurement requires several minutes. NOTE If “Caution!” is displayed on TV screen: Go to “Error messages”… -
Page 90
Contents Connections Playback Settings Tips Appendix Error messages An error message is displayed if “Auto Setup” could not be completed due to speaker placement, the measurement environment, etc. If an error message is displayed, perform the necessary measures. Be sure to turn off the power before checking speaker connections. Examples Error details Measures… -
Page 91
Contents Connections Playback Settings Tips Appendix Manual Setup Speaker Config. Perform when setting the speakers manually or when changing settings Select whether or not speakers are present, playback capacity for low made in “Auto Setup”. bass frequencies and speaker size. This unit can be used without changing “Manual Setup”… -
Page 92
Contents Connections Playback Settings Tips Appendix o Center Distances Set the presence and size of the center speaker. Set distance from listening position to speakers. Use a large speaker that can adequately Measure beforehand the distance from the listening position to each Large: play back very low bass frequencies. -
Page 93
Contents Connections Playback Settings Tips Appendix Levels Crossovers Set the volume of the test tone to be the same at the listening position Set in accordance with the lower limit frequency of the base frequencies when it is output from each speaker. that can be played back through each speaker. -
Page 94
Contents Connections Playback Settings Tips Appendix o LPF for LFE Bass Set LFE signal playback range. Set this when you want to change the Set subwoofer and LFE signal range playback. playback frequency (low pass filter point) of the subwoofer. o Subwoofer Mode 80 Hz / 90 Hz / 100 Hz / 110 Hz / 120 Hz/ 150 Hz / 200 Hz / 250 Hz (Default: 120 Hz) -
Page 95
Contents Connections Playback Settings Tips Appendix General Make various other settings. Language Set the language for display the menu on the TV screen. Configure the settings of the ECO Mode and auto standby mode. English / Français / Español (Default : English) o ECO Mode This mode can reduce the power consumption when the power of the 0 “Language”… -
Page 96
Contents Connections Playback Settings Tips Appendix o Pow.On Default o Auto Standby Set the mode to ECO when the power is on. Set so the unit power automatically switches to standby. Sets the time for switching to auto standby when there are no audio or The ECO Mode will be set to the previous Last video signals input into this unit. -
Page 97
“Off” will prevent unintended actions such as turning on this unit or switching the source input to “Bluetooth”. NOTE 0 When using the “Denon 500 Series Remote” app, use with the “BluetoothStandby” setting set to “On”. Front panel Display… -
Page 98
Contents Connections Playback Settings Tips Appendix Front Display Firmware Adjust the display brightness of this unit. When new firmware is supplied, update this unit using the USB port. Use a USB memory device to update the firmware. o Dimmer o Update Start Bright Normal display brightness. -
Page 99
Contents Connections Playback Settings Tips Appendix Setup Lock Reset All settings are reset to the factory default values. Protect settings from inadvertent changes. o Lock 0 The “Reset” operation can also be performed by using the button on the main unit. For details on resetting all of the settings to the factory defaults see “Resetting Turn protection on. -
Page 100
Contents Connections Playback Settings Tips Appendix Checking the information Information on the main unit’s various settings (Status) and on input signals (Audio Input Signal) is shown on the display. Press INFO. The information screen is displayed. 0 Press INFO to display current input source name, volume, sound mode, and other information at the bottom of the screen. -
Page 101
Contents Connections Playback Settings Tips Appendix o Contents Troubleshooting Power does not turn on / Power is turned off Tips Operations cannot be performed through the remote control unit I want the volume not to become too loud by mistake Display on this unit shows nothing I want to keep the volume at the same level when I turn the power No sound comes out… -
Page 102
Contents Connections Playback Settings Tips Appendix Tips I want the volume not to become too loud by mistake Set the volume upper limit for “Limit” in the menu beforehand. This prevents children or others from increasing the volume too much by mistake. (v p. -
Page 103
Contents Connections Playback Settings Tips Appendix Troubleshooting If a problem should arise, first check the following: 1. Are the connections correct? 2. Is the set being operated as described in the owner’s manual? 3. Are the other devices operating properly? 0 If steps 1 to 3 above do not improve the problem, restarting the device may improve the problem. -
Page 104
Contents Connections Playback Settings Tips Appendix o Power does not turn on / Power is turned off Symptom Cause / Solution Page Power does not turn on. Check whether the power plug is correctly inserted into the power outlet. Power automatically turns The sleep timer is set. -
Page 105
Contents Connections Playback Settings Tips Appendix o Operations cannot be performed through the remote control unit Symptom Cause / Solution Page Operations cannot be Batteries are worn out. Replace with new batteries. performed through the Operate the remote control unit within a distance of about 7 m from this unit and at an angle of within 30°. remote control unit. -
Page 106
Contents Connections Playback Settings Tips Appendix o No sound comes out Symptom Cause / Solution Page No sound comes out of Check the connections for all devices. speakers. Insert connection cables all the way in. - Check that input connectors and output connectors are not reversely connected. -… -
Page 107
Contents Connections Playback Settings Tips Appendix o Desired sound does not come out Symptom Cause / Solution Page The volume does not The maximum volume is set too low. Set the maximum volume using “Limit” on the menu. increase. Appropriate volume correction processing is performed according to the input audio format and settings, -… -
Page 108
Contents Connections Playback Settings Tips Appendix Symptom Cause / Solution Page “Restorer” cannot be Check that an analog signal or PCM signal (Sample Rate = 44.1/48 kHz) is input. For playback of selected. multichannel signals such as Dolby Digital or DTS surround, “Restorer” cannot be used. Switch to a sound mode other than “Direct”. -
Page 109
Contents Connections Playback Settings Tips Appendix o Sound is interrupted or noise occurs Symptom Cause / Solution Page During playback from the When the transfer speed of the USB memory device is slow, sound may occasionally be interrupted. - USB memory device, sound is occasionally interrupted. -
Page 110
Contents Connections Playback Settings Tips Appendix o No video is shown on the TV Symptom Cause / Solution Page Check the connections for all devices. No picture appears. Insert connection cables all the way in. - Check that input connectors and output connectors are not reversely connected. -… -
Page 111
Contents Connections Playback Settings Tips Appendix o The menu screen is not displayed on the TV Symptom Cause / Solution Page The menu screen or status The menu screen is only displayed on this unit and a TV connected with an HDMI cable. If this unit is -… -
Page 112
Contents Connections Playback Settings Tips Appendix o USB memory devices cannot be played back Symptom Cause / Solution Page “No connection” is This unit cannot recognize the USB memory device. Disconnect and reconnect the USB memory device. displayed. Mass storage class compatible USB memory devices are supported. -… -
Page 113
Contents Connections Playback Settings Tips Appendix o File names on the USB memory device are not displayed properly Symptom Cause / Solution Page The file names are not Characters that cannot be displayed have been used. On this unit, characters that cannot be displayed -… -
Page 114
Contents Connections Playback Settings Tips Appendix o The HDMI control function does not work Symptom Cause / Solution Page The HDMI control function Check that “HDMI Control” in the menu is set to “On”. does not work. You cannot operate devices that are not compatible with the HDMI control function. In addition, depending on the connected device or the settings, the HDMI control function may not work. -
Page 115
Contents Connections Playback Settings Tips Appendix Resetting factory settings Perform this procedure if the display is abnormal or if operations cannot be performed. Various settings are reset to the factory default values. Make settings again. Turn off the power using X. TUNER PRESET CH + Press X while simultaneously pressing TUNER PRESET CH + and TUNE +. -
Page 116
Contents Connections Playback Settings Tips Appendix About HDMI HDMI is an abbreviation of High-Definition Multimedia Interface, which is an AV digital interface that can be connected to a TV or amplifier. This unit supports input and output of 3D (3 dimensional) video signals With the HDMI connection, high definition video and high quality audio of HDMI. -
Page 117
Contents Connections Playback Settings Tips Appendix HDMI Control ARC (Audio Return Channel) If you connect the unit and an HDMI control function compatible TV or This function transmits audio signals from the TV to this unit through player with an HDMI cable and then enable the HDMI control function the HDMI cable and plays back the audio from the TV on this unit setting on each device, the devices will be able to control each other. -
Page 118
Contents Connections Playback Settings Tips Appendix o Supported audio formats Copyright protection system In order to play back digital video and audio such as BD video or DVD 2-channel Linear PCM 2-channel, 32 kHz – 192 kHz, 16/20/24 bit video via HDMI connection, both this unit and the TV or player must to Multi-channel Linear 7.1-channel, 32 kHz –… -
Page 119
Contents Connections Playback Settings Tips Appendix Playing back a USB memory devices This unit is compatible with MP3 ID3-Tag (Ver. 2) standard. This unit can show the artwork that was embedded by using MP3 ID3-Tag Ver. 2.3 or 2.4. This unit is compatible with WMA META tags. If the image size (pixels) of an album artwork exceeds 500 ×… -
Page 120
Contents Connections Playback Settings Tips Appendix Playing back a Bluetooth device o Maximum number of playable files and folder The limits on the number of folders and files that can be displayed by This unit supports the following Bluetooth profile. this unit are as follows. -
Page 121
Contents Connections Playback Settings Tips Appendix Personal memory plus function The most recently used settings (input mode, HDMI output mode, sound mode, tone control, channel level, Restorer and audio delay, etc.) are saved for each input source. 0 “Surr.Parameter” and “Tone” settings are stored for each sound mode. Last function memory This function stores the settings which were made before going into the standby mode. -
Page 122
Contents Connections Playback Settings Tips Appendix Sound modes and channel output S This indicates the audio output channels or surround parameters that can be set. D This indicates the audio output channels. The output channels depend on the settings of “Speaker Config.”. (v p. 91) Channel output Sound mode Front L/R… -
Page 123
Contents Connections Playback Settings Tips Appendix Sound modes and surround parameters Surr.Parameter Neo:6 Music Restorer Dynamic Pro Logic g Music mode only Sound mode Tone mode only Mode Comp. Frequency Subwoofer Panorama Dimension Center Width Center Image Direct (2-channel) Direct (Multi-channel) Stereo Multi Ch In Dolby Pro Logic g… -
Page 124
Contents Connections Playback Settings Tips Appendix Types of input signals, and corresponding sound modes F This indicates the default sound mode. S This indicates the selectable sound mode. Type and format of input signals DTS-HD Dolby Dolby Digital DTS-HD Dolby Sound mode Dolby DTS-HD… -
Page 125
Contents Connections Playback Settings Tips Appendix Explanation of terms o Dolby Dolby Pro Logic g Dolby Pro Logic g is a matrix decoding technology developed by Dolby Dolby Digital Laboratories. Dolby Digital is a multi-channel digital signal format developed by Dolby Regular music such as that on CDs is encoded into 5-channels to achieve Laboratories. -
Page 126
Contents Connections Playback Settings Tips Appendix o DTS DTS-HD High Resolution Audio DTS-HD High Resolution Audio is an improved version of the conventional DTS, DTS-ES and DTS 96/24 signals formats, compatible with sampling This is an abbreviation of Digital Theater System, which is a digital audio frequencies of 96 or 48 kHz and up to 7.1-channels of discrete digital system developed by DTS. -
Page 127
Contents Connections Playback Settings Tips Appendix o Audio THIS SOFTWARE IS PROVIDED BY THE COPYRIGHT HOLDERS AND CONTRIBUTORS “AS IS” AND ANY EXPRESS OR IMPLIED WARRANTIES, INCLUDING, BUT NOT LIMITED TO, THE IMPLIED FLAC (Free Lossless Audio Codec) WARRANTIES OF MERCHANTABILITY AND FITNESS FOR A FLAC stands for Free lossless Audio Codec, and is a lossless free audio PARTICULAR PURPOSE ARE DISCLAIMED. -
Page 128
Contents Connections Playback Settings Tips Appendix MPEG (Moving Picture Experts Group), MPEG-2, MPEG-4 Speaker impedance These are the names for digital compression format standards used for This is an AC resistance value, indicated in Ω (ohms). the encoding of video and audio. Video standards include “MPEG-1 Greater power can be obtained when this value is smaller. -
Page 129
Contents Connections Playback Settings Tips Appendix o Others Pairing Pairing (registration) is an operation that is required in order to connect a HDCP Bluetooth device to this unit using Bluetooth. When paired, the devices When transmitting digital signals between devices, this copyright authenticate each other and can connect without mistaken connections protection technology encrypts the signals to prevent content from being occurring. -
Page 130
Contents Connections Playback Settings Tips Appendix Trademark information The Bluetooth word mark and logos are registered trademarks owned ® “Made for iPod”, “Made for iPhone” and “Made for iPad” mean that an by Bluetooth SIG, Inc. and any use of such marks by D&M Holdings Inc. electronic accessory has been designed to connect specifically to iPod, is under license. -
Page 131
Contents Connections Playback Settings Tips Appendix For DTS patents, see http://patents.dts.com. Manufactured under license from DTS, Inc. DTS, the Symbol, DTS and the Symbol together, DTS-HD, and the DTS-HD logo are registered trademarks and/or trademarks of DTS, Inc. in the United States and/or other countries. © DTS, Inc. All Rights Reserved. -
Page 132
Contents Connections Playback Settings Tips Appendix Specifications o Audio section Power amplifier Rated output: Front: 70 W + 70 W (8 Ω/ohms, 20 Hz – 20 kHz with 0.08 % T.H.D.) 90 W + 90 W (6 Ω/ohms, 1 kHz with 0.7 % T.H.D.) Center: 70 W (8 Ω/ohms, 20 Hz –… -
Page 133
Contents Connections Playback Settings Tips Appendix o Tuner section [FM] [AM] (Note: μV at 75 Ω/ohms, 0 dBf = 1 x 10 –15 Reception frequency range: 87.5 MHz – 108.0 MHz 522 kHz – 1611 kHz Effective sensitivity: 1.2 μV (12.8 dBf) 18 μV 50 dB sensitivity: MONO ―… -
Page 134
Contents Connections Playback Settings Tips Appendix o General Power supply: AC 230 V, 50/60 Hz Power consumption: 310 W Power consumption in standby modes: Setting items in the menu HDMI PassThrough Standby modes Power consumption BluetoothStandby (v p. 80) / (v p. -
Page 135
Contents Connections Playback Settings Tips Appendix Dimensions (Unit : mm) Weight: 7.6 kg Front panel Display Rear panel Remote Index… -
Page 136
Contents Connections Playback Settings Tips Appendix Index Direct sound mode ……… 62 Input Assign ……….. 84 Display …………13 Input settings ……….71, 84 v Numerics Dolby sound mode ……… 61, 125 Input signal ……….. 124 3D …………..116 DTS sound mode ……..61, 126 Input source ……….. -
Page 137
Contents Connections Playback Settings Tips Appendix Pairing …………43, 45 Tips ………….. 102 PCM multi-channel sound mode ….61 Tone Control ……….57 Protection circuit ………. 129 Troubleshooting ……….. 103 TV …………26, 27, 28 Random playback ………. 56 Rear panel …………14 USB memory device …….. -
Page 138
3520 10577 00AD Copyright © 2018 D&M Holdings Inc. All Rights Reserved.


Данная инструкция на русском языке предназначена для ресивера
Denon AVR-X550BT, описывает принцип работы и основные моменты эксплуатации устройства.
Производитель настойчиво рекомендует перед включением ресивера
внимательно изучить настоящую инструкцию.
Инструкция для ресивера
представлена в формате PDF. Все современные браузеры уже поддерживают данный формат и сложностей с открытием файла возникнуть не должно.
Но если открыть инструкцию все же не удается, то необходимо установить на компьютер программу для чтения PDF файлов, например, Acrobat Reader. Если у вас возникли сложности с открытием инструкции на смартфоне под управлением Android, нужно установить, например, Adobe Acrobat Reader.
Комментарии (0)
Комментарии про другие Аудиоусилители и ресиверы
Другие Аудиоусилители и ресиверы Denon
|
Содержание |
Подсоединения |
Воспроизведение |
Установки |
Рекомендации |
Приложение |
AVR-X550BT
A/V РЕСЙВЕР
Руководство пользователя
|
Передняя |
Дисплей |
Задняя |
1 |
Пульт ДУ |
Предметный |
|
панель |
панель |
указатель |

|
Содержание |
Подсоединения |
Воспроизведение |
Установки |
Рекомендации |
Приложение |
|
Комплект поставки |
5 |
||
|
Установка батареек |
6 |
||
|
Диапазон действия пульта ДУ |
6 |
||
|
Отличительные особенности |
7 |
||
|
Высокое качество звучания |
7 |
||
|
Высокое качество видео |
7 |
||
|
Простота и удобство использования |
9 |
||
|
Наименования и назначение составных частей |
10 |
||
|
Передняя панель |
10 |
||
|
Дисплей |
13 |
||
|
Задняя панель |
14 |
||
|
Пульт дистанционного управления |
16 |
||
|
Подсоединения |
|||
|
Подсоединение акустической системы |
20 |
||
|
Установка акустической системы |
20 |
||
|
Подключение колонок |
22 |
||
|
Стандартная конфигурация и подключение динамиков |
24 |
||
|
Подсоединение телевизора |
25 |
||
|
Соединение 1 : Телевизор поддерживает режим ARC (Audio |
26 |
||
|
Return Channel) и имеет разъем HDMI |
|||
|
Соединение 2: Телевизор оснащен разъемом HDMI и |
27 |
||
|
несовместим с ARC (Audio Return Channel) |
|||
|
Соединение 3 : Телевизор не имеет разъема HDMI |
28 |
|
Подключение устройства воспроизведения |
29 |
||
|
Подсоединение телеприставки (Спутниковый приемник/ |
30 |
||
|
кабельное ТВ) |
|||
|
Подключение DVD-проигрывателя или проигрывателя дисков |
31 |
||
|
Blu-ray |
|||
|
Подключение игровой приставки или видеокамеры |
32 |
||
|
Подсоедините запоминающее устройство USB к порту USB |
33 |
||
|
Подключение антенны FM/AM |
34 |
||
|
Подключение кабеля питания |
36 |
||
|
Воспроизведение |
|||
|
Базовая эксплуатация |
38 |
||
|
Включение питания |
38 |
||
|
Выбор источника входного сигнала |
38 |
||
|
Регулировка уровня громкости |
39 |
||
|
Временное отключение звука (Выключение звука) |
39 |
||
|
Воспроизведение с проигрывателя DVD/Blu-ray |
39 |
||
|
Воспроизведение запоминающего устройства USB |
40 |
||
|
Воспроизведение файлов с запоминающих устройств USB |
41 |
||
|
Прослушивание музыки на устройстве Bluetooth |
42 |
||
|
Воспроизведение музыки с Bluetooth-устройства |
43 |
||
|
Сопряжение с другими Bluetooth-устройствами |
45 |
||
|
Повторное подключение к данному устройству с Bluetooth-устройства |
46 |
|
Передняя |
Дисплей |
Задняя |
2 |
Пульт ДУ |
Предметный |
|
панель |
панель |
указатель |

|
Содержание |
Подсоединения |
Воспроизведение |
Установки |
Рекомендации |
Приложение |
|
Прослушивание FM/AM-радиостанций |
47 |
|
|
Прослушивание FM/AM-радиостанций |
48 |
|
|
Поиск RDS |
49 |
|
|
Поиск PTY |
50 |
|
|
Поиск TP |
51 |
|
|
Радиотекст |
51 |
|
|
Настройка радиостанций и их автоматическое добавление (Auto Preset) |
52 |
|
|
Предварительная настройка текущей радиостанции (Preset Memory) |
53 |
|
|
Прослушивание предустановленной радиостанции |
53 |
|
|
Пропуск добавленных радиостанций (Preset Skip) |
54 |
|
|
Отмена пропуска радиостанций |
54 |
|
|
Удобные функции |
55 |
|
|
Повторное воспроизведение (Repeat) |
56 |
|
|
Воспроизведение композиций в случайном порядке (Random) |
56 |
|
|
Регулировка тональности (Tone) |
57 |
|
|
Оптимизация уровня громкости при прослушивании ночью (Night Mode) |
58 |
|
|
Проигрывание определенного видео во время воспроизведения аудио |
59 |
|
|
(Video Select) |
||
|
Выбор режима звука |
60 |
|
|
Выбор режима звука |
60 |
|
|
Режим управления HDMI |
64 |
|
|
Порядок настройки |
64 |
|
|
Регулировка громкости каждого канала для соответствия источнику |
65 |
|
|
входного сигнала (Ch Level Adjust) |
|
Режим автоматического отключения |
66 |
||
|
Использование таймера сна |
67 |
||
|
Функция быстрого выбора плюса |
68 |
||
|
Настройки вызова |
69 |
||
|
Изменение настроек |
69 |
||
|
Установки |
|||
|
Карта меню |
70 |
||
|
Управление меню |
73 |
||
|
Audio |
74 |
||
|
Surr.Parameter |
74 |
||
|
Restorer |
77 |
||
|
Audio Delay |
78 |
||
|
Volume |
78 |
||
|
Room EQ |
79 |
||
|
Video |
80 |
||
|
HDMI Audio Out |
80 |
||
|
HDMI PassThrough |
80 |
||
|
Pass Source |
81 |
||
|
HDMI Control |
81 |
||
|
ARC |
82 |
||
|
TV Audio Switching |
82 |
||
|
Pow.Off Control |
83 |
|
Передняя |
Дисплей |
Задняя |
3 |
Пульт ДУ |
Предметный |
|
панель |
панель |
указатель |

|
Содержание |
Подсоединения |
Воспроизведение |
Установки |
Рекомендации |
Приложение |
|
Inputs |
84 |
||
|
Input Assign |
84 |
||
|
Source Level |
84 |
||
|
Input Select |
85 |
||
|
Speakers |
86 |
||
|
Auto Setup |
86 |
||
|
Процедура настройки динамиков (Auto Setup) |
88 |
||
|
Сообщения об ошибках |
90 |
||
|
Manual Setup |
91 |
||
|
Speaker Config. |
91 |
||
|
Distances |
92 |
||
|
Levels |
93 |
||
|
Crossovers |
93 |
||
|
Bass |
94 |
||
|
General |
95 |
||
|
Language |
95 |
||
|
ECO |
95 |
||
|
Bluetooth |
97 |
||
|
Front Display |
98 |
||
|
Firmware |
98 |
||
|
Setup Lock |
99 |
||
|
Reset |
99 |
||
|
Проверка информации |
100 |
Рекомендации
|
Рекомендации |
102 |
||
|
Устранение неполадок |
103 |
||
|
Возврат к заводским настройкам |
115 |
||
|
Приложение |
|||
|
HDMI |
116 |
||
|
Воспроизведение устройств памяти USB |
119 |
||
|
Воспроизведение с устройства Bluetooth |
120 |
||
|
Режим персональной памяти |
121 |
||
|
Режим запоминания настроек при выключении |
121 |
||
|
Режимы звука и вывод канала |
122 |
||
|
Режимы звука и параметры объемного звука |
123 |
||
|
Типы входных сигналов и соответствующие режимы |
124 |
||
|
воспроизведения звука |
|||
|
Словарь терминов |
125 |
||
|
Сведения о торговых марках |
130 |
||
|
Технические характеристики |
132 |
||
|
Предметный указатель |
136 |
|
Передняя |
Дисплей |
Задняя |
4 |
Пульт ДУ |
Предметный |
|
панель |
панель |
указатель |
|
Содержание |
Подсоединения |
Воспроизведение |
Установки |
Рекомендации |
Приложение |
Благодарим за приобретение устройства Denon.
Чтобы гарантировать его бесперебойную работу, пожалуйста, внимательно прочтите настоящее руководство пользователя, прежде чем приступить к эксплуатации изделия.
Ознакомившись с руководством, используйте его в дальнейшей работе с устройством.
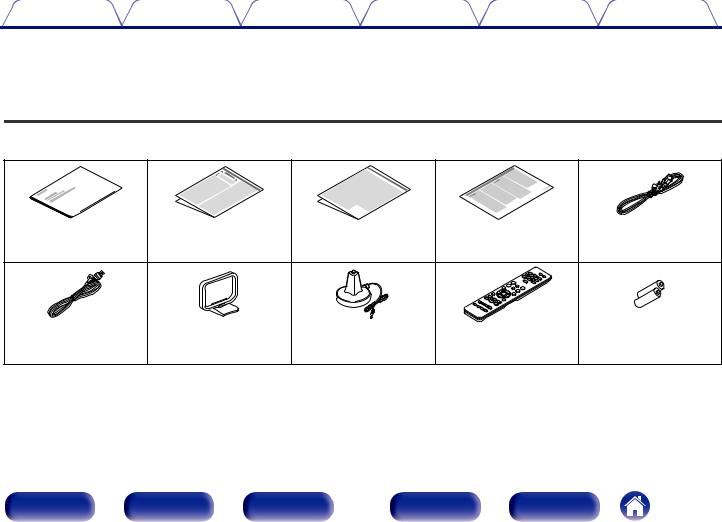
Комплект поставки
Убедитесь в наличии следующих компонентов в комплекте поставки изделия:
|
Краткое руководство |
Правила техники |
Предупреждение |
Примечания по радио |
Сетевой шнур |
|
пользователя |
безопасности |
относительно батареек |
|
Комнатная FM-антенна |
Рамочная AM-антенна |
Микрофон калибровки |
Пульт дистанционного |
Батарейки R03/AAA |
|
звука |
управления |
|||
|
(RC-1216) |
|
Передняя |
Дисплей |
Задняя |
5 |
Пульт ДУ |
Предметный |
|
панель |
панель |
указатель |
|
Содержание |
Подсоединения |
Воспроизведение |
Установки |
Рекомендации |
Приложение |
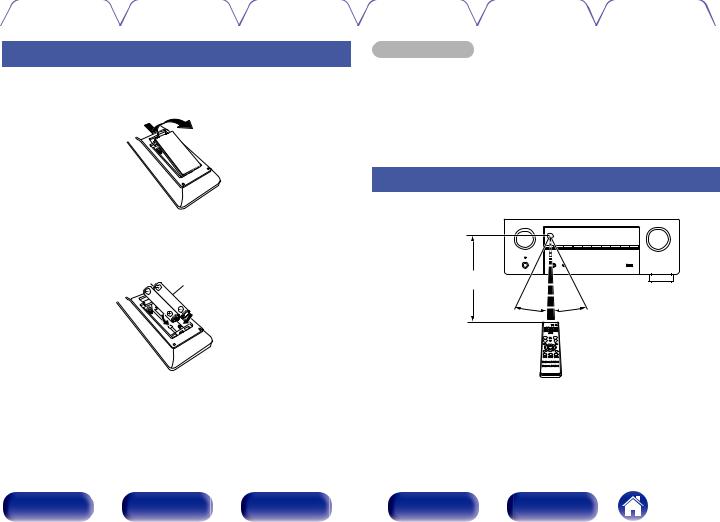
Установка батареек
1Снимите заднюю крышку в направлении, указанном стрелкой, и снимите ее.
2Вставьте две батареи в отсек для батарей надлежащим образом как показано.
Элементы питания
ПРИМЕЧАНИЕ
0 Чтобы предотвратить ущерб или утечку жидкости из батареек:
0Запрещается пользоваться новой батарейкой вместе со старой.
0Запрещается пользоваться батарейками разных типов.
0Извлекайте батарейки из пульта ДУ при продолжительном перерыве в его использовании.
0В случае утечки жидкости из батареек тщательно вытрите жидкость в отсеке для батареек и вставьте новые батарейки.
Диапазон действия пульта ДУ
При управлении направляйте пульт ДУ на датчик ДУ.
Приблизительно 7 м 
3Вставьте заднюю крышку на место.
|
Передняя |
Дисплей |
Задняя |
6 |
Пульт ДУ |
Предметный |
|
панель |
панель |
указатель |
|
Содержание |
Подсоединения |
Воспроизведение |
Установки |
Рекомендации |
Приложение |
Отличительные особенности
Высокое качество звучания
0 Благодаря технологии с дискретной схемой усилитель
обеспечивает одинаковое качество для всех 5-каналов (90 Вт х 5-каналов)
Секция усилителя оснащена отдельными блоками питания (неинтегральная схема), что позволяет добиться максимальной реалистичности и потрясающего динамического диапазона. Благодаря мощным отдельным блокам питания усилитель дает возможность легко управлять высококачественными колонками.
Высокое качество видео
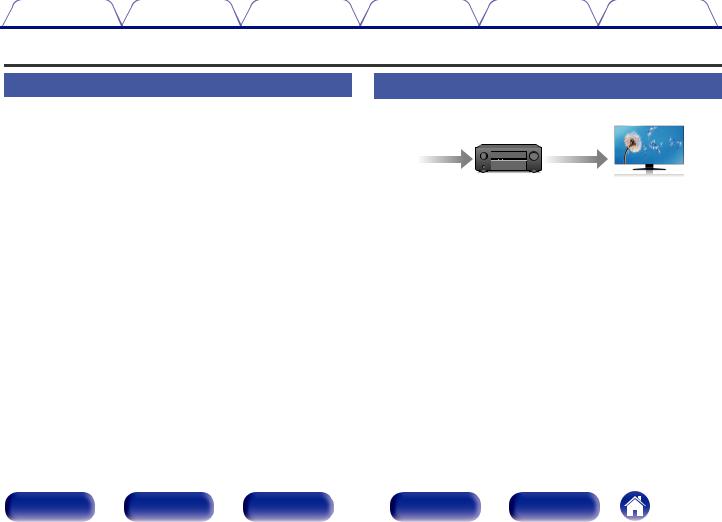
0 Поддерживается вход/выход 4K 60 Гц
|
4K 60p |
4K 60p |
|||
|
4:4:4 |
4:4:4 |
|||
Когда используется 4K Ultra HD (High Definition), скорость входа/ выхода 60 кадров в секунду (60p) достигается для видео сигналов. При подключении к 4K Ultra HD и телевизору, совместимому с входным видео сигналом 60р, Вы можете наслаждаться ощущением реальности, которое доступно только в изображениях с высоким разрешением, даже при просмотре быстро движущегося видео.
Данное устройство также поддерживает обработку изображений для 4K 60p, 4:4:4 и 24-битных видео. Путем обработки видео в оригинальном разрешении, это устройство позволяет наслаждаться безупречным качеством изображения с высоким разрешением.
Данное устройство также поддерживает HDR (расширенный динамический диапазон) и широкую цветовую гамму BT.2020.
0 HDCP 2.2
Данное устройство совместимо со стандартом защиты авторских прав HDCP2.2.
|
Передняя |
Дисплей |
Задняя |
7 |
Пульт ДУ |
Предметный |
|
панель |
панель |
указатель |

|
Содержание |
Подсоединения |
Воспроизведение |
Установки |
Рекомендации |
Приложение |
0Разъемы HDMI позволяют подключать различные цифровые аудио- и видеоустройства (5 входов, 1 выхода)
5 
Вход Выход
Данное устройство оснащено 5 входами HDMI и 1 выходом HDMI, что позволяет подключать его к различным HDMI-совместимым устройствам, например к проигрывателям дисков Blu-Ray, игровым приставкам и цифровым видеокамерам HD.
0Беспроводное подключение к устройствам Bluetooth можно легко выполнить (v стр. 42)
Вы можете наслаждаться музыкой, просто подключившись посредством беспроводной связи к Вашему смартфону, планшету, ПК и т.д.
0Энергосберегающий дизайн
Данное устройство имеет функцию ЭКО-режима, которая позволяет наслаждаться музыкой и видеороликами при снижении энергопотребления во время использования, а также функцию автоматического режима ожидания, которая автоматически выключает питание, когда устройство не используется. Это помогает уменьшить излишнее использование питания.
|
Передняя |
Дисплей |
Задняя |
8 |
Пульт ДУ |
Предметный |
|
панель |
панель |
указатель |
|
Содержание |
Подсоединения |
Воспроизведение |
Установки |
Рекомендации |
Приложение |
Простота и удобство использования
0В “Setup Assistant” содержатся удобные указания по настройке
Сначала по запросу выбирается язык. Затем просто следуйте инструкциям на экране телевизора для настройки динамиков и т. п.
0Удобный графический интерфейс пользователя
Данное устройство оснащено графическим интерфейсом пользователя для улучшенной работоспособности.
0Совместимость с приложением “Denon 500 Series Remote”, выполняющим основные операции управления устройством с помощью устройств iPad, iPhone или Android™ (Google, Amazon Kindle Fire)
Приложение “Denon 500 Series Remote”z позволяет управлять устройством по беспроводному соединению с помощью устройства iPhone, iPad, смартфона или планшета Android, если выполнено сопряжение и подключение по каналу Bluetooth. Основные функции: включение/выключение питания, управление громкостью, отключение звука и выбор источника.
zЗагрузите соответствующее приложение “Denon 500 Series Remote” для iOS или устройств на платформе Android. Для использования приложения
“Denon 500 Series Remote” устройство iOS или Android должно быть заранее сопряжено с данным устройством.
|
Передняя |
Дисплей |
Задняя |
9 |
Пульт ДУ |
Предметный |
|
панель |
панель |
указатель |
|
Содержание |
Подсоединения |
Воспроизведение |
Установки |
Рекомендации |
Приложение |
Наименования и назначение составных частей
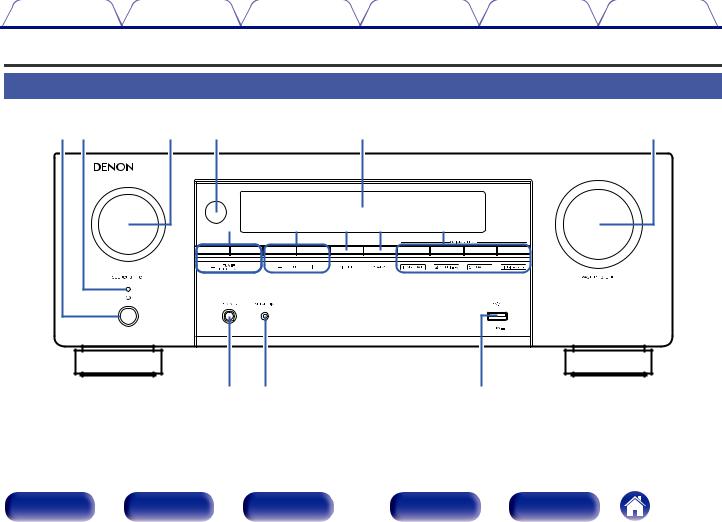
Передняя панель
|
q w |
e |
r |
t |
y |
||
|
u |
i |
o |
Q0 |
Q1 |
||
|
Q2 Q3 |
Q4 |
Подробности можно узнать на следующей странице.
|
Передняя |
Дисплей |
Задняя |
10 |
Пульт ДУ |
Предметный |
|
панель |
панель |
указатель |
|
Содержание |
Подсоединения |
Воспроизведение |
Установки |
Рекомендации |
Приложение |
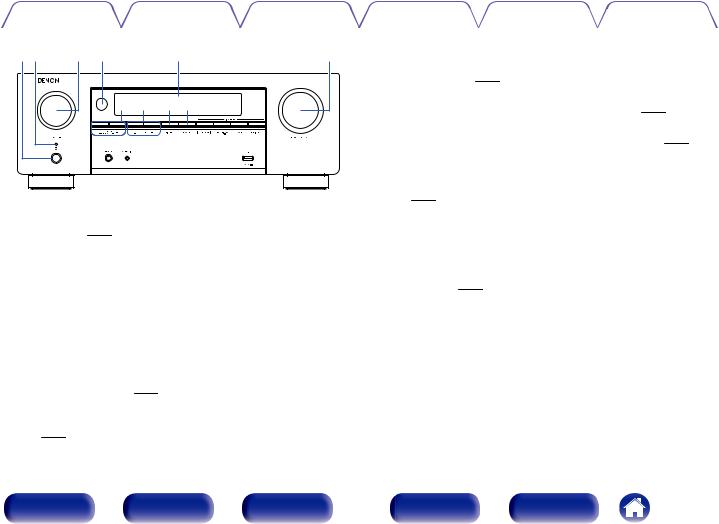
AКнопка включения питания (X)
Используется для включения/выключения (режим ожидания) питания. (v стр. 38)
B Индикатор питания
Цвет индикатора питания отражает текущий режим:
0Зеленый: питание включено
0Выкл.: Режим обычного ожидания
0Красный:
0 Когда “HDMI PassThrough” установлен в положение
“On” (v стр. 80)
0 Когда для параметра “HDMI Control” установлено значение
“On” (v стр. 81)
0 Когда для параметра “BluetoothStandby” установлено значение “On” (v стр. 97)
C Регулятор SOURCE SELECT
Используется для выбора источника входного сигнала. (v стр. 38)
D Датчик пульта ДУ
Используется для приема сигналов от пульта дистанционного управления. (v стр. 6)
EДисплей
Используется для отображения информации. (v стр. 13)
F Регулятор MASTER VOLUME
Используется для регулировки уровня громкости. (v стр. 39)
G Кнопки предустановленных каналов тюнера
(TUNER PRESET CH +, –)
Используются для выбора запрограммированных радиостанций. (v стр. 53)
H Кнопки настройки (TUNE +, –)
Выбирают либо FM-радиостанции либо АМ-радиостанции. (v стр. 48)
I Кнопка DIMMER
При каждом нажатии этой кнопки изменяется уровень яркости дисплея. (v стр. 98)
J Кнопка STATUS
При каждом нажатии этой кнопки изменяется информация о состоянии, отображаемая на дисплее.
|
Передняя |
Дисплей |
Задняя |
11 |
Пульт ДУ |
Предметный |
|
панель |
панель |
указатель |
|
Содержание |
Подсоединения |
Воспроизведение |
Установки |
Рекомендации |
Приложение |
Q2Q3 Q4
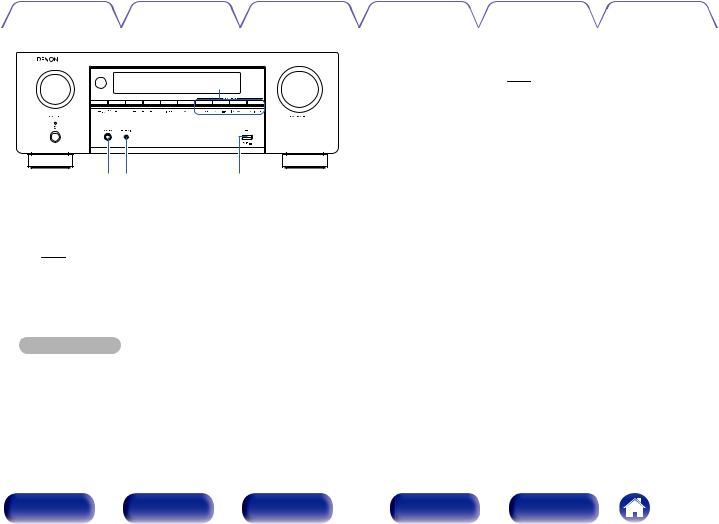
K Кнопки QUICK SELECT
При нажатии на любую из этих кнопок вызываются присвоенные им настройки — например, относящиеся к источнику входного сигнала, уровню громкости или режиму воспроизведения звука. (v стр. 68)
L Разъем для наушников (PHONES)
Используются для подключения наушников.
При подключении наушников к этому разъему звук перестает выводиться через акустическую систему или через разъемы
SUBWOOFER.
ПРИМЕЧАНИЕ
0Чтобы предотвратить ухудшение слуха, не следует слишком высоко поднимать уровень громкости при использовании головных телефонов.
M Разъем микрофона SETUP MIC
Используется для подключения прилагаемого микрофона калибровки звука. (v стр. 89)
NUSB-порт (T)
Используется для подключения USB-накопителей (устройств памяти USB) и входящего в комплект USB-кабеля. (v стр. 33)
|
Передняя |
Дисплей |
Задняя |
12 |
Пульт ДУ |
Предметный |
|
панель |
панель |
указатель |
|
Содержание |
Подсоединения |
Воспроизведение |
Установки |
Рекомендации |
Приложение |
||
|
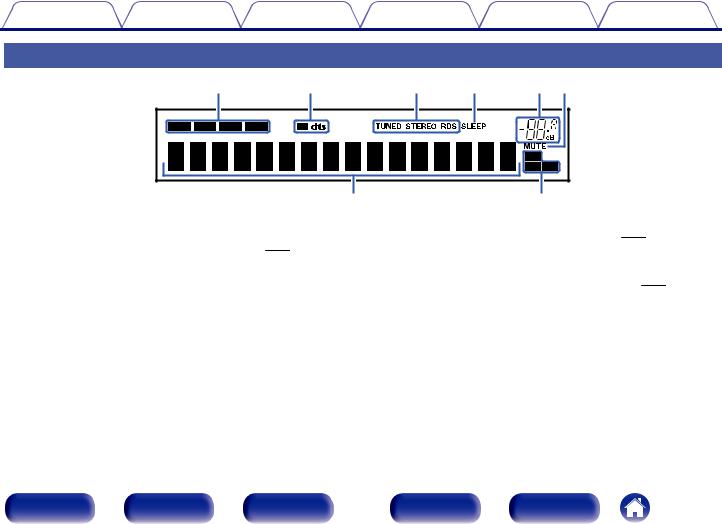
Дисплей |
|||||||
|
q |
w |
e |
r |
t y |
|||
|
u |
i |
||||||
|
A Индикаторы режима входа |
D Индикатор таймера отключения |
||||||
|
Подсвечиваются в соответствии с настройками режима аудио |
Подсвечивается при выборе режима сна. (v стр. 66) |
||||||
|
входа каждого источника входного сигнала. (v стр. 85) |
E Индикатор громкости |
||||||
|
B Индикатор декодирования |
F Индикатор MUTE |
||||||
|
Загорается, когда на выходе есть сигнал Dolby или DTS, или во |
Мигает при включенном беззвучном режиме. (v стр. 39) |
||||||
|
время работы Dolby или DTS. |
G Информационный экран |
||||||
|
C Индикаторы режима приема тюнера |
|||||||
|
Здесь выводятся имя источника входного сигнала, режим звука, |
|||||||
|
Подсвечивается в зависимости от условий приема при выборе в |
|||||||
|
значения настроек и другие сведения. |
|||||||
|
качестве источника сигнала “Tuner”. |
H Индикаторы входного сигнала |
||||||
|
TUNED : Подсвечивается при правильной настройке на |
|||||||
|
Соответствующий индикатор загорается в соответствии с |
|||||||
|
радиостанцию. |
|||||||
|
входным сигналом. (v стр. 85) |
|||||||
|
STEREO: Загорается при приеме радиовещания в |
|||||||
|
стереодиапазоне FM. |
|||||||
|
RDS : Подсвечивается при приеме радиовещания RDS. |
|
Передняя |
Дисплей |
Задняя |
13 |
Пульт ДУ |
Предметный |
|
панель |
панель |
указатель |
Содержание Подсоединения Воспроизведение Установки Рекомендации Приложение
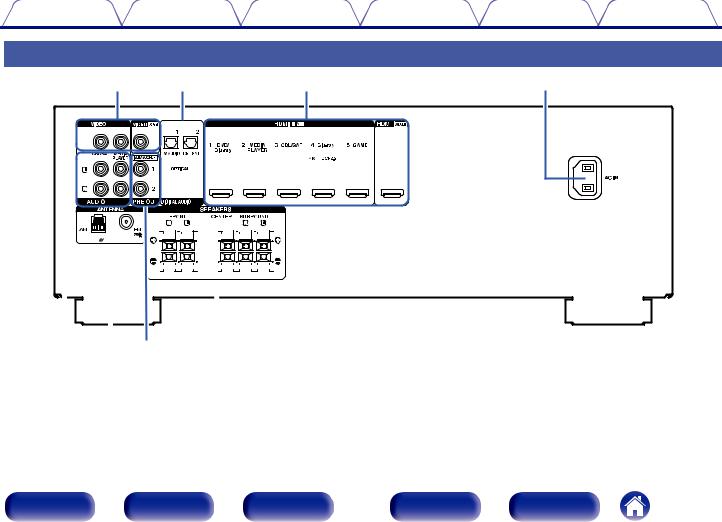
Задняя панель
q w e r
|
t y u |
i |
Подробности можно узнать на следующей странице.
|
Передняя |
Дисплей |
Задняя |
14 |
Пульт ДУ |
Предметный |
|
панель |
панель |
указатель |
|
Содержание |
Подсоединения |
Воспроизведение |
Установки |
Рекомендации |
Приложение |
|
|
q w |
e |
r |
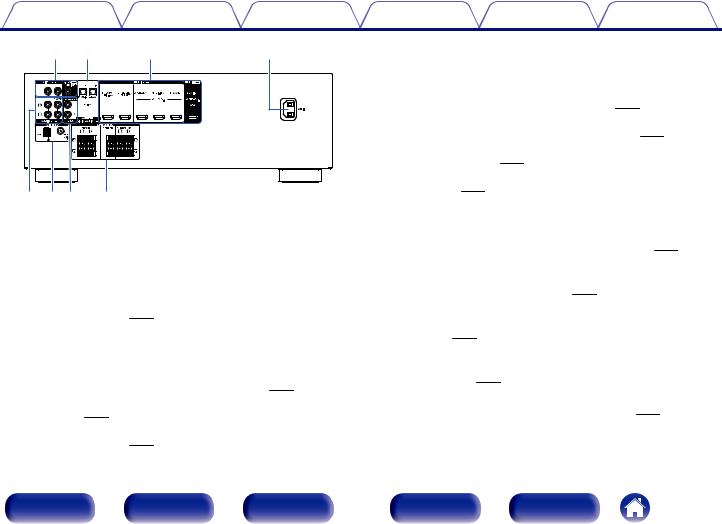
C Разъем HDMI |
|||
|
Используются для подключения устройств, оборудованных |
||||||
|
разъемами HDMI. |
||||||
|
0 |
“Соединение 1 : Телевизор поддерживает режим ARC (Audio |
|||||
|
Return Channel) и имеет разъем HDMI” (v стр. 26) |
||||||
|
0 |
“Соединение 2: Телевизор оснащен разъемом HDMI и |
|||||
|
несовместим с ARC (Audio Return Channel)” (v стр. 27) |
||||||
|
0 |
“Подсоединение телеприставки (Спутниковый приемник/ |
|||||
|
кабельное ТВ)” (v стр. 30) |
||||||
|
0 |
“Подключение DVD-проигрывателя или проигрывателя дисков |
|||||
|
t y u |
i |
Blu-ray” (v стр. 31) |
||||
|
0 |
“Подключение игровой приставки или |
|||||
|
видеокамеры” (v стр. 32) |
A Разъемы видео (VIDEO)
Используются для подключения устройств, оборудованных видеоразъемами.
0“Соединение 3 : Телевизор не имеет разъема
HDMI” (v стр. 28)
0“Подсоединение телеприставки (Спутниковый приемник/ кабельное ТВ)” (v стр. 30)
B Разъемы для цифрового звука (DIGITAL AUDIO)
Используются для подключения устройств, оборудованных цифровыми аудиоразъемами.
0“Соединение 2: Телевизор оснащен разъемом HDMI и
несовместим с ARC (Audio Return Channel)” (v стр. 27)
0“Соединение 3 : Телевизор не имеет разъема
HDMI” (v стр. 28)
0“Подсоединение телеприставки (Спутниковый приемник/ кабельное ТВ)” (v стр. 30)
|
Передняя |
Дисплей |
Задняя |
|
панель |
панель |
D Вход AC (AC IN)
Используется для подключения шнура питания. (v стр. 36)
E Разъемы аналогового звука (AUDIO)
Используются для подключения устройств, оборудованных аналоговыми аудиоразъемами. (v стр. 30)
F Гнездо FM/AM-антенны (ANTENNA)
Используется для подключения FM-антенн и рамочных АМантенн. (v стр. 34)
G Разъемы PRE OUT
Используется для подключения сабвуфера со встроенным усилителем. (v стр. 23)
H Клеммы динамиков (SPEAKERS)
Используются для подключения динамиков. (v стр. 22)
|
15 |
Пульт ДУ |
Предметный |
|
указатель |
|
Содержание |
Подсоединения |
Воспроизведение |
Установки |
Рекомендации |
Приложение |
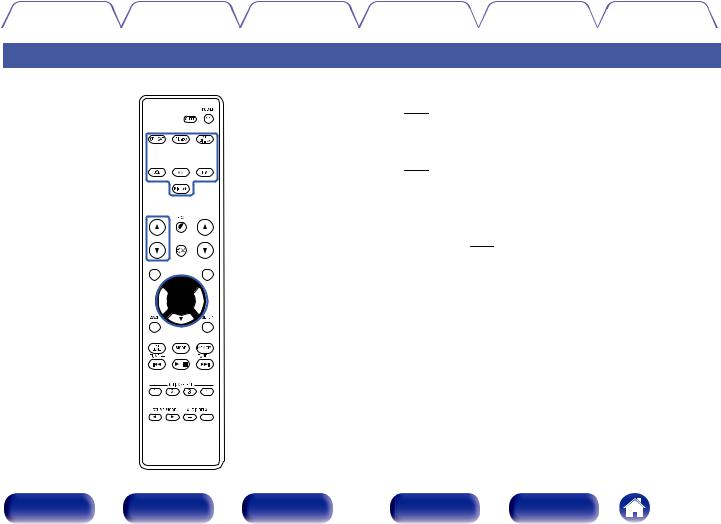
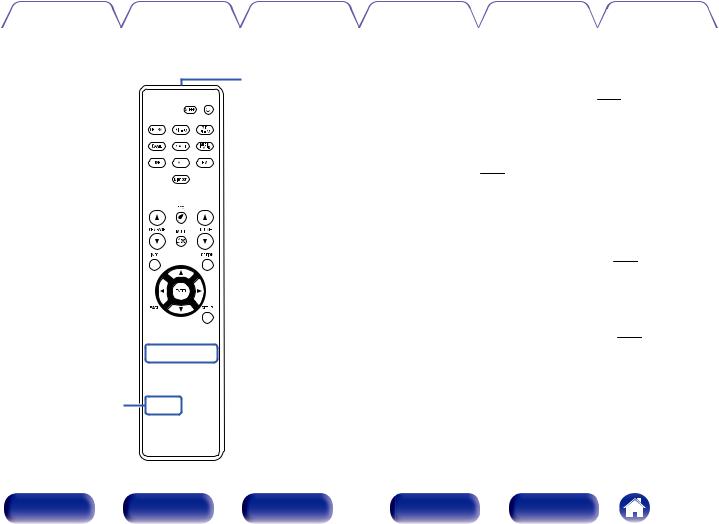
A Кнопки выбора источника входного сигнала
Используются для выбора источника входного сигнала. (v стр. 38)
B Кнопки поиска канала или страницы (CH/PAGE df)
Используются для выбора радиостанций, от зарегистрированных до предустановленных, или перехода между страницами.
(v стр. 53)
C Кнопка MUTE (:)
Используется для отключения звука. (v стр. 39)
D Кнопка информации (INFO)
Используется для отображения на экране телевизора информации о состоянии. (v стр. 100)
EКнопки курсора (uio p)
Используются для выбора пунктов.
|
Передняя |
Дисплей |
Задняя |
16 |
Пульт ДУ |
Предметный |
|
панель |
панель |
указатель |
|
Содержание |
Подсоединения |
Воспроизведение |
Установки |
Рекомендации |
Приложение |
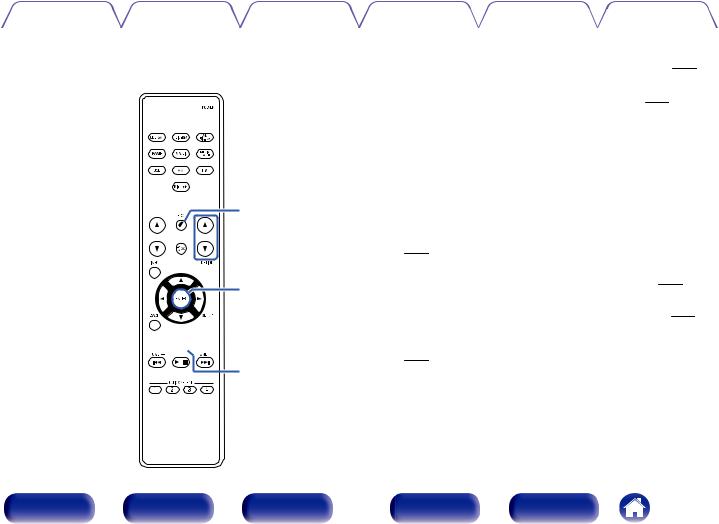
F Кнопка BACK
Используется для возврата в предыдущее меню.
G Кнопка уровня канала (CH LEVEL)
Регулирование громкости динамиков. (v стр. 65)
H Системные кнопки
Используются для управления воспроизведением.
Кнопки настройки на радиостанции (TUNE +, –)
Используются для выбора либо FM-радиостанции либо АМрадиостанции. (v стр. 48)
I Кнопки QUICK SELECT (1 – 4)
Вызывают настройки, зарегистрированные на каждой кнопке, такие как источник ввода, уровень громкости и настройки режима звука. (v стр. 68)
J Кнопки SOUND MODE (0 1)
Используются для выбора режима звука. (v стр. 60)
K Передатчик сигнала дистанционного управления
Используется для передачи сигналов от пульта дистанционного управления. (v стр. 6)
L Кнопка SLEEP
Используется для установки таймера сна. (v стр. 66)
|
Передняя |
Дисплей |
Задняя |
17 |
Пульт ДУ |
Предметный |
|
панель |
панель |
указатель |
|
Содержание |
Подсоединения |
Воспроизведение |
Установки |
Рекомендации |
Приложение |
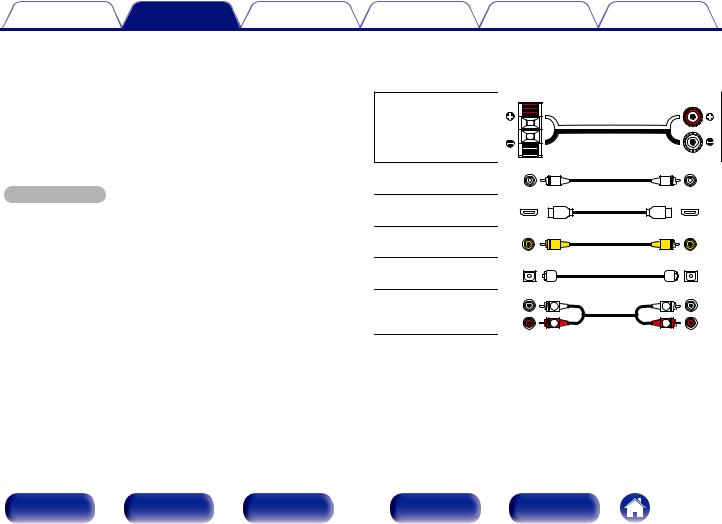
M Кнопка POWER (X)
Используется для включения и выключения питания. (v стр. 38)
NКнопка ЭКО-режим (G)
Используется для переключения в ECO-режим. (v стр. 95)
O Кнопки VOLUME (df)
Используются для регулировки уровня громкости. (v стр. 39)
P Кнопка OPTION
Используется для отображения на экране телевизора меню действий.
Q Кнопка ENTER
Определяет выбор.
R Кнопка SETUP
Используется для отображения меню на экране телевизора. (v стр. 73)
S Кнопка предустановленной памяти (MEMORY)
Текущая радиостанция будет добавлена в память. (v стр. 53)
T Кнопка выбора режима настройки (MODE)
Используется для переключения режима настройки. (v стр. 48)
U Кнопки AUDIO DELAY (+, –)
Компенсирует задержку по времени между видео и звуком. (v стр. 78)
|
Передняя |
Дисплей |
Задняя |
18 |
Пульт ДУ |
Предметный |
|
панель |
панель |
указатель |
|
Содержание |
Подсоединения |
Воспроизведение |
Установки |
Рекомендации |
Приложение |
o Содержание
|
Подсоединение акустической системы |
20 |
|
Подсоединение телевизора |
25 |
|
Подключение устройства воспроизведения |
29 |
|
Подсоедините запоминающее устройство USB к порту USB |
33 |
|
Подключение антенны FM/AM |
34 |
|
Подключение кабеля питания |
36 |
ПРИМЕЧАНИЕ
0Не вставляйте шнур питания в розетку, пока не будут подсоединены все компоненты. Однако, когда “Setup Assistant” работает, следуйте инструкциям на экране “Setup Assistant” (стр. 7 в отдельном “Краткое руководство пользователя”) для выполнения соединений. (Во время работы “Setup Assistant” на входные/выходные разъемы напряжение не подается.)
0Не прокладывайте сетевые шнуры вместе с соединительными кабелями. Это может привести к образованию помех.
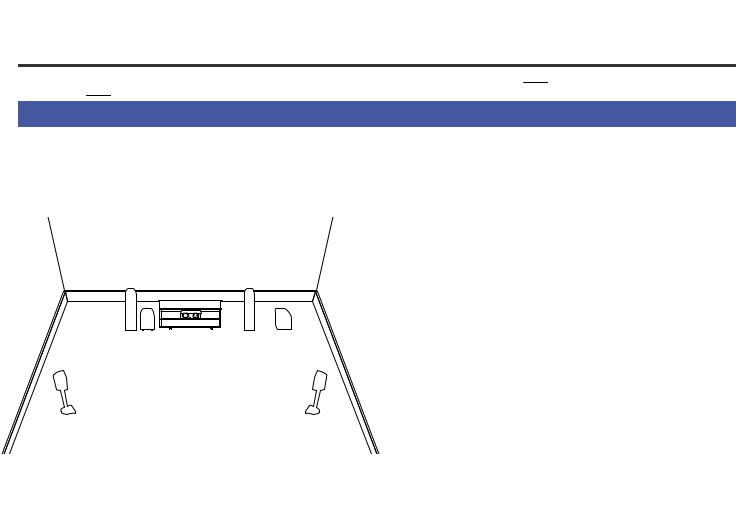
oКабели, используемые для подключения
Кподключаемым устройствам используйте предназначенные им кабели.
Кабель для колонок
Кабель для сабвуфера
Кабель HDMI
Видеокабель
Оптический кабель
|
Аудиокабель |
L |
L |
|
|
R |
R |
||
|
Передняя |
Дисплей |
Задняя |
19 |
Пульт ДУ |
Предметный |
|
панель |
панель |
указатель |
|
Содержание |
Подсоединения |
Воспроизведение |
Установки |
Рекомендации |
Приложение |
Подсоединение акустической системы
Установите колонки и подключите их к данному устройству. (“Установка акустической системы” (v стр. 20), “Подключение колонок” (v стр. 22))
Установка акустической системы
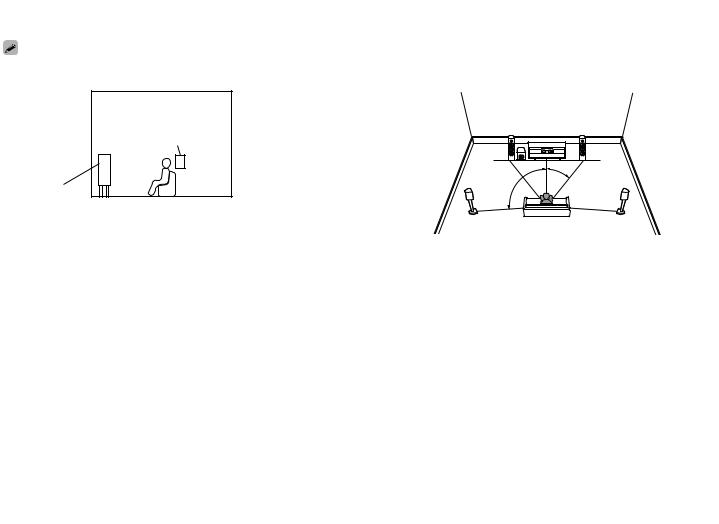
Определите тип акустической системы в зависимости от количества используемых Вами динамиков и установите каждый динамик и сабвуфер в комнате.
Порядок установки динамиков объяснен на этом примере типичной установки.
|
FL/FR |
Установите левый и правый FRONT динамики |
|
|
на равном удалении от основной позиции |
||
|
(левый/правый |
прослушивания. Расстояние между |
|
|
фронтальный |
||
|
телевизором и обоими динамиками также |
||
|
динамик): |
||
|
должно быть одинаковым. |
||
|
C |
Поместите CENTER динамик спереди и по |
|
|
(центральный |
центру телевизора между фронтальными |
|
|
динамик): |
левыми и правыми динамиками. |
|
|
SL/SR |
Установите левый и правый динамики |
|
|
(левый/правый |
SURROUND звучания по обеим сторонам от |
|
|
динамик объемного |
основной позиции прослушивания на равном |
|
|
звучания): |
удалении от нее. |
|
|
SW 1/2 |
Установите SUBWOOFER в удобном месте |
|
|
рядом с фронтальными динамиками. При |
||
|
(сабвуфер): |
использовании двух сабвуферов расположите |
|
|
их в комнате симметрично. |
|
Передняя |
Дисплей |
Задняя |
20 |
Пульт ДУ |
Предметный |
|
панель |
панель |
указатель |
|
Содержание |
Подсоединения |
Воспроизведение |
Установки |
Рекомендации |
Приложение |
0Ниже на рисунке показано, на какой высоте устанавливать каждую колонку. Высота указана приблизительно.
oУстановка 5.1-канальной акустической системы
Панорамный
громкоговоритель
|
Фронтальный |
|
|
громкогово-ритель |
GВид сбокуH |
z1 22° – 30° z2 120°
|
Передняя |
Дисплей |
Задняя |
21 |
Пульт ДУ |
Предметный |
|
панель |
панель |
указатель |
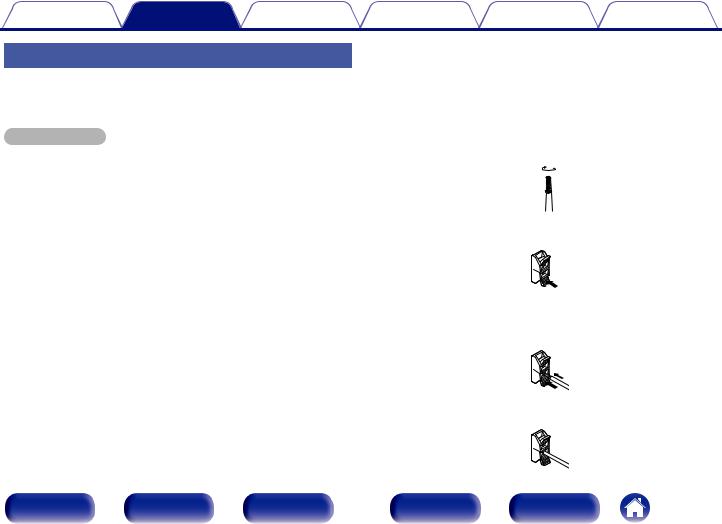
|
Содержание |
Подсоединения |
Воспроизведение |
Установки |
Рекомендации |
Приложение |
Подключение колонок
В данном разделе описывается подключение данного устройства к колонкам в помещении.
Подключение объясняется на примерах.
ПРИМЕЧАНИЕ
0Перед подключением акустической системы, отключите шнур питания устройства из розетки. Выключите сабвуфер.
0Выполняйте подсоединение таким образом, чтобы центральные проводники кабеля акустической системы не выступали из клеммы громкоговорителя. Возможно срабатывание схемы защиты при соприкосновении центральных проводников с задней панелью или при соприкосновении проводов + и — друг с другом. (“Схема защиты” (v стр. 129))
0Запрещается прикасаться к клеммам динамиков при подключенном сетевом шнуре. Это может привести к поражению электрическим током. Когда “Setup Assistant” (стр. 7 в отдельном “Кратком руководстве пользователя”) работает, следуйте инструкциям на экране “Setup Assistant” для выполнения соединений. (Во время работы “Setup Assistant” электропитание на клеммы динамиков не подается.)
0Используйте динамики с импедансом в диапазоне от 6 до 16 Ом.
oПодключение кабелей к акустической системе
Внимательно проверьте левый (Л) и правый (П) каналы и полярность (+ красный, – черный) на колонках, присоединенных к устройству, и подключите каналы в соответствии с указанной маркировкой.
1Срежьте около 10 мм изоляции с провода колонок, затем или крепко скрутите сердечник провода, или воспользуйтесь клеммами для подключения.
2Нажмите на рычаг на клемме динамика.
3Удерживая рычаг на клемме динамика вставьте оголенный провод кабеля динамика в клемму динамика до упора.
4Уберите ваш палец с рычага клеммы динамика.
|
Передняя |
Дисплей |
Задняя |
22 |
Пульт ДУ |
Предметный |
|
панель |
панель |
указатель |
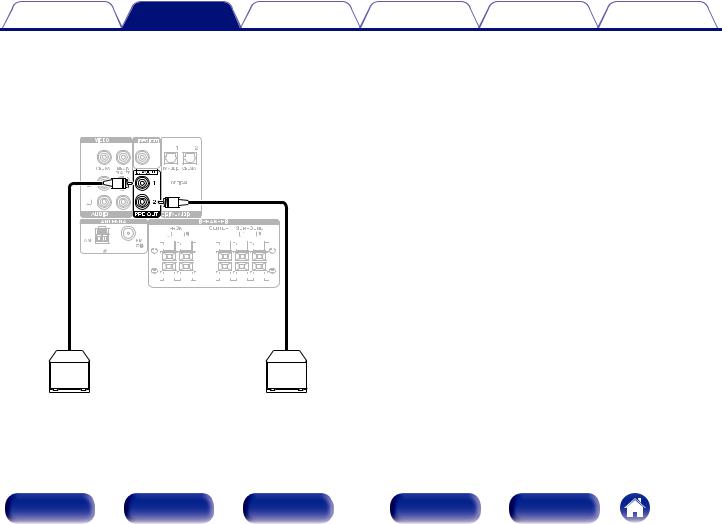
|
Содержание |
Подсоединения |
Воспроизведение |
Установки |
Рекомендации |
Приложение |
o Подключение сабвуфера
Чтобы подключить сабвуфер, воспользуйтесь кабелем для сабвуфера. К данному устройству можно подключить два сабвуфера.
Тот же сигнал выводится с соответствующих разъемов сабвуфера.
|
SW1 |
SW2 |
|
Передняя |
Дисплей |
Задняя |
23 |
Пульт ДУ |
Предметный |
|
панель |
панель |
указатель |
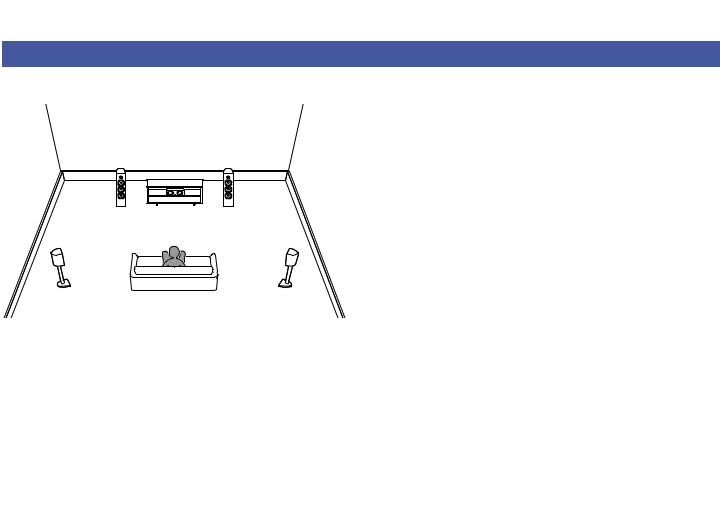
|
Содержание |
Подсоединения |
Воспроизведение |
Установки |
Рекомендации |
Приложение |
Стандартная конфигурация и подключение динамиков
Служит в качестве основной 5.1-канальной объемной системы. Поддерживаются режимы звука такие как Dolby Pro Logic g.
SL 
|
Передняя |
Дисплей |
Задняя |
24 |
Пульт ДУ |
Предметный |
|
панель |
панель |
указатель |
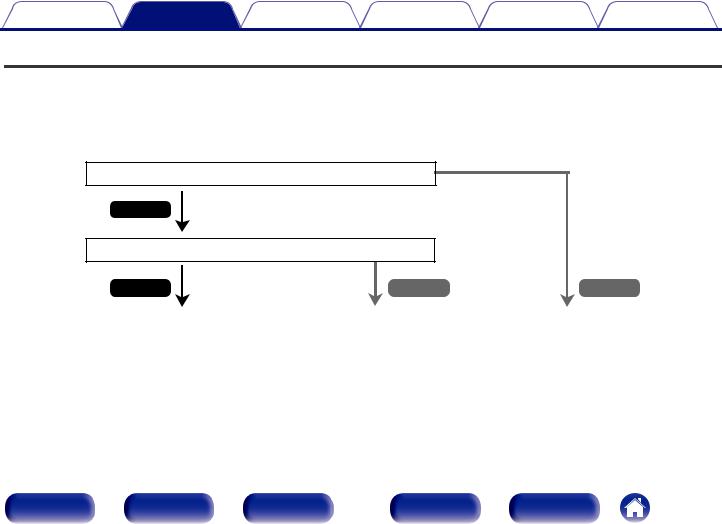
|
Содержание |
Подсоединения |
Воспроизведение |
Установки |
Рекомендации |
Приложение |
Подсоединение телевизора
Подключите телевизор к данному устройству таким образом, чтобы вывести на него входящий видеосигнал. Данное устройство может использоваться также для прослушивания звука с телевизора.
Конфигурация подключения зависит от набора разъемов и функций телевизора.
Благодаря функции ARC (Audio Return Channel) на данном устройстве можно воспроизводить звук с телевизора, передавая звуковой сигнал по кабелю HDMI.
Телевизор имеет разъем HDMI?
Да
Телевизор совместим с режимом ARC (Audio Return Channel)?
|
Да |
Нет |
Нет |
||||||
|
“Соединение 1 : Телевизор поддерживает |
“Соединение 2: Телевизор оснащен разъемом |
“Соединение 3 : Телевизор не имеет |
||||||
|
режим ARC (Audio Return Channel) и имеет |
HDMI и несовместим с ARC (Audio Return |
разъема HDMI” (v стр. 28) |
||||||
|
разъем HDMI” (v стр. 26) |
Channel)” (v стр. 27) |
|||||||
|
Передняя |
Дисплей |
Задняя |
25 |
Пульт ДУ |
Предметный |
|
панель |
панель |
указатель |
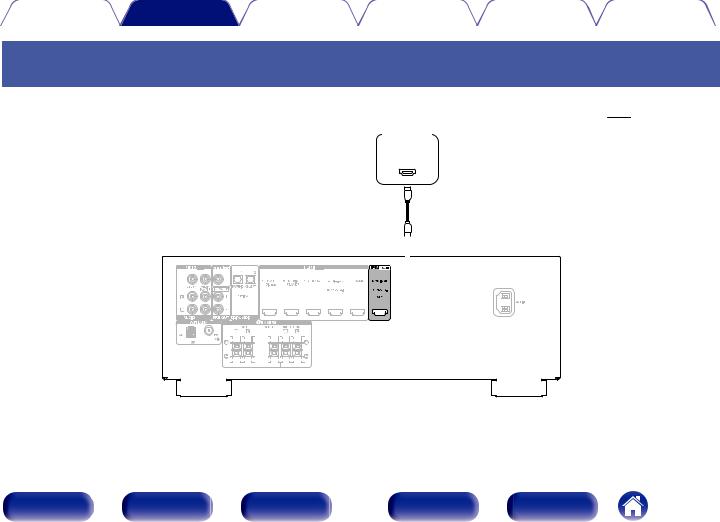
|
Содержание |
Подсоединения |
Воспроизведение |
Установки |
Рекомендации |
Приложение |
Соединение 1 : Телевизор поддерживает режим ARC (Audio Return Channel) и имеет разъем HDMI
Для подключения к данному устройству телевизора, совместимого с режимом ARC, используйте кабель HDMI.
При использовании телевизора с поддержкой функции ARC выберите для параметра “HDMI Control” значение “On”. (v стр. 81)
ТВ
HDMI
IN
(ARC)
|
26 |
||||||||||||||||||||||||||||||||||||||||||||
|
Передняя |
Дисплей |
Задняя |
Пульт ДУ |
Предметный |
||||||||||||||||||||||||||||||||||||||||
|
панель |
панель |
указатель |
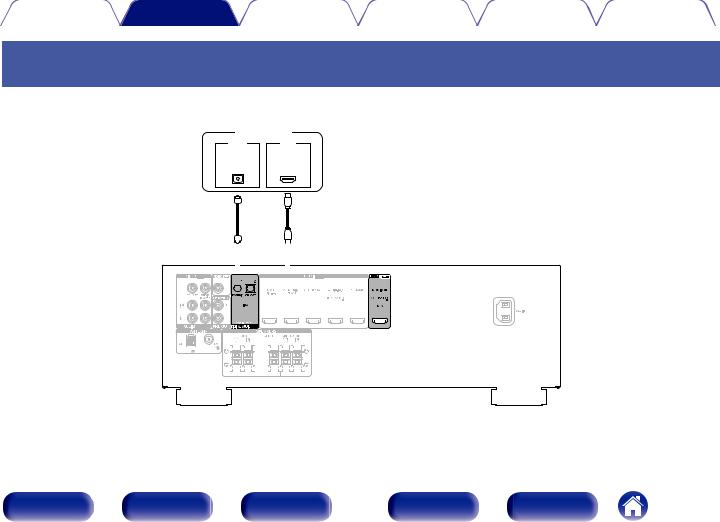
|
Содержание |
Подсоединения |
Воспроизведение |
Установки |
Рекомендации |
Приложение |
Соединение 2: Телевизор оснащен разъемом HDMI и несовместим с ARC (Audio Return Channel)
Для подключения телевизора к данному устройству используйте кабель HDMI.
Для прослушивания звука с телевизора соедините оба устройства оптическим кабелем.
|
ТВ |
|
|
OUT |
IN |
|
OPTICAL |
HDMI |
|
OUT |
IN |
|
27 |
||||||||||||||||||||||||||||||||||
|
Передняя |
Дисплей |
Задняя |
Пульт ДУ |
Предметный |
||||||||||||||||||||||||||||||
|
панель |
панель |
указатель |
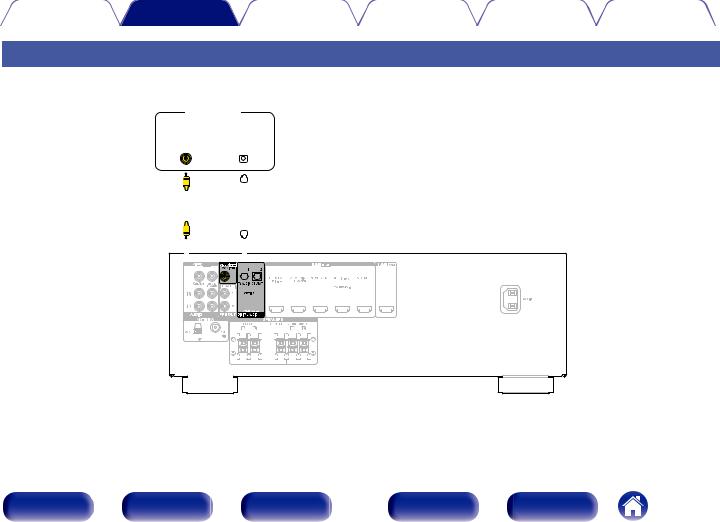
|
Содержание |
Подсоединения |
Воспроизведение |
Установки |
Рекомендации |
Приложение |
Соединение 3 : Телевизор не имеет разъема HDMI
Для подключения телевизора к данному устройству используйте видеокабель.
Для прослушивания звука с телевизора соедините оба устройства оптическим кабелем.
|
ТВ |
||||||||||||||||||||||||||||||||||||
|
IN |
OUT |
|||||||||||||||||||||||||||||||||||
|
VIDEO |
OPTICAL |
|||||||||||||||||||||||||||||||||||
|
IN |
OUT |
|||||||||||||||||||||||||||||||||||
|
Передняя |
Дисплей |
Задняя |
28 |
Пульт ДУ |
Предметный |
|
панель |
панель |
указатель |
|
Содержание |
Подсоединения |
Воспроизведение |
Установки |
Рекомендации |
Приложение |
Подключение устройства воспроизведения
Данное устройство оснащено двумя типами видеоразъемов входного сигнала (HDMI и композитное видео) и тремя типами аудиоразъемов входного сигнала (HDMI, цифровой звук и звук).
Используйте входные разъемы, соответствующие параметрам подключаемого устройства.
Если прибор, подключенный к этому устройству оборудован разъемом HDMI, рекомендуется использовать подключение HDMI. Для передачи аудио- и видеосигналов через разъем HDMI требуется только кабель HDMI.
0“Подсоединение телеприставки (Спутниковый приемник/кабельное ТВ)” (v стр. 30)
0“Подключение DVD-проигрывателя или проигрывателя дисков Blu-ray” (v стр. 31)
0“Подключение игровой приставки или видеокамеры” (v стр. 32)
0Подключите к входным разъемам данного устройства другие устройства, как предписано маркировкой на входных разъемах источников аудио-/видеосигнала.
0Источник, назначенный для разъемов OPTICAL 1 и OPTICAL 2, можно изменить. См. “Input Assign” для получения информации об изменении источника входного сигнала, назначенного на входные разъемы. (v стр. 84)
0Чтобы воспроизвести поступающие на данное устройство аудиосигналы через телевизор, подключенный с помощью HDMI, установите “HDMI Audio Out” на “TV”. (v стр. 80)
0Для воспроизведения содержимого, защищенного системой защиты авторских прав HDCP 2.2, используйте устройство воспроизведения и телевизор, совместимые с HDCP 2.2.
0Для воспроизведения содержимого 4K или содержимого, защищенного системой защиты авторских прав HDCP 2.2, подключите данное устройство к входному разъему HDMI 3, HDMI 4 или HDMI 5.
|
Передняя |
Дисплей |
Задняя |
29 |
Пульт ДУ |
Предметный |
|
панель |
панель |
указатель |
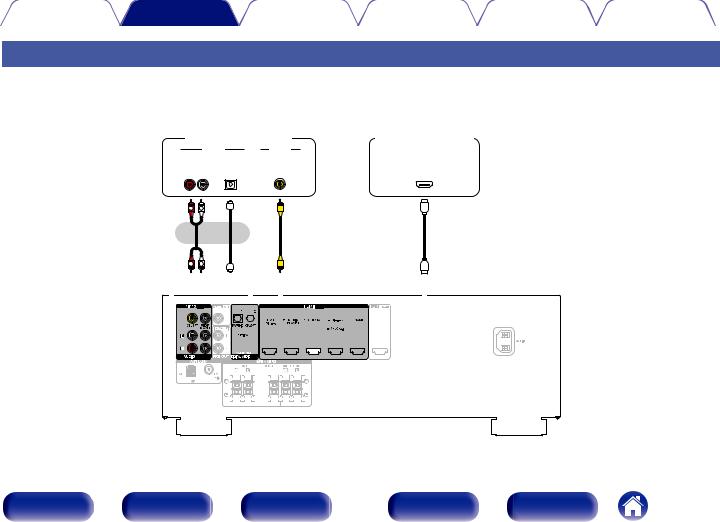
|
Содержание |
Подсоединения |
Воспроизведение |
Установки |
Рекомендации |
Приложение |
Подсоединение телеприставки (Спутниковый приемник/кабельное ТВ)
В инструкции ниже описано подключение спутникового тюнера/декодера кабельного ТВ.
Используйте входные разъемы в данном устройстве, соответствующие разъемам подключаемого устройства.
|
(HDMI-несовместимое устройство) |
Спутниковый |
|||
|
Спутниковый приемник/ |
||||
|
кабельное ТВ |
приемник/ |
|||
|
AUDIO |
VIDEO |
кабельное ТВ |
||
|
AUDIO |
OPTICAL |
VIDEO |
||
|
OUT |
OUT |
OUT |
HDMI |
|
|
R |
L |
OUT |
||
|
R |
L |
|||
|
или |
||||
|
R |
L |
|
30 |
||||||||||||||||||||||||||||||||||||||||||
|
Передняя |
Дисплей |
Задняя |
Пульт ДУ |
Предметный |
||||||||||||||||||||||||||||||||||||||
|
панель |
панель |
указатель |

|
Содержание |
Подсоединения |
Воспроизведение |
Установки |
Рекомендации |
Приложение |
Подключение DVD-проигрывателя или проигрывателя дисков Blu-ray
В инструкции описано подключение DVD-проигрывателя или проигрывателя дисков Blu-ray в качестве примера.
При подключении проигрывателя, совместимого с 4K/HDCP 2.2, подключите его к входному разъему HDMI 3, HDMI 4 или HDMI 5.
DVD-проигрыватель/ проигрыватель дисков Blu-ray
HDMI
OUT
|
31 |
|||||||||||||||||||||||||||||||||||||||||
|
Передняя |
Дисплей |
Задняя |
Пульт ДУ |
Предметный |
|||||||||||||||||||||||||||||||||||||
|
панель |
панель |
указатель |

|
Содержание |
Подсоединения |
Воспроизведение |
Установки |
Рекомендации |
Приложение |
Подключение игровой приставки или видеокамеры
В инструкции ниже в качестве примера описано подключение игровой приставки.
Подключите к данному устройству воспроизводящее устройство, например, игровую приставку или видеокамеру.
Игровая приставка
HDMI
OUT
|
32 |
|||||||||||||||||||||||||||||||||||||||||||
|
Передняя |
Дисплей |
Задняя |
Пульт ДУ |
Предметный |
|||||||||||||||||||||||||||||||||||||||
|
панель |
панель |
указатель |

|
Содержание |
Подсоединения |
Воспроизведение |
Установки |
Рекомендации |
Приложение |
Подсоедините запоминающее устройство USB к порту USB
Инструкции по управлению см. в “Воспроизведение запоминающего устройства USB” (v стр. 40).
Запоминающее устройство USB
0Компания Denon не гарантирует, что все запоминающие устройства USB будут работать или получать электропитание. При использовании портативного жесткого диска с USB-соединением, который поставлялся в комплекте с блоком питания, используйте блок питания из комплекта.
ПРИМЕЧАНИЕ
0Запоминающие устройства USB не будут работать через USB концентратор (хаб).
0Данное устройство не поддерживает подключение к компьютеру с помощью кабеля USB через USB порт на устройстве.
0Запрещается пользоваться кабельными удлинителями при подсоединении запоминающих устройств USB. Это может привести к созданию радиопомех для другой аппаратуры.
|
Передняя |
Дисплей |
Задняя |
33 |
Пульт ДУ |
Предметный |
|
панель |
панель |
указатель |

|
Содержание |
Подсоединения |
Воспроизведение |
Установки |
Рекомендации |
Приложение |
Подключение антенны FM/AM
Подключите антенну, настройте ее на радиостанцию, а затем переместите антенну в место, где меньше всего шума. Затем используйте ленту и т.д., чтобы закрепить антенну в данном положении. (“Прослушивание FM/AM-радиостанций” (v стр. 47))
Рамочная AM-антенна (из комплекта поставки)
0При невозможности приема качественного вещательного сигнала рекомендуется установка выносной антенны. Подробности можно выяснить в розничном магазине, где было приобретено устройство.
ПРИМЕЧАНИЕ
0Убедитесь, что свинцовый разъем рамочной АМ-антенны не касается металлических частей панели.
Комнатная антенна FM (из комплекта поставки)
|
Передняя |
Дисплей |
Задняя |
34 |
Пульт ДУ |
Предметный |
|
панель |
панель |
указатель |

|
Содержание |
Подсоединения |
Воспроизведение |
Установки |
Рекомендации |
Приложение |
o Использование рамочной АМ-антенны
Подвешивание на стене
Подвешивание на стену напрямую без сборки.
Гвоздь, кнопка и т.д.
Сам по себе
Используйте порядок сборки, показанный выше.
Во время сборки см. “AM loop antenna assembly”.
o Сборка рамочной AM-антенны
1Поставьте стойку внизу рамочной антенны с задней части и согните ее вперед.
2Вставьте выступающую часть в квадратное отверстие в стойке.
|
Стойка |
|
|
Рамочная антенна |
Квадратное отверстие |
|
Выступающая часть |
|
Передняя |
Дисплей |
Задняя |
35 |
Пульт ДУ |
Предметный |
|
панель |
панель |
указатель |

|
Содержание |
Подсоединения |
Воспроизведение |
Установки |
Рекомендации |
Приложение |
Подключение кабеля питания
После подключения всех компонентов, включите устройство в розетку.

К розеткам электросети в жилых помещениях (переменный ток 230 В, 50/60 Гц)
|
Передняя |
Дисплей |
Задняя |
36 |
Пульт ДУ |
Предметный |
|
панель |
панель |
указатель |

|
Содержание |
Подсоединения |
Воспроизведение |
Установки |
Рекомендации |
Приложение |
o Содержание
Базовая эксплуатация
|
Включение питания |
38 |
|
Выбор источника входного сигнала |
38 |
|
Регулировка уровня громкости |
39 |
|
Временное отключение звука (Выключение звука) |
39 |
|
Выбор режима звука |
60 |
Воспроизведение устройства
|
Воспроизведение с проигрывателя DVD/Blu-ray |
39 |
|
Воспроизведение запоминающего устройства USB |
40 |
|
Прослушивание музыки на устройстве Bluetooth |
42 |
|
Прослушивание FM/AM-радиостанций |
47 |
Удобные функции
|
Удобные функции |
55 |
|
Режим управления HDMI |
64 |
|
Регулировка громкости каждого канала для соответствия |
65 |
|
источнику входного сигнала (Ch Level Adjust) |
|
|
Режим автоматического отключения |
66 |
|
Функция быстрого выбора плюса |
68 |
|
Передняя |
Дисплей |
Задняя |
37 |
Пульт ДУ |
Предметный |
|
панель |
панель |
указатель |

|
Содержание |
Подсоединения Воспроизведение |
Установки |
Рекомендации |
Приложение |
||
|
Базовая эксплуатация |
||||||
|
POWER |
Включение питания |
|||||
|
X |
Нажмите кнопку POWER X, чтобы включить |
|||||
|
Кнопки выбора |
1 устройство. |
|||||
|
источника |
0 |
Вы можете нажать кнопку выбора источника входного сигнала, когда |
||||
|
входного |
устройство находится в режиме ожидания, чтобы включить питание. |
|||||
|
сигнала |
0 |
Также можно переключить питание в режим ожидания, нажав кнопку X на |
||||
|
основном блоке. |
||||||
|
MUTE : |
VOLUME df |
Выбор источника входного сигнала |
||||
|
1 |
Для начала воспроизведения нажмите кнопку |
|
выбора источника входного сигнала. |
Нужный источник входного сигнала можно выбрать непосредственно.
0 Источник входного сигнала также можно выбрать, повернув ручку управления SOURCE SELECT на основном блоке.
|
Передняя |
Дисплей |
Задняя |
38 |
Пульт ДУ |
Предметный |
|
панель |
панель |
указатель |

|
Содержание |
Подсоединения |
Воспроизведение |
Установки |
Рекомендации |
Приложение |
Регулировка уровня громкости
1Используйте кнопку VOLUME df для регулировки
уровня громкости.
0Диапазон регулировки отличается в зависимости от входного сигнала и настройки уровня канала.
0Громкость также можно настроить, повернув регулятор MASTER VOLUME на основном блоке.
Временное отключение звука (Выключение звука)
|
1 |
Нажмите кнопку MUTE :. |
|
|
0 |
На дисплей загорается индикатор MUTE. |
|
|
0 |
После этого на экране телевизора появляется |
|
|
индикатор :. |
0Уровень громкости снижается до значения, заданного параметром “Mute Level” меню. (v стр. 79)
0Для отмены нажмите кнопку MUTE : еще раз. Кроме того, отключение звука можно отменить, повернув регулятор общего уровня громкости.
Воспроизведение с проигрывателя
DVD/Blu-ray
Ниже описана процедура воспроизведения проигрывателя дисков
DVD/Blu-ray.
1Подготовьтесь к воспроизведению.
A Включите телевизор, сабвуфер и проигрыватель.
B Переключите вход телевизора на данное устройство.
2Нажмите кнопку POWER X, чтобы включить
устройство.
3Нажмите DVD/Blu-ray (4K не поддерживается) или Blu-ray (4K поддерживается) для переключения источника входного сигнала проигрывателя, на котором выполняется воспроизведение.
4Запустите воспроизведение DVD-проигрывателя или проигрывателя дисков Blu-ray.
o Объемное воспроизведение (v стр. 60)
|
Передняя |
Дисплей |
Задняя |
39 |
Пульт ДУ |
Предметный |
|
панель |
панель |
указатель |

|
Содержание |
Подсоединения |
Воспроизведение |
Установки |
Рекомендации |
Приложение |
Воспроизведение запоминающего устройства USB
USB

ui p
ENTER
BACK
1/3 8 9
0Воспроизведение музыкальных файлов, хранящихся на устройстве памяти USB.
0На данном устройстве возможно только воспроизведение запоминающих устройств USB, соответствующих стандартам класса запоминающих устройств большой емкости.
0Данное устройство совместимо с запоминающими устройствами
USB формата “FAT16” или “FAT32”.
0Ниже указаны типы аудиоформатов и технические характеристики, поддерживаемые данным устройством при воспроизведении.
Подробную информацию см. в разделе “Воспроизведение с устройств памяти USB”. (v стр. 119)
0WMA
0MP3
0WAV
0MPEG-4 AAC
0FLAC
|
Передняя |
Дисплей |
Задняя |
40 |
Пульт ДУ |
Предметный |
|
панель |
панель |
указатель |

|
Содержание |
Подсоединения |
Воспроизведение |
Установки |
Рекомендации |
Приложение |
Воспроизведение файлов с запоминающих устройств USB
1Подсоедините запоминающее устройство USB к
порту USB. (v стр. 33)
2Нажмите кнопку USB, чтобы переключить источник входного сигнала на “USB”.


OPTION Option
3С помощью кнопок ui p выберите файл для
воспроизведения и нажмите кнопку ENTER.
Начнется воспроизведение.
|
Кнопки управления |
Функции |
||
|
1/3 |
Воспроизведение / пауза |
||
|
Воспроизвести предыдущую дорожку/ |
|||
|
8 9 |
воспроизвести следующую дорожку |
||
|
(Нажать и удерживать) Перемотка |
|||
|
назад/перемотка вперед |
|||
|
ENTER |
Воспроизведение / пауза |
||
|
(Нажать и удерживать) Остановка |
|||
|
Воспроизвести предыдущую дорожку/ |
|||
|
u i |
воспроизвести следующую дорожку |
||
|
(Нажать и удерживать) Перемотка |
|||
|
назад/перемотка вперед |
|||
|
PAGE d f |
Перейти к предыдущей/следующей |
||
|
странице списка |
|||
ПРИМЕЧАНИЕ
0Обратите внимание, что компания Denon не несет никакой ответственности за возникновение каких-либо неполадок, связанных с данными на запоминающем устройстве USB, при совместном использовании запоминающего устройства USB и данного устройства.
oДействия, доступные с помощью меню настройки
0“Повторное воспроизведение (Repeat)” (v стр. 56)
0“Воспроизведение композиций в случайном порядке
(Random)” (v стр. 56)
0“Регулировка тональности (Tone)” (v стр. 57)
0“Проигрывание определенного видео во время воспроизведения аудио (Video Select)” (v стр. 59)
|
Передняя |
Дисплей |
Задняя |
41 |
Пульт ДУ |
Предметный |
|
панель |
панель |
указатель |

|
Содержание |
Подсоединения |
Воспроизведение |
Установки |
Рекомендации |
Приложение |
Прослушивание музыки на устройстве Bluetooth
|
Bluetooth |
|
|
ui |
|
|
ENTER |
OPTION |
BACK


Музыкальными файлами, сохраненными на устройствах с Bluetooth, таких как смартфоны, цифровые проигрыватели музыки и т.д., можно наслаждаться на данном устройстве посредством сопряжения и подключения данного устройства к устройству с
Bluetooth.
Соединение возможно в радиусе примерно 10 м.
ПРИМЕЧАНИЕ
0Для воспроизведения музыки с устройства с Bluetooth, устройство с Bluetooth должно поддерживать профиль A2DP.
|
Передняя |
Дисплей |
Задняя |
42 |
Пульт ДУ |
Предметный |
|
панель |
панель |
указатель |

Для ознакомления с инструкцией необходимо нажать на ссылку «ЗАГРУЗИТЬ», чтобы скачать pdf файл. Если есть кнопка «ПРОСМОТР», то можно просто посмотреть документ онлайн.
Для удобства, Вы можете сохранить данную страницу с файлом руководства по эксплуатации в свой список «избранное» прямо на сайте (доступно для зарегистрированных пользователей).
Смотрите инструкцию для похожих моделей:
Вы можете задать вопрос посетителям сайта по модели DENON AVR-X550BT. Если Вы являетесь её пользователем, то пожалуйста оставьте, по возможности развёрнутый отзыв:


