- Manuals
- Brands
- Sony Manuals
- Voice Recorder
- ICD-BX132
- Help manual
-
Contents
-
Table of Contents
-
Troubleshooting
-
Bookmarks
Quick Links
Help Guide
How to Use
Troubleshooting
List of Topics
4-448-103-11(1)
© 2013 Sony Corporation
IC Recorder
ICD-BX132
Use this help guide when you have any questions on how to use your
IC recorder.
1
Go to Page Top
Related Manuals for Sony ICD-BX132
Summary of Contents for Sony ICD-BX132
-
Page 1: Troubleshooting
IC Recorder ICD-BX132 Help Guide How to Use Troubleshooting List of Topics Use this help guide when you have any questions on how to use your IC recorder. Go to Page Top 4-448-103-11(1) © 2013 Sony Corporation…
-
Page 2: Help Guide
In the “List of Topics,” you can see headers for all of the topics in this help Playback guide. You can search for what you want by entering keywords in the search Editing window at the top of the page. Menu Go to Page Top Specifications Announcements Troubleshooting List of Topics 4-448-103-11(1) © 2013 Sony Corporation…
-
Page 3: List Of Topics
In the “List of Topics,” you can see headers for all of the topics in this help guide. Messages You can search for what you want by entering keywords in the search window at the top of the page. System limitations Go to Page Top List of Topics 4-448-103-11(1) © 2013 Sony Corporation…
-
Page 4
List of Topics If you cannot find the item: You can search for what you want by entering keywords in the search How to Use window at the top of the page. Troubleshooting Go to Page Top 4-448-103-11(1) © 2013 Sony Corporation… -
Page 5
Back to Top Help Guide Preparation Parts description How to Use Display window Preparation Recording Power Playback Clock setting Editing Selecting items on the display Menu HOLD Specifications Announcements Go to Page Top Troubleshooting List of Topics 4-448-103-11(1) © 2013 Sony Corporation… -
Page 6
IC Recorder ICD-BX132 Back Back to Top Help Guide Recording Recording How to Use Various operations/settings Preparation Recording Using external devices Playback Go to Page Top Editing Menu Specifications Announcements Troubleshooting List of Topics 4-448-103-11(1) © 2013 Sony Corporation… -
Page 7
IC Recorder ICD-BX132 Back Back to Top Help Guide Playback Playing How to Use Various operations/settings Preparation Recording Setting an alarm Playback Go to Page Top Editing Menu Specifications Announcements Troubleshooting List of Topics 4-448-103-11(1) © 2013 Sony Corporation… -
Page 8
IC Recorder ICD-BX132 Back Back to Top Help Guide Editing Erasing files How to Use Organizing files Preparation Recording Dividing files Playback Protecting files Editing Go to Page Top Menu Specifications Announcements Troubleshooting List of Topics 4-448-103-11(1) © 2013 Sony Corporation… -
Page 9
IC Recorder ICD-BX132 Back Back to Top Help Guide Menu Using menus How to Use Menu items Preparation Recording Go to Page Top Playback Editing Menu Specifications Announcements Troubleshooting List of Topics 4-448-103-11(1) © 2013 Sony Corporation… -
Page 10: Specifications
IC Recorder ICD-BX132 Back Back to Top Help Guide Specifications Specifications How to Use Go to Page Top Preparation Recording Playback Editing Menu Specifications Announcements Troubleshooting List of Topics 4-448-103-11(1) © 2013 Sony Corporation…
-
Page 11
Back Back to Top Help Guide Announcements Notes on use How to Use Safety regulations Preparation Recording Important information Playback Copyrights/Trademarks Editing Support website Menu Go to Page Top Specifications Announcements Troubleshooting List of Topics 4-448-103-11(1) © 2013 Sony Corporation… -
Page 12: Ic Recorder Operations
Help Guide IC recorder operations If you have problems How to Use Noise Troubleshooting Power IC recorder operations General operations Messages System limitations Recording List of Topics Playback Editing Clock Display Files Go to Page Top 4-448-103-11(1) © 2013 Sony Corporation…
-
Page 13
IC Recorder ICD-BX132 Back Back to Top Help Guide Messages Messages list How to Use Go to Page Top Troubleshooting IC recorder operations Messages System limitations List of Topics 4-448-103-11(1) © 2013 Sony Corporation… -
Page 14: System Limitations
IC Recorder ICD-BX132 Back Back to Top Help Guide System limitations System limitations How to Use Go to Page Top Troubleshooting IC recorder operations Messages System limitations List of Topics 4-448-103-11(1) © 2013 Sony Corporation…
-
Page 15
IC Recorder ICD-BX132 Back Back to Top Help Guide How to Use How to Use Preparation Parts description Troubleshooting Parts and controls Display window List of Topics Display when stopped Display when recording How to Use Display during playback Display in the HOLD status… -
Page 16
Recording with an external microphone Recording from external equipment Using external devices Recording the playback sound of the IC recorder on external equipment Playback Playing Playing back the recorded sound Various operations while playing Various operations/settings Reducing noise in the playback sound and making the human voice clearer (N- CUT)–… -
Page 17
Specifications Design and specifications Battery life Announcements Notes on use Precautions Safety regulations Safety regulations Important information Listening for a Lifetime Copyrights/Trademarks Trademarks Notice for users Support website Customer support websites Go to Page Top 4-448-103-11(1) © 2013 Sony Corporation… -
Page 18
IC Recorder ICD-BX132 Back Back to Top Help Guide Troubleshooting How to Use IC recorder operations If you have problems Troubleshooting Troubleshooting Noise List of Topics The recorded file is noisy and you want to record with less noise in your recording. -
Page 19
Files “FULL” is displayed and you cannot start recording. “FILE FULL” is displayed and you cannot operate the IC recorder. Messages Messages list Messages list System limitations System limitations System limitations Go to Page Top 4-448-103-11(1) © 2013 Sony Corporation… -
Page 20: Parts Description
Parts and controls How to Use Explains the name of parts, such as buttons and switches, on the IC recorder. Preparation Go to Page Top Recording Playback Editing Menu Specifications Announcements Troubleshooting List of Topics 4-448-103-11(1) © 2013 Sony Corporation…
-
Page 21: Display Window
Shows the message that appears in the display window when you operate the IC recorder while the HOLD function is set to “ON.” Troubleshooting Display of the current date and time Explains the display that indicates the current date and time. List of Topics Go to Page Top 4-448-103-11(1) © 2013 Sony Corporation…
-
Page 22
The battery life is short. There is no battery power remaining after you have left the batteries inserted for long time without using the IC recorder. The battery life of the rechargeable batteries is short. Go to Page Top 4-448-103-11(1) © 2013 Sony Corporation… -
Page 23: Clock Setting
Explains how to set the clock when the clock setting window appears. Preparation Setting the clock using the menu Recording Explains how to set the clock from the menu. Playback Go to Page Top Editing Menu Specifications Announcements Troubleshooting List of Topics 4-448-103-11(1) © 2013 Sony Corporation…
-
Page 24: Selecting Items On The Display
Selecting a folder and a file How to Use Explains how to select a file or a folder in the display window. Preparation Go to Page Top Recording Playback Editing Menu Specifications Announcements Troubleshooting List of Topics 4-448-103-11(1) © 2013 Sony Corporation…
-
Page 25
Explains how to disable all button operations to prevent unintentional operations. Preparation Releasing the HOLD function Recording Explains how to release the HOLD function to enable button operations. Playback Go to Page Top Editing Menu Specifications Announcements Troubleshooting List of Topics 4-448-103-11(1) © 2013 Sony Corporation… -
Page 26
You cannot add a recording or an overwrite recording. The VOR function does not work. Recording level is low. When recording from other equipment, the input level is too strong or not strong enough. Go to Page Top 4-448-103-11(1) © 2013 Sony Corporation… -
Page 27: Various Operations/Settings
Explains how to record with an external microphone that is connected to the IC recorder. Recording from external equipment Explains how to record from external equipment that is connected to the IC recorder. Go to Page Top 4-448-103-11(1) © 2013 Sony Corporation…
-
Page 28: Using External Devices
Recording the playback sound of the IC recorder on external How to Use equipment Explains how to record the playback sound of the IC recorder on external Preparation equipment. Recording Go to Page Top Playback Editing Menu Specifications Announcements Troubleshooting List of Topics 4-448-103-11(1) © 2013 Sony Corporation…
-
Page 29
Explains how to play back the recorded sound with the speaker of the IC recorder. Preparation Various operations while playing Recording Introduces various operations you can perform while playing. Playback Go to Page Top Editing Menu Specifications Announcements Troubleshooting List of Topics 4-448-103-11(1) © 2013 Sony Corporation… -
Page 30
Explains how to find a desired point in the file by cueing/reviewing during playback. Searching the desired point quickly (EASY-S) – the Easy search function Explains how to quickly locate the point at which you wish to start playback. Go to Page Top 4-448-103-11(1) © 2013 Sony Corporation… -
Page 31: Setting An Alarm
How to Use Explains how to start playing back a file with alarm sound at a desired time you set. Preparation Go to Page Top Recording Playback Editing Menu Specifications Announcements Troubleshooting List of Topics 4-448-103-11(1) © 2013 Sony Corporation…
-
Page 32: Erasing Files
Preparation Erasing all files in a folder (ERASE ALL) Recording Explains how to erase all files in a selected folder at once. Playback Go to Page Top Editing Menu Specifications Announcements Troubleshooting List of Topics 4-448-103-11(1) © 2013 Sony Corporation…
-
Page 33: Organizing Files
Moving a file to a different folder (MOVE) How to Use Explains how to move a selected file to a selected folder. Preparation Go to Page Top Recording Playback Editing Menu Specifications Announcements Troubleshooting List of Topics 4-448-103-11(1) © 2013 Sony Corporation…
-
Page 34: Dividing Files
Dividing files Dividing a file How to Use Explains how to divide a file into two parts at the desired position. Preparation Go to Page Top Recording Playback Editing Menu Specifications Announcements Troubleshooting List of Topics 4-448-103-11(1) © 2013 Sony Corporation…
-
Page 35: Protecting Files
Protecting a file (LOCK) How to Use Explains how to protect a file so that you cannot erase or edit it. Preparation Go to Page Top Recording Playback Editing Menu Specifications Announcements Troubleshooting List of Topics 4-448-103-11(1) © 2013 Sony Corporation…
-
Page 36: Using Menus
Introduces the menus and in which operation mode the IC recorder can make changes to the menu. It also includes a link to each menu topic. Playback Go to Page Top Editing Menu Specifications Announcements Troubleshooting List of Topics 4-448-103-11(1) © 2013 Sony Corporation…
-
Page 37: Menu Items
Explains how to check the version number of the software. Formatting the memory (FORMAT) Explains how to format the memory, erasing all files and changing the folder structure back to the initial status. Go to Page Top 4-448-103-11(1) © 2013 Sony Corporation…
-
Page 38
Preparation Battery life Recording Shows the battery life for alkaline batteries and rechargeable batteries, in each file format. Playback Editing Go to Page Top Menu Specifications Announcements Troubleshooting List of Topics 4-448-103-11(1) © 2013 Sony Corporation… -
Page 39: Notes On Use
How to Use Explains notes on operations, such as the places you use the IC recorder, and information on handling or maintenance. Preparation Go to Page Top Recording Playback Editing Menu Specifications Announcements Troubleshooting List of Topics 4-448-103-11(1) © 2013 Sony Corporation…
-
Page 40: Safety Regulations
Back to Top Help Guide Safety regulations Safety regulations How to Use Describes important information (warnings or notes) for your safety. Preparation Go to Page Top Recording Playback Editing Menu Specifications Announcements Troubleshooting List of Topics 4-448-103-11(1) © 2013 Sony Corporation…
-
Page 41
Back to Top Help Guide Important information Listening for a Lifetime How to Use Important information on the sound level. Preparation Go to Page Top Recording Playback Editing Menu Specifications Announcements Troubleshooting List of Topics 4-448-103-11(1) © 2013 Sony Corporation… -
Page 42
Back to Top Help Guide Copyrights/Trademarks Trademarks How to Use List of trademarks/registered trademarks Preparation Notice for users Recording Important notice on copyrights Playback Go to Page Top Editing Menu Specifications Announcements Troubleshooting List of Topics 4-448-103-11(1) © 2013 Sony Corporation… -
Page 43: Support Website
Back to Top Help Guide Support website Customer support websites How to Use Introduces URLs of the customer support websites. Preparation Go to Page Top Recording Playback Editing Menu Specifications Announcements Troubleshooting List of Topics 4-448-103-11(1) © 2013 Sony Corporation…
-
Page 44: If You Have Problems
IC Recorder ICD-BX132 Back Back to Top Help Guide If you have problems Troubleshooting How to Use Go to Page Top Troubleshooting IC recorder operations Messages System limitations List of Topics 4-448-103-11(1) © 2013 Sony Corporation…
-
Page 45
(not supplied). System limitations Noise is heard when you listen to the file using headphones. List of Topics Noise is heard in the playback even though the noise cut function is active. Go to Page Top 4-448-103-11(1) © 2013 Sony Corporation… -
Page 46
The battery life of the rechargeable batteries is short. Go to Page Top You might be looking for the following topics: Inserting batteries Turning the power on Turning the power off Go to Page Top 4-448-103-11(1) © 2013 Sony Corporation… -
Page 47: General Operations
It takes a long time for the IC recorder to start. Troubleshooting The IC recorder does not operate, even if you press any button. IC recorder operations The operation indicator does not light. Messages System limitations Go to Page Top List of Topics 4-448-103-11(1) © 2013 Sony Corporation…
-
Page 48
You might be looking for the following topics: Recording sound from the built-in microphone About the remaining memory indicator Monitoring sound while recording Various operations while recording Dividing a file during recording Go to Page Top 4-448-103-11(1) © 2013 Sony Corporation… -
Page 49
Sound comes from the speaker even when the headphones are Messages plugged in. System limitations Playback speed is too fast or too slow. List of Topics Playback sound is not good when a recorded file is played back. Go to Page Top 4-448-103-11(1) © 2013 Sony Corporation… -
Page 50
Help Guide Editing You cannot divide a file. How to Use You cannot move a file. Troubleshooting You cannot erase a file. IC recorder operations Go to Page Top Messages System limitations List of Topics 4-448-103-11(1) © 2013 Sony Corporation… -
Page 51
Back to Top Help Guide Clock “—:—” is displayed. How to Use The recording date of a file appears as “—Y—M—D” or “—:—.” Troubleshooting Go to Page Top IC recorder operations Messages System limitations List of Topics 4-448-103-11(1) © 2013 Sony Corporation… -
Page 52
Help Guide Display There are fewer menu items displayed in the menu mode. How to Use “ACCESS” display does not disappear. Troubleshooting Go to Page Top IC recorder operations Messages System limitations List of Topics 4-448-103-11(1) © 2013 Sony Corporation… -
Page 53
“FULL” is displayed and you cannot start recording. How to Use “FILE FULL” is displayed and you cannot operate the IC recorder. Troubleshooting Go to Page Top IC recorder operations Messages System limitations List of Topics 4-448-103-11(1) © 2013 Sony Corporation… -
Page 54: Messages List
IC Recorder ICD-BX132 Back Back to Top Help Guide Messages list Messages list How to Use Go to Page Top Troubleshooting IC recorder operations Messages System limitations List of Topics 4-448-103-11(1) © 2013 Sony Corporation…
-
Page 55: System Limitations
IC Recorder ICD-BX132 Back Back to Top Help Guide System limitations System limitations How to Use Go to Page Top Troubleshooting IC recorder operations Messages System limitations List of Topics 4-448-103-11(1) © 2013 Sony Corporation…
-
Page 56: Parts And Controls
IC Recorder ICD-BX132 Print Back Back to Top Help Guide Parts and controls How to Use Preparation Recording Playback Editing Menu Specifications Announcements 1. Built-in microphone Troubleshooting (headphone) jack 3. Operation indicator List of Topics 4. Display window 5. FOLDER button 6.
-
Page 57
Go to Page Top 4-448-103-11(1) © 2013 Sony Corporation… -
Page 58: Display When Stopped
IC Recorder ICD-BX132 Print Back Back to Top Help Guide Display when stopped How to Use Preparation Recording Playback Editing Note Menu The window shown above displays indications, numbers or items for explanatory purposes. The actual window may differ from those displayed here.
-
Page 59
Go to Page Top 4-448-103-11(1) © 2013 Sony Corporation… -
Page 60: Display When Recording
ELAPSE: Displays the elapsed recording time of a file. REMAIN: Displays the remaining recording time of a file. 5. LCF (Low Cut Filter) indicator Appears when “LCF” is set to “ON” in the menu. Go to Page Top 4-448-103-11(1) © 2013 Sony Corporation…
-
Page 61: Display During Playback
You can adjust the playback speed in the menu. 6. Counter indication You can select the display mode in the menu. ELAPSE: Displays the elapsed playback time of a file. REMAIN: Displays the remaining playback time of a file. Go to Page Top 4-448-103-11(1) © 2013 Sony Corporation…
-
Page 62: Display In The Hold Status
Flashes when you attempt to operate the IC recorder while the HOLD function Announcements is set to prevent unintentional operations. All button operations are disabled. Troubleshooting Go to Page Top List of Topics Related Topic Preventing unintentional operations (HOLD) Releasing the HOLD function Go to Page Top 4-448-103-11(1) © 2013 Sony Corporation…
-
Page 63
(stop) in the stop mode. When you Troubleshooting release the button, after about one second the window returns to the stop mode display. e.g.: 13Y12M 31D 23:59 (December 31, 2013, 11:59 p.m.) List of Topics Go to Page Top 4-448-103-11(1) © 2013 Sony Corporation… -
Page 64: Inserting Batteries
: “LOW BATT” flashes and the IC recorder will stop operation. When replacing the batteries, files recorded or alarm settings are not erased even when you remove the batteries. You can use two NH-AAA-B2KN rechargeable batteries (not supplied). Go to Page Top 4-448-103-11(1) © 2013 Sony Corporation…
-
Page 65: Turning The Power On
When the IC recorder is in the stop mode, and you leave the IC recorder without attempting an operation for approximately 10 minutes, the auto power off function will take effect. Go to Page Top Related Topic Turning the power off Go to Page Top 4-448-103-11(1) © 2013 Sony Corporation…
-
Page 66: Turning The Power Off
When the IC recorder is in the stop mode, and you leave the IC recorder without Troubleshooting attempting an operation for approximately 10 minutes, the auto power off function will take effect. List of Topics Go to Page Top Related Topic Turning the power on Go to Page Top 4-448-103-11(1) © 2013 Sony Corporation…
-
Page 67: Setting The Clock
IC Recorder ICD-BX132 Print Back Back to Top Help Guide Setting the clock How to Use You need to set the clock to use the alarm function or record the date and time. When you insert batteries and turn the power on, “SET DATE” appears on the…
-
Page 68
Go to Page Top Related Topic Setting the clock using the menu Selecting the clock display (HOUR) Go to Page Top 4-448-103-11(1) © 2013 Sony Corporation… -
Page 69: Setting The Clock Using The Menu
IC Recorder ICD-BX132 Print Back Back to Top Help Guide Setting the clock using the menu How to Use While the IC recorder is stopped, you can set the clock using the menu. Preparation Recording Playback Editing Menu 1. Press MENU to enter the menu mode.
-
Page 70
Go to Page Top Related Topic Selecting the clock display (HOUR) Go to Page Top 4-448-103-11(1) © 2013 Sony Corporation… -
Page 71: Selecting A Folder And A File
Press FOLDER repeatedly to select the desired folder. When you purchase the IC recorder, there are 5 folders already available ( 3. Select a file. Press to select the desired file, and then press PLAY/ENTER. Go to Page Top 4-448-103-11(1) © 2013 Sony Corporation…
-
Page 72: Preventing Unintentional Operations (Hold)
Even if the HOLD function is activated, you can stop the alarm playback by pressing any button. (You cannot stop normal playback.) Go to Page Top Related Topic Releasing the HOLD function Go to Page Top 4-448-103-11(1) © 2013 Sony Corporation…
-
Page 73: Releasing The Hold Function
Release the HOLD function when you operate the IC recorder. Menu Specifications 1. Slide the HOLD・POWER ON/OFF switch towards the center. Announcements Troubleshooting List of Topics Go to Page Top Related Topic Preventing unintentional operations (HOLD) Go to Page Top 4-448-103-11(1) © 2013 Sony Corporation…
-
Page 74
IC Recorder ICD-BX132 Print Back Back to Top Help Guide Recording sound from the built-in microphone How to Use The following steps are the basic recording procedures using the specified microphone sensitivity and recording mode. Preparation Recording Playback Editing Menu… -
Page 75
While the IC recorder is accessing data, do not remove the batteries. Doing so may damage the data. Go to Page Top Related Topic Monitoring sound while recording Turning the power on Releasing the HOLD function Various operations while recording Go to Page Top 4-448-103-11(1) © 2013 Sony Corporation… -
Page 76
Specifications recording time display will also flash. To continue recording, first erase some of the files. Announcements Go to Page Top Troubleshooting List of Topics 4-448-103-11(1) © 2013 Sony Corporation… -
Page 77: Monitoring Sound While Recording
IC recorder may record a rustling noise. The rustling noise can be List of Topics reduced by holding the cord away from the IC recorder. Go to Page Top Related Topic Recording sound from the built-in microphone Go to Page Top 4-448-103-11(1) © 2013 Sony Corporation…
-
Page 78: Various Operations While Recording
Files recorded using this IC recorder will be recorded as MP3 files. You can record up to 99 files in each folder. Go to Page Top Related Topic Recording sound from the built-in microphone Go to Page Top 4-448-103-11(1) © 2013 Sony Corporation…
-
Page 79
IC recorder for a certain period. This is not a malfunction. Wait until the operation indicator goes off. Hint You can divide the currently recorded file during recording pause. Go to Page Top 4-448-103-11(1) © 2013 Sony Corporation… -
Page 80: Tips For Better Recording
By placing the IC recorder close to one side of your mouth, you can prevent Announcements breathing on the built-in microphone, and record with clear sound. Troubleshooting List of Topics Recording an interview Place the IC recorder so that the built-in microphone faces the interviewee. Go to Page Top 4-448-103-11(1) © 2013 Sony Corporation…
-
Page 81: Starting To Record Automatically In Response To Sound — The Vor Function
IC Recorder ICD-BX132 Print Back Back to Top Help Guide Starting to record automatically in response to sound – the VOR function How to Use You can set the VOR (Voice Operated Recording) function to “ON,” to make the IC…
-
Page 82
Recording sound from the built-in microphone Using the menu Go to Page Top 4-448-103-11(1) © 2013 Sony Corporation… -
Page 83
The sound quality of LP mode is set for dictation. Set the microphone sensitivity to L. LP mode is not suitable for music recording. Set SHQ mode when you want to record music or record with high-quality sound. Go to Page Top 4-448-103-11(1) © 2013 Sony Corporation… -
Page 84
To record a sound far away from the IC recorder or a low sound, such as recording in a spacious room. (Initial setting) To record dictation with a microphone in front of your mouth, a sound near the IC recorder, or a loud sound. Go to Page Top 4-448-103-11(1) © 2013 Sony Corporation… -
Page 85: Adding A Recording To A Previously Recorded File
IC Recorder ICD-BX132 Print Back Back to Top Help Guide Adding a recording to a previously recorded file (ADD) How to Use You can add a recording to the file being played back. The added recording will be Preparation placed after the current file, and will be counted as a part of the file.
-
Page 86
The added portion of a file will be recorded in the same recording mode. If 10 minutes have passed after step 6, you must start the procedure again from the beginning. Go to Page Top 4-448-103-11(1) © 2013 Sony Corporation… -
Page 87: Adding An Overwrite Recording During Playback
IC Recorder ICD-BX132 Print Back Back to Top Help Guide Adding an overwrite recording during playback (OVER) How to Use You can add an overwrite recording after a selected point in a recorded file. The Preparation remainder of the file after the selected point is deleted.
-
Page 88
The overwritten portion of a file is recorded in the same recording mode. If 10 minutes have passed after step 6, you must start the procedure again from the beginning. Go to Page Top 4-448-103-11(1) © 2013 Sony Corporation… -
Page 89: Recording With An External Microphone
You can use a headphone-type electret condenser microphone (not supplied) to record sound from a telephone or a cell phone. For details on how to make the connection, refer to the operating instructions supplied with the microphone. Go to Page Top 4-448-103-11(1) © 2013 Sony Corporation…
-
Page 90: Recording From External Equipment
IC recorder. To stop recording, press (stop). Go to Page Top Related Topic Recording the playback sound of the IC recorder on external equipment Go to Page Top 4-448-103-11(1) © 2013 Sony Corporation…
-
Page 91: Recording The Playback Sound Of The Ic Recorder On External Equipment
A file from the IC recorder will be recorded on the equipment connected. Specifications 3. Press (stop) on the IC recorder and the connected equipment at the same time to stop recording. Announcements Go to Page Top Troubleshooting List of Topics 4-448-103-11(1) © 2013 Sony Corporation…
-
Page 92: Playing Back The Recorded Sound
4. Press VOL –/+ to adjust the volume. Hint Press (stop) to stop playback. Go to Page Top Related Topic Turning the power on Releasing the HOLD function Selecting a folder and a file Various operations while playing Go to Page Top 4-448-103-11(1) © 2013 Sony Corporation…
-
Page 93: Various Operations While Playing
(During the stop mode, keep the button pressed to skip the files continuously.) List of Topics Go to Page Top Related Topic Playing back the recorded sound Searching the desired point quickly (EASY-S) – the Easy search function Go to Page Top 4-448-103-11(1) © 2013 Sony Corporation…
-
Page 94
When playing back a recorded file in good sound quality, make sure to set the noise cut function to “OFF.” The noise cut function works when you listen to sound through the headphones. It does not work when you play back sound using the built-in speaker. Go to Page Top 4-448-103-11(1) © 2013 Sony Corporation… -
Page 95: Adjusting The Playback Speed — The Dpc (Digital Pitch Control) Function
You can adjust the playback speed in a range from 0.50 times to 2.00 times. OFF: The DPC function does not work. (Initial setting) Hint To resume normal playback speed, set “DPC” to “OFF” in step 3. Go to Page Top 4-448-103-11(1) © 2013 Sony Corporation…
-
Page 96: Playing Back A File Repeatedly
1. During playback, press and hold PLAY/ENTER until “ ” (repeat) appears. Menu The selected file will be played back repeatedly. Specifications Hint Announcements To resume normal playback, press PLAY/ENTER or (stop). Go to Page Top Troubleshooting List of Topics 4-448-103-11(1) © 2013 Sony Corporation…
-
Page 97
You can play back all files in a folder continuously. OFF: The CONT function does not work. (Initial setting) Hint To resume normal playback, set “CONT” to “OFF” in step 3. Go to Page Top 4-448-103-11(1) © 2013 Sony Corporation… -
Page 98: Listening With Better Sound Quality
Editing be automatically disconnected. Menu Listening to the sound from an external speaker: Connect an active or passive speaker (not supplied) to the (headphone) Specifications jack. Announcements Go to Page Top Troubleshooting List of Topics 4-448-103-11(1) © 2013 Sony Corporation…
-
Page 99: Searching Forward/Backward During Playback (Cue/Review)
If you press and hold while “END” is lit, the files are played back rapidly, and normal playback will start at the point you release the button. Go to Page Top 4-448-103-11(1) © 2013 Sony Corporation…
-
Page 100
OFF: The easy search function does not work. When you press , a file will be moved forward or backward. (Initial setting) Go to Page Top 4-448-103-11(1) © 2013 Sony Corporation… -
Page 101: Playing Back A File At A Desired Time With An Alarm
IC Recorder ICD-BX132 Print Back Back to Top Help Guide Playing back a file at a desired time with an alarm (ALARM) How to Use You can sound an alarm and start playback of a selected file at a desired time. You…
-
Page 102
If the HOLD function is activated, you can stop the alarm playback by pressing any button. The alarm sounds even if you set “BEEP” to “OFF” in the menu. Go to Page Top Related Topic Setting the clock Go to Page Top 4-448-103-11(1) © 2013 Sony Corporation… -
Page 103: Erasing A File
IC Recorder ICD-BX132 Print Back Back to Top Help Guide Erasing a file How to Use You can select a file and erase it. Note Preparation Once a file has been erased, you cannot retrieve it. You cannot erase a protected file. To erase the file, release the protection first, and Recording then erase the file.
-
Page 104
3 through 4. Go to Page Top Related Topic Turning the power on Releasing the HOLD function Selecting a folder and a file Dividing a file Protecting a file (LOCK) Go to Page Top 4-448-103-11(1) © 2013 Sony Corporation… -
Page 105
(stop) to exit the menu mode. Hint To cancel erasing, press (stop) in step 2. Go to Page Top Related Topic Protecting a file (LOCK) Selecting a folder and a file Erasing a file Go to Page Top 4-448-103-11(1) © 2013 Sony Corporation… -
Page 106
If 99 files have been recorded in the folder to which you want to move a file, you cannot move it. Hint To cancel moving the file, press (stop) before step 4. Go to Page Top Related Topic Protecting a file (LOCK) Selecting a folder and a file Go to Page Top 4-448-103-11(1) © 2013 Sony Corporation… -
Page 107: Dividing A File
IC Recorder ICD-BX132 Print Back Back to Top Help Guide Dividing a file How to Use You can divide a file, so that the file is divided into two parts and new file numbers are added to the divided file names. By dividing a file, you can easily find the point…
-
Page 108
Related Topic Protecting a file (LOCK) Go to Page Top 4-448-103-11(1) © 2013 Sony Corporation… -
Page 109
To release protection, select the protected file, and then proceed with steps 2 through 5. Select “OFF” and then press PLAY/ENTER in step 4. To cancel setting the protection, press (stop) in step 3. Go to Page Top 4-448-103-11(1) © 2013 Sony Corporation… -
Page 110: Using The Menu
Hint To return to the previous window, press MENU during menu mode. To exit the menu mode, press (stop) or MENU. Go to Page Top 4-448-103-11(1) © 2013 Sony Corporation…
-
Page 111: Menu List
IC Recorder ICD-BX132 Print Back Back to Top Help Guide Menu list How to Use The list below shows the menu items and in which operation mode the IC recorder can make changes to the menus. Preparation MODE: Stop mode…
-
Page 112
Moving a file to a different folder (MOVE) LOCK: Stop mode Protecting a file (LOCK) ALARM: Stop mode Playing back a file at a desired time with an alarm (ALARM) For the European models only Go to Page Top 4-448-103-11(1) © 2013 Sony Corporation… -
Page 113
The IC recorder cuts low frequency noise such as projector machine sound or roaring noise from the wind, etc. OFF: Cancels the low cut filter function. (Initial setting) Hint Select “OFF” in step 3 to cancel the low cut filter function. Go to Page Top 4-448-103-11(1) © 2013 Sony Corporation… -
Page 114: Selecting The Display Mode (Display)
During stop or playback, the remaining time of one file During recording, the available recording time Note When the IC recorder is in the stop mode, recorded date and time is displayed regardless of the display setting. Go to Page Top 4-448-103-11(1) © 2013 Sony Corporation…
-
Page 115
List of Topics 12:00AM = midnight, 12:00PM = noon 24H: 0:00 = midnight, 12:00 = noon (Initial setting) Note The default setting differs depending on the area you purchased your IC recorder. Go to Page Top 4-448-103-11(1) © 2013 Sony Corporation… -
Page 116: Turning The Beep Sound On Or Off (Beep)
A beep will sound to indicate that an operation has been accepted or an error has occurred. (Initial setting) OFF: No beep sound will be heard. Note The alarm sounds even if you set “BEEP” to “OFF” in the menu. Go to Page Top 4-448-103-11(1) © 2013 Sony Corporation…
-
Page 117: Turning The Operation Indicator On Or Off (Led)
You can select one of the menu items available. List of Topics During recording or playback, the operation indicator lights or flashes. (Initial setting) OFF: The operation indicator does not light or flash, even during operation. Go to Page Top 4-448-103-11(1) © 2013 Sony Corporation…
-
Page 118
Troubleshooting List of Topics 3. Press to select “YES,” and then press PLAY/ENTER. 4. Press (stop) to exit the menu mode. Hint To cancel the operation, select “NO” in step 3. Go to Page Top 4-448-103-11(1) © 2013 Sony Corporation… -
Page 119
1. In the stop mode, press MENU to enter the menu mode. Recording 2. Press to select “SYSTEM,” and then press PLAY/ENTER. Playback Editing Menu Specifications 3. Press (stop) to exit the menu mode. Announcements Go to Page Top Troubleshooting List of Topics 4-448-103-11(1) © 2013 Sony Corporation… -
Page 120: Formatting The Memory (Format)
List of Topics “ACCESS” appears and the built-in memory will be formatted. 4. Press (stop) to exit the menu mode. Hint To cancel formatting the built-in memory, select “NO” in step 3. Go to Page Top 4-448-103-11(1) © 2013 Sony Corporation…
-
Page 121: Design And Specifications
IC Recorder ICD-BX132 Print Back Back to Top Help Guide Design and specifications How to Use Capacity (User available capacity) (*) 2 GB (approx. 1.75 GB = 1,879,048,192 Byte) Preparation A small amount of the built-in memory is used for file management and therefore not available for user storage.
-
Page 122
When you are going to record continuously for a long time, you may have to replace the batteries with new ones in the midst of recording. For details on the battery life, see “Battery life”. Go to Page Top 4-448-103-11(1) © 2013 Sony Corporation… -
Page 123: Battery Life
Print Back Back to Top Help Guide Battery life How to Use When using Sony LR03 (SG) (size AAA) alkaline batteries (*1) SHQ (Super high quality mode) Preparation Recording: Approx. 13 h. Playback through speaker (*2): Approx. 10 h. Recording Playback using the headphones: Approx.
-
Page 124
Industries Association). The battery life may shorten depending on how you operate the IC recorder. When playing back music through the internal speaker with the volume level set to 28. Go to Page Top 4-448-103-11(1) © 2013 Sony Corporation… -
Page 125
To clean the exterior, use a soft cloth slightly moistened in water. Then use a soft dry cloth to wipe the exterior. Do not use alcohol, benzine or thinner. If you have any questions or problems concerning your unit, please consult your nearest Sony dealer. Backup recommendations… -
Page 126
To avoid potential risk of data loss caused by accidental operation or malfunction of the IC recorder, we recommend that you save a backup copy of your recorded files. Go to Page Top 4-448-103-11(1) © 2013 Sony Corporation… -
Page 127
IC Recorder ICD-BX132 Print Back Back to Top Help Guide Safety regulations How to Use WARNING Do not expose the batteries (battery pack or batteries installed) to excessive heat Preparation such as sunshine, fire or the like for a long time. -
Page 128
EU directives This product has been manufactured by or on behalf of Sony Corporation, 1-7-1 Konan Minato-ku Tokyo, 108-0075 Japan. Inquiries related to product compliance based on European Union legislation shall be addressed to the authorized representative, Sony Deutschland GmbH, Hedelfinger Strasse 61, 70327 Stuttgart, Germany. -
Page 129: Listening For A Lifetime
IC Recorder ICD-BX132 Print Back Back to Top Help Guide Listening for a Lifetime How to Use Selecting fine audio equipment such as the unit you’ve just purchased is only the start of your musical enjoyment. Now it’s time to consider how you can maximize the fun and excitement your equipment offers.
-
Page 130
CEA. A safety tip from the Consumer Electronics Association, 1919 South Eads Street, Arlington, VA 22202 and the American Speech-Language-Hearing Association, 2200 Research Boulevard, Rockville, MD 20850. Go to Page Top 4-448-103-11(1) © 2013 Sony Corporation… -
Page 131
All other trademarks and registered trademarks are trademarks or registered Recording trademarks of their respective holders. Furthermore, “™” and “®” are not Playback mentioned in each case in this Help Guide. Go to Page Top Editing Menu Specifications Announcements Troubleshooting List of Topics 4-448-103-11(1) © 2013 Sony Corporation… -
Page 132: Notice For Users
THE SOFTWARE OR OTHER INFORMATION CONTAINED HEREIN OR THE USE Editing THEREOF. Menu Sony Corporation reserves the right to make any modification to this Help Guide or the information contained herein at any time without notice. Specifications Announcements Display windows in this Help Guide may differ from what are actually displayed on your IC recorder depending on the area you purchased the IC recorder and the settings you have made.
-
Page 133: Customer Support Websites
For customers in Canada: Menu http://www.sony.ca/ElectronicsSupport http://fr.sony.ca/ElectronicsSupport Specifications For customers in other countries/regions: http://www.sony-asia.com/support Announcements Note that recorded files may be deleted during service or repair work. Go to Page Top Troubleshooting List of Topics 4-448-103-11(1) © 2013 Sony Corporation…
-
Page 134: Troubleshooting
For customers in the U.S.A.: http://www.sony.com/recordersupport For customers in Canada: http://www.sony.ca/ElectronicsSupport http://fr.sony.ca/ElectronicsSupport For customers in other countries/regions: http://www.sony-asia.com/support Note that recorded files may be deleted during service or repair work. Go to Page Top 4-448-103-11(1) © 2013 Sony Corporation…
-
Page 135: The Recorded File Is Noisy And You Want To Record With Less Noise In Your Recording
IC recorder operations Go to Page Top Messages Related Topic System limitations Reducing noise when recording (LCF) – the Low Cut Filter function List of Topics Go to Page Top 4-448-103-11(1) © 2013 Sony Corporation…
-
Page 136: A Rustling Noise Is Recorded
A rustling noise may be recorded if the IC recorder is rubbed by your hand or clothing while you are recording. Troubleshooting If possible, please do not touch the IC recorder until you finish recording. Go to Page Top IC recorder operations Messages System limitations List of Topics 4-448-103-11(1) © 2013 Sony Corporation…
-
Page 137: A Buzzing Or Humming Noise Is Recorded
AC power source, a fluorescent lamp, or a mobile phone during recording or Troubleshooting playback. Keep the IC recorder away from such equipment when recording. IC recorder operations Go to Page Top Messages System limitations List of Topics 4-448-103-11(1) © 2013 Sony Corporation…
-
Page 138: Noise Is Recorded When You Record A File Using An External Microphone (Not Supplied)
Noise is recorded when you record a file using an external microphone (not supplied). How to Use The plug of the connected external microphone is dirty. Troubleshooting Clean the plug. IC recorder operations Go to Page Top Messages System limitations List of Topics 4-448-103-11(1) © 2013 Sony Corporation…
-
Page 139: Noise Is Heard When You Listen To The File Using Headphones
Noise is heard when you listen to the file using headphones. How to Use The plug of the connected headphones is dirty. Troubleshooting Clean the plug. IC recorder operations Go to Page Top Messages System limitations List of Topics 4-448-103-11(1) © 2013 Sony Corporation…
-
Page 140: Noise Is Heard In The Playback Even Though The Noise Cut Function Is Active
IC recorder operations Go to Page Top Messages Related Topic System limitations Reducing noise in the playback sound and making the human voice clearer (N-CUT)– the noise cut function List of Topics Go to Page Top 4-448-103-11(1) © 2013 Sony Corporation…
-
Page 141: The Ic Recorder Cannot Be Turned On. The Ic Recorder Does Not Operate, Even If You Press Any Button
The HOLD function is activated. Slide the HOLD・POWER ON/OFF switch in the center direction. List of Topics Go to Page Top Related Topic Turning the power on Parts and controls Releasing the HOLD function Go to Page Top 4-448-103-11(1) © 2013 Sony Corporation…
-
Page 142: The Ic Recorder Cannot Be Turned Off
ON/OFF” until “OFF” is displayed when the IC recorder is stopped. The power is Troubleshooting turned off. Go to Page Top IC recorder operations Messages Related Topic System limitations Turning the power off List of Topics Parts and controls Go to Page Top 4-448-103-11(1) © 2013 Sony Corporation…
-
Page 143
The batteries have been inserted with incorrect polarity. IC recorder operations Go to Page Top Messages Related Topic System limitations Turning the power on List of Topics Releasing the HOLD function Inserting batteries Go to Page Top 4-448-103-11(1) © 2013 Sony Corporation… -
Page 144: The Ic Recorder Is Powered Off Automatically
When the IC recorder is in the stop mode and you leave the IC recorder without attempting an operation for approximately 10 minutes, the auto power off Troubleshooting function will take effect. Go to Page Top IC recorder operations Messages System limitations List of Topics 4-448-103-11(1) © 2013 Sony Corporation…
-
Page 145: The Battery Life Is Short
You are using manganese batteries for this IC recorder. You cannot use the IC recorder with manganese batteries. IC recorder operations Messages Go to Page Top System limitations Related Topic List of Topics Turning the power off Battery life Go to Page Top 4-448-103-11(1) © 2013 Sony Corporation…
-
Page 146
IC recorder for an extended period of time, it is IC recorder operations recommended that you turn the power off or remove the batteries. Messages Go to Page Top System limitations Related Topic List of Topics Turning the power off Go to Page Top 4-448-103-11(1) © 2013 Sony Corporation… -
Page 147
IC recorder can be used approximates only half of the normal time, even after System limitations the rechargeable batteries are fully charged, replace the batteries with new ones. List of Topics Go to Page Top 4-448-103-11(1) © 2013 Sony Corporation… -
Page 148: The Ic Recorder Does Not Operate Correctly
How to Use Take out the batteries and insert them again. Troubleshooting Go to Page Top IC recorder operations Related Topic Messages Formatting the memory (FORMAT) System limitations Go to Page Top List of Topics 4-448-103-11(1) © 2013 Sony Corporation…
-
Page 149
IC recorder to start. This is not a malfunction of the IC recorder. Troubleshooting Wait until the start-up display disappears. Go to Page Top IC recorder operations Messages System limitations List of Topics 4-448-103-11(1) © 2013 Sony Corporation… -
Page 150
The HOLD function is activated. Slide the HOLD・POWER ON/OFF switch in the center direction. IC recorder operations Go to Page Top Messages System limitations Related Topic List of Topics Turning the power on Releasing the HOLD function Go to Page Top 4-448-103-11(1) © 2013 Sony Corporation… -
Page 151: The Operation Indicator Does Not Light
Display the menu and set “LED” to “ON.” Troubleshooting Go to Page Top IC recorder operations Messages Related Topic System limitations Turning the operation indicator on or off (LED) Go to Page Top List of Topics 4-448-103-11(1) © 2013 Sony Corporation…
-
Page 152: You Cannot Record A File
Print Back Back to Top Help Guide You cannot record a file. How to Use The remaining memory capacity is insufficient. Troubleshooting Go to Page Top IC recorder operations Messages System limitations List of Topics 4-448-103-11(1) © 2013 Sony Corporation…
-
Page 153: Recording Is Interrupted
“VOR” to “OFF” in the menu. Troubleshooting Go to Page Top IC recorder operations Messages Related Topic System limitations Starting to record automatically in response to sound – the VOR function Go to Page Top List of Topics 4-448-103-11(1) © 2013 Sony Corporation…
-
Page 154: You Cannot Add A Recording Or An Overwrite Recording
System limitations Go to Page Top List of Topics Related Topic Adding a recording to a previously recorded file (ADD) Adding an overwrite recording during playback (OVER) Protecting a file (LOCK) Go to Page Top 4-448-103-11(1) © 2013 Sony Corporation…
-
Page 155: The Vor Function Does Not Work
The VOR function is set to “OFF.” Set “VOR” to “ON” in the menu. Troubleshooting Go to Page Top IC recorder operations Related Topic Messages Starting to record automatically in response to sound – the VOR function System limitations Go to Page Top List of Topics 4-448-103-11(1) © 2013 Sony Corporation…
-
Page 156
“SENS” (microphone sensitivity) is set to “L.” Troubleshooting Set “SENS” to “H” in the menu. Go to Page Top IC recorder operations Messages Related Topic System limitations Selecting the microphone sensitivity (SENS) List of Topics Go to Page Top 4-448-103-11(1) © 2013 Sony Corporation… -
Page 157: When Recording From Other Equipment, The Input Level Is Too Strong Or Not Strong Enough
If you use an audio connecting cable with high resistance, the input level becomes low during recording. Use an audio connecting cable without Messages resistance. System limitations Go to Page Top List of Topics Related Topic Recording from external equipment Go to Page Top 4-448-103-11(1) © 2013 Sony Corporation…
-
Page 158: The Playback Volume Is Low
The built-in speaker is mainly for monitoring, and the playback volume is low. Use the supplied headphones. Troubleshooting The volume is turned down completely. Press VOL – /+ to adjust the volume. IC recorder operations Go to Page Top Messages System limitations List of Topics 4-448-103-11(1) © 2013 Sony Corporation…
-
Page 159: No Sound Comes From The Speaker
Headphones are plugged in. The volume is turned down completely. Troubleshooting Go to Page Top IC recorder operations Messages Related Topic System limitations Listening with better sound quality List of Topics Go to Page Top 4-448-103-11(1) © 2013 Sony Corporation…
-
Page 160
Set the recording mode to “SP” or “LP” in the menu. Go to Page Top IC recorder operations Messages Related Topic System limitations Selecting the recording mode (MODE) List of Topics Go to Page Top 4-448-103-11(1) © 2013 Sony Corporation… -
Page 161: Sound Comes From The Speaker Even When The Headphones Are Plugged In
If you plug in the headphones not securely during playback, the sound may Troubleshooting come from the speaker. Unplug the headphones, and then insert them securely. IC recorder operations Go to Page Top Messages System limitations List of Topics 4-448-103-11(1) © 2013 Sony Corporation…
-
Page 162: Playback Speed Is Too Fast Or Too Slow
Adjust the speed in “DPC” again in the menu. Troubleshooting Go to Page Top IC recorder operations Messages Related Topic System limitations Adjusting the playback speed – the DPC (Digital Pitch Control) function Go to Page Top List of Topics 4-448-103-11(1) © 2013 Sony Corporation…
-
Page 163
IC recorder operations Go to Page Top Messages System limitations Related Topic List of Topics Reducing noise in the playback sound and making the human voice clearer (N-CUT)– the noise cut function Go to Page Top 4-448-103-11(1) © 2013 Sony Corporation… -
Page 164: You Cannot Divide A File
You cannot divide a protected file. To divide the file, release the protection first. System limitations Go to Page Top List of Topics Related Topic Erasing a file Protecting a file (LOCK) Go to Page Top 4-448-103-11(1) © 2013 Sony Corporation…
-
Page 165: You Cannot Move A File
If 99 files have been recorded in the folder to which you want to move a file, Troubleshooting you cannot move it. IC recorder operations Go to Page Top Messages Related Topic System limitations Protecting a file (LOCK) List of Topics Go to Page Top 4-448-103-11(1) © 2013 Sony Corporation…
-
Page 166
You cannot erase a protected file. To erase the file, release the protection first. Troubleshooting Go to Page Top IC recorder operations Related Topic Messages Protecting a file (LOCK) System limitations Go to Page Top List of Topics 4-448-103-11(1) © 2013 Sony Corporation… -
Page 167
You have not set the clock. Troubleshooting Go to Page Top IC recorder operations Related Topic Messages Setting the clock System limitations Setting the clock using the menu List of Topics Go to Page Top 4-448-103-11(1) © 2013 Sony Corporation… -
Page 168
The date of recording will not be displayed if you recorded the file when the Troubleshooting clock was not set. IC recorder operations Go to Page Top Messages Related Topic System limitations Setting the clock List of Topics Setting the clock using the menu Go to Page Top 4-448-103-11(1) © 2013 Sony Corporation… -
Page 169: There Are Fewer Menu Items Displayed In The Menu Mode
How to Use During playback or recording, there are menu items that are not displayed. Troubleshooting Go to Page Top IC recorder operations Messages Related Topic System limitations Menu list List of Topics Go to Page Top 4-448-103-11(1) © 2013 Sony Corporation…
-
Page 170
This is not a malfunction of Troubleshooting the IC recorder. Wait until the message disappears. IC recorder operations Go to Page Top Messages System limitations List of Topics 4-448-103-11(1) © 2013 Sony Corporation… -
Page 171
The memory is full. Erase some of the files or erase all the files. Troubleshooting Go to Page Top IC recorder operations Messages Related Topic System limitations Erasing a file Go to Page Top List of Topics 4-448-103-11(1) © 2013 Sony Corporation… -
Page 172
Erase some of the files or erase all the files. IC recorder operations Messages Go to Page Top System limitations Related Topic List of Topics Erasing a file Go to Page Top 4-448-103-11(1) © 2013 Sony Corporation… -
Page 173: Messages List
IC Recorder ICD-BX132 Print Back Back to Top Help Guide Messages list How to Use Follow the instructions below if a message appears on the display. HOLD Troubleshooting All the button operations are disabled because the IC recorder is in the HOLD status to prevent unintentional operations.
-
Page 174
A system error other than the above has occurred. Remove the batteries and re- insert them. ERROR 01 — ERROR 06 A system error other than the above has occurred. Remove the batteries and re- insert them. Go to Page Top 4-448-103-11(1) © 2013 Sony Corporation… -
Page 175
The remaining recording time becomes shorter when you divide a file. You need a certain amount of free space for a file management area to divide a System limitations file, therefore the remaining recording time will be shortened. Go to Page Top List of Topics 4-448-103-11(1) © 2013 Sony Corporation… -
Page 176
IC Recorder ICD-BX132 Help Guide How to Use Troubleshooting List of Topics Use this help guide when you have any questions on how to use your IC recorder. Go to Page Top 4-448-103-11(1) © 2013 Sony Corporation…
IC Recorder
Краткое руководство
пользователя
4-448-097-
91(1)
© 2013 Sony Corporation Printed in China
ICD-BX132
Добро пожаловать в ваш новый цифровой диктофон Sony!
Это руководство по быстрой установке, в нем содержатся инструкции по основным операциям с
цифровым диктофоном.
Пожалуйста, внимательно ознакомьтесь с настоящим руководством. Мы надеемся, что вы останетесь
довольны своим новым цифровым диктофоном Sony.
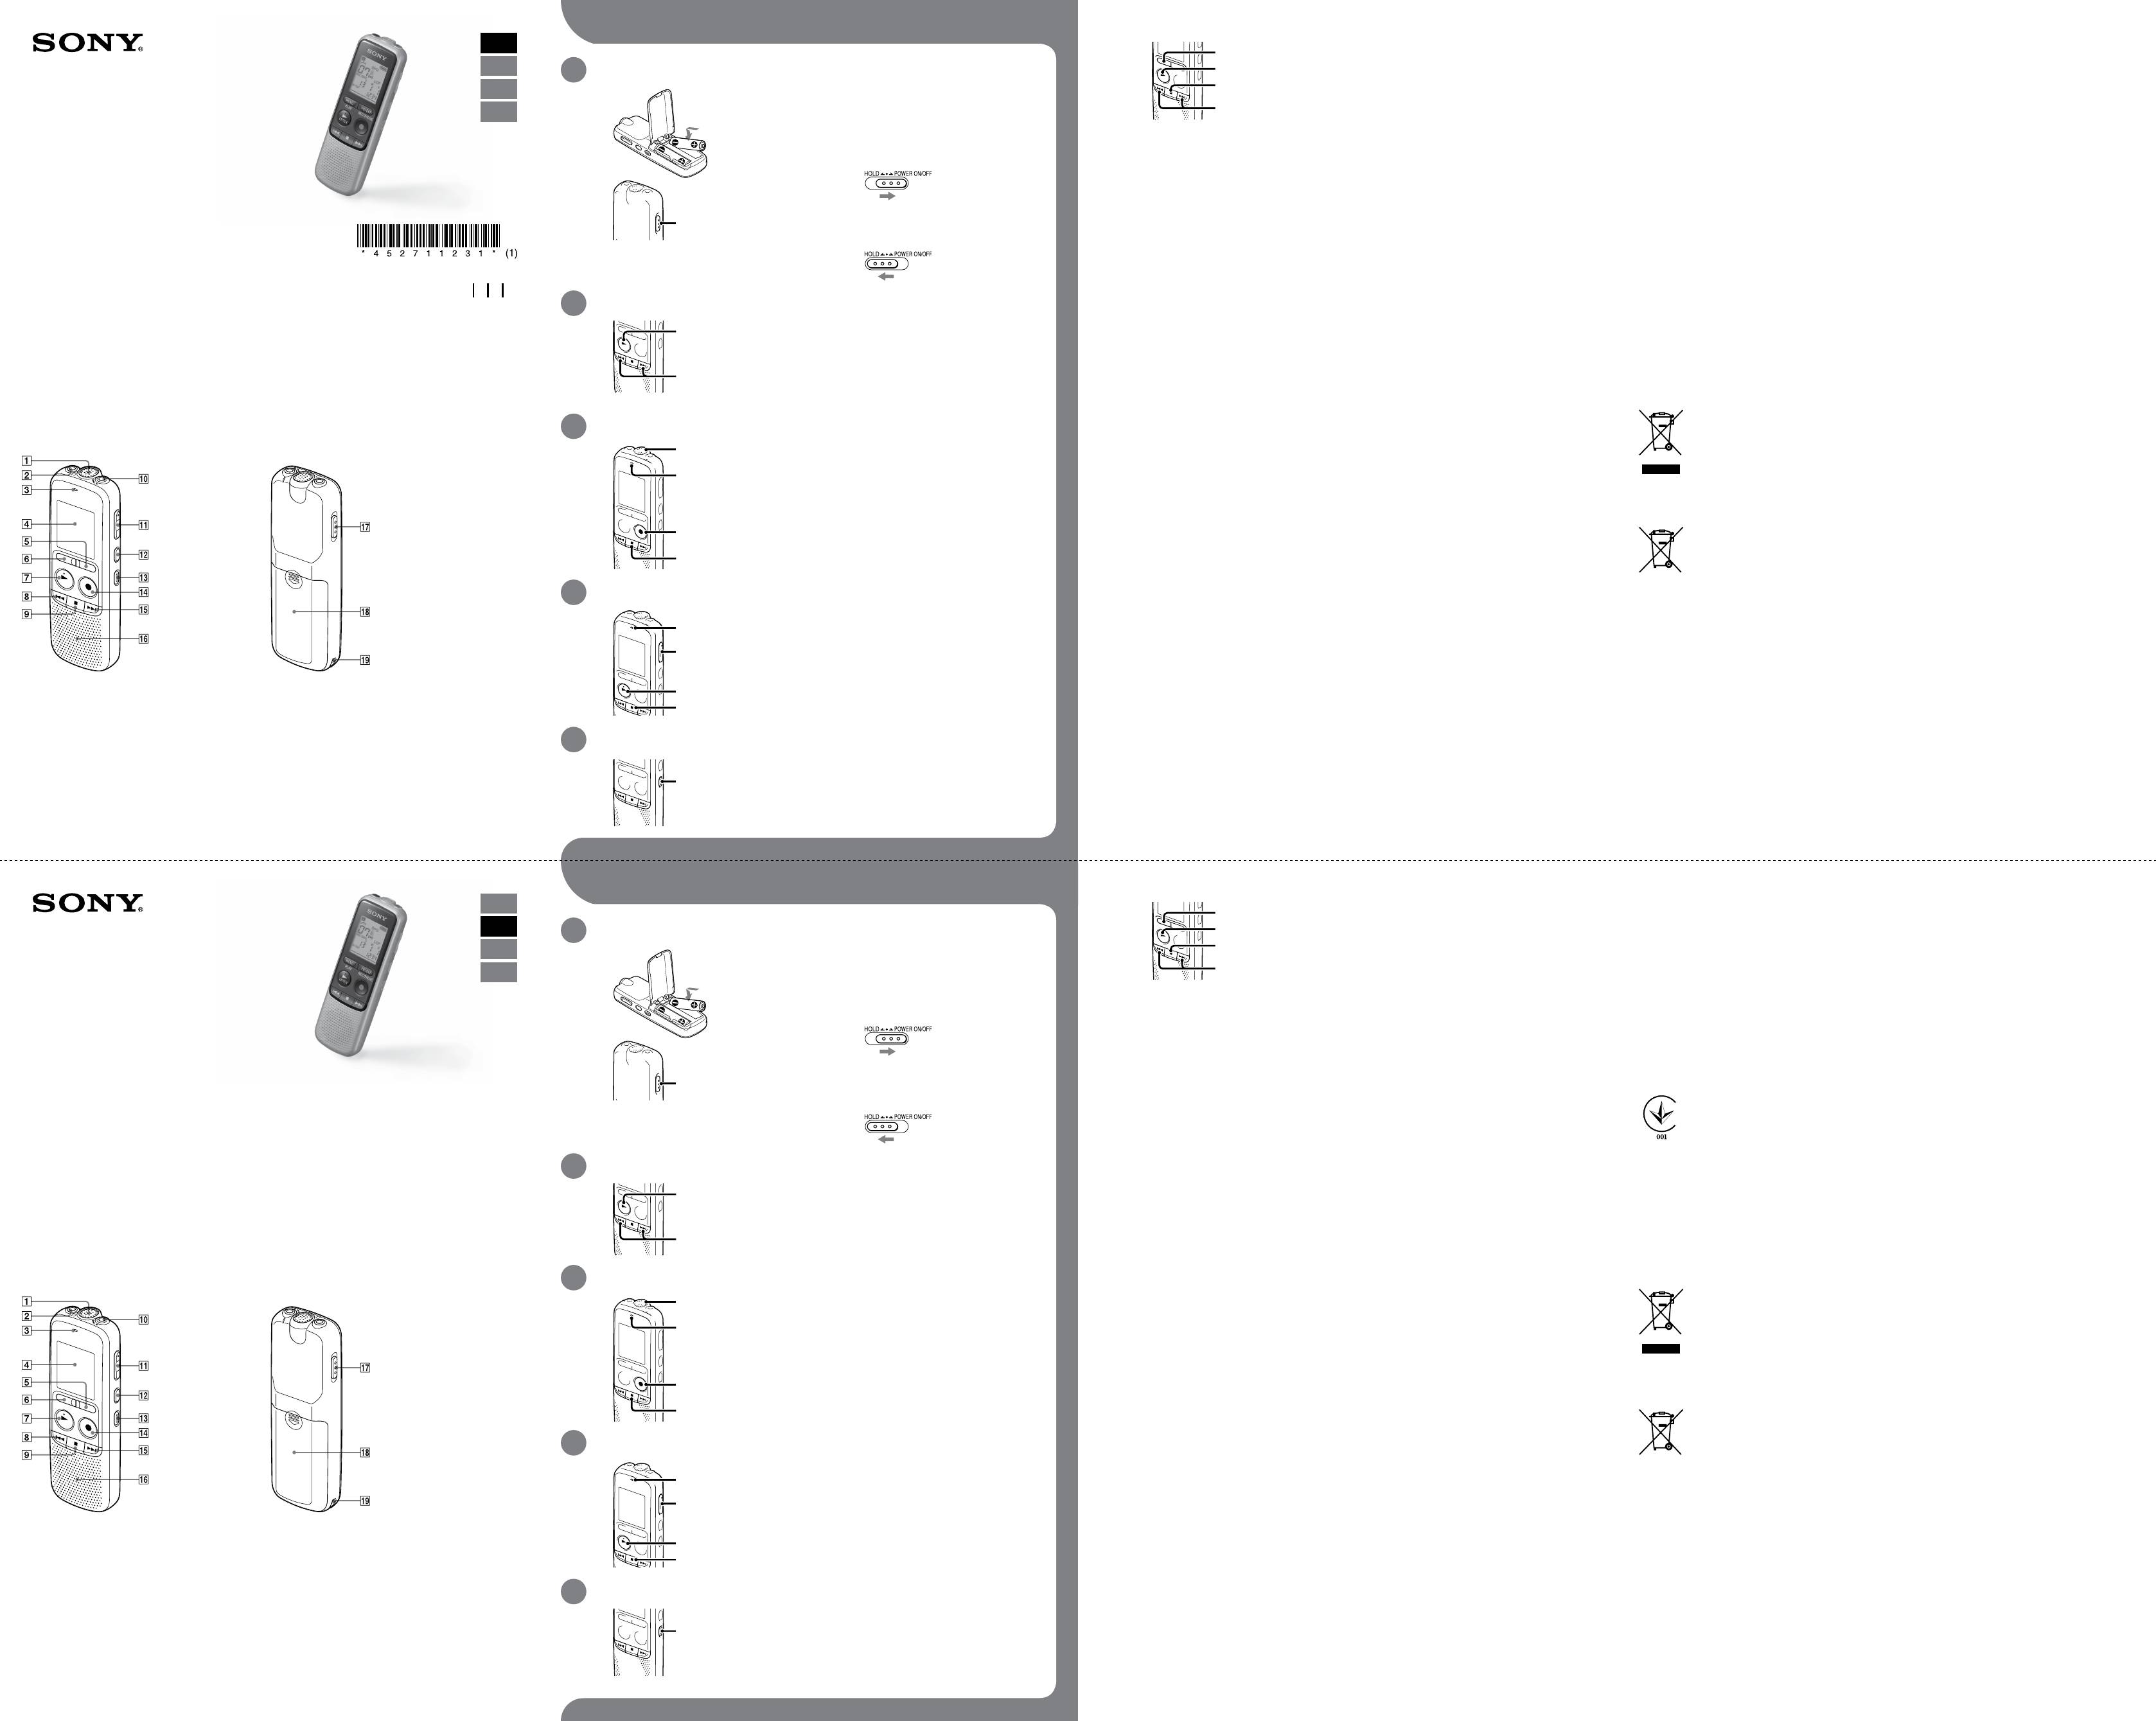
Компоненты и элементы управления
Встроенный микрофон
Разъем для наушников
Индикатор работы
Экран дисплея
Кнопка FOLDER
Кнопка MENU
Кнопка PLAY/ENTER (*)
Кнопка (ускоренной перемотки назад/просмотра)
Кнопка (остановки)
Разъем для микрофона) (PLUG IN POWER) (*)
Кнопка VOL –/+ установки громкости (*)
Кнопка DIVIDE
Кнопка ERASE
Кнопка REC/PAUSE (записи/паузы)
Кнопка (ускоренной перемотки вперед/сигнала)
Динамик
Переключатель HOLD•POWER ON/OFF
Батарейный отсек
Отверстие для ремешка (ремешок не входит в
комплект поставки)
* Эти кнопки и разъем имеют тактильную точку. Используйте ее как ориентир при выполнении операций или для идентификации разъемов.
RU
UA
Проверьте комплект поставки.
ˎ Цифровой диктофон (1)
ˎ Краткое руководство пользователя
ˎ Аккумуляторные щелочные батарейки LR03 (тип AAA) (2)
Испытайте ваш новый цифровой диктофон
1. Питание.
Скользящим движением сдвиньте и поднимите крышку
батарейного отсека, после этого вставьте батарейки,
учитывая полярность.
Включите питание.
Переместите переключатель HOLD•POWER ON/OFF в
направлении “POWER ON/OFF” и удерживайте его там до тех
пор, пока на экране дисплея не появится окно.
Для выключения питания переместите и удерживайте переключатель
HOLD•POWER ON/OFF в направлении “POWER ON/OFF” до тех пор,
пока на экране не появится сообщение “OFF”.
Предотвращение случайных операций (HOLD)
2. Установка даты и времени.
Когда вы вставите батарейки, на экране дисплея появится
сообщение “SET DATE”, и начнет вспыхивать сегмент для
установки года.
Нажимайте
или , чтобы установить год (две
последние цифры года), и после этого нажмите кнопку
PLAY/ENTER. Повторите эту процедуру, чтобы
последовательно установить месяц, день, час и минуты.
3. Запись.
Индикатор
работы
Нажмите
REC/PAUSE.
Запись начнется, и индикатор работы загорится красным цветом.
¼ Вы можете приостановить запись, нажав на REC/PAUSE.
Нажмите
REC/PAUSE еще раз, чтобы возобновить запись.
Расположите цифровой диктофон таким образом, чтобы
встроенный микрофон был обращен в направлении
источника записываемого звука.
Нажмите
(остановка), чтобы остановить запись.
Появляется сообщение “ACCESS” и запись останавливается.
4. Прослушивание.
Индикатор
работы
Нажмите
PLAY/ENTER.
Начинается воспроизведение, и индикатор работы загорится
зеленым цветом.
Установите уровень громкости с помощью нажатия VOL –/+.
Нажмите
(остановка), чтобы остановить
воспроизведение.
5. Удаление.
Когда цифровой диктофон находится в режиме
остановки, нажмите и удерживайте кнопку ERASE.
Когда цифровой диктофон находится в режиме
воспроизведения, нажмите кнопку ERASE.
На экран выведется сообщение “ERASE”.
Нажмите кнопку ERASE.
Нажмите кнопку MENU.
Нажимайте
или , чтобы выбрать пункт меню, для
которого вы желаете установить настройку, и после этого
нажмите на кнопку
PLAY/ENTER.
Нажимайте
или , чтобы выбрать нужную вам
настройку, которую вы желаете установить, и после этого
нажмите кнопку
PLAY/ENTER.
Нажмите
(остановка), чтобы выйти из режима меню.
Питание
Работайте с устройством только при 3,0 В или 2,4 В
постоянного тока.
Используйте две щелочные батарейки LR03 (тип AAA)
или две перезаряжаемые аккумуляторные батарейки
NH‑AAA.
Техника безопасности
Не пользуйтесь устройством во время вождения
автомобиля, езды на велосипеде или управления
любыми моторизованными транспортными
средствами.
Обращение с устройством
ˎ Не оставляйте устройство вблизи источников тепла
или в местах, подверженных воздействию прямых
солнечных лучей, большого количества пыли или
механических ударов.
ˎ В случае попадания внутрь устройства твердых
предметов или жидкостей извлеките элементы
питания и не пользуйтесь устройством, пока его не
проверит квалифицированный специалист.
В случае возникновения вопросов или проблем,
касающихся данного устройства, обратитесь к
ближайшему дилеру Sony.
Меры предосторожности
Использование меню
Дополнительные функции
Вы также можете ознакомиться с этим справочным руководством на домашней странице поддержки
пользователей цифрового диктофона Sony:
http://rd1.sony.net/help/icd/b13/ce/
Подробности этих дополнительных функций для записи, воспроизведения и редактирования включены
в справочное руководство.
ˎ MODE (Режим записи)
ˎ SENS (Чувствительность микрофона)
ˎ LCF (Фильтр удаления низких частот из
аудиосигнала)
ˎ VOR (Запись, управляемая голосом)
ˎ REC‑OP (Добавление записи)
ˎ DPC (Цифровое управление высотой звука)
ˎ N‑CUT (Сокращение шума)
ˎ EASY‑S (Легкий поиск)
ˎ CONT (Непрерывное воспроизведение)
ˎ LOCK (Защита файла)
ˎ ALARM
ˎ DIVIDE (Разделение файла)
Объем памяти (объем памяти доступный
пользователю *
1
*
2
)
2 ГБ (приблиз. 1,75 ГБ = 1879048192 байт)
*
1
Небольшое количество встроенной памяти используется
для управления файлами и поэтому недоступно для памяти
пользователя.
*
2
Когда встроенная память отформатирована с помощью
цифрового диктофона.
Размеры (ш/в/г) (без выступающих деталей и
органов управления) (JEITA)*
3
Приблиз. 38,5 мм × 115,2 мм × 21,3 мм
Macca (JEITA)
*3
Приблиз. 72 г, включая две щелочные батарейки LR03
(тип AAA)
*
3
Измерено по стандарту ассоциации JEITA (Japan Electronics
and Information Technology Industries Association)
Рабочая температура
5 °C – 35 °C
Срок службы батареек (когда используются
щелочные батарейки Sony LR03 (SG) (тип AAA) (*
4
))
• SHQ (Режим сверхвысокого качества)
Запись: приблиз. 13 час.
Воспроизведение через динамик (*
5
): приблиз. 10 час.
Воспроизведение через наушники: приблиз. 21 час.
• HQ (Режим высокого качества)
Запись: приблиз. 15 час.
Воспроизведение через динамик (*
5
): приблиз. 10 час.
Воспроизведение через наушники: приблиз. 23 час.
• SP (Режим стандартного воспроизведения)
Запись: приблиз. 16 час.
Воспроизведение через динамик (*
5
): приблиз. 10 час.
Воспроизведение через наушники: приблиз. 24 час.
• LP (Режим длительного воспроизведения)
Запись: приблиз. 20 час.
Воспроизведение через динамик (*
5
): приблиз. 12 час.
Воспроизведение через наушники: приблиз. 32 час.
*
4
Измерено по стандарту ассоциации JEITA (Японская
ассоциация производителей электроники и
информационных технологий). Срок службы батареек
может укорачиваться в зависимости от того, как вы
управляете цифровым диктофоном. При использовании
аккумуляторных батарей NH‑AAA (не входят в комплект
поставки), срок службы батарей становится короче.
*
5
При воспроизведении музыки через внутренний динамик с
уровнем громкости, установленным в 28.
Технические характеристики
ˎ Электретный конденсаторный микрофон, ECM‑CS3
ˎ Перезаряжаемые аккумуляторные батарейки
NH‑AAA‑B2KN
ˎ Зарядное устройство для аккумуляторных батареек
BCG‑34HSN
ˎ Компактное зарядное устройство для 2‑pc AAA
батареек многоразового использования серии
Premium BCG‑34HS2KAN, BCG‑34HW2KAN
Дополнительные принадлежности
Примечание
Доступность некоторых моделей и дополнительных принадлежностей зависит от страны и региона.
Товарные знаки
ˎ Технология кодирования звука MPEG Layer‑3 и патенты используются по лицензии Fraunhofer IIS and Thomson.
ˎ Все другие товарные знаки и зарегистрированные товарные знаки являются товарными знаками и
зарегистрированными товарными знаками соответствующих владельцев. Кроме того, в данном руководстве
“™” и “®” не упоминаются в каждом отдельном случае.
ВНИМАНИЕ!
Не подвергайте батареи (батарейный блок или установленные батареи) длительному воздействию чрезмерного
нагрева, например на солнце, вблизи огня и т.п.
ОСТОРОЖНО!
Существует угроза взрыва при использовании батареи недопустимого типа.
Проводите утилизацию использованных батарей согласно инструкциям.
Изготовитель: Сони Kорпорейшн
Адрес: 1‑7‑1 Kонан, Минато‑ку, Токио 108‑0075, Япония Страна‑производитель: Kитай
Относится только к первичным элементам питания, идущим в комплекте с данным изделием.
Импортер на территории РФ и название и адрес организации, раположенной на территории РФ,
уполномоченной принимать претензии от пользователей:
ЗАО “Сони Электроникс”, 123103, Москва,Карамышевский проезд, 6, Россия
Дата изготовления
Цифровой диктофон : Указана на упаковке
Щелочные батарейки: Рекомендованный срок годности(месяц‑год) указан на батарейках.
Утилизация отслужившего электрического и электронного оборудования (директива применяется в
странах Евросоюза и других европейских странах, где действуют системы раздельного сбора отходов)
Данный знак на устройстве или его упаковке обозначает, что данное устройство нельзя утилизировать
вместе с прочими бытовыми отходами. Его следует сдать в соответствующий приемный пункт переработки
электрического и электронного оборудования. Неправильная утилизация данного изделия может привести к
потенциально негативному влиянию на окружающую среду и здоровье людей, поэтому для предотвращения
подобных последствий необходимо выполнять специальные требования по утилизации этого изделия.
Переработка данных материалов поможет сохранить природные ресурсы. Для получения более подробной
информации о переработке этого изделия обратитесь в местные органы городского управления, службу
сбора бытовых отходов или в магазин, где было приобретено изделие.
Утилизация использованных элементов питания (применяется в странах Евросоюза и других
европейских странах, где действуют системы раздельного сбора отходов)
Данный знак на элементе питания или упаковке означает, что элемент питания, поставляемый с
устройством, нельзя утилизировать вместе с прочими бытовыми отходами.
На некоторых элементах питания данный символ может комбинироваться с символом химического
элемента. Символы ртути (Hg) или свинца (Pb) указываются, если содержание данных металлов
более 0,0005% (для ртути) и 0,004% (для свинца) соответственно.
Обеспечивая правильную утилизацию использованных элементов питания, вы
предотвращаете негативное влияние на окружающую среду и здоровье людей, возникающее при
неправильной утилизации. Вторичная переработка материалов, использованных при изготовлении элементов
питания, способствует сохранению природных ресурсов.
При работе устройств, для которых в целях безопасности, выполнения каких‑либо действий или сохранения
имеющихся в памяти устройств данных необходима подача постоянного питания от встроенного элемента
питания, замену такого элемента питания следует производить только в специализированных сервисных
центрах. Для правильной утилизации использованных элементов питания, после истечения срока службы,
сдавайте их в соответствующий пункт по сбору электронного и электрического оборудования.
Об использовании прочих элементов питания, пожалуйста, узнайте в разделе, в котором даны инструкции
по извлечению элементов питания из устройства, соблюдая меры безопасности. Сдавайте использованные
элементы питания в соответствующие пункты по сбору и переработке использованных элементов питания.
Для получения более подробной информации о вторичной переработке данного изделия или использованного
элемента питания, пожалуйста, обратитесь в местные органы городского управления, службу сбора бытовых
отходов или в магазин, где было приобретено изделие.
Чтобы получить сведения о поддержке вашего цифрового диктофона, пожалуйста, получите доступ к
следующей домашней странице поддержки:
http://support.sony‑europe.com/DNA
Испытайте ваш новый цифровой диктофон
Использование меню
Дополнительные принадлежности
RU
Нажмите кнопку MENU.
ˎ Электретный конденсаторный микрофон, ECM‑CS3
ˎ Компактное зарядное устройство для 2‑pc AAA
Нажимайте или , чтобы выбрать пункт меню, для
ˎ Перезаряжаемые аккумуляторные батарейки
батареек многоразового использования серии
UA
1. Питание.
которого вы желаете установить настройку, и после этого
NH‑AAA‑B2KN
Premium BCG‑34HS2KAN, BCG‑34HW2KAN
HU
Скользящим движением сдвиньте и поднимите крышку
нажмите на кнопку PLAY/ENTER.
Примечание
IC Recorder
Нажимайте или , чтобы выбрать нужную вам
TR
батарейного отсека, после этого вставьте батарейки,
Доступность некоторых моделей и дополнительных принадлежностей зависит от страны и региона.
учитывая полярность.
настройку, которую вы желаете установить, и после этого
Краткое руководство
Включите питание.
нажмите кнопку PLAY/ENTER.
Товарные знаки
ˎ Технология кодирования звука MPEG Layer‑3 и патенты используются по лицензии Fraunhofer IIS and Thomson.
пользователя
Переместите переключатель HOLD•POWER ON/OFF в
направлении “POWER ON/OFF” и удерживайте его там до тех
Нажмите (остановка), чтобы выйти из режима меню.
ˎ Все другие товарные знаки и зарегистрированные товарные знаки являются товарными знаками и
пор, пока на экране дисплея не появится окно.
зарегистрированными товарными знаками соответствующих владельцев. Кроме того, в данном руководстве
Дополнительные функции
“™” и “®” не упоминаются в каждом отдельном случае.
Вы также можете ознакомиться с этим справочным руководством на домашней странице поддержки
ВНИМАНИЕ!
Для выключения питания переместите и удерживайте переключатель
пользователей цифрового диктофона Sony:
Не подвергайте батареи (батарейный блок или установленные батареи) длительному воздействию чрезмерного
ICD-BX132
HOLD•POWER ON/OFF в направлении “POWER ON/OFF” до тех пор,
http://rd1.sony.net/help/icd/b13/ce/
нагрева, например на солнце, вблизи огня и т.п.
пока на экране не появится сообщение “OFF”.
Подробности этих дополнительных функций для записи, воспроизведения и редактирования включены
ОСТОРОЖНО!
Предотвращение случайных операций (HOLD)
в справочное руководство.
Существует угроза взрыва при использовании батареи недопустимого типа.
4-527-112-31(1)
Проводите утилизацию использованных батарей согласно инструкциям.
ˎ MODE (Режим записи)
ˎ N‑CUT (Сокращение шума)
Страна-изготовитель
© 2013 Sony Corporation Printed in China
ˎ SENS (Чувствительность микрофона)
ˎ EASY‑S (Легкий поиск)
Цифровой диктофон: Сделано в Китае
ˎ LCF (Фильтр удаления низких частот из
ˎ CONT (Непрерывное воспроизведение)
Изготовитель: Сони Kорпорейшн
2. Установка даты и времени.
аудиосигнала)
ˎ LOCK (Защита файла)
Адрес: 1‑7‑1 Kонан, Минато‑ку ,Токио 108‑0075, Япония
Добро пожаловать в ваш новый цифровой диктофон Sony!
ˎ VOR (Запись, управляемая голосом)
ˎ ALARM
Импортер на территории РФ и название и адрес организации, раположенной на территории РФ,
При установке батарей и включении питания на дисплее
ˎ REC‑OP (Добавление записи)
ˎ DIVIDE (Разделение файла)
уполномоченной принимать претензии от пользователей:
Это руководство по быстрой установке, в нем содержатся инструкции по основным операциям с
появляется сообщение “SET DATE” и показание года начинает
ˎ DPC (Цифровое управление высотой звука)
ЗАО “Сони Электроникс”, 123103, Москва,Карамышевский проезд, 6, Россия
цифровым диктофоном.
мигать.
Дата изготовления
Пожалуйста, внимательно ознакомьтесь с настоящим руководством. Мы надеемся, что вы останетесь
Нажимайте или , чтобы установить год (две
Меры предосторожности
Цифровой диктофон : Указана на упаковке
довольны своим новым цифровым диктофоном Sony.
последние цифры года), и после этого нажмите кнопку
Питание
Обращение с устройством
Щелочные батарейки: Рекомендованный срок годности(месяц‑год) указан на батарейках.
Проверьте комплект поставки.
PLAY/ENTER. Повторите эту процедуру, чтобы
последовательно установить месяц, день, час и минуты.
Работайте с устройством только при 3,0 В или 2,4 В
ˎ Не оставляйте устройство вблизи источников тепла
Утилизация отслужившего электрического и электронного оборудования (директива применяется в
странах Евросоюза и других европейских странах, где действуют системы раздельного сбора отходов)
ˎ Цифровой диктофон (1)
ˎ Аккумуляторные щелочные батарейки LR03 (тип AAA) (2)
постоянного тока.
или в местах, подверженных воздействию прямых
Данный знак на устройстве или его упаковке обозначает, что данное устройство нельзя утилизировать вместе
ˎ Краткое руководство пользователя
Используйте две щелочные батарейки LR03 (тип AAA)
солнечных лучей, большого количества пыли или
с прочими бытовыми отходами. Его следует сдать в соответствующий приемный пункт переработки
3. Запись.
или две перезаряжаемые аккумуляторные батарейки
механических ударов.
электрического и электронного оборудования. Неправильная утилизация данного изделия может привести к
Компоненты и элементы управления
Нажмите REC/PAUSE.
NH‑AAA.
ˎ В случае попадания внутрь устройства твердых
потенциально негативному влиянию на окружающую среду и здоровье людей, поэтому для предотвращения
Запись начнется, и индикатор работы загорится красным цветом.
Техника безопасности
предметов или жидкостей извлеките элементы
подобных последствий необходимо выполнять специальные требования по утилизации этого изделия.
Индикатор
питания и не пользуйтесь устройством, пока его не
Переработка данных материалов поможет сохранить природные ресурсы. Для получения более подробной
работы
¼ Вы можете приостановить запись, нажав на REC/PAUSE.
Нажмите REC/PAUSE еще раз, чтобы возобновить запись.
Не пользуйтесь устройством во время вождения
проверит квалифицированный специалист.
информации о переработке этого изделия обратитесь в местные органы городского управления, службу
автомобиля, езды на велосипеде или управления
сбора бытовых отходов или в магазин, где было приобретено изделие.
Расположите цифровой диктофон таким образом, чтобы
любыми моторизованными транспортными
встроенный микрофон был обращен в направлении
средствами.
В случае возникновения вопросов или проблем,
Утилизация использованных элементов питания (применяется в странах Евросоюза и других
источника записываемого звука.
касающихся данного устройства, обратитесь к
европейских странах, где действуют системы раздельного сбора отходов)
Данный знак на элементе питания или упаковке означает, что элемент питания, поставляемый с
Нажмите (остановка), чтобы остановить запись.
ближайшему дилеру Sony.
устройством, нельзя утилизировать вместе с прочими бытовыми отходами.
Появляется сообщение “ACCESS” и запись останавливается.
Технические характеристики
На некоторых элементах питания данный символ может комбинироваться с символом химического
элемента. Символы ртути (Hg) или свинца (Pb) указываются, если содержание данных металлов
Объем памяти (объем памяти доступный
Воспроизведение через динамик (*
5
): приблиз. 10 час.
более 0,0005% (для ртути) и 0,004% (для свинца) соответственно.
пользователю *
1
*
2
)
Воспроизведение через наушники: приблиз. 21 час.
Обеспечивая правильную утилизацию использованных элементов питания, вы
4. Прослушивание.
2 ГБ (приблиз. 1,75 ГБ = 1879048192 байт)
• HQ (Режим высокого качества)
Нажмите PLAY/ENTER.
*
Небольшое количество встроенной памяти используется
1
предотвращаете негативное влияние на окружающую среду и здоровье людей, возникающее при
для управления файлами и поэтому недоступно для памяти
Запись: приблиз. 15 час.
неправильной утилизации. Вторичная переработка материалов, использованных при изготовлении элементов
Индикатор
Воспроизведение через динамик (*
5
): приблиз. 10 час.
питания, способствует сохранению природных ресурсов.
работы
Начинается воспроизведение, и индикатор работы загорится
*
Когда встроенная память отформатирована с помощью
2
пользователя.
зеленым цветом.
Воспроизведение через наушники: приблиз. 23 час.
• SP (Режим стандартного воспроизведения)
При работе устройств, для которых в целях безопасности, выполнения каких‑либо действий или сохранения
цифрового диктофона.
Запись: приблиз. 16 час.
имеющихся в памяти устройств данных необходима подача постоянного питания от встроенного элемента
Установите уровень громкости с помощью нажатия VOL –/+.
5
): приблиз. 10 час.
питания, замену такого элемента питания следует производить только в специализированных сервисных
Нажмите (остановка), чтобы остановить
Размеры (ш/в/г) (без выступающих деталей и
органов управления) (JEITA)*
3
Воспроизведение через динамик (*
Воспроизведение через наушники: приблиз. 24 час.
центрах. Для правильной утилизации использованных элементов питания, после истечения срока службы,
Встроенный микрофон
Кнопка VOL –/+ установки громкости (*)
сдавайте их в соответствующий пункт по сбору электронного и электрического оборудования.
Разъем для наушников
Кнопка DIVIDE
воспроизведение.
Приблиз. 38,5 мм × 115,2 мм × 21,3 мм
• LP (Режим длительного воспроизведения)
Macca (JEITA)
*3
Запись: приблиз. 20 час.
Об использовании прочих элементов питания, пожалуйста, узнайте в разделе, в котором даны инструкции
Индикатор работы
Кнопка ERASE
Приблиз. 72 г, включая две щелочные батарейки LR03
Воспроизведение через динамик (*
5
): приблиз. 12 час.
по извлечению элементов питания из устройства, соблюдая меры безопасности. Сдавайте использованные
Воспроизведение через наушники: приблиз. 32 час.
элементы питания в соответствующие пункты по сбору и переработке использованных элементов питания.
Экран дисплея
Кнопка REC/PAUSE (записи/паузы)
(тип AAA)
*
3
Измерено по стандарту ассоциации JEITA (Japan Electronics
*
4
Измерено по стандарту ассоциации JEITA (Японская
Для получения более подробной информации о вторичной переработке данного изделия или использованного
Кнопка FOLDER
Кнопка
(ускоренной перемотки вперед/сигнала)
5. Удаление.
and Information Technology Industries Association)
информационных технологий). Срок службы батареек
ассоциация производителей электроники и
элемента питания, пожалуйста, обратитесь в местные органы городского управления, службу сбора бытовых
Кнопка MENU
Динамик
Рабочая температура
может укорачиваться в зависимости от того, как вы
отходов или в магазин, где было приобретено изделие.
Кнопка PLAY/ENTER (*)
Переключатель HOLD•POWER ON/OFF
Когда цифровой диктофон находится в режиме
5 °C – 35 °C
аккумуляторных батарей NH‑AAA (не входят в комплект
управляете цифровым диктофоном. При использовании
Чтобы получить сведения о поддержке вашего цифрового диктофона, пожалуйста, получите доступ к
Кнопка
(ускоренной перемотки назад/просмотра)
Батарейный отсек
остановки, нажмите и удерживайте кнопку ERASE.
Кнопка (остановки)
Отверстие для ремешка (ремешок не входит в
Когда цифровой диктофон находится в режиме
Срок службы батареек (когда используются
4
При воспроизведении музыки через внутренний динамик с
5
поставки), срок службы батарей становится короче.
следующей домашней странице поддержки:
щелочные батарейки Sony LR03 (SG) (тип AAA) (*
))
*
http://support.sony‑europe.com/DNA
Разъем для микрофона (PLUG IN POWER) (*)
комплект поставки)
воспроизведения, нажмите кнопку ERASE.
• SHQ (Режим сверхвысокого качества)
На экран выведется сообщение “ERASE”.
Запись: приблиз. 13 час.
уровнем громкости, установленным в 28.
*
Эти кнопки и разъем имеют тактильную точку. Используйте ее как ориентир при выполнении операций или для идентификации разъемов.
Нажмите кнопку ERASE.
Спробуйте свій новий цифровий диктофон
Використання меню
Торгові марки
RU
Натисніть кнопку MENU.
ˎ Технологія кодування звуку MPEG Layer‑3 та патенти ліцензовані компаніями Fraunhofer IIS and Thomson.
Щоб вибрати пункт меню, який потрібно настроїти, натисніть
ˎ Усі інші торгові марки та зареєстровані торгові марки є торговими марками або зареєстрованими торговими
UA
1. Увімкнення живлення.
кнопку або , а потім– кнопку PLAY/ENTER.
марками відповідних власників. Окрім того, символи «™» і «®» не наводяться в цьому посібнику в усіх випадках.
HU
Посуньте та підніміть кришку відсіку для батарей, вставте
Щоб вибрати параметр, який потрібно встановити, натисніть
ПОПЕРЕДЖЕННЯ
IC Recorder
батареї, дотримуючись полярності.
кнопку або , а потім– кнопку PLAY/ENTER.
Не піддавайте батареї (акумуляторний блок або встановлені батареї) впливу високих температур, наприклад
TR
Увімкніть живлення.
Щоб вийти з меню, натисніть кнопку (зупинення).
сонячного світла, вогню тощо, протягом тривалого часу.
Стислий посібник з
Посуньте та утримуйте перемикач HOLD•POWER ON/OFF
ОБЕРЕЖНО
Існує ризик вибуху за встановлення батарей невідповідного типу.
використання
у напрямку «POWER ON/OFF», доки на екрані не з’явиться
зображення.
Додаткові функції
Утилізуйте використані батареї відповідно до інструкцій.
Можна також переглянути довідковий посібник із використання цифрового диктофона Sony на наведеній нижче
Дата виробництва
домашній сторінці служби підтримки клієнтів.
http://rd1.sony.net/help/icd/b13/ce/
Цифровий диктофон: зазначено на упаковці
Лужні батареї: рекомендований термін придатності (місяць, рік) зазначено на батареях.
Щоб вимкнути живлення, посуньте та утримуйте перемикач
Відомості про перелічені нижче додаткові функції записування, відтворення та внесення змін містяться в
довідковому посібнику.
Країна походження
ICD-BX132
HOLD•POWER ON/OFF у напрямку «POWER ON/OFF», доки на екрані
не з’явиться повідомлення «OFF».
ˎ MODE (режим записування)
ˎ DPC (цифрове керування висотою звуку)
Цифровий диктофон: зроблено в Китаї
Уникнення випадкового виконання операцій (HOLD)
ˎ SENS (робота мікрофона в режимі підвищеної
ˎ N‑CUT (зменшення перешкод)
чутливості)
ˎ EASY‑S (легкий пошук)
ˎ LCF (фільтр високих частот)
ˎ CONT (безперервне відтворення)
ˎ VOR (записування під керуванням голосового
ˎ LOCK (захист файлу)
сигналу)
ˎ ALARM
Виробник:
ˎ REC‑OP (додавання запису)
ˎ DIVIDE (ділення файлу)
Sony Corporation 1‑7‑1, Konan, Minato‑ku, Tokyo, Japan, 108‑0075.
Вас вітає ваш новий цифровий диктофон Sony!
2. Налаштування дати й часу.
Заходи безпеки
Уповноважений представник в Україні:
Цей стислий посібник із використання містить інструкції щодо основних операцій цифрового диктофона.
Після встановлення батарей і увімкнення живлення на дисплеї
ТОВ «Соні Україна», вул. Спаська 30, м.Київ, 04070, Україна.
Уважно його прочитайте. Сподіваємося, вам сподобається новий цифровий диктофон Sony.
з’явиться індикація «SET DATE», і почне миготіти секція року.
Живлення
Експлуатація
Використовуйте пристрій лише при постійному струмі
ˎ Не залишайте пристрій біля джерел тепла, під
Обладнання відповідає вимогам:
Щоб установити рік (дві останні цифри року), натисніть кнопку
або , а потім– кнопку PLAY/ENTER. Повторіть цю
з напругою 3,0 В або 2,4 В.
прямим сонячним світлом або в запилених місцях.
Технічного регламенту з електромагнітної сумісності обладнання (постанова КМУ від 29.07.2009 № 785).
Перевірте комплект поставки.
Бережіть пристрій від механічних пошкоджень.
ˎ Цифровий диктофон (1)
та хвилини.
або дві акумуляторні батареї NH‑AAA.
Обладнання відповідає вимогам Технічного регламенту обмеження використання деяких небезпечних речовин
ˎ Лужні батареї LR03 розміру AAA (2)
процедуру, щоб послідовно встановити місяць, день, години
Використовуйте дві лужні батареї LR03 (розміруAAA)
ˎ Якщо всередину пристрою потрапить сторонній
ˎ Стислий посібник з використання
Техніка безпеки
предмет або рідина, вийміть батареї та не
в електричному та електронному обладнанні (постанова КМУ від 03.12.2008 № 1057).
Не використовуйте пристрій під час керування
використовуйте пристрій, доки його не перевірить
Утилізація старого електричного та електронного обладнання (застосовується в Європейському союзі та
Деталі та елементи керування
3. Записування.
інших європейських країнах із системами роздільного збирання сміття)
автомобілем, мотоциклом чи іншим транспортним
кваліфікований спеціаліст.
Натисніть кнопку REC/PAUSE.
засобом.
Цей символ на виробі або на упаковці означає, що цей виріб не можна утилізувати як побутове
Розпочнеться записування, індикатор виконання операцій
У разі виникнення будь‑яких запитань або проблем,
сміття. Замість цього його потрібно здати до відповідного приймального пункту для вторинної
засвітиться червоним.
пов’язаних із пристроєм, зверніться до найближчого
обробки електричного та електронного обладнання. Забезпечивши належну утилізацію цього
Індикатор
дилера компанії Sony.
виробу, ви допоможете запобігти негативним наслідкам для навколишнього середовища та
виконання
людського здоров‘я, до яких могла б призвести неправильна утилізація цього виробу. Вторинна
операцій
¼ Призупинити записування можна, натиснувши кнопку REC/
PAUSE. Щоб відновити записування, натисніть кнопку REC/
Технічні характеристики
переробка матеріалів допоможе зберегти природні ресурси. Щоб отримати
PAUSE ще раз.
Обсяг пам’яті (пам’ять, доступна користувачеві *
1
*
2
)
Відтворення через динамік (*
5
): Прибл. 10год.
докладнішу інформацію щодо вторинної переробки цього виробу, зверніться до місцевих органів влади, до
Розташуйте цифровий диктофон так, щоб вбудований мікрофон було
2ГБ (прибл. 1,75ГБ= 1879048192 байт)
Відтворення через навушники: Прибл. 21год.
служби утилізації побутових відходів або до магазину, де було придбано цей виріб.
спрямовано на джерело звуку, який потрібно записати.
*
1
Незначний обсяг вбудованої пам’яті забезпечує можливість
керування файлами та не може використовуватися як
• HQ (Режим високої якості)
Записування: Прибл. 15год.
Переробка використаних елементів живлення (директива діє у межах країн Європейського Союзу та інших
Щоб припинити записування, натисніть кнопку
(зупинення).
сховище.
Після цього буде відображено напис «ACCESS», і записування буде припинено.
2
5
країн Європи зі системами роздільного збору відходів)
*
Якщо вбудовану пам’ять форматовано за допомогою
Відтворення через динамік (*
): Прибл. 10год.
Даний знак на елементі живлення або упаковці означає, що елемент живлення, який використовується для
цифрового диктофона.
Відтворення через навушники: Прибл. 23год.
• SP (Режим стандартного відтворення)
роботи цього пристрою, не можна утилізувати разом з іншими побутовими відходами.
Розміри (ш/в/г) (без деталей, які виступають, і
4. Прослуховування.
елементів керування) (JEITA)*
3
Записування: Прибл. 16год.
На деяких елементах живлення цей знак може використовуватись у комбінації з позначенням хімічного
Відтворення через динамік (*
5
): Прибл. 10год.
елементу. Якщо елемент живлення містить більше ніж 0,0005% ртуті або 0,004%
Індикатор
Прибл. 38,5мм×115,2мм×21,3мм
Відтворення через навушники: Прибл. 24год.
свинцю, наводиться відповідне позначення хімічного елементу ртуті (Hg) або свинцю (Pb).
виконання
Натисніть кнопку PLAY/ENTER.
Вага (JEITA)*
3
• LP (Режим довготривалого відтворення)
Забезпечивши належну переробку використаних елементів живлення, ви допоможете запобігти потенційно негативним
операцій
Почнеться відтворення, індикатор виконання операцій
Прибл. 72грами включно із двома лужними
Записування: Прибл. 20год.
Відтворення через динамік (*
5
наслідкам впливу на зовнішнє середовище та людське здоров’я, які спричиняються невідповідною переробкою елементів
засвітиться зеленим.
батареями LR03 (розміру AAA)
): Прибл. 12год.
живлення. Вторинна переробка матеріалів сприяє збереженню природних ресурсів.
Відрегулюйте рівень гучності за допомогою кнопки VOL –/+.
*
Виміряно за стандартом JEITA (Japan Electronics and
3
Відтворення через навушники: Прибл. 32год.
Щоб зупинити відтворення, натисніть кнопку (зупинення).
Information Technology Industries Association)
*
4
Значення виміряно відповідно до стандартів JEITA (Японська
При роботі пристроїв, для яких із метою безпеки, виконання яких‑небудь дій або збереження наявних у пам’яті пристроїв
Вбудований мікрофон
Кнопка VOL (гучність) –/+ (*)
асоціація виробників електронної індустрії та інформаційних
даних необхідна подача постійного живлення від вбудованого елемента живлення, заміну такого елемента живлення варто
технологій). Час роботи від батарей може бути нижчий.
робити тільки в уповноважених сервісних центрах.
Роз’єм (для навушників)
Кнопка DIVIDE
Робоча температура
5 °C– 35 °C
Це залежить від інтенсивності використання цифрового
Для правильної переробки використаних елементів живлення після закінчення терміну їх служби, здавайте їх у відповідний
Індикатор виконання операцій
Кнопка ERASE
Час роботи від батарей (у разі використання лужних
NH‑AAA (не постачається в комплекті), скорочується термін
диктофона. Якщо використовувати акумуляторні батареї
пункт збору електронного й електричного обладнання.
Вікно дисплея
Кнопка REC/PAUSE
(записування/призупинення)
батарей Sony LR03 (SG) розміру AAA (*
4
)
служби акумулятора.
Стосовно використання інших елементів живлення дивіться інформацію в розділі, у якому дані інструкції з безпечного
Кнопка FOLDER
Кнопка
(сигнал/швидке перемотування вперед)
• SHQ (Режим надвисокої якості)
*
5
Під час відтворення музики через внутрішній динамік,
витягнення елементів живлення із пристрою. Здавайте використані елементи живлення у відповідні пункт збору й переробки
Кнопка MENU
Динамік
Записування: Прибл. 13год.
рівень гучності якого встановлено на 28.
використаних елементів живлення.
Для одержання більш докладної інформації про вторинну переробку даного виробу або використаного елемента живлення,
Кнопка PLAY/ENTER (*)
Перемикач HOLD•POWER ON/OFF
5. Видалення.
будь ласка, звертайтесь до органу місцевої адміністрації, служби збору побутових відходів або до магазину, в якому ви
Кнопка
(огляд/швидке перемотування назад)
Відсік для батареї
Якщо цифровий диктофон перебуває в режимі зупинки,
Додаткові аксесуари
натисніть і утримуйте кнопку ERASE.
ˎ Електретний конденсаторний мікрофон ECM‑CS3
ˎ Компактний зарядний пристрій і комплект
придбали виріб.
Кнопка (зупинення)
Отвір для ремінця (ремінець не входить у комплект
Роз’єм (для мікрофона) (PLUG IN POWER) (*)
поставки)
Якщо цифровий диктофон перебуває в режимі відтворення,
ˎ Акумуляторна батарея NH‑AAA‑B2KN
із 2 батарей AAA преміум‑класу для
Перейдіть на наведену нижче домашню сторінку служби підтримки, щоб отримати додаткові відомості про свій
натисніть кнопку ERASE.
багатофункціонального використання
цифровий диктофон.
З’явиться повідомлення «ERASE».
BCG‑34HS2KAN, BCG‑34HW2KAN
http://support.sony‑europe.com/DNA
* На цих кнопках і роз’ємі містяться тактильні точки. Використовуйте ці точки як орієнтири для виконання дій,
Натисніть кнопку ERASE.
або щоб знайти потрібні елементи.
Примітка
Деякі моделі або додаткові аксесуари можуть бути недоступні в певних країнах або регіонах.
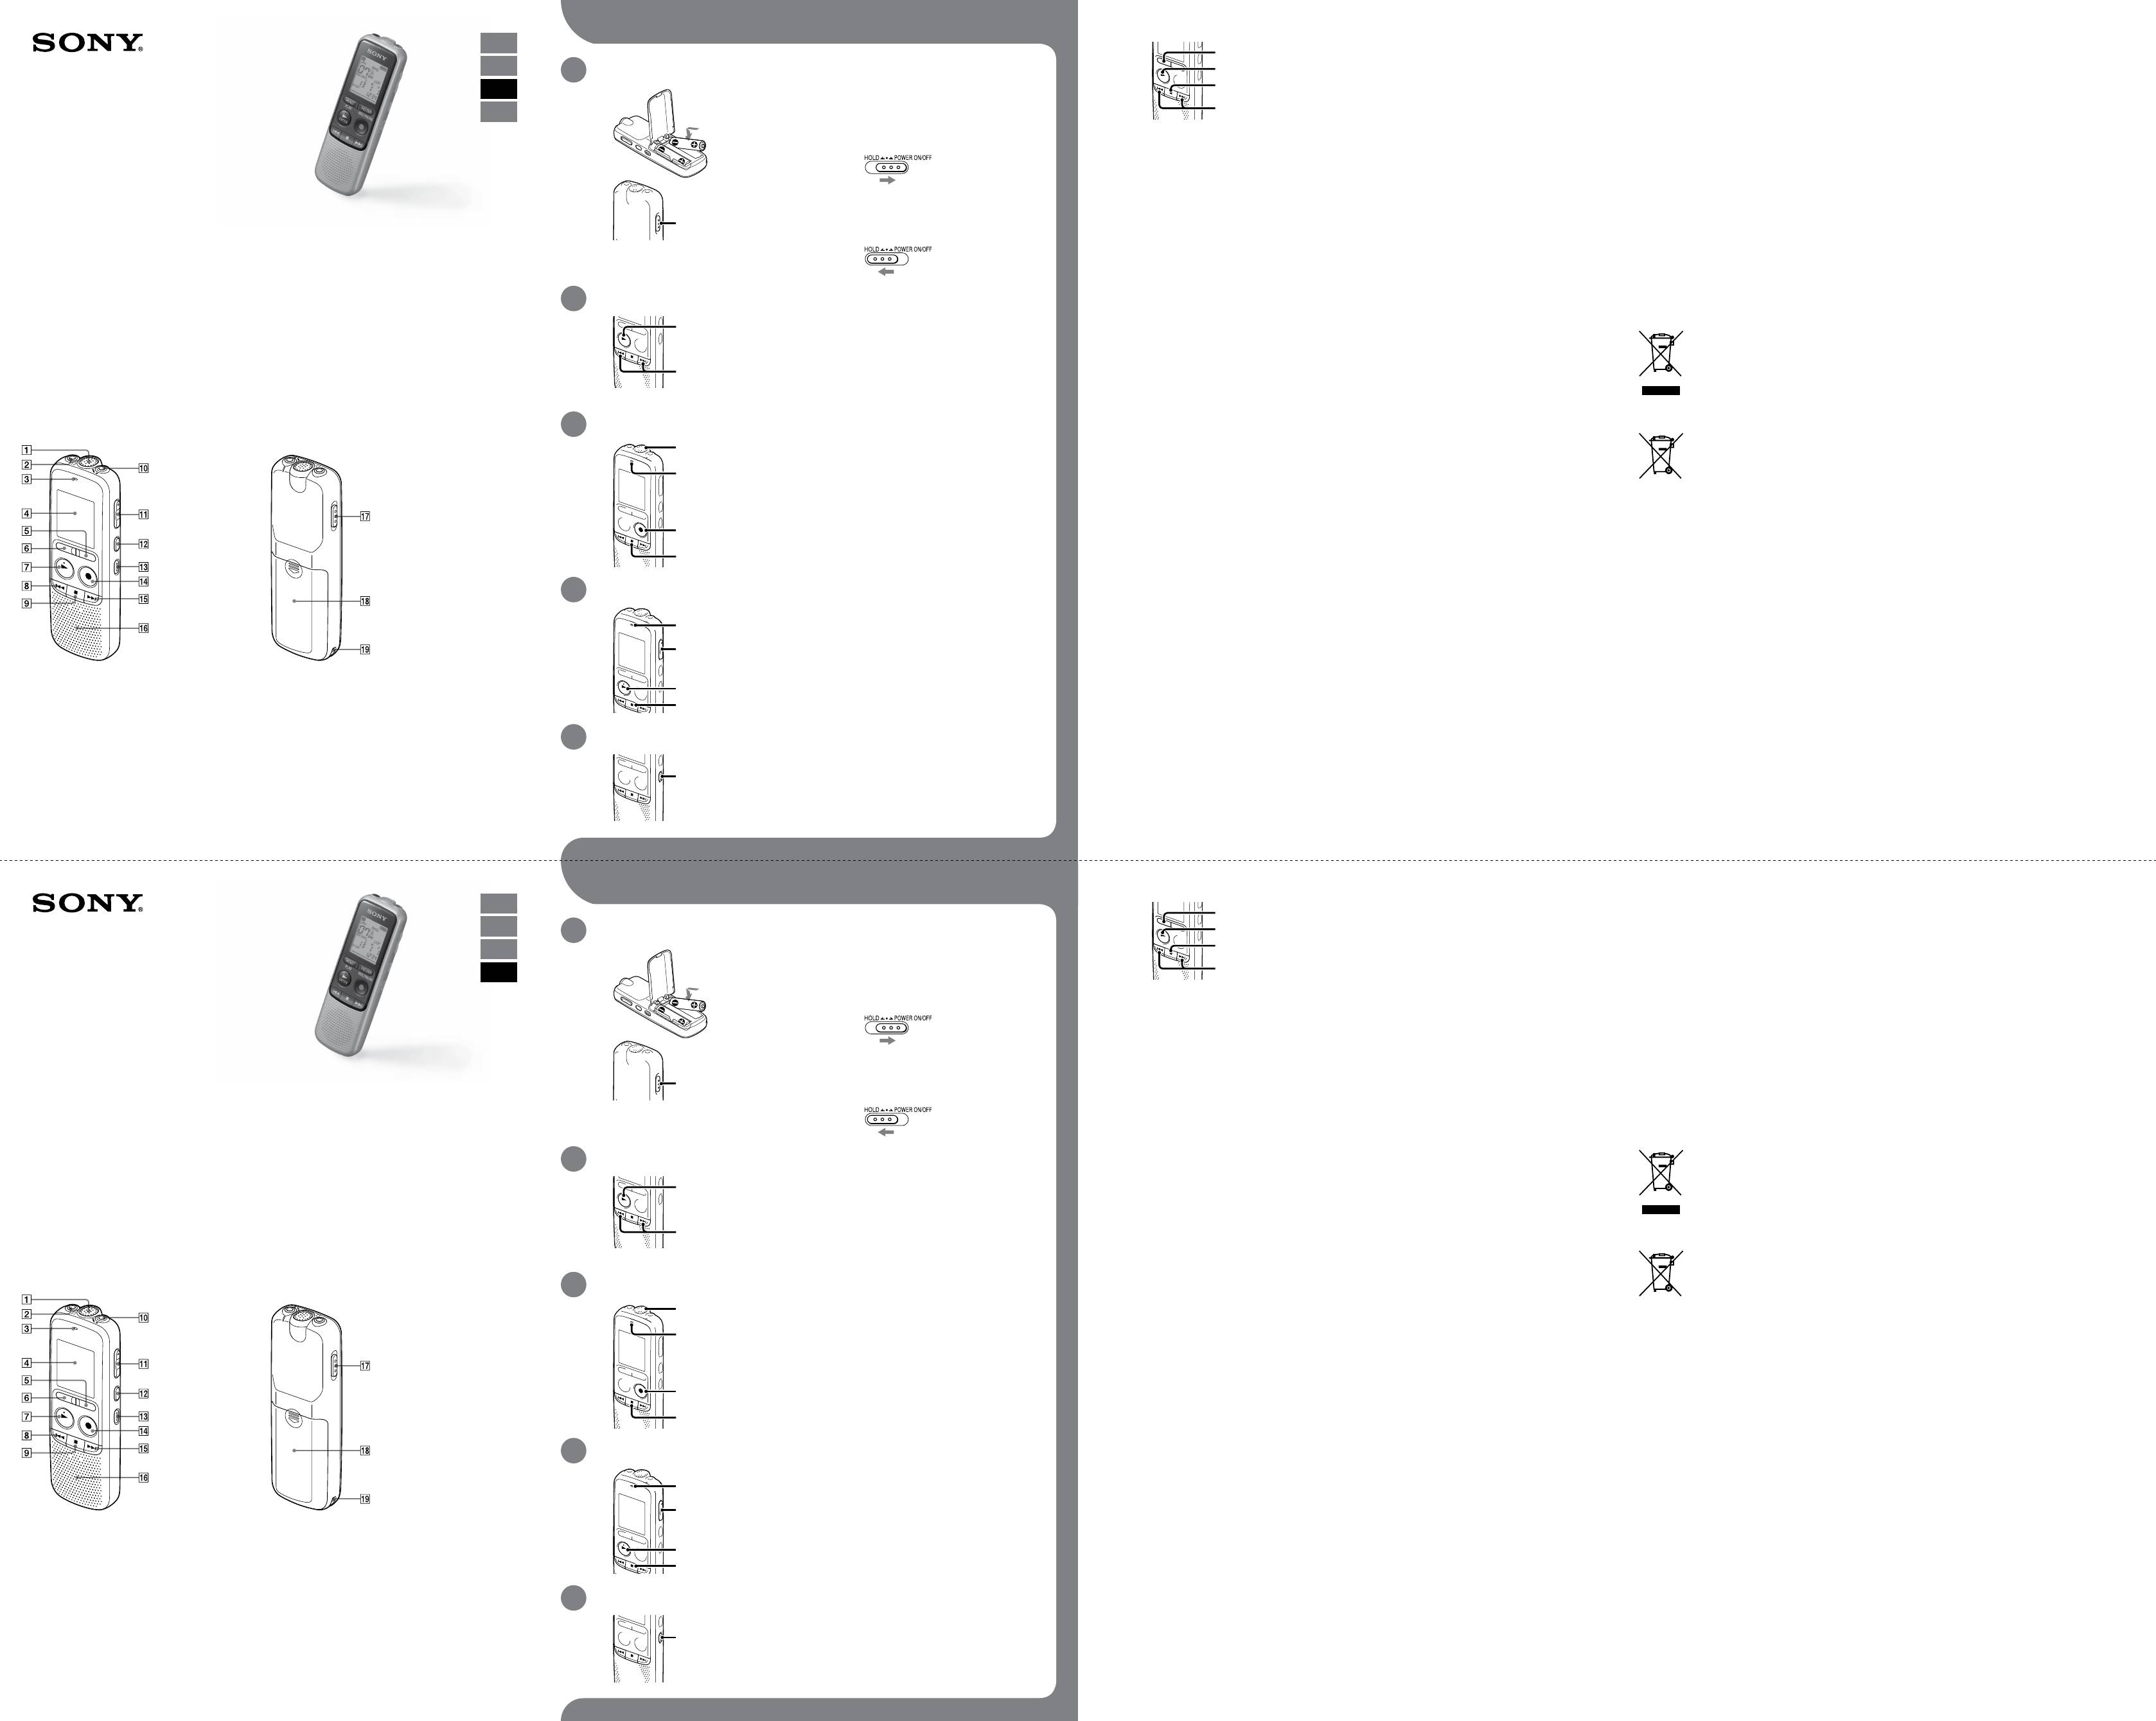
Próbálja ki új diktafonját
A menü használata
Opcionális tartozékok
RU
Nyomja meg a MENU gombot.
ˎ Elektrét kondenzátormikrofon ECM‑CS3
ˎ Kompakt töltő és 2 db. AAA többcélú prémium
UA
Nyomja meg a vagy gombot a beállítandó menüelem
ˎ Akkumulátor ‑ NH‑AAA‑B2KN
akkumulátor ‑ BCG‑34HS2KAN, BCG‑34HW
1. Kapcsolja be.
kiválasztásához, majd nyomja meg a PLAY/ENTER gombot.
HU
Csúsztassa el és emelje le az elemtartó rekesz fedelét, majd
Nyomja meg a vagy gombot az elvégzendő beállítás
IC Recorder
Note
illessze be az elemeket, ügyelve a helyes polaritásra.
kiválasztásához, majd nyomja meg a PLAY/ENTER gombot.
TR
Depending on the country or region, some of the models or optional accessories are not available.
Üzembe helyezési útmutató
Kapcsolja be a készüléket.
A menü üzemmódból való kilépéshez nyomja meg a (stop)
Csúsztassa a HOLD•POWER ON/OFF kapcsolót a „POWER ON/OFF”
gombot.
irányába és tartsa, amíg a kijelzőn megjelenik az ablak.
Védjegyek
További jellemzők
ˎ Az MPEG Layer‑3 hangkódolási technológiák és szabványok licencét a Fraunhofer IIS and Thomson biztosítja.
A súgóútmutatót a következő Sony diktafon ügyféltámogató weblapon is megtekintheti:
ˎ Minden más védjegy és bejegyzett védjegy az illető tulajdonosok védjegye vagy bejegyzett védjegye.
http://rd1.sony.net/help/icd/b13/ce/
Továbbá sem a „™”, sem a „®” jel nincs feltüntetve minden esetben ebben a kézikönyvben.
A diktafon kikapcsolásához csúsztassa és tartsa a HOLD•POWER
A rögzítés, lejátszás és szerkesztés további jellemzőinek részleteit megtalálja a súgóútmutatóban.
ON/OFF kapcsolót a „POWER ON/OFF” irányba, amíg az „OFF”
ICD-BX132
szöveg megjelenik.
ˎ MODE (Rögzítési mód)
ˎ N‑CUT (Zajvágás)
FIGYELEM!
A véletlen műveletek megelőzése (HOLD)
ˎ SENS (Mikrofon‑érzékenység)
ˎ EASY‑S (Egyszerű keresés)
Ne tegye ki az akkumulátorokat (akkumulátorcsomagot vagy beszerelt akkumulátorokat) túlzott hőnek, például
napsütésnek, tűznek vagy hasonló hatásnak hosszú ideig.
ˎ LCF (Alulvágó szűrő)
ˎ CONT (Folyamatos lejátszás)
ˎ VOR (Voice Operated Recording)
ˎ LOCK (Fájl védelme)
FIGYELEM!
ˎ REC‑OP (Felvétel hozzáadása)
ˎ ALARM
Ha az akkumulátort nem megfelelő típusúval helyettesíti, fennáll a robbanásveszély.
Az elhasznált akkumulátorokat ártalmatlanítsa az utasításoknak megfelelően.
ˎ DPC (Digital Pitch Control)
ˎ DIVIDE (Fájl felosztása)
2. Állítsa be a dátumot és az időt.
Óvintézkedések
Feleslegessé vált elektromos és elektronikus készülékek hulladékként való eltávolítása (Használható az
Gratulálunk új Sony diktafonjához!
Európai Unió és egyéb európai országok szelektív hulladékgyűjtési rendszereiben)
Ez az Üzembe helyezési útmutató a diktafonon végezhető alapvető műveleteket ismerteti.
Elemek behelyezése és a tápfeszültség bekapcsolása után
megjelenik a „SET DATE” a kijelzőn, és az év számjegyei
Áramellátás
Kezelés
Ez a szimbólum a készüléken vagy a csomagolásán azt jelzi, hogy a terméket ne kezelje háztartási
Olvassa el figyelmesen. Reméljük, sok örömét leli új Sony diktafonja használatában.
elkezdenek villogni.
Az egységet kizárólag 3,0 V vagy 2,4 V
ˎ Ne hagyja a készüléket hőforrások közelében,
hulladékként. Kérjük, hogy az elektromos és elektronikai hulladék gyűjtésére kijelölt gyűjtőhelyen adja
Nyomja meg a vagy gombot az évszám (az évszám
egyenárammal működtesse.
se olyan helyen, ahol közvetlen napfény, nagy
le. A feleslegessé vált termék helyes kezelésével segít megelőzni a környezet és az emberi egészség
utolsó két számjegye) beállításához, majd nyomja meg a
Két darab LR03 (AAA méretű) alkáli elemet vagy két
mennyiségű por vagy ütés érheti.
károsodását, mely bekövetkezhetne, ha nem követi a hulladékkezelés helyes módját. Az anyagok
Ellenőrizze a csomag tartalmát.
újrahasznosítása segít a természeti erőforrások megőrzésében. A termék újrahasznosítása érdekében
PLAY/ENTER gombot. A hónap, nap, óra, valamint a perc
darab NH‑AAA akkumulátort használjon.
ˎ Ha valamilyen szilárd tárgy vagy folyadék kerül
további információért forduljon a lakhelyén az illetékesekhez, a helyi hulladékgyűjtő szolgáltatóhoz vagy
ˎ Diktafon (1)
ˎ LR03 (AAA méretű) alkáli elemek (2)
ˎ Üzembe helyezési útmutató
beállításához ismételje meg a műveletet.
Biztonság
a készülékbe, távolítsa el az elemeket, majd
ahhoz az üzlethez, ahol a terméket megvásárolta.
Ne használja a készüléket vezetés, kerékpározás vagy
ellenőriztesse a készüléket szakemberrel, mielőtt
Feleslegessé vált elemek hulladékként való eltávolítása (Használható az Európai Unió és egyéb európai
bármilyen gépjármű működtetése közben.
tovább használná.
országok szelektív hulladékgyűjtési rendszereiben)
Részek és kezelőszervek
3. Készítsen felvételt.
Ez a szimbólum az elemen vagy annak csomagolásán azt jelzi, hogy a terméket ne kezelje háztartási
Nyomja meg a REC/PAUSE gombot.
Ha bármilyen kérdése vagy problémája van a
hulladékként. Egyes elemeken vagy azok csomagolásán ez a szimbólum együtt szerepelhet a higany (Hg)
Megkezdődik a rögzítés, és a műveletjelző piros színnel kigyullad.
készülékkel kapcsolatban, vegye fel a kapcsolatot a
vagy az ólom (Pb) vegyjelével akkor, ha az elem 0,0005%‑nál több higanyt vagy 0,004%‑nál több ólmot
tartalmaz. Kérjük, hogy azt a használt elemek gyűjtésére kijelölt gyűjtőhelyen adja le. A feleslegessé
Műveletjelző
¼ A rögzítést szüneteltetheti a REC/PAUSE gomb
legközelebbi Sony kereskedővel.
vált elemek helyes kezelésével segít megelőzni a környezet és az emberi egészség károsodását, mely
megnyomásával. A rögzítés folytatásához nyomja meg újra a
bekövetkezhetne, ha nem követi a hulladékkezelés helyes módját. Az anyagok újrahasznosítása segít a
REC/PAUSE gombot.
Műszaki adatok
természeti erőforrások megőrzésében.
Helyezze el a diktafont úgy, hogy a beépített mikrofonok a
Kapacitás (Felhasználó számára elérhető kapacitás *
1
*
2
)
Elem működési idő (Sony LR03 (SG) (AAA méretű)
Olyan berendezéseknél alkalmazott elemeket, ahol biztonsági, teljesítményi, illetve adatok megőrzése érdekében
2 GB (körülbelül 1,75 GB = 1879048192 bájt)
alkáli elemek használata esetén (*
4
))
elengedhetetlen az energiaellátás folyamatosságának biztosítása, csak az arra felkészült szerviz állomány cserélheti ki.
rögzíteni kívánt hangforrás irányába nézzenek.
• SHQ (Csúcsminőségű üzemmód)
Beépített elem esetén, hogy biztosítható legyen az elem megfelelő kezelése, a termékének elhasználódásakor jutassa
*
1
A beépített memória egy részét fájlkezelésre használják, ezért
A felvétel leállításához nyomja meg a (stop) gombot.
2
nem áll rendelkezésre felhasználói tárolásra.
Rögzítés: Kb. 13 ó.
el azt az arra kijelölt elektromos és elektronikus hulladékgyűjtő pontra.
Minden más elem esetén kérjük, hogy tanulmányozza, milyen módon lehet biztonságosan az elemet a készülékből
Megjelenik az „ACCESS” szöveg és a rögzítés leáll.
*
Amikor a beépített memóriát a diktafonnal formázzák.
Lejátszás hangszóróval (*
5
): Kb. 10 ó.
Méretek (Sz/Ma/Mé) (kivéve a kiálló részeket és a
Lejátszás fejhallgatóval: Kb. 21 ó.
eltávolítani. Az elemet a használt elemek megfelelő begyűjtőhelyén adja le.
• HQ (Kiváló minőségű üzemmód)
A termék újrahasznosítása érdekében további információért forduljon a lakhelyén az illetékesekhez, a helyi
kezelőszerveket) (JEITA)*
3
Kb. 38,5 mm × 115,2 mm × 21,3 mm
Rögzítés: Kb. 15 ó.
hulladékgyűjtő szolgáltatóhoz vagy ahhoz az üzlethez, ahol a terméket megvásárolta.
4. Hallgassa meg a felvételt.
Lejátszás hangszóróval (*
5
): Kb. 10 ó.
Megjegyzés a vásárlók számára: a következő információk csak az EU irányelveit alkalmazó országokban
Nyomja meg a PLAY/ENTER gombot.
Tömeg (JEITA)*
3
Lejátszás fejhallgatóval: Kb. 23 ó.
értékesített készülékekre vonatkoznak
Műveletjelző
Kb. 72 g két darab LR03 (AAA méretű) alkáli elemmel
• SP (Normál lejátszás üzemmód)
Ezt a terméket a Sony Corporation (1‑7‑1 Konan Minato‑ku Tokió, 108‑0075 Japán), vagy megbízottja gyártotta. Az
Megkezdődik a lejátszás, és a műveletjelző zöld színnel kigyullad.
együtt
Rögzítés: Kb. 16 ó.
A hangerőt a VOL –/+ gombbal állíthatja be.
*
JEITA (Japan Electronics and Information Technology Industries
3
Lejátszás hangszóróval (*
5
Európai Unió jogszabályai alapján a termékbiztonsággal kapcsolatban a Sony Deutschland GmbH (Hedelfinger Strasse
): Kb. 10 ó.
61, 70327 Stuttgart, Németország) a jogosult képviselő. Kérjük, bármely szervizeléssel vagy garanciával kapcsolatos
Association) szabvány szerint mért érték
Lejátszás fejhallgatóval: Kb. 24 ó.
ügyben, a különálló szerviz‑ vagy garanciadokumentumokban megadott címekhez forduljon.
A lejátszás leállításához nyomja meg a (stop) gombot.
Működési hőmérséklet
• LP (Hosszú lejátszás üzemmód)
5 °C ‑ 35 °C
Rögzítés: Kb. 20 ó.
A diktafonra vonatkozó támogatási információ érdekében, kérjük, keresse fel a támogatási weblapot:
Beépített mikrofon
VOL (hangerő) –/+ gomb (*)
Lejátszás hangszóróval (*
5
): Kb. 12 ó.
(fejhallgató) csatlakozó
DIVIDE gomb
Lejátszás fejhallgatóval: Kb. 32 ó.
http://support.sony‑europe.com/DNA
4
Műveletjelző
ERASE gomb
*
JEITA (Japan Electronics and Information Technology Industries
Association) szabvány szerint mért érték Az elem élettartama
Kijelző ablak
REC/PAUSE (felvétel/szünet) gomb
rövidebb lehet a diktafon használatának módjától függően.
FOLDER gomb
(gyorskeresés/előretekerés) gomb
esetén az akkumulátor működési ideje rövidebb.
NH‑AAA tölthető akkumulátorok (nem tartozék) használata
MENU gomb
Hangszóró
5. Törölje a felvételt.
*
5
Ha 28‑as hangerőn történik a lejátszás a beépített hangszóróval.
PLAY/ENTER gomb (*)
HOLD•POWER ON/OFF kapcsoló
Amikor a diktafon stop módban van, nyomja meg és tartsa
(áttekintés/visszatekerés) gomb
Akkumulátortartó
lenyomva az ERASE gombot.
(stop) gomb
Szíjrögzítő nyílás (A szíj nem tartozék.)
Amikor a diktafon lejátszás módban van, nyomja meg az
ERASE gombot.
(mikrofon) aljzat (PLUG IN POWER) (*)
Megjelenik az „ERASE” szöveg
* Ezek a gombok és az aljzat egy tapintható jellel vannak ellátva. A jel segít a kezelőszervek és az aljzatok
Nyomja meg az ERASE gombot.
megkülönböztetésében.
Yeni IC kaydedicinizi deneyelim
Menüyü kullanma
İsteğe bağlı aksesuarlar
RU
MENU düğmesine basın.
ˎ Electret kondenser mikrofon ECM‑CS3
ˎ Kompakt şarj cihazı ve 2 adet AAA Çok Kullanımlı
ˎ Şarj edilebilir pil NH‑AAA‑B2KN
Premium pil BCG‑34HS2KAN, BCG‑34HW2KAN
UA
1. Gücü açın.
Ayarlamak istediğiniz menü öğesini seçmek için veya
düğmesine bastıktan sonra PLAY/ENTER düğmesine basın.
HU
Pil bölmesi kapağını kaydırarak kaldırın ve daha sonra pilleri
Yapmak istediğiniz ayarı seçmek için veya düğmesine
Not
IC Recorder
kutup işaretlerine dikkat ederek yerleştirin.
bastıktan sonra PLAY/ENTER düğmesine basın.
Ülkeye veya bölgeye bağlı olarak bazı modeller veya isteğe bağlı aksesuarlar bulunamamaktadır.
TR
Hızlı Başlatma Kılavuzu
Gücü açın.
Menü modundan çıkmak için (durdurma) düğmesine basın.
HOLD•POWER ON/OFF düğmesini “POWER ON/OFF” yönüne doğru
Ticari Markalar
kaydırın ve düğmeyi pencere ekranı çıkana kadar tutun.
Diğer özellikler
ˎ MPEG Layer3 ses kodlama teknolojisi ve patentleri Fraunhofer IIS and Thomson’dan lisanslanmıştır.
Yardım kılavuzuna Sony IC Kaydedici müşteri desteği ana sayfasından da ulaşabilirsiniz:
ˎ Diğer tüm ticari markalar ve tescilli ticari markalar ilgili sahiplerinin ticari markaları ya da tescilli ticari
http://rd1.sony.net/help/icd/b13/ce/
markalarıdır. Ayrıca, “™” ve “®” bu kılavuz içerisinde her zaman belirtilmemiştir.
Gücü kapatmak için “OFF” bilgisi görüntülenene kadar
Kayıt, çalma ve düzenleme için kullanılan bu ek özelliklerle ilgili ayrıntılı bilgi yardım kılavuzunda verilmiştir.
UYARI
HOLD•POWER ON/OFF düğmesini “POWER ON/OFF” yönünde
Pilleri (pil takımını veya takılı pilleri) güneş ışığı, ateş vb. yüksek ısı kaynaklarına uzun süre maruz bırakmayın.
ICD-BX132
kaydırın ve basılı tutun.
ˎ MODE (Kayıt modu)
ˎ N‑CUT (Ses kesme)
DİKKAT
Yanlışlıkla çalıştırmayı önlemek için (HOLD)
ˎ SENS (Mikrofon hassasiyeti)
ˎ EASY‑S (Kolay arama)
Yanlış tip pil kullanımı durumunda patlama riski.
ˎ LCF (Alçak Kesen Filtre)
ˎ CONT (Kesintisiz çalma)
Kullanılmış pilleri yönergelere göre elden çıkarın.
ˎ VOR (Sesle Çalışan Kayıt)
ˎ LOCK (Dosya koruma)
Eski Elektrikli ve Elektronik Cihazların İmhası (Avrupa Birliği ve diğer Avrupa ülkelerinde ayrı toplama
ˎ REC‑OP (Kayıt Ekleme)
ˎ ALARM
sistemleriyle uygulanmaktadır)
ˎ DPC (Dijital Ton Kontrolü)
ˎ DIVIDE (Dosya bölme)
Ürünün veya ambalajı üzerindeki bu sembol, bu ürünün bir ev atığı gibi muamele görmemesi gerektiğini
2. Tarihi ve saati ayarlayın.
belirtir. Bunun yerine, elektrikli ve elektronik cihazların geri dönüşümü için uygun toplama noktasına
teslim edilmelidir. Bu ürünün doğru bir şekilde elden çıkarılmasını sağlayarak, uygunsuz bir elden çıkarma
Yeni Sony IC kaydedicinize hoş geldiniz!
Pilleri taktıktan sonra gücü açık konuma getirdiğinizde ekranda
Bu Hızlı Başlangıç Kılavuzu’nda IC kaydedicinin temel işlemleriyle ilgili talimatlar yer almaktadır.
Önlemler
durumunda çevre ve insan sağlığı açısından doğacak potansiyel olumsuz sonuçların önlenmesine yardımcı
“SET DATE” ibaresi görüntülenir ve yıl bölümü yanıp sönmeye
olmuş olacaksınız. Materyallerin geri dönüştürülmesi doğal kaynakların korunmasına yardımcı olacaktır. Bu
başlar.
Güçle ilgili
Kullanımla ilgili
ürünün geri dönüşümü hakkında daha detaylı bilgi için lütfen yerel sivil büronuz, ev atıkları imha hizmetleri
Lütfen belgeyi dikkatlice okuyun. Yeni Sony IC kaydedicinizi keyifle kullanmanızı dileriz.
veya ürünü satın aldığınız satıcı ile temasa geçiniz.
Aygıtla birlikte verilen öğeleri kontrol edin.
Yılı (yılın son iki basamağını) ayarlamak için veya
Aygıtı yalnızca 3,0 V veya 2,4 V DC ile çalıştırın.
ˎ Aygıtı ısı kaynaklarının yanında veya direkt
düğmesine bastıktan sonra PLAY/ENTER’a basın. Sırasıyla
İki adet LR03 (AAA boyutu) alkalin pil veya iki adet
güneş ışığı altında, aşırı tozlu veya mekanik şok
Atık pillerin bertaraf edilmesi (Avrupa Birliği’nde ve ayrı toplama sistemleri bulunan diğer Avrupa
ülkelerinde uygulanan)
ˎ IC Kaydedici (1)
ˎ LR03 (AAA boyutu) alkalin pil (2)
ayı, günü, saati ve dakikayı ayarlamak için bu prosedürü
NH‑AAA şarjlı pil kullanın.
ortamlarında bırakmayın.
Pil veya ambalajın üzerindeki bu sembol, bu ürünle birlikte teslim edilen pilin evsel atık olarak
ˎ Hızlı Başlatma Kılavuzu
tekrarlayın.
Güvenlikle ilgili
ˎ Aygıtın üzerine herhangi bir nesne düştüğünde
değerlendirilmemesi gerektiğini belirtmektedir.
Parçalar ve kumandalar
veya sıvı döküldüğünde, derhal pillerini çıkarın
Bazı piller için bu sembol, kimyasal bir sembolle birleştirilerek kullanılmış olabilir. Eğer piller %0,0005 cıva
Araba sürerken, bisiklete binerken ya da herhangi bir
veya %0,004 kurşun‘dan fazla içerikteyseler, o zaman bu kimyasal semboller cıva (Hg) veya kurşun (Pb) için
3. Kaydedin.
motorlu taşıt kullanırken aygıtı çalıştırmayın.
ve yeniden çalıştırmadan önce yetkili personele
REC/PAUSE düğmesine basın.
kontrol ettirin.
eklenir.
Bu pillerin doğru şekilde bertaraf edilmesini sağlamakla, pillerin uygunsuz şekilde bertaraf edilmesi
Kayıt başlar ve çalışma göstergesi kırmızı renkte yanar.
neticesinde çevre ve insan sağlığında meydana gelebilecek olan potansiyel zararların engellenmesine de katkıda
bulunmuş olacaksınız. Materyallerin geri dönüştürülmesi doğal kaynakların korunmasına yardımcı olacaktır.
Çalışma
Aygıtınızla ilgili herhangi bir sorunuz ya da
göstergesi
¼ REC/PAUSE düğmesine basarak kaydı duraklatabilirsiniz. Kaydı
Ürünlerin güvenlik, performans veya veri entegrasyon gibi sebeplerden dolayı beraberlerindeki pille sürekli bir bağlantı
yeniden başlatmak için REC/PAUSE düğmesine yeniden basın.
sorununuz varsa, lütfen en yakın Sony bayisine
başvurun.
gerektirdikleri durumlarda pilin yalnızca kalifiye servis personeli tarafından değiştirilmesi zorunludur.
Pilin uygun bir şekilde değerlendirilmesini sağlamak amacıyla ürünü, kullanım süresinin sonunda elektrikli ve elektronik
IC kaydediciyi, dahili mikrofonu kaydedilecek kaynağa
ekipmanların geri dönüştürülmesine ilişkin yürürlükte olan toplama noktasına teslim ediniz.
bakacak şekilde yerleştirin.
Teknik Özellikler
Diğer tüm piller için lütfen pillerin üründen güvenli bir şekilde çıkarılmasına ilişkin bölümü inceleyiniz. Pili, atık pillerin
Kaydetme işlemini durdurmak için (durdurma) düğmesine
geri dönüştürülmesine yönelik yürürlükteki toplama noktasına teslim ediniz.
basın.
Kapasite (Kullanıcının kullanabildiği kapasite *
1
*
2
)
Pil ömrü (Sony LR03 (SG) (AAA boyutu) alkalin pil
Bu ürünün veya pilin geri dönüştürülmesine ilişkin daha ayrıntılı bilgi için lütfen yerel Yetkili Dairenizle, evsel atık
2 GB (yaklaşık 1,75 GB = 1.879.048.192 Bayt)
kullanırken (*
4
))
bertaraf servisinizle veya ürünü satın aldığınız mağazayla irtibat kurunuz.
Ekranda “ACCESS” bilgisi çıkar ve kayıt durur.
*
1
Yerleşik belleğin küçük bir kısmı dosya yönetimi için
kullanıldığından kullanıcı tarafından depolama amacıyla
• SHQ (Çok yüksek kalite modu)
İTHALATÇI FİRMA
kullanılamaz.
Kayıt: Yaklaşık 13 s.
*
Yerleşik bellek IC kaydediciyle formatlandığında.
2
Hoparlörden çalma (*
5
): Yaklaşık 10 s.
SONY EURASIA PAZARLAMA AŞ.
Kulaklık kullanarak çalma: Yaklaşık 21 s.
Onur Ofis Park Plaza Inkılap Mah. Üntel Sok. No:10 Ümraniye 34768/İstanbul Sony Bilgi ve Danışma Hattı:
4. Dinleyin.
Boyutlar (g/y/d) (çıkıntılı kısımlar ve kumandalar hariç)
• HQ (Yüksek kalite modu)
(212) 444 SONY (7669)
PLAY/ENTER düğmesine basın.
(JEITA)*
3
Kayıt: Yaklaşık 15 s.
Uygunluk beyanı, üretici fırmanın yetkili kılmış olduğu, Product Compliance Europe (PCE),
Çalışma
Çalma başlar ve çalışma göstergesi yeşil renkte yanar.
Yaklaşık 38,5 mm × 115,2 mm × 21,3 mm
Hoparlörden çalma (*
5
): Yaklaşık 10 s.
göstergesi
Kulaklık kullanarak çalma: Yaklaşık 23 s.
Sony Deutschland GmbH tarafından yapılmaktadır.
VOL –/+ düğmesine basarak ses şiddetini ayarlayın.
Ağırlık (JEITA)*
3
İki adet LR03 (AAA boyutu) alkalin pil ile birlikte yaklaşık
• SP (Standart çalma modu)
Product Compliance Europe (PCE),
Sony Deutschland GmbH Hedelfinger Strasse 61,
Çalma işlemini durdurmak için (durdurma) düğmesine
Kayıt: Yaklaşık 16 s.
Dahili mikrofon
VOL (ses seviyesi) –/+ düğmesi (*)
72 g
Hoparlörden çalma (*
5
): Yaklaşık 10 s.
70327 Stuttgart, Germany
basın.
*
3
JEITA (Japan Electronics and Information Technology Industries
Kulaklık kullanarak çalma: Yaklaşık 24 s.
Tel: (0)711‑5858‑0, Fax: (0)711‑5858‑488
(kulaklık) girişi
DIVIDE düğmesi
Association) standardına göre ölçülen değer
• LP (Uzun çalma modu)
URL of EU DoC Database: http://www.compliance.sony.de/
Çalışma göstergesi
ERASE düğmesi
Çalışma sıcaklığı
Kayıt: Yaklaşık 20 s.
Üretici Firma:
Ekran penceresi
REC/PAUSE (kayıt/duraklatma) düğmesi
5 °C ‑ 35 °C
Hoparlörden çalma (*
5
): Yaklaşık 12 s.
Kulaklık kullanarak çalma: Yaklaşık 32 s.
Sony Corporation
FOLDER düğmesi
(ileri sarma/hızlı ileri sarma) düğmesi
*
JEITA (Japan Electronics and Information Technology Industries
4
1‑7‑1 Konan, Minato‑ku, Tokyo, 108‑0075 Japan
MENU düğmesi
Hoparlör
Association) standardına göre ölçülen değer. Pil ömrü IC
5. Silin.
kaydedicinizi nasıl çalıştırdığınıza bağlı olarak kısalabilir.
Türkiye İrtibat Numaraları:
PLAY/ENTER düğmesi (*)
HOLD•POWER ON/OFF düğmesi
NH‑AAA şarj edilebilir pil (birlikte verilmez) kullanırken pil ömrü
Tel:0216‑633 98 00
IC kaydedici durdurma modundayken ERASE düğmesine
5
daha kısa olur.
Faks:0216‑632 70 30
(eri sarma/hızlı geri sarma) düğmesi
Pil bölmesi
*
Ses şiddeti seviyesi 28’e ayarlıyken dahili hoparlörden müzik
email:bilgi@eu.sony.com
(durdurma) düğmesi
Kayış deliği (Kayış birlikte verilmez.)
basın ve düğmeyi basılı tutun.
IC kaydedici çalma modundayken ERASE düğmesine basın ve
çalarken.
AEEE Yönetmeliğine Uygundur
(mikrofon) girişi (PLUG IN POWER) (*)
düğmeyi basılı tutun.
IC Kaydedicinizle ilgili destek bilgisi almak için lütfen şu destek sayfasına gidin:
* Bu düğmelerde ve girişte dokunma noktası bulunur. Bu noktayı işlemler için referans noktası olarak veya her terminali
Ekranda “ERASE” bilgisi görüntülenir.
http://support.sony‑europe.com/DNA
belirlemek için kullanabilirsiniz.
ERASE düğmesine basın.
Страницы и текст этой инструкции
 Руководство пользователя диктофона Sony ICD-BX132
 Информация отображена на картинке
 Информация отображена на картинке
 Информация отображена на картинке
 Информация отображена на картинке
Как использовать наш сайт инструкций OnlineManuals.ru
Наша цель состоит в том, чтобы предоставить вам быстрый доступ к содержанию инструкции для диктофона Sony ICD-BX132.
С помощью онлайн просмотра, Вы можете быстро просмотреть содержимое инструкции и найти решение проблемы с диктофона Sony ICD-BX132.
Для Вашего удобства
Если листать руководство пользователя диктофона Sony ICD-BX132 прямо на сайте, не очень удобно для Вас, есть два возможных решения:
• Просмотр в полноэкранном режиме — легко просмотреть руководство пользователя (без загрузки его на свой компьютер), Вы можете использовать режим полноэкранного просмотра.
Для просмотра инструкции пользователя диктофона Sony ICD-BX132 на полном экране, используйте кнопку «Открыть в Pdf-viewer».
• Загрузка на компьютер — Вы можете также скачать Руководство пользователя диктофона Sony ICD-BX132 на свой компьютер и сохранить его в файлах.
Многие люди предпочитают читать документы не на экране, а в печатной версии.
Возможность печати руководства пользователя также была предусмотрена на нашем сайте,
и вы можете использовать ее, нажав на иконку «печать» в Pdf-viewer.
Нет необходимости печатать все руководство диктофона Sony ICD-BX132, можно выбрать только нужные страницы инструкции.