Display Language Switcher
===============================================================================
Info
-
A mostly automated script to install and change «Display Language» for
Windows Editions (SKUs) that are not allowed to have multiple languages by default -
Supports the following editions:
Windows 10 Home Single Language
Windows 8.1 Single Language
Windows 8 Single Language
Windows 7 SP1 Starter
Windows 7 SP1 Starter N
Windows 7 SP1 Home Basic
Windows 7 SP1 Home Basic N
Windows 7 SP1 Home Premium
Windows 7 SP1 Home Premium N
Windows 7 SP1 Professional
Windows 7 SP1 Professional N -
Supports the following languages:
Arabic, Bulgarian, Chinese (Simplified), Chinese (Hong Kong S.A.R.), Chinese (Taiwan), Croatian,
Czech, Danish, Dutch, English, English (United Kingdom), Estonian, Finnish, French, French (Canada),
German, Greek, Hungarian, Italian, Japanese, Korean, Latvian, Lithuanian, Norwegian, Polish,
Portuguese (Brazil), Portuguese (Portugal), Romanian, Russian, Serbian (Latin), Slovak, Slovenian,
Spanish, Spanish (Mexico), Swedish, Thai, Turkish, Ukrainian
===============================================================================
How To Use
- Get desired Language Pack matching operating system version and architecture (32bit or 64 bit)
and put the file in «LangPack» folder
for Windows 7, you can use the original EXE file, or manually converted CAB file
- Optional: Get Language Features On Demand Packs for Windows 10 if available
and put the files in «FOD» folder
you can let Windows Update to install them later after changing the language
-
Right-click on DisplayLanguageSwitcher.cmd and select «Run as administrator»
-
After loading and showing Opetating System and detected Language Pack information
you will be prompted to continue to install new LangPack or exit
afterwards, you must restart the system to complete the language change
===============================================================================
Notes
-
If you later want to go back to original language or already installed multiple languages
run the script and you will be prompted to select one of detected languages to set as primary -
The script will not set or change the local language preferences:
Formats, Location, Keyboards, language for non-unicode programs (system locale)
you can set them manually, before or after changing the display language:
Windows 7 : «Region and Language» Control Panel
Windows 8/8.1 : «Region», «Language» Control Panels
Windows 10 : «Region», «Language» Control Panels, or Settings app
-
It is recommended for Windows 8/8.1 to enable .NET Framework 3.5 feature before installing new language
-
All files in «FOD» folder will be installed on Windows 10 without checking
make sure to download and place the correct files matching Windows 10 version and architecture -
To spare yourself the trouble, keep the work directory path short, do not use spaces and do not use non-ASCII characters.
===============================================================================
Содержание
- Manage the input and display language settings in Windows 10
- Display language switcher windows 10
- Display Language Switcher
- How to Change Windows 10 Display Language Without Reinstalling the Operating System?
- Introduction
- How to change the default display language in Windows 10?
- Disable language synchronization
- The steps to take if you want to change the display language
- Changing region settings
- Conclusion
Manage the input and display language settings in Windows 10
To manage all aspects of the input and display language settings on your Windows 10 device, use the following methods.
To switch the keyboard layout you’re using in Windows 10, press and hold the Windows key and then repeatedly press the Spacebar to cycle through all your installed keyboards. (If this doesn’t do anything, it means you have only one installed.)
You can also select the language abbreviation on the far right of the taskbar and then choose the language or input method you want to use.
Note: In the input field, press Windows +period (.) to access the emoji keyboard, if your language supports this.
If you can’t find the keyboard layout you want, you may have to add a new keyboard.
Adding an input language lets you set a language-preference order for websites and apps, as well as change your keyboard language.
Select the Start button, then select Settings > Time & Language > Language.
Under Preferred languages, select the language that contains the keyboard you want, and then select Options.
Select Add a keyboard and choose the keyboard you want to add. If you don’t see the keyboard you want, you may have to add a new language to get additional options. If this is the case, go on to step 4.
Return to the Language settings page, and select Add a language.
Choose the language you want to use from the list, and then select Next.
Review any language features you want to set up or install, and select Install.
The display language you select changes the default language used by Windows features like Settings and File Explorer.
Select the Start button, then select Settings > Time & Language > Language.
Choose a language from the Windows display language menu.
If a language is listed under Preferred languages but doesn’t appear on the Windows display language list, you’ll first need to install its language pack (if it’s available).
Select the Start button, then select Settings > Time & Language > Language.
Choose a language from the Add a language list under Preferred languages, and then select Options.
Select Download from the Download language pack option.
After the language pack is installed, select Back .
Choose a language from the Windows display language menu.
If you receive an «Only one language pack allowed» or «Your Windows license supports only one display language» message, you have a single language edition of Windows 10. Here’s how to check your Windows 10 language edition:
Select the Start button, select Settings > About, and then scroll down to the Windows specification section.
If you see Windows 10 Home Single Language next to Edition, you have a single language edition of Window 10, and you can’t add a new language unless you purchase an upgrade to either Windows 10 Home or Windows 10 Pro.
Select the Start button, then select Settings > Time & Language > Language.
Under Preferred languages, select the language you want to remove, and then click Remove.
To remove an individual keyboard, select the language in question (see step 2), select Options, scroll down to the Keyboards section, select the keyboard you want to remove, and click Remove.
Display language switcher windows 10
Display Language Switcher
A mostly automated script to install and change «Display Language» for Windows Editions (SKUs) that are not allowed to have multiple languages by default
Supports the following editions: Windows 10 Home Single Language Windows 8.1 Single Language Windows 8 Single Language Windows 7 SP1 Starter Windows 7 SP1 Starter N Windows 7 SP1 Home Basic Windows 7 SP1 Home Basic N Windows 7 SP1 Home Premium Windows 7 SP1 Home Premium N Windows 7 SP1 Professional Windows 7 SP1 Professional N
Supports the following languages: Arabic, Bulgarian, Chinese (Simplified), Chinese (Hong Kong S.A.R.), Chinese (Taiwan), Croatian, Czech, Danish, Dutch, English, English (United Kingdom), Estonian, Finnish, French, French (Canada), German, Greek, Hungarian, Italian, Japanese, Korean, Latvian, Lithuanian, Norwegian, Polish, Portuguese (Brazil), Portuguese (Portugal), Romanian, Russian, Serbian (Latin), Slovak, Slovenian, Spanish, Spanish (Mexico), Swedish, Thai, Turkish, Ukrainian
- Get desired Language Pack matching operating system version and architecture (32bit or 64 bit) and put the file in «LangPack» folder
for Windows 7, you can use the original EXE file, or manually converted CAB file
- Optional: Get Language Features On Demand Packs for Windows 10 if available and put the files in «FOD» folder
you can let Windows Update to install them later after changing the language
Right-click on DisplayLanguageSwitcher.cmd and select «Run as administrator»
After loading and showing Opetating System and detected Language Pack information you will be prompted to continue to install new LangPack or exit
afterwards, you must restart the system to complete the language change
If you later want to go back to original language or already installed multiple languages run the script and you will be prompted to select one of detected languages to set as primary
The script will not set or change the local language preferences: Formats, Location, Keyboards, language for non-unicode programs (system locale)
you can set them manually, before or after changing the display language: Windows 7 : «Region and Language» Control Panel Windows 8/8.1 : «Region», «Language» Control Panels Windows 10 : «Region», «Language» Control Panels, or Settings app
It is recommended for Windows 8/8.1 to enable .NET Framework 3.5 feature before installing new language
All files in «FOD» folder will be installed on Windows 10 without checking make sure to download and place the correct files matching Windows 10 version and architecture
To spare yourself the trouble, keep the work directory path short, do not use spaces and do not use non-ASCII characters.


Enable Group Policy Editor (gpedit.msc) in Windows 10 Home Edition
How to Delete Cookies in Microsoft Edge
Windows Update or Upgrade Error 0XC1900103
Windows 10 Activation Error Code 0xC004F012
What Does IMY Mean?
What Does AFK Mean?
What Does ICYDK Mean?
What Does ICYMI Mean?
What Does IDK Mean?
What Does ROTFLMAO, ROFL, or ROTF Mean?
Display Language Switcher
 Download@MajorGeeks
Download@MajorGeeks
Display Language Switcher is a mostly automated script to install and change the Display Language for Windows Editions that are not allowed to have multiple languages by default.
Some of these editions include Windows 10 Home Single Language, Windows 8.1 Single Language, Windows 8 Single Language, Windows 7 SP1 Starter, Windows 7 SP1 Starter N, Windows 7 SP1 Home Basic, Windows 7 SP1 Home Basic N, Windows 7 SP1 Home Premium, Windows 7 SP1 Home Premium N, Windows 7 SP1 Professional, and Windows 7 SP1 Professional N.
The following languages are supported: Arabic, Bulgarian, Chinese (Simplified), Chinese (Hong Kong S.A.R.), Chinese (Taiwan), Croatian, Czech, Danish, Dutch, English, English (United Kingdom), Estonian, Finnish, French, French (Canada), German, Greek, Hungarian, Italian, Japanese, Korean, Latvian, Lithuanian, Norwegian, Polish, Portuguese (Brazil), Portuguese (Portugal), Romanian, Russian, Serbian (Latin), Slovak, Slovenian, Spanish, Spanish (Mexico), Swedish, Thai, Turkish, and Ukrainian.
1: Get desired Language Pack matching your operating system version and architecture (32bit or 64 bit) and put the file in «LangPack» folder. For Windows 7, you can use the original EXE file, or manually converted CAB file
Optional: Get Language Features On Demand Packs for Windows 10 if available and put the files in «FOD» folder
you can let Windows Update to install them later after changing the language
2: Right-click on DisplayLanguageSwitcher.cmd and select Run as administrator
3: After loading and showing Operating System and detected Language Pack information, you will be prompted to continue to install a new LangPack or exit.
4: Restart the system to complete the language change
If you later want to go back to the original language or already installed multiple languages run the script, and you will be prompted to select one of the detected languages to set as primary
The script will not set or change the local language preferences: Formats, Location, Keyboards, language for non-Unicode programs (system locale). You can set them manually, before or after changing the display language:
Windows 7: «Region and Language» Control Panel Windows.
8/8.1: «Region», «Language» Control Panel.
Windows 10: «Region,» «Language,» Control Panels, or Settings app.
How to Change Windows 10 Display Language Without Reinstalling the Operating System?
Read this article to find out how to change the language of Windows 10 interface without having to reinstall it, what system languages can be installed and what settings should be modified for that purpose.
Introduction
In Windows 10, people usually choose the preferred language for the entire operating system when they install it. However, if the language settings were wrong, or people have to use computing devices with certain language preferences, there are some settings to be modified in order to bring them in line with your personal likings.
So if you ever need to change language preferences in Windows 10, this can be done in a quick and easy way with the help of the Settings app and without having to reinstall the operating system.
In today’s article, we will show you how to change the default display language into any other, including doing it for new and existing user accounts.
How to change the default display language in Windows 10?
If you have to move to a different region or you need to use a display language different from the default choice, or the initial language settings for the computing device have been wrong, there is absolutely no point in reinstalling Windows 10. All you need is to modify a couple of system settings to enjoy the experience of using your operating system in the right language.
Disable language synchronization
If you are using a Microsoft account, the language settings will apply to all devices linked to such account. If you plan to change regional and language settings for one computer only, you need to disable synchronization of such settings before you proceed.
This is how you disable language sync in Windows 10.
Open the main system application, Settings. You can do it in any way you prefer. For example, click on the Start button in the lower left corner of your desktop, on the Taskbar, and open the main Windows menu. Use the scroll bar or the mouse wheel to search the list of all programs and applications installed on this computer and find the line Settings, or click on the Settings button in the left side of the user menu, and the application will open.

In the main Settings window, scroll down if necessary and choose the tab Accounts.

In the left panel, go to Sync your settings.
In the right panel, find the section Individual sync settings and the line Language preferences, then set the slider to the Off position (disabled).

When these steps are taken, you can start changing language settings for the copy of Windows 10 installed on this computer, without worrying that this can affect similar settings in other linked devices.
The steps to take if you want to change the display language
To change the display language of your Windows 10, you should close all running applications and do what is described below.
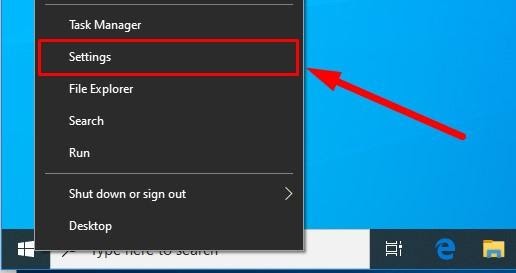
Use any method you prefer to open the Settings application. For example, right-click on the Start button that you can find on the Taskbar, in the left lower corner of the desktop, or press the key sequence Windows + X instead to open the context menu, and select the line Settings. The application will start immediately.
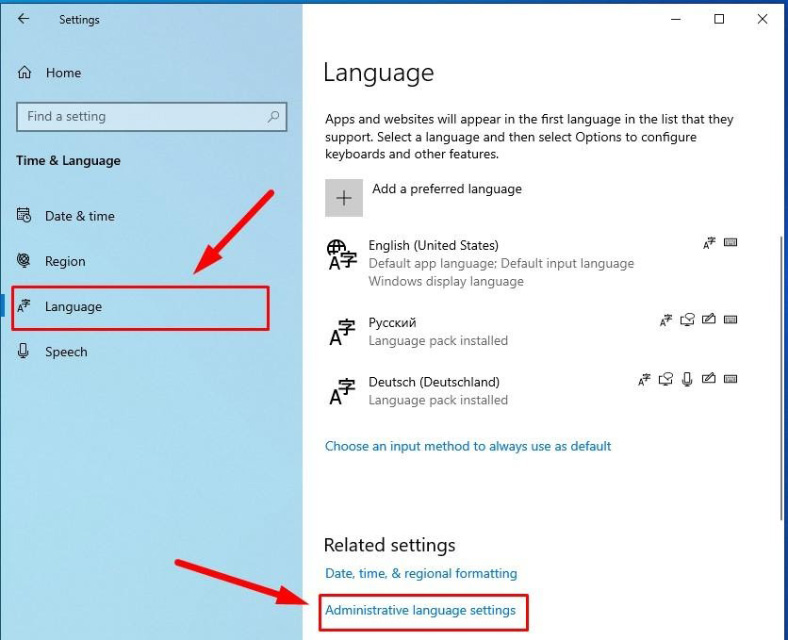
Use the scroll bar or the mouse wheel to navigate the Settings window, and find the tab Time and language.

In the left panel, go to Language.
Now look to the right and find the section Preferred languages, where you can prioritize language settings, and click on the button Add a preferred language, with a + (plus) symbol on it.

In the new window Choose a language to install use the scroll bar or the mouse wheel to find the language you need, or start typing its name in the search field above.
Choose the language pack you are planning to use in Windows 10 from the list.

When the language is chosen, hit Next.
In the next page Install language features check the box for Install language pack to confirm your choice (the box with the tick will become blue, i.e. active).

Click Install below.
Changes will take effect after the language package is installed, which usually takes several minutes only. In some cases, restarting your Windows 10 may be required, and then the corresponding language settings will apply to all system elements. The changes will affect the sign-in screen, the Settings app, Windows Explorer, desktop, all applications, preferred browsers and websites you visit. From now on, they will use the new language by default. Besides, Windows 10 may suggest reviewing your current privacy settings.
Changing region settings
If you change the display language for Windows 10 because you move to a different region, then regional settings should be modified too.
Changing them in Windows 10 is easy enough: just follow the steps below.
Open the main system application, Settings, using any way you prefer. For example, press the keyboard shortcut Windows + I to access the app directly.
In the main window of the Settings app, find and select the tab Time and language.
In the left panel, select Region.
In the right panel, find the section Region and use the nested menu Country or region to specify your new location if it differs from the current settings.
In the section Regional format use another nested menu to select proper formats to display date and time in Windows, if these differ for your time and region.

Now look at the left panel and jump to the tab Language again.
Use the scroll bar or the mouse wheel to find the section Related settings and click on the link Administrative language settings.
In the new pop-up Region window, jump to the tab Administrative and in the section Welcome screen and new user accounts hit the button Copy settings.

The new window will show you corresponding screen and account settings. In the section Copy your current settings to check the boxes for each option: Welcome screen and system accounts and New user accounts.

Click ОК one more time, and then restart the computer.
After all these steps, your computer will display proper regional settings specified according to your physical location.
Most of the time, people don’t change or install additional languages regularly for their personal needs. This opportunity to change language packs quickly is more often required in small or large companies that need to deal with customers having various language preferences.
Besides, this option would be useful for people who have to move to a different region and would like their regional settings to comply. Another scenario is buying a computer from another country when the required configuration is not available locally.
Also, you should remember that modifying language settings may disable some functions like Cortana because this service is not supported in certain regions.
Conclusion
Preferred display language is one of the easily customizable things in the operating system. If you ever need to change the language settings, use one of the methods described here to replace the language pack currently used by Windows 10 without having to reinstall it.
See the full article with all additional video tutorials. If you still have any questions, please ask in a comments. Also visit our Youtube channel, there are over 400 video tutorials.
Содержание
- Как изменить язык в Windows 10: включаем русский интерфейс
- Изменение языка системы в Windows 10: английский на русский
- Как изменить язык интерфейса в Windows 10 Single Language
- Как изменить язык интерфейса в Windows 10 Single Language
- Последние
- Реклама
- telegram
- Рубрики
- СЧЕТЧИКИ
- РЕКЛАМА И ДОНАТЫ
- Социальные сети
- Как добавить русский язык Windows 10 в одноязычной версии?
- Как добавить русский язык в windows 10 для одного языка?
- Добавляем еще один язык интерфейса в Windows 10 пошагово
- Добавляем язык ввода в раскладку клавиатуры Windows 10
- Изменение языка интерфейса в Windows 10
- Изменение языка системы в Виндовс 10
- Процесс изменения языка интерфейса
- Как в Windows 11 включить русский язык // русификация системы
- Русификация
- 👉 Вариант 1
- Если произошел сбой
- 👉 Вариант 2
Как изменить язык в Windows 10: включаем русский интерфейс
Изменение основного языка системы может быть необходимым, например, если на компьютере установлена англоязычная версия системы, а вам нужен русский интерфейс. Вы можете скачать и установить дополнительные языковые пакеты для Windows 10 и Windows 10 Enterprise 1903 / LTSC 2019, чтобы получить интерфейс операционной системы на требуемым языке.
Изменение языка системы в Windows 10: английский на русский
Прежде всего, войдите в учетную запись администратора устройства. Нажмите сочетание клавиша Windows + I для запуска приложения Settings (Параметры), а затем перейдите в раздел Time & Language (Время и язык).
В разделе Windows display language (Язык интерфейса Windows) нажмите ссылку Add a Windows display language in Microsoft Store (Добавьте язык интерфейса Windows в Microsoft Store).
Откроется страница Microsoft Store со всеми доступными для установки языковыми пакетами. Найдите и выберите язык, который нужно установить – например, русский (пакет локализованного интерфейса на русском).
На следующей странице нажмите Get (Получить).
Затем нажмите Install (Установить).
Дождитесь загрузки и установки выбранного языкового пакета. Выберите Yes, sign out now (Да, выйти сейчас), чтобы выйти из учетной записи для применений изменений или No, sign out later (Нет, выйти из системы позже).
Система будет доступна на выбранном языке после выхода из учетной записи или перезагрузки.
Источник
Как изменить язык интерфейса в Windows 10 Single Language
Недавно попросили изменить язык интерфейса в Windows 10 Single Language. Да тех, кто не в курсе, это одноязычная версия Windows 10 Home для устройств с небольшим объёмом накопителя. Например, для планшетов. К слову, пока решить эту проблему на том гаджете не удалось. Подозреваю, что проблема в правах пользователя на изменение системных файлов, так что будем пробовать. Но всё же хочется поделиться общим решением для изменения языка интерфейса.

Как изменить язык интерфейса в Windows 10 Single Language
0. Рекомендую проделывать все эти изменения на чистой системе.
1. Скачиваем русский языковой пакет. Обращаем внимание на разрядность версии Windows.
2. Переименовываем пакет в «lp.cab» и перемещаем в папку в корне жесткого диска. Например, в папку «lp».
3. Нажмите «Win+X» и выберите «Командная строка (Администратор)».
6. Удалите первый язык. Введите команду dism /Online /Remove-Package /PackageName:Microsoft-Windows-Client-LanguagePack-Package
7. Перезагрузите систему. Язык должен измениться.
Читайте анонсы и посты целиком в ЖЖ, Medium, Голосе и Яндекс.Дзен!
Поддержите мой блог финансово. Все донаты пойдут на оплату хостинга и развитие сайта!
Последние
Реклама
telegram
Рубрики
Большущее вам СПАСИБО.
СЧЕТЧИКИ
РЕКЛАМА И ДОНАТЫ
Социальные сети
©2016-2022 Блог Евгения Левашова. Самое интересное и полезное из мира ИТ. Windows 10, Linux, Android и iOS. Обзоры программ и веб-сервисов. Статьи о мотивации и продуктивности.
Использование материалов разрешается с активной ссылкой на levashove.ru. 
Данный блог является личным дневником, содержащим частные мнения автора. В соответствии со статьей 29 Конституции РФ, каждый человек может иметь собственную точку зрения относительно его текстового, графического, аудио и видео наполнения, равно как и высказывать ее в любом формате. Блог не имеет лицензии Министерства культуры и массовых коммуникаций РФ и не является СМИ, а, следовательно, автор не гарантирует предоставления достоверной, не предвзятой и осмысленной информации. Сведения, содержащиеся в этом блоге не имеют никакого юридического смысла и не могут быть использованы в процессе судебного разбирательства. Автор блога не несёт ответственности за содержание комментариев к его записям.
Источник
Как добавить русский язык Windows 10 в одноязычной версии?
Здравствуйте, друзья! Сегодня принесли ноутбук на настройку. Малыш — Dell Inspiron 11 3000 серии для работы в поездках, довольно быстрый. У человека вдруг отказал скайп и заодно все остальные программы.
Причина оказалась банальна- на ноутбуках этой серии вместо стандартных жестких дисков стоит накопитель размером всего 32 Гб. Что то среднее между планшетом и обычным ноутбуком. Но? зато сенсорный экран и полноценная клавиатура. Шустрый, мне понравился.

Оказалось, что ноутбук этот приехал из Америки. Дети давно проживают там, а родители здесь. Общаются ежедневно по Skype, а тут такая незадача.
Как добавить русский язык в windows 10 для одного языка?


Теперь приступим. Действовать будем через «Панель управления». Чтобы не лазить по меню я создал на рабочем столе ярлык и в свойствах его прописал слово control

Мы добавили ярлык «панели управления». Там мы проделаем все остальные действия. Жмем на ярлык и выбираем Clock, Language, Region (часы,язык и регион).

Добавляем еще один язык интерфейса в Windows 10 пошагово
Сначала сменим местонахождение (это небоходимо для правильного формата дат, времени и т.д) Переходим в «Location» (Местоположение):

Выбираем нужную нам страну…

На этом этапе компьтер попросит перезапуска. Если так случилось — перезапускаем. Снова идем в Control — (Часы, язык и регион). Добавляем новый язык

Находим «Русский». Он спрятан, не сразу находится иногда можно искать по алфавиту либо в поисковом окне сверху «Search Language»)…:

Система предложит скачать языковой пакет (нужно подключение к интернету) в виде обновления:


После скачивания и установки нужно выбрать «Сделать этот язык основным»:

Система потребует перезапуска и в следующем заходе вы увидите меню и рабочий стол на русском.

Осталось добавить русский язык в раскладку, чтобы вводить русский текст и переключаться на английский, когда надо.
Добавляем язык ввода в раскладку клавиатуры Windows 10
Добавляем метод ввода:

Здесь же переключим выбранный язык вверх — система при загрузке будет выбирать нужный язык.

В «Дополнительных параметрах» выбираем переключение методов ввода…

И делаем так, как привыкли. У меня сделано вот так:
Источник
Изменение языка интерфейса в Windows 10

Иногда бывает, что после установки системы Windows 10 Вы обнаруживаете, что язык интерфейса не соответствует Вашим интересам. И вполне закономерно возникает вопрос, можно ли поменять установленную конфигурацию на другую с более приемлемой для пользователя локализацией.
Изменение языка системы в Виндовс 10
Проанализируем, как можно изменить настройки системы и установить дополнительные языковые пакеты, которые будут использоваться в дальнейшем.
Стоит заметить, что изменить локализацию Вам удастся только в том случае, если операционная система Виндовс 10 установлена не в варианте Single Language.
Процесс изменения языка интерфейса
Для примера, пошагово рассмотрим процесс изменения языковых настроек с английского на русский.


Очевидно, что установить на систему Виндовс 10 удобный для Вас язык достаточно просто, поэтому не ограничивайтесь стандартными настройками, экспериментируйте с конфигурацией (в разумных мерах) и Ваша ОС будет выглядеть так, как Вам это удобно!
Помимо этой статьи, на сайте еще 12385 инструкций.
Добавьте сайт Lumpics.ru в закладки (CTRL+D) и мы точно еще пригодимся вам.
Отблагодарите автора, поделитесь статьей в социальных сетях.
Источник
Как в Windows 11 включить русский язык // русификация системы
 Доброго дня!
Многие текущие версии ОС Windows 11 по умолчанию идут с англ. языком — и вопрос перевода ее на русский достаточно популярный. Именно его сегодня и хочу рассмотреть в этой небольшой заметке! 👌
Однако, сразу хочу предупредить : идеального перевода всего и вся я еще не встречал (всё равно некоторые элементы будут на англ.).
Кроме этого, некоторые пользователи отмечали, что после русификации ОС — она начинала вести себя нестабильно: пропадала панель задач (поэтому, перед этим, на всякий случай, создайте 👉 точку восстановления для возможности отката).
Примечание : кстати, насчет настройки панели задач — у меня на блоге 👉 была недавно заметка. Через реестр ее можно немного изменить, например, сделать чуть меньше по высоте.

Русификация
👉 Вариант 1


Windows Display Language
Когда снова войдете — большинство элементов как на рабочем столе, так и в менюшках — будут на русском. 👇

Часть интерфейса стала русским
Если произошел сбой
Если система начала вести себя нестабильно — откатите ее к ранее 👉 созданной точке восстановления.

End Task // Windows Explorer
Затем в диспетчере задач нажмите по «File / Run new task» (новая задача) и используйте команду netplwiz — должно появиться окно, в котором можно создать нового пользователя. Создайте нового администратора. 👇

👉 Вариант 2
Как бы это странно не звучало, но с текущими не самыми стабильными версиями Windows 11 — иногда лучший способ перевести ОС на «Великий и Могучий» — это загрузить другой установочный ISO (с уже добавленным русским) и заново подготовить загрузочную флешку. Т.е. переустановить систему! Ссылка ниже в помощь.
Как создать загрузочную флешку с Windows 11 — см. инструкцию
Источник
Reading time
4 min
Views 5.1K
Read this article to find out how to change the language of Windows 10 interface without having to reinstall it, what system languages can be installed and what settings should be modified for that purpose.
Introduction
In Windows 10, people usually choose the preferred language for the entire operating system when they install it. However, if the language settings were wrong, or people have to use computing devices with certain language preferences, there are some settings to be modified in order to bring them in line with your personal likings.
So if you ever need to change language preferences in Windows 10, this can be done in a quick and easy way with the help of the Settings app and without having to reinstall the operating system.
In today’s article, we will show you how to change the default display language into any other, including doing it for new and existing user accounts.
How to change the default display language in Windows 10?
If you have to move to a different region or you need to use a display language different from the default choice, or the initial language settings for the computing device have been wrong, there is absolutely no point in reinstalling Windows 10. All you need is to modify a couple of system settings to enjoy the experience of using your operating system in the right language.
Disable language synchronization
If you are using a Microsoft account, the language settings will apply to all devices linked to such account. If you plan to change regional and language settings for one computer only, you need to disable synchronization of such settings before you proceed.
This is how you disable language sync in Windows 10.
Open the main system application, Settings. You can do it in any way you prefer. For example, click on the Start button in the lower left corner of your desktop, on the Taskbar, and open the main Windows menu. Use the scroll bar or the mouse wheel to search the list of all programs and applications installed on this computer and find the line Settings, or click on the Settings button in the left side of the user menu, and the application will open.
In the main Settings window, scroll down if necessary and choose the tab Accounts.
In the left panel, go to Sync your settings.
In the right panel, find the section Individual sync settings and the line Language preferences, then set the slider to the Off position (disabled).
When these steps are taken, you can start changing language settings for the copy of Windows 10 installed on this computer, without worrying that this can affect similar settings in other linked devices.
The steps to take if you want to change the display language
To change the display language of your Windows 10, you should close all running applications and do what is described below.
Use any method you prefer to open the Settings application. For example, right-click on the Start button that you can find on the Taskbar, in the left lower corner of the desktop, or press the key sequence Windows + X instead to open the context menu, and select the line Settings. The application will start immediately.
Use the scroll bar or the mouse wheel to navigate the Settings window, and find the tab Time and language.
In the left panel, go to Language.
Now look to the right and find the section Preferred languages, where you can prioritize language settings, and click on the button Add a preferred language, with a + (plus) symbol on it.
In the new window Choose a language to install use the scroll bar or the mouse wheel to find the language you need, or start typing its name in the search field above.
Choose the language pack you are planning to use in Windows 10 from the list.
When the language is chosen, hit Next.
In the next page Install language features check the box for Install language pack to confirm your choice (the box with the tick will become blue, i.e. active).
Click Install below.
Changes will take effect after the language package is installed, which usually takes several minutes only. In some cases, restarting your Windows 10 may be required, and then the corresponding language settings will apply to all system elements. The changes will affect the sign-in screen, the Settings app, Windows Explorer, desktop, all applications, preferred browsers and websites you visit. From now on, they will use the new language by default. Besides, Windows 10 may suggest reviewing your current privacy settings.
Changing region settings
If you change the display language for Windows 10 because you move to a different region, then regional settings should be modified too.
Changing them in Windows 10 is easy enough: just follow the steps below.
Open the main system application, Settings, using any way you prefer. For example, press the keyboard shortcut Windows + I to access the app directly.
In the main window of the Settings app, find and select the tab Time and language.
In the left panel, select Region.
In the right panel, find the section Region and use the nested menu Country or region to specify your new location if it differs from the current settings.
In the section Regional format use another nested menu to select proper formats to display date and time in Windows, if these differ for your time and region.
Now look at the left panel and jump to the tab Language again.
Use the scroll bar or the mouse wheel to find the section Related settings and click on the link Administrative language settings.
In the new pop-up Region window, jump to the tab Administrative and in the section Welcome screen and new user accounts hit the button Copy settings.
The new window will show you corresponding screen and account settings. In the section Copy your current settings to check the boxes for each option: Welcome screen and system accounts and New user accounts.
Click ОК.
Click ОК one more time, and then restart the computer.
After all these steps, your computer will display proper regional settings specified according to your physical location.
Most of the time, people don’t change or install additional languages regularly for their personal needs. This opportunity to change language packs quickly is more often required in small or large companies that need to deal with customers having various language preferences.
Besides, this option would be useful for people who have to move to a different region and would like their regional settings to comply. Another scenario is buying a computer from another country when the required configuration is not available locally.
Also, you should remember that modifying language settings may disable some functions like Cortana because this service is not supported in certain regions.
Conclusion
Preferred display language is one of the easily customizable things in the operating system. If you ever need to change the language settings, use one of the methods described here to replace the language pack currently used by Windows 10 without having to reinstall it.
See the full article with all additional video tutorials. If you still have any questions, please ask in a comments. Also visit our Youtube channel, there are over 400 video tutorials.
Display Language Switcher is a mostly automated script to install and change the Display Language for Windows Editions that are not allowed to have multiple languages by default.
Some of these editions include Windows 10 Home Single Language, Windows 8.1 Single Language, Windows 8 Single Language, Windows 7 SP1 Starter, Windows 7 SP1 Starter N, Windows 7 SP1 Home Basic, Windows 7 SP1 Home Basic N, Windows 7 SP1 Home Premium, Windows 7 SP1 Home Premium N, Windows 7 SP1 Professional, and Windows 7 SP1 Professional N.
The following languages are supported: Arabic, Bulgarian, Chinese (Simplified), Chinese (Hong Kong S.A.R.), Chinese (Taiwan), Croatian, Czech, Danish, Dutch, English, English (United Kingdom), Estonian, Finnish, French, French (Canada), German, Greek, Hungarian, Italian, Japanese, Korean, Latvian, Lithuanian, Norwegian, Polish, Portuguese (Brazil), Portuguese (Portugal), Romanian, Russian, Serbian (Latin), Slovak, Slovenian, Spanish, Spanish (Mexico), Swedish, Thai, Turkish, and Ukrainian.
How to use:
1: Get desired Language Pack matching your operating system version and architecture (32bit or 64 bit) and put the file in «LangPack» folder. For Windows 7, you can use the original EXE file, or manually converted CAB file
Optional: Get Language Features On Demand Packs for Windows 10 if available and put the files in «FOD» folder
you can let Windows Update to install them later after changing the language
2: Right-click on DisplayLanguageSwitcher.cmd and select Run as administrator
3: After loading and showing Operating System and detected Language Pack information, you will be prompted to continue to install a new LangPack or exit.
4: Restart the system to complete the language change
A few notes:
If you later want to go back to the original language or already installed multiple languages run the script, and you will be prompted to select one of the detected languages to set as primary
The script will not set or change the local language preferences: Formats, Location, Keyboards, language for non-Unicode programs (system locale). You can set them manually, before or after changing the display language:
Windows 7: «Region and Language» Control Panel Windows.
8/8.1: «Region», «Language» Control Panel.
Windows 10: «Region,» «Language,» Control Panels, or Settings app.