
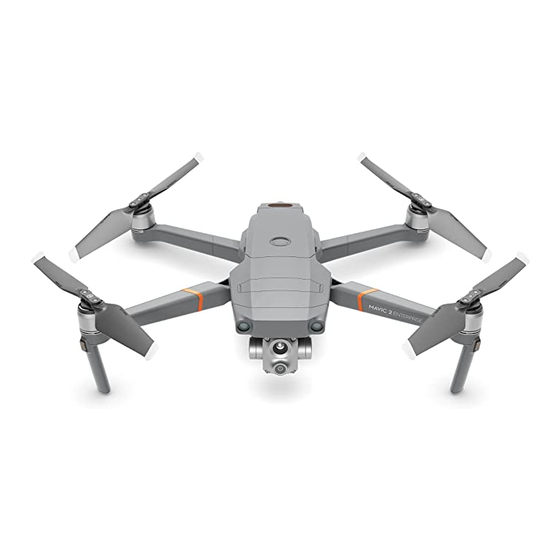
Складной и компактный. Портативный и мощный дрон.
Документация
- Mavic 2 Enterprise Пояснительная записка 2022-06-20
- Mavic 2 Enterprise — Руководство пользователя v1.82021-04-13
- Mavic 2 Enterprise Комплект поставки 2018-10-29
- Mavic 2 Enterprise — Краткое руководство (Mavic 2 Enterprise) v1.42020-06-10
- Mavic 2 Enterprise — Краткое руководство (Mavic 2 Enterprise Dual) v1.22020-06-10
- Mavic 2 Enterprise Комплект поставки (Smart_Controller)2021-03-09
- Mavic 2 Enterprise — Краткое руководство (Mavic 2 Enterprise with Smart_Controller) v1.22020-06-10
- Mavic 2 Enterprise — Краткое руководство (Mavic 2 Enterprise Dual with Smart_Controller) v1.22020-06-10
- Mavic 2 Enterprise Заявление об отказе от ответственности и руководство по технике безопасности 2021-03-09
- Mavic 2 Enterprise Руководство по технике безопасности для аккумулятора Intelligent Flight Battery 2021-03-09
- Mavic 2 Enterprise Примеры использования Более эффективная работа полиции 2018-11-06
- Mavic 2 Enterprise Примеры использования Спасение людей в труднодоступных местах 2018-11-06
- Mavic 2 Enterprise Примеры использования Спасение жизней в пустыне 2018-11-06
Программное обеспечение
![]()
DJI Assistant 2 для Mavic
Совместимость с Mavic. В настоящий момент приложение DJI Assistant 2 недоступно для macOS 11 и более поздних версий. Проблема будет решена в будущих обновлениях.
Программное обеспечение
Windows V2.0.14
2020-08-05
Документы
- DJI Assistant 2 для Mavic Пояснительная записка V2.0.142020-08-05
dji Mavic 2 Enterprise Advanced Aircraft

Самолет
Взлетная масса (без аксессуаров)
- 909g
Максимальный взлетный вес
- 1100g
Размеры (Д × Ш × В)
- В сложенном виде: 214 × 91 × 84 мм
- В разложенном виде: 322 × 242 × 84 мм
- В разложенном виде+прожектор: 322×242×114 мм
- В разложенном виде+маяк: 322×242×101 мм
- В разложенном виде+динамик: 322×242×140 мм
- Разложенный + модуль RTK: 322x242x125 мм
Диагональное расстояние
- 354 мм
Максимальная скорость подъема
- 6 м / с (S-режим)
- 5 м / с (режим P)
- 4 м/с (S-режим с аксессуарами)
- 4 м/с (режим P с принадлежностями)
Максимальная скорость спуска
- Спуститься вертикально
- 5 м / с (S-режим)
- 4 м / с (режим P)
- Наклон
- 7 м / с (S-режим)
- 4 м / с (режим P)
Максимальная Скорость
- 72 км/ч (режим S, без ветра)
- 50 км/ч (режим P, без ветра)
Максимальный уровень обслуживания над уровнем моря
- 6000 m
Максимальное время полета
- 31 мин (измерено при полете со скоростью 25 км/ч в безветренных условиях)
- 28 мин (модуль RTK подключен)
- 29 мин (с включенным маяком)
- 30 мин (с выключенным маяком)
- 24 мин (с включенным прожектором)
- 28 мин (с выключенным прожектором)
- 27 мин (с включенным динамиком)
- 28 мин (с выключенным динамиком)
Максимальное сопротивление скорости ветра
- 10 м/с (шкала 5)
Макс. Угол наклона
- 35°(S-режим, с пультом дистанционного управления)
- 25 ° (режим P)
Максимальная угловая скорость
- 200°/с (S-режим)
- 100°/с (P-режим)
Рабочая Температура
- -10 ° в 40 ° C
GNSS
- GPS + ГЛОНАСС
Диапазон точности наведения
- По вертикали:
- ± 0.1 м (с RTK)
- ± 0.1 м (с визуальным позиционированием)
- ± 0.5 м (с GPS-позиционированием)
- По горизонтали:
- ± 0.1 м (с RTK)
- ± 0.3 м (с визуальным позиционированием)
- ± 1.5 м (с GPS-позиционированием)
Рабочая частота
- 2.400–2.4835 ГГц;
- 5.725-5.850 ГГц
Мощность передатчика (EIRP)
- 2.400 — 2.4835 GHz
- FCC: ≤26 дБм;
- CE: ≤20 дБм;
- SRRC: ≤20 дБм;
- MIC: ≤20 дБм
- 5.725 — 5.850 GHz
- FCC: ≤26 дБм;
- CE: ≤14 дБм;
- SRRC: ≤26 дБм
Внутренние хранения
- 24 GB
Тепловизионная камера M2EA
датчик
- Неохлаждаемый микроболометр VOx
Фокусное расстояние
- Прибл. 9mm
- Эквивалент формата 35 мм: прибл. 38мм
- Разрешение сенсора
- 640 × 512 при 30 Гц
Точность тепловой температуры
- Измерение: ±2℃ или ±2%, в зависимости от того, что больше.
Диапазон сцены
- от -40 °C до 150 °C (высокое усиление)
- от 40 °C до 550 °C (низкий коэффициент усиления)
Цифровой зум
- 16 ×
Pixel Pitch
- 12 мкм
Спектральный диапазон
- 8-14 мкм
Формат фотографии
- R-JPEG
Формат видео
- MP4
Метод измерения
- Точечный измеритель, измерение площади
FFC
- Автоматический / ручной
Визуальная камера M2EA
датчик
- 1/2-дюймовый CMOS, эффективные пиксели: 48 мегапикселей
объектив
- FOV: 84 °
- Эквивалент формата 35 мм: 24 мм
- Диафрагма: f / 2.8
- Фокус: от 1 м до ∞
Диапазон ISO
- Видео: 100-12800 (авто)
- фото: 100-1600 (авто)
Цифровой зум
- 32 ×
Максимальный размер изображения
- 8000 × 6000
Режимы фотосъемки
- Single shot interval: 2/3/5/7/10/15/20/30/60 s
- Панорама: Сфера
Разрешение видео
- 3840 × 2160 @ 30fps
- 1920 × 1080 @ 30fps
Формат фотографии
- JPEG
Формат видео
- MP4
карданный подвес
Механический диапазон
- Наклон: -135°- +45°
- Панорамирование: -100°- +100°
Контролируемый диапазон
- Наклон: -90°- +30°
- Панорамирование: -75°- +75°
Стабилизация
- Ось 3 (наклон, рулон, кастрюля)
Максимальная скорость управления
- 120 ° / с
Угловой диапазон вибрации
- ± 0.005 °
считывание Система
Сенсорная система
- Всенаправленное обнаружение препятствий[2]
вперед
- Диапазон измерения точности: 0.5 — 20 м
- Диапазон обнаружения: 20 — 40 м
- Эффективная скорость обнаружения: ≤ 14m / s
- FOV: Горизонтальное: 40 °, Вертикальное: 70 °
назад
- Диапазон измерения точности: 0.5 — 16 м
- Диапазон обнаружения: 16 — 32 м
- Эффективная скорость обнаружения: ≤ 12m / s
- FOV: Горизонтальное: 60 °, Вертикальное: 77 °
Вверх
- Диапазон измерения точности: 0.1-8 м
Вниз
- Диапазон точного измерения: 0.5-11 м
- Обнаруживаемый диапазон: 11-22 м
Стороны
- Диапазон измерения точности: 0.5 — 10 м
- Эффективная скорость обнаружения: ≤ 8m / s
- FOV: Горизонтальное: 80 °, Вертикальное: 65 °
Условия эксплуатации
- Вперед, назад и по сторонам:
- Поверхность с четким рисунком и достаточным освещением
- (люкс > 15)
- Вверху: Обнаруживает диффузно отражающие поверхности (> 20%) (стены, деревья, люди и т. д.)
- Вниз: поверхность с четким рисунком и достаточным освещением
- (люкс > 15) Обнаруживает диффузно отражающие поверхности (> 20%) (стены, деревья, люди и т. д.)
Пульт дистанционного управления
Рабочая частота
- 2.400-2.483 ГГц;
- 725 – 5.850 ГГц
Максимальное расстояние передачи (беспрепятственно, без помех)
- 2.400-2.483 ГГц; 5.725 — 5.850 ГГц
- FCC: 10000m
- CE: 6000m
- SRRC: 6000m
- Микрофон: 6000 м
Мощность передачи (EIRP)
- 2.400–2.4835 ГГц:
- 25.5 дБм (FCC), 18.5 дБм (CE), 19 дБм (SRRC), 18.5 дБм (MIC)
- 5.725–5.850 ГГц:
- 25.5 дБм (FCC), 12.5 дБм (CE), 18.5 дБм (SRRC)
Хранилище
- ПЗУ 16 ГБ + Расширяемое хранилище MicroSD
Порт видеовыхода
- Порт HDMI
Встроенный аккумулятор
- Тип: 18650 Li-Po (5000 мАч при 7.2 В)
- Режим зарядки: заряжается от USB-зарядного устройства на 12 В/2 А.
- Номинальная мощность 15 Вт
- Время зарядки: 2 часа (от зарядного устройства USB на 12 В/2 А)
Рабочий ток / об.tage
- 1800 мА ⎓ 3.83 В
Срок службы батареи
- Встроенный аккумулятор прибл. 2.5 часа
Рабочая Температура
- -20 ° С — 40 ° С
Размер пульта дистанционного управления
- В сложенном виде без джойстика: 177.5 x 121.3 x 40 мм
- В разложенном виде с джойстиком: 177.5 x 181 x 60 мм
Вес
- Прибл. 630 g
Интеллектуальная батарея полета
- Основное звено: 17.6 В ⎓ 3.41 А или 17.0 В ⎓ 3.53 А
- USB: 5.0 V ⎓ 2.0 A
Интеллектуальная батарея полета
Пропускная способность
- 3850 мАч
Voltage
- 15.4V
Максимальный объем зарядкиtage
- 17.6V
Тип батареи
- LiPo
Энергия
- 59.29 Wh
вес нетто
- 297g
Температура зарядки
- 5 ℃ — 40 ℃
Диапазон рабочих температур:
- -10 ℃ — 40 ℃
Методы нагрева:
- Ручной нагрев, автоматический нагрев
температура нагрева
- -20 ℃ — 6 ℃
Продолжительность нагрева
- 500 с (макс.)
Мощность нагрева
- 5W (Макс.)
Время зарядки
- 90 минут
Максимальная зарядная мощность
- 80W
Модули RTK
Размеры
- 69 мм x 69 мм x 59mm
Коммутация
- Micro USB-порт
- Точность позиционирования RTK
- В РТК ФИКС
- 1 см+1 стр/мин (по горизонтали)
- 1.5 см + 1 часть на миллион (по вертикали)
В центре внимания M2EA
Размеры
- 68×60×41мм
Коммутация
- Micro USB-порт
рабочий диапазон
- 30 m
Питания
- Макс 26W
Освещенность
- FOV17°, макс.: 11 люкс на 30 м по прямой
Маяк M2EA
Размеры
- 68mm × 40mm × 27.8mm
Коммутация
- Micro USB-порт
Питания
- Сред. 1.6 Вт
Контролируемый диапазон
- 5000 m
Интенсивность света
- Минимальный угол: 55 кд;
- Интенсивность света: 157 кд
Динамик M2EA
Размеры
- 68 × 55 × 65 мм
Коммутация
- Micro USB-порт
Питания
- Макс 10W
Децибел
- 100 дБ на расстоянии 1 метр
Максимальный битрейт
- 16kbps
Карты SD
Поддерживаемые SD-карты
-
- Micro SD ™
- Поддерживает microSD емкостью до 128 ГБ.
- Требуется карта microSD UHS-I Speed Grade 3.
- Micro SD ™
ПРИЛОЖЕНИЕ / В прямом эфире View
Система видеопередачи
- OcuSync 2.0
Мобильное приложение
- DJI PILOT (версия для Android)
Концерты View Качество
- Пульт:
- 720p при 30 кадрах в секунду / 1080p при 30 кадрах в секунду
Макс Живой View Поток
- 40Mbps
Задержка
- 120 — 130 мс
Требуемая операционная система
- iOS 10.0 или новее Android 5.0 или новее
Другое
Сноски
[1] Точность измерения температуры измеряется на расстоянии 5 м от абсолютно черного тела с коэффициентом излучения 0.95 в идеальных условиях. Фактическая точность также зависит от различных факторов окружающей среды, таких как температура и влажность, и ее необходимо корректировать с помощью программного обеспечения для постобработки. В идеальных условиях точность измерения температуры может достигать ±2℃ или ±2%, в зависимости от того, что больше. [2] Всенаправленное обнаружение препятствий включает обнаружение препятствий влево/вправо, вверх/вниз и вперед/назад. Определение направлений влево/вправо доступно только в режиме штатива. Всенаправленное обнаружение препятствий не полностью охватывает окружность 360-градусной дуги. А система обнаружения препятствий слева и справа работает только в определенных режимах и условиях. Гарантия DJI не распространяется на любые убытки, вызванные аварией при полете влево или вправо, даже если активирован режим штатива. Пожалуйста, следите за своим окружением и уведомлениями приложений при работе с Mavic 2, чтобы обеспечить безопасность.
Документы / Ресурсы
- Публикация
- Товары4
Инструкции: Первый полёт DJI Mavic 2 (инструкция на русском)
- Скачайте приложение DJI Go 4 для своего мобильного устройства в магазинах Apple Store или Google Play.
- Разложите зажимы пульта дистанционного управления и прикрутите рычаги управления.
- Раскройте антенны пульта управления.
- Кабель с левой стороны пульта управления служит для подключения телефона к пульту.
- После того как пульт подключен к телефону, а телефон находится в зажимах пульта, раскройте лучи дрона.
- Нажмите и удерживайте кнопку питания 2 секунды для включения дрона и пульта управления.
- Поместите летательный аппарат на землю.
- Запустите приложение DJI Go 4, нажав на ярлык Mavic 2 на рабочем столе.
- Панель статуса полета в верхней части экрана показывает состояние и работоспособность дрона и сенсоров.
- При статусе приложения “Ready to Go” потяните оба стика на себя и к центру для запуска моторов.
- Затем двигайте левый стик от себя для взлета.
- Также Вы можете нажать кнопку “Автовзлет” в левой части экрана для того, чтобы подняться в воздух.
- Для примера возьмем режим управления рычагами “mode” 2.
- Левый стик отвечает за высоту и направление дрона
- В то время как правый контролирует его движения вперед, назад, влево или вправо
- Нажмите иконку в верхнем правом углу приложения для входа в меню пульта управления и изменения режима управления рычагами.
- Если аппарат улетел слишком далеко, Вы можете проверить его позицию на карте в нижнем левом углу.
- Нажмите кнопку “Flight Pause” на пульте управления для экстренного торможения и зависания.
- В левой части меню “Intellegent Flight” встроено очень много интеллектуальных режимов полета, которые значительно упрощают любые действия в воздухе
- A.P.A.S. позволяет автоматически обходить препятствия и значительно увеличивает безопасность полета
- Нажмите “Return to home” — возврат домой или нажмите и удерживайте кнопку “Smart RTH” на пульте управления, чтобы вернуть аппарат назад к точке взлета.
- Функциональные кнопки в правой части приложения — это текущие параметры камеры
- Меню установок для настройки установок съемки, таких как экспозиция и также слайд-бар регулирующий угол подвеса и кнопка “Play”.
- Вы можете записать свой полет и снять великолепные моменты кнопками на пульте управления.
- Например, колесо подвеса контролирует наклон камеры.
- Кнопка спуска — нажмите ее, чтобы сделать фото.
- Кнопка записи — нажмите ее для старта или окончания записи видео.
- Для посадки дрона потяните левый рычаг на себя и удерживайте пока он не коснется земли.
- Также Вы можете нажать кнопку “Auto Landing” в приложении и позволить дрону выполнить посадку самостоятельно.
Товары
Все4
DJI Mavic 22
DJI Mavic 2 Enterprise1
Аксессуары DJI Mavic 21
Артикул: 3005
Добавить к сравнению
Артикул: 3001
Добавить к сравнению
Артикул: 3159
Добавить к сравнению
Артикул: 3003
Добавить к сравнению
Для ознакомления с инструкцией необходимо нажать на ссылку «ЗАГРУЗИТЬ», чтобы скачать pdf файл. Если есть кнопка «ПРОСМОТР», то можно просто посмотреть документ онлайн.
Для удобства, Вы можете сохранить данную страницу с файлом руководства по эксплуатации в свой список «избранное» прямо на сайте (доступно для зарегистрированных пользователей).
Смотрите инструкцию для похожих моделей:

Вы можете задать вопрос посетителям сайта по модели DJI Mavic 2 Enterprise Dual. Если Вы являетесь её пользователем, то пожалуйста оставьте, по возможности развёрнутый отзыв:
- Manuals
- Brands
- dji Manuals
- Drones
- Mavic 2 Enterprise
- User manual
-
Contents
-
Table of Contents
-
Bookmarks
Quick Links
MAVIC 2 ENTERPRISE
User Manual
v1.0
2018.10
Related Manuals for dji Mavic 2 Enterprise
Summary of Contents for dji Mavic 2 Enterprise
-
Page 1
MAVIC 2 ENTERPRISE User Manual v1.0 2018.10… -
Page 2: Using This Manual
2 Enterprise Quick Start Guide and refer to this Mavic 2 Enterprise User Manual for more details. Video Tutorials Go to the address below or scan the QR code on the right to watch the Mavic 2 Enterprise tutorial videos, which demonstrate how to use the Mavic 2 Enterprise safely: http://www.dji.com/mavic-2-enterprise/info#video…
-
Page 3: Table Of Contents
Contents Using This Manual Legend Read Before the First Flight Video Tutorials Download the DJI Pilot App Download DJI Assistant 2 for Mavic Product Profile Introduction Preparing the Mavic 2 Enterprise Preparing the Remote Controller Aircraft Diagram Activation Aircraft Flight Modes…
-
Page 4
Flight Flight Environment Requirements Flight Limits and GEO Zones Pre-Flight Checklist Starting/Stopping the Motors Test Flight Appendix Specifications Calibrating the Compass Firmware Updates Remote Controller LCD Screen Menu Information After-Sales Information © 2018 DJI All Rights Reserved. -
Page 5
T h i s s e c t i o n i n t r o d u c e s M a v i c 2 Enterprise and lists the components of the aircraft and remote controller. © 2018 DJI All Rights Reserved. -
Page 6: Product Profile
The maximum run time is 2 hours and 15 minutes. The Mavic 2 Enterprise boasts a maximum flight speed of 44.7 mph (72 kph) and a maximum flight time of 31 minutes.
-
Page 7
Mavic 2 Enterprise User Manual *Attach the gimbal cover when not in use. 1) Hold the gimbal in place and insert gimbal clamp between the aircraft and the gimbal. 2) Make sure the hooks on the Gimbal Protector are locked in the grooves of the aircraft, then lower the Gimbal Protector over the gimbal and secure with the buckle. -
Page 8: Preparing The Remote Controller
Mavic 2 Enterprise User Manual Preparing the Remote Controller 1. Unfold the mobile device clamps and the antennas. 2. Remove the control sticks from their storage slots on the remote controller and screw them into place. 3. Choose an appropriate RC cable based on the type of mobile device. A cable with a Lightning connector is connected by default to the cable slider.
-
Page 9: Aircraft Diagram
Mavic 2 Enterprise User Manual Aircraft Diagram 1. Forward Vision System 2. Propellers 3. Motors 4. Front LEDs 5. Antennas 6. Gimbal and Camera 7. Backward Vision System 8. Aircraft Status Indicator 9. Battery Buckles 10. Lateral Vision System 11. USB-C Port 12.
-
Page 10
Press once, then again, and hold to store. The default flight control is set to Mode turn on/off the remote controller. 2. Set the flight control mode in DJI Pilot. 12. C1 Button (Customizable) 5. Flight Pause Button The default configuration is center focus. -
Page 11: Activation
The default configuration is playback. Adjust the configuration in DJI Pilot based on your preferences. Activation The Mavic 2 Enterprise requires activation before first time use. Follow the onscreen guide to activate the Mavic 2 Enterprise using DJI Pilot. © 2018 DJI All Rights Reserved.
-
Page 12
Aircraft This section introduces the flight controller, Intelligent Flight Battery, and the Forward, Backward and Downward Vision Systems. © 2018 DJI All Rights Reserved. -
Page 13: Aircraft
Intelligent Flight Battery. Refer to the aircraft diagram in the Product Profile section. Flight Modes The Mavic 2 Enterprise has three flight modes, plus a fourth flight mode that the aircraft switches to in certain circumstances: P-mode (Positioning): P-mode works best when the GPS signal is strong. The aircraft utilizes GPS and the Vision Systems to locate itself, stabilize, and navigate between obstacles.
-
Page 14: Aircraft Leds And Status Indicator
Mavic 2 Enterprise User Manual Aircraft LEDs and Status Indicator The Mavic 2 Enterprise has Front LEDs and Aircraft Status Indicators as shown in the figure below. Front LEDs Aircraft Status Indicator Front LEDs Aircraft Status Indicator The Front LEDs show the orientation of the aircraft and glow solid red when the aircraft is turned on to indicate the front of the aircraft (they can be turned off in the DJI Pilot).
-
Page 15: Return To Home
Low Battery RTH is triggered when the Intelligent Flight Battery is depleted to the point that the safe return of the aircraft may be affected. Return home or land the aircraft immediately when prompted. DJI Pilot displays a warning when the battery level is low. The aircraft will automatically return to the Home Point if no action is taken after a ten-second countdown.
-
Page 16
This cannot be canceled. If there is a danger of a collision, push the throttle up and try to navigate away. If the battery level is sufficient, the battery level indicator bar in DJI Pilot displays the estimated remaining flight time based on the current battery level. -
Page 17
Obstacle Avoidance during RTH Provided that lighting conditions are sufficient for the Forward and Backward Vision Systems to operate, the Mavic 2 Enterprise senses and actively attempts to avoid obstacles during RTH. The obstacle avoidance procedure is as follows: 1. The aircraft decelerates when an obstacle is sensed. -
Page 18
3. If Landing Protection is not operational, DJI Pilot displays a landing prompt when the aircraft descends below 0.5 m. Pull down on the throttle for one second or use the auto landing slider in the app to land. -
Page 19: Vision Systems And Infrared Sensing Systems
Mavic 2 Enterprise User Manual Vision Systems and Infrared Sensing Systems The Mavic 2 Enterprise is equipped with Forward, Backward, Downward, and Lateral Vision Systems, and Upward and Downward Infrared Sensing Systems, providing omnidirectional obstacle sensing (if lighting conditions are adequate).
-
Page 20
DJI Assistant 2 for Mavic or DJI Pil The most accurate way to calibrate the Vision System cameras is by using DJI Assistant 2 for Mavic. Follow the steps below to calibrate the Forward Vision System cameras, then repeat the steps to calibrate other Vision System cameras. -
Page 21
Be sure to maintain line of sight with the aircraft and pay attention to prompts in DJI Pilot. DJI takes no responsibility for any aircraft that is damaged or lost while using Lateral Vision Systems. -
Page 22: Advanced Pilot Assistance Systems
If there is any dirt, dust, or water on the glass of the Infrared Sensing and Vision System, clean it with a soft cloth. Do not use any cleanser that contains alcohol. c. Contact DJI Support if there is any damage to the glass of the Infrared Sensing and Vision System.
-
Page 23: Flight Recorder
Flight Recorder Flight data including flight telemetry, aircraft status information, and other parameters are automatically saved to the aircraft’s internal data recorder. The data can be accessed using DJI Assistant 2 for Mavic. Password Protection The Mavic 2 Enterprise supports password protection. This feature helps ensure secure access to your aircraft and its onboard data storage, thus preventing leakage of sensitive information.
-
Page 24: Intelligent Flight Battery
Ensure the ESCs sound normal when powered on. Intelligent Flight Battery The Mavic 2 Intelligent Flight Battery is a 15.4 V, 3850 mAh battery with smart charging/discharging functionality. Only use a DJI approved AC power adapter to charge the battery. Intelligent Flight Battery AC Power Adapter Battery Features 1.
-
Page 25
11. Communication: Information about the battery’s voltage, capacity, and current is transmitted to the aircraft. 12. Heating: Batteries of the Mavic 2 Enterprise are self-heating, which makes them capable of working under harsh and cold weather conditions for as low 14° F (-10° C). -
Page 26
Mavic 2 Enterprise User Manual Auto Heating: Insert the battery into the aircraft and power it on. When the temperature of the battery is below 43℉ (6℃) and the battery level is above 45%, it will warm up automatically and the temperature will remain between 46 to 50 ℉(8 to 10 ℃). -
Page 27
Mavic 2 Enterprise User Manual Power Outlet AC Power Adapter Intelligent Flight Battery Battery Level LEDs During Charging LED 1 LED 2 LED 3 LED 4 Battery Level LEDs During Charging Battery Level 0%~25% 25%~50% 50%~75% Fully Charged Battery Protection… -
Page 28: Gimbal And Camera
Use the gimbal dial on the remote controller to control the camera’s tilt. Alternatively, enter Camera View in DJI Pilot. Press the screen until a blue circle appears and drag the circle up and down to control camera tilt. Dragging the circle left and right controls the aircraft’s orientation.
-
Page 29
Storing the Photos and Videos The Mavic 2 Enterprise comes with 24 GB of internal storage to store photos and videos. To protect your data and ensure secure access to your device, you can enable password protection. -
Page 30: Dji Airsense
ADS-B outs or with malfunctioning ADS-B outs. 2. If there is an obstacle or steel structure between civil and DJI aircraft, the system won’t be able to receive ADS-B messages sent by manned aircraft or send out warnings. Keenly observe your surroundings and fly with caution.
-
Page 31: Modular Accessories
Mavic 2 Enterprise User Manual Modular Accessories Mavic 2 Enterprise features an extended port, which allows users to mount additional DJI modular accessories onto the aircraft. Compatible DJI accessories consist of the following: M2E Beacon: Enables aircraft identification during flight at night or in low light areas.
-
Page 32
Remote Controller This section describes the features of the remote controller and includes instructions for controlling the aircraft and the camera. © 2018 DJI All Rights Reserved. -
Page 33: Remote Controller
Built into the remote controller is DJI’s long-range transmission technology OcuSync 2.0, offering a maximum transmission range of 5 mi (8 km) and displaying video from the aircraft to DJI Pilot on your mobile device at up to 1080p. Easily control the aircraft and camera using the onboard buttons. An onboard LCD screen gives real-time aircraft data information and the detachable control sticks make the remote controller easier to store.
-
Page 34
Mavic 2 Enterprise User Manual Charging the Battery Connect the provided AC power adapter to the power port on the remote controller. It takes approximately 2 hours and 15 minutes to charge the remote controller battery fully. Remove the RC cable from the remote controller before charging. -
Page 35
Three preprogrammed modes (Mode 1, Mode 2, and Mode 3) are available and custom modes can be configured in DJI Pilot. The default mode is Mode 2. In each of the three pre-programmed modes, the Mavic 2 hovers in place at a constant orientation when both sticks are centered. -
Page 36
Mavic 2 Enterprise User Manual Remote Aircraft Controller Remarks Indicates Nose Direction) (Mode 2) Moving the left stick up or down changes the aircraft’s altitude. Push the stick up to ascend and down to descend. The more the stick is pushed away from the center position, the faster the aircraft will change altitude. -
Page 37
Refer to the Return to Home section for more information about RTH. C1 and C2 Button The functions of the C1 and C2 buttons are set in DJI Pilot. The default configuration for the C1 button is Center Focus and the default configuration for the C2 button is Playback. -
Page 38
Mavic 2 Enterprise User Manual strong weak Ensure that the aircraft is flying within the optimal transmission zone. To maintain optimal transmission performance, adjust the remote controller and antennas according to the figure above. LCD Screen The LCD Screen displays various system statuses including real-time flight telemetry and battery levels. -
Page 39: Linking The Remote Controller
Mavic 2 Enterprise User Manual Linking the Remote Controller The remote controller is linked to your aircraft before delivery. Linking is only required when using a new remote controller for the first time. Follow these steps to link a new remote controller: 1.
-
Page 40
DJI Pilot App This section introduces the main functions of the DJI Pilot app. © 2018 DJI All Rights Reserved. -
Page 41: Dji Pilot App
DJI Pilot App The DJI Pilot app is specifically developed for enterprise users. Manual flight integrates a variety of professional features that make flying simple and intuitive. Mission flight supports flight planning, and allows you to control the drone automatically, making your workflow much simpler and more efficient.
-
Page 42
: This icon shows the strength of the remote controller signal. The icon will blink when an interference is recognized during flight. When there are no additional warnings in DJI Pilot, it means that the interference will not affect operation and overall flight experience. -
Page 43
Mavic 2 Enterprise User Manual 12. Battery Settings : Shows the current battery level. Tap to view the battery information menu, set the various battery warning thresholds, and view the battery warning history. 13. AF(CF)/MF : Tap to switch the focus mode. -
Page 44: Mission Flight (Coming Soon)
The app is designed to assist your operation. Please use your sound discretion and DO NOT rely on the app to control your aircraft. Your use of the app is subject to DJI Pilot Terms of Use and DJI Privacy Policy. Please read them carefully in the app.
-
Page 45
Flight This section describes safe flight practices and flight restrictions. © 2018 DJI All Rights Reserved. -
Page 46: Flight
Flight Once pre-flight preparation is complete, it is recommended to use the flight simulator in DJI Pilot to hone your flight skills and practice flying safely. Ensure that all flights are carried out in an open area. Refer to the Remote Controller and DJI Pilot sections for information about using the remote controller and the app to control the aircraft.
-
Page 47: Pre-Flight Checklist
Fly the aircraft only within your line of sight. GEO Zones All GEO Zones are listed on the DJI official website at http://www.dji.com/flysafe. GEO Zones are divided into different categories and include locations such as airports, flying fields where manned aircraft operate at low altitudes, borders between countries, and sensitive locations such as power plants.
-
Page 48: Starting/Stopping The Motors
8. Make sure that the accessories are correctly and securely mounted on the aircraft before using it. 9. Use only genuine DJI parts or parts certified by DJI. Unauthorized parts or parts from non-DJI certified manufacturers may cause system malfunctions and compromise safety.
-
Page 49: Test Flight
1. The pre-flight checklist is designed to help you fly safely and to ensure that you can shoot video during flight. Go through the full pre-flight checklist before each flight. 2. Select the desired gimbal operation mode in DJI Pilot. 3. Only shoot video when flying in P-mode or T-mode.
-
Page 50
Appendix © 2018 DJI All Rights Reserved. -
Page 51: Appendix
Internal Storage 24 GB Gimbal Mechanical Range Tilt: -135 to 45°, Pan: -100 to 100°, Roll: -45 to 45° Controllable Range Tilt: -90 to 30°, Pan: -75 to 75° Stabilization 3-axis (tilt, roll, pan) © 2018 DJI All Rights Reserved.
-
Page 52
Mavic 2 Enterprise User Manual Max Control Speed (tilt) 120°/s Angular Vibration Range ±0.005° Sensing System Sensing System Omnidirectional Obstacle Sensing Forward: Horizontal: 40°, Vertical: 70° Backward:Horizontal: 60°, Vertical: 77° Downward: Front and Back: 100°, Left and Right: 83° Lateral: Horizontal: 80°, Vertical: 65°… -
Page 53
Mavic 2 Enterprise User Manual Photo Format JPEG / DNG (RAW) Video Format MP4 / MOV (MPEG-4 AVC/H.264, HEVC/H.265) Supported SD Cards Micro SD Supporting Micro SD with capacity up to 128 GB and R/W speed up to UHS-I Speed Grade 3 Operating Temperature -10°C to 40°C… -
Page 54: Calibrating The Compass
1. Flying at a location farther than 31 miles (50 km) away from the location the drone was last flown. 2. The aircraft has not been flown for more than 30 days. 3. A compass interference warning appears in DJI Pilot and/or the Aircraft Status Indicators blink alternating red and yellow.
-
Page 55: Firmware Updates
Use DJI Pilot or DJI Assistant 2 for Mavic to update the aircraft firmware. Using DJI Pil When you connect the aircraft or remote controller to DJI Pilot, you will be notified if a new firmware update is available. To start updating, connect your mobile device to the internet and follow the on- screen instructions.
-
Page 56: Remote Controller Lcd Screen Menu Information
USB cable. 2. Power on the aircraft. 3. Launch DJI Assistant 2 for Mavic and log in with your DJI account. 4. Select “Mavic 2” and click on Firmware Updates on the left panel. 5. Select the firmware version that you wish to update to.
-
Page 57: After-Sales Information
NO RC SIGNL Remote controller signal lost. RC TEMP HI Remote controller too hot. NO RTH Aircraft cannot Return to Home. After-Sales Information Visit https://www.dji.com/support to learn more about after-sales service policies, repair services and support. © 2018 DJI All Rights Reserved.
-
Page 58
This content is subject to change. Download the latest version from http://www.dji.com/mavic-2-enterprise If you have any questions about this document, please contact DJI by sending a message to DocSupport@dji.com. MAVIC is a trademark of DJI. Copyright © 2018 DJI All Rights Reserved.