|
Учебное пособие «Программирование манипулятора в среде Google Blockly» Совместимость: Dobot Magician;Dobot Magician Lite; Данное пособие поможет в организации работы на уроках робототехники. В книге предлагаются практические работы, рекомендуемые для проведения учащимися основной и средней школы физико-математического профиля. Эксперименты рассчитаны на использование учебного оборудования Dobot Magician. С помощью универсального комплекта сменных рабочих инструментов Dobot Magician способен реализовывать такие функции, как 3D-печать, лазерная гравировка, манипуляция с объектами и рисование. |
Скачать |
|
Руководство пользователя по Dobot Magician Совместимость: Dobot Magician; |
Скачать |
|
DobotStudio Совместимость: Dobot Magician;Dobot Magician Lite; Программное обеспечение для управления роботом Dobot, включая файлы драйверов. Включает такие функции, как обучение и воспроизведение, запись и рисование, блокирование, сценарии и т. д. |
Windows Mac OS |
|
DobotBlock Совместимость: Dobot Magician;Dobot Magician Lite; Программное обеспечение позволяет пользователям программировать роботов и другие аппаратные устройства Dobot простым перетаскиванием. Тем не менее, пользователи могут контролировать каждое движение робота, получая удовольствие от изучения ИИ и других технологий. |
Windows Mac OS |
|
Демонстрационные программы Совместимость: Dobot Magician;Dobot Magician Lite; |
Скачать |
|
Набор библиотек для программирования Совместимость: Dobot Magician;Dobot Magician Lite; |
Скачать |
|
Мобильное приложение Dobot Magician Совместимость: Dobot Magician;Dobot Magician Lite; Вы можете программировать, создавать игры и анимацию для роботов и других аппаратных устройств Dobot, перетаскивая и перемещая их, чтобы управлять роботом, изучать ИИ и получать удовольствие от мульти-технологий. |
Google Play App Store |
|
Руководство пользователя Совместимость: Dobot MOOZ 2 Plus; |
Скачать |
|
Ultimaker Cura (мультиязычный) Совместимость: Dobot MOOZ 2 Plus;Dobot MOOZ 3Z; Программное обеспечение для нарезки 3D-печати. Каждая модель, которую вы разрабатываете для печати, должна быть преобразована программным обеспечением для нарезки в инструкции, понятные вашему 3D-принтеру. |
Windows Mac OS |
|
Прошивка для платы управления (версия с Wi-Fi) Совместимость: Dobot MOOZ 2 Plus; |
Скачать |
|
Прошивка для платы управления (версия без Wi-Fi) Совместимость: Dobot MOOZ 2 Plus; |
Скачать |
|
Прошивка для пульта управления (версия с Wi-Fi) Совместимость: Dobot MOOZ 2 Plus; |
Скачать |
|
Прошивка для пульта управления (версия без Wi-Fi) Совместимость: Dobot MOOZ 2 Plus; |
Скачать |
|
Драйвер CH341SER Совместимость: Dobot MOOZ 2 Plus;Dobot MOOZ 3Z; |
Windows Mac OS |
|
Dobot MOOZStudio Совместимость: Dobot MOOZ 3Z; Специально разработанное программное обеспечение для лазерной гравировки и резьбы на станках с ЧПУ. |
Windows Mac OS |
|
Прошивка для платы управления Совместимость: Dobot MOOZ 3Z; |
Скачать |
|
Прошивка для пульта управления Совместимость: Dobot MOOZ 3Z; |
Скачать |
|
Краткое руководство Совместимость: Конвейерная лента; |
Скачать |
|
Краткое руководство Совместимость: Комплект линейных перемещений; |
Скачать |
|
Краткое руководство Совместимость: Ресурсный набор Arduiono AI; |
Скачать |
|
Arduino IDE (мультиязычный) Совместимость: Ресурсный набор Arduiono AI; Интегрированная среда разработки для Windows, MacOS и Linux, разработанная на С и C ++, предназначенная для создания и загрузки программ на Arduino-совместимые платы, а также на платы других производителей. |
Windows Mac OS |
|
PixyMon Совместимость: Ресурсный набор Arduiono AI; Приложение, которое позволяет настраивать устройство Pixy, устанавливать выходной порт и управлять цветовыми подписями. |
Windows Mac OS |
|
Демонстрационные программы Совместимость: Ресурсный набор Arduiono AI; |
Скачать |
|
Краткое руководство Совместимость: Комплект технического зрения; |
Скачать |
|
Руководство по сборке Совместимость: Комплект технического зрения; |
Скачать |
|
Dobot Vision Studio Совместимость: Комплект технического зрения; Программное обеспечение платформы технического зрения совместимое с модулями движения робота DOBOT Magician. С помощью этого программного обеспечения пользователи могут использовать модули корреляции зрения и управлять роботом DOBOT Magician. |
Windows |
- Manuals
- Brands
- Dobot Manuals
- Robotics
- Magician
- User manual
-
Contents
-
Table of Contents
-
Bookmarks
Quick Links
Dobot Magician User Manual
Dobot Magician
User Manual
AN01010101
V1.2.0
Date: 2017/2/28
Shenzhen Yuejiang Technology Co.,Ltd
Related Manuals for Dobot Magician
Summary of Contents for Dobot Magician
-
Page 1
Dobot Magician User Manual Dobot Magician User Manual AN01010101 V1.2.0 Date: 2017/2/28 Shenzhen Yuejiang Technology Co.,Ltd… -
Page 2
Shenzhen Yuejiang Technology Co.,LTD Dobot Magician User Manual Revised History Version Date Reason V1.00 2016/09/27 Create a document V1.01 2016/11/10 Add iOS APP and Bluetooth module tutorial V1.1.0 2016/12/12 Add system adaptation description in the home page V1.1.0 2016/12/12 Add shade laser engraving tutorial V1.2.0… -
Page 3: Table Of Contents
Shenzhen Yuejiang Technology Co.,LTD Dobot Magician User Manual Contents Dobot Magician User Manual Instruction and Precautions ……….. 8 1. Dobot Magician Driver Installation Instruction ………… 10 1.1 Download CH340 driver package and install it …………..10 1.2 Check if the equipment can work properly in the device management……12 2.
-
Page 4
8.3.4 Start printing ……………………94 8.3.5 Text note ……………………. 96 9. Bluetooth Kit ………………….103 10.WIFI Kit …………………… 104 10.1 Set Dobot Wi-Fi module ………………..104 11. Stick controller kit ………………..107 Leap Motion Kit ………………. 109 Mouse control ………………..113 14 Blockly …………………… -
Page 5: Dobot Magician User Manual Instruction And Precautions
It will work properly if the light at the bottom right on Dobot controller from yellow to green. Note that if the light is changed into red, it shows Dobot is at a limited position, so please make sure the forearm and rear arm are kept in normal range of movements.
-
Page 6
Shenzhen Yuejiang Technology Co.,LTD Dobot Magician User Manual 4. More Material Follow us and get first-hand material about Dobot Magician: The Tutorial: http://dobot.cc/tutorial/ Download Center: http://dobot.cc/download-center/ 5. The adaptation system of DobotStudio: win7 SP1 x32/x64、win8/win10、mac osx10.10 and mac osx10.11、mac osx10.12. -
Page 7: Dobot Magician Driver Installation Instruction
Dobot Magician User Manual 1. Dobot Magician Driver Installation Instruction Normally, at the first time, connect Dobot with PC through USB, plug in and power on, and then the system will recognize corressponding hardware automatically, search the driver and install it.
-
Page 8
Shenzhen Yuejiang Technology Co.,LTD Dobot Magician User Manual Figure 1.2 Install driver Click Install: Figure 1.3 Click Install Shenzhen Yuejiang Technology Co., Ltd… -
Page 9: Check If The Equipment Can Work Properly In The Device Management
Shenzhen Yuejiang Technology Co.,LTD Dobot Magician User Manual Figure 1.4 the driver installed successfully 1.2 Check if the equipment can work properly in the device management 1.2.1 Open the device management, if you can find the corresponding COM port of “USB- SERIAL CH340”,then it shows the driver is installed successfully.
-
Page 10: Dobotstudio Operating Instruction
Shenzhen Yuejiang Technology Co.,LTD Dobot Magician User Manual 2. DobotStudio Operating Instruction The software used by Dobot Magician is DobotStudio, and you can download the latest version from our official website: http://www.dobot.cc/download-center/dobot-magician.html After download successfully, unzip and double click DobotStudio.exe, then open the software, the result as follows: Figure 2.1 DobotStudio file…
-
Page 11
Shenzhen Yuejiang Technology Co.,LTD Dobot Magician User Manual Note: An error or other related errors maybe come out when opening DobotStudio, some of them shown as follows: corresponding .exe file in the folder attachment, then open Dobotstudio again Please execute the and that is OK. -
Page 12
Possible solution: Install required netframework4.6.1 required by vc2015. Figure 2.3 The starter edition may cause such errors 1. Select Dobot corresponding serial port, the top left corner of DobotStudio, and click Connect, after successful connection, Disconnect will be shown, at the same time, the coordinate parameters will be updated on the right side of the interface. -
Page 13
Figure 2.4 Connected successfully There are eight modules on the main software interface: (1)Teaching & Playback: A system to teach a robot a required trajectory. It enables Dobot to accomplish recorded movement repeatedly replacing human. (2)Write & Draw: Control Dobot to write, draw or laser engrave. -
Page 14
(counter-clockwise is the positive direction). Figure 2.6 Coordinate system (1) Click X+,X- and Dobot will move along X in the negative or positive direction; (2) Click Y+,Y- and Dobot will move along Y in the negative or positive direction; (3)… -
Page 15
Shenzhen Yuejiang Technology Co.,LTD Dobot Magician User Manual (4) Click R+,R- and Dobot will move along R in the negative or positive direction. Notice: R-axis will move together with Y-axis during the movements, and make sure the terminal posture relative to the origin of coordinates keeps constant. -
Page 16
Shenzhen Yuejiang Technology Co.,LTD Dobot Magician User Manual Through ticking the corresponding buttons, open gripper/suction cup/laser, and just click again, you can close gripper/suction cup/laser. The terminal can be selected from Setting-> End Effector Settings: Figure 2.8 Select End Effector You can also custom EndEffector Configure according to relative to coordinate offset of terminal center. -
Page 17
Area 2: Home:Dobot auto reset. Click this button, Dobot can rotate left to the end and return to preset Home automatically. In this process, the point of Home can be self-defined, which will be explained in area 5. -
Page 18
The height and Z limit of Jump mode: 图 2.12 Jump mode settings Handhold teaching: Tick the function, press and hold down Unlock on the forearm, and drag Dobot to any other position, then you can save a point after loosening. Of course, you can save points… -
Page 19
Shenzhen Yuejiang Technology Co.,LTD Dobot Magician User Manual continuously. After all the points are recorded, Dobot can not only playback the programmed trajectory repeatedly. 图 2.13 Playback settings Area 4:Select save mode. Click +Point, you can save the current point information in area 5. -
Page 20
Shenzhen Yuejiang Technology Co.,LTD Dobot Magician User Manual MOVJ:Joint movements. From point A to point B, each joint will run from initial angle to its target angle, regardless of the trajectory. The motion time for all joints are the same which means all joints will start and finish at the same time. -
Page 21
Shenzhen Yuejiang Technology Co.,LTD Dobot Magician User Manual 5. Insert:Insert a line of saved points. 6. MoveUp/MoveDown: Move up/Move down the line of saved point. 7. Delete:Delete selected saved points。 8. DeleteAll: Delete all the saved points. 9. RunSeleted: Execute selected points. -
Page 22: Teaching & Playback
Because we need to use air pump kit or gripper kit, we can introduce these two kits. 3.1 Air pump kit The terminal default installation of Dobot Magician is suction cup. And the pump box and suction cup kit, shown as follows: Figure 3.1 Air pump kit…
-
Page 23: Pneumatic Gripper Kit
Shenzhen Yuejiang Technology Co.,LTD Dobot Magician User Manual Figure 3.2 The installation effect of air pump kit 3.2 Pneumatic Gripper Kit Pneumatic accessories shown in following picture: Figure 3.3 Pneumatic Gripper Kit 2. Gripper kit needs to share together with air pump kit of suction cup. You can remove suction cup from Joint4: Unscrew the fixed on the suction cup with hex wrench, shown in Figure 2.4:…
-
Page 24
Shenzhen Yuejiang Technology Co.,LTD Dobot Magician User Manual JackScrew Figure 3.4 Remove suction cup 3. Install the gripper kit on Joint4 with coupler, that is done! Shown in Figure 2.5: Figure 3.5 Gripper Installation 4. The connection method of gripper is the same with air pump kit, here you can refer to air pump kit method above. -
Page 25: Demo Of Teach & Playback
SuctionCup and open the pump, and then the small object will be sucked up; 3. Click +Point and save a point; 4. Click Z+ to rise Dobot, move Dobot to another position, place the small object on the table, just uncheck SuctionCup and close the pump;…
-
Page 26: Advanced Function Of Teaching&Playback
Shenzhen Yuejiang Technology Co.,LTD Dobot Magician User Manual 4. Advanced function of teaching&playback You can switch Easy into Pro when pressing the button of Easy/Pro, shown as follows: Figure 4.1 Advanced function of teaching&playback 4.1 StepRun 1. StepRun: You can execute the first saved point when you press the button at the first time, and you will turn next point when press the button again.
-
Page 27: Offline Mode
Figure 4.4 Offline mode button Notice: Before save points and offline move, Dobot need to reset pressing Home key, and then it can keep consistent of coordinates when teach&playback and playback the trajectory clearly.
-
Page 28: Eio Addressing
Shenzhen Yuejiang Technology Co.,LTD Dobot Magician User Manual Figure 4.5 EIO Interface 4.3.1 EIO addressing In order to use more conveniently, we address them all together. EIO exists in base, forearm separately in DobotV2.0. 1)EIO addressing in forearm shown as follows: Figure 4.6 EIO addressing in forearm…
-
Page 29: Eio Multiplex Function
Shenzhen Yuejiang Technology Co.,LTD Dobot Magician User Manual Figure 4.7 EIO addressing in base 18PIN 3)EIO addressing in base 10PIN interface board, shown as follows: Figure 4.8 EIO addressing in base 10PIN 4.3.2 EIO multiplex function Now let’s describe EIO multiplex function. (Depends on hardware) 1)EIO multiplex instruction of forearm interface board, shown as follows:…
-
Page 30: Eio Multiplex Demo
Shenzhen Yuejiang Technology Co.,LTD Dobot Magician User Manual √ √ √ 3.3V √ √ √ 3.3V √ √ √ 3.3V √ √ √ 3.3V 2)EIO multiplex instruction of 18PIN interface board on the base, shown as follows: Figure 4.2 EIO multiplex instruction of 18PIN interface board on the base…
-
Page 31
Also, take EIO01 on the forearm connector for an example, if you get an external photoelectric sensor, it will trigger Dobot move and can be configured into low/high level input trigger mode when access to an inductive object. Select trigger point->EIO1_Input (Trigger area on the bottom right)->… -
Page 32
Shenzhen Yuejiang Technology Co.,LTD Dobot Magician User Manual Figure 4.11 EIO1 ADC input demo 4) PWM Output PWM: Take EIO4 for a demo Level Range Level Level Input Addressing Output √ √ √ 3.3V Tick IO_4 pin in the Output area, click +Point to save new points, double click EIO4 table cell, select “…”… -
Page 33
Shenzhen Yuejiang Technology Co.,LTD Dobot Magician User Manual Figure 4.12 EIO4 PWM output demo Above is four multiplx demo. Shenzhen Yuejiang Technology Co., Ltd… -
Page 34: Writing & Drawing Manual
Shenzhen Yuejiang Technology Co.,LTD Dobot Magician User Manual 5. Writing & Drawing Manual The whole flow chart as follows: Import Adjust the Connect pictures and position and Installation DobotStudio set params start to write 5.1 Installation of writing accessories Pen and pen holder included in the draw kit, the installation steps as follows: 1.
-
Page 35: Connect Dobotstudio
Shenzhen Yuejiang Technology Co.,LTD Dobot Magician User Manual Figure 5.2 Pen installation 5.2 Connect DobotStudio 1. The software used by writing & drawing is DobotStudio, and the hardware itself is applicable for DobotStudio, so here you can connect directly. Open the software, click writing & drawing module, here comes the interface of writing &…
-
Page 36: Import Pictures And Set Parameters
5.3 Import pictures and set parameters 1. The imported picture should be put into the sector area of main interface, as Dobot will be at a limited position if beyond the standard range as a result of writing unnormally. Actually, there will be a warning of a red highlighting if beyond range.
-
Page 37
Shenzhen Yuejiang Technology Co.,LTD Dobot Magician User Manual Figure 5.5 Open the file 2) Insert the included pictures of DobotStudio; Figure 5.6 Insert the included file 3) Input text manually; Shenzhen Yuejiang Technology Co., Ltd… -
Page 38
Figure 5.7 Input text manually 4) Also you can import pictures , convert these formats(BMP/JPEG/JPG/PNG and so on) into SVG recognized by Dobot, once took and once draw; Figure 5.8 Import pictures After opening the picture, set proper, click Convert Bitmap, then SVG path file will come out automatically, then click Plot to Main Scene, the ready trajectory can be loaded in writing main Shenzhen Yuejiang Technology Co., Ltd… -
Page 39: Adjust The Position And Start Writing
Shenzhen Yuejiang Technology Co.,LTD Dobot Magician User Manual interface, show as follows: Figure 5.9 Import pictures into SVG files 2. Set writing parameters: set velocity and acceleration(0~300mm/s) and PenUpOffset; Figure 5.10 Set velocity and acceleration 4.4 Adjust the position and start writing Set endeffector as Pen, here you can choose from Settings->EndEffector, shown as follows:…
-
Page 40
Shenzhen Yuejiang Technology Co.,LTD Dobot Magician User Manual Figure 5.11 Set EndEffector Adjust the nib position: press and hold down Unlock key on the forearm and drag the forearm to make the nib contact to paper, also, you can control Z axis moving down to paper gradually, shown as follows: Figure 5.12 Adjust the nib position… -
Page 41
If the writing is not very well, the nib height need to be adjusted slightly, also you can revise the value of Pendown. Click SyncPos, Dobot will move into the top position of writing starting point automatically. Click Start, Pause and Stop to control Dobot. -
Page 42
Shenzhen Yuejiang Technology Co.,LTD Dobot Magician User Manual The result as follows: Figure 4.15 The effect of writing Shenzhen Yuejiang Technology Co., Ltd… -
Page 43: Laser Engraving
Shenzhen Yuejiang Technology Co.,LTD Dobot Magician User Manual 6. Laser Engraving The whole process of laser engraving as follows Adjust focus Import Pattern Connect and Set laser installation DobotStudio Parameters start to engrave Notice: Laser engraving and shade laser engraving are different functions. The firmware and upper computer used by laser engraving are the same with writing&drawing,…
-
Page 44
Shenzhen Yuejiang Technology Co.,LTD Dobot Magician User Manual Figure 6.2 Laser engraving interface 2. If the current firmware is not for laser engraving, for example, if it is for firmware 3D printing, then will pop up select dialog when connecting, we can choose DobotStudio in the drop-down box: Shenzhen Yuejiang Technology Co., Ltd… -
Page 45: Import Pictures And Set Parameters
After burning, DobotStudio will be opened automatically, also, after about ten seconds, then you can hear a short sound from built-in buzzer, which shows a successful burning. At the same time, the light on the bottom right will turn into green. Thus, we can connect Dobot according to above operation.
-
Page 46
Shenzhen Yuejiang Technology Co.,LTD Dobot Magician User Manual 1) Click Open, and import the ready PLT or SVG file: Figure 6.4 Open PLT File 2) Insert the included pictures of DobotStudio; Figure 6.5 Insert included pictures 3) Input text manually;… -
Page 47
Figure 6.6 Input text manually 4) Also you can import pictures , convert these formats(BMP/JPEG/JPG/PNG and so on)into SVG recognized by Dobot, once took and once draw; Figure 6.7 Import pictures After opening the picture, set proper switching threshold, click Convert Bitmap, then SVG path… -
Page 48: Adjust The Focus And Start Writing
Shenzhen Yuejiang Technology Co.,LTD Dobot Magician User Manual Figure 6.8 Import pictures and SVG path file will come out automatically 2. Set laser engraving parameters: set velocity and acceleration( suggested value is 3 ) and PenUpOffset, here just keep the default 20;…
-
Page 49
Shenzhen Yuejiang Technology Co.,LTD Dobot Magician User Manual Figure 6.10 Set EndEffector 2. Tick ON to open the software; Figure 6.11 Open the laser 3. Focus Adjustment. Hold down Unlock Key to adjust the distance between laser and the surface of the material, and then adjust knob to proper focus, if it shown as the brightest dot of Facularpoint, this will be the most proper height. -
Page 50
Shenzhen Yuejiang Technology Co.,LTD Dobot Magician User Manual If it still cannot focus, then maybe the focus of laser is too long. We can rotate metal knob of laser to adjust(as the picture on the right button), refocus again after adjusting. -
Page 51
If the writing is not very well, the nib height need to be adjusted slightly, also you can revise the value of Pendown. Click SyncPos, Dobot will move into the top position of writing starting point automatically. Click Start, Pause and Stop to control Dobot. -
Page 52: The Tutorial Of Shade Laser Engraving
Shenzhen Yuejiang Technology Co.,LTD Dobot Magician User Manual 7. The Tutorial of Shade Laser Engraving The whole flow chart of shade laser engraving as below: Installation Import Pattern Start Connect Grbl of Laser and Set Engraving Controller Accessories Parameters Notice: Shade laser engraving is also a kind of laser engraving.
-
Page 53
Shenzhen Yuejiang Technology Co.,LTD Dobot Magician User Manual Figure 7.2 Enter into shade laser engraving interface 2. If the current firmware is not for DobotStudio, for example, for 3D printing, here will pop up the Checkbox, and then we can select DobotStudio in the drop-down box: Figure 7.3 Select DobotStudio… -
Page 54: Import Pattern And Set Parameters
7.3 Import Pattern and Set Parameters 1. The imported picture should be put into the sector area of main interface, as Dobot will be at a limited position if beyond the standard range as a result of writing unnormally. Actually, there will be a warning of a red highlighting if beyond range.
-
Page 55
Shenzhen Yuejiang Technology Co.,LTD Dobot Magician User Manual Open the picture, adjust the gray scale(0-255), laser power(0-100%) and the border for the customized engrave effect. Figure 7.5 Import the pictures into SVG file 2. Set shade laser engraving velocity and acceleration, here we suggest 5, shown as folllows: Figure 7.6 Set the parameter… -
Page 56: Adjust Focus And Start To Engrave
Shenzhen Yuejiang Technology Co.,LTD Dobot Magician User Manual 7.4 Adjust Focus and Start to Engrave 1. Set the endeffector as Laser. Settings-> EndEffector->Laser, shown in follows: Figure 7.7 Set EndEffector 2. Focus adjustment. Adjust the distance between the laser and engraving material, check ON to open the laser.
-
Page 57
Shenzhen Yuejiang Technology Co.,LTD Dobot Magician User Manual be signs of burn on the material when get sufficient laser power. If still cannot focus, just rotate the metal knob at the bottom of laser to adjust. Figure 7.9 Focus adjustment Notice:… -
Page 58
Figure 7.11 Check the height If the effect is not very well, finetune the laser height, also can modify the pendown value. 4. After focus adjustment, click SyncPos, Dobot will move to the start position. 5. Click Start, pause and stop to control Dobot. -
Page 59
Shenzhen Yuejiang Technology Co.,LTD Dobot Magician User Manual Figure 7.12 The Engraving Effect Shenzhen Yuejiang Technology Co., Ltd… -
Page 60: The Tutorial Of 3D Printing
CuraEngine, Slic3r and so on. More parameter settings, more flexible. Here will introduce the details separately from the second step. Note: In Mac system, Dobot can only be avaliable for Cura, refer to the tutorial of Cura.
-
Page 61
Shenzhen Yuejiang Technology Co.,LTD Dobot Magician User Manual Figure 7.2 Insert filament 2. Insert the filament to PTFE Tube and push it down the bottom of the hotend, then tighten the Push-in fitting on the extruder. Notice: Make sure the PTFE Tube itself is push down to the hotend bottom, otherwise, it will cause abnormal discharge. -
Page 62
Shenzhen Yuejiang Technology Co.,LTD Dobot Magician User Manual 4. Connect power line of heating cable with interface 4 of forearm, link power line of fan with interface 5, connect thermistor line with interface 6; Figure 7.4 Connection of forearm 5. Connect extruder motor line with Stepper1 on the controller. -
Page 63: Repetier Host
Shenzhen Yuejiang Technology Co.,LTD Dobot Magician User Manual Figure 7.6 3D printing installation 8.2 Repetier Host 8.2.1 Switch into 3D printing Repetier host has been built in DobotStudio. Open DobotStudio, click Tools-> Open 3D Printing: Here will pop up a dialog of 3D printing burning firmware, click Confirm, and then will pop up software interface Repetier Host automatically, as follows::…
-
Page 64
Shenzhen Yuejiang Technology Co.,LTD Dobot Magician User Manual The interface of Repetier Host: Figure 7.7 Repetier host Note: If the current software has been 3D printing, you can open DobotStudio directly when you want to use next time. Click Connect, select Ok, and then you can switch to Repetier Host, as follows: Shenzhen Yuejiang Technology Co., Ltd… -
Page 65: Parameter Settings Of 3D Printing For The First Time
Click ‘Printer settings’ in the top right corner of the interface, and set related parameters in the pop up diaglogue box: (1)Connection lable settings Printer Name: Dobot ( can be named by oneself) Select Dobot Serial Port: Dobot serial port Baud Rate: 115200 Reset on connect:DTR low->high->low…
-
Page 66
Shenzhen Yuejiang Technology Co.,LTD Dobot Magician User Manual Figure 7.9 Connection Settings (2)Connection Lable Settings Shenzhen Yuejiang Technology Co., Ltd… -
Page 67
Shenzhen Yuejiang Technology Co.,LTD Dobot Magician User Manual uncheck the following three settings and keep the rest default: Figure 7.10 Printer settings Shenzhen Yuejiang Technology Co., Ltd… -
Page 68
Shenzhen Yuejiang Technology Co.,LTD Dobot Magician User Manual (3)Extruder Settings The number of extruder setting: 1 The nozzle diameter: 0.4mm Keep the rest default. Figure 7.11 Extruder Settings (4)Printer Shape Settings Select circle printer and the detailed parameters as follows: Home X:… -
Page 69
After setting parameters, return to main interface, open Dobot main power supply, insert USB, and click Connect at the top left corner of main interface, then we can connect Dobot. The led will turn out green and the tempreture will be shown below the interface:… -
Page 70: Preparation Before Printing
Shenzhen Yuejiang Technology Co.,LTD Dobot Magician User Manual Figure 7.13 Connect Dobot 8.2.3 Preparation before Printing It will work when the temperature of extruder reaches above 170℃ and consumables are at melt state, so we should heat up extrusion head. Here set heating temperature to 200℃ and then click the heating button on control panel to heat it.
-
Page 71
Shenzhen Yuejiang Technology Co.,LTD Dobot Magician User Manual Figure 7.14 Heat the Extrusion Head When the heating temperature is up to 200℃, click feedstock of extruder up to 10-30mm, as shown below: Figure 7.16 Extrude filaments Shenzhen Yuejiang Technology Co., Ltd… -
Page 72: Adjust The Printing Space And Get Printing Coordinates
Shenzhen Yuejiang Technology Co.,LTD Dobot Magician User Manual If melted materials flowed from nozzle of the extruder, then it means the extruder works properly: Figure 7.17 Filament Extrusion Note: If the filament extrusion is in the opposite direction, for example, you can click feedstock, but it is discharging.
-
Page 73
Adjustment process: Press Unlock key on the forearm, drag printing head to contact the surface of mask tape, and then press “key” at the base of dobot to save current Z value (or insert M415 in the command line, enter and get the current Z value), now the adjustment is finished. -
Page 74: Import Model
Shenzhen Yuejiang Technology Co.,LTD Dobot Magician User Manual Figure 7.19 Sending out M415 command If you cannot find the command line window, pls close Easy mode, shown as follows: 8.2.5 Import Model The file format of 3D printing is STL employed universally.
-
Page 75: Set Slice Parameters And Slice Up
Shenzhen Yuejiang Technology Co.,LTD Dobot Magician User Manual Figure 7.20 Import Models Model Center/Scale: Users can operate the model to place in the middle, zoom or rotate and any other functions. Figure 7.21 Model Center/Scale 8.2.6 Set slice parameters and slice up Select slice engine Slic3r and click Configuration to set slice parameters.
-
Page 76
Shenzhen Yuejiang Technology Co.,LTD Dobot Magician User Manual Figure 7.22 Main interface of parameter settings Shenzhen Yuejiang Technology Co., Ltd… -
Page 77
DobotStudio: 图 7.23 Config files Dobot-2.0-Vase.ini is used for printing of thin-valled vase, while Dobot-2.0.ini is used for the filling of entity, the filling rate is 15%. Import the file after downloading: Click File->Load configto load.ini file. -
Page 78
Shenzhen Yuejiang Technology Co.,LTD Dobot Magician User Manual Figure 7.24 Import configuration file Shenzhen Yuejiang Technology Co., Ltd… -
Page 79
Shenzhen Yuejiang Technology Co.,LTD Dobot Magician User Manual After importing the file, users need to save the three lables: Print settings, Filament settings and Printer settings respectively, also, users can rename them, here we keep the default: Figure 7.25 Save configuration file Slice: After finishing above settings, save the settings of each label, and return to main interface. -
Page 80: Start To Print
Shenzhen Yuejiang Technology Co.,LTD Dobot Magician User Manual Figure 7.25 Finish slice 8.2.7 Start to Print Now, click Start print at the top left corner of main interface to print: Shenzhen Yuejiang Technology Co., Ltd…
-
Page 81
Shenzhen Yuejiang Technology Co.,LTD Dobot Magician User Manual Here we choose vase mode, and the effect after printing as follows: Shenzhen Yuejiang Technology Co., Ltd… -
Page 82: Cura Introduction For 3D Printing
Shenzhen Yuejiang Technology Co.,LTD Dobot Magician User Manual Figure 7.26 The Effect of Printing 8.3 Cura Introduction for 3D printing If you want to use Cura for 3D printing, the details seen as follows: Notice: Installation of accessories and firmware burning shown as Repetier Host 3D printing.
-
Page 83
Shenzhen Yuejiang Technology Co.,LTD Dobot Magician User Manual Figure 7.30 Cura interface Machine->machine settings, set related parameters in the pop-up dialog: (1)Connection label settings maximum width:80mm maximum depth:80mm maximum height:150mm; Machine center 0,0:Need tick Build Platform shape: Circular COM port setting: The corressponding COM port in the device management Baud rate:115200… -
Page 84
Shenzhen Yuejiang Technology Co.,LTD Dobot Magician User Manual Figure 7.31 Machine settings (2)Import configuration file It is vital to set slice parameters, in which users should get the best slice parameters according to printed models and tested performance of equipment. Here we suggest a configuration file that can be impoted from attachement of DobotStudio: Shenzhen Yuejiang Technology Co., Ltd… -
Page 85
Shenzhen Yuejiang Technology Co.,LTD Dobot Magician User Manual Figure 7.32 Configure files Dobot-2.0-Vase.ini is used for printing of thin-valled vase, while Dobot-2.0.ini is used for the filling of entity, the filling rate is 15%. Import the file after downloading: Click File->Load Profile. -
Page 86
Figure 7.33 Import configuration settings More detailed printing parameters, go to Cura website, not be repeated here.。 (3)Open the model and connect Dobot Click Load, import a 3D model, Cura will slice up automatically, also, you can select different modes in the drop-down list of right hand to check its trajectory is correct or not::… -
Page 87
Shenzhen Yuejiang Technology Co.,LTD Dobot Magician User Manual Figure 7.34 Import a model Click the model itself, and users can operate the model to place in the middle, zoom or rotate and any other functions. Shenzhen Yuejiang Technology Co., Ltd… -
Page 88
After importing model, Print with USB on the main interface will be activated, click it to connect Dobot automatically, and there will show the current printing temperature on the top corner of the window, at the same time, the Printing key will be activated, shown as follows: Figure 7.35 Connect Dobot… -
Page 89: Preparation Before Printing
Shenzhen Yuejiang Technology Co.,LTD Dobot Magician User Manual 8.3.2 Preparation before Printing Please have a test to the function of extruder before printing, such as whether in and out of the material is smooth, or the direction in and out of material is reverse. .Here set heating temperature to 200℃…
-
Page 90
Shenzhen Yuejiang Technology Co.,LTD Dobot Magician User Manual If melted materials flowed from nozzle of the extruder, then it means the extruder works properly: Figure 7.37 Filament Extrusion Note: If the filament extrusion is in the opposite direction, for example, you can click feedstock, but it is discharging. -
Page 91: Adjust The Printing Sapce And Get Printing Coordinates
Shenzhen Yuejiang Technology Co.,LTD Dobot Magician User Manual Figure 7.37 Reverse installation diagram of the extruder 8.3.3 Adjust the printing space and get printing coordinates Note: These detailed steps, please refer to above chapter Repetier Host. Figure 7.38 Distance adjustment 8.3.4 Start printing…
-
Page 92
Shenzhen Yuejiang Technology Co.,LTD Dobot Magician User Manual Figure 7.39 Start printing Note: During the printing, if the distance between the nozzle and print is too large to paste the print bed of the first layer; If the distance is too small, which will cause consumables block. So we need to adjust the proper distance for smooth printing. -
Page 93: Text Note
Shenzhen Yuejiang Technology Co.,LTD Dobot Magician User Manual Figure 7.40 Amend the height of first layer Here we choose vase mode, and the effect after printing as follows: Figure 7.41 The Effect of Printing 8.3.5 Text note Parameters Introduction of 3D printing…
-
Page 94
Shenzhen Yuejiang Technology Co.,LTD Dobot Magician User Manual Set the height of print layer: 0.2mm; The height of first layer: 0.35mm; Shenzhen Yuejiang Technology Co., Ltd… -
Page 95
Shenzhen Yuejiang Technology Co.,LTD Dobot Magician User Manual Spiral vase: Check this one and click Yes, then we can print unfilled vase. The fill rate settings: Shenzhen Yuejiang Technology Co., Ltd… -
Page 96
Shenzhen Yuejiang Technology Co.,LTD Dobot Magician User Manual If users need print support, please tick Support material: The speed settings: Shenzhen Yuejiang Technology Co., Ltd… -
Page 97
Shenzhen Yuejiang Technology Co.,LTD Dobot Magician User Manual (2) Filament settings Consumable diameter: 1.75mm The temperature : 200℃ Open the fan: Shenzhen Yuejiang Technology Co., Ltd… -
Page 98
Shenzhen Yuejiang Technology Co.,LTD Dobot Magician User Manual (3) Printer settings The number of Extruder: 1 The nozzle Z offset of extruder: 0mm Notice: If the height of nozzle is so large that consumables cannot paste print bed or so small that it cannot discharge when printing the first layer, users can amend the height from this interface, such as -0.01mm or +0.01mm, thus, one need not adjust the height… -
Page 99
Shenzhen Yuejiang Technology Co.,LTD Dobot Magician User Manual The nozzle diameter settings: 0.4mm; The pump back speed settings: length=6 mm,speed=60 mm/s. Shenzhen Yuejiang Technology Co., Ltd… -
Page 100: Bluetooth Kit
9.1 Bluetooth module is included in this kit, and the installation shown as follows: Figure 8.1 Bluetooth module installation 9.2 After installation, power on Dobot Magician and you should be able to hear three short beep sounds, then you can find device BLE-100 and connect Dobot Magician through mobile APP.
-
Page 101: Wifi Kit
Shenzhen Yuejiang Technology Co.,LTD Dobot Magician User Manual 10.WIFI Kit WIFI kit contains WiFi module, connect it into Dobot extensible port, and use USB cable to connect Dobot and PC, shown as follows: Figure 9.1 WiFi module 10.1 Set Dobot Wi-Fi module If first use, you need connect USB to configure WiFi module, creating virtual serial port.
-
Page 102
Generally, use the function of DHCP, click OK, and then will finish the settings. Wait for several seconds, the green indicator of Dobot WiFi wireless module will be kept on, which means Dobot has been connected with WLAN. Figure 9.3 Connected with WLAN… -
Page 103
Dobot Magician User Manual Figure 9.4 Dobot IP address Select the address, click Connect, then you can control Dobot through WiFi successfully. In the subsequent usage, just insert WiFi module and connect Dobot through the address without the use of USB cable. -
Page 104: Stick Controller Kit
Shenzhen Yuejiang Technology Co.,LTD Dobot Magician User Manual 11. Stick controller kit 11.1 Stick controller kit includes stick and USB Host module, connect wireless module into 10pin communication port behind the controller.There are two ways to connect, wired and wireless, shown as follows: Figure 11.1 Installation of stick module…
-
Page 105
Shenzhen Yuejiang Technology Co.,LTD Dobot Magician User Manual At this moment, the front button led will be on, and the beneth led will flash: Figure 11.3 Stick at work 11.3There are two ways of control ways, Linear mode and Jog mode, which can be swithed by… -
Page 106: Leap Motion Kit
Shenzhen Yuejiang Technology Co.,LTD Dobot Magician User Manual 12 Leap Motion Kit 12.1 Connect Leap Motion module with PC through USB cable. Figure 12.1 Leap motion module https://www.leapmotion.com/setup 12.2 Here are the link: to download Leap Motion Windows driver and install it.
-
Page 107
Shenzhen Yuejiang Technology Co.,LTD Dobot Magician User Manual If there is a warning when installing, please keep on installing until it’s done. Shenzhen Yuejiang Technology Co., Ltd… -
Page 108
Shenzhen Yuejiang Technology Co.,LTD Dobot Magician User Manual Figure 12.2 Successful installation 12.3 After preparation, start up the equipment, open DobotStudio, click Leap Motion and enter into the interface: Shenzhen Yuejiang Technology Co., Ltd… -
Page 109
Dobot Magician User Manual Figure 12.3 Leap motion interface 12.4 Start: In order to keep Dobot more stable, turn palm up to move into controlled area of Leap Motion. Dobot will move accordingly, hold hands to trigger suction cup or gripper. -
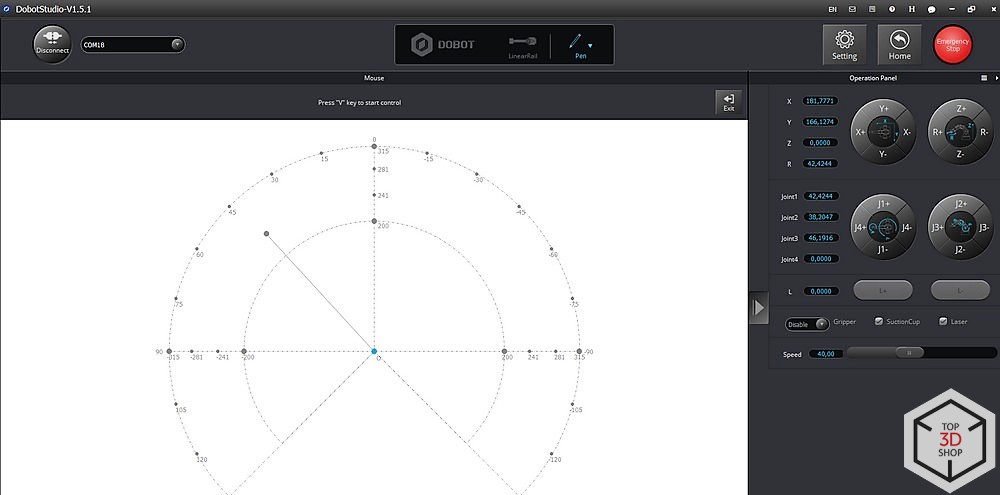
Page 110: Mouse Control
Shenzhen Yuejiang Technology Co.,LTD Dobot Magician User Manual 13. Mouse control 13.1 The software used by mouse controlling is DobotStudio, please open the software, and enter into mouse module interface, shown as follows: Figure 12.1 Enter into mouse controlling interface 13.2 V key: Start and Stop;…
-
Page 111
Dobot Magician User Manual Figure 12.2 Parameter settings Speed (percentage):0-100,suggest 50; Scale (percentage): 0-100, suggest 100; Figure 12.3 Parameter settings Scale X/Y/Z:Scale ratio between mouse coordinates and Dobot coordinates; Sample:20-60,depends on PC performance; DobotCenter:Keep the default; Shenzhen Yuejiang Technology Co., Ltd… -
Page 112: Blockly
Shenzhen Yuejiang Technology Co.,LTD Dobot Magician User Manual 14 Blockly Dobot Blockly is a platform of programming based on Google Blockly. In this process, users canprogram through puzzle, stright and easy to understand. Also, users can use the integrated API of Dobot anytime.
-
Page 113: Blockly Demo
New/Open/Save:New/Open/Save the current files Area 2: Start/Stop Area 3: This part includes the current point location info of Dobot, and log information is in the middle, programming code is on the left: Figure 14.3 Code information Area 4: Selected area of blockly module, including logistic, loop, math, Dobot API and so on, just drag them to the window that is OK.
-
Page 114
Figure 14.4 Programing demo Explanation of Demo: Set endeffector as gripper, set the loop number as 3, and make the Z axis move back and forth 3 times. After this, click Start, Dobot will move accordingly. Shenzhen Yuejiang Technology Co., Ltd… -
Page 115: More Support
For more information,visit http://cn.dobot.cc/ For more detailed material about software, second development and any others,visit http://cn.dobot.cc/download-center/dobot-magician.html Share your idea on Dobot forum http://forum.dobot.cc/ Further question, welcome to send email at support@dobot.cc Shenzhen Yuejiang Technology Co., Ltd…
-
Page 116
Shenzhen Yuejiang Technology Co.,LTD Dobot Magician User Manual Shenzhen Yuejiang Technology Co.,Ltd Website:www.dobot.cc 4F, A8, Tanglang Industrial Area, Taoyuan Street, Nanshan District, Shenzhen, China Shenzhen Yuejiang Technology Co., Ltd…
Время на прочтение
7 мин
Количество просмотров 12K
Здравствуйте! Сегодня мы рассказываем о небольшом настольном многофункциональном роботе манипуляторе DoBot Magician, предназначенном для образования — знакомства с робототехникой, ЧПУ и аддитивными технологиями, основами программирования.
Видео
Небольшой видеообзор даст первое представление об этой роборуке. Подробнее — далее в статье.
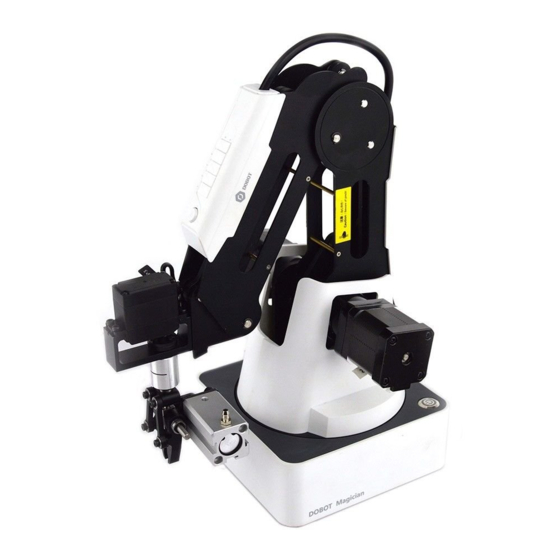
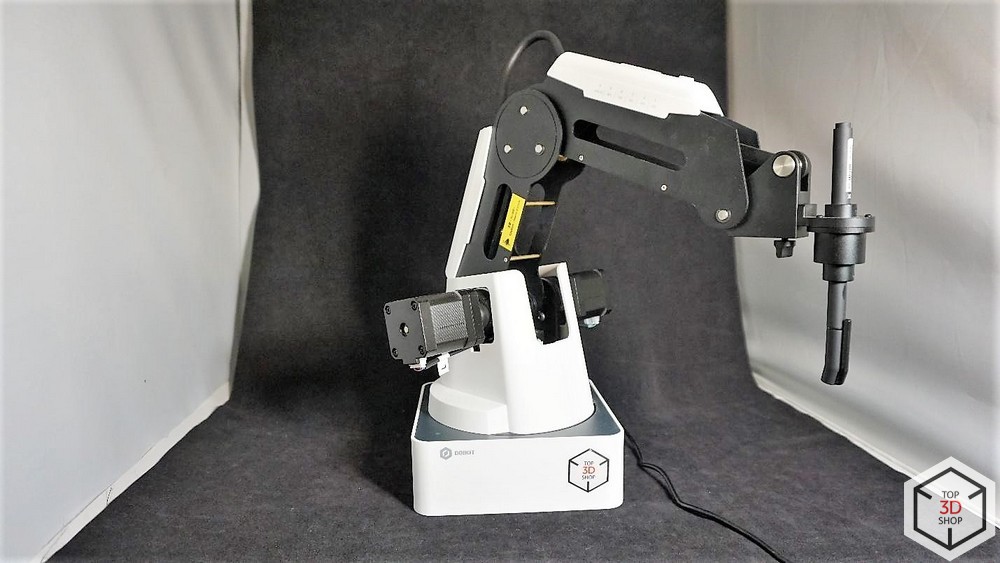
DoBot Magician
Характеристики
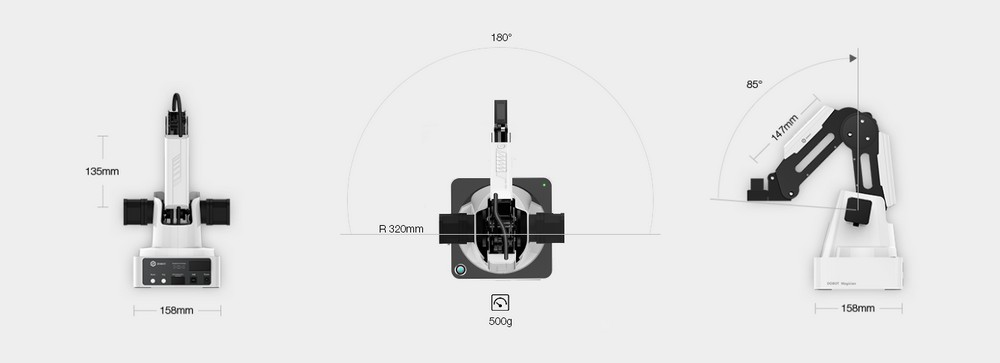
- Осей: 4
- Загрузка: 500г
- Дальность действия манипулятора: 320мм
- Точность: 0,2 мм
- Соединение: USB / Wi-Fi / Bluetooth
- Питание от сети: 100-240В, 50/60 Гц
- Выход блока питания: 12В/7A
- Потребление максимальное, Ватт: 60
- Рабочие температуры, °C: -10 — +60
- Вес робота без насадок, кг: 3,4
- Вес стандартного набора в упаковке, кг: 7,2
- Вес образовательного набора в упак., кг: 8
- Диаметр подставки: 158мм
- Материалы: Алюминиевый сплав 6061, ABS
- Форм-фактор: Настольный
- 3D-принтер: принт макс., мм: 150 × 150 × 150; материал печати: PLA; разрешение: 0,1мм
- Лазер: мощность: 0,5Вт; длина волны: 405нм; напряжение: 12В; TTL trigger ( With PWM Driver )
- Держатель пера: диаметр инструмента: 10мм
- Вакуумная присоска: диаметр: 20мм, давление -35 кПа
- Захват: пневматический, раскрытие до 27,5мм, сила: 8 Ньютонов
- Цена: 106 120 рублей
Уникальный миниробот имеет открытую аппаратно-программную платформу — он оснащен 13 портами ввода-вывода и может работать с двумя десятками языков программирования.
Благодаря комплекту насадок DOBOT Magician может перемещать объекты, выполнять гравировку лазером и 3D-печать, чертить и рисовать.
Распаковка
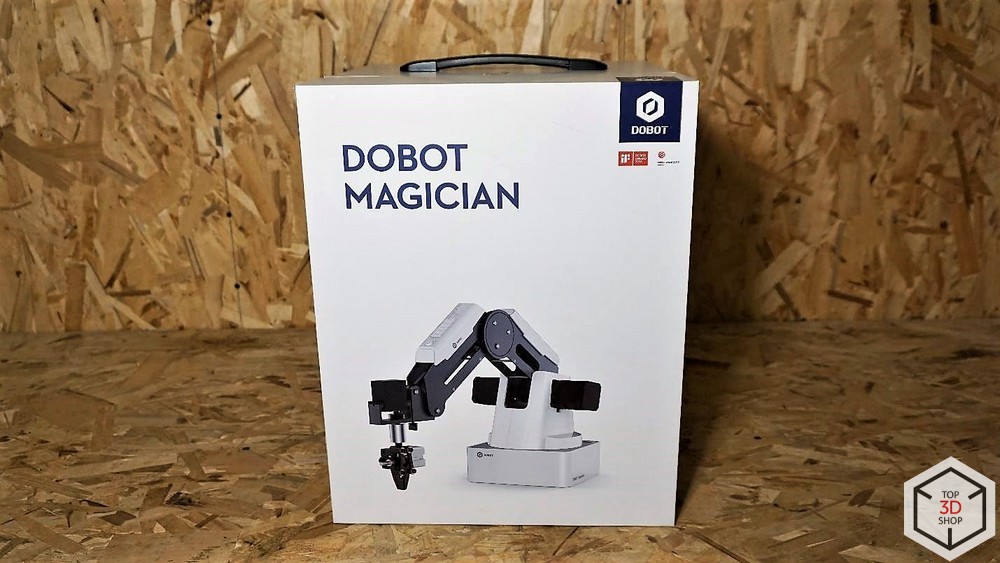
Робот приходит в такой коробке:
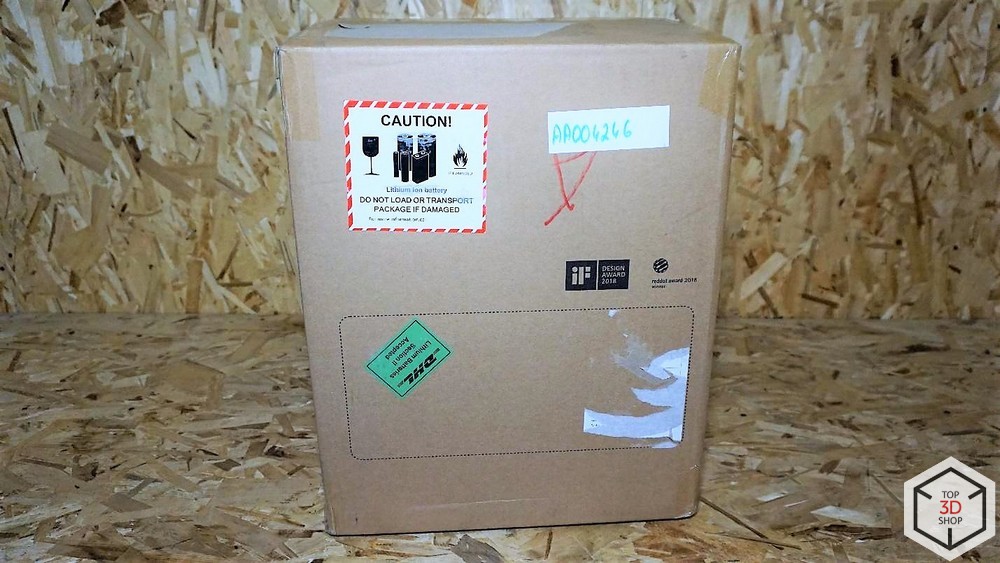
Внутри еще одна.
А в ней, в транспортировочной пене, коробочки поменьше.
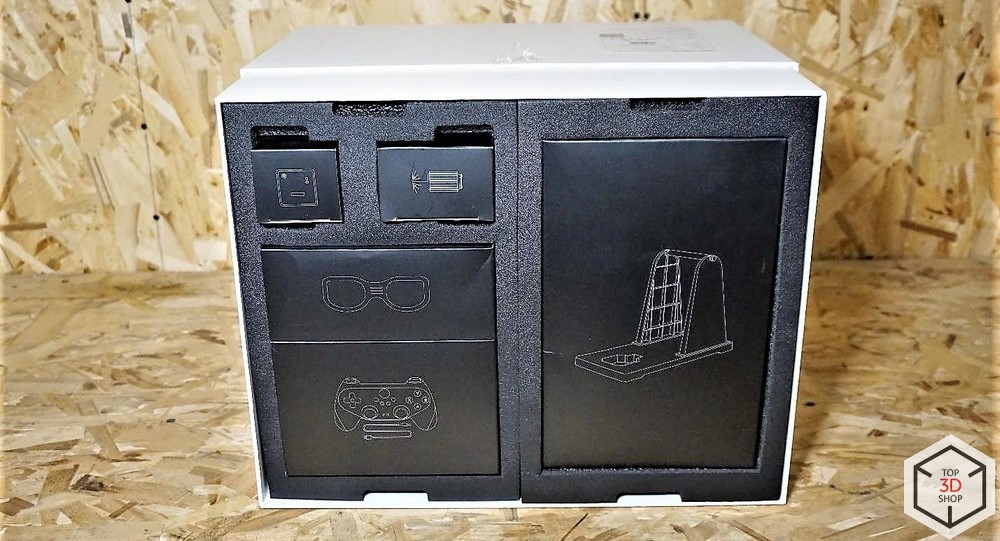
Комплектация
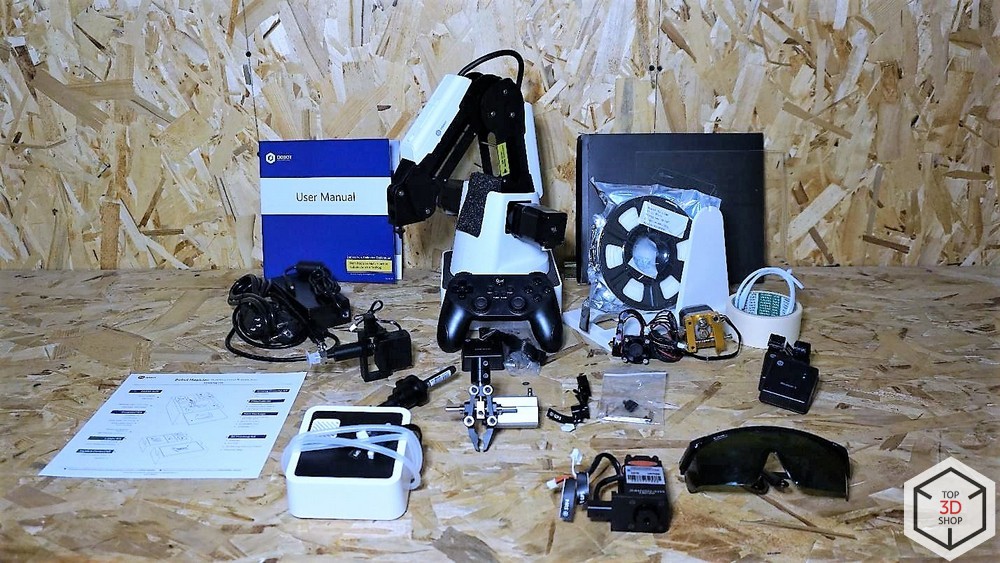
DoBot Magician поставляется в двух вариантах комплектации: Базовый и Образовательный. У нас на обзоре Образовательный набор, базовый отличается от него лишь отсутствием модулей Bluetooth и Wi-Fi, джойстика, лазера и очков для работы с ним.
В комплект поставки образовательного робота манипулятора Dobot Magician входят: механический захват, вакуумная присоска, комплект для 3D-печати, лазер, держатель для ручки. Производитель постоянно расширяет ассортимент доступных насадок и аксессуаров, возможен предварительный заказ слайдера, миниатюрного конвейера и модуля компьютерного зрения. В ближайших планах DoBot — выпуск насадки для фрезерования.
Подробнее:
Сам манипулятор, который имеет слоты подключения периферии на втором сочленении и на задней стенке базы робота. Манипулятор приводится в движение тремя шаговыми двигателями, которые оснащены датчиками обратной связи и редукторами.
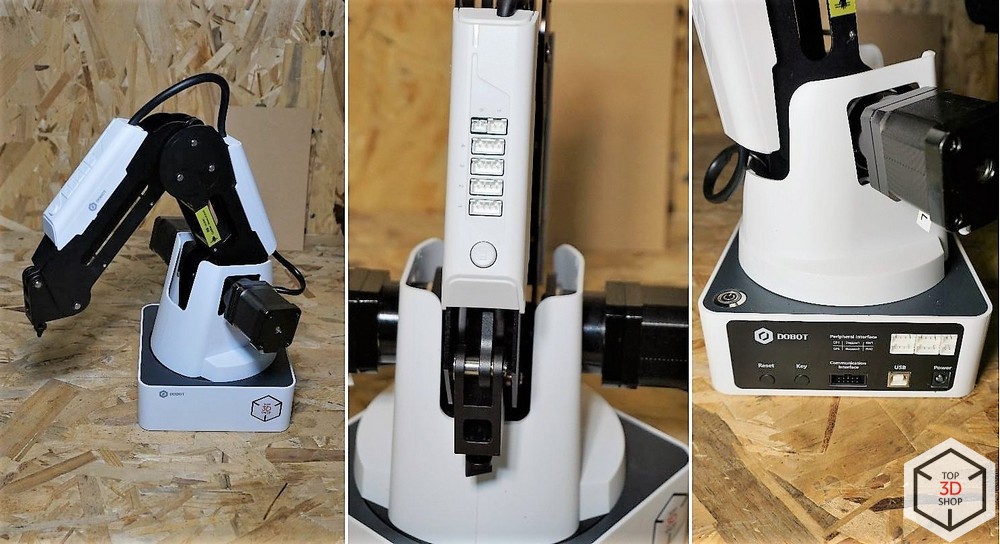
Серводвигатель, который выступает в роли четвертой оси робота. На нем можно закрепить вакуумный или механический захват.
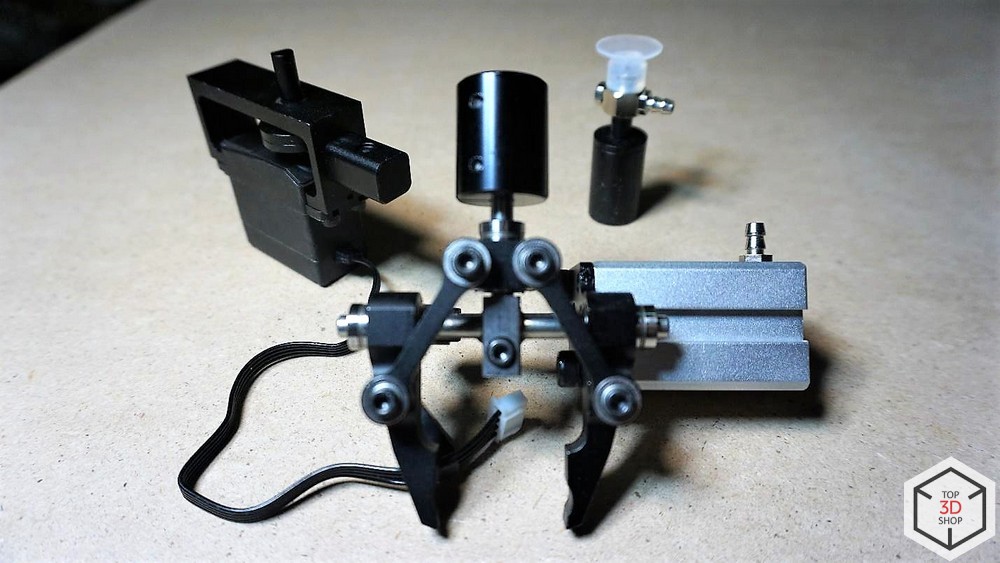
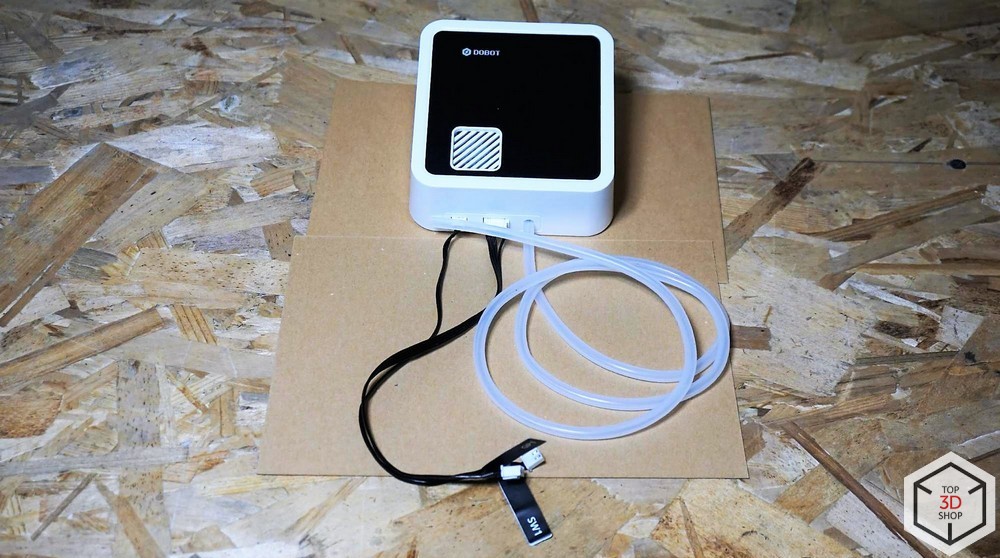
Захваты приводятся в движение воздушной помпой.
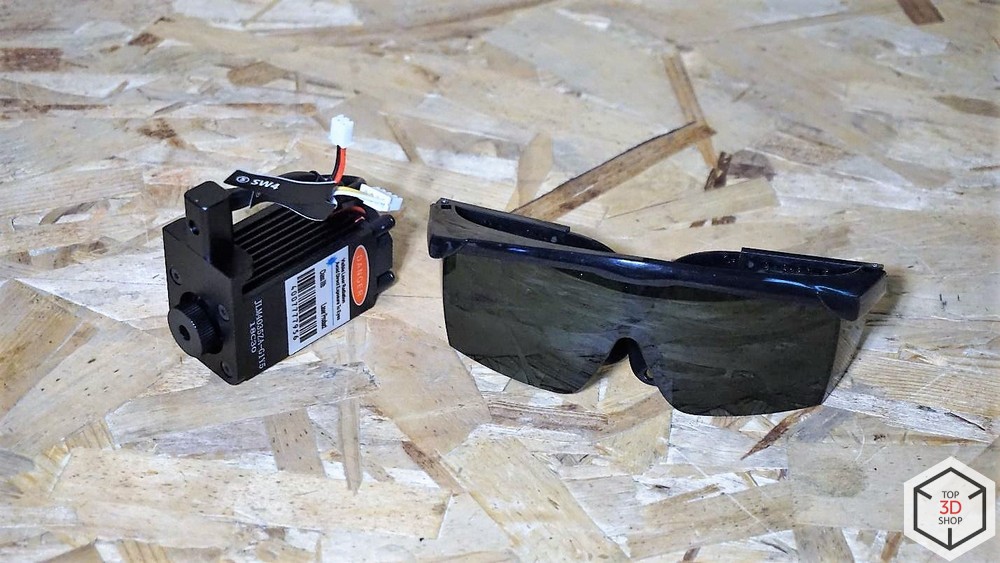
В качестве рабочего инструмента можно установить лазерную головку. В комплекте, для защиты зрения пользователя, есть специальные очки.
Есть держатель пера, для написания текста или рисования, в него можно установить авторучку, лайнер или карандаш диаметром до 10мм.

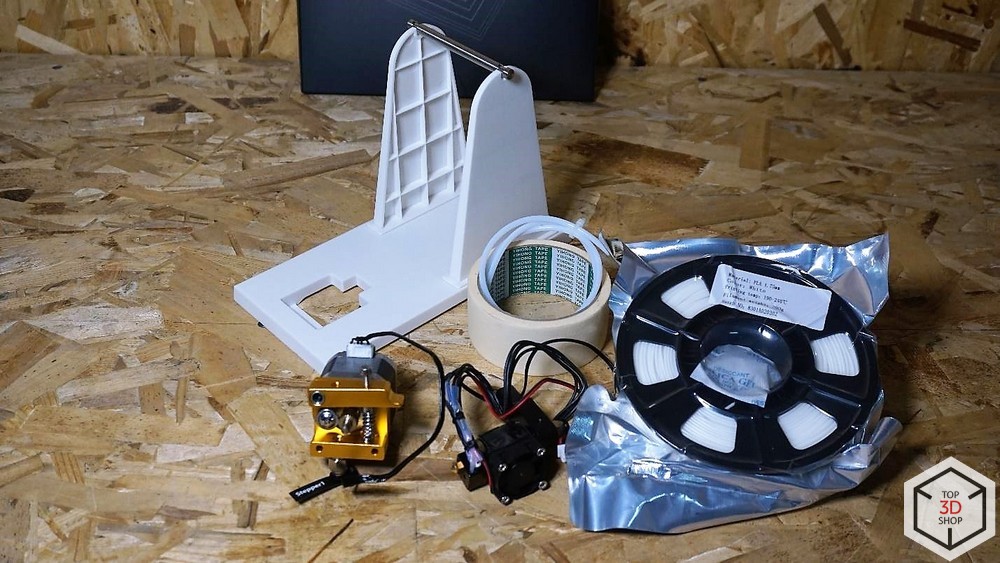
Набор для 3D-печати: блок экструдера, подставка под катушку пластика, катушка PLA, тефлоновая трубка, стекло и малярный скотч. Скотч служит для закрепления стекла на столе.
Управлять манипулятором можно не только с компьютера, но и дистанционно, с помощью джойстика подключенного по Bluetooth. Кабель USB нужен для зарядки аккумулятора в джойстике.

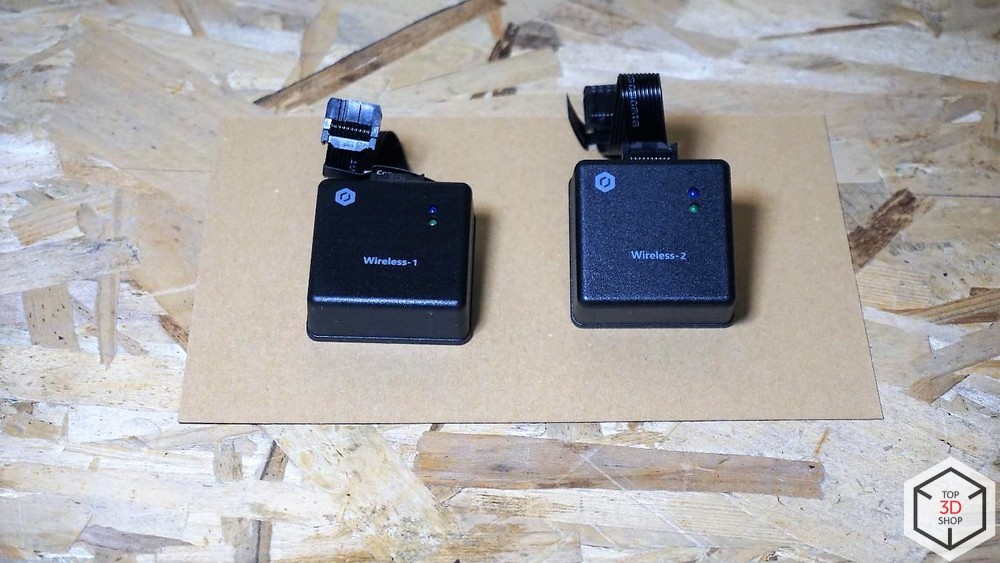
Модули Bluetooth и Wi-Fi.
Устройство для автоматической калибровки, запасные винты и шестигранники.
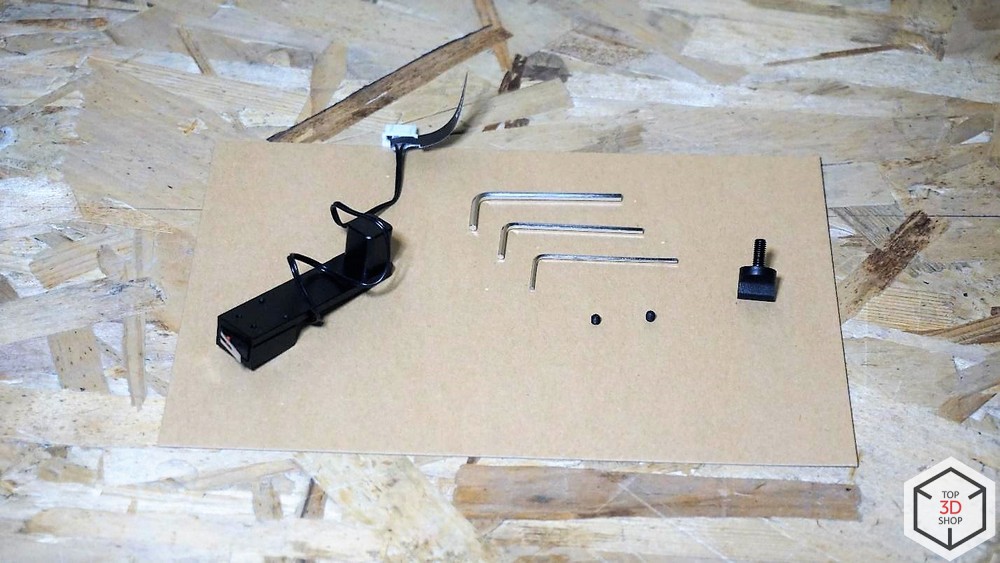
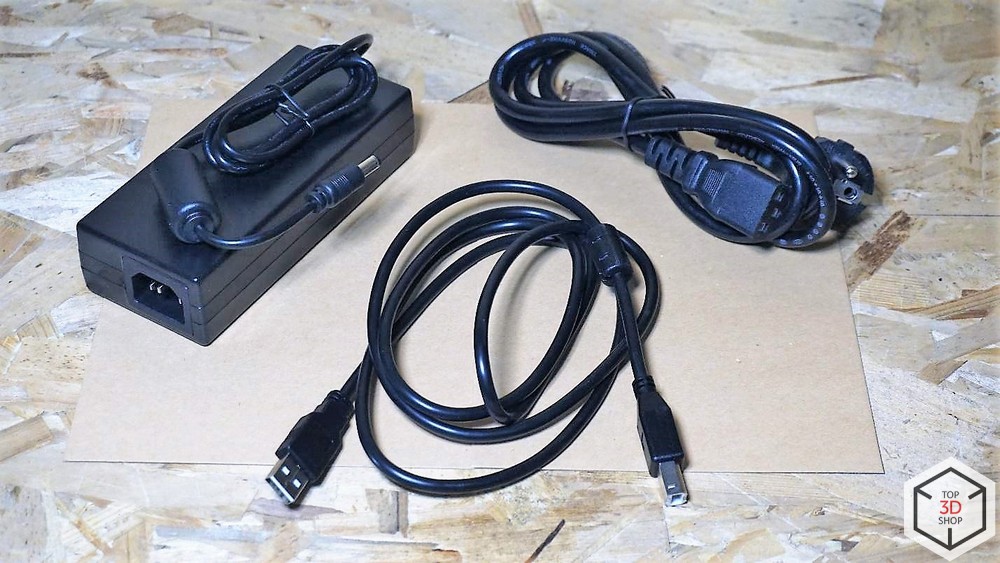
Блок питания, кабель USB для соединения с ПК.
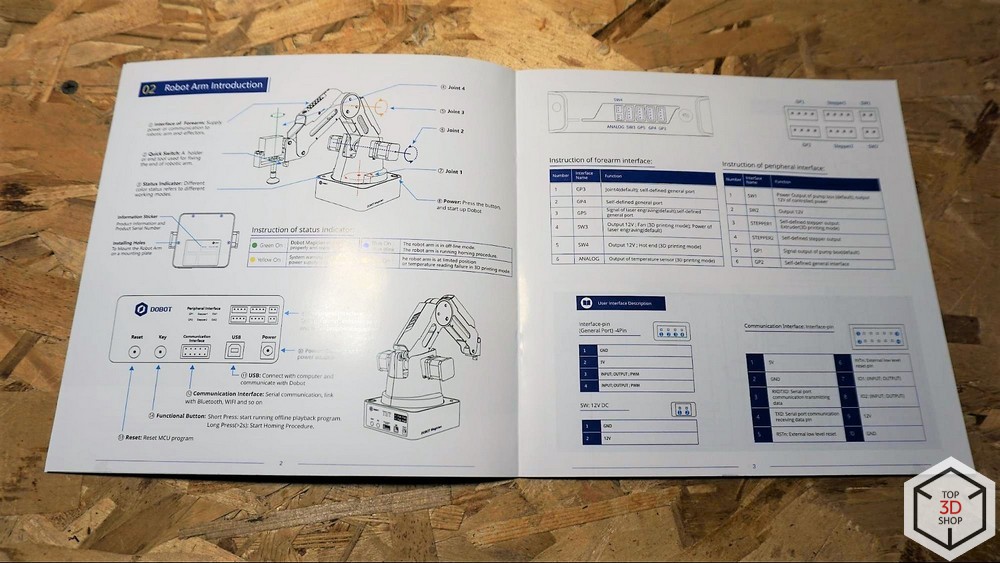
Краткая инструкция.
ПО
Для управления манипулятором надо установить драйвер и программу DoBot Studio, которые можно скачать с официального
сайта
.
Magician совместим со многими актуальными аппаратными и программными средствами, которые широко используются в робототехнике. Например, заявлена поддержка программной платформы ROS (Robot Operating System) и микроконтроллеров Arduino.
Так выглядит основной экран Dobot Studio.
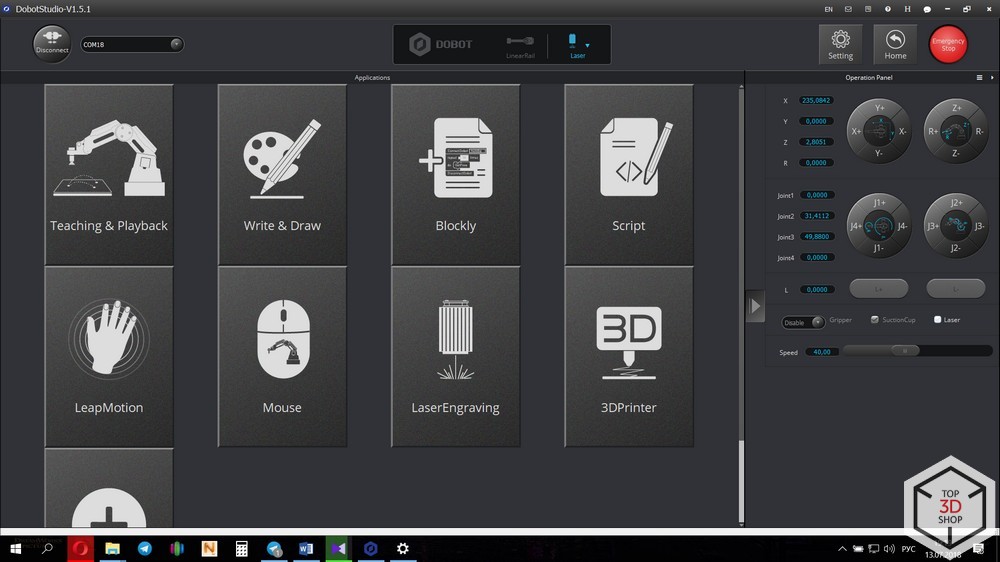
В основном окне мы видим выбор режимов работы робота, справа располагается панель управления манипулятором, чуть выше находится меню настроек, кнопка экстренной остановки и кнопка «Home», а посередине окно выбора инструмента.
Софт DoBot Studio допускает управление несколькими роботами одновременно. По сути, прямо на столе можно создать имитацию сборочной линии, этому также способствует совокупность технических параметров, среди которых приемлемая повторяемость.
Управление
DoBot Magician гибок в управлении — программировать роборуку и управлять ею в режиме реального времени можно с помощью компьютера, смартфона или планшета. В качестве канала связи используется как Wi-Fi или Bluetooth, так и проводное USB-соединение. Робот может распознавать голосовые команды и жесты.
Режимы программирования
Основным режимом является «Обучение и повторение».
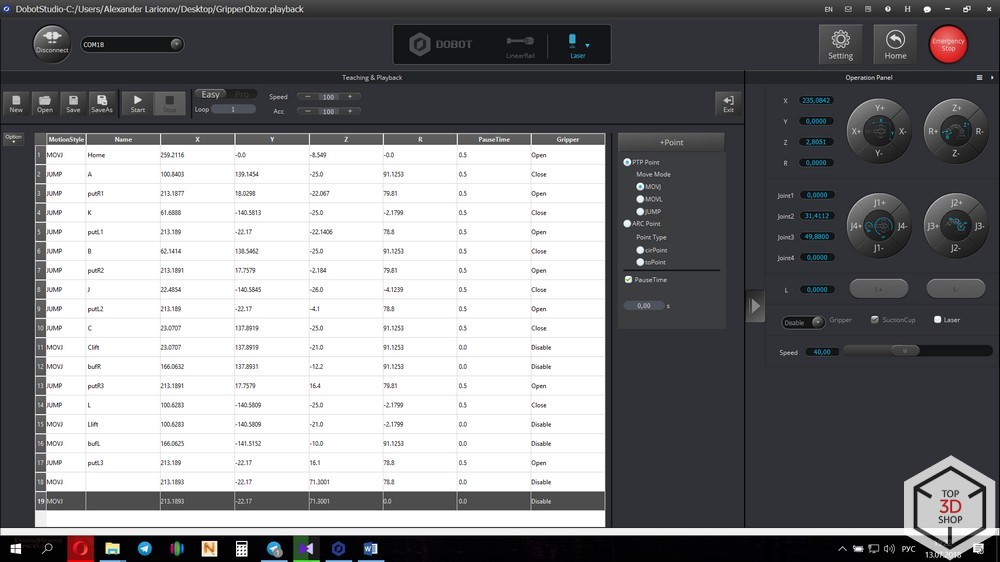
В этом режиме можно создавать управляющие программы, которые робот сможет выполнять единожды или циклично. Обучать робота можно двумя способами:
1.: На втором сочленении располагается кнопка, при нажатии на которую с двигателей снимается ток удержания и, благодаря этому, появляется возможность свободно перемещать манипулятор вручную. После перемещения инструмента и отпускания кнопки, координаты запишутся в таблицу.
2.: Переместить инструмент в нужное положение можно и с помощью панели управления, которая расположена в правой части экрана. Двигать можно как линейно, по осям, так и каждое сочленение поочередно. После перемещения, соответствующая координата сохраняется путем нажатия кнопки “+ Point”.
После записи всех координат и настройки способов движения, нажатием кнопки Play, мы запустим выполнение управляющей программы.
Управляющую программу можно загрузить в память манипулятора, чтобы он выполнял работу в режиме офлайн.
Для отладки существует кнопка Step Run, позволяющая запустить программу пошагово, чтобы убедиться в правильности движения.
Два следующих режима, «Блочное программирование» и «Скрипт», созданы для более глубокого изучения программирования и робототехники. В них возможно создание гораздо более сложных алгоритмов поведения, добавление условий выполнения различных сценариев.
Для начинающих, которые еще плохо знакомы с языками программирования, отлично подойдет режим Блочного программирования. Вместо запоминания сложных синтаксических форм и обозначений здесь используются блоки обозначающие условия, циклы, функции, математические преобразования. Тело программы выстраивается путем вставки одних блоков в другие.

Для продвинутых пользователей существует режим «Скрипты», где они смогут использовать весь потенциал этого робота, используя язык программирования Python.

Режимы работы
Для того, чтобы оценить максимально возможную область перемещения инструмента “живьем”, можно воспользоваться функцией управления манипулятором с помощью «мыши».
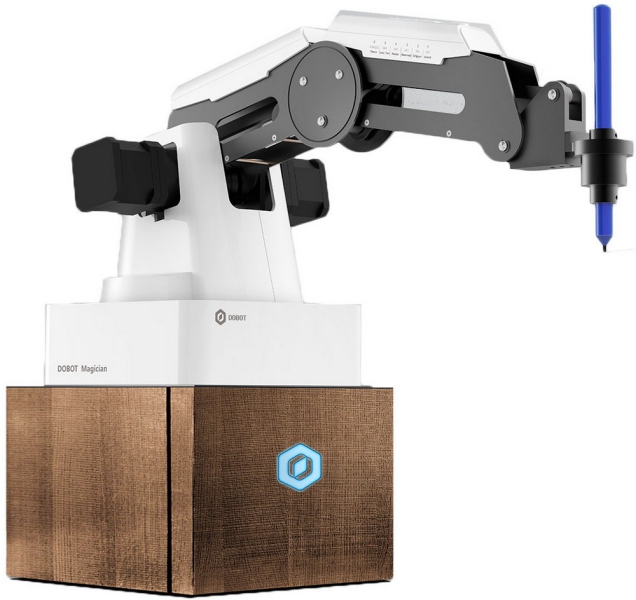
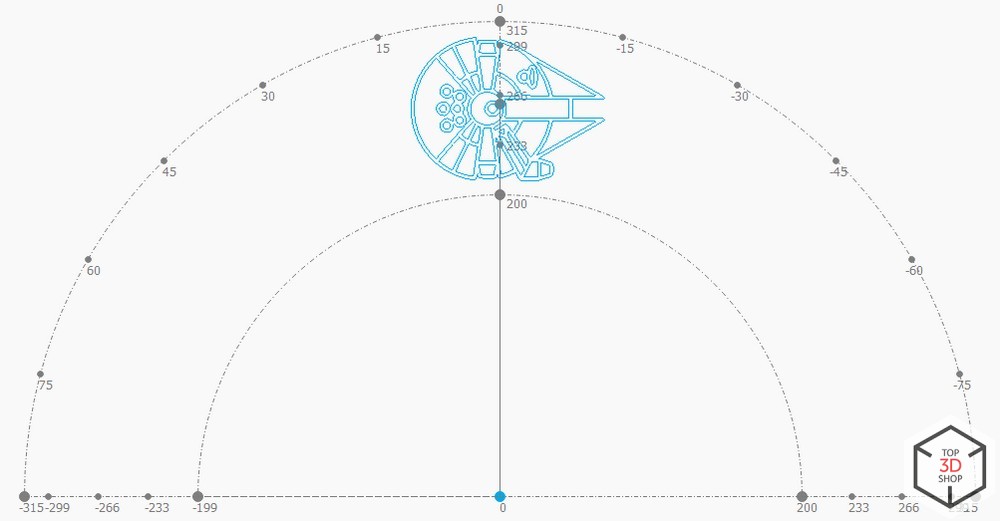
Следующий режим — «Рисование». В качестве инструмента на манипулятор, в специальный подпружиненный держатель, устанавливается ручка.
Можно создать надпись, вставить рисунок из встроенной библиотеки или добавить собственный.

Контуры воспроизводятся с высокой точностью.
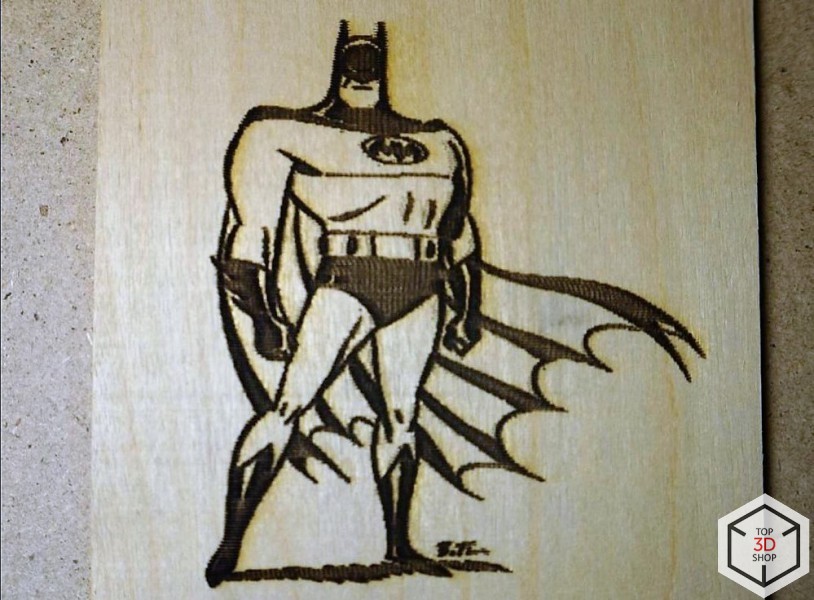
Лазерный гравер. С помощью лазера можно выжигать или гравировать изображения.
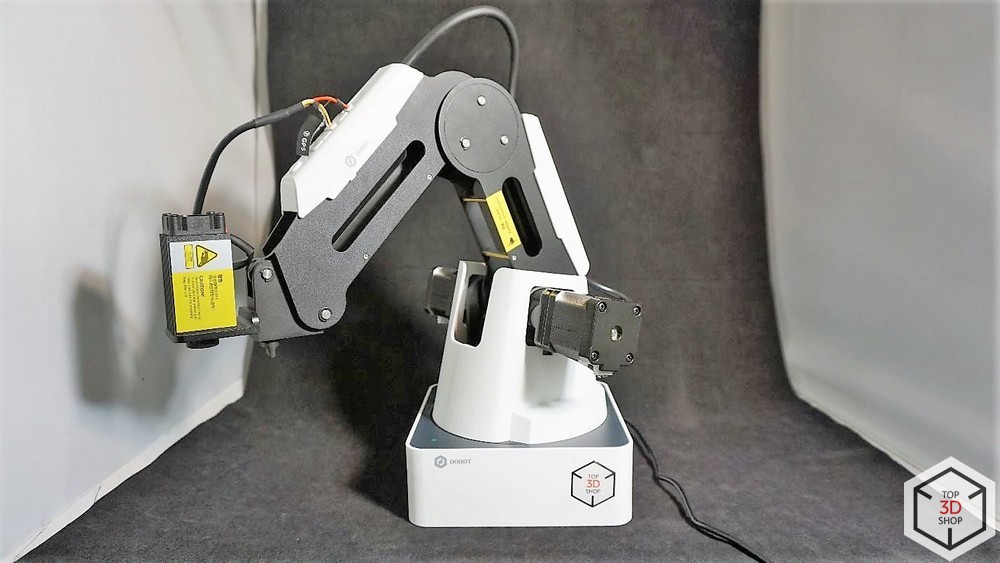
Из настроек доступны «Диапазон оттенков серого», минимальная и максимальная мощность, в общих настройках можно отрегулировать скорость и ускорение.
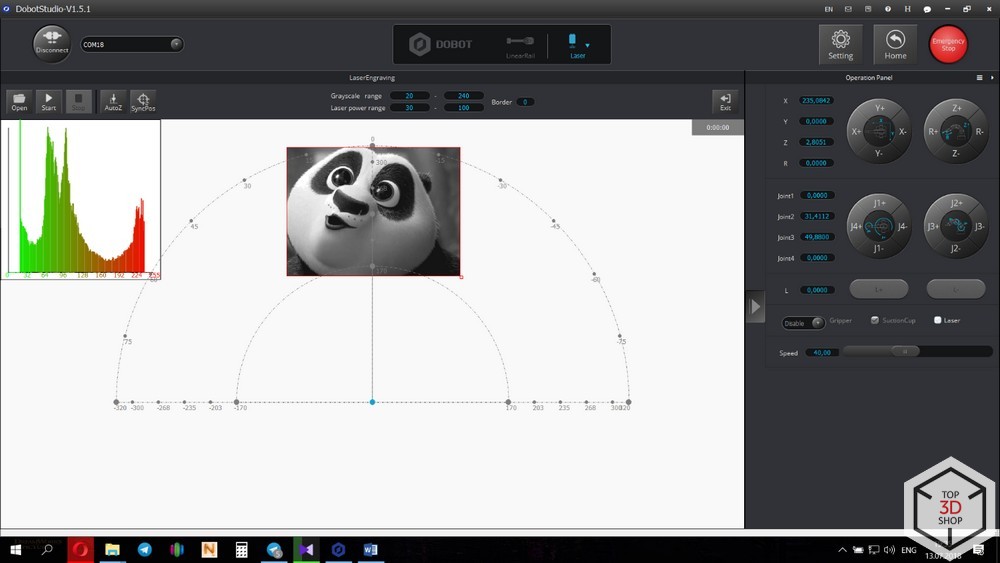
Обработке поддаются многие материалы, такие как дерево, кожа, бумага, картон, акрил.
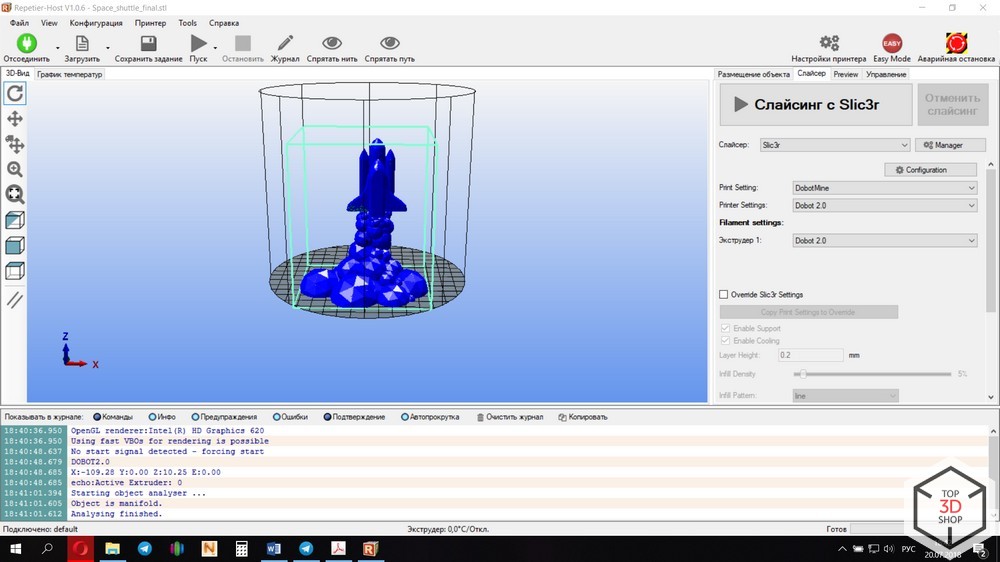
3D-печать. Для того, чтобы перейти к подготовке файла для печати, потребуется загрузка новой прошивки. При нажатии на кнопку “3D-печать” в главном меню, программа сама предложит изменить прошивку, вам просто нужно дождаться окончания загрузки и установки.
После этого откроется довольно привычное многим 3D-печатникам окно программы Repitier Host.
Здесь мы вбиваем параметры принтера, подгружаем профили печати и можно приступать к слайсингу.
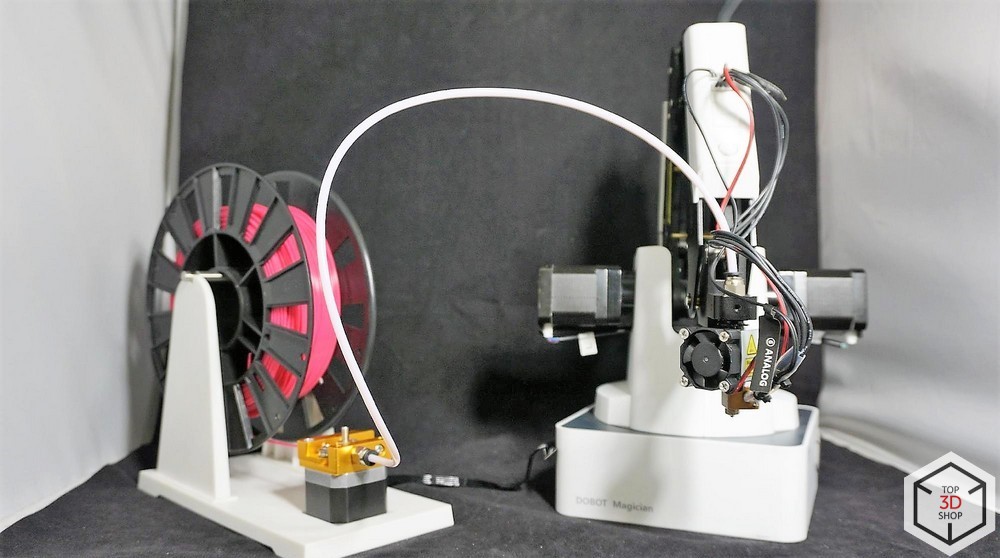
Представленные ниже детали печатались на скорости всего 4 мм/с, поэтому печать заняла около 14 часов. Это стандартное значение скорости, взятое из родного профиля. Для облегчения веса экструдера, двигатель подачи пластика вынесен отдельно на платформу держателя катушки. Из-за этого приходится сокращать или вовсе убирать ретракты в настройках слайсера.
Вот так происходит печать.
К сожалению, из-за специфики строения аппарата, манипулятор имеет значительный люфт на инструменте. Это не мешает точному позиционированию при малых значениях ускорений и при использовании вакуумного или механического захвата. При использовании лазерного модуля и хотэнда, которые имеют немалый вес, этот люфт становится заметен.
Режим ручного управления. Управляя роботом с помощью джойстика, можно совершенствовать свои навыки в управлении подобным устройством и просто весело проводить время.
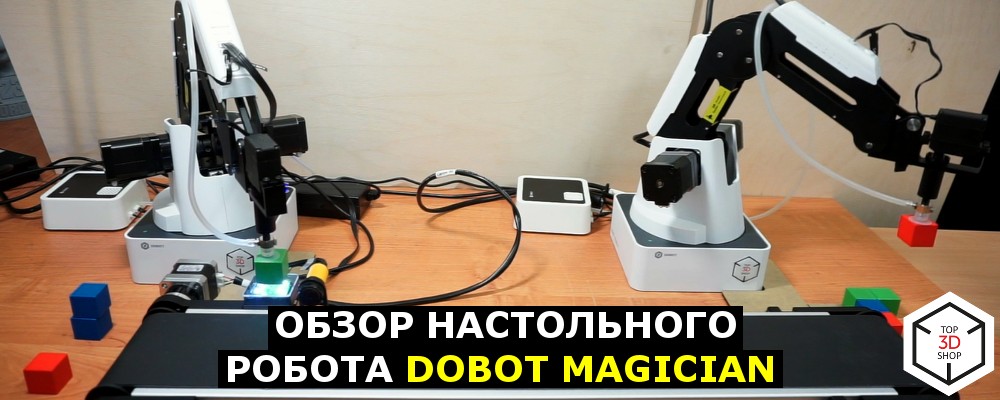
Если требуется более глубокое понимание принципов работы роботов манипуляторов и их сфер применения, то, с помощью второго DoBot,
конвейера
, инфракрасного и цветового датчика можно собрать небольшую производственную линию.
Для их синхронизации и запуска потребуется подключить оба робота к одному компьютеру и открыть два окна Dobot Studio, в которые загружаются исполняемые программы, которые скачиваются с сайта производителя, для каждого отдельного робота. Перед первым запуском систему нужно откалибровать, для этого в программе есть специальные переменные, которые можно изменять.

Правый манипулятор, по заданному алгоритму и с заданной периодичностью, выкладывает кубики на конвейерную ленту, а левый манипулятор регистрирует наличие кубика на ленте (с помощью инфракрасного датчика), определяет его цвет (с помощью цветового датчика) и помещает кубик в соответствующую стопку.
Назначение
Пример применения DoBot компанией Volkswagen.
DoBot Magician отлично подойдет для обучения детей. Учебный процесс с его участием может начинаться с простейшей игровой формы, благодаря наличию джойстика. Следующий шаг — основы программирования, сначала в блочном редакторе, а потом и скрипты.
Столь наглядное и интерактивное обучение намного эффективнее работы с “сухим” кодом, особенно в самом начале.
Учитывая интересы более продвинутых потенциальных пользователей, разработчики предусмотрели возможность подключения разнообразной периферии, которая не поставляется в комплекте. Это могут быть всевозможные датчики, сервоприводы и шаговые двигатели, светодиодные приборы и множество других электронных устройств, включая микрокомпьютеры и микроконтроллерные платформы, такие как Arduino. Учитывая это, можно рекомендовать DoBot Magician не только школам, но и техникумам, и вузам, как исключительно удачное наглядное пособие.
Уже сегодня этот миниробот используется как одно из основных средств STEM-обучения в ведущих китайских вузах — Университете Цинхуа и Шаньдунском политехе, а также в Австралии — в Сиднейском технологическом университете.
Выводы
Рассматривать качество работы DoBot Magician в сравнении с обычным 3D-принтером или лазерным гравером нельзя. Он никогда не даст качество 3D-печати сравнимое даже с бюджетными принтерами, но это естественно: это не принтер и не гравер, это совершенно другой аппарат, с иными задачами, которые он выполняет отлично.
Если вы работаете в сфере образования и ищете максимально эффективные средства обучения, обратитесь в
Top 3D Shop
— наши сотрудники подберут оптимальное для выполнения ваших задач оборудование.
Хотите больше интересных новостей из мира 3D-технологий?
Подписывайтесь на нас в соц. сетях:


Подписывайтесь на наш телеграм-канал с отборными кейсами роботизации и автоматизации со всего мира: https://tglink.ru/easy_robotics

В этой статье вы узнаете какое устройство поможет вам сделать свои первые шаги в такой интересной сфере как робототехника!
Дорогие друзья, сегодня в нашем обзоре необычное устройство, настоящая робо-рука, а точнее многофункциональный, роботизированный, настольный манипулятор — DOBOT Magician!
Содержание
- Общая информация
- Распаковка и сборка
- Первый взгляд
- Пример 3D печати
- Пример письма и рисования
- Примеры работы манипулятора
- Видео обзор
- Итог
- Где купить?
Общая информация
DOBOT Magician — это многофункциональный настольный роботизированный манипулятор, и предназначен он для практического обучения.

Прогресс неумолимо несется вперед, каждый день появляются новые автоматизированные устройства в самых разных сферах деятельности, и чтобы юные умы успевали осваивать все эти новые технологии, в учебный процесс по всему миру внедряются самые разные технические решения. Вы возможно уже слышали о 3д принтерах и других технологиях, с помощью которых обучают детей и молодых людей в самых разных учебных заведениях.
DOBOT Magician как раз нужен для этих целей. В 2018 году это устройство получило награды CES и Innovation Award, а также iF DESIGN AWARD, эта многогранная система является привлекательным дополнением к образовательной среде или экспериментальному пространству для энтузиастов в техно сфере.
DOBOT предлагает широкий спектр возможностей конечного инструмента, таких как 3D-печать, лазерная гравировка, письмо и рисование и многое другое. Кроме того, производитель разработал учебную программу для педагогов, чтобы максимально повысить образовательную ценность DOBOT Magician. Доступный в виде базовой модели и образовательной модели, этот роботизированный манипулятор идеально подходит для создателей или преподавателей, которые ищут инструмент для изготовления, который делает кучу интересных — манипуляций.
Подборка статей из раздела «База знаний» с сайта компании LIDER-3D: 1) Все, что вы хотели знать о 3D печати • 2) Роботизированный дирижабль на 3D принтере • 3) Гайд по SLS-порошкам для покупателя
Распаковка и сборка
Magician надежно упакован, все содержимое разложено по отдельным секциям. Схемы на небольших коробках помогают пользователю идентифицировать компоненты внутри, а прилагаемое руководство облегчает распаковку.

Вложенное в коробку руководство очень краткое — но его вполне хватает для первичной сборки и настройки, остальная часть руководства включена в дополнительный онлайн-документ.
Подключение питания было простым, а этикетки, прикрепленные к проводам, облегчали первоначальную настройку. Для калибровки мы установили рекомендованное программное обеспечение DobotStudio. Навигация в DobotStudio достаточно удобна и интуитивно понятна, она предлагает три различных режима калибровки: базовая калибровка, ручное выравнивание и автоматическое выравнивание. В нашем случае хорошо сработал метод автоматического выравнивания.
Как и было заявлено изначально, переключаться между различными доступными инструментами легко. Применение экструдера для 3D-печати также было интуитивно понятным, каждая головка/модуль крепится с помощью винта.
Первый взгляд
Назначение DOBOT Magician довольно простое: это многофункциональная четырех осевая роботизированная рука размером с настольный компьютер, предназначенная для практического обучения. Но DOBOT может не только перемещать разные вещи с места на место, устройство поставляется с различными насадками, позволяющими осуществлять 3D-печать, лазерную гравировку, письмо и рисование, а также захват и вакуумную откачку.
Будь то пайка печатных плат или работа с пером для 3D-печати, DOBOT Magician способен выполнять самые разнообразные задачи. Более того, он обеспечивает высокую повторяемость позиционирования до 0,2 мм.


Открытая роботизированная система совместима с 13 расширяемыми интерфейсами и 20 языками программирования, поэтому у пользователей есть множество способов контролировать и направлять роботизированную руку. Она включает визуализированный интерфейс программирования, использующий функции перетаскивания команд, чтобы облегчить процесс кодирования.
Студенты и создатели могут управлять роботизированным манипулятором с помощью программирования, APP, Bluetooth и WiFi. Помимо простых методов управления, производитель также предусмотрел возможность использования SDK последовательного порта и интерфейса управления движением для более продвинутых пользователей.
В настоящее время производитель предлагает две различные модели: базовую и образовательную. Как можно предположить, роботизированная система для образовательных учреждений содержит несколько дополнительных функций, которых нет у более дешевой модели.
Хотя обе версии включают конечные инструменты для 3D-печати, письма и рисования, захвата и вакуумной откачки, образовательная модель также содержит набор для лазерной гравировки, модули Bluetooth и WiFI, джойстики и многое другое. Мы тестировали как раз базовую версию, поэтому пощупать гравер и джойстики нам не удалось.
DOBOT Magician состоит из компонентов промышленного класса, включая шаговый двигатель с высокоточным редуктором и высокопрочный алюминиевый сплав, поверхность которого обработана методом анодного оксидирования.
Чтобы расширить возможности DOBOT Magician, к системе можно подключить различные дополнительные устройства, включая комплект линейного рельса, комплект конвейерной ленты, визуальный комплект и гусеничный робот.

Комплект линейных рельсов эффективно расширяет рабочую зону роботизированной руки(в 350мм), позволяя ей перемещаться на расстояние 1000 мм. Используя массив инструментальных головок и графическую среду программирования, пользователи могут выполнять такие задачи, как написание длинного письма или компоновка предметов.
Конвейерная лента также может быть добавлена к DOBOT Magician для имитации полного производственного процесса. Различные настройки, такие как скорость, расстояние и датчик цвета, могут быть отрегулированы для создания высокоэффективной системы, напоминающей производственную мини-фабрику.
В дополнение к этим аксессуарам компания DOBOT разработала множество приложений и образовательную программу, чтобы оптимизировать процесс обучения с помощью этой роботизированной системы. Более того, пользователи, имеющие под рукой несколько устройств DOBOT Magician, смогут управлять несколькими роботизированными руками с одного устройства, что производитель называет «сотрудничеством нескольких роботов».
Дополнительные расширения:
- Комплект искусственного зрения DOBOT Robot Vision Kit
- Конвейерная лента для DOBOT Magician
- Направляющая рельса для DOBOT Magician
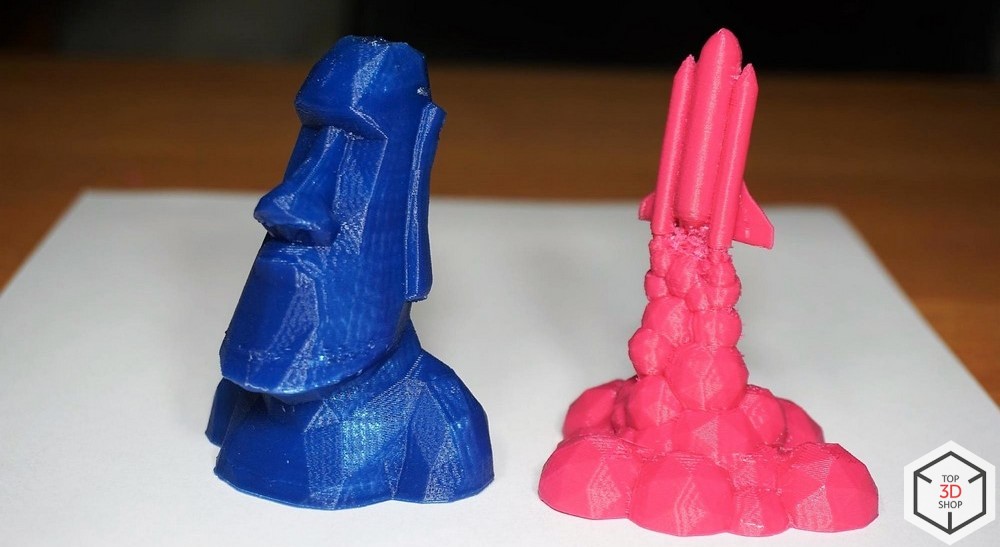
Пример 3D печати
Максимальная рабочая область насадки для 3D печати — 150x150x150мм, печатает DOBOT материалом PLA, с разрешением в 0.1мм.
Нарезка модели производится в программе Repitier Host, с ней ни у кого не должно возникнуть проблем. В целом качество печати для такого устройства нормальное, но при использовании экструдера или гравера присутствует небольшой люфт.
Пример письма и рисования
В режиме письма и рисования в манипулятор устанавливается ручка. Вы можете наносить надписи на разные поверхности, или рисунки. Есть даже библиотека со стандартными рисунками которая позволит вам провести первичные тесты, и также можно загрузить своим материалы. Так как ручка значительно легче чем гравер или экструдер, люфта вы не заметите, в этом режиме устройство работает наиболее точно.

ПО кстати умеет конвертировать любой рисунок в вектор, что очень удобно. Увидеть устройство в действии вы можете в нашем видео обзоре!
Видео обзор
Примеры работы манипулятора
Итог
В этом компактном роботизированном манипуляторе, предназначенном для образовательных целей, собрано множество интересных функций. DOBOT Magician одинаково хорошо покажет себя как в образовательном процессе, так и на рабочем столе энтузиастов. Но нужно понимать и помнить, это не моно устройство, а многофункциональная система позволяющая обучаться как работе с инструментами которыми она оснащена, так и программированию. Конечно о качестве 3д печати на уровне даже самых бюджетных 3д принтеров речи быть не может, но DOBOT Magician на это и не претендует, а со своей задачей, быть многофункциональным роботизированным манипулятором для обучения, DOBOT Magician справляется на все сто!
Подписывайтесь на нас в социальных сетях: ВКонтакте, YouTube, TikTok, Telegram, Instagram, Я.Дзен, Facebook чтобы первыми получать самые интересные материалы!
Magician
Overview
Specs
Download
FAQ
Magician Robot
The Magician is the world’s first desktop grade 4-axis robot. It can perform a wide range of tasks such as 3D printing, laser graving, calligraphy and drawing. 13 interface ports are available to support secondary developement, lab projects and robotics curricula.
Studies such as robotic systems, the DH convention, control of robot movement and robot programming can be taught to different levels of students. A variety of application scenarios can be developed through the use of programming software and hardware accessories.
Operable by
One Person
The Magician is designed for students and consumers in mind. It is extremely portable and capable of various automation tasks. Users can interact with the Magician using quick access command buttons or wirelessly with portable computing devices.
Teach Robot
Physically
The Magician is capable of drag-to-teach. Simply by moving the robotic arm through desired paths to program it. It’s that simple.
High Expandability with Secondary Development
The Magician has 13 interface ports and wireless connectivity for secondary development. Controller support is available for beginners.
Wide Selection of Accessories
A wide variety of accessories such as grippers, rails, conveyor belts, mobility and vision modules are available to allow the Magician to complete different tasks.
| Specifications | |
| Number of Axis | 4 |
| Payload | 500 g |
| Max. Reach | 320 mm |
| Repeatability | ±0.2 mm |
| Communication | USB / Wi-Fi* / Bluetooth* |
| Power Supply | 100V — 240V, 50/60 HZ |
| Power In | 12V / 6.5A DC |
| Consumption | 78W Max |
| Working Temperature | -10° — 60° C |
| Axis Movement | ||
| Axis | Range | Max Speed (250 g workload) |
| Joint 1 base | -120° ~+120° | 320° / s |
| Joint 2 rear arm | -5°~+90° | 320° / s |
| Joint 3 forearm | -15°~+90° | 320° / s |
| Joint 4 rotation servo | -140°~+140° | 480° / s |
| Physical | |
| Net Weight | 3.4 KG |
| Gross weight ( Standard Version) | 7.2 KG |
| Gross weight ( Education Version) | 8.0 KG |
| Base Dimension(Footprint) | 158 mm × 158 mm |
| Materials | Aluminum Alloy 6061, ABS Engineering Plastic |
| Controller | Dobot Integrated Controller |
| Robot Mounting | Desktop |
| Packing Size (L × W × H) | 421 mm x 334 mm x 352 mm |
| Applications | |
| Software | DobotLab, DobotStudio, Repetier Host, GrblController3.6, DobotBlockly (Visual Programing editor) |
| SDK ( Software Develop Kit ) | Communication Protocol, Dobot Program Library |
| Extensible I/O Interfaces | 1. I/O × 10 (Configurable as Analog Input or PWM Output) |
| 2. Controllable 12V Power output × 4 | |
| 3. Communication Interface (UART, Reset, Stop, 12V, 5V and two I/O included) | |
| 4. Stepper × 2 |
| Endeffectors | ||
| 3D Printer Kit | Maximum Print Size (L × W × H) | 150 mm ×150 mm × 150 mm |
| 3D printing material | PLA | |
| Resolution | 0.1 mm | |
| Laser * | Power Consumption | 500 mw |
| Type | 405 nm ( Blue laser ) | |
| Power | 12V , TTL trigger ( With PWM Driver ) | |
| Pen Holder | Pen Diameter | 10 mm |
| Vacuum Suction Cup | Suction Cup Diameter | 20 mm |
| Pressure | -35 Kpa | |
| Gripper | Range | 27.5 mm |
| Drive Type | Pneumatic | |
| Force | 8 N | |
| Iterms marked with are optional kits, not inclueded in default package. |
| Plan & Shipping List |
.png) |
What is offline mode?
The Magician has internal storage for commands. Users can upload…
Learn more
What is multi-robot cooperation?
Through Wi-Fi connection or connecting multiple robots to an external board…
Learn more
What is secondary development?
Secondary development uses a robotic arm as a platform. Programming can…
Learn more
What updates does the Magician controller have? What interfaces are there and how are they used?
There are the latest ARM controller updates, which enhance the processing…
Learn more
What is graphical programming? What kind of visualized platform is used by the Magician?
Graphical programming is a system using patterned procedure codes…
Learn more
What are the highlights of the Magician 3D printing?
The Magician is an extensible desktop 3D printing. Not only it can reserve…
Learn more
What is 3D printing? What software does it use and what format does it support? What materials are supported?
3D printing is a kind of rapid prototyping technology, which uses powder…
Learn more
What is gray engraving?
The Magician can engrave not just lines but also sketch images…
Learn more
What is laser engraving? What kind of materials can be engraved on?
Laser engraving is applied to the high precision of robot and…
Learn more
What is drag-to-teach?
Users can program robotic arm movements by simply pressing…
Learn more
What is the highlight of drawing & writing?
Users can use gel pens, ink brushes, fountain pens and other kinds…
Learn more
What is Teach & Playback ?
Teach & Playback is a function that teaches robots multiple positions…
Learn more
What are the kits available to the Magician?
The standard version includes the robotic arm, a suction cup…
Learn more
Which end effectors does the Magician have?
The Magician has a suction cup, a pen holder, a laser, a gripper…
Learn more
Take part in automation transformation. Let’s work together towards a more efficient tomorrow.
Contact Information
We have sent the file to your email, please check
Dobot sincerely invites robotics software companies and hardware manufacturers to Dobot+. Together we can offer best in class solutions to end users in various industries.