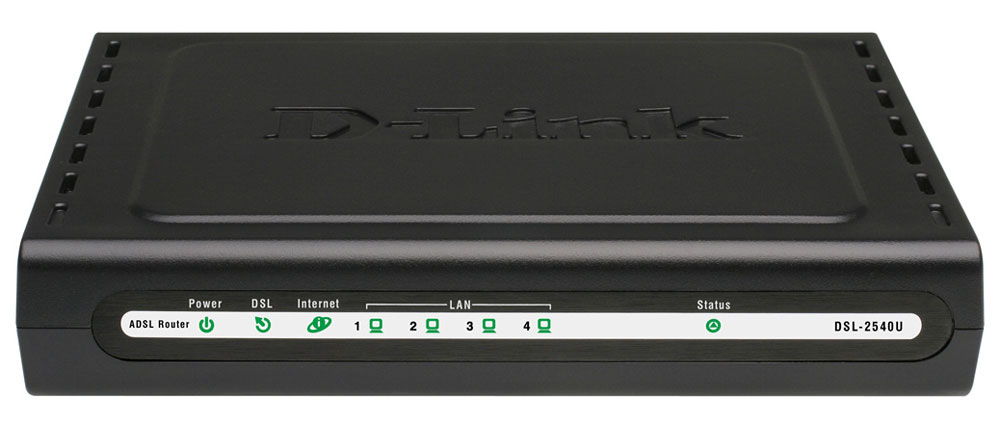
Всем привет! Сегодня мы попробуем заняться настройкой древнего DSL маршрутизатора 2540U. Он очень старый и он уже как пару лет вышел из производства. С другой стороны — это отличная модель, которая может стать альтернативным вариантом на какое-то время. Для начала, прежде чем его настроить – давайте познакомимся с роутеров D-Link 2540U.
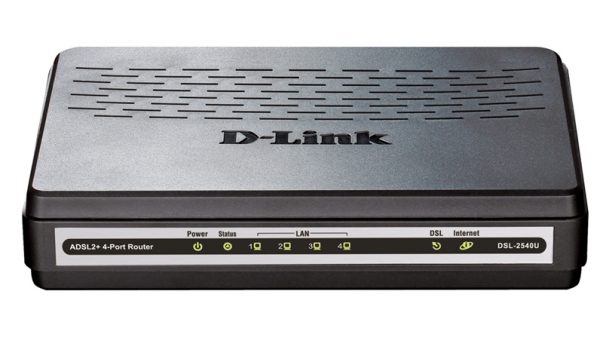
В первую очередь нужно понять – какие индикаторы у нас есть. Это очень важный момент, ведь если что-то произойдет с соединением, то вы сразу поймете, что не так – просто взглянув на лампочки. И так слева на право:
- Power – кнопка питания. Включен или выключен аппарат.
- Status и DSL – показывает подключение к линии провайдера.
- 1-4 LAN – есть или нет подключение к локальному устройству. Всё зависит от того, какой порт вы будете использовать.
- Internet – есть или нет подключение к интернету.
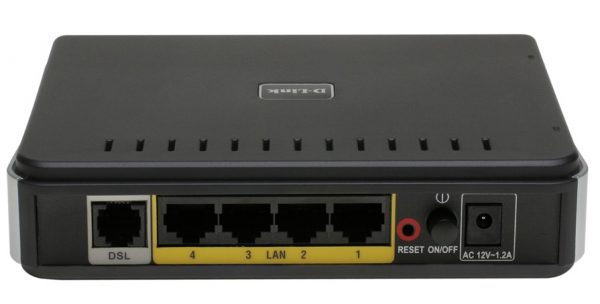
Теперь давайте познакомимся с портами и начнем его подключать для настройки. Также слева на право:
- DSL – сюда вставляем телефонный кабель.
- 1-4 LAN порты – сюда можно подключить любые устройства напрямую. Я для настройки буду использовать ноутбук. Возьмите сетевой кабель из коробки и вставьте его в один из этих портов. Второй конец подключите к ноутбуку или компьютеру.
- Reset – кнопка для сброса маршрутизатора до заводских настроек. Если вы его взяли у друга или знакомого, то после включения аппарата, зажмите эту кнопку на 10 секунд.
- ON/OFF – кнопка включения и выключения. Таким образом можно перезагрузить аппарат.
- AC 12V~1.2A – вход для блока питания. Подключаем роутер к розетке.
И так, мы его подключили, некоторые лампочки уже должны загореться. В частности, обязательно должен загореться индикатор питания. Теперь наша главная задача – настроить интернет. Если у вас в процессе возникнут какие-то сложности – пишите об этом в комментариях.
Содержание
- Настройка
- Задать вопрос автору статьи
Настройка
ПРИМЕЧАНИЕ! Для настройки вам понадобится договор от провайдера, где прописаны вся информация по настройке. Без него настроить интернет – невозможно. За этой информацией вы также можете обратиться в техническую поддержку поставщика услуг. Далее настройка будет идти на примере провайдера «Ростелеком».
- Для входа в настройки, устанавливать ничего не нужно. С подключенного устройства к маршрутизатору, откройте браузер и введите в адресную строку: 192.168.1.1. Далее в обе строки впишите слово «admin».
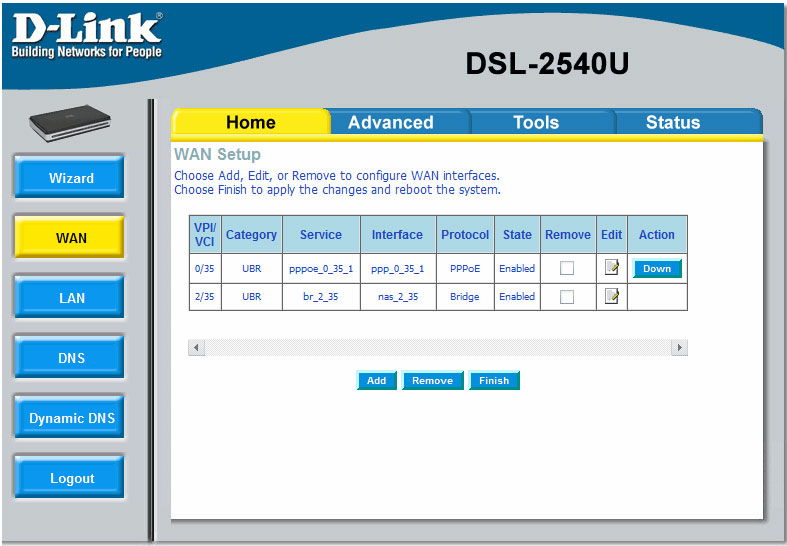
- Вам нужно найти раздел «WAN», который может находится в «Advanced Setup». Нужно убедиться, чтобы не было ни одной записи или подключения. Удалите все лишние записи с помощью кнопки «Remove». А в самом конце нажмите «Add».
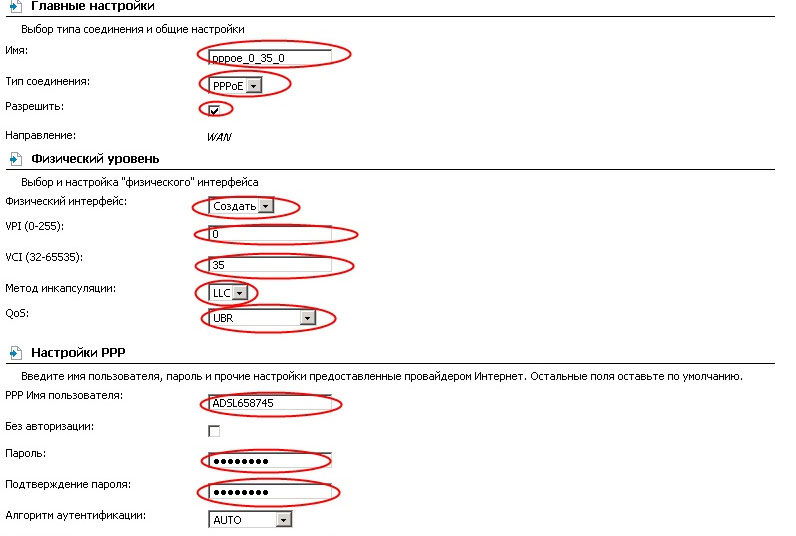
- Теперь берём договор от провайдера и вписываем все необходимые данные. Если какой-то информации нет – то оставляйте поля по умолчанию. Тут нужно обязательно указать: PORT, VPI и VCI.
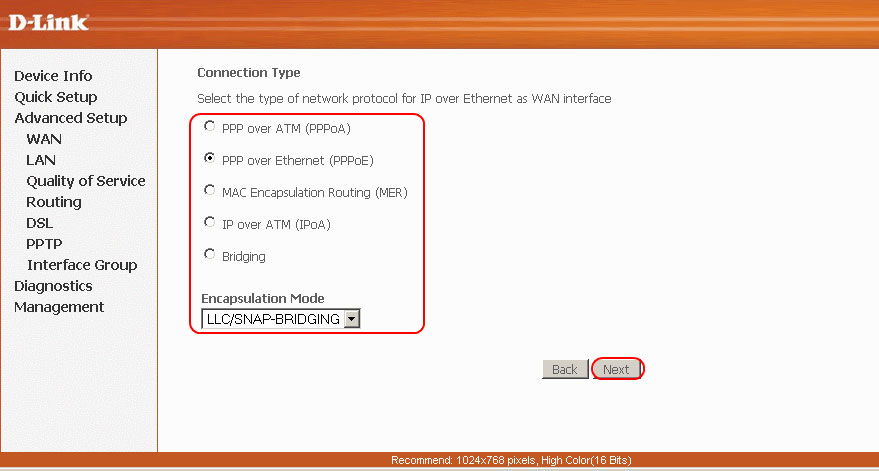
- Здесь надо указать тип подключения.
- Указываем дополнительные данные. У меня «Ростелеком» и я выбрал тип подключения PPPoE. Поэтому тут надо ввести логин, пароль, а также MTU.
- Укажите галочки как у меня на картинке выше. Далее просто нажимаем «Save».
- Теперь мы настроили интернет, надо ещё настроить одно подключение – жмём «Add».
- Вписываем новые данные.
- Тут указываем «Bridged».
- Ставим галочку, наименование не меняем, нажимаем «Next» и «Save».
- Теперь создайте ещё один «Bridge» с VPI – 8 и VCI – 33. В общем у вас должно получится одно интернет-подключение и два моста.
- Теперь давайте проверим, чтобы «DHCP» сервер был включен. Для этого там же переходим в соседний пункт «LAN». Установите галочки и настройки как на картинке выше.
- Manuals
- Brands
- D-Link Manuals
- Network Router
- DSL-2540U
- User manual
-
Contents
-
Table of Contents
-
Troubleshooting
-
Bookmarks
Quick Links
Table of Contents
D-Link DSL-2540U User Manual
1
Related Manuals for D-Link DSL-2540U
Summary of Contents for D-Link DSL-2540U
-
Page 1
Table of Contents D-Link DSL-2540U User Manual… -
Page 2: Table Of Contents
NETWORKING BASICS ………………… 72 WAN……………………..39 LAN ……………………..41 IP A ………………. 72 HECK DDRESS NAT……………………..42 IP A …………….73 TATICALLY SSIGN AN DDRESS Virtual Servers ………………….42 Port Triggering…………………..43 TECHNICAL SPECIFICATION …………….. 74 DMZ Host…………………..43 ADSL STANDARDS…………………. 74 ……………………44 ECURITY D-Link DSL-2540U User Manual…
-
Page 3: Package Contents
• One straight-through Ethernet cable • One Quick Installation Guide Note: Using a power supply with a different voltage rating than the one included with the DSL-2540U will cause damage and void the warranty for this product. System Requirements • ADSL Internet service •…
-
Page 4: F Eatures
This eliminates the need to reconfigure every host whenever changes in network topology occur. • Network Address Translation (NAT) – For small office environments, the DSL-2540U allows multiple users on the LAN to access the Internet concurrently through a single Internet account. This provides Internet access to everyone in the office for the price of a single user.
-
Page 5
• Telnet Connection – The Telnet enables a network manager to access the Router’s management software remotely. • Easy Installation – The DSL-2540U uses a web-based graphical user interface program for convenient management access and easy set up. Any common web browser software can be used to manage the Router. -
Page 6: Hardware Overview
To manually reset, Use the adapter shipped with the Use the Ethernet port to connect the Router to a computer or an depress button with Router to connect to power Ethernet LAN the power on for source D-Link DSL-2540U User Manual…
-
Page 7: Leds
A blinking green light activity currently passing through the System failure is indicated by either indicates that ADLS is attempting to Ethernet port. a steady green or dark light. sync. D-Link DSL-2540U User Manual…
-
Page 8: Installation
Before You Begin Please read and make sure you understand all the prerequisites for proper installation of your new Router. Have all the necessary information and equipment on hand before beginning the installation. D-Link DSL-2540U User Manual…
-
Page 9: Installation Notes
Operating Systems The DSL-2540U uses an HTML-based web interface for setup and management. The web configuration manager may be accessed using any operating system capable of running web browser software, including Windows 98 SE, Windows ME, Windows 2000, Windows XP, and Windows Vista.
-
Page 10
LAN side of the bridge, such as a PC, a server, a gateway device such as a router or similar firewall hardware. The IP address can be assigned in a number of ways. Your network service provider will give you instructions about any additional connection software or NIC configuration that may be required. D-Link DSL-2540U User Manual… -
Page 11: Information You Will Need From Your Adsl Service Provider
ADSL, ADSL2, and ADSL2+ modulation. Security Protocol This is the method your ADSL service provider will use to verify your Username and Password when you log on to their network. Your Router supports the PAP and CHAP protocols. D-Link DSL-2540U User Manual…
-
Page 12
ADSL service provider’s network and your computer. If you are setting up the Router for multiple virtual connections, you will need to configure the VPI and VCI as instructed by your ADSL service provider for the additional connections. This setting can be changed in the WAN Settings window of the web management interface. D-Link DSL-2540U User Manual… -
Page 13: Information You Will Need About Dsl-2540U
IP address used for DHCP service on the LAN when DHCP is enabled. LAN Subnet Mask for the DSL-2540U This is the subnet mask used by the DSL-2540U, and will be used throughout your LAN. The default subnet mask is 255.255.255.0. This can be changed later.
-
Page 14: Information You Will Need About Your Lan Or Computer
Ethernet NIC If your computer has an Ethernet NIC, you can connect the DSL-2540U to this Ethernet port using an Ethernet cable. You can also use the Ethernet ports on the DSL-2540U to connect to other computer or Ethernet devices.
-
Page 15: D Evice I Nstallation
Device Installation The DSL-2540U connects two separate physical interfaces, an ADSL (WAN) and an Ethernet (LAN) interface. Place the Router in a location where it can be connected to the various devices as well as to a power source. The Router should not be located where it will be exposed to moisture or excessive heat.
-
Page 16: Factory Reset Button
MDI-X ports (1x, 2x, etc.) with a crossed cable. Computer to Router Connection You can connect the Router directly to a 10/100BASE-TX Ethernet adapter card (NIC) installed on a PC using the Ethernet cable provided. D-Link DSL-2540U User Manual…
-
Page 17: Configuration
Section 3 – Configuration Configuration This section will show you how to configure your new D-Link Router using the web-based configuration utility. Web-based Configuration Utility Connect to the Router The default IP address for ADSL MODEM is: 192.168.1.1; The Subnet Mask is:255.255.255.0. Users can configure ADSL MODEM through an Internet browser.
-
Page 18: Device Info
Section 3 – Configuration Device Info To access the Device Info window, click either the Device Info or Summary button in the Device Info directory. The following page opens: D-Link DSL-2540U User Manual…
-
Page 19: Wan
This window displays the current status of your DSL connection, including the software version, LAN IP address, and DNS server address. To access the WAN Info window, click the WAN button in the Device Info directory. This window displays the current status of your WAN connection. D-Link DSL-2540U User Manual…
-
Page 20: S Tatistics
Statistics button to refresh these statistics. This window displays the Router’s WAN statistics. Click the Reset Statistics button to refresh these statistics. This window displays the Router’s ATM statistics. Click the Reset button to refresh these statistics. D-Link DSL-2540U User Manual…
-
Page 21
Section 3 – Configuration This window displays the Router’s ADSL statistics. Click the Reset Statistics button to refresh these statistics. Click the ADSL BER Test button to access the ADSL Bit Error Rate Test window displayed below: D-Link DSL-2540U User Manual… -
Page 22: Tatistics Route
To access the Device Info – ARP window, click the ARP button in the Device Info directory. This read-only window displays Address Resolution Protocol info. DHCP To access the Device Info – DHCP Leases window, click the DHCP button in the Device Info directory. This read-only window displays DHCP lease info. D-Link DSL-2540U User Manual…
-
Page 23: Quick Setup
Identifier, Virtual Path Identifier, and Virtual Channel Identifier. The VPI and VCI values should be provided by your ISP. This window also allows you to enable QoS by ticking the Enable Quality of Service check box. Click the Next button to continue. D-Link DSL-2540U User Manual…
-
Page 24
Encapsulation Mode. Click the Next button to continue. QUICK SETUP – BRIDGING To enable bridging, tick the Enable Bridge Service check box and enter a Service Name. To disable WAN service, unselect the check box. Click the Next button to continue. D-Link DSL-2540U User Manual… -
Page 25
QUICK SETUP – BRIDGING This window allows you to configure the Router IP address and subnet mask for your LAN. Once you have entered an IP address and subnet mask, click the Next button to continue. D-Link DSL-2540U User Manual… -
Page 26
QUICK SETUP – PPPoA Click the PPP over ATM (PPPoA) radio button on this window. This window also allows you to use the drop-down menu to select the desired Encapsulation Mode. Click the Next button to continue. D-Link DSL-2540U User Manual… -
Page 27
This window allows you to set the username and the password for your PPP connection. This information is obtained from your ISP. Additional settings on this window will also depend on your ISP. Click the Next button to continue. D-Link DSL-2540U User Manual… -
Page 28
To enable the DHCP server, enter a starting IP address, an ending IP address, and a subnet mask. You may also choose to change the default value of the leased time. Click the Next button to continue. D-Link DSL-2540U User Manual… -
Page 29
QUICK SETUP – PPPoE Click the PPP over Ethernet (PPPoE) radio button on this window. This window also allows you to use the drop-down menu to select the desired Encapsulation Mode. Click the Next button to continue. D-Link DSL-2540U User Manual… -
Page 30
This window allows you to set the username and the password for your PPP connection. This information is obtained from your ISP. Additional settings on this window will also depend on your ISP. Click the Next button to continue. D-Link DSL-2540U User Manual… -
Page 31
To enable the DHCP server, enter a starting IP address, an ending IP address, and a subnet mask. You may also choose to change the default value of the leased time. Click the Next button to continue. D-Link DSL-2540U User Manual… -
Page 32
This summary window allows you to confirm the settings you have just made. Click the Save/Reboot button to save your new PPP over Ethernet settings and restart the Router. Note:After you complete the configuration,you must reboot the modem to apply the changes D-Link DSL-2540U User Manual… -
Page 33
Encapsulation Mode. Click the Next button to continue. QUICK SETUP – MER This window allows you to configure the WAN IP settings. This information is obtained from your ISP. Click the Next button to continue. D-Link DSL-2540U User Manual… -
Page 34
To enable the DHCP server, enter a starting IP address, an ending IP address, and a subnet mask. You may also choose to change the default value of the leased time. Click the Next button to continue. D-Link DSL-2540U User Manual… -
Page 35
This summary window allows you to confirm the settings you have just made. Click the Save/Reboot button to save your new MAC Encapsulation Routing settings and restart the Router. Note:After you complete the configuration,you must reboot the modem to apply the changes D-Link DSL-2540U User Manual… -
Page 36
Encapsulation Mode. Click the Next button to continue. QUICK SETUP – IPoA This window allows you to configure the WAN IP settings. This information is obtained from your ISP. Click the Next button to continue. D-Link DSL-2540U User Manual… -
Page 37
To enable the DHCP server, enter a starting IP address, an ending IP address, and a subnet mask. You may also choose to change the default value of the leased time. Click the Next button to continue. D-Link DSL-2540U User Manual… -
Page 38
This summary window allows you to confirm the settings you have just made. Click the Save/Reboot button to save your new IP over ATM settings and restart the Router. Note:After you complete the configuration,you must reboot the modem to apply the changes D-Link DSL-2540U User Manual… -
Page 39: Advanced Setup
Channel Identifier. The VPI and VCI values should be provided by your ISP. This window also allows you to enable QoS by ticking the Enable Quality of Service check box. Click the Next button to continue. D-Link DSL-2540U User Manual…
-
Page 40
MAC Filtering and Parental Control sub-menus will appear in the Advanced Setup directory. If the connection type of WAN Interface is not in Bridging, NAT and Security with IP Filtering and Parental Control will appear in the Advanced Setup directory. D-Link DSL-2540U User Manual… -
Page 41: Lan
This window allows you to set up a LAN interface. When you are finished, click either the Save or Save/Reboot button. Note:: After you complete the configuration, click the Save button, a dialog box will pop-up to hint users to reboot device to make configuration effectively D-Link DSL-2540U User Manual…
-
Page 42: Nat
Select a Service radio button and then using the drop-down list to choose an existing service, or by clicking the Custom Server radio button and entering your own Application Rule in the field provided. Click Save/Apply when you are finished with the virtual server configuration. D-Link DSL-2540U User Manual…
-
Page 43: Port Triggering
Custom application radio button and entering your own Application Rule in the field provided. Click Save/Apply when you are finished with the port setting configuration. The new Application Rule will appear in the Port Triggering table. DMZ Host D-Link DSL-2540U User Manual…
-
Page 44: S Ecurity
To designate a DMZ IP address, type in the IP Address of the server or device on your LAN, and click the Save/Apply button. Security To access the Security window, click the Security button in the Advanced Setup directory. The Security button appears after configuring WAN D-Link DSL-2540U User Manual…
-
Page 45: Ip Filtering
Now default policy is BLOCK, it means all outgoing IP traffic from LAN is blocked, but some IP traffic can be accepted by setting up filters. If you are setting up the outgoing IP filtering, click the Add button. D-Link DSL-2540U User Manual…
-
Page 46
The Source Port is the TCP/UDP port on either the LAN or WAN depending on if you are configuring an Outbound or Inbound Filter rule. Destination Port The Destination Port is the TCP/UDP port on either the LAN or WAN depending on if you are configuring an Outbound or Inbound Filter rule. D-Link DSL-2540U User Manual… -
Page 47
Now default policy is BLOCK, it means all incoming IP traffic from WAN is blocked, but some IP traffic can be accepted by setting up filters. If you are setting up the incoming IP filtering, click the Add button. D-Link DSL-2540U User Manual… -
Page 48
The Source Port is the TCP/UDP port on either the LAN or WAN depending on if you are configuring an Outbound or Inbound Filter rule. Destination Port The Destination Port is the TCP/UDP port on either the LAN or WAN depending on if you are configuring an Outbound or Inbound Filter rule. D-Link DSL-2540U User Manual… -
Page 49: P Arental C Ontrol
LAN device, or click Other MAC Address and enter a MAC address manually. Tick the checkboxes for the desired individual days of the week and enter desired Start Blocking Time and End Blocking Time. Click the Save/Apply button to save the configuration D-Link DSL-2540U User Manual…
-
Page 50: Url Filter
This window allows you to set up URL Filter on the Router. Choose URL List Type Exclude or Include first and click Add button. Enter the URL address and port number then click Save/Apply to add the entry to the URL filter. Quality of Service D-Link DSL-2540U User Manual…
-
Page 51: Queue Config
This window allows you to set up QoS on the Router. When you are finished, click on the Save/Apply button. Queue Config Click the Add button to add a QoS Queue Configuration table entry. Note:After you complete the configuration,you must reboot the modem to apply the changes D-Link DSL-2540U User Manual…
-
Page 52: Qos Classification
This window allows you to configure a QoS queue entry and assign it a specific network interface. Click the Save/Apply button to save and activate the filter. QoS Classification Choose Add or Remove to configure network traffic classes. D-Link DSL-2540U User Manual…
-
Page 53
Please remember that all of the specified conditions on this window must be met for the rule to take effect. Click the Save/Apply button to save and activate this rule. D-Link DSL-2540U User Manual… -
Page 54: Routing Default Gateway
Click the Add button on the Routing – Static Route window to access the following window displayed on the next page. Enter the static routing information for an entry to the routing table. Click the Save/Apply button when you are finished. D-Link DSL-2540U User Manual…
-
Page 55: Dns
Server. Click the Save button when you are finished. Note:: After you complete the configuration, click the Save button, a dialog box will pop-up to hint users to reboot device to make configuration effectively Dynamic DNS D-Link DSL-2540U User Manual…
-
Page 56: Device Installation Dsl
DDNS servers prior to engaging it on the Router. This function will not work without an accepted account with a DDNS server. Note To access the DSL Settings window, click the DSL Setup button in the Advanced Setup directory. D-Link DSL-2540U User Manual…
-
Page 57
This window allows you to select the desired modulation, phone line pair, and capability. Click the Save/Apply button when you are finished. Click the Advanced Settings button to select a DSL test mode. Note: Modulation ADSL2、ADSL2+ and AnnexL should be selected simultaneously D-Link DSL-2540U User Manual… -
Page 58
Select the desired DSL test mode and then click the Apply button. Click the Tone Selection button to modify the upstream and downstream tones. Select the appropriate upstream and downstream tones for your ADSL connection. Click the Apply button to let your settings take effect. D-Link DSL-2540U User Manual… -
Page 59: Pptp
To access the PPTP Setting window, click the PPTP button in the Advanced Setup directory. To set up Point-to-Point Tunnel Protocol, tick the Enable check box, enter the appropriate information in the fields offered, and then click the Save/Apply button when you are finished. D-Link DSL-2540U User Manual…
-
Page 60: Interface Group
LAN and WAN interfaces using the Add button. The Remove button will remove the grouping and add the ungrouped interfaces to the Default group. Only the default group has IP interface. Choose Enable virtual ports on eth0 button and click Add to do advanced settings. D-Link DSL-2540U User Manual…
-
Page 61: Diagnostics
Section 3 – Configuration To create a new mapping group, enter Group Name, add interfaces to Grouped Interfaces. Click Save/Apply to save the changes. Diagnostics D-Link DSL-2540U User Manual…
-
Page 62: Management
Section 3 – Configuration Your modem is capable of testing your DSL connection with access to Diagnostics. This window is used to test connectivity of the Router. Management D-Link DSL-2540U User Manual…
-
Page 63: Settings
Click the Update Settings button to update your Router configurations with a file on your computer. This window allows Restore DSL router settings to the factory defaults. Click the Restore DSL Settings button to restore DSL router settings to the factory defaults. D-Link DSL-2540U User Manual…
-
Page 64: System Log
System Log server. The available event severity levels are: Emergency, Alert, Critical, Error, Warning, Notice, Informational, and Debugging. This window allows you to log selected events. When you are finished, click the Save/Apply button. D-Link DSL-2540U User Manual…
-
Page 65: Tr-069 C Lient
TR-069 client in the Router. When you are finished, click the Save button. Note:After you complete the configuration,you must reboot the modem to apply the changes Internet Time D-Link DSL-2540U User Manual…
-
Page 66
Section 3 – Configuration To access the Time settings window, click the Internet Time button in the Management directory. This window allows you to set the Router’s time configuration. When you are finished, click the Save/Apply button. D-Link DSL-2540U User Manual… -
Page 67: A Ccess C Ontrol
Section 3 – Configuration Access Control To access the Access Control windows, click the Access Control button in the Management directory. Services Enable or disable the desired LAN services. When you are finished, click the Save/Apply button. IP Address D-Link DSL-2540U User Manual…
-
Page 68: Passwords
Enter the IP address of the management station permitted to access the local management services. When you are finished, click the Save/Apply button. Passwords This window allows you to change the password on the Router. When you are finished, click the Save/Apply button. Update Software D-Link DSL-2540U User Manual…
-
Page 69: Save/Reboot
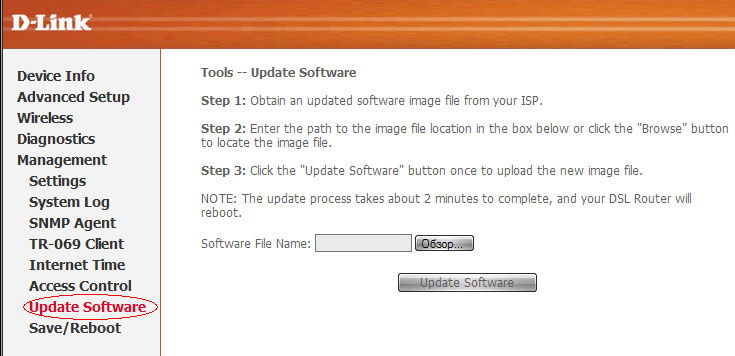
To access the Tools — Update Software window, click the Update Software button in the Management directory. This window allows you to update the Router’s software. Save/Reboot To access this window, click the Save/Reboot button in the Management directory. To save your settings and reboot the system, click the Save/Reboot button. D-Link DSL-2540U User Manual…
-
Page 70: Troubleshooting
Troubleshooting This chapter provides solutions to problems that might occur during the installation and operation of the DSL-2540U. Read the following descriptions if you are having problems. (The examples below are illustrated in Windows® XP. If you have a different operating system, the screenshots on your computer will look similar to the following examples.)
-
Page 71
There might be a potential security issue if you disable the setting of Firewall on your PC. Please remember to turn it back on once you have finished the whole installation procedure and can surf on Internet without any problem. D-Link DSL-2540U User Manual… -
Page 72: Networking Basics
Check Your IP Address After you install your new D-Link adapter, by default, the TCP/IP settings should be set to obtain an IP address from a DHCP server (i.e. wireless router) automatically. To verify your IP address, please follow the steps below.
-
Page 73: Ddress
Windows® 2000 — From the desktop, right-click on the My Network Places > Properties. Step 2 Right-click on the Local Area Connection which represents your D-Link network adapter and select Properties. Step 3 Highlight Internet Protocol (TCP/IP) and click on the Properties.
-
Page 74: Technical Specification
• RFC2131 DHCP Client / • RFC1213 SNMP v1 & v2c • RFC1334 PAP DHCP Server • RFC2364 PPP over ATM • RFC1389 RIP v2 • RFC2516 PPP over • RFC1577 Classical IP over Ethernet Data Transfer Rate D-Link DSL-2540U User Manual…
-
Page 75
• This device complies with Part15 of the FCC Rules. Operation is subject to the following conditions: (1) This device may not cause harmful interference, and (2) This device must accept any interference received, including interference that may cause undesired operation D-Link DSL-2540U User Manual…
Роутер D-Link DSL 2540U — одно из многих простых и недорогих устройств для подключения к интернету. Оборудование предназначено для использования дома и в небольших офисах, а настройка его осуществляется довольно просто. Давайте рассмотрим, какие основные функции предлагает нам этот маршрутизатор, как его установить и обновить на нём прошивку, если это необходимо.
Функциональное устройство подойдёт для любых помещений
Функционал
Модель DSL 2540U представляет собой недорогое устройство с достаточно высокой продуктивностью, которое отлично подойдёт для простых пользователей. В нём предусмотрено 4 LAN-порта, с их помощью можно создать локальную сеть для подключения к интернету, при этом сигнал будет поступать надёжно и на высокой скорости для каждого пользователя.
Для защиты сети предусмотрены базовые необходимые функции фильтрации адресов и межсетевой экран. Оборудование может работать в качестве моста или полноценного роутера.
Использование в режиме роутера
Для использования D-Link DSL 2540U как роутера от Ростелекома выполните такую настройку:
- Зайдите в параметры модема через адресную строку любого из браузеров.
- В меню выберите раздел Сеть, подменю Соединения.
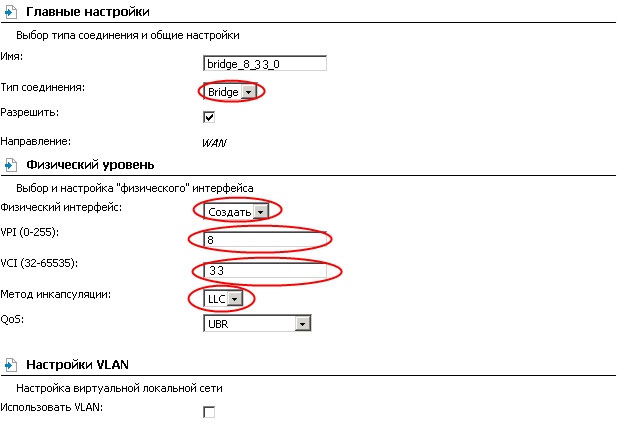
- Поочерёдно внесите необходимые данные для подключения: имя соединения, тип — PPPoE, на физическом уровне выберите вариант создать в строке «Статический интерфейс», введите комбинации цифр для VCI и VPI, далее из выпадающего списка выберите значение LLC.
- В настройках PPP не забудьте, что обязательно нужно ввести имя пользователя и пароль из договора с Ростелеком, при необходимости заполните остальные поля (ориентируйтесь на данные, предоставленные провайдером).
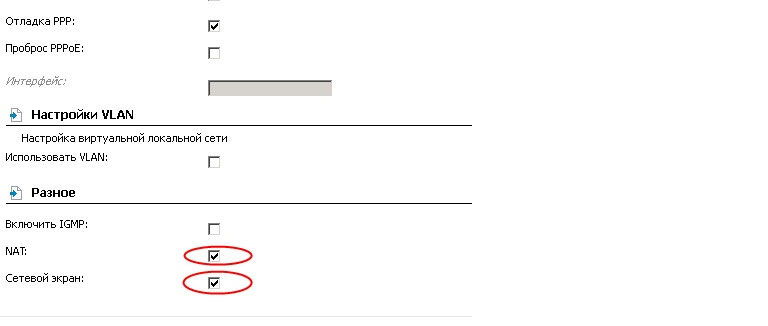
- Внизу окна отметьте галочкой только строки «NAT» и «Сетевой экран». Сохраните изменения, после чего в списке подключений появится новая строка с вашими параметрами.
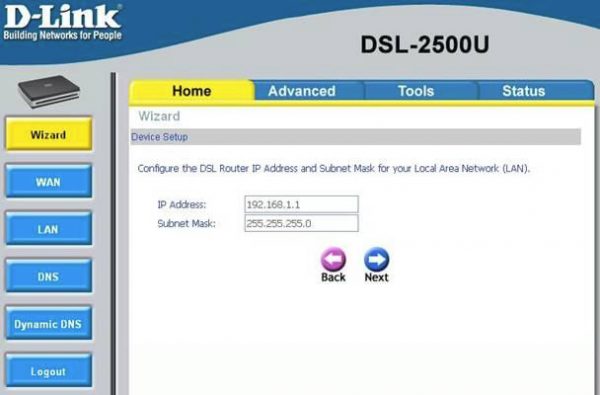
- Откройте меню Home, раздел Wizard.
- Уберите подтверждение со строки DSL Auto-Connect. Введите данные VCI и VPI, перейдите в следующее окно.
- В типе соединения остановитесь на PPP over Ethernet.
- В следующем меню введите данные логина и пароля, полученные от провайдера.
- Уберите галочку со строки «Dial on demand (with idle timeout timer)» и поставьте её напротив «Obtain default gateway automatically».
- Сохраните настройки.
Использование в режиме моста
Этот режим работы предусматривает, что маршрутизатор может синхронизироваться с другой точкой доступа, создавая общую сеть. Этот способ работы необходим для объединения нескольких пользователей в одной сети, для соединения группы компьютеров.
Мы рассмотрим, как настроить роутер D-Link DSL 2540U на примере того, как это происходит, если вы пользуетесь интернетом от оператора Ростелеком.
Поэтому для установки параметров в режиме «моста» требуется выполнить следующее:
- Зайдите в любой из браузеров, в строке адреса введите комбинацию 192.168.1.1.
- В окне авторизации введите слово admin в обеих строках (это актуально, если ранее вы не изменяли параметры роутера).
- В меню Wizard первым делом снимите галочку напротив строки DSL Auto-connect, далее введите значения VCI и VPI для вашего региона — если вы не знаете их, обратитесь к провайдеру или сами предварительно найдите эти данные.
- Жмите на стрелку с надписью Next, в следующем меню выберите тип подключения Bridging.
- Пропустите следующие два окна, ничего в них не меняя.
- Если всё верно, вы увидите таблицу со свойствами созданного соединения. Выберите «Сохранить» (Save/Reboot), после чего маршрутизатор выполнит перезагрузку.
Если интерфейс меню оборудования у вас на русском языке и перед вами не появилось меню Wizard, зайдите в раздел Соединения, выполните настройку режима моста в появившемся окне: выберите режим моста, поставьте галочку напротив «Разрешить», введите значения VCI и VPI, уберите флажок со строки «Использовать VLAN».
Обновление ПО
Прежде всего, стоит отметить, что у марки D-Link предусмотрен отдельный FTP-сервер, где можно загрузить новую версию прошивки для роутера DSL 2540U. При выборе обращайте внимание на модель, и обязательно — версию программного обеспечения.
Загрузите необходимый файл на компьютер и выполните такие действия:
- Зайдите в интерфейс роутера через браузер, выберите раздел Management.
- Откройте вкладку Update Software, в появившемся окне укажите путь к файлу прошивки.
- Нажмите Update Software, роутер установит прошивку, перезагрузится, после чего вы можете проверить или заново установить настройки и продолжать пользоваться интернетом.
Как видите, роутер D-Link DSL 2540U довольно прост в настройке, в нём удачно сочетаются доступность по цене, качество и производительность, комфорт в пользовании. Поэтому он является отличным вариантом сетевого оборудования для дома или небольшого офиса.
Роутеры и модемы D-Link идут наверно на втором месте по популярности после моделей TP-Link. У компании есть уже устаревшие бюджетные модели, как, например, D-Link DSL 2540u, которые больше не производят. Как вам настроить интернет на этом модеме, если вы стали его владельцем? Какие у девайса характеристики?
Комплектация D-Link DSL 2540u, внешний вид + цена
Устройство чёрного цвета, сделано из пластика. Содержимое коробки впечатляющее:
- сам беспроводной маршрутизатор модели DSL 2540u;
- блок питания на 12В;
- LAN-кабель для подключения к компьютеру;
- DSL-кабель (удлинитель для протягивания кабеля от розетки провайдера до устройства);
- подставка для вертикальной установки модема;
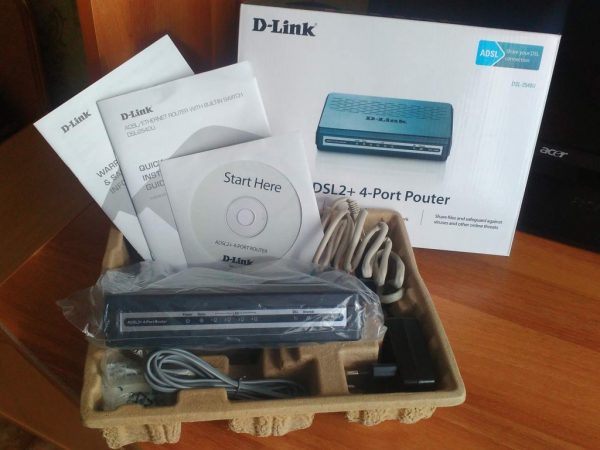
- инструкция и другие документы к роутеру.
В комплект входит кабель для подключения модема к ПК
Модель устройства уже устаревшая, поэтому её можно приобрести в большинстве случаев только с рук. Приблизительная цена — от 500 до 100 рублей в зависимости от состояния модема.
Описание индикаторов и портов
На фронтальной панели модема находится несколько светодиодов:
- Питание.
- Передача данных (трафик проходит через модем).
- Порты LAN (если горят, к ним подключены кабели, которые идут от других устройств).
- Успешное подключение ADSL (если горит, связь с провайдером есть).
- Доступ к интернету (если горит, то он есть).
Спереди находятся все индикаторы состония модема и его разъёмов
Сзади расположены такие разъёмы: порты LAN для «локалки», выход для адаптера питания, порт ADSL (для кабеля провайдера). На тыльной панели вы также найдёте клавишу для включения/отключения девайса, а также кнопку для возврата заводских настроек. Если вы захотите сбросить настройки модема, просто зажмите её иголкой, скрепкой или иным острым предметом на несколько секунд.
Сзади находятся 4 локальных выхода
Таблица: технические характеристики D-Link DSL 2540u
| Стандарты ADSL | Стандарты ADSL: Multi-mode, ANSI T1.413 Issue 2, ITU-T G.992.1 (G.dmt) Annex A, ITU-T G.992.2 (G.lite) Annex A, ITU-T G.994.1 (G.hs). Стандарты ADSL2: ITU-T G.992.3 (G.dmt.bis) Annex A/L/M, ITU-T G.992.4 (G.lite.bis) Annex A. Стандарты ADSL2-: ITU-T G.992.5 Annex A/M. |
| Скорости передачи данных ADSL | G.dmt: 8 Мбит/с нисходящего потока, 832 Кбит/с восходящего потока. G.lite: 1.5 Мбит/с нисходящего потока, 512Кбит/с восходящего потока. ADSL2: 12 Мбит/с нисходящего потока, 1 Мбит/с восходящего потока. ADSL2-: 24 Мбит/с нисходящего потока, 1 Мбит/с восходящего потока. |
| Протоколы ATM/PPP | ATM Adaptation Layer Type 5 (AAL5). Инкапсуляция Ethernet Bridged и Routed Мультиплексирование на основе VC и Logical Link Control (LLC). MAC Encapsulated Routing. ATM Forum UNI3.1/4.0 PVC. PPP over Ethernet (PPPoE). PPP over ATM (RFC 2364). PPP Link Control Protocol (LCP). Internet Protocol Control Protocol (IPCP). PPP Authentication Protocol (PAP). PPP Challenge Handshake Authentication Protocol (CHAP). Microsoft PPP CHAP extensions. |
| Функции маршрутизатора и сетевые протоколы | Ethernet to ADSL Self-Learning Transparent Bridging. Internet Control Message Protocol (ICMP). Трансляция сетевых адресов (NAT), статическая IP-маршрутизация. NAT ALG (опционально): MSN/AOL/Yahoo Messenger, FTP, SNMP, CUSEEME, Real Audio, MIRC, SIP, ICQ, игры. Dynamic Host Configuration Protocol: DHCP-сервер/клиент/relay. SNTP, DNS Relay, DDNS proxy и IGMP proxy. |
| Межсетевой экран / Безопасность доступа | Межсетевой экран BNAT. Фильтрация на основе MAC-адресов. Фильтрация пакетов. Фильтрация содержимого URL (фильтрация по ключевому слову). Блокировка доменов. Stateful Packet Inspection (SPI). Предотвращение атак Denial of Service (DoS). Система обнаружения вторжений. Регистрация событий. Аутентификация пользователей PAP. Аутентификация пользователей CHAP. DMZ. |
| VPN | Multiple IPSec/PPTP/L2TP pass-through |
Общая схема подключения модема к линии провайдера и компьютеру
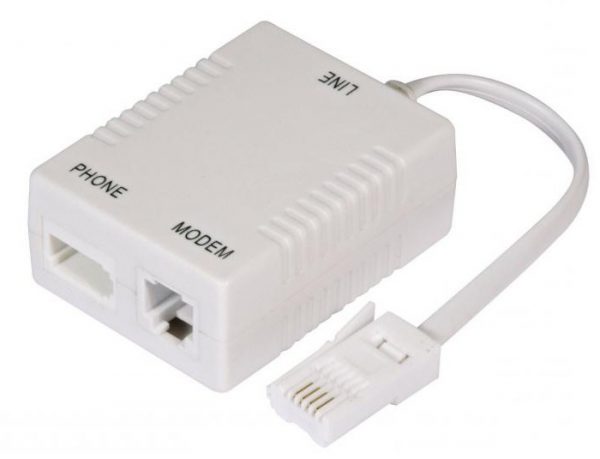
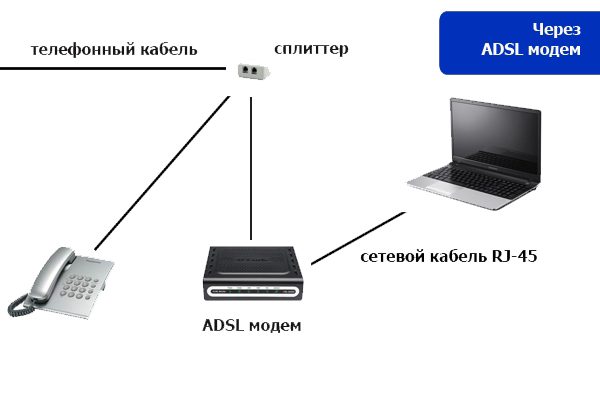
Модем ADSL нужно подключить с одной стороны к линии интернет-провайдера. Вам нужен сплиттер, который будет разъединять сигнал для телефона и интернета. Кабель компании вставляем в разъём Line, с другой стороны вставляем DSL-кабель из комплекта в порт Modem. Другой конец DSL кабеля подключаем к выходу ADSL на роутере.
К сплиттеру подключается телефонная линия провайдера
LAN-кабель из комплекта одним концом вставляем в первый порт роутера, а вторым — в сетевую карту на ПК. Если у вас ноутбук, выход карты будет справа или слева, а если стационарный ПК — сзади.
ADSL-модем нужно соединить со сплиттером и ПК
Подготовка компьютера к настройкам
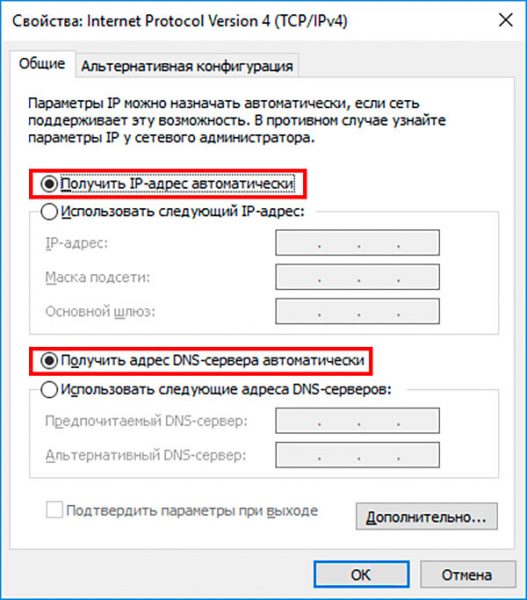
Перед отладкой «инета» на роутере, сетевую карту ПК нужно переключить на режим автоматической отправки IP и DNS:
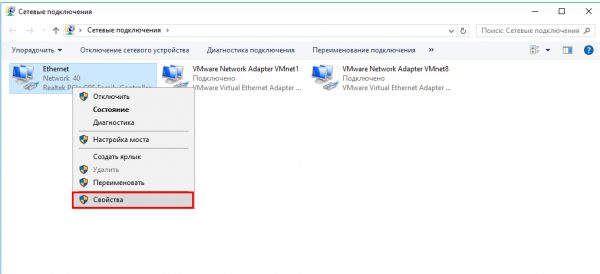
- Зажмите Windows и R на «клаве» и напишите команду ncpa.cpl.
- В окне сетевых адаптеров выберите нужный (Ethernet или «Локальная сеть») и с помощью правой клавиши мыши раскройте его свойства.
Зайдите в свойства адаптера
- Из списка компонентов выберите протокол TCP/IP четвёртой версии и двойным щелчком мыши вызовите его настройки.
- Настройте автоматическую отправку сетевого адреса и адреса сервера DNS. Щёлкните по кнопке ОК для сохранения.
Выставьте автоматическое получение данных
Вход в настройки
Как попасть с настройки D-Link DSL 2540u:
- Запустите любой браузер и напишите в адресной строке 192.168.1.1. Перейдите на эту страницу и войдите в интерфейс (логин — admin, пароль не нужен).
- Перейдите в раздел «Система».
- В меню для пароля «админа» задайте пароль. Сохраните изменения.
Настройка подключения к интернету
Покажем и расскажем, как настроить подключение к интернету по ADSL. Для примера возьмём оператора «Ростелеком»:
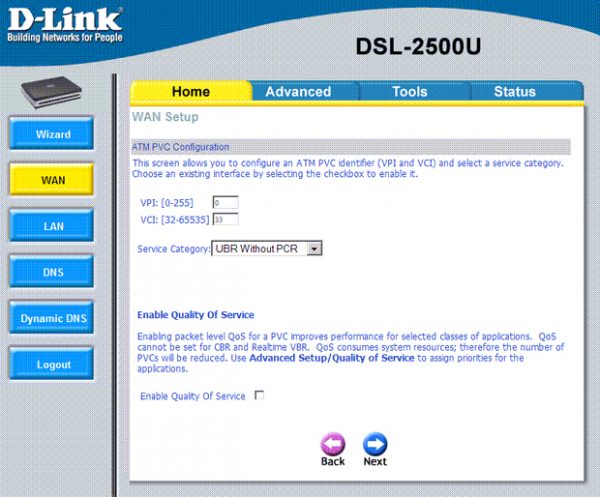
- Перейдите в раздел WAN и щёлкните по Add. Напишите значения для параметров VPI и VCI (они должны быть указаны в договоре, можно узнать информацию у техподдержки провайдера). В Service Category ставим значение UBR Without PCR. Щёлкните по Next.
Наберите VPI и VCI
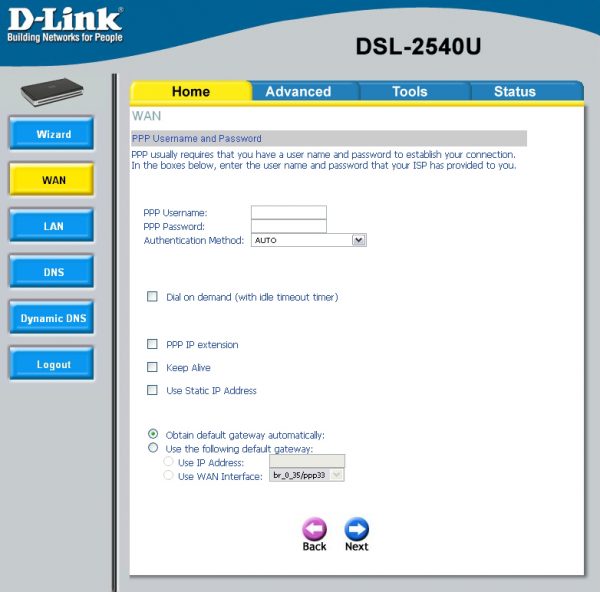
- Выберите PPPoE в перечне протоколов. Напишите логин (username) и пароль (password) — данные найдёте в договоре с провайдером. Поставьте птичку рядом с Keep Alive.
Пройдите авторизацию: напишите логин и пароль
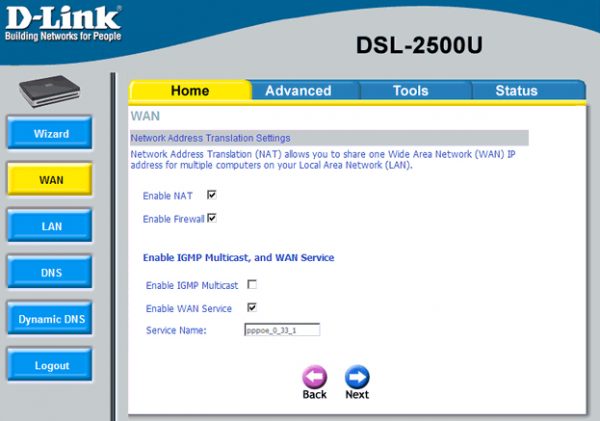
- Активируйте NAT и Firewall и при необходимости IGMP, если собираетесь пользоваться цифровым телевидением от провайдера. Щёлкните по Next, чтобы сохраниться.
Включите NAT и сетевой экран
Отладка беспроводной сети Wi-Fi
Интернет практически готов к использованию. Осталось только настроить некоторые параметры беспроводной сети модема:
- Перейдите в блок «Вай-Фай». В основных настройках активируйте беспроводную сеть, выберите и впишите имя для сети (SSID). Укажите свою страну.
- Поставьте автоматический переход на разные каналы связи. В режиме сети укажите 802.11 B/G/N mixed.
- В параметрах безопасности (меню ниже), поставьте комбинированный тип защиты WPA-PSK/WPA2-PSK-mixed. Вбейте придуманный пароль на сеть и сохраните изменения.
Проброс портов
Проброс портов нужен, если вам, например, необходимо получить доступ к домашним сетевым папкам либо изображению камеры IP. Как выполнить проброс:
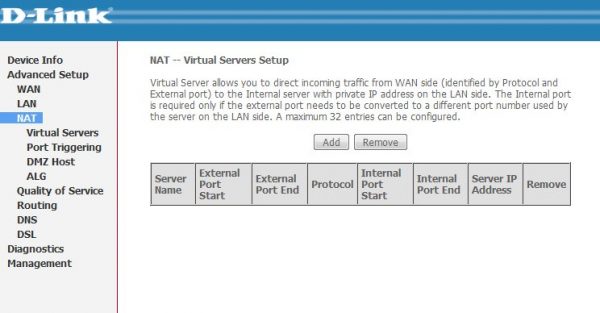
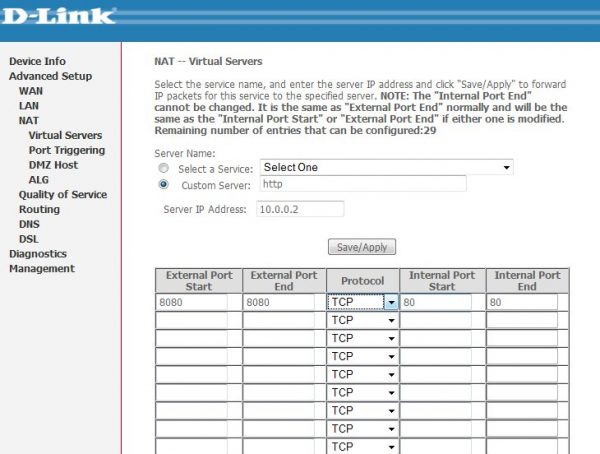
- Заходим в раздел Advanced setup — NAT и кликаем на ADD. Добавить новый порт для проброса можно из окна создания виртуальных серверов.
Кликните по Add в меню
- В диалоге настройки порта последовательно заполните следующие поля:
- имя правила — в дальнейшем оно поможет идентифицировать порт с конкретным приложением или устройством;
- интерфейс — выберите из выпадающего списка тот, при помощи которого установлено интернет-соединение;
- протокол — можно выбрать TCP, UDP или оба типа;
- диапазон адресов для внутреннего и внешнего портов — если порт один, начальное и конечное значения диапазона должны совпадать;
- внутренний адрес IP — сетевой адрес в локальной сети компьютера, на котором запущено приложение, нуждающееся в пробросе порта, или адрес периферийного устройства с сетевым интерфейсом (камеры, принтера, сетевого хранилища);
- внешний адрес IP — адрес, который получает при соединении с провайдером ваш маршрутизатор.
Заполните все поля в форме
Настройка модема в режиме моста
Модель D-Link DSL 2540u можно использовать в качестве дополнительного роутера (подключить его к другому, более мощному маршрутизатору). Чтобы соединить два устройства, используйте режим моста:
- Откройте окно с мастером настройки модема (Wizard). Снимите галочку в пункте DSL Auto-connect и в открывшемся поле введите значения VPI и VCI в зависимости от вашего провайдера (узнайте в техподдержке). Нажмите на Next.
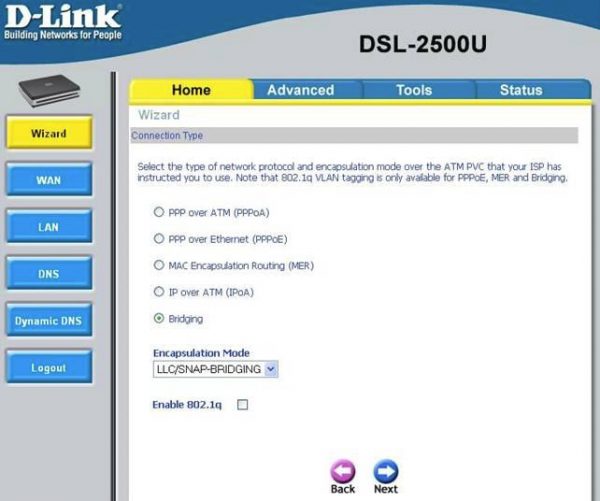
- В следующем окне Connection Type выберите Bridging, Encapsulation Mode — LLC/SNAP Bridging, нажмите на Next.
Переключитесь на режим моста
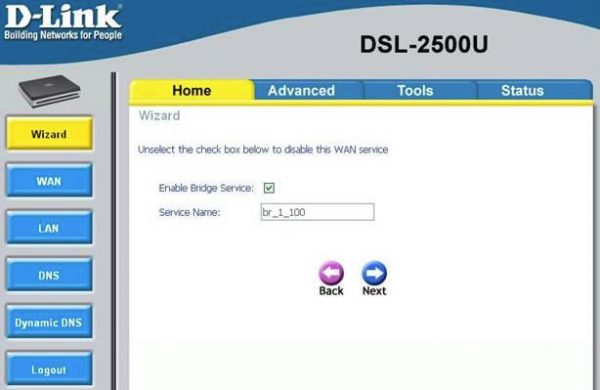
- Далее установите галочку Enable Bridge Service. Введите имя сервиса и щёлкните по Next.
Отметьте пункт и задайте имя для сервиса
- При необходимости поменяйте IP-адрес модема. Если модем будет использоваться в связке с беспроводным маршрутизатором, установите адрес из того диапазона, что выдаёт сервер DHCP беспроводного роутера. Маска подсети тоже должна совпадать.
Поставьте другой адрес модема
- В последнем окне мастера настройки выводится суммарная информация. Если все значения верны, нажмите на кнопку Save/Reboot для сохранения настроек и перезагрузки модема.
Таблица: возможные проблемы с роутером и их решение
| Описание проблемы | Причина и решение |
| Светодиод питания не горит, хотя роутер к сети подключён и включён с помощью кнопки | Скорее всего, сгорел блок питания. Его нужно заменить. Если не знаете какой купить, сдайте устройство в сервисный центр. А вообще подойдёт любой с напряжением 12В и током от 0,5А и выше. |
| Светодиод питания горит оранжевым | Устройство находится в режиме аварийного восстановления. Его прошивка сейчас повреждена — её нужно переустановить. Сделать это можно через тот же веб-интерфейс с настройками. Предварительно скачайте последнюю прошивку с официального сайта производителя с учётом модели. |
| Светодиод DSL постоянно моргает | Девайс не может связаться с оборудованием вашего интернет-провайдера. Посмотрите, всё ли в порядке с кабелями и сплиттером — не повреждены ли они. Если нет, звоните в техподдержку провайдера. Возможно, проблема на его стороне. |
| Устройство само перезагружается каждую минуту-две. | Блок питания «полетел». Его нужно заменить. |
| Не светится светодиод подключения к сети | Возможно, при настройке PPPoE вы неверно ввели логин и пароль от сети провайдера. |
| Скорость интернета падает, устройство нагревается | Процессор модема перегружен. Либо отключите от сети «Вай-Фай» ненужные устройства, либо используйте роутер DSL как дополнительный — в паре с более мощным маршрутизатором. |
Модем D-Link DSL 2540u может работать в качестве роутера и дополнительного маршрутизатора (в режиме моста). Настраивается модель как и любая другая — через веб-оболочку с различными параметрами. Так как это ADSL-модем, его нужно предварительно подключить к телефонной линии провайдера с помощью сплиттера, который разъединяет сигнал для телефона и интернета.
- Распечатать
Оцените статью:
- 5
- 4
- 3
- 2
- 1
(5 голосов, среднее: 1 из 5)
Поделитесь с друзьями!


