- Manuals
- Brands
- Duplo Manuals
- Printer Accessories
- DC-10 mini
- Instruction manual
-
Contents
-
Table of Contents
-
Troubleshooting
-
Bookmarks
Quick Links
DC-10 mini
Instruction Manual
Please let our service people install the machine.
DUPLO CORPORATION
1
Related Manuals for Duplo DC-10 mini
Summary of Contents for Duplo DC-10 mini
-
Page 1
DC-10 mini Instruction Manual Please let our service people install the machine. DUPLO CORPORATION… -
Page 3: Safety Precautions
SAFETY PRECAUTIONS Thank you for purchasing a DC-10 mini Duplo Collator. This instruction manual describes the functions of the DC-10Bmini, how to operate it, and safety precautions in use. Before using your unit, read this instruction manual carefully in order to use your unit correctly and get the best out of it.
-
Page 4: Table Of Contents
Table of Contents WARNINGS ……..5 7-5. When the PAPER FEED TABLE ERROR Lamp Blinks Quickly in Red ….32 PRECAUTIONS ……8 7-6. When the CARRIER COVER OPEN 2-1. Precautions in Installation ……8 Lamp Lights Up ……..33 2-2.
-
Page 5: Warnings
WARNINGS • Do not drop metallic objects, inflammable objects, and liquids such as water inside the unit. Should such objects and liquids accidentally drop inside the unit, turn off the power switch, disconnect the power plug, and remove the object or liquid. If the object or liquid cannot be removed, contact your dealer promptly.
-
Page 6
WARNINGS • Do not scratch, damage, nor remodel the power cord. Do not place heavy objects on it, pull it, nor bend it strongly, as the power cord may become damaged, and fire and electric hazards may result. If the power cord is frayed, scratched, or damaged, turn off the power switch immediately, disconnect the power supply plug from the outlet, and contact your dealer promptly. -
Page 7
WARNINGS • Do not bind the power cord even if it is too long, as heat discharge may become poor and cause fire hazards. Prohibited • Wipe away dusts collected on the power supply plug blades and the face of these blades with a dry cloth. -
Page 8: Precautions
PRECAUTIONS 2-1. Precautions in Installation • Install the unit on a horizontal, wide, and stable ground, or the unit may turn over and cause injuries. The size of the unit in use is 790 (Width) x 500 (Depth) x 970 (Height) mm. •…
-
Page 9: Component Parts
Paper receiving table ö û Instruction manual Auxiliary paper feed table ü Support Guide for feeding A5 paper Screw (MSKW6x10) horizontally NOTE The added parts (marked with ) are necessary for the installation of DC-10 mini on the exclusive cabinet.
-
Page 10: Attaching The Parts
2. INSTALLING THE UNIT 2-3. ATTACHING THE PARTS ó Attach the jogger unit ó Remove the two ornamental screws attached to the unit and attach the jogger unit ó <Parts Used> Jogger unit ……… 1 Ornamental Jogger unit screws • Screw on the stopper screws lightly and push Jogger unit down the left and right edges of the jogger unit…
-
Page 11
2. INSTALLING THE UNIT ô Attach the auxiliary paper feed table Auxiliary paper feed table ô Insert the hook of the auxiliary paper receiving table into the pillar of the unit. ô <Parts Used> Auxiliary paper feed table ..10 Connect the power supply cord to the connector of the unit. -
Page 12: Names Of Each Part
3. NAMES OF EACH PART Movable guide Fixed guide Control panel Paper feed table Auxiliary paper feed table Paper feed pressure adjusting knob (One for each plate) Jogger (right) Paper receiving stopper Power switch Jogger (left) Paper receiving table Paper separator pressure adjusting knob Carrier cover Connector for connecting the paper…
-
Page 13: Names And Functions Of Control Panel Parts
4. NAMES AND FUNCTIONS OF CONTROL PANEL PARTS…
-
Page 14: Dip Switches
4. NAMES AND FUNCTIONS OF CONTROL PANEL PARTS Name Function ó NO. OF SETS • Displays the number of sets to be collated into or the number of sets yet to be window collated into. • When the INTERLEAVING mode is set, it will display where the interleaf is to be inserted (after how many sets).
-
Page 15: Normal Mode
4. NAMES AND FUNCTIONS OF CONTROL PANEL PARTS Name Function • 123 key Use to set the number of digits to be input for the number of sets required. Each time this key is pressed, the number of digits will change. ¶…
-
Page 16: Precautions Before Use
5. PRECAUTIONS BEFORE USE 5-1. STACKING THE PAPER Loosen the paper sufficiently and stack it on the paper feed table. • Insert the paper along the fixed guides until it touches the guide of the paper feed gate lightly. • Flatten folded or curled paper before using them.
-
Page 17: Stacking According To Paper Size
5. PRECAUTIONS BEFORE USE 5-2. STACKING ACCORDING TO PAPER SIZE Take note that the way to stack the paper differs according to the size of the paper. For A3SR, A3, LD, A4, LT, and B5 paper: • Place the paper vertically as shown in the figure. For A5 paper: •…
-
Page 18: Stacking Paper For The Continuous Mode
5. PRECAUTIONS BEFORE USE 5-4. STACKING PAPER FOR THE ALTERNATIVE MODE • Divide paper of the same page into two piles and stack them on odd and even paper feed tables (tables 1 and 2, table 3 and 4, tables 5 and 6, tables 7 and 8, tables 9 and 10).
-
Page 19: Operating Procedures
6. OPERATING PROCEDURES 6-1. PROCEDURES FOR USING THE UNIT <Tower A Initial Setting Operations> <Operations when initial Order settings have been changed> Turn on the power Turn on the power 2 —————————————- 3 —————————————- Adjust the paper feed pressure Adjust the paper feed pressure 4 —————————————- Adjust the paper separator Adjust the paper separator…
-
Page 20
6. OPERATING PROCEDURES Insert t h e p ow e r c o rd i n to t he electrical outlet. Turn on the power switch. • When pushed to “I”, the power will be supplied. • When pushed to “O”, the power will be cut off. Power switch Set the paper feed pressure adjusting knob as follows. -
Page 21
6. OPERATING PROCEDURES Push the movable guides lightly against the sides of the paper. Press the PERIPHERALS key. • When using the downstream processing devices (optional), press the key and turn it on…………The lamp lights up • When not using them, press the key and turn it off. PERIPHERALS key It will remain off as long as no downstream PAPER RECEIVING key… -
Page 22
6. OPERATING PROCEDURES ö • When using A5 paper, push in the paper receiving Guide for stopper completely and then attach the guide feeding for feeding horizontally provided with your unit horizontally as shown in the figure. Paper receiving stopper Paper scale Set the jogger (left). -
Page 23
6. OPERATING PROCEDURES Decide the speed. When using the jogger unit and paper receiving table • When the power is turned on, the speed will be set to “Slow” (35 sets/minute)..SLOW lamp lights up • To set to “Fast” (55 sets/minute), press the SPEED key. -
Page 24
6. OPERATING PROCEDURES D e c i d e w h i c h m o d e — N O R M A L , ALTERNATIVE, or INTERLEAVING-to set. • When the power is supplied, the NORMAL mode will be set. •… -
Page 25
6. OPERATING PROCEDURES õ Press the 123 key again. The NO. OF SETS window will display the number input continuously. The first digit will be blinking. Press the START/STOP key and start operations. • The following operations will be carried out according to the method set for displaying the number of sets to be collated into. -
Page 26: Preset Key
6. OPERATING PROCEDURES 6-2. PRESET KEY Use the PRESET key to check which table has paper and which does not, and at the same time, to record the thickness of the paper. After checking, the paper will be fed only from the table which has paper. ó…
-
Page 27: Sort Mode And Normal Mode
6. OPERATING PROCEDURES 6-3. OFFSET MODE AND STRAIGHT MODE OFFSET Mode • In this mode, the paper ejected onto the paper receiving table will be stacked into one set as shown in the figure. STRAIGHT Mode • The paper ejected on the paper receiving table will not be sorted but stacked into one pile.
-
Page 28: And Interleaving Modes
6. OPERATING PROCEDURES 6-4. SINGLE, ALTERNATIVE, AND INTERLEAVING MODES NORMAL Mode • In this mode, paper can be stacked on all the paper feed tables. The paper will be fed from the tables, starting from the top one, and ejected as one set. •…
-
Page 29
6. OPERATING PROCEDURES C h e c k i n g t h e n u m b e r o f s e t s specified and re-inputting the number • To check the number of sets input and specified, press the COLLATION MODE key. -
Page 30: Dip Switches
6. OPERATING PROCEDURES 6-5. DIP SWITCHES • The dip switches are located inside the cover. • The functions of the dip switches and settings at factory are as shown in the figure below. Setting Dip Switches Cover OFF ON Detects paper jamming at 1st table Yes No Detects paper jamming at 2nd table Yes No…
-
Page 31: What To Do When
7. WHAT TO DO WHEN… 7-1. WHEN THE PAPER FEED TABLE ERROR LAMP LIGHTS UP IN GREEN Cause • There is no more paper on the paper feed table. Correction • When there is not enough paper in the set ejected onto the paper receiving table or downstream processing device, Err1 will be displayed on the NO.
-
Page 32: When The Paper Feed Table Error Lamp Blinks In Red
7. WHAT TO DO WHEN… 7-4. WHEN THE PAPER FEED TABLE ERROR LAMP BLINKS IN RED Cause • Paper have been multi-fed from the paper feed table. Correction • There is excessive paper in the set ejected onto the paper receiving table or downstream processing device.
-
Page 33: When The Carrier Cover Open Lamp Lights Up
7. WHAT TO DO WHEN… 7-6. WHEN THE CARRIER COVER OPEN LAMP LIGHTS UP Cause • When the carrier cover is not closed properly. Correction • Close the door properly. The lamp will go off. • If the unit stops during operations, press the EJECT key and eject the paper inside.
-
Page 34: When The Paper Jams
7. WHAT TO DO WHEN… 7-10. WHEN THE PAPER JAMS When paper jams at the paper feed ring Pull out the jammed paper towards you and remove it. When the paper jams at the ejection gate Press the EJECT key. The unit will start and eject the jammed paper.
-
Page 35: Troubleshooting Guide
8. TROUBLESHOOTING GUIDE 8-1. WHEN THE UNIT DOES NOT START EVEN WHEN THE START/STOP KEY IS PRESSED ó n Close the door. The unit can be operated. Is the door open? ò n Remove the paper. Operations will start. Is the paper receiving table full with paper? ô…
-
Page 36: When «E-1» Is Displayed On The No. Of Sets Window
8. TROUBLESHOOTING GUIDE 8-5. WHEN “E-1” IS DISPLAYED ON THE NO. OF SETS WINDOW T h e p a p e r r e c e i v e r h o r i z o n t a l m o v e m e n t n Turn off the power switch, wait 30 seconds, and turn mechanism is faulty.
-
Page 37: Daily Cleaning And Replacing Expendable Parts
9. DAILY CLEANING AND REPLACING EXPENDABLE PARTS Cleaning the Unit Using paper feed rings, paper separators, etc. (parts carrying the paper) which are dirty with ink or paper powder will cause paper-feeding problems. Therefore, clean these parts occasionally according to the following procedure.
-
Page 38: Specifications
10. SPECIFICATIONS Name DC-10 mini Model Desktop No. of tables Paper feeding method 3-rings paper separator Paper carrying method Roller belt Paper feed table capacity 28 mm (Fine quality paper:64g/m , equivalent to 280 sheets) Paper sizes Smallest:A5 (148×210) Largest:A3SR (320×450) But the smallest paper (A5) can only be fed horizontally and the largest paper (A3SR) be collated in the NORMAL mode.
-
Page 39
97J-91185-9611XXXXS-0…
-
Руководства по ремонту
1

Duplo DC-10 сервис-мануал
(153 страницы)
- Языки:Английский
-
Тип:
ZIP -
Размер:
6.89 MB
Просмотр
Duplo DC-10 (Другое) сервис мануалы в PDF-формате помогут найти неполадки и ошибки, а также осуществить ремонт Duplo DC-10 и восстановить работу устройства.
6. OPERATING PROCEDURES
13
D e c i d e w h i c h m o d e — N O R M A L ,
ALTERNATIVE, or INTERLEAVING-to
set.
•
When the power is supplied, the NORMAL mode
will be set.
•
The mode will change to NORMAL or
ALTERNATIVE each time the COLLATION
MODE key is pressed.
•
The INTERLEAVING mode will be set when the
key is pressed for more than 0.5 seconds. When
pressed for a further 0.5 seconds, the NORMAL
mode will be set.
•
I n t h e I N T E R L E A V I N G m o d e , t h e
INTERLEAVING MODE lamp and NORMAL
MODE lamp will light up.
•
For the INTERLEAVING mode, it is necessary
to input where the interleaf is to be inserted (after
how many sets).
Refer to «6-4. SINGLE CONTINUOUS, and
INTERLEAVING Modes» on page 28.
14
Decide the method of displaying the
number of sets required.
Add display method
Before starting, check that the NO. OF SETS window
displays 0. To set to 0, press the CLEAR key.
Subtract display method
Input the number of sets required as follows.
Up to 9999 can be input.
ó
Press the 123 key.
«0.0.0.0.» will be displayed on the NO. OF SETS
window. The fourth «0.» from the right will be
blinking. This blinking digit will increase by one from
1 each time the + key is pressed and decrease by one
from 9 each time the – key is pressed. Set this fourth
digit using these keys.
ò
Press the 123 key again.
ó
The third «0.» on the NO. OF SETS window will
blink. Like step
digit.
ô
Press the 123 key again.
ó
The second «0.» on the NO. OF SETS window will
blink. Like step
second digit.
ö
Press the 123 key again.
ó
The first «0.» on the NO. OF SETS window will blink.
Like step
, use the + or – key to set this first digit.
24
, use the + or – key to set this third
, use the + or – key to set this
COLLATION MODE key
г.Москва, Ленинградский проспект. д.78, корп.1 (м. Сокол) / пн-чт: с 10:00 до 19:00, пт: до 18:00
+7 (499) 152-00-16
»
»
Листоподборочный аппарат Duplo DC 10 mini
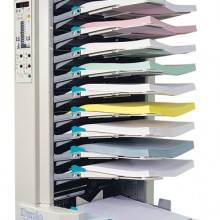
Листоподборщик на 10 лотков; А3-А5 формат бумаги, max — 320х450, min — 148×210; масса подбираемой бумаги 40-200 г/м2; емкость лотка 28 мм; скорость листоподбора 1500 — 3300 блоков/час; вспомогательное оборудование DC-S4 — степлер, DC J — сталкиватель; дополнительное оборудование DBM-120 + DBM-120T; электропитание 230/50 V/Hz; габариты (ДхШхВ) — 625х500х970 мм; вес 55 кг.

100% гарантия на перепечатку некачественного материала (при заказе и разработке макета у нас)

Помощь в доработке Ваших макетов

Лучшее соотношение цены и качества печати

Регулярное обновление и пополнение самым новым оборудованием

У нас работают только профи своего дела с многолетним опытом

У нас своя постпечатная обработка, этим мы экономим ваше время и деньги