
Руководство на английском языке по техническому обслуживанию и ремонту автомобилей Volkswagen Golf и Volkswagen Jetta 1984-1992 годов выпуска с бензиновыми двигателями.
- Автор: —
- Издательство: Haynes Publishing
- Год издания: 1997
- Страниц: 310
- Формат: PDF
- Размер: 7,2 Mb
Руководство на английском языке по техническому обслуживанию и ремонту автомобилей Volkswagen Golf/Golf GTI/Jetta 1999-2005 годов выпуска с бензиновыми и дизельными двигателями.
- Автор: —
- Издательство: Bentley Publishers
- Год издания: 2005
- Страниц: 4954
- Формат: PDF
- Размер: 60,9 Mb

Программа самообучения по устройству автомобиля Volkswagen Jetta 2006 года выпуска.
- Автор: —
- Издательство: Volkswagen AG
- Год издания: —
- Страниц: 39
- Формат: PDF
- Размер: 4,2 Mb
Схемы на английском языке по электрооборудования автомобиля Volkswagen Jetta с 2010 года выпуска.
- Автор: —
- Издательство: Volkswagen AG
- Год издания: —
- Страниц: 1099
- Формат: PDF
- Размер: 21,3 Mb

Сборник руководств на английском языке по техническому обслуживанию и ремонту автомобиля Volkswagen Jetta с 2005 года выпуска.
- Автор: —
- Издательство: Volkswagen AG
- Год издания: 2005-2015
- Страниц: —
- Формат: PDF
- Размер: 179,8 Mb
Сборник руководств на английском языке по техническому обслуживанию и ремонту автомобиля Volkswagen Jetta с 2011 года выпуска.
- Автор: —
- Издательство: Volkswagen AG
- Год издания: 2010-2016
- Страниц: —
- Формат: PDF
- Размер: 206,4 Mb
Руководство по техническому обслуживанию и ремонту автомобилей Volkswagen Golf и Volkswagen Jetta 1984-1992 годов выпуска с бензиновыми двигателями.
- Автор: —
- Издательство: Алфамер
- Год издания: —
- Страниц: 278
- Формат: PDF
- Размер: 17,0 Mb

Руководство по эксплуатации, техническому обслуживанию и ремонту автомобилей Volkswagen Golf и Volkswagen Jetta с 2004 года выпуска с бензиновыми и дизельными двигателями.
- Автор: —
- Издательство: Алфамер
- Год издания: —
- Страниц: 408
- Формат: —
- Размер: —
Мультимедийное руководство по эксплуатации и ремонту автомобилей Volkswagen Golf II и Volkswagen Jetta 1983-1992 годов выпуска.
- Автор: —
- Издательство: —
- Год издания: —
- Страниц: —
- Формат: —
- Размер: 102,4 Mb

Руководство на немецком языке по техническому обслуживанию и ремонту автомобилей Volkswagen Golf V/Golf Plus/Jetta/Touran с 2003 года выпуска.
- Автор: —
- Издательство: Delis Klasing
- Год издания: —
- Страниц: 332
- Формат: PDF
- Размер: 133,2 Mb

Руководство по техническому обслуживанию и ремонту автомобилей Volkswagen Golf до 1983 и Volkswagen Jetta до 1984 года выпуска с дизельными двигателями.
- Автор: —
- Издательство: Автостиль
- Год издания: 1996
- Страниц: 271
- Формат: PDF
- Размер: 46,0 Mb
Руководство на английском языке по ремонту АКПП автомобиля Volkswagen Jetta 1986 года выпуска.
- Автор: —
- Издательство: —
- Год издания: —
- Страниц: 47
- Формат: PDF
- Размер: 2,1 Mb

Руководство по техническому обслуживанию и ремонту автомобилей Volkswagen Golf/Jetta/Scirocco 1974-1984 годов выпуска.
- Автор: —
- Издательство: ПетерГранд
- Год издания: 1998
- Страниц: 217
- Формат: DjVu
- Размер: 12,9 Mb

Руководство по техническому обслуживанию и ремонту автомобилей Volkswagen Golf и Volkswagen Jetta 1984-1992 годов выпуска с бензиновыми двигателями объемом 1,1/1,3/1,6/1,8 л.
- Автор: —
- Издательство: Легион-Автодата
- Год издания: —
- Страниц: 336
- Формат: —
- Размер: —

Руководство по эксплуатации, техническому обслуживанию и ремонту автомобилей Volkswagen Golf II и Volkswagen Jetta II 1984-1993 годов выпуска с бензиновыми двигателями.
- Автор: —
- Издательство: Экоинвест
- Год издания: 1997
- Страниц: 331
- Формат: DjVu
- Размер: 31,9 Mb

Руководство по эксплуатации и ремонту автомобилей Volkswagen Golf V/Golf Plus/Jetta/Touran с 2003 года выпуска с бензиновыми и дизельными двигателями.
- Автор: —
- Издательство: Гуси-лебеди
- Год издания: 2007
- Страниц: 265
- Формат: PDF
- Размер: 55,7 Mb

Руководство по эксплуатации и ремонту автомобилей Volkswagen Golf V и Volkswagen Jetta с 2003 года выпуска с бензиновыми и дизельными двигателями.
- Автор: —
- Издательство: Монолит
- Год издания: —
- Страниц: 494
- Формат: —
- Размер: —

Руководство по эксплуатации и техническому обслуживанию автомобиля Volkswagen Jetta с 2012 года выпуска.
- Автор: —
- Издательство: Volkswagen AG
- Год издания: 2012
- Страниц: 383
- Формат: —
- Размер: 107,4 Mb

Руководство по эксплуатации, техническому обслуживанию и ремонту автомобилей Volkswagen Golf II и Volkswagen Jetta II 1983-1992 годов выпуска с бензиновыми и дизельными двигателями.
- Автор: —
- Издательство: Атласы автомобилей
- Год издания: 2002
- Страниц: 248
- Формат: —
- Размер: —

Руководство по эксплуатации, техническому обслуживанию и ремонту автомобиля Volkswagen Jetta с 2010 года выпуска с бензиновыми двигателями объемом 1,4/1,6 л.
- Автор: —
- Издательство: АНТА-ЭКО
- Год издания: 2014
- Страниц: 404
- Формат: —
- Размер: —

Руководство по эксплуатации, техническому обслуживанию и ремонту автомобилей Volkswagen Bora, Volkswagen Jetta и Volkswagen Golf 1997-2005 годов выпуска.
- Автор: —
- Издательство: Мир Автокниг
- Год издания: 2008
- Страниц: 513
- Формат: PDF
- Размер: 464,8 Mb

Добрый день, Господа!
Представляю Вашему вниманию мануал к VW Jetta V и всем подходящим под этот мануал автомобилей!
Инструкция по ремонту и эксплуатации автомобилей Volkswagen Jetta v 5, Golf v 5, Golf Plus, Touran автомобили с 2003 и с 2005
Мелочь конечно же, но лишней не будет)
яндексдиск.мануал
Volkswagen Jetta VI (A6, Typ 1B) с бензиновыми двигателями: CAXA/CAVA TSI 1.4 л (1390 см³) 122-150 л.с./90-110 кВт и CLRA SRE 1.6 л (1595 см³) 105 л.с./77 кВт; Руководство по эксплуатации, техническому обслуживанию и ремонту, технические характеристики, электрические схемы, жгуты и разъёмы, устройство, диагностика, особенности конструкции. Иллюстрированное практическое пособие легковой автомобиль малого класса Фольксваген Джетта 6 с цельнометаллическими несущими кузовами четырёхдверный седан передне- и полноприводные модели шестого поколения выпуска с 2010 года
ЕСЛИ ВЫ ВИДИТЕ ОШИБКУ 406 Not Acceptable и не видите документ, то скорей всего у Вас IP РФ и его надо сменить, на любой другой страны, с помощью VPN ( Scribd и SlideShare блокируют посетителей с Российским IP).
Видео VW Jetta VI замена передних тормозных колодок и ремня ГРМ, свечей накала, термостата TDI (Фольксваген Джетта 6 с 2010)
Volkswagen Jetta Mark VI общая информация (Фольксваген Джетта 6 с 2010)
Тормоза передних колес
Двигатель; Код комплектации; Передние тормоза
1,6 л — 77 кВт; 1ZM/1ZQ; FS III (15)
1,4 л — 90 кВт; 1ZP/1ZE; FN 3 (15)
1,4 л — 110 кВт; 1ZA/1ZB/1LV; FN 3 (16)
Передние тормоза FS III
Код комплектации 1ZM/1ZQ
Тормозной суппорт FS III (15)
Толщина тормозной колодки 14 мм
Предельная допустимая толщина тормозной колодки без опорной пластины 2 мм
Тормозной диск, диаметр 280 мм
Тормозной диск, толщина 22 мм
Тормозной диск, мин. допустимая толщина 19 мм
Тормозной суппорт, поршень, диаметр 54 мм
Передние тормоза FN 3
Код комплектации 1ZA/1ZB/1LV / 1ZP/1ZE
Тормозной суппорт FN 3 (16) / FN 3 (15)
Толщина тормозной колодки 14 мм / 14 мм
Предельная допустимая толщина тормозной колодки без опорной пластины 2 мм / 2 мм
Тормозной диск, диаметр 312 мм / 288 мм
Тормозной диск, толщина 25 мм / 25 мм
Тормозной диск, мин. допустимая толщина 22 мм / 22 мм
Тормозной суппорт, поршень, диаметр 54 мм / 54 мм
Тормоза передних колес
Указание: После замены тормозные колодки необходимо привести в рабочее положение многократными сильными нажатиями педали тормоза на неподвижном автомобили. Для откачки тормозной жидкости из бачка использовать устройство для заполнения и прокачки тормозной системы — VАS 5234 -. Перед снятием тормозного суппорта или отсоединением тормозного шланга установить распорку (при этом снизить давление). Не сдувать с тормозных механизмов продукты износа сжатым воздухом, эта пыль опасна для здоровья! Тщательно очистить место установки тормозных колодок на тормозной скобе, удалить ржавчину. Для чистки тормозного суппорта использовать только спирт.
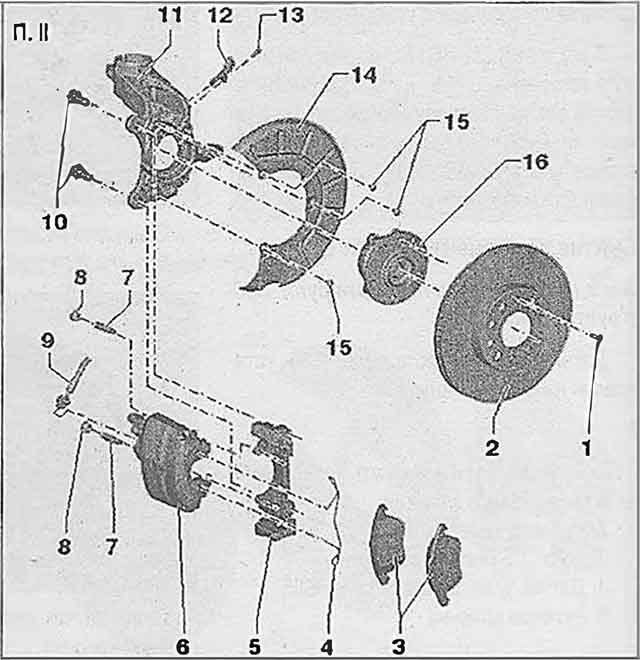
Передние тормозные. механизмы FS III без индикатора износа тормозных колодок
1. Болты: 70 Нм и довернуть на 90°; заменять после каждого снятия; 4 шт.
2. Поворотный кулак: с интегрированной тормозной скобой
3. Передний датчик частоты вращения: перед установкой датчика очистить внутреннюю поверхность отверстия и смазать тугоплавкой смазкой — G 052.112.AЗ — .
4. Болт: 8 Нм
5. Подшипниковый узел: магнитное кольцо для работы датчика ABS встроено в подшипник
6. Щиток
7. Тормозной диск: вентилируемый; диаметр 280 мм; толщина 22 мм; предельно допустимая величина: 19 мм; заменять все колодки соответствующей оси; не применять силу при снятии тормозного диска со ступицы — возможно повреждение диска, при необходимости использовать преобразователь ржавчины (проникающую смазку)
8. Болт: 4 Нм
9. Болт: 12 Нм
10. Тормозные колодки: толщина 14 мм без учета опорной пластины; предел износа: 2 мм без учета толщины опорной пластины; заменять все колодки соответствующей оси
11. Тормозной суппорт: для замены тормозных колодок откручивать тормозной шланг не требуется
12. Опорная втулка
13. Направляющие пальцы: 30 Нм
14. Защитный колпачок: снять
15. Свёртная втулка
16. Тормозной шланг со штуцером и полым винтом: 35 Нм
Передние тормозные механизмы FS III с индикатором износа тормозных колодок
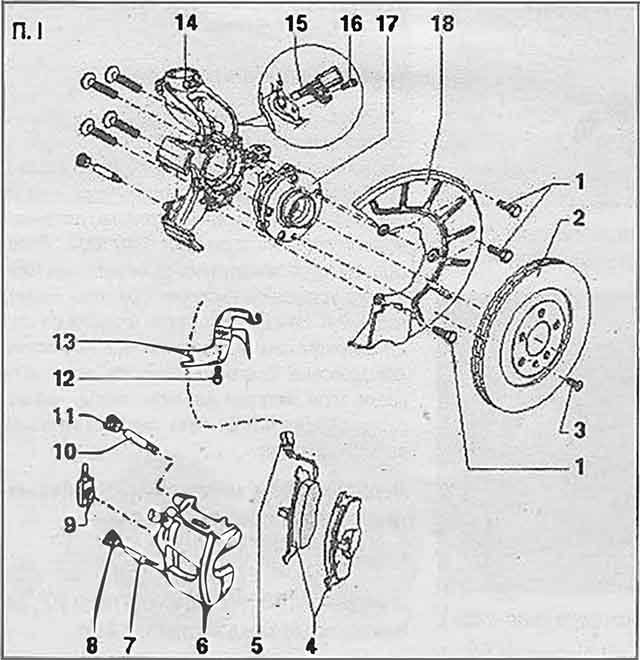
1. Болты: 12 Нм; 3 шт.
2. Тормозной диск: вентилируемый, диаметр 280 мм; толщина 22 мм; предельно допустимая величина:·19 мм; заменять все колодки соответствующей оси; для снятия предварительно демонтировать тормозной суппорт
3. Болт: 4 Нм
4. Тормозные колодки: толщина 14 мм без учета опорной пластины; с датчиком износа тормозных колодок переднего левого колеса — G34 -; при сильном износе колодки (толщина накладки примерно 4 мм) в комбинации приборов загорается соответствующая контрольная лампа — K118 — минимальная допустимая толщина: 2 мм без учета толщины опорной пластины проверка тормозных колодок; заменять тормозные колодки для каждой оси
5. Разъём: датчика износа тормозных колодок ·переднего левого колеса — G34 —
6. Тормозной суппорт: для замены тормозных колодок откручивать тормозной шланг не требуется
7. Направляющие: 30 Нм
8. Защитный колпачок: снять
9. Тормозной шланг со штуцером и полым винтом: 35 Нм
10. Направляющие: 30 Нм
11. Защитный колпачок: снять
12. Болт
13. Кронштейн
14. Поворотный кулак: с интегрированной тормозной скобой
15. Передний датчик частоты вращения: пере установкой датчика очистить внутреннюю поверхность отверстия и смазать тугоплавкой смазкой — G 052 112 A3 —
16. Болт: 8 Нм
17. Подшипник/Подшипниковый узел: магнитное кольцо для работы датчика ABS встроено в подшипник
18. Щиток
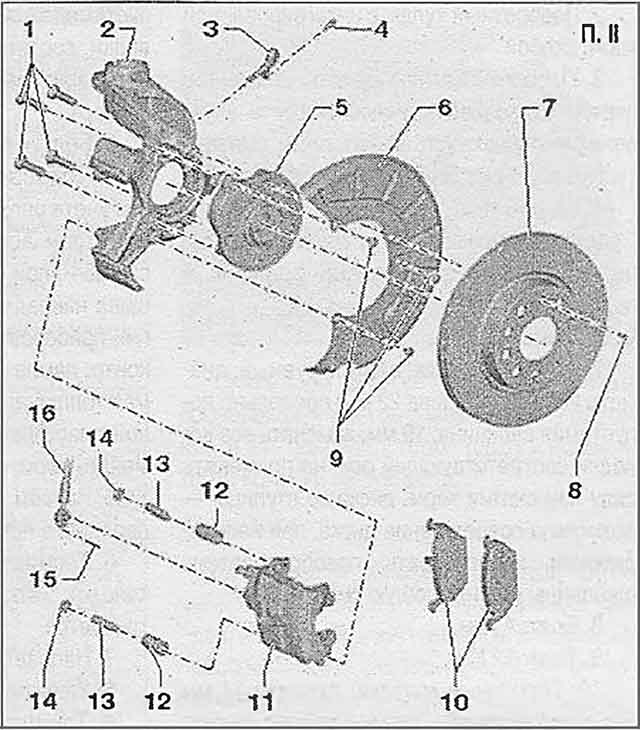
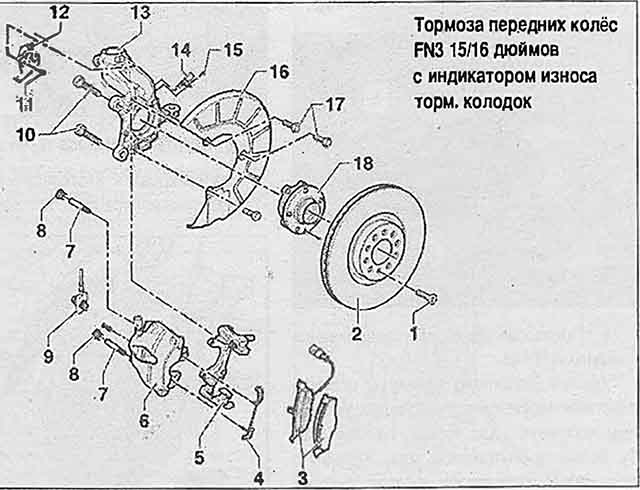
Тормоза передних колёс FN3 15/16 дюймов без индикатором износа тормозных колодок
1. Болт: 4 Нм
2. Тормозной диск: вентилируемый; диаметр 288 мм; толщина: 25 мм; предельно допустимая величина: 22 мм; заменять все колодки соответствующей оси; не применять силу при снятии тормозного диска со ступицы — возможно повреждение диска, при необходимости использовать преобразователь ржавчины (проникающую смазку)
3. Тормозные колодки: толщина 14 мм без учета опорной пластины; предел износа: 2 мм без учета толщины опорной пластины; заменять все колодки соответствующей оси
4. Пружина: вставить в оба отверстия тормозного суппорта
5. Тормозная скоба
6. Тормозной суппорт: для замены тормозных колодок откручивать тормозной шланг не требуется
7. Направляющие: 30 Нм
8. Защитный колпачок
9. Тормозной шланг со штуцером и полым винтом: 35 Нм
10. Болт: 200 Нм; перед повторным применением очистить
11. Поворотный кулак; с прикрученной тормозной скобой
12. Передний датчик частоты вращения: перед установкой датчика очистить внутреннюю поверхность отверстия и смазать тугоплавкой смазкой — G 052 112 A3 —
13. Болт: 8 Нм
14. Щиток
15. Болт: 12 Нм
16. Подшипниковый узел: магнитное кольцо для работы датчика ABS встроено в подшипник
Тормоза передних колёс FN3 15/16 дюймов с индикатором износа тормозных колодок
1. Болт: 4 Нм
2. Тормозной диск: вентилируемый, диаметр 288 мм, 15 дюймов; вентилируемый, диаметр 312 мм; 16 дюймов; толщина: 25 мм; предельно допустимая величина: 22 мм; заменять тормозные диски попарно для каждой оси; для снятия предварительно демонтировать тормозной суппорт
3. Тормозные колодки, толщина 14 мм без учета опорной пластины; с датчиком износа; при сильном износе колодки (толщина накладки примерно 4 мм) в комбинации приборов загорается соответствующая контрольная лампа — 118 -. При достижении предела износа в 2 мм заменить на обоих колёсах оси
4. Пружина, вставить в оба отверстия тормозного суппорта
5. Тормозная скоба: крепится болтами к поворотному кулаку
6. Тормозной суппорт: для замены тормозных колодок откручивать, тормозной шланг не требуется
7. Направляющие: 30 Нм
8. Защитный колпачок: снять
9. Тормозной шланг со штуцером и полым винтом: 35 Нм
10. Болт: 200 Нм; перед повторным применением очистить
11. Болт
12. Кронштейн
13. Поворотный кулак: с прикрученной тормозной скобой
14. Передний датчик частоты вращения: перед установкой датчика очистить внутреннюю поверхность отверстия и смазать тугоплавкой смазкой — G 052 112 АЗ —
15. Болт: 8 Нм
16. Щиток
17. Болт: 12 Нм
18. Подшипниковый узел: магнитное кольцо для работы датчика ABS встроено в подшипник
Снятие тормозных колодок, тормозной суппорт FS III
Пометить расположение тормозных колодок, если они будут ещё использоваться.
Они должны быть установлены обратно на те же места, иначе возникнет неравномерность распределения тормозных сил между колесами!
Для снятия гидравлическую часть тормозной системы не разгерметизировать!
Ослабить колёсные болты.
Поднять автомобиль.
Снять колесо.
Автомобиль с указателем износа тормозных колодок
Разблокировать и отсоединить разъём указателя износа тормозных колодок.
Все
Снять колпачки.
Выкрутить оба направляющих пальца из тормозного суппорта
Снять тормозной суппорт и подвязать его проволокой, чтобы он своим весом не растянул и не повредил тормозной шланг.
Извлечь колодки из суппорта.
Установка.
Установка в обратном порядке.
Откачать тормозную жидкость из бачка, прежде чем вдавливать поршни в цилиндры с помощью приспособления — T10145 -.
Это позволит избежать её утечки и возможных повреждений, если по мере износа тормозных колодок тормозная жидкость доливалась.
Установить приспособление — T10145 — в тормозной суппорт и вдавить поршень в цилиндр.
Вставить в суппорт до установки пружинных фиксаторов внутреннюю колодку (со стороны поршня) и внешнюю колодку.
Внутренняя колодка (со стороны поршня) имеет большой пружинный фиксатор
Наружная колодка имеет малый пружинный фиксатор.
Установить тормозной суппорт с колодками сначала снизу тормозную скобу.
Выступ тормозного суппорта должен находиться за направляющей тормозной скобы.
Прикрутить тормозной суппорт с помощью направляющих пальцев к тормозной скобе
Установить колпачки.
Установить колёса и затянуть болты их крепления.
Указание: После каждой замены тормозных колодок несколько раз сильно нажать на педаль тормоза. Это необходимо для того, чтобы тормозные колодки заняли свое рабочее положение. После замены тормозных колодок проверить уровень тормозной жидкости.
| № | Спецификация / Specs | Данные |
| Габариты (мм/mm) и масса (кг/kg) / Dimensions and Weight | ||
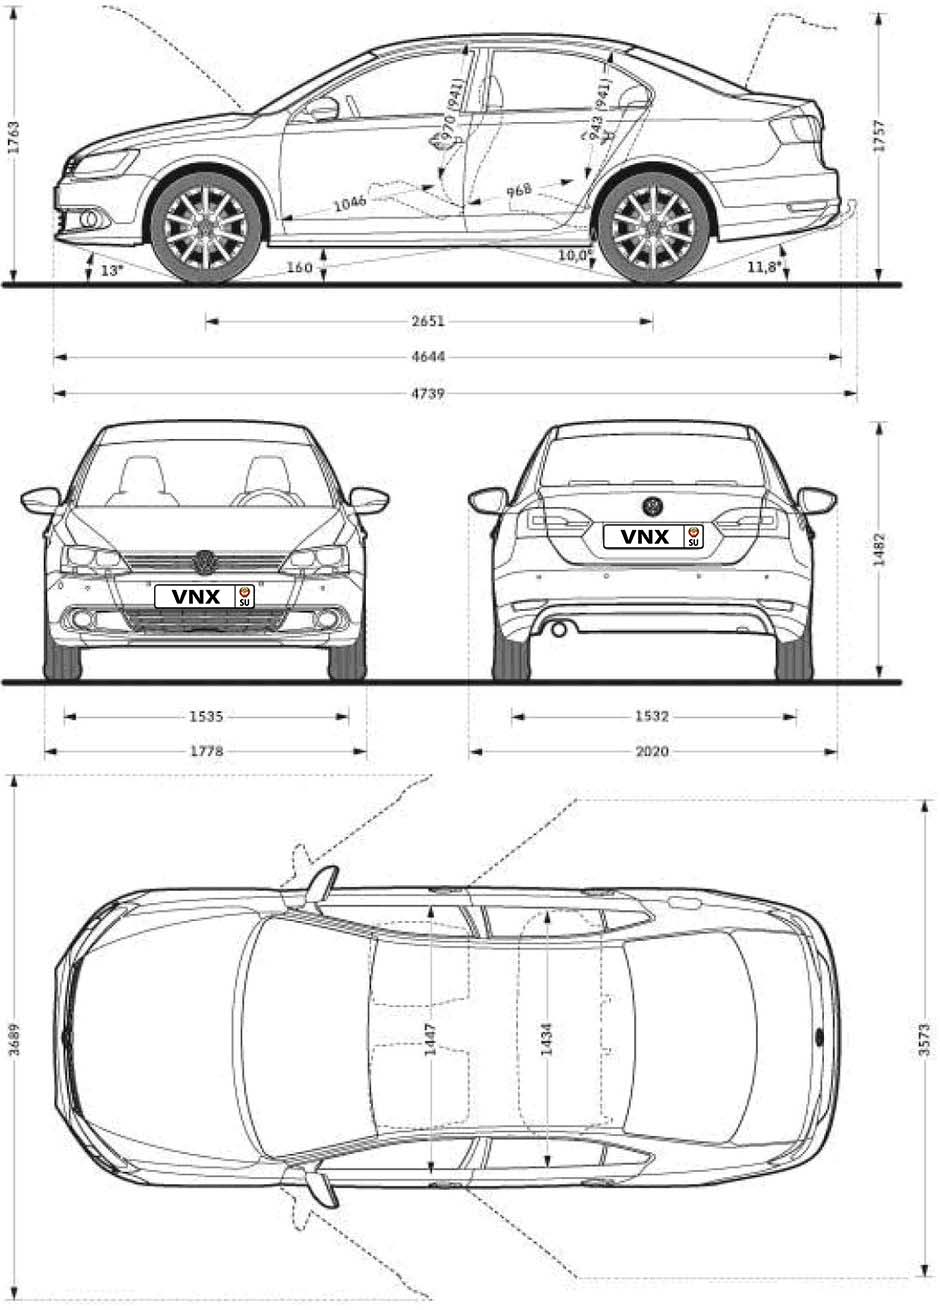
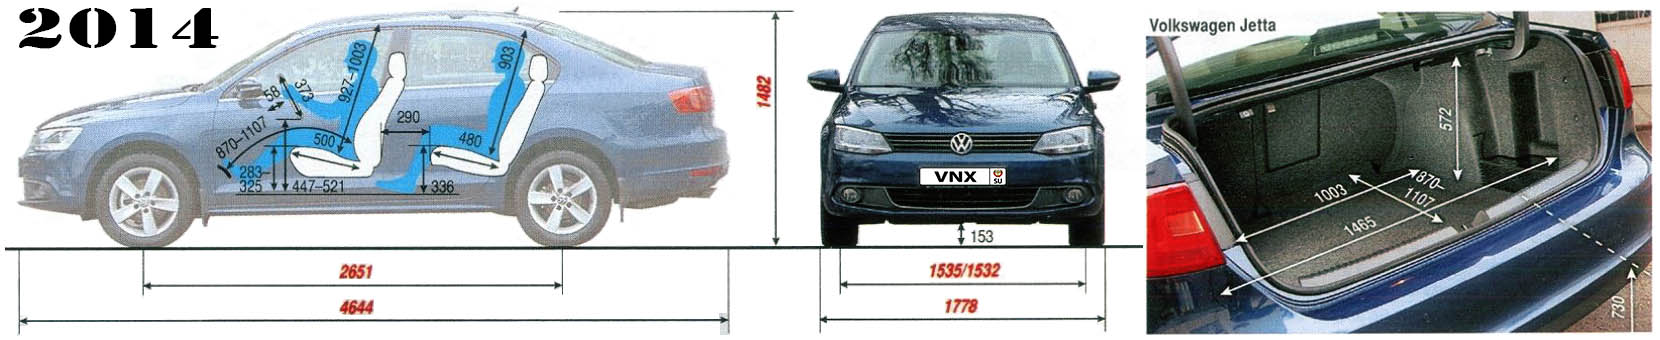
| 1 | Длина / Length | 4644/4739 с фаркопом |
| 2 | Ширина (без/с зеркалами) / Width | 1778/2020 |
| 3 | Высота (загружен/пустой) / Height | 1482 |
| 4 | Колёсная база / Wheelbase | 2651 |
| 5 | Дорожный просвет (клиренс) / Ground clearance | 160⇒139 |
| 6 | Снаряжённая масса / Total (curb) weight | 1400 |
| Полная масса / Gross (max.) weight | 1850 | |
|
Двигатель / Engine |
||
| 7 | Тип / Engine Type, Code | Бензиновый, жидкостного охлаждения, четырехтактный, CAXA, TSI |
| 8 | Количество цилиндров / Cylinder arrangement: Total number of cylinders, of valves | 4-цилиндровый, рядный, 16V, DOHC с верхним расположением двух распределительных валов |
| 9 | Диаметр цилиндра / Bore | 76.5 мм |
| 10 | Ход поршня / Stroke | 75.6 мм |
| 11 | Объём / Engine displacement | 1390 см³ |
| 12 | Система питания / Fuel supply, Aspiration | Непосредственный впрыск топлива Bosch Motronic MED 17.5.20 |
| Турбонаддув и промежуточное охлаждение наддувочного воздуха | ||
| 13 | Степень сжатия / Compression ratio | 10.0:1 |
| 14 | Максимальная мощность / Max. output power kW (HP) at rpm | 90 кВт (122 л.с.) при 5000 об/мин |
| 15 | Максимальный крутящий момент / Max. torque N·m at rpm | 200 Нм при 1500-4000 об/мин |
|
Трансмиссия / Transmission |
||
| 16 | Сцепление / Clutch type | Однодисковое, сухое, с диафрагменной нажимной пружиной и гасителем крутильных колебаний, постоянно замкнутого типа |
| 17 | КПП / Transmission type | 02S МКПП 6 шестиступенчатая механическая, двухвальная, с синхронизаторами на всех передачах переднего хода |
О Книге
- Название: Volkswagen Jetta с 2010 Руководство по эксплуатации, ремонту и техническому обслуживанию
- Бензиновые двигатели: CAXA/CAVA TSI 1.4 л (1390 см³) 122-150 л.с./90-110 кВт и CLRA SRE 1.6 л (1595 см³) 105 л.с./77 кВт
- Выпуск с 2010 года
- Серия: «Ремонт Автомобилей»
- Год издания: 2014
- Автор: Коллектив авторов
- Издательство: «Ассоциация независимых издателей»
- Формат: PDF
- Страниц в книге: 404
- Размер: 370.36 МБ
- Язык: Русский
- Количество электросхем: более 30

- Manuals
- Brands
- Volkswagen Manuals
- Automobile
- 2013 Jetta
Manuals and User Guides for Volkswagen 2013 Jetta. We have 4 Volkswagen 2013 Jetta manuals available for free PDF download: Repair Manual, Brochure & Specs, Quick Start Manual
Volkswagen 2013 Jetta Repair Manual (390 pages)
Brand: Volkswagen
|
Category: Automobile
|
Size: 24.4 MB
Table of Contents
-
Table of Contents
3
-
General, Technical Data
9
-
Check List, Assessing the Suspension on Vehicles Involved in a Collision
9
-
General Information
11
-
-
Front Suspension
12
-
Vehicles Involved in Collisions, Evaluating
12
-
Wheel Bearing, Lifting to Curb Weight Position
13
-
Overview — Front Axle
15
-
Subframe
17
-
Overview — Subframe
17
-
Thread in Longitudinal Member, Servicing
19
-
Subframe, Securing
19
-
Subframe, Lowering
22
-
Subframe Without Steering Gear, Removing and Installing
25
-
Subframe with Hydraulic Steering Gear, Removing and Installing
28
-
Subframe with Electromechanical Steering Gear, Removing and Installing
34
-
Subframe, Servicing
38
-
Front Suspension and Control Arm
45
-
Overview — Front Suspension and Control Arm
45
-
Ball Joint, Checking
47
-
Ball Joint, Removing and Installing
47
-
Control Arm, Removing and Installing
51
-
Control Arm, Removing and Installing, Left Side of Vehicle with DSG® or Automatic Transmission
52
-
Control Arm Front Bonded Rubber Bushing, Replacing
56
-
Control Arm Rear Bonded Rubber Bushing, Replacing
58
-
Wheel Bearing
60
-
Overview — Wheel Bearing
60
-
Wheel Bearing Unit, Removing and Installing
62
-
Wheel Bearing Housing, Removing and Installing
66
-
Stabilizer Bar
72
-
Overview — Stabilizer Bar
72
-
Stabilizer Bar, Removing and Installing
72
-
Suspension Strut
76
-
Overview — Suspension Strut
76
-
Suspension Strut, Removing and Installing
76
-
Suspension Strut, Servicing
82
-
Drive Axles, Removing and Installing
85
-
Twelve-Point Bolt with Ribs, Loosening and Tightening, Drive Axle Threaded Connection
85
-
Twelve-Point Bolt Without Ribs, Loosening and Tightening, Drive Axle Threaded Connection
86
-
Drive Axle with CV Joint, Removing and Installing
88
-
Right Axle Shaft with Mounted CV Joint, Removing and Installing
91
-
Drive Axles with Triple Roller Joint Aar2600I, Removing and Installing
96
-
Drive Axles with Triple Roller Joint Aar3300I, Removing and Installing
100
-
Drive Axles, Overview and Servicing
105
-
Overview — Drive Axles
105
-
Drive Axle Heat Shield
106
-
Drive Axle with CV Joint VL 100
107
-
Overview — Drive Axle with CV Joint VL 100
107
-
Drive Axle with CV Joint VL100, Disassembling and Assembling
110
-
Outer CV Joint, Checking
113
-
Inner CV Joint, Checking
113
-
Drive Axle with CV Joint VL 107
116
-
Overview — Drive Axle with CV Joint VL 107
116
-
Drive Axle with CV Joint VL107, Disassembling and Assembling
119
-
Drive Axle with CV Joint VL107 (Attached)
123
-
Overview — Drive Axle with CV Joint VL107 (Attached)
123
-
Drive Axle with CV Joint VL107 Attached, Disassembling and Assembling
125
-
Drive Axle with Triple Roller Joint Aar2600I
128
-
Overview — Drive Axle with Triple Roller Joint Aar2600I
128
-
Drive Axle with Triple Roller Joint Aar2600I, Disassembling and Assembling
130
-
Drive Axle with Triple Roller Joint Aar3300I
134
-
Overview — Drive Axle with Triple Roller Joint Aar3300I
134
-
Drive Axle with Triple Roller Joint Aar3300I, Disassembling and Assembling
136
-
Special Tools
141
-
-
Rear Suspension
153
-
Vehicles Involved in Collisions, Evaluating
153
-
Rear Axle Curb Weight (Twist Beam Rear Suspension)
154
-
Overview — Rear Axle (Torsion Beam)
156
-
Axle Beam, Subframe, Crossbrace (Torsion Beam)
158
-
Overview — Axle Beam, Subframe, Crossbrace (Torsion Beam)
158
-
Axle Beam, Removing and Installing
160
-
Axle Beam Bonded Rubber Bushing, Removing and Installing
163
-
Crossbrace, Removing and Installing
166
-
Crossbrace Bonded Rubber Bushing, Removing and Installing
167
-
Axle Beam Plate (Torsion Beam)
169
-
Overview — Axle Beam Plate (Torsion Beam)
169
-
Axle Beam Plate, Removing
170
-
Axle Beam Plate, Installing
170
-
Suspension (Torsion Beam)
176
-
Overview — Suspension (Torsion Beam)
176
-
Coil Spring, Removing and Installing
177
-
Shock Absorber (Torsion Beam)
179
-
Overview — Shock Absorber (Torsion Beam)
179
-
Shock Absorber, Removing and Installing
180
-
Wheel Bearing, Drum Brake (Torsion Beam)
182
-
Overview — Wheel Bearing, Drum Brake (Torsion Beam)
182
-
Wheel Bearing/Wheel Hub on Vehicles with Drum Brakes, Removing and Installing
183
-
Wheel Bearing, Disc Brake (Torsion Beam)
186
-
Overview — Wheel Bearing, Disc Brake (Torsion Beam)
186
-
Wheel Bearing/Wheel Hub on Vehicles with Disc Brakes, Removing and Installing
187
-
Rear Axle Curb Weight (Multi-Link Rear Suspension)
190
-
Overview — Rear Axle, Multi-Link Rear Suspension
192
-
Subframe, Transverse Link and Tie Rod (Multi-Link Suspension)
193
-
Overview — Subframe, Transverse Link and Tie Rod (Multi-Link Suspension)
193
-
Overview — Left Rear Level Control System Sensor G76
196
-
Left Rear Level Control System Sensor G76 , Removing and Installing
196
-
Subframe, Securing
197
-
Rear Axle, Lowering
198
-
Rear Axle, Removing and Installing
199
-
Upper Transverse Link, Removing and Installing
202
-
Lower Transverse Link, Removing and Installing
204
-
Tie Rod, Removing and Installing
206
-
Wheel Bearing Housing and Trailing Arm (Multi-Link Suspension)
209
-
Overview — Wheel Bearing Housing and Trailing Arm (Multi-Link Suspension)
209
-
Wheel Bearing Housing, Removing and Installing
210
-
Wheel Bearing Housing Bonded Rubber Bushing, Replacing
213
-
Wheel Bearing and Wheel Hub, Removing and Installing
215
-
Trailing Arm with Mounting Bracket, Removing and Installing
218
-
Trailing Arm, Servicing
221
-
Shock Absorber and Coil Spring (Multi-Link Suspension)
223
-
Overview — Shock Absorber and Coil Spring (Multi-Link Suspension)
223
-
Coil Spring, Removing and Installing
223
-
Shock Absorber, Removing and Installing
225
-
Shock Absorber, Servicing
226
-
Stabilizer Bar (Multi-Link Suspension)
229
-
Overview — Stabilizer Bar (Multi-Link Suspension)
229
-
Stabilizer Bar, Removing and Installing
229
-
Subframe Attachments, Bluemotion Vehicles
232
-
Overview — Subframe Attachments, Bluemotion Vehicles
232
-
Rear Axle Trim Panel, Removing and Installing
233
-
Special Tools
235
-
-
Wheels, Tires, Wheel Alignment
244
-
Vehicles Involved in Collisions, Evaluating
244
-
Wheel Installation Tightening Specifications
245
-
Wheels and Tires, Mounting
246
-
General Information
246
-
Assembly Requirements
246
-
Tires, Wheels with TPMS, Removing and Installing
248
-
Safety Precautions and Conditions for Removing and Installing Tires, Wheels with TPMS
248
-
Wheel, Changing
248
-
Assembly Requirements
249
-
Tires, Dismounting
250
-
Tires, Dismounting
251
-
Tires, Mounting
252
-
Run-Flat Tires, Removing and Mounting
254
-
Safety Precautions
254
-
Assembly Requirements
254
-
Tires, Dismounting
256
-
Tires, Mounting
258
-
Tire Pressure Monitoring System
260
-
General Information
260
-
Tire Pressure Monitoring System
262
-
Overview — Tire Pressure Monitoring Sensor
262
-
Tire Pressure Monitoring Sensor , Removing and Installing
263
-
Wheel Alignment
264
-
General Information about Vehicles with Torsion Beam Rear Suspension
264
-
General Information about Vehicles with Multi-Link Rear Suspension
266
-
Test Prerequisites
267
-
Axle Beam Trailing Arm (Torsion Beam), Checking with Crankshaft Holding Fixture VW801
271
-
Measure Preparations
273
-
Alignment Specified Values for Vehicles with Torsion Beam Rear Suspension
273
-
Alignment Specified Values for Vehicles with Multi-Link Rear Suspension
275
-
Vehicle Transverse Inclination, «Zero Position
277
-
Work Procedure Overview for Vehicle Alignment
277
-
Front Axle Camber, Correcting
278
-
Rear Torsion Beam Suspension Camber, Checking
280
-
Multi-Link Suspension Camber, Adjusting
280
-
Rear Torsion Beam Suspension Toe, Checking
281
-
Multi-Link Suspension Toe, Adjusting
281
-
Front Axle Toe, Adjusting
282
-
Basic Setting for Steering Angle Sensor G85
283
-
Vehicle Data Label
283
-
Wheels and Tires
284
-
Vehicles with Tire Mobility Kit
284
-
Tires, Removing
284
-
Tires, Mounting
284
-
Tire Sealant, Disposing
285
-
Wheel, Changing and Mounting
286
-
Wheel, Mounting
286
-
Wheel Centering Seat, Protecting against Corrosion
288
-
Wheel/Tire Vibration, Causes and Solution
289
-
Vibration Causes
289
-
Balancing
289
-
Road Test, Performing before Balancing
290
-
Stationary Balancing Machine
290
-
Hunter RFT33VAG Road Force Touch™ Wheel Balancer VAS6230B4
292
-
Finish Balancer
292
-
Tire and Wheel Radial and Lateral Run-Out
293
-
Disc Wheel, Checking Radial and Lateral Run out
294
-
Matching
295
-
Flat Spots in Tires from Standing
296
-
Special Tools
298
-
-
Steering
300
-
Vehicles Involved in Collisions, Evaluating
300
-
General Repair Information
301
-
Preliminary Information
301
-
Steering Gear
301
-
Seals and Gaskets
301
-
Bolts and Nuts
302
-
Electrical Components
302
-
Guided Fault Finding, OBD and Test Instruments
302
-
Steering Wheel Airbag
303
-
Overview — Steering Wheel Airbag
303
-
Airbag Steering Wheel, Removing and Installing
303
-
Steering Column
306
-
Overview — Steering Column
306
-
Steering Column, Removing and Installing
307
-
Steering Column, Handling and Transporting
313
-
Steering Column, Checking for Damage
314
-
Overview — Steering Column, RHD
316
-
Steering Column, Removing and Installing, RHD
316
-
Steering Column, Handling and Transporting
325
-
Steering Column, Checking for Damage
326
-
Electromechanical Steering Gear
327
-
Overview — Electromechanical Steering Gear
327
-
Steering Gear, Removing and Installing
328
-
Electromechanical Steering Gear, RHD
336
-
Overview — Electromechanical Steering Gear, RHD
336
-
Steering Gear, Removing and Installing, RHD
337
-
Electromechanical Steering Gear, Servicing
344
-
Overview — Electromechanical Steering Gear
344
-
Tie Rod, Removing and Installing
345
-
Tie Rod End, Removing and Installing
347
-
Boot, Removing and Installing
348
-
Checking Play, Fastening and Joint Boots of Tie Rod Ends
350
-
Tie Rod Length, Checking and Adjusting
350
-
Tie Rod End Allocation
351
-
Hydraulic Power Steering
352
-
Overview — Hydraulic Power Steering
352
-
Power Steering Gear, Removing and Installing
352
-
Hydraulic Power Steering Gear, Servicing
359
-
Overview — Power Steering Gear
359
-
Tie Rod, Removing and Installing
360
-
Tie Rod End, Removing and Installing
362
-
Boot, Removing and Installing
363
-
Checking Play, Fastening and Joint Boots of Tie Rod Ends
365
-
Left Tie Rod Length, Checking and Adjusting
365
-
Tie Rod End Allocation
366
-
Power Steering Pump, 4-Cylinder Gasoline Engine
367
-
Overview — Power Steering Pump
367
-
Power Steering Pump, Removing and Installing
368
-
Power Steering Pump, 5-Cylinder Gasoline Engine
371
-
Power Steering Pump, Checking Delivery Pressure
371
-
Overview — Power Steering Pump
374
-
Power Steering Pump, Removing and Installing
375
-
Overview — Hydraulic Lines, 4-Cylinder Gasoline Engine
377
-
Overview — Hydraulic Lines, 5-Cylinder Gasoline Engine
379
-
Overview — Power Steering Fluid Reservoir, 4-Cylinder Gasoline Engine
381
-
Overview — Power Steering Fluid Reservoir, 5-Cylinder Gasoline Engine
382
-
Power Steering, Checking Hydraulic Oil Level
383
-
Steering System, Bleeding and Checking for Leaks
384
-
Power Steering System, Bleeding
384
-
Steering System, Checking for Leaks
384
-
Special Tools
385
-
Revision History
390
-
Advertisement

Volkswagen 2013 Jetta Brochure & Specs (15 pages)
2013 Jetta Automobile
Brand: Volkswagen
|
Category: Automobile
|
Size: 6.58 MB

Volkswagen 2013 Jetta Quick Start Manual (12 pages)
Brand: Volkswagen
|
Category: Automobile
|
Size: 1.62 MB
Table of Contents
-
Ipod Adapter
6
-
Cruise Control
7
-
Manual Climate Control
8
-
Manual Seats
9
-
Tire Pressure Monitoring System
10
Advertisement
Volkswagen 2013 Jetta Brochure & Specs (11 pages)
VW Jetta SportWagen
Brand: Volkswagen
|
Category: Automobile
|
Size: 5.06 MB
Advertisement
Related Products
-
VOLKSWAGEN 2013 Eos
-
Volkswagen 2013 Tiguan
-
Volkswagen 2013 GTI
-
Volkswagen 2013 Passat
-
Volkswagen 2013 Beetle
-
Volkswagen 2013 Tiguan S
-
Volkswagen 2013 Tiguan SE
-
Volkswagen 2013 Tiguan SEL
-
Volkswagen 2013 Golf 2.5L
-
Volkswagen 2014 Touareg
Volkswagen Categories
Automobile
Automobile Accessories
Car Receiver
Adapter
Engine
More Volkswagen Manuals

- Manuals
- Brands
- Volkswagen Manuals
- Automobile
- Jetta 2011
- Service manual
-
Contents
-
Table of Contents
-
Bookmarks
Related Manuals for Volkswagen Jetta 2011
Summary of Contents for Volkswagen Jetta 2011
-
Page 1
Service Workshop Manual Jetta 2011 ➤ Jetta Hybrid 2013 ➤ General body repairs, interior Edition 06.2012 Service Department. Technical Information… -
Page 2
In addition, the normal basic safety precautions for working on motor vehicles must, as a matter of course, be observed. All rights reserved. No reproduction without prior agreement from publisher. Copyright © 2012 Volkswagen AG, Wolfsburg D3E802C2CFB… -
Page 3: Table Of Contents
Jetta 2011 ➤ , Jetta Hybrid 2013 ➤ General body repairs, interior — Edition 06.2012 Contents 00 — Technical data ……….. .
-
Page 4
Jetta 2011 ➤ , Jetta Hybrid 2013 ➤ General body repairs, interior — Edition 06.2012 Repairing interior mirror retaining plate …….. -
Page 5
Jetta 2011 ➤ , Jetta Hybrid 2013 ➤ General body repairs, interior — Edition 06.2012 11.9 Importers reporting obligation ……….142 70 — Trim, insulation . -
Page 6
Jetta 2011 ➤ , Jetta Hybrid 2013 ➤ General body repairs, interior — Edition 06.2012 Removing and installing backrest adjusting lever ……. . 249 Removing and installing lumbar adjustment lever . -
Page 7: Technical Data
Jetta 2011 ➤ , Jetta Hybrid 2013 ➤ General body repairs, interior — Edition 06.2012 00 – Technical data Safety information (VRL004837; Edition 06.2012) 1. Safety information…
-
Page 8: Safety Measures When Working On Vehicles With A Start-Stop System
Jetta 2011 ➤ , Jetta Hybrid 2013 ➤ General body repairs, interior — Edition 06.2012 ⇒ “1.1 Safety measures when working on vehicles with a start- stop system”, page 2 ⇒ “1.2 Safety measures when working with pyrotechnic compo‐ nents”, page 3 ⇒…
-
Page 9: Safety Measures When Working With Pyrotechnic Components
Jetta 2011 ➤ , Jetta Hybrid 2013 ➤ General body repairs, interior — Edition 06.2012 Safety measures when working with py‐ rotechnic components Note The following are pyrotechnic components: ♦ Airbag units ♦ Belt tensioner ♦ Belt force limiters (depending on vehicle equipment level) ♦…
-
Page 10: Storage, Transportation And Disposal Of Airbag, Belt Tensioner And Battery Isolator Units (Pyrotechnic Components)
Jetta 2011 ➤ , Jetta Hybrid 2013 ➤ General body repairs, interior — Edition 06.2012 ♦ If work is interrupted, the pyrotechnic component must be stored back in its packaging. ♦ Leaving the pyrotechnic component unattended is prohibited. ♦ When connecting restraint system pyrotechnic components, only the person carrying out the work may be inside the vehi‐…
-
Page 11: Additional Safety Regulations For Side Airbag
Jetta 2011 ➤ , Jetta Hybrid 2013 ➤ General body repairs, interior — Edition 06.2012 ♦ Untriggered pyrotechnic components must be disposed of correctly in the original packaging in accordance with national legislation. Contact your importer if in any doubt.
-
Page 12: Safety Regulations For Crash Sensors (Pressure Sensors) For Front Side Airbags
Jetta 2011 ➤ , Jetta Hybrid 2013 ➤ General body repairs, interior — Edition 06.2012 ♦ Repair work on trims is not permissible (upper A-pillar trim, B- pillar trim, C-pillar trim and D-pillar trim). ♦ Ensure proper seating of trims when installing them.
-
Page 13: Airbag Deactivation — Country-Specific
Jetta 2011 ➤ , Jetta Hybrid 2013 ➤ General body repairs, interior — Edition 06.2012 front passenger airbag deactivation — country-specific ♦ Basic settings of seat occupied recognition control unit must be performed after each repair to front passenger seat in which the seat and/or the backrest was »detached«…
-
Page 14
Jetta 2011 ➤ , Jetta Hybrid 2013 ➤ General body repairs, interior — Edition 06.2012 The airbag control unit must be renewed: ♦ In the event of a driver/front passenger airbag deployment “though not for airbag generation 9.*, 10.* and 8.R ”… -
Page 15: Checking Airbag Securing Parts After An Accident
Jetta 2011 ➤ , Jetta Hybrid 2013 ➤ General body repairs, interior — Edition 06.2012 Note The “Resistance too high” fault can also be logged in the event ♦ of a cable break. Under normal circumstances, no crash entry is then logged.
-
Page 16: Checking Seat Belts
Jetta 2011 ➤ , Jetta Hybrid 2013 ➤ General body repairs, interior — Edition 06.2012 1.12 Checking seat belts WARNING The seat belt system must be inspected systematically after every accident! If damage is determined at any of the points to be checked, customer must be informed regarding necessity of changing belts.
-
Page 17: Checking Inertia Reel (Locking Mechanism)
Jetta 2011 ➤ , Jetta Hybrid 2013 ➤ General body repairs, interior — Edition 06.2012 • If either of the types of damage illustrated below (1 and 2) are determined on accident vehicle, renew seat belt complete with belt buckle.
-
Page 18: Checking Belt Guide Fittings And Latch Plates
Jetta 2011 ➤ , Jetta Hybrid 2013 ➤ General body repairs, interior — Edition 06.2012 Checking release mechanism – Release seat belt by pressing button on belt buckle with finger pressure. When belt is slack, latch plate must spring out of belt buckle on its own.
-
Page 19: Safety Instructions For Automatically Dimmable Interior Mirror
Jetta 2011 ➤ , Jetta Hybrid 2013 ➤ General body repairs, interior — Edition 06.2012 1.20 Safety instructions for automatically dimmable interior mirror WARNING ♦ The mirror glass is made of several layers and contains an electrolyte to achieve the dimming functionality. Be‐…
-
Page 20: Repair Instructions
Jetta 2011 ➤ , Jetta Hybrid 2013 ➤ General body repairs, interior — Edition 06.2012 Repair instructions ⇒ “2.1 Contact corrosion”, page 14 ⇒ “2.2 Routing and securing wires”, page 14 Contact corrosion Contact corrosion can occur if unsuitable fastening elements (screws, bolts, nuts, washers) are used.
-
Page 21: Interior Equipment
Jetta 2011 ➤ , Jetta Hybrid 2013 ➤ General body repairs, interior — Edition 06.2012 68 – Interior equipment Compartments/covers ⇒ “1.1 Removing and installing storage compartment”, page 15 ⇒ “1.2 Removing and installing steering column trim”, page 15 ⇒ “1.3 Removing and installing left dash panel cover on driver side”, page 17…
-
Page 22: Jetta 2011 ➤ , Jetta Hybrid
Jetta 2011 ➤ , Jetta Hybrid 2013 ➤ General body repairs, interior — Edition 06.2012 ♦ Removal wedge -3409- Note For greater clarity, steering wheel is not shown in figure. Its re‐ moval is not necessary. Removing – Release locking lever of steering wheel positioner.
-
Page 23: Removing And Installing Left Dash Panel Cover On Driver Side
Jetta 2011 ➤ , Jetta Hybrid 2013 ➤ General body repairs, interior — Edition 06.2012 – Unscrew 2 bolts -2- (1.5 Nm). Turn steering wheel to gain ac‐ cess to bolts. – Release locking lever of steering wheel positioner. – Detach lower steering column trim -1- from mountings and re‐…
-
Page 24: Removing And Installing Glove Compartment
Jetta 2011 ➤ , Jetta Hybrid 2013 ➤ General body repairs, interior — Edition 06.2012 Installing – Install in reverse order of removal. Note Before installing, check all fasteners for damage and renew if necessary. Removing and installing glove compart‐…
-
Page 25
Jetta 2011 ➤ , Jetta Hybrid 2013 ➤ General body repairs, interior — Edition 06.2012 – Disconnect wiring harness from glove compartment light — W6- . – Disconnect wiring harness from glove compartment light switch -E26- . – In vehicles with a key operated switch to deactivate front pas‐… -
Page 26: Removing And Installing Glove Compartment Lock Cylinder
Jetta 2011 ➤ , Jetta Hybrid 2013 ➤ General body repairs, interior — Edition 06.2012 Removing and installing glove compart‐ ment lock cylinder Removing Note It is not possible to remove the lock cylinder -1- separately. ♦ The opening button -2- must be replaced.
-
Page 27: Removing And Installing Decorative Trim On Glove Compartment
Jetta 2011 ➤ , Jetta Hybrid 2013 ➤ General body repairs, interior — Edition 06.2012 Removing and installing decorative trim on glove compartment Removing – Remove glove compartment ⇒ page 18 – Remove bolts -1- (1.5 Nm). – Remove decorative trim -3- from glove compartment -2-.
-
Page 28: Equipment
Jetta 2011 ➤ , Jetta Hybrid 2013 ➤ General body repairs, interior — Edition 06.2012 Equipment ⇒ “2.1 Removing and installing sun visor”, page 22 ⇒ “2.2 Removing and installing roof grab handle”, page 23 ⇒ “2.3 Removing and installing roof grab handle bracket”,…
-
Page 29: Removing And Installing Roof Grab Handle
Jetta 2011 ➤ , Jetta Hybrid 2013 ➤ General body repairs, interior — Edition 06.2012 Installing – Install in reverse order of removal. Note Before installing, check all fasteners for damage and renew if necessary. Removing and installing roof grab han‐…
-
Page 30
Jetta 2011 ➤ , Jetta Hybrid 2013 ➤ General body repairs, interior — Edition 06.2012 Note Alternatively, it is possible to release the clips with a screwdriver. Installing Install in reverse order of removal. Note Before installing, check all fasteners for damage and renew if necessary. -
Page 31: Removing And Installing Roof Grab Handle Bracket
Jetta 2011 ➤ , Jetta Hybrid 2013 ➤ General body repairs, interior — Edition 06.2012 Removing and installing roof grab han‐ dle bracket Note The figure shows the front left grab handle bracket, the removal and installation of the remaining grab handle brackets is identical.
-
Page 32: Centre Console
Jetta 2011 ➤ , Jetta Hybrid 2013 ➤ General body repairs, interior — Edition 06.2012 Centre console ⇒ “3.1 Removing and installing Basic centre console”, page 26 ⇒ “3.2 Removing and installing Comfort and Highline centre con‐ sole”, page 30 ⇒…
-
Page 33
Jetta 2011 ➤ , Jetta Hybrid 2013 ➤ General body repairs, interior — Edition 06.2012 – Unscrew and remove bolt -1- on each side (1.5 Nm). 3. Centre console… -
Page 34
Jetta 2011 ➤ , Jetta Hybrid 2013 ➤ General body repairs, interior — Edition 06.2012 – Remove trim on each side -2- of centre console in -direction of arrow-. – Unscrew 2 bolts -3- (1.5 Nm). – Remove storage compartment -1- from centre console -2- and, depending on the vehicle equipment, disconnect wiring harnesses. -
Page 35
Jetta 2011 ➤ , Jetta Hybrid 2013 ➤ General body repairs, interior — Edition 06.2012 – Remove centre console -1- from vehicle in -direction of arrow-. When doing so, disconnect wiring harness from 12 V socket -U5- . Note At this time, the handbrake lever -2- must be in its highest position. -
Page 36: Removing And Installing »Comfort And Highline« Centre Console
Jetta 2011 ➤ , Jetta Hybrid 2013 ➤ General body repairs, interior — Edition 06.2012 Removing and installing »Comfort and Highline« centre console Removing – Switch off ignition. Vehicles with automatic gearbox – Move selector lever to position “N”. – Release selector lever cover along with handle from cover ⇒…
-
Page 37
Jetta 2011 ➤ , Jetta Hybrid 2013 ➤ General body repairs, interior — Edition 06.2012 – Unscrew and remove bolt -1- on each side (1.5 Nm). 3. Centre console… -
Page 38
Jetta 2011 ➤ , Jetta Hybrid 2013 ➤ General body repairs, interior — Edition 06.2012 – Remove trim on each side -2- of centre console in -direction of arrow-. – Unscrew 2 bolts -3- (1.5 Nm). – Remove storage compartment -1- from centre console -2- and, depending on the vehicle equipment, disconnect wiring harnesses. -
Page 39
Jetta 2011 ➤ , Jetta Hybrid 2013 ➤ General body repairs, interior — Edition 06.2012 »Comfort« centre console – Remove centre console -1- from vehicle in -direction of arrow-. »Highline« centre console – Remove centre console -2- together with air conduit from ve‐… -
Page 40: Removing And Installing Rear Trim Of »Comfort And Highline« Centre Console
Jetta 2011 ➤ , Jetta Hybrid 2013 ➤ General body repairs, interior — Edition 06.2012 Note At this time, the handbrake lever -3- must be in its highest position. ♦ The arm rest can remain installed when removing the centre console.
-
Page 41
Jetta 2011 ➤ , Jetta Hybrid 2013 ➤ General body repairs, interior — Edition 06.2012 »Comfort« centre console – Unclip trim -1- from centre console -2- using removal wedge -3409- . »Highline« centre console – Unclip inverter with socket 12 V-230 V -U13- -3- from centre console -4- using removal wedge -3409- . -
Page 42: Removing And Installing Rear Trim Bracket Of »Comfort And Highline« Centre Console
Jetta 2011 ➤ , Jetta Hybrid 2013 ➤ General body repairs, interior — Edition 06.2012 Installing – Install in reverse order of removal. Note Before installing, check all fasteners for damage and renew if necessary. Removing and installing rear trim brack‐…
-
Page 43: Removing And Installing Lid Of Rear Storage Compartment Of »Comfort And Highline« Centre Console
Jetta 2011 ➤ , Jetta Hybrid 2013 ➤ General body repairs, interior — Edition 06.2012 – Remove bracket -1- from centre console. Installing – Install in reverse order of removal. Note Before installing, check all fasteners for damage and renew if necessary.
-
Page 44: Removing And Installing Centre Console Securing Bracket
Jetta 2011 ➤ , Jetta Hybrid 2013 ➤ General body repairs, interior — Edition 06.2012 Removing and installing centre console securing bracket ⇒ “3.6.1 Assembly overview — securing bracket”, page 38 ⇒ “3.6.2 Removing and installing front securing bracket”, page 38 ⇒…
-
Page 45
Jetta 2011 ➤ , Jetta Hybrid 2013 ➤ General body repairs, interior — Edition 06.2012 ♦ ⇒ “3.1 Removing and installing Basic centre console”, page 26 ♦ ⇒ “3.2 Removing and installing Comfort and Highline centre console”, page 30 – Undo 2 nuts -2- (2.0 Nm) and remove securing bracket -1-. -
Page 46
Jetta 2011 ➤ , Jetta Hybrid 2013 ➤ General body repairs, interior — Edition 06.2012 3.6.4 Removing and installing support Removing – Switch off ignition. – Remove centre console: ♦ ⇒ “3.1 Removing and installing Basic centre console”, page 26 ♦… -
Page 47: Interior Mirror
Jetta 2011 ➤ , Jetta Hybrid 2013 ➤ General body repairs, interior — Edition 06.2012 Interior mirror ⇒ “4.1 Assembly overview — interior mirror”, page 41 ⇒ “4.2 Removing and installing interior mirror”, page 44 ⇒ “4.3 Repairing interior mirror retaining plate”, page 50 ⇒…
-
Page 48
Jetta 2011 ➤ , Jetta Hybrid 2013 ➤ General body repairs, interior — Edition 06.2012 4.1.2 Assembly overview — interior mirror, »with rain sensor« 1 — Retaining plate ❑ Retaining plate for mir‐ ror foot ❑ Glued to windscreen ❑ Repairing interior mirror retaining plate ⇒… -
Page 49
Jetta 2011 ➤ , Jetta Hybrid 2013 ➤ General body repairs, interior — Edition 06.2012 4.1.3 Assembly overview — interior mirror, »with rain sensor and front camera« 1 — Retaining plate ❑ Retaining plate for mir‐ ror foot ❑ Glued to windscreen ❑… -
Page 50: Removing And Installing Interior Mirror
Jetta 2011 ➤ , Jetta Hybrid 2013 ➤ General body repairs, interior — Edition 06.2012 Removing and installing interior mirror ⇒ “4.2.1 Removing and installing Basic interior mirror”, page 44 ⇒ “4.2.2 Removing and installing interior mirror, with rain sensor ”, page 45…
-
Page 51
Jetta 2011 ➤ , Jetta Hybrid 2013 ➤ General body repairs, interior — Edition 06.2012 4.2.2 Removing and installing interior mirror, »with rain sensor« Removing Special tools and workshop equipment required ♦ Removal wedge -3409- WARNING ♦ Observe safety instructions for automatically dimmable interior mirror ⇒… -
Page 52
Jetta 2011 ➤ , Jetta Hybrid 2013 ➤ General body repairs, interior — Edition 06.2012 – Detach lower cable guide -4- from catch with retaining plate -1-. – Pull lower cable guide -4- out of trim piece for roof trim -3-. -
Page 53
Jetta 2011 ➤ , Jetta Hybrid 2013 ➤ General body repairs, interior — Edition 06.2012 Installing – Install in reverse order of removal. 4.2.3 Removing and installing interior mirror, »with rain sensor and front camera« Removing Special tools and workshop equipment required ♦… -
Page 54
Jetta 2011 ➤ , Jetta Hybrid 2013 ➤ General body repairs, interior — Edition 06.2012 WARNING ♦ Observe safety instructions for automatically dimmable interior mirror ⇒ page 13 – Switch off ignition. – Using removal wedge -3409- , release fasteners of cover caps -3-. -
Page 55
Jetta 2011 ➤ , Jetta Hybrid 2013 ➤ General body repairs, interior — Edition 06.2012 – Detach connector -5- for rain sensor -6-. – Remove rain sensor -6- from retaining plate -1- in -direction of arrow-. – Detach upper cable guide -2- from catch with retaining plate -1-. -
Page 56: Repairing Interior Mirror Retaining Plate
Jetta 2011 ➤ , Jetta Hybrid 2013 ➤ General body repairs, interior — Edition 06.2012 Repairing interior mirror retaining plate ⇒ “4.3.1 Repairing interior mirror retaining plate, Basic version”, page 50 ⇒ “4.3.2 Repairing interior mirror retaining plate, with rain sensor ”, page 52…
-
Page 57
Jetta 2011 ➤ , Jetta Hybrid 2013 ➤ General body repairs, interior — Edition 06.2012 – Grind off the three spacer protrusions -arrows- on bonding surface. To do this, use sandpaper (360/400 grain) laid on flat surface. – Keep sanded surface clean and free of grease. -
Page 58
Jetta 2011 ➤ , Jetta Hybrid 2013 ➤ General body repairs, interior — Edition 06.2012 4.3.2 Repairing interior mirror retaining plate, »with rain sensor« Note With the repair procedure described, it is no longer necessary ♦ to renew the windscreen. -
Page 59: Automatic Anti-Dazzle Interior Mirror — Functional Description
Jetta 2011 ➤ , Jetta Hybrid 2013 ➤ General body repairs, interior — Edition 06.2012 – Press retaining plate -1- into position on prepared windscreen -2- immediately after applying adhesive. – Fix retaining plate -1- in its intended position on ceramic pre- coat surface and secure with adhesive tape.
-
Page 60
Jetta 2011 ➤ , Jetta Hybrid 2013 ➤ General body repairs, interior — Edition 06.2012 Selecting reverse gear switches off the anti-dazzle function. Con‐ sequently, one can, for example, reverse out of a dark garage with the aid of the interior mirror. -
Page 61: Passenger Protection
Jetta 2011 ➤ , Jetta Hybrid 2013 ➤ General body repairs, interior — Edition 06.2012 69 – Passenger protection 1. Seat belts…
-
Page 62: Seat Belts
Jetta 2011 ➤ , Jetta Hybrid 2013 ➤ General body repairs, interior — Edition 06.2012 Seat belts ⇒ “1.1 Assembly overview — front three-point seat belt”, page 56 ⇒ “1.2 Assembly overview — rear three-point seat belt”, page 57 ⇒ “1.3 Removing and installing front 3-point seat belt”, page 57 ⇒…
-
Page 63: Assembly Overview — Rear Three-Point Seat Belt
Jetta 2011 ➤ , Jetta Hybrid 2013 ➤ General body repairs, interior — Edition 06.2012 Assembly overview — rear three-point seat belt 1 — Left outside seat belt ❑ Three-point seat belt with belt inertia reel and belt tensioner ❑ The belt is locked in the double belt buckle ⇒…
-
Page 64
Jetta 2011 ➤ , Jetta Hybrid 2013 ➤ General body repairs, interior — Edition 06.2012 Removing WARNING ♦ Follow safety regulations for pyrotechnic components ⇒ page 1 ♦ Follow disposal regulations for pyrotechnic components ⇒ page 4 – Remove upper B-pillar trim ⇒… -
Page 65
Jetta 2011 ➤ , Jetta Hybrid 2013 ➤ General body repairs, interior — Edition 06.2012 – Disconnect electrical connectors -1- and-2- from belt inertia reel -3-. For all vehicles: – Disconnect electrical connector -1- from belt inertia reel -2-. – Undo bolt -2- (40 Nm) and remove belt anchor -5- from body. -
Page 66
Jetta 2011 ➤ , Jetta Hybrid 2013 ➤ General body repairs, interior — Edition 06.2012 WARNING Before handling pyrotechnic components (e.g. separating the electrical connector), the person handling them must “electri‐ cally discharge” himself/herself. To do this e.g. briefly touch the door striker plate. -
Page 67
Jetta 2011 ➤ , Jetta Hybrid 2013 ➤ General body repairs, interior — Edition 06.2012 Note Ensure electrical connector is pushed fully onto stop and en‐ ♦ gages audibly. If parts of the belt system are removed because of an accident, ♦… -
Page 68: Removing And Installing Rear Outer Three-Point Seat Belt
Jetta 2011 ➤ , Jetta Hybrid 2013 ➤ General body repairs, interior — Edition 06.2012 – Further installation is performed in the reverse order of re‐ moval. WARNING Battery must be connected with ignition switched on. If pyro‐ technic components (e.g. airbag, seat belt tensioners) are repaired incorrectly, undesired triggering may occur after the battery is connected.
-
Page 69
Jetta 2011 ➤ , Jetta Hybrid 2013 ➤ General body repairs, interior — Edition 06.2012 Removing WARNING ♦ Follow safety regulations for pyrotechnic components ⇒ page 1 ♦ Follow disposal regulations for pyrotechnic components ⇒ page 4 – Remove bench seat ⇒… -
Page 70
Jetta 2011 ➤ , Jetta Hybrid 2013 ➤ General body repairs, interior — Edition 06.2012 – Take belt inertia reel -4- together with electrical connector -5- out of upper part of rear wall in -direction of arrow-. Installing WARNING ♦ Follow safety regulations for pyrotechnic components ⇒… -
Page 71: Removing And Installing Rear Middle Three-Point Seat Belt
Jetta 2011 ➤ , Jetta Hybrid 2013 ➤ General body repairs, interior — Edition 06.2012 Note Ensure electrical connector is pushed fully onto stop and en‐ ♦ gages audibly. If parts of the belt system are removed because of an accident, ♦…
-
Page 72
Jetta 2011 ➤ , Jetta Hybrid 2013 ➤ General body repairs, interior — Edition 06.2012 – Working from the luggage compartment, remove complete middle seat belt -2- from upper part of rear wall -1- in -direction of arrow-. Rep. gr.69 — Passenger protection… -
Page 73: Removing And Installing Front Belt Height Adjuster
Jetta 2011 ➤ , Jetta Hybrid 2013 ➤ General body repairs, interior — Edition 06.2012 Installing – If parts of the belt system are removed because of an accident, the belt system securing bolts must be renewed. – Fit three-point seat belt ensuring that anti-rotation tab engages in mounting and tighten bolt (40 Nm).
-
Page 74
Jetta 2011 ➤ , Jetta Hybrid 2013 ➤ General body repairs, interior — Edition 06.2012 Note There is no need to remove the belt anchor or anchor rail for seat belt . – Remove bolt -1- (40 Nm) and detach belt guide anchor -2- from belt height adjuster -3-. -
Page 75
Jetta 2011 ➤ , Jetta Hybrid 2013 ➤ General body repairs, interior — Edition 06.2012 Installing Note If parts of the belt system are removed because of an accident, the belt system bolts must be renewed. – Insert belt height adjuster -2- into mountings -3-. -
Page 76
Jetta 2011 ➤ , Jetta Hybrid 2013 ➤ General body repairs, interior — Edition 06.2012 Note For installation of the top B-pillar trim, the belt adjuster slide -4- must be in the uppermost position. In another position, the slide can crack at the rated break point. -
Page 77: Removing And Installing Front Belt Buckle With Belt Switch E24 / E25
Jetta 2011 ➤ , Jetta Hybrid 2013 ➤ General body repairs, interior — Edition 06.2012 Removing and installing front belt buck‐ le with belt switch -E24- / -E25- Note Removal and installation is described for left side of vehicle. Fol‐…
-
Page 78
Jetta 2011 ➤ , Jetta Hybrid 2013 ➤ General body repairs, interior — Edition 06.2012 Seat with electrical height adjustment: – Detach wiring harness -1- from seat frame. – Guide wiring harness -1- out of seat wiring harness -2-. – Remove bolt -2- (20 Nm). -
Page 79
Jetta 2011 ➤ , Jetta Hybrid 2013 ➤ General body repairs, interior — Edition 06.2012 Installing Install in reverse order, but note the following: – Place belt buckle -1- onto mounting -3- in such a way that the dog point -4- together with the belt buckle -1- latches into place. -
Page 80: Removing And Installing Rear Double Belt Buckle
Jetta 2011 ➤ , Jetta Hybrid 2013 ➤ General body repairs, interior — Edition 06.2012 WARNING ♦ Follow safety regulations for pyrotechnic components ⇒ page 1 ♦ Before handling pyrotechnic components (e.g. connecting the electrical connector), the person handling them must ensure that he/she is “electrically discharged”.
-
Page 81
Jetta 2011 ➤ , Jetta Hybrid 2013 ➤ General body repairs, interior — Edition 06.2012 – Unscrew bolt -1- (40 Nm) and remove double belt buckle -2- from body -3-. Installing – Install in reverse order of removal. 1. Seat belts… -
Page 82: Child Seat Anchors
Jetta 2011 ➤ , Jetta Hybrid 2013 ➤ General body repairs, interior — Edition 06.2012 Child seat anchors ⇒ “2.1 Points to check”, page 76 ⇒ “2.2 Child seat anchors in rear shelf”, page 76 Points to check ♦ Child seat anchors must be checked for damage and defor‐…
-
Page 83: Airbag System
Jetta 2011 ➤ , Jetta Hybrid 2013 ➤ General body repairs, interior — Edition 06.2012 Airbag system ⇒ “3.1 Airbag system”, page 77 ⇒ “3.2 Adapting components”, page 78 Airbag system 1 — Airbag unit on driver side ❑ Removing and installing ⇒…
-
Page 84: Adapting Components
Jetta 2011 ➤ , Jetta Hybrid 2013 ➤ General body repairs, interior — Edition 06.2012 10 — Curtain airbag, driver side ❑ Removing and installing ⇒ page 97 11 — Curtain airbag, front pas‐ senger side ❑ Removing and installing ⇒…
-
Page 85: Airbag Control Unit
Jetta 2011 ➤ , Jetta Hybrid 2013 ➤ General body repairs, interior — Edition 06.2012 Airbag control unit ⇒ “4.1 Assembly overview — airbag control unit”, page 79 ⇒ “4.2 Removing and installing airbag control unit J234 ”, page 79…
-
Page 86
Jetta 2011 ➤ , Jetta Hybrid 2013 ➤ General body repairs, interior — Edition 06.2012 – Remove bolt -1- (1.5 Nm). – Remove trim -2- of centre console in -direction of arrow-. Note No further components of the centre console need to be removed. -
Page 87
Jetta 2011 ➤ , Jetta Hybrid 2013 ➤ General body repairs, interior — Edition 06.2012 – Remove control unit -2- from centre tunnel. Installing WARNING ♦ Follow safety regulations for pyrotechnic components ⇒ page 1 ♦ Before handling pyrotechnic components (e.g. connecting the electrical connector), the person handling them must ensure that he/she is “electrically discharged”. -
Page 88: Driver’s Airbag
Jetta 2011 ➤ , Jetta Hybrid 2013 ➤ General body repairs, interior — Edition 06.2012 Driver’s airbag ⇒ “5.1 Removing and installing driver side airbag igniter N95 ”, page 82 Removing and installing driver side air‐ bag igniter -N95- Note Removal and installation of the airbag unit is described for the ♦…
-
Page 89
Jetta 2011 ➤ , Jetta Hybrid 2013 ➤ General body repairs, interior — Edition 06.2012 WARNING Before handling pyrotechnic components (e.g. separating the electrical connector), the person handling them must “electri‐ cally discharge” himself/herself. To do this e.g. briefly touch the door striker plate. -
Page 90
Jetta 2011 ➤ , Jetta Hybrid 2013 ➤ General body repairs, interior — Edition 06.2012 Installing WARNING ♦ Follow safety regulations for pyrotechnic components ⇒ page 1 ♦ Before handling pyrotechnic components (e.g. connecting the electrical connector), the person handling them must ensure that he/she is “electrically discharged”. -
Page 91
Jetta 2011 ➤ , Jetta Hybrid 2013 ➤ General body repairs, interior — Edition 06.2012 Note Ensure electrical connector is pushed fully onto stop and engages audibly. ♦ Ensure that no cables are trapped. ♦ WARNING Battery must be connected with ignition switched on. If pyro‐… -
Page 92: Front Passenger Side Airbag
Jetta 2011 ➤ , Jetta Hybrid 2013 ➤ General body repairs, interior — Edition 06.2012 Front passenger side airbag ⇒ “6.1 Advanced Airbag System (only for USA/Canada)”, page 86 ⇒ “6.2 Removing and installing front passenger airbag unit with front passenger side airbag igniter N131 / N132 ”, page 86 ⇒…
-
Page 93
Jetta 2011 ➤ , Jetta Hybrid 2013 ➤ General body repairs, interior — Edition 06.2012 – Remove side dash panel cover ⇒ page 163 – Remove centre A-pillar trim ⇒ page 192 – Remove glove compartment ⇒ page 18 WARNING Before handling pyrotechnic components (e.g. -
Page 94
Jetta 2011 ➤ , Jetta Hybrid 2013 ➤ General body repairs, interior — Edition 06.2012 Note Brackets for front passenger airbag unit -1- are clipped onto retaining frame -2-. – Unclip bracket -1- and remove it from retaining frame -2-. -
Page 95
Jetta 2011 ➤ , Jetta Hybrid 2013 ➤ General body repairs, interior — Edition 06.2012 Installing Note If the housing of the front passenger airbag unit -4- is made of plastic, the bolts -3- (9 Nm) must be secured ♦… -
Page 96: Removal And Installation Of Key Operated Switch To Deactivate Front Passenger Airbag E224
Jetta 2011 ➤ , Jetta Hybrid 2013 ➤ General body repairs, interior — Edition 06.2012 – Connect connector to airbag igniter. – Press in connector lock. Doing so, the connector will be fully inserted into airbag igniter and locked at the same time.
-
Page 97
Jetta 2011 ➤ , Jetta Hybrid 2013 ➤ General body repairs, interior — Edition 06.2012 – Remove glove compartment ⇒ page 18 WARNING Before handling pyrotechnic components (e.g. separating the electrical connector), the person handling them must “electri‐ cally discharge” himself/herself. To do this e.g. briefly touch the door striker plate. -
Page 98: Side Airbags
Jetta 2011 ➤ , Jetta Hybrid 2013 ➤ General body repairs, interior — Edition 06.2012 Side airbags ⇒ “7.1 Removing and installing front side airbag with side airbag igniter N199 / N200 ”, page 92 ⇒ “7.2 Removing and installing side airbag with rear side airbag igniter N201 / N202 ”, page 94…
-
Page 99
Jetta 2011 ➤ , Jetta Hybrid 2013 ➤ General body repairs, interior — Edition 06.2012 Installing WARNING ♦ Follow safety regulations for pyrotechnic components ⇒ page 1 ♦ Before handling pyrotechnic components (e.g. connecting the electrical connector), the person handling them must ensure that he/she is “electrically discharged”. -
Page 100: Removing And Installing Side Airbag With Rear Side Airbag Igniter N201 / N202
Jetta 2011 ➤ , Jetta Hybrid 2013 ➤ General body repairs, interior — Edition 06.2012 WARNING Battery must be connected with ignition switched on. If pyro‐ technic components (e.g. airbag, seat belt tensioners) are repaired incorrectly, undesired triggering may occur after the battery is connected.
-
Page 101
Jetta 2011 ➤ , Jetta Hybrid 2013 ➤ General body repairs, interior — Edition 06.2012 Installing WARNING ♦ Follow safety regulations for pyrotechnic components ⇒ page 1 ♦ Before handling pyrotechnic components (e.g. connecting the electrical connector), the person handling them must ensure that he/she is “electrically discharged”. -
Page 102
Jetta 2011 ➤ , Jetta Hybrid 2013 ➤ General body repairs, interior — Edition 06.2012 WARNING Battery must be connected with ignition switched on. If pyro‐ technic components (e.g. airbag, seat belt tensioners) are repaired incorrectly, undesired triggering may occur after the battery is connected. -
Page 103: Curtain Airbags
Jetta 2011 ➤ , Jetta Hybrid 2013 ➤ General body repairs, interior — Edition 06.2012 Curtain airbags ⇒ “8.1 Removing and installing curtain airbag with curtain airbag igniter N251 / N252 ”, page 97 Removing and installing curtain airbag with curtain airbag igniter -N251- / -…
-
Page 104
Jetta 2011 ➤ , Jetta Hybrid 2013 ➤ General body repairs, interior — Edition 06.2012 WARNING Before handling pyrotechnic components (e.g. separating the electrical connector), the person handling them must “electri‐ cally discharge” himself/herself. To do this e.g. briefly touch the door striker plate. -
Page 105
Jetta 2011 ➤ , Jetta Hybrid 2013 ➤ General body repairs, interior — Edition 06.2012 – Detach clipping lugs -1- and -2- of curtain airbag from body. – Detach retaining clips -4- from body ⇒ page 97 – Unhook front and rear fixing links -3- from body. -
Page 106
Jetta 2011 ➤ , Jetta Hybrid 2013 ➤ General body repairs, interior — Edition 06.2012 – Remove bolt -1- (4.5 Nm). Note The bolt -1- must be renewed. – Remove clips of -3- of curtain airbag -2- from body. – Detach retaining clips -4- from body ⇒… -
Page 107
Jetta 2011 ➤ , Jetta Hybrid 2013 ➤ General body repairs, interior — Edition 06.2012 Installing WARNING ♦ Follow safety regulations for pyrotechnic components ⇒ page 1 ♦ Always follow steps of procedure for installing curtain air‐ bag in the given order. -
Page 108
Jetta 2011 ➤ , Jetta Hybrid 2013 ➤ General body repairs, interior — Edition 06.2012 WARNING Battery must be connected with ignition switched on. If pyro‐ technic components (e.g. airbag, seat belt tensioners) are repaired incorrectly, undesired triggering may occur after the battery is connected. -
Page 109: Airbag Crash Sensors
Jetta 2011 ➤ , Jetta Hybrid 2013 ➤ General body repairs, interior — Edition 06.2012 Airbag crash sensors ⇒ “9.1 Removing and installing front airbag crash sensor, driver side G283 (USA)”, page 103 ⇒ “9.2 Front airbag crash sensor, front passenger side G284 (USA)”, page 105…
-
Page 110
Jetta 2011 ➤ , Jetta Hybrid 2013 ➤ General body repairs, interior — Edition 06.2012 – Release connector locking mechanism and pull off connector -1- from front airbag crash sensor on driver side -G283- -3-. – Unscrew bolt -2- (4.5 Nm) and remove front airbag crash sen‐… -
Page 111: Front Airbag Crash Sensor, Front Passenger Side G284 (Usa)
Jetta 2011 ➤ , Jetta Hybrid 2013 ➤ General body repairs, interior — Edition 06.2012 Front airbag crash sensor, front passen‐ ger side -G284- (USA) Note Front airbag crash sensor on front passenger side -G284- can be found on the right-hand side of the lock carrier at the front end of the vehicle.
-
Page 112: Removing And Installing Side-Airbag Crash Sensor, Driver Side G179
Jetta 2011 ➤ , Jetta Hybrid 2013 ➤ General body repairs, interior — Edition 06.2012 – Insert front airbag crash sensor on driver side -G283- -3- in such a way that lug -arrow A- engages in hole -arrow B-. Note This is the only way to ensure that the front airbag crash sensor on driver side -G283- is installed in the correct position.
-
Page 113
Jetta 2011 ➤ , Jetta Hybrid 2013 ➤ General body repairs, interior — Edition 06.2012 – Disconnect battery earth cable with ignition switched on ⇒ Electrical system; Rep. gr. 27 ; Battery; Connecting and dis‐ connecting battery . – Remove front door trim ⇒… -
Page 114
Jetta 2011 ➤ , Jetta Hybrid 2013 ➤ General body repairs, interior — Edition 06.2012 Installing WARNING For the crash sensor (pressure sensor) to function properly, it is vital to ensure that the door forms an effective seal. WARNING ♦ Follow safety regulations for pyrotechnic components ⇒… -
Page 115
Jetta 2011 ➤ , Jetta Hybrid 2013 ➤ General body repairs, interior — Edition 06.2012 Further installation is carried out in reverse order of removal. Ob‐ serve the following: Note Ensure electrical connector is pushed fully onto stop and engages audibly. -
Page 116: Removing And Installing Side-Airbag Crash Sensor, Front Passenger Side G180
Jetta 2011 ➤ , Jetta Hybrid 2013 ➤ General body repairs, interior — Edition 06.2012 Note If airbag warning lamp -K75- indicates a fault following installation, event memory must be read, deleted and read again ⇒ Vehicle diagnostic tester. Removing and installing side-airbag…
-
Page 117
Jetta 2011 ➤ , Jetta Hybrid 2013 ➤ General body repairs, interior — Edition 06.2012 – Disconnect battery earth cable with ignition switched on ⇒ Electrical system; Rep. gr. 27 ; Battery; Connecting and dis‐ connecting battery . – Remove bench seat ⇒… -
Page 118
Jetta 2011 ➤ , Jetta Hybrid 2013 ➤ General body repairs, interior — Edition 06.2012 Installing WARNING ♦ Follow safety regulations for pyrotechnic components ⇒ page 1 ♦ Before handling pyrotechnic components (e.g. connecting the electrical connector), the person handling them must ensure that he/she is “electrically discharged”. -
Page 119: Removing And Installing Rear Side-Airbag Crash Sensor, Front Passenger Side G257
Jetta 2011 ➤ , Jetta Hybrid 2013 ➤ General body repairs, interior — Edition 06.2012 Note Ensure electrical connector is pushed fully onto stop and engages audibly. ♦ Ensure that no cables are trapped. ♦ WARNING Battery must be connected with ignition switched on. If pyro‐…
-
Page 120: Seat Belt Verification
Jetta 2011 ➤ , Jetta Hybrid 2013 ➤ General body repairs, interior — Edition 06.2012 Seat belt verification ⇒ “10.1 Removing and installing seat occupied sensor, front pas‐ senger side G128 ”, page 114 ⇒ “10.2 Removing and installing seat occupied sensor, front pas‐…
-
Page 121
Jetta 2011 ➤ , Jetta Hybrid 2013 ➤ General body repairs, interior — Edition 06.2012 Vehicles without height adjustment – Remove left trim on seat without adjustable seat height ⇒ page 250 – Remove front seat bar ⇒ page 259 Vehicles with manually adjustable seat –… -
Page 122
Jetta 2011 ➤ , Jetta Hybrid 2013 ➤ General body repairs, interior — Edition 06.2012 Installing WARNING ♦ Follow safety regulations for pyrotechnic components ⇒ page 1 ♦ Before handling pyrotechnic components (e.g. connecting the electrical connector), the person handling them must ensure that he/she is “electrically discharged”. -
Page 123
Jetta 2011 ➤ , Jetta Hybrid 2013 ➤ General body repairs, interior — Edition 06.2012 – Hold the aligned sensor -2- in place with your right hand. Pull of adhesive strip -3- and glue sensor into foam recess. – Pull off adhesive strip -1- and glue wiring harness into foam recess. -
Page 124: Removing And Installing Seat Occupied Sensor, Front Passenger Side G128 , As Of Model Year 2012
Jetta 2011 ➤ , Jetta Hybrid 2013 ➤ General body repairs, interior — Edition 06.2012 Further installation is carried out in reverse order of removal. Ob‐ serve the following: – After installation, carry out a function check with ignition switched on.
-
Page 125
Jetta 2011 ➤ , Jetta Hybrid 2013 ➤ General body repairs, interior — Edition 06.2012 ♦ Removal lever -80 — 200- Note The seat occupied sensor, front passenger side -G128- is only ♦ installed in the front passenger seat. The seat occupied sensor for front passenger side -G128- has ♦… -
Page 126
Jetta 2011 ➤ , Jetta Hybrid 2013 ➤ General body repairs, interior — Edition 06.2012 Vehicles without height adjustment – Remove left trim on seat without adjustable seat height ⇒ page 250 – Remove front seat bar ⇒ page 259 Vehicles with manually adjustable seat –… -
Page 127
Jetta 2011 ➤ , Jetta Hybrid 2013 ➤ General body repairs, interior — Edition 06.2012 Installing WARNING ♦ Follow safety regulations for pyrotechnic components ⇒ page 1 ♦ Before handling pyrotechnic components (e.g. connecting the electrical connector), the person handling them must ensure that he/she is “electrically discharged”. -
Page 128
Jetta 2011 ➤ , Jetta Hybrid 2013 ➤ General body repairs, interior — Edition 06.2012 – Place cover with front seat cushion -1- onto seat frame -2- and align. Further installation ist carried out in reverse order of removal. Observe the following: –… -
Page 129
Jetta 2011 ➤ , Jetta Hybrid 2013 ➤ General body repairs, interior — Edition 06.2012 WARNING Battery must be connected with ignition switched on. If pyro‐ technic components (e.g. airbag, seat belt tensioners) are repaired incorrectly, undesired triggering may occur after the battery is connected. -
Page 130: Seat Occupied Recognition (Usa)
Jetta 2011 ➤ , Jetta Hybrid 2013 ➤ General body repairs, interior — Edition 06.2012 Seat occupied recognition (USA) ⇒ “11.1 Safety precautions for when working on seat occupied recognition”, page 124 ⇒ “11.2 Procedure after an accident when belt tensioner and/or airbag was triggered”, page 124…
-
Page 131: Assembly Overview — Front Seat «Basic
Jetta 2011 ➤ , Jetta Hybrid 2013 ➤ General body repairs, interior — Edition 06.2012 carried out with the vehicle diagnosis and service information system -VAS 5052 A- . ♦ If the seat rail and/or seat pan are renewed after an accident due to deformation, the pressure sensor for seat occupied recognition -G452- must be renewed.
-
Page 132
Jetta 2011 ➤ , Jetta Hybrid 2013 ➤ General body repairs, interior — Edition 06.2012 ❑ Before gluing, positioning aids must be aligned with the positioning aids of the front seat cushion padding ⇒ Item 3 (page 125) 5 — Pressure sensor for seat occupied recognition -G452- ❑… -
Page 133: Assembly Overview — Front Seat «Comfort
Jetta 2011 ➤ , Jetta Hybrid 2013 ➤ General body repairs, interior — Edition 06.2012 11.4 Assembly overview — front seat “Comfort” 1 — Wiring harness ❑ Wiring harness with connector for pressure sensor for seat occu‐ pied recognition -G452- ❑…
-
Page 134: Assembly Overview — Front Seat «Sport
Jetta 2011 ➤ , Jetta Hybrid 2013 ➤ General body repairs, interior — Edition 06.2012 ❑ Clipped onto seat frame ❑ Removing and installing ⇒ page 141 9 — Seat occupied recognition control unit -J706- ❑ Can be diagnosed ❑ The necessity for replacement of the seat occupied recognition control unit -J706- does not mean that the pressure sensor for seat occupied recognition -G452- has to be replaced as well.
-
Page 135
Jetta 2011 ➤ , Jetta Hybrid 2013 ➤ General body repairs, interior — Edition 06.2012 occupied recognition — G452- ❑ Before gluing, positioning aids must be aligned with the positioning aids of the front seat cushion padding ⇒ Item 3 (page 128) 5 — Pressure sensor for seat occupied recognition -G452- ❑… -
Page 136: Removing And Installing Pressure Sensor For Seat Occupied Recognition G452
Jetta 2011 ➤ , Jetta Hybrid 2013 ➤ General body repairs, interior — Edition 06.2012 11.6 Removing and installing pressure sen‐ sor for seat occupied recognition -G452- Note It is only permissible to renew pressure sensor for seat occu‐ ♦…
-
Page 137
Jetta 2011 ➤ , Jetta Hybrid 2013 ➤ General body repairs, interior — Edition 06.2012 – Disconnect connector -4- for pressure sensor -2- from seat occupied recognition control unit -J706- -3-. – Disconnect wiring harness -5- for pressure sensor from seat frame. -
Page 138
Jetta 2011 ➤ , Jetta Hybrid 2013 ➤ General body repairs, interior — Edition 06.2012 Note Removed components are to be separated from each other and disposed of separately from each other so ♦ that they are not accidentally re-installed. -
Page 139
Jetta 2011 ➤ , Jetta Hybrid 2013 ➤ General body repairs, interior — Edition 06.2012 Installing WARNING ♦ Follow safety regulations for pyrotechnic components ⇒ page 1 ♦ Before handling pyrotechnic components (e.g. connecting the electrical connector), the person handling them must ensure that he/she is “electrically discharged”. -
Page 140
Jetta 2011 ➤ , Jetta Hybrid 2013 ➤ General body repairs, interior — Edition 06.2012 Note The pressure sensor for seat occupied recognition -G452- ♦ must be positioned without kinks. After seat occupied recognition has been renewed, vehicle di‐ ♦… -
Page 141
Jetta 2011 ➤ , Jetta Hybrid 2013 ➤ General body repairs, interior — Edition 06.2012 – Lightly press pressure sensor into front “channel transitions”, while aligning it to the seat padding. – Remove protective film -1- of front side position adhesive -2- and affix pressure sensor, applying slight pressure and avoid‐… -
Page 142
Jetta 2011 ➤ , Jetta Hybrid 2013 ➤ General body repairs, interior — Edition 06.2012 – Lightly press pressure sensor into rear “channel transitions”, while aligning it to the seat padding. – Remove protective film -5- of rear side position adhesive -1- and affix pressure sensor, applying slight pressure and avoid‐… -
Page 143
Jetta 2011 ➤ , Jetta Hybrid 2013 ➤ General body repairs, interior — Edition 06.2012 – Feed wiring harness -1- through opening in seat padding -2- and attach it in anchoring channel -3-. Note It must be ensured that the entire wiring harness -1- is routed straight through the seat padding -2- and that there are no cable loops in the anchoring channel -3- after installation. -
Page 144
Jetta 2011 ➤ , Jetta Hybrid 2013 ➤ General body repairs, interior — Edition 06.2012 – Attach wiring harness of pressure sensor -4- to seat frame -3- and fix in place as shown. Rep. gr.69 — Passenger protection… -
Page 145: Removing And Installing Seat Occupied Recognition Control Unit J706
Jetta 2011 ➤ , Jetta Hybrid 2013 ➤ General body repairs, interior — Edition 06.2012 – Connect connector -1- of wiring harness -4- to seat occupied recognition control unit -J706- -2-. Note Ensure electrical connector is pushed fully onto stop and engages audibly.
-
Page 146
Jetta 2011 ➤ , Jetta Hybrid 2013 ➤ General body repairs, interior — Edition 06.2012 Installing WARNING ♦ Follow safety regulations for pyrotechnic components ⇒ page 1 ♦ Before handling pyrotechnic components (e.g. connecting the electrical connector), the person handling them must ensure that he/she is “electrically discharged”. -
Page 147: Removing And Installing Bracket Of Seat Occupied Recognition Control Unit J706
Jetta 2011 ➤ , Jetta Hybrid 2013 ➤ General body repairs, interior — Edition 06.2012 WARNING Battery must be connected with ignition switched on. If pyro‐ technic components (e.g. airbag, seat belt tensioners) are repaired incorrectly, undesired triggering may occur after the battery is connected.
-
Page 148: Importers Reporting Obligation
Jetta 2011 ➤ , Jetta Hybrid 2013 ➤ General body repairs, interior — Edition 06.2012 Installing – Install in reverse order of removal. 11.9 Importers reporting obligation Following the installation of new components of the seat occupied recognition system ( pressure sensor for seat occupied recogni‐…
-
Page 149
Jetta 2011 ➤ , Jetta Hybrid 2013 ➤ General body repairs, interior — Edition 06.2012 → Deactivation of airbag units/child seat, seat installation etc. → Appendix 2 In the “Technical Service Handbook 2”, the “Process ID” or the “technical solution number” for this procedure is “2022327/1”. -
Page 150: Trim, Insulation
Jetta 2011 ➤ , Jetta Hybrid 2013 ➤ General body repairs, interior — Edition 06.2012 70 – Trim, insulation Door trims ⇒ “1.2 Removing and installing driver door trim”, page 145 ⇒ “1.3 Removing and installing front passenger door trim”, page 149 ⇒…
-
Page 151: Removing And Installing Driver Door Trim
Jetta 2011 ➤ , Jetta Hybrid 2013 ➤ General body repairs, interior — Edition 06.2012 ♦ Pop rivet pliers -VAS 5072- ♦ Torque wrench -V.A.G 1783- Removing and installing driver door trim Special tools and workshop equipment required ♦ Removal wedge -3409- ♦…
-
Page 152
Jetta 2011 ➤ , Jetta Hybrid 2013 ➤ General body repairs, interior — Edition 06.2012 ♦ Torque wrench -V.A.G 1783- Removing – Switch off ignition. – Lever upper part of handle recess -3- upwards out of mount‐ ings in door trim -2- in -direction of arrow-, using the removal wedge -3409- to do so. -
Page 153
Jetta 2011 ➤ , Jetta Hybrid 2013 ➤ General body repairs, interior — Edition 06.2012 – Prize lower part of handle recess -1- out of catches -2- and -3- of door trim -4- in -direction of arrow-, using removal wedge -3409- to do so. -
Page 154
Jetta 2011 ➤ , Jetta Hybrid 2013 ➤ General body repairs, interior — Edition 06.2012 – Release retaining clips -6- of door trim -3- in lower area from mountings, using wedges -T10383- . – Release retaining clips -6- of door trim -3- at sides from mount‐… -
Page 155: Removing And Installing Front Passenger Door Trim
Jetta 2011 ➤ , Jetta Hybrid 2013 ➤ General body repairs, interior — Edition 06.2012 Caution Before installing door trim, ensure that the locking mechanisms of all clips are in -position 1-. It is not possible to install the door trim without problem if clips…
-
Page 156
Jetta 2011 ➤ , Jetta Hybrid 2013 ➤ General body repairs, interior — Edition 06.2012 ♦ Removal wedge -3409- ♦ Wedges -T10383- ♦ Torque wrench -V.A.G 1783- Removing – Switch off ignition. – Lever upper part of handle recess -4- upwards out of mount‐… -
Page 157
Jetta 2011 ➤ , Jetta Hybrid 2013 ➤ General body repairs, interior — Edition 06.2012 – Prize lower part of handle recess -1- out of catches -2- and -3- of door trim, using removal wedge -3409- to do so. – Undo bolts -6- in area of handle recess and upper door trim (4 Nm). -
Page 158
Jetta 2011 ➤ , Jetta Hybrid 2013 ➤ General body repairs, interior — Edition 06.2012 – Release retaining clips -3- of door trim -4- in lower area from mountings, using wedges -T10383- . – Release retaining clips -3- of door trim -4- at sides from mount‐… -
Page 159: Removing And Installing Front Door Trim Bracket
Jetta 2011 ➤ , Jetta Hybrid 2013 ➤ General body repairs, interior — Edition 06.2012 Caution Before installing door trim, ensure that the locking mechanisms of all clips are in -position 1-. It is not possible to install the door trim without problem if clips…
-
Page 160
Jetta 2011 ➤ , Jetta Hybrid 2013 ➤ General body repairs, interior — Edition 06.2012 ♦ Pop rivet pliers -VAS 5072- ♦ Torque wrench -V.A.G 1783- Removing – Remove front door trim on driver side ⇒ page 145 – Drill open blind rivets -2- and remove securing bracket -1- from door. -
Page 161: Removing And Installing Rear Door Trim
Jetta 2011 ➤ , Jetta Hybrid 2013 ➤ General body repairs, interior — Edition 06.2012 Installing – Install in reverse order of removal. Note Rivet on securing bracket, using riveting tongs -VAS 5072- and blind rivets. 1.4.1 Installing Removing and installing rear door trim Note Removal and installation of trim is described for the left rear door.
-
Page 162
Jetta 2011 ➤ , Jetta Hybrid 2013 ➤ General body repairs, interior — Edition 06.2012 ♦ Removal wedge -3409- ♦ Wedges -T10383- ♦ Torque wrench -V.A.G 1783- Removing – Switch off ignition. – Lever upper part of handle recess -3- upwards out of mount‐… -
Page 163
Jetta 2011 ➤ , Jetta Hybrid 2013 ➤ General body repairs, interior — Edition 06.2012 – Undo bolts -4- in area of handle recess and upper door trim (4 Nm). – Remove bolt -5- (2 Nm). – Release retaining clips -6- of door trim -3- in lower area from mountings, using wedges -T10383- . -
Page 164
Jetta 2011 ➤ , Jetta Hybrid 2013 ➤ General body repairs, interior — Edition 06.2012 Installing – Install in reverse order of removal. Note Before installing, check all fasteners for damage and renew if necessary. Caution Before installing door trim, ensure that the locking mechanisms of all clips are in -position 1-. -
Page 165: Removing And Installing Rear Door Trim Bracket
Jetta 2011 ➤ , Jetta Hybrid 2013 ➤ General body repairs, interior — Edition 06.2012 Removing and installing rear door trim bracket Note Removal and installation of rear door trim bracket is described on the driver side. Removal and installation on the right vehicle side are analogous.
-
Page 166
Jetta 2011 ➤ , Jetta Hybrid 2013 ➤ General body repairs, interior — Edition 06.2012 ♦ Pop rivet pliers -VAS 5072- Removing – Remove rear door trim ⇒ page 155 – Drill open blind rivets -2- and remove securing bracket -1- from door. -
Page 167: Removing And Installing Front Inner Mirror Cover
Jetta 2011 ➤ , Jetta Hybrid 2013 ➤ General body repairs, interior — Edition 06.2012 Note Rivet on securing bracket, using riveting tongs -VAS 5072- and blind rivets. Removing and installing front inner mir‐ ror cover Note Removal and installation are described for the left vehicle side.
-
Page 168
Jetta 2011 ➤ , Jetta Hybrid 2013 ➤ General body repairs, interior — Edition 06.2012 Installing – Install in reverse order of removal. Note Before installing, check all fasteners for damage and renew if necessary. Rep. gr.70 — Trim, insulation… -
Page 169: Dash Panel
Jetta 2011 ➤ , Jetta Hybrid 2013 ➤ General body repairs, interior — Edition 06.2012 Dash panel ⇒ “2.1 Removing and installing covers on side of dash panel”, page 163 ⇒ “2.2 Removing and installing dash panel insert trim, with left and middle dash panel vents”, page 164…
-
Page 170: Removing And Installing Dash Panel Insert Trim, With Left And Middle Dash Panel Vents
Jetta 2011 ➤ , Jetta Hybrid 2013 ➤ General body repairs, interior — Edition 06.2012 Installing – Install in reverse order of removal. Note Before installing, check all fasteners for damage and renew if necessary. Removing and installing dash panel in‐…
-
Page 171
Jetta 2011 ➤ , Jetta Hybrid 2013 ➤ General body repairs, interior — Edition 06.2012 ♦ Removal wedge -3409- Removing – Switch off ignition. – Remove middle dash panel trim ⇒ page 168 – Move steering wheel to lowest position. -
Page 172: Removing And Installing Dash Panel Vents On Right
Jetta 2011 ➤ , Jetta Hybrid 2013 ➤ General body repairs, interior — Edition 06.2012 Installing – Install in reverse order of removal. Note Before installing, check all fasteners for damage and renew if necessary. Removing and installing dash panel…
-
Page 173
Jetta 2011 ➤ , Jetta Hybrid 2013 ➤ General body repairs, interior — Edition 06.2012 ♦ Removal wedge -3409- Removing – Using removal wedge -3409- , release the upper and lower catches of the right vent -arrows- and pull out a little. -
Page 174: Removing And Installing Left Decorative Trim Panel On Driver Side
Jetta 2011 ➤ , Jetta Hybrid 2013 ➤ General body repairs, interior — Edition 06.2012 Note Before installing, check all fasteners for damage and renew if necessary. Removing and installing left decorative trim panel on driver side Special tools and workshop equipment required ♦…
-
Page 175
Jetta 2011 ➤ , Jetta Hybrid 2013 ➤ General body repairs, interior — Edition 06.2012 ♦ Removal wedge -3409- Removing – Prise trim in middle of dash panel -2- out of fasteners in dash panel -1-, using removal wedge -3409- (insert wedge close to fastener). -
Page 176: Removing And Installing Trim In Middle Of Dash Panel (Vehicles With Climatronic)
Jetta 2011 ➤ , Jetta Hybrid 2013 ➤ General body repairs, interior — Edition 06.2012 Note Before installing, check all fasteners for damage and renew if necessary. Removing and installing trim in middle of dash panel (vehicles with Climatronic) Special tools and workshop equipment required ♦…
-
Page 177: Removing And Installing Dash Panel
Jetta 2011 ➤ , Jetta Hybrid 2013 ➤ General body repairs, interior — Edition 06.2012 Installing – Install in reverse order of removal. Note Before installing, check all fasteners for damage and renew if necessary. Removing and installing dash panel Special tools and workshop equipment required 2.
-
Page 178
Jetta 2011 ➤ , Jetta Hybrid 2013 ➤ General body repairs, interior — Edition 06.2012 ♦ Removal wedge -3409- Removing – Move front seats to rearmost position and tilt backrests by 45°. WARNING ♦ Follow safety regulations for pyrotechnic components ⇒… -
Page 179
Jetta 2011 ➤ , Jetta Hybrid 2013 ➤ General body repairs, interior — Edition 06.2012 – Remove windscreen wiper switch -E- . ⇒ Electrical system; Rep. gr. 94 ; Steering column switch; Removing and installing windscreen wiper switch -E- – Remove dash panel insert ⇒ Electrical system; Rep. gr. 90 ;… -
Page 180
Jetta 2011 ➤ , Jetta Hybrid 2013 ➤ General body repairs, interior — Edition 06.2012 – Undo bolts -2- and -3- from dash panel -1- (1.5 Nm). Note Prior to installing bolts -3-, ensure that the bushes are inserted in dash panel mounting. -
Page 181
Jetta 2011 ➤ , Jetta Hybrid 2013 ➤ General body repairs, interior — Edition 06.2012 WARNING Before handling pyrotechnic components (e.g. separating the electrical connector), the person handling them must “electri‐ cally discharge” himself/herself. To do this e.g. briefly touch the door striker plate. -
Page 182
Jetta 2011 ➤ , Jetta Hybrid 2013 ➤ General body repairs, interior — Edition 06.2012 – Pull dash panel -2- out of mountings at overlap to windscreen and from dash panel central tube -1-. – Depending on the vehicle’s equipment, disconnect the corre‐… -
Page 183
Jetta 2011 ➤ , Jetta Hybrid 2013 ➤ General body repairs, interior — Edition 06.2012 Installing Note Before installing, check all fasteners for damage and renew if necessary. – Before installing dash panel, check whether the mountings -1- are firmly attached to the stud bolts -2-. -
Page 184
Jetta 2011 ➤ , Jetta Hybrid 2013 ➤ General body repairs, interior — Edition 06.2012 – With the aid of as second mechanic place dash panel -1- onto dash panel central tube -1- so that a perfect fit is achieved. -
Page 185
Jetta 2011 ➤ , Jetta Hybrid 2013 ➤ General body repairs, interior — Edition 06.2012 WARNING ♦ Follow safety regulations for pyrotechnic components ⇒ page 1 ♦ Before handling pyrotechnic components (e.g. connecting the electrical connector), the person handling them must ensure that he/she is “electrically discharged”. -
Page 186: Deformation Elements For Dash Panel Usa
Jetta 2011 ➤ , Jetta Hybrid 2013 ➤ General body repairs, interior — Edition 06.2012 WARNING Battery must be connected with ignition switched on. If pyro‐ technic components (e.g. airbag, seat belt tensioners) are repaired incorrectly, undesired triggering may occur after the battery is connected.
-
Page 187: Aligning Dash Panel In Vehicle
Jetta 2011 ➤ , Jetta Hybrid 2013 ➤ General body repairs, interior — Edition 06.2012 – Take deformation element -2- off dash panel. Front passenger side deformation element – Remove glove compartment ⇒ page 18 – Remove bolts -2- (1.5 Nm).
-
Page 188
Jetta 2011 ➤ , Jetta Hybrid 2013 ➤ General body repairs, interior — Edition 06.2012 – Only undo bolts -1- and -2- 2 to 3 turns (20 Nm). – Only undo bolts -1- 2 to 3 turns (20 Nm). – Undo nuts -1- and nuts -4- 2 to 3 turns (20 Nm). -
Page 189
Jetta 2011 ➤ , Jetta Hybrid 2013 ➤ General body repairs, interior — Edition 06.2012 – After aligning dash panel in vehicle, fasten it in place, tighten‐ ing bolts to specified torques. Installation of parts is carried out in reverse order of removal. -
Page 190: Dash Panel Central Tube
Jetta 2011 ➤ , Jetta Hybrid 2013 ➤ General body repairs, interior — Edition 06.2012 Dash panel central tube ⇒ “3.1 Assembly overview — dash panel central tube”, page 184 ⇒ “3.2 Removing and installing dash panel central tube”, page 185 ⇒…
-
Page 191: Removing And Installing Dash Panel Central Tube
Jetta 2011 ➤ , Jetta Hybrid 2013 ➤ General body repairs, interior — Edition 06.2012 9 — Bolt ❑ Bolt of dash panel central tube to middle tunnel ❑ Qty. 2 ❑ Specified torque 20 Nm. 10 — Threaded plate ❑…
-
Page 192
Jetta 2011 ➤ , Jetta Hybrid 2013 ➤ General body repairs, interior — Edition 06.2012 Removing – Disconnect battery earth cable with ignition switched on ⇒ Electrical system; Rep. gr. 27 ; Battery; Connecting and dis‐ connecting battery . – Removing dash panel ⇒… -
Page 193
Jetta 2011 ➤ , Jetta Hybrid 2013 ➤ General body repairs, interior — Edition 06.2012 – Detach steering column from cross member. ⇒ Running gear, axles, steering; Rep. gr. 48 ; Steering column and steering wheel; Assembly overview — steering column, left-hand drive vehicles . -
Page 194
Jetta 2011 ➤ , Jetta Hybrid 2013 ➤ General body repairs, interior — Edition 06.2012 – Undo nuts -1- on driver side (20 Nm). Note In area of nuts -2- and locating pin-3-, use a scriber to mark ver‐ tical and horizontal position of cross member -1- in vehicle. -
Page 195: Removing And Installing Bracket For Dash Panel Central Tube, Lhd Vehicles
Jetta 2011 ➤ , Jetta Hybrid 2013 ➤ General body repairs, interior — Edition 06.2012 Installing – Install in reverse order of removal. Note Before bolting dash panel cross member in place, align it using ♦ marks made during removal.
-
Page 196
Jetta 2011 ➤ , Jetta Hybrid 2013 ➤ General body repairs, interior — Edition 06.2012 – Remove driver side bracket -2- from inside of A-pillar -4-. Bracket on front passenger side: – Unscrew bolts -1- (20 Nm). – Remove front passenger side bracket -4- from inside of A-pillar -2-. -
Page 197: Interior Trims
Jetta 2011 ➤ , Jetta Hybrid 2013 ➤ General body repairs, interior — Edition 06.2012 Interior trims ⇒ “4.1 Removing and installing upper A-pillar trim”, page 191 ⇒ “4.2 Removing and installing centre A-pillar trim”, page 192 ⇒ “4.3 Removing and installing lower A-pillar trim on driver side”, page 194 ⇒…
-
Page 198: Removing And Installing Centre A-Pillar Trim
Jetta 2011 ➤ , Jetta Hybrid 2013 ➤ General body repairs, interior — Edition 06.2012 Installing – Install in reverse order of removal. Note Before installing, check all fasteners for damage and renew if ♦ necessary. Following installation, ensure that trim is positioned in door ♦…
-
Page 199
Jetta 2011 ➤ , Jetta Hybrid 2013 ➤ General body repairs, interior — Edition 06.2012 ♦ Removal wedge -3409- Removing – Remove dash panel end covers ⇒ page 163 – Release trim -2- from door seal beading. – Release retaining clip -1-, using removal wedge -3409- . -
Page 200: Removing And Installing Lower A-Pillar Trim On Driver Side
Jetta 2011 ➤ , Jetta Hybrid 2013 ➤ General body repairs, interior — Edition 06.2012 Installing – Install in reverse order of removal. Note Before installing, check all fasteners for damage and renew if ♦ necessary. Following installation, ensure that trim is positioned in door ♦…
-
Page 201: Removing And Installing Lower A-Pillar Trim On Front Passenger Side
Jetta 2011 ➤ , Jetta Hybrid 2013 ➤ General body repairs, interior — Edition 06.2012 Installing – Install in reverse order of removal. Note Before installing, check all fasteners for damage and renew if ♦ necessary. Following installation, ensure that trim is positioned in door ♦…
-
Page 202
Jetta 2011 ➤ , Jetta Hybrid 2013 ➤ General body repairs, interior — Edition 06.2012 ♦ Removal wedge -3409- Removing – Release sill panel moulding from body in area of overlap to lower trim of A-pillar ⇒ page 206 – Remove dash panel end covers ⇒… -
Page 203: Releasing And Securing Upper B-Pillar Trim
Jetta 2011 ➤ , Jetta Hybrid 2013 ➤ General body repairs, interior — Edition 06.2012 Installing – Install in reverse order of removal. Note Before installing, check all fasteners for damage and renew if ♦ necessary. Following installation, ensure that trim is positioned in door ♦…
-
Page 204
Jetta 2011 ➤ , Jetta Hybrid 2013 ➤ General body repairs, interior — Edition 06.2012 Securing Note Before installing, check all fasteners for damage and renew if necessary. ♦ When installing, the belt adjuster slide and the button of the trim must be in the same position. -
Page 205: Removing And Installing Upper B-Pillar Trim
Jetta 2011 ➤ , Jetta Hybrid 2013 ➤ General body repairs, interior — Edition 06.2012 Removing and installing upper B-pillar trim Note Removal and installation are described for the left vehicle side. Follow same instructions for the right side as appropriate.
-
Page 206
Jetta 2011 ➤ , Jetta Hybrid 2013 ➤ General body repairs, interior — Edition 06.2012 ♦ Removal wedge -3409- Removing – Remove »Airbag« emblem -1- and unscrew and remove bolt -3- (4 Nm). – Pull retaining clips -4- of trim -1- in lower area out of mountings in body -direction of arrow-. -
Page 207
Jetta 2011 ➤ , Jetta Hybrid 2013 ➤ General body repairs, interior — Edition 06.2012 – Remove bolt -1- (40 Nm). – Thread belt end anchor together with seat belt -2- through the hole in the trim. Installing Note Before installing, check all fasteners for damage and renew if necessary. -
Page 208: Removing And Installing Lower B-Pillar Trim
Jetta 2011 ➤ , Jetta Hybrid 2013 ➤ General body repairs, interior — Edition 06.2012 Removing and installing lower B-pillar trim Note Removal and installation are described for the left vehicle side. Follow same instructions for the right side as appropriate.
-
Page 209
Jetta 2011 ➤ , Jetta Hybrid 2013 ➤ General body repairs, interior — Edition 06.2012 ♦ Removal wedge -3409- Removing – Switch off ignition if vehicle has interior monitoring system. – Remove sill strip ⇒ page 206 – Detach upper B-pillar trim ⇒… -
Page 210: Removing And Installing C-Pillar Trim
Jetta 2011 ➤ , Jetta Hybrid 2013 ➤ General body repairs, interior — Edition 06.2012 Installing – Install in reverse order of removal. Note Before installing, check all fasteners for damage and renew if ♦ necessary. Following installation, ensure that trim is positioned in door ♦…
-
Page 211
Jetta 2011 ➤ , Jetta Hybrid 2013 ➤ General body repairs, interior — Edition 06.2012 ♦ Removal wedge -3409- Removing – Remove wheel housing trim: ♦ Remove wheel housing trim without side airbag ⇒ page 209 ♦ Remove wheel housing trim with side airbag ⇒… -
Page 212: Removing And Installing Sill Moulding
Jetta 2011 ➤ , Jetta Hybrid 2013 ➤ General body repairs, interior — Edition 06.2012 Installing – Install in reverse order of removal. Note Before installing, check all fasteners for damage and renew if ♦ necessary. Following installation, ensure that trim is positioned in door ♦…
-
Page 213
Jetta 2011 ➤ , Jetta Hybrid 2013 ➤ General body repairs, interior — Edition 06.2012 ♦ Wedges -T10383- ♦ Removal wedge -3409- Removing – Remove wheel housing trim: ♦ Remove wheel housing trim without side airbag ⇒ page 208 ♦ Remove wheel housing trim with side airbag ⇒… -
Page 214: Removing And Installing Wheel Housing Trim For Vehicles With Side Airbag
Jetta 2011 ➤ , Jetta Hybrid 2013 ➤ General body repairs, interior — Edition 06.2012 Installing Install in reverse order of removal. Note Before installing, check all fasteners for damage and renew if necessary. 4.10 Removing and installing wheel housing…
-
Page 215: Removing And Installing Wheel Housing Trim For Vehicles Without Side Airbag
Jetta 2011 ➤ , Jetta Hybrid 2013 ➤ General body repairs, interior — Edition 06.2012 – Release clips -3- from body flange. – Pull wheel housing trim -2- out of mounts in sill moulding -4- in direction of -arrow-. Installing Install in reverse order of removal.
-
Page 216
Jetta 2011 ➤ , Jetta Hybrid 2013 ➤ General body repairs, interior — Edition 06.2012 Special tools and workshop equipment required ♦ Removal wedge -3409- Removing – Remove bench seat ⇒ page 270 – Fold backrest forwards. – Remove nut -6- (8 Nm). -
Page 217: Removing And Installing Rear Shelf
Jetta 2011 ➤ , Jetta Hybrid 2013 ➤ General body repairs, interior — Edition 06.2012 Installing Install in reverse order of removal. Note Before installing, check all fasteners for damage and renew if necessary. 4.12 Removing and installing rear shelf Removing –…
-
Page 218
Jetta 2011 ➤ , Jetta Hybrid 2013 ➤ General body repairs, interior — Edition 06.2012 – Remove belt end anchor -2- from fastening buckle -3- on both sides – Remove retaining clips -3-. – Unclip retaining clips -2-. To do this, pull front area of rear shelf -1- upwards in -direction of arrow-. -
Page 219: Removing And Installing Rear Shelf Usa
Jetta 2011 ➤ , Jetta Hybrid 2013 ➤ General body repairs, interior — Edition 06.2012 – Take outer left and right belt end anchors out of side belt guides of rear shelf. – Take middle seat belt out of cut-out -arrow C- of rear shelf.
-
Page 220
Jetta 2011 ➤ , Jetta Hybrid 2013 ➤ General body repairs, interior — Edition 06.2012 – Pull rear shelf -4- in direction of travel -arrow A- until guide pins -1- emerge from guides in body -arrow B-. – Detach connector -3- of bulb for high-level brake light -M25- -2-. -
Page 221
Jetta 2011 ➤ , Jetta Hybrid 2013 ➤ General body repairs, interior — Edition 06.2012 Installing – Install in reverse order of removal. Note Before installing, check all fasteners for damage and renew if necessary. 4. Interior trims… -
Page 222: Luggage Compartment Trims
Jetta 2011 ➤ , Jetta Hybrid 2013 ➤ General body repairs, interior — Edition 06.2012 Luggage compartment trims ⇒ “5.1 Removing and installing luggage compartment floor cov‐ ering”, page 216 ⇒ “5.2 Removing and installing luggage compartment floor cov‐ ering, hybrid vehicles”, page 217 ⇒…
-
Page 223: Removing And Installing Luggage Compartment Floor Covering, Hybrid Vehicles
Jetta 2011 ➤ , Jetta Hybrid 2013 ➤ General body repairs, interior — Edition 06.2012 Installing – Install in reverse order of removal. Removing and installing luggage com‐ partment floor covering, hybrid vehicles Removing – Remove luggage compartment floor covering -1- from luggage compartment in -direction of arrow-.
-
Page 224: Removing And Installing Rear Panel Trim
Jetta 2011 ➤ , Jetta Hybrid 2013 ➤ General body repairs, interior — Edition 06.2012 Installing – Install in reverse order of removal. Removing and installing rear panel trim Special tools and workshop equipment required ♦ Removal wedge -3409- Removing –…
-
Page 225
Jetta 2011 ➤ , Jetta Hybrid 2013 ➤ General body repairs, interior — Edition 06.2012 Note In case of hybrid vehicles remove luggage compartment floor covering ⇒ page 217 – Release left and right retaining clips -2- in -direction of arrow C- using removing wedge -3409- . -
Page 226: Removing And Installing High-Voltage Battery Cover, Hybrid Vehicles
Jetta 2011 ➤ , Jetta Hybrid 2013 ➤ General body repairs, interior — Edition 06.2012 Note Before installing, check all fasteners for damage and renew if ♦ necessary. Following installation, ensure that lock carrier cover is posi‐ ♦ tioned in rear lid seal beading.
-
Page 227
Jetta 2011 ➤ , Jetta Hybrid 2013 ➤ General body repairs, interior — Edition 06.2012 – Fold down rear backrest completely. – Remove caps -2-. – Unscrew bolts -3- (3.5 Nm). – Remove bracket -4- from cover. – Remove high-voltage battery cover -1- from luggage compart‐… -
Page 228: Removing And Installing Side Panel Trim In Luggage Compartment
Jetta 2011 ➤ , Jetta Hybrid 2013 ➤ General body repairs, interior — Edition 06.2012 Installing: – Install in reverse order of removal. Note Before installing, check all fasteners for damage and renew if necessary. Removing and installing side panel trim…
-
Page 229
Jetta 2011 ➤ , Jetta Hybrid 2013 ➤ General body repairs, interior — Edition 06.2012 ♦ Release tool -T10236- Removing – Switch off ignition. – Remove luggage compartment floor covering ⇒ page 216 – Remove backrest ⇒ page 271 – Remove rear lock carrier cover ⇒… -
Page 230: Removing And Installing Side Panel Trim In Luggage Compartment, Hybrid Vehicles
Jetta 2011 ➤ , Jetta Hybrid 2013 ➤ General body repairs, interior — Edition 06.2012 Installing – Install in reverse order of removal. Note Before installing, check all fasteners for damage and renew if ♦ necessary. Following installation, ensure that luggage compartment trim ♦…
-
Page 231
Jetta 2011 ➤ , Jetta Hybrid 2013 ➤ General body repairs, interior — Edition 06.2012 Special tools and workshop equipment required ♦ Release tool -T10236- Removing – Switch off ignition. – Remove luggage compartment floor covering (hybrid vehicles) ⇒ page 216 –… -
Page 232
Jetta 2011 ➤ , Jetta Hybrid 2013 ➤ General body repairs, interior — Edition 06.2012 Removing right side panel trim in luggage compartment: – Remove right backrest ⇒ page 271 – Remove retaining clips -1-. – Pull trim -2- off in -direction of arrow-. While doing so, remove trim from rear lid seal beading. -
Page 233: Removing And Installing Rear Lid Trim
Jetta 2011 ➤ , Jetta Hybrid 2013 ➤ General body repairs, interior — Edition 06.2012 Installing – Install in reverse order of removal. Note Before installing, check all fasteners for damage and renew if ♦ necessary. Following installation, ensure that luggage compartment trim ♦…
-
Page 234
Jetta 2011 ➤ , Jetta Hybrid 2013 ➤ General body repairs, interior — Edition 06.2012 ♦ Wedges -T10383- ♦ Torque wrench -V.A.G 1783- Removing – Remove bolts -2- from closure recesses (2 Nm). – Release retaining clips -4- of trim -3- out of mountings in rear lid, using wedges -T10383- . -
Page 235
Jetta 2011 ➤ , Jetta Hybrid 2013 ➤ General body repairs, interior — Edition 06.2012 Installing – Install in reverse order of removal. Note Before installing, check all fasteners for damage and renew if necessary. 5. Luggage compartment trims… -
Page 236: Roof Trims
Jetta 2011 ➤ , Jetta Hybrid 2013 ➤ General body repairs, interior — Edition 06.2012 Roof trims ⇒ “6.1 Detaching and fastening moulded headliner”, page 230 ⇒ “6.2 Removing and installing moulded headlining”, page 233 ⇒ “6.3 Removing and installing insulation/roof reinforcements”, page 238 Detaching and fastening moulded head‐…
-
Page 237
Jetta 2011 ➤ , Jetta Hybrid 2013 ➤ General body repairs, interior — Edition 06.2012 – Remove hand holds on left and right sides of roof ⇒ page 23 – Undo bolts -4- (2 Nm) from retaining frame. – Carefully unlatch retaining clips -3- from rear roof cross mem‐… -
Page 238
Jetta 2011 ➤ , Jetta Hybrid 2013 ➤ General body repairs, interior — Edition 06.2012 – Using release lever -T10039- , detach frame -1- from all round the moulded headlining -2-. – Undo bolts -5- (2 Nm) from retaining frame. -
Page 239: Removing And Installing Moulded Headlining
Jetta 2011 ➤ , Jetta Hybrid 2013 ➤ General body repairs, interior — Edition 06.2012 Note Before installing, check all fasteners for damage and renew if necessary. Removing and installing moulded head‐ lining Special tools and workshop equipment required ♦ Removal wedge -3409- ♦…
-
Page 240
Jetta 2011 ➤ , Jetta Hybrid 2013 ➤ General body repairs, interior — Edition 06.2012 – Remove upper left and right A-pillar trim ⇒ page 191 – Remove upper left and right B-pillar trim ⇒ page 197 – Remove left and right C-pillar trim ⇒… -
Page 241
Jetta 2011 ➤ , Jetta Hybrid 2013 ➤ General body repairs, interior — Edition 06.2012 Models with sliding/tilting sunroof – Push wedge -T10039/1- between frame -1- and moulded headlining -2-. – Using release lever -T10039- , detach frame -1- from all round the moulded headlining -2-. -
Page 242
Jetta 2011 ➤ , Jetta Hybrid 2013 ➤ General body repairs, interior — Edition 06.2012 All vehicles – Detach moulded headliner -1- from door seal beading and lower. – Swivel moulded headliner -1- and take it out of the vehicle carefully through the right rear door. -
Page 243
Jetta 2011 ➤ , Jetta Hybrid 2013 ➤ General body repairs, interior — Edition 06.2012 Installing – Install in reverse order of removal. Note Before installing, check all fasteners for damage and renew if necessary. 6. Roof trims… -
Page 244: Removing And Installing Insulation/Roof Reinforcements
Jetta 2011 ➤ , Jetta Hybrid 2013 ➤ General body repairs, interior — Edition 06.2012 Removing and installing insulation/roof reinforcements Rep. gr.70 — Trim, insulation…
-
Page 245
Jetta 2011 ➤ , Jetta Hybrid 2013 ➤ General body repairs, interior — Edition 06.2012 ♦ Electric cutter -V.A.G 1561 A- ♦ Cutting blade -V.A.G 1561/20- ♦ Cartridge gun -V.A.G 1628- ♦ Release lever -T10039 — ♦ Removal wedge -T10039 /1- ♦… -
Page 246
Jetta 2011 ➤ , Jetta Hybrid 2013 ➤ General body repairs, interior — Edition 06.2012 Note If paint structure has been damaged on removal of the insulation/roof reinforcements, repair paint damage according to guidelines of ⇒ Paint workshop manual . -
Page 247
Jetta 2011 ➤ , Jetta Hybrid 2013 ➤ General body repairs, interior — Edition 06.2012 Installing Note Observe adhesive processing instructions when installing insu‐ lation/roof reinforcements. – Use hand-cartridge gun -V.A.G 1628- to apply single-compo‐ nent assembly adhesive -D 190 MKD A3- to roof insulation/ reinforcements -1- and -2-. -
Page 248
Jetta 2011 ➤ , Jetta Hybrid 2013 ➤ General body repairs, interior — Edition 06.2012 Models with sliding/tilting sunroof – Use hand-cartridge gun -V.A.G 1628- to apply single-compo‐ nent assembly adhesive -D 190 MKD A3- to roof insulation/ reinforcements -1-. -
Page 249
Jetta 2011 ➤ , Jetta Hybrid 2013 ➤ General body repairs, interior — Edition 06.2012 6. Roof trims… -
Page 250: Seat Frames
Jetta 2011 ➤ , Jetta Hybrid 2013 ➤ General body repairs, interior — Edition 06.2012 72 – Seat frames Front seats ⇒ “1.1 Removing and installing front seat”, page 244 ⇒ “1.2 Removing and installing backrest adjusting lever”, page 249 ⇒…
-
Page 251: Jetta 2011 ➤ , Jetta Hybrid
Jetta 2011 ➤ , Jetta Hybrid 2013 ➤ General body repairs, interior — Edition 06.2012 ♦ Airbag adapter -VAS 6282- ♦ Torque wrench -V.A.G 1331- Removing WARNING ♦ Follow safety regulations for pyrotechnic components ⇒ page 1 ♦ Before handling pyrotechnic components (e.g. separating the electrical connector), the person handling them must “electrically discharge”…
-
Page 252
Jetta 2011 ➤ , Jetta Hybrid 2013 ➤ General body repairs, interior — Edition 06.2012 WARNING Before handling pyrotechnic components (e.g. separating the electrical connector), the person handling them must “electri‐ cally discharge” himself/herself. To do this e.g. briefly touch the door striker plate. -
Page 253
Jetta 2011 ➤ , Jetta Hybrid 2013 ➤ General body repairs, interior — Edition 06.2012 Installing WARNING ♦ Follow safety regulations for pyrotechnic components ⇒ page 1 ♦ Before handling pyrotechnic components (e.g. connecting the electrical connector), the person handling them must ensure that he/she is “electrically discharged”. -
Page 254
Jetta 2011 ➤ , Jetta Hybrid 2013 ➤ General body repairs, interior — Edition 06.2012 WARNING If, when installing a seat a thread in seat cross member mount‐ ing plate is damaged, reworking damaged threads is prohibi‐ ted! In this case, the seat cross member mounting plate must be replaced. -
Page 255: Removing And Installing Backrest Adjusting Lever
Jetta 2011 ➤ , Jetta Hybrid 2013 ➤ General body repairs, interior — Edition 06.2012 Note If airbag warning lamp -K75- indicates a fault following installation, event memory must be read, deleted and read again ⇒ Vehicle diagnostic tester. Removing and installing backrest ad‐…
-
Page 256: Removing And Installing Lumbar Adjustment Lever
Jetta 2011 ➤ , Jetta Hybrid 2013 ➤ General body repairs, interior — Edition 06.2012 – Pull backrest adjusting lever off -1-. Installing – Install in reverse order of removal. Note Before installing, check all fasteners for damage and renew if necessary.
-
Page 257
Jetta 2011 ➤ , Jetta Hybrid 2013 ➤ General body repairs, interior — Edition 06.2012 ♦ Torque wrench -V.A.G 1783- Removing – Undo bolts -2- of trim -1- (3 Nm). – Remove spreader clip -3- of trim -1-. – Release retaining clips -4- of trim -1- from seat frame -2-. -
Page 258: Removing And Installing Left Trim On Seat With Manual Height Adjustment
Jetta 2011 ➤ , Jetta Hybrid 2013 ➤ General body repairs, interior — Edition 06.2012 Installing – Install in reverse order of removal. Note Before installing, check all fasteners for damage and renew if necessary. Removing and installing left trim on seat…
-
Page 259
Jetta 2011 ➤ , Jetta Hybrid 2013 ➤ General body repairs, interior — Edition 06.2012 ♦ Torque wrench -V.A.G 1783- Removing – Pull height adjustment handle -3- upwards and press metal tab of retaining clip -1- inwards using a small screwdriver. Pull height adjustment handle -3- off adjusting lever -2-. -
Page 260: Removing And Installing Left Trim On Seat With Electrical Height Adjustment
Jetta 2011 ➤ , Jetta Hybrid 2013 ➤ General body repairs, interior — Edition 06.2012 Installing – Install in reverse order of removal. Note Before installing, check all fasteners for damage and renew if necessary. Removing and installing left trim on seat…
-
Page 261
Jetta 2011 ➤ , Jetta Hybrid 2013 ➤ General body repairs, interior — Edition 06.2012 ♦ Torque wrench -V.A.G 1783- Removing – Switch off ignition. – Remove spreader clip -3- of trim -2-. – Remove trim -6- from retaining hoop -2-. -
Page 262
Jetta 2011 ➤ , Jetta Hybrid 2013 ➤ General body repairs, interior — Edition 06.2012 Renewing trim: Note If the trim on left of seat -8- is replaced, the seat adjustment switch -7- and the switch for height adjustment of the lumbar support -4- have to be removed and reinstalled. -
Page 263: Removing And Installing Right Trim On Seat
Jetta 2011 ➤ , Jetta Hybrid 2013 ➤ General body repairs, interior — Edition 06.2012 Note Before installing, check all fasteners for damage and renew if necessary. Removing and installing right trim on seat Note Removal and installation is described for the left seat. Apply the same instructions for removal and installation of the right seat as appropriate.
-
Page 264: Removing And Installing Front Seat Drawer Together With Mounting
Jetta 2011 ➤ , Jetta Hybrid 2013 ➤ General body repairs, interior — Edition 06.2012 Removing and installing front seat draw‐ er together with mounting Note Removal and installation is described for the left seat. Apply the same instructions for removal and installation of the right seat as appropriate.
-
Page 265: Removing And Installing Front Seat Bar And Operating Lever
Jetta 2011 ➤ , Jetta Hybrid 2013 ➤ General body repairs, interior — Edition 06.2012 Installing – Install in reverse order of removal. Note Before installing, check all fasteners for damage and renew if necessary. Removing and installing front seat bar…
-
Page 266: Removing And Installing Bar Of Electrically Adjustable Seat
Jetta 2011 ➤ , Jetta Hybrid 2013 ➤ General body repairs, interior — Edition 06.2012 ♦ Torque wrench -V.A.G 1783- Removing – Remove left trim on seat with manually adjustable seat height ⇒ page 252 – Undo bolts -1- (8 Nm) and remove control lever -2- from seat frame.
-
Page 267
Jetta 2011 ➤ , Jetta Hybrid 2013 ➤ General body repairs, interior — Edition 06.2012 ♦ Torque wrench -V.A.G 1783- Removing – Switch off ignition. – Remove left trim on seat with electric height adjuster ⇒ page 254 – Remove bolt -3- (7.5 Nm). -
Page 268: Removing And Installing Head Restraint Guides
Jetta 2011 ➤ , Jetta Hybrid 2013 ➤ General body repairs, interior — Edition 06.2012 Installing – Install in reverse order of removal. Note Before installing, check all fasteners for damage and renew if necessary. 1.11 Removing and installing head restraint…
-
Page 269: Removing And Installing Backrest
Jetta 2011 ➤ , Jetta Hybrid 2013 ➤ General body repairs, interior — Edition 06.2012 Installing – Install in reverse order of removal. 1.12 Removing and installing backrest Note Removal and installation is described for the left seat. Apply the same instructions for removal and installation of the right seat as appropriate.
-
Page 270
Jetta 2011 ➤ , Jetta Hybrid 2013 ➤ General body repairs, interior — Edition 06.2012 ♦ Torque wrench -V.A.G 1331- Removing WARNING ♦ Follow safety regulations for pyrotechnic components ⇒ page 1 ♦ Before handling pyrotechnic components (e.g. separating the electrical connector), the person handling them must “electrically discharge”… -
Page 271: Removing And Installing Manually Adjustable Lumbar Support Frame
Jetta 2011 ➤ , Jetta Hybrid 2013 ➤ General body repairs, interior — Edition 06.2012 Carry out following work: – Install in reverse order of removal. WARNING ♦ Follow safety regulations for pyrotechnic components ⇒ page 1 ♦ Before handling pyrotechnic components (e.g. connecting the electrical connector), the person handling them must ensure that he/she is “electrically discharged”.
-
Page 272
Jetta 2011 ➤ , Jetta Hybrid 2013 ➤ General body repairs, interior — Edition 06.2012 Special tools and workshop equipment required ♦ Torque wrench -V.A.G 1783- Removing – Mount seat repair stand -VAS 6136- on engine and gearbox support -VAS 6095- . -
Page 273: Removing And Installing Fire Extinguisher Holder
Jetta 2011 ➤ , Jetta Hybrid 2013 ➤ General body repairs, interior — Edition 06.2012 Installing – Install in reverse order of removal. Note Before installing, check all fasteners for damage and renew if necessary. 1.14 Removing and installing fire extinguish‐…
-
Page 274: Removing And Installing Fire Extinguisher Holder On Seat Frame
Jetta 2011 ➤ , Jetta Hybrid 2013 ➤ General body repairs, interior — Edition 06.2012 ♦ Torque wrench -V.A.G 1783- Removing – Remove fire extinguisher – Unscrew bolts -1- (5 Nm). – Remove fire-extinguisher holder -2- from bracket -3- on seat frame.
-
Page 275: Removing And Installing Drive For Backrest Adjustment (Electrically Adjustable Seat)
Jetta 2011 ➤ , Jetta Hybrid 2013 ➤ General body repairs, interior — Edition 06.2012 – Remove fire-extinguisher holder -2- from seat frame. Installing – Place bracket -2- on seat frame. – Insert new pop rivets -1- and rivet with pop rivet pliers -VAS 5072- .
-
Page 276: Rear Seats
Jetta 2011 ➤ , Jetta Hybrid 2013 ➤ General body repairs, interior — Edition 06.2012 Rear seats ⇒ “2.1 Removing and installing rear bench seat”, page 270 ⇒ “2.2 Removing and installing rear seat backrest”, page 271 ⇒ “2.3 Removing and installing backrest release mechanism”, page 274 ⇒…
-
Page 277: Removing And Installing Rear Seat Backrest
Jetta 2011 ➤ , Jetta Hybrid 2013 ➤ General body repairs, interior — Edition 06.2012 Installing Install in reverse order, but note the following: – Check body apertures -arrow- for deformation. – Repair any deformation using a plastic head hammer.
-
Page 278
Jetta 2011 ➤ , Jetta Hybrid 2013 ➤ General body repairs, interior — Edition 06.2012 – Undo bolt -3- (9 Nm) and remove retaining clamp -4-. – Working from luggage compartment, unlock the wider back‐ rest section -1- (2/3) and fold it down. -
Page 279
Jetta 2011 ➤ , Jetta Hybrid 2013 ➤ General body repairs, interior — Edition 06.2012 Installing Note During installation, it must be ensured that a guide sleeve -4- is in each of the two backrest frames -1- and -2- before backrest is mounted onto bolt -5-. -
Page 280: Removing And Installing Backrest Release Mechanism
Jetta 2011 ➤ , Jetta Hybrid 2013 ➤ General body repairs, interior — Edition 06.2012 – Further installation is performed in the reverse order of re‐ moval. Removing and installing backrest re‐ lease mechanism Removing – Remove rear shelf ⇒ page 211 –…
-
Page 281: Removing And Installing Side Padding With Side Airbag
Jetta 2011 ➤ , Jetta Hybrid 2013 ➤ General body repairs, interior — Edition 06.2012 Installing – Install in reverse order of removal. Note Before installing, check all fasteners for damage and renew if necessary. Removing and installing side padding…
-
Page 282
Jetta 2011 ➤ , Jetta Hybrid 2013 ➤ General body repairs, interior — Edition 06.2012 WARNING ♦ Follow safety regulations for pyrotechnic components ⇒ page 1 ♦ Before handling pyrotechnic components (e.g. separating the electrical connector), the person handling them must “electrically discharge”… -
Page 283
Jetta 2011 ➤ , Jetta Hybrid 2013 ➤ General body repairs, interior — Edition 06.2012 Installing Install in reverse order, but note the following: WARNING ♦ Follow safety regulations for pyrotechnic components ⇒ page 1 ♦ Before handling pyrotechnic components (e.g. connecting the electrical connector), the person handling them must ensure that he/she is “electrically discharged”. -
Page 284: Removing Head Restraint Guides
Jetta 2011 ➤ , Jetta Hybrid 2013 ➤ General body repairs, interior — Edition 06.2012 WARNING Battery must be connected with ignition switched on. If pyro‐ technic components (e.g. airbag, seat belt tensioners) are repaired incorrectly, undesired triggering may occur after the battery is connected.
-
Page 285
Jetta 2011 ➤ , Jetta Hybrid 2013 ➤ General body repairs, interior — Edition 06.2012 Installing – Install in reverse order of removal. Note Before installing, check all fasteners for damage and renew if necessary. 2. Rear seats… -
Page 286: Seat — Padding, Covers
Jetta 2011 ➤ , Jetta Hybrid 2013 ➤ General body repairs, interior — Edition 06.2012 74 – Seat — padding, covers Front seat covers and padding ⇒ “1.1 Removing and installing seat pan cover and padding”, page ⇒ “1.2 Removing and installing backrest cover and padding”,…
-
Page 287
Jetta 2011 ➤ , Jetta Hybrid 2013 ➤ General body repairs, interior — Edition 06.2012 ♦ Seat repair stand -VAS 6136- ♦ Upholstery clip pliers -V.A.G 1634- ♦ Awl -V.A.G 1636A- Removing WARNING ♦ Follow safety regulations for pyrotechnic components ⇒… -
Page 288
Jetta 2011 ➤ , Jetta Hybrid 2013 ➤ General body repairs, interior — Edition 06.2012 Vehicles with manually adjustable seat – Remove left trim on seat: ♦ Left trim on seat without adjustable seat height ⇒ page 250 ♦ Left trim on seat with manually adjustable seat height ⇒… -
Page 289
Jetta 2011 ➤ , Jetta Hybrid 2013 ➤ General body repairs, interior — Edition 06.2012 – Roll outer edges of cover -1- upwards in -direction of arrow- off the padding of front seat cushion -2-. – Detach the anchoring pins of the cover -1- from their mount‐… -
Page 290
Jetta 2011 ➤ , Jetta Hybrid 2013 ➤ General body repairs, interior — Edition 06.2012 Vehicles with seat occupied recognition and seat heater WARNING The seat occupied sensor, front passenger side -G128- -1- or the pressure sensor for seat occupied recognition -G452- -4-… -
Page 291
Jetta 2011 ➤ , Jetta Hybrid 2013 ➤ General body repairs, interior — Edition 06.2012 ♦ Installing pressure sensor for seat occupied recognition — G452- ⇒ page 130 Installing WARNING ♦ Follow safety regulations for pyrotechnic components ⇒ page 1 ♦… -
Page 292: Removing And Installing Backrest Cover And Padding
Jetta 2011 ➤ , Jetta Hybrid 2013 ➤ General body repairs, interior — Edition 06.2012 Further assembly is performed in reverse order of removal. Removing and installing backrest cover and padding Note Removal and installation is described for the left seat. Apply the same instructions for removal and installation of right seat com‐…
-
Page 293
Jetta 2011 ➤ , Jetta Hybrid 2013 ➤ General body repairs, interior — Edition 06.2012 ♦ Removal pliers -3392- ♦ Engine and gearbox support -VAS 6095- ♦ Seat repair stand -VAS 6136- ♦ Upholstery clip pliers -V.A.G 1634- 1. Front seat covers and padding… -
Page 294
Jetta 2011 ➤ , Jetta Hybrid 2013 ➤ General body repairs, interior — Edition 06.2012 ♦ Awl -V.A.G 1636A- Removing WARNING ♦ Follow safety regulations for pyrotechnic components ⇒ page 1 ♦ Before handling pyrotechnic components (e.g. separating the electrical connector), the person handling them must “electrically discharge”… -
Page 295
Jetta 2011 ➤ , Jetta Hybrid 2013 ➤ General body repairs, interior — Edition 06.2012 – Press down padding by head restraint guide -arrow-. – Press lug of head restraint guide -arrow- onto stop using re‐ moval wedge -3409- . -
Page 296
Jetta 2011 ➤ , Jetta Hybrid 2013 ➤ General body repairs, interior — Edition 06.2012 – Roll backrest cover -1- upwards a little. – Unhook clamping wire -5- from backrest frame on left and right. – Remove cover padding clips -1- on padding -4- alternately and release cover clip retainer -1- from mountings in padding -2- using a small screwdriver. -
Page 297
Jetta 2011 ➤ , Jetta Hybrid 2013 ➤ General body repairs, interior — Edition 06.2012 Vehicles with seat heating Note If on models with seat heating the padding -1- or backrest heater element -2- are defective, always replace both elements. -
Page 298
Jetta 2011 ➤ , Jetta Hybrid 2013 ➤ General body repairs, interior — Edition 06.2012 – Clip cover -1- in area of anchoring pins -4- to padding -5-. – Fasten cover -1- to padding -5- all round it with new padding clips -2- at the positions indicated -3-, using the padding clip pliers -V.A.G 1634- . -
Page 299: Rear Seat Covers And Padding
Jetta 2011 ➤ , Jetta Hybrid 2013 ➤ General body repairs, interior — Edition 06.2012 Rear seat covers and padding ⇒ “2.1 Removing and installing bench seat cover and padding”, page 293 ⇒ “2.2 Removing and installing cover and padding for smaller backrest section (1/3)”, page 297…
-
Page 300
Jetta 2011 ➤ , Jetta Hybrid 2013 ➤ General body repairs, interior — Edition 06.2012 – Detach all padding clips -arrow- on the bottom of the seat bench. – Roll cover upwards all round. Note The illustration shows how the -6- cover is fastened in place in the »Comfort« equipment version. The seat covers of the »Basic«… -
Page 301
Jetta 2011 ➤ , Jetta Hybrid 2013 ➤ General body repairs, interior — Edition 06.2012 Installing Note The illustration shows how the -1- cover is fastened in place in the »Comfort« equipment version. The seat covers of the »Basic« and »Sport« versions are fastened in the same way. -
Page 302
Jetta 2011 ➤ , Jetta Hybrid 2013 ➤ General body repairs, interior — Edition 06.2012 – Fasten cover to seat frame all round with new padding clips -arrows-, using the padding clip pliers -V.A.G 1634- . Rep. gr.74 — Seat — padding, covers… -
Page 303: Removing And Installing Cover And Padding For Smaller Backrest Section (1/3)
Jetta 2011 ➤ , Jetta Hybrid 2013 ➤ General body repairs, interior — Edition 06.2012 Removing and installing cover and pad‐ ding for smaller backrest section (1/3) Special tools and workshop equipment required ♦ Upholstery clip pliers -V.A.G 1634- 2. Rear seat covers and padding…
-
Page 304
Jetta 2011 ➤ , Jetta Hybrid 2013 ➤ General body repairs, interior — Edition 06.2012 ♦ Removal wedge -3409- ♦ Awl -V.A.G 1636A- Removing – Remove bench seat ⇒ page 270 – Remove backrest ⇒ page 271 – Press down padding by head restraint guide -arrow-. -
Page 305
Jetta 2011 ➤ , Jetta Hybrid 2013 ➤ General body repairs, interior — Edition 06.2012 – On the rear of the backrest, lever the sections -arrows- out of the mountings of the backrest frame -2-, using a screwdriver. – Fold over cover -7- at the sides. -
Page 306
Jetta 2011 ➤ , Jetta Hybrid 2013 ➤ General body repairs, interior — Edition 06.2012 Installing Note The illustration shows how the -1- cover is fastened in place in the »Comfort« equipment version. The seat covers of the »Basic« and »Sport« versions are fastened in the same way. -
Page 307: Removing And Installing Cover And Padding For Wider Backrest Section (2/3)
Jetta 2011 ➤ , Jetta Hybrid 2013 ➤ General body repairs, interior — Edition 06.2012 Removing and installing cover and pad‐ ding for wider backrest section (2/3) Special tools and workshop equipment required ♦ Upholstery clip pliers -V.A.G 1634- 2. Rear seat covers and padding…
-
Page 308
Jetta 2011 ➤ , Jetta Hybrid 2013 ➤ General body repairs, interior — Edition 06.2012 ♦ Removal wedge -3409- ♦ Awl -V.A.G 1636A- Note Removal and installation of cover and padding of backrest 23 are described with reference to backrest with through-loading unit. -
Page 309
Jetta 2011 ➤ , Jetta Hybrid 2013 ➤ General body repairs, interior — Edition 06.2012 – On the rear of the backrest, lever the sections -arrows- out of the mountings of the backrest frame -2-, using a screwdriver. – Fold over cover -7- at the sides. -
Page 310
Jetta 2011 ➤ , Jetta Hybrid 2013 ➤ General body repairs, interior — Edition 06.2012 Note When doing this, carefully pull cover -7- and padding -8- over the head restraint guides. Installing Note The illustration shows how the -1- cover is fastened in place in the »Comfort« equipment version. The seat covers of the »Basic«… -
Page 311: Removing And Installing Through-Loading Unit With Centre Armrest
Jetta 2011 ➤ , Jetta Hybrid 2013 ➤ General body repairs, interior — Edition 06.2012 – Roll cover -1- up at sides and attach clamping strips to back‐ rest frame. – Further installation is performed in the reverse order of re‐…
-
Page 312
Jetta 2011 ➤ , Jetta Hybrid 2013 ➤ General body repairs, interior — Edition 06.2012 – Fold down centre armrest and detach trim cover -1- from back‐ rest frame -2- in -direction of arrow-. – Remove through-loading unit -1- from backrest frame -2-. -
Page 313
Jetta 2011 ➤ , Jetta Hybrid 2013 ➤ General body repairs, interior — Edition 06.2012 – Unscrew bolts -4- and -5- (8 Nm). – Remove centre armrest -3- from backrest frame -6- in -direction of arrow-. – Remove covering cap -1- from bracket -2-. -
Page 314
Jetta 2011 ➤ , Jetta Hybrid 2013 ➤ General body repairs, interior — Edition 06.2012 Installing – Install in reverse order of removal. Note Before installing, check all fasteners for damage and renew if necessary. Rep. gr.74 — Seat — padding, covers…