- Manuals
- Brands
- Medica Manuals
- Diagnostic Equipment
- EasyStat
- Operator’s manual
-
Contents
-
Table of Contents
-
Troubleshooting
-
Bookmarks
Quick Links
Summary of Contents for Medica EasyStat
-
Page 1
EasyStat EDIC@… -
Page 2
Flow Charts ANALYSIS RESULTS #001 CALCULATED VALUES 1/3 ENTER PATIENT DATA 2/2 ENTER PATIENT DATA 1/2 7.203 g/dL LIFT SAMPLER TO SAMPLE TYPE ARTERIAL 32.5 mmHg pH (T) PAT. TEMP 37.0 ANALYZE SAMPLE SITE RADIAL mmol/L mmHg 14.5 g/dL mmHg OPERATOR ID? 140.1 mmol/L… -
Page 3
SECOND MENU USER OPTIONS DATE / TIME 1 STANDBY 1 DATE / TIME 2 REPLACE COMPONENTS 2 LANGUAGE DEC — 05 — 2001; 15:30 3 DIAGNOSTICS 3 CORRELATION 4 STORED INFORMATION 4 REPORTED PATIENT DATA 5 SETUP MENU 5 BAROMETRIC PRESSURE CONFIRM ? 6 ADJUST DISPLAY 6 SECURITY CODE… -
Page 4
STORED INFORMATION PATIENT RESULTS 1 PATIENT RESULTS 1 LAST 2 QC RESULTS 2 ALL 3 REFERENCE LIMITS 3 ENTER ID# 4 CAL/SAMPLE # DATA 5 REAGENT MODULE 6 PRINTOUTS LAST CONTROL QC RESULTS 1 LEVEL 1 1 LAST CONTROL 2 PRINT QC STATS 2 LEVEL 2 3 PRINT QC RESULTS 3 LEVEL 3… -
Page 5
EDIC@ EasyStat Operator’s Manual Ref. 7415 003770-901R1, 2015-07… -
Page 6
If the system is used in a manner differently than specified by Medica Corporation, performance of the equipment may be impaired. See all Hazards, Precautions and Warnings. -
Page 7
Preface This Operator’s Manual will assist you in using the EasyStat analyzer. Easy-to-follow instructions guide you through analyzer setup and operation. Display messages and flow charts are combined with the written instructions for quick reference. Symbols used throughout the manual… -
Page 8: Table Of Contents
Contents Preface 1 Understanding the EasyStat Analyzer Intended Use ………………………..5 Operational Hazards and Precautions ………………..6 2 Analyzer Layout Front View ……………………….8 Rear View ……………………….9 Keypad ……………………….10 Display ……………………….11 Fluid Path Description ……………………12 3 Analyzer Installation Unpacking ……………………….14 Location ……………………….15…
-
Page 9: Table Of Contents
Hct Sensor ……………………..101 Electrode Measurement/Diagrams ………………..102 Tonometered Reagents ……………………103 Calculations ……………………..104 7 Specifications ……………………….110 8 EasyStat Setup Defaults ……………………….114 9 Troubleshooting Introduction ……………………..115 Electrodes ………………………. 117 Flow ……………………….125 Reagent Module ……………………… 134 Sensor Module ……………………..
-
Page 11: Intended Use
Ca ++ (ionized calcium) and Cl — (chloride) electrodes are interchange- able on the analyzer. The EasyStat can only measure Ca ++ (ionized calcium) or Cl — (chloride) at one time. After switching to the EasyStat (Chloride) mode, the new Cl — electrode will occupy the same position as the Ca ++ electrode.
-
Page 12: Operational Hazards And Precautions
• Anion Gap, when Cl — channel is selected Operational Hazards and Precautions Read the Operator’s Manual before setting up or operating the EasyStat analyzer. Observe all Warnings, Notes, and Key Information in this manual. Failure to leave the analyzer connected to power with a reagent mod- ule in place could damage the electrodes, sensor module, valve mod- ule, and pump tubing.
-
Page 13
To clean the outside surfaces of the EasyStat analyzer, use a clean- ing agent consisting of a 10% bleach (0.4-0.6% NaClO) solution. Dampen a cloth with solution to wipe down all outside surfaces. -
Page 14: Front View
2. Analyzer Layout Front View…
-
Page 15: Rear View
Rear View EDIC@ See operator’s manual for instructions. Fuse Voltage RS-232 serial interface connection. Frequency Barcode reader connection. (Use only an EasyStat barcode reader.) Current Single phase alternating current Battery port connection. (Use only an EasyStat battery module.)
-
Page 16: Keypad
a n a l y z e r l a y o u t Keypad Press to correct an entry or return to the previous screen. In addition to numerical inputs, the 0 and 9 keys each have one additional function. Press to return to HOME MENU.
-
Page 17: Display
a n a l y z e r l a y o u t Display To adjust the display, proceed to the SECOND MENU and select ADJUST DISPLAY. Press the number 1 or number 2 keys to adjust the brightness. Press the number 3 key to reverse the contrast of the display.
-
Page 18
a n a l y z e r l a y o u t Fluid Path / Module Description Ca ++ /Cl — ELECTRODE Cl — electrode should be installed when Cl — mode is selected. -
Page 19
a n a l y z e r l a y o u t Reagent Module Disposable module contains all reagents and a waste container. The reagent module is equipped with an electronic chip which contains encoded information which is automatically read by the analyzer upon installation of the reagent module. -
Page 20: Unpacking
3. Analyzer Installation Unpacking Carefully remove the EasyStat analyzer and accessories from the shipping containers and place them on a solid work surface. Visually inspect for any damage sustained during shipment. If damage is found, or if items are missing, promptly notify your dealer.
-
Page 21: Location
a n a l y z e r i n s t a l l a t i o n Location The analyzer operates in the ambient (room) temperature range from 15° to 30°C (59° to 86°F) with a maximum relative humidity of 85%, and a barometric pressure range of 500-800 mmHg.
-
Page 22: Power Up
When factory set to 110V, the installed fuses are 0.8 amp. When factory set to 220V, the installed fuses are 0.4 amp. If it is necessary to switch the EasyStat voltage setting, the correct fuses must be installed. Refer to Replace Components/Fuses, or contact your EasyStat dealer.
-
Page 23: Date/Time
Date/Time The EasyStat analyzer has a 24 hour internal clock. At the DATE/TIME display, press NO to change the month and YES to accept. Press the number keys to enter the day, year and time, accepting each with YES, or pressing NO to move to the left to correct an entry.
-
Page 24: Components
Components Press the raised dots on the access door to open, and familiarize yourself with the EasyStat analyzer components. The access door must remain closed during operation to maintain a temperature of 37.0º C. P rior to installing the electrodes, select ELECTRODES under REPLACE COMPONENTS in the SECOND MENU.
-
Page 25
a n a l y z e r i n s t a l l a t i o n Pump Tubing Install the pump tubing. Push the two middle collars completely into the back of the slots on the pump shelf. -
Page 26
a n a l y z e r i n s t a l l a t i o n Reagent Module Place the reagent module into the front of the analyzer. The guide arrow must point to the right side of the reagent module. Push the module straight back, then firmly to the right to lock it into place against the valve module. -
Page 27
a n a l y z e r i n s t a l l a t i o n When the installed reagent module has less than 10% remaining, the HOME MENU display will flash the % remaining. Prepare to install a new reagent module when the % remaining reaches zero. -
Page 28: Calibrate
REAGENT MODULE STATUS Select CALIBRATE to perform a two-point calibration and prepare 021%, 15 DAYS the EasyStat analyzer for sample analysis. The analyzer displays the JUNE-05-20 ;13:35 calibration status. Bubble detector and pump cal results are printed at completion. After a successful calibration, the analyzer displays and prints the slope of each electrode, the % of calibrants remaining, and the number of days before expiration.
-
Page 29
In addition to calibration, analysis of quality control material is required to verify the performance of the EasyStat analyzer. This pro- cedure is outlined under Analyze QC in this chapter. The EasyStat analyzer is factory set to perform automatic two- point calibrations every eight hours. -
Page 30: Analyze Sample
o p e r a t i n g t h e a n a l y z e r Analyze Sample HOME MENU 1 ANALYZE SAMPLE 2 ANALYZE QC 3 CALIBRATE 4 DAILY CLEANER 5 SECOND MENU LIFT SAMPLER TO LIFT SAMPLER TO ANALYZE Hct Na…
-
Page 31
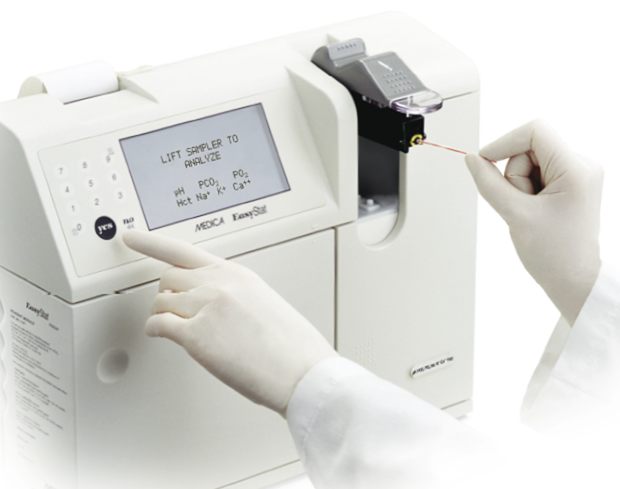
The EasyStat sampler is designed for two separate sample entry modes. To select the sampling mode, place your thumb on the raised dots under the corresponding symbol, and push up to lift the sampler for syringe capillary samples. -
Page 32
o p e r a t i n g t h e a n a l y z e r Syringe Mode To analyze samples from blood gas syringes (120 µL minimum), lift the sampler until PROBE IN SAMPLE? is displayed. When using a syringe, it is important that the sample probe does not touch the plunger of the syringe. -
Page 33
o p e r a t i n g t h e a n a l y z e r If the sampler is not returned within two minutes of aspiration the sample will be pumped to waste Sample analysis can be interrupted by pressing NO. STOP ANALYSIS? is displayed. -
Page 34
o p e r a t i n g t h e a n a l y z e r Calculated values for THb, pH(T), PCO 2 (T), PO 2 (T), TCO 2 , HCO 3 — , and BE b are displayed. MORE DATA? appears at the top of the display screen. -
Page 35
CAPILLARY INSERTED? Note: Use only the Medica capillary kit. Use of other capillary tubes may result in erroneous results or damage to the analyzer and electrodes. The capillary should be filled entirely with no visible air bubbles. -
Page 36
o p e r a t i n g t h e a n a l y z e r When analysis is complete, the measured results are printed with the current sample number. The measured results are reported in mmHg for blood gas parameters and mmol/L for electrolytes. -
Page 37
o p e r a t i n g t h e a n a l y z e r The analyzer displays CALCULATED VALUES?. The calcu- lated results are printed with the measured results. View the calculated values by pressing YES. Calculated values for THb, pH(T), PCO (T), — , and BE (T), TCO… -
Page 38: Analyze Qc
o p e r a t i n g t h e a n a l y z e r Analyze QC HOME MENU 1 ANALYZE SAMPLE 2 ANALYZE QC 3 CALIBRATE 4 DAILY CLEANER 5 SECOND MENU ANALYZE QC 1 QC LEVEL 1 2 QC LEVEL 2 3 QC LEVEL 3…
-
Page 39
Once established, enter the limits into the EasyStat analyzer under SET REFERENCE LIMITS in the SETUP MENU. The EasyStat stores quality control results for 3 levels (a maximum of 93 for each level) when control samples are analyzed through ANALYZE QC. -
Page 40
Press YES to confirm the entry and advance to the next entry. To enter quality control information using the barcode reader, Medica quality controls must be used. To enter quality control information using the barcode reader, Select or Hct LEVELS. -
Page 41
When more than three of a control level are performed on the same day, the three most recent results replace the results previously stored for that day. The EasyStat analyzer stores up to 93 quality control results for each level. -
Page 42
To analyze proficiency samples, select PROFICIENCY under ANALYZE QC. These samples are analyzed without applying cor- relation values to the measured results, which enables the EasyStat results to be grouped together on the proficiency program’s interlabo- ratory reports. The proficiency results are not stored. -
Page 43
o p e r a t i n g t h e a n a l y z e r Levey-Jennings Chart: QC LEVEL 2 Levey-Jennings charts plot the measured quality control results for each LOT# 00000000 day. The calculated mean value is shown by the solid, vertical center MEAN 7.414 0.008 line. -
Page 44
o p e r a t i n g t h e a n a l y z e r Random Errors An isolated result which falls outside the +/- 3 SD control limits is classified as a random error. When a single random error occurs, disregard the result. -
Page 45
Level 2 Level 3 Hct Level 1 Hct Level 2 Do not use perfluorocarbon-based control materials on the EasyStat analyzer. This type of control material will damage the electrodes. Precautions Refer to the package insert provided with the quality control material. -
Page 46: Daily Cleaner
o p e r a t i n g t h e a n a l y z e r Daily Cleaner HOME MENU 1 ANALYZE SAMPLE 2 ANALYZE QC 3 CALIBRATE 4 DAILY CLEANER 5 SECOND MENU DAILY CLEANER LIFT SAMPLER TO USE CLEANER Probe…
-
Page 47
o p e r a t i n g t h e a n a l y z e r When CLEANER REQUIRED is displayed, a cleaning cycle must be completed before calibration or sample analysis is permitted. Performing a cleaning cycle is the only daily maintenance required, and is essential to promote trouble-free analyzer operation. -
Page 48: Second Menu
o p e r a t i n g t h e a n a l y z e r Second Menu HOME MENU 1 ANALYZE SAMPLE 2 ANALYZE QC 3 CALIBRATE 4 DAILY CLEANER 5 SECOND MENU SECOND MENU 1 STANDBY 2 REPLACE COMPONENTS 3 DIAGNOSTICS…
-
Page 49: Standby
o p e r a t i n g t h e a n a l y z e r Standby SECOND MENU 1 STANDBY 2 REPLACE COMPONENTS Standby is activated manually or automatically to conserve fluids dur- 3 DIAGNOSTICS 4 STORED INFORMATION ing long periods of inactivity.
-
Page 50: Replace Components
Replace Components SECOND MENU The EasyStat analyzer contains components which require periodic 1 STANDBY 2 REPLACE COMPONENTS replacement. These components include the electrodes (pH, PCO 3 DIAGNOSTICS 4 STORED INFORMATION , Na + , K + , Ca ++ , Cl — , and Reference) and reagent module.
-
Page 51
o p e r a t i n g t h e a n a l y z e r PUMP TUBING Replace every 6 months VALVE MODULE Replace as required SENSOR MODULE Replace as required SAMPLER Replace as required pH ELECTRODE Replace as required ELECTRODE… -
Page 52
To replace EasyStat components, first select REPLACE COMPONENTS from the SECOND MENU, then proceed with component replacement as described in this section. If any replace- ment procedure exceeds 20 minutes, the analyzer beeps and NEED MORE TIME? is displayed. -
Page 53
Reagent Module If the EasyStat displays RGNT MODULE EMPTY or RGNT MODULE EXPIRED, it is necessary to install a new reagent module. Select REAGENT MODULE from the REPLACE COMPONENTS menu. Fluid is automatically purged from the sample path. -
Page 54
The best indicator that an electrode (pH, PCO , PO Ca ++ , Cl — or reference) requires replacement is when the EasyStat displays SLOPE ↑/↓ , mV OUT OF RANGE or DRIFT for a single electrode. These messages generally indicate that the elec- trode is not functioning correctly. -
Page 55
REPLACE COMPONENTS screen. A WARMING UP message may appear for up to 30 minutes. During this time, the EasyStat will not calibrate or analyze samples. New electrodes require a short stabilization period to prevent drift errors. This stabilization is minimized by the analyzer, which performs calibrations every hour for 8 hours. -
Page 56
o p e r a t i n g t h e a n a l y z e r Pump Tubing Replace the pump tubing every six months, or earlier if the pump tubing appears worn or flattened. Select PUMP TUBING. Fluid is automatically purged from the sample flow path. -
Page 57
o p e r a t i n g t h e a n a l y z e r Probe Wiper Replacement Probe wipers should be changed every 3 months. In some cases they may last longer, as the frequency of probe wiper replacement depends on the number and type of samples analyzed. -
Page 58
o p e r a t i n g t h e a n a l y z e r Sensor Module/Sampler Sensor module or sampler replacement should be infrequent. Sensor Module replacement will be necessary only if certain display mes- sages become chronic (refer to SENSOR MODULE in Troubleshooting). -
Page 59
o p e r a t i n g t h e a n a l y z e r Pull the release lever and the sensor module is disengaged. Remove from the analyzer. -
Page 60
o p e r a t i n g t h e a n a l y z e r Sampler Removal To remove the sampler from the sensor module, place the sensor module on its side with the sampler side up. Using a coin or fingers, remove the retaining screw from the sensor module. -
Page 61
o p e r a t i n g t h e a n a l y z e r After installing a new sampler, reinstall the complete sensor module. Lift the sampler up slightly. Place the sensor module on the alignment pin and, using your thumb, push it straight back into position. -
Page 62
COMPONENTS screen. A WARMING UP message may appear for up to 30 minutes. During this time, the EasyStat will not calibrate or analyze samples. If the sampler was replaced, the sampler switches may be checked for proper function. Select the SAMPLER SWITCHES test outlined… -
Page 63
o p e r a t i n g t h e a n a l y z e r Valve Module Valve Module replacement is necessary when VALVE ERROR or VALVE TEMPERATURE error messages become chronic (refer to VALVE MODULE in Troubleshooting). To remove or replace the valve module, select VALVE MODULE. -
Page 64
o p e r a t i n g t h e a n a l y z e r Disengage the sampler by slightly lifting the sampler until it unlocks from the valve module. Slightly Lift Sampler Pull the release lever and the sensor module is disengaged. Remove from the analyzer. -
Page 65
o p e r a t i n g t h e a n a l y z e r Remove the valve module by pulling it straight out. To install a new valve module, place the valve module onto the align- ment pin and push straight back. -
Page 66
When priming is complete, the display indicates the detection of each fluid with PASS, then automatically returns to the REPLACE COMPONENTS screen. A WARMING UP message may appear for up to 30 minutes. During this time, the EasyStat will not calibrate or analyze samples. -
Page 67
o p e r a t i n g t h e a n a l y z e r Compression Plate Compression plate replacement is necessary when the latch, spring mechanism, or seal is damaged. Follow the previous instructions for electrode or sensor module replacement. -
Page 68
To turn the printer off, refer to PRINTER OPTIONS in the SETUP MENU. Operation of the printer without Medica approved printer paper will result in the premature failure of the printer, voiding the warranty. -
Page 69
To replace the fuse(s), remove the power cord, then push down on the fuse holder release tab and pull straight out. The EasyStat analyzer will only accept slow blow or time delay fuses. Remove the fuse(s) from the holder and insert the new fuse(s). Confirm that the fuse rating matches the voltage setting on the analyzer. -
Page 70: Analyzer Surface Cleaning/Storage
To resume operation, insert the power cord and install the electrodes, pump tube and reagent module. A WARMING UP message may appear for up to 30 minutes. During this time, the EasyStat will not calibrate or analyze samples.
-
Page 71: Diagnostics
PRIME FLUIDS PRINT mV The tests and data in this section are available to examine the function and status of individual EasyStat components and fluidics. To identify component defects or fluidic problems, refer to the Troubleshooting chapter in this manual.
-
Page 72
NO and FAIL is displayed. Remove the pump tubing and repeat the PUMP test. If the test passes, install a new pump tubing, cali- brate the analyzer and resume operation. If the test fails, contact your EasyStat dealer. VALVE Select VALVE to verify valve function. The screen displays ROTATING…, then FULL ROTATION?. -
Page 73
o p e r a t i n g t h e a n a l y z e r SAMPLER SWITCHES Select SAMPLER SWITCHES to verify the sampler positioning sensor and the sample mode switch. CAPILLARY MODE? is displayed. Lift the sampler to the capil- lary mode and press YES. -
Page 74
o p e r a t i n g t h e a n a l y z e r DOOR SWITCH Select DOOR SWITCH to verify access door switch function. When DOOR OPEN? is displayed, open the access door and press YES. When DOOR CLOSED? is displayed, close the access door and press YES. -
Page 75
o p e r a t i n g t h e a n a l y z e r REAGENT READER Select REAGENT READER to verify reagent reader function. REAGENT MODULE REMOVED? is displayed. Remove the reagent module and press YES. REAGENT MODULE INSTALLED? is displayed. -
Page 76
Then dry the contacts thoroughly. Repeat the REAGENT READER test. If it fails again, contact your EasyStat dealer. Prior to installation, a reagent module must be stored at room tem- perature for a minimum of four hours. -
Page 77
o p e r a t i n g t h e a n a l y z e r Test Fluidics The sampler must be in the closed position for the following tests. TEST FLUIDICS Select TEST FLUIDICS to test the operating status of the reagent flow, sample flow, bubble detector and pump calibration. -
Page 78
o p e r a t i n g t h e a n a l y z e r BUBBLE DETECTOR CAL Select BUBBLE DETECTOR CAL to verify proper air and fluid detection. During testing, the screen will display BUBBLE CAL. When testing is complete, BD PASS or BD FAIL is displayed with readings for both air and fluid. -
Page 79
Prime the fluid path by pumping Calibrant B, Calibrant A and Calibrant C from the reagent module. PRINT mV , S Select PRINT mV , S to display and print millivolt readings for each parameter. This feature is useful when reporting problems to your EasyStat distributor. -
Page 80: Stored Information
o p e r a t i n g t h e a n a l y z e r Stored Information SECOND MENU 1 STANDBY 2 REPLACE COMPONENTS 3 DIAGNOSTICS 4 STORED INFORMATION 5 SETUP MENU 6 ADJUST DISPLAY STORED INFORMATION 1 PATIENT RESULTS 2 QC RESULTS…
-
Page 81
o p e r a t i n g t h e a n a l y z e r Select STORED INFORMATION from the SECOND MENU to obtain stored information on patient and quality control results, as well as view the reference limits, calibration, and reagent module information. -
Page 82
o p e r a t i n g t h e a n a l y z e r QC RESULTS View the last quality control results, print quality control statistics, and plot quality control charts. LAST CONTROL View the results for the last control samples. Choose from QC Level 1, QC Level 2, QC Level 3, Hct Level 1 or Hct Level 2. -
Page 83
o p e r a t i n g t h e a n a l y z e r REFERENCE LIMITS View the limits for quality control, normal, critical and AMR limits. QC LEVEL 1,2 or 3, Hct Level 1 or 2 View the current quality control reference limits set for each control level. -
Page 84
o p e r a t i n g t h e a n a l y z e r CRITICAL View the analyzer’s critical limits for arterial , mixed venous , or venous samples. These limits have been set to be equal to normal limits. -
Page 85
o p e r a t i n g t h e a n a l y z e r SLOPES View the slope and calibration status for each electrode (PASS, FAIL or INVALID). Anelectrode with a PASS status indicates the last calibration was successful and the electrode is currently cali- brated. -
Page 86
STATUS View the current reagent module serial number and installation date; the EasyStat analyzer serial number on which the reagent module was first installed; and the reagent volume (%) remaining with the number of days remaining before calibrants expire. -
Page 87
o p e r a t i n g t h e a n a l y z e r PRINTOUTS Print the settings for User Options, Configuration, Patient Limits, QC Limits, and Patient Information. USER OPTIONS Print the User Options settings. CONFIGURATION Print the Configuration settings. -
Page 88: Setup Menu
o p e r a t i n g t h e a n a l y z e r Setup Menu CONFIGURATION CONFIGURATION 1 CAL FREQUENCY 8 HRS 1 PO / PCO / BP mmHg 2 AUTO STANDBY 2 Na / Ca mmol/L 3 Hct…
-
Page 89
Select SETUP MENU from the SECOND MENU to set the func- tional parameters of the EasyStat analyzer. Enter the security code if SECURITY CODE is turned ON under USER OPTIONS. Turning the SECURITY CODE ON prevents unauthorized personnel from entering and changing the SETUP MENU. -
Page 90
Next, determine the correlation factors by performing a regression analysis of the data. The EasyStat data must be the “x” data, and the reference analyzer must be the “y” data. The regression slope is entered as the correlation slope, and the regression intercept is… -
Page 91
o p e r a t i n g t h e a n a l y z e r CORRELATION Next, select CORRELATION, then SET PARAMETERS to SET PARAMETERS view the stored correlation equations. To change any of these values, SLOPE INTERCEPT = X.XX X+ X.XXXX press NO to CONFIRM?, and enter any new correlation slopes… -
Page 92
Press YES when the entry is complete. If the barometric pressure does not change, verify the accuracy of the reference barometer. When the error remains, contact your EasyStat dealer. SECURITY CODE To activate this feature, press YES when SECURITY ON? is dis- played. -
Page 93
o p e r a t i n g t h e a n a l y z e r CONFIGURATION CONFIGURATION Select CONFIGURATION to set analyzer options. Select from: 1 PO / PCO / BP mmHg 2 Na / Ca mmol/L PO 2 /PCO 2 /BP, Na + /K + /Ca ++ , Hct, Hb, CAL 3 Hct… -
Page 94
o p e r a t i n g t h e a n a l y z e r AUTO STANDBY Select ON or OFF. When ON, the analyzer will enter standby auto- matically. Standby is available manually with either selection. TEMPERATURE Change the temperature unit. -
Page 95
o p e r a t i n g t h e a n a l y z e r QC LEVEL 1, 2, 3, Hct Enter, by level, quality control lot numbers and set the minimum and maximum values for each parameter. Press the number keys to set the values. -
Page 96
NO is pressed as a response to CONFIRM?, entries can be cor- rected. When patient results fall within the normal range for the EasyStat analyzer, no arrows appear with the measured results. For example, when the normal pH range is 7.350 — 7.450, no flags are displayed/ printed for patient pH results greater than or equal to 7.350 and less… -
Page 97
o p e r a t i n g t h e a n a l y z e r CRITICAL SET REFERENCE LIMITS CRITICAL Set the critical ranges for each parameter. Select arterial, mixed ARTERIAL 7.300 — 7.600 venous, or venous. Press the number keys to enter the desired lim- PCO 2 20.0 — 50.0 mmHg PO 2… -
Page 98
Press the number keys to select and change an option. Press YES to 3 OPERATOR ID CONFIRM?. When any options are turned ON, the EasyStat displays ENTER PATIENT DATA? after sample aspiration. Press YES to enter patient information. Use the number keys to enter values, and press YES to advance to the next option. -
Page 99: Adjust Display
o p e r a t i n g t h e a n a l y z e r When TIME DRAWN is turned on, the operator will be prompted to enter the time the sample was drawn. When SAMPLE TYPE is turned on, the operator is prompted to select arterial, venous or mixed venous.
-
Page 100: Syringe Sample
The ice water bath maintains an accurate sample for up to 2 hours at a temperature between 1 and 5°C. Note: Use only the Medica Capillary Kit. Use of other capillary tubes may cause erroneous results, or damage to the analyzer and elec-…
-
Page 101: Capillary Sample
E vacuated tubes are not recommended for blood gas specimen collec- tion due to variations in technique. Capillary Sample Capillary tubes are available from your EasyStat dealer. Follow directions in capillary kit. Errors occur from improper collection or handling procedures. When test results are inconsistent with a patient’s present condition or test history,…
-
Page 102
These electrodes are known as ion selective electrodes. The EasyStat analyzer measures sodium, potassium, calcium, chloride and pH in biological fluids, using ion selective electrode technology. Refer to the Electrode Measurement Diagram in this chapter. The flow- through sodium electrode uses a selective membrane, specially formu- lated to be sensitive to sodium ions. -
Page 103
p r i n c i p l e s o p e r a t i o n t h e o r y The potential of each electrode is measured relative to a fixed, stable voltage established by the double-junction silver/silver chloride refer- ence electrode. -
Page 104
p r i n c i p l e s o p e r a t i o n t h e o r y A comparative method of measurement is utilized. First, the analyzer measures the potentials developed when the sample is positioned in the electrodes. -
Page 105
p r i n c i p l e s o p e r a t i o n t h e o r y Using this definition of pH: pH = -Log (c) the equations for pH becomes: pH (Samp) = pH (Cal A) — (E (Samp) — E (Cal A) ) /S where pH (Samp) pH of this sample… -
Page 106: Pco 2 Electrode
p r i n c i p l e s o p e r a t i o n t h e o r y Electrode The PCO 2 electrode is a modified pH electrode, using Severinghaus electrode technology. The sample is introduced to a CO 2 permeable membrane surrounding internal fill solution (bicarbonate solution) which is in direct contact with pH-sensitive glass and a silver/silver chloride electrode terminal (an internal reference electrode).
-
Page 107: Hct Sensor
p r i n c i p l e s o p e r a t i o n t h e o r y Hct Sensor The percentage of red blood cells to the total blood volume is defined as hematocrit.
-
Page 108: Electrode Measurement/Diagrams
, Na + , K + , Ca ++ and Cl — electrodes used in the The pH, PCO , PO EasyStat analyzer have no replaceable parts and are designed to require no maintenance.
-
Page 109: Tonometered Reagents
p r i n c i p l e s o p e r a t i o n t h e o r y Tonometered Reagents The reagent module contains reagents that have been tonometered to known partial pressures of PO 2 and PCO 2 . Tonometry is the process of bubbling a gas through a liquid until equi- librium is reached.
-
Page 110: Calculations
The measured results are often corrected to the patient body tempera- ture. The temperature corrected results more accurately reflect the in vivo conditions. The EasyStat analyzer performs these calculations using the following equations 1 : = 0.0065 (7.4 — pH) — 0.0147 ∆pH/∆T…
-
Page 111
Hb is in g/dL and Hct is % The hemoglobin calculation is an estimation based on a normal MCHC of 33.3%. The EasyStat hemoglobin estimation from samples with red cell dys- crasia or hemoglobinopathies may vary significantly from hemoglobin mea-… -
Page 112
p r i n c i p l e s o p e r a t i o n t h e o r y HCO 3 The following equation is used to calculate the bicarbonate concentra- tion log [HCO 3 — ] = pH — 7.608 + log PCO 2 where: HCO 3 — is expressed in mmol/L The base excess of blood, or in vitro base excess, is calculated using… -
Page 113
37.0°C with PCO 2 = 40 mmHg and PO 2 greater than 100 mmHg is known as the standard bicar- bonate of blood. The EasyStat analyzer uses the following equation 1 : SBC = 25 + 0.78 BE b + 0.002 [Hb] (%SO 2 c — 100) -
Page 114
%SO 2 c The EasyStat analyzer estimates the calculated oxygen saturation (at normal P50) of available hemoglobin from the measured value of PO 2 , pH and PCO 2 according to the equation 1 :… -
Page 115
21% or when entered, the value input from the screen. PATIENT INFORMATION The EasyStat analyzer calculates the respiratory index according to the following equation A-aDO Anion Gap The EasyStat (chloride mode) analyzer calculates the Anion Gap… -
Page 116
7. Specifications CLIA Classification: Moderate complexity Sample Type: Whole blood Sample Size: 120 µL Syringe mode/95 µL Capillary mode Measured Parameters and Limits* PO 2 5 — 700 mmHg PCO 2 5.0 — 150.0 mmHg 6.500 — 8.000 pH units 10-70% Cl — 50.0-150.0 (Cl — mode) mmol/L Na +… -
Page 117
s p e c i f i c a t i o n s ypical performance data: Syringe Mode Within-run precision using whole blood (for PO 2 , PCO 2 , pH, Cl — and Hct) and serum (for Na + , K + and Ca ++ ) Na + Ca ++ Cl -… -
Page 118
s p e c i f i c a t i o n s Day-to-Day precision of duplicates (NCCLS, EP-5) using EasyQC Blood Gas/Electrolyte controls Level 1 Na + Ca ++ Cl — PO 2 PCO 2 Mean 73.5 7.171 114.6 1.96 1.35… -
Page 119
s p e c i f i c a t i o n s Typical performance data: Capillary Mode Within-run precision of duplicates (NCCLS EP-5) using whole blood and serum Na + Ca ++ Cl — PO 2 PCO 2 Mean 37.1 7.423… -
Page 120
8. EasyStat Setup Defaults For reference, the following tables show the settings of the EasyStat analyzer at initial startup. All listed settings may be adjusted by the user, refer to Operating the Analyzer / SETUP MENU. Correlation Off (when turned on, the correlation is 1.00x + 0.000 for all analytes) -
Page 121: Introduction
9. Troubleshooting Introduction To ensure trouble-free operation of the EasyStat analyzer, it is necessary to follow the Replacement Schedule shown in Replace Components and in Chapter 11. When the EasyStat analyzer detects problems during operation, an ERROR message is displayed and printed. Refer to the error messages for an explanation, and the recommended corrective actions in this chapter.
-
Page 122
Isolate the problem area to avoid unnecessary component replacement and downtime. EasyStat error messages are grouped by type. Solutions for each are outlined in this chapter. The EasyStat DIAGNOSTICS software menu contains several component, hardware and fluidic tests to address many of the error messages listed below. -
Page 123: Electrodes
It is critical that the EasyStat sensor module surfaces and electrode exterior surfaces are completely dry before reassembly. The presence of moisture in these areas will interfere with normal calibration and sample analysis.
-
Page 124
If they are dirty or corroded, clean them gen- tly with a pencil eraser, being careful not to remove the gold coating. Push in each contact, then release. The contact will spring back. If any contact does not spring back, contact your EasyStat dealer. -
Page 125
t r o u b l e s h o o t i n g Random or single Hct Sensor error messages If the error occurred during calibration, re-calibrate the • analyzer. If the error occurred during sample analysis, run the sam- •… -
Page 126
t r o u b l e s h o o t i n g Electrode error messages for more than one electrode may indicate a flow problem. Remove the electrodes from the sensor module. • Inspect the O-ring connections, and replace any cracked O-rings. •… -
Page 127
Each electrode is keyed to assist with correct placement. Release the compression plate. Close the access door. • Calibrate. • A WARMING UP message may appear for up to 30 minutes. During this time, the EasyStat will not calibrate or analyze samples. -
Page 128
If the electrode mV readings are out of range, first verify that the reference electrode is within its use period (refer to the Replacement Schedule in Chapter 11). In the case of multiple electrode mV failures, contact your EasyStat • dealer. -
Page 129
t r o u b l e s h o o t i n g ↑ / ↓ ELECTRODES QC DATA Quality control result is out of range. When quality control data is out of range, review the quality control information under Analyze QC in Operating the Analyzer. -
Page 130
t r o u b l e s h o o t i n g ELECTRODES ***** Quality control or patient sample result is not reported. The electrode is not calibrated. • An error occurred during sample analysis. Repeat sam- •… -
Page 131: Flow
FLOW PUMP CAL FAIL BUBBLE DETECTOR! To remove or replace the EasyStat sensor module, pump tubing or valve module, follow the instructions under Replace Components in Operating the Analyzer. Pump Cal failures (PUMP CAL FAIL) Verify that all EasyStat components (electrodes, valve •…
-
Page 132
Bubble detector failures (BD FAIL) Verify that all EasyStat components (electrodes, valve mod- • ule, pump tubing and reagent module) are installed cor- rectly. Confirm that the sampler is down. -
Page 133
t r o u b l e s h o o t i n g FLOW AIR IN CALIBRANT A AIR IN CALIBRANT B AIR IN CALIBRANT C AIR IN SAMPLE AIR IN CONTROL AIR IN CLEANER Air messages for one reagent (Calibrant A, Calibrant B or Rinse) Perform the REAGENT FLOW test under TEST •… -
Page 134
t r o u b l e s h o o t i n g Look for red dye movement through the pump tubing. If • the red test dye does not move, proceed to the instructions for “No red dye movement during FLOW test”. If there is fluid movement, this indicates a poor sampler/ •… -
Page 135
t r o u b l e s h o o t i n g No red test dye movement during SAMPLE FLOW test If the red test dye is not moving through the pump tubing during • the SAMPLE FLOW test, inspect the electrode alignment in the sensor module. -
Page 136
t r o u b l e s h o o t i n g If failure continues, remove the pump tube from the • valve module and loosen the pump so that it is attached only to the Sensor Module and not stretched around the pump. -
Page 137
t r o u b l e s h o o t i n g Sample probe/sensor module obstructions To remove a persistent flow obstruction, or as preventive maintenance, perform the following steps. Remove the electrodes from the sensor module. Refer •… -
Page 138
• Confirm a successful SAMPLE FLOW test with the test • block installed. Remove the test block and reinstall the EasyStat electrodes. Release the compression plate and close the sampler. • Perform the SAMPLE FLOW test. If successful, resume •… -
Page 139
t r o u b l e s h o o t i n g FLOW AIR IN SAMPLE Air was detected in the sample. Confirm that sample volume is sufficient (syringe mode — • 120 µL, capillary mode — 95 µL). There may be air bubbles in the sample itself (sample was •… -
Page 140: Reagent Module
REAGENT MODULE RGNT MODULE EMPTY RGNT MODULE EXPIRED When removing or replacing the EasyStat reagent module, follow the Replace Components/Reagent Module procedure in Operating the Analyzer. The installed reagent module is consumed or has exceeded its •…
-
Page 141
Verify the barometric pressure under USER OPTIONS • in the SETUP MENU. Recalibrate. • If necessary, move the EasyStat to an atmospheric air • environment (21% O 2 ) and recalibrate. If the error continues, install a new reagent module and •… -
Page 142: Sensor Module
t r o u b l e s h o o t i n g SENSOR MODULE SAMPLER UP This error message appears when sampler is not com- pletely down. Push the sampler down into the closed position. • If the error continues, select TEST COMPONENTS •…
-
Page 143
If WARMING UP remains displayed after 30 minutes, • install a new sensor module, and wait up to 30 minutes. If the temperature remains out of range, contact your • EasyStat dealer. SENSOR MODULE SENSOR TEMPERATURE This error indicates an abnormally high temperature in the sensor module. -
Page 144
DOOR OPEN This message indicates that the access door is not closed. The access door must be closed during EasyStat operation. Verify that all electrodes are installed properly. If any • electrode is not pushed in completely, the door will not close properly. -
Page 145: Valve Module
Select TEST COMPONENTS from the DIAGNOSTICS • menu. Perform the VALVE test. • When the test passes, proceed with EasyStat operation. • If the test fails, remove the valve module as described under Replace • Components in Operating the Analyzer.
-
Page 146
If these steps returned the valve module to operation, it is • strongly advised that a replacement valve module be obtained as the valve errors recently cured may return permanently. For repeated valve failure, contact your EasyStat dealer. • VALVE MODULE VALVE TEMPERATURE The valve temperature is not in the range 36-41°C. -
Page 147: Printer
If the printer continues to fail, note the failure mode (paper • does not advance, printhead does not move, printhead moves but poor or no printing), and contact your EasyStat dealer.
-
Page 148: Hardware
DIAGNOSTICS and selecting SENSOR STATUS. Move the analyzer to a location where the temperature • and barometric pressure fall within the operating limits. If the error continues, contact your EasyStat dealer. • QUALITY CONTROL QC ERROR 1 Incorrect values for EasyStat.
-
Page 149
10. Computer Connection Interface the EasyStat analyzer with an external computer by means of the RS-232 serial interface, using the following specifications. EasyStat RS-232 Protocol: Transmission Rate 2400 bits per second Bit Configuration 8 data bits, 1 stop bit, no parity Interface requires the EasyStat serial cable. -
Page 150
o p e r a t i n g t h e a n a l y z e r c o m p u t e r c o n n e c t i o n For computers running: Windows 95, select Hypertrm from Accessories/Hyperterminal •… -
Page 151
11. Replacement Schedule PUMP TUBING Replace every 6 months (Warranty – 3 months use) VALVE MODULE Replace as required (Warranty – 12 months use) SENSOR MODULE Replace as required (Warranty – 12 months use) SAMPLER Replace as required (Warranty – 6 months use) pH ELECTRODE Replace as required (Warranty –… -
Page 153: Appendix A: Warranty
Dealers, representatives and employees, which are inconsistent or in conflict with, or in addition to, the terms of this warranty shall not be binding upon Medica unless in writing and signed by one of its officers. For warranty service in the USA or Canada, please call our Customer Service Department, 1-800-777-5983.
-
Page 155: Appendix B: Understanding The Symbols
Appendix B Understanding the Symbols Symbol Definition Symbol Definition Fuse In vitro diagnostic device Barcode connection Consult operating instructions Battery port connection Attention, see instructions for use RS-232 serial interface connection Temperature limitation Alternating current Do not freeze Date Installed Batch code Install by Use by…
-
Page 158
For Service or Technical Assistance: 800 777 5983 In Continental US 781 275 4892 International 781 275 2731 Fax medica@medicacorp.com E-mail Medica Corporation 5 Oak Park Drive Bedford, MA 01730-1413 USA EDIC@…
- Manuals
- Brands
- Medica Manuals
- Diagnostic Equipment
- EasyStat
Manuals and User Guides for Medica EasyStat. We have 1 Medica EasyStat manual available for free PDF download: Operator’s Manual
|
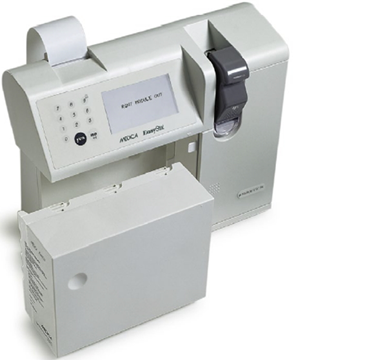
Анализатор газов крови и электролитов MEDICA Easy Stat |
||||||
|
||||||
|
||||||
|
||||||
|
||||||
|
||||||
|
||||||
|
||||||
|
||||||
|
||||||
|
||||||
|
||||||
|
||||||
|
||||||
|
||||||
|
||||||
|
||||||
|
||||||
|
||||||
|
||||||
|
||||||
|
||||||
|
||||||
|
||||||
|
||||||
|
||||||
|
||||||
|
||||||
|
||||||
|
||||||
|
||||||
|
||||||
|
||||||
|
||||||
|
||||||
|
||||||
|
||||||
|
||||||
|
||||||
|
||||||
|


 Пак так же может закончится по сроку установки, 2-3 недели до прихода следующего пака не выключайте прибор из сети. В паке имеется запас жидкости (даже после выработки основного объема) для периодического прохождения раствора через электроды, чтобы исключить их высыхание. Даже когда истечет срок и закончится объем реагентов в паке — не вынимайте блок реагентов из прибора! Пусть стоит эти 2 недели.


 ? На второй можно тоже так попробувать, конечно. С уважением.

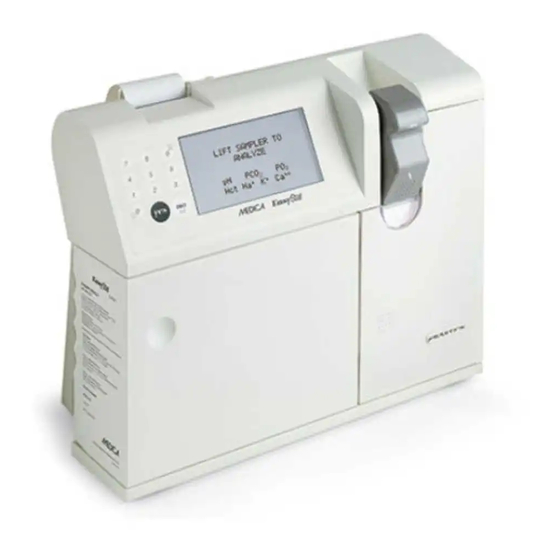
Анализатор EasyStat измеряет уровень элетролитов в крови и газов крови( pH, PCO2, PO2, натрий, калий, кальций или хлор и Hct), а также параметры пациента, включая % содержания кислорода во вдыхаемом пациентом воздухе, идентификатор пациента, температуру пациента, и другую информацию.
Все компоненты анализатора объединены в простые модули, которые будут интуитивно понятны для любого лаборанта. Кроме того, простое управление сделает работу на приборе еще проще и быстрее.
Компактный формат EasyStat и модульная конструкция значительно сокращают расходы на обслуживание, а небольшие размеры сэкономят пространство в лаборатории. Одноразовые электроды и модуль реагентов обеспечивают экономичную работу и низкую стоимость одного анализа.
Ключевые особенности
• Анализатор EasyStat Medica измеряет pH, PCO2, PO2, Na +, K +, Ca ++ или Cl-и Hct и вычисляет дополнительные параметры. Дополнительные данные, которые потребуется изучить, можно вводить с помощью цифровой клавиатуры и интегрировать с результатами пациента. Измеренные и рассчитанные результаты отображаются и печатаются
• EasyStat фокусируется на лабораторных потребностях для обеспечения экономичного и эффективного получения результатов проб
• Эргономичность и производительность, необходимые в сегодняшней напряженной и требовательной среде здравоохранения, были реализованы в EasyStat в максимально компактном формате.
• Все компоненты объединены в три простых модуля, легко доступных для пользователя. Текущее обслуживание ограничено заменой электродов и одной трубки насоса.
• Простое меню помогает пользователю при работе с анализатором.
• Уникальная конструкция электрода без сменных мембран в сочетании с модулем реагента с емкостью более 1000 образцов обеспечивают экономичную работу и низкую стоимость на образец.
Меню

Интерфейс EasyStat (В меню прибора добавлено множество языков, в том числе и русский язык). Гибкое программное обеспечение EasyStat может быть запрограммировано в соответствии с установленными в лаборатории стандартами.
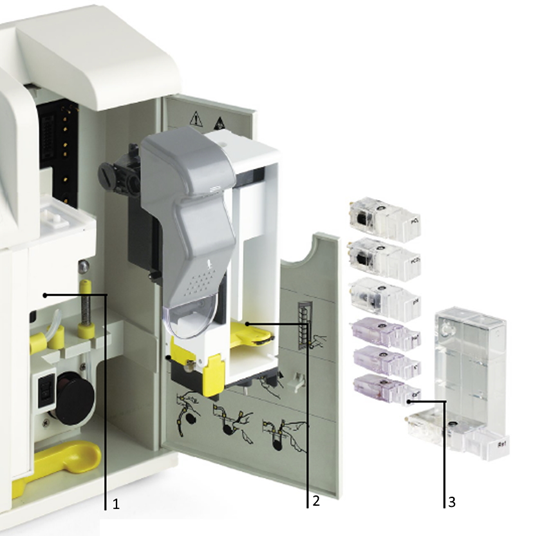
1. Модуль клапана служит для калибровочных и промывочных растворов
2. Модуль датчика содержит универсальный пробоотборник с функцией самоочищения пробы для удобства и безопасности.
3. Не требующие техобслуживания сменные электроды обеспечивают быструю и надежную установку
EasyStat может использоваться и обслуживаться любым пользователем в любое время и в любом месте
 • Установка трех сменных модулей — модуля реагентов, модуля датчика и модуля ValveModule — выполняется без инструментов.
• Благодаря встроенной мембранной конструкции Medica используются электроды одноразового типа. Электроды защелкиваются при установке и легко снимаются для последующей замены.
• Инновационная конструкция упрощает техническое обслуживание, удовлетворяя потребности удаленной лаборатории, которая имеет ограниченный доступ к персоналу технического обслуживания. Диагностическое программное обеспечение отображает состояние системы, обеспечивая быстрое устранение неполадок. Модульность делает сборку и разборку быстрой и легкой. Нет необходимости в дорогостоящем техническом обслуживании.
• Программа контроля качества EasyStat рассчитывает и сохраняет полную статистику за последние 31 день результатов «контроля качества» на каждом из трех уровней. Напечатанная диаграмма Леви-Дженнингса визуально идентифицирует тенденции.
• Программа управления данными сравнивает все результаты пациента с диапазонами, сохраненными в памяти, и отмечает результаты вне диапазона. Результаты сохраняются в памяти для 64 пациентов.
• Замена компонентов, калибровка и другие происходящие события документируются для соответствия нормативным требованиям
Работа анализатора крови никогда не была проще
 • Универсальный пробоотборник адаптируется как к шприцу, так и к капиллярным образцам без адаптеров. Функция самоочистки зонда обеспечивает удобство, целостность образца и безопасность.
• Простое меню с подсказками «да / нет» делает возможным быстрое обучение нового персонала.
• Облегченная конструкция с дополнительной ручкой обеспечивает портативность прибора и позволяет использовать его в любых условиях.
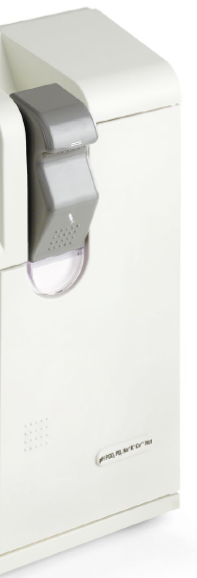
На картинке справа автономный модуль реагентов

-
Описание -
Характеристики -
Производитель -
Доставка, оплата -
Ввод в эксплуатацию
Описание Medica Corp EasyStat
Анализатор газов крови и электролитов Medica Corp EasyStat, со стартовым комплектом. Представляет собой 21-параметровый анализатор газов крови и электролитов. Семь параметров непосредственно измеряются прибором, остальные четырнадцать – рассчитываются с учетом данных, вводимых с клавиатуры. Встроенный термопринтер, используются сменные пакеты, содержащие калибровочные растворы с газами и емкость для отходов, не требуются баллоны с газами для калибровки прибора. Сменные электроды, не требующие техобслуживания. Автоматическая калибровка прибора, интегрированная программа контроля качества по контрольным материалам с построением контрольных карт. Сохранение в памяти результатов измерений 64 проб и 30 контрольных материалов трех уровней.
Особенности Medica Corp EasyStat
- Не требуются баллоны с газами для калибровки прибора;
- Используются сменные пакеты, содержащие калибровочные растворы с газами и емкость для отходов;
- Сменные электроды, не требующие техобслуживания;
- Автоматическая калибровка прибора;
- Сохранение в памяти результатов измерений 64 проб и 30 контрольных материалов трех уровней;
- Интегрированная программа контроля качества по контрольным материалам с построением контрольных карт;
- Встроенный термопринтер.
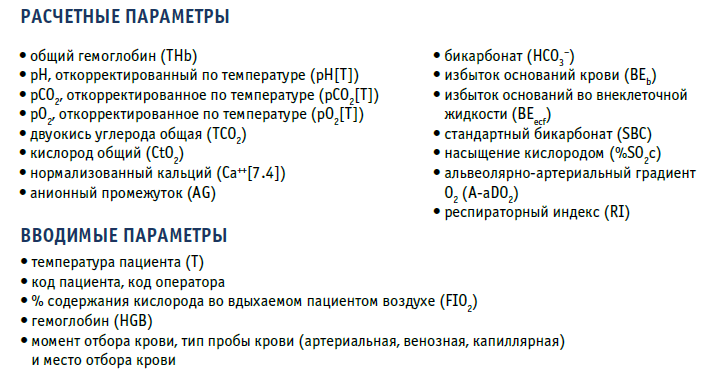
Рассчетные параметры:
- Концентрация гемоглобина (THb);
- pH, откорректированный по температуре (pH [T]);
- pCO2, откорректированное по температуре (pCO2[T]);
- pO2, откорректированное по температуре (pO2[T]);
- Двуокись углерода общая (TCO2);
- Кислород общий (CtO2);
- Нормализованный кальций (Ca++[7.4]);
- Бикарбонат (HC03—);
- Избыток оснований в крови (BEb);
- Избыток оснований во внеклеточной жидкости (BEecf);
- Стандартный бикарбонат (SBC);
- Насыщение кислородом (%SO2c);
- Альвеолярно-артериальный градиент (А-аDO2);
- Респираторный индекс (RI);
- Анионный промежуток (AG).
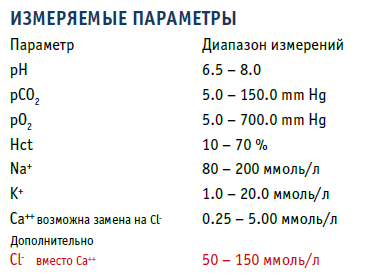
Измеряемые параметры:
- pH (диапазон измерений 6.500 — 8.000);
- pCO2 (диапазон измерений 5.0 — 150.0 мм Hg);
- pO2 (диапазон измерений 5.0 — 700.0 мм Hg);
- Na+ (диапазон измерений 80 — 200 ммоль/л);
- K+ (диапазон измерений 1.0 — 20.0 ммоль/л);
- Ca++ (диапазон измерений 0.25 — 5.00 ммоль/л);
- Hct (диапазон измерений 10-70%).
Вводимые параметры:
- Температура пациента (Т);
- % содержания кислорода во вдыхаемом пациентом воздухе (FIO2).
Технические характеристики Medica Corp EasyStat
- Производительность: проб/ч до 30;
- Размеры: мм 320 х 180 х 370;
- Вес: кг (включая пакет с реагентами) 7,7;
- Время анализа: с 120;
- Калибровка: автоматическая или по требованию;
- Память: 64 результата;
- ID (идентификационный номер пациента): 14 знаков.
- Портативный прибор: Нет
- Определяемые параметры: pH, рСО₂, pO₂, Hct, Na⁺, К⁺
- Сенсорный дисплей: Нет
- Принтер: Встроенный
- Считыватель штрих-кода: Нет
- Производительность, тестов/час: 30
- Тип исследуемого образца: Венозная кровь, Капиллярная кровь, Артериальная кровь
- Объем измеряемого образца, мкл: 95
- Время измерения 1 образца, сек: 120
- Тип реагентов: Электроды и растворы
- Расчетные параметры: cHCO⁻₃, ctCO₂, cBE, RI, cBB
- Подключение к ЛИС: Да
|
|
Medica Corp. |
|---|---|
|
|
Да |
|
|
Артериальная кровь, Венозная кровь, Капиллярная кровь |
 Тестов в час |
30 |
|
|
95 |
|
|
272180 |
|
|
ЖК дисплей |
|
|
Встроенный |
|
|
Нет |
|
|
Автоматический |
|
|
Прямая потенциометрия |
|
|
Ca, HCT, K, Na, pCO2, pH, pO2 |
|
|
64 |
|
|
95 |
|
|
95 |
|
|
Стационарный |
|
|
7.7 |
|
|
США |
Компания Medica Corporation (г. Бедфорд, штат Массачусетс, США) с 1984 года занимается созданием аналитического оборудования, сочетающего высокие аналитические технологии и надежность с низкой стоимостью и проcтотой обслуживания. В настоящее время компания предлагает приборы, ориентированные на малые и средние лаборатории: ионоселективные анализаторы электролитов EasyLyte и анализаторы газов крови EasyBloodGas.
Более 70% оборота компании Medica занимают международные продажи, в том числе продажи в Россию – за последние 5 лет российскими ЛПУ приобретены более 1000 приборов с маркой Medica