
Руководство пользователя
Компактная модульная платформа
FTB-200
-
Contents
-
Table of Contents
-
Troubleshooting
-
Bookmarks
Quick Links
User Guide
FTB-200 v2
Compact Modular Platform
Related Manuals for EXFO FTB-200
Summary of Contents for EXFO FTB-200
-
Page 1
User Guide FTB-200 v2 Compact Modular Platform… -
Page 2
EXFO Inc. (EXFO). Information provided by EXFO is believed to be accurate and reliable. However, no responsibility is assumed by EXFO for its use nor for any infringements of patents or other rights of third parties that may result from its use. -
Page 3
End-User License Agreement You have acquired a device («DEVICE») that includes software licensed by EXFO Inc. (EXFO) from an affiliate of Microsoft Corporation («MS»). Those installed software products of MS origin, as well as associated media, printed materials, and «online» or electronic documentation («SOFTWARE») are protected by international intellectual property laws and treaties. -
Page 4
SOFTWARE. To be valid, the label must be affixed to the DEVICE, or appear on [COMPANY’s] software packaging. If you receive the label separately other than from EXFO, it is invalid. You should keep the label on the DEVICE or packaging to prove that you are licensed to use the SOFTWARE. -
Page 5: Table Of Contents
Contents Contents Certification Information ………………… viii 1 Introducing the FTB-200 v2 Compact Modular Platform ……1 Main Features …………………….1 LED Panel Description ………………….4 Keypad Description …………………….6 Ports ……………………….7 Power Sources ……………………8 Optional Software Package …………………8 Conventions ……………………..9 2 Safety Information ………………11 Other Safety Symbols on Your Unit ………………12…
-
Page 6
Connecting to a Wireless Network ………………126 Using the USB to RS-232 Adapter ………………131 Enabling or Disabling the Bluetooth and Wi-Fi Devices …………137 Transferring Files with the USB Data Mover Application ………….139 Connecting to a VPN from Your Unit ………………145 FTB-200 v2… -
Page 7
Performing a Trace Route Test …………………172 Exporting the Results ………………….174 11 Maintenance ………………… 175 Cleaning Detector Ports ………………….176 Cleaning the Touchscreen of Your FTB-200 v2 Unit ………….177 Recharging the Main Battery ………………..177 Recalibrating the Battery ………………..179 Replacing Batteries ………………….182 Recalibrating the Unit ………………….183 Recycling and Disposal (Applies to European Union Only) ……….184… -
Page 8: Certification Information
Electronic test and measurement equipment is exempt from FCC part 15, subpart B compliance in the United States of America and from ICES-003 compliance in Canada. However, EXFO Inc. makes reasonable efforts to ensure compliance to the applicable standards. The limits set by these standards are designed to provide reasonable protection against harmful interference when the equipment is operated in a commercial environment.
-
Page 9
European Community Declaration of Conformity An electronic version of the declaration of conformity for your product is available on our website at www.exfo.com. Refer to the product’s page on the Web site for details. Compact Modular Platform… -
Page 11: Introducing The Ftb-200 V2 Compact Modular Platform
Introducing the FTB-200 v2 Compact Modular Platform Optimized for all phases of the network lifecycle, the FTB-200 v2 Compact Modular Platform houses any of EXFO’s FTB one- or two-slot modules to meet your evolving needs. You can configure your platform by combining optical, transport and datacom modules to cover a wide range of applications.
-
Page 12
Introducing the FTB-200 v2 Compact Modular Platform Main Features Optional built-in power meter and VFL Direct Web access from your unit Possibility to take screen captures PDF file generator and viewer available from your unit Easy transfer of files and folders to a USB storage device … -
Page 13
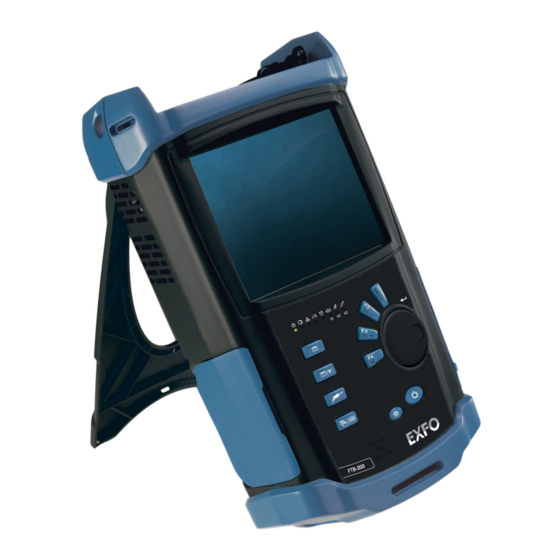
Introducing the FTB-200 v2 Compact Modular Platform Main Features Left panel Right panel Fiber inspection probe port USB host ports USB host port RJ-45 port Headset/microphone port AC adapter/charger (for 2.5 mm connector) connector Top panel Built-in power meter Module slots… -
Page 14: Led Panel Description
Introducing the FTB-200 v2 Compact Modular Platform LED Panel Description Bottom panel Retaining screws LED Panel Description The LED panel located on the front of the unit provides you with the status of your unit. Note: The function of certain LEDs vary with the applications.
-
Page 15
Introducing the FTB-200 v2 Compact Modular Platform LED Panel Description Status Meaning Laser status LED Red, blinking At least one module emits an optical signal. No modules emit signal. Result status from application currently displayed. Green Pass (result does not exceed the defined threshold). -
Page 16: Keypad Description
Introducing the FTB-200 v2 Compact Modular Platform Keypad Description Keypad Description The keypad of your unit gives you access to various functions at all times. The table below shows an overview of their purpose. Note: The function of certain buttons vary with the applications.
-
Page 17: Ports
Introducing the FTB-200 v2 Compact Modular Platform Ports Ports Your unit is equipped with several communication ports (for probe, mouse, keyboard, hub, etc.). It can also be equipped with internal Wi-Fi and Bluetooth devices for wireless information transfer. These two devices are optional.
-
Page 18: Power Sources
Note: When it is connected with the AC adapter/charger, the unit will function even if the battery is not present. AUTION EXFO guarantees the specifications and viability of the products ONLY if they are used with chargers and batteries provided by EXFO.
-
Page 19: Conventions
Introducing the FTB-200 v2 Compact Modular Platform Conventions Conventions Before using the product described in this guide, you should understand the following conventions: ARNING Indicates a potentially hazardous situation which, if not avoided, could result in death or serious injury. Do not proceed unless you understand and meet the required conditions.
-
Page 21: Safety Information
Safety Information ARNING Do not install or terminate fibers while a light source is active. Never look directly into a live fiber and ensure that your eyes are protected at all times. ARNING The use of controls, adjustments and procedures, namely for operation and maintenance, other than those specified herein may result in hazardous radiation exposure or impair the protection provided by this unit.
-
Page 22: Other Safety Symbols On Your Unit
Alternating current Both direct and alternating current The unit is equipped with an earth (ground) terminal. The unit is equipped with a protective conductor terminal. The unit is equipped with a frame or chassis terminal. On (Power) Off (Power) FTB-200 v2…
-
Page 23: Laser Safety Information
Safety Information Laser Safety Information Laser Safety Information Units with Built-In VFL Your instrument is a Class 3R laser product in compliance with standards IEC 60825-1: 2007 and 21 CFR 1040.10, except for deviations pursuant to Laser Notice No. 50, dated June 24, 2007. Laser radiation is emitted at the output port.
-
Page 24: Electrical Safety Information
Unless otherwise specified, all interfaces are intended for connection to Safety Extra Low Voltage (SELV) circuits only. Capacitors inside the unit may be charged even if the unit has been disconnected from its electrical supply. FTB-200 v2…
-
Page 25
Use only accessories (such as the car outlet adapter, batteries, and fiber inspection probe) designed for your unit and approved by EXFO. For a complete list of accessories available for your unit, refer to its technical specifications. When you use the unit outdoors, ensure that it is protected … -
Page 26
Measured in 0 °C to 31 °C (32 °F to 87.8 °F) range, decreasing linearly to 50 % at 40 °C (104 °F). Equipment must be normally protected against exposure to direct sunlight, precipitation and full wind pressure. Not exceeding ± 10 % of the nominal voltage. FTB-200 v2… -
Page 27
Safety Information Electrical Safety Information MPORTANT The operation and storage temperatures of some modules may differ from the temperatures specified for your platform. In this case, always ensure that you comply with the most restrictive conditions (either module or platform). Compact Modular Platform… -
Page 29: Getting Started With Your Unit
AUTION To avoid damaging your unit, use it only with modules approved by EXFO. ARNING When the laser safety LED is flashing, at least one of your modules is emitting an optical signal. Please check all modules, as it might not be the one you are currently using.
-
Page 30
Getting Started with Your Unit Inserting and Removing Test Modules To insert a module into the Compact Modular Platform: 1. Turn off your unit. 2. Position the unit so that its front panel is facing you. FTB-200 v2… -
Page 31
Getting Started with Your Unit Inserting and Removing Test Modules 3. Take the module and place it vertically so that the retaining screw hole is at the left of the connector pins. AUTION Inserting a module upside down could result in permanent damage to the module, as the connector pins might be bent. -
Page 32
This will secure the module into its “seated” position. Turn retaining screws clockwise Bottom panel When you turn on the unit, the startup sequence will automatically detect the module. FTB-200 v2… -
Page 33
Getting Started with Your Unit Inserting and Removing Test Modules To remove a module from the Compact Modular Platform: 1. Turn off your unit. 2. Position the unit so that the bottom panel is facing you. 3. Lift the mobile part of the retaining screw and use it to turn the retaining screw counterclockwise until it stops. -
Page 34
5. Hold the module by its sides or by the handle (NOT by the connector) and pull it out. AUTION Pulling out a module by a connector could seriously damage both the module and connector. Always pull out a module by its casing. 6. Cover empty slots with the supplied protective covers. FTB-200 v2… -
Page 35: Using A Keyboard, Mouse Or Other Usb Devices
USB to RS-232 To be able to transfer data between your unit and a adapter device only equipped with RS-232 (serial) ports. For (purchased from more information, see Using the USB to RS-232 EXFO) Adapter on page 131. Compact Modular Platform…
-
Page 36
Note: It is not necessary to turn off the unit before connecting the USB device. The software will automatically detect its presence. Your device is automatically recognized and immediately usable (provided that it uses the drivers already available on your unit). FTB-200 v2… -
Page 37: Using The On-Screen (Virtual) Keyboard
Getting Started with Your Unit Using the On-Screen (Virtual) Keyboard Using the On-Screen (Virtual) Keyboard Your unit is equipped with an on-screen keyboard that supports multilingual features. This keyboard functions according to the keyboard settings of Windows. To use the on-screen keyboard: 1.
-
Page 38: Turning On Or Off The Unit
You can also configure your unit to automatically restart when AC power comes back after the unit has turned off (emergency shutdown, standby, or hibernation modes) when battery level is too low. FTB-200 v2…
-
Page 39
Getting Started with Your Unit Turning On or Off the Unit To turn on the unit: Press the On/Off button. To turn off the unit: 1. Press the On/Off button. On the Windows taskbar, tap Start. This will display the standard shutdown window, from which you have a choice of actions or shutdown modes. -
Page 40
4. From the When I press the power button on my computer list, select the desired behavior (Ask me what to do option is selected by default). 5. Tap Apply to confirm the changes, and then OK to return to Control Panel. FTB-200 v2… -
Page 41
Getting Started with Your Unit Turning On or Off the Unit To configure your unit to automatically restart after AC power comes back: 1. From the Main Menu, tap Setup. 2. Double-tap Application Startup. 3. Select the Power on the unit when AC outlet is connected or after power outage box to enable the corresponding option. -
Page 42: Installing Or Upgrading The Applications
(see Managing Data on page 115). The update files must be copied to the location that has been specified for the deployment packages in Update Manager. FTB-200 v2…
-
Page 43
the computer a USB memory key For the upgrades, you will need: an FTB-200 v2 Compact Modular Platform unit a computer equipped with a USB port; Windows must be installed on the computer a USB memory key … -
Page 44
6. Copy the installation files (from the USB key) to the newly created folder. 7. From the newly created folder, tap the Setup.exe file to start the installation. 8. Follow the on-screen instructions. 9. When the installation is complete, simply disconnect the USB memory key. FTB-200 v2… -
Page 45
Getting Started with Your Unit Installing or Upgrading the Applications To install or upgrade the applications: 1. If necessary, retrieve the desired installation files from the Internet. If you do not intend to download files directly on your unit, connect a USB memory key to one of the USB ports of the computer and copy the installation files to this USB key. -
Page 46
USB key. 6. When the operation is complete, click Close, and then Exit to close the installation DVD window. 7. Disconnect the USB memory key from the computer. Your new installation USB key is now ready. FTB-200 v2… -
Page 47: Activating Software Options
In all other cases, you can follow the instructions presented in this section. Before being able to activate options, you need to contact EXFO with the following information: Purchase order number of the newly purchased options …
-
Page 48
1. Connect a USB memory key to one of the USB ports of your computer. 2. Copy the key file to the USB memory key. 3. Disconnect the USB key from the computer and connect it to your unit. 4. From Compact ToolBox, select the Utilities tab, then double-tap Options Activation. FTB-200 v2… -
Page 49
Getting Started with Your Unit Activating Software Options 5. In the Platform Options tab, use the Browse button to locate the key file that you want to use. 6. Press Activate. The option indicator will turn into a green check mark to confirm that the option is now active. -
Page 50
1. Connect a USB memory key to one of the USB ports of your computer. 2. Copy the key file to the USB memory key. 3. Disconnect the USB key from the computer and connect it to your unit. 4. From Compact ToolBox, select the Utilities tab, then double-tap Options Activation. FTB-200 v2… -
Page 51
Getting Started with Your Unit Activating Software Options 5. In the Module Options tab, use the Browse button to locate the key file that you want to use. 6. Press Activate. The option indicator will turn into a green check mark to confirm that the option is now active. -
Page 52: Starting Module Applications
It will turn blue to indicate that it is highlighted. Selected module Modules inserted in the platform Applications specific to selected module 2. Under Applications, select an application, then press Start. To start the Power Meter or Probe application: From Main Menu, press Power Meter or Probe. FTB-200 v2…
-
Page 53: Setting Up Your Unit
Setting Up Your Unit Adjusting Brightness To fit your work environment, you may adjust the LCD brightness. Values are kept in memory even when you turn the unit off. Note: These settings do not apply to a fiber inspection probe display. To adjust the display brightness: Press the key repeatedly to switch between brightness levels.
-
Page 54: Adjusting Microphone And Speaker Volume
To fit your work environment, you may adjust the microphone and speaker volume. Values are kept in memory even when you turn the unit off. To adjust the microphone volume: 1. From the Main Menu, tap Setup. 2. Double-tap Sounds and Audio Devices. 3. Select the Voice tab. FTB-200 v2…
-
Page 55
Setting Up Your Unit Adjusting Microphone and Speaker Volume 4. Under Voice recording, tap Volume. 5. Under Microphone, use the slider to adjust the sound of your microphone. Close the window when your settings are complete. 6. Tap OK to return to the Control Panel window. Compact Modular Platform… -
Page 56
Setting Up Your Unit Adjusting Microphone and Speaker Volume To adjust the speaker volume: 1. From the Main Menu, tap Setup. 2. Double-tap Sounds and Audio Devices. 3. Select the Volume tab. FTB-200 v2… -
Page 57
Setting Up Your Unit Adjusting Microphone and Speaker Volume 4. Under Device volume, use the slider to adjust the sound of your speaker. Note: You can also select the Mute check box if you want to quickly turn off the sound. -
Page 58: Recalibrating The Touchscreen
The parameters are taken into account only when the process is complete. To recalibrate the touchscreen with a 4-point calibration: 1. From the Main Menu, tap Setup, then double-tap Touch Screen Calibration. 2. Tap Calibrate. FTB-200 v2…
-
Page 59
Setting Up Your Unit Recalibrating the Touchscreen 3. Using the stylus (or any blunt pointing device), simply press the center of the different targets that appear on the screen. Keep pressing until the application displays OK to indicate that the new parameters have been taken into account. -
Page 60
Setting Up Your Unit Recalibrating the Touchscreen To recalibrate the touchscreen with a 25-point linearization: 1. From the Main Menu, tap Setup, then double-tap Touch Screen Calibration. 2. Tap Advanced. 3. Select the Tools tab. 4. Tap Linearization. FTB-200 v2… -
Page 61
Setting Up Your Unit Recalibrating the Touchscreen 5. Using the stylus (or any blunt pointing device), simply press the center of the different targets that appear on the screen. Keep pressing until the application displays OK to indicate that the new parameters have been taken into account. -
Page 62: Enabling Or Disabling The Touchscreen Right-Click Feature
Touchscreen on page 27). However, you can disable this feature if you prefer. To enable or disable the right-click of the touchscreen: 1. From the Main Menu, tap Setup. 2. Double-tap Touch Screen Calibration. 3. Tap Advanced. FTB-200 v2…
-
Page 63
Setting Up Your Unit Enabling or Disabling the Touchscreen Right-Click Feature 4. Select the Setting tab. 5. Tap the Option button. Compact Modular Platform… -
Page 64
Clear the check box if you prefer to disable the right-click. 7. Tap Apply to confirm the changes, and then OK to return to the Control Panel window. 8. Tap OK once again to close the touchscreen parameters window. 9. Tap to close the Touchscreen Calibration window. FTB-200 v2… -
Page 65: Customizing The On-Screen Keyboard
Setting Up Your Unit Customizing the On-Screen Keyboard Customizing the On-Screen Keyboard You can customize the appearance and behavior of the on-screen keyboard. For more information on the various parameters that you can set, refer to the on-screen keyboard online help. For information on how to switch from one of the available languages to another, see Selecting the Language of Operation on page 68.
-
Page 66: Enabling Or Disabling The Automatic Logon
If you want to modify the account used for the automatic logon, you will also have to disable the feature first, and then enable it again for the new account. To enable (or modify) the automatic logon: 1. From the Main Menu, tap Setup. 2. Double-tap AutoLogon. FTB-200 v2…
-
Page 67
Setting Up Your Unit Enabling or Disabling the Automatic Logon 3. Enter the desired user name (account) and the corresponding password. MPORTANT You cannot create user accounts or modify passwords from the Automatic Logon window. The user name and password that you specify must correspond to those of an account that has been defined from User Accounts in Control Panel. -
Page 68
2. Double-tap AutoLogon. 3. Tap Disable Auto Logon. 4. When the application prompts you, confirm with Yes. 5. Tap to return to the Control Panel window. At next startup, you will have to specify the user name and password. FTB-200 v2… -
Page 69: Configuring The Shortcut Buttons
Setting Up Your Unit Configuring the Shortcut Buttons Configuring the Shortcut Buttons You can start a particular application directly by pressing one of the shortcut buttons. You can determine which application each of these shortcut buttons will start. There are two shortcut buttons: one to start an application related to the module in slot 0 or the …
-
Page 70
1. From the Main Menu, tap Setup. 2. Double-tap Application Startup. 3. Under Shortcut buttons, associate the application to each button. 4. Tap Apply to confirm the changes, and then OK to return to the Control Panel window. FTB-200 v2… -
Page 71: Selecting The Startup Application
Setting Up Your Unit Selecting the Startup Application Selecting the Startup Application The first time you start your unit, Compact Toolbox is displayed. However, you can configure your unit to automatically start in any of the available applications. The selected application or applications will start automatically the next time you turn on your unit after a shutdown (not in standby mode).
-
Page 72
Note: The Power Meter application is only available if you purchased this option with your unit. 4. Tap Apply to confirm the changes, and then OK to return to the Control Panel window. FTB-200 v2… -
Page 73: Selecting The Fip Startup Application
Setting Up Your Unit Selecting the FIP Startup Application Selecting the FIP Startup Application Your unit supports both the fiber inspection probes (FIP) of the FIP-400 and FIP-400B series. By default, the unit prompts you to select the application corresponding to the FIP with which you want to work (FIP-400 or FIP-400B).
-
Page 74
If you also wish to work with probes of the FIP-400B series, you will need to install the most recent ConnectorMax kit. 4. Tap Apply to confirm the changes, and then OK to return to the Control Panel window. FTB-200 v2… -
Page 75: Configuring Network Printers
Setting Up Your Unit Configuring Network Printers Configuring Network Printers To print documents and images on a network printer, you must configure the printer first.You must know the IP address of the network printer that you want to configure (contact your network administrator). MPORTANT Your unit does not support USB printers.
-
Page 76
3. Select the HP Universal Printing PCL 6 item. 4. From the menu, select File > Printing Preferences. 5. Under Find a Printer, select Enter a Printer Address. 6. Enter the IP address of the printer that you want to configure, and then tap OK. FTB-200 v2… -
Page 77
Setting Up Your Unit Configuring Network Printers 7. Select the Add this printer to my Printers and Faxes folder check box. 8. Tap OK to confirm. The operation can take several minutes to complete. 9. When the application prompts you, click OK to acknowledge the message. -
Page 78: Selecting The Language Of Operation
The keyboards that you add will not be available from the logon window. To avoid problems, when you define or modify passwords, EXFO recommends that you always use the keyboard corresponding to the language of the unit at time of purchase. Otherwise, you might not be able to log on to your user account (unsupported characters, different keyboard layout, etc.)
-
Page 79
Setting Up Your Unit Selecting the Language of Operation To select a new interface language: 1. From the Main Menu, tap Setup. 2. Double-tap Regional and Language Options. 3. Select the Languages tab. 4. From the Language used in menus and dialogs list, select the desired language. -
Page 80
Setting Up Your Unit Selecting the Language of Operation To add new input languages: 1. From the Main Menu, tap Setup. 2. Double-tap Regional and Language Options. 3. Select the Languages tab. 4. Under Text services and input languages, tap Details. FTB-200 v2… -
Page 81
Setting Up Your Unit Selecting the Language of Operation 5. Under Installed services, tap Add. 6. From the Input language list, select the desired language. 7. If necessary, from the Keyboard layout/IME list, select the desired option. 8. Tap OK to confirm. 9. -
Page 82
Windows, but you can select any other language. 5. Tap Save to confirm and close the application. Note: This operation has no impact on the date and time formats in Windows Embedded Standard and in the Compact Toolbox applications. FTB-200 v2… -
Page 83: Setting Date And Time Formats
Setting Up Your Unit Setting Date and Time Formats Setting Date and Time Formats The current date and time are displayed at the bottom of the Main Menu. You can modify the format in which the date and time are displayed. For information on how to adjust the date, the time, and the time zone, see Adjusting the Date, Time and Time Zone on page 75.
-
Page 84
5b. Select either the Time or Date tab, depending on the settings that you want to modify. 6. Modify the settings. 7. Tap Apply to confirm the changes, and then OK to return to the Control Panel window. FTB-200 v2… -
Page 85: Adjusting The Date, Time And Time Zone
Setting Up Your Unit Adjusting the Date, Time and Time Zone Adjusting the Date, Time and Time Zone Note: Only administrator-level users can adjust the date, time and time zone. The current date and time are displayed at the bottom of the Main Menu. When saving results, the unit also saves the corresponding date and time.
-
Page 86
1. From the Main Menu, tap Setup. 2. Double-tap Date and Time. 3. Select the Date & Time tab. 4. Modify the settings according to your needs. 5. Tap Apply to confirm the changes, and then OK to return to the Control Panel window. FTB-200 v2… -
Page 87
Setting Up Your Unit Adjusting the Date, Time and Time Zone To change the time zone: 1. From the Main Menu, tap Setup. 2. Double-tap Date and Time. 3. Select the Time Zone tab. 4. Modify the settings according to your needs. 5. -
Page 88: Configuring The Power Management Options
The values that you set are kept in memory even when you turn the unit off. Note: When the backlight is turned off, the unit operation is not interrupted. Press any key or touch anywhere on the screen to return to normal operation. FTB-200 v2…
-
Page 89
Setting Up Your Unit Configuring the Power Management Options The table below indicates the default values that are included in each of the predefined power schemes. When AC is Running on Power Scheme Action connected batteries Standard Turn off monitor Never After 5 minutes (selected by… -
Page 90
1. From the Main Menu, tap Setup. 2. Double-tap Power Options. 3. From the Power Schemes list, select the desired predefined set of parameters. 4. Tap Apply to confirm the changes, and then OK to return to the Control Panel window. FTB-200 v2… -
Page 91
Setting Up Your Unit Configuring the Power Management Options To modify a power scheme: 1. From the Main Menu, tap Setup. 2. Double-tap Power Options. 3. From the Power Schemes list, select the predefined set of parameters that you want to modify or on which you want to base your new scheme. -
Page 92: Configuring The Internet Options
4. Modify the settings using the information provided by your network administrator. 5. Tap OK to return to the Control Panel window. Setting Other Parameters You can also configure other parameters via the Control Panel window. Refer to Microsoft Windows Embedded Standard documentation for details. FTB-200 v2…
-
Page 93: Working With Your Unit
If you need more flexibility and a greater choice of report types, you can also transfer result files to a computer onto which applications such as EXFO FastReporter 2 are installed. Note: Some applications may not offer print functions. Compact Modular Platform…
-
Page 94
2b. Tap Browse to locate the file that you want to open. 2c. Tap Open to load the file in Internet Explorer. 2d. Tap OK to confirm. 3. From the menu, select File > Print. 4. From the General tab, select the desired printer (PDFCreator by default). FTB-200 v2… -
Page 95
Working with Your Unit Printing Documents 5. If necessary, tap Preferences to adjust the parameters to your needs. Note: If you selected a network printer, you can save the whole set of preferences for future use with the Save As button or simply press the unit’s knob to save the parameters for the current work session. -
Page 96: Viewing Pdf Files
4. The file opens automatically in the SumatraPDF application. Note: You can access the online help directly from the Help menu of the SumatraPDF application. You will need a connection to the Internet to view the online help. FTB-200 v2…
-
Page 97: Taking Screen Captures
Working with Your Unit Taking Screen Captures Taking Screen Captures You can take captures of what is displayed on your screen, directly from your unit. This could be useful for troubleshooting when you need another person to have a look at a specific configuration or problem. You could also use this tool for training purposes.
-
Page 98
(the screen capture button is part of a floating toolbar that remains available until you close it). By default, this toolbar is located in the lower-right corner of the screen. However, you can move it to a location that better suits your needs. FTB-200 v2… -
Page 99
Working with Your Unit Taking Screen Captures To take only one screen capture: 1. From the unit’s keypad, press the button. 2. Tap the button. The screen capture is automatically taken (a sound and visual effect typical of a camera taking a picture indicate that the capture is complete). Note: If a keyboard is connected to your unit, you can also press the PRINT SCREEN key. -
Page 100: Setting Storage Parameters For Screen Captures
Similarly, if you have defined a destination folder on a USB key and this key is not connected to your unit when you take screen captures, the latter will be sent to the default folder. FTB-200 v2…
-
Page 101
Working with Your Unit Setting Storage Parameters for Screen Captures To set the default image format: 1. Minimize the Compact Toolbox window. 2. From the Windows taskbar, double-tap the icon. 3. Under Image format, select the option corresponding to the desired format. -
Page 102
Working with Your Unit Setting Storage Parameters for Screen Captures To modify the destination folder: 1. Minimize the Compact Toolbox window. 2. From the Windows taskbar, double-tap the icon. 3. Under Destination folder, tap Browse. FTB-200 v2… -
Page 103
Working with Your Unit Setting Storage Parameters for Screen Captures 4. From the Browse for Folder window, select the folder that you want to use to store the screen captures. If necessary, you can create a folder. 5. When your selection is made, tap OK. 6. -
Page 104: Reading Audio And Video Files
For more information on how to configure the language of the media player, see Selecting the Language of Operation on page 68. For more information on how to use the video player, refer to the VideoLAN online help. FTB-200 v2…
-
Page 105
Working with Your Unit Reading Audio and Video Files To read video or audio files: 1. From Compact Toolbox, select File Manager. 2. Locate the video or audio file that you want to read. 3. Double-tap the file. The media player starts reading automatically if the file format is recognized. -
Page 106: Installing Adobe Flash Player On Your Unit
Flash format. MPORTANT EXFO does not provide licenses for Adobe Flash Player. Contact Adobe to purchase a license that will entitle you to install Flash Player on your unit.
-
Page 107
Working with Your Unit Installing Adobe Flash Player on Your Unit MPORTANT Ensure to download the latest installation package for the 32-bit version of Flash Player for Windows (operating system), and Internet Explorer (browser). You should retrieve the EXE installer component. -
Page 108: Browsing The Web
Internet using a 3G USB modem key, see Accessing the Internet with a 3G USB Modem Key on page 100. To browse the Web: 1. Open a Web browser as follows: 1a. From Compact Toolbox, select the Utilities tab. 1b. Double-tap the Internet Explorer icon to open the browser. FTB-200 v2…
-
Page 109
Working with Your Unit Browsing the Web 2. Enter the desired Web address in the address bar and tap the button (located at the right of the address bar) to start browsing. 3. Close the window to return to the Utilities tab. Simply close the Control Panel window to return to Compact Toolbox. -
Page 110: Accessing The Internet With A 3G Usb Modem Key
Purchase a compatible and unlocked SIM card from a provider offering 3G services. If you need more information on the 3G coverage in your area, contact your regional EXFO sales representative. Have the card activated (you must subscribe to a package of mobile …
-
Page 111
2b. Log on to your My EXFO account. 2c. Under FTB-200 v2 Compact Modular Platform, find the System Upgrade and Platform kits. If you need information on how to download the kits, refer to the Readme files provided with the kits. -
Page 112
2. If necessary, insert the SIM card into the USB modem key. For more information, refer to the documentation that came with your modem key. 3. Connect the USB modem key to one of the USB ports of your unit. The installation of the AirCard Watcher application will start automatically. FTB-200 v2… -
Page 113
Working with Your Unit Accessing the Internet with a 3G USB Modem Key 4. Follow the on-screen instructions. You will know that the installation is complete when the AirCard Watcher application starts. 5. Close the AirCard Watcher application. 6. Disconnect the USB modem key from your unit. 7. -
Page 114
3. If necessary, connect the USB modem key to one of the USB ports of your unit. 4. From the Windows desktop, double-tap the AirCard Watcher icon to start the application. FTB-200 v2… -
Page 115
Working with Your Unit Accessing the Internet with a 3G USB Modem Key 5. Once the AirCard Watcher application starts, tap Connect to establish a connection with the mobile network. As soon as the connection is established, you are ready to browse the Web. -
Page 116: Retrieving The Gps Location Of Your Unit
URL link to a Web browser to locate your unit on a map. MPORTANT Only the Canmore GT-730F(L) keys provided by EXFO are supported on your unit. Before using the GPS USB key for the first time, you must install …
-
Page 117
2b. Log on to your My EXFO account. 2c. Under FTB-200 v2 Compact Modular Platform, find the System Upgrade and Platform kits. If you need information on how to download the kits, refer to the Readme files provided with the kits. -
Page 118
To retrieve the GPS location of your unit: 1. Go outdoors with your unit. 2. If necessary, turn on your unit and wait for the startup sequence to complete. 3. Ensure that the GPS USB key is connected to your unit. FTB-200 v2… -
Page 119
Working with Your Unit Retrieving the GPS Location of Your Unit 4. From Compact Toolbox, select the Utilities tab, then double-tap GPS Coordinates Viewer. The GPS coordinates are displayed. Status of the connection Note: If you see “GPS not detected” at the bottom of the GPS Coordinates window, this means that the GPS key is not connected to your unit. -
Page 120: Using The Calculator
You can also purchase advanced software tools if you need more flexibility and possibilities. Online help is available from these applications to guide you. To access tools: 1. From Compact Toolbox, select the Test Tools tab. 2. Double-tap the icon corresponding to the tool that you want to use. FTB-200 v2…
-
Page 121: Using The Optional Built-In Power Meter And Vfl
(dB). The power meter can detect modulated signals (1 kHz, 2 kHz, and 270 Hz). The FTB-200 v2 can also include a visual fault locator (VFL) to inspect or identify fibers. For more information on how to use the power meter or the VFL, refer to the power meter online help.
-
Page 122
To access the built-in power meter or the VFL: From the Main Menu, tap Power Meter. Note: You can access the online help of the power meter and the VFL by tapping button from the power meter application. FTB-200 v2… -
Page 123: Inspecting Fibers With A Probe
Inspecting Fibers with a Probe The fiber inspection probe (FIP) is used to find dirty or damaged connectors by displaying an enlarged view of the connector surface. You can connect a probe to your unit to view fiber ends. Your unit supports both the probes of the FIP-400 and FIP-400B series. Fiber inspections are made using the ConnectorMax (FIP-400) or the ConnectorMax2 (FIP-400B) application, depending on the probe that you use.
-
Page 124
FIP-400 series. If you also wish to be able to work with probes of the FIP-400B series, you will need to install the most recent ConnectorMax kit. Note: You can access the online help by tapping the button from the ConnectorMax or ConnectorMax2 application. FTB-200 v2… -
Page 125: Managing Data
Managing Data You can copy, move, rename, delete files and folders directly on your unit. You can transfer files from your unit to a USB memory key or a computer. You can also transfer data from a storage device or a computer to your unit. Your unit is equipped with the following ports and devices for data transfer: Three USB 2.0 ports to connect a memory key or a USB to RS-232 …
-
Page 126
The free disk space is displayed next to the Available Flash on “D: (APP)” item. 3. When you have finished, tap OK to close System Information. To manage files or folders on your unit only: From Main Menu, select File Manager. FTB-200 v2… -
Page 127
Managing Data To transfer files or folders between your unit and a USB memory key: 1. Connect the USB memory key to the USB port. 2. From Main Menu, select File Manager. The list of available drives and folders should include the memory key (Removable Disk). -
Page 128: Transferring Data Via Bluetooth
Some devices only allow data transfer between devices of the same make. In this case, you will need to use another type of device or a standard computer to transfer data from your FTB-200 v2 unit. Your unit must be located within a 9-meter area from your computer (limitation of the Bluetooth technology).
-
Page 129
Managing Data Transferring Data via Bluetooth MPORTANT Depending on the operating system that your computer is running, it is possible that only data transfer secured with a passkey be allowed. Since your unit cannot receive data secured with passkeys, in such a case, data transfer would only be possible from your unit to the computer. -
Page 130
1b. Double-tap Bluetooth Devices. 1c. From the Options tab, under Discovery, select the Turn discovery on check box. 1d. Ensure that the Allow Bluetooth devices to connect to this computer check box is selected. 1e. Tap OK to confirm. FTB-200 v2… -
Page 131
Managing Data Transferring Data via Bluetooth 2. Configure the computer as follows: 2a. On the computer, from Control Panel, double-click Bluetooth Devices. 2b. From the Options tab, under Discovery, select the Turn discovery on check box. 2c. Ensure that the Allow Bluetooth devices to connect to this computer check box is selected. -
Page 132
Managing Data Transferring Data via Bluetooth 5. Double-tap Bluetooth File Transfer Wizard. 6. From the Welcome window, tap Next. 7. Select Send a file and tap Next. FTB-200 v2… -
Page 133
Managing Data Transferring Data via Bluetooth 8. Select the computer to which you want to transfer data as follows: 8a. Tap Browse. 8b. Select the desired computer, and then tap OK to confirm. Compact Modular Platform… -
Page 134
9. If you want to use a passkey, select the corresponding check box and enter the passkey. When you have finished, tap Next. 10. Tap Browse to select the file that you want to send to the computer. 11. Select the file, tap Open to confirm, and then Next. FTB-200 v2… -
Page 135
Managing Data Transferring Data via Bluetooth 12. On the computer, when the application prompts you, allow the connection and enter the passkey if necessary. Note: Once you have established a secured connection using a passkey, this passkey is kept in memory both on your unit and on the computer until you remove this connection (Setup >… -
Page 136: Connecting To A Wireless Network
If you are not sure on how to proceed, contact your network administrator. 2. If it is not already done, configure the firewall as follows: 2a. From Main Menu, tap Setup. 2b. Double-tap Windows Firewall. 2c. Select the Exceptions tab. FTB-200 v2…
-
Page 137
Managing Data Connecting to a Wireless Network 2d. Ensure that the File and Printer Sharing item is selected. 2e. Tap OK to confirm. 3. On your unit, from Compact ToolBox, select the Utilities tab. 4. Double-tap WiFi Connect. 5. Tap OK to acknowledge the message on how to display the list of wireless networks. -
Page 138
Managing Data Connecting to a Wireless Network 6. Double-tap Wireless Network Connection. 7. If your unit is already connected to a wireless network, tap View Wireless Networks to display the list of wireless networks. FTB-200 v2… -
Page 139
Managing Data Connecting to a Wireless Network 8. From the Wireless Network Connection window, select the wireless network to which you want to connect. 9. Tap Connect. Compact Modular Platform… -
Page 140
As soon as the connection is established, you can start working with the selected wireless network. When you have finished, from the Wireless Network Connection window, tap Disconnect to stop communication with the wireless network. FTB-200 v2… -
Page 141: Using The Usb To Rs-232 Adapter
RS-232 (serial) ports, you have to use a USB/RS-232 adapter. MPORTANT Only the USB/RS-232 adapters sold by EXFO are supported. Once the adapter has been detected, the unit assigns it a COM port number (values begin at COM 3). This COM port number is kept in memory even when you turn the unit off.
-
Page 142
USB/RS-232 adapter FTB-200 v2 Note: If the device that you want to use is a computer (not equipped with USB ports) you may want to use a null-modem serial cable as an “extension cable” between the device and the USB/RS-232 adapter. -
Page 143
Managing Data Using the USB to RS-232 Adapter 3. From your unit, retrieve the COM port of the adapter as follows: 3a. On your unit, from the Main Menu, select Setup. 3b. Double-tap Device Manager. 3c. Expand the Ports (COM & LPT) list to retrieve the COM port number that has been assigned to the adapter and write it down. -
Page 144
Managing Data Using the USB to RS-232 Adapter 4. From your unit, configure the communication parameters as follows: 4a. On your unit, from Compact ToolBox, select the Utilities tab, then double-tap PuTTY. FTB-200 v2… -
Page 145
Managing Data Using the USB to RS-232 Adapter 4b. Configure the parameters. Tree view From the tree view, select Connection > Serial and set the parameters as needed. Ensure that the COM port that you specify corresponds to the one that you wrote down at step 3c. If you want to view the characters that you type on screen, from the … -
Page 146
Note: The COM port number that you set on your device will probably differ from the one that you used on your unit. 6. From the device, establish communication with the unit using your favorite communication tool (PuTTY, HyperTerminal, etc.). FTB-200 v2… -
Page 147: Enabling Or Disabling The Bluetooth And Wi-Fi Devices
Managing Data Enabling or Disabling the Bluetooth and Wi-Fi Devices Enabling or Disabling the Bluetooth and Wi-Fi Devices By default, both the Wi-Fi and Bluetooth devices are enabled on units that are equipped with the corresponding options. If you do not intend to transfer files via Bluetooth or to work with a wireless network for a certain period of time, you may wish to disable the devices to extend battery life.
-
Page 148
Managing Data Enabling or Disabling the Bluetooth and Wi-Fi Devices 3. Select Wireless Network Connection. 4. From the File menu, select Enable or Disable, according to your needs. FTB-200 v2… -
Page 149: Transferring Files With The Usb Data Mover Application
Managing Data Transferring Files with the USB Data Mover Application Transferring Files with the USB Data Mover Application With the USB Data Mover application, you can copy folders and files from your unit to a USB storage device quickly. You can retrieve files from the predefined source folders or specify your own folders.
-
Page 150
Note: The HOUR value will appear in a 24-hour format, regardless of your unit’s time settings. To transfer files with the USB Data Mover: 1. Connect a USB storage device to one of the USB ports. 2. From Compact Toolbox, select the Utilities tab. 3. Double-tap USB Data Mover. FTB-200 v2… -
Page 151
Managing Data Transferring Files with the USB Data Mover Application 4. Select or clear the check boxes to adjust the folder selection to your needs. 5. If necessary, under Destination media, select the desired USB storage device. 6. Tap Copy. The files will remain on your unit after the transfer. 7. -
Page 152
Managing Data Transferring Files with the USB Data Mover Application To manage the list of source folders: 1. From Compact Toolbox, select the Utilities tab. 2. Double-tap USB Data Mover. 3. Tap User Preferences. FTB-200 v2… -
Page 153
Managing Data Transferring Files with the USB Data Mover Application 4. If you want to add your own folders to the list of source folders, proceed as follows: 4a. Tap Add a Folder. 4b. Select the desired folder, and then tap OK. Compact Modular Platform… -
Page 154
Note: The application will not prompt you to confirm the removal of the folder from the list. 6. When you have finished, tap Close. Your changes are reflected automatically. All the newly added folders are selected by default. 7. Tap to exit the USB Data Mover application. FTB-200 v2… -
Page 155: Connecting To A Vpn From Your Unit
Managing Data Connecting to a VPN from Your Unit Connecting to a VPN from Your Unit Note: Only administrator-level users can install software under Windows Embedded Standard. However, when the installation is complete, all users will have the possibility to connect to a VPN from the unit. You can connect to a Virtual Private Network (VPN) from your unit if you install one of the supported VPN clients (applications).
-
Page 156
Managing Data Connecting to a VPN from Your Unit MPORTANT EXFO does not provide any VPN clients. You must provide the installation files for one of the supported VPN clients yourself. The complete list is available from the VPN Installer application. -
Page 157
Managing Data Connecting to a VPN from Your Unit 4. All the supported VPN clients appear on the Supported software and versions list. You can write down this list and contact your network administrator to get the installation files. 5. Tap Cancel to close the VPN Installer. You are ready to go to the procedure explaining how to install the VPN client on your unit. -
Page 158
VPN server will not update the client either. Otherwise, the VPN client may no longer work properly. MPORTANT EXFO does not recommend to install more than one VPN client on a single FTB-200 v2 unit. MPORTANT To avoid communication problems between the VPN client and the VPN server, ensure that the date set on your unit corresponds to the current date. -
Page 159
Managing Data Connecting to a VPN from Your Unit To install a VPN client on your unit: 1. If the date on your unit does not correspond to the current date, modify it (see Adjusting the Date, Time and Time Zone on page 75). 2. -
Page 160
5. From the VPN Installer first window, read the information. When you have finished, tap Continue. 6. From the Supported software and versions list, select the entry corresponding to the VPN client for which you have retrieved installation files at step 2. Tap Continue. FTB-200 v2… -
Page 161
Managing Data Connecting to a VPN from Your Unit 7. From the VPN Installer, select the corresponding setup file using the Browse button. MPORTANT To avoid installation problems, ensure that the installation files are available from the Windows desktop of your unit. Never use installation files directly from a USB key. -
Page 163: Accessing Your Unit Remotely
Accessing Your Unit Remotely You can access your unit remotely from a computer using either the Remote Desktop Connection or TightVNC Client applications. The table below presents the differences between the two applications. Remote Desktop Characteristic TightVNC Client Connection Type of connection Direct between the unit and Not exclusive;…
-
Page 164: Working With Remote Desktop
Enter the appropriate user name when Remote Desktop application prompts you. Usually, this user name must correspond to the user name of the person currently logged on the unit. Otherwise, you will disconnect the person that was already connected. FTB-200 v2…
-
Page 165
Accessing Your Unit Remotely Working with Remote Desktop To access your unit remotely with Remote Desktop: 1. Connect both the computer and your unit to the same network and make sure they can “see” each other as network restrictions might prevent them from communicating. -
Page 166
Allowing Users with Limited Accounts to Use Remote Desktop By default, only the accounts with administrator rights can use Remote Desktop. However, you can assign extra user rights to accounts with limited rights so that they can also use Remote Desktop. FTB-200 v2… -
Page 167
Accessing Your Unit Remotely Working with Remote Desktop To allow a user with limited accounts to use Remote Desktop: 1. On your unit, from the Main Menu, select Setup. 2. Double-tap Remote Desktop. 3. Ensure that Allow remote connections to this unit from computer using Remote Desktop client application is selected. -
Page 168
Desktop. However, all users having administrator user rights will be able to modify this setting at any time. To prevent users from connecting to the unit using Remote Desktop: 1. On your unit, from the Main Menu, select Setup. 2. Double-tap Remote Desktop. FTB-200 v2… -
Page 169
Accessing Your Unit Remotely Working with Remote Desktop 3. Select the Do not allow remote connections to this unit option. 4. Tap OK to confirm. Compact Modular Platform… -
Page 170
2. On the taskbar, click Start, then select Run. 3. If you want to restart your unit, in the Open box, enter Shutdown -r. If you want to turn off your unit, in the Open box, enter Shutdown -s. FTB-200 v2… -
Page 171: Working With Tightvnc
Accessing Your Unit Remotely Working With TightVNC Working With TightVNC The control of your unit with TightVNC requires the TightVNC Server (already installed on your unit) and the TightVNC Client Viewer (that you must install on your computer). The first time you start the TightVNC Server on your unit, the application will prompt you to define passwords.
-
Page 172
The TightVNC Server is already installed on your unit. You must configure passwords before establishing a connection between a computer and your unit. To configure the TightVNC Server: 1. From Compact Toolbox, select the Utilities tab, then double-tap Launch TightVNC Server. 2. Select the Server tab. FTB-200 v2… -
Page 173
Accessing Your Unit Remotely Working With TightVNC 3. In the Primary password and View-only password boxes, type the desired passwords. Note: The two passwords are independent of each other. They do not have to be identical. 4. Tap Apply, and then OK. Compact Modular Platform… -
Page 174
Computer If the TightVNC Viewer is not already installed on your computer, you can install it with the DVD that came with your FTB-200 v2. To install the TightVNC Viewer on your computer: 1. Insert the installation DVD into the CD/DVD drive of your computer. -
Page 175
Accessing Your Unit Remotely Working With TightVNC Connecting to Your Unit with TightVNC Once the TightVNC Viewer is installed on your computer, you are ready to access your unit remotely. To connect to your unit with TightVNC: 1. Connect both the computer and your unit to the same network and make sure they can “see”… -
Page 176
Launch TightVNC Server. 6. From your computer, double-click the TightVNC Viewer shortcut on your desktop. 7. In the VNC Server list, type the IP address of your unit that you wrote down at step 4. 8. Click Connect. FTB-200 v2… -
Page 177: Adding Exceptions To The Firewall
Accessing Your Unit Remotely Adding Exceptions to the Firewall Adding Exceptions to the Firewall Note: Only administrator-level users can add exceptions to the firewall. Your unit is protected by the Microsoft firewall to prevent unauthorized access when it is connected to a network or to the Internet. The firewall has been preconfigured so that all the applications that come with your unit work properly.
-
Page 178
3. Select the Exceptions tab. 4. Tap Add Program to add any application that you need. 5. When you have finished, tap OK (located at the bottom of the dialog box) to confirm the changes and return to the Control Panel window. FTB-200 v2… -
Page 179: 10 Testing Network Connections
10 Testing Network Connections Note: This function is available with the optional IPT software package only. The two most common basic tests widely used in networking are the ping test and the trace route test. With these tests, you can ensure that IP packets travel as expected from a local host to a remote host and vice versa.
-
Page 180
Testing Network Connections Performing a Ping Test To perform a ping test: 1. From Compact Toolbox, select the Test Tools tab, then double-tap IP Tools. 2. From IP Testing Tools, select the Ping tab. FTB-200 v2… -
Page 181
Testing Network Connections Performing a Ping Test 3. Enter a URL or an IP address to reach. You can tap the Default button to use the unit’s default ping address. The default value cannot be configured. 4. Set the other parameters: Number of packets to send … -
Page 182: Performing A Trace Route Test
host (TTL). Choose whether to resolve DNS for the IP address or not. When the test is complete, you can export the results. You can later import the generated text file (tab-delimited) directly into Microsoft Excel. FTB-200 v2…
-
Page 183
Testing Network Connections Performing a Trace Route Test To perform a trace route test: 1. From IP Testing Tools, select the Trace Route tab. 2. Enter an URL or an IP address to reach. You can tap the Default button to use the unit’s default trace route address. -
Page 184: Exporting The Results
Example: For a ping test at www.yoursite.org made on January 3 , 2010, the suggested filename would be: Ping for www.yoursite.org on 2010_01_03.txt To export results: Tap the Export button. If necessary, modify the suggested file name. FTB-200 v2…
-
Page 185: 11 Maintenance
11 Maintenance To help ensure long, trouble-free operation: Always inspect fiber-optic connectors before using them and clean them if necessary. Keep the unit free of dust. Clean the unit casing and front panel with a cloth slightly dampened …
-
Page 186: Cleaning Detector Ports
4. While applying light pressure (to avoid breaking the detector window), gently rotate the cleaning tip on the detector window. 5. Repeat step 4 with a dry cleaning tip or blow dry with compressed air. 6. Discard the cleaning tips after one use. FTB-200 v2…
-
Page 187: Cleaning The Touchscreen Of Your Ftb-200 V2 Unit
Maintenance Cleaning the Touchscreen of Your FTB-200 v2 Unit Cleaning the Touchscreen of Your FTB-200 v2 Unit Clean the touchscreen with a soft, non-abrasive cloth, such as one used for cleaning reading glasses, dampened with water. AUTION Using anything else than water can damage the special coating of the touchscreen.
-
Page 188
A complete calibration cycle will be necessary (see Recalibrating the Battery on page 179). To recharge the main battery: Connect the unit to a power outlet using the AC adapter/charger. The charge cycle will start and end automatically. FTB-200 v2… -
Page 189: Recalibrating The Battery
MPORTANT When the estimate offset value (displayed in the battery calibration application) is of 10 % or more, EXFO recommends that you recalibrate the battery. You can perform a recalibration with the battery calibration utility: The utility will charge the battery until it is full.
-
Page 190
Maintenance Recalibrating the Battery To recalibrate the batteries: 1. From the Main Menu, select Setup, and then double-tap Battery Calibration. 2. Connect the AC adapter/charger to your unit. FTB-200 v2… -
Page 191
Maintenance Recalibrating the Battery 3. Tap the Start Calibration button (the Stop Calibration button will become available). Once calibration is complete, the Start Calibration button becomes available again. Compact Modular Platform… -
Page 192: Replacing Batteries
Do not throw batteries into fire or water and do not short-circuit the battery’s electrical contacts. Do not disassemble. To replace the main battery: 1. If you do not have a replacement battery, contact EXFO to purchase a new one. 2. Turn off the unit.
-
Page 193: Recalibrating The Unit
Under normal use, the recommended interval for your FTB-200 v2 Compact Modular Platform is: one year. For newly delivered units, EXFO has determined that the storage of this product for up to six months between calibration and shipment does not affect its performance (EXFO Policy PL-03).
-
Page 194: Recycling And Disposal (Applies To European Union Only)
To ensure that your unit conforms to the published specifications, calibration may be carried out at an EXFO service center or, depending on the product, at one of EXFO’s certified service centers. Calibrations at EXFO are performed using standards traceable to national metrology institutes.
-
Page 195: 12 Troubleshooting
12 Troubleshooting Solving Common Problems Problem Cause Solution Unit does not turn on. Battery is discharged. Charge the battery. Replace the battery with a fully charged one. Connect the unit to an external power supply using the AC adapter/charger.
-
Page 196
Ensure that the latest version for your application has not module’s application is available on been installed yet on your unit (see the Installing or your unit or the Upgrading the Applications section). module’s application is not up-to-date. FTB-200 v2… -
Page 197
Troubleshooting Solving Common Problems Problem Cause Solution One of the applications Press and hold it down until the is not responding. shutdown menu appears, then select Turn off. Turn the unit on again to reset it. Impossible to calibrate Screen calibration is Press and hold it down until … -
Page 198
To do so, see the Restoring Your Unit to Normal Operation section. If you were trying to install a VPN client, restart your unit and start a new installation. If the problem persists, restore your unit. FTB-200 v2… -
Page 199
Internet. documentation that came with your modem key. The FTB-200 v2 Ensure that the latest System Upgrade unit is not up to and Platform kits are installed on your date. -
Page 200
Restore your unit. To do so, see the updated accidentally. Restoring Your Unit to Normal Operation section. A complete battery calibration cycle consists of a full charge, immediately followed by a full discharge, then followed by a full charge. FTB-200 v2… -
Page 201: Restoring Your Unit To Normal Operation
Troubleshooting Restoring Your Unit to Normal Operation Restoring Your Unit to Normal Operation Your FTB-200 v2 is set to start using the standard Windows startup sequence. However, you can also use the emergency system tools feature if you need to: check the disk integrity …
-
Page 202
Press the knob to select an item (equivalent of the ENTER key). To restore the system partition: 1. Turn on the FTB-200 v2. 2. While the system is displaying the boot menu (3 seconds), press from the unit’s keypad to select the Maintenance and recovery mode. -
Page 203
Troubleshooting Restoring Your Unit to Normal Operation 4. From the main window, select Restore system partition from an image, then tap Next. 5. If you want to revert your unit to its initial state (most cases), select Factory recovery image. If you prefer to use an image file (provided by customer service, for example), select .wim file and use the Browse button to locate the file. -
Page 204
Troubleshooting Restoring Your Unit to Normal Operation 6. Tap Next to proceed to the next step. 7. Tap Next to start the restoration process. The unit will restart upon completion of the process. FTB-200 v2… -
Page 205
Restoring Your Unit to Normal Operation To retrieve data from the D drive: 1. Turn on the FTB-200 v2. 2. While the system is displaying the boot menu (3 seconds), press from the unit’s keypad to select the Maintenance and recovery mode. -
Page 206
A shaded check box indicates that not all of the files of subfolders are selected. 6. If the USB device you want to use is not connected to the unit, connect it now so that the system can find it. Tap Next. FTB-200 v2… -
Page 207
Troubleshooting Restoring Your Unit to Normal Operation 7. Select the USB device onto which you want to save the data from the list of available devices. Note: If you have forgotten to connect the USB device at this point and that it does not show up in the list, tap Back, connect the device, then tap Next to return to this window. -
Page 208
Troubleshooting Restoring Your Unit to Normal Operation To verify disk integrity: 1. Turn on the FTB-200 v2. 2. While the system is displaying the boot menu (3 seconds), press from the unit’s keypad to select the Maintenance and recovery mode. -
Page 209
Troubleshooting Restoring Your Unit to Normal Operation 5. Tap Next to start the disk analysis. Once the analysis is complete, you can view a report on each drive by tapping Details. 6. Tap OK once you have finished. 7. To exit the integrity analysis tool, tap Cancel to return to the main window. -
Page 210: Contacting The Technical Support Group
Contacting the Technical Support Group To obtain after-sales service or technical support for this product, contact EXFO at one of the following numbers. The Technical Support Group is available to take your calls from Monday to Friday, 8:00 a.m. to 7:00 p.m.
-
Page 211: 13 Warranty
13 Warranty General Information EXFO Inc. (EXFO) warrants this equipment against defects in material and workmanship for a period of one year from the date of original shipment. EXFO also warrants that this equipment will meet applicable specifications under normal use.
-
Page 212: Liability
Liability Liability EXFO shall not be liable for damages resulting from the use of the product, nor shall be responsible for any failure in the performance of other items to which the product is connected or the operation of any system of which the product may be a part.
-
Page 213: Service And Repairs
5. Return the equipment, prepaid, to the address given to you by support personnel. Be sure to write the RMA number on the shipping slip. EXFO will refuse and return any package that does not bear an RMA number.
-
Page 214: Exfo Service Centers Worldwide
Warranty EXFO Service Centers Worldwide EXFO Service Centers Worldwide If your product requires servicing, contact your nearest authorized service center. EXFO Headquarters Service Center 400 Godin Avenue 1 866 683-0155 (USA and Canada) Quebec (Quebec) G1M 2K2 Tel.: 1 418 683-5498…
-
Page 215: A Technical Specifications
MPORTANT The following technical specifications can change without notice. The information presented in this section is provided as a reference only. To obtain this product’s most recent technical specifications, visit the EXFO Web site at www.exfo.com. SPECIFICATIONS GENERAL SPECIFICATIONS Display Touchscreen, color, 640 x 480 TFT 163 mm (6.5 in)
-
Page 216
The selected model may change without notice. d. At 23 ºC ± 1 ºC, 1550 nm and FC connector. With modules in idle mode. Battery operated. e. Up to 5 dBm. f. For ±0.05 dB, from 18 ºC to 28 ºC. FTB-200 v2… -
Page 217: Index
Index Index cleaning detector ports ……..176 3G USB modem, using ……100 front panel……….. 175 touchscreen ……… 177 clock battery. see battery ……8 connecting to a VPN……..145 AC LED …………4 conventions, safety……..9 AC requirements ……… 16 coordinates, GPS ……..
-
Page 218
……13 predefined folders ……..139 laser safety LED ……….4 printing documents ……..83 LED panel description……..4 product localizing your unit……..106 identification label ……. 200 longitude and latitude ……106 specifications ……..205 FTB-200 v2… -
Page 219
174 ventilation ……….. 14 screenshots, taking ……..87 virtual private network (VPN)….. 145 service and repairs……..203 service centers ……….. 204 shipping to EXFO ……..203 warranty software certification………. 202 options ……….37 exclusions ……….202 options at startup……..61 general………. -
Page 220
CHINESE REGULATION ON RESTRICTION OF HAZARDOUS SUBSTANCES NAMES AND CONTENTS OF THE TOXIC OR HAZARDOUS SUBSTANCES OR ELEMENTS CONTAINED IN THIS EXFO PRODUCT EXFO Indicates that this toxic or hazardous substance contained in all of the homogeneous materials for this part is below the limit requirement in SJ/T11363-2006… -
Page 221
MARKING REQUIREMENTS Product Environmental protection use period (years) Logo This Exfo product EXFO Battery If applicable. -
Page 222
Tel.: 1 978 367-5600 · Fax: 1 978 367-5700 EXFO FINLAND Elektroniikkatie 2 FI-90590 Oulu, FINLAND Tel.: +358 (0) 403 010 300 · Fax: +358 (0) 8 564 5203 TOLL-FREE (USA and Canada) 1 800 663-3936 © 2014 EXFO Inc. All rights reserved. Printed in Canada (2014-01) …
Вы здесь
Каталог инструкций » E » EXFO » Измерительные приборы EXFO » EXFO FTB-200 v2 Compact Modular Platform » Страница инструкции 1
-

1
-
2
-
3
-
4
-
5
-
6
-
7
-
8
-
9
-
10
-
11
-
12
-
13
-
14
-
15
-
16
-
17
-
18
-
19
-
20
-
21
-
22
-
23
-
24
-
25
-
26
-
27
-
28
-
29
-
30
-
31
-
32
-
33
-
34
-
35
-
36
-
37
-
38
-
39
-
40
-
41
-
42
-
43
-
44
-
45
-
46
-
47
-
48
-
49
-
50


- 1
- 2
- 3
- ››
Распечатать
Страница 1 из
- << Предыдущая
- Следующая >>

Ftb-200 в инструкции по эксплуатации EXFO FTB-200 v2 Compact Modular Platform
Руководство пользователя
Компактная модульная платформа
FTB-200
- << Предыдущая
- Следующая >>
 03:02
03:02
Видео: рефлектометр EXFO FTB-200. Обзор возможностей
 15:02
15:02
EXFO FTB 500 7400 OTDR Set up
 03:00
03:00
Меняем название файла измерений в EXFO FTB-200 V.2
 33:45
33:45
EXFO FTB 3930 OLTS Setup
 00:49
00:49
EXFO FTB-200 SM Fiber OTDR FTB-7300D FTB-3930
 03:50
03:50
EXFO’S NetBlazer (tests up to 100G!)
 07:30
07:30
Teste de Otdr FTB 200
РУКОВОДСТВО
ПОЛЬЗОВАТЕЛЯ
MULTITEST
FTB-3930 для FTB-200
CЕТЕВОЕ ТЕСТИРОВАНИЕ

Optical Engineering Inc. Все права защищены. Запрещается вос…
Страница 2
- Изображение
- Текст
ii
FTB-3930
© 2004–2008 EXFO Electro-Optical Engineering Inc. Все права
защищены. Запрещается воспроизводить, сохранять в поисковой
системе или передавать в любой форме — электронными,
механическими или любыми другими средствами, например через
фотокопирование, запись или иным способом, — любую часть данной
публикации без письменного разрешения EXFO Electro-Optical
Engineering Inc. (EXFO)
Информация, предоставляемая EXFO, считается точной и надежной.
Однако EXFO не несет ответственности за использование данной
информации, а также за любые нарушения патентных или иных прав
третьих лиц, которые могут быть связаны с использованием данной
информации. В связи с патентными правами EXFO не
предоставляется, явно или косвенно, никакой лицензии.
Код EXFO для коммерческих и государственных организаций (CAGE)
под эгидой Организации Североатлантического договора (NATO):
0L8C3.
Информация, содержащаяся в данной публикации, может быть
изменена без предварительного уведомления.
Товарные знаки
Товарные знаки компании EXFO отмечены как таковые. Однако
присутствие или отсутствие таких отметок не влияет на правовой
статус любых товарных знаков.
Единицы измерения
Единицы измерения в данной публикации соответствуют стандартам и
правилам Международной системы единиц (СИ).
Патенты
Права
F
AS
T
ES
T защищены патентами США 5 305 078 и/или 5 455 672.
Универсальный интерфейс EXFO защищен патентом США 6 612 750.
Версия: 4.0.0

Содержание MultiTest iii Содержание Информация о сертификаци…
Страница 3
- Изображение
- Текст

Визуальное определение дефектов волокна ………………….
Страница 4
- Изображение
- Текст

Информация о сертификации, F.c.c. информация, Информация
Страница 5
- Изображение
- Текст
Информация о сертификации
MultiTest
v
Информация о сертификации
F.C.C. Информация
Электронное тестовое оборудование исключено из заявления о
соответствии Части 15 (правил FCC) в США. Однако проверочные
тесты на соответствие систематически проводятся для большей части
оборудования EXFO.
Информация
Электронное измерительное оборудование должно отвечать
требованиям директивы по электромагнитной совместимости (EMC) в
Европейском Союзе. В стандарте EN61326 описаны требования к
излучению и устойчивости к нему для лабораторного, измерительного и
контрольного оборудования. Это оборудование тщательно тестируется
в соответствии с директивой и стандартами Европейского Союза.

Информация о сертификации
vi
FTB-3930
Application of Council Directive(s):
73/23/EEC — The Low Voltage Directive
89/336/EEC — The EMC Directive
Manufacturer’s Name:
EXFO ELECTRO-OPTICAL ENGINEERING INC.
Manufacturer’s Address:
400 Godin Avenue
Quebec, Quebec
Canada G1M 2K2
(418) 683-0211
Equipment Type/Environment:
Industrial Scientific Equipment
Trade Name/Model No.:
FTB-3930 MultiTest Module
Standard(s) to which Conformity is Declared:
EN 60825-1: 1994/
A2: 2001
Safety of Laser Products-Part 1: Equipment Classification, Requirement, and
User’s guide
EN 61326: 1997/ A2:
2001
Electrical Equipment for Measurement, Control and Laboratory
Use — EMC Requirements
EN 55022: 1998/ A1:
2000
Limits and methods of measurement of radio disturbance characteristics of
information technology equipment
I, the undersigned, hereby declare that the equipment specified above conforms to the above Directive and Standards.
Manufacturer
Signature:
Full Name:
Stephen Bull, E. Eng
Position:
Vice-President Research and Development
Address:
400 Godin Avenue Quebec, Quebec, Canada
Date:
July 20, 2004
DECLARATION OF CONFORMITY

1 общие сведения о ftb-3930 multitest, Основные характеристики
Страница 7
- Изображение
- Текст
MultiTest
1
1
Общие сведения о FTB-3930
MultiTest
Модуль FTB-3930 MultiTest включает измеритель мощности и источники
излучения с измерителем оптических возвратных потерь, а также
дополнительный телефон и дефектоскоп.
Основные характеристики
Основное назначение модуля — это тестирование волокон с помощью
функции
F
AS
T
ES
T™, разработанной EXFO и позволяющей выполнять
измерения одним нажатием кнопки. В течение 10 секунд можно
одновременно протестировать вносимые потери и ORL на четырех
длинах волн в обоих направлениях. При выполнении этого теста тестер
также определяет длину волокна.
Измеритель мощности имеет следующие технические характеристики:
³
Детектор на основе Ge, GeX или InGaAs с 40 калиброванными
длинами волн для измерения абсолютной мощности или потерь в
линии связи
³
Настраиваемый список избранных длин волн для облегчения
доступа
³
Детектирование модулированного сигнала
³
Не требует обнуления в обычном режиме работы
Источник излучения имеет следующие технические характеристики:
³
Одномодовый порт (с двумя или тремя длинами волн), также
используемый для выполнения измерения
F
AS
T
ES
T и измерения
ORL.
и/или
Многомодовый порт (на две длины волны), также используемый
для выполнения
F
AS
T
ES
T
³
Модулируемый сигнал или сигнал высокой мощности,
совместимый с другими устройствами EXFO

Общие сведения о FTB-3930 MultiTest
2
FTB-3930
Основные характеристики
Другие сервисные функции:
³
Возможность обмена текстовыми сообщениями
³
Полнодуплексный цифровой телефон (дополнительный)
³
Дефектоскоп для обследования или идентификации волокон
(дополнительный)
Функции обработки результатов и анализа данных (также доступны в
виде приложения Optical Test Report Viewer):
³
Настраиваемые пороговые значения и анализ линии по критерию
Годен/Негоден
³
Настройка параметров пользователя и параметров идентификации
кабеля
³
Результаты
F
AS
T
ES
T, отображаемые в соответствии с практикой
использования и терминологией FTTx

Общие сведения о FTB-3930 MultiTest
MultiTest
3
Типичные области применения
Типичные области применения
Вы можете использовать MultiTest во многих областях, таких как:
³
Строительство и техническое обслуживание волоконных линий
³
FTTx: тестирование пассивных оптических сетей (PON)
³
Измерение абсолютной мощности и потерь в линиях связи
³
Двунаправленное измерение потерь и измерение потерь на
отражение (ORL)
³
Измерение длины волокна
³
Универсальный измерительный инструмент — удобный для
строителей и инсталляторов волоконных линий связи

Общие сведения о FTB-3930 MultiTest
4
FTB-3930
Условные обозначения
Условные обозначения
Перед использованием изделия, описанного в этом руководстве,
необходимо ознакомиться со условными обозначениями.
П
РЕДУПРЕЖДЕНИЕ
Данный знак указывает на потенциально опасные ситуации,
которые могут привести к смерти или серьезной травме. Не
продолжайте работу до тех пор, пока требуемые условия не
будут соблюдены.
О
СТОРОЖНО
Данный знак обозначает потенциально опасные ситуации,
которые могут привести к травме легкой или средней
тяжести. Не продолжайте работу до тех пор, пока требуемые
условия не будут соблюдены.
О
СТОРОЖНО
Данный знак обозначает потенциально опасные ситуации,
которые могут привести к повреждению оборудования. Не
продолжайте работу до тех пор, пока требуемые условия не
будут соблюдены.
В
АЖНО
Относится к важной информации об этом устройстве, с которой
следует ознакомиться.

Комментарии

Общие сведения о продуктах Компактная модульная платформа FTB-200
6
FTB-200
Устройство чтения карт и порты
Устройство чтения карт и порты
Устройство оборудовано считывателем карт (типа CompactFlash;
используется также для установки карты беспроводной связи Bluetooth)
и связными портами (для подключения видеомикроскопа, мыши,
внешней клавиатуры, концентратора сети и т.д.).
³
Устройство считывания карт расположено на левой панели
устройства.
³
Все четыре порта расположены на правой панели устройства:
³
8-контактный разъем для подключения видеомикроскопа.
³
Порт USB-хост (разъем типа A)
используется для
подключения съемных устройств памяти USB, внешней
клавиатуры, мыши и т.д.
³
USB-порт клиента (вторичный) (разъем типа B)
используется
для подключения USB-кабеля для передачи данных между
устройством и компьютером.
³
Порт RJ-45 для подключения устройства к сети Ethernet.
Чтобы скачать инструкцию введите решение кода с картинки и нажмите скачать. Сколько будет:
(скачивание инструкции бесплатно)
Формат файла: PDF
Доступность: Бесплатно как и все руководства на сайте. Без регистрации и SMS.
Дополнительно: Бесплатное скачивание инструкции