инструкцияFibaro The Heat Controller

THE HEAT
CONTROLLER
RADIATOR THERMOSTAT
Quick Manuals. Warranty Terms
Посмотреть инструкция для Fibaro The Heat Controller бесплатно. Руководство относится к категории термостаты, 1 человек(а) дали ему среднюю оценку 8.7. Руководство доступно на следующих языках: русский, английский. У вас есть вопрос о Fibaro The Heat Controller или вам нужна помощь? Задайте свой вопрос здесь

Главная
| Fibaro | |
| The Heat Controller | FGT-START | |
| термостат | |
| 5902701701079 | |
| русский, английский | |
| Руководство пользователя (PDF) |
Свойства
| Цвет товара | Белый |
| Сертификация | RoHS 2011/65/EU, RED 2014/53/EU |
| Единицы измерения | °C |
| Ручная регулировка температуры | Да |
| Функция мультизональности | Да |
| Функция планировщика | Да |
| Поддержка управления со смартфона | Да |
| Интерфейс | Z-Wave |
| Умный термостат | Да |
| Цвет товара | Белый |
| Точность | 0.5 °C |
| Функция мультизональности | Да |
| Функция планировщика | Да |
| Поддержка управления со смартфона | Да |
| Поддерживаемые мобильные операционные системы | Android, iOS |
| Умный термостат | Да |
Вес и размеры
| Ширина | 56 mm |
| Высота | 56 mm |
| Глубина | 74 mm |
| Ширина | 56 mm |
| Высота | 56 mm |
| Глубина | 74 mm |
Энергопитание
| Технология батареи | Литий-полимерная (LiPo) |
Условия эксплуатации
| Диапазон температур (T-T) | 10 — 30 °C |
| Точность | 0.5 °C |
Системные требования
| Поддерживаемые мобильные операционные системы | Android, iOS |
Сенсоры
| Датчик температуры | Да |
| Датчик активности ближнего поля | Да |
Содержимое упаковки
| Адаптер для котла в комплекте | Да |
показать больше
Не можете найти ответ на свой вопрос в руководстве? Вы можете найти ответ на свой вопрос ниже, в разделе часто задаваемых вопросов о Fibaro The Heat Controller.
Какие сертификаты Fibaro The Heat Controller имеет?
Где лучше всего разместить термостат?
Что такое зона нечувствительности термостата?
Какая идеальная комнатная температура?
Какая высота Fibaro The Heat Controller?
Какая ширина Fibaro The Heat Controller?
Какая толщина Fibaro The Heat Controller?
Инструкция Fibaro The Heat Controller доступно в русский?
Не нашли свой вопрос? Задайте свой вопрос здесь
Downloads
Manuals
Back To Top
Declarations
Back To Top
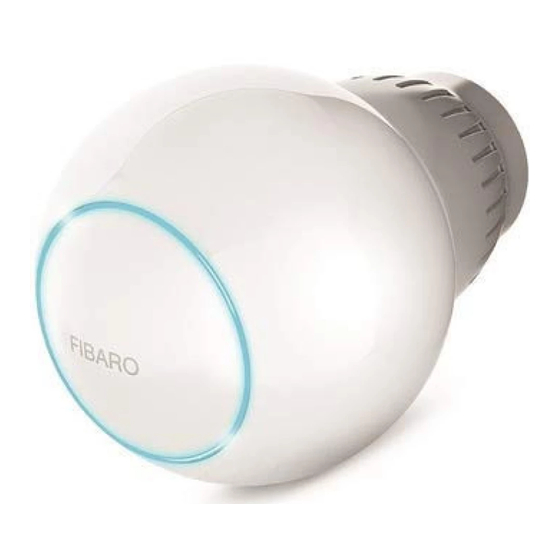
Description and features
Description
The FIBARO Heat Controller is a remotely controlled thermostatic head to control temperature in your room.
It measures the temperature and automatically adjust the heat level. It can be mounted without tools on three types of thermostatic radiator valves.
You can create schedules via app to easily manage temperature throughout the week.
Find out more:
Back To Top
Features
- To be installed on three types of valves: M30 x 1.5, Danfoss RTD-N and Danfoss RA-N,
- Compatible with any Z-Wave or Z-Wave+ Controller,
- Supports Z-Wave network Security Modes: S0 with AES-128 encryption and S2 with PRNG-based encryption,
- Built-in battery recharged through standard micro-USB port,
- Easy installation – no tools required,
- Can use a dedicated temperature sensor,
- Supports heating schedules,
- Automatic calibration,
- Anti-freeze function,
- Decalc function,
- Unconstrained rotation spherical knob to set desired temperature.
This device may be used with all devices certified with Z-Wave certificate and should be compatible with such devices produced by other manufacturers.
Back To Top
Specifications
Thermostatic Head:
| Power supply: | SELV 3.7V Li-Poly battery pack (non-replaceable) |
| Supported charger (not included): | micro-USB 5V DC, min. 0.5A |
| Radio protocol: | Z-Wave (S2-enabled) |
| Radio frequency bands: | 868.0-868.6 MHz 869.7-870.0 MHz 2402-2480 MHz |
| Max. transmit power: | 6dBm (Z-Wave) 7dBm (BLE) |
| Operating temperature: | 0-40°C |
| Storage temperature: | -10-25°C |
| Maximum water temperature: | 90°C |
| Temperature measuring accuracy: | 0.5°C (within 0-40°C) |
| Supported valves: | M30 x 1.5, Danfoss RTD-N, Danfoss RA-N |
| Rated impulse voltage: | 330V (when connected to the USB power supply) |
| Dimensions (diameter x length): | 56 x 74 mm 56 x 87 mm (with adapter) |
| EU directives compliance: | RED 2014/53/EU RoHS 2011/65/EU |
Temperature Sensor:
| Power supply: | 3.0V CR2032 battery (included) |
| Radio frequency band: | 2402-2480 MHz |
| Max. transmit power: | 1dBm |
| Operating temperature: | 0-40°C |
| Dimensions (diameter x height): | 38 x 12 mm |
| EU directives compliance: | RED 2014/53/EU RoHS 2011/65/EU |
Back To Top
Installation
First launch
- Connect the charger to the micro-USB port to charge the device.
If you have the temperature sensor:- Use a coin to open the battery cover by turning it counter-clockwise.
- Remove the sticker underneath the battery.
- Use a coin to close the battery cover by turning it clockwise.
- Disconnect the charger when the LED ring pulses green (device fully charged).
First charging may take up to 3 hours.
- Dismount your current thermostatic head.
- Depending on type of your thermostatic valve:
| M30 x 1.5 | Danfoss RTD-N | Danfoss RA-N |
 |
 |
 |
| Proceed normally | Use adapter: | Use adapter: |
 |
 |
If you use one of the adapters, double check that it is mounted properly. It should click when putting on the valve, hold tight after installing and not rotate!
Install the device in horizontal position only!
- Mount the Heat Controller with the button facing the floor (the button should not be facing the light source) and check that the device is rigidly mounted and does not move sideways during calibration. If the device moves sideways during calibration, loosen and tighten the device again.
- Press and hold the button for at least one second or use the included key to click the button.


- The LED ring will start blinking blue.
If you have the temperature sensor:
- Click the button on it now.

- The LED ring will blink green 5 times if the connection was successful.

Do not cover or veil the thermostatic head.
Back To Top
Video tutorial
Back To Top
Head calibration
Calibrating the device to your radiator valve is required for proper controlling the temperature.
Calibration cannot be performed while the device is being charged.
Calibration is performed:
- Automatically, after 10 minutes from turning on if no operation on the device has been made (only at first installation),
- Automatically, after 10 minutes from last state change (only at first installation),
- Manually, using the menu (see below).
To perform calibration using the menu:
- Press and hold the button (or use the included key if necessary).
- Release the button when you see white LED colour.
- Click the button to confirm the selection.


Back To Top
Dismounting the device
Before dismounting, the device must be put in Standby Mode to ensure safe removal. See „Standby Mode” for more information.
To dismount the device:
- Press and hold the button (or use the key included if necessary).
- Release the button when you see cyan LED colour.
- Click the button to confirm the selection.
- Turn the cap counter-clockwise and remove adapter if used.
- Store the device in temperature: -10°C to 25°C.
Back To Top
Z-Wave network
Adding to the network
Adding (Inclusion) – Z-Wave device learning mode, allowing to add the device to existing Z-Wave network.
To add the device to the Z-Wave network:
- Generic
- Home Center
- SmartThings
- Vera
- Homey
- Make sure the device is within the direct range of your Z-Wave controller.
- Set the main controller into the adding mode (see the controller’s manual).
- Triple click the button on the thermostatic head (or use the included key if necessary).
- The LED ring will start blinking white.
- If you are adding in S2 authenticated mode, type in the device pin code (underlined part of the public key on the label).
- Wait for the adding process to end.
- Successful adding will be confirmed by the Z-Wave controller.
- Make sure the device is within the direct range of your Z-Wave controller.
- Log into Home Center configuration interface.
- In Devices section click Add or remove device.
- Click Add to start adding mode.
- Triple click the button on the thermostatic head (or use the included key if necessary).
- The LED ring will start blinking white.
- If you are adding in S2 authenticated mode, type in the device pin code (underlined part of the public key on the label).
- Wait for the adding process to end.
- Successful adding will be confirmed by the Z-Wave controller.
- Make sure the device is within the direct range of your Z-Wave controller.
- Click the Plus (+) icon on the Home Screen.
- Select FIBARO and click on the device.
- Choose a hub you want to add your device to and click Next.
- Choose a room where the device will be placed and click Next.
- Triple click the button on the thermostatic head (or use the included key if necessary).
- The LED ring will start blinking white.
- If you are adding in S2 authenticated mode, type in the device pin code (underlined part of the public key on the label).
- Wait for the adding process to end.
- Successful adding will be confirmed by the Z-Wave controller.
- Make sure the device is within the direct range of your Z-Wave controller.
- From your Vera’s Dashboard, go to Devices > Add devices
- Choose a Generic Z-Wave device from the list.
- Follow the instructions on screen.
- Triple click the button on the thermostatic head (or use the included key if necessary).
- The LED ring will start blinking white.
- If you are adding in S2 authenticated mode, type in the device pin code (underlined part of the public key on the label).
- Wait for the adding process to end.
- Successful adding will be confirmed by the Z-Wave controller.
Click here for more detailed instructions for Vera gateways.
- Make sure the device is within the direct range of your Z-Wave controller.
- In Homey app select Devices from the tab bar.
- Find your device’s brand and click the [+] icon in the top right corner and search for FIBARO and tap the logo.
- Find your device on the list. Then click the device’s icon. A dialog will appear that confirms if you want to continue. Click install.
- Follow the on-screen instructions.
- Triple click the button on the thermostatic head (or use the included key if necessary).
- The LED ring will start blinking white.
- If you are adding in S2 authenticated mode, type in the device pin code (underlined part of the public key on the label).
- Wait for the adding process to end.
- Successful adding will be confirmed by the Z-Wave controller.
Back To Top
Removing from the network
Removing (Exclusion) – Z-Wave device learning mode, allowing to remove the device from existing Z-Wave network.
To remove the device from the Z-Wave network:
- Generic
- Home Center
- SmartThings
- Vera
- Homey
- Make sure the device is within the direct range of your Z-Wave controller.
- Set the main controller in remove mode (see the controller’s manual).
- Triple click the button on the thermostatic head (or use the included key if necessary).
- The LED ring will start blinking white.
- Wait for the removing process to end.
- Successful removing will be confirmed by the Z-Wave controller.
- Make sure the device is within the direct range of your Z-Wave controller.
- Log into Home Center configuration interface.
- In Devices section click Add or remove device.
- Click Delete to start removing mode.
- Triple click the button on the thermostatic head (or use the included key if necessary).
- The LED ring will start blinking white.
- Wait for the removing process to end.
- Successful removing will be confirmed by the Z-Wave controller.
- Make sure the device is within the direct range of your Z-Wave controller.
- On the Home Screen, select Menu icon and click Devices.
- Select More Options (three dots) icon and click Edit.
- Select the minus icon (-) next to the device.
- Click Delete to confirm.
- Triple click the button on the thermostatic head (or use the included key if necessary).
- The LED ring will start blinking white.
- Wait for the removing process to end.
- Successful removing will be confirmed by the Z-Wave controller.
- Make sure the device is within the direct range of your Z-Wave controller.
- From your Vera’s Dashboard, go to Devices.
- Choose the device you want to remove and click the arrow next to it.
- Go to the bottom of the page and click Delete Device.
- Click Unpair.
- Triple click the button on the thermostatic head (or use the included key if necessary).
- The LED ring will start blinking white.
- Wait for the removing process to end.
- Successful removing will be confirmed by the Z-Wave controller.
- Make sure the device is within the direct range of your Z-Wave controller.
- In Homey app select Devices from the tab bar.
- Click and hold the device you want to remove.
- Click in the gear icon in the top right corner.
- Click Remove device.
- Confirm that you want to remove this device — click OK.
- Triple click the button on the thermostatic head (or use the included key if necessary).
- The LED ring will start blinking white.
- Wait for the removing process to end.
- Successful removing will be confirmed by the Z-Wave controller.
Back To Top
Range test
The device has a built in Z-Wave network main controller’s range tester.
To perform range test:
- Press and hold the button (or use the key included if necessary).
- Release the button when you see magenta LED colour.
- Click the button to confirm the selection.
- LED ring will indicate the Z-Wave network’s range:
- Pulsing green – the device attempts to establish a direct communication with the main controller. If a direct communication attempt fails, the device will try to establish a routed communication, through other modules, which will be signaled by visual indicator pulsing yellow.
- Glowing green – the device communicates with the main controller directly.
- Pulsing yellow – the device tries to establish a routed communication with the main controller through other modules (repeaters).
- Glowing yellow – the device communicates with the main controller through the other modules. After 2 seconds the device will retry to establish a direct communication with the main controller, which will be signaled with visual indicator pulsing green.
- Pulsing magenta – the device does communicate at the maximum distance of the Z-Wave network. If connection proves successful it will be confirmed with a yellow glow. It’s not recommended to use the device at the range limit.
- Glowing red – the device is not able to connect to the main controller directly or through another Z-Wave network device (repeater).
- To exit Z-Wave range test, press the button briefly.
Back To Top
Extra temperature sensor
Extra temperature sensor
The device can be used with an additional, dedicated temperature sensor (FGBRS-001) to provide the best temperature regulation.
It can be placed anywhere in the room and the device will use it as a reference point for the room temperature.
Before using, the sensor must be paired with the thermostatic head. One thermostatic head can be paired with only one sensor, but one sensor can be paired with up to three thermostatic heads.
FGBRS-001 is the only compatible temperature sensor.
To pair the FGBRS-001 with the device:
- Press and hold the button (or use the key included if necessary).
- Release the button when you see blue LED colour.
- Click the button to confirm the selection, the LED ring will start blinking blue.
- Within 1 minute click button on the sensor.
- The LED ring on thermostatic head will blink to confirm the result:
- 5 times green – sensor paired successfully,
- 5 times red – sensor not paired.
- Place the sensor in same room as head, no further than 5 meters from it.
To remove all paired heads from the sensor’s memory:
- Press and hold the button on the sensor for 2 seconds.
- The LED on the sensor will blink 3 times to confirm unpairing.
Back To Top
Operating the device
Controlling the temperature
You can set temperature using app (10-30°C) or directly on the device (16-24°C).
During manual temperature change LED ring colour corresponds to the temperature set-point.
To check and change the temperature on the device:
- Bring your hand close to the sphere.
- LED ring will:
- Glow if temperature was set manually,
- Pulse slowly if device is in schedule mode,
- Pulse quickly if device is in override schedule mode.
- Turn the sphere counter-clockwise to lower temperature or turn clockwise to raise the temperature.
- Remove the hand from the sphere, after 5 seconds LED will fade and new temperature will be set.
With colour depending on set temperature:
| Z-Wave Mode | Temperature [°C] | Colour |
|---|---|---|
| OFF | Valve closed (anti-freeze) | White |
| HEAT | 16°C or lower | Blue |
| 17°C | Azure | |
| 18°C | Cyan | |
| 19°C | Spring green | |
| 20°C | Green | |
| 21°C | Chartreuse | |
| 22°C | Yellow | |
| 23°C | Orange | |
| 24°C or higher | Red | |
| MANUFACTURER SPECIFIC | Valve fully opened | Magenta |
If device is currently during normal schedule, setting temperature manually will set Override Schedule.
Back To Top
Menu
Menu allows to perform important configuration and maintenance actions.
In order to use the menu:
- Press and hold the button (or use the key included if necessary).
- Release the button when you see desired LED colour:
- Click the button to confirm the selection.
| Colour | |
|---|---|
| Blue | pair dedicated temperature sensor |
| Red | enable/disable local control protection |
| White | perform head calibration |
| Green | adding/removing to/from Z-Wave network |
| Magenta | Z-Wave network’s range test |
| Cyan | put device in Standby Mode |
| Yellow | factory reset |
Back To Top
Local protection
After enabling the local protection changing temperature directly on the device (by turning it) will not be possible.
Enabling local protection is recommended if you want to prevent accidental temperature change, e.g. by children.
When attempting to change temperature if local protection is enabled:
- The device will not set new target temperature,
- The LED ring will blink red 3 times.
To change the temperature use the app or disable the local protection.
Local protection can also be enabled/disabled using Z-Wave protocol Command Class Protection
To enable/disable local protection using the menu:
- Press and hold the button (or use the key included if necessary).
- Release the button when you see red LED colour.
- Click the button to confirm the selection.
Back To Top
Standby mode
In Standby Mode the device is in deep sleep state allowing safe dismounting, transporting and low as possible battery consumption.
The device is shipped in Standby Mode.
Entering the device in Standby Mode will not factory reset the device nor will result in loosing any data.
To enter Standby Mode:
- Press and hold the button (or use the key included if necessary).
- Release the button when you see cyan LED colour.
- Click the button to confirm the selection.
To exit Standby Mode click the button once, the device will enter first installation procedure.
Back To Top
Factory reset
Reset procedure allows to restore the heat controller back to its factory settings, which means all information about the network and user configuration will be deleted.
Resetting the device is not the recommended way of removing the device from the Z-Wave network. Use the reset procedure only if the primary controller is missing or inoperable.
To perform factory reset:
- Press and hold the button (or use the key included if necessary).
- Release the button when you see yellow LED colour.
- Click the button to confirm the selection.
- After finishing resetting the device will be put in Standby Mode. Click the button to activate it again.
Back To Top
Battery and charging
The device is equipped with a rechargeable lithium-polymer battery pack that can be charged via micro-USB port using standard 5V charger (not included).
When battery is low the LED ring will start to blink red. The device will also report low battery status of itself and dedicated temperature sensor (if paired) to the controller.
Make sure you are using certified charger Class II, which complies with parameters specified in the manual.
Do not leave the device unattended while charging.
Do not use cables longer than 3 meters for charging the device.
To charge the battery:
- Connect charger to the micro-USB port.
- During charging the LED ring will pulse red and valve control will be disabled.
- When LED starts pulsing green, disconnect the charger.
- The device will restore its previous operation.
Back To Top
Normal Schedules
The device allows to create multiple heating schedules to manage temperature in the room throughout the week. Schedules are created via controller interface or app.
- Up to 253 normal schedules can be created,
- The lower the schedule ID number, the higher the priority,
- Schedules with higher priority override those with lower priority in case of overlapping schedules,
- Schedules can be disabled without deleting it,
- Schedules allow to set target temperature, fully open the valve or fully close the valve.
To create normal schedules user must specify:
- Day of the week,
- Starting time (hour and minute),
- Duration,
- Temperature setpoint in range 10-30°C (for HEAT mode),
- One of the operating modes:
- HEAT for setting temperature,
- OFF for valve fully closed,
- MANUFACTURER SPECIFIC for valve fully opened.
Back To Top
Override Schedule
Override Schedule is a special type schedule that has the highest priority; thus it overrides other schedules.
The Override Schedule starts right after setting and lasts for specified time, then it is removed and current schedule or normal operation is restored.
To create Override Schedule user must specify:
- Duration,
- Temperature setpoint in range 10-30°C (for HEAT mode),
- One of the operating modes:
- HEAT for setting temperature,
- OFF for valve fully closed,
- MANUFACTURER SPECIFIC for valve fully opened.
Override Mode can be enabled in two ways:
- By turning the knob, while normal schedule is active. The LED ring will pulse with selected adjustment.
- Via controller, by creating schedule with ID set 255, start time set to NOW and duration (in minutes/hours/days).
To exit Override Mode grab knob with your hand for 5 seconds.
Back To Top
Configuration
Advanced parameters
The device allows to customize its operation to user’s needs. The settings are available in the FIBARO interface as simple options that may be chosen by selecting the appropriate box.
In order to configure the device (using the Home Center controller):
- Go to Settings .
- Go to Devices.
- Select the appropriate device from the list.
- Select the Parameters tab.
- Change values of selected parameters.
- Save the changes.
This parameter determines duration of Override Schedule after turning the knob while normal schedule is active.
Available settings:
10-10000 (in minutes)
Default setting: 240 (4h)
Parameter size: 4 [bytes]
This parameter allows to enable different additional functions of the device.
Available settings:
1 (bit 0) – enable Open Window Detector
2 (bit 1) – enable fast Open Window Detector
4 (bit 2) – increase receiver sensitivity (shortens battery life)
8 (bit 3) – enabled LED indications when controlling remotely
16 (bit 4) – protect from setting Full ON and Full OFF mode by turning the knob manually
Default setting: 1
Parameter size: 4 [bytes]
Parameter 2 values may be combined, e.g. 1+8=9 means that Open Window Detector and LED indications when controlling remotely are enabled.
This parameter allows to check statuses of different additional functions.
Available settings:
1 (bit 0) – optional temperature sensor connected and operational
2 (bit 1) – open window detected
Default setting: 0
Parameter size: 4 [bytes]
Parameter 3 values may be combined, e.g. 1+2=3 means optional sensor works properly and open window detection was triggered.
Back To Top
Support
Articles
Back To Top
FAQ
The FIBARO Heat Controller is a Z-Wave compatible, remotely controlled thermostatic head to control the temperature in your room.
You can use it:
- in scenes,
- with the heating panel,
- manually.
Read more in manual.
The FIBARO Heat Controller works only with radiators with M30 x 1.5m, Danfoss RTD-N, and Danfoss RA-N (with adapter) valves.
Valve becomes fully opened.
It supports M30 x 1.5 type and Danfoss RTD-N and Danfoss RA-N (using adapters).
Important: the valve must now be installed horizontally.
No – Extra Temperature Sensor works only with FIBARO Heat Controller.
- Thermostat FGT-001/FGBHT-001
- Thermostat FG(BH)T-001 has a built-in battery (lithium-ion cell) that is not replaceable.
- The declared lifetime of the battery is 300 charging cycles.
- It takes about 4 hours to fully charge the battery.
- It is necessary to use a USB charger with a power of at least 2,5W (500mA).
- Extra temperature sensor FGBRS-001
- The sensor is powered by a CR2032 lithium battery.
- It is recommended to fully charge the battery before installing The Heat Controller on the thermostatic valve.
- It is recommended to charge the battery before the start of the heating season and after the end of the heating season.
- If possible, it is recommended to remove the head for the charging process.
- The device memorizes the last valve setting while the battery is charging. The device does not regulate the temperature during the charging process. The device may inaccurately regulate the temperature for an hour after the end of charging.
- Using an extra temperature sensor: 10 months (error rate + – 25%).
- Without an extra temperature sensor: 11 months (error rate + – 25%).
Typically, the calibration process takes about 30 seconds.
The best heating type to be controlled by the FIBARO Heat Controller is the one that holds the most constant temperature or slowly fluctuates. Hence, the Heat Controller can act accordingly. With more significant temperature changes, the Heat Controller may underheat or overheat the rooms.
- It is recommended to place the temperature sensor at a short distance from the radiator. It is best for the sensor to “see” the radiator. It should be noted, however, that the temperature is regulated at the point where the sensor is located.
- The position of the sensor should be selected experimentally. You can place the sensor one meter from the radiator and verify for a few days the quality of adjustment, then increase the distance, for example, one meter, etc., until you get satisfying results.
- Do not place the sensor where it can be touched by people and animals or other objects that may heat or cool it and distort results.
- Do not place the temperature sensor in the places where drafts are present.
- Do not cover the temperature sensor with anything.
- It should be kept in mind that the room temperature is not evenly distributed. Apart from the influence of other factors, for example, other heat sources (fireplace, fan heater) or drafts, the temperature also depends on the height above the floor level. The difference between the temperature at the floor and the ceiling can reach up to 3 degrees of Celsius. Keep this in mind when choosing a location for your external sensor.
- Place the device on non-metallic surfaces.
Back To Top
Troubleshooting
Heating system management is a process which can be influenced by many factors.
If the specification and questions provided above still does not answer to your problems, head to the article:
The Heat Controller: Troubleshooting
If you don’t have an idea in which configurations it is possible to use The Heat Controller or you would like to analyze different setup scenarios, head to the article:
The Heat Controller: Use Cases
Back To Top
Термостат радиатора FIBARO FGBHT-001

Важная информация по безопасности
Прочтите это руководство перед установкой устройства!
Несоблюдение рекомендаций, содержащихся в данном руководстве, может быть опасным или привести к нарушению закона. Производитель, Fibar Group SA, не несет ответственности за любые убытки или ущерб, возникшие в результате несоблюдения инструкций в руководстве по эксплуатации.
Этот продукт не игрушка. Беречь от детей и животных!
Батарейка типа «таблетка» CR2032 является опасной при проглатывании!
Предупреждение о батарейном блоке!
Контроллер тепла содержит литий-ионный полимерный аккумулятор, обратите внимание на все следующие предупреждения:
- При обнаружении необычного запаха или неисправности избегайте источников открытого огня и снимите устройство с радиатора.
- В случае повреждений в результате столкновений и т. Д. Осторожно переместите их в безопасное место как минимум на полчаса для наблюдения.
- Не оставляйте устройство без присмотра во время зарядки.
- Не пытайтесь заменить аккумулятор!
Технология HomeKit
Технология Apple HomeKit обеспечивает простой и безопасный способ управления аксессуарами с поддержкой HomeKit с помощью Siri на вашем iPhone, iPad или iPod touch.
После установки FIBARO Heat Controller настройте его из совместимого приложения, выполнив всего несколько простых шагов.
Вы даже можете создавать свои собственные пользовательские сцены для управления домашними настройками. Для бывшегоampТаким образом, вы можете создать сцену для автоматического # выключения света, запирания дверей, закрытия гаражных ворот и установки термостата на желаемую температуру всего за один шаг.
Для управления этим аксессуаром с поддержкой HomeKit рекомендуется iOS 11.2 или новее.
Для автоматического управления этим аксессуаром с поддержкой HomeKit вдали от дома требуется Apple TV с tvOS 11 или новее, HomePod или iPad с iOS 11.2 или новее, настроенные в качестве домашнего концентратора.
Описание и особенности
FIBARO Heat Controller — это термостатическая головка с дистанционным управлением, поддерживающая HomeKit, для контроля температуры в вашей комнате с помощью беспроводной технологии Bluetooth® с низким энергопотреблением.
Он измеряет температуру и автоматически регулирует уровень нагрева.
Его можно установить без инструментов на три типа термостатических радиаторных клапанов.
Вы можете создать расписание через приложение, чтобы легко управлять температурой в течение недели.
Основные характеристики терморегулятора FIBARO:
- для установки на клапаны трех типов: M30 x 1.5, Danfoss RTD-N и Danfoss RA-N,
- совместим с технологией Apple HomeKit,
- Технология Bluetooth® с низким энергопотреблением для беспроводной связи,
- встроенный аккумулятор заряжается через стандартный порт micro-USB,
- простая установка — не требуются инструменты,
- можно использовать внешний датчик температуры — FGBRS-001,
- поддерживает еженедельный график отопления,
- автоматическая калибровка,
- функция защиты от замерзания,
- функция декалькирования,
- неограниченное вращение сферической ручки для установки желаемой температуры.
3 типа управления температурой в FIBARO Heat Controller:
- вручную — прямо на устройстве,
- режим расписания — создание правил расписания для управления температурой в помещении в течение недели. Расписание создается через приложение,
- режим отмены — заменяет текущую запланированную температуру на определенное время.
Базовая активация
- Подключите зарядное устройство к порту micro-USB, чтобы зарядить устройство.
- Отключите зарядное устройство, когда светодиодное кольцо начнет мигать зеленым светом (устройство полностью заряжено).
- Снимите имеющуюся термостатическую головку.
- В зависимости от типа вашего термостатического клапана:

- Установите устройство на клапан и затяните его, повернув колпачок по часовой стрелке.

ЗАМЕТКА
- Первая зарядка может занять до 3 часов.
- Для достижения максимальной производительности установите устройство в горизонтальном положении.
ВНИМАНИЕ!
- Если вы используете один из адаптеров, дважды проверьте, правильно ли он установлен. Он должен щелкнуть при надевании клапана, после установки держаться крепко и не проворачиваться!
- Не закрывайте и не закрывайте термостатическую головку.
Сопряжение с HomeKit (FGBHT-001)
- Откройте приложение «Настройки» на своем устройстве iOS.
- Перейдите в раздел Bluetooth® и включите Bluetooth®.
- Поместите аксессуар рядом с вашим устройством iOS.
- Откройте любое приложение, совместимое с HomeKit, на своем устройстве iOS.
- Найдите код установки HomeKit на последней странице Руководства по быстрому запуску в коробке, которая выглядит следующим образом:
- Начните сопряжение с вашим приложением HomeKit.
- Следуйте инструкциям, отображаемым в приложении.
ПРИМЕЧАНИЕ: Вы найдете код настройки на корпусе устройства и на обратной стороне краткого руководства.
Контроль температуры
Вы можете установить температуру в приложении (10-30 ° C) или прямо на устройстве (16-24 ° C). При ручном изменении температуры цвет светодиодного кольца соответствует заданному значению температуры.
Чтобы проверить и изменить температуру на устройстве:
- Поднесите руку к сфере.
- Светодиодное кольцо будет:
- Свечение, если температура была установлена вручную,
- Медленная пульсация, если устройство находится в режиме расписания,
- Быстро подайте импульс, если устройство находится в режиме блокировки.
Цвет в зависимости от заданной температуры:
- Поверните сферу против часовой стрелки, чтобы понизить температуру, или поверните по часовой стрелке, чтобы повысить температуру.

- Уберите руку с шара, через 5 секунд светодиод погаснет и установится новая температура.


ПРИМЕЧАНИЕ: Если устройство в настоящее время находится в расписании, установка температуры вручную переопределит ее (см. «Еженедельное расписание и режим отмены»).
Дополнительный датчик температуры
Устройство можно использовать с дополнительным специализированным датчиком температуры (FGBRS-001) для обеспечения наилучшего регулирования температуры.
Его можно разместить в любом месте комнаты, и устройство будет использовать его как точку отсчета для комнатной температуры.
Перед использованием датчик необходимо соединить с термостатической головкой.
Одна термостатическая головка может быть сопряжена только с одним датчиком, но один датчик может быть сопряжен с тремя термостатическими головками.
Чтобы выполнить сопряжение FGBRS-001 с устройством:
- Используйте прилагаемую клавишу, чтобы нажать и удерживать кнопку.

- Отпустите кнопку, когда увидите синий цвет светодиода.
- Быстро нажмите кнопку для подтверждения, светодиодное кольцо начнет мигать синим цветом.
- В течение 1 минуты нажмите кнопку на датчике.

- Светодиодное кольцо на термостатической головке загорится зеленым, подтверждая успешное сопряжение.
- Разместите датчик в той же комнате, что и голова, на расстоянии не более 5 метров от нее.


Чтобы удалить все парные головы:
- Нажмите и удерживайте кнопку на датчике в течение 2 секунд.
- Светодиод на датчике мигнет 3 раза, подтверждая отключение пары.
ПРИМЕЧАНИЕ: FGBRS-001 — единственный совместимый внешний датчик температуры.
ВНИМАНИЕ: Этот продукт не игрушка. Беречь от детей и животных!
Демонтаж устройства
Перед демонтажем устройство необходимо перевести в режим ожидания, чтобы обеспечить безопасное извлечение. См. Главу «Режим ожидания» на странице 12 для получения дополнительной информации.
Чтобы снять устройство:
- Используйте прилагаемую клавишу, чтобы нажать и удерживать кнопку.

- Отпустите кнопку, когда увидите голубой индикатор.
- Быстро нажмите кнопку, чтобы подтвердить.
- Подождите, пока светодиод перестанет мигать.
- Поверните колпачок против часовой стрелки и снимите адаптер, если он используется.
- Хранить устройство при температуре: от -10 ° C до 25 ° C.

Меню
Меню позволяет выполнять важные действия по настройке и обслуживанию. Чтобы использовать меню:
- Используйте прилагаемую клавишу, чтобы нажать и удерживать кнопку.

- Отпустите кнопку, когда увидите светодиод желаемого цвета:

- Быстро нажмите кнопку для подтверждения.


Местная охрана
После включения защиты местного управления изменение температуры непосредственно на приборе (поворотом) будет невозможно.
Если вы хотите предотвратить случайное изменение температуры, например, детьми, рекомендуется включить локальную защиту. Локальную защиту можно включить / отключить вручную или через приложение.
При попытке изменить температуру, если включена локальная защита:
- Устройство не установит новую температуру,
- Светодиодное кольцо мигнет красным 3 раза.
Для изменения температуры используйте приложение или отключите локальную защиту.
Чтобы включить / отключить локальную защиту:
- Используйте прилагаемую клавишу, чтобы нажать и удерживать кнопку.

- Отпустите кнопку, когда увидите красный цвет светодиода.
- Быстро нажмите кнопку для подтверждения.

Калибровка головы
Калибровка устройства для вашего радиаторного клапана необходима для правильного регулирования температуры.
Калибровка выполняется:
- Автоматически, через 10 минут после включения, если с устройством не производилось никаких действий *,
- Автоматически, через 10 минут после последнего изменения состояния вручную *,
- Вручную, используя меню (см. Ниже),
- Используя настройки в приложении FIBARO для HomeKit Devices,
- После установки температуры в приложении FIBARO for HomeKit Devices *.
Чтобы выполнить калибровку с помощью меню:
- Используйте прилагаемую клавишу, чтобы нажать и удерживать кнопку.

- Отпустите кнопку, когда увидите белый светодиод.
- Быстро нажмите кнопку для подтверждения.
ПРИМЕЧАНИЕ: Калибровку нельзя выполнить, пока устройство заряжается.
ВНИМАНИЕ: Если калибровка не будет успешно завершена, устройство не сможет работать правильно.
Только при первой установке, после восстановления заводских настроек или после выхода из ждущего режима.
Режим ожидания
В режиме ожидания устройство находится в состоянии глубокого сна, что обеспечивает безопасный демонтаж и транспортировку, а также минимальное потребление заряда аккумулятора.
Устройство поставляется в ждущем режиме.
Переход устройства в режим ожидания не приведет к сбросу настроек устройства и не приведет к потере каких-либо данных, но калибровка и сопряжение датчиков (после длительного ожидания) будут потеряны.
Чтобы войти в режим ожидания:
- Используйте прилагаемую клавишу, чтобы нажать и удерживать кнопку.
- Отпустите кнопку, когда увидите голубой индикатор.
- Быстро нажмите кнопку для подтверждения.
- Подождите, пока светодиод перестанет мигать.
Для выхода из режима ожидания нажмите кнопку один раз, устройство войдет в первую процедуру установки.
сброс к заводским настройкам
Процедура сброса позволяет вернуть аксессуар к заводским настройкам, включая HomeKit и сопряжение дополнительных датчиков температуры, а также конфигурацию устройства.
Чтобы выполнить сброс к заводским настройкам:
- Используйте прилагаемую клавишу, чтобы нажать и удерживать кнопку.
- Когда светодиодное кольцо загорится желтым, отпустите кнопку.
- Быстро нажмите кнопку для подтверждения.
- После завершения сброса устройство перейдет в режим ожидания. Нажмите кнопку, чтобы активировать его снова.
Аккумулятор и зарядка
Устройство оснащено перезаряжаемой литий-полимерной батареей, которую можно заряжать через порт micro-USB с помощью стандартного зарядного устройства на 5 В (не входит в комплект).
Когда батарея разряжена, светодиодное кольцо начинает мигать красным. Устройство также сообщит контроллеру о низком уровне заряда батареи и о специальном датчике температуры (если он сопряжен).
Устройство не управляет клапаном и поддерживает последнее положение клапана до полной зарядки.
Чтобы зарядить аккумулятор:
- Подключите зарядное устройство к порту micro-USB.
- Во время зарядки светодиодное кольцо будет мигать красным, и управление клапаном будет отключено.
- Когда светодиод начнет мигать зеленым, отключите зарядное устройство.
- Устройство восстановит свою предыдущую работу.
ВНИМАНИЕ!
- Убедитесь, что вы используете сертифицированное зарядное устройство класса II, которое соответствует параметрам, указанным в руководстве.
- Не оставляйте устройство без присмотра во время зарядки.
- Перед зарядкой выключите устройство (белый цвет) или снимите термостатическую головку, если это невозможно.
- Убедитесь, что устройство не разряжается во время отопительного сезона, иначе это может вызвать повышение температуры!
ПРИМЕЧАНИЕ: Не используйте для зарядки устройства кабели длиной более 3 метров.
Еженедельное расписание и режим переопределения
Устройство позволяет составить график обогрева для управления температурой в помещении на протяжении недели. Расписание создается через приложение. В расписании можно создать до 50 различных правил.
Для создания правила пользователь должен указать:
- День недели,
- Время начала (час и минута),
- Один из четырех доступных режимов:
- В гостевом режиме — 10-29.5 ° C (по умолчанию 16.5 ° C)
- Эко-режим — 10-29.5 ° C (по умолчанию 19.5 ° C)
- Комфортный режим — 10-29.5 ° C (по умолчанию 21.5 ° C)
- Режим Comfort Plus — 10-29.5 ° C (по умолчанию 23.5 ° C)
Режим переопределения — это особый тип режима, который переопределяет расписание. Режим переопределения запускается сразу после установки на фиксированную продолжительность (по умолчанию 4 часа). Продолжительность можно изменить в приложении FIBARO.
Чтобы запустить режим переопределения, установите температуру, повернув ручку, или измените температуру через приложение, когда расписание активно. Светодиодное кольцо будет быстро мигать выбранным цветом.
Чтобы выйти из режима переопределения, удерживайте ручку рукой в течение 5 секунд.
Есть 3 особых типа режимов переопределения:
Режим отпуска — это специальный режим отмены, который устанавливает постоянную температуру (от 10 до 29.5 ° C) и работает до тех пор, пока не будет выключен #.
Клапан закрыт (защита от замерзания) — это режим, при котором клапан открывается только для предотвращения замерзания. Работает, пока не выключится #.
Полностью открытый клапан (30 ° C) — это режим, при котором температура повышена до максимального значения, устройство не регулирует температуру и клапан полностью открыт. Работает до выключения.
ВНИМАНИЕ: Работа в режиме переопределения в течение недели или дольше отключает режим расписания.
Настраиваемые параметры
Состояние внешнего датчика (только чтение)
Состояние связи с внешним датчиком температуры.
| Доступные настройки: | 0 — непарный 1 — парные |
| Настройки по умолчанию: | 0 (Непарный) |
Блокировать физический контроль
Родительский замок ручного управления. При включении устройство предотвращает изменение температуры поворотом ручки до тех пор, пока она не будет отключена этим параметром или из меню.
| Доступные настройки: | 0 — ручное управление включено 1 — ручное управление отключено |
| Настройки по умолчанию: | 0 (включено) |
Калибровка
Принудительная автоматическая калибровка устройства.
| Доступные настройки: | 0 — прибор не во время калибровки 1 — принудительная автокалибровка |
| Настройки по умолчанию: | 0 |
Неисправности статуса
Устройство сообщает о статусе обнаруженных ошибок в виде битовой маски (статус ошибок). Значения можно комбинировать, напримерample: код со значением 5 (1 + 4) означает, что батарея разряжена и обнаружена ошибка калибровки.
| Code | Статус |
| 0x01 | Низкий заряд батареи внешнего датчика — низкий уровень заряда аккумулятора дополнительного датчика температуры. Поменять аккумулятор. |
| 0x02 | Аппаратная неисправность — неисправность устройства. Устройство снова попытается откалибровать. |
| 0x04 | Ошибка калибровки * — неудачная калибровка. Устройство не может работать должным образом. |
После каждого сброса к заводским настройкам и режима ожидания устройство сообщает об ошибке калибровки (статус исчезает после правильной калибровки).
Характеристики

ПРИМЕЧАНИЕ: Тип зарядного устройства: Устройство должно поставляться из источника, сертифицированного как источник ограниченного питания (LPS), как определено в пункте 2.5 стандарта IEC60950-1 2-е издание + Amd. 1 + драм. 2.
ВНИМАНИЕ: Источник питания SELV (источник питания USB) используется только для зарядки аккумулятора. Устройство не управляет клапаном во время зарядки.
![]()
Документы / Ресурсы
Рекомендации

Руководства FIBARO | Устройства автоматизации умного дома
-
Contents
-
Table of Contents
-
Bookmarks
Quick Links
CONTENTS
O P E R A T I N G
M A N U A L
THE HEAT CONTROLLER
RADIATOR THERMOSTAT
FGT-001
3
4
5
6
7
8
9
10
11
12
13
EN
v1.0
14
15
16
17
18
19
23
24
27
Related Manuals for FIBARO FGT-001
Summary of Contents for FIBARO FGT-001
-
Page 1: Table Of Contents
O P E R A T I N G M A N U A L THE HEAT CONTROLLER RADIATOR THERMOSTAT FGT-001 CONTENTS v1.0 #1: Description and features #12: Factory reset #2: Basic activation #13: Z-Wave range test #3: Adding to Z-Wave network…
-
Page 2: Important Safety Information
Do not attempt to replace the battery! General information about the FIBARO System FIBARO is a wireless smart home automation system, based on the Z-Wave protocol. All of available devices can be controlled through a computer (PC or Mac), smartphone or tablet. Z-Wave devices are not only receivers, but can also repeat the signal, increasing the Z-Wave network’s range.
-
Page 3: 1: Description And Features
#1: Description and features FIBARO Heat Controller is a remotely controlled thermostatic head to control temperature in your room. It measures the temperature and automatically adjust the heat level. It can be mounted without tools on three types of thermostatic radiator valves.
-
Page 4: 2: Basic Activation
#2: Basic activation 1. Connect the charger to the micro-uSB port to charge the device. If you have the temperature sensor: a. use a coin to open the battery cover by turning it coun- ter-clockwise. b. Remove the sticker underneath the battery. c.
-
Page 5: 3: Adding To Z-Wave Network
#3: Adding to Z-Wave network Adding (Inclusion) — Z-Wave device learning mode, allowing to add the device to existing Z-Wave network. To add the device to the Z-Wave network: 1. Make sure the device is within the direct range of your Z-Wave controller.
-
Page 6: 4: Removing The Device
#4: Removing the device Removing (Exclusion) — Z-Wave device learning mode, allowing to NOTE remove the device from existing Z-Wave network. Removing the device To remove the device from the Z-Wave network: from the Z-Wave net- work restores all the 1.
-
Page 7: 5: Controlling The Temperature
#5: Controlling the temperature You can set temperature using app (10-30°C) or directly on the device (16-24°C). During manual temperature change LED ring colour corresponds to the temperature set-point. To check and change the temperature on the device: 1. Bring your hand close to the sphere. 2.
-
Page 8: 6: Extra Temperature Sensor
#6: Extra temperature sensor The device can be used with an additional, dedicated temperature NOTE sensor (FGBRS-001) to provide the best temperature regulation. FGBRS-001 is the only It can be placed anywhere in the room and the device will use it as a compatible tempera- reference point for the room temperature.
-
Page 9: 7: Dismounting The Device
#7: Dismounting the device Before dismounting, the device must be put in Standby Mode to ensure safe removal. See chapter „Standby Mode” on page 13 for more information. To dismount the device: 1. use the included key to press and hold the button. 2.
-
Page 10: 8: Menu
#8: Menu Menu allows to perform important configuration and maintenance actions. In order to use the menu: 1. use the included key to press and hold the button. 2. Release the button when you see desired LED colour: Colour Action Blue pair dedicated temperature sensor enable/disable local control protec-…
-
Page 11: 9: Local Protection
#9: Local protection After enabling the local protection changing temperature directly on the device (by turning it) will not be possible. Enabling local protection is recommended if you want to prevent ac- cidental temperature change, e.g. by children. When attempting to change temperature if local protection is enabled: •…
-
Page 12: 10: Head Calibration
#10: Head calibration Calibrating the device to your radiator valve is required for proper NOTE controlling the temperature. Calibration cannot be performed while the device is being Calibration is performed: charged. • Automatically, after 10 minutes from turning on if no operation on the device has been made (only at first installation), •…
-
Page 13: 11: Standby Mode
#11: Standby Mode In Standby Mode the device is in deep sleep state allowing safe dis- mounting, transporting and low as possible battery consumption. The device is shipped in Standby Mode. Entering the device in Standby Mode will not factory reset the device nor will result in loosing any data.
-
Page 14: 12: Factory Reset
#12: Factory reset Reset procedure allows to restore the device back to its factory set- NOTE tings, which means all information about the network and user con- Resetting the device is figuration will be deleted. not the recommend- ed way of removing the device from the To perform factory reset: Z-Wave network.
-
Page 15: 13: Z-Wave Range Test
#13: Z-Wave range test The device has a built in Z-Wave network main controller’s range tester. To perform range test: 1. use the included key to press and hold the button. 2. Release the button when you see magenta LED colour. 3.
-
Page 16: 14: Battery And Charging
#14: Battery and charging The device is equipped with a rechargeable lithium-polymer bat- CAUTION tery pack that can be charged via micro-uSB port using standard 5v Make sure you are using charger (not included). certified charger Class When battery is low the LED ring will start to blink red. The device II, marked which will also report low battery status of itself and dedicated temperature…
-
Page 17: 15: Normal Schedules
#15: Normal Schedules The device allows to create multiple heating schedules to manage temperature in the room throughout the week. Schedules are created via controller interface or app. • up to 253 normal schedules can be created. • The lower the schedule ID number, the higher the priority. •…
-
Page 18: 16: Override Schedule
#16: Override Schedule Override Schedule is a special type schedule that has the highest priority; thus it overrides other schedules. The Override Schedule starts right after setting and lasts for specified time, then it is removed and current schedule or normal operation is restored.
-
Page 19: 17: Z-Wave Specification
#17: Z-Wave specification Endpoint 1: Generic Device Class: GENERIC_TYPE_THERMOSTAT Specific Device Class: SPECIFIC_TYPE_THERMOSTAT_GENERAL_v2 Description: represents thermostatic head, allows to set tempera- ture, schedules and check its battery level. Endpoint 2: Generic Device Class: GENERIC_TYPE_SENSOR_MuLTILEvEL Specific Device Class: SPECIFIC_TYPE_ROuTING_SENSOR_MuLTILEvEL Description: represents dedicated temperature sensor, allows to check temperature and its battery level (if not paired reported tem- perature and battery level are always 0).
-
Page 20
Supported Command Classes: Command Class version Secure ZWAvEPLuS_INFO [0x5E] ASSOCIATION [0x85] MuLTI_CHANNEL_ASSOCIATION [0x8E] BASIC [0x20] APPLICATION_STATuS [0x22] THERMOSTAT_MODE [0x40] THERMOSTAT_SETPOINT [0x43] SCHEDuLE [0x53] TRANSPORT_SERvICE [0x55] ASSOCIATION_GRP_INFO [0x59] DEvICE_RESET_LOCALLY [0x5A] MuLTI_CHANNEL [0x60] SuPERvISION [0x6C] NOTIFICATION [0x71] MANuFACTuRER_SPECIFIC [0x72] POWERLEvEL [0x73] PROTECTION [0x75] FIRMWARE_uPDATE_MD [0x7A] BATTERY [0x80] CLOCk [0x81]… -
Page 21
Multichannel Command Class: Command Class version Secure Endpoint 1 ZWAvEPLuS_INFO [0x5E] ASSOCIATION [0x85] MuLTI_CHANNEL_ASSOCIATION [0x8E] BASIC [0x20] THERMOSTAT_MODE [0x40] THERMOSTAT_SETPOINT [0x43] SCHEDuLE [0x53] ASSOCIATION_GRP_INFO [0x59] SuPERvISION [0x6C] NOTIFICATION [0x71] BATTERY [0x80] CLOCk [0x81] PROTECTION [0x75] SECuRITY [0x98] SECuRITY_2 [0x9F] Endpoint 2 ZWAvEPLuS_INFO [0x5E] ASSOCIATION [0x85] MuLTI_CHANNEL_ASSOCIATION [0x8E]… -
Page 22
Notification Command Class: The device uses Notification Command Class to report different events to the controller (“Lifeline” group). Endpoint 1: Notification Event Event Parameters Type Charge battery soon [0x0E] Power Charge battery now! [0x0F] Management Battery is charging [0x0C] [0x08] Battery is fully charged [0x0D] External sensor remove [0x02]… -
Page 23: 18: Advanced Parameters
#18: Advanced parameters The device allows to customize its operation to user’s needs. The set- NOTE tings are available in the FIBARO interface as simple options that may be chosen by selecting the appropriate box. Entering invalid value of parameter will re-…
-
Page 24: 19: Specifications
#19: Specifications Power supply: 3.7v Li-Poly battery pack (non-re- placeable) NOTE Charging port: micro-uSB Charger type: unit shall be supplied by a source Charger voltage (not included): 5v DC (±5%) certified as Limited Power Source (LPS) as Minimum charger current 0.5A defined in clause 2.5 (not included):…
-
Page 25
For communication with the controller: Radio protocol: Z-Wave (500 series chip) Radio frequency band: 868 MHz ISM band (for Eu) Maximum transmit power: EIRP up to -4dBm For communication with the extra sensor (FGBRS-001): Radio frequency band: 2.4 GHz ISM band Maximum transmit power: EIRP up to 6dBm SPECIFICATIONS… -
Page 26: 20: Accessory Specification (Fgbrs-001)
#20: Accessory specification (FGBRS-001) Power supply: CR2032, 3.0v battery (included) CAUTION using batteries other Operating temperature: 0–40°C than specified may re- sult in explosion. Dis- Storage temperature: -10–40°C pose of properly, ob- serving environmental Temperature measuring accu- 0.5°C (within 0–40°C range) protection rules.
-
Page 27: 21: Regulations
All information, including, but not limited to, information regarding the features, functionality, and/or other product specification are subject to change without notice. Fibaro reserves all rights to revise or update its products, software, or documentation without any obligation to no- tify any individual or entity.
РУССКИЙ
радиатор термостат FIBARO The Heat Controller FGBHT-001
это устройство работающее в среде Apple HomeKit, для
управления температурой в помещении с использовани-
ем беспроводной технологии Bluetooth
Устройство измеряет температуру и автоматически ре-
гулирует уровень температуры. Устройство может быть
установлено без инструментов на трёх типах термоста-
тических радиаторных клапанов.
Вы можете создавать расписания через приложение,
чтобы автоматически регулировать температуру в по-
мещении в течение всей недели.
СОВЕТ: Фотографии и инструкции вы найдёте в
соответствующем разделе руководства пользователя
(Quick Start Guide).
Содержание упаковки (страница 3):
• Термостатическая головка,
• 2 адаптера (для Danfoss RTD-N и RA-N),
• Ключ обслуживания,
• Дополнительный датчик температуры (опциональ-
но),
• Руководство пользователя и условия гарантийного
обслуживания.
Загрузите приложение FIBARO из App Store
(страница 4).
Первый запуск (страница 5):
1) Подключите зарядное устройство в микро-USB
порт, чтобы зарядить устройство (Fig. 1).
2) Отключите зарядное устройство, когда светоди-
одное кольцо начнёт мигать зелёным (устройство
полностью заряжено) (Fig. 2).
3) Демонтируйте свою текущую термостатическую го-
ловку (Fig. 3).
4) В зависимости от типа клапана: Проходит нормаль-
но или Используйте адаптер (Fig. 4).
5) Установите устройство на клапан и затяните резьбу,
повернув колпачок по часовой стрелке (Fig. 5).
6) Используйте комплектный специальный ключ, что-
бы нажать кнопку включения (Fig. 6).
7) Откройте приложение FIBARO на своём мобильном
устройстве и нажмите на иконку
 Приложение проведёт вас через процесс установ-
ки и сопряжения.
Код установки:
Вы найдёте код установки на корпусе устройства и на
задней части краткого руководства.
Сброс (страница 7):
1) Используйте комплектный специальный ключ,
чтобы нажать и удерживать кнопку включения.
Когда индикатор загорится жёлтым цветом, отпу-
стите кнопку (Fig. 8).
2) Нажмите кнопку ещё раз для подтверждения.
3) Устройство будет переведено в режим ожидания.
Нажмите кнопку ещё раз, чтобы активировать его
снова.
®
low energy.
manuals.fibaro.com/ru/hk-heat-controller
Спецификация (Термостатическая головка):
Источник питания:
Поддерживаемое
зарядное устройство:
Радио протокол:
Радиочастотный диапазон:
Рабочая температура:
Максимальная температура воды:
Поддерживаемые клапаны:
Размеры (диаметр х длина):
Спецификация
(Датчик температуры — опционально):
Источник питания:
Радиочастотный диапазон:
Рабочая температура:
Размеры (диаметр х высота):
Предупреждения:
Эксплуатация устройства в целях, не указанных в
полной технической документации может повредить
работоспособность устройства или вообще вывести
(Fig. 7).
его из строя. Производитель, Fibar Group S.A. не несёт
ответственности за любые неисправности, вызван-
ные неверной эксплуатацией устройства.
Использование неподходящих по спецификации
батарей может привести к возгоранию устройства и
даже его взрыву. Утилизируйте устройство и батареи,
с соблюдением правил охраны окружающей среды.
Этот продукт не является игрушкой. Беречь от детей
и животных! CR2032 батарейки опасны для здоровья
при проглатывании!
21
ВАЖНО: Прочитайте руководство
пользователя, перед установкой
устройства!
Для получения полной инструк-
ции по эксплуатации и техниче-
ской спецификации посетите наш
веб-сайт:
3.7В Литий-полимерный
аккумулятор (не заменяемый)
micro-USB 5V, мин. 0.5A
Bluetooth ® low energy
Danfoss RTD-N, Danfoss RA-N
56 x 87 mm (С адаптером)
3.0V CR2032 батарейка
(в комплекте)
2.4 GHz
0-40°C
90°C
M30 x 1.5,
56 x 74 mm
2.4 GHz
0-40°C
38 x 12 mm