Руководство пользователя
ОБЪЯВЛЕНИЕ
Введение
Благодарим вас за приобретение Scarlett Solo второго поколения, одного из семейств профессиональных аудиоинтерфейсов Focusrite, включающих высококачественные аналоговые предварительные аудиоинтерфейсы Focusrite.ampспасатели. Теперь у вас есть простое и компактное решение для маршрутизации высококачественного звука на компьютер и обратно. При разработке серии интерфейсов Scarlett второго поколения мы улучшили как производительность, так и набор функций, включая поддержку sample частоты до 192 кГц, улучшенный микрофонный предусилительamp производительность с низким уровнем шума и большим усилением, а также модернизированные инструментальные входы с дополнительным запасом для записи самых громких гитарных партий без клиппирования. Они соответствуют классу на Mac, что означает, что они подключаются и работают, поэтому нет необходимости устанавливать драйвер, если вы пользователь Mac. Вы также сможете загрузить некоторые интересные новые программные плагины после регистрации продукта.
В этом руководстве пользователя содержится подробное описание оборудования, которое поможет вам получить полное представление о рабочих функциях продукта. Мы рекомендуем как пользователям, которые не знакомы с компьютерной записью, так и более опытным пользователям найти время, чтобы прочитать руководство пользователя, чтобы вы полностью осознавали все возможности, которые Scarlett Solo и сопутствующее программное обеспечение могут предложить. . Если в основных разделах Руководства пользователя нет необходимой информации, обязательно проконсультируйтесь с support.focusrite.com, который содержит исчерпывающий набор общих запросов в службу технической поддержки.
Особенности
Аппаратный интерфейс Scarlett Solo предоставляет средства для подключения микрофона и инструмента или аудиосигналов линейного уровня к компьютеру под управлением Mac OS или Windows. Сигналы на физических входах могут быть направлены на ваше программное обеспечение для записи звука / цифровую звуковую рабочую станцию (в данном руководстве пользователя именуемую «DAW») с разрешением до 24 бит, 192 кГц; аналогично, монитор или записанный выход DAW будет отображаться на физических выходах устройства.
Это позволяет вам записывать «реальные» инструменты в Ableton Live Lite, GarageBand® (или любую другую DAW, которую вы можете использовать) вместе с любыми «родными» звуками, уже доступными на вашем компьютере, или вместо них. Физические выходы могут быть подключены к ampлифтер и колонки, активные мониторы, наушники или любое другое аудиооборудование с аналоговыми входами, которое вы хотите использовать. Хотя все входы и выходы на Scarlett Solo направляются напрямую в DAW и из нее для записи и воспроизведения, вы можете настроить маршрутизацию в DAW в соответствии с вашими потребностями.
Комплектация
Наряду с вашим Scarlett Solo у вас должны быть:
- Код пакета * для доступа к следующим онлайн-ресурсам:
— Комплект плагинов Focusrite Red 2 и 3
— ProTools | Первый
— Ableton Live Lite
— Loopmasters sampле библиотека - USB-кабель
- Руководство по началу работы и важная информация по безопасности *
* информация напечатана на внутренней стороне подарочной коробки
Системные требования
Mac OS и Windows
Информацию о системных требованиях для Scarlett и дополнительного программного обеспечения в комплекте см. На странице s. Функция прямого мониторинга позволяет вам слышать, что вы играете, без эффекта задержки компьютера.
http://support.focusrite.com
НАЧАЛО РАБОТЫ
ВАЖНО: ПОЛЬЗОВАТЕЛИ WINDOWS — УБЕДИТЕСЬ, ЧТО ВЫ ЗАПУСТИТЕ УСТАНОВКУ ПЕРЕД ПОДКЛЮЧЕНИЕМ SCARLETT SOLO К ВАШЕМУ КОМПЬЮТЕРУ.
НАЧНИТЕ С SCARLETT SOLO ВТОРОЕ ПОКОЛЕНИЕ SCARLETT SOLO СООТВЕТСТВУЕТ КЛАССУ MACS, ПОЭТОМУ НЕ ТРЕБУЕТСЯ УСТАНОВКА ДРАЙВЕРА.
Установка программного обеспечения
Все программное обеспечение, необходимое для Scarlett Solo, а также несколько мощных и полезных дополнений можно загрузить с Focusrite. webсайт www.focusrite.com/register. Вы найдете «Код пакета», напечатанный на внутренней стороне подарочной коробки, в которой поставляется Scarlett Solo, а серийный номер можно найти на нижней стороне устройства. Вам нужно будет ввести их, когда вы получите доступ к области загрузок webсайт; эта процедура гарантирует, что у вас будут самые последние версии программного обеспечения.
ЗАГРУЗКА ВКЛЮЧЕННОГО ПРОГРАММНОГО ОБЕСПЕЧЕНИЯ
Чтобы загрузить прилагаемое программное обеспечение, вам необходимо зарегистрировать Scarlett Solo на сайте www.focusrite.com/register Вам понадобится серийный номер продукта, который можно найти на нижней стороне оборудования Solo.
После того, как вы ввели серийный номер, вам будет предложено ввести КОД НАБОРА, указанный ниже:
Focusrite является товарным знаком Focusrite Audio Engineering Limited, зарегистрированным в Великобритании и других странах.
Scarlett Solo является товарным знаком Focusrite Audio Engineering Limited, зарегистрированным в Великобритании и других странах.
2016 © Focusrite Audio Engineering Limited. Все права защищены.
- В обычном браузере перейдите по адресу www.focusrite.com/register/.
- Следуйте инструкциям на экране, введя серийный номер, а затем код пакета (XXXXXX-XXXXXX-XXXXXX) в форму, где будет предложено. Код вашего набора напечатан на внутренней стороне подарочной коробки.
- После этого вы сможете получить доступ к странице «Мои продукты», где доступны для загрузки программные продукты, на которые ваша регистрация дает вам право, вместе с кодами активации, где это применимо.
- Загрузите и установите драйверы Scarlett Solo (только для Windows). Следуйте всем инструкциям на экране.
• По завершении установки перезагрузите компьютер.
• После перезапуска подключите Scarlett Solo к компьютеру с помощью прилагаемого USB-кабеля.
Эта информация верна по состоянию на май 2016 года, однако мы постоянно стремимся улучшить качество обслуживания клиентов, и, как следствие, этот процесс может быть изменен. Если что-то изменилось, см. www.focusrite.com/get-started для получения последней информации.
Только Mac OS:
Ваша ОС должна автоматически переключать аудиовходы и выходы компьютера по умолчанию на Скарлетт Соло. Чтобы убедиться в этом, перейдите на Системные настройки> Звук, и убедитесь, что вход и выход настроены на Scarlett Solo. Для получения более подробной информации о параметрах настройки на Mac откройте Приложения> Утилиты> Аудио Настройка MIDI.
Только Windows:
Ваша ОС должна автоматически переключать аудиовходы и выходы компьютера по умолчанию на Скарлетт Соло. Чтобы убедиться в этом, перейдите по ссылке: Пуск> Панель управления> Оборудование и Звук> Звук> Управление аудио Устройств и убедитесь, что для параметров «Воспроизведение по умолчанию» и «Запись» установлено значение «Scarlett Solo».
Питание вашего Scarlett Solo
Scarlett Solo является активным устройством, и для его работы требуется источник питания постоянного тока. Он будет поставляться с Mac или ПК, к которому он подключен, через одно соединение USB. Обратите внимание, что внешний источник питания не требуется.
У вас не должно возникнуть проблем с питанием Scarlett Solo от USB-портов на любом совместимом Mac или ПК. Однако имейте в виду, что порты USB на некоторых портативных компьютерах могут не обеспечивать такой же ток для внешних подключенных устройств, когда они работают от своих внутренних батарей, по сравнению с их текущими возможностями при работе от сети переменного тока. Поэтому мы настоятельно рекомендуем, если вы используете Scarlett Solo с ноутбуком, подключите его к сети с помощью прилагаемого адаптера переменного тока.
Подключение вашего Scarlett Solo
ВАЖНО — ПОЛЬЗОВАТЕЛИ WINDOWS: Перед подключением Scarlett Solo к компьютеру завершите установку программного обеспечения в соответствии с инструкциями на странице 5. Это обеспечит использование в оборудовании правильных драйверов и предотвратит непредвиденное поведение.
Ваш Scarlett Solo имеет один порт USB 2.0 (на задней панели). После завершения установки программного обеспечения (при необходимости) просто подключите Scarlett Solo к компьютеру с помощью прилагаемого USB-кабеля.
Обратите внимание, что Scarlett Solo является устройством USB 2.0, поэтому для подключения USB требуется порт, совместимый с USB 2.0+, на вашем компьютере. Он не будет правильно работать с портами USB 1.0 / 1.1.
Настройка звука в вашей DAW
Scarlett Solo совместим с любой DAW на базе Windows, которая поддерживает ASIO или WDM, или с любой DAW на базе Mac, использующей Core Audio. После установки драйверов USB (только для Windows) и подключения оборудования вы можете начать использовать Scarlett Solo с выбранной DAW. Чтобы вы могли начать работу, если на вашем компьютере еще не установлено приложение DAW, оба Pro Tools | First и Ableton Live Lite включены в пакет программного обеспечения, доступный после регистрации Scarlett Solo в Интернете. Чтобы установить любую DAW, загрузите и сохраните желаемый установщик. file с вашего зарегистрированного Focusrite «Мои продукты», как описано на стр. 5, а затем запустите его, следуя всем инструкциям на экране.
Инструкции по эксплуатации для Pro Tools | First и Ableton Live Lite выходят за рамки данного Руководства пользователя, но оба приложения включают полный набор справки. files.
Обратите внимание — ваша DAW может не выбирать автоматически Скарлетт Соло в качестве устройства ввода-вывода по умолчанию. В этом случае вы должны вручную выбрать Scarlett Solo в качестве драйвера для вашей DAW. Настройка звука * страница. См. Документацию к вашей DAW (или справку files) если вы не уверены, где выбрать драйвер ASIO или Core Audio. ЭксampВ приведенном ниже файле показана правильная конфигурация Ableton Live Lite. Настройки панель (показана версия для Windows).
* Типичное название. Терминология может немного отличаться между DAW.
После того, как Scarlett Solo будет установлен в качестве предпочтительного аудиоустройства * в вашей DAW, его входы и выходы появятся в настройках аудио ввода / вывода DAW. В зависимости от вашей DAW вам может потребоваться включить определенные входы или выходы перед использованием. Два бывшихampВ нижеследующих файлах показаны два входа и два выхода, включенные в настройках аудио Ableton Lite.
* Типичное название. Терминология может немного отличаться между DAW.
Exampфайлы использования
Scarlett Solo — идеальный аудиоинтерфейс для многих приложений DAW, работающих на ноутбуке или другом компьютере, ПК или Mac.
Типичный набор соединений показан ниже.
Подключение микрофона / инструмента
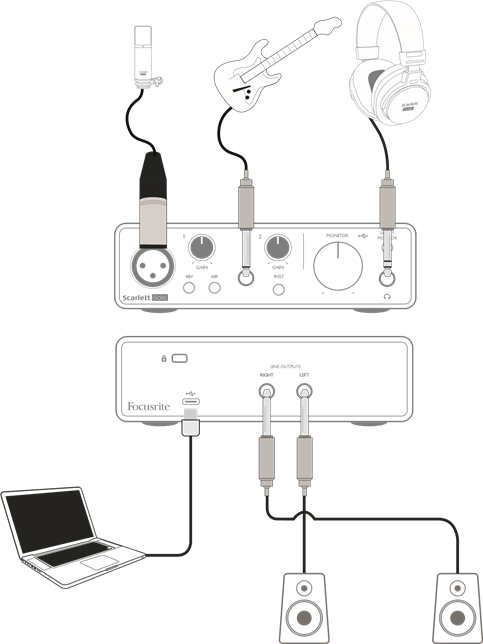
Эта установка иллюстрирует типичную конфигурацию для записи с использованием программного обеспечения DAW на вашем Mac или ПК. В этом случае вы можете записывать вокал через Вход 1 и гитару через Вход 2 в свое записывающее приложение, одновременно контролируя воспроизведение через наушники.
Входы Scarlett Solo находятся на передней панели: вход 1 использует стандартный 3-контактный разъем XLR и настроен для работы с микрофонами большинства типов; у вас, вероятно, будет соответствующий штекер XLR на конце микрофонного кабеля. Для входа 2 используется гнездо ”(6.35 мм) (2-полюсное в режиме инструмента и 3-полюсное при использовании в качестве линейного входа) и предназначено для приема сигналов от электрической или электроакустической гитары или бас-гитары.
Если вы используете «студийный» конденсаторный (конденсаторный) микрофон, рассчитанный на работу от 48 V фантомное питание, нажмите кнопку 48V. Другие типы микрофонов (включая обычный динамический тип) не требуют фантомного питания и могут быть повреждены при подаче фантомного питания.
Использование прямого мониторинга
Вы часто будете слышать термин «задержка», используемый в отношении цифровых аудиосистем. В случае простого приложения для записи DAW, описанного выше, задержка — это время, необходимое для прохождения входных сигналов через записывающее устройство (ваш Mac или ПК) и соответствующее программное обеспечение.
Задержка может быть проблемой для исполнителя, который хочет записывать, контролируя свои входные сигналы.
Scarlett Solo оснащена опцией «Прямой мониторинг», которая решает эту проблему. Настройка передней панели ПРЯМОЙ МОНИТОР переключиться на ON будет направлять входные сигналы непосредственно на выходы наушников и основного монитора Scarlett Solo. Это позволяет вам слышать себя с нулевой задержкой — то есть в «реальном времени» — вместе с воспроизведением на компьютере. Эта настройка никоим образом не влияет на входные сигналы вашего компьютера.
Если для параметра «Прямой мониторинг» установлено значение «ВКЛ.», Убедитесь, что ваше записывающее программное обеспечение не настроено на маршрутизацию своего входа (того, что вы в данный момент записываете) на его выход. Если это так, вы услышите себя «дважды», причем один сигнал будет задержан в виде эха.
Мониторинг наушников
Подключите пару стереонаушников к разъему для наушников на передней панели, чтобы слышать то, что вы записываете — текущий входной сигнал (ы), а также любые треки, которые вы уже записали на свой компьютер.
Примечание. Установите переключатель DIRECT MONITOR на передней панели в положение ON во время записи. Предварительно записанные треки будут слышны в стереофоническом режиме, а текущие входные сигналы — в моно — центральном в стереоизображении. Если вы используете и микрофонный, и инструментальный входы, два входа будут суммированы в моно.
Подключение Scarlett Solo к громкоговорителям
Выходы Phono (RCA) на задней панели можно использовать для подключения контрольных колонок.
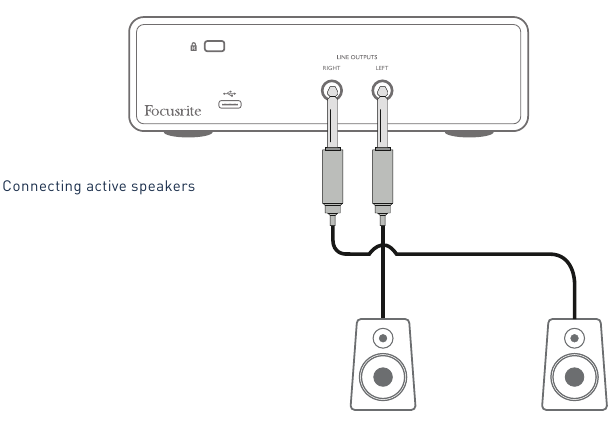
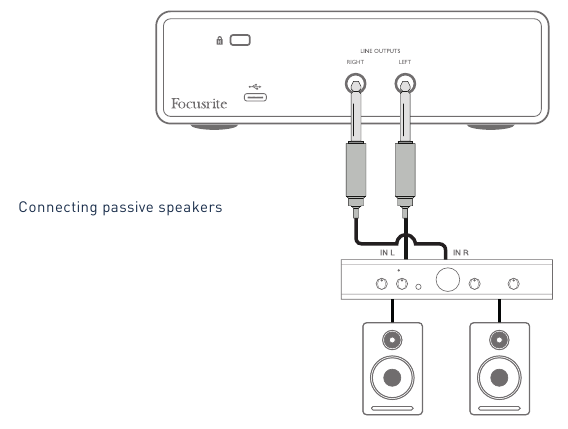
Мониторы с автономным питанием (например, обычные компьютерные колонки) имеют внутренние ampподъемники с регулятором громкости и могут быть подключены напрямую. Для более крупных пассивных громкоговорителей потребуется отдельная стереосистема. ampпожизненнее; в этом случае выходы на задней панели должны быть подключены к ampвклады лифтера.
Подключение активных колонок
Подключение пассивных динамиков
Разъемы линейных выходов представляют собой стандартные разъемы типа «фонокорректор» (RCA). Типичный потребитель (Hi-Fi) ampУ лифтеров и небольших мониторов с питанием будут входы на гнездах для наушников (RCA) или на одном 3.5-полюсном штекере 3 мм (предназначенном для прямого подключения к компьютеру). В любом случае используйте подходящий соединительный кабель с фонокорректором (гнездами RCA) на одном конце.
ПРИМЕЧАНИЕ: Вы рискуете создать петлю звуковой обратной связи, если громкоговорители активны одновременно с микрофоном! Мы рекомендуем всегда выключать (или убавлять) контрольные громкоговорители во время записи и использовать наушники при наложении.
ВАЖНО — Линейные выходы 1-2 не имеют защиты от ударов, пожалуйста, убедитесь, что вы включили свой ampПодъемные или мониторные динамики служат в последнюю очередь, чтобы избежать ударов, хлопков или щелчков при включении компьютера и интерфейса.
ОСОБЕННОСТИ ОБОРУДОВАНИЯ
Передняя панель
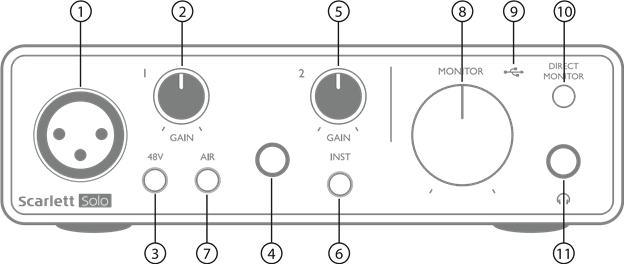
На передней панели находятся входные разъемы для микрофонных и линейных / инструментальных сигналов, а также элементы управления входным усилением и мониторингом.
- Вход 1 — электронно-симметричный вход через 3-контактный разъем XLR для микрофонов.
- ПРИБЫЛЬ 1 — отрегулируйте усиление микрофонного сигнала на входе 1. На регуляторе усиления есть светодиодное «кольцо» для подтверждения уровня сигнала: зеленый цвет указывает на входной уровень не менее -24 дБ полной шкалы (т.е. «сигнал присутствует»), затем кольцо поворачивается. красный, когда уровень сигнала достигает 0 dBFS, что указывает на цифровое ограничение.
- 48V — переключатель фантомного питания для микрофонного входа — включает фантомное питание 48 В на разъеме XLR.
- Вход 2 — для подключения инструментальных (несимметричных) или линейных (симметричных) источников; Гнездо ”TRS jack.
- ПРИБЫЛЬ 2 — регулирует усиление линейного / инструментального сигнала на входе 2. Регулятор усиления имеет двухцветное светодиодное кольцо, как [2].
- INST / LINE — Переключатель инструментального / линейного уровня для входа 2 — переключает усиление для соответствия инструментальным или линейным сигналам.
- MONITOR — регулятор выходного уровня основного монитора — устанавливает выходной уровень на выходах на задней панели и на выходе наушников на передней панели.
Светодиод USB — загорается, когда устройство получает питание по шине USB, и компьютер подтверждает, что он подключен и работает правильно.
- ПРЯМОЙ МОНИТОР — выбирает мониторинг входных сигналов (смешанных с выходом DAW) напрямую со входов (ON) или через DAW (OFF).
-
— Выходной разъем ¼ ”TRS — сюда подключаются стереонаушники.
Задняя Панель
- K (замок безопасности Kensington) — при желании закрепите Scarlett Solo на подходящей конструкции.
См. www.kensington.com/kensington/us/us/s/1704/kensington-security-slot.aspx для получения дополнительной информации о том, как использовать эту функцию. Порт USB 2.0 — разъем типа B; подключитесь к ноутбуку или компьютеру с помощью прилагаемого USB-кабеля.
- ВЫХОДЫ ЛИНИИ: ЛЕВЫЙ и ПРАВО — 2 гнезда для подключения наушников (RCA); +9 дБн макс. выходной уровень.
ВАЖНАЯ ИНФОРМАЦИЯ — Линейные выходы 1 и 2 не имеют защиты от ударов, убедитесь, что вы включили ampПодъемные или мониторные динамики служат в последнюю очередь, чтобы избежать ударов, хлопков или щелчков при включении компьютера и интерфейса.
ТЕХНИЧЕСКИЕ ХАРАКТЕРИСТИКИ
| Источник часов | внутренний |
| Поддерживается sampле ставки | 44.1 кГц. 48 кГц. 88.2 кГц. 96 кГц. 176.4 кГц. 192 кГц |
| вход микрофона | |
| Динамический диапазон | 106 дБ IA-взвешенный) |
| Частотный отклик | От 20 Гц до 20 кГц ± 0.1 дБ |
| THD + N | <0.002% [минимальное усиление, вход -1 дБFS с наклонной полосой 22 Гц / 22 кГц |
| Шум EIN | -128 дБ (A-взвешенный) |
| Максимальный уровень входного сигнала | +4 дБн |
| Диапазон усиления | 50 дБ |
| Линейный вход | |
| Динамический диапазон | 106 дБ по 1А |
| Частотный отклик | От 20 Гц до 20 кГц, ± 0.1 дБ |
| THD + N | <0.002% [минимальное усиление, вход -1 дБFS с наклонной полосой 22 Гц / 22 кГц |
| Максимальный уровень входного сигнала | +22 дБн |
| Диапазон усиления | 50 дБ |
| Инструментальный вход | |
| Динамический диапазон | 106 дБ по 1 А1 |
| Частотный отклик | От 20 Гц до 20 кГц, ± 0.1 дБ |
| THD + N | <0.02% [минимальное усиление, вход -1 дБFS с наклонной полосой 22 Гц / 22 кГц |
| Максимальный уровень входного сигнала | +13 дБн |
| Диапазон усиления | 50 дБ |
| Линейные выходы | |
| Динамический диапазон | 106 дБ по 1 А1 |
| Максимальный выходной уровень (0 дБFS) | +10 дБн |
| THD + N | <0.002% [минимальное усиление. -1 дБFS на входе 1 кГц, с полосовым фильтром 22 Гц / 22 кГц) |
| Выход для наушников | |
| Динамический диапазон | 107 дБ (по шкале А) |
| Максимальный выходной уровень | > +10 дБн |
| THD + N | <0.002% (минимальное усиление, вход -1 дБFS, 1 кГц, с полосовым фильтром 22 Гц / 22 кГц) |
| Аналоговый вход 1 | |
| соединитель | Сбалансированный, через 3-контактный разъем XLR с розеткой на передней панели |
| Фантомного питания | Переключатель фантомного питания 48 В |
| Аналоговый вход 2 | |
| соединитель | Гнездо 1 / 4- 16.35 мм на передней панели Режим INST: несимметричный, 2-полюсный ITS] Режим LINE: сбалансированный ITRSI |
| Аналоговые выходы | |
| Основные выходы | Несимметричный, через 2 разъема Phono [RCA) на задней панели. |
| Стерео выход для наушников | 1/4 ″ TRS-джек на передней панели |
| Контроль уровня выходного сигнала наушники) |
На передней панели |
| Прямой мониторинг | Переключатель на передней панели; позволяет контролировать входы с нулевой задержкой |
| Другие операции ввода-вывода | |
| USB | 1 разъем USB 2.0 типа B |
| Индикаторы передней панели | |
| USB-питания | Зеленый светодиод |
| Получить ореолы | Цветные светодиодные кольца |
| Вес и размеры | |
| ШхВхГ | 144 мм x 44 мм x 119 мм 5.67 дюйма x 1.73 дюйма x 4.68 дюйма |
| Вес | 0.43 кг 0.95 XNUMX фунтов |
УСТРАНЕНИЕ
По всем вопросам, связанным с устранением неполадок, посетите Справочный центр Focusrite, где вы найдете статьи, посвященные многочисленным вопросам устранения неполадок, напримерampони:
support.focusrite.com
АВТОРСКИЕ ПРАВА И ЮРИДИЧЕСКИЕ УВЕДОМЛЕНИЯ
Focusrite является зарегистрированным товарным знаком, а Scarlett Solo является товарным знаком Focusrite Audio Engineering Limited.
Все остальные товарные знаки и торговые наименования являются собственностью соответствующих владельцев.
2016 © Focusrite Audio Engineering Limited. Все права защищены.
Документы / Ресурсы
Рекомендации
OVERVIEW
Introduction
Thank you for purchasing this Third Generation Scarlett Solo, one of the family of Focusrite professional computer audio interfaces incorporating high quality Focusrite analogue preamps. You now have a simple and compact solution for routing high quality audio to and from your computer and you will also be able to download some exciting new software plug-ins once you’ve registered the product.
In developing the Third Generation series of Scarlett interfaces, we have made further improvements to both performance and features to allow you to get the best out of your recordings. Audio specifications have been upgraded throughout the unit to give you greater dynamic range and even lower noise and distortion; additionally, the mic preamp now accepts higher input levels. An important enhancement is the inclusion of Focusrite’s AIR function. Individually selectable on each channel, AIR subtly modifies the preamp’s frequency response to model the sonic characteristics of our classic transformer-based ISA microphone preamps. When recording with good quality microphones, you will notice an enhanced clarity and definition in the important mid to high frequency range, just where it is most needed for vocals and many acoustic instruments.
You can also plug a guitar or bass straight into the dedicated instrument input: its high headroom will let you record without distortion or clipping. Both of Solo’s inputs have Gain Halo meters, which makes it easy to set input levels. Solo now has balanced outputs, which means when you connect them to monitors or an amplifier with balanced inputs, your audio will be protected from any hum or interference.
Third Generation Scarlett interfaces are class compliant on macOS: this means they are plug-andplay, so no need to install a driver if you are a Mac user.
This User Guide provides a detailed explanation of the hardware to help you achieve a thorough understanding of the product’s operational features. We recommend that both users who are new to computer-based recording, as well as more experienced users, take the time to read through the User Guide so that you are fully aware of all the possibilities that the Scarlett Solo and accompanying software have to offer. If the main User Guide sections do not provide the information you need, be sure to consult https://support.focusrite.com/, which contains a comprehensive collection of common technical support queries.
Features
The Scarlett Solo hardware interface provides the means for connecting a microphone and an instrument or line level audio signal to a computer running Mac OS or Windows. The signals at the physical inputs can be routed to your audio recording software / digital audio workstation (referred to throughout this user guide as the «DAW») at up to 24-bit, 192 kHz resolution; similarly, the DAW’s monitor or recorded output will appear at the unit’s physical outputs.
This lets you record «real-world» instruments into Ableton Live Lite, ProTools | First (or whichever other DAW you may use) along with – or instead of – any «native» sounds already available within your computer. The physical outputs can be connected to an amplifier and speakers, powered monitors, headphones or any other audio equipment with analogue inputs that you wish to use. Solo’s Direct Monitoring feature lets you hear what you are playing in «real-time», without the effects of computer latency.
Box Contents
Along with your Scarlett Solo you should have:
• USB cable, Type ‘A’ to Type ‘C’
• Getting Started Information (printed on inside of box lid)
• Important Safety Information
System Requirements
The easiest way to check that your computer’s operating system (OS) is compatible with the Scarlett Solo is to use our online OS Checker at https://customer.focusrite.com/downloads/os. As new OS versions become available over time, you can continue to check for further compatibility information by searching our Help Centre at https://support.focusrite.com/hc/en-gb.
GETTING STARTED
With the Third Generation, Scarlett interfaces introduce a new, faster way of getting up and running, using the Scarlett Quick Start tool. All you need to do is connect your Scarlett Solo to your computer. Once connected, you will see that the device is recognised by your PC or Mac and the Quick Start tool will guide you through the process from there.
IMPORTANT: The Scarlett Solo has a single USB 2.0 Type C port (on the rear panel): connect it to your computer using the USB cable provided. Note that Scarlett Solo is a USB 2.0 device, and thus the USB connection requires a USB 2.0+ compliant port on your computer.
Scarlett Solo gets its power from your computer via the USB connection: there is no need for a separate power supply. However, we do recommend that when using it with a laptop, the laptop should be powered using its AC adaptor, as otherwise the battery will run down faster than when powering the laptop alone.
Your computer will initially treat your Scarlett as a Mass Storage Device (MSD), and during its fi rst connection, the Scarlett will be in «MSD Mode».
Quick Start Tool
We have tried to make registering your Scarlett Solo as simple as possible. The procedure is designed to be self explanatory, but we have described each step below, so you can see how they should appear on either a PC or a Mac.
Mac users only
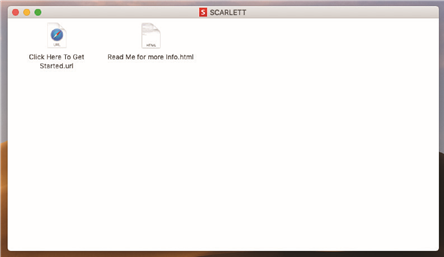
On connecting your Scarlett Solo to your Mac, a Scarlett icon will appear on the desktop:
Double-click on the icon to open the Finder window shown below:
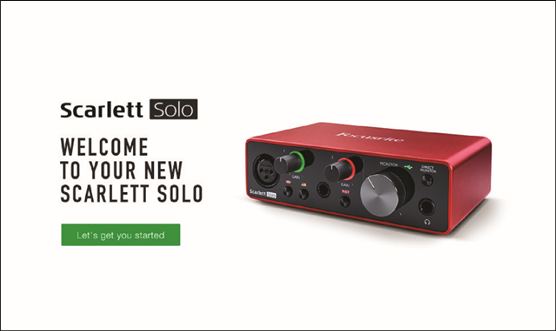
Double-click on the «Click Here to Get Started.url» icon. This will redirect you to the Focusrite website, where we recommend that you register your device:
Click on «Let’s get you started», and you’ll be presented with a form which will be partly prefi lled for you automatically. On submitting the form, options will be presented to either go straight to the downloads to get the software for your Scarlett, or to follow a step by step setup guide based on your choices. Once you have installed the Focusrite Control software to set up and confi gure your interface, the Scarlett will be switched out of MSD mode so that it no longer appears as a Mass Storage Device when connected to your computer.
Your OS should automatically switch the computer’s default audio inputs and outputs to the Scarlett Solo. To verify this, go to System Preferences > Sound, and ensure that the input and output are set to Scarlett Solo. For more detailed setup options on a Mac, open Applications > Utilities > Audio MIDI Setup..
Windows users only
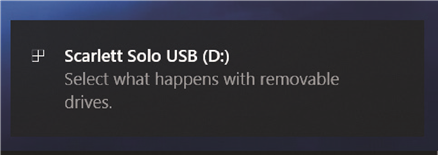
On connecting your Scarlett Solo to your PC, a Scarlett icon will appear on the desktop:
(Note that the drive letter may be something other than D:, depending on what other devices you have connected to your PC.)
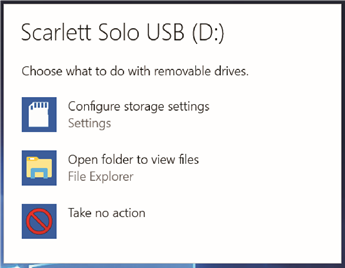
Double-click on the pop-up message to open the dialogue box shown below:
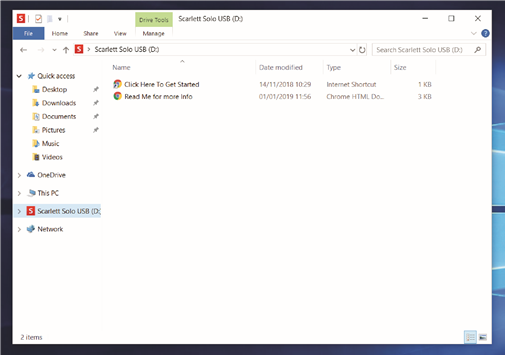
Double-click on «Open folder to view fi les»: this will open an Explorer window:
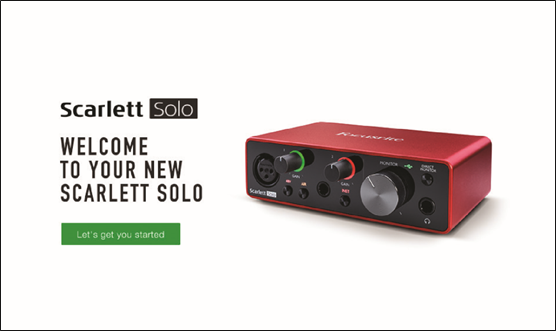
Double-click «Click Here to Get Started». This will redirect you to the Focusrite website, where we recommend that you register your device:
TClick on «Let’s get you started», and you’ll be presented with a form which will be partly prefilled for you automatically. On submitting the form, options will be presented to either go straight to the downloads to get the software for your Scarlett, or to follow a step-by-step setup guide based on your choices. Once you have installed the Focusrite Control software to set up and configure your interface, the Scarlett will be switched out of MSD mode so that it no longer appears as a Mass Storage Device when connected to your computer.
Your OS should automatically switch the computer’s default audio inputs and outputs to be the Scarlett Solo. To verify this, right click on the Sound icon on the taskbar and select Sound Settings, and set the Scarlett as the Input and Output Device.
All users
Note that a second file — «More Info & FAQs» — is also available during the initial set-up process. This file contains some additional information about the Focusrite Quick Start tool which you may find helpful if you have any issues with the procedure.
Once registered, you will have immediate access to the following resources:
• Focusrite Control (Mac and Windows versions available) — see NOTE below
• Multi-language User Guides
Licence codes and links will be provided for the following bundled software within your account page.
- Pro Tools | First
- Ableton Live Lite
- Focusrite Red 2 & 3 Plug-in Suite
- Softube Time and Tone bundle
- XLN Addictive Keys
- Plug-in Collective Offers
NOTE: Installing Focusrite Control will also automatically install the correct driver for your device. Focusrite Control is available to download at any time, even without registering: see «Manual Registration» below.
Manual Registration
If you decide to register your Scarlet Solo at a later date you can do so at https://customer.focusrite.com/user/register. You will need to enter the Serial Number manually: this number can be found on the base of the interface itself, and can also on the barcode label on the side of the box.
We recommend that you download and install our Focusrite Control application, as this will disable MSD mode and unlock the full potential of the interface. Initially, when in MSD mode, the interface will function at sample rates up to 48 kHz. Once Focusrite Control is installed on your computer, you can work at sample rates up to 192 kHz. If you decide not to download and install Focusrite Control immediately, it can be downloaded at any time from https://customer.focusrite.com/support/downloads.
In order to force your Scarlett Solo out of MSD mode without first registering it, connect it to your host computer and press and hold the 48V button for five seconds. This will ensure that your Scarlett Solo has full functionality. Please bear in mind that should you wish to register your Scarlett Solo after taking this action, you will need to so manually, as explained above.
Audio Setup in your DAW
The Scarlett Solo is compatible with any Windows-based DAW that supports ASIO or WDM or any Mac-based DAW that uses Core Audio. After following the Getting Started procedure described above, you can start using your Scarlett Solo with the DAW of your choice. To allow you to get started if you do not already have a DAW application installed on your computer, both ProTools | First and Ableton Live Lite are included; these will be available to you once you’ve registered your Scarlett Solo. If you need help installing either DAW, please visit our Getting Started pages at
https://focusrite.com/get-started
, where Getting Started videos are available.
Operating instructions for ProTools | First and Ableton Live Lite are beyond the scope of this User Guide, but both applications include a full set of Help fi les. Instructions are also available at
www.avid.com
and
www.ableton.com
respectively.
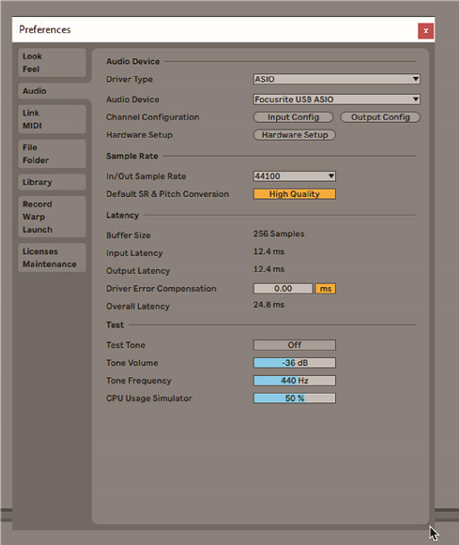
Please note — your DAW may not automatically select the Scarlett Solo as its default I/O device. In this case, you must manually select Focusrite USB ASIO as the driver on your DAW’s Audio Setup* page. Please refer to your DAW’s documentation (or Help fi les) if you are unsure where to select the ASIO or Core Audio driver. The example below shows the correct confi guration in the Ableton Live Lite Preferences panel (Windows version shown).
*Typical name. Terminology may differ slightly between DAWs.
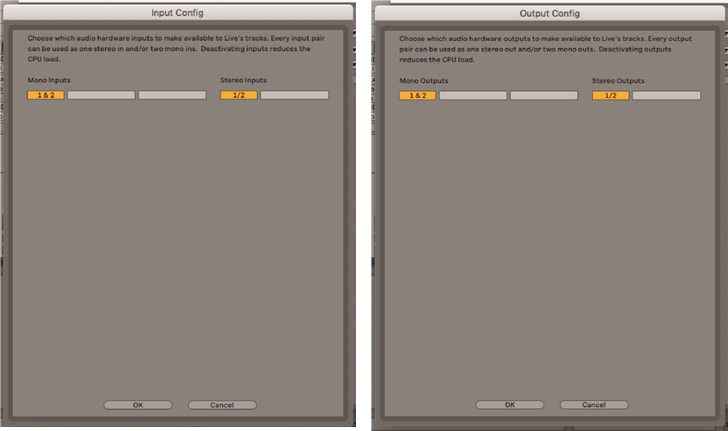
Once the Scarlett Solo is set as the preferred Audio Device* in your DAW, its inputs and outputs will appear in your DAW’s Audio I/O preferences. Depending on your DAW, you may need to enable certain inputs or outputs before use. The two examples below show two Inputs and two outputs enabled in the Ableton Lite Audio Preferences.
*Typical name. Terminology may differ slightly between DAWs.
Examples of use
Scarlett Solo is an ideal audio interface for many DAW applications running on a laptop or other computer, PC or Mac. A typical set of connections is illustrated below.
Connecting a microphone/instrument
This setup illustrates a typical configuration for recording using DAW software on your Mac or PC. In this case, you would record vocals through Input 1 and guitar through Input 2 into your recording application, while monitoring the playback via headphones.
Scarlett Solo’s inputs are on the front panel: Input 1 uses a standard 3-pin XLR socket, and is configured to work with microphones of most types; you will probably have a male XLR connector on the end of your mic cable.
If you are using a «studio» condenser (capacitor) microphone designed to operate on 48 volt phantom power, press the 48V button. Some lower spec. condenser microphones are able to operate from a lower phantom power voltage – typically 15 V. You should check the mic spec to see if it is safe to operate it from 48 V; if not, obtain a suitable external phantom power supply. Most modern microphones of other types, e.g., dynamic or ribbon, will not be damaged by the inadvertent application of phantom power, but note that some older mics may be; if you have any doubt, please check the specification of your mic to ensure that it is safe to use.
Input 2 uses a ¼» (6.35 mm) jack socket which is 2-pole when in instrument mode and 3-pole when used as a mono line input. It can accept signals from an electric or electroacoustic guitar or bass, a keyboard, and most other types of audio equipment. Set the INST switch ON (‘INST’ illuminates red) if you are connecting a musical instrument, e.g., a guitar in the example, using an ordinary 2-pole (TS) guitar jack. Set the INST switch to OFF if you are connecting a line level source such as a keyboard, synthesiser or the balanced output of an external audio mixer via a 3-pole (TRS) jack. Note the jack socket accepts both TRS and TS types of jack plug.
Using Direct Monitoring
You will frequently hear the term «latency» used in connection with digital audio systems. In the case of the simple DAW recording application described above, latency will be the time it takes for your input signals to pass through your computer and audio software. Latency can be a problem for a performer who wishes to record while monitoring their input signals.
The Scarlett Solo is fitted with a «Direct Monitoring» option, which overcomes this problem. Setting the front panel DIRECT MONITOR switch to ON will route your input signals directly to the Scarlett Solo’s headphone and main monitor outputs. This enables you to hear yourself with zero latency – i.e., in «real time» – along with the computer playback. Your inputs will be summed to mono, so both mic and instrument will appear in the centre of the stereo image. Note that the input signals to your computer are not affected in any way by the use of Direct Monitor.
When Direct Monitoring is set to ON, ensure that your recording software is not set to route its input (what you are currently recording) to its output. If it is, you will hear yourself «twice», with one signal audibly delayed as an echo.
Monitoring with DIRECT MONITOR set to OFF can be useful when using an FX plug-in to your DAW to create a stereo effect which contributes to the live performance. In this way, you will be able to hear exactly what is being recorded, complete with the FX. However, some latency may result, the amount depending on the DAW’s buffer size and processing power of the computer.
Headphone monitoring
Connect a pair of stereo headphones to the front panel headphone socket to hear both what you are recording — your current input signal(s), plus any tracks you’ve already recorded in your computer. Note: Set the front panel DIRECT MONITOR switch to ON when recording. The pre-recorded tracks will be heard in stereo, and the current input signals in mono – central in the stereo image. If you are using both the mic and instrument inputs, the two inputs will be summed in mono.
Connecting Scarlett Solo to loudspeakers
The ¼» jack outputs on the rear panel can be used to connect monitoring speakers. Self-powered monitors incorporate internal amplifiers with a volume control, and may be connected directly. Passive loudspeakers will require a separate stereo amplifier; in this case, the rear panel outputs should be connected to the amplifier’s inputs.
The line outputs are 3-pole (TRS) ¼» (6.35 mm) jack sockets, and are electronically balanced. Typical consumer (Hi-Fi) amplifiers and small powered monitors will have unbalanced inputs, either on phono (RCA) sockets, or via a 3.5 mm 3-pole jack plug intended for direct connection to a computer.
In either case, use a suitable connecting cable with jack plugs at one end.
Professional power amplifiers will generally have balanced inputs; we highly recommend using balanced cables to connect these to the outputs of the Scarlett Solo.
NOTE: You run the risk of creating an audio feedback loop if loudspeakers are active at the same time as a microphone! We recommend that you always turn off (or turn down) monitoring loudspeakers while recording, and use headphones when overdubbing.
HARDWARE FEATURES
Front Panel
The front panel includes the input connectors for mic and line/instrument signals, and the input gain and monitoring controls.
- Input 1 – electronically balanced input via 3-pin XLR socket for microphones.
- GAIN 1 – adjust the gain for the microphone signal at Input 1. The gain controls have concentric tri-colour LED ‘rings’ to confirm signal level: green indicates an input level of at least -24 dBFS (i.e., ‘signal present’), the ring then turns amber at -6 dBFS to indicate that the signal is close to clipping, and finally to red at 0 dBFS (digital clipping).
- 48V – phantom power switch for mic input — enables 48 V phantom power at the XLR socket.
- Input 2 – ¼» TRS jack socket for connecting instruments (unbalanced) or line level (balanced) sources.
- GAIN 2 – adjusts the gain for the line/instrument signal at Input 2. The gain control has a tricolour LED ring as [2].
- INST/LINE – Instrument/Line level switch for Input 2 – switches gain to suit instrument or line level signals. ‘INST’ illuminates red when Instrument mode is selected. Note that INST mode may also be selected from Focusrite Control.
- AIR – switch enabling AIR mode for the mic input. AIR modifies the frequency response of the input stage to model the classic, transformer-based Focusrite ISA microphone preamps. ‘AIR’ illuminates yellow when the mode is selected. Note that AIR may also be selected from Focusrite Control.
- MONITOR – main monitor output level control — sets the output level at the rear panel outputs and the front panel headphone output.
USB LED – illuminates when the unit receives USB bus power and is confirmed by the computer as connected and operating correctly.
- DIRECT MONITOR – selects monitoring of input signals (mixed with the DAW output) to be directly from inputs (ON) or via the DAW (OFF).
-
– ¼» TRS output jack. If your headphones have a ¼» TRS jack plug, connect them directly; if they have a 3.5 mm TRS «mini jack», use a TRS ¼»-to-3.5 mm jack adaptor. Note that it is likely that headphones fitted with 4-pole TRRS plugs will not operate correctly.
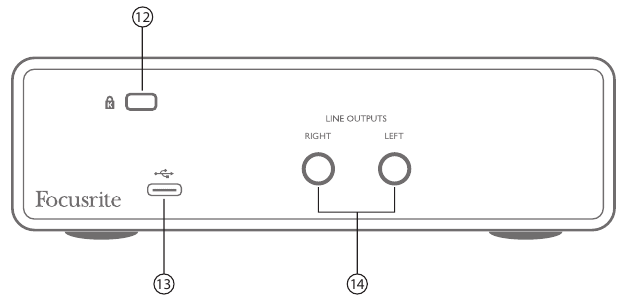
Back Panel
12. (Kensington security lock) – secure your Scarlett Solo to a suitable structure if desired.
13. USB 2.0 port – Type C connector; connect to your laptop or computer with the USB cable supplied.
14. LINE OUTPUTS: LEFT and RIGHT – 2 x ¼» (6.35 mm) TRS jack sockets; +10 dBu output level (variable), electronically balanced. Either ¼» TRS (balanced connection) or TS (unbalanced connection) jack plugs can be used.
Here you can download full pdf version of manual, it may contain additional safety instructions, warranty information, FCC rules, etc.
-
Contents
-
Table of Contents
-
Troubleshooting
-
Bookmarks
Quick Links
User Guide
www.focusrite.com
FFFA001168-01
Related Manuals for Focusrite Scarlett solo
Summary of Contents for Focusrite Scarlett solo
-
Page 1: User Guide
User Guide www.focusrite.com FFFA001168-01…
-
Page 2: Important Safety Instructions
IMPORTANT SAFETY INSTRUCTIONS 1. Read these instructions. 2. Keep these instructions. 3. Heed all warnings. 4. Follow all instructions. 5. Do not use this apparatus with water. 6. Clean only with dry cloth. 7. Do not install near any heat sources such as radiators, heat registers, stoves, or other apparatus (including amplifiers) that produce heat. 8. Protect the power cord from being walked on or pinched particularly at plugs, convenience receptacles, and the point where they exit from the apparatus. 9. Only use attachments/accessories specified by the manufacturer. 10. Use only with the cart, stand, tripod, bracket, or table specified by the manufacturer, or sold with the apparatus. When a cart is used, use caution when moving the cart/ apparatus combination to avoid injury from tip-over.
-
Page 3: Environmental Declaration
ENVIRONMENTAL DECLARATION Compliance Information Statement: Declaration of Compliance procedure Product Identification: Focusrite Scarlett Solo Studio Responsible party: American Music and Sound Address: 4325 Executive Drive Suite 300 Southaven, MS 38672 Telephone: 800-431-2609 This device complies with part 15 of the FCC Rules. Operation is subject to the following two conditions: (1) This device may not cause harmful interference, and (2) this device must accept any interference received, including interference that may cause undesired operation. For USA To the User: 1. Do not modify this unit! This product, when installed as indicated in the instructions contained in this manual, meets FCC requirements. Modifications not expressly approved by Focusrite may void your…
-
Page 4: Table Of Contents
TABLE OF CONTENTS IMPORTANT SAFETY INSTRUCTIONS . . . . . . . . . . . . . . . . . . . . . . . . . . . . . . . . . . . . . . . . . . . . . . 2 OVERVIEW .
-
Page 5: Overview
OVERVIEW Introduction Thank you for purchasing the Scarlett Solo Studio package, part of the range of Focusrite professional computer audio interfaces incorporating high quality, Focusrite analogue pre-amplifiers. You now have a simple, compact and complete solution for recording with a microphone or directly from instruments, by routing high quality audio to and from your computer. This User Guide provides a detailed explanation of the components to help you achieve a thorough understanding of the Scarlett Solo’s operational features. We recommend that whether you are new to computer recording or a more experienced user, you should take the time to read through the user guide so that you are fully aware of all the possibilities that the Scarlett Solo Studio components and accompanying software has to offer. If the main User Guide sections do not provide the information you need, be sure to consult http://www.focusrite.com/answerbase, which contains a comprehensive collection of answers to common technical support queries. Features The Scarlett Solo Studio package comprises a Scarlett Solo computer audio interface, a Scarlett CM25 studio quality condenser microphone, a pair of Scarlett HP60 reference quality headphones and all the necessary software – including Steinberg’s Cubase LE — to get you started with recording…
-
Page 6: Box Contents
Box Contents You should find that your Scarlett Solo Studio package comprises: • Scarlett Solo computer audio interface • Scarlett CM25 condenser microphone • Scarlett HP60 headphones • Software Activation card, with codes for accessing the following on-line resources: — USB Drivers for Windows — Scarlett Plug-in Suite for Mac and Windows — Cubase LE — LoopMasters sample library (1 GB) — Novation Bass station — Multi-language User Guides • Red XLR microphone cable (3 m) • USB cable (1.5 m), Type ‘A’ – Type ‘B’ • “Getting Started Guide” System requirements Mac OS Apple Macintosh with a high-speed USB 2.0-compliant USB port OS: Mac OS X 10.8 or 10.9 Windows Windows compatible computer with a USB 2.0-compliant USB port OS: Windows 7 (all versions) or Windows 8 (excluding Windows 8 RT)
-
Page 7: Getting Started
GETTING STARTED IMPORTANT PC USERS — PLEASE ENSURE THAT YOU INSTALL THE SCARLETT DRIVERS BEFORE CONNECTING THE INTERFACE TO YOUR COMPUTER. The registration card (“Download your Software”) included with the Scarlett Solo Studio package enables you to download the latest Windows drivers from the Focusrite website. Registering your product To operate correctly with Windows, your Scarlett Solo first needs software drivers to be installed on your computer. These — and several powerful and useful extras — are available for download from the Focusrite website (www.focusrite.com/register). The Software Activation card provided with your Scarlett Solo contains validation codes which you will need to enter at the above web address. This procedure ensures that you will have the most up-to-date software versions. Can’t get started? If you have any trouble with this product do not go back to the place of purchase. Contact our support team on:…
-
Page 8: Software Installation
Sound > Sound > Manage Audio Devices Default Playback Recording and confirm that ‘ ’ and ‘ ’ Scarlett Solo USB are set to ‘ ’. Powering the Scarlett Solo The Scarlett Solo is an active device, and needs a DC power source to operate. This will be supplied by the Mac or PC to which it is connected, via the single USB connection. Note that an external power supply is not required. You should experience no problems in powering the Scarlett Solo from the USB ports on any compatible Mac or PC. However, please be aware that USB ports on some laptops may not be able to deliver the same current to externally-connected devices when they are running off their internal batteries, compared to their current capability when running from AC mains. We therefore strongly recommend that if you are using Scarlett Solo with a laptop, please power the laptop from the mains…
-
Page 9: Connecting Your Scarlett Solo
Scarlett Solo is compatible with any Windows-based DAW that supports ASIO or WDM and any Mac-based DAW that uses Core Audio. After installing the drivers and connecting the hardware, you can start using Scarlett Solo with the DAW of your choice. Steinberg Cubase LE can be downloaded free of charge once you have registered the product; this will allow you to get started if you do not already have a DAW application installed on your computer. To help you install Cubase LE and get started with it, please go to the following URL where you will find a dedicated article on the subject. http://global.focusrite.com/answerbase/how-to-install-and-activate-cubase-le-7 Focusrite has also prepared a video tutorial to accompany this, which can be found at http://global.focusrite.com/answerbase/video-how-to-install-and-activate-cubase-le-7. Operating instructions for Cubase LE are beyond the scope of this User Guide, but the application includes a full set of Help files.
-
Page 10
Scarlett driver for Mac or for Windows). Please refer to your DAW’s Solo USB Focusrite Scarlett ASIO documentation (or Help files) if you are unsure where to select the ASIO/Core Audio driver. The Device Setup example below shows the correct configuration in the Cubase LE pane (Mac version shown). Once the Scarlett Solo driver is selected as the preferred Audio Device*, its inputs and outputs will appear in your DAW’s Audio I/O preferences. Depending on your DAW, you may need to enable… -
Page 11: Example Of Usage
Example of Usage The Scarlett Solo is an ideal audio interface for many DAW applications running on a laptop or other computer, PC or Mac. A typical set of connections is illustrated below: Connecting a microphone/instrument This setup illustrates a typical configuration for recording using DAW software on your Mac or PC. In this case, you might record vocals through Input 1 and guitar through Input 2 into your recording application, while monitoring the playback via headphones or loudspeakers. Scarlett Solo’s inputs are on the front panel; Input 1 uses a standard 3-pin XLR socket, and is configured to work with microphones of most types; you will find a mating XLR male connector on the end of the mic cable supplied. Input 2 uses a ¼” (6.35 mm) jack socket (2-pole when in instrument mode and 3-pole when used as a line input), and is intended to accept higher level signals from a guitar or bass.
-
Page 12: Recording With A Microphone
Recording with a microphone The Scarlett CM25 microphone supplied with Scarlett Solo Studio is a studio quality condenser mic which is ideal for recording vocals and most acoustic instruments. Connect the CM25 to the Scarlett Solo’s Input 1 with the cable supplied. Note that the cable has a male and a female connector; the female end connects to the microphone and the male end to the Scarlett Solo. Condenser microphones (also sometimes referred to as “capacitor” microphones) require a source of DC power to operate. This is almost always supplied by “phantom” powering from the mic pre-amp to which the mic is connected (early and special-purpose condenser mics might have a separate power supply). For the CM25 (or any other condenser mic) to work with the Scarlett Solo, press the 48V button on the front panel (see front panel diagram on page 16, item [3]). We recommend that you follow the following sequence: •…
-
Page 13
Microphone Dos and Don’ts A guide to microphone technique is beyond the scope of this User Guide (though many excellent books on the subject are available), but if you are new to recording with a studio quality microphone, you need to observe a few golden rules. DO use a mic stand. The CM25 has an industry-standard 5/8” threaded insert which allows it to be mounted on most mic stands. An 3/8” adaptor is included to allow it to be fitted to mic stands that have this thread size. Inexpensive short, long and boom stands are readily available from music stores. DO observe the microphone’s orientation. The CM25 has a cardioid response pattern; this basically means that it has a “front” and a “back”, and if you point it the wrong way round, it will sound awful. This mark (a cardioid response pattern) identifies the front of the microphone. -
Page 14: Using Direct Monitoring
Using Direct Monitoring You will frequently hear the term “latency” used in connection with digital audio systems. In the case of the simple recording application described above, latency will be the time it takes for your input signals to pass through your recording device (your Mac or PC) and the associated software. Latency can be a problem for a performer who wishes to record while monitoring their input signals. Scarlett Solo is fitted with a “Direct Monitoring” option, which overcomes this problem. Setting the front panel DIRECT MONITOR switch to ON will route your input signals directly to Scarlett Solo’s headphone and main monitor outputs. This enables you to hear yourself with zero latency – i.e., in “real time” – along with the computer playback. The input signals to your computer are not affected in any way by this setting. When “Direct Monitoring” is set to ON, ensure that Cubase LE (or other DAW) is not set to route its input (what you are currently recording) to its output. If it is, you will hear yourself twice, with one signal audibly delayed as an echo. Connecting Scarlett Solo to headphones The Scarlett Solo Studio package includes a pair of high quality headphones, the Scarlett HP60s. They are lightweight and durable, and should prove comfortable to wear for extended periods. The headband is adjustable. The HP60 headphones have a low noise, oxygen-free copper cable, fitted with a ¼” (6.35 mm) 3-pole (TRS) jack plug. This should be connected to the socket at the right hand side of the Scarlett Solo’s front panel (indicated by a symbol). The Scarlett Solo’s headphone output is, of course, suitable for use with other models of headphones. The volume in the headphones can be adjusted by the rotary MONITOR control. Please be aware that headphones are capable of generating very high sound pressure levels at the ear; prolonged exposure to high sound levels may impair your hearing. Never turn headphones volume up any further than necessary.
-
Page 15: Connecting Scarlett Solo To Loudspeakers
Connecting Scarlett Solo to loudspeakers The phono (RCA) outputs on the rear panel can be used to connect monitoring speakers. Self-powered monitors (i.e., typical computer speakers) incorporate internal amplifiers, and may be connected directly. Larger, passive loudspeakers will require a separate stereo amplifier; in this case, the rear panel outputs should be connected to the amplifier’s inputs. Powered Monitor Amplifier Alternative methods for connecting monitor speakers. The line output connectors are standard phono (RCA) sockets. Typical consumer (hi-fi) amplifiers and small powered monitors will have inputs on phono (RCA) sockets or a single 3.5 mm 3-pole jack plug (intended for direct connection to a computer). In either case, use a suitable connecting cable with phono plugs (RCA jacks) at one end. NOTE: You run the risk of creating an audio feedback loop if loudspeakers are active at the same time as a microphone! We recommend that you always turn off (or turn down) monitoring loudspeakers while recording, and use headphones when overdubbing.
-
Page 16: Hardware Features
HARDWARE FEATURES Front Panel The front panel includes the input connectors for mic and line/instrument signals, and the input gain and monitoring controls. 1. Input 1 – electronically balanced input via 3-pin XLR socket for microphones. 2. 01 – adjust the gain for the microphone signal at input 1. The gain control has a concentric bi-colour LED ‘ring’ to confirm signal level: green indicates an input level of at least -24 dBFS (i.e. ‘signal present’), the ring then turns red when signal level reaches 0 dBFS.
-
Page 17: Back Panel
Back Panel 1. Kensington security lock – secure your Scarlett to a suitable structure if desired. 2. USB 2 .0 port – Type B connector; connect to your laptop or computer with the USB cable supplied. 3. LINE OUTPUTS — 2 x phono (RCA) sockets; +9 dBu max. output level.
-
Page 18: Specifications
SPECIFICATIONS Performance Specifications Clock source: Internal 106 dB ‘A-weighted’ (all inputs). Converter chipset A/D ADC Dynamic Range dynamic range 114 dB Range 106 dB ‘A-weighted’ (all outputs). Converter chipset DAC Dynamic Range D/A dynamic range 114 dB 44.1 kHz, 48 kHz, 88.2 kHz, 96 kHz / 24 bit – operation with Supported Sample Rates Mac and PC Microphone Input Frequency Response 20 Hz to 20 kHz +/-0.3 dB Gain Range -4 dB to +46 dB -97 dB Noise (EIN) — 125 dB Dynamic Range 106 dB (A-weighted) Max. Input level +4 dBu Instrument Input Frequency Response…
-
Page 19: Physical And Electrical Characteristics
Line Outputs -100 dB Noise (Equivalent Output Noise) -92 dB, Noise = -97 dB (A-weighted) Dynamic Range 106 dB Max. Output Level +9 dBu, unbalanced Headphone Output -100 dB Dynamic Range 106 dB Max. Output Level +10 dBu (no load) Physical and Electrical Characteristics Analogue Input 1 Connector Balanced, via female 3-pin XLR on front panel Phantom power 48 V phantom power switch Analogue Input 2 ¼” (6.35 mm) jack socket on front panel Connector Instrument mode: Unbalanced, 2-pole Line input mode: Balanced, 3-pole Analogue Outputs Unbalanced, via 2 x phono (RCA) sockets on Main outputs rear panel Stereo headphone output…
-
Page 20: Scarlett Cm25 Microphone Specifications
Scarlett CM25 Microphone Specifications Capsule Type 20 mm dia. condenser element Response type Cardioid Mounting Standard 5/8” female; 3/8” adaptor supplied Performance Frequency response 30 Hz to 20 kHz Sensitivity -36 dB ±2 dB (0 dB = 1 V/Pa) Self noise 18 dBA Maximum SPL 130 dB (1 kHz) S/N ratio 76 dB (A-weighted) Impedance 150 ohms Power Via 48 V phantom supply Scarlett HP60 Headphones Specifications Type Closed Driver diameter 53 mm Impedance 60 ohms Sensitivity SPL 94 dB ±3 dB Frequency response 10 Hz to 30 kHz Max. power rating 1.2 W Cable length…
-
Page 21: Troubleshooting
TROUBLESHOOTING For all troubleshooting queries, please visit the Focusrite Answerbase at www.focusrite.com/answerbase where you will find articles covering numerous troubleshooting examples. COPYRIGHT AND LEGAL NOTICES Focusrite is a registered trade mark and Scarlett Solo and Scarlett Solo Studio are trade marks of Focusrite Audio Engineering Limited. All other trade marks and trade names are the property of their respective owners. 2014 © Focusrite Audio Engineering Limited. All rights reserved.
Посмотреть инструкция для Focusrite Scarlett Solo бесплатно. Руководство относится к категории устройства звукозаписи, 4 человек(а) дали ему среднюю оценку 7.7. Руководство доступно на следующих языках: русский. У вас есть вопрос о Focusrite Scarlett Solo или вам нужна помощь? Задайте свой вопрос здесь
Не можете найти ответ на свой вопрос в руководстве? Вы можете найти ответ на свой вопрос ниже, в разделе часто задаваемых вопросов о Focusrite Scarlett Solo.
Какой вес Focusrite Scarlett Solo?
Инструкция Focusrite Scarlett Solo доступно в русский?
Не нашли свой вопрос? Задайте свой вопрос здесь


