Введение 8
Обеспечение безопасности детей 15
Детские сиденья ………………………………..19
Установка детского сиденья ………………………..19
Детские автокресла-бустеры ……………………….22
Установка детских сидений…………………………25
Замки системы блокировки дверей от открывания детьми ……33
Ремни безопасности 34
Пристегивание ремней безопасности ………………….36
Регулировка высоты ремня безопасности ……………….41
Предупреждающий световой и звуковой сигнал непристегнутого
ремня безопасности ……………………………..42
Устройство напоминания о необходимости пристегнуть
ремень безопасности……………………………..42
Техническое обслуживание детских удерживающих устройств и
ремней безопасности …………………………….45
Система персональной безопасности 46
Вспомогательная удерживающая система 48
Надувные подушки безопасности водителя и пассажира ……..50
Система определения занятости сиденья переднего пассажира . . .53
Боковые надувные подушки безопасности ………………58
Боковые шторки системы надувных подушек безопасности
Safety Canopy ………………………………….60
Датчики удара и предупреждающий индикатор надувной
подушки безопасности ……………………………62
Утилизация надувных подушек безопасности …………….64
Ключи и дистанционное управление 65
Общая информация о радиочастотах ………………….65
Пульт дистанционного управления ……………………66
Ключи ………………………………………66
Замена утерянного ключа или пульта дистанционного
управления ……………………………………67
Содержание 1
2013 Edge (edg)
Owners Guide gf, 1st Printing, September 2013
Russia_(LHD) (r_lhd)
Посмотреть инструкция для Ford Edge (2019) бесплатно. Руководство относится к категории автомобили, 4 человек(а) дали ему среднюю оценку 8.5. Руководство доступно на следующих языках: английский. У вас есть вопрос о Ford Edge (2019) или вам нужна помощь? Задайте свой вопрос здесь
Не можете найти ответ на свой вопрос в руководстве? Вы можете найти ответ на свой вопрос ниже, в разделе часто задаваемых вопросов о Ford Edge (2019).
Как перевести мили в километры?
Где я могу узнать идентификационный номер транспортного средства Ford?
Что такое идентификационный номер транспортного средства (VIN)?
Когда транспортному средству Ford требуется техническое обслуживание?
Когда следует заменять тормозную жидкость на Ford?
В чем разница между топливом E10 и E5?
Одна или несколько дверей не открываются изнутри. Что мне делать?
Автомобильный радиоприемник не включается, что делать?
Инструкция Ford Edge (2019) доступно в русский?
Не нашли свой вопрос? Задайте свой вопрос здесь

- Manuals
- Brands
- Ford Manuals
- Automobile
- 2008 EDGE
- Owner’s manual
2012
-
Contents
-
Table of Contents
-
Bookmarks
Quick Links
2012 Edge (edg)
Owners Guide, 1st Printing
USA (fus)
Table of Contents
12
12
18
20
45
45
53
55
56
57
57
59
66
69
69
73
74
75
80
80
82
85
87
89
90
112
4
1
Related Manuals for Ford Edge
Summary of Contents for Ford Edge
-
Page 1: Table Of Contents
Automatic temperature control Rear window defroster Lights Headlamps Turn signal control Interior lamps Bulb replacement Driver Controls Windshield wiper/washer control Steering wheel adjustment Power windows Mirrors Speed control Adaptive cruise control Utility hooks 2012 Edge (edg) Owners Guide, 1st Printing USA (fus)
-
Page 2
Transmission operation Reverse sensing system Rear-view camera system Roadside Emergencies Getting roadside assistance Hazard flasher control Fuel pump shut-off Fuses and relays Changing tires Wheel lug nut torque Jump starting Wrecker towing 2012 Edge (edg) Owners Guide, 1st Printing USA (fus) -
Page 3
Ford Motor Company. Ford may change the contents without notice and without incurring obligation. Copyright © 2011 Ford Motor Company… -
Page 4: Introduction
Introduction CONGRATULATIONS Congratulations on acquiring your new Ford. Please take the time to get well acquainted with your vehicle by reading this handbook. The more you know and understand about your vehicle, the greater the safety and pleasure you will derive from driving it.
-
Page 5
Drive your new vehicle at least 1,000 miles (1,600 km) before towing a trailer. For more detailed information about towing a trailer, refer to Trailer towing in the Tires, Wheels and Loading chapter. 2012 Edge (edg) Owners Guide, 1st Printing USA (fus) -
Page 6
In order to properly diagnose and service your vehicle, Ford Motor Company, Ford of Canada, and service and repair facilities may… -
Page 7
EDR. Ford Motor Company and Ford of Canada do not access event data recorder… -
Page 8
If you do not want Ford or its vendors to receive this information, do not activate the service. Ford Motor Company and the vendors it uses to provide you with this information do not store your vehicle travel information. -
Page 9
WARNING: Driving while distracted can result in loss of vehicle control, accident and injury. Ford strongly recommends that you use extreme caution when using any device or feature that may take your focus off the road. Your primary responsibility is the safe operation of your vehicle. -
Page 10
Brake Fluid — Parking Aid System Non-Petroleum Based Stability Control System Speed Control Master Lighting Switch Hazard Warning Flasher Fog Lamps-Front Fuse Compartment Fuel Pump Reset Windshield Wash/Wipe Windshield Rear Window Defrost/Demist Defrost/Demist 2012 Edge (edg) Owners Guide, 1st Printing USA (fus) -
Page 11
Sparks Explosive Gas Fan Warning Maintain Correct Fluid Power Steering Fluid Level Service Engine Soon Engine Air Filter Passenger Compartment Jack Air Filter Low Tire Pressure Check Fuel Cap Warning 2012 Edge (edg) Owners Guide, 1st Printing USA (fus) -
Page 12: Instrument Cluster
Warning lights can alert you to a vehicle condition that may become serious enough to cause extensive repairs. A warning light may illuminate when a problem exists with one of your vehicle’s functions. 2012 Edge (edg) Owners Guide, 1st Printing USA (fus)
-
Page 13: Instrument Cluster
Powertrain malfunction/reduced power (RTT): Illuminates when a powertrain or an AWD fault has been detected. Contact your authorized dealer as soon as possible. 2012 Edge (edg) Owners Guide, 1st Printing USA (fus)
-
Page 14
A Belt-Minder chime will also sound to remind you to fasten your safety belt. Refer to the Seating and Safety Restraints chapter to activate/deactivate the Belt-Minder chime feature. 2012 Edge (edg) Owners Guide, 1st Printing USA (fus) -
Page 15
(TPMS) in the Tires, Wheels and Loading chapter. Low fuel (RTT): Illuminates when the fuel level in the fuel tank is at or near empty. Refer to Fuel gauge in this chapter. 2012 Edge (edg) Owners Guide, 1st Printing USA (fus) -
Page 16
(RTT): Illuminates when the engine coolant temperature is high. Stop the vehicle as soon as possible, switch off the engine and let cool. Refer to Engine coolant in the Maintenance and Specifications chapter. 2012 Edge (edg) Owners Guide, 1st Printing USA (fus) -
Page 17
Parking brake on chime: Sounds when the parking brake is left on and the vehicle is driven. If the warning stays on after the park brake is off, contact your authorized dealer as soon as possible. 2012 Edge (edg) Owners Guide, 1st Printing USA (fus) -
Page 18: Gauges
If the engine coolant temperature exceeds the normal range, stop the vehicle as soon as safely possible, switch off the engine and let the engine cool. 2012 Edge (edg) Owners Guide, 1st Printing USA (fus)
-
Page 19
This is also used to configure different vehicle personalization options and display the status of various vehicle functions. See Optional message center in this chapter for more information. 2012 Edge (edg) Owners Guide, 1st Printing USA (fus) -
Page 20: Message Center
BASE MESSAGE CENTER (IF EQUIPPED) WARNING: Driving while distracted can result in loss of vehicle control, accident and injury. Ford strongly recommends that drivers use extreme caution when using any device or feature that may take their focus off the road. Your primary responsibility is the safe operation of the vehicle.
-
Page 21
*Note: Some items are optional and may not appear. 2012 Edge (edg) Owners Guide, 1st Printing USA (fus) -
Page 22
Zone (1–15) (if equipped) See the diagram below to determine your magnetic zone. Determine which magnetic zone you are in for your geographic location by referring to the zone map. 7 8 9 1011 2012 Edge (edg) Owners Guide, 1st Printing USA (fus) -
Page 23
Auto or Off Climate Control Driver Seat Auto or Off Climate Control Passenger Seat Auto or Off Duration (5, 10 or 15 minutes) Quiet Start System Wipers Courtesy Wipe Rain Sensing Reverse Wiper 2012 Edge (edg) Owners Guide, 1st Printing USA (fus) -
Page 24
Use the up/down arrow buttons to scroll through the list; press the right arrow button to display specific information on the highlighted warning. *Note: Some items are optional and may not appear. 2012 Edge (edg) Owners Guide, 1st Printing USA (fus) -
Page 25
OPTIONAL MESSAGE CENTER (IF EQUIPPED) WARNING: Driving while distracted can result in loss of vehicle control, accident and injury. Ford strongly recommends that drivers use extreme caution when using any device or feature that may take their focus off the road. Your primary responsibility is the safe operation of the vehicle. -
Page 26
To change the Menu Control between Standard or Memory On, refer to Vehicle and Menu Control found in the table under the Settings section later in this chapter. 2012 Edge (edg) Owners Guide, 1st Printing USA (fus) -
Page 27
Note: You can also choose to have only the fuel gauge show in this mode. Refer to Display > Gauge Display found in the table under the Settings section later in this chapter. 2012 Edge (edg) Owners Guide, 1st Printing USA (fus) -
Page 28
More power to 01234.5mi either front or rear wheels will be displayed by more area filled in. Refer to All-Wheel Drive (AWD) system in the Driving chapter. 2012 Edge (edg) Owners Guide, 1st Printing USA (fus) -
Page 29
The white highlighted box indicates which of the screens you are currently viewing: Choose the standard or enhanced display. See the Settings chart following to reach the trip display settings. 2012 Edge (edg) Owners Guide, 1st Printing USA (fus) -
Page 30
The boxes in the upper right corner of the screen indicate that there are multiple screens that you can navigate through. Each press of the right arrow will navigate to the next screen 2012 Edge (edg) Owners Guide, 1st Printing USA (fus) -
Page 31
2. Record the highway fuel economy for future reference. It is important to reset fuel economy after setting the speed control to get accurate highway fuel economy readings. 2012 Edge (edg) Owners Guide, 1st Printing USA (fus) -
Page 32
On / Off Autounlock On / Off Remote All doors / Driver’s door Unlocking Menu Control Standard / Memory On Oil Life Reset Set to XXX % Power Liftgate Enable / Disable 2012 Edge (edg) Owners Guide, 1st Printing USA (fus) -
Page 33
*Some MyKey items will only appear if a MyKey is set. Display Gauge Display Fuel Gauge / Fuel + Tach Trip Display Standard / Enhanced Language English / Español / Français 2012 Edge (edg) Owners Guide, 1st Printing USA (fus) -
Page 34
Warnings display first (only displays if warnings are present) Oil Life Wash Fluid Doors Liftgate Blind spot Cross Traffic Brakes Fuel (distance to empty) *Some items will only display during a system check if a problem has been detected. 2012 Edge (edg) Owners Guide, 1st Printing USA (fus) -
Page 35
• Some messages can be acknowledged and reset by pressing OK. This allows you to use the full message center functionality by clearing the message. 2012 Edge (edg) Owners Guide, 1st Printing USA (fus) -
Page 36
CONTROL OFF chapter for more information. TRAILER SWAY Displayed when the trailer sway control has detected trailer sway. For more information, REDUCE SPEED refer to the Driving chapter for more information. 2012 Edge (edg) Owners Guide, 1st Printing USA (fus) -
Page 37
Displayed in conjunction with the Throttle CHECK AWD Control/Transmission/AWD light when the AWD system is not operating properly. If the warning stays on or continues to come on, contact your authorized dealer as soon as possible. 2012 Edge (edg) Owners Guide, 1st Printing USA (fus) -
Page 38
(BLIS ) with Cross Traffic Alert in the Driving chapter. BLIND SPOT Displayed when a fault with the blind spot information system has occurred. Contact your SYSTEM FAULT authorized dealer as soon as possible. 2012 Edge (edg) Owners Guide, 1st Printing USA (fus) -
Page 39
ENGAGED more than 3 mph (5 km/h). If the warning stays on after the parking brake is released, contact your authorized dealer as soon as possible. 2012 Edge (edg) Owners Guide, 1st Printing USA (fus) -
Page 40
Refer to Easy Fuel “no cap” INLET fuel system in the Maintenance and Specifications chapter. FUEL LEVEL LOW Displayed as an early reminder of a low fuel condition. XXX MI TO E 2012 Edge (edg) Owners Guide, 1st Printing USA (fus) -
Page 41
This is a reminder that the brake pedal must be applied when the start/stop button is pressed in order to start the engine. Refer to Push button start system in the Driving chapter for more information. 2012 Edge (edg) Owners Guide, 1st Printing USA (fus) -
Page 42
Displayed when starting the vehicle and MyKey is in use and the MyKey speed limit is 80 MPH on. Refer to MyKey in the Locks and Security chapter for more information. 2012 Edge (edg) Owners Guide, 1st Printing USA (fus) -
Page 43
COULD NOT Displayed when an attempt is made to program a spare key using two existing PROGRAM KEY MyKeys. Refer to MyKey in the Locks and Security chapter for more information. 2012 Edge (edg) Owners Guide, 1st Printing USA (fus) -
Page 44
Understanding Your Tire Pressure Monitoring System (TPMS) in the Tires, Wheels and Loading chapter. If the warning stays on or continues to come on, contact your authorized dealer as soon as possible. 2012 Edge (edg) Owners Guide, 1st Printing USA (fus) -
Page 45: Entertainment Systems
MYFORD™ SYSTEM (IF EQUIPPED) WARNING: Driving while distracted can result in loss of vehicle control, accident and injury. Ford strongly recommends that drivers use extreme caution when using any device or feature that may take their focus off the road. Your primary responsibility is the safe operation of the vehicle.
-
Page 46
• Press RADIO repeatedly to cycle through AM, AM2-AST, FM1, FM2, FM3-AST frequency bands. • Select the Tune soft key then scroll through the frequencies by using or the tune knob. 2012 Edge (edg) Owners Guide, 1st Printing USA (fus) -
Page 47
• Set Category: Select to choose a specific music category in FM mode. You can then search for stations only playing this kind of music. Note: RBDS/RDS text must be turn on before “Set Category” will appear. 2012 Edge (edg) Owners Guide, 1st Printing USA (fus) -
Page 48
The display will also indicate the presets to which the stations are saved. • Select the ‘Replay’ soft key to replay audio on the current channel. You can replay approximately 45 minutes of audio as long as you have 2012 Edge (edg) Owners Guide, 1st Printing USA (fus) -
Page 49
• Set Category: Select to scroll through a list of available SIRIUS channel categories (Pop, Rock, News, etc.) Note: If you select a category, the seek and scan functions will only stop on channels in that category. 2012 Edge (edg) Owners Guide, 1st Printing USA (fus) -
Page 50
• Station overload: When you pass a ground based broadcast repeating tower, a stronger signal may overtake a weaker one and result in an audio mute. 2012 Edge (edg) Owners Guide, 1st Printing USA (fus) -
Page 51
Note: SIRIUS reserves the unrestricted right to change, rearrange, add or delete programming including canceling, moving or adding particular channels, and its prices, at any time, with or without notice to you. Ford Motor Company shall not be responsible for any such programming changes. -
Page 52
• Scan All: Press to hear a brief selection of all tracks on the current disc. • Scan Folder: Available when playing an MP3 disc. Select for a brief sampling of all the music in the current folder. 2012 Edge (edg) Owners Guide, 1st Printing USA (fus) -
Page 53: Auxiliary Input Jack (Line In)
Due to technical incompatibility, certain recordable and re-recordable compact discs may not function correctly when used in Ford CD players. Do not use any irregular shaped CDs or discs with a scratch protection film attached. CDs with homemade paper (adhesive) labels should not be inserted into the CD player as the label may peel and cause the CD to become jammed.
-
Page 54
Press again to return to the playing media. If your vehicle is equipped with a touchscreen system, refer to the MyFord Touch™ / MyLincoln Touch™ supplement for further information. 2012 Edge (edg) Owners Guide, 1st Printing USA (fus) -
Page 55: Usb Port
USB port (if equipped) WARNING: Driving while distracted can result in loss of vehicle control, accident and injury. Ford strongly recommends that drivers use extreme caution when using any device or feature that may take their focus off the road. Your primary responsibility is the safe operation of the vehicle.
-
Page 56: Myford Touch™ System
MYFORD TOUCH ™ (IF EQUIPPED) WARNING: Driving while distracted can result in loss of vehicle control, accident and injury. Ford strongly recommends that drivers use extreme caution when using any device that may take their focus off the road. Your primary responsibility is the safe operation of the vehicle.
-
Page 57: Climate Controls
A/C mode. Recirculated air may also help reduce undesirable odors from entering the vehicle. Press the MAX A/C button again for normal A/C operation. 2012 Edge (edg) Owners Guide, 1st Printing USA (fus)
-
Page 58
2-3 minutes after start-up or until the vehicle has been “aired out.” • A small amount of air may be felt from the floor vent regardless of the air distribution setting that is selected. 2012 Edge (edg) Owners Guide, 1st Printing USA (fus) -
Page 59: Automatic Temperature Control
Message Center section of the Instrument Cluster chapter. 1. A/C control: Press to activate/deactivate air conditioning. Use with recirculated air to improve cooling performance and efficiency. Engages automatically in AUTO, (defrost) and (floor/defrost). 2012 Edge (edg) Owners Guide, 1st Printing USA (fus)
-
Page 60
(dual zone) or the entire vehicle cabin (single zone) if the passenger side temperature is not activated. 10. AUTO: Press to engage full automatic operation. Select the desired temperature using the temperature control. The system will 2012 Edge (edg) Owners Guide, 1st Printing USA (fus) -
Page 61
Note: Your vehicle is also equipped with touchscreen climate control features. To access, press the lower right corner ( ) of the touchscreen. Refer to your MyFord Touch™ / MyLincoln Touch™ supplement for more information. 2012 Edge (edg) Owners Guide, 1st Printing USA (fus) -
Page 62
The system will automatically determine fan speed, airflow distribution, A/C on or off, and outside or recirculated air, to heat or cool the vehicle to reach the desired temperature. 2012 Edge (edg) Owners Guide, 1st Printing USA (fus) -
Page 63
DUAL: Touch to activate dual zone (separate passenger temperature control). Touch again to deactivate and return to single zone temperature control (where the driver settings control the temperature for the entire vehicle). 2012 Edge (edg) Owners Guide, 1st Printing USA (fus) -
Page 64
If the passenger temperature controls are not activated (dual zone), the driver’s settings will determine the temperature setting for the entire vehicle cabin. 2012 Edge (edg) Owners Guide, 1st Printing USA (fus) -
Page 65
1. Press MAX A/C. The system will default to single-zone operation and set the temperature to 60°F (16°C). 2. A/C, will be selected. 3. Fan speed will be determined by the vehicle’s internal temperature, but can be adjusted as desired. 2012 Edge (edg) Owners Guide, 1st Printing USA (fus) -
Page 66: Rear Window Defroster
This may cause damage to the heated grid lines and will not be covered by your warranty. 2012 Edge (edg) Owners Guide, 1st Printing USA (fus)
-
Page 67
• The interior cabin will be set to 72°F (22°C). • The cooled seats (if equipped and if the feature is selected to AUTO in the message center) will be set to high. 2012 Edge (edg) Owners Guide, 1st Printing USA (fus) -
Page 68
Running the system without a filter in place could result in degradation or damage to the system. For replacement intervals, refer to the Scheduled Maintenance chapter. For more information regarding your filter, see your authorized dealer. 2012 Edge (edg) Owners Guide, 1st Printing USA (fus) -
Page 69: Lights
(Steps 1 through 6 must be done within 10 seconds): 1. Turn the vehicle off. 2. Rotate the headlamp control to the autolamp position. 2012 Edge (edg) Owners Guide, 1st Printing USA (fus)
-
Page 70
(DRL) system does not activate the tail lamps and generally may not provide adequate lighting during these conditions. Failure to activate your headlamps under these conditions may result in a collision. 2012 Edge (edg) Owners Guide, 1st Printing USA (fus) -
Page 71
The headlamps on your vehicle are properly aimed at the assembly plant. If your vehicle has been in an accident the alignment of your headlamps should be checked by your authorized dealer. 2012 Edge (edg) Owners Guide, 1st Printing USA (fus) -
Page 72
If the top edge of the high intensity light zone is not at the horizontal reference line, the headlamp will need to be adjusted. -
Page 73: Turn Signal Control
Using a Hex head driver, turn the adjuster either clockwise (to adjust down) or counterclockwise (to adjust up). The horizontal edge of the brighter light should touch the horizontal reference line. 5. Close the hood and turn off the lamps.
-
Page 74: Interior Lamps
INTERIOR LAMPS Front row map lamps (if equipped) To turn on the map lamps, press the outer edge of the clear lens. The front row map lamp lights when: • any door is opened. • the dome lamp button on the instrument panel is activated.
-
Page 75: Bulb Replacement
Trade Function Number of bulbs number Headlamp high/low beam HIR2 (halogen) * HID (high intensity discharge) headlamp * Front sidemarker lamp 3457NAK Front park/turn signal lamp (amber) 2012 Edge (edg) Owners Guide, 1st Printing USA (fus)
-
Page 76
Replacing headlamp bulbs Check the operation of all bulbs frequently. 1. Make sure that the headlamp control is in the off position. 2. Open the hood. 3. Remove the bulb cover. 2012 Edge (edg) Owners Guide, 1st Printing USA (fus) -
Page 77
The low beam headlamps on your vehicle use a “high intensity discharge” source. These lamps operate at a high voltage. When the bulb is burned out, the bulb and starter capsule assembly must be replaced by your authorized dealer. 2012 Edge (edg) Owners Guide, 1st Printing USA (fus) -
Page 78
4. Rotate the bulb socket counterclockwise and remove from lamp assembly. 5. Pull bulb straight out of socket and snap in the new bulb. 6. Install the bulb socket into the lamp assembly and rotate clockwise. 2012 Edge (edg) Owners Guide, 1st Printing USA (fus) -
Page 79
4. Pull bulb straight out of socket and push in the new bulb. 5. Install the bulb socket into the lamp assembly and rotate clockwise. 6. To install, carefully press the lamp assembly into the liftgate. 2012 Edge (edg) Owners Guide, 1st Printing USA (fus) -
Page 80: Driver Controls
Note: The rain-sensing wiper feature must be turned off before entering a car wash. 2012 Edge (edg) Owners Guide, 1st Printing USA (fus)
-
Page 81
Select: 2 — Intermittent operation (shortest pause between wipes). 1 — Intermittent operation (longest pause between wipes). O (off) — Rear wiper and washer off. 2012 Edge (edg) Owners Guide, 1st Printing USA (fus) -
Page 82: Steering Wheel Adjustment
3. While holding the steering wheel in place, pull the lever up to its original position to lock the steering column. WARNING: Never adjust the steering wheel when the vehicle is moving. 2012 Edge (edg) Owners Guide, 1st Printing USA (fus)
-
Page 83
The storage compartment may be used to store a pair of sunglasses. Press the release area on the rear edge of the bin door to open the storage compartment. The door will open to the full open position. 2012 Edge (edg) -
Page 84
Note: Do not plug optional electrical accessories into the cigarette lighter socket (if equipped). Improper use of the lighter can cause damage not covered by your warranty, and can result in fire or serious injury. 2012 Edge (edg) Owners Guide, 1st Printing USA (fus) -
Page 85: Power Windows
Rear Window Buffeting: When one or both of the rear windows are open, the vehicle may demonstrate a wind throb or buffeting noise. This noise can be alleviated by lowering a front window approximately 2–3 inches (5–8 cm). 2012 Edge (edg) Owners Guide, 1st Printing USA (fus)
-
Page 86
With accessory delay, the window switches, audio system and moon roof (if equipped) may be used for up to 10 minutes after the ignition is turned off or until either front door is opened. 2012 Edge (edg) Owners Guide, 1st Printing USA (fus) -
Page 87: Mirrors
2. Move the control in the direction you wish to tilt the mirror. 3. Return to the center position to lock mirrors in place. 2012 Edge (edg) Owners Guide, 1st Printing USA (fus)
-
Page 88
Your vehicle may be equipped with blind spot mirrors or a blind spot information system. Refer to Blind spot mirrors or Blind spot information system (BLIS ) with cross traffic alert (CTA) in the Driving chapter. 2012 Edge (edg) Owners Guide, 1st Printing USA (fus) -
Page 89: Speed Control
Disengaging speed control To disengage the speed control, press the brake pedal or press and release CNCL. Disengaging the speed control will not erase the previous set speed. 2012 Edge (edg) Owners Guide, 1st Printing USA (fus)
-
Page 90: Driver Controls
Once activated, the driver can deactivate the system at any time by pressing the brake pedal, pressing the steering wheel ON/OFF control or pressing the RES/CNCL control. In 2012 Edge (edg) Owners Guide, 1st Printing USA (fus)
-
Page 91
Press to resume or cancel a set speed. ON/OFF: Press to turn the system on or off. GAP: Press to change the distance between your vehicle and the vehicle in front of you. 2012 Edge (edg) Owners Guide, 1st Printing USA (fus) -
Page 92
• The vehicle in front of you moves out of your lane or out of view. • The vehicle speed falls below 16 mph (26 km/h). • A new gap distance is set. 2012 Edge (edg) Owners Guide, 1st Printing USA (fus) -
Page 93
56 yards (53 m) Normal 4 bars 2.3 seconds 66 yards (64 m) Comfort Each time the vehicle is restarted, the last chosen gap for the current driver will be automatically selected. 2012 Edge (edg) Owners Guide, 1st Printing USA (fus) -
Page 94
The set speed will display continuously in the message center while ACC is active. Note: Resume should only be used if the driver is aware of the set speed and intends to return to it. 2012 Edge (edg) Owners Guide, 1st Printing USA (fus) -
Page 95
The radar sensor has a limited field of vision. In some situations it may not detect vehicles at all or detect a vehicle later than expected. Detection issues can occur: • When driving on a different line than the vehicle in front. 2012 Edge (edg) Owners Guide, 1st Printing USA (fus) -
Page 96
Driver Controls • With vehicles that edge into your lane. These vehicles can only be detected once they have moved fully into your lane. • There may be issues with the detection of vehicles in front when driving into and coming out of a bend or curve in the road. -
Page 97
This can happen, for example, when driving in sparse rural or desert environments. A false blocked condition will either self clear or clear after a key cycle. 2012 Edge (edg) Owners Guide, 1st Printing USA (fus) -
Page 98
MEDIA: Press repeatedly to scroll through available audio modes. MUTE: Press to silence the radio. VOL (Volume): Press up or down to increase or decrease the volume. 2012 Edge (edg) Owners Guide, 1st Printing USA (fus) -
Page 99
• Routed map • Phone • Redundant center stack display • Favorite contacts • Climate • On • Fan speed • Temperature Refer to the MyFord Touch™ / MyLincoln Touch™ supplement. 2012 Edge (edg) Owners Guide, 1st Printing USA (fus) -
Page 100
To open the panoramic Vista Roof™ press and release the control. The panoramic Vista Roof™ will open to the “comfort” position. Press and release the control again to fully open. To stop the one-touch open feature press the control again. 2012 Edge (edg) Owners Guide, 1st Printing USA (fus) -
Page 101
WARNING: When programming your HomeLink Wireless Control System to a garage door or gate, be sure that people and objects are out of the way to prevent potential injury or damage. 2012 Edge (edg) Owners Guide, 1st Printing USA (fus) -
Page 102
3. Firmly press and hold for five seconds and release the programmed HomeLink button up to two separate times to activate the door. If the door does not activate, press and hold the just-trained HomeLink button and observe the indicator light. 2012 Edge (edg) Owners Guide, 1st Printing USA (fus) -
Page 103
• Continue to press and hold the HomeLink button (note Step 2 in the Programming section) while you press and release — every two seconds (“cycle”) your hand-held transmitter until the frequency 2012 Edge (edg) Owners Guide, 1st Printing USA (fus) -
Page 104
1. Press and hold the desired HomeLink button. Do NOT release the button. 2. The indicator light will begin to flash after 20 seconds. Without releasing the HomeLink button, follow Step 1 in the Programming section. 2012 Edge (edg) Owners Guide, 1st Printing USA (fus) -
Page 105
• Always make sure that objects cannot fall into the driver foot well while the vehicle is moving. Objects that are loose can become trapped under the pedals causing a loss of vehicle control. 2012 Edge (edg) Owners Guide, 1st Printing USA (fus) -
Page 106
Note: In the event of a power failure, the latch can be accessed and released from the inside using the access panel on the liftgate trim. 2012 Edge (edg) Owners Guide, 1st Printing USA (fus) -
Page 107
6-10 inches (15–24 cm) from being latched, the liftgate may reverse to the full open position. Verify that the gate is closed before operating or moving the vehicle, especially in an enclosure, 2012 Edge (edg) Owners Guide, 1st Printing USA (fus) -
Page 108
Note: For the best performance allow the power system to open the liftgate after pressing the control. Manually pushing or pulling the liftgate may activate the system’s obstacle detection feature and stops the power operation. 2012 Edge (edg) Owners Guide, 1st Printing USA (fus) -
Page 109
If the power liftgate is opening, the system will stop and a chime will sound three times when an obstacle is detected. Once the obstacle is removed, the liftgate can again be operated normally. 2012 Edge (edg) Owners Guide, 1st Printing USA (fus) -
Page 110
The cargo management system consists of storage compartments located in the floor of the rear cargo area. 1. To open, lift the release handle and the lid. 2. To close, lower the lid. 2012 Edge (edg) Owners Guide, 1st Printing USA (fus) -
Page 111
The cargo net secures lightweight objects in the cargo area. Attach the net to the loops and anchors provided. WARNING: This net is not designed to restrain objects during a collision. 2012 Edge (edg) Owners Guide, 1st Printing USA (fus) -
Page 112: Utility Hooks
Driver Controls Utility hook The utility hook can be used to hang small items such as grocery bags, etc. Do not hang more than 10 lb (4.5 kg) on the hook. 2012 Edge (edg) Owners Guide, 1st Printing USA (fus)
-
Page 113
Your vehicle may be equipped with factory-installed crossbars. Ford Genuine Accessory crossbars, designed specifically for your vehicle, are also recommended for use with your roof rack system. -
Page 114: Locks And Security
Your vehicle may be equipped with two intelligent access keys which operate the power locks and the remote start system. The IA key must be in the vehicle to activate the push button start system. 2012 Edge (edg) Owners Guide, 1st Printing USA (fus)
-
Page 115
• The audio system will be muted whenever Belt-Minder is activated until the safety belts are buckled. Refer to the Seating and Safety Restraints chapter for a detailed description of Belt-Minder operation. 2012 Edge (edg) Owners Guide, 1st Printing USA (fus) -
Page 116
Note: All MyKeys can be cleared within the same key cycle that it was created, otherwise an admin key is required to clear the MyKey programming. To clear all MyKeys go to Step 2 in the Clear MyKey section. 2012 Edge (edg) Owners Guide, 1st Printing USA (fus) -
Page 117
Using MyKey with remote start systems MyKey is not compatible with non Ford-approved aftermarket remote start systems. If you choose to install a remote start system please see your authorized dealer for a Ford-approved remote start system. -
Page 118
Ford-approved remote start system as a MyKey if the remote start fob is used by the MyKey driver. To program a non Ford-approved remote start system as MyKey , do the following: 1. Enter the vehicle and close all doors. -
Page 119
Locks and Security Note: For all vehicles with a non Ford-approved remote start installed, it is possible to program all ’real’ keys as MyKeys , in which case, you will need to use your remote start system to reset all MyKeys as admin keys by doing the following: 1. -
Page 120
• For programming spare keys, refer to the Lost any key Programming spare keys section in this chapter. • Vehicle has a non Ford-approved remote start I accidentally programmed all system that is recognized as an admin key. Refer to… -
Page 121: Locks
IA key inside the vehicle, you can lock your vehicle after all doors are closed by using the keyless entry keypad, pressing the control on another IA key or touching the locking area on the handle with another 2012 Edge (edg) Owners Guide, 1st Printing USA (fus)
-
Page 122
3. Enter factory–set 5–digit entry code. 4. Press and hold the 3 • 4. While holding the 3 • 4 press the 7 • 8. 5. Release the 7 • 8. 2012 Edge (edg) Owners Guide, 1st Printing USA (fus) -
Page 123
5. Release the 3 • 4. The user should receive a horn chirp to indicate the system has been disabled or a chirp followed by a honk to indicate the system has been enabled. 2012 Edge (edg) Owners Guide, 1st Printing USA (fus) -
Page 124
The childproof locks are located on the rear edge of each rear door and must be set separately for each door. Setting the lock for one door will not automatically set the lock for both doors. -
Page 125
You can activate the intelligent access feature as long as you have one of your IA keys within range of the front doors or the liftgate. 2012 Edge (edg) Owners Guide, 1st Printing USA (fus) -
Page 126
Refer to Message center in the Instrument Cluster chapter. If equipped with an IA key, when two-stage unlocking is disabled, intelligent access at the driver’s door results in an unlock of all doors (not just the driver door). 2012 Edge (edg) Owners Guide, 1st Printing USA (fus) -
Page 127
This will also prevent passengers and cargo from falling out. If you must drive with the liftgate open, keep the vents open so outside air comes into the vehicle. 2012 Edge (edg) Owners Guide, 1st Printing USA (fus) -
Page 128
2. Within three seconds press the 3. Repeat this procedure for each additional transmitter if desired. 2012 Edge (edg) Owners Guide, 1st Printing USA (fus) -
Page 129
Note: Do not wipe off any grease on the battery terminals or on the back surface of the circuit board. 2012 Edge (edg) Owners Guide, 1st Printing USA (fus) -
Page 130
• the ignition is turned on, or • the control on the transmitter is pressed, or • the vehicle is locked using the keyless entry keypad, or • after 25 seconds of illumination. 2012 Edge (edg) Owners Guide, 1st Printing USA (fus) -
Page 131
All the buttons have this increased range performance capability when equipped with remote start. 2012 Edge (edg) Owners Guide, 1st Printing USA (fus) -
Page 132
Note: Each button press must be done within three seconds of each other. If this sequence is not followed, the vehicle will not remote start and the horn will not chirp. 2012 Edge (edg) Owners Guide, 1st Printing USA (fus) -
Page 133
You can disable or enable the remote start system through the message center. Refer to Message center in the Instrument Cluster chapter. 2012 Edge (edg) Owners Guide, 1st Printing USA (fus) -
Page 134
You may also program a personal entry code through the MyFord Touch™ / MyLincoln Touch™ system (if equipped). Refer to the MyFord Touch™ / MyLincoln Touch™ supplement. 2012 Edge (edg) Owners Guide, 1st Printing USA (fus) -
Page 135
To lock all doors, press and hold the 7 • 8 and the 9 • 0 at the same time (with the driver’s door closed). You do not need to enter the keypad code first. To enable/disable autolock/autounlock, refer to Autolock feature or Autounlock feature earlier in this chapter. 2012 Edge (edg) Owners Guide, 1st Printing USA (fus) -
Page 136: Anti-Theft System
Note: The SecuriLock passive anti-theft system is not compatible with non-Ford aftermarket remote start systems. Use of these systems may result in vehicle starting problems and a loss of security protection. Note: Large metallic objects, electronic devices that are used to purchase gasoline or similar items, or a second coded key on the same key chain may cause vehicle starting issues.
-
Page 137
• If two previously programmed coded keys are not available, you must take your vehicle to your authorized dealer to have the spare key(s) programmed. Please read and understand the entire procedure before you begin. 2012 Edge (edg) Owners Guide, 1st Printing USA (fus) -
Page 138
If two previously programmed keys are not available, you must take your vehicle to your authorized dealer to have the spare key(s) programmed. 2012 Edge (edg) Owners Guide, 1st Printing USA (fus) -
Page 139
8. Verify that the remote entry functions operate (press lock then unlock, making sure you end in unlock) and that the vehicle starts with new intelligent access key. 2012 Edge (edg) Owners Guide, 1st Printing USA (fus) -
Page 140
When fully armed (after the 20 second pre-arm mode), any IA keys (if equipped) found inside the vehicle are disabled/inoperable and will not start the engine. Press button to re-enable them. 2012 Edge (edg) Owners Guide, 1st Printing USA (fus) -
Page 141
Perimeter alarm issues If there seems to be a potential perimeter alarm system problem with your vehicle, ensure ALL keys/remote entry transmitters are brought to your authorized dealer to aid in troubleshooting. 2012 Edge (edg) Owners Guide, 1st Printing USA (fus) -
Page 142: Seating And Safety Restraints
The driver should never adjust the head restraint while the vehicle is in motion. 2012 Edge (edg) Owners Guide, 1st Printing USA (fus)
-
Page 143
For occupants of extremely tall stature, adjust the head restraint to its full up position. 2012 Edge (edg) Owners Guide, 1st Printing USA (fus) -
Page 144
Lift handle to move seat forward or backward. Pump the handle upwards to raise the cushion and pump downward to lower the cushion to the desired location. 2012 Edge (edg) Owners Guide, 1st Printing USA (fus) -
Page 145
WARNING: Reclining the seatback can cause an occupant to slide under the seat’s safety belt, resulting in severe personal injuries in the event of a collision. 2012 Edge (edg) Owners Guide, 1st Printing USA (fus) -
Page 146
The control is located on the outboard side of the seat cushion. Press the front or rear portion to tilt the seat. Press the control to move the seat forward, backward, up or down. 2012 Edge (edg) Owners Guide, 1st Printing USA (fus) -
Page 147
• Operate the seat heater if water or any other liquid is spilled on the seat. Allow the seat to dry thoroughly. The heated seats will only function when the engine is running. 2012 Edge (edg) Owners Guide, 1st Printing USA (fus) -
Page 148
The seat will move to the final position when the key is in the ignition (if easy entry feature is enabled). 2012 Edge (edg) Owners Guide, 1st Printing USA (fus) -
Page 149
5. Move the seat as far forward as possible. WARNING: Cover sharp edges on the load to help prevent injury to occupants. Secure the load to help prevent shifting during sudden stops. 2012 Edge (edg) Owners Guide, 1st Printing USA (fus) -
Page 150
WARNING: To prevent possible damage to the seat or safety belts, ensure that the safety belts are not buckled when moving the seat to the load floor position. 2012 Edge (edg) Owners Guide, 1st Printing USA (fus) -
Page 151
(accessible from the liftgate area). Press and hold the control mechanism to lower the seatback. The top portion lowers the right (40%) seatback, and the bottom portion lowers the left (60%) seatback. 2012 Edge (edg) Owners Guide, 1st Printing USA (fus) -
Page 152
The second row seat reclines for additional comfort. To adjust the second row seatback to the desired position, while seated, pull the release lever up and push the seatback rearward. 2012 Edge (edg) Owners Guide, 1st Printing USA (fus) -
Page 153
Returning the 2nd row armrest to the upright position Close the cover on the cup holders. Rotate the armrest rearward until the armrest is in the latched position. The armrest will click when it is latched into position. 2012 Edge (edg) Owners Guide, 1st Printing USA (fus) -
Page 154: Personal Safety System
The pretensioners are designed to activate in frontal and near-frontal collisions, and in rollovers and side collisions when the Safety Canopy is activated. 2012 Edge (edg) Owners Guide, 1st Printing USA (fus)
-
Page 155
If you must use a forward-facing child seat in the front seat, move the seat all the way back. WARNING: Always transport children 12 years old and under in the back seat and always properly use appropriate child restraints. 2012 Edge (edg) Owners Guide, 1st Printing USA (fus) -
Page 156
Routine maintenance of the Personal Safety System is not required. The Restraints Control Module (RCM) monitors its own internal circuits and the circuits for the airbag supplemental restraints, crash sensor(s), 2012 Edge (edg) Owners Guide, 1st Printing USA (fus) -
Page 157: Safety Belt System
Be sure everyone in your vehicle is in a seat and using a safety belt properly. 2012 Edge (edg) Owners Guide, 1st Printing USA (fus)
-
Page 158
(the buckle closest to the direction the tongue is coming from) until you hear a snap and feel it latch. Make sure the tongue is securely fastened in the buckle. 2012 Edge (edg) Owners Guide, 1st Printing USA (fus) -
Page 159
For example, if the driver brakes suddenly or turns a corner sharply, or the vehicle receives an impact of approximately 5 mph 2012 Edge (edg) Owners Guide, 1st Printing USA (fus) -
Page 160
“automatic locking retractor” feature for child seats is still functioning properly. In addition, all safety belts should be checked for proper function. 2012 Edge (edg) Owners Guide, 1st Printing USA (fus) -
Page 161
Manufacturer identification is located at the end of the webbing on the label. Also, use the safety belt extension only if the safety belt is too short for you when fully extended. 2012 Edge (edg) Owners Guide, 1st Printing USA (fus) -
Page 162
It is used to adjust the comfort of the shoulder belt for smaller occupants in the outboard second row seats. 2012 Edge (edg) Owners Guide, 1st Printing USA (fus) -
Page 163
Safety belt warning light and indicator chime The safety belt warning light illuminates in the instrument cluster and a chime sounds to remind the occupants to fasten their safety belts. 2012 Edge (edg) Owners Guide, 1st Printing USA (fus) -
Page 164
If the Belt-Minder warnings have expired (warnings for approximately five minutes) for one occupant (driver or front passenger), the other occupant can still activate the Belt-Minder feature. 2012 Edge (edg) Owners Guide, 1st Printing USA (fus) -
Page 165
30 seconds, repeating for (5 km/h) and more than approximately five minutes or until 1-2 minutes have elapsed since the safety belts are buckled. the ignition switch has been turned to on… 2012 Edge (edg) Owners Guide, 1st Printing USA (fus) -
Page 166
“The people I’m with don’t Set the example, teen deaths occur 4 wear belts” times more often in vehicles with TWO or MORE people. Children and younger brothers/sisters imitate behavior they see. 2012 Edge (edg) Owners Guide, 1st Printing USA (fus) -
Page 167
Read Steps 1 — 4 thoroughly before proceeding with the deactivation/activation programming procedure. Note: The driver and front passenger Belt-Minder features must be disabled/enabled separately. Both cannot be disable/enabled during the same key cycle. 2012 Edge (edg) Owners Guide, 1st Printing USA (fus) -
Page 168
12 times in three seconds. • This will enable the Belt-Minder feature for that seating position if it is currently disabled. As confirmation, the safety belt warning light will flash 12 times in three seconds. 2012 Edge (edg) Owners Guide, 1st Printing USA (fus) -
Page 169: Airbags
(SRS) is provided. WARNING: When possible, all children 12 years old and under should be properly restrained in a rear seating position. 2012 Edge (edg) Owners Guide, 1st Printing USA (fus)
-
Page 170
(including frame, bumper, front end body structure and tow hooks) may affect the performance of the airbag system, increasing the risk of injury. Do not modify the front end of the vehicle. 2012 Edge (edg) Owners Guide, 1st Printing USA (fus) -
Page 171
Rather, it means the forces were not of the type sufficient to cause activation. Front airbags are designed to activate in frontal and near-frontal collisions, not rollover, side-impact, or rear-impacts unless the collision causes sufficient longitudinal deceleration. 2012 Edge (edg) Owners Guide, 1st Printing USA (fus) -
Page 172
• driver and passenger airbag modules (which include the inflators and airbags) • seat-mounted side airbags. Refer to Seat-mounted side airbag system later in this chapter • safety belt pretensioners • one or more impact and safing sensors 2012 Edge (edg) Owners Guide, 1st Printing USA (fus) -
Page 173
• the system determines that a small child is present in a booster seat. • a front passenger takes his/her weight off of the seat for a period of time. 2012 Edge (edg) Owners Guide, 1st Printing USA (fus) -
Page 174
• Restart the vehicle and have the person remain in this position for about two minutes. This will allow the system to detect that person and enable the passenger’s frontal airbag. 2012 Edge (edg) Owners Guide, 1st Printing USA (fus) -
Page 175
• Objects lodged underneath the seat • Objects between the seat cushion and the center console (if equipped) • Objects hanging off the seat back 2012 Edge (edg) Owners Guide, 1st Printing USA (fus) -
Page 176
• Remove the obstruction(s) (if found). • Restart the vehicle. • Wait at least two minutes and verify that the airbag readiness light in the instrument cluster is no longer illuminated 2012 Edge (edg) Owners Guide, 1st Printing USA (fus) -
Page 177
If it is necessary to modify an advanced front airbag system to accommodate a person with disabilities, contact the Ford Customer Relationship Center at the phone number shown in the Customer Assistance section of this Owner’s Guide or see your authorized dealer. -
Page 178
• Two crash sensors located at the C pillar behind the rear doors (one on each side of the vehicle). Side airbags, in combination with safety belts, can help reduce the risk of severe injuries in the event of a significant side impact collision. 2012 Edge (edg) Owners Guide, 1st Printing USA (fus) -
Page 179
Any difficulty with the system is indicated by one or more of the following: • The readiness light (same light as used for front airbag system) will either flash or stay lit. 2012 Edge (edg) Owners Guide, 1st Printing USA (fus) -
Page 180
Safety Canopy . See your authorized dealer. WARNING: All occupants of the vehicle including the driver should always wear their safety belts even when an airbag SRS and Safety Canopy System is provided. 2012 Edge (edg) Owners Guide, 1st Printing USA (fus) -
Page 181
Children 12 years old and under should always be properly restrained in the second or third row seats. The Safety Canopy will not interfere with children restrained using a properly installed child or booster seat 2012 Edge (edg) Owners Guide, 1st Printing USA (fus) -
Page 182
The SRS uses a readiness light in the instrument cluster or a tone to indicate the condition of the system. Refer to Warning lights and chimes in the Instrument Cluster chapter. Routine maintenance of the airbag is not required. 2012 Edge (edg) Owners Guide, 1st Printing USA (fus) -
Page 183: Child Restraints
See the following sections for directions on how to properly use safety restraints for children. Also see Airbag supplemental restraint system (SRS) in this chapter for special instructions about using airbags. 2012 Edge (edg) Owners Guide, 1st Printing USA (fus)
-
Page 184
Recommendations for Safety Restraints are based on probable child height, age and weight thresholds from NHTSA and other safety organizations or are the minimum requirements of law. Ford recommends checking with a NHTSA Certified Child Passenger Safety Technician (CPST) and consult your pediatrician to make sure your child seat is appropriate for your child, and is compatible with and properly installed in the vehicle. -
Page 185
Accident statistics suggest that children are safer when properly restrained in the rear seating positions than in a front seating position. 2012 Edge (edg) Owners Guide, 1st Printing USA (fus) -
Page 186
A safety seat that is improperly installed or utilized, is inappropriate for your child’s height, age, or weight or does not properly fit the child may increase the risk of serious injury or death. 2012 Edge (edg) Owners Guide, 1st Printing USA (fus) -
Page 187
Highway Traffic Safety Administration (NHTSA) provides education and training to ensure that all children ages 0 to 16 are properly restrained in the correct restraint system. Ford recommends checking with a NHTSA Certified Child Passenger Safety Technician (CPST) and your pediatrician to make sure your seat is appropriate for your child and properly installed in the vehicle. -
Page 188
Children 12 and under should be properly restrained in a rear seating position whenever possible. If all children cannot be seated and restrained properly in a rear seating position, properly restrain the largest child in the front seat. 2012 Edge (edg) Owners Guide, 1st Printing USA (fus) -
Page 189
Perform the following steps when installing the child seat with combination lap/shoulder belts: Note: Although the child seat illustrated is a forward facing child seat, the steps are the same for installing a rear facing child seat. 2012 Edge (edg) Owners Guide, 1st Printing USA (fus) -
Page 190
3. While holding the shoulder and lap belt portions together, route the tongue through the child seat according to the child seat manufacturer’s instructions. Be sure the belt webbing is not twisted. 2012 Edge (edg) Owners Guide, 1st Printing USA (fus) -
Page 191
It also helps to achieve the proper snugness of the child seat to the vehicle. Sometimes, a slight lean 2012 Edge (edg) Owners Guide, 1st Printing USA (fus) -
Page 192
Ford Motor Company recommends the use of a child safety seat having a top tether strap. See Attaching tether straps and Recommendations for attaching safety restraints for children in this chapter for more information. -
Page 193
LATCH lower anchors, rendering those features potentially unusable. To avoid risk of injury, occupants should only use seating positions where they are able to be properly restrained. 2012 Edge (edg) Owners Guide, 1st Printing USA (fus) -
Page 194
2012 Edge (edg) Owners Guide, 1st Printing USA (fus) -
Page 195
If the top of the safety seat hits the adjustable head restraint, raise the head restraint to let the child seat fit further rearward. 2012 Edge (edg) Owners Guide, 1st Printing USA (fus) -
Page 196
WARNING: If the safety seat is not anchored properly, the risk of a child being injured in a collision greatly increases. If your child restraint system is equipped with a tether strap, and the child restraint manufacturer recommends its use, Ford also recommends its use. Child booster seats The belt-positioning booster (booster seat) is used to improve the fit of the vehicle safety belt. -
Page 197
Booster seats position a child so that vehicle lap/shoulder safety belts fit better. They lift the child up so that the lap belt rests low across the hips and the knees bend comfortably at the edge of the cushion, while minimizing slouching. Booster seats may also make the shoulder belt fit better and more comfortably. -
Page 198
• High back booster seats If, with a backless booster seat, you cannot find a seating position that adequately supports your child’s head, a high back booster seat would be a better choice. 2012 Edge (edg) Owners Guide, 1st Printing USA (fus) -
Page 199
It is generally best to use a booster seat with lap/shoulder belts in the back seat. Move a child to a different seating location if the shoulder belt does not stay positioned on the shoulder during use. 2012 Edge (edg) Owners Guide, 1st Printing USA (fus) -
Page 200
Refer to the child restraint manufacturer’s instructions for additional inspection and maintenance information specific to the child restraint. Ford Motor Company recommends that all safety belt assemblies in use in vehicles involved in a collision be replaced. -
Page 201: Tires, Wheels And Loading
Study your owner’s guide for specific information about equipment features, instructions for safe driving and additional precautions to reduce the risk of an accident or serious injury. 2012 Edge (edg) Owners Guide, 1st Printing USA (fus)
-
Page 202
Although a AWD vehicle may accelerate better than two-wheel drive vehicle in low traction situations, it won’t stop any faster than two-wheel drive vehicles. Always drive at a safe speed. 2012 Edge (edg) Owners Guide, 1st Printing USA (fus) -
Page 203: Tire Information
“LT” type tires, tires with nominal rim diameters of 10 to 12 inches or limited production tires as defined in Title 49 Code of Federal Regulations Part 575.104(c)(2). 2012 Edge (edg) Owners Guide, 1st Printing USA (fus)
-
Page 204
Tires, Wheels and Loading U.S. Department of Transportation-Tire quality grades: The U.S. Department of Transportation requires Ford Motor Company to give you the following information about tire grades exactly as the government has written it. Treadwear The treadwear grade is a comparative rating based on the wear rate of the tire when tested under controlled conditions on a specified government test course. -
Page 205
• Recommended inflation pressure: The cold inflation pressure found on the Safety Compliance Certification Label or Tire Label located on the B-Pillar or the edge of the driver’s door. • B-pillar: The structural member at the side of the vehicle behind the front door. -
Page 206: Tire Inflation
The Ford recommended tire inflation pressure is found on the Safety Compliance Certification Label or Tire Label which is located on the B-Pillar or the edge of the driver’s door. Failure to follow the tire pressure recommendations can cause uneven treadwear patterns and adversely affect the way your vehicle handles.
-
Page 207
6. Visually inspect the tires to make sure there are no nails or other objects embedded that could poke a hole in the tire and cause an air leak. 7. Check the sidewalls to make sure there are no gouges, cuts or bulges. 2012 Edge (edg) Owners Guide, 1st Printing USA (fus) -
Page 208
1/16th of an inch (2 mm). When the tire tread wears down to the same height as these “wear bars”, the tire is worn out and must be replaced. 2012 Edge (edg) Owners Guide, 1st Printing USA (fus) -
Page 209
This information is used to contact customers if a tire defect requires a recall. Tire replacement requirements Your vehicle is equipped with tires designed to provide a safe ride and handling capability. 2012 Edge (edg) Owners Guide, 1st Printing USA (fus) -
Page 210
Ford. The recommended tire and wheel size may be found on either the Safety Compliance Certification Label or the Tire Label which is located on the B-Pillar or edge of the driver’s door. If this information is not found on these labels then you should contact your authorized dealer as soon as possible. -
Page 211
The tire pressure sensors mounted in the wheels (originally installed on your vehicle) are not designed to be used in aftermarket wheels. The use of wheels or tires not recommended by Ford Motor Company may affect the operation of your tire pressure monitoring system. -
Page 212
Note: After having your tires rotated, inflation pressure must be checked and adjusted to the vehicle requirements. 2012 Edge (edg) Owners Guide, 1st Printing USA (fus) -
Page 213
Manufacturing Association). 2. 215: Indicates the nominal width of the tire in millimeters from sidewall edge to sidewall edge. In general, the larger the number, the wider the tire. 3. 65: Indicates the aspect ratio which gives the tire’s ratio of height to width. -
Page 214
This information is used to contact customers if a tire defect requires a recall. 9. M+S or M/S: Mud and Snow, or AT: All Terrain, or AS: All Season. 2012 Edge (edg) Owners Guide, 1st Printing USA (fus) -
Page 215
Safety Compliance Certification Label or Tire Label which is located on the B-Pillar or the edge of the driver’s door. The cold inflation pressure should never be set lower than the recommended pressure on the vehicle label. -
Page 216
4. Maximum Load Single lb (kg) at psi (kPa) cold: Indicates the maximum load and tire pressure when the tire is used as a single; defined as two tires (total) on the rear axle. 2012 Edge (edg) Owners Guide, 1st Printing USA (fus) -
Page 217
2. 145: Indicates the nominal width of the tire in millimeters from sidewall edge to sidewall edge. In general, the larger the number, the wider the tire. 3. 80: Indicates the aspect ratio which gives the tire’s ratio of height to width. -
Page 218: Tire Pressure Monitoring System (Tpms)
TPMS to continue to function properly. The tire pressure monitoring system complies with part 15 of the FCC rules and with RSS-210 of Industry Canada. Operation is subject to the 2012 Edge (edg) Owners Guide, 1st Printing USA (fus)
-
Page 219
When one of your road tires needs to be replaced with the temporary spare, the TPMS will continue to identify an issue to remind you that the damaged road wheel/tire needs to be repaired and put back on your vehicle. 2012 Edge (edg) Owners Guide, 1st Printing USA (fus) -
Page 220
2. After inflating your tires to the manufacturer’s recommended pressure as shown on the Tire Label (located on the edge of driver’s door or the B-Pillar), the vehicle must be driven for at least two minutes over 20 mph (32 km/h) before the light turns off. -
Page 221
Check air pressure in the road tires. If any tire is under-inflated, carefully drive the vehicle to the nearest location where air can be added to the tires. Inflate all the tires to the recommended inflation pressure. 2012 Edge (edg) Owners Guide, 1st Printing USA (fus) -
Page 222: Vehicle Loading
SNOW TIRES AND CHAINS WARNING: Snow tires must be the same size, load index, speed rating as those originally provided by Ford. Use of any tire or wheel not recommended by Ford can affect the safety and performance of your vehicle, which could result in an increased risk of loss of vehicle control, vehicle rollover, personal injury and death.
-
Page 223
Payload – is the combined weight of cargo and passengers that the vehicle is carrying. The maximum payload for your vehicle can be found on the Tire Label on the B-Pillar or the edge of the driver’s door (vehicles exported outside the US and Canada may not have a Tire Label). -
Page 224
GAW (Gross Axle Weight) – is the total weight placed on each axle (front and rear) – including vehicle curb weight and all payload. 2012 Edge (edg) Owners Guide, 1st Printing USA (fus) -
Page 225
(front or rear). These numbers are shown on the Safety Compliance Certification Label located on the B-Pillar or the edge of the driver’s door. The total load on each axle must never exceed its GAWR. -
Page 226
WARNING: Exceeding the Safety Compliance Certification Label vehicle weight rating limits could result in substandard vehicle handling or performance, engine, transmission and/or structural damage, serious damage to the vehicle, loss of control and personal injury. 2012 Edge (edg) Owners Guide, 1st Printing USA (fus) -
Page 227
GVWR and GAWR limitations. WARNING: Exceeding any vehicle weight rating limitation could result in serious damage to the vehicle and/or personal injury. 2012 Edge (edg) Owners Guide, 1st Printing USA (fus) -
Page 228
220 lb. (99 kg), the calculation would be: 1,400 — (2 x 220) — (12 x 100) = 1,400 — 440 — 1,200 = — 240 lb. No, you do not have enough cargo capacity to carry that much weight. In metric units, the 2012 Edge (edg) Owners Guide, 1st Printing USA (fus) -
Page 229: Trailer Towing
Front or the Rear Gross Axle Weight Rating specified for your vehicle on the Safety Compliance Certification Label found on the edge of the driver’s door. TRAILER TOWING Trailer towing with your vehicle may require the use of a trailer tow option package.
-
Page 230
Refer to the following chart for information regarding the factory-equipped trailer tow connector: Color Function 1. Dark Green Right turn signal/brake lamp/hazard flasher 2. Yellow Left turn signal/brake lamp/hazard flasher 3. Brown Tail lamps/parking lamps 4. White Ground 2012 Edge (edg) Owners Guide, 1st Printing USA (fus) -
Page 231
Splicing into the wiring or attaching wiring to the vehicle bulb may DISABLE the rear vehicle lamps or cause them not to function properly. Your lamp outage feature may also be disabled or provide incorrect information. 2012 Edge (edg) Owners Guide, 1st Printing USA (fus) -
Page 232: Recreational Towing
In case of a roadside emergency with a disabled vehicle, please refer to Wrecker towing in the Roadside Emergencies chapter. These guidelines are designed to prevent damage to your vehicle after it is hooked-up to the RV or tow dolly. 2012 Edge (edg) Owners Guide, 1st Printing USA (fus)
-
Page 233
With the engine running and your foot on the brake, shift into D (Drive) and then into R (Reverse) before shifting back into N (Neutral). 2012 Edge (edg) Owners Guide, 1st Printing USA (fus) -
Page 234: Driving
WARNING: Do not start your vehicle in a closed garage or in other enclosed areas. Exhaust fumes can be toxic. Always open the garage door before you start the engine. See Guarding against exhaust fumes in this chapter for more instructions. 2012 Edge (edg) Owners Guide, 1st Printing USA (fus)
-
Page 235
Seating and Safety Restraints chapter. 2. Make sure the headlamps and electrical accessories are off. • Make sure the parking brake is set. 2012 Edge (edg) Owners Guide, 1st Printing USA (fus) -
Page 236
Note: Cranking may be stopped at any time by turning the key to the off position. 3. After idling for a few seconds, release the parking brake, apply the brake, shift into gear and drive. 2012 Edge (edg) Owners Guide, 1st Printing USA (fus) -
Page 237
This will power your vehicle’s electrical system and the warning lights in the instrument cluster will illuminate, but the engine will remain off. Note: You can start the engine from any ignition mode. 2012 Edge (edg) Owners Guide, 1st Printing USA (fus) -
Page 238
20 seconds of switching the vehicle off, if a valid IA key is not present when the vehicle is switched off. When you switch your vehicle off without an IA key in the passenger compartment or 2012 Edge (edg) Owners Guide, 1st Printing USA (fus) -
Page 239
If the engine is idling while the vehicle is stopped for a long period of time, open the windows at least 1 inch (2.5 cm) or adjust the heating or air conditioning to bring in fresh air. 2012 Edge (edg) Owners Guide, 1st Printing USA (fus) -
Page 240
• Make sure that when in operation, the extension cord plug/engine block heater cord plug connection is free and clear of water in order to prevent possible shock or fire. 2012 Edge (edg) Owners Guide, 1st Printing USA (fus) -
Page 241: Brakes
Your vehicle is equipped with an anti-lock braking system (ABS). This system helps you maintain steering control during emergency stops by keeping the brakes from locking. Noise from the ABS pump motor and 2012 Edge (edg) Owners Guide, 1st Printing USA (fus)
-
Page 242
If you experience this condition, apply the brakes 2012 Edge (edg) Owners Guide, 1st Printing USA (fus) -
Page 243
Driving with the parking brake on will cause the brakes to wear out quickly and reduce fuel economy. Note: If the vehicle is driven with the parking brake applied, a chime will sound. 2012 Edge (edg) Owners Guide, 1st Printing USA (fus) -
Page 244: Advancetrac
If your AdvanceTrac with RSC system activates, SLOW DOWN. 2012 Edge (edg) Owners Guide, 1st Printing USA (fus)
-
Page 245
• If the driving condition is severe and your foot is not on the brake, the brake pedal may move as the systems applies higher brake forces. You may also hear a whoosh of air from under the instrument panel during this severe condition. 2012 Edge (edg) Owners Guide, 1st Printing USA (fus) -
Page 246
• Taking a turn too fast • Maneuvering quickly to avoid an accident, pedestrian or obstacle • Driving over a patch of ice or other slippery surfaces • Changing lanes on a snow-rutted road 2012 Edge (edg) Owners Guide, 1st Printing USA (fus) -
Page 247
To switch off the traction control system, select traction control off in the message center. Full features of the AdvanceTrac with RSC system can be restored by selecting traction control on, or by turning off and restarting the engine. 2012 Edge (edg) Owners Guide, 1st Printing USA (fus) -
Page 248
Pull the vehicle-trailer over to a safe location to check the trailer weight distribution and tongue load, and reduce speed to a safe level while towing. If trailer sway is experienced, SLOW DOWN. 2012 Edge (edg) Owners Guide, 1st Printing USA (fus) -
Page 249
WARNING: Turning off trailer sway control increases the risk of loss of vehicle control, serious injury, or death. Ford does not recommend disabling this feature except in situations where speed reduction may be detrimental (e.g., hill climbing), the driver has… -
Page 250
1. Apply the parking brake, turn the ignition key to the off position, and remove the key. 2. Using a screwdriver (or similar tool), carefully pry off and remove the BSI access panel. 2012 Edge (edg) Owners Guide, 1st Printing USA (fus) -
Page 251: Transmission Operation
Over time, the adaptive learning process will fully update transmission operation. Additionally, whenever the battery is disconnected or a new battery installed, the strategy must be relearned. 2012 Edge (edg) Owners Guide, 1st Printing USA (fus)
-
Page 252
The normal driving position for the best fuel economy. Transmission operates in gears one through six. The automatic transmission shift strategy has the ability to detect hilly terrain or mountainous areas and will provide a limited amount of grade 2012 Edge (edg) Owners Guide, 1st Printing USA (fus) -
Page 253
• Will downshift to the lowest available gear for the current vehicle speed; allows for first gear when vehicle reaches slower speeds. • Is not intended for use under extended or normal driving conditions and results in lower fuel economy. 2012 Edge (edg) Owners Guide, 1st Printing USA (fus) -
Page 254
Extensive manual control can be achieved by moving the shifter to the M (Manual) position. The system will stay in manual control until the shifter is moved out of the manual position. 2012 Edge (edg) Owners Guide, 1st Printing USA (fus) -
Page 255
The brakes are released automatically once the engine has developed sufficient drive to prevent the vehicle from rolling down the 2012 Edge (edg) Owners Guide, 1st Printing USA (fus) -
Page 256
If your vehicle gets stuck in mud or snow, it may be rocked out by shifting between forward and reverse gears, stopping between shifts in a steady pattern. Press lightly on the accelerator in each gear. 2012 Edge (edg) Owners Guide, 1st Printing USA (fus) -
Page 257: Reverse Sensing System
WARNING: Certain add-on devices such as large trailer hitches, bike or surfboard racks and any device that may block the normal detection zone of the RSS system may create false beeps. 2012 Edge (edg) Owners Guide, 1st Printing USA (fus)
-
Page 258
RSS. If your vehicle sustains damage to the rear bumper/fascia, leaving it misaligned or bent, the sensing zone may be altered causing inaccurate measurement of obstacles or false alarms. 2012 Edge (edg) Owners Guide, 1st Printing USA (fus) -
Page 259: Rear-View Camera System
To turn this feature on or off when the vehicle is not in R (Reverse), do the following on the touchscreen: 1. Select Menu 2. Select Vehicle 2012 Edge (edg) Owners Guide, 1st Printing USA (fus)
-
Page 260
It allows the driver to manually zoom closer to an object behind the vehicle. The zoomed image keeps the bumper in the image to provide a reference. 2012 Edge (edg) Owners Guide, 1st Printing USA (fus) -
Page 261
WARNING: Backup as slow as possible since higher speeds might limit your reaction time to stop the vehicle. 2012 Edge (edg) Owners Guide, 1st Printing USA (fus) -
Page 262
This system does NOT activate the brakes automatically. Failure to press the brake pedal to activate the brakes may result in a collision. 2012 Edge (edg) Owners Guide, 1st Printing USA (fus) -
Page 263
• Pedestrians or objects in the roadway. • Oncoming vehicles in the same lane. • Severe weather conditions (see also blocked sensor section). • Debris build-up on the grille near the headlamps (see block sensor section). 2012 Edge (edg) Owners Guide, 1st Printing USA (fus) -
Page 264
When the radar signals are obstructed, a vehicle ahead cannot be detected and the collision warning system will not function. The following table lists possible causes and actions for this message being displayed. 2012 Edge (edg) Owners Guide, 1st Printing USA (fus) -
Page 265
Setting lower sensitivity would lead to fewer and later system warnings. Refer to the Message center in the Instrument Cluster chapter for instructions on reducing the sensitivity. 2012 Edge (edg) Owners Guide, 1st Printing USA (fus) -
Page 266
When the approaching vehicle is at a distance, its image is small and near the inboard edge of the main mirror. As the vehicle approaches, the image becomes larger and begins to move outboard across the main mirror (1). -
Page 267
(Neutral). If the transmission is shifted out of D (Drive) or N (Neutral) the system will enter the CTA mode (see CTA operation below). Once shifted back into D (Drive) the BLIS mode will activate once driven above 3 mph (5 km/h). 2012 Edge (edg) Owners Guide, 1st Printing USA (fus) -
Page 268
False alerts are temporary and self correct. 2012 Edge (edg) Owners Guide, 1st Printing USA (fus) -
Page 269
CTA sensors (refer to figure for approximate zone coverage areas [sensor obstructed for vehicle on left]). Backing slowly from the parking spot in these situations helps to increase the sensor coverage and effectiveness. 2012 Edge (edg) Owners Guide, 1st Printing USA (fus) -
Page 270
Circumstances that may cause a false alert when backing up are backing out of a garage, backing into a parking space, and objects very close to the sensor. False alerts are temporary and self correct. 2012 Edge (edg) Owners Guide, 1st Printing USA (fus) -
Page 271
TRAFFIC NOT AVAILABLE warning and the appropriate left and/or right exterior mirror alert indicator will illuminate. The message center warning may be cleared by the driver but the exterior mirror alert indicator will remain illuminated. 2012 Edge (edg) Owners Guide, 1st Printing USA (fus) -
Page 272
Due to the nature of radar technology, it is possible to get a blockage warning and not be blocked. This is rare and known as a false blockage warning. A false blocked condition will either self clear or clear after a key cycle. 2012 Edge (edg) Owners Guide, 1st Printing USA (fus) -
Page 273
This condition may occur if the vehicle was operated in extreme conditions with excessive wheel slip, such as deep sand. To resume normal AWD function as soon as possible, stop the vehicle in a safe 2012 Edge (edg) Owners Guide, 1st Printing USA (fus) -
Page 274
If your vehicle goes off the edge of the pavement • If your vehicle goes off the edge of the pavement, slow down, but avoid severe brake application, ease the vehicle back onto the pavement only after reducing your speed. -
Page 275
• If the vehicle goes from one type of surface to another (i.e., from concrete to gravel) there will be a change in the way the vehicle responds to a maneuver (steering, acceleration or braking). Again, avoid these abrupt inputs. 2012 Edge (edg) Owners Guide, 1st Printing USA (fus) -
Page 276
If the vehicle does slide, steer in the direction of the slide until you regain control of the vehicle. 2012 Edge (edg) Owners Guide, 1st Printing USA (fus) -
Page 277
Ford Motor Company joins the U.S. Forest Service and the Bureau of Land Management in encouraging you to help preserve our national forest and other public and private lands by “treading lightly.”… -
Page 278
Drive slower than usual and consider using one of the lower gears. In emergency stopping situations, apply the brake steadily. Since your vehicle is equipped with a four wheel anti-lock brake system (ABS), 2012 Edge (edg) Owners Guide, 1st Printing USA (fus) -
Page 279
Any modifications to a vehicle that raise the center of gravity can make it more likely the vehicle will rollover as a result of a loss of control. Ford Motor Company recommends that caution be used with any vehicle equipped with a high load or device (such as ladder or luggage racks). -
Page 280: Roadside Emergencies
ROADSIDE ASSISTANCE Vehicles sold in the U.S. : Getting roadside assistance To fully assist you should you have a vehicle concern, Ford Motor Company offers a complimentary roadside assistance program. This program is separate from the New Vehicle Limited Warranty. The service is available: •…
-
Page 281: Hazard Flasher Control
U.S. Ford vehicle customers who require Roadside Assistance, call 1-800-241-3673. If you need to arrange roadside assistance for yourself, Ford Motor Company will reimburse a reasonable amount for towing to the nearest dealership within 35 miles (56 km). To obtain reimbursement information, U.S.
-
Page 282: Fuel Pump Shut-Off
WARNING: Failure to inspect and if necessary repair fuel leaks after a collision may increase the risk of fire and serious injury. Ford Motor Company recommends that the fuel system be inspected by an authorized dealer after any collision. FUSES AND RELAYS…
-
Page 283
To remove a fuse, use the fuse puller tool provided on the fuse panel cover. 2012 Edge (edg) Owners Guide, 1st Printing USA (fus) -
Page 284
Not used (spare) Demand lamps Not used (spare) RF module 7.5A Power mirror switch, Memory seat switch, Driver seat module Not used (spare) Power liftgate Run/accessory relay Instrument panel cluster, Heads-up display 2012 Edge (edg) Owners Guide, 1st Printing USA (fus) -
Page 285
Global positioning system (GPS) module intelligent access (IA) Ignition switch (without IA), Key inhibit solenoid, Push button start (with IA) Radio, Multi-function display screen, Electronic finish panel, SYNC module Front park lamps 2012 Edge (edg) Owners Guide, 1st Printing USA (fus) -
Page 286
(OCS), Restraints control module Grade assist control switch (2.0L engine) Not used (spare) Not used (spare) Not used (spare) Climate control LED signal mirrors 30A Circuit Power windows Breaker — Delayed accessory relay 2012 Edge (edg) Owners Guide, 1st Printing USA (fus) -
Page 287
79 80 81 82 83 84 85 86 87 The high-current fuses are coded as follows: Fuse/Relay Fuse Amp Power Distribution Box Location Rating Description — Not used — Not used — Not used 30A** Wipers 2012 Edge (edg) Owners Guide, 1st Printing USA (fus) -
Page 288
Not used — Not used 40A** Rear window defroster 20A** Front power point/lighter 30A** Climate controlled seats — Not used — Not used — Not used — Not used — Not used 2012 Edge (edg) Owners Guide, 1st Printing USA (fus) -
Page 289
Left TT stop/turn lamps relay — Not used — Wiper relay 15A* Transmission control module (TCM) (2.0L engine) 20A* Left high-intensity discharge (HID) headlamps 10A* Alternator sensor 10A* Brake on/off switch 15A* Stop lamps 2012 Edge (edg) Owners Guide, 1st Printing USA (fus) -
Page 290
— TT park lamps relay 20A* Right HID headlamps Adaptive cruise control — Not used — Not used 15A* Rear washer — Not used 20A* TT park lamps — Not used 2012 Edge (edg) Owners Guide, 1st Printing USA (fus) -
Page 291: Changing Tires
Have a flat serviced by an authorized dealer in order to prevent damage to the TPMS sensors, refer to Tire pressure monitoring system (TPMS) in the Tires, Wheels and Loading chapter. Replace the spare 2012 Edge (edg) Owners Guide, 1st Printing USA (fus)
-
Page 292
Ford. If the dissimilar spare tire or wheel is damaged, it should be replaced rather than repaired. -
Page 293
• Load leveling adjustment (if applicable) When driving with the full-size dissimilar spare tire/wheel additional caution should be given to: • Towing a trailer • Driving vehicles equipped with a camper body 2012 Edge (edg) Owners Guide, 1st Printing USA (fus) -
Page 294
WARNING: When one of the front wheels is off the ground, the transmission alone will not prevent the vehicle from moving or slipping off the jack, even if the vehicle is in P (Park). 2012 Edge (edg) Owners Guide, 1st Printing USA (fus) -
Page 295
Do not start the engine when your vehicle is on the jack. The jack is only meant for changing the tire. 2012 Edge (edg) Owners Guide, 1st Printing USA (fus) -
Page 296
2. Place the jack assembly kit in the jack kit recess in the spare tire well in its original location and orientation. 3. Place the tire in the spare tire well over the jack assembly. 2012 Edge (edg) Owners Guide, 1st Printing USA (fus) -
Page 297: Wheel Lug Nut Torque
20 * Torque specifications are for nut and bolt threads free of dirt and rust. Use only Ford recommended replacement fasteners. WARNING: When a wheel is installed, always remove any corrosion, dirt or foreign materials present on the mounting surfaces of the wheel or the surface of the wheel hub, brake drum or brake disc that contacts the wheel.
-
Page 298: Jump Starting
Do not attempt to push-start your automatic transmission vehicle. Automatic transmissions do not have push-start capability. Attempting to push-start a vehicle with an automatic transmission may cause transmission damage. 2012 Edge (edg) Owners Guide, 1st Printing USA (fus)
-
Page 299
5. Turn the heater fan on in both vehicles to protect from any electrical surges. Turn all other accessories off. Connecting the jumper cables Note: In the illustration, the vehicle on the bottom is used to designate the assisting (boosting) battery. 2012 Edge (edg) Owners Guide, 1st Printing USA (fus) -
Page 300
2. Start the engine of the disabled vehicle. 3. Once the disabled vehicle has been started, run both engines for an additional three minutes before disconnecting the jumper cables. 2012 Edge (edg) Owners Guide, 1st Printing USA (fus) -
Page 301
After the disabled vehicle has been started and the jumper cables removed, allow it to idle for several minutes so the engine computer can relearn its idle conditions. 2012 Edge (edg) Owners Guide, 1st Printing USA (fus) -
Page 302: Wrecker Towing
It is recommended that your vehicle be towed with a wheel lift and dollies or flatbed equipment. Do not tow with a slingbelt. Ford Motor Company has not approved a slingbelt towing procedure. On FWD vehicles, if your vehicle is to be towed from the front, ensure proper wheel lift equipment is used to raise the front wheels off the ground.
-
Page 303
If the vehicle is towed by other means or incorrectly, vehicle damage may occur. Ford Motor Company produces a towing manual for all authorized tow truck operators. Have your tow truck operator refer to this manual for proper hook-up and towing procedures for your vehicle. -
Page 304: Customer Assistance
A reasonable time must be allowed to perform a repair after taking your vehicle to the authorized dealer. Repairs will be made using Ford or Motorcraft parts, or remanufactured or other parts that are authorized by Ford.
-
Page 305
• The name of the authorized dealer and city where located • The vehicle’s current odometer reading In some states, you must directly notify Ford in writing before pursuing remedies under your state’s warranty laws. Ford is also allowed a final repair attempt in some states. -
Page 306
California Civil Code Section 1793.22(b) or the Magnuson-Moss Warranty Act, resort to BBB AUTO LINE is not required by those statutes. 2012 Edge (edg) Owners Guide, 1st Printing USA (fus) -
Page 307
THE BETTER BUSINESS BUREAU (BBB) AUTO LINE PROGRAM (U.S. ONLY) Your satisfaction is important to Ford Motor Company and to your dealer. If a warranty concern has not been resolved using the three-step procedure outlined earlier in this chapter in the Getting the services you need section, you may be eligible to participate in the BBB AUTO LINE program. -
Page 308
(CANADA ONLY) For vehicles delivered to authorized Canadian dealers. In those cases where you continue to feel that the efforts by Ford of Canada and the authorized dealer to resolve a factory-related vehicle service concern have been unsatisfactory, Ford of Canada participates in an impartial third party mediation/arbitration program administered by the Canadian Motor Vehicle Arbitration Plan (CAMVAP). -
Page 309
Telephone: (313) 594-4857 For customers in Guam, the Commonwealth of the Northern Mariana Islands (CNMI), America Samoa, and the U.S. Virgin Islands, please feel free to call our Toll-Free Number: (800) 841-FORD (3673). FAX: (313) 390-0804 Email: expcac@ford.com If your vehicle must be serviced while you are traveling or living in Puerto Rico, contact the nearest authorized dealer. -
Page 310
If you buy your vehicle in North America and then relocate to any of the above locations, register your vehicle identification number (VIN) and new address with Ford Motor Company Export Operations & Global Growth Initiatives by emailing expcac@ford.com. If you are in another foreign country, contact the nearest authorized dealer. -
Page 311: Reporting Safety Defects (U.s. Only)
However, NHTSA cannot become involved in individual problems between you, your dealer, or Ford Motor Company. To contact NHTSA, you may call the Vehicle Safety Hotline toll-free at 1–888–327–4236 (TTY: 1–800–424–9153);…
-
Page 312: Cleaning
• Never use abrasive materials such as steel wool or plastic pads as they can scratch the chrome surface. WAXING • Wash the vehicle first. • Use a quality wax that does not contain abrasives. 2012 Edge (edg) Owners Guide, 1st Printing USA (fus)
-
Page 313
• Take care when using a power washer to clean the engine. The high-pressure fluid could penetrate the sealed parts and cause damage. • Do not spray a hot engine with cold water to avoid cracking the engine block or other engine components. 2012 Edge (edg) Owners Guide, 1st Printing USA (fus) -
Page 314
3.5L V6 engine shown, 3.7L engine similar 2.0L EcoBoost™ engine • Never wash or rinse the engine while it is hot or running; water in the running engine may cause internal damage. 2012 Edge (edg) Owners Guide, 1st Printing USA (fus) -
Page 315
Do not use sharp objects, such as a razor blade, to clean the inside of the rear window or to remove decals, as it may cause damage to the rear window defroster’s heated grid lines. 2012 Edge (edg) Owners Guide, 1st Printing USA (fus) -
Page 316
30 minutes. 4. Remove the soaked cloth, and if it is not soiled badly, use this cloth to clean the area by using a rubbing motion for 60 seconds. 2012 Edge (edg) Owners Guide, 1st Printing USA (fus) -
Page 317
These products may cause premature wearing or damage to the leather. UNDERBODY Flush the complete underside of your vehicle frequently. Keep body and door drain holes free from packed dirt. 2012 Edge (edg) Owners Guide, 1st Printing USA (fus) -
Page 318
Cleaning FORD AND LINCOLN CAR CARE PRODUCTS Your Ford or Lincoln authorized dealer has many quality products available to clean your vehicle and protect its finishes. These quality products have been specifically engineered to fulfill your automotive needs; they are custom designed to complement the style and appearance of your vehicle. -
Page 319: Maintenance And Specifications
1. Set the parking brake and shift to P (Park). 2. Block the wheels. 2012 Edge (edg) Owners Guide, 1st Printing USA (fus)
-
Page 320
3. Lift the hood and support it with the prop rod. Note: Make sure the hood is properly closed. 2012 Edge (edg) Owners Guide, 1st Printing USA (fus) -
Page 321: Engine Compartment
1. Engine coolant reservoir 2. Brake fluid reservoir 3. Battery 4. Power distribution box 5. Air filter assembly 6. Engine oil filler cap 7. Engine oil dipstick 8. Windshield washer fluid reservoir 2012 Edge (edg) Owners Guide, 1st Printing USA (fus)
-
Page 322
C. Brake fluid reservoir D. Battery E. Power distribution box F. Air filter assembly G. Transmission fluid dipstick H. Engine oil dipstick I. Engine oil filler cap J. Windshield washer fluid reservoir 2012 Edge (edg) Owners Guide, 1st Printing USA (fus) -
Page 323: Changing The Wiper Blades
In very cold weather, do not fill the reservoir completely. Only use a washer fluid that meets Ford specifications. Do not use any special washer fluid such as windshield water repellent type fluid or bug wash. They may cause squeaking, chatter noise, streaking and smearing.
-
Page 324: Engine Oil
To prolong the life of the wiper blades, it is highly recommended to scrape off the ice on the windshield before turning on the wipers. The layer of ice has many sharp edges and can damage the micro edge of the wiper rubber element.
-
Page 325
4. Install the dipstick and ensure it is fully seated. 5. Fully install the engine oil filler cap by turning the filler cap clockwise until it stops. 2012 Edge (edg) Owners Guide, 1st Printing USA (fus) -
Page 326
Approval Committee (ILSAC), comprised of U.S. and Japanese automobile manufacturers. To protect your engine and engine’s warranty, use Motorcraft SAE 5W-30 or an equivalent SAE 5W-30 oil meeting Ford specification WSS-M2C946-A. Refer to Maintenance product specifications and capacities later in this section for more information. -
Page 327
Approval Committee (ILSAC), comprised of U.S. and Japanese automobile manufacturers. To protect your engine and engine’s warranty, use Motorcraft SAE 5W-20 or an equivalent SAE 5W-20 oil meeting Ford specification WSS-M2C945-A. SAE 5W-20 oil provides optimum fuel economy and durability performance meeting all requirements for your vehicle’s engine. -
Page 328: Battery
Lift the battery with a battery carrier or with your hands on opposite corners. 2012 Edge (edg) Owners Guide, 1st Printing USA (fus)
-
Page 329
If the battery has been disconnected or a new battery has been installed, the clock and radio settings must be reset once the battery is reconnected. 2012 Edge (edg) Owners Guide, 1st Printing USA (fus) -
Page 330: Engine Coolant
For best results, coolant concentration should be tested with a refractometer such as Rotunda tool 300-ROB75240E available from your dealer. Ford does not recommend the use of hydrometers or coolant test strips for measuring coolant concentration. The level of coolant should be maintained at the FULL COLD level or within the COLD FILL RANGE in the coolant reservoir.
-
Page 331
Premium Cooling System Flush, and refilled with a 50/50 mixture of engine coolant and distilled water as soon as possible. Water alone (without engine coolant) can cause engine damage from corrosion, overheating or freezing. 2012 Edge (edg) Owners Guide, 1st Printing USA (fus) -
Page 332
After any coolant has been added, check the coolant concentration (refer to Checking engine coolant). If the concentration is not 50/50, drain some coolant and adjust the concentration. It may take several drains and additions to obtain a 50/50 coolant concentration. 2012 Edge (edg) Owners Guide, 1st Printing USA (fus) -
Page 333
Recycled engine coolant Ford Motor Company does NOT recommend the use of recycled engine coolant since a Ford-approved recycling process is not yet available. Used engine coolant should be disposed of in an appropriate manner. -
Page 334
The air conditioning may also cycle on and off during severe operating conditions to protect overheating of the engine. When the engine coolant temperature decreases to a more normal operating temperature, the air conditioning will turn on once again. 2012 Edge (edg) Owners Guide, 1st Printing USA (fus) -
Page 335
If the engine reaches a preset over-temperature condition, the engine will automatically switch to alternating cylinder operation. Each disabled cylinder acts as an air pump and cools the engine. 2012 Edge (edg) Owners Guide, 1st Printing USA (fus) -
Page 336
FUEL FILTER Your vehicle is equipped with a lifetime fuel filter that is integrated with the fuel tank. Regular maintenance or replacement is not needed. 2012 Edge (edg) Owners Guide, 1st Printing USA (fus) -
Page 337: Fuel Information
Failure to seek proper medical attention could lead to permanent injury. • Fuels can also be harmful if absorbed through the skin. If fuel is splashed on the skin and/or clothing, promptly remove contaminated 2012 Edge (edg) Owners Guide, 1st Printing USA (fus)
-
Page 338
• DO NOT fill a fuel container while it is in the vehicle (including the cargo area). • Keep the fuel pump nozzle in contact with the fuel container while filling. 2012 Edge (edg) Owners Guide, 1st Printing USA (fus) -
Page 339
Continuing to drive with the check fuel fill inlet light or CHECK FUEL FILL INLET message on may cause the service engine soon lamp to turn on as well. 2012 Edge (edg) Owners Guide, 1st Printing USA (fus) -
Page 340
Do not be concerned if your engine sometimes knocks lightly. However, if it knocks heavily while you are using fuel with the recommended (R+M)/2 METHOD octane rating, see your authorized dealer to prevent any engine damage. 2012 Edge (edg) Owners Guide, 1st Printing USA (fus) -
Page 341
Ask your fuel supplier about gasolines that meet the World-Wide Fuel Charter. Cleaner air Ford endorses the use of reformulated “cleaner-burning” gasolines to improve air quality, per the recommendations in the Choosing the right fuel section. Running out of fuel Avoid running out of fuel because this situation may have an adverse effect on powertrain components. -
Page 342
1. After lifting the trunk cargo cover, locate the white plastic funnel. It is attached to the rear, lower edge of the spare tire compartment. 2. Slowly insert the funnel into the Easy Fuel system. -
Page 343
• Allow no more than two automatic click-offs when filling. • Always use fuel with the recommended octane rating. • Use a known quality gasoline, preferably a national brand. • Have the vehicle loading and distribution the same every time. 2012 Edge (edg) Owners Guide, 1st Printing USA (fus) -
Page 344
• Sudden or hard accelerations may reduce fuel economy. • Slow down gradually. • Driving at reasonable speeds (traveling at 55 mph [88 km/h] uses 15% less fuel than traveling at 65 mph [105 km/h]). 2012 Edge (edg) Owners Guide, 1st Printing USA (fus) -
Page 345
• Transmissions give their best fuel economy when operated in the top cruise gear and with steady pressure on the gas pedal. • Close windows for high speed driving. 2012 Edge (edg) Owners Guide, 1st Printing USA (fus) -
Page 346
If other than Ford, Motorcraft or Ford-authorized parts are used for maintenance replacements or for service of components affecting emission control, such non-Ford parts should be equivalent to genuine Ford Motor Company parts in performance and durability. -
Page 347
OBD-II may not have symptoms that are apparent, continued driving with the service engine soon indicator on can result in increased emissions, lower fuel economy, reduced engine and transmission smoothness, and lead to more costly repairs. 2012 Edge (edg) Owners Guide, 1st Printing USA (fus) -
Page 348
I/M testing, the above driving cycle will have to be repeated. POWER STEERING FLUID Check the power steering fluid. Refer to scheduled maintenance information. 2012 Edge (edg) Owners Guide, 1st Printing USA (fus) -
Page 349: Transmission Fluid
Note: Automatic transmission fluid expands when warmed. To obtain an accurate fluid check, drive the vehicle until it is warmed up 2012 Edge (edg) Owners Guide, 1st Printing USA (fus)
-
Page 350
The transmission fluid should be checked at normal operating temperature 180°F-200°F (82°C-93°C) on a level surface. The normal operating temperature can be reached after approximately 20 miles (30 km) of driving. 2012 Edge (edg) Owners Guide, 1st Printing USA (fus) -
Page 351
Do not use supplemental transmission fluid additives, treatments or cleaning agents. The use of these materials may affect transmission operation and result in damage to internal transmission components. 2012 Edge (edg) Owners Guide, 1st Printing USA (fus) -
Page 352: Air Filter(S)
3. Remove the air filter element from the air filter housing. 4. Wipe the air filter housing and cover clean to remove any dirt or debris and to ensure good sealing. 2012 Edge (edg) Owners Guide, 1st Printing USA (fus)
-
Page 353
• Cover chrome and stainless steel parts with a thick coat of auto wax to prevent discoloration. Re-wax as necessary when the vehicle is washed. See the Cleaning chapter for more information. 2012 Edge (edg) Owners Guide, 1st Printing USA (fus) -
Page 354
Note: If battery cables are disconnected, it will be necessary to reset memory features. 2012 Edge (edg) Owners Guide, 1st Printing USA (fus) -
Page 355: Part Numbers
WW-2001-PF (passenger side) blade WW-1401-PF (rear) Replace the spark plugs with ones that meet Ford material and design specifications for your vehicle, such as Motorcraft or equivalent replacement parts. The customer warranty may be void for any damage to the engine if such spark plugs are not used.
-
Page 356: Maintenance Product Specifications And Capacities
Maintenance and Specifications 2012 Edge (edg) Owners Guide, 1st Printing USA (fus)
-
Page 357
Maintenance and Specifications 2012 Edge (edg) Owners Guide, 1st Printing USA (fus) -
Page 358
Maintenance and Specifications 2012 Edge (edg) Owners Guide, 1st Printing USA (fus) -
Page 359
Maintenance and Specifications 2012 Edge (edg) Owners Guide, 1st Printing USA (fus) -
Page 360: Engine Data
Compression ratio 10.8:1 10.5:1 9.3:1 Engine drivebelt routing 3.5L/3.7L V6 engine 1. Short drivebelt is on first pulley groove closest to engine. 2. Long drivebelt is on second pulley groove farthest from engine. 2012 Edge (edg) Owners Guide, 1st Printing USA (fus)
-
Page 361
Safety Compliance Certification Label may be located. The Safety Compliance Certification Label is located on the structure (B-Pillar) by the trailing edge of the driver’s door or the edge of the driver’s door. 2012 Edge (edg) Owners Guide, 1st Printing… -
Page 362
Weight Rating (GVWR) / Restraint Devices and their location 3. Make, vehicle line, series, body type 4. Engine type 5. Check digit 6. Model year 7. Assembly plant 8. Production sequence number 2012 Edge (edg) Owners Guide, 1st Printing USA (fus) -
Page 363
You can find a transmission code on the Safety Compliance Certification Label. The following table tells you which transmission each code represents. Description Code 6-speed automatic transmission (6F50) 6-speed automatic transmission (6F35) 2012 Edge (edg) Owners Guide, 1st Printing USA (fus) -
Page 364: Accessories
FORD CUSTOM ACCESSORIES FOR YOUR VEHICLE A wide selection of Ford Custom Accessories are available for your vehicle through your local Ford or Ford of Canada dealer. These quality accessories have been specifically engineered to fulfill your automotive needs; they are custom designed to complement the style and aerodynamic appearance of your vehicle.
-
Page 365
Ford Motor Company engineering requirements. Contact your Ford dealer for details regarding the manufacturer’s limited warranty and/or a copy of the FLA product limited warranty offered by the accessory manufacturer. -
Page 366
Amateur Radio Antennas in the area of the driver’s side hood. • Any non-Ford custom electrical or electronic accessories or components that are added to the vehicle by the authorized dealer or the owner, may adversely affect battery performance and durability, and may also adversely affect the performance of other electrical systems in the vehicle. -
Page 367: Ford Extended Service Plan
BaseCare – Covers 84 components. PowertrainCare – Covers 29 critical components. Ford ESP is honored by all Ford and Lincoln Dealers in the U.S. and Canada It’s the only extended service plan authorized and backed by Ford Motor Company. That means you get: •…
-
Page 368
Ford ESP Can Quickly Pay for Itself One service bill – the cost of parts and labor – can easily exceed the price of your Ford ESP Service Contract. With Ford ESP, you minimize your risk for unexpected repair bills and rising repair costs. -
Page 369
Ford Extended Service Plan 2012 Edge (edg) Owners Guide, 1st Printing USA (fus) -
Page 370
Ford Motor Company dealers. For more information, visit your local Ford of Canada dealer or www.ford.ca to find the Ford Extended Service Plan that is right for you. Note: Repairs performed outside of Canada and the United States are not eligible for Ford ESP coverage. -
Page 371: Scheduled Maintenance
Your dealer has factory-trained technicians who can perform the required maintenance using genuine Ford parts. They are committed to meeting your service needs and to assuring your continuing satisfaction. Protecting your investment Maintenance is an investment that will pay dividends in the form of improved reliability, durability and resale value.
-
Page 372
Please consult your Warranty Guide for complete warranty information. Chemicals or additives not approved by Ford are not required for factory recommended maintenance. In fact, Ford Motor Company recommends against the use of such additive products unless specifically recommended by Ford for a particular application. -
Page 373
Genuine Ford and Motorcraft replacement parts Dealerships stock Ford and Motorcraft branded replacement parts. These parts meet or exceed Ford Motor Company’s specifications, and we stand behind them. Parts installed at your dealership carry a nationwide, 12 month/12,000 mile (20,000 km) parts and labor limited warranty. -
Page 374
Parking brake for proper operation Safety belts and seat latches for wear and function Safety warning lamps (brake, ABS, airbag, safety belt) for operation Washer spray/wiper operation; clean or replace blades as necessary 2012 Edge (edg) Owners Guide, 1st Printing USA (fus) -
Page 375
In order to keep your vehicle running right, it is important to have the systems on your vehicle checked regularly. This can help identify potential issues and prevent major problems. Ford Motor Company recommends the following multi-point inspection be performed at every scheduled maintenance interval to help ensure your vehicle keeps running great. -
Page 376
Scheduled Maintenance 2012 Edge (edg) Owners Guide, 1st Printing USA (fus) -
Page 377: Normal Scheduled Maintenance And Log
– Moderate to heavy load/towing 5000-7499 – Mountainous or off-road conditions (8000-11999) – Extended idling – Extended hot or cold operation Extreme 3000-4999 – Maximum load/towing (4000-7999) – Extreme hot or cold operation 2012 Edge (edg) Owners Guide, 1st Printing USA (fus)
-
Page 378
Reset your Intelligent Oil Life Monitor™ after each engine oil and filter change; refer to the Instrument Cluster chapter Do not exceed one year or 10,000 miles (16,000 km) between service intervals 2012 Edge (edg) Owners Guide, 1st Printing USA (fus) -
Page 379
Scheduled Maintenance 2012 Edge (edg) Owners Guide, 1st Printing USA (fus) -
Page 380
OURS ILEAGE ILEAGE EALER ALIDATION EALER ALIDATION P&A C P&A C RO#: RO#: OURS OURS ILEAGE ILEAGE EALER ALIDATION EALER ALIDATION P&A C P&A C RO#: RO#: OURS OURS ILEAGE ILEAGE 2012 Edge (edg) Owners Guide, 1st Printing USA (fus) -
Page 381
OURS ILEAGE ILEAGE EALER ALIDATION EALER ALIDATION P&A C P&A C RO#: RO#: OURS OURS ILEAGE ILEAGE EALER ALIDATION EALER ALIDATION P&A C P&A C RO#: RO#: OURS OURS ILEAGE ILEAGE 2012 Edge (edg) Owners Guide, 1st Printing USA (fus) -
Page 382
OURS ILEAGE ILEAGE EALER ALIDATION EALER ALIDATION P&A C P&A C RO#: RO#: OURS OURS ILEAGE ILEAGE EALER ALIDATION EALER ALIDATION P&A C P&A C RO#: RO#: OURS OURS ILEAGE ILEAGE 2012 Edge (edg) Owners Guide, 1st Printing USA (fus) -
Page 383
Example #2: The OIL CHANGE REQUIRED message has not come on but the odometer reads 30,000 miles (48,000 km); perform the engine air filter replacement. (i.e., Intelligent Oil Life Monitor™ was reset at 25,000 miles [40,000 km].) 2012 Edge (edg) Owners Guide, 1st Printing USA (fus) -
Page 384
Example #2: The OIL CHANGE REQUIRED message has not come on but the odometer reads 30,000 miles (48,000 km); perform the engine air filter replacement. (i.e., Intelligent Oil Life Monitor™ was reset at 25,000 miles [40,000 km].) 2012 Edge (edg) Owners Guide, 1st Printing USA (fus) -
Page 385
Instrument Cluster chapter Exclusive use of E85 (Flex Fuel Vehicles only) Every oil change If ran exclusively on E85, fill the fuel tank full with regular unleaded fuel 2012 Edge (edg) Owners Guide, 1st Printing USA (fus) -
Page 386
OURS ILEAGE ILEAGE EALER ALIDATION EALER ALIDATION P&A C P&A C RO#: RO#: OURS OURS ILEAGE ILEAGE EALER ALIDATION EALER ALIDATION P&A C P&A C RO#: RO#: OURS OURS ILEAGE ILEAGE 2012 Edge (edg) Owners Guide, 1st Printing USA (fus) -
Page 387
OURS ILEAGE ILEAGE EALER ALIDATION EALER ALIDATION P&A C P&A C RO#: RO#: OURS OURS ILEAGE ILEAGE EALER ALIDATION EALER ALIDATION P&A C P&A C RO#: RO#: OURS OURS ILEAGE ILEAGE 2012 Edge (edg) Owners Guide, 1st Printing USA (fus) -
Page 388
Normal vehicle axle maintenance: Rear axles and power take-off (PTO) units with synthetic fluid and light-duty trucks equipped with Ford-design axles are lubricated for life; do not check or change fluid unless a leak is suspected, service is required or the assembly has been submerged in water. -
Page 389
American Petroleum Institute (API) performance category of API SK or earlier (for example SJ, etc.) Edge/MKX AWD only – vehicles operating off-road in sand during high ambient temperatures must replace the AWD PTU (All-wheel drive Power Transfer Unit) lube every 20,000 miles (32,000 km). -
Page 390: Index
Cargo net ……..111 fluid, refill capacities ….356 Cell phone use ……9 fluid, specification ….356 Selectshift (SST) ….254 Changing a tire ….291, 294 Child safety seats ……188 Auxiliary input jack (Line in) ..53 2012 Edge (edg) Owners Guide, 1st Printing USA (fus)
-
Page 391
….333, 356 specifications ……356 Engine ……..360 cleaning ……..313 Cross Traffic Alert ….267 coolant ……..330 Cruise control fail-safe cooling …….335 (see Speed control) ….89 idle speed control ….328 Cupholder(s) ……153 lubrication specifications ..356 2012 Edge (edg) Owners Guide, 1st Printing USA (fus) -
Page 392
Illuminated visor mirror …..83 quality ……..341 running out of fuel ..298, 341 Infant seats safety information relating to (see Safety seats) …..188 automotive fuels …..337 Inspection/maintenance (I/M) Fuses ……..282–283 testing ……..348 2012 Edge (edg) Owners Guide, 1st Printing USA (fus) -
Page 393
….70 headlamps ………69 headlamps, flash to pass ..70 Octane rating ……340 instrument panel, dimming ..71 Oil (see Engine oil) ….324 interior lamps ……74 replacing bulbs ……76 Overdrive ……..251 2012 Edge (edg) Owners Guide, 1st Printing USA (fus) -
Page 394
….130–131 Normal Scheduled locking/unlocking Maintenance and Log …..377 doors ……..126–127 opening the trunk ….127 Seats ……….142 Remote start ……131 child safety seats ….188 replacement/additional easy access/easyout transmitters ……130 feature ……..149 2012 Edge (edg) Owners Guide, 1st Printing USA (fus) -
Page 395
Ventilating your vehicle …239 Tires ……203–205, 291 alignment ……..212 care ……….208 changing ……291, 294 Warning lights (see Lights) ..12 checking the pressure ….208 Washer fluid ……323 inflating ……..206 Water, Driving through …..279 label ………217 2012 Edge (edg) Owners Guide, 1st Printing USA (fus) -
Page 396
Index Windows checking and adding fluid ..323 power ………85 replacing wiper blades …323–324 rear wiper/washer …..82 Wrecker towing ……302 Windshield washer fluid and wipers ……….80 2012 Edge (edg) Owners Guide, 1st Printing USA (fus)
Инструкция на русском языке для Ford Edge (2006 – 2014), содержит справочные данные и описание основных моментов эксплуатации автомобиля.
Рекомендуем перед началом использования изучить руководство, это позволит избежать проблем при эксплуатации и узнать о всех функциях и особенностях автомобиля.
Информация о файле: 35.6 Мб, pdf
manual-ford-edge-2006-2014
Скачать руководство для Ford Focus II (2004 — 2008)▶
Содержание |
1 |
|
Введение |
8 |
|
Обеспечение безопасности детей |
15 |
Детские сиденья . . . . . . . . . . . . . . . . . . . . . . . . . . . . . . . . . . . . . .19 Установка детского сиденья . . . . . . . . . . . . . . . . . . . . . . . . . . . . .19 Детские автокресла-бустеры . . . . . . . . . . . . . . . . . . . . . . . . . . . .22 Установка детских сидений . . . . . . . . . . . . . . . . . . . . . . . . . . . . . .25 Замки системы блокировки дверей от открывания детьми . . . . . .33
Пристегивание ремней безопасности . . . . . . . . . . . . . . . . . . . . . .36 Регулировка высоты ремня безопасности . . . . . . . . . . . . . . . . . . .41
Предупреждающий световой и звуковой сигнал непристегнутого ремня безопасности . . . . . . . . . . . . . . . . . . . . . . . . . . . . . . . . . . .42
Устройство напоминания о необходимости пристегнуть ремень безопасности. . . . . . . . . . . . . . . . . . . . . . . . . . . . . . . . . . .42
Техническое обслуживание детских удерживающих устройств и ремней безопасности . . . . . . . . . . . . . . . . . . . . . . . . . . . . . . . . . .45
|
Система персональной безопасности |
46 |
|
Вспомогательная удерживающая система |
48 |
Надувные подушки безопасности водителя и пассажира . . . . . . . .50 Система определения занятости сиденья переднего пассажира . . .53 Боковые надувные подушки безопасности . . . . . . . . . . . . . . . . . .58
Боковые шторки системы надувных подушек безопасности
Safety Canopy . . . . . . . . . . . . . . . . . . . . . . . . . . . . . . . . . . . . . . . .60
Датчики удара и предупреждающий индикатор надувной подушки безопасности . . . . . . . . . . . . . . . . . . . . . . . . . . . . . . . . .62
Утилизация надувных подушек безопасности . . . . . . . . . . . . . . . .64
|
Ключи и дистанционное управление |
65 |
Общая информация о радиочастотах . . . . . . . . . . . . . . . . . . . . . .65 Пульт дистанционного управления . . . . . . . . . . . . . . . . . . . . . . . .66 Ключи . . . . . . . . . . . . . . . . . . . . . . . . . . . . . . . . . . . . . . . . . . . . .66
Замена утерянного ключа или пульта дистанционного управления . . . . . . . . . . . . . . . . . . . . . . . . . . . . . . . . . . . . . . . . . .67
Настройки, MyKey . . . . . . . . . . . . . . . . . . . . . . . . . . . . . . . . . . . .68 Создание. . . . . . . . . . . . . . . . . . . . . . . . . . . . . . . . . . . . . . . . . . . .69 Удаление . . . . . . . . . . . . . . . . . . . . . . . . . . . . . . . . . . . . . . . . . . .71 Состояние системы . . . . . . . . . . . . . . . . . . . . . . . . . . . . . . . . . . . .71 Дистанционный запуск двигателя, MyKey . . . . . . . . . . . . . . . . . . .72 Поиск и устранение неисправностей, MyKey . . . . . . . . . . . . . . . . .75
|
Замки |
78 |
|
Запирание и отпирание. . . . . . . . . . . . . . . . . . . . . . . . . . . . . . . . |
.78 |
|
Клавиатура бесключевого входа SecuriCode™ . . . . . . . . . . . . . . |
.87 |
|
Безопасность |
90 |
|
Пассивная противоугонная система SecuriLock® . . . . . . . . . . . . . . |
90 |
|
Рулевое колесо |
93 |
|
Регулировка рулевого колеса . . . . . . . . . . . . . . . . . . . . . . . . . . . . |
93 |
|
Кнопки управления на рулевом колесе . . . . . . . . . . . . . . . . . . . . . |
94 |
|
Стеклоочистители и стеклоомыватели |
96 |
|
Стеклоочистители ветрового стекла. . . . . . . . . . . . . . . . . . . . . . . |
96 |
|
Омыватели ветрового стекла . . . . . . . . . . . . . . . . . . . . . . . . . . . . |
96 |
|
Стеклоочиститель и омыватель заднего стекла. . . . . . . . . . . . . . . |
97 |
|
Освещение |
98 |
Управление освещением . . . . . . . . . . . . . . . . . . . . . . . . . . . . . . . .98
Система автоматического управления включением внешнего освещения. . . . . . . . . . . . . . . . . . . . . . . . . . . . . . . . . . . . . . . . . . .99
Регулятор яркости подсветки панели приборов . . . . . . . . . . . . . .100 Задержка выключения фар. . . . . . . . . . . . . . . . . . . . . . . . . . . . .100 Передние противотуманные фары . . . . . . . . . . . . . . . . . . . . . . .101 Указатели поворота . . . . . . . . . . . . . . . . . . . . . . . . . . . . . . . . . .101 Плафоны освещения салона . . . . . . . . . . . . . . . . . . . . . . . . . . . .102
|
Содержание |
3 |
|
Окна и зеркала |
104 |
Окна с электроприводом стекол . . . . . . . . . . . . . . . . . . . . . . . . .104 Наружные зеркала . . . . . . . . . . . . . . . . . . . . . . . . . . . . . . . . . . .106 Внутренние зеркала . . . . . . . . . . . . . . . . . . . . . . . . . . . . . . . . . .106 Солнцезащитные козырьки. . . . . . . . . . . . . . . . . . . . . . . . . . . . .107
|
Щиток приборов |
108 |
|
Измерительные приборы . . . . . . . . . . . . . . . . . . . . . . . . . . . . . |
.108 |
|
Предупреждающие сигналы и индикаторы . . . . . . . . . . . . . . . . |
.109 |
|
Звуковые предупреждающие сигналы. . . . . . . . . . . . . . . . . . . . |
.114 |
|
Информационные дисплеи |
115 |
|
Органы управления. . . . . . . . . . . . . . . . . . . . . . . . . . . . . . . . . . . |
115 |
|
Бортовой компьютер . . . . . . . . . . . . . . . . . . . . . . . . . . . . . . . . . |
119 |
|
Информационные сообщения . . . . . . . . . . . . . . . . . . . . . . . . . . . |
121 |
|
Аудиосистема |
134 |
|
Система MyFord™. . . . . . . . . . . . . . . . . . . . . . . . . . . . . . . . . . . . |
136 |
|
Дополнительное гнездо входа . . . . . . . . . . . . . . . . . . . . . . . . . . . |
142 |
|
Система управления микроклиматом |
144 |
Система отопления и кондиционирования воздуха с ручным управлением . . . . . . . . . . . . . . . . . . . . . . . . . . . . . . . . . . . . . . . .144
Двухзонная система автоматического управления микроклиматом. . . . . . . . . . . . . . . . . . . . . . . . . . . . . . . . . . . . . .146
Обогреватель заднего стекла . . . . . . . . . . . . . . . . . . . . . . . . . . .151 Воздушный фильтр салона . . . . . . . . . . . . . . . . . . . . . . . . . . . . .151
Правильная посадка . . . . . . . . . . . . . . . . . . . . . . . . . . . . . . . . . .154 Подголовники . . . . . . . . . . . . . . . . . . . . . . . . . . . . . . . . . . . . . . .155 Сиденья с ручной регулировкой . . . . . . . . . . . . . . . . . . . . . . . . .158 Сиденья с электроприводом регулировки . . . . . . . . . . . . . . . . . .160 Обогрев сидений . . . . . . . . . . . . . . . . . . . . . . . . . . . . . . . . . . . . .162 Задние сиденья . . . . . . . . . . . . . . . . . . . . . . . . . . . . . . . . . . . . . .163

|
4 |
Содержание |
|
|
Дополнительные гнезда электропитания |
165 |
|
|
Вещевые отделения |
166 |
|
|
Центральная консоль . |
. . . . . . . . . . . . . . . . . . . . . . . . . . . . . . . |
.166 |
|
Потолочная консоль . . . |
. . . . . . . . . . . . . . . . . . . . . . . . . . . . . . . |
166 |
|
Запуск и остановка двигателя |
167 |
|
|
Выключатель зажигания. . . . . . . . . . . . . . . . . . . . . . . . . . . . . . . |
168 |
|
|
Топливо и заправка |
171 |
Качество топлива . . . . . . . . . . . . . . . . . . . . . . . . . . . . . . . . . . . .172 Полная выработка топлива . . . . . . . . . . . . . . . . . . . . . . . . . . . . .173 Заправка топливом . . . . . . . . . . . . . . . . . . . . . . . . . . . . . . . . . . .175 Расход топлива . . . . . . . . . . . . . . . . . . . . . . . . . . . . . . . . . . . . . .177
|
Коробка передач |
183 |
|
Автоматическая коробка передач . . . . . . . . . . . . . . . . . . . . . . . |
.183 |
|
Система помощи при трогании на подъеме . . . . . . . . . . . . . . . . |
.190 |
|
Полный привод (при наличии) |
192 |
|
Полный привод . . . . . . . . . . . . . . . . . . . . . . . . . . . . . . . . . . . . . . |
192 |
|
Тормозная система |
200 |
Тормозная система . . . . . . . . . . . . . . . . . . . . . . . . . . . . . . . . . . .200
Советы по управлению автомобилем с антиблокировочной системой тормозов . . . . . . . . . . . . . . . . . . . . . . . . . . . . . . . . . . .201
Стояночный тормоз . . . . . . . . . . . . . . . . . . . . . . . . . . . . . . . . . .202
|
Система контроля тягового усилия |
203 |
|
Система Traction Control™ . . . . . . . . . . . . . . . . . . . . . . . . . . . . |
.203 |
|
Система поддержания устойчивости |
204 |
|
Система AdvanceTrac®. . . . . . . . . . . . . . . . . . . . . . . . . . . . . . . . . |
205 |
|
Системы помощи при парковке |
206 |
Система датчиков . . . . . . . . . . . . . . . . . . . . . . . . . . . . . . . . . . . .206

|
Содержание |
5 |
|
Система круиз-контроля |
209 |
|
Использование системы круиз-контроля . . . . . . . . . . . . . . . . . . |
.209 |
|
Системы помощи водителю |
211 |
|
Рулевое управление . . . . . . . . . . . . . . . . . . . . . . . . . . . . . . . . . . |
211 |
|
Перевозка грузов |
212 |
Разделительная сетка багажного отделения . . . . . . . . . . . . . . . .212 Багажники и устройства для перевозки грузов на крыше . . . . . .214 Дополнительный крюк . . . . . . . . . . . . . . . . . . . . . . . . . . . . . . . .215 Нагрузка автомобиля . . . . . . . . . . . . . . . . . . . . . . . . . . . . . . . . .215
|
Буксировка |
223 |
|
Буксировка прицепа . . . . . . . . . . . . . . . . . . . . . . . . . . . . . . . . . |
.223 |
|
Аварийная буксировка . . . . . . . . . . . . . . . . . . . . . . . . . . . . . . . . |
231 |
|
Рекреационная буксировка . . . . . . . . . . . . . . . . . . . . . . . . . . . . . |
232 |
|
Советы по управлению автомобилем |
234 |
|
Экономичный стиль вождения . . . . . . . . . . . . . . . . . . . . . . . . . . |
234 |
|
Преодоление водной преграды . . . . . . . . . . . . . . . . . . . . . . . . . . |
235 |
|
Напольные коврики . . . . . . . . . . . . . . . . . . . . . . . . . . . . . . . . . . |
236 |
|
Аварийные ситуации |
238 |
|
Аварийная световая сигнализация . . . . . . . . . . . . . . . . . . . . . . . . |
238 |
|
Выключатель отсечки топлива . . . . . . . . . . . . . . . . . . . . . . . . . . |
238 |
|
Запуск двигателя от внешнего источника электропитания . . . . .239 |
|
|
Система технической помощи на дорогах |
243 |
|
Система технической помощи на дорогах . . . . . . . . . . . . . . . . . . |
243 |
|
Предохранители |
245 |
Замена предохранителя. . . . . . . . . . . . . . . . . . . . . . . . . . . . . . . .245 Таблица технических характеристик предохранителей . . . . . . . .246
|
6 |
Содержание |
|
Обслуживание |
258 |
Общие сведения . . . . . . . . . . . . . . . . . . . . . . . . . . . . . . . . . . . . .258 Открытие и закрытие капота . . . . . . . . . . . . . . . . . . . . . . . . . . .259 Компоненты моторного отсека . . . . . . . . . . . . . . . . . . . . . . . . . .260 Масляный щуп двигателя . . . . . . . . . . . . . . . . . . . . . . . . . . . . . .261 Проверка уровня масла в двигателе. . . . . . . . . . . . . . . . . . . . . . .261 Проверка уровня охлаждающей жидкости двигателя . . . . . . . . .262
Проверка трансмиссионной жидкости для автоматической коробки передач . . . . . . . . . . . . . . . . . . . . . . . . . . . . . . . . . . . . .269
Проверка тормозной жидкости . . . . . . . . . . . . . . . . . . . . . . . . . .272 Проверка уровня жидкости рулевого привода с усилителем . . . .272 Топливный фильтр . . . . . . . . . . . . . . . . . . . . . . . . . . . . . . . . . . .272 Проверка уровня жидкости омывателя . . . . . . . . . . . . . . . . . . . .273 Замена аккумуляторной батареи автомобиля . . . . . . . . . . . . . . .273 Проверка щеток стеклоочистителей . . . . . . . . . . . . . . . . . . . . . .276 Замена щеток стклоочистителей. . . . . . . . . . . . . . . . . . . . . . . . .277 Воздушный (-е) фильтр (-ы) . . . . . . . . . . . . . . . . . . . . . . . . . . . .277 Регулировка света фар . . . . . . . . . . . . . . . . . . . . . . . . . . . . . . . .279 Замена лампы . . . . . . . . . . . . . . . . . . . . . . . . . . . . . . . . . . . . . . .280 Таблица технических характеристик ламп . . . . . . . . . . . . . . . . . .284
Чистящие средства . . . . . . . . . . . . . . . . . . . . . . . . . . . . . . . . . . .286 Мойка кузова . . . . . . . . . . . . . . . . . . . . . . . . . . . . . . . . . . . . . . .286 Полировка восковой пастой . . . . . . . . . . . . . . . . . . . . . . . . . . . .288
Устранение незначительных повреждений лакокрасочного покрытия . . . . . . . . . . . . . . . . . . . . . . . . . . . . . . . . . . . . . . . . . .289
Очистка двигателя . . . . . . . . . . . . . . . . . . . . . . . . . . . . . . . . . . .289 Очистка стекол и щеток стеклоочистителей . . . . . . . . . . . . . . . .290 Чистка салона . . . . . . . . . . . . . . . . . . . . . . . . . . . . . . . . . . . . . . .291 Очистка стекол панели приборов и щитка приборов . . . . . . . . . .292 Чистка кожаных сидений . . . . . . . . . . . . . . . . . . . . . . . . . . . . . .293 Очистка легкосплавных колесных дисков . . . . . . . . . . . . . . . . . .293 Хранение автомобиля . . . . . . . . . . . . . . . . . . . . . . . . . . . . . . . . .294
|
Содержание |
7 |
|
Колеса и шины |
298 |
Уход за шинами . . . . . . . . . . . . . . . . . . . . . . . . . . . . . . . . . . . . .301 Использование цепей противоскольжения . . . . . . . . . . . . . . . . .320 Система контроля давления в шинах (TPMS). . . . . . . . . . . . . . . .321 Замена колеса. . . . . . . . . . . . . . . . . . . . . . . . . . . . . . . . . . . . . . .326 Технические характеристики. . . . . . . . . . . . . . . . . . . . . . . . . . . .333 Момент затяжки гайки колеса. . . . . . . . . . . . . . . . . . . . . . . . . . .333
|
Заправочные объемы и технические характеристики |
334 |
Технические характеристики двигателя . . . . . . . . . . . . . . . . . . . .334 Номера деталей . . . . . . . . . . . . . . . . . . . . . . . . . . . . . . . . . . . . .340 Идентификационный номер автомобиля . . . . . . . . . . . . . . . . . . .341 Паспортная табличка автомобиля . . . . . . . . . . . . . . . . . . . . . . . .341 Обозначение кода коробки передач . . . . . . . . . . . . . . . . . . . . . .342
|
Плановое техническое обслуживание |
343 |
Плановое техническое обслуживание и ведение журнала . . . . . .348
Информация в настоящем документе была точной на момент подписания в печать. Мы постоянно прикладываем усилия к совершенствованию продукции и оставляем за собой право изменять технические характеристики, конструкцию или оборудование без предварительного уведомления. Запрещается воспроизводить этот документ полностью или частично, передавать, хранить в информационных системах или переводить на любой язык, в любой форме и любым способом без предварительного письменного разрешения с нашей стороны. Исключая возможные ошибки и пропуски.
© Ford Motor Company 2013

О ДАННОМ РУКОВОДСТВЕ
Благодарим вас за то, что вы остановили свой выбор на автомобиле марки Ford. Рекомендуем уделить время и ознакомиться с данным руководством, чтобы узнать возможности вашего автомобиля. Чем лучше вы знаете свой автомобиль, тем безопаснее и приятнее вождение.
ПРЕДОСТЕРЕЖЕНИЕ. Соблюдайте должную осторожность и будьте внимательны при управлении своим автомобилем и
использовании его функций.
Примечание. В данном руководстве описаны функции и дополнительное оборудование всего модельного ряда автомобилей, часть из которого еще не установлена на все модели. Иногда встречается описание дополнительного оборудования, которым не располагает ваш автомобиль.
Примечание. Некоторые иллюстрации из настоящего руководства могут использоваться в руководствах для различных моделей, несколько отличаясь от установленного на вашем автомобиле оборудования. Тем не менее основная информация о том, что показано на этих иллюстрациях, всегда верна.
Примечание. При использовании и эксплуатации автомобиля строго соблюдайте все нормы действующего законодательства и требования нормативных документов.
Примечание. В случае продажи автомобиля данное руководство необходимо передать новому владельцу. Оно является неотъемлемой принадлежностью автомобиля.
В данном руководстве некоторые элементы конструкции могут сопровождаться определениями «левый» и «правый». Сторона определяется из положения на сиденье водителя «лицом по ходу движения».

|
A |
A. Правая сторона |
|
|
B. Левая сторона |
||
Защита окружающей среды
Вы должны внести свой вклад в охрану окружающей среды. Правильное использование автомобиля и утилизация отходов, чистящих и смазочных материалов в соответствии с
требованиями нормативных документов — важные шаги на пути к этой цели.
СЛОВАРЬ УСЛОВНЫХ СИМВОЛОВ
ПРЕДОСТЕРЕЖЕНИЕ. Несоблюдение инструкций, отмеченных предупреждающим символом, повышает риск
смертельного исхода или получения серьезных травм как для вас самих, так и для других людей.
Ниже приведены несколько символов, которые вы можете увидеть на вашем автомобиле.
|
Сим- |
Описание |
Сим- |
Описание |
Сим- |
Описание |
||
|
вол |
вол |
вол |
|||||
|
Предупреж- |
См. руко- |
Антиблоки- |
|||||
|
дение об |
водство по |
ровочная |
|||||
|
опасности |
эксплуата- |
система тор- |
|||||
|
ции |
мозов |
||||||
|
Не допус- |
Аккумуля- |
Кислота для |
|||||
|
кайте куре- |
торная бата- |
аккумуля- |
|||||
|
ния, искр и |
рея |
торной бата- |
|||||
|
открытого |
реи |
||||||
|
пламени |

|
10 |
Введение |
||||
|
Сим- |
Описание |
Сим- |
Описание |
Сим- |
Описание |
|
вол |
вол |
вол |
|||
|
Тормозная |
Тормозная |
Фильтр са- |
|||
|
жидкость — |
система |
лона |
|||
|
не на нефтя- |
|||||
|
ной основе |
|||||
|
Проверьте |
Включение/ |
Нижнее ан- |
|||
|
топливную |
выключение |
керное креп- |
|||
|
крышку |
функции |
ление де- |
|||
|
блокировки |
тского |
||||
|
двери от от- |
сиденья |
||||
|
крывания |
|||||
|
детьми |
|||||
|
Анкерное |
Система |
Не откры- |
|||
|
крепление |
круиз- |
вайте в горя- |
|||
|
ремня безо- |
контроля |
чем состоя- |
|||
|
пасности |
нии |
||||
|
детского |
|||||
|
сиденья |
|||||
|
Воздушный |
Охлаждаю- |
Температура |
|||
|
фильтр дви- |
щая жид- |
охлаждаю- |
|||
|
гателя |
кость двига- |
щей жид- |
|||
|
теля |
кости двига- |
||||
|
теля |
|||||
|
Моторное |
Взрывоопас- |
Предупреж- |
|||
|
масло |
ный газ |
дение о ра- |
|||
|
ботающем |
|||||
|
вентиляторе |
|||||
|
Пристегните |
Передняя |
Передние |
|||
|
ремень безо- |
надувная |
противоту- |
|||
|
пасности |
подушка |
манные |
|||
|
безопас- |
фары |
||||
|
ности |
![]()
|
Введение |
11 |
||||||||||
|
Сим- |
Описание |
Сим- |
Описание |
Сим- |
Описание |
||||||
|
вол |
вол |
вол |
|||||||||
|
Сброс давле- |
Блок пре- |
Аварийная |
|||||||||
|
ния в топ- |
дохраните- |
световая |
|||||||||
|
ливном на- |
лей |
сигнализа- |
|||||||||
|
сосе |
ция |
||||||||||
|
Обогревае- |
Внутренняя |
Домкрат |
|||||||||
|
мое заднее |
ручка от- |
||||||||||
|
стекло |
крывания |
||||||||||
|
багажного |
|||||||||||
|
отделения |
|||||||||||
|
Управление |
Предупреж- |
Поддержи- |
|||||||||
|
освещением |
дение о низ- |
вайте пре- |
|||||||||
|
ком давле- |
дусмотрен- |
||||||||||
|
нии воздуха |
ный уровень |
||||||||||
|
в шинах |
жидкости |
||||||||||
|
Тревожная |
Система по- |
Система сто- |
|||||||||
|
сигнализа- |
мощи при |
яночного |
|||||||||
|
ция |
парковке |
тормоза |
|||||||||
|
Жидкость |
Окна с элек- |
Блокировка |
|||||||||
|
рулевого |
троприво- |
окон с элек- |
|||||||||
|
привода с |
дом стекол |
троприво- |
|||||||||
|
усилителем |
(передние/ |
дом стекол |
|||||||||
|
задние) |
|||||||||||
|
Предупреж- |
Боковая на- |
Система |
|||||||||
|
дение о при- |
дувная по- |
поддержа- |
|||||||||
|
ближении |
душка безо- |
ния устойчи- |
|||||||||
|
срока техоб- |
пасности |
вости |
|||||||||
|
служивания |
|||||||||||
|
двигателя |

|
12 |
Введение |
||||
|
Сим- |
Описание |
Сим- |
Описание |
Сим- |
Описание |
|
вол |
вол |
вол |
|||
|
Устранение |
Омыватель |
||||
|
обледенения/ |
и стекло- |
||||
|
запотевания |
очиститель |
||||
|
ветрового |
ветрового |
||||
|
стекла |
стекла |
ПЕРХЛОРАТ
Примечание. Некоторые компоненты вашего автомобиля, такие как модули надувной подушки безопасности, преднатяжители ремня безопасности и батарейки пульта дистанционного управления, могут содержать перхлорат. При техническом обслуживании или окончательной утилизации автомобиля может понадобиться особое обращение с такими компонентами. Дополнительные сведения см. на сайте www.dtsc.ca.gov/hazardouswaste/perchlorate.
РЕКОМЕНДАЦИИ ПО ЗАМЕНЕ ДЕТАЛЕЙ
Ваш автомобиль изготовлен в соответствии с самыми высокими стандартами с использованием деталей высокого качества. При прохождении планового технического обслуживания или ремонта мы рекомендуем требовать использования только оригинальных запасных частей Ford и Motorcraft. Оригинальные запасные части Ford и Motorcraft легко распознать по изображению торговых марок Ford, FoMoCo или Motorcraft как на самих запасных частях, так и на их упаковке.
ОСОБЫЕ ПРИМЕЧАНИЯ
Ограниченная гарантия на новый автомобиль
Подробное описание того, что подпадает и что не подпадает под действие ограниченной гарантии на новый автомобиль, приведено в условиях гарантийного полиса, предоставляемого вам вместе с руководством по эксплуатации.
Особые инструкции
Для обеспечения дополнительной безопасности ваш автомобиль оснащен сложным электронным оборудованием управления.

ПРЕДОСТЕРЕЖЕНИЕ. Внимательно ознакомьтесь с разделом Вспомогательная удерживающая система подушек
и ремней безопасности. Несоблюдение конкретных предупреждений и инструкций может привести к травмам.
ПРЕДОСТЕРЕЖЕНИЕ. ЗАПРЕЩАЕТСЯ установка обращенных назад детских сидений или люлек безопасности на
переднем сиденье пассажира перед активированной подушкой безопасности.
ОБОРУДОВАНИЕ МОБИЛЬНОЙ СВЯЗИ
Использование устройств мобильной связи становится все более важным как при ведении бизнеса, так и в личной жизни. Вместе с тем при использовании такого оборудования не следует идти на компромисс в том, что касается собственной безопасности или безопасности других лиц. При правильном использовании мобильная связь может повысить личную безопасность, особенно в чрезвычайных ситуациях. Безопасность должна иметь первостепенное значение при использовании оборудования мобильной связи, чтобы не свести к нулю все выгоды такой связи.
Оборудование мобильной связи включает в себя, помимо прочего, сотовые телефоны, пейджеры, портативные устройства для работы с электронной почтой, устройства для отправки текстовых сообщений и портативные приемопередающие радиоустановки.
ПРЕДОСТЕРЕЖЕНИЕ. Вождение с отвлеченным вниманием может привести к потере контроля над автомобилем, авариям
и травмам. Настоятельно рекомендуется соблюдать крайнюю осторожность при использовании любых устройств, которые могут отвлечь внимание водителя от дороги. В первую очередь вы отвечаете за безопасную эксплуатацию автомобиля. Рекомендуется воздержаться от использования любых портативных устройств во время вождения и по возможности использовать системы с голосовым управлением. Обязательно ознакомьтесь с применимым местным законодательством, регулирующим использование электронных устройств во время вождения.
ДОПОЛНИТЕЛЬНАЯ ИНФОРМАЦИЯ ОБ ЭКСПОРТИРУЕМЫХ АВТОМОБИЛЯХ (НЕ ДЛЯ РЫНКА США И КАНАДЫ)
Автомобиль, реализуемый в конкретном регионе мира, может быть оснащен функциями и опциями, которые отличаются от описанных в данном руководстве. Данное руководство может дополняться приложением, предназначенным для конкретного рынка. Это приложение предназначено для предоставления информации по уникальным функциям вашего автомобиля, его техническим характеристикам, а также соответствующих рекомендаций. Данное руководство по эксплуатации подготовлено преимущественно для использования на рынках США и Канады. Функции и оборудование, приведенные в нем в качестве стандартных, могут отличаться от использованных на автомобилях, подготовленных для экспорта. В
данном руководстве по эксплуатации приведена и другая необходимая информация, включая информацию по технике безопасности.

Обеспечение безопасности детей |
15 |
ОБЩИЕ СВЕДЕНИЯ
В следующем разделе приведены указания по правильному использованию детских удерживающих устройств.
ПРЕДОСТЕРЕЖЕНИЕ. Перед началом поездки всегда необходимо убедиться в том, что ваш ребенок надежно
зафиксирован в удерживающем устройстве, соответствующем его росту, возрасту и весу. Детские удерживающие устройства должны приобретаться отдельно от автомобиля. Несоблюдение данных инструкций и указаний может значительно повысить риск получения вашим ребенком серьезных травм или привести к смертельному исходу.

16 Обеспечение безопасности детей
ПРЕДОСТЕРЕЖЕНИЕ. Все дети различаются по комплекции. Рекомендации по использованию удерживающих
устройств основаны на пороговых величинах роста, возраста и веса детей, полученных в Национальном управлении по безопасности движения автотранспорта США и других организациях обеспечения безопасности. Они могут быть также основаны на минимальных требованиях, установленных законодательством. Ford рекомендует получить консультацию сертифицированного технического специалиста по безопасности детей Национального управления по безопасности движения автотранспорта США (CPST), а также вашего педиатра. Это сможет стать гарантией того, что детское сиденье подходит не только для вашего ребенка, но и для вашего автомобиля и может быть надежно установлено в нем. Местонахождение пунктов по установке детских сидений, а также информацию о технических специалистах по обеспечению безопасности детей можно узнать по бесплатному номеру в Национальном управлении по безопасности движения автотранспорта США 1-888-327-4236 или на сайте http://www.nhtsa.dot.gov. В Канаде следует обратиться в местное отделение службы скорой помощи Святого Иоанна для получения консультации технического специалиста по обеспечению безопасности пассажиров-детей. За дополнительной информацией необходимо обратиться в министерство транспорта вашей провинции, зайти на веб-сайт службы скорой помощи Святого Иоанна или позвонить в Министерство транспорта Канады по номеру 1–800–333–0371 (http://www.tc.gc.ca). Неправильная фиксация детей в детских креслах безопасности, предназначенных для использования детьми соответствующего роста, возраста и веса, может значительно увеличить опасность получения вашим ребенком серьезных травм или смертельного исхода.

|
Обеспечение безопасности детей |
17 |
Рекомендации по использованию детских удерживающих устройств
|
Рекомендуемый тип |
||
|
Рост, вес или возраст ребенка |
удерживающего уст- |
|
|
ройства |
||
|
Дети |
Дети весом 40 фунтов (18 кг) или |
Используйте детское |
|
преддо- |
меньше (обычно дети четырех |
сиденье (иногда назы- |
|
школь- |
лет или младше). |
ваемое сиденьем для |
|
ного |
ребенка, сиденьем с |
|
|
возраста |
откидным верхом или |
|
|
креслом для ребенка). |
||
|
Малень- |
Дети более старшего возраста, |
Используйте |
|
кие дети |
чем в предыдущей категории, или |
автокресло-бустер с |
|
дети, которым детское сиденье |
креплением ремнем |
|
|
уже не подходит по параметрам |
безопасности. |
|
|
(обычно это дети ростом менее |
||
|
4 футов 9 дюймов (1,45 м) старше |
||
|
четырех (4) и младше двенадцати |
||
|
(12) лет, а также дети весом от |
||
|
40–80 фунтов (18–36 кг) до |
||
|
100 фунтов (45 кг), если произво- |
||
|
дитель рекомендует использо- |
||
|
вать для них удерживающие уст- |
||
|
ройства). |

18 Обеспечение безопасности детей
Рекомендации по использованию детских удерживающих устройств
|
Рекомендуемый тип |
||
|
Рост, вес или возраст ребенка |
удерживающего уст- |
|
|
ройства |
||
|
Дети |
Дети, которым автокресло- |
Используйте ремень |
|
более |
бустер с креплением при помощи |
безопасности. Поясная |
|
крупной |
ремня безопасности уже не под- |
лямка ремня безопас- |
|
комп- |
ходит по комплекции (обычно |
ности должна удобно |
|
лекции |
это дети, достигшие роста 4 фу- |
располагаться поперек |
|
тов 9 дюймов (1,45 м) или выше, |
бедер ребенка, плече- |
|
|
весящие 80–100 фунтов |
вая лямка ремня безо- |
|
|
(36–45 кг), если производитель |
пасности должна про- |
|
|
рекомендует использовать для |
ходить по центру тела |
|
|
них удерживающие устройства). |
через плечо и грудь |
|
|
ребенка, спинка |
||
|
кресла должна быть в |
||
|
вертикальном положе- |
||
|
нии. |
•Если вы находитесь в США или Канаде, то обязаны правильно использовать детские сиденья для детей преддошкольного возраста
всоответствии с законодательством.
•Во многих штатах США и провинциях Канады действует требование по использованию одобренных автокресел-бустеров при перевозке детей младше восьми лет ростом менее 4 футов 9 дюймов (1,45 м) или весом менее 80 фунтов (36 кг). Ознакомьтесь с особыми требованиями, предъявляемыми местным или федеральным законодательством к перевозке детей в вашем автомобиле.
•По возможности обязательно фиксируйте при помощи удерживающих устройств детей до 12 лет включительно на заднем сиденье автомобиля. Статистика автомобильных аварий показывает, что наиболее безопасным для детей является не переднее, а заднее сиденье. Дополнительную информацию о
системе определения занятости сиденья переднего пассажира см.
вразделе Вспомогательная удерживающая система подушек и ремней безопасности.
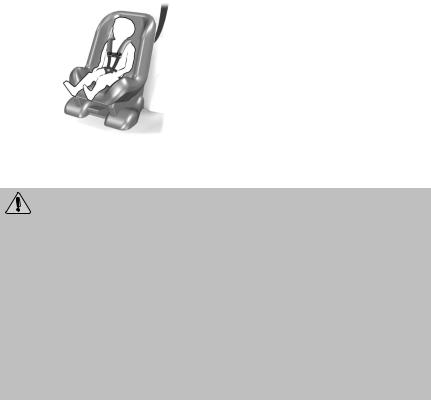
|
Обеспечение безопасности детей |
19 |
ДЕТСКИЕ СИДЕНЬЯ
Используйте детское сиденье (иногда называемое сиденьем с откидным верхом или детским креслом) для детей младшего возраста или весом до 40 фунтов (18 кг) (обычно дети четырех лет и младше).
УСТАНОВКА ДЕТСКОГО СИДЕНЬЯ
ПРЕДОСТЕРЕЖЕНИЕ. Срабатывание надувных подушек безопасности может стать причиной серьезных травм или
смерти ребенка, находящегося в детском сиденье. НИКОГДА не устанавливайте обращенное назад детское сиденье перед активированной надувной подушкой безопасности. При установке обращенного вперед детского сиденья на переднем сиденье отодвиньте его как можно дальше назад. По возможности перевозите детей до 12 лет включительно на заднем сиденье автомобиля, надежно зафиксировав их при помощи удерживающих устройств. В случае если не удается усадить всех детей на заднее сиденье и зафиксировать их соответствующим образом при помощи удерживающих устройств, самого старшего ребенка можно поместить на переднее сиденье и пристегнуть ремень безопасности.

20 Обеспечение безопасности детей
ПРЕДОСТЕРЕЖЕНИЕ. Обязательно тщательно соблюдайте инструкции и предупреждения производителя детских средств
безопасности, чтобы определить, насколько эти средства соответствуют росту, весу и возрасту ребенка. Следуйте инструкциям и предупреждениям производителя детских средств безопасности относительно их установки и использования вместе с указаниями производителя автомобиля. Детское автомобильное кресло, которое неправильно установлено или используется либо не соответствует росту, весу и возрасту ребенка, может значительно увеличить опасность получения серьезных травм или смертельного исхода.
ПРЕДОСТЕРЕЖЕНИЕ. Не позволяйте пассажирам держать ребенка на руках или коленях во время движения автомобиля.
Во время столкновения, которое может привести к серьезным повреждениям или смертельному исходу, пассажир не сможет защитить ребенка от получения травм.
ПРЕДОСТЕРЕЖЕНИЕ. Запрещается использовать подушки, книги или полотенца для увеличения высоты сидения ребенка.
Дети могут соскользнуть с сиденья, что повышает вероятность получения травмы или смертельного исхода при аварии.
ПРЕДОСТЕРЕЖЕНИЕ. Обязательно надежно фиксируйте детское сиденье или автокресло-бустер, если в нем нет
ребенка. При столкновении или неожиданной остановке эти предметы могут перемещаться по непредсказуемой траектории и стать причиной получения серьезных травм.
ПРЕДОСТЕРЕЖЕНИЕ. Никогда не пропускайте ремень безопасности под рукой ребенка или за его спиной, поскольку
это уменьшит защиту верхней части тела и увеличит вероятность получения травмы или смертельного исхода при аварии.
ПРЕДОСТЕРЕЖЕНИЕ. Не оставляйте без присмотра детей и животных в автомобиле.
|
Обеспечение безопасности детей |
21 |
|||||
|
Используйте метод фиксации, обозначенный |
||||||
|
ниже символом Х. |
||||||
|
Сис- |
Система |
Ремень |
Ремень |
Только |
||
|
тема |
LATCH |
безо- |
безопас- |
ремень |
||
|
LATCH |
(система |
пас- |
ности и |
безо- |
||
|
(сис- |
крепле- |
ности и |
система |
пас- |
||
|
тема |
ния де- |
анкер- |
LATCH |
ности |
||
|
крепле- |
тских |
ное |
(нижние |
|||
|
ния де- |
сидений) |
крепле- |
анкерные |
|||
|
тских |
(только |
ние |
крепле- |
|||
|
Тип удер- |
сиде- |
нижние |
верх- |
ния и ан- |
||
|
ний) |
анкер- |
них |
керное |
|||
|
живаю- |
Вес ре- |
|||||
|
(ниж- |
ные |
страхо- |
крепле- |
|||
|
щего уст- |
бенка |
|||||
|
ние ан- |
крепле- |
вочных |
ние верх- |
|||
|
ройства |
||||||
|
керные |
ния) |
ремней |
них стра- |
|||
|
крепле- |
ховочных |
|||||
|
ния и |
ремней) |
|||||
|
анкер- |
||||||
|
ное |
||||||
|
крепле- |
||||||
|
ние вер- |
||||||
|
хних |
||||||
|
страхо- |
||||||
|
вочных |
||||||
|
ремней) |
||||||
|
Детское |
До |
|||||
|
сиденье, |
48 фун- |
X |
X |
|||
|
обращен- |
тов |
|||||
|
ное назад |
(21 кг) |
|||||
|
Детское |
До |
|||||
|
сиденье, |
48 фун- |
X |
X |
X |
||
|
обращен- |
тов |
|||||
|
ное впе- |
(21 кг) |
|||||
|
ред |
||||||
|
Детское |
Более |
|||||
|
сиденье, |
48 фун- |
X |
X |
|||
|
обращен- |
тов |
|||||
|
ное впе- |
(21 кг) |
|||||
|
ред |
Примечание. Детское сиденье должно вплотную прилегать к сиденью автомобиля, на котором оно установлено. Возможно, потребуется поднять или снять подголовник. Сведения о подголовниках см. в разделе Сиденья.

22 Обеспечение безопасности детей
ДЕТСКИЕ АВТОКРЕСЛА-БУСТЕРЫ
ПРЕДОСТЕРЕЖЕНИЕ. Никогда не пропускайте ремень безопасности под рукой ребенка или за его спиной, поскольку
это уменьшит защиту верхней части тела и увеличит вероятность получения травмы или смертельного исхода при аварии.
Используйте автокресло-бустер с креплением ремнем безопасности для детей более старшего возраста или для тех, которым детское сиденье уже не подходит по параметрам (обычно это дети ростом менее 4 футов 9 дюймов (1,45 м) старше четырех (4) и младше двенадцати (12) лет весом от 40–80 фунтов (18–36 кг) до 100 фунтов (45 кг), если производитель рекомендует использовать для них удерживающие устройства). Во многих штатах США и провинциях Канады действует требование по использованию одобренных автокресел-бустеров при перевозке детей до восьми (8) лет ростом менее 4 футов 9 дюймов (1,45 м) или весом менее 80 фунтов (36 кг).
Автокресло-бустер следует использовать, если вы можете ответить ДА на ВСЕ вопросы, в условиях, когда ребенок занимает место без автокресла-бустера.
• Может ли ребенок сидеть всю дорогу облокотившись на сиденье автомобиля с удобно согнутыми коленями на краю подушки сиденья?
• Может ли ребенок сидеть не сутулясь?
•Поясной ремень безопасности проходит поперек бедер ребенка?
•Наплечный ремень безопасности проходит по центру тела через плечо и грудь ребенка?
•Может ли ребенок в таком положении провести всю поездку?
Обязательно используйте автокресло-бустер в сочетании с диагонально-поясным ремнем безопасности.
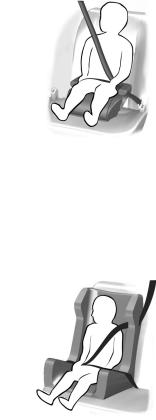
|
Обеспечение безопасности детей |
23 |
Виды автокресел-бустеров
• Автокресла-бустеры без спинки
В случае если автокресло-бустер без спинки располагает накладным кожухом, снимите его. Если сиденье автомобиля имеет низкую спинку или отсутствует подголовник, то голова ребенка, находящегося в автокресле-бустере без спинки, может оказаться выше верхней части сиденья (на уровне верхних кончиков ушей). В этом случае переместите автокресло-бустер без спинки на другое сиденье с более высокой спинкой или с подголовником и диагонально-поясным ремнем безопасности либо используйте автокресло-бустер с высокой спинкой.
• Автокресла-бустеры с высокой спинкой
Если не нашлось сиденья, на котором автокресло-бустер без спинки обеспечивает надлежащую опору для головы ребенка, воспользуйтесь автокреслом-бустером с высокой спинкой.

24 Обеспечение безопасности детей
Детские автокресла-бустеры подбираются по росту и габаритам ребенка. Выберите автокресло-бустер, при использовании которого поясная лямка ремня безопасности проходит поперек бедер ребенка, не поднимаясь на живот, с возможностью регулирования плечевого ремня безопасности, так чтобы он проходил через грудь и прилегал к центру плеча. На следующих иллюстрациях представлено идеальное расположение плечевого ремня безопасности (по центру), дискомфортное рядом с шеей и у края плеча с возможностью соскальзывания. Кроме того, на рисунках представлен поясной ремень безопасности, который должен располагаться поперек бедер ребенка.
В случае если автокресло-бустер соскальзывает с сиденья автомобиля, на котором оно установлено, подложите под него прорезиненную сетку (подкладку на полку или под ковровое покрытие). Запрещается подкладывать что-либо более толстое под автокресло-бустер. Дополнительные сведения см. в инструкциях производителя автокресла-бустера.

|
Обеспечение безопасности детей |
25 |
УСТАНОВКА ДЕТСКИХ СИДЕНИЙ
Использование диагонально-поясных ремней безопасности
ПРЕДОСТЕРЕЖЕНИЕ. Срабатывание надувных подушек безопасности может стать причиной серьезных травм или смерти
ребенка, находящегося в детском сиденье. НИКОГДА не устанавливайте обращенное назад детское сиденье перед активированной надувной подушкой безопасности. Если обращенное вперед детское сиденье все же необходимо установить на переднем сиденье, отодвиньте это сиденье как можно дальше назад.
ПРЕДОСТЕРЕЖЕНИЕ. Срабатывание надувных подушек безопасности может стать причиной серьезных травм или
смерти ребенка, находящегося в детском сиденье. Если возможно, то удерживающие устройства для детей до и старше 12 лет должны быть установлены на заднем сиденье.
ПРЕДОСТЕРЕЖЕНИЕ. В зависимости от места крепления и конструкции детского удерживающего устройства можно
заблокировать доступ к некоторым замкам ремня безопасности в сборе или нижним анкерным креплениям системы LATCH, которые не будут использоваться. Во избежание получения травм пассажиры должны находиться только в таком положении, в котором они будут надежно зафиксированы.
При установке детского сиденья с помощью комбинированных диагонально-поясных ремней безопасности выполните следующие действия.
•Используйте замок ремня безопасности, соответствующий данному сиденью.
•Вставляйте язычок ремня безопасности в соответствующий замок до полного защелкивания и характерного щелчка. Убедитесь, что язычок надежно зафиксирован в замке.
•Во избежание непреднамеренного отстегивания ремня безопасности кнопка отстегивания должна быть направлена вверх и в сторону от детского сиденья, а язычок ремня должен находиться между сиденьем и кнопкой отстегивания.

26 Обеспечение безопасности детей
•Поместите сиденье автомобиля, на котором будет установлено детское сиденье, в вертикальное положение.
•Переведите ремень безопасности в режим автоматической блокировки. См. шаг 5. В данном автомобиле не требуется использование фиксаторов.
Для установки детского сиденья при помощи комбинированного диагонально-поясного ремня безопасности выполните следующие действия.
Примечание. Несмотря на то что на иллюстрации приведены примеры по установке обращенных вперед детских сидений, действия по установке обращенных назад детских сидений являются аналогичными.
1. Установите детское сиденье на сиденье с диагонально-поясным ремнем безопасности.
2. Потяните вниз за плечевой ремень, затем возьмите в руку плечевую и поясную лямки.

|
Обеспечение безопасности детей |
27 |
3. Удерживая вместе плечевую и поясную лямку ремня безопасности, проденьте язычок через детское сиденье в соответствии с инструкциями производителя детского сиденья. Ремни безопасности не должны быть перекручены.
4. Вставьте язычок ремня безопасности до упора в замок, соответствующий данному сиденью (самый ближний замок по направлению движения язычка), вы должны услышать щелчок и почувствовать зацепление защелки. Потяните язычок и убедитесь в надежности его фиксации.
5. Чтобы перевести натяжитель в режим автоматической блокировки, возьмитесь за плечевую часть ремня безопасности и, потянув вниз, полностью вытяните его.
Примечание. Переднее пассажирское сиденье и задние сиденья оборудованы режимом автоматической блокировки. В
данном автомобиле не требуется использование фиксаторов.
6.Дайте ремню втянуться в натяжитель, при этом не должно быть никаких провисаний. После завершения втягивания раздастся щелчок, который означает, что ремень находится в режиме автоматической блокировки.
7.Попробуйте вытянуть ремень из натяжителя, чтобы убедиться, что он находится в режиме автоматической блокировки. Ремень не должен вытянуться. Если натяжитель не фиксируется, отстегните ремень и повторите шаги 5 и 6.

28Обеспечение безопасности детей
8.Устраните оставшееся провисание ремня безопасности. С силой надавите на сиденье,
например нажмите на него или надавите на детское удерживающее устройство коленом. При этом потяните вверх плечевую лямку для устранения провисания ремня.
Это необходимо сделать для удаления оставшегося провисания ремня, которое возникнет при усаживании ребенка на детское удерживающее устройство. Кроме того, это обеспечивает плотное прилегание детского сиденья к сиденью автомобиля. В некоторых случаях можно устранить слабину натяжения ремня, слегка наклонив сиденье в сторону замка ремня.
9. Прикрепите верхний страховочный ремень (если детское сиденье оснащено им). См. пункт Использование верхних страховочных ремней ниже в данном разделе.
10. Перед тем как посадить ребенка на сиденье, с усилием попробуйте переместить сиденье вперед и назад, чтобы убедиться в его надежном креплении.
Для этого возьмитесь за ремни безопасности и попытайтесь подвигать сиденье в разные стороны, вперед и назад. При правильной установке величина смещения не должна превышать 1 дюйма (2,5 см).
Ford рекомендует вам обратиться в Национальное управление по безопасности движения автотранспорта США и проконсультироваться с его сертифицированными техническими специалистами по обеспечению безопасности ребенка-пассажира в отношении правильности установки детского удерживающего устройства. В Канаде следует обратиться в местное отделение службы скорой помощи Святого Иоанна и получить рекомендации технического специалиста по обеспечению безопасности пассажиров-детей.

|
Обеспечение безопасности детей |
29 |
Использование нижних анкерных креплений и верхних страховочных ремней (система LATCH)
ПРЕДОСТЕРЕЖЕНИЕ. Запрещается использовать одно  анкерное крепление для двух детских сидений. При аварии одного анкерного крепления может оказаться недостаточно для
удержания двух детских сидений, оно может сломаться, что приведет к серьезным травмам или смертельному исходу.
ПРЕДОСТЕРЕЖЕНИЕ. В зависимости от места крепления и конструкции детского удерживающего устройства можно
заблокировать доступ к некоторым замкам ремня безопасности в сборе или нижним анкерным креплениям системы LATCH, которые не будут использоваться. Во избежание получения травм пассажиры должны находиться только в таком положении, в котором они будут надежно зафиксированы.
Система LATCH располагает тремя анкерными креплениями: два нижних анкерных крепления находятся в точке, где спинка сиденья сходится с подушкой сиденья (так называемый сгиб сиденья), одно анкерное крепление верхних страховочных ремней расположено позади сиденья.
Детские сиденья, совместимые с системой крепления LATCH, располагают двумя жесткими или установленными на ленте креплениями, которые соединяются с двумя нижними анкерными креплениями на сиденьях автомобиля, оборудованных системой LATCH. Такой тип крепления исключает необходимость использования ремней безопасности для фиксации детского сиденья, однако применение ремня в этих целях допускается. Для детских сидений, обращенных вперед, верхний страховочный ремень (при наличии) должен также крепиться к соответствующему анкерному креплению верхних страховочных ремней.

30 Обеспечение безопасности детей
Ваш автомобиль располагает нижними креплениями LATCH для установки детских кресел на сиденьях машины, отмеченных значком детского кресла.
Анкерные крепления LATCH находятся на задней секции заднего сиденья между подушкой и спинкой и отмечены соответствующими значками (см. рис.). Для надлежащей установки детского сиденья с креплениями LATCH следуйте инструкциям их производителя.
Соблюдайте инструкции по установке детских сидений с верхними страховочными ремнями. См. пункт Использование верхних страховочных ремней в этом разделе.
Нижние анкерные крепления LATCH детского сиденья прикрепляйте только к указанным анкерным креплениям.
Использование нижних анкерных креплений внутренних сидений для крепления на боковых сиденьях (использование центральных сидений)
ПРЕДОСТЕРЕЖЕНИЕ. Стандартное межцентровое
 расстояние между нижними анкерными креплениями LATCH составляет 11 дюймов (28 см). Не следует использовать нижние крепления LATCH для центральных сидений, если в инструкциях производителя детского сиденья нет такого указания и там не определено использование креплений, находящихся на таком расстоянии, как в данном автомобиле.
Нижние анкерные крепления, располагающиеся в центре заднего сиденья, находятся на расстоянии 18 дюймов (46 см) друг от друга. Детское сиденье с жесткими деталями крепления LATCH нельзя устанавливать на центральном сиденье. Детские сиденья,
![]()
|
Обеспечение безопасности детей |
31 |
совместимые с системой крепления LATCH (с деталями крепления на ремне безопасности), можно устанавливать на центральном сиденье только в том случае, если производитель детского кресла допускает использование креплений, расположенных на данном расстоянии. Не следует прикреплять детское сиденье к нижнему анкерному креплению, если туда уже прикреплено другое детское сиденье.
Каждый раз перед использованием детского сиденья проверяйте надежность крепления сиденья к нижним анкерным креплениям и анкерному креплению верхнего страховочного ремня (при их наличии). Покачайте детское сиденье из стороны в сторону и вперед-назад, чтобы проверить надежность крепления. При правильной установке сиденье должно смещаться не более чем на один дюйм.
При неправильном закреплении детского сиденья риск получения ребенком серьезных травм во время аварии значительно возрастает.
Закрепление детского сиденья при помощи ремня безопасности и системы нижних креплений LATCH
Если при установке сиденья используются ремень безопасности и система креплений LATCH, в первую очередь можно закрепить ремень безопасности или крепления LATCH при условии, что установка выполняется правильно. Если к детскому сиденью прилагается петля страховочного ремня, то ее следует прикреплять позже.
Использование верхних страховочных ремней
Большинство детских сидений, обращенных вперед, оснащены верхним страховочным ремнем, который идет от задней части детского сиденья и входит в так называемое
анкерное крепление верхних страховочных ремней. Для многих детских сидений старых моделей верхние страховочные ремни доступны в качестве дополнительного оборудования.
Для получения дополнительных сведений относительно заказа верхних страховочных ремней или приобретения более длинного ремня, если верхний страховочный ремень детского сиденья не дотягивается до соответствующего анкерного крепления верхних страховочных ремней автомобиля, обратитесь к производителю детских сидений.
После установки детского сиденья с помощью ремня безопасности или нижних анкерных креплений системы LATCH или и того и другого можно прикрепить верхний страховочный ремень.

32 Обеспечение безопасности детей
Анкерные крепления верхнего страховочного ремня в автомобиле находятся в следующих местах (вид сверху):
Для установки детского сиденья с помощью анкерных креплений верхних страховочных ремней выполните следующие действия.
Примечание. При установке детского сиденья с жесткими креплениями LATCH не следует затягивать верхний страховочный ремень так, чтобы детское сиденье приподнималось на подушке сиденья автомобиля, когда на нем сидит ребенок. Верхний страховочный ремень должен быть натянут без поднятия передней части детского сиденья. Неплотное соприкосновение детского сиденья с сиденьем автомобиля обеспечивает наилучшую защиту в случае серьезной аварии.
1. Пропустите верхний страховочный ремень детского сиденья за спинкой сиденья.
Для боковых сидений протяните верхний страховочный ремень детского сиденья под подголовником между его штырями. Для центральных сидений протяните верхний страховочный ремень детского сиденья поверх подголовника. При необходимости можно также убрать подголовники.
2. Найдите соответствующее анкерное крепление под заглушкой выбранного сиденья.

|
Обеспечение безопасности детей |
33 |
3. Потяните назад заглушку для доступа к анкерным креплениям. Закрепите верхний страховочный ремень в анкерном креплении, как показано на рисунке.
4. Затяните верхний страховочный ремень детского сиденья в соответствии с инструкциями производителя.
Если система безопасности для детей оборудована верхним страховочным ремнем и производитель рекомендует его использовать, компания Ford также настаивает на его применении.
ЗАМКИ СИСТЕМЫ БЛОКИРОВКИ ДВЕРЕЙ ОТ ОТКРЫВАНИЯ ДЕТЬМИ
Замки с блокировкой от открывания детьми расположены на задней кромке всех задних дверей, их необходимо устанавливать отдельно для каждой двери.
Если такие замки установлены, то задние двери нельзя открыть изнутри.
• Вставьте ключ и поверните его в положение блокировки (ключ в горизонтальном положении)
для включения функции блокировки дверей от открывания детьми.
• Вставьте ключ и поверните его в положение разблокировки (ключ в вертикальном положении) для отключения функции блокировки дверей от открывания детьми.

ПРИНЦИП РАБОТЫ
ПРЕДОСТЕРЕЖЕНИЕ. Не позволяйте пассажирам держать ребенка на руках или коленях во время движения автомобиля.
Во время аварии пассажир не сможет защитить ребенка от получения травм.
ПРЕДОСТЕРЕЖЕНИЕ. Перевозка людей в грузовом отсеке снаружи или внутри автомобиля чрезвычайно опасна. При
столкновении риск получения серьезной травмы или смертельного исхода более высок для людей, находящихся в этих зонах. Не позволяйте людям находиться в какой-либо зоне автомобиля, не оснащенной сиденьями и ремнями безопасности. Убедитесь, что все пассажиры автомобиля находятся на сиденьях и используют ремни безопасности надлежащим образом.
ПРЕДОСТЕРЕЖЕНИЕ. Во время управления автомобилем спинка сиденья должна находиться в вертикальном положении,
а поясная лямка ремня безопасности проходить по бедрам.
ПРЕДОСТЕРЕЖЕНИЕ. Для того чтобы уменьшить риск получения травмы, ребенка необходимо посадить в таком
месте, где он будет надежно зафиксирован.
ПРЕДОСТЕРЕЖЕНИЕ. Все пассажиры автомобиля, включая водителя, должны пристегиваться ремнем безопасности, даже
если в автомобиле установлена вспомогательная удерживающая система надувных подушек безопасности. Нарушение правил применения ремней безопасности может значительно повысить риск получения серьезных травм или привести к гибели.
ПРЕДОСТЕРЕЖЕНИЕ. При аварии с опрокидыванием автомобиля вероятность погибнуть у непристегнутого ремнем
безопасности пассажира гораздо выше, чем у пассажира, который использовал ремень безопасности.

ПРЕДОСТЕРЕЖЕНИЕ. Каждое сиденье в автомобиле оборудовано особыми ремнями безопасности в сборе,
состоящими из одного замка и одного язычка, которые должны использоваться в паре. 1. Наплечный ремень безопасности должен проходить только через то плечо, которое обращено к наружной стороне автомобиля. Никогда не пропускайте наплечный ремень безопасности под мышкой. 2. Никогда не наматывайте ремень безопасности вокруг шеи через плечо, находящееся ближе к замку ремня. 3. Никогда не используйте один ремень безопасности для нескольких человек.
ПРЕДОСТЕРЕЖЕНИЕ. Старайтесь перевозить детей до 12 лет включительно на заднем сиденье автомобиля, надежно
зафиксировав их при помощи удерживающих устройств. Несоблюдение данного предупреждения может значительно повысить риск получения серьезных травм или смертельного исхода.
ПРЕДОСТЕРЕЖЕНИЕ. Ремни безопасности и сиденья в солнечную погоду могут сильно нагреться и причинить ожоги
маленьким детям. Перед тем как посадить ребенка в сиденье, проверьте обивку сидений и замки ремней безопасности.
ПРЕДОСТЕРЕЖЕНИЕ. Пассажиры, сидящие на переднем и заднем сиденье, включая беременных женщин, обязаны
пристегиваться ремнем безопасности для оптимальной защиты в случае аварии.
Все посадочные места в автомобиле оснащены диагонально-поясными ремнями безопасности. Все пассажиры автомобиля должны пристегиваться ремнем безопасности, даже если в автомобиле установлена вспомогательная удерживающая система надувных подушек безопасности.
Система ремня безопасности состоит из следующих элементов:
•поясной и плечевой лямки;
•плечевой лямка с функцией автоматической блокировки (кроме ремня безопасности водителя);

•регулятора высоты ремня безопасности на передних боковых сиденьях;
•преднатяжителей ремней безопасности на передних боковых сиденьях;
•датчика натяжения ремня на передних боковых сиденьях для пассажиров;
•предупреждающего светового и звукового индикатора непристегнутого ремня безопасности; см. пункт
Предупреждающий световой и звуковой сигнал
непристегнутого ремня безопасности в данном разделе ниже;
• датчиков удара и системы контроля с индикатором
готовности; см. пункт Датчики удара и предупреждающий индикатор надувной подушки безопасности в разделе
Вспомогательная удерживающая система подушек и ремней безопасности.
Преднатяжители ремней безопасности предназначены для срабатывания при лобовом и боковом столкновении, при столкновении под углом, а также при опрокидывании автомобиля. При срабатывании преднатяжителей ремень безопасности передних сидений плотно облегает тело пассажира. Это помогает увеличить эффективность ремней безопасности. При лобовых столкновениях возможно срабатывание только преднатяжителей ремней безопасности или при большой силе столкновения одновременное срабатывание надувных подушек безопасности.
ПРИСТЕГИВАНИЕ РЕМНЕЙ БЕЗОПАСНОСТИ
Удерживающие системы передних боковых и задних сидений вашего автомобиля представляют собой комбинированные диагонально-поясные ремни безопасности.
1. Вставьте язычок ремня безопасности до упора в соответствующий замок (самый ближний замок по направлению движения язычка), вы должны услышать щелчок и почувствовать зацепление защелки. Убедитесь, что язычок надежно зафиксирован в замке.

2. Чтобы отстегнуть ремень, нажмите кнопку открывания и выньте язычок из замка.
Во время использования разместите ремни безопасности задних боковых сидений в удобных направляющих. Эти направляющие прикреплены к подголовнику и хранятся в кармане на спинке сиденья.
Для регулировки удобных направляющих выполните следующие действия.
1. Вставьте наплечный ремень безопасности в направляющую ремня.
2. Сдвиньте направляющую вверх или вниз вдоль ленты таким образом, чтобы ремень располагался по центру плеча водителя или пассажира.

Использование ремня безопасности беременными женщинами
ПРЕДОСТЕРЕЖЕНИЕ. При вождении автомобиля всегда сидите прямо, правильно пристегнув ремень безопасности.
Поясная часть ремня безопасности должна удобно располагаться поперек бедер. Плечевая часть ремня безопасности должна проходить через центр груди. Беременные женщины должны следовать такой же практике. См. следующее изображение.
Беременные женщины всегда должны пристегивать ремень безопасности. Поясную часть
комбинированного диагонально-поясного ремня
безопасности необходимо
располагать внизу поперек бедер и
ниже живота, натянув максимально туго, но так, чтобы
это не причиняло неудобств. Наплечный ремень должен
проходить через середину плеча и центр груди.
Режимы блокировки ремня безопасности
ПРЕДОСТЕРЕЖЕНИЕ. После любой автомобильной аварии система ремней безопасности сидений всех пассажиров должна
быть проверена авторизованным дилером, чтобы оценить надежность работы автоматической блокировки натяжителей для детских сидений. Кроме того, необходимо проверить надежность функционирования всех ремней безопасности.
ПРЕДОСТЕРЕЖЕНИЕ. РЕМЕНЬ БЕЗОПАСНОСТИ И НАТЯЖИТЕЛЬ НЕОБХОДИМО ЗАМЕНИТЬ, если при
проверке авторизованным дилером было установлено, что функция автоматической блокировки натяжителя ремня безопасности или какая-либо другая функция ремня безопасности не работает должным образом. Если не заменить ремень безопасности и натяжитель, то риск получения травм во время аварий существенно возрастет.
Все удерживающие устройства данного автомобиля представляют собой комбинированные диагонально-поясные ремни безопасности. Ремень безопасности водителя имеет первый тип режима блокировки, а ремни безопасности передних и задних боковых пассажирских сидений имеют оба типа режимов блокировки, которые представлены ниже.
Чувствительный режим
Это нормальный режим натяжителя, который позволяет свободно регулировать длину плечевой части ремня безопасности, и в ответ на движение автомобиля происходит блокировка ремня. Например, если водитель внезапно нажимает на тормоз, совершает резкий поворот или автомобиль получает удар со скоростью 5 миль/ч (8 км/ч) или выше, комбинированные ремни безопасности будут заблокированы для уменьшения отклонения пассажиров и водителя вперед.
Кроме того, натяжитель предназначен для блокировки ремня, если он вытягивается слишком быстро. Если это произошло, дайте ремню немного втянуться и снова медленно без рывков потяните ленту ремня.
Режим автоматической блокировки
В этом случае плечевая лямка ремня безопасности находится в режиме предварительной автоматической блокировки. Ремень будет втягиваться для удаления провисания плечевой лямки ремня безопасности. Ремень безопасности водителя не оборудован режимом автоматической блокировки.
Случаи использования режима автоматической блокировки
Данный режим необходимо включать каждый раз, когда в автомобиль на переднее или заднее пассажирское сиденье устанавливается детское сиденье, за исключением автокресла-бустера. Детей до 12 лет включительно необходимо перевозить на заднем сиденье автомобиля, надежно зафиксировав их при помощи удерживающих устройств. См. раздел Обеспечение безопасности детей.

Принципы использования режима автоматической блокировки
1. Пристегните комбинированный диагонально-поясной ремень безопасности.
2. Возьмитесь за наплечную часть ремня и потяните вниз, пока весь ремень не будет извлечен из катушки.
3. Дайте ремню втянуться. После завершения втягивания ремня вы услышите щелчок. Это означает, что теперь ремень безопасности переведен в режим автоматической блокировки.
Отключение режима автоматической блокировки
Отстегните комбинированный диагонально-поясной ремень безопасности и дайте ему полностью втянуться, режим автоматической блокировки будет отключен, и активируется чувствительный (аварийный) режим.
Удлинитель ремня безопасности
ПРЕДОСТЕРЕЖЕНИЕ. Не используйте удлинители для изменения степени прилегания ремня к телу.
Если ремень слишком короток даже в полностью вытянутом состоянии, можно приобрести удлинитель ремня безопасности в сборе у официального дилера.
Используйте удлинители того же изготовителя, что и для ремня безопасности. Маркировка производителя находится на ярлыке на конце ленты. Используйте удлинители ремня безопасности только в том случае, если ремень слишком короток для вас, даже в полностью вытянутом состоянии.
![]()
РЕГУЛИРОВКА ВЫСОТЫ РЕМНЯ БЕЗОПАСНОСТИ
ПРЕДОСТЕРЕЖЕНИЕ. Установите регуляторы высоты ремня безопасности так, чтобы ремень проходил посредине
вашего плеча. Неправильная регулировка ремня безопасности может снизить его эффективность и увеличить риск получения травм при аварии.
Установите высоту наплечного ремня безопасности так, чтобы ремень проходил посредине вашего плеча.
Для регулировки высоты плечевого ремня безопасности выполните следующие действия.
1.Нажмите центральную кнопку и сдвиньте регулятор высоты вверх или вниз.
2.Отпустите кнопку и потяните вниз регулятор высоты, чтобы убедиться в его блокировке.

ПРЕДУПРЕЖДАЮЩИЙ СВЕТОВОЙ И ЗВУКОВОЙ СИГНАЛ НЕПРИСТЕГНУТОГО РЕМНЯ БЕЗОПАСНОСТИ
Если ремень безопасности водителя не пристегнут, а зажигание автомобиля включено, то включается лампа предупреждающего сигнала и подается предупреждающий
звуковой сигнал.
Условия срабатывания
|
Если… |
то… |
|
Ремень безопасности водителя |
индикатор непристегнутого ремня |
|
не пристегнут до того, как |
безопасности горит в течение |
|
выключатель зажигания был |
1–2 минут, предупреждающий |
|
переведен в положение ВКЛ… |
звуковой сигнал звучит 4–8 секунд. |
|
Ремень безопасности водителя |
индикатор непристегнутого ремня |
|
застегнут в то время, когда |
безопасности и предупреждающий |
|
горит индикатор |
звуковой сигнал выключаются. |
|
непристегнутого ремня |
|
|
безопасности и звучит |
|
|
предупреждающий звуковой |
|
|
сигнал… |
|
|
Ремень безопасности водителя |
индикатор непристегнутого ремня |
|
пристегнут до того, как |
безопасности и предупреждающий |
|
выключатель зажигания был |
звуковой сигнал не включаются. |
|
переведен в положение ВКЛ… |
ФУНКЦИЯ НАПОМИНАНИЯ О НЕПРИСТЕГНУТОМ РЕМНЕ БЕЗОПАСНОСТИ SAFETY BELT-MINDER®
Если сиденье водителя или переднее сиденье пассажира занято, а ремни безопасности не пристегнуты, то эта функция обеспечивает дополнительное напоминание о непристегнутом ремне безопасности путем периодического включения звукового сигнала и светового индикатора напоминания о непристегнутом ремне безопасности.
Система использует данные, полученные от системы идентификации занятости сидений, чтобы определить, что пассажир сидит на переднем сиденье и, возможно, ему нужно напоминание. Чтобы исключить включение предупреждений при помещении каких-либо предметов на переднем сиденье пассажира, функция Belt-Minder
будет выдавать предупреждения только после того, как система определения занятости сидений подтвердит нахождение пассажира на переднем сиденье.
Когда предупреждения, подаваемые при помощи функции Belt-Minder, перестанут подаваться (это продолжается примерно пять минут) одному пассажиру (водителю или переднему пассажиру), то другой пассажир может снова активировать функцию Belt-Minder.
|
Если… |
то… |
|
Ремни безопасности водителя |
функция Belt-Minder не будет |
|
и переднего пассажира |
активирована. |
|
пристегнуты до того, как |
|
|
выключатель зажигания был |
|
|
повернут в положение ВКЛ |
|
|
или прошло менее 1–2 минут |
|
|
с момента включения |
|
|
зажигания… |
|
|
Ремень безопасности |
включается функция Belt-Minder — |
|
водителя или переднего |
загорается индикатор |
|
пассажира не был пристегнут, |
непристегнутого ремня |
|
когда автомобиль достиг |
безопасности, и в течение 6 секунд |
|
скорости не менее 6 миль/ч |
через каждые 25 секунд звучит |
|
(9,7 км/ч) и прошло |
звуковое предупреждение, которое |
|
1–2 минуты со времени |
повторяется в течение |
|
включения зажигания… |
приблизительно пяти минут или до |
|
пристегивания ремней безопасности. |
|
|
Ремень безопасности |
включается функция Belt-Minder — |
|
водителя или переднего |
загорается индикатор |
|
пассажира не был пристегнут |
непристегнутого ремня |
|
в течение одной минуты при |
безопасности, и в течение 6 секунд |
|
достижении автомобилем |
через каждые 25 секунд звучит |
|
скорости не менее 6 миль/ч |
звуковое предупреждение, которое |
|
(9,7 км/ч) и 1–2 минут со |
повторяется в течение |
|
времени включения |
приблизительно пяти минут или до |
|
зажигания… |
пристегивания ремней безопасности. |

Включение и отключение функции Belt-Minder®
ПРЕДОСТЕРЕЖЕНИЕ. Несмотря на то что система
 позволяет отключить функцию Belt-Minder, эта функция предназначена для того, чтобы вы не забывали пристегнуть ремень безопасности и тем самым увеличили свои шансы на выживание в аварии. Мы рекомендуем оставлять систему включенной, если автомобиль используется вами или кем-либо еще. Для уменьшения риска получения травм не включайте и не отключайте систему во время вождения.
Примечание. Напоминания для водителя и переднего пассажира отключаются и включаются независимо друг от друга. При отключении или включении напоминаний для одного из сидений не пристегивайте ремень на другом сиденье, т. к. это приведет к прекращению напоминания.
Перед выполнением процедуры программирования внимательно прочтите указания 1–4.
Перед выполнением процедуры убедитесь в следующем:
•стояночный тормоз включен;
•рычаг переключения передач находится в положении P (стояночный тормоз включен);
•зажигание выключено;
•ремни безопасности водителя и переднего пассажира отстегнуты. 1. Включите зажигание. Не запускайте двигатель.
2. Подождите, пока погаснет индикатор непристегнутого ремня безопасности (приблизительно 1–2 минуты).
• В течение 50 секунд после отключения светового индикатора непристегнутого ремня безопасности шаг 3 будет завершен.
3. Чтобы отключить функцию напоминания о непристегнутом ремне безопасности, пристегните, а затем отстегните ремень безопасности три раза; скорость выполнения операций должна быть умеренной, последней операцией должно быть отстегивание ремня безопасности.
•После завершения шага 3 индикатор непристегнутого ремня безопасности включится на три секунды.
4. В течение семи секунд после отключения индикатора застегните и отстегните ремень безопасности. В подтверждение загорится световой индикатор непристегнутого ремня безопасности.
•Эта операция приведет к отключению функции для данного сиденья, если она была включена.
•Если она была отключена, то эта операция приведет к включению данной функции для данного сиденья.
Однократное отключение функции Belt-Minder®
В случае если в любой момент времени водитель или пассажир на переднем сиденье быстро пристегнет и отстегнет ремень безопасности этого сиденья, система будет отключена для текущего цикла зажигания. Функция будет включена в этом цикле зажигания, если водитель или пассажир пристегнет ремень безопасности и останется в этом положении в течение 30 секунд. Для однократного отключения функции подтверждение не выдается.
ТЕХНИЧЕСКОЕ ОБСЛУЖИВАНИЕ ДЕТСКИХ УДЕРЖИВАЮЩИХ УСТРОЙСТВ И РЕМНЕЙ БЕЗОПАСНОСТИ
Время от времени осматривайте ремни безопасности автомобиля и системы детских удерживающих устройств на предмет их правильного функционирования и отсутствия повреждений. Проверьте ремни безопасности автомобиля и детских сидений на предмет разрывов, потертостей или порезов. При необходимости замените их. После аварии следует осмотреть все элементы ремня безопасности в сборе, включая натяжители, замки, замки передних ремней безопасности в сборе, опоры замка ремня безопасности в сборе (ползунок при наличии), регуляторы высоты плечевого ремня безопасности (при наличии), направляющую плечевого ремня на спинке сиденья (при наличии), скобы креплений LATCH и анкерные крепления верхних страховочных ремней детского сиденья, а также другие крепежные элементы. Дополнительную информацию по осмотру и обслуживанию детских средств безопасности см. в инструкциях изготовителя.
Ford Motor Company рекомендует заменять все ремни безопасности автомобиля, побывавшего в аварии. Однако в случае незначительной аварии, если авторизованный дилер не обнаружил значительных повреждений ремней безопасности и подтвердил их надежность, заменять ремни не нужно. Ремни безопасности, которые не были задействованы во время аварии, также необходимо осмотреть и заменить в случае их повреждения или нарушения в их функционировании.
Информацию о надлежащей очистке загрязненных ремней безопасности см. в пункте Очистка салона раздела Уход за автомобилем.

46 Система персональной безопасности
СИСТЕМА PERSONAL SAFETY SYSTEM™
Система персональной безопасности обеспечивает повышенный уровень защиты пассажиров, сидящих на переднем сиденье, при лобовых столкновениях. Кроме того, она предназначена для снижения риска получения травм от срабатывания надувной подушки безопасности. Перед активацией соответствующих устройств безопасности данная система анализирует положение пассажиров и оценивает последствия столкновения для наилучшей защиты пассажира при лобовых столкновениях.
Система персональной безопасности автомобиля включает следующие элементы:
•двухступенчатые надувные подушки безопасности водителя и пассажира;
•ремни безопасности передних сидений с преднатяжителями, натяжители с ограничителями нагрузки (только первый ряд) и датчики использования ремней безопасности;
•датчик положения сиденья водителя;
•система определения занятости сиденья переднего пассажира;
•контрольная лампа включения и отключения надувной подушки безопасности пассажира;
•датчики лобового столкновения;
•модуль управления удерживающей системой подушек и ремней безопасности с датчиком удара и аварийным датчиком;
•сигнальная лампа и предупреждающий звуковой сигнал удерживающей системы подушек и ремней безопасности;
•электрическая проводка надувных подушек безопасности, датчиков удара, преднатяжителей ремней безопасности, датчиков использования передних ремней безопасности, датчика положения сиденья водителя, системы определения занятости сиденья переднего пассажира и предупреждающих сигналов.
|
Система персональной безопасности |
47 |
Принципы работы системы персональной безопасности
Система персональной безопасности способна анализировать степень серьезности вероятных повреждений, а также положение пассажиров при столкновении и в соответствии с этим активировать нужные системы обеспечения безопасности. Модуль управления удерживающей системой подушек и ремней безопасности получает большое количество данных от датчиков удара и занятости сиденья. Во время столкновения модуль управления удерживающей системой подушек и ремней безопасности определяет силу удара и, если она превышает пороговое значение, отдает команду на срабатывание преднатяжителей ремней безопасности и первой или при сильном столкновении обеих ступеней газогенераторов надувных подушек безопасности.

48 Вспомогательная удерживающая система
ПРИНЦИП РАБОТЫ
ПРЕДОСТЕРЕЖЕНИЕ. Разворачивание надувных подушек безопасности происходит быстро и резко, поэтому при
срабатывании подушки безопасности и нахождении рядом с отделкой модуля подушки безопасности существует риск получения травмы.
ПРЕДОСТЕРЕЖЕНИЕ. Все пассажиры автомобиля, включая водителя, должны пристегиваться ремнем безопасности, даже
если в автомобиле установлена вспомогательная удерживающая система надувных подушек безопасности.
ПРЕДОСТЕРЕЖЕНИЕ. Детей до 12 лет включительно следует перевозить на заднем сиденье, надежно зафиксировав
их при помощи детских удерживающих устройств, соответствующих возрасту, весу и росту ребенка.
ПРЕДОСТЕРЕЖЕНИЕ. Никогда не кладите руку на модуль надувной подушки безопасности, т. к. при срабатывании
надувной подушки безопасности возможен перелом руки или получение других травм.
ПРЕДОСТЕРЕЖЕНИЕ. Срабатывание надувных подушек безопасности может стать причиной серьезных травм или смерти
ребенка, находящегося в детском сиденье. НИКОГДА не устанавливайте обращенное назад детское сиденье перед активированной надувной подушкой безопасности. Если обращенное вперед детское сиденье все же необходимо установить на переднем сиденье, отодвиньте это сиденье как можно дальше назад.
ПРЕДОСТЕРЕЖЕНИЕ. Не производите самостоятельно обслуживание, ремонт или замену вспомогательной
удерживающей системы надувных подушек безопасности или ее предохранителей. Как можно скорее обратитесь к авторизованному дилеру.

Вспомогательная удерживающая система 49
ПРЕДОСТЕРЕЖЕНИЕ. После срабатывания некоторые элементы системы надувной подушки безопасности
нагреваются. Не дотрагивайтесь до них после срабатывания подушки безопасности.
ПРЕДОСТЕРЕЖЕНИЕ. Надувная подушка безопасности предназначена для одного срабатывания, после этого ее
необходимо сразу же заменить. Если вовремя не произвести замену надувной подушки безопасности, то при попадании в аварию отсутствие защиты в данной области увеличивает вероятность получения травм.
Надувные подушки безопасности относятся к вспомогательной удерживающей системе подушек и ремней безопасности. Они предназначены для защиты верхней части тела водителя и переднего пассажира от различных травм, они должны применяться вместе с ремнями безопасности. Разворачивание надувных подушек безопасности происходит очень быстро, при этом существует риск получения травм.
Примечание. При срабатывании надувной подушки безопасности слышится громкий хлопок и выделяется некоторое количество безопасного для здоровья порошка. Это нормальное явление.
При активации надувная подушка безопасности быстро надувается и сдувается. Срабатывание надувной подушки безопасности сопровождается выделением дыма и порошка или запахом сгоревшего горючего. Порошок, образовавшийся в результате срабатывания надувной подушки безопасности, может содержать кукурузный крахмал, тальк (для смазки подушки безопасности) или натриевые соединения (например, пищевую соду). В данном порошке может присутствовать некоторое количество гидроксида натрия, которое может вызвать раздражение кожи и глаз, однако ни один из компонентов образующегося порошка не является токсичным. Несмотря на то что данная система разработана с целью предотвращения серьезных травм, при срабатывании надувной подушки безопасности можно также получить ссадины и ушибы. В результате шума, вызванного срабатыванием надувной подушки безопасности, может возникнуть временная потеря слуха. Поскольку надувные подушки безопасности должны надуваться очень быстро и под большим давлением, то в этом случае существует риск получения серьезных травм (различные переломы, травмы лица и глаз или повреждения внутренних органов) или смертельного исхода.

50 Вспомогательная удерживающая система
Особенно это относится к пассажирам, не пристегнутым ремнями безопасности или находящимся в непредусмотренном положении во время срабатывания надувной подушки безопасности. Поэтому водитель и пассажиры должны правильно использовать удерживающие устройства и находиться как можно дальше от модуля надувной подушки безопасности, но при этом расстояние не должно быть слишком большим, чтобы помешать управлению автомобилем.
Текущее техническое обслуживание надувных подушек безопасности не проводится.
СИСТЕМА ПОДАЧИ СИГНАЛА SOS (SOS POST-CRASH ALERT SYSTEM™)
При серьезном столкновении, которое повлекло срабатывание фронтальных и боковых надувных подушек безопасности, модуля бокового шторка системы надувных подушек безопасности или Safety Canopy, система подачи сигнала SOS включает указатели поворотов и звуковую сигнализацию (периодического действия).
Звуковая сигнализация и указатели поворотов будут выключены в следующих случаях:
•нажата кнопка аварийной сигнализации;
•на передатчике модуля дистанционного входа нажата кнопка тревожной сигнализации (при наличии);
•разряжена аккумуляторная батарея автомобиля.
НАДУВНЫЕ ПОДУШКИ БЕЗОПАСНОСТИ ВОДИТЕЛЯ И ПАССАЖИРА
ПРЕДОСТЕРЕЖЕНИЕ. Никогда не кладите руки или посторонние предметы на модуль надувной подушки
безопасности. Если рука находится на пути раскрытия надувной подушки безопасности, это может привести к перелому руки или другим травмам. Предметы, расположенные в зоне раскрытия надувной подушки безопасности, под воздействием удара подушки могут попасть в лицо или тело, причинив серьезные травмы.
 Loading…
- Manuals
- Brands
- Ford Manuals
- Automobile
- 2015 EDGE
Manuals and User Guides for Ford 2015 EDGE. We have 2 Ford 2015 EDGE manuals available for free PDF download: Owner’s Manual, Quick Reference Manual

Ford 2015 EDGE Owner’s Manual (508 pages)
Brand: Ford
|
Category: Automobile
|
Size: 6.5 MB
Table of Contents
-
Table of Contents
4
-
Introduction
10
-
About this Manual
10
-
Symbols Glossary
10
-
Data Recording
12
-
California Proposition 65
14
-
Perchlorate
14
-
Ford Credit
14
-
Replacement Parts Recommendation
14
-
Special Notices
15
-
Mobile Communications Equipment
15
-
Export Unique Options
16
-
-
Environment
17
-
Protecting the Environment
17
-
-
Child Safety
18
-
General Information
18
-
Installing Child Seats
19
-
Using Lap and Shoulder Belts
20
-
Using Tether Straps
26
-
-
Booster Seats
27
-
Types of Booster Seats
28
-
Child Seat Positioning
29
-
Child Safety Locks
30
-
Left-Hand Side
31
-
Right-Hand Side
31
-
-
-
Safety Belts
32
-
Principle of Operation
32
-
Fastening the Safety Belts
33
-
Safety Belt Extension Assembly
36
-
Safety Belt Height Adjustment
37
-
Safety Belt Warning Lamp and Indicator Chime
37
-
Safety Belt Minder
38
-
Child Restraint and Safety Belt Maintenance
39
-
-
Personal Safety System?
40
-
Personal Safety System
40
-
-
Supplementary Restraints System
41
-
Principle of Operation
41
-
Driver and Passenger Airbags
42
-
Children and Airbags
42
-
-
Front Passenger Sensing System
43
-
Side Airbags
45
-
Driver and Passenger Knee Airbags
46
-
Driver and Passenger Knee Airbags
47
-
Safety Canopy
47
-
Crash Sensors and Airbag Indicator
48
-
Airbag Disposal
49
-
-
Keys and Remote Controls
50
-
General Information on Radio
50
-
Frequencies
50
-
-
Remote Control
50
-
Using the Key Blade
51
-
Replacing the Battery
52
-
Car Finder
54
-
Sounding a Panic Alarm
54
-
-
Replacing a Lost Key or Remote Control
56
-
-
Mykey
57
-
Principle of Operation
57
-
Creating a Mykey
58
-
Clearing All Mykeys
58
-
Checking Mykey System Status
60
-
Using Mykey with Remote Start Systems
61
-
Mykey Troubleshooting
61
-
-
Locks
63
-
Locking and Unlocking
63
-
Power Door Locks
63
-
Auto Relock
66
-
Illuminated Entry
66
-
-
Manual Liftgate
67
-
Illuminated Exit
67
-
Battery Saver
67
-
Opening the Liftgate
67
-
-
Power Liftgate
68
-
Closing the Liftgate
68
-
Opening and Closing the Liftgate
68
-
-
Keyless Entry
71
-
-
Security
74
-
Passive Anti-Theft System
74
-
Anti-Theft Alarm
76
-
Arming the Alarm
76
-
Disarming the Alarm
76
-
-
-
Steering Wheel
77
-
Adjusting the Steering Wheel — Vehicles With: Manual Adjustable Steering Column
77
-
Adjusting the Steering Wheel — Vehicles With: Power Adjustable Steering Column
77
-
-
Audio Control
78
-
End of Travel Position
78
-
Memory Feature
78
-
-
Audio Control
79
-
Voice Control
79
-
Cruise Control
79
-
Information Display Control
80
-
Heated Steering Wheel
80
-
-
Wipers and Washers
81
-
Windshield Wipers
81
-
Autowipers
81
-
Intermittent Wipe
81
-
Speed Dependent Wipers
81
-
-
Windshield Washers
82
-
Rear Window Wiper and Washers
83
-
Rear Window Washer
83
-
-
Lighting
84
-
General Information
84
-
Lighting Control
84
-
High Beams
84
-
Autolamps
85
-
Headlamp Flasher
85
-
Instrument Lighting Dimmer
86
-
Headlamp Exit Delay
86
-
Daytime Running Lamps
86
-
Automatic High Beam Control
87
-
Activating the System
87
-
Direction Indicators
88
-
Manually Overriding the System
88
-
Interior Lamps
88
-
Front Interior Lamp
88
-
Ambient Lighting
90
-
-
Windows and Mirrors
91
-
Power Windows
91
-
Global Opening
91
-
Exterior Mirrors
92
-
Interior Mirror
93
-
Sun Visors
94
-
Moonroof
94
-
Opening and Closing the Moonroof
94
-
-
Instrument Cluster
96
-
Gauges
96
-
Engine Coolant Temperature Gauge
97
-
Fuel Gauge
97
-
-
Warning Lamps and Indicators
98
-
Brake System
99
-
Anti-Lock Braking System
99
-
Direction Indicator
99
-
Door Ajar
99
-
Electric Park Brake
100
-
Engine Coolant Temperature
100
-
High Beam
100
-
Engine Oil
100
-
Hood Ajar
100
-
Low Fuel Level
100
-
Fasten Safety Belt
100
-
Low Tire Pressure Warning
100
-
Front Airbag
100
-
-
Audible Warnings and Indicators
101
-
Keyless Warning Alert
102
-
Headlamps on Warning Chime
102
-
Parking Brake on Warning Chime
102
-
-
-
Information Displays
103
-
General Information
103
-
Information Display Controls
108
-
Information Messages
112
-
Automatic Engine Shutdown
115
-
Auto Start-Stop
116
-
Battery and Charging System
116
-
Electronic Stability Control
118
-
Keys and Keyless Entry
119
-
Park Aid
122
-
Park Brake
122
-
Power Steering
123
-
Pre-Collision Warning System
123
-
Starting System
124
-
-
-
Climate Control
127
-
Control (EMTC)
127
-
Climate Control
128
-
Automatic Climate Control — Vehicles With: Dual Automatic Temperature Control (DATC)
129
-
Automatic Climate Control — Vehicles With: Dual Automatic Temperature Control (Datc)/Sony Audio System
130
-
Hints on Controlling the Interior Climate
132
-
Recommended Settings for Heating
133
-
Cooling the Interior Quickly
133
-
Recommended Settings for Cooling
133
-
Heating the Interior Quickly
133
-
-
Heated Windows and Mirrors
134
-
Cabin Air Filter
134
-
Remote Start
134
-
Heated Rear Window
134
-
Heated Exterior Mirror
134
-
Automatic Settings
135
-
-
-
Seats
136
-
Sitting in the Correct Position
136
-
Head Restraints
136
-
Adjusting the Head Restraint
137
-
Tilting Head Restraints
137
-
-
Manual Seats
138
-
Power Seats
138
-
Memory Function
140
-
Saving a Preset Position
141
-
Rear Seats
142
-
Heated Seats
143
-
Front Seats
143
-
Climate Controlled Seats
144
-
Cooled Seats
144
-
Rear Seat Armrest
145
-
-
Universal Garage Door
146
-
Universal Garage Door Opener
146
-
-
Auxiliary Power Points
150
-
Volt DC Power Point
150
-
-
Storage Compartments
152
-
Center Console
152
-
Overhead Console
152
-
-
Starting and Stopping the Engine
153
-
General Information
153
-
Ignition Switch
153
-
Keyless Starting — Vehicles With: Push Button Start
153
-
Starting a Gasoline Engine
154
-
Ignition Modes
154
-
Engine Block Heater
157
-
Using the Engine Block Heater
158
-
-
-
Unique Driving Characteristics
159
-
Auto-Start-Stop
159
-
Disabling Auto Startstop
160
-
-
Fuel and Refueling
161
-
Safety Precautions
161
-
Fuel Quality
162
-
Fuel Filler Funnel Location
162
-
Choosing the Right Fuel
162
-
Running out of Fuel
162
-
Refueling
163
-
Filling a Portable Fuel Container
163
-
Fuel Consumption
165
-
Filling the Tank
165
-
Emission Control System
166
-
Transmission
167
-
-
Transmission
168
-
-
Transmission
169
-
Automatic Transmission
169
-
Brake-Shift Interlock
170
-
-
All-Wheel Drive
173
-
Using All-Wheel Drive
173
-
Brakes
174
-
Brakes
175
-
Brakes
177
-
-
-
Brakes
178
-
General Information
178
-
Hints on Driving with Anti-Lock Brakes
178
-
Electric Parking Brake
179
-
Applying the Electric Parking Brake
179
-
Releasing the Electric Parking Brake
180
-
-
Hill Start Assist
181
-
Battery with no Charge
181
-
-
Using Hill Start Assist
182
-
-
Traction Control
183
-
Principle of Operation
183
-
Using Traction Control
183
-
-
Stability Control
184
-
Principle of Operation
184
-
Using Stability Control
185
-
-
Parking Aids
186
-
Principle of Operation
186
-
Rear Parking Aid
186
-
Front Parking Aid
187
-
Side Sensing System
188
-
Active Park Assist
190
-
Troubleshooting the System
194
-
Rear View Camera
196
-
-
Cruise Control
199
-
Principle of Operation
199
-
Using Cruise Control
199
-
Switching Cruise Control off
199
-
Switching Cruise Control on
199
-
-
Using Adaptive Cruise Control
200
-
Setting the Adaptive Cruise Speed
200
-
Cruise Control
201
-
Following a Vehicle
201
-
Setting the Gap Distance
201
-
Disengaging the System
202
-
Overriding the System
202
-
Changing the Set Speed
202
-
Detection Issues
203
-
Resuming the Set Speed
203
-
Automatic Cancellation
203
-
Hilly Condition Usage
203
-
Blocked Sensor
204
-
System Not Available
204
-
Switching to Normal Cruise Control
205
-
-
Driving Aids
206
-
Driver Alert
206
-
Using Driver Alert
206
-
Lane Keeping System
207
-
-
Driving Aids
208
-
Blind Spot Information System
211
-
Steering
215
-
Collision Warning System
215
-
Front View Camera
217
-
Drive Control
218
-
Driver Select Suspension
218
-
Using the Front View Camera
218
-
Adaptive Steering
219
-
-
-
Load Carrying
220
-
Rear under Floor Storage
220
-
Cargo Management System
220
-
Cargo Nets
220
-
Roof Racks and Load Carriers
220
-
Load Limit
221
-
Towing
223
-
Towing
224
-
Towing
226
-
Towing
227
-
-
-
Towing
229
-
Towing a Trailer
229
-
Trailer Sway Control
230
-
Recommended Towing Weights
230
-
Essential Towing Checks
232
-
Before Towing a Trailer
233
-
When Towing a Trailer
233
-
-
Transporting the Vehicle
234
-
Towing the Vehicle on Four Wheels — 6-Speed Automatic Transmission — 6F35
234
-
Towing the Vehicle on Four Wheels — 6-Speed Automatic Transmission — 6F50/6F55
235
-
Driving Hints
237
-
Breaking-In
237
-
Economical Driving
237
-
Cold Weather Precautions
237
-
Driving through Water
237
-
Floor Mats
238
-
-
Driving Hints
239
-
Roadside Emergencies
240
-
Roadside Assistance
240
-
Hazard Warning Flashers
241
-
Fuel Shutoff
241
-
Jump Starting the Vehicle
242
-
Connecting the Jumper Cables
242
-
Preparing Your Vehicle
242
-
-
Post-Crash Alert System
244
-
-
Customer Assistance
245
-
Getting the Services You Need
245
-
In California (U.S. Only)
246
-
The Better Business Bureau (BBB) Auto Line Program (U.S. Only)
247
-
Utilizing the Mediation/Arbitration Program (Canada Only)
247
-
Getting Assistance Outside the U.S. and Canada
248
-
Ordering Additional Owner’s Literature
249
-
Reporting Safety Defects (U.S. Only)
249
-
Reporting Safety Defects (Canada Only)
250
-
-
Fuses
251
-
Fuse Specification Chart
251
-
Power Distribution Box
251
-
Passenger Compartment Fuse Panel
257
-
-
Changing a Fuse
260
-
-
Maintenance
261
-
General Information
261
-
Opening and Closing the Hood
261
-
Under Hood Overview — 2.0L Ecoboost
262
-
Closing the Hood
262
-
Under Hood Overview — 2.7L Ecoboost
263
-
Under Hood Overview — 3.5L
264
-
Engine Oil Dipstick — 2.0L Ecoboost
265
-
Engine Oil Dipstick — 2.7L Ecoboost /3.5L
265
-
Engine Oil Check
265
-
Oil Change Indicator Reset
266
-
Engine Coolant Check
266
-
Checking the Engine Coolant
267
-
Adding Engine Coolant
267
-
-
How Fail-Safe Cooling Works
268
-
Automatic Transmission Fluid Check — 2.0L Ecoboost
269
-
When Fail-Safe Mode Is Activated
269
-
Automatic Transmission Fluid Check — 2.7L Ecoboost /3.5L
270
-
Brake Fluid Check
271
-
Adding Transmission Fluid
271
-
Power Steering Fluid Check
272
-
Washer Fluid Check
272
-
Fuel Filter
272
-
Changing the 12V Battery
272
-
Checking the Wiper Blades
274
-
Changing the Wiper Blades
274
-
Service Position
274
-
Adjusting the Headlamps
275
-
Vertical Aim Adjustment
275
-
Removing a Headlamp
277
-
Changing a Bulb
277
-
Led Lamps
278
-
Bulb Specification Chart
279
-
Changing the Engine Air Filter
281
-
-
Vehicle Care
282
-
General Information
282
-
Cleaning Products
282
-
Cleaning the Exterior
282
-
Exterior Chrome Parts
282
-
Waxing
283
-
Exterior Plastic Parts
283
-
Cleaning the Engine
283
-
Cleaning the Windows and Wiper Blades
284
-
Cleaning the Interior
284
-
Cleaning the Instrument Panel and Instrument Cluster Lens
284
-
Cleaning Leather Seats
285
-
Repairing Minor Paint Damage
286
-
Cleaning the Alloy Wheels
286
-
Vehicle Storage
286
-
Fuel System
287
-
Cooling System
287
-
Removing Vehicle from Storage
288
-
-
-
Wheels and Tires
289
-
General Information
289
-
Temporary Mobility Kit
291
-
Tire Care
297
-
Using Summer Tires
314
-
Using Snow Chains
314
-
Tire Pressure Monitoring System
315
-
Changing a Road Wheel
318
-
Stowing the Flat Tire
321
-
Technical Specifications
322
-
-
Capacities and Specifications
324
-
Engine Specifications — 2.0L Ecoboost
324
-
Engine Specifications — 2.7L Ecoboost
324
-
Engine Specifications — 3.5L
325
-
Motorcraft Parts — 2.0L Ecoboost
326
-
Motorcraft Parts — 2.7L Ecoboost
327
-
Motorcraft Parts — 3.5L
328
-
Vehicle Identification Number
329
-
Vehicle Certification Label
329
-
Transmission Code Designation
330
-
Capacities and Specifications — 2.0L Ecoboost
331
-
Capacities and Specifications — 2.7L Ecoboost
334
-
Capacities and Specifications — 3.5L
338
-
-
Audio System
342
-
General Information
342
-
Audio Unit — Vehicles With: Am/Fm/CD/Sync
343
-
Audio Unit — Vehicles With: Premium Am/Fm/CD
346
-
Audio Unit — Vehicles With: Sony Am/Fm/CD
347
-
Menu Structure
348
-
Digital Radio
350
-
Satellite Radio
352
-
Audio Input Jack
355
-
USB Port
355
-
Media Hub
356
-
-
Sync
357
-
General Information
357
-
Using Voice Recognition
359
-
Initiating a Voice Session
359
-
Using SYNC with Your Phone
361
-
Pairing a Phone for the First Time
361
-
Accessing Your Phone Settings
367
-
Bluetooth Devices
368
-
-
SYNC Applications and Services
371
-
Using SYNC with Your Media Player
375
-
What’s Playing
375
-
Media Voice Commands
375
-
Media Menu Features
377
-
Accessing Your Usb Song Library
378
-
Voice Commands for Audio Sources
380
-
Line in Audio
380
-
-
SYNC Troubleshooting
382
-
-
Myford Touch
391
-
General Information
391
-
Settings
400
-
Entertainment
410
-
Browsing Device Content
410
-
Am/Fm Radio
412
-
Sd Card Slot and Usb Port
422
-
Line in
426
-
-
Phone
427
-
Pairing Your Phone for the First Time
428
-
Phone Menu Options
429
-
Phone Settings
431
-
-
Information
433
-
Climate
442
-
Climate Control Voice Commands
444
-
Navigation
445
-
Setting a Destination
446
-
Point of Interest (Poi) Categories
446
-
Setting Your Navigation Preferences
448
-
Map Mode
449
-
Quick-Touch Buttons
451
-
Navigation Map Updates
452
-
Navigation Voice Commands
452
-
-
-
Accessories
454
-
Peace of Mind
454
-
Exterior Style
454
-
Interior Style
454
-
-
Extended Service Plan (ESP)
456
-
Service Plans (U.s. Only)
456
-
Service Plans (Canada Only)
457
-
-
Scheduled Maintenance
458
-
General Maintenance Information
458
-
Normal Scheduled Maintenance
461
-
Normal Maintenance Intervals
462
-
Special Operating Conditions Scheduled Maintenance
464
-
Scheduled Maintenance Record
466
-
End User License Agreement
474
-
Type Approvals
495
-
Child Restraint and Safety Belt Maintenance
499
-
Getting the Services You Need
502
-
-
Advertisement
Ford 2015 EDGE Quick Reference Manual (10 pages)
Brand: Ford
|
Category: Automobile
|
Size: 4.74 MB
Advertisement
Related Products
-
Ford 2015 EXPLORER
-
Ford 2015 EXPEDITION
-
Ford 2015 ESCAPE
-
Ford 2015 ECOSPORT
-
Ford 2015 F-150
-
Ford 2015 FLEX
-
Ford 2015 C-MAX HYBRID
-
Ford 2015 FUSION
-
Ford 2015 TAURUS
-
Ford 2015 Figo
Ford Categories
Automobile
Automobile Accessories
Engine
Portable Generator
Trucks
More Ford Manuals