Для ознакомления с инструкцией необходимо нажать на ссылку «ЗАГРУЗИТЬ», чтобы скачать pdf файл. Если есть кнопка «ПРОСМОТР», то можно просто посмотреть документ онлайн.
Для удобства, Вы можете сохранить данную страницу с файлом руководства по эксплуатации в свой список «избранное» прямо на сайте (доступно для зарегистрированных пользователей).
Смотрите инструкцию для похожих моделей:

Вы можете задать вопрос посетителям сайта по модели FORD Transit (2008). Если Вы являетесь её пользователем, то пожалуйста оставьте, по возможности развёрнутый отзыв:
Ford Transit / Transit Tourneo руководство по эксплуатации, ремонту и техническому обслуживанию с бензиновыми двигателями: 2.3 л Duratec-HE (2261 см³) 146 л.с./107 кВт и с турбодизельными серии «Puma» P8FA/QVFA/QWFA 2.2 л Duratorq-TDCi (2198 см³) 85-110-130 л.с./62-81-96 кВт, PHFA/JXFA/H9FB 2.4 л Duratorq-TDCi (2402 см³) 100-115-140 л.с./74-85-103 кВт, PHFA/JXFA/H9FB 3.2 л Duratorq-TDCi (3199 см³) 200 л.с./147 кВт; полные технические характеристики, электросхемы, контрольные размеры кузова, устройство, диагностика, особенности конструкции. Форд Транзит фургон, комби, шасси, бортовой и пассажирский Транзит Турнео (11-18 местные), коротко-, средне-, длиннобазные, двухскатные, с передним и задним приводом модели: 260, 280, 300, 330, 350, 410, 430, 460 M/L/EF/S выпуска с 2006 по 2010 год
ЕСЛИ ВЫ ВИДИТЕ ОШИБКУ 406 Not Acceptable и не видите документ, то скорей всего у Вас IP РФ и его надо сменить, на любой другой страны, с помощью VPN ( Scribd и SlideShare блокируют посетителей с Российским IP).
Видео Ford Transit проверка состояния цепи ГРМ 2.4 л Duratorq-TDCi и замена магнитолы/ Radio Removal (Форд Транзит 06-10)
Ford Transit / Transit Tourneo общая информация (Форд Транзит 2006-2010)
МОТОРНОЕ ОТДЕЛЕНИЕ — 2.3L DURATEC-HE (MI4)
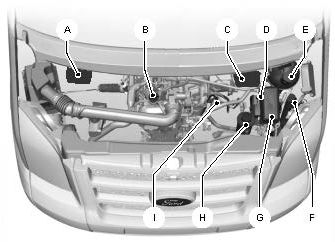
A — Бачок для тормозной жидкости и рабочей жидкости гидропривода сцепления (автомобили с правым расположением органов управления). См. Проверка уровня тормозной жидкости и рабочей жидкости гидропривода сцепления.
B — Крышка маслозаливной горловины1. См. Проверка моторного масла.
C — Бачок для тормозной жидкости и рабочей жидкости гидропривода сцепления (автомобили с левым расположением органов управления). См. Проверка уровня тормозной жидкости и рабочей жидкости гидропривода сцепления.
D — «Положительный» вывод аккумуляторной батареи (для подключения кабелей вспомогательной батареи) См. Аккумуляторная батарея автомобиля.
E — Бачок для охлаждающей жидкости двигателя См. Проверка охлаждающей жидкости двигателя.
F — Бачок для рабочей жидкости стеклоомывателей См. Проверка омывающей жидкости.
G — Распределительная коробка в моторном отсеке. См. Плавкие предохранители.
H — Бачок для рабочей жидкости гидроусилителя рулевого управления См. Проверка
рабочей жидкости усилителя рулевого управления.
I — Маслоизмерительный щуп. См. Проверка моторного масла.
Крышки заливных горловин и масляный щуп двигателя окрашены в яркий цвет для более легкого определения их местоположения.
МОТОРНОЕ ОТДЕЛЕНИЕ — 2.2L DURATORQ-TDCI (PUMA) ДИЗЕЛЬ
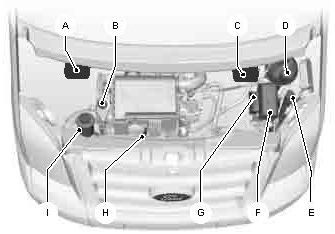
A — Влагоотделитель топливного фильтра (автомобили с левым расположением органов управления).
A — Бачок для тормозной жидкости и рабочей жидкости гидропривода сцепления (автомобили с правым расположением органов управления).
B — Крышка маслозаливной горловины.
C — Бачок для тормозной жидкости и рабочей жидкости гидропривода сцепления (автомобиль с левым расположением органов управления).
C — Влагоотделитель топливного фильтра (автомобили с правым расположением органов управления).
D — Бачок для охлаждающей жидкости двигателя.
E — Бачок для рабочей жидкости стеклоомывателей.
F — Распределительная коробка в моторном отсеке.
G — «Положительный» вывод аккумуляторной батареи (для подключения кабелей вспомогательной батареи).
H — Маслоизмерительный щуп.
I — Бачок для рабочей жидкости гидроусилителя рулевого управления.
МОТОРНОЕ ОТДЕЛЕНИЕ — 2.4L DURATORQ-TDCI (PUMA) ДИЗЕЛЬ/3.2L DURATORQ-TDCI (PUMA) ДИЗЕЛЬ
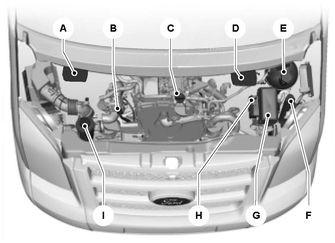
A — Влагоотделитель топливного фильтра (автомобили с левым расположением органов управления).
A — Бачок для тормозной жидкости и рабочей жидкости гидропривода сцепления (автомобили с правым расположением органов управления).
B — Маслоизмерительный щуп.
C — Крышка маслозаливной горловины.
D — Бачок для тормозной жидкости и рабочей жидкости гидропривода сцепления (автомобиль с левым расположением органов управления).
D — Влагоотделитель топливного фильтра (автомобили с правым расположением органов управления).
E — Бачок для охлаждающей жидкости двигателя.
F — Бачок для рабочей жидкости стеклоомывателей.
G — Распределительная коробка в моторном отсеке.
H — «Положительный» вывод аккумуляторной батареи (для подключения кабелей вспомогательной батареи).
I — Бачок для рабочей жидкости гидроусилителя рулевого управления.
ДИАГНОСТИКА И ПРОВЕРКИ
Шум, вибрация и жесткость (NVH)
Осмотр и проверка
1. Проверьте обоснованность жалобы клиента.
2. Проверьте визуально наличие очевидных признаков механических или электрических повреждений.
3. Если очевидная причина отмеченной или полученной жалобы обнаружена, устраните причину (по возможности) до перехода к следующему этапу.
4. Если причина неисправности визуально не очевидна, проверьте признак неисправности и обратитесь к Таблице признаков неисправности. Методика использования этого раздела процедур диагностики – Проблемы шума, вибрации и жесткости (NVH) стали очень важными, т.к. автомобили стали более восприимчивы к таким воздействиям.
Настоящий раздел поможет идентифицировать такие ситуации.
– Раздел предоставляет информацию по процедурам диагностики, в основе которых лежит конкретный признак неисправности. Если, например, проблема проявляется при высокой скорости автомобиля, наиболее подходящим местом для начала диагностики является глава «Тряска и вибрации на высокой скорости».
– Процедура дорожного испытания расскажет Вам, как классифицировать состояния по категориям и как отличить вибрацию от тряски.
– Чтобы убедиться в том, что причина или выявлена, или устранена, предусмотрены серии быстрых проверок, выполняемых в ходе дорожного испытания.
– Определитесь с названием состояния, перейдите к соответствующему разделу и найдите правильную методику диагностики. После того как состояние идентифицировано, работа частично выполнена.
– Следуйте предписанной процедуре диагностики.
– Быстрые проверки описываются внутри отдельного этапа, в то время как наиболее сложные проверки и регулировки описываются в главе «Общие процедуры».
– Всегда точно следуйте последовательности каждого этапа и делайте пометки, чтобы позднее можно было отследить какие-либо важные моменты.
Опрос клиента
Дорожное испытание и опрос клиента (если возможен) предоставляют информацию, которая поможет идентифицировать проблему и укажет с чего лучше начать диагностику.
Идентификация состояния Шум, вибрация и жесткость (NVH) обычно проявляются в четырех зонах:
– шины
– аксессуары двигателя
– подвеска
– трансмиссия
Поэтому важно как можно скорее локализовать проблему NVH, т.е. свести ее к какой-то конкретной зоне(зонам) автомобиля. Наиболее легким и наиболее простым способом для этого является дорожное испытание. Для облегчения выполнения диагностических и проверочных процедур используйте соответствующее санкционированное диагностическое оборудование, предназначенное конкретно для диагностики параметров NVH.
Процедура диагностики шума
Шум, не связанный с мостами автомобиля Пять самых распространенных источников шума, не имеющего отношения к мостам автомобиля, это — система выпуска, шины, багажник крыши, отделка и молдинги. Поэтому, перед переходом к разборке и диагностике трансмиссии, убедитесь в том, что причиной шума не является ни одно из указанных ниже состояний.
– В определенных условиях выброс выхлопных газов может вызвать звук, очень похожий на «механический» шум. В других случаях его можно ошибочно принять за грохотание подшипников колес.
– Шины, особенно зимние покрышки, могут вызывать высоко тональный вой или рев протекторов, похожий на шум механизма. Такую характеристику, в некоторой степени, имеют радиальные шины. Также шум типа воя или рева может быть вызван нестандартными шинами с необычной конструкцией протектора.
– Отделка и молдинги также могут вызывать шум типа свиста или воя.
– При введении в зацепление передачи заднего хода или передачи движения в случае использования автоматической коробки передач в блоке с ведущим мостом можно слышать глухой металлический звук. Также его можно слышать при задействовании или отпускании дроссельной заслонки. Шум может вызваться боковыми зазорами, имеющимися в трансмиссии.
– Грохотание в подшипниках похоже на звук сталкивания стеклянных шариков. Это состояние обычно вызывается выходом из строя подшипников колес.
Шумы
– «Механический» шум — это, как правило, рев или вой, вызываемый повреждением в механизме или неправильным преднатягом подшипников. Он может проявляться при различных скоростях и условиях движения. Такой шум может быть и постоянно присутствующим.
– «Кудахтанье» — это определенный дребезжащий шум, который звучит подобно палке. попавшей в спицы быстро вращающегося велосипедного колеса. Это случается при замедлении со скорости 64 км/ч (40 миль/ч), и обычно такой шум можно слышать на всем пути замедления до полной остановки. Частота изменяется со скоростью автомобиля.
– Стук очень похож на «кудахтанье», хотя он может быть тише. Он проявляется при ускорении или замедлении. Разборка покажет, что следует исправить. Щелканье, хлопки и скрежет могут быть вызваны следующим:
– Износом, повреждением или неправильной установкой подшипников колес, элементов подвески или системы тормозов. Перед разборкой коробки передач для диагностирования и устранения шума в редукторе проверьте шины, элементы системы выпуска и отделки и выполните необходимые корректирующие действия. Шумы, описанные в главе «Дорожное испытание», обычно имеют специфические причины, которые можно диагностировать путем наблюдения за узлом по мере его разборки. Первичными ключами к разгадке являются характер шума, услышанного в процессе дорожного испытания, и условия движения. Вибрация Вибрация при высоких скоростях движения может быть вызвана следующим:
– Разбалансировкой передних или задних колес.
– Отклонением формы шин от формы окружности (овальностью). Вибрация, дрожание при ускорении могут быть вызваны следующим:
– Повреждением опор силового агрегата/ трансмиссии.
– Превышением рабочих углов в шарнирах равных угловых скоростей (ШРУС); это вызывается неправильной высотой дорожного просвета. Проверьте дорожный просвет, проверьте правильность характеристик пружин и проверьте узлы в нерабочем состоянии.
Дорожное испытание
Любой узел с механическим приводом при работе будет производить какой-то шум. Некоторые шумы приемлемы, их можно слышать при определенных значениях скорости движения автомобиля или при определенных дорожных условиях, например при движении по новой асфальтовой дороге. Незначительный шум не мешает и такое состояние следует считать нормальным.
Дорожное испытание и опрос клиента (если возможен) предоставляют информацию, которая помогает идентифицировать проблему и подсказывает, с чего лучше начать диагностику.
1. В процессе диагностики делайте пометки. Записывайте даже незначительную информацию, потому что все может повернуться так, что эта информация станет самой важной информацией.
2. Не притрагивайтесь ни к чему до проведения дорожного испытания и выполнения тщательного визуального осмотра автомобиля. Оставьте давление в шинах и загрузку автомобиля такими же, какими они были при первом проявлении проблемы. Корректировка давления в шинах, загрузки автомобиля или выполнение других регулировок может привести к тому, что интенсивность проявления проблемы сведется к такому минимуму, при котором уже не удастся точно идентифицировать проблему. Кроме того, Вы также можете внести что-то новое в систему, препятствуя тем самым правильному диагностированию.
3. Проведите визуальный осмотр, как часть предварительной диагностической программы, записывайте все, что кажется Вам подозрительным. Запишите величину давления в шинах, но пока не корректируйте это давление. Запишите, какие имеются протечки, есть ли не затянутые гайки и болты, места, где элементы могут тереться друг о друга. Проверьте грузовое отделение на наличие необычных грузов.
4. Выполните дорожное испытание, в ходе которого путем многократного воспроизведения проблемного состояния, определите характер неисправности.
5. По мере воспроизведения проблемного состояния выполните Быстрые проверки, выполняемые в ходе дорожного испытания. Это поможет Вам выбрать правильную диагностическую процедуру. Выполните Быстрые проверки, выполняемые в ходе дорожного испытания, еще раз, чтобы проверить действительность их результатов. Помните, что Быстрые проверки, выполняемые в процессе дорожного испытания, не расскажут Вам, в чем заключается проблема (где), но покажут, где ее нет.
Быстрые проверки, выполняемые в процессе дорожного испытания
1. 24-80 км/ч (15-50 миль/ч): при легком ускорении, слышится «стонущий» шум и возможно ощущение вибрации в передней части пола. Обычно ситуация ухудшается в случае ускорения на этой скорости при определенной частоте вращения коленчатого вала двигателя и при определенном положении дроссельной заслонки. Также может возникать «стонущий» шум, характер которого зависит от элемента, служащего причиной этого. Обратитесь к Таблице признаков неисправности, пункту «Стонущий звук переменной тональности».
2. Ускорение/ замедление: При медленном ускорении или замедлении иногда отмечается тряска в рулевом колесе/ колонке, сиденьях, передней части пола, панелях отделки передних дверей или кузовных элементах передней части автомобиля. Это низкочастотная вибрация (приблизительно 9-15 циклов в секунду). При легком задействовании тормозов она может возрастать, а может и нет. Обратитесь к Таблице признаков неисправности, пункту «Гудение на холостом ходу/ Тряска/ Вибрация».
3. Высокая скорость: Ощущается вибрация без видимой тряски в передней части пола или сиденьях. Сопровождается громыханием, гудением, гулом. Проедите по инерции при выжатой педали сцепления (механическая коробка передач) или рычаге переключения передач в нейтральном положении (автоматическая коробка передач) или на холостом ходу двигателя. Если вибрация все еще присутствует, она имеет отношение к колесам, шинам, передним тормозным дискам, ступицам колес или подшипникам передних колес. Обратитесь к Таблице признаков неисправности, пункту «Тряска и вибрация при движении».
4. Чувствительность к частоте вращения коленчатого вала двигателя: Вибрация ощущается всякий раз, когда двигатель достигает определенной частоты вращения коленчатого вала. Она будет пропадать при движении накатом. Вибрацию можно воспроизвести и при неподвижном автомобиле, доведя частоту вращения коленчатого вала двигателя до проблемной частоты вращения. Она может быть вызвана любым элементом: от ремня привода аксессуаров до сцепления или гидротрансформатора, которые вращаются с частотой вращения коленчатого вала двигателя, когда автомобиль находится в неподвижном состоянии Обратитесь к «Таблице признаков неисправности», пункту «Тряска и вибрация при движении».
5. Шум и вибрация при поворачивании: Щелканье, хлопки или скрежет могут быть вызваны следующими факторами: – Износом, повреждением или неправильной установкой подшипников передних колес. – Повреждением опор силового агрегата/ трансмиссии.

| № | Спецификация / Specs | Данные |
| Габариты (мм/mm) и масса (кг/kg) / Dimensions and Weight | ||
| 1 | Длина / Length | 5301 |
| 2 | Ширина (без/с зеркалами) / Width | 1974 |
| 3 | Высота (загружен/пустой) / Height | 2302 |
| 4 | Колёсная база / Wheelbase | 3300 |
| 5 | Дорожный просвет (клиренс) / Ground clearance | 170 |
| 6 | Снаряжённая масса / Total (curb) weight | 1720 |
| Полная масса / Gross (max.) weight | 3300 | |
|
Двигатель / Engine |
||
| 7 | Тип / Engine Type, Code | Дизельный, жидкостного охлаждения, четырехтактный, QWFA «Puma» Duratorq-TDCi |
| 8 | Количество цилиндров / Cylinder arrangement: Total number of cylinders, of valves | 4-цилиндровый, рядный, 16V, DOHC с верхним расположением двух распредвалов |
| 9 | Диаметр цилиндра / Bore | 86.0 мм |
| 10 | Ход поршня / Stroke | 94.6 мм |
| 11 | Объём / Engine displacement | 2198 см³ |
| 12 | Система питания / Fuel supply, Aspiration | Непосредственный впрыск топлива насос-форсунками Common Rail Denso, PCM |
| Турбокомпрессор с регулируемым сопловым аппаратом и охлаждение наддувочного воздуха | ||
| 13 | Степень сжатия / Compression ratio | 17.5:1 |
| 14 | Максимальная мощность / Max. output power kW (HP) at rpm | 96 кВт (130 л.с.) при 4000 об/мин |
| 15 | Максимальный крутящий момент / Max. torque N·m at rpm | 310 Нм при 1600-2500 об/мин |
|
Трансмиссия / Transmission |
||
| 16 | Сцепление / Clutch type | Однодисковое, диаметром 240 мм, сухое, с диафрагменной нажимной пружиной и гасителем крутильных колебаний, постоянно замкнутого типа |
| 17 | КПП / Transmission type | Тип MT82 МКПП 6 шестиступенчатая механическая, двухвальная, с синхронизаторами на всех передачах переднего хода |
О Книге
- Название: Ford Transit, Transit Tourneo Руководство по эксплуатации, ремонту и техническому обслуживанию
- Бензиновые двигатели: 2.3 л Duratec-HE (2261 см³) 146 л.с./107 кВт и с турбодизельными серии «Puma» P8FA/QVFA/QWFA 2.2 л Duratorq-TDCi (2198 см³) 85-110-130 л.с./62-81-96 кВт, PHFA/JXFA/H9FB 2.4 л Duratorq-TDCi (2402 см³) 100-115-140 л.с./74-85-103 кВт, PHFA/JXFA/H9FB 3.2 л Duratorq-TDCi (3199 см³) 200 л.с./147 кВт
- Выпуск с 2006 года
- Серия: «Ремонт Автомобилей»
- Год издания: 2009
- Автор: Коллектив авторов
- Издательство: «Ассоциация независимых издателей»
- Формат: PDF
- Страниц в книге: 759
- Размер: 160.55 МБ
- Язык: Русский
- Количество электросхем: 63

|
FordTransit |
Feel the difference |
||
|
Owner’shandbook |
|||

The information contained in this publication was correct at the time of going to print. In the interest of development the right is reserved to change specifications, design or equipment at any time without notice and without incurring any obligations. This publication, or part thereof, may not be reproduced nor translated without our approval. Errors and omissions excepted.
© Ford Motor Company 2008
All rights reserved.
Part number: 8C1J-19A321-DA (CG3527en) 02/2008 20080304103138

Table of contents
|
Introduction |
|
|
About this handbook………………………….. |
5 |
|
Symbols glossary……………………………….. |
5 |
|
Parts and accessories………………………… |
5 |
|
Quick start |
|
|
Quick start………………………………………….. |
6 |
|
Occupant protection |
|
|
Principle of operation………………………… |
13 |
|
Fastening the seat belts……………………. |
14 |
|
Seat belt height adjustment………………. |
15 |
|
Using seat belts during pregnancy……. |
16 |
|
Disabling the passenger airbag…………. |
16 |
|
Keys and remote |
|
|
controls |
|
|
General information on radio |
|
|
frequencies……………………………………. |
18 |
|
Programming the remote control……… |
18 |
|
Locks |
|
|
Locking and unlocking………………………. |
19 |
|
Engine immobiliser |
|
|
Principle of operation………………………… |
23 |
|
Coded keys……………………………………… |
23 |
|
Arming the engine immobiliser…………. |
23 |
|
Disarming the engine immobiliser…….. |
23 |
|
Alarm |
|
|
Principle of operation………………………… |
24 |
|
Arming the alarm………………………………. |
24 |
|
Disarming the alarm………………………….. |
25 |
|
Steering wheel |
|
|
Adjusting the steering wheel…………….. |
26 |
|
Audio control……………………………………. |
26 |
|
Wipers and washers |
|
|
Windscreen wipers…………………………… |
28 |
|
Autowipers……………………………………….. |
28 |
|
Windscreen washers……………………….. |
29 |
|
Rear window wiper and washers……… |
29 |
|
Checking the wiper blades………………. |
30 |
|
Changing the wiper blades………………. |
30 |
|
Lighting |
|
|
Lighting control………………………………….. |
31 |
|
Autolamps………………………………………… |
32 |
|
Front fog lamps………………………………… |
32 |
|
Rear fog lamps…………………………………. |
32 |
|
Headlamp levelling……………………………. |
33 |
|
Hazard warning flashers…………………… |
33 |
|
Direction indicators…………………………… |
33 |
|
Interior lamps……………………………………. |
33 |
|
Stepwell lamps…………………………………. |
34 |
|
Changing a bulb……………………………….. |
34 |
|
Bulb specification chart…………………….. |
42 |
|
Windows and mirrors |
|
|
Electric windows………………………………. |
44 |
|
Exterior mirrors…………………………………. |
44 |
|
Electric exterior mirrors…………………….. |
45 |
|
Interior mirror……………………………………. |
45 |
|
Sliding windows………………………………… |
46 |
|
Rear quarter windows………………………. |
46 |
|
Instruments |
|
|
Gauges…………………………………………….. |
47 |
|
Warning lamps and indicators………….. |
49 |
|
Audible warnings and indicators………. |
53 |
|
Information displays |
|
|
General information………………………….. |
54 |
|
Information messages……………………… |
56 |
|
Personalised settings……………………….. |
58 |
1

Table of contents
|
Climate control |
|
|
Principle of operation………………………… |
61 |
|
Air vents…………………………………………….. |
61 |
|
Manual climate control……………………… |
62 |
|
Heated windows and mirrors…………… |
64 |
|
Auxiliary heater…………………………………. |
64 |
|
Seats |
|
|
Sitting in the correct position…………….. |
68 |
|
Front seats……………………………………….. |
68 |
|
Rear seats………………………………………… |
70 |
|
Head restraints………………………………….. |
71 |
|
Heated seats……………………………………. |
72 |
|
Convenience features |
|
|
Clock………………………………………………… |
73 |
|
Sun visors…………………………………………. |
73 |
|
Ticket holders……………………………………. |
73 |
|
Cigar lighter………………………………………. |
73 |
|
Ashtray……………………………………………… |
74 |
|
Auxiliary power sockets……………………. |
74 |
|
Cup holders………………………………………. |
75 |
|
Glove box…………………………………………. |
75 |
|
Storage compartments……………………. |
76 |
|
Bottle holder……………………………………… |
76 |
|
Auxiliary input (AUX IN) socket………….. |
76 |
|
Starting the engine |
|
|
Starting a petrol engine…………………….. |
77 |
|
Starting a diesel engine…………………….. |
78 |
|
Switching off the engine……………………. |
78 |
|
Fuel and refuelling |
|
|
Safety precautions……………………………. |
79 |
|
Fuel quality — Petrol……………………………. |
79 |
|
Fuel quality — Diesel…………………………… |
79 |
|
Catalytic converter……………………………. |
79 |
|
Fuel filler flap……………………………………… |
80 |
|
Refuelling………………………………………….. |
80 |
|
Fuel consumption…………………………….. |
80 |
|
Technical specifications…………………….. |
81 |
|
Transmission |
|
|
Manual transmission…………………………. |
83 |
|
All-wheel drive (AWD)……………………….. |
83 |
|
Brakes |
|
|
Principle of operation………………………… |
85 |
|
Hints on driving with ABS………………….. |
85 |
|
Parking brake……………………………………. |
85 |
|
Stability control |
|
|
Principle of operation………………………… |
86 |
|
Using stability control………………………… |
86 |
|
Hill launch assist (HLA) |
|
|
Principle of operation………………………… |
88 |
|
Using HLA…………………………………………. |
88 |
|
Traction control |
|
|
Principle of operation………………………… |
90 |
|
Using traction control……………………….. |
90 |
|
Parking aid |
|
|
Principle of operation………………………… |
91 |
|
Using the parking aid…………………………. |
91 |
|
Rear view camera |
|
|
Principle of operation………………………… |
93 |
|
Using the rear view camera……………… |
93 |
|
Cruise control |
|
|
Principle of operation………………………… |
97 |
|
Using cruise control………………………….. |
97 |
|
Automatic speed limiter |
|
|
(ASL) |
|
|
Principle of operation………………………… |
99 |
2

Table of contents
|
Load carrying |
|
|
General information………………………… |
100 |
|
Load retaining fixtures…………………….. |
100 |
|
Roof racks and load carriers…………… |
102 |
|
Towing |
|
|
Towing a trailer………………………………… |
103 |
|
Driving hints |
|
|
Running-in………………………………………. |
104 |
|
Reduced engine performance……….. |
104 |
|
Emergency equipment |
|
|
First aid kit……………………………………….. |
105 |
|
Warning triangle………………………………. |
105 |
|
Emergency exit……………………………….. |
105 |
|
Status after a collision |
|
|
Fuel cut-off switch…………………………… |
106 |
|
Inspecting safety system |
|
|
components………………………………… |
106 |
|
Fuses |
|
|
Fuse box locations………………………….. |
107 |
|
Changing a fuse……………………………… |
109 |
|
Fuse specification chart………………….. |
109 |
|
Vehicle recovery |
|
|
Towing points…………………………………… |
118 |
|
Towing the vehicle on four wheels…… |
118 |
|
Towing the vehicle on four wheels — |
|
|
AWD……………………………………………… |
119 |
|
Maintenance |
|
|
General information………………………… |
120 |
|
Opening and closing the bonnet…….. |
120 |
|
Engine compartment overview — 2.3L |
|
|
Duratec-HE (MI4)…………………………. |
122 |
|
Engine compartment overview — 2.2L |
|
|
Duratorq-TDCi (Puma) Diesel………. |
123 |
|
Engine compartment overview — 2.4L |
|
|
Duratorq-TDCi (Puma) Diesel/3.2L |
|
|
Duratorq-TDCi (Puma) Diesel………. |
125 |
|
Engine oil dipstick — 2.3L Duratec-HE |
|
|
(MI4)…………………………………………….. |
126 |
|
Engine oil dipstick — 2.2L Duratorq-TDCi |
|
|
(Puma) Diesel………………………………. |
126 |
|
Engine oil dipstick — 2.4L Duratorq-TDCi |
|
|
(Puma) Diesel/3.2L Duratorq-TDCi |
|
|
(Puma) Diesel……………………………….. |
127 |
|
Engine oil check………………………………. |
127 |
|
Engine coolant check……………………… |
127 |
|
Brake and clutch fluid check…………… |
128 |
|
Power steering fluid check……………… |
128 |
|
Draining the fuel filter water trap……… |
129 |
|
Fuel filter service indicator check…….. |
130 |
|
Washer fluid check………………………….. |
130 |
|
Technical specifications…………………… |
130 |
|
Vehicle care |
|
|
Cleaning the exterior………………………. |
133 |
|
Cleaning the interior………………………… |
133 |
|
Repairing minor paint damage………… |
134 |
|
Vehicle battery |
|
|
Battery care…………………………………….. |
135 |
|
Using booster cables………………………. |
135 |
|
Changing the vehicle battery………….. |
136 |
|
Battery connection points………………. |
136 |
|
Child safety |
|
|
Child seats………………………………………. |
137 |
|
Child seat positioning………………………. |
138 |
|
Booster cushions……………………………. |
139 |
|
ISOFIX anchor points………………………. |
140 |
|
Child safety locks…………………………….. |
141 |
|
Wheels and tyres |
|
|
General information………………………… |
142 |
|
Changing a road wheel…………………… |
142 |
|
Tyre repair kit…………………………………… |
148 |
3

Table of contents
|
Tyre care…………………………………………. |
153 |
|
Using winter tyres……………………………. |
154 |
|
Using snow chains………………………….. |
154 |
|
Technical specifications…………………… |
154 |
|
Vehicle identification |
|
|
Vehicle identification plate……………….. |
158 |
|
Vehicle identification number (VIN)….. |
158 |
|
Technical specifications |
|
|
Technical specifications…………………… |
159 |
|
Telephone |
|
|
General information…………………………. |
172 |
|
Telephone setup……………………………… |
172 |
|
Bluetooth setup………………………………. |
173 |
|
Telephone controls…………………………. |
174 |
|
Using the telephone — Vehicles Without: |
|
|
Navigation System……………………….. |
176 |
|
Using the telephone — Travel Pilot |
|
|
EX…………………………………………………. |
178 |
|
Voice control |
|
|
Principle of operation………………………. |
180 |
|
Using voice control…………………………. |
180 |
|
Audio unit commands……………………… |
181 |
|
Telephone commands……………………. |
185 |
|
Navigation system commands……….. |
190 |
|
Climate control commands…………….. |
190 |
|
Appendices |
|
|
Type approvals……………………………….. |
193 |
|
Electromagnetic compatibility…………. |
193 |
4

Introduction
ABOUT THIS HANDBOOK
Thank you for choosing Ford. We recommend that you take some time to get to know your vehicle by reading this handbook. The more that you know about it, the greater the safety and pleasure you will get from driving it.
Note: This handbook describes product features and options available throughout the range, sometimes even before they are generally available. It may describe options not fitted to your vehicle.
Note: Always use and operate your vehicle in line with all applicable laws and regulations.
Note: Pass on this handbook when selling your vehicle. It is an integral part of the vehicle.
SYMBOLS GLOSSARY
Symbols in this handbook
WARNING
You risk death or serious injury to yourself and others if you do not follow the instructions highlighted
by the warning symbol.
CAUTION
You risk damaging your vehicle if you do not follow the instructions highlighted by the caution symbol.
Symbols on your vehicle
When you see these symbols, read and follow the relevant instructions in this handbook before touching or attempting adjustment of any kind.
PARTS AND ACCESSORIES
Genuine Ford parts and accessories have been designed specifically for your vehicle. Unless we have specifically stated, we have not tested non-Ford parts and accessories and, therefore, we will not guarantee that they are suitable for your vehicle. We recommend that you ask your Ford Dealer for advice on parts and accessories suitable for your vehicle.
5

Quick start
QUICK START
Instrument panel overview — left-hand drive
A B C D E F G H I J K L
V U T S R Q P O N M
E70781
6

Quick start
Instrument panel overview — right-hand drive
L K J I H G F E D R B A
M N O P Q C T S U V
E76166
A Electric exterior mirror switch. See Electric exterior mirrors (page 45).
BLighting control. See Lighting control (page 31).
CMultifunction lever. See Direction indicators (page 33). See Lighting control (page 31).
DInstrument cluster. See Gauges (page 47).
EClock.
FAll wheel drive (AWD) indicator. See All-wheel drive (AWD) (page 83).
GHazard warning flasher switch. See Hazard warning flashers (page 33).
HHeated windscreen switch. See Heated windows and mirrors (page 64).
IHeated rear window switch. See Heated windows and mirrors (page 64).
J Tray with cup holders. See Cup holders (page 75).
K Audio unit. See separate handbook.
L Air vents. See Air vents (page 61).
7

Quick start
MCigar lighter. See Cigar lighter (page 73).
N Climate controls. See Climate control (page 61).
OGear lever. See Manual transmission (page 83).
PPassenger airbag deactivation warning lamp. See Disabling the passenger airbag (page 16).
Q Stability control (ESP) switch. See Stability control (page 86).
R Wiper lever. See Wipers and washers (page 28).
SIgnition switch.
THorn.
U Headlamp levelling control. See Headlamp levelling (page 33).
VCup holder. See Cup holders (page 75).
Adjusting the steering wheel
WARNING
Never adjust the steering wheel when the vehicle is moving.
E95179
|
WARNING |
|||
|
Make sure that you fully engage the |
|||
|
locking lever when returning it to its |
|||
|
1 |
original position. |
||
|
E95178 |
|||
|
See Adjusting the steering wheel |
|||
|
(page 26). |
8
![]()
Quick start
Information displays
15:04
15.0 C
C
DISTANCE TO
EMPTY: 200 km
AVERAGE FUEL 8.0 l/100
AVERAGE SPEED 87 km/h
OUTSIDE AIR
TEMP 15.0 C
C
YOUR SETTINGS


 SET/RESET
E73982
E73265
Use the rotary control to scroll through the menu.
E73266
Press the SET and RESET button to select a sub-menu or the item that you want to adjust.
See Information displays (page 54).
Warning lamps and indicators
Brake pad wear warning lamp
Brake system warning lamp
Cruise control indicator
E71340
Hill launch assist indicator
Message indicator lamp
Stability control (ESP) and traction control warning lamp
Service interval indicator lamp (vehicles with a diesel engine)
Shift indicator
9

Quick start
Water-in-fuel indicator lamp (vehicles with a diesel engine)
See Warning lamps and indicators
(page 49).
Locking and unlocking
Rear doors
C
B 
A
E71287
AUnlock or open
BLock
CWhite visible, door locked
Sliding door
C 
 D
D 
 C
C
A B
E71289
AVan and Kombi
BBus
C Lock
DUnlock
Double rear doors
 B
B
A
10

Quick start
Tailgate
B
A
E71292
A Outside
BInside
Locking system operation
The locking system of your vehicle may have been configured to operate in one of three main lock operation combinations. See Locking and unlocking (page 19).
Auxiliary power sockets
E69125
CAUTION
If you use the auxiliary power socket when the engine is not running, the battery may discharge.
Switch the ignition on to use the auxiliary power socket.
Engine idle speed after starting
The engine may idle at a higher speed than normal immediately after starting from cold.
See Starting the engine (page 77).
11

Quick start
Manual transmission
Reverse gear − 6-speed transmission
1
2
E68299
12

Occupant protection
PRINCIPLE OF OPERATION
Airbags
WARNINGS
Do not modify the front of your vehicle in any way. This could adversely affect deployment of the
airbags.
Original text according to ECE R94.01: Extreme Hazard! Do not use a rearward facing child restraint on
a seat protected by an air bag in front of it!
Wear a seat belt and keep sufficient distance between yourself and the steering wheel. Only when you use the seat belt properly, can it hold you in a
position that allows the airbag to achieve its optimum effect. See Sitting in the correct position (page 68).
Have repairs to the steering wheel, steering column, seats, airbags and seat belts carried out by properly
trained technicians.
Keep the areas in front of the airbags free from obstruction. Do not affix anything to or over the
airbag covers.
Do not poke sharp objects into areas where airbags are fitted. This could damage and adversely affect
deployment of the airbags.
Use seat covers designed for seats with side airbags. Have these fitted by properly trained technicians.
Note: You will hear a loud bang and see a cloud of harmless powdery residue if an airbag deploys. This is normal.
Note: The front passenger airbag protects both positions of a double seat.
Note: Only wipe airbag covers with a damp cloth.
Driver and front passenger airbags
30o
30o
E68581
The driver and front passenger airbags will deploy during significant frontal collisions or collisions that are up to 30 degrees from the left or the right. The airbags will inflate within a few thousandths of a second and deflate on contact with the occupants, thus cushioning forward body movement. During minor frontal collisions, overturns, rear collisions and side collisions, the driver and front passenger airbags will not deploy.
13

Occupant protection
Side airbags
E68905
Side airbags are fitted inside the seatback of the front seats. A label indicates that side airbags are fitted to your vehicle.
The side airbags will deploy during significant lateral collisions. Only the airbag on the side affected by the collision will deploy. The airbags will inflate within a few thousandths of a second and deflate on contact with the occupants, thus providing protection for the head and rib areas. During minor lateral collisions, overturns, front collisions and rear collisions, the side airbags will not deploy.
Seat belts
WARNINGS
Wear a seat belt and keep sufficient distance between yourself and the steering wheel. Only when you use the seat belt properly, can it hold you in a
position to achieve its optimum effect. See Sitting in the correct position
(page 68).
 Use a seat belt for only one person.
Use the correct buckle for each seat belt.
WARNINGS
Do not use a seat belt that is slack or twisted.
Do not wear thick clothing. The seat belt must fit tightly around your body to achieve its optimum effect.
Position the shoulder strap of the seat belt over the centre of your shoulder and position the lap strap
tightly across your hips.
Seat belt pretensioners have a lower deployment threshold than the airbags. During minor collisions, it is possible that only the seat belt pretensioner will deploy.
FASTENING THE SEAT BELTS
E68584
14

Occupant protection
E68585
E68586
WARNING
Insert the tongue into the buckle until you hear a distinct click. You have not fastened the seat belt
properly if you do not hear a click.
Pull the seat belt out steadily. It may lock if you pull it sharply or if the vehicle is on a slope.
Press the red button on the buckle to release the seat belt. Let it retract completely and smoothly.
SEAT BELT HEIGHT
ADJUSTMENT
Front seat belt
E68901
Rear seat belt
E73074
WARNING
Make sure that the seat belt runs smoothly through the guide.
15

Occupant protection
USING SEAT BELTS DURING PREGNANCY
E68587
WARNING
Position the seat belt correctly for your safety and that of your unborn child. Do not use only the lap strap
or the shoulder strap.
Position the lap strap comfortably across your hips and low beneath your pregnant abdomen. Position the shoulder strap between your breasts, above and to the side of your pregnant abdomen.
DISABLING THE PASSENGER AIRBAG
WARNING
To avoid the risk of death or serious injury, NEVER use a rearward facing child restraint in the front,
unless the airbag is OFF.
E71313
The key switch and the airbag deactivation lamp are located in the instrument panel.
If the airbag warning lamp in the instrument cluster illuminates intermittently, it means that there is a malfunction. Remove the child restraint from the front. Have the system checked by a suitably trained technician for your own safety. See Warning lamps and indicators (page 49).
Disabling the passenger airbag
AB
E71312
To use a child restraint in the front, make sure that the key switch is turned to position A.
When you switch the ignition on, check that the passenger airbag deactivation warning lamp comes on. See Quick start (page 6).
16

Occupant protection
Enabling the passenger airbag
WARNING
For the adult restraint system to perform as intended, make sure that the airbag is ON.
After removing the child restraint from the front, make sure that you turn the key switch to position B.
17

Keys and remote controls
GENERAL INFORMATION
ON RADIO FREQUENCIES
CAUTION
The radio frequency used by your remote control can also be used by other short distance radio
transmissions (e.g. amateur radios, medical equipment, wireless headphones, remote controls and alarm systems). If the frequencies are jammed, you will not be able to use your remote control. You can lock and unlock the doors with the key.
Note: You could unlock the doors if you press the buttons on the remote control unintentionally.
The operating range between your remote control and your vehicle varies depending on the environment.
PROGRAMMING THE
REMOTE CONTROL
You can programme a maximum of eight remote controls to use with your vehicle (including any supplied with your vehicle). Ask your dealer for instructions.
18
![]()
Locks
LOCKING AND UNLOCKING
Double locking
WARNING
Do not activate double locking when persons or animals are inside the vehicle. You will not be able to
unlock the doors from the inside if you have double locked them.
Double locking is a theft protection feature that prevents someone from opening the doors from the inside. You can only double lock the doors if they are all closed. If you try to double lock the doors when a door is still open, you may hear a short tone from the horn and the locks will cycle. The door locks will return to their previous state.
If you have double locked the doors successfully, the direction indicators will flash twice. If the hazard warning flashers are on, the direction indicators will give two long flashes.
Locking and unlocking the doors with the key
A 
 A
A
BB
 A
A
B
E71294
A Unlock
BLock
Double locking the doors with the key
Turn the key to the unlock position and then to the lock position to double lock the doors.
19

Locks
Locking and unlocking the doors with the remote control
BC
A
E71293
ALock
BUnlock
CCargo unlock
Press the appropriate button once.
Double locking the doors with the remote control
Press the lock button twice.
Locking and unlocking the doors with the handles
Front doors
A
C B
E71286
AWhite mark
BLock
CUnlock
If you see the white mark, the door is locked.
Rear doors
C
B 
A
E71287
AUnlock or open
BLock
CWhite mark
20

Locks
If you see the white mark, the door is locked.
Sliding door
C 
 D
D 
 C
C
A B
E71289
AVan and Kombi
BBus
C Lock
DUnlock
Double rear doors
 B
B
A
E71290
A Outside
BInside
E71291
Tailgate
B
A
E71292
A Outside
BInside
Access the release button through the aperture at the bottom of the tailgate.
Slam locking
Note: Do not leave your keys in the vehicle.
Note: You may hear a short tone from the horn if you try to lock the doors when a door is still open.
Slam locking allows you to lock a door with the key or remote control with the door open. The door will be locked when it is closed.
21

Locks
Automatic locking
Note: Your dealer can permanently disable this function if required.
The doors will lock automatically when you exceed 8 km/h (5 mph). Unlock the doors with the interior handle.
Automatic re-locking
The doors will re-lock automatically if you do not open a door within 45 seconds of unlocking the doors with the remote control. The door locks and the alarm will return to their previous state.
One-stage unlocking
Note: The direction indicators will flash once when you unlock the doors.
When enabled, the following features are available:
You will unlock all of the doors when you:
•pull either interior handle (except if you have double locked the doors).
•turn the key in either of the door locks.
•press the unlock button on the remote control once.
•press the cargo unlock button on the remote control once (Chassis Cab).
You will unlock the rear doors or tailgate and the sliding door if you press the cargo unlock button once.
Two-stage unlocking
Note: The direction indicators will flash once when you unlock the doors.
You will unlock the front doors when you:
•pull either interior handle (except if you have double locked the doors).
•turn the key in either of the door locks.
•press the unlock button on the remote control once (Van, Bus and Kombi).
You will unlock the driver side door when you:
•press the unlock button on the remote control once (Chassis Cab).
You will unlock the front doors, rear doors and loadspace doors when you:
•turn the key in either of the front door locks twice within three seconds.
•press the unlock button on the remote control twice within three seconds.
On Van vehicles, you will unlock the rear doors or tailgate and the sliding door if you press the cargo unlock button once.
On Chassis Cab vehicles, you will unlock the passenger side door if you press the cargo unlock button once.
Zone re-locking
The locks on Van, Bus and Kombi are split into two zones, cabin and cargo. Chassis Cab has only the cabin zone.
•Exit the vehicle and press the lock button.
•Press the unlock button or the cargo unlock button once to open the respective zone.
If you now open a door within the unlocked zone, the other doors in that zone will automatically lock.
Configurable unlocking
Configurable unlocking is set at the time of vehicle purchase and allows you to select which doors unlock when the unlock and cargo unlock buttons on the remote control are pressed once or twice. If you have this feature deactivated, it can not be reactivated. Ask your dealer for further information.
22

Engine immobiliser
PRINCIPLE OF OPERATION
The engine immobiliser is a theft protection system that prevents someone from starting the engine with an incorrectly coded key.
CODED KEYS
Note: Do not shield your keys with metal objects. This may prevent the receiver from recognising your key as a valid one.
Note: Have all of your remaining keys erased and recoded if you lose a key. Ask your dealer for further information. Have replacement keys recoded together with your existing keys.
If you lose a key, you can obtain a replacement from your Ford Dealer. If possible, provide them with the key number from the tag provided with the original keys. You can also obtain additional keys from your Ford Dealer.
ARMING THE ENGINE IMMOBILISER
The engine immobiliser is armed automatically a short time after you have switched the ignition off.
The indicator in the instrument cluster will flash to confirm that the system is operating.
DISARMING THE ENGINE
IMMOBILISER
The engine immobiliser is disarmed automatically when you switch the ignition on with a correctly coded key.
The indicator in the instrument cluster will come on for approximately three seconds and then go out. If the indicator stays on for one minute or flashes for approximately one minute and then repeatedly at irregular intervals, your key has not been recognised. Remove the key and try again.
If you are unable to start the engine with a correctly coded key, this indicates a malfunction. Have the immobiliser checked immediately.
23

Alarm
PRINCIPLE OF OPERATION
All vehicles
If the alarm is triggered, the alarm horns will sound for 30 seconds and the hazard warning flashers will flash for five minutes. If the cause of the alarm being triggered has been removed, the alarm will return to its previous armed state. If the cause has not been removed, the alarm horns will sound again.
Vehicles with a perimeter alarm
The perimeter alarm is a deterrent against unauthorised access to your vehicle through the doors and the bonnet. It also protects the audio unit and the trailer (if a Ford trailer-tow kit is fitted). You can fully arm or partially arm the alarm. Trailer detection is disabled when you have partially armed the alarm.
The perimeter alarm will be triggered if someone:
•opens a door.
•opens the bonnet.
•attempts to start the engine with an incorrectly coded key.
•removes the audio unit.
•disconnects the trailer electrical connector (if it was connected at the time the alarm was armed).
Vehicles with a category one alarm
E71401
The category one alarm is additional to the perimeter alarm. Ultrasonic interior motion detection protects your vehicle against unauthorised access to the passenger compartment and the cargo area. You can fully arm or partially arm the alarm. Trailer detection and interior motion detection are disabled when you have partially armed the alarm. Interior motion detection is not activated if you arm the alarm when a door is open.
The category one alarm will only function correctly if all windows are fully closed. Keep the area in front of the motion sensors free from obstruction.
The category one alarm is triggered if:
•motion is detected in the passenger compartment or cargo area.
•someone attempts to access the cargo area through the rear door or tailgate window.
ARMING THE ALARM
Perimeter alarm
The alarm is armed 20 seconds after you have locked the doors. This delay allows you to close any doors or the bonnet without triggering the alarm.
Partial arming
Lock the doors with the key. See
Locking and unlocking (page 19).
Full arming
Lock the doors with the remote control or double lock the doors with the key or the remote control. See Locking and unlocking (page 19).
24

Alarm
Category one alarm
Partial arming
Lock the doors with the key. See
Locking and unlocking (page 19).
Full arming
Note: Do not fully arm the alarm if someone is inside the vehicle.
Lock the doors with the remote control or double lock the doors with the key or the remote control. See Locking and unlocking (page 19).
DISARMING THE ALARM
Perimeter alarm
Disarm and silence the alarm by unlocking the doors with the key, switching the ignition on with a correctly coded key or unlocking the doors with the remote control. See Locking and unlocking
(page 19).
Category one alarm
Disarm and silence the alarm by unlocking the doors with the key in the driver’s door and switching the ignition on with a correctly coded key within 12 seconds or unlocking the doors with the remote control. See Locking and unlocking
(page 19).
25

Steering wheel
ADJUSTING THE STEERING WHEEL
WARNING
Never adjust the steering wheel when the vehicle is moving.
Note: Make sure that you are sitting in the correct position. See Sitting in the correct position (page 68).
2 
2
 1
1
E95178
 3
3
E95179
WARNING
Make sure that you fully engage the locking lever when returning it to its original position.
AUDIO CONTROL
Select radio, CD or cassette mode on the audio unit.
The following functions can be operated with the remote control:
Volume
E78046
Volume up: Press the top button on the back of the remote control.
Volume down: Press the bottom button on the back of the remote control.
26

|
Steering wheel |
|
|
Seek |
• In radio mode, this will locate the |
|
next pre-set radio station. |
|
|
• In CD mode, this will select the next |
|
|
CD if a CD changer is fitted. |
|
|
• In all modes to abort a traffic |
|
|
message during broadcasting. |
|
|
Press and hold the button on the side: |
|
|
• In radio mode to change the |
|
|
waveband. |
E78047
Move the lever up or down:
•In radio mode, this will locate the next radio station up or down the frequency band.
•In CD mode, it will select the next or previous track.
Mode
E78048
Briefly press the button on the side:
27
Wipers and washers
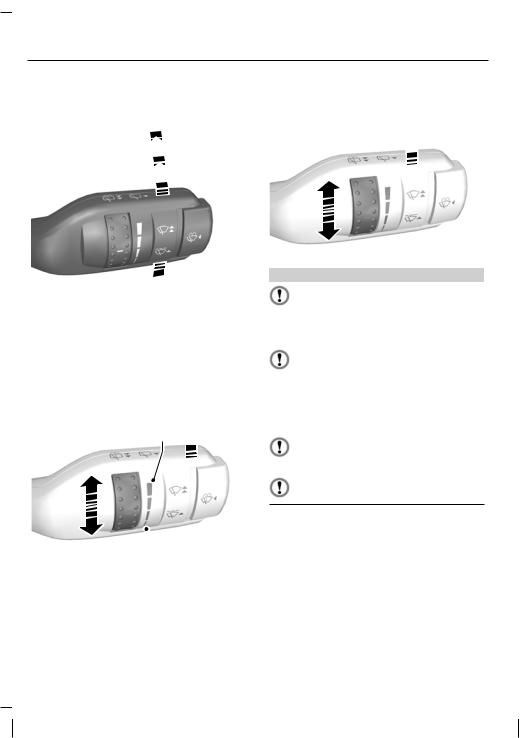
WINDSCREEN WIPERS
 D
D
 C
C
 B
B
 A
A
E71012
ASingle wipe
B Intermittent wipe
CNormal wipe
DHigh speed wipe
Intermittent wipe
A  B
B
 C
C
E71013
A Long wipe interval
B Intermittent wipe
CShort wipe interval
AUTOWIPERS
Autowipers
 B
B
E71014
CAUTIONS
Do not switch autowipers on in dry weather conditions. The rain sensor is very sensitive and the wipers may
operate if dirt, mist or flies hit the windscreen.
Replace the wiper blades as soon as they begin to leave bands of water and smears. If you do not replace
them, the rain sensor will continue to detect water on the windscreen and the wipers will operate, even though the majority of the windscreen is dry.
Fully defrost the windscreen in icy conditions before you switch autowipers on.
Switch autowipers off before you enter a car wash.
If you switch autowipers on after you have switched the ignition on, the wipers will cycle once regardless of whether the windscreen is wet or dry. The rain sensor will then continuously measure the amount of water on the windscreen and adjust the speed of the wipers automatically.
28
![]()
Wipers and washers
If you switch the ignition on with autowipers already switched on, the wipers will not cycle until the rain sensor detects water on the windscreen.
A
B
E71015
A Low sensitivity
BHigh sensitivity
Adjust the sensitivity of the rain sensor using the rotary control. If you set the control to low sensitivity, the wipers will operate when the sensor detects a lot of water on the windscreen. If you set the control to high sensitivity, the wipers will operate if the sensor detects a small amount of water on the windscreen.
WINDSCREEN WASHERS
E71016
WARNING
Do not operate the windscreen washers for more than 10 seconds or when the reservoir is empty.
REAR WINDOW WIPER AND WASHERS
Intermittent wipe
E71017
The rear window wiper will follow the windscreen wiper interval.
Reverse gear wipe
The rear window wiper will operate automatically when you select reverse gear if the wiper lever is in position A, B, C or D.
Rear window washer
E71018
29

Wipers and washers
WARNING
Do not operate the rear window washer for more than 10 seconds or when the reservoir is empty.
|
CHECKING THE WIPER |
3 |
|
|
BLADES |
||
E93784
5
E66644
Run the tip of your fingers over the edge of the blade to check for roughness.
Clean the wiper blade lips with water applied with a soft sponge.
|
CHANGING THE WIPER |
4 |
|
BLADES |
E93785 |
|
2 |
6 |
1 
E93783
E93786
Install in the reverse order.
30

Lighting
LIGHTING CONTROL
Lighting control positions
F A B C
ED
E71094
AOff
BSide and tail lamps
CHeadlamps
D Front fog lamps
E Rear fog lamps
FParking lamps
Parking lamps
First, switch off the ignition.
Both sides
Push the lighting control inwards and turn it to position F.
Single side
 A
A
 B
B
E77368
A Right-hand side
BLeft-hand side
Main and dipped beam
E71095
Pull the lever fully towards the steering wheel to switch between main and dipped beam.
Headlamp flasher
Pull the lever slightly towards the steering wheel.
31

Lighting
Home safe lighting
Switch the ignition off and pull the direction indicator lever towards the steering wheel to switch the headlamps on. You will hear a short tone. The headlamps will go off automatically after 3 minutes with any door open, or 30 seconds after the last door has been closed.
With all doors closed, but within the 30 second delay, opening any door will result in the 3 minute timer starting again.
The home safe lights can be cancelled by either pulling the direction indicator lever towards the steering wheel again or by turning the ignition switch ON.
AUTOLAMPS
E73840
Note: If you have switched autolamps on, you can only switch the main beam on when autolamps has switched the headlamps on.
The headlamps will come on and go off automatically depending on the ambient light.
FRONT FOG LAMPS
E71096
WARNING
Only use the front fog lamps when visibility is considerably restricted by fog, snow or rain.
Note: You cannot switch the front fog lamps on if you have switched autolamps on.
REAR FOG LAMPS
E71097
WARNING
Do not use the rear fog lamps when it is raining or snowing and visibility is more than 50 metres.
32

Lighting
Note: You cannot switch the rear fog lamps on if you have switched autolamps on.
HEADLAMP LEVELLING
You can adjust the level of the headlamp beams according to the vehicle load.
A
B
E74611
A Raise beams
BLower beams
Set the headlamp levelling control to zero when your vehicle is unloaded. Set it to provide illumination between 35 and 100 metres when your vehicle is partially or fully loaded.
HAZARD WARNING
FLASHERS
For item location: See Quick start (page 6).
DIRECTION INDICATORS
E71098
Note: Tap the lever up or down to make the direction indicators flash only three times.
INTERIOR LAMPS
Courtesy lamps — Vehicles without interior sensors
C
B 
E71099 A
AOn
BOff
CDoor contact
Courtesy lamps that are not fitted with a switch will only come on when the switch on the front courtesy lamp is set to position C and you open a door.
33

Lighting
Vehicles with double locking
If you set the switch to position C, the courtesy lamps will stay on for a short time after you close the doors. They will go off immediately when you switch the ignition on.
When you switch the ignition off, the courtesy lamps will come on. They will go off automatically after a short time.
If you leave a door open, the courtesy lamps will go off automatically after 30 minutes. To switch them back on, switch the ignition on for a short time.
Courtesy lamp — Vehicles with interior sensors
A B C
E71945
AOff
BDoor contact
COn
If you set the switch to position B, the courtesy lamp will come on when you unlock or open a door or the tailgate. If you leave a door open, it will go off automatically after a short time to prevent the vehicle battery from discharging. To switch it back on, switch the ignition on for a short time.
The courtesy lamp will also come on when you switch the ignition off. It will go off automatically after a short time or when you start or restart the engine.
If you set the switch to position C, the courtesy lamp will come on. It will go off automatically after a short time to prevent the vehicle battery from discharging. To switch it back on, switch the ignition on for a short time.
Reading lamps
E71946
If you switch the ignition off, the reading lamps will go off automatically after a short time to prevent the vehicle battery from discharging. To switch them back on, switch the ignition on for a short time.
STEPWELL LAMPS
The stepwell lamps will come on and go off automatically when you open and close the doors. If you unlock the doors with the remote control, they will come on. They will go off automatically after a short time.
CHANGING A BULB
WARNINGS
 Switch the lights and the ignition off.
Let the bulb cool down before removing it.
34

Lighting
CAUTIONS
 Do not touch the glass of the bulb.
Only fit bulbs of the correct specification. See Bulb specification chart (page 42).
Note: We recommended that you ask your dealer to change the bulbs if your vehicle is fitted with air conditioning. Some bulbs are difficult to access.
Note: You will need to remove the headlamp to change the headlamp, side lamp or front direction indicator bulbs.
Note: The following instructions describe how to remove the bulbs. Fit replacements in the reverse order unless otherwise stated.
Removing a headlamp
2
4
3
E71057
1.Open the bonnet. See Maintenance (page 120).
2.Remove the screws.
3.Disconnect the electrical connector.
4.Remove the headlamp.
Headlamp main and dipped beam
1
3
2
E71058
54
E71059
1.Remove the headlamp.
2.Release the clips.
3.Remove the cover.
4.Disconnect the electrical connector.
5.Release the clip and remove the bulb.
35

Lighting
Side lamps
1 4 3 2
E71060
1.Remove the headlamp.
2.Remove the cover.
3.Remove the bulb and the bulb holder.
4.Remove the bulb.
Front direction indicators
1
3
2
E71061
1.Remove the headlamp.
2.Turn the bulb holder anti-clockwise and remove it.
3.Gently press the bulb into the bulb holder, turn it anti-clockwise and remove it.
Front fog lamps
 2
2
1
E71062
Note: You cannot separate the bulb from the bulb holder.
1.Disconnect the electrical connector.
2.Turn the bulb holder anti-clockwise and remove it.
Side repeaters
31
 2
2
E71063
36

Lighting
1.Carefully remove the side repeater.
2.Hold the bulb holder, turn the housing anti-clockwise and remove it.
3.Remove the bulb.
1
2
E71064
1.Turn the lens clockwise and remove it.
2.Gently press the bulb into the bulb holder, turn it anti-clockwise and remove it.
Side marker lamps
Chassis cab and Flatbed truck with extended frame
3  1
1
2
E75022
1.Disconnect the electrical connector.
2.Turn the bulb holder anti-clockwise and remove it.
3.Remove the bulb.
Jumbo van
1
2
E71065
1.Turn the lens in either direction and remove it.
2.Remove the bulb.
37

Lighting
Rear lamps
Bus and Kombi
A
1 2
B
C
D
|
E71067 |
||
|
A |
Tail and brake lamp |
|
|
E71066 |
B |
Direction indicator |
|
C |
Reversing lamp |
|
|
D |
Fog lamp |
|
|
1. |
Remove the wing nuts. |
|
|
2. |
Remove the rear lamp and unclip the |
|
|
bulb holder. |
||
|
3. |
Gently press the bulb into the bulb |
|
|
holder, turn it anti-clockwise and |
||
|
remove it. |
38
![]()
Lighting
Chassis cab and Flatbed truck
3
2
1
E71068
E D C B A
E71069
A Direction indicator
B Brake lamp
CTail lamp
D Reversing lamp
E Fog lamp
1.Release the retaining clip and move the plastic frame to the side.
2.Remove the lens.
3.Gently press the bulb into the bulb holder, turn it anti-clockwise and remove it.
Rear side lamps
Flatbed truck
2
1
E71072
1.Carefully prise the lens from the holder.
2.Gently press the bulb into the bulb holder, turn it anti-clockwise and remove it.
Central brake lamp
2
3 
1
E71071
1.Remove the screws.
2.Remove the lamp.
3.Remove the bulb.
39

Lighting
Roof position lamps
1
3 
2
E71073
1.Remove the screws.
2.Remove the lens.
3.Gently press the bulb into the bulb holder, turn it anti-clockwise and remove it.
Number plate lamp
Vehicles with double rear doors
1
2
E71074
1.Remove the lens.
2.Remove the bulb.
Vehicles with a tailgate
2 2
1
1
E71075
1.Open the lens.
2.Gently press the bulb into the bulb holder, turn it anti-clockwise and remove it.
Flatbed truck
1
2
E71076
1.Remove the lens.
2.Gently press the bulb into the bulb holder, turn it anti-clockwise and remove it.
40

Lighting
Front interior lamps
Vehicles without interior sensors
1
2
E71077
1.Carefully prise out the lamp.
2.Gently press the bulb into the bulb holder, turn it anti-clockwise and remove it.
Vehicles with interior sensors
1
 2
2
E73091
3
E73092
1.Carefully prise out the lamp.
2.Remove the lens.
3.Remove the bulb.
Rear interior lamps
1
2
E71078
1.Carefully prise out the lamp.
2.Remove the bulb.
41

Lighting
Front reading lamps
2
1
E73938
3
E73939
1.Carefully prise out the lamp.
2.Turn the bulb holder anti-clockwise and remove it.
3.Remove the bulb.
Stepwell lamps
1
2
2
3
E71080
1.Carefully prise out the lamp.
2.Remove the bulb holder.
3.Remove the bulb.
BULB SPECIFICATION CHART
|
Bulb |
Watts (Specification) |
|
Headlamp main and dipped beam |
55/60 |
|
Side lamp |
5 |
|
Front direction indicator |
21 |
|
Front fog lamp |
55 (H11) |
|
Side repeater |
5 |
|
Side repeater |
21/5 |
|
Side marker lamp |
3 |
42

Lighting
|
Bulb |
Watts (Specification) |
|
|
Tail and brake lamp |
21/5 |
|
|
Tail lamp — Chassis Cab and Flatbed Truck |
10 |
|
|
Brake lamp — Chassis Cab and Flatbed Truck |
21 |
|
|
Rear direction indicator |
21 |
|
|
Reversing lamp |
21 |
|
|
Rear fog lamp |
21 |
|
|
Rear side lamp — Flatbed Truck |
4 |
|
|
Central brake lamp |
16 |
|
|
Roof marker lamp |
4 |
|
|
Number plate lamp — Vehicles with double rear doors |
5 |
|
|
Number plate lamp — Except vehicles with double rear |
10 |
|
|
doors |
||
|
Interior lamp |
10 |
|
|
Reading lamp |
10 |
|
|
Stepwell lamp |
10 |
43

Windows and mirrors
ELECTRIC WINDOWS
WARNING
Do not operate the electric windows unless they are free from obstruction.
E71327
Switch on the ignition to operate the electric windows.
Opening the driver window automatically
Press the switch to the second action point and release it. Press it again to stop the window.
EXTERIOR MIRRORS
A
E71273
AConvex mirror
WARNING
Do not over estimate the distance of the objects that you see in the convex mirrors. Objects seen in
convex mirrors will appear smaller and further away than they actually are.
The mirrors increase your rearward field of vision to reduce the so-called blind spot at the rear quarter of your vehicle.
44

Windows and mirrors
E71274
Make sure that you fully engage the mirror in its support when returning it to its original position.
ELECTRIC EXTERIOR MIRRORS
B

 C
C
A
E71280
ALeft-hand mirror
BOff
CRight-hand mirror
E71281
The electric exterior mirrors are fitted with a heating element that will defrost or demist the mirror glass. See Climate control (page 61).
INTERIOR MIRROR
E71272
Dip the mirror to reduce glare when driving at night.
45

Windows and mirrors
SLIDING WINDOWS
1
2 
E66497
REAR QUARTER WINDOWS
E66498
Pull the lever outwards to open the window. Press the lever in the middle to engage it in its catch. Pull the lever in the middle to close the window. Push it backwards until it engages in its catch.
46

Instruments
GAUGES
Low series instrument cluster
A B C D
G F E
E71334
ATachometer
B Engine coolant temperature gauge
CFuel gauge
DSpeedometer
E Tripmeter reset button
FOdometer, tripmeter, clock, distance to empty and door open warning indicator
GClock set button
47

Instruments
High series instrument cluster
A B C D
F E
E73043
ATachometer
B Engine coolant temperature gauge
CFuel gauge
DSpeedometer
EMessage warning lamp
FMessage centre. See General information (page 54).
48
 Loading…
Подборка руководств по эксплуатации Ford Transit 2006-2013 годов выпуска.
Рекомендуем перед началом ремонта или обслуживания изучить руководство, это позволит избежать проблем при эксплуатации и узнать о всех функциях и особенностях автомобиля.
◀Скачать Руководство пользователя Ford Tourneo Connect 2006-2013 г
Войдите или зарегистрируйтесь, чтобы писать комментарии, задавать вопросы и участвовать в обсуждении.
Войти
Зарегистрироваться