Главная > Фотоаппараты > Руководство пользователя Canon 550D
Инструкция по эксплуатации Canon 550D в PDF (12.0 MB)
| устройство: | зеркальный фотоаппарат |
| производитель: | Canon |
| модель: | EOS 550D (DS126271) |
| дата обращения: | 15.06.2019 |
| страница добавлена: | 23.06.2019 |
| формат файла: | |
| размер файла: | 12.0 мегабайт |
| запросил пользователь: | unknown |
| с устройства: | ноутбук |
| информация о устройстве: | Кэнон 550Д – любительский зеркальный фотоаппарат 2010 года выпуска. 9-точечная автофокусировка, серийная фотосъемка 3,7 кадров в секунду. |
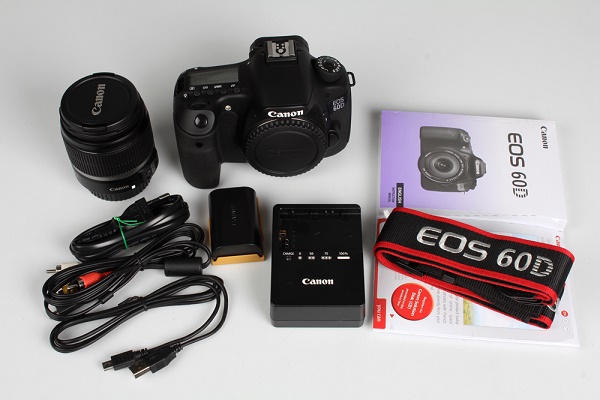
| дополнительная информация: | Инструкция Canon EOS 550D на русском языке, состоит из 256 страниц. В документе: знакомство с комплектацией, устройством и возможностями, основные фото и видео операции, просмотр и печать фотографий, справочная информация. |
| ССЫЛКА: |  |
Правила эксплуатации зеркального фотоаппарата Кэнон
Фотоаппарат – это достаточно сложное устройство, которое требует определенных знаний по эксплуатации. Тем, кто раньше уже пользовался любой фотокамерой, будет значительно проще освоить новую технику. Но люди, которые держат устройство в руках впервые, могут столкнуться с рядом сложностей. Ниже будет подробно рассказано о том, как пользоваться зеркальным фотоаппаратом Canon с момента первого включения и до подключения дополнительных аксессуаров.
Сборка устройства
Любой зеркальный фотоаппарат находится в заводской упаковке в разобранном виде. Если говорить точно, то тушка, объектив и аккумулятор лежат отдельно. В первую очередь следует снять защитную крышку с объектива и самого фотоаппарата. После этого объектив надевается на устройство. Чтобы это сделать, на объективе нужно найти белую точку и совместись ее с белой точкой на тушке. После этого объектив поворачивается по часовой стрелке до щелчка.
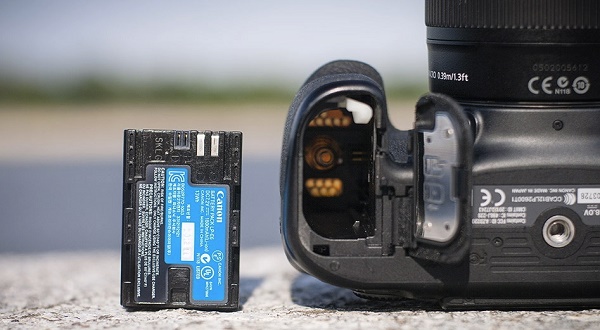
Второй этап – установка аккумулятора. Сделать это тоже достаточно легко. Отсек для аккумулятора находится на дне фотоаппарата и открывается специальной защелкой. Ее нужно потянуть вниз, и крышка отсека откинется. Аккумулятор помещается в фотоаппарат стороной с контактами. Вообще перепутать здесь невозможно, так как другой стороной он просто не влезет.
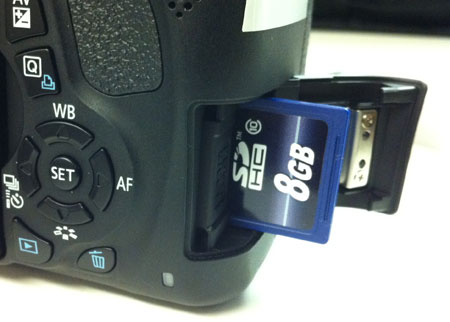
Разъем под карту памяти чаще всего скрывается под крышкой отсека аккумулятора, но у некоторых моделей он может быть расположен с правой стороны. Карта памяти вставляется стороной тоже контактами вперед.
Чаще всего фотоаппарат в коробке будет в разряженном виде, или аккумулятор будет иметь небольшой процент заряда. Перед началом эксплуатации лучше всего его полностью зарядить, чтобы он не сел во время первой настройки. Зарядка в большинстве случае осуществляется не путем подключения всего устройства к сети, а с помощью отдельного зарядного устройства для аккумулятора. Батарею следует извлечь и вставить в зарядку. В процессе будет гореть красная лампа, которая после окончания зарядки загорится зеленым. В редких моделях доступна функция зарядки через USB кабель. Современные батареи не требуют заряжать и сажать их полностью. У них нет эффекта памяти, как это было в старых типах аккумуляторов, поэтому батарея не боится частичной зарядки и разрядки.
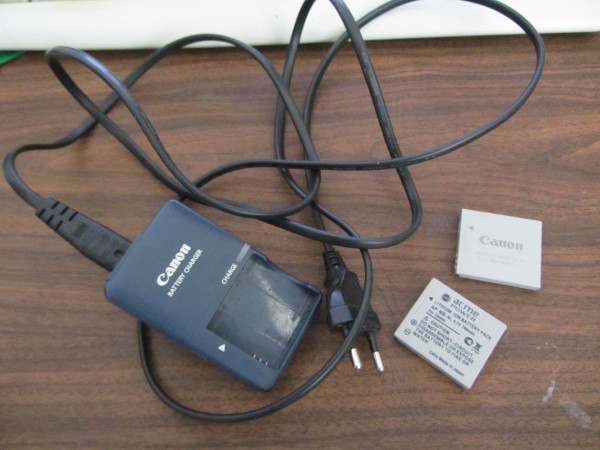
Совет! Чтобы зарядить фотоаппарат Canon, стоит использовать оригинальные зарядные устройства. Только так можно продлить срок службы аккумулятора и не испортить его раньше времени.
Первое включение
После того, как аккумулятор заряжен и одет объектив, самое время включить фотоаппарат. Перед началом его использования потребуется первоначальная настройка, во время которой осуществляется выставление даты, часового пояса, языка и других системных параметров. По сути, первоначальная настройка фотоаппарата Canon не требует особых знаний или дополнительных инструкций. Устройство выдает на дисплее информацию, и пользователю нужно просто действовать согласно предложенным действиям.
После того, как первое включение будет закончено, фотоаппарат в большинстве случае попросит отформатировать карту памяти. Если карта новая, то такая необходимость появится точно. Сделать это можно тремя способами:
- с помощью ноутбука или компьютера;
- при непосредственном запросе фотоаппарата;
- через настройки.
Первый вариант подробно рассматривать смысла нет, так как он не самый лучший. Дело в том, что любая техника форматирует носитель под себя, и иногда случается ситуация, что отформатированная в ноутбуке карта памяти не читается фотоаппаратом. По этой причине делать это лучше всего с помощью той техники, в которой карта будет использоваться.
В том случае, когда карта новая, и фотоаппарат не понимает, как с ней работать, он просто напишет на дисплее, что нужно отформатировать носитель, и предложит сделать это прямо сейчас. В таком случае пользователю нужно просто согласиться.
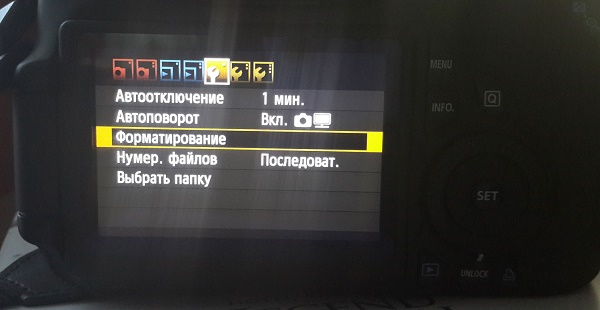
Если карта использовалась ранее или ее просто нужно почистить, то форматирование можно провести с помощью специальной опции в настройках. Для этого на самом устройстве следует нажать кнопку «Menu», после этого выбрать пункт с нарисованным ключом. В этом пункте меню можно менять все системные настройки, например, выставить заново дату, и в том числе отформатировать карту памяти.
Совет! Устройство предложит два типа форматирования: быстрое и обычное. Первый вариант подойдет для новых карт, второй для ранее использованных или тех, которые выдавали ошибки.
Режимы фотоаппарата
Любой фотоаппарат независимо от класса имеет разные режимы съемки. Часть из них автоматические, а вторая половина потребует настроить тот или иной параметр под конкретные условия съемки.
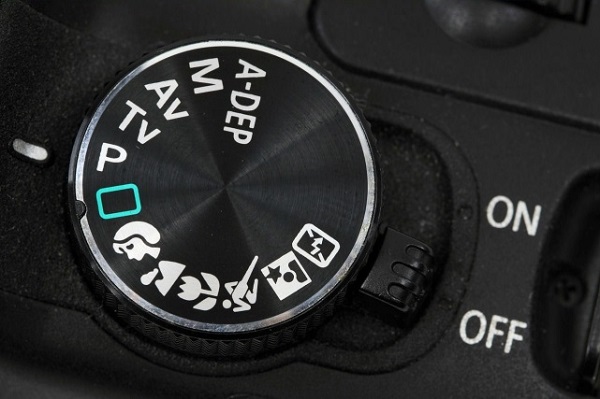
Все режимы фотоаппарата Canon можно увидеть на колесике прокрутки режимов — оно расположено сверху. Выбор режимов осуществляется его вращением. Белая короткая черта отмечает, какой режим выбран, соответственно, для выбора другого нужно прокрутить колесико до нужного варианта. Количество режимов может меняться в зависимости от модели. При этом уменьшиться или увеличиться они могут только за счет автоматических программ съемки. Полуавтоматические режимы неизменны — их всегда четыре.
К автоматическим режимам относятся макросъемка (цветок на колесе), спортивный режим (бегущий человек), портретная съемка (лицо человека), автомат (зеленый пустой прямоугольник) и другие. В этих режимах от пользователя требуется только навести камеру на объект и после фокусировки, которая также осуществляется автоматически, нажать на кнопку затвора.
Полуавтоматические режимы обозначены буквами M, Av, Tv, P. При работе с ними от фотографа потребуется определенное знание и понимание работы с диафрагмой и выдержкой. Однако и снимки здесь получатся более интересными.
Режим Р
Режим P или программный не отличается глобально от автоматики, но дает возможность пользователя регулировать диафрагму в ограниченных пределах. Также здесь есть возможность регулировать баланс белого.
Большинство опытных фотографов считают, что программный режим совершенно бесполезен. Производителя отмечают, что он поможет начинающим пользователям перейти от автоматики к ручным настройкам.
Режим Av
Av – приоритет диафрагмы. В данном случае пользователь сам выставляет размер диафрагмы, чтобы поэкспериментировать с количеством пропускаемого света и конечным изображением. Исходя из размера диафрагмы, камера сама выбирает время выдержки и делает снимок. С помощью данного режима можно влиять на глубину резкости.
Совет! При использовании не рекомендуется выставлять максимальные и минимальные значения диафрагмы, так как существенно повышается вероятность появления артефактов на фото.
С помощью данного режима можно настроить резкость и сделать размытый фон. Чтобы сделать предметы на фото более четкими, нужно выставить меньшее значение диафрагмы, если нужно размыть задний план и сфокусировать на главных объектах, то для выдержки выбирается большое значение.
Стоит понимать, что настройка диафрагмы зависит от объектива, который подключен к камере. Именно поэтому при смене оптики нужно выбрать не только объектив, но и задать под него новые параметры съемки. Еще один нюанс – на разных камерах один и тот же объектив может потребовать новых настроек.
Режим Tv
Tv – приоритет выдержки. В этом режиме пользователь выбирает время, которое диафрагма будет пропускать свет, соответственно сам размер диафрагмы выбирается автоматически. Использование такой функции незаменимо при съемке спортивных мероприятий или движущихся объектов. Также разное время выдержки может дать интересные эффекты, например, фото с проводкой. Режим понравится тем, кто любит фотографировать любое движение, независимо человек это, животное или природное явление.
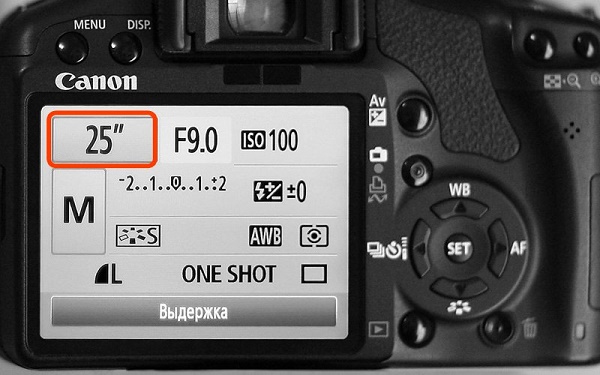
Режим М
M – ручной режим. С его помощью пользователь получает доступ к одновременной настройке диафрагмы и выдержки. Подходит для тех, кто точно знает, что делает, и чего хочет добиться. Режим особенно хорошо ночью, когда камера из-за темноты не понимает какую диафрагму и выдержку ей следует выставлять. Пользователь может сам выбрать параметры, которые ему нужны. В таком режим чаще всего работают профессионалы. Начинающие пользователю просто не разберутся, как влияет тот или иной параметр на фото.
Системные настройки
Фотокамеры Canon имеют широкий диапазон настроек. Это может касаться непосредственно процесса съемки, а также настроек камеры, например, формата, в котором будет сохраняться снимок, его размера и др. В системных настройках можно поставить таймер, синхронизировать вспышку или отформатировать карту памяти.
Качество и размер фото
Чтобы выставить конкретные настройки фотографии, необходимо нажать кнопку «menu» и выбрать пункт с нарисованным фотоаппаратом. Именно здесь доступны все настройки связанные с фото.

В зависимости от модели пункт, в котором можно выбрать качество фотографии, будет называться по-разному. Чаще всего название говорит само за себя: «качество». В камере Canon варианты обозначены буквами L, M, S1, S2, S3, RAW и RAW+L. Все буквенные варианты (L,M,S) сохраняются в формате JPEG и между собой подразумевают ухудшение качества от L к S3. Меняется не только качество фото, но и его размер, а также то, сколько он занимает на карте памяти. Очевидно, что лучше всего в данном случае выбрать вариант L.
Форматы RAW и RAW+L – это максимальное качество фото и его размер. Снимки сохраняются в RAW и занимают много места. Фото в данном формате напоминают электронный негатив, который несет информацию о фото, но не само изображение. Снимки в этом формате требуют обязательной обработки на ПК.
Преимущество формата заключается в том, что в нем можно получить более гибкие варианты обработки снимка в профессиональном редакторе на компьютере. Минус – занимают много места и не открываются без специальной программы.
Фокусировка изображения
Фокусировка изображения в фотоаппарате может быть ручной или автоматической. В первом случае пользователь все делает самостоятельно с мощью поворотных колец на объективе. Во втором случае работает автоматика. Чтобы переключиться с одного объекта на другой, следует нажать переключатель на объективе AF-MF. Режим AF в свою очередь делится еще на два варианта.
- AF-S – фокусировка по кадрам. Ее смысл в том, что камера фокусируется на выбранном объекте при легком нажатии на кнопку затвора. Лучше всего он подходит для съемки неподвижных объектов. Чтобы настроить фокус на новый объект, необходимо отпустить кнопку и заново навести фотоаппарат на предмет съемки.
- AF-C – непрерывная фокусировка. Ее смысл в том, что при нажатии на кнопку камера продолжает следить за объектом, даже если он перемещается. Очевидно, что удобнее использовать такой тип автофокуса при съемке спортивных событий.
Немаловажный момент – выбор точки фокусировки. Современные камеры предлагают от 9 до 50 точек. При этом есть главный объект, на котором осуществляется фокус, остальные точки фокусируются по другим предметам. Когда фотограф смотрит в видоискатель, он видит несколько точек, активная выделена красным цветом. Чтобы сделать активной точку фокусировки, которая совмещена с объектом, нужно использовать маленькое колесико на камере или кнопки навигации. На первый взгляд может показаться, что гораздо проще сместить камеру и таким образом совместить точки. Но есть нюанс: при изменении положения камеры меняется экспозиция, то есть вся задумка может быть испорчена. Используя клавиши навигации, пользователь может сделать несколько снимков одного объекта, но при этом фокусироваться каждый раз на новой точке.
Работа с выдержкой
Выдержка фотоаппарата – это параметр, который измеряется в секундах, а точнее долях секунды. Физический смысл выдержки заключается в том, что это время, за которое свет проходит сквозь диафрагму и попадает на матрицу. Очевидно, что чем больше времени свет попадает на матрицу, тем светлее получится снимок. Это важно при съемке в условиях плохого освещения, но есть и обратная сторона медали. Большое количество света может сделать снимок засвеченным и дать размытие в кадре. Чтобы получить эффект смазывания, следует поставить выдержку более длинную, если требуется резкость, то время выставляется минимальное. Регулировать выдержку можно в ручном режиме или приоритете выдержки.
Что такое баланс белого
Баланс белого – это корректность отображения цветов на снимке. Как известно, цветовой спектр может иметь более холодные или теплые значения.
Примером может служить фотография человека. При нормальном балансе белого кожа лица будет естественной. Если спектр скатывается к теплу, то кожа будет желтить, если к холодной части, то все фото будет отдавать синевой.
Очевидно, что в зависимости от освещения спектр может меняться, и фото будет иметь неестественные цвета. Солнечные лучи или лампа накаливания имеют теплые тона, а вот лампа дневного освещения делает изображение «холодным». И вот именно в таких ситуациях требуется регулировка баланса белого света.
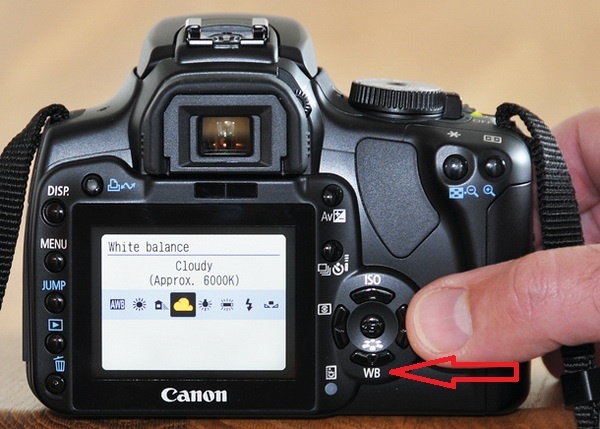
Все камеры Canon имеют специальную кнопку WB, которая открывает меню настройки баланса белого цвета. Здесь есть вариант выбрать уже предустановленные режимы, которые обозначены схематичными рисунками. Например, солнце означает оптимальные настройки для съемки на улице в дневное время. Аналогичным образом выбираются автонастройки для других ситуаций.
Однако камера дает возможность не только использовать предустановленные варианты, но и осуществить регулировку самостоятельно. Этот процесс аналогичен использованию светофильтров и не подойдет любителям. Для этого необходимо нажать кнопку «menu», выбрать пункт с нарисованной камерой и там найти строку «Сдвиг ББ». Далее на дисплее открывается экран коррекции, который поделен на четыре части двумя прямыми. Каждая из них обозначена буквами:
- A — янтарь,
- M — пурпур,
- G — зеленый цвет.
Сдвиг курсора (на экране отображается, как черный квадрат) приводит к усилению одного из этих цветов или их комбинации.
Как выставить дату на фото
Иногда бывают ситуации, когда требуется, чтобы на фотографии отображалась дата и время снимка. В современных зеркальных фотоаппаратах такой функции уже нет, так как в целом дата портит фотографию, и при особой необходимости ее можно поместить на фото при распечатке снимков. Программа печати извлекает дату и время из информации о фотографии и помещает в угол. В более простых устройствах, например, компактных фотоаппаратах, данная функция есть. Выставить дату можно в меню настроек фотографии. Следует найти пункт «Отображать дату и время на фото». При этом предварительно пользователь сможет настроить формат даты и времени.
Фото с таймером
Сделать селфи на зеркальном фотоаппарате достаточно сложно. Именно для этого производители предусмотрели таймер, который выставляется на несколько секунд и делает снимок по истечению этого времени. Для использования функции фотоаппарат необходимо предварительно надежно установить, в идеале на штатив, выбрать экспозицию, проверить, чтобы все попало в кадр, и после этого выбрать таймер и время срабатывания с помощью специальной кнопки на корпусе. Кнопка отмечена значком часов. Благодаря тому, что устройство издает звуковой сигнал после каждой секунды, можно точно знать через, сколько сработает затвор и успеть занять свое место.

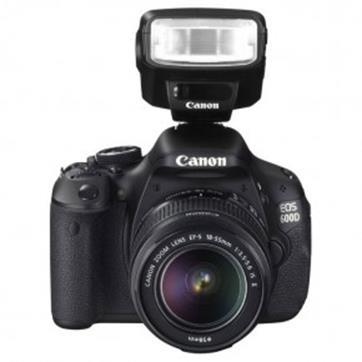
Использование вспышки
Вспышки для фотоаппарата бывают двух типов – встроенная и внешняя. Первая встроена непосредственно в тушку камеры и открывается при необходимости. В автоматическом режиме процесс регулируется самой камерой, в ручном режиме включить вспышку можно с помощью специальной кнопки (молния), которая расположена обычно рядом с самой вспышкой.
Как работает вспышка
Основной момент, который следует знать о работе вспышки – это ее мощность. Очевидно, что светить с одной мощностью она не может, так как уровень освещения может быть разный. По этой причине вспышка работает в три этапа:
- определение уровня освещения;
- экспонирование кадра;
- снимок.
Иными словами, вспышка срабатывает очень быстро три раза подряд. При этом снимок делается на третью вспышку, и около 10% людей имеют высокую чувствительность к свету и замечают первые две вспышки. Таким образом, на фото такие люди получаются с закрытыми или полузакрытыми глазами. Процесс определения и экспонирования называется TTL. Профессиональные фотографы знают, что TTL можно отключить, и тогда мощность приходится подбирать вручную. Это достаточно сложно, но более удобно, и в данном случае можно выбрать оптимальную мощность вспышки.
Особенности внешней вспышки
Внешняя вспышка имеет ряд преимуществ перед встроенной.
- Она более мощная, может быть направлена под углом или сверху, что делает освещение и тени более естественными.
- Еще одно достоинство – дальность действия. Стандартная вспышка может осветить объект в пределах 4-5 метров перед собой.
- Внешняя вспышка обеспечивает более гибкую настройку освещения.
Совет! При настройке вспышки необходимо выставить значение выдержки. Учитывая, что в момент снимка света на объект поступать будет больше, выдержка большая не нужна, кроме случаев, когда это делается для получения необычного эффекта. По мнению опытных фотографов, оптимальное время выдержки при съемке со вспышкой – 1/200-1/250.
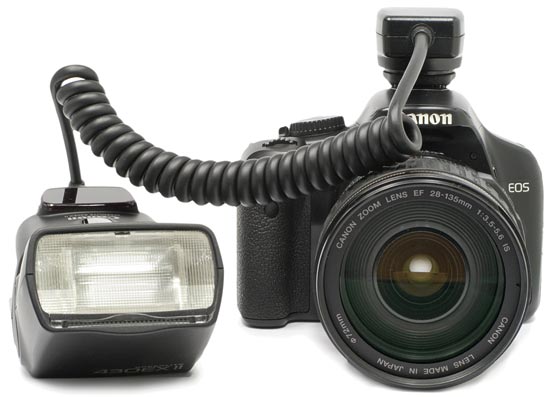
Есть два варианта внешней вспышки – беспроводная и проводная. Второй вариант подключается непосредственно к камере через специальный разъем для подключения. Выглядит он как металлическое гнездо на верхней части фотоаппарата. Нередко он закрыт пластиковой заглушкой. Подключить вспышку можно с помощью специального кабеля, который позволит немного отдалить вспышку от камеры. Длина кабеля у компании Canon составляет 60 см. Беспроводной вариант самый удобный, так как фотографу не мешают шнуры. В данном случае в паз для вспышки вставляется специальный передатчик, который отправляет на вспышку сигнал о том, что нужно сработать. На этом передатчике находятся все кнопки управления мощностью.
Что такое синхронизация
В настоящее время синхронизация вспышки потеряла свою актуальность, так как весь процесс является автоматическим. Задача пользователя — просто сделать внешнюю вспышку зависимой от основной. Перед тем, как подключить внешнюю вспышку к фотоаппарату Canon, пользователю нужно в настойках фотоаппарата выставить «главной» его штатную вспышку. Для этого следует несколько секунд подержать кнопку «zoom», далее с помощью колесика прокрутки нужно выбрать надпись «master» и подтвердить выбор нажатием на центральную кнопку. На вспышке нужно аналогичным образом выбрать «slave». Теперь она подчиняется основной и реагирует на ее импульсы.
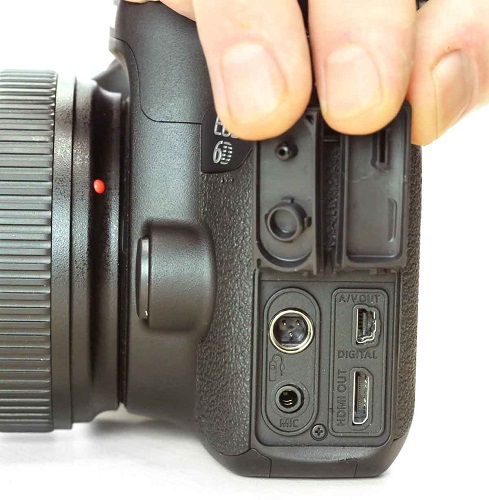
Подключение микрофона
Для профессиональной съемки на видео праздника обязательно потребуется внешний микрофон. Большинство современных зеркальных фотоаппаратов имеют целый набор необходимых разъемов. Здесь есть аудио-видеовыход, разъем для микрофона, mini-HDM и другие. Соответственно, подключить микрофон к фотоаппарату Canon можно через разъем с надписью «mic». Все настройки в камере сводятся только к тому, чтобы выбрать, в каком варианте нужно писать звук – моно или стерео. Этот пункт находится в меню настроек в разделе видео.
Как проверить пробег фотоаппарата
Пробег фотоаппаратов – это количество срабатываний затвора, что в свою очередь дает понять степень изношенности аппарата.
Для бюджетных устройств нормальным параметром является 15 тысяч кадров, после этого в любой момент можно ждать поломки, хотя это и не значит, что она случится в 100% случаев. У моделей дорогого и среднего сегмента данный параметр достигает 150 и даже 200 тысяч.
Долгое время узнать пробег фотоаппарата Canon можно было только посредством разбора тушки. Очевидно, что способ не самый простой и опасный, ведь разобрать легко, а сделать, как было — не очень. В настоящее время появились более простые способы посмотреть пробег, а именно воспользоваться компьютерными программами.
Информацию о пробеге можно увидеть либо зашитыми в фотографию, либо непосредственно в тушке устройства. Следует сразу отметить, что фирма Canon предпочитает не вставлять такую информацию в фотографии. Есть ограниченное число моделей, которые зашивают данные в фотоаппарат. Таким образом, поможет только проверка самого устройства. Лучшими вариантами в настоящее время являются программы EOSMSG и EOSInfo. Программы распространяются бесплатно и для их использования достаточно только установить их на ПК. После этого камера Canon подключается с помощью USB кабеля. В некоторых случаях ноутбук может не увидеть камеру, тогда потребуется установка драйверов или специальной программы, которая помимо подключения обеспечивает управление фотоаппаратом Canon с компьютера. После подключения фотокамеры к ПК и запуска программы в открывшемся окне нужно найти пункт ShutterCount (ShutCount), который и показывает количество срабатываний затвора.
Некоторые камеры не имеют возможности проверить этот параметр в домашних условиях. В таком случае лучшим решением будет обращение в сервисный центр, чтобы диагностика показала состояние устройства. Так стоит поступить, если планируется приобрести камеру с рук, а никакой информации о предыдущей ее эксплуатации нет. Сервисный центр сможет дать ответ, насколько камера хорошо сохранилась, и сколько еще сможет прослужить.
Зеркальные фотоаппараты – это хрупкие устройства, которые могут выйти из строя по самым разным причинам. Чтобы избежать поломки, нужно аккуратно относиться к фотоаппарату и оптике, использовать защитный чехол, чистить поверхности линзы, а также при раздельном хранении оптики и тушки закрывать места соединения специальной крышкой.
- Попадание влаги. Влага является очень опасным веществом для фотоаппарата. Устройству не обязательно попадать под дождь или намокать, чтобы испортиться. Его длительное нахождение во влажном помещении может привести к окислению внутренних деталей и поломке. Если возникли опасения, что произошло что-то подобное, то следует положить устройство в теплое и сухое место, а потом отнести в мастерскую.
- Механические повреждения. Удары и падения не способствуют нормальной работе зеркальной камеры. Самыми хрупкими элементами в ней является зеркало, которое легко может разбиться, а также объектив, в котором может выйти из строя система фокусировки. Если камера не может навести фокус, то в результате удара произошла поломка в объективе. При этом в ремонт нести лучше всего все устройство.
- Попадание частиц пыли. Частые неисправности фотоаппарата Canon связаны с попаданием песка и пыли внутрь камеры. Это может привести к полной поломке, но гораздо чаще к посторонним шумам во время работы объектива (фокусировки) или его блокировке. В данном случае поможет только чистка фотоаппарата, и лучшим решением станет обращение в профессиональный сервисный центр.
- Несоблюдение теплового режима. Любая камера имеет диапазон рабочих температур. При их несоблюдении устройство вполне может выйти из строя из-за сгорания того или иного механизма. Самостоятельно такую проблему решить невозможно.
- Устройство выдает ошибки. Надпись «busy» может появиться при использовании карты памяти с низкой скоростью, в случае, если внешняя вспышка не успела зарядиться от тушки. В целом перевести эту надпись можно, как «занято»: камера намекает, что какой-то процесс еще не завершен, и нужно немного подождать. Если камера не видит карту памяти или отказывается сохранять на нее данные, то следует провести форматирование или посмотреть, не стоит ли на карте блокировка.
Продлить срок службы камеры очень просто. В первую очередь необходимо приобрести чехол, который позволит защитить устройство от ударов и падений.
Совет! Не стоит перевозить камеру и объектив в собранном виде. Лучше всего на момент транспортировки разбирать фотоаппарат.
Если камера долго не используется, то батарею лучше вытащить и периодически ее разряжать и заряжать. Камеру следует хранить в теплом и сухом месте, а также избегать попадания на нее пыли или песка. Для чистки устройства нужно использовать только специальные наборы, которые позволяют бережно удалить пыль и мусор с объектива и прочих узлов техники.

Зеркальная камера – это серьезное устройство, которое требует к себе такого же подхода. Нельзя просто купить камеру и начать снимать. Чтобы понять, как ей пользоваться, разобраться с функциями и настройками, продлить срок службы, не нужно спешить на дорогостоящие курсы. Для начала вполне хватит знакомства с инструкцией, где подробно расписано, что и как можно делать с фотоаппаратом.
Canon EOS 550D оснащена 18-МП сенсором и процессором Digic IV. Эта камера предлагает расширенный до 12800 диапазон чувствительности ISO, доступный в специальном режиме, улучшенную технологию подавления шумов и встроенные функции по редактированию фотографий. Производитель оснастил EOS 550D рядом возможностей, ранее доступным лишь владельцам профессиональных моделей. Размер ЖК-дисплея составляет 3 дюйма, а его разрешение – 1040 тыс. пикселей. Камера оснащена разъемом HDMI для подключения к компьютерным мониторам и телевизорам высокой четкости.
Обзор на фотокамеру Canon EOS 550D
В феврале 2010 года, японская компания по производству фото и видеотехники «Canon» предоставила фотолюбителям новую зеркальную фотокамеру модели «Canon EOS 550D», имеющую разрешение в 18 Мегапикселей. Специальная матрица «APS-C CMOS» даёт ей возможность почувствовать себя корифеем фото-видео-съёмки даже непрофессионалу, благодаря процессору обработки изображения «DIGIC 4» и видеосъёмки в формате Full HD.
Фотокамера «Canon EOS 550D» поддерживает настройку чувствительности от 100 до 6400. Использование четырнадцати битной обработки изображения делает практически незаметными цветовые переходы, что является важным параметром во время просмотра и печати снимков.
Зачастую возникает необходимость запечатлеть некоторые моменты во время движения, либо фотографируемого объекта, либо самого фотографа. Здесь на помощь придёт режим мультисъёмки со скоростью 3,7 кадра в секунду. Далее, при просмотре снимков, можно выбрать наиболее понравившийся кадр.
«Canon EOS 550D» позволяет делать высококачественные снимки даже в условиях сложной освещённости. Такой момент достигнут, благодаря внедрению технологий, используемых в дорогих профессиональных аппаратах, в более дешёвые, предназначенные для широкого круга потребителей.
Как говорилось выше, модель камеры «Canon EOS 550D» позволяет производить видеосъёмку в формате Full HD. Многим любителям недостаточно одних только фотоснимков. Они видят себя в роли кинооператоров или репортёров.
Фотокамера «Canon EOS 550D» даёт такую возможность. Разрешение 1920х1080р HD позволяет устанавливать частоту кадров от 24 до 30 в секунду. А при включении режима в 720р 50-60 кадров в секунду. Также дополнительный разъём 3,5мм позволяет добавить стереомикрофон для звукового сопровождения видеосъёмки. Если нужно снять какое-нибудь удалённое событие, то здесь придёт на помощь «Movie Crop» — функция видео-кадрирования, увеличивающая изображение раз в семь. Также на фотокамере есть возможность просматривать фото и видеоизображения на телевизорах, поддерживающих HD, благодаря порту HDMI. При этом, просмотр ведётся с помощью обычного телевизионного пульта.
Перенести свои шедевры с камеры «Canon EOS 550D» можно беспроводным способом, при помощи функции «Eye-Fi connected». Фотокамера имеет пульт дистанционного управления. С его помощью фотограф дистанционно может управлять аппаратом с расстояния до пяти метров, если у него появилось желание самому поучаствовать в фотосессии.
В заключении можно добавить, что фотокамера «Canon EOS 550D» — это ещё один шаг компании «Canon» на пути к сочетанию высоких технологий, удобства и простоты управления этими самыми технологиями.
Матрица
- Общее число пикселей — 18.7 млн
- Число эффективных пикселей — 18 млн
- Тип матрицы — CMOS
- Физический размер матрицы — 22.3 х 14.9 мм
- Кроп-фактор — 1.6
- Максимальное разрешение фотоснимка — 5184×3456
- Соотношение сторон — 3:2
- Минимальная чувствительность (ISO) — 100
- Максимальная чувствительность (ISO) — 1600
- Функция очистки матрицы — есть
Объектив
- Объектив в комплекте — нет
- Байонет — Canon EF/EF-S
Затвор
- Минимальная выдержка — 1/4000 с
- Максимальная выдержка — 30 с
- Выдержка X-Sync — 1/200 c
- Время работы таймера, с — 10 с, 2 с
Режимы съемки
- Скорость съемки — 3.7 кадр./сек
- Максимальная серия снимков (JPEG) — 34
- Максимальная серия снимков (RAW) — 6
- Форматы файлов изображений — JPEG, RAW
Вспышка
- Расстояние действия встроенной вспышки — до 13 м
- Функции встроенной вспышки — подавление эффекта красных глаз
- Управление внешней вспышкой — E-TTL II
- Брекетинг вспышки — есть
Баланс белого
- Тип баланса белого — из списка, ручная установка, автоматический, брекетинг
Фокусировка
- Подсветка автофокуса — есть
Экспозиция
- Автоматическая обработка экспозиции — с приоритетом выдержки, с приоритетом диафрагмы
- Экспокоррекция — +/- 5 EV с шагом 1/3 ступени
- Замер экспозиции — мультизонный, точечный, общий (Evaluative), центровзвешенный
- Видоискатель и ЖК-экран
Видоискатель — зеркальный (TTL)
- Поле зрения видоискателя — 95%
- Диагональ ЖК экрана — 3″
- Число пикселей ЖК экрана — 1040000
Коммуникация и хранение данных
- Wi-Fi — нет
- GPS — нет
- Форматы поддерживаемых карт памяти — SDXC, SDHC, SD
Габариты, вес
- Ширина — 129 мм
- Высота — 98 мм
- Глубина — 62 мм
- Вес с элементами питания — 530 г
Содержание
- Учимся фотографировать на Canon
- Что означают цифры и буквы в марке твоей камеры?
- Как правильно фотографировать: Canon для новичков
- Учимся правильно выставлять настройки Canon
- Как фотографировать на Canon, используя всю мощность камеры?
Учимся фотографировать на Canon
Ах, эти чудесные камеры Canon, которые так и просятся на ручки! Каждый, кто работает в поте лица, откладывая ассигнации на заветный EOS, знает, что делает. Фотоаппараты Canon отличаются высокой скоростью производительности, завидной автофокусировкой, высоким качеством изображения и просто магической цветопередачей. Именно поэтому многие фотографы (как новички, так и олдскульщики) могут часами размазывать слюни по витрине, разглядывая мощнейшие коробки и объективы.
Так как ты уже владеешь мечтой и жаждешь научиться ею управлять, предлагаем в рамках общего развития разобраться в марках фотоаппаратов Canon.
Что означают цифры и буквы в марке твоей камеры?
Большинство «начинающих фотографов», считающих себя как минимум Лежеком Бужновски, не имеют ни малейшего понятия о том, как расшифровывается EOS. Стоит спросить такого «профессионала» что означает буковка D в марке его фотоаппарата, так он со смущенным видом незаметно пытается зайти в Википедию. Что ж, возможно, настоящему таланту эти знания и не нужны, и подобное запоминает только тот, кто любит блеснуть в компании друзей, но мы считаем, чтобы научиться фотографировать, Canon ты должен знать назубок.
- Аббревиатура EOS (Electro-Optical System) созвучна с именем богини зари Эос, которую можно встретить в древнегреческой мифологии. Первой камерой из этой серии стала Canon EOS 650, которая увидела свет аж в 1987 году.
- Буква D в названии означает Digital.
- Фотоаппараты, в названии которых есть 3 или 4 цифры (EOS 400D, EOS 1000D) позиционируются как камеры для начинающих.
- Если в названии одна или две цифры, но при этом они не начинаются на единицу (EOS 33V, EOS 30D), то перед тобой полупрофессиональная камера.
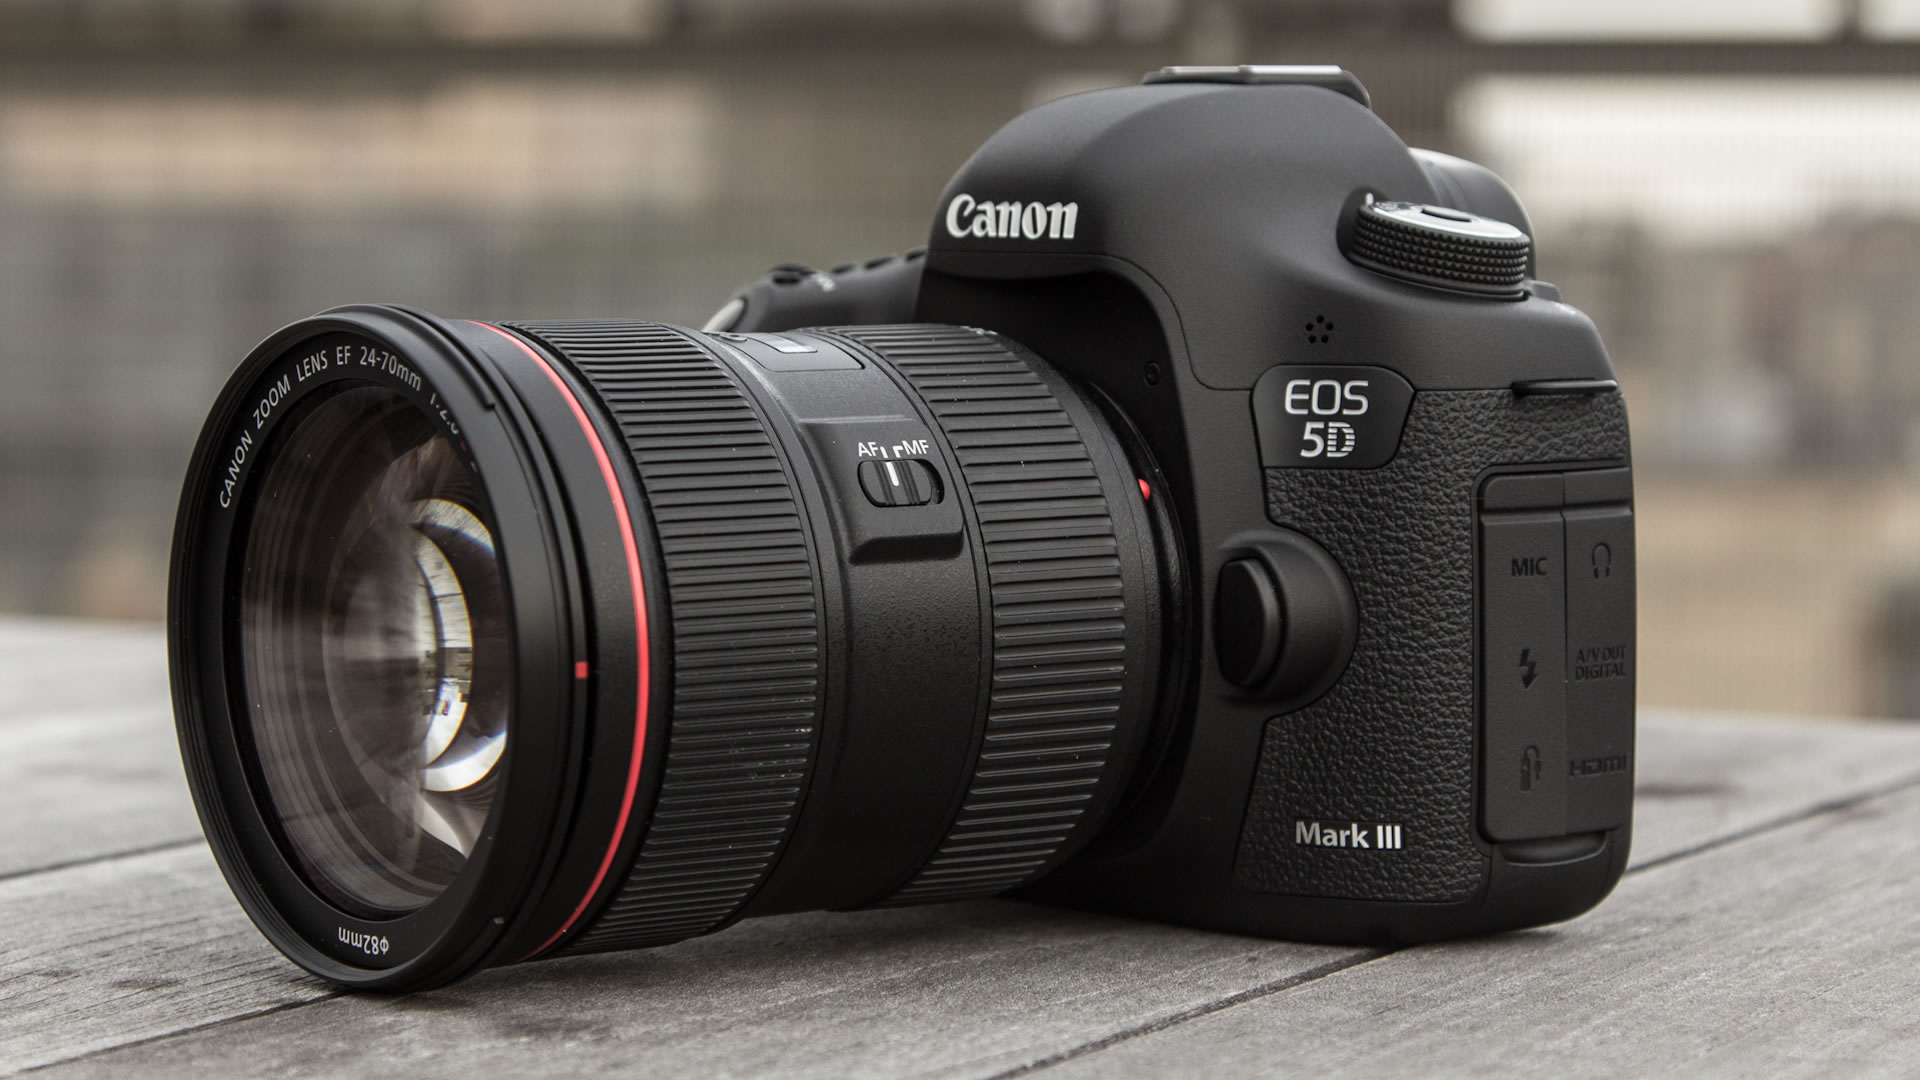
- Canon для профессионалов это: EOS 5D Mark III, EOS 1D X, EOS 1D C.
Как правильно фотографировать: Canon для новичков
Известно, что в Авто-режиме камера самостоятельно выбирает настройки таким образом, чтобы в итоге получилось годная экспозиция. Но стоит учесть, что если снимать при сложном освещении, то даже самая крутая камера не всегда сможет справиться со своей задачей. Более того, ты хочешь узнать, как фотографировать зеркалкой Сanon, используя все возможности, а не просто рандомно нажимать на кнопочку и ждать, когда же тебе повезет. Сделать хорошую фотографию можно только после того, как освоишь основные настройки. Уже потом ты интуитивно разберешься с тем, как фотографировать на 500d, 550d, 7d, 1100d, 600d, 650d, 60d, 1000d и прочие «d».
Существуют три основные настройки и все они, так или иначе, связаны со светом:
- Диафрагма – это размер «отверстия», открываемого камерой, который пропускает свет. Чем больше открыта диафрагма – тем больше света на снимке: тут все логично.
- Выдержка – это то время, на которое ты открываешь доступ света к матрице фотоаппарата.
- Светочувствительность (ISO) – чем выше светочувствительность, тем больше света принимает матрица.
Учимся правильно выставлять настройки Canon
Диафрагма твоего фотоаппарата обозначается как «f/» + цифра, которая будет демонстрировать насколько открыто/закрыто «отверстие», пропускающее свет. Хочешь размытый фон – открой диафрагму, желаешь получить полностью четкий снимок – закрой. Чем сильнее открыта диафрагма, тем меньше цифра рядом с «f/».
Регулируя значение диафрагмы, ты сможешь сфокусироваться на определенном объекте и обратить внимание зрителя на выбранный тобою предмет. Как здесь:

Открытая диафрагма просто потрясающе «работает» на снимках с бабочками, цветами и мелкими предметами. Как правильно фотографировать портрет? Сanon с открытой диафрагмой – нет ничего проще. Необходимо визуально выделить человека на фоне остальных? Опять же – Canon с открытой диафрагмой.
Закрывать диафрагму нужно при съемке толпы, пейзажа и улиц, в общем, везде, где нужно, чтобы вся картинка была в фокусе.
На курсах нашей Фотошколы студенты часто спрашивают: как фотографировать с выдержкой? Сanon лучше всего подойдет для того, чтобы освоить данную настройку. Для начала тебе необходимо определится с тем, каким образом ты хочешь запечатлеть движение? Ведь чем длиннее выдержка, тем больше движения успеет зафиксировать камера, короткая выдержка – напротив, остановит мгновение.
Длинная выдержка используется во время съемки ночного города, однако стоит прибегнуть к помощи штатива. Также с длинной выдержкой делают вот такие интересные фотографии:

Что касается короткой выдержки: она хороша при съемке падающих объектов.
Светочувствительность измеряют в единицах ISO со значениями 100, 200, 400, и так далее вплоть до 6400. Более высокие значения используют в том случае, если съемка проходит при плохом освещении, но зачастую на снимках появляются шумы (мелкие точечки).
Итак, прежде, чем баловаться с этой настройкой определись:
- Хватает ли тебе света для того, чтобы сделать фотографию при минимальном значении ISO?
- Хочешь ли ты получить снимок с шумом или нет? Черно-белые картинки с шумом достаточно круто выглядят, однако цветные снимки это порой портит.
- Если у тебя есть штатив или любая другая возможность закрепить камеру? Светочувствительность можно компенсировать, сделав выдержку более длинной, но тогда без штатива не обойтись.
- Если предмет твоей съемки непрерывно движется, то ISO просто необходимо поднять для того, чтобы фотография не смазалась.
Высокое ИСО тебе придется ставить в следующих случаях:
- Спортивные игры, танцы, детский праздник в помещении. В общем, тогда, когда короткая выдержка просто необходима.
- В помещениях, где запрещают использовать вспышку.
- Тот момент, когда именинник готовиться задуть свечи на праздничном торте. Вспышкой можно испортить уютный свет и все настроение момента, а поэтому просто увеличите светочувствительность камеры.
Как фотографировать на Canon, используя всю мощность камеры?
Ежедневные наблюдения показывают: подавляющее большинство владельцев зеркальных камер снимают только в режиме Auto — зеленый квадратик. И этот безрадостный факт делает столь дорогую покупку просто бессмысленной. Предположим, ты заплатил за свой Canon 600d около 27 00 тысяч рублей, но на авто-режиме твоя камера отрабатывает лишь 5400, т.е. возможности отличной зеркальной камеры используются всего на 20%. Ты хочешь научиться фотографировать на Canon 600d и другие модели? Хочешь использовать свою камеру на сто процентов? Тогда запоминай, а лучше записывай.
В этой части мы будем обсуждать работу со следующими режимами: P, A (или Av), S (или Tv), M, A-Dep. Эти режимы являются отличными помощниками для новичков, которые пока не знают как фотографировать на свой Canon, да и вообще не ведают, что творят. Опытные фотографы также очень уважают эти режимы за то, что они значительно экономят их время.
1.Самый простой режим – это режим P (программная автоэкспозиция). Этот режим поможет тебе получить хорошую экспозицию кадра, подобрать значения диафрагмы и выдержки в зависимости от того, какое ИСО ты выставишь. Это невероятно удобно для начинающих фотографов, которые пока только экспериментируют со светочувствительностью.
Также ты можешь менять значения экспопары (экспозиционные параметры выдержки и диафрагмы), к примеру, на фотоаппарате Canon 550d это можно сделать легким движением прокрутки ролика. Если тебе нужно поставить более короткую выдержку, то достаточно просто прокрутить ролик направо, при этом камера слегка призакроет диафрагму, сохраняя экспозицию на том же уровне. Это позволит тебе сфотографировать любой падающий предмет, который на снимке просто застынет в воздухе.

2. Режим A или Av – приоритет диафрагмы.
Вся суть этого режима в том, что он позволяет контролировать силу размытия фона на снимке. Тебе нужно самостоятельно задать значение ISO и отрегулировать диафрагму, а вот нужную выдержку фотоаппарат выставит таким образом, чтобы в итоге получился хороший кадр. Здесь нужно решить, хочешь ли ты получить размытый фон, затем поставить подобающее значение диафрагмы, а все остальное дело за камерой. Удобно, правда?
Снимая портрет на Canon, поставь ИСО и полностью открой диафрагму (самая маленькая цифра), чтобы получить размытый фон, а выдержку фотоаппарат выставит сам.

3. Режим S или Tv – приоритет выдержки.
Действует абсолютно так же, как и предыдущие режимы: задаешь ИСО, а значение диафрагмы остается на совести камеры.
Для того, чтобы попрактиковаться в использовании этого режима найди любой движущийся объект (человек, кошка, машина, фонтан): поставь короткую выдержку – так ты получишь четкую фотографию объекта «остановленного» в кадре. Теперь сделай выдержку подлиннее, поставь камеру на любую устойчивую поверхность и нежно нажми на кнопку. скорее всего, ты получиim красивый «смаз», отображающий красоту динамики движения.
4.И последний режим – A-DEP (приоритет глубины резкости). Он, кстати, есть не на всех камерах. Этот режим позволяет камере устанавливать диафрагму и выдержку таким образом, чтобы все объекты, попавшие в фокус, были достаточно резкими.
Стоит добавить, что стоит тебе хотя бы немножко побаловаться с ручными настройками или же полуавтоматическими режимами, то к «зеленому квадратику» ты ни за что уже не вернешься.
Если, прочитав эту статью, у тебя все еще остались вопросы о том, что все-таки делать со своей камерой и как фотогравировать на Canon, то преподаватели нашей Фотошколы будут рады видеть тебя на своих курсах.
-
Contents
-
Table of Contents
-
Troubleshooting
-
Bookmarks
Quick Links
Related Manuals for Canon DS126061
Summary of Contents for Canon DS126061
-
Page 1
INSTRUCTION MANUAL… -
Page 2
Before using the camera, take a few test shots and check that the images are properly recorded on the memory card. If the camera or memory card is faulty and the images cannot be recorded or read by a personal computer, Canon cannot be held liable for any loss or inconvenience caused. Copyrights Copyright laws in your country may prohibit the use of your recorded images of people and certain subjects for anything but private enjoyment. -
Page 3: Item Check List
* Be careful not to lose any of the above items. * No CF card (for recording images) is included. Please purchase it separately. CF cards made by Canon are recommended. Lens (with lens cap and dust cap) * Lens kit only.
-
Page 4: Table Of Contents
Contents Introduction Item Check List…3 Handling Precautions …8 Nomenclature …10 Conventions Used in this Manual …16 Getting Started Recharging the Battery…18 Installing and Removing the Battery …20 Using a Household Power Outlet …22 Mounting and Detaching a Lens…23 Installing and Removing the CF Card…24 Basic Operation …26 Menu Operations …29 Setting the Language …33…
-
Page 5
CF Card Reminder … 90 Flash Photography Using the Built-in Flash … 92 Using EOS-Dedicated, External Speedlites … 97 Using Non-Canon Flash Units… 98 Image Playback Setting the Image Review Time … 100 Auto Image Rotation… 101 Setting the LCD Brightness … 102 Image Playback… -
Page 6: Safety Warnings
Safety Warnings Follow these safeguards and use the equipment properly to prevent injury, death, and material damage. Preventing Serious Injury or Death • To prevent fire, excessive heat, chemical leakage, and explosions, follow the safeguards below: — Do not use any batteries, power sources, and accessories not specified in this booklet.
-
Page 7
• Do not use paint thinner, benzene, or other organic solvents to clean the equipment. Doing so may cause fire or a health hazard. If the product does not work properly or requires repair, contact your dealer or your nearest Canon Service Center. -
Page 8: Handling Precautions
The camera is not waterproof and cannot be used underwater. If you accidentally drop the camera into water, promptly consult your nearest Canon Service Center. Wipe off any water droplets with a dry cloth. If the camera has been exposed to salty air, wipe with a well-wrung wet cloth.
-
Page 9
¡ Always store your CF cards in a case to protect the data stored on them. ¡ Non-Canon CF cards may not be able to record and playback images. Using Canon CF cards is recommended. ¡ Do not bend the card or subject it to any excessive force or physical shock. -
Page 10: Nomenclature
Nomenclature For detailed information, reference page numbers are provided in parentheses (p.**). <E> AF mode selection/ White balance selection button (p.64/50) <R> Drive mode selection/ISO speed button (p.72/49) <Q> Metering mode selection/Flash exposure compensation button (p.71/96) <6> Main Dial (p.27) Shutter button (p.26) Red-eye…
-
Page 11
Dioptric adjustment knob (p.38) Eyecup (p.89) Viewfinder eyepiece <M> Menu button (p.29) <B> Info/ Trimming orientation button (p.62,103/129) <C> Jump button (p.107) <x> Playback button (p.103) <L> Erase button (p.112) LCD monitor (p.32) <4> Power switch (p.26) Tripod socket <0> Setting button (p.29) <9>… -
Page 12: Lcd Panel
Nomenclature LCD Panel Shutter speed Busy (buSY) Built-in flash recycling (buSY) ISO speed gISO speed White balance Q Auto W Daylight E Shade R Cloudy Y Tungsten light U White fluorescent light I Flash O Custom P Color temperature 2 White balance correction Battery check MBeeper…
-
Page 13
Viewfinder Information Focusing screen <A> AE lock/FE lock AEB in-progress <D> Flash-ready Improper FE lock warning <O> High-speed sync (FP flash) <y> Flash exposure compensation Shutter speed FE lock (FEL) Busy (buSY) Built-in flash recycling (D buSY) The actual display will show only the applicable items. Partial metering circle Exposure level indicator Exposure compensation amount… -
Page 14
Nomenclature Mode Dial The Mode Dial is divided into two function zones. q Basic Zone All you do is press the shutter button. 1 : Full Auto (p.40) For fully automatic shooting. Image Zone Allows you fully automatic shooting for specific subjects. : Portrait (p.42) 3 : Landscape (p.42) : Close-up (p.42) -
Page 15
Nomenclature Battery Charger CG-580 This is a battery pack charger. (p.18) Power plug Battery pack slot Red lamp Battery Charger CB-5L This is a battery pack charger. (p.18) Battery pack slot Power cord Red lamp Power cord socket… -
Page 16: Conventions Used In This Manual
¡The asterisk M on the right of the page title indicates that the respective feature is available only in Creative Zone modes ( , 8). ¡The Canon EF-S17-85mm f/4-5.6 IS USM lens is used as the sample lens in this Instruction Manual. ¡The procedures assume that the menu settings and Custom Functions are set to the default settings.
-
Page 17: Getting Started
Getting Started This chapter explains a few preliminary steps and basic camera operations. Attaching the Strap Pass the end of the strap through the camera’s strap mount from the bottom. Then pass it through the strap’s buckle as shown in the illustration.
-
Page 18: Recharging The Battery
Recharging the Battery For details on the battery, refer to the instructions for Battery Pack BP-511A. <–> mark CG-580 CB-5L Remove the cover. ¡ When you remove the battery from the camera, be sure to reattach the cover to protect against short circuit. Attach the battery.
-
Page 19
Recharge Leve l Red lamp 0-50% Blinks once per second 50-75% Blinks twice per second Blinks three times 75-90% per second 90% or higher Lights on ¡ Do not recharge any battery pack other than Battery Pack BP-511A, BP- 514, BP-511, or BP-512. ¡… -
Page 20: Installing And Removing The Battery
Installing and Removing the Battery Installing the Battery Load a fully charged BP-511A battery pack into the camera. Battery Pack BP-514, BP-511, or BP-512 can also be used. Checking the Battery Level When the <4> switch is set to <1> or <J> (p.26), the battery level will be indicated at one of three levels.
-
Page 21: Removing The Battery
Battery Life Temperature At 20°C / 68°F At 0°C / 32°F ¡ The figures above are based on a fully-charged BP-511A and CIPA (Camera & Imaging Products Association) testing criteria. ¡ The actual number of shots may be fewer than indicated above depending on the shooting conditions.
-
Page 22: Using A Household Power Outlet
Using a Household Power Outlet With AC Adapter Kit ACK-E2 (optional), you can connect the camera to a household power outlet and not worry about the battery level. Do not connect or disconnect the power cord while the camera’s <4> switch is set to <1>…
-
Page 23: Mounting And Detaching A Lens
Mounting and Detaching a Lens Mounting a Lens EF-S Lens mount index EF lens mount index Detaching the Lens When attaching or detaching the lens, take care to prevent dust from entering the camera through the lens mount. Remove the caps. ¡…
-
Page 24: Installing And Removing The Cf Card
¡ Slide the cover as shown by the arrow to open it. Insert the CF card. ¡ Using Canon CF cards is recommended. ¡ If the CF card is inserted in the wrong way, it may damage the camera. As shown by the arrow,…
-
Page 25: Removing The Cf Card
Removing the CF Card Access lamp ¡ A blinking access lamp indicates that data is being read, written, or erased on the CF card or that data is being transferred. Never do the following while the access lamp is lit or blinking. Such actions may destroy the image data.
-
Page 26: Basic Operation
Basic Operation Power Switch The camera can operate only after the <4> switch is turned on. ¡ To save battery power, the camera turns off automatically after 1 minute of non-operation. To turn on the camera again, just press the shutter button. ¡…
-
Page 27
¡ If you press the shutter button halfway and (0) elapse, you must press it halfway again and wait a moment before pressing it completely to take a picture. If you press the shutter button completely without pressing it halfway first or if you press the shutter button halfway and then press it completely immediately, the camera will take a moment before it takes the picture. -
Page 28
Basic Operation Operating the <5> Dial The < > dial is mainly used for shooting-related settings and selecting LCD monitor items. When you want to use the < shooting, set the <4> switch to <J> first. You can also operate (1) when the <4> switch is set to <1>. Operating the <9>… -
Page 29: Menu Operations
Menu Operations By setting various optional settings with the menus, you can set the image recording quality, processing parameters, the date/time, Custom Functions, etc. While looking at the LCD monitor, you use the <M> button, <0> button, and <5> dial on the camera back to proceed to the next step.
-
Page 30
Menu Operations Menu Setting Procedure ¡ When a Basic Zone mode is set, there are menu items which will not be displayed. (p.31) ¡ You can also use the <6> dial to select menu items or playback images. ¡ The explanation of menu functions hereinafter assumes that you pressed the <M>… -
Page 31: Menu Settings
Menu Settings <z> Shooting menu (Red) 73/83/74/84/76/86/ RAW/ Quality RAW+73/ +83/ +74/ +84/ +76/ +86 Red-eye On/Off Off / On Beep On / Off Shoot w/o card On / Off 1/3-stop increments, ±2 stops WB SHIFT/BKT 9 levels of B/A/M/G color bias / B/A and M/G bias 1 level, ±3 levels Custom WB Manual setting of white balance Color temp.
-
Page 32: About The Lcd Monitor
Menu Operations About the LCD Monitor ¡ When using the LCD monitor, you can use the <5> dial even while the <4> switch is <1>. ¡ The LCD monitor cannot be used as a viewfinder for shooting. ¡ You can adjust the brightness of the LCD monitor to one of five levels. (p.102) Restoring the Camera’s Default Settings N Shooting Settings AF mode…
-
Page 33: Setting The Language
3Setting the Language The LCD monitor’s interface language can be set to one of twelve languages. English English Deutsch German Français French Nederlands Dutch Dansk Danish Suomi Finnish 3Set the power-off time/Auto power off You can set the auto power-off time for the camera to turn off automatically after a set time of idle operation.
-
Page 34: Setting The Date And Time
3Setting the Date and Time Set the date and time as shown below. Each captured image is recorded with the date and time it was taken. If the date and time are not properly set, the wrong date/time will be recorded. Make sure you set the date and time correctly.
-
Page 35: Replacing The Date/Time Battery
Replacing the Date/Time Battery The date/time (back-up) battery maintains the camera’s date and time. The battery’s service life is about 5 years. If the date/time is reset when the battery is replaced, replace the back-up battery with a new CR2016 lithium battery as described below.
-
Page 36: Cleaning The Cmos Sensor
To avoid this, follow the procedure below to clean the image sensor. Note that the image sensor is a very delicate component. If possible, you should have it cleaned by a Canon Service Center. While you clean the image sensor, the camera must be turned on.
-
Page 37
¡ During the sensor cleaning, never do any of the following that would turn off the power. If the power is cut off, the shutter will close and it may damage the shutter curtains and image sensor. • Turn the <4> switch to <2>. •… -
Page 38: Dioptric Adjustment
Dioptric Adjustment By adjusting the diopter to suit your eyesight, you can see a sharp viewfinder image even without eyeglasses. The camera’s adjustable dioptric range is -3 to +1 dpt. If the camera’s dioptric adjustment still cannot provide a sharp viewfinder image, using Dioptric Adjustment Lens E (10 types, optional) is recommended.
-
Page 39: Fully Automatic Shooting
Fully Automatic This chapter explains how to use the Basic Zone modes on the Mode Dial for quick and easy shooting. In each mode <1> <2> <3> <4> <5> <6> <7>, the AF mode, drive mode, etc., are set automatically to suit the subject.
-
Page 40: Using Full Auto
1Using Full Auto All you do is point the camera and press the shutter button. Everything is automatic so it is easy to photograph any subject. With nine AF points to focus the subject, anyone can easily take nice pictures. AF point Focus confirmation light Shutter speed…
-
Page 41: Take The Picture
LCD panel. If this happens, turn the <4> switch to <2> and set it back to <1>. ¡ Using a non-Canon lens with an EOS camera may not result in proper camera or lens operation. ¡ When focus is achieved, the focus and exposure setting will also be locked.
-
Page 42: Basic Zone Modes
Basic Zone Modes Select a shooting mode to suit the target subject, and the camera will be set to obtain the best results. Portrait Landscape Close-up This mode blurs the background to make the human subject stand out. ¡ Holding down the shutter button executes continuous shooting.
-
Page 43: Night Portrait
Sports Night Portrait Flash off In the <6> mode, use a tripod to prevent camera shake. In the <3> or <7> mode, if the shutter speed display blinks, be aware that camera shake may occur. This is for fast-moving subjects when you want to freeze the action.
-
Page 44: Self-Timer Operation
jSelf-timer Operation Use the self-timer when you want to be in the picture. You can use self- timer in any Basic Zone mode or Creative Zone mode. Do not stand in front of the camera when you press the shutter button to start the self-timer.
-
Page 45: Image Settings
This chapter explains the digital image settings for the image-recording quality, ISO speed, white balance, color space, and processing parameters. ¡ For Basic Zone modes, only the image-recording quality (except RAW and RAW+JPEG), file numbering, and camera setting check will apply in this chapter. ¡…
-
Page 46: Setting The Image-Recording Quality
Setting the Image-recording Quality The 73/83/74/84/76/86 modes record the image in the widely-used JPEG format. In the 1 mode, the captured image will require post-processing with the software provided. The 1+73/ +83/+74/+84/+76/+86 (RAW+ JPEG) modes simultaneously record the image in both RAW and JPEG formats. Note that in the Basic Zone modes, the RAW and RAW+JPEG formats cannot be selected.
-
Page 47
The single image size, number of possible shots, and maximum burst during continuous shooting (p.48) are based on Canon’s testing standards (ISO 100 with [ Parameter 1 ] set). The actual single image size, number of possible shots, and maximum burst will vary depending on the subject, shooting mode, ISO speed, parameters, etc. -
Page 48
3 Setting the Image-recording Quality Max. Burst During Continuous Shooting The maximum burst during continuous shooting depends on the image- recording quality. The approx. maximum burst during continuous shooting is indicated below for each image-recording quality. Note that with high-speed CF cards, the maximum burst may be higher than shown in the table below depending on the shooting conditions. -
Page 49: Setting The Iso Speed
g Setting the ISO SpeedN The ISO speed is a numeric indication of the sensitivity to light. A higher ISO speed number indicates a higher sensitivity to light. Therefore, a high ISO speed is suited for low light and moving subjects. However, the image may look more coarse with noise, etc.
-
Page 50: Setting The White Balance
To the human eye, a white object looks white regardless of the type of lighting. With a digital camera, the color temperature can be adjusted with software so that the colors in the image look more natural. The subject’s white color is used as the criteria for adjusting the other colors.
-
Page 51: Custom White Balance
Custom White BalanceN With custom white balance, you shoot a white object that will serve as the basis for the white balance setting. By selecting this image, you import its white balance data for the white balance setting. Partial metering Press the <E>…
-
Page 52: Setting The Color Temperature
3 Custom White BalanceN ¡ If the exposure obtained in step 3 is underexposed or overexposed, a correct white balance might not be obtained. ¡ If an image was captured while the processing parameter was set to [B/ W] (p.59), it cannot be selected in step 5. Instead of a white object, an 18% gray card (commercially available) can produce a more accurate white balance.
-
Page 53: White Balance Correction
White Balance CorrectionN You can correct the standard color temperature for the white balance setting. This adjustment will have the same effect as using a color temperature conversion or color compensating filter. Each color can be corrected to one of nine levels. Users familiar with using color temperature conversion or color compensating filters will find this feature handy.
-
Page 54: White Balance Auto Bracketing
White Balance Auto BracketingN With just one shot, three images having a different color tone can be recorded simultaneously. Based on the white balance mode’s standard color temperature, the image will be bracketed with a blue/amber bias or magenta/green bias. This is called white balance bracketing.
-
Page 55: Canceling White Balance Auto Bracketing
Canceling White Balance Auto Bracketing ¡ White balance bracketing will not work if the image-recording quality is set to RAW or RAW+JPEG. ¡ With white balance bracketing, the maximum burst will be 6 shots. ¡ When white balance bracketing is set, the white balance icon will blink on the LCD panel and the remaining shots will decrease to about 1/3.
-
Page 56: Setting The Color Space
Setting the Color SpaceN The color space refers to the range of reproducible colors. With this camera, you can set the color space for captured images to sRGB or Adobe RGB. For normal images, sRGB is recommended. In the Basic Zone modes, sRGB will be set automatically.
-
Page 57: Selecting The Processing Parameters
Selecting the Processing Parameters N The image you capture can be processed to look more vivid and sharp or more subdued. The processing parameters can be set according to the preset Parameter 1 or Parameter 2 or to Set 1, 2, or 3 that you can set yourself.
-
Page 58: Setting The Processing Parameters
Setting the Processing ParametersN The image you capture can be processed automatically by the camera in accordance with the parameter settings you set (five settings each for [Contrast], [Sharpness], [Saturation], and [Color tone]). You can register and save up to three sets of processing parameters. Select [Parameters].
-
Page 59
Black-and-White Shooting When you capture images with the processing parameter set to Monochrome, the camera will process and record the images as black- and-white images onto the CF card. ¡ To obtain natural-looking, black-and-white images, set a suitable white balance. ¡… -
Page 60: Filter Effects
3 Setting the Processing ParametersN Filter effects The same effect as using filters with black-and-white film can be obtained with digital images. A color can be brightened by using a filter having a similar or same color. At the same time, the complementary colors will be darkened.
-
Page 61: File Numbering Methods
File Numbering Methods The file number is like the frame number on film. There are two file numbering methods: [Continuous] and [Auto reset]. The images you take are automatically assigned a file number from 0001 to 9999 and saved in a folder (created automatically) that can hold up to 100 images.
-
Page 62: Checking Camera Settings
B Checking Camera Settings When the camera is ready to shoot, press the <B> button to view the current camera settings on the LCD monitor. Camera Setting Display Auto power off (p.33) CF card remaining capacity Flash exposure compensation (p.96) For details on the image info during playback, see “Shooting Information Display”…
-
Page 63: Setting The Af, Metering, And Drive Modes
Setting the AF, Metering, and Drive Modes Drive modes AF mode Metering mode ¡ The asterisk M on the right of the page title indicates that the respective feature is available only in Creative Zone modes (d, s, f, a, 8 ¡…
-
Page 64: Selecting The Af Mode
f Selecting the AF ModeN The AF mode is the autofocusing operation method. Three AF modes are provided. One-Shot AF is suited for still subjects, while AI Servo AF is for moving subjects. And AI Focus AF switches from One-Shot AF to AI Servo AF automatically if the still subject starts moving.
-
Page 65: Ai Servo Af For Moving Subjects
One-Shot AF for Still Subjects AF point Focus confirmation light If focus cannot be achieved, the focus confirmation light < o > in the viewfinder will blink. If this occurs, a picture cannot be taken even if the shutter button is pressed fully. Recompose the picture and try and focus again.
-
Page 66
f Selecting the AF ModeN * About Predictive AF If the subject approaches or retreats from the camera at a constant rate, the camera tracks the subject and predicts the focusing distance immediately before the picture is taken. This is for obtaining correct focus at the moment of exposure. -
Page 67: Selecting The Af Point
SSelecting the AF PointN The AF point is used for focusing. The AF point can be selected automatically by the camera or manually by you. Automatic AF point selection is set in the Basic Zone modes and 8 >. In the <d> <s> <f> <a> modes, you can switch <8 between automatic and manual AF point selection.
-
Page 68
SSelecting the AF PointN Selecting with the Dial ¡ When looking at the LCD panel to select the AF point, note the following: Automatic selection ¡ If focus cannot be achieved with an EOS-dedicated, external Speedlite’s AF-assist beam, select the center AF point. AF-Assist beam with the Built-in Flash Under low-light conditions, the built-in flash fires a brief burst of flashes when you press the shutter button halfway. -
Page 69: Focusing An Off-Center Subject
Focusing an Off-Center Subject After achieving focus, you can lock the focus on a subject and recompose the shot. This is called “focus lock.” Focus lock works only in the One-Shot AF mode. If the AF mode is AI Servo AF (or AI Focus AF set to Servo mode), focus lock will not work.
-
Page 70: When Autofocus Fails (Manual Focusing)
When Autofocus Fails (Manual Focusing) Autofocus can fail to achieve focus (the focus confirmation light <o> blinks) with certain subjects such as the following: Subjects difficult to focus (a) Low-contrast subjects Example: Blue sky, solid-color walls, etc. (b) Subjects in low light. (c) Extremely backlit and reflective subjects Example: Car with a reflective body, etc.
-
Page 71: Selecting The Metering Mode
qSelecting the Metering ModeN The camera has three metering modes: Evaluative, partial, and centerweighted average metering. In the Basic Zone modes, evaluative metering will be set automatically. q Evaluative Metering This is the camera’s standard metering mode suited for most subjects even under backlit conditions.
-
Page 72: Selecting The Drive Mode
iSelecting the Drive Mode Single and continuous drive modes are provided. In the Basic Zone modes, the optimum drive mode is set automatically. ¡ During continuous shooting, the captured images are first stored in the camera’s internal memory and then successively transferred to the CF card. When the internal memory becomes full during continuous shooting, “buSY”…
-
Page 73: Advanced Operations
Advanced Operations ¡ The asterisk M on the right of the page title indicates that the respective feature is available only in Creative Zone modes (d, s, f, a, 8). ¡ After you press the shutter button halfway and let go, the timer operation will keep the LCD panel and viewfinder information displayed for about 4 sec.
-
Page 74: Program Ae
d Program AE AF point Shutter speed Aperture Like <1> (Full Auto) mode, this is a general-purpose shooting mode. The camera automatically sets the shutter speed and aperture value to suit the subject’s brightness. This is called Program AE. * <d> stands for Program * AE stands for Auto Exposure Set the Mode Dial to <d>.
-
Page 75
¡ If “30″” and the maximum aperture blink, it indicates underexposure. Increase the ISO speed or use flash. ¡ If “8000” and the minimum aperture blink, it indicates overexposure. Decrease the ISO speed or use an ND filter (optional) to reduce the amount of light entering the lens. -
Page 76: Shutter-Priority Ae
s Shutter-Priority AE In this mode, you set the shutter speed and the camera automatically sets the aperture value to suit the brightness of the subject. This is called Shutter-Priority AE. A fast shutter speed can freeze the motion of a fast-moving subject and a slow shutter speed can blur the subject to give the impression of motion.
-
Page 77
¡ If the maximum aperture blinks, it indicates underexposure. Turn the <6> dial to set a slower shutter speed until the aperture value stops blinking. ¡ If the minimum aperture blinks, it indicates overexposure. Turn the <6> dial to set a faster shutter speed until the aperture value stops blinking or lower the ISO speed. -
Page 78: Aperture-Priority Ae
f Aperture-Priority AE In this mode, you set the desired aperture and the camera sets the shutter speed automatically to suit the subject brightness. This is called aperture-priority AE. The smaller the aperture (larger f/number), the wider the depth of field (range of acceptable focus). The larger the aperture (smaller f/number), the narrower the depth of field.
-
Page 79: Depth Of Field Preview
¡ If the “30″” shutter speed blinks, it indicates underexposure. Turn the <6> dial to set a larger aperture (smaller f/number) until the blinking stops or set a higher ISO speed. ¡ If the “8000” shutter speed blinks, it indicates overexposure.
-
Page 80: Manual Exposure
a Manual Exposure Standard exposure index Exposure level mark In this mode, you set both the shutter speed and aperture value as desired. To determine the exposure, refer to the exposure level indicator in the viewfinder or use a handheld exposure meter. This method is called manual exposure.
-
Page 81
If the exposure level mark <s> blinks at the <G> or <F> level, it indicates that the exposure level exceeds the standard exposure by ±2 stops. Set the exposure. ¡ Check the exposure level and set the desired shutter speed and aperture value. -
Page 82: Automatic Depth-Of-Field Ae
8 Automatic Depth-of-Field AE This mode is for obtaining a wide depth of field automatically between a near subject and far subject. It is effective for group photos and landscapes. The camera uses the nine AF points to detect the nearest and farthest subjects to be in focus.
-
Page 83: Setting Exposure Compensation
Setting Exposure CompensationN Exposure compensation is used to alter the standard exposure setting set by the camera. You can make the image look lighter (increased exposure) or darker (decreased exposure). You can set the exposure compensation up to ±2 stops in 1/3-stop increments. Increased exposure Decreased exposure ¡…
-
Page 84: Auto Exposure Bracketing (Aeb)
Auto Exposure Bracketing (AEB)N By changing the shutter speed or aperture automatically, the camera brackets the exposure up to ±2 stops in 1/3-stop increments for three successive shots. This is called Auto Exposure Bracketing (AEB). Standard exposure AEB amount Standard exposure Decreased exposure Increased exposure Decreased exposure…
-
Page 85: Canceling Aeb
Canceling AEB Neither flash nor bulb exposures can be used with AEB. ¡ If the drive mode is set to continuous (i), the three bracketed shots will be taken continuously and then the shooting will stop automatically. If the drive mode is set to single image (u), you must press the shutter button three times.
-
Page 86: Ae Lock
AAE LockN AE lock enables you to lock the exposure at a different place from the point of focus. After locking the exposure, you can recompose the shot while maintaining the desired exposure setting. This is called AE lock. It is effective for backlit subjects.
-
Page 87: Bulb Exposures
Bulb Exposures When bulb is set, the shutter stays open while you hold down the shutter button fully, and closes when you let go of the shutter button. This is called bulb exposure. Use bulb exposures for night scenes, fireworks, the heavens, and other subjects requiring long exposures.
-
Page 88: Mirror Lockup
Mirror LockupN Mirror lockup is enabled with C.Fn-12 [Mirror lockup] set to [1: Enable] (p.144). The mirror can be swung up separately from when the exposure is made. This prevents mirror vibrations which may blur the image during close-ups or when a super telephoto lens is used. Set Custom Functions with [c Custom Functions (C.Fn)].
-
Page 89: Lcd Panel Illumination
ULCD Panel Illumination Pressing any shooting-related button or turning the Mode Dial while the LCD panel is illuminated prolongs the illumination. Using the Eyepiece Cover During self-timer or remote switch (optional) operation when your eye does not cover the viewfinder eyepiece, stray light may enter the eyepiece and affect the exposure when the image is captured.
-
Page 90: You Can Also Silence The Beeper
You can also silence the beeper You can silence the beeper so it does not sound in any shooting mode. CF Card Reminder This prevents shooting if there is no CF card in the camera. This can be set in all shooting modes. If [Off] has been set and you press the shutter button while there is no CF card in the camera, “no CF”…
-
Page 91: Flash Photography
Flash Photography The built-in flash or an EOS- dedicated, EX-series Speedlite enables E-TTL II autoflash (evaluative flash metering with preflash), making flash photography as easy as normal shooting. The result is natural- looking flash photos. In the Basic Zone modes (except <3> <5> <7>), flash photography is fully automatic.
-
Page 92: Using The Built-In Flash
Using the Built-in Flash E-TTL II autoflash obtains high-precision and consistent flash shots. Using the Built-in Flash in the Basic Zone If necessary, the built-in flash will pop-up automatically in low-light or backlit conditions (except in <3> <5> <7> modes). Using the Built-in Flash in the Creative Zone Regardless of the light level, you can press the <D>…
-
Page 93
Built-in Flash Range With EF-S17-85mm f/4-5.6 IS USM ISO speed Wide angle: 17mm Approx. 1 — 3.3 / 3.3 — 10.8 Approx. 1 — 4.6 / 3.3 — 15.1 Approx. 1 — 6.5 / 3.3 — 21.3 Approx. 1 — 9.2 / 3.3 — 30.2 1600 Approx. -
Page 94: Using Red-Eye Reduction
Using the Built-in Flash Using Red-eye Reduction When flash is used in a low-light environment, the subject’s eyes may look red in the image. “Red eye” happens when the light from the flash reflects off the retina of the eyes. The camera’s red-eye reduction feature turns on the red-eye reduction lamp to shine a gentle light into the subject’s eyes to narrow the pupil diameter or iris.
-
Page 95
AFE lockN FE (flash exposure) lock obtains and locks the correct flash exposure reading for any part of a subject. Partial metering If the subject is too far away and beyond the effective range of the flash, the <D> icon will blink. Get closer to the subject and repeat steps 2 to 4. Check that the <D>… -
Page 96
Using the Built-in Flash yFlash exposure compensationN In the same way as normal exposure compensation, you can set exposure compensation for flash. You can set flash exposure compensation up to ±2 stops in 1/3-stop increments. Increased exposure Decreased exposure ¡ The exposure compensation amount will remain in effect even after the <4>… -
Page 97: Using Eos-Dedicated, External Speedlites
Using EOS-Dedicated, External Speedlites With EX-series Speedlites An EOS-dedicated, EX-series Speedlite makes flash photography as easy as normal shooting. You can easily do the flash operations below. For detailed procedures, see the Speedlite’s instruction manual. ¡ ¡ ¡ ¡ E-TTL II Autoflash E-TTL II is a new autoflash exposure system incorporating improved flash exposure control and lens focusing distance information, making it more precise than the previous E-TTL (evaluative flash metering with preflash)
-
Page 98: Using Non-Canon Flash Units
Using Non-Canon Flash Units Sync Speed The EOS 20D can synchronize with compact, non-Canon flash units at 1/250 sec. or slower shutter speeds. With large studio flash, the sync speed is 1/125 sec. or slower. Be sure to test the flash unit beforehand to make sure it synchronizes properly with the camera.
-
Page 99: Image Playback
Image Playback This chapter explains image playback operations such as how to view and erase captured images and how to connect the camera to a TV monitor. For images taken with another camera: The camera might not be able to properly display images captured with a different camera or edited with a personal computer or whose file name was changed.
-
Page 100: Setting The Image Review Time
Setting the Image Review Time You can set how long the image is to be displayed on the LCD monitor right after it is captured. To keep the image displayed, set [Hold]. To not have the image displayed, set [Off]. ¡…
-
Page 101: Auto Image Rotation
Auto Image Rotation Vertical shots can be rotated automatically so that they are displayed upright during playback. ¡ Auto rotate will work only if [Auto rotate] has been set to [On]. Auto rotate will not work with vertical images captured while [Auto rotate] was [Off].
-
Page 102: Setting The Lcd Brightness
Setting the LCD Brightness You can adjust the brightness of the LCD monitor to one of five levels. To check the image’s exposure, look at the histogram (p.104). Select [LCD Brightness]. ¡ Turn the <5> dial to select [c LCD Brightness], then press <0>.
-
Page 103: Image Playback
Image Playback You can select any captured image to view. You can view a single image, the shooting information, an index display, or a magnified view. xSingle image display Single image display (with basic info) ¡ Even in display formats other than single image (index display, magnified view, etc.), you can press the <B>…
-
Page 104: Shooting Information Display
Image Playback Shooting Information Display Image Flash exposure compensation amount Shooting time Shooting date Shutter speed Images recorded/ Total images recorded Image protect Exposure compensation amount Image-recording quality Histogram A histogram is a graph indicating the image’s brightness. The horizontal axis indicates the brightness level (darker on the left and brighter on the right), while the vertical axis indicates how many pixels exist for each brightness level.
-
Page 105: Index Display
H Index Display Nine thumbnail images are displayed on one screen. Switching from the index display to another display mode ¡ To display a single image, press the <x> button. ¡ Pressing the <u> button switches to the single image display and pressing it again switches to magnified view.
-
Page 106
Image Playback u/yMagnified View You can magnify the image by 1.5x to 10x on the LCD monitor. Magnified area While in the magnified view, you can maintain the same magnified area and magnification when you turn the <6> dial to view another image. Display the image. -
Page 107: Jump Display, Auto Playback, Rotating An Image
CJump Display During the single image, image with shooting information, index, or magnified image display, you can jump forward or back to images stored on the CF card. Jump bar Jumping during Single image, image with shooting information, magnified image view: Turn the dial counterclockwise to jump ten images backward, or turn it clockwise to jump ten images forward.
-
Page 108
Image Playback 3Automated Playback of Images (Auto playback) You can playback the CF card’s images in an automatic slide show. Each image will be displayed for about 3 sec. ¡ During auto play, auto power off will not work. ¡ The display time may vary depending on the image. -
Page 109: Rotating An Image
3Rotating an Image You can rotate an image by 90° or 270° clockwise. Images will then be displayed in the correct orientation during playback. ¡ If you have set [c Auto rotate] to [On] (p.101) before taking the vertical shots, you need not rotate the image as described above. ¡…
-
Page 110: Viewing The Images On A Tv
Viewing the Images on a TV By connecting the camera to a TV set with the video cable (provided), you can view the captured images on a TV set. Always turn off the camera and the television before connecting or disconnecting them. Video IN ¡…
-
Page 111: Protecting Images
Protecting Images This prevents the image from being erased accidentally. Image protect icon ¡ Once an image is protected, it cannot be erased by the camera’s Erase function. To erase a protected image, you must first cancel the protection. ¡ If you erase all the images (p.113), only the protected images will remain.
-
Page 112: Erasing Images
LErasing Images You can erase images individually or erase all the images at one time in the CF card. Only protected images will not be erased. Once an image is erased, it cannot be recovered. Make sure you no longer need the image before erasing it. To prevent important images from being erased accidentally, protect them.
-
Page 113: Erasing All Images
Erasing All Images While data is being written to the CF card (access lamp blinking) after continuous shooting, press the <x> button and then press the <L> button to erase the displayed image or all images. If you select [All] and press the <0>…
-
Page 114: Formatting The Cf Card
¡ A non-Canon CF card or a CF card formatted with another camera or personal computer might not work with the camera. If this happens, format the card with the camera first. Then it might work with the camera.
-
Page 115: Direct Printing From The Camera
CF card. This chapter explains how to print your digital camera photos with a printer capable of direct printing via “<w> PictBridge” or Canon’s own “<A> CP Direct” or “<S> Bubble Jet Direct” standard. Canon CP printer…
-
Page 116: Preparing To Print
Preparing to Print You do the direct printing procedure entirely through your camera’s LCD monitor. Setting the Camera On the menu, set [c Communication] to [PTP]. When connecting the camera to the personal computer, set [Communication] to [Normal]. Transmissions between the camera and personal computer will not work with the [PTP] setting.
-
Page 117
Printers and Cables Printer Compatibility PictBridge only PictBridge and CP Direct PictBridge and Bubble Jet Direct CP Direct only Bubble Jet Direct only Connect the camera to the printer. ¡ Refer to the table (Printers and Cables) below to select the proper cable to connect the camera to printer. -
Page 118
Preparing to Print PictBridge CP Direct Bubble Jet Direct ¡ If you use a battery to power the camera, make sure it is fully charged. During direct printing, keep checking the battery level. ¡ If there is a long beeping sound in step 5, it indicates a problem with the PictBridge printer. -
Page 119
wPrinting with PictBridge The setting options will differ depending on the printer. Some settings might be disabled. For details, refer to your printer’s instruction manual. Printer connected icon Print setting screen The Paper Size, Type, and Layout you have set will be displayed. * Depending on your printer, certain settings like the date imprinting and trimming might not be available. -
Page 120
PictBridge TSetting the Paper Size YSetting the Paper Type About the Paper Types If you are using a Canon printer with Canon paper, set the respective paper type as follows: Photo Photo Paper Plus Glossy Fast Photo Photo Paper Pro… -
Page 121
Option to print 8, 2, 4, 9, 16, or 20 copies of same image on one **-up sheet. Default With a Canon printer, the print will be borderless. Date imprinting Set the other options. ¡ If desired, also set the <H> date imprinting, <E>… -
Page 122
wPrinting with PictBridge ¡ Depending on the image’s file size and recording quality, it may take some time for the printing to start after you select [Print]. ¡ The [Default] setting for printing effects and other options are the printer’s own default settings as set by the printer’s manufacturer. See the printer’s instruction manual to find out what the [Default] settings are. -
Page 123
APrinting with CP Direct Printer connected icon Print setting screen Trimming frame: Appears when you want to trim the image. The printing style settings are displayed. < Select the image to be printed. ¡ Check that the <A> icon is displayed on the upper left of the LCD monitor. -
Page 124
APrinting with CP Direct Image Set the options as desired. ¡ Set the [Image], [Borders], and [Date] as desired. Borders ¡ Turn the <5> dial to select the menu item, then press <0>. ¡ Turn the <5> dial to select the desired setting, then press <0>. -
Page 125
¡ The date may look light if it is imprinted on a bright background or border. ¡ If [Multiple] is selected, [Borders] and [Date] cannot be selected. [Borderless] and [Date] will be set to [Off]. The image will also be cut off along all four edges. -
Page 126
SPrinting with Bubble Jet Direct Printer connected icon Print setting screen Trimming frame: Appears when you want to trim the image. The printing style settings are displayed. < Select the image to be printed. ¡ Check that the <S> icon is displayed on the upper left of the LCD monitor. -
Page 127
Set the options as desired. Paper ¡ ¡ ¡ ¡ ¡ Set the number of copies. ¡ ¡ ¡ ¡ Set the trimming. ¡ ¡ SPrinting with Bubble Jet Direct Borders Turn the <5> dial to select the menu item, then press <0>. Turn the <5>… -
Page 128
SPrinting with Bubble Jet Direct If [Bordered] is set, the date might be imprinted on the border, depending on the printer. ¡ If [Date] is [On], the date recorded for the image will appear on the print. The date will appear on the lower right of the image. ¡… -
Page 129: Setting The Trimming
Setting the Trimming You can trim the image and print only the trimmed portion as if the image was recomposed. Do the trimming right before printing. If you set the trimming and then set the print settings, you may have to set the trimming again. Select [Trimming].
-
Page 130
Setting the Trimming Image area to be printed ¡ Depending on the printer, the trimmed image area might not be printed as you specified. ¡ The smaller you make the trimming frame, the grainier the picture will look. If the picture will be too grainy, the trimming frame will turn red. ¡… -
Page 131: Dpof: Digital Print Order Format
DPOF (Digital Print Order Format) is a standard for recording print ordering instructions to the CF card. It is for images taken with a digital camera, and you can specify which photos and the quantity to print. With a DPOF-compatible digital camera, you can do the following: ¡…
-
Page 132: Print Ordering
Print Ordering Print settings Set the print type, date imprinting, and file No. imprinting. The print settings will be applied to all print-ordered images. (They cannot be set individually for each image.) Standard Index Print Type Both Date File No. Prints one image on one sheet.
-
Page 133
Print Type ¡ RAW images cannot be selected for printing. ¡ Even if [Date] and [File No.] are set to [On], the date or file No. might not be imprinted depending on the print type setting and printer type. ¡ With [Index] prints, both the [Date] and [File No.] cannot be set to [On] at the same time. -
Page 134
3 Print Ordering Selecting Individual Images for Printing Select [Order]. ¡ Turn the <5> dial to select [Order], then press <0>. The order screen will appear. Select the image to be printed. ¡ Turn the <5> dial to select the image to be printed. -
Page 135
For [Index] ¡ If you want to include the image in the index print, checkmark <X> the box. Otherwise, leave the box unchecked. ¡ Press <0> to checkmark the box <X>, or press <0> again to remove the checkmark. ¡ If there are other images you want to select, repeat steps 2 and 3. -
Page 136: Selecting All Images
3 Print Ordering Selecting All images The print order can also be set or canceled for all the images in the CF card. For standard-type prints, a quantity of one will be ordered for all the images. Note that after following the “Selecting Individual Images” procedure, if you do the “Selecting All Images”…
-
Page 137: Direct Printing With Dpof
Direct Printing with DPOF With a printer compatible with direct printing, you can easily print images specified with DPOF. PictBridge Prepare to print. ¡ See “Setting the Camera” (steps 1 and 2) and “Connect the camera to the printer” (steps 1 to 5) on pages 116 to 117.
-
Page 138
3 Direct Printing with DPOF ¡ When printing with a PictBridge or Bubble Jet Direct printer, be sure to set the paper size. ¡ With PictBridge, the file No. cannot be imprinted. ¡ If [Bordered] is set, the date might be imprinted on the border, depending on the printer. -
Page 139: Customizing The Camera
Customizing the Camera Custom Functions enable you to customize various camera features to suit your picture-taking preferences. ¡ Custom Functions work in Creative Zone modes.
-
Page 140
Setting a Custom FunctionN Custom Function No. Description Resetting All Custom FunctionsN Select [Custom Functions (C.Fn)]. ¡ Turn the <5> dial to select [c Custom Functions (C.Fn)], then press <0>. The Custom Function screen will appear. Select Custom Function No. ¡… -
Page 141
Custom Function Settings N C.Fn-01 SET function when shooting You can change the function assigned to <0>. With C.Fn-01-1/2, you can press <0>, then look at the LCD panel and set <5> directly. 0: Default (no function) 1: Change quality Enables you to select the recording quality directly. -
Page 142
3 Custom Function SettingsN C.Fn-04 0: AF/AE lock 1: AE lock/AF Convenient when you want to focus and meter separately. Press the < A > button to autofocus and press the shutter button halfway to attain AE lock. 2: AF/AF lock, no AE lock In the AI Servo AF mode, you can press the <A>… -
Page 143
C.Fn-07 Flash firing You can enable the built-in flash, external Speedlite, and non-Canon flash connected to the PC terminal to fire. 0: Fires 1: Does not fire The flash will not fire. C.Fn-08 ISO expansion 0: Off 1: On For the ISO speed, “H” (equivalent to ISO 3200) will be selectable. -
Page 144
3 Custom Function SettingsN C.Fn-10 0: On 1: Off The AF point in the viewfinder will not flash in red. Recommended when it is bothersome to see it light up. The AF point will still light when you select it. C.Fn-11 When you press the <M>… -
Page 145
C.Fn-14 E-TTL II 0: Evaluative Fully automatic flash photography for all conditions, from low light to daylight fill-flash. 1: Average The flash is averaged for the entire area covered by the flash. Since automatic flash exposure compensation will not be executed, you may have to set it yourself depending on the scene. -
Page 146
3 Custom Function SettingsN C.Fn-17 Lens AF stop button function 0: AF stop 1: AF start AF operates only while the AF stop button is pressed. While the button is pressed, AF operation with the camera is disabled. 2: AE lock while metering When the button is pressed while metering is still active, AE lock is applied. -
Page 147: Reference
Reference This section will help you understand your camera better. It covers information on camera features, system accessories, and other reference information.
-
Page 148: Function Availability Table
Function Availability Table Mode Dial JPEG RAW + JPEG Auto Manual Auto WB Preset WB, Custom WB, Color temperature setting, WB correction, WB bracketing Parameters One-Shot AI Servo AI Focus Auto point Manual selection Evaluative Partial Centerweighted average Program shift Exposure compensation AE lock Depth-of-field preview…
-
Page 149: Af Modes And Drive Modes
AF Modes and Drive Modes Drive modes One-Shot AF An image cannot be taken unless focus is achieved. When focus is achieved, it is locked. With evaluative uSingle metering, the exposure shooting setting is also locked. (The exposure setting is stored in memory before the shot is taken.) The above conditions…
-
Page 150: Troubleshooting Guide
Troubleshooting Guide If there is a problem, first refer to this Troubleshooting Guide. Power Source The battery cannot be recharged. ¡ You are using the wrong battery. Do not recharge any battery pack other than Battery Pack BP- 511A, BP-514, BP-511, or BP-512. ¡…
-
Page 151
The camera turns off by itself. ¡ Auto power off is in effect. Press the shutter button halfway. If you do not want auto power off to take effect, set [c Auto power off] on the menu to [Off]. Only the < >… -
Page 152
If it is [Err CF], see page 114. If it is [Err 02], see page 153. ¡ You are using a non-Canon CF card. Using Canon CF cards is recommended. (p.155) Image Review & Operation The image cannot be erased. -
Page 153: Error Codes
Turn the <4> switch to <1>. Err 99 An error other than the above has occurred. Remove and re-install the battery. This error may occur if you use a non-Canon lens and the camera or lens does not operate properly. Countermeasures…
-
Page 154
Major Accessories (Optional) Battery Pack BP-511A High-capacity, lithium-ion, secondary power pack. AC Adapter Kit ACK-E2 Power source kit (AC adapter, DC coupler, power cord) for supplying power to the camera with a household power outlet. Compatible with AC 100 — 240 V. Compact Power Adapter CA-PS400 Quick charger for BP-511A. -
Page 155: Pc Card Adapter
CF card Data storage media where the captured images are recorded. CF cards made by Canon are recommended. PC card adapter Enables a CF card to be inserted into a PC card slot or PC card reader.
-
Page 156: System Map
System Map Eyepiece Extender EP-EX15 ST-E2 Rubber Frame Eb E-series Dioptric Bundled Adjustment Lenses Accessories Eyecup Eb Wide Strap EW-100DGR Angle Finder C Battery Charger CG-580 or CB-5L Semi-hard Case EH-17L Battery Pack BP-514 Battery Magazine Battery Grip BGM-E2 BG-E2 220EX 420EX 580EX Macro Ring Lite…
-
Page 157
CF card CF Card reader • EOS DIGITAL Solution Disk • Digital Photo Professional Disk • Adobe Photoshop Elements Disk Interface Cable IFC-400PCU Video Cable VC-100 EF-S lenses Wireless Controller EF lenses PC card adapter PC card slot USB port (2.0/1.1) Data Verification Kit DVK-E2 (Ver.2.1) -
Page 158: Specifications
Type I or II CF card * Compatible with Microdrive and 2GB or larger CF cards 22.5 x 15.0mm Canon EF lenses (including EF-S lenses) (35mm-equivalent focal length is equal to approx.1.6 times the marked focal length.) Canon EF mount…
-
Page 159
• White Balance Type: Auto, daylight, shade, cloudy, tungsten, white fluorescent light, flash, custom, color temperature setting Auto white balance: Auto white balance with the image sensor Color temperature correction: White balance correction: ±9 stops in full-stop increments White balance bracketing: ±3 stops in full-stop increments * Blue/amber bias or magenta/green bias possible Color temperature… -
Page 160
Specifications AF-assist beam: • Exposure Control Metering modes: Metering range: Exposure control: ISO speed: Exposure compensation: Manual: ±2 stops in 1/3- or 1/2-stop increments (can be AE lock: • Shutter Type: Shutter speeds: Shutter release: Self-timer: Remote control: • Built-in Flash Type: Flash metering: Guide No.:… -
Page 161
• External Speedlite EOS-dedicated Speedlite: E-TTL II autoflash with EX-series Speedlite PC terminal: Provided Zooming to match lens focal length: Provided • Drive System Drive modes: Single, continuous, and Self-timer (10 sec.) Continuous: Max. 5 shots per sec. Max. burst: JPEG* (Large/Fine): Approx. -
Page 162
Specifications • Power Source Battery: Battery life: Battery check: Power saving: Date/Time battery: • Dimensions and Weight Dimensions: Weight: • Operation Environment Working temperature range: 0°C- 40°C / 32°F — 104°F Working humidity: • Battery Charger CG-580 Compatible battery: Recharging time: Rated input: Rated output: Working temperature range: 0°C — 40°C / 32°F — 104°F… -
Page 163
Dimensions (W x H x D): 91 x 67 x 32.3 mm / 3.6 x 2.6 x 1.3 in Weight: 105 g / 3.7 oz (excluding power cord) ¡ All the specifications above are based on Canon’s testing standards. ¡ The camera’s specifications and physical appearance are subject to change without notice. -
Page 164
— Consult the dealer or an experienced radio/TV technician for help. The cable with the ferrite core provided with the digital camera must be used with this equipment in order to comply with Class B limits in Subpart B of Part 15 of the FCC rules. -
Page 165
Index AC Adapter Kit …22, 154 Access lamp…25 Accessories …154 Add original decision data…146 A-DEP …82 Adobe RGB…56 AE …74 AE lock…86, 149 AEB…84 AF mode …64 AF point…67 AF-assist beam …68, 142 AI Focus AF …66 AI Servo AF…65 Aperture value …78 Attaching the Strap …17 Auto Play…108… -
Page 166
Monochrome … 59 Multi-controller… 16, 28 Night Portrait … 43 Noise reduction … 141 Nomenclature… 10 Non-Canon Flash Units… 98 NTSC … 31, 110 Number of copies . 121, 124, 127, 134 One-Shot AF … 65 P (Program)… 74 PAL … 31, 110… -
Page 167
Paper settings …119 Partial Metering…71 PC terminal …98 PictBridge …119 Playback…103 Playback menu…29, 31 Portrait …42 Possible Shots …21, 47 Power Outlet …22 Power Switch …16, 26 Pressing completely…26 Pressing halfway …26 Print Ordering …131 Processing Parameters…57, 58 Program AE …74 Program Shift …75 Protect…111 Protection…111… -
Page 168
CANON INC. 30-2, Shimomaruko 3-chome, Ohta-ku, Tokyo 146-8501, Japan U.S.A. CANON U.S.A. INC. For all inquiries concerning this camera, call toll free in the U.S. 1-800-OK-CANON or write to: Customer Relations, Canon U.S.A., Inc. One Canon Plaza, Lake Success, N.Y. 11042-1198 CANADA CANON CANADA INC.