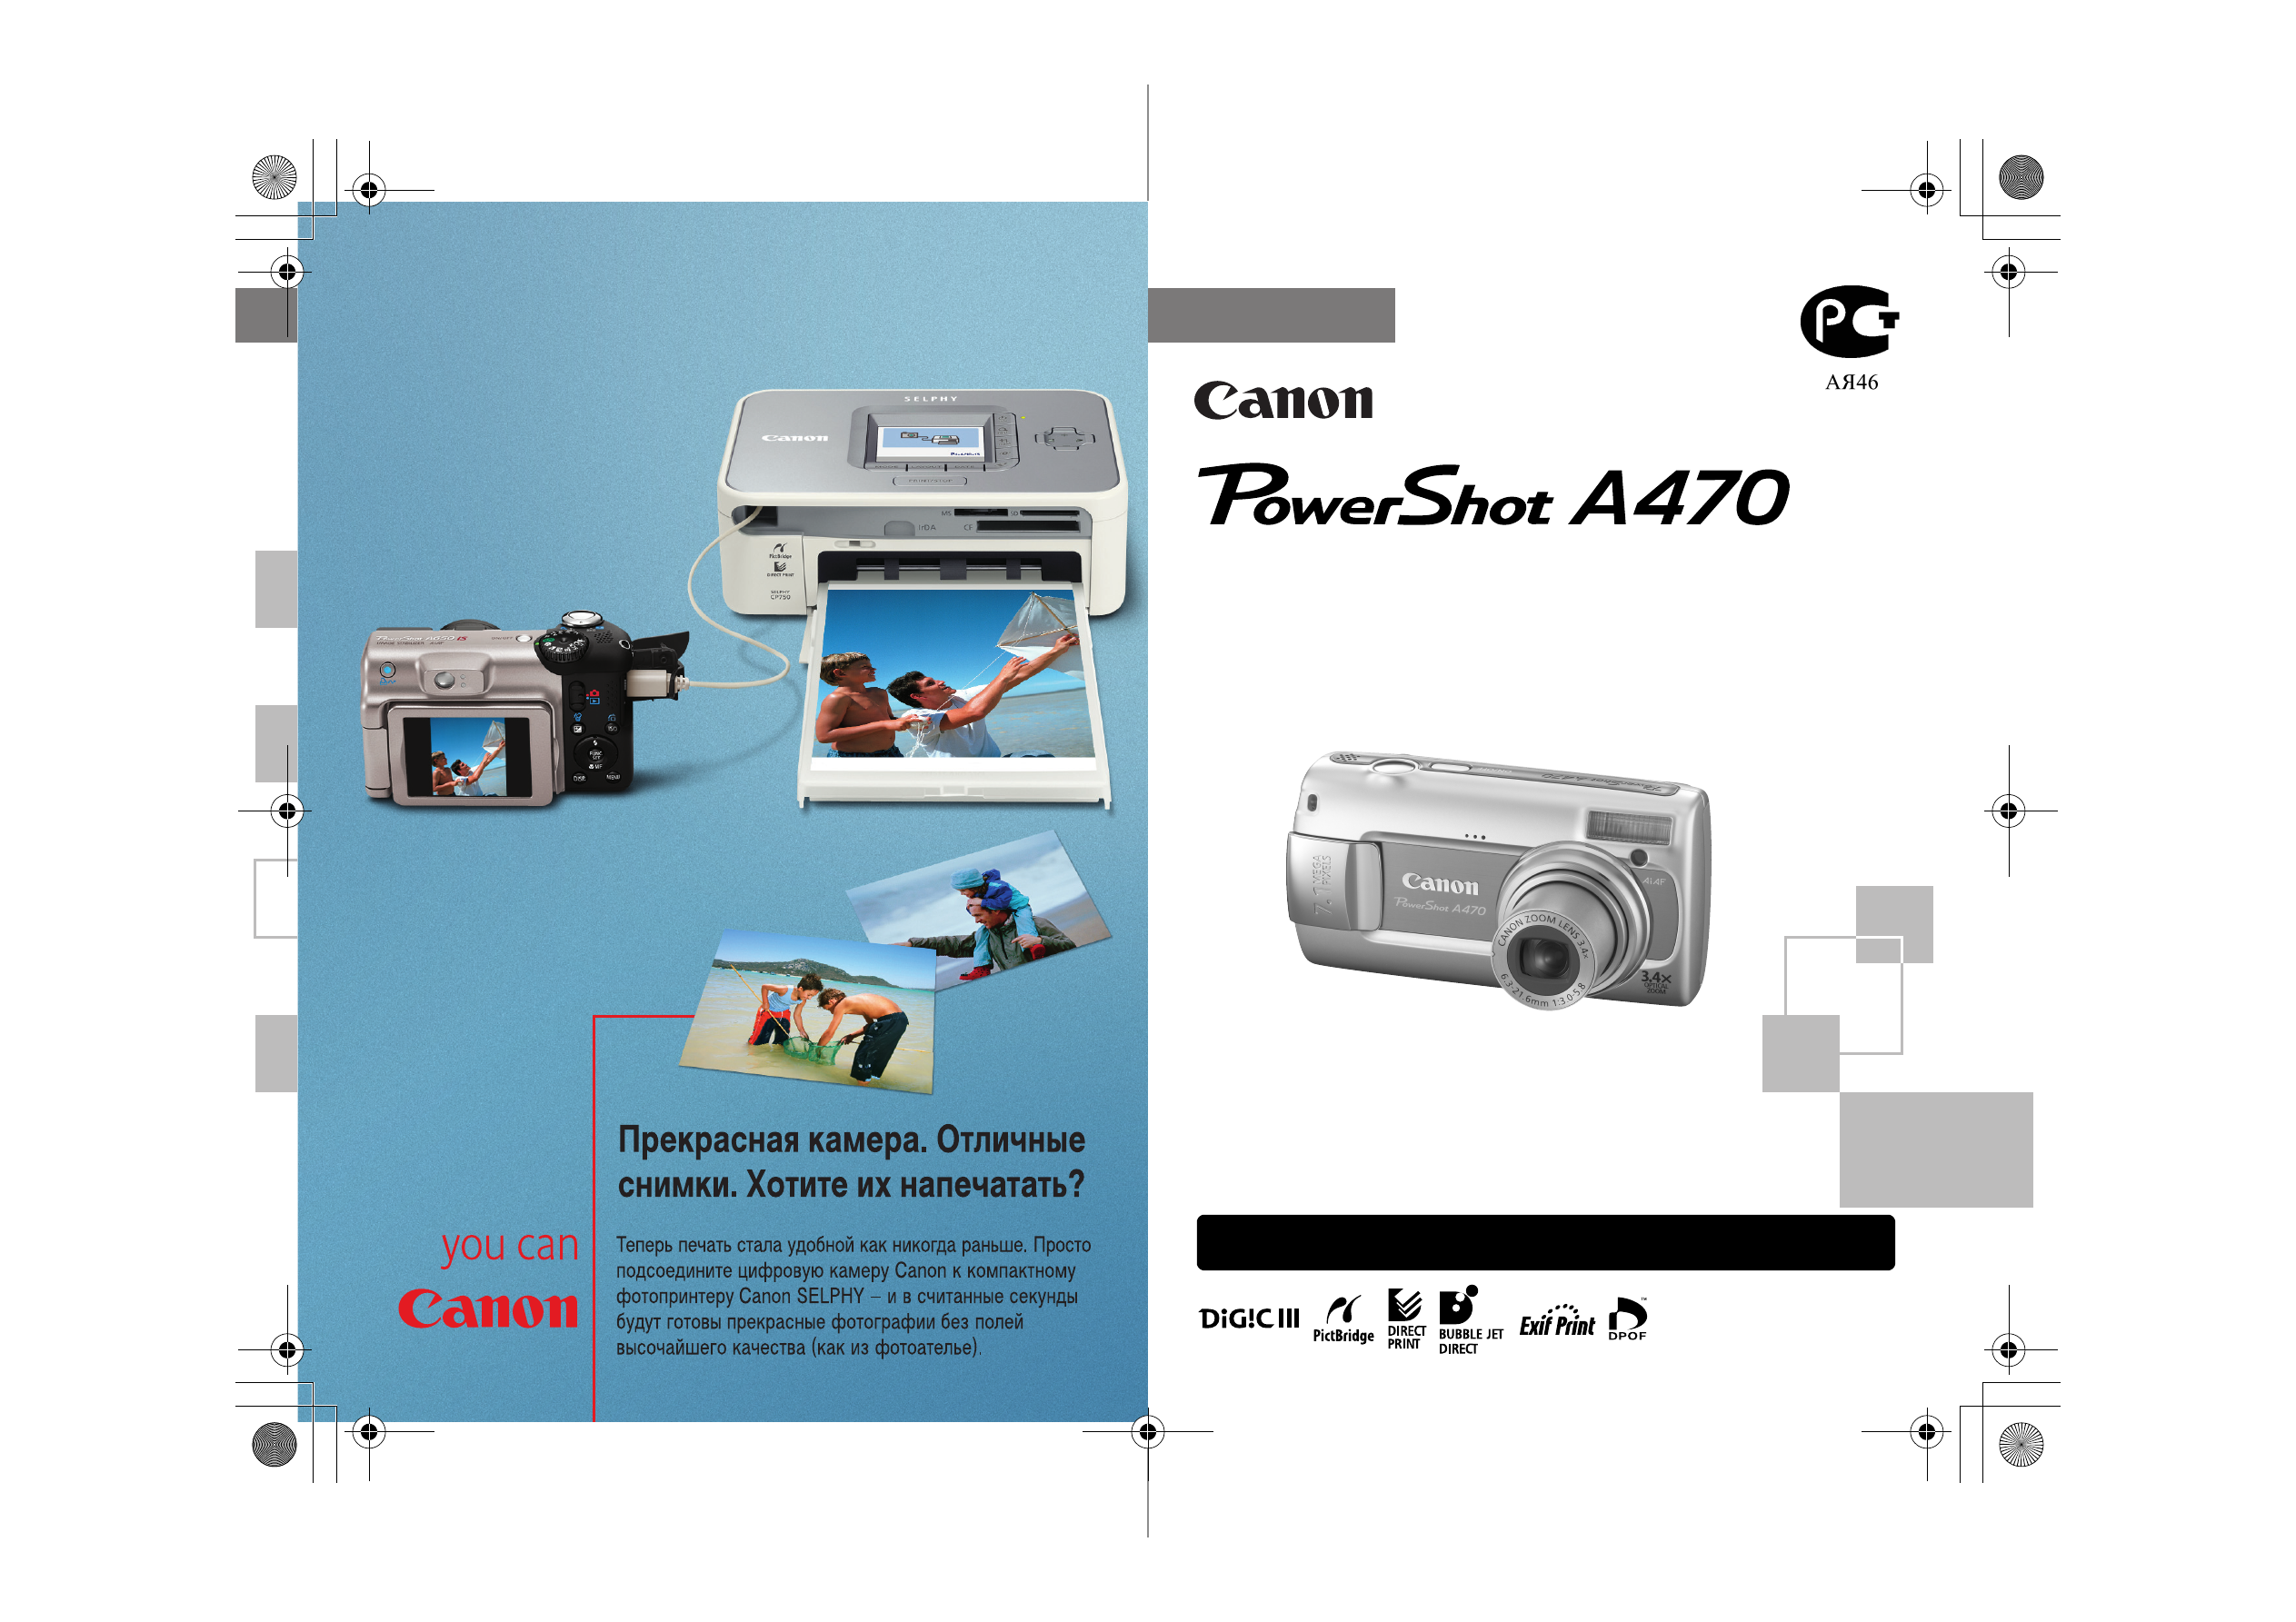
Руководство по началу работы
РУССКИЙ
Обязательно ознакомьтесь с мерами предосторожности
(внутренняя сторона задней обложки)
CEL-SH5GA200
EC242_GSG_RU_Cover.fm Page 1 Sunday, January 6, 2008 5:13 PM
Руководство пользователя камеры
Обязательно ознакомьтесь с мерами предосторожности
(стр. 144–149)
.
Начало работы
РУССКИЙ
стр. 7
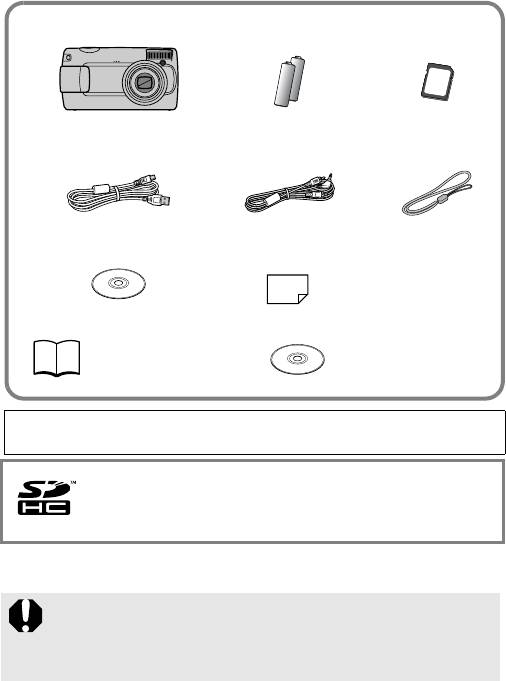
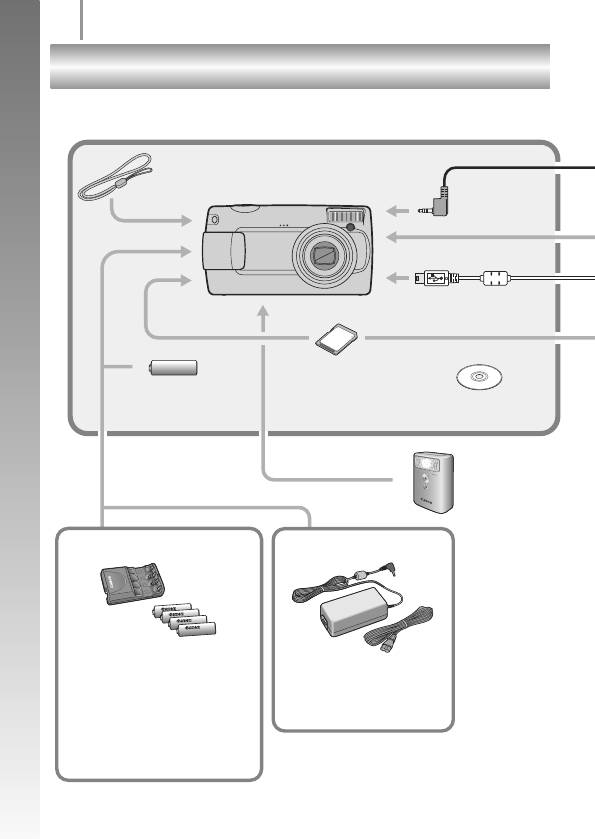
Проверка комплектности
Ниже показан комплект поставки. Если чего-либо не хватает, обращайтесь в магазин,
в котором была приобретена камера.
Просмотр Руководств в формате PDF
Карта памяти, входящая в комплект поставки камеры, может не обеспечивать
полное использование возможностей камеры.
С этой камерой можно использовать карты памяти SD, SDHC
(SD High Capacity – SD большой емкости), MultiMediaCard, MMCplus
и HC MMCplus. В настоящем Руководстве для этих карт использу-
ется общий термин «карта памяти».
Для просмотра Руководств в формате PDF необходимо установить
программу Adobe Reader. Если в компьютере отсутствует эта
программа, загрузите ее с указанного ниже Web-узла.
http://www.adobe.com
Щелочные элементы
питания AA (
×2)
a
b
c
d
e
g
Камера
Карта памяти
(32 Мбайта)
Интерфейсный кабель
IFC-400PCU
Аудио/видеокабель
AVC-DC300
Компакт-диск Canon Digital
Camera Solution Disk
i
f
Наручный ремень
WS-800
Руководства пользователя
Руководство по началу работы
h
Гарантийный талон
на русском языке
Компакт-диск Canon
Digital Camera Manuals
Disk (с руководствами)
1
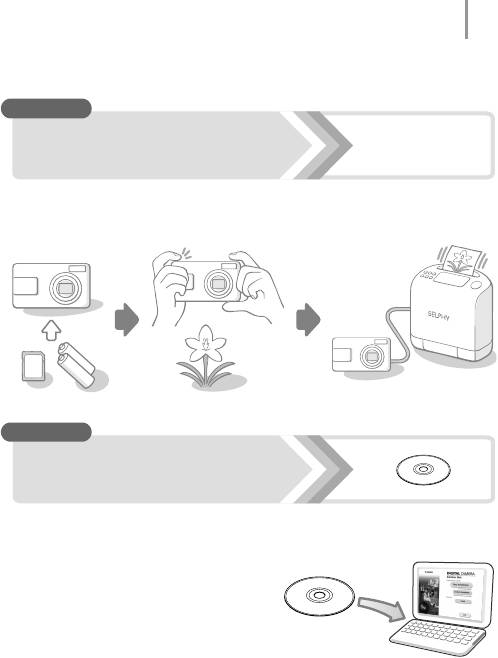
Приступаем!
Для просмотра руководств в формате PDF требуется программа
Adobe Reader.
Загрузите ее с web-узла http://www.adobe.com
В этом разделе рассматривается подготовка камеры к работе и основные
операции съемки, просмотра и печати изображений. Начните со знакомства
с камерой и освоения основных операций.
Освоив основные операции, переходите к использованию многочисленных
функций камеры для съемки более сложных фотографий.
Руководства в формате PDF находятся
на прилагаемом компакт-диске.
Сначала…
Далее…
Руководства в формате PDF
Начало работы
стр. 7
Содержание
5
Условные обозначения
О данном Руководстве
Этим символом обозначается важная информация, относящаяся
к работе камеры.
Этим символом обозначаются сведения, дополняющие основные
операции.
Инструкции в данном Руководстве относятся к настройкам камеры, по умолчанию
установленным на момент ее приобретения. Технические характеристики могут
быть изменены без предварительного уведомления. В результате иллюстрации
и примеры экранов, используемые в данном Руководстве, могут отличаться
от фактического вида камеры.
59
Ши
ро
ко испо
ль
зу
ем
ые фу
нкци
и
съем
ки
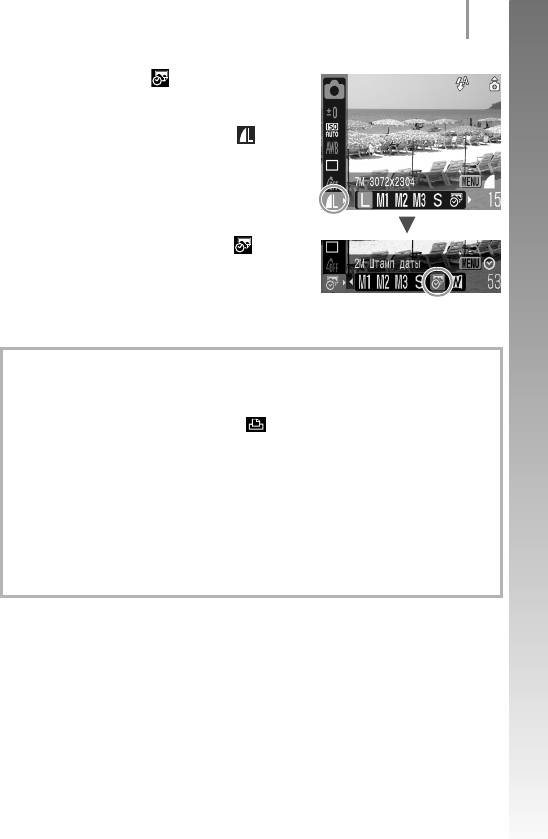
Использование вспышки
Доступные режимы съемки
стр. 176
1
Нажмите кнопку .
1. Кнопкой
W или X измените режим
работы вспышки.
: [Авто]
: [Вкл.]
: [Выкл.]
• Нажав кнопку MENU во время отобра-
жения данного экрана, можно задать
подробные настройки вспышки
(стр. 70)
.
— Замедл. синхр., Коррекция кр. Глаз, Лампа кр.гл.
Положение диска установки режима
В некоторых режимах съемки часть
функций может быть недоступна. Если
на этот счет нет никаких указаний, функция
может использоваться во всех режимах.
Обязательно прочитайте эти параграфы
6
Обязательно прочитайте эти параграфы
Тестовые снимки
Перед съемкой важных сюжетов настоятельно рекомендуется снять несколько пробных
кадров, чтобы убедиться в правильности работы камеры.
Обратите внимание на то, что компания Canon Inc., ее филиалы и дочерние компании, а также
дистрибьюторы не несут никакой ответственности за любой ущерб, обусловленный какой-
либо неисправностью камеры и ее принадлежностей (включая карты памяти), приводящей
к сбою в записи изображения или к записи изображения не тем способом, на который
рассчитан аппарат.
Предостережение в отношении нарушения авторских прав
Обратите внимание, что цифровые камеры Canon предназначены для личного использования
и ни при каких обстоятельствах не должны использоваться для целей, нарушающих или
противоречащих международным или местным законам и положениям по защите авторских
прав. В некоторых случаях копирование с помощью камеры или иного устройства изображений,
снятых во время спектаклей или выставок, а также снимков объектов коммерческого назначения
может являться нарушением авторских прав или других установленных законодательством
прав даже в том случае, если съемка изображения была произведена в целях личного
использования.
Ограничения действия гарантии
Условия гарантии на камеру см. в гарантийном талоне.
Адреса службы поддержки клиентов Canon см. в гарантийном талоне.
Видеоформат
Перед использованием камеры совместно с телевизором установите в камере тот формат
видеосигнала, который используется в Вашем регионе.
Установка языка меню
Порядок изменения языка меню см. в разделе Установка языка
(стр. 13)
.
Температура корпуса камеры
Если камера используется в течение длительного времени, корпус камеры может нагреваться.
Помните об этом и соблюдайте осторожность при работе с камерой в течение длительного
времени.
ЖК-монитор
Жидкокристаллический монитор изготавливается с использованием высокопрецизионных
технологий. Более 99,99% пикселов работают в соответствии с техническими требованиями.
Менее 0,01 % пикселов могут иногда не срабатывать или отображаться в виде красных или
черных точек. Это не оказывает никакого воздействия на записанное изображение и не
является неисправностью.
Начало работы
Запечатлейте незабываемые моменты
8
Запечатлейте незабываемые моменты
Раздел: Бытовая, кухонная техника, электроника и оборудование
Тип: Цифровая Фотокамера
Характеристики, спецификации
Разрешение матрицы:
7.1 Мпикс
Функция «Оптический Zoom»:
3.4x
Дисплей:
TFT 2.5″ встроенный
Фокусное расстояние:
6.3-21.6 мм
Фокусное расстояние (35 мм):
38-132 мм
Режимы фокусировки:
автоматический
Тип автофокусировки:
TTL phase detection
Минимальная дальность фокусировки (макросъемка):
1 см
Светосила объектива:
F/3.0-5.8
Настройка зума:
электропривод
Функция «Цифровой Zoom»:
4x
Стабилизатор изображения:
электронный
Чувствительность матрицы:
ISO 100, ISO 1600, ISO 200, ISO 400, ISO 80, ISO 800
Замер экспозиции:
оценочный, точечный, центрально-взвешенный
Экспокоррекция:
+/- 2 EV с шагом 1/3 ступени
Скорость затвора:
1/2000 — 15 сек
Баланс белого:
автоматический, из списка, ручная установка
Настройки баланса белого:
дневной свет, лампа накаливания, облачность, флюоресцентное освещение
Режимы съемки:
автопортрет, аквариум, дети и животные, закат, листва, макро, ночной, пляж, помещение, портрет, фейерверк
Серийная съемка, кадров/сек.:
1.9
Таймер:
Есть, 2 сек., 10 сек.
Запись фото:
JPEG — 1600 x 1200
Запись видео:
160 x 120 — 15 g
Режимы вспышки:
автоматический, выключена, подавление «эффекта красных глаз»
Максимальная дальность работы:
3 м
Поддерживаемые форматы карт памяти:
MultiMediaCard, SD, SDHC
Поддерживаемый стандарт батарей:
AA
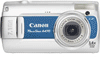
Инструкция к Цифровой Фотокамере Canon POWERSHOT A470
РУССКИЙ
Руководство по началу работы
Обязательно ознакомьтесь с мерами предосторожности
(внутренняя сторона задней обложки)
CEL-SH5GA200
Проверка комплектности
Ниже показан комплект поставки. Если чего-либо не хватает, обращайтесь в магазин,
в котором была приобретена камера.
a
Камера Карта памяти
bc
Щелочные элементы
питания AA (×2)
(32 Мбайта)
Интерфейсный кабель
Аудио/видеокабель
Наручный ремень
de
f
IFC-400PCU
AVC-DC300
WS-800
Компакт-диск Canon Digital
g
h
Гарантийный талон
Camera Solution Disk
на русском языке
Руководства пользователя
i
Руководство по началу работы
Компакт-диск Canon
(данное Руководство)
Digital Camera Manuals
Disk (с руководствами)
Карта памяти, входящая в комплект поставки камеры, может не обеспечивать
полное использование возможностей камеры.
С этой камерой можно использовать карты памяти SD, SDHC
(SD High Capacity – SD большой емкости), MultiMediaCard, MMCplus
и HC MMCplus. В настоящем Руководстве для этих карт используется
общий термин «карта памяти».
Просмотр Руководств в формате PDF
Для просмотра Руководств в формате PDF необходимо установить
программу Adobe Reader. Если в компьютере отсутствует эта
программа, загрузите ее с указанного ниже Web-узла.
http://www.adobe.com
1
Приступаем!
Сначала…
Настоящее
Начало работы
Руководство
В этом разделе рассматривается подготовка камеры к работе и основные
операции съемки, просмотра и печати изображений. Начните со знакомства
с камерой и освоения основных операций.
Далее…
Руководства в формате PDF
Освоив основные операции, переходите к освоению многочисленных функций
камеры для съемки более сложных фотографий.
Руководства в формате PDF находятся
на прилагаемом компакт—диске.

2
Обязательно прочитайте эти параграфы
Обязательно прочитайте эти параграфы
Тестовые снимки
Перед съемкой важных сюжетов настоятельно рекомендуется снять несколько пробных кадров,
чтобы убедиться в правильности работы камеры.
Обратите внимание на то, что компания Canon Inc., ее филиалы и дочерние компании, а также
дистрибьюторы не несут никакой ответственности за любой ущерб, обусловленный какой—либо
неисправностью камеры и ее принадлежностей (включая карты памяти), приводящей к сбою
в записи изображения или к записи изображения не тем способом, на который рассчитан аппарат.
Предостережение в отношении нарушения авторских прав
Обратите внимание, что цифровые камеры Canon предназначены для личного использования
и ни при каких обстоятельствах не должны использоваться для целей, нарушающих или проти—
воречащих международным или местным законам и положениям по защите авторских прав.
В некоторых случаях копирование с помощью камеры или иного устройства изображений,
снятых во время спектаклей или выставок, а
также снимков объектов коммерческого наз—
начения может являться нарушением авторских прав или других установленных законода—
тельством прав даже в том случае, если съемка изображения была произведена в целях
личного использования.
Ограничения действия гарантии
Условия гарантии на камеру см. в гарантийном талоне на русском языке, входящем в комплект
поставки камеры.
Адреса службы поддержки клиентов Canon см. в гарантийном талоне на русском языке.
Температура корпуса камеры
Если камера используется в течение длительного времени, корпус камеры может нагреваться.
Помните об этом и соблюдайте осторожность при работе с камерой в течение длительного
времени.
ЖК—монитор
Жидкокристаллический монитор изготавливается с использованием высокопрецизионных
технологий. Более 99,99% пикселов работают в соответствии с техническими требованиями.
Менее 0,01 % пикселов могут иногда не срабатывать или отображаться в виде красных или
черных точек. Это не оказывает никакого влияния на записываемое изображение и не является
неисправностью.
Видеоформат
Перед использованием камеры совместно с телевизором установите в камере тот формат
видеосигнала, который используется в Вашем регионе.
Установка языка меню
Порядок изменения языка меню см. в разделе Установка языка (стр.9).

3
Начало работы
” Подготовка (стр. 5)
” Съемка фотографий (стр. 10)
” Просмотр фотографий (стр. 12)
” Стирание (стр. 13)
” Печать (стр. 14)
” Включение даты в данные изображения (стр. 16)
” Съемка видеофильмов (стр. 18)
” Просмотр видеофильмов (стр. 20)
” Загрузка изображений в компьютер (стр. 21)
” Состав системы (стр. 28)
4
Запечатлейте незабываемые моменты
Начало работы
Запечатлейте незабываемые моменты
Подготовка
5
Начало работы
Подготовка
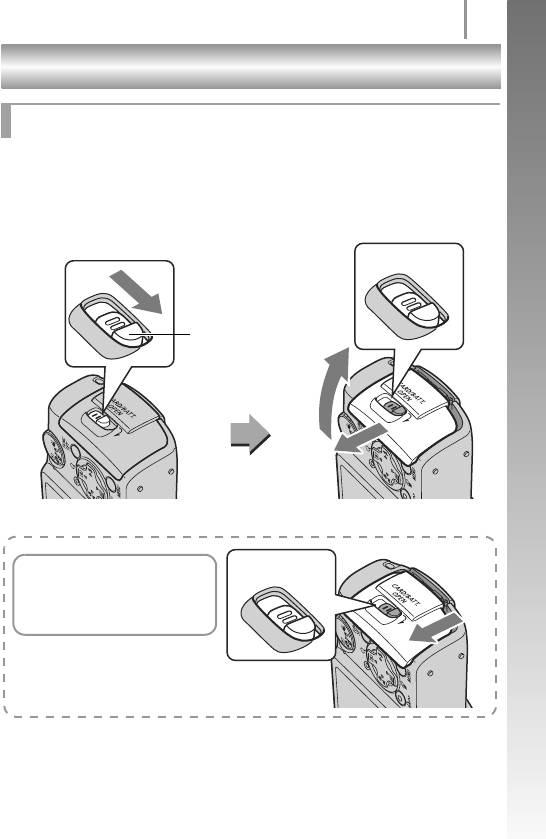
Установка элементов питания и карты памяти
a Сдвиньте фиксатор крышки отсека элементов питания в направле—
нии стрелки (a) и, удерживая его в этом положении, переместите
всю крышку в направлении стрелки (b), затем откройте ее вверх
в направлении стрелки (
c).
Удерживайте
фиксатор открытым
a
Фиксатор крышки отсека
элементов питания
c
b
Удерживайте
Целиком сдвигая крышку отсека
фиксатор открытым
элементов питания в направлении
стрелки, обязательно удерживайте
фиксатор крышки открытым.

6
Подготовка
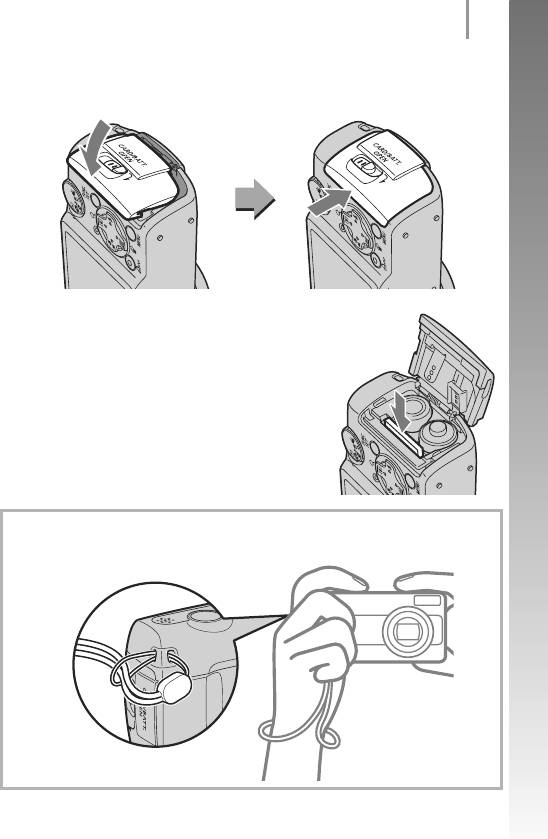
b Установите два элемента питания.
Положительный полюс (+)Отрицательный полюс (—)
Внимание!
Проверьте правильность
Начало работы
полярности элементов
питания.
c Установите карту памяти до фиксации со щелчком.
Внимание!
Обратная
Проверьте правильность ориентации карты
сторона
памяти.
Только карты памяти SD и SDHC
Язычок защиты от записи
Убедитесь, что язычок защиты
от записи разблокирован.
Передняя сторона
Если по ошибке вставить карту памяти обратной стороной, камера
может не распознать карту памяти или могут возникнуть неполадки
вработе камеры.
Подготовка
7
Начало работы
d Закройте крышку (a), затем нажмите на крышку и сдвиньте
ее до щелчка в фиксаторах (b).
a
b
Извлечение карты памяти
• Пальцем нажмите на карту памяти до щелчка
в фиксаторах, затем отпустите ее.
Во избежание падения камеры во время работы с нею рекомендуется
надевать наручный ремень.
8
Подготовка
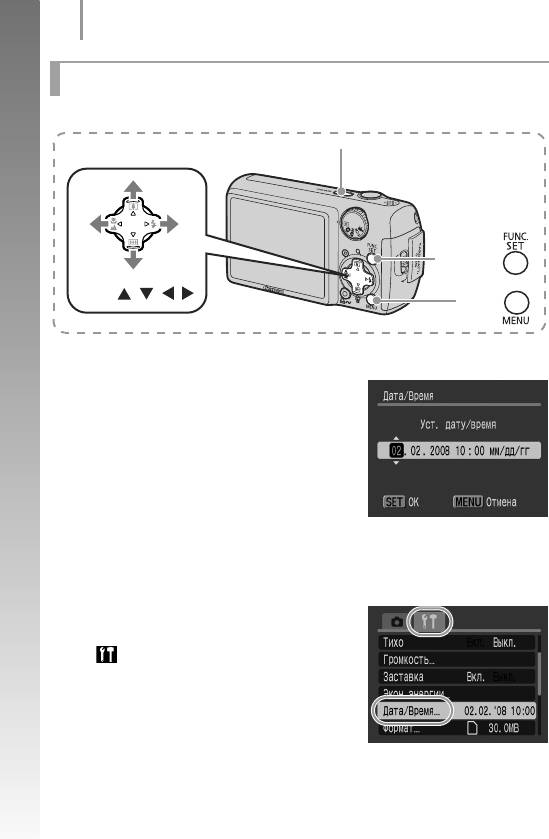
Установка даты и времени
При первом включении питания отображается меню установки даты/времени.
Кнопка питания
a
ON/OFF
Начало работы
b
Кнопка
c
Кнопки ///
Кнопка
a Нажмите кнопку ON/OFF.
b Выберите месяц, число, год и время,
атакже порядок их отображения.
1. Кнопкой
v или w выберите категорию.
2. Кнопкой r или s установите значение.
c Нажмите кнопку FUNC./SET.
Для изменения ранее установленных даты и времени
В соответствии с приведенными ниже инструкциями откройте окно установки
даты и времени, затем выполните приведенные выше шаги
b—c.
1. Нажмите кнопку MENU.
2. Кнопкой
v или w выберите меню
(Настройка).
3. Кнопкой r или s выберите пункт
[Дата/Время].
4. Нажмите кнопку FUNC./SET.
5. Нажмите кнопку MENU.
Подготовка
9
Начало работы
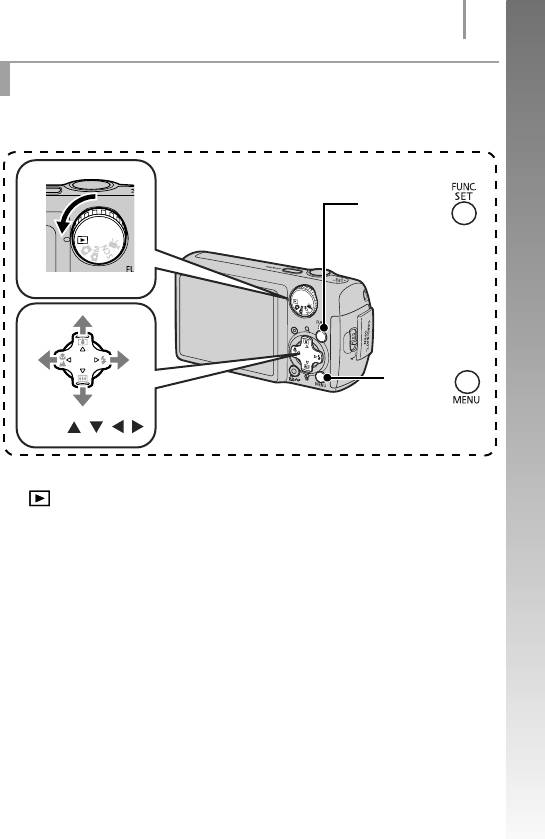
Установка языка
Можно изменить язык, на котором на ЖК—мониторе отображаются меню
и сообщения.
a
Кнопка
bd
Диск установки режима
c
b
Кнопка
Кнопки ///
a Поверните диск установки режима в положение
(Воспроизведение).
b Удерживая нажатой кнопку FUNC./SET, один раз нажмите
кнопку MENU.
c Кнопкой r, s, v или w выберите язык.
d Нажмите кнопку FUNC./SET.
10
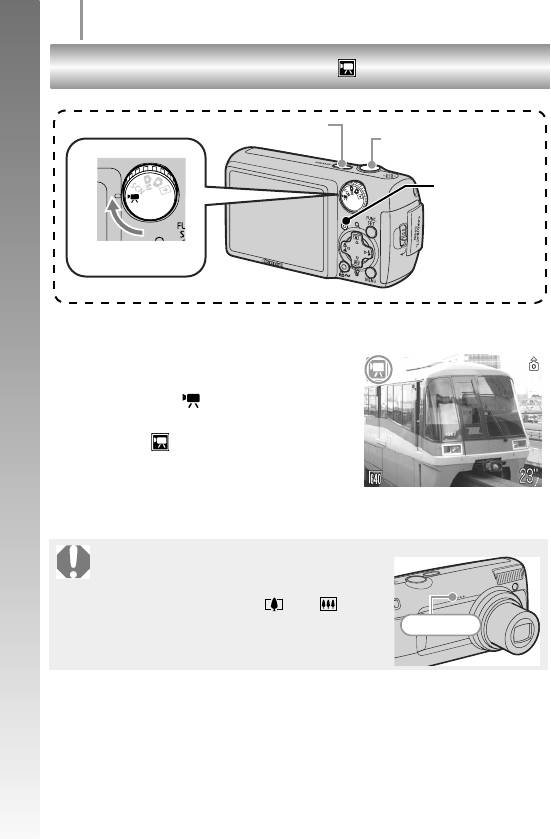
Съемка фотографий
Съемка фотографий
Начало работы
a
Нажмите кнопку ON/OFF.
• Воспроизводится звук включения питания, и на ЖК—монитор выводится
заставка.
• При повторном нажатии кнопки ON/OFF камера выключается.
• Для переключения в режим, в котором отключены все звуковые сигналы,
нажмите кнопку MENU и, удерживая ее нажатой, нажмите кнопку ON/OFF.
Значение параметра [Тихо] можно также изменить в меню (Настройка).
b Выберите режим съемки.
1. Поверните диск установки режима
вположение (Авто).
c Направьте камеру на объект.
Как избежать сотрясения камеры
Надежно удерживая камеру по краям, прижмите
руки к телу. Эффективной мерой является
установка камеры на штатив.
d Для осуществления фокусировки слегка (наполовину) нажмите
кнопку спуска затвора.
• После завершения фокусировки подаются два звуковых сигнала и индикатор
загорается зеленым светом (оранжевым, если будет использована вспышка).
(
Автоматический режим
)
Кнопка ON/OFF
a
Кнопка спуска
de
затвора
b
Индикатор
Диск установки режима
Съемка фотографий
11
Начало работы
e Ничего больше не изменяя, произведите съемку, полностью
нажав кнопку спуска затвора.
• Подается один звуковой сигнал срабатывания затвора, и производится
запись изображения.
• Сразу после съемки снятое изображение отображается на ЖК—мониторе
в течение приблизительно 2 с* (Просмотр снимка). Съемка возможна даже
в том случае, если на экране отображается ранее снятое изображение.
* Длительность отображения изображений можно изменить с помощью параметра
[Просмотр снимка] в меню (Меню съемки).
• Если после съемки удерживать нажатой кнопку спуска затвора, изображение
остается на экране.
• Индикатор мигает зеленым цветом, и файл записывается на карту памяти.
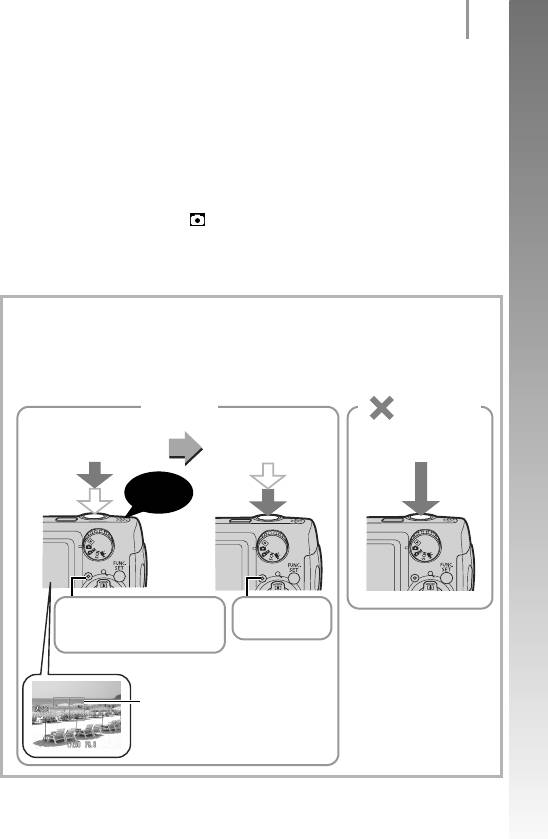
Для съемки сфокусированных изображений
Камера автоматически устанавливает фокусировку при нажатии кнопки спуска
затвора наполовину*.
* Кнопка спуска затвора имеет двухступенчатое управление. Нажатие до первого положения
называется «нажатием наполовину».
Правильно
Неправильно
Нажмите наполовину
Нажмите полностью
Просто полное нажатие
для фокусировки
Звуковые
сигналы
Подготовка к съемке завершена:
Запись: мигает
горит зеленым цветом (оранжевым,
зеленым цветом
если сработает вспышка)
В точках, на которые произведена
фокусировка, рамки автофокуси—
ровки отображаются зеленым цветом.
12
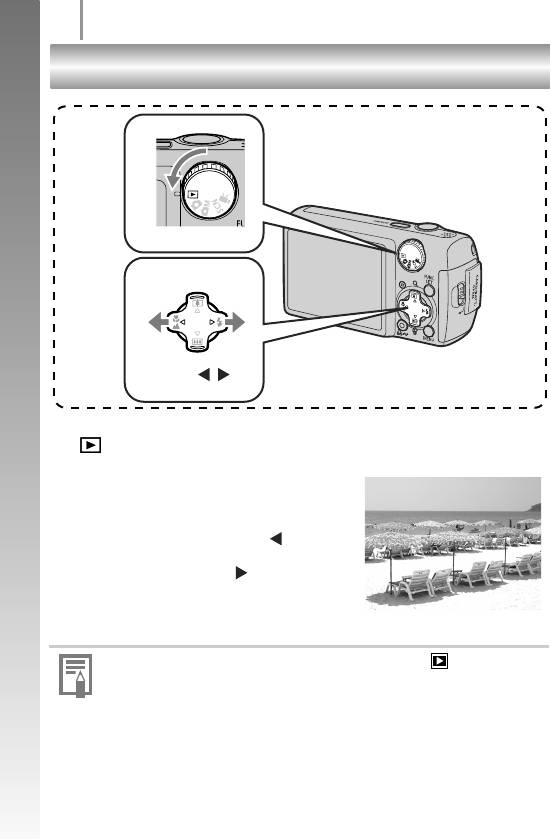
Просмотр фотографий
Просмотр фотографий
a
Начало работы
Диск установки режима
b
Кнопки /
a Поверните диск установки режима в положение
(Воспроизведение).
b Кнопкой v или w выберите
изображение для просмотра.
• Для перемещения к предыдущему
изображению служит кнопка ,
для перемещения к следующему
изображению — кнопка .
• Если постоянно удерживать кнопку
нажатой, переход между изображениями
производится быстрее, но качество изображения будет ниже.
” Устанавливая для параметра [Отображать] в меню (Меню показа)
значение [Посл.просм]* или [Посл.снят.], можно выбирать изображение,
которое будет отображаться в режиме
воспроизведения (* Настройка
по умолчанию). Если выбран вариант [Посл.просм], отображается
последнее просматривавшееся изображение (Возобновление
воспроизведения).
” При указанных ниже операциях отображается последнее снятое изобра—
жение, независимо от значения параметра [Отображать]:
съемка изображения, смена карты памяти или редактирование изобра—
жения на карте памяти с помощью компьютера.
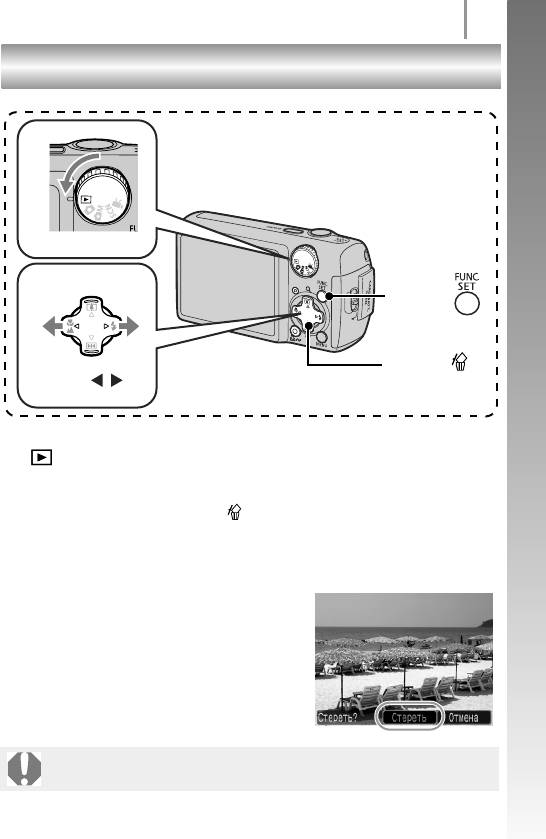
Стирание
13
Начало работы
Стирание
a
Диск установки режима
b
Кнопка
c
Кнопка
b
Кнопки /
a
Поверните диск установки режима в положение
(Воспроизведение).
b Кнопкой v или w выберите изображение, которое требуется
стереть, и нажмите кнопку .
c Убедитесь, что выбран вариант [Стереть], и нажмите кнопку
FUNC./SET.
• Для выхода из операции без выполнения
стирания выберите [Отмена].
Помните, что стертые изображения невозможно восстановить. Будьте
внимательны при стирании изображений.
14
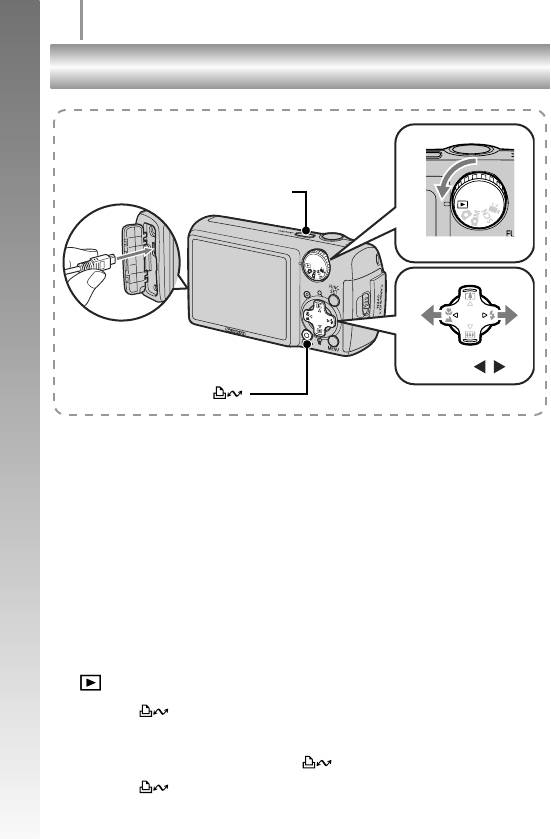
Печать
Печать
c
Начало работы
Кнопка ON/OFF
c
a
Диск установки режима
d
Кнопки /
Кнопка
d
a
Подключите камеру к принтеру, поддерживающему прямую
печать.
• Откройте крышку разъемов на камере и полностью вставьте интерфейсный
кабель в разъем.
• Инструкции по подключению см. в руководстве пользователя принтера.
• Так как в данной камере используется стандартный протокол (PictBridge),
ее можно использовать не только с принтерами марки Canon, но и с
другими принтерами, поддерживающими стандарт PictBridge. Подробнее
см. Руководство по прямой печати.
b Включите принтер.
c Поверните диск установки режима камеры в положение
(Воспроизведение) и нажмите кнопку ON/OFF.
• Кнопка подсвечивается синим цветом.
d Кнопкой v или w выберите изображение, которое требуется
напечатать, и нажмите кнопку .
• Кнопка мигает синим цветом, и начинается печать.
Печать
15
Начало работы
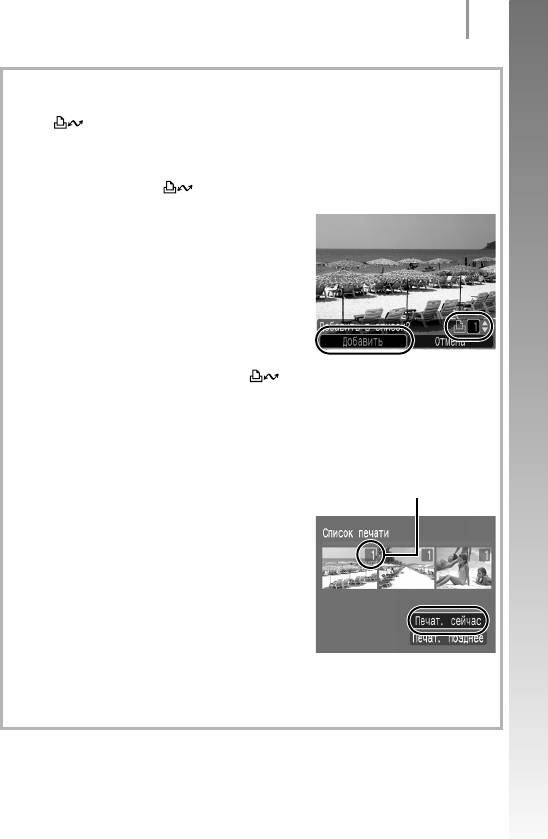
Печать из списка печати
Можно добавлять изображения непосредственно в список печати, просто нажимая
кнопку сразу после съемки или просмотра изображения. Затем при подклю—
чении камеры к принтеру можно легко напечатать изображения из списка печати.
Добавление в список печати
a Нажмите кнопку (только для фотографий).
b Добавьте в список печати.
1. Кнопкой
r или s задайте количество
печатаемых экземпляров.
2. Кнопкой v или w выберите пункт
[Добавить].
3. Нажмите кнопку FUNC./SET.
• Для удаления изображения из списка
печати снова нажмите кнопку , кнопкой v или w выберите пункт
[Удалить] и нажмите кнопку FUNC./SET.
Печать изображений из списка печати
Данные инструкции основаны на примере принтера серии Canon SELPHY ES
или SELPHY CP.
a Подключите камеру к принтеру.
Число печатаемых экземпляров
b Выполните печать.
1. Кнопкой
r или s выберите пункт
[Печат. сейчас].
• С помощью кнопки v или w можно
проверить изображения, добавленные
всписок печати.
2. Нажмите кнопку FUNC./SET.
• Начинается печать.
• В случае остановки печати и ее последующего возобновления печать
начинается со следующего изображения из очереди.
16
Включение даты в данные изображения
Включение даты в данные изображения
В этом разделе рассматривается включение даты в изображения во время
их записи (Штамп даты).
• После встраивания штампа с датой его невозможно удалить из изображения.
Начало работы
Заранее установите в камере правильные дату и время (стр. 8).
• Для размера изображения фиксируется значение 2M (1600 × 1200), а для
компрессии — значение «Хорошо» (подходит для печати фотографий формата L
или формата
почтовой открытки).
b
Кнопка ON/OFF
a
Диск установки режима
c
Кнопка
c
Кнопка
Кнопки ///
a Нажмите кнопку ON/OFF.
b Поверните диск установки режима в положение (Авто).
• Эту настройку можно также произвести в режиме или .
Включение даты в данные изображения
17
Начало работы
c Выберите пункт (Штамп даты).
1. Нажмите кнопку FUNC./SET.
2. Кнопкой
r или s выберите .
3. Кнопкой v или w выберите .
• Непечатаемая область отображается
серым цветом.
• При нажатии кнопки MENU можно
переключиться в режим [Дата и время] с помощью кнопки v или w.
Для печати даты на изображениях без встроенного штампа даты можно
воспользоваться следующими способами.
• Установите
в камере функцию DPOF (Формат заказа цифровой печати).
На экране [Настройки печати] меню (Печать) установите для параметра
[Дата] значение [Вкл.].
• Подключите камеру к принтеру и впечатайте дату.
См. Руководство по прямой печати.
• Установите карту памяти в принтер и впечатайте дату.
См. руководство пользователя принтера.
• Используйте прилагаемое программное обеспечение.
См.
Вводное руководство по программному обеспечению.
18
Съемка видеофильмов
Съемка видеофильмов
Начало работы
a
Нажмите кнопку ON/OFF.
b Выберите режим съемки.
1. Поверните диск установки режима
вположение (Видео).
• Убедитесь, что в камере установлен
режим (Стандартный).
c Направьте камеру на объект.
” Не дотрагивайтесь до микрофона во время
съемки.
” Не нажимайте никакие кнопки, кроме
кнопки спуска затвора, или .
Звуки нажатия кнопок записываются
ввидеофильме.
(
Стандартный режим
)
Кнопка ON/OFF
a
de
Кнопка спуска
затвора
b
Индикатор
Диск установки режима
Микрофон

Съемка видеофильмов
19
Начало работы
d Для осуществления фокусировки слегка (наполовину) нажмите
кнопку спуска затвора.
• Когда камера сфокусируется, подаются два электронных звуковых сигнала
и индикатор загорается зеленым цветом.
• При наполовину нажатой кнопке спуска затвора автоматически устанавли—
ваются экспозиция, фокус и баланс белого.
e Ничего больше не изменяя, произведите съемку, полностью
нажав кнопку спуска затвора.
• Начинается запись.
• Во время съемки на ЖК—мониторе
отображаются прошедшее время
записи и символ [”ЗАП].
Прошедшее время
f Для остановки съемки снова нажмите кнопку спуска затвора
(полное нажатие).
• Индикатор мигает зеленым цветом, и данные записываются на карту памяти.
• Съемка автоматически останавливается по прошествии максимального
времени съемки, при переполнении встроенной памяти камеры или при
полном заполнении карты памяти.
20
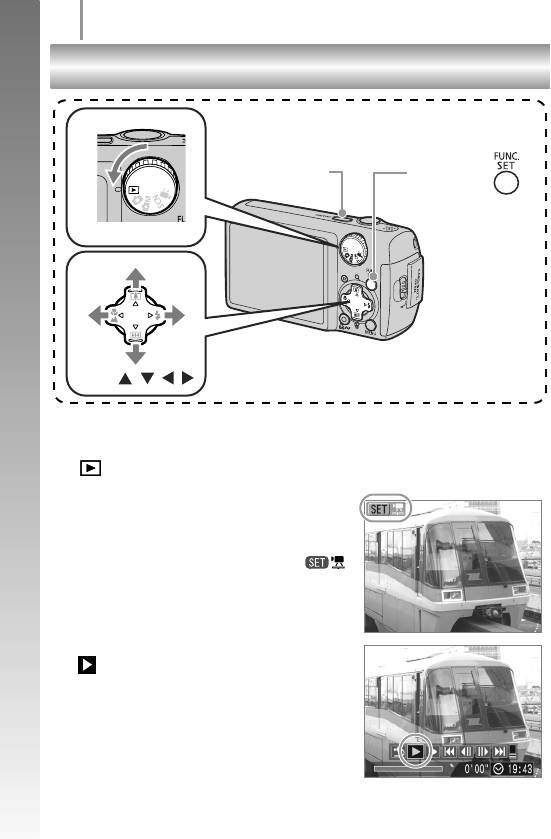
Просмотр видеофильмов
Просмотр видеофильмов
b
Начало работы
Кнопка
Кнопка ON/OFF
a
cd
Диск установки режима
cd
Кнопки ///
a
Нажмите кнопку ON/OFF.
b Поверните диск установки режима в положение
(Воспроизведение).
c Кнопкой v или w выведите на экран
видеофильм и нажмите кнопку
FUNC./SET.
• Видеофильмы помечаются значком .
d Кнопкой v или w выберите значок
(Показать) и нажмите кнопку
FUNC./SET.
• Начинается воспроизведение видеофильма.
• Нажимая кнопку FUNC./SET во время
просмотра, можно приостанавливать
и возобновлять воспроизведение
видеофильма.
• С помощью кнопки r или s можно
настраивать громкость воспроизведения.
Загрузка изображений в компьютер
21
Начало работы
Загрузка изображений в компьютер
Для загрузки изображений в компьютер рекомендуется использовать прилагаемое
программное обеспечение.
Что необходимо подготовить
• Камеру и компьютер
• Компакт—диск Canon Digital Camera Solution Disk, входящий в комплект поставки
камеры
• Интерфейсный кабель, входящий в комплект поставки камеры
Требования к системе
Программное обеспечение следует устанавливать на компьютер, удовлетворяющий
следующим минимальным требованиям.
Windows
ОС Windows Vista
Windows XP Service Pack 2
Windows 2000 Service Pack 4
Модель
Перечисленные выше операционные системы (ОС) должны быть установлены
компьютера
на заводе—изготовителе на компьютеры со встроенными USB-портами.
Процессор Windows Vista
: Pentium 1,3 ГГц или более мощный
Windows XP/Windows 2000
: Pentium 500 МГц или более мощный
ОЗУ Windows Vista
: Не менее 512 Мбайт
Windows XP/Windows 2000
: Не менее 256 Мбайт
Интерфейс USB
Свободное
• Утилиты Canon Utilities
пространство на
— ZoomBrowser EX
: не менее 200 Мбайт
жестком диске
— PhotoStitch
: не менее 40 Мбайт
•TWAIN—драйвер камеры Canon
: не менее 25 Мбайт
Монитор 1024 × 768 пикселов/Среднее (16 бит) качество цветопередачи или более
Macintosh
ОС Mac OS X (v10.3 — v10.4)
Модель
Перечисленные выше операционные системы (ОС) должны быть установлены
компьютера
на заводе—изготовителе на компьютеры со встроенными USB-портами.
Процессор PowerPC G3/G4/G5 или процессор Intel
ОЗУ Не менее 256 Мбайт
Интерфейс USB
Свободное
• Утилиты Canon Utilities
пространство на
— ImageBrowser
: не менее 300 Мбайт
жестком диске
— PhotoStitch
: не менее 50 Мбайт
Дисплей 1024 × 768 пикселов/32000 цветов или более
22
Загрузка изображений в компьютер
Подготовка к загрузке изображений
Пользователям ОС Windows 2000 необходимо установить программное
обеспечение до подключения камеры к компьютеру.
Начало работы
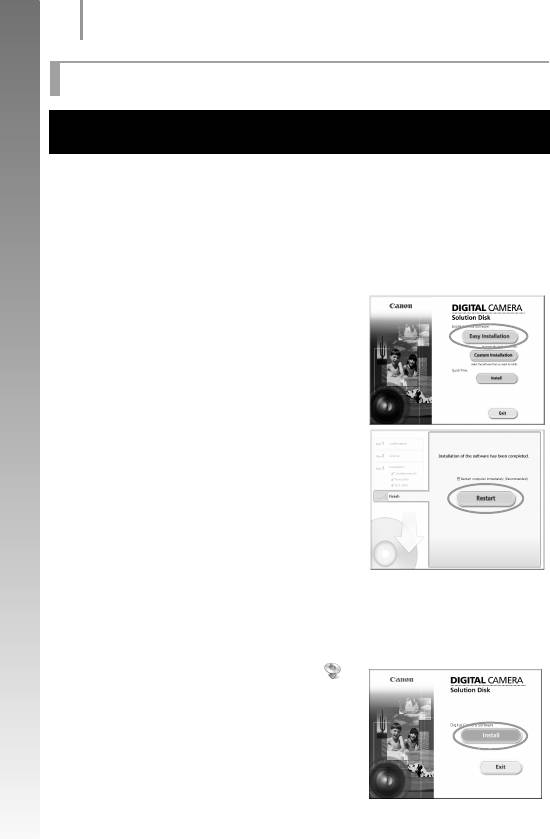
a Установите программное обеспечение.
Windows
1. Установите компакт—диск Canon Digital Camera Solution Disk в дисковод
компакт—дисков компьютера.
2. Щелкните мышью на варианте
[Easy Installation/Простая установка].
Продолжайте установку в соответствии
ссообщениями, выводимыми на экран.
3. После завершения установки щелкните
мышью на кнопке [Restart/Перезагрузка]
или [Finish/Готово].
После завершения установки отображается
кнопка [Restart/Перезагрузка] или [Finish/
Готово]. Щелкните мышью на появившейся
кнопке.
4. После появления на
экране обычного
рабочего стола извлеките компакт—диск
из дисковода.
Macintosh
Дважды щелкните мышью на значке
вокне компакт—диска. При появлении
панели программы установки щелкните
мышью на кнопке [Install/Установить].
Следуйте инструкциям, выводимым
на экран.
Загрузка изображений в компьютер
23
Начало работы
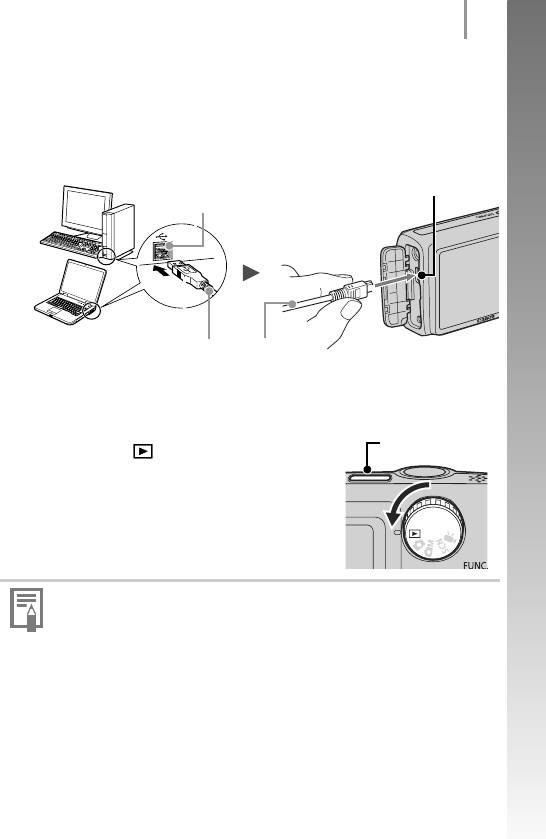
b Подсоедините камеру к компьютеру.
1. Подсоедините прилагаемый кабель интерфейса к USB-порту
компьютера и к разъему DIGITAL камеры.
• Откройте крышку разъемов на камере и полностью вставьте интер—
фейсный кабель в разъем.
Разъем DIGITAL
Порт USB
Интерфейсный кабель
c Подготовьтесь к загрузке изображений в компьютер.
1. Поверните диск установки режима камеры
Кнопка ON/OFF
в положение (Воспроизведение)
инажмите кнопку ON/OFF.
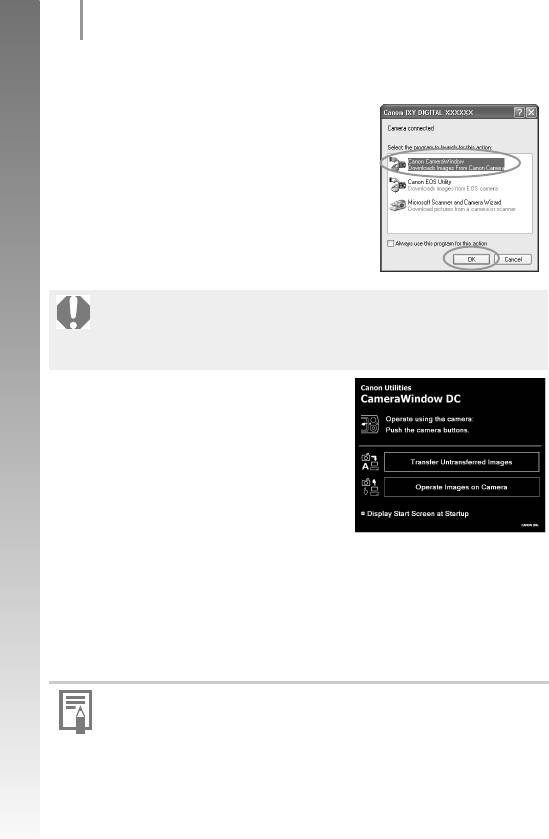
В случае появления окна [Digital signature not found/Цифровая подпись
не найдена] щелкните мышью на кнопке [Yes/Да]. После подсоединения
камеры к компьютеру и открытия соединения будет автоматически
завершена установка драйвера USB на компьютер.
24
Загрузка изображений в компьютер
d Отображение окна Camera Window.
Windows
Выберите [Canon CameraWindow] и щелкните
мышью на кнопке [OK].
Начало работы
Если это диалоговое окно события не открывается, щелкните мышью
на меню [Start/Пуск], выберите [All Programs/Все программы] или
[Programs/Программы], затем выберите [Canon Utilities], [CameraWindow],
[CameraWindow] и [CameraWindow].
Открывается окно [CameraWindow].
Macintosh
После установления соединения между камерой и компьютером открывается
окно CameraWindow. Если окно не открылось, щелкните мышью на значке
[CameraWindow] в доке (панель, появляющаяся в нижней части рабочего стола).
Подготовка к загрузке изображений завершена. Переходите к разделу
Загрузка изображений с помощью камеры (Прямая передача) (стр. 25)
(кроме ОС Windows 2000).
” Порядок загрузки изображений с помощью компьютера см. во Вводном
руководстве по программному обеспечению.
” При использовании ОС Windows 2000 загружайте изображения
с помощью команд компьютера.
Загрузка изображений в компьютер
25
Начало работы
Загрузка изображений с помощью камеры
(Прямая передача)
Этот способ позволяет загружать изображения с помощью органов управления
камеры (кроме ОС Windows 2000).
Перед первой загрузкой изображений с использованием прямой передачи
установите программное обеспечение (стр. 22).
a
Кнопка
Кнопки ///
Кнопка
Кнопка
b
a Убедитесь, что на ЖК—мониторе камеры отображается меню
«Прямая передача».
• Кнопка подсвечивается
синим цветом.
• Если меню «Прямая передача»
не открывается, нажмите
кнопку MENU.
Меню «Прямая передача»
b Нажмите кнопку .
• В компьютер загружаются изображения,
которые не были загружены ранее.
26
Загрузка изображений в компьютер
Для задания способа загрузки изображений можно также использовать следующие
пункты меню Прямая передача.
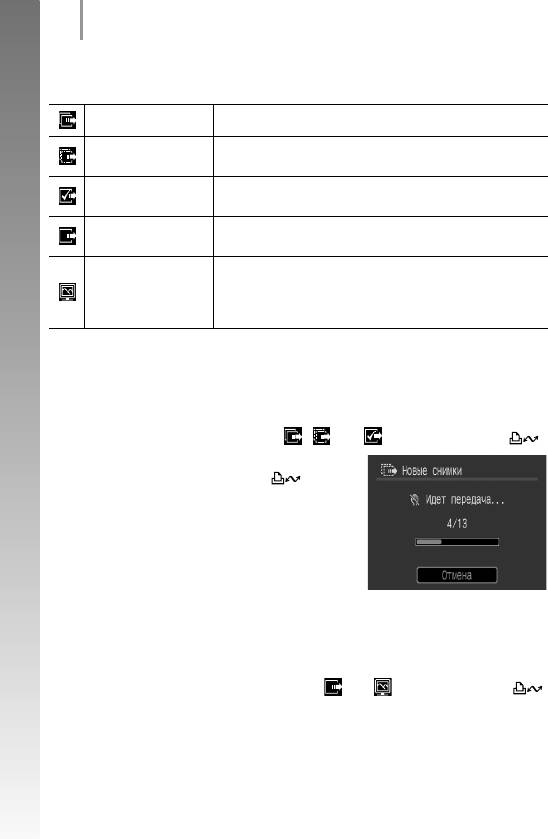
Передача и сохранение в компьютере всех изображений.
Все снимки
Передача и сохранение в компьютере только тех изобра—
Новые снимки
Начало работы
жений, которые не были переданы ранее.
Передача и сохранение в компьютере только изображений
DPOF снимки
с установленными заказами передачи DPOF.
Передача и сохранение в компьютере одиночных изобра—
Выбор и передача
жений по мере их просмотра и выбора.
Передача и сохранение в компьютере одиночных изобра—
жений по мере их просмотра и выбора. Переданные
Обои
изображения отображаются в виде фонового рисунка
рабочего стола компьютера.
Все снимки/Новые снимки/DPOF снимки
1. Убедитесь, что на ЖК—мониторе камеры отображается меню
«Прямая передача».
2. Кнопкой
r или s выберите , или и нажмите кнопку .
• Производится загрузка изображений.
Во время загрузки кнопка мигает
синим цветом.
• После завершения загрузки вновь
отображается меню «Прямая передача».
• Для отмены загрузки нажмите кнопку
FUNC./SET.
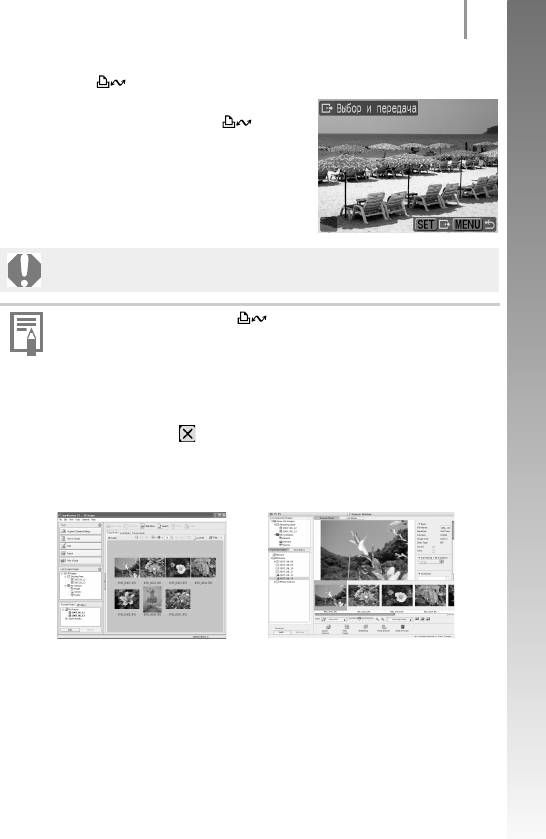
Выбор и передача/Обои
1. Убедитесь, что на ЖК—мониторе камеры отображается меню
«Прямая передача».
2. Кнопкой
r или s выберите значок или и нажмите кнопку
(или FUNC./SET).
Загрузка изображений в компьютер
27
Начало работы
3. Кнопкой
v или w выберите изображения для загрузки, затем нажмите
кнопку .
• Производится загрузка изображений.
Во время загрузки кнопка мигает
синим цветом.
4. После завершения загрузки нажмите
кнопку MENU.
• Снова открывается меню «Прямая
передача».
В качестве обоев в компьютер могут загружаться только изображения
JPEG.
Вариант, выбранный кнопкой , сохраняется даже при выключении
питания камеры. В следующий раз при открытии меню «Прямая передача»
будет активна предыдущая установка. Если в последний раз был выбран
вариант [Выбор и передача] или [Обои], сразу же открывается экран
выбора изображения.
Щелкните мышью на кнопке в правом нижнем углу окна для закрытия окна
CameraWindow, и загруженные изображения будут отображаться на
экране
компьютера.
Windows Macintosh
ZoomBrowser EX ImageBrowser
По умолчанию изображения сохраняются в компьютере в папках в соответствии
сдатой съемки.
28
Состав системы
Состав системы
Начало работы
Наручный ремень
Аудио/видеокабель
WS-800
1
AVC-DC300*
Интерфейсный кабель
1
IFC-400PCU*
Карта памяти
(32 Мбайта)
Щелочные элементы
питания AA (×2)
Компакт—диск Canon Digital
Camera Solution Disk
Вспышка повышенной
мощности HF-DC1
Комплект «Аккумуляторы
Комплект сетевого питания
6
изарядное устройство» CBK4-300*
ACK800
Зарядное устройство CB-5AH/CB-5AHE
NiMH аккумуляторы NB-3AH типо—
• Компактный блок питания
размера AA (×4)
CA-PS800
• Можно также отдельно приобрести
• Кабель питания
комплект из четырех никель—металло—
гидридных аккумуляторов типо—
размера AA (NB4-300)
• В этой камере используются два
аккумулятора
Состав системы
29
Начало работы
Разъем видеовхода Video IN
Разъем аудиовхода Audio IN
Телевизор/видеомагнитофон
Принтер Canon, поддерживающий
прямую печать с камер
Кабель интерфейса прямой печати
Струйные принтеры,
поддерживающие
2
прямую печать*
5
Карта памяти SD*
• SDC-128M
• SDC-512MSH
Компактные фотопринтеры
2
3
Compact Photo Printers*
*
Адаптер
Устройство
чтения карт с
(серия SELPHY)
PCMCIA
интерфейсом
USB
Порт USB
Гнездо PC Card
*1 Также продается отдельно.
*2 Дополнительную информацию о принтере см. в Руководстве пользователя принтера.
*3 Данная камера может также подключаться к принтерам CP-10/CP-100/CP-200/CP-300.
*4 Дополнительную информацию о принтере и кабеле интерфейса см. в Руководстве
пользователя струйного принтера.
*5 В некоторых регионах не продается.
*6
Можно также использовать комплект CBK4-200 (аккумуляторы и зарядное устройство).

30
Состав системы
Дополнительные принадлежности
Следующие принадлежности камеры продаются отдельно.
Некоторые принадлежности могут не продаваться в ряде регионов или могут быть
уже сняты с продажи.
Начало работы
Вспышка
• Вспышка повышенной мощности HF-DC1
Эта устанавливаемая на камеру дополнительная вспышка может использоваться
для съемки объектов, расположенных дальше зоны действия встроенной вспышки.
Источники питания
• Комплект сетевого питания ACK800
Этот комплект обеспечивает питание камеры от любой стандартной электрической
розетки. Рекомендуется для питания камеры во время длительных сеансов работы
или при подключении к компьютеру (не может использоваться для зарядки
аккумуляторов в камере).
• Комплект CBK4-300 (аккумуляторы и зарядное устройство)
Этот специальный комплект питания включает в себя зарядное устройство и
четыре
NiMH (никель—металлогидридных) аккумулятора типоразмера AA. Удобен при
съемке или просмотре большого количества изображений. Можно также отдельно
приобрести комплект NiMH аккумуляторов NB4-300, состоящий из четырех NiMH
аккумуляторов типоразмера AA.
Прочие принадлежности
• Карта памяти SD
Карты памяти SD служат для хранения изображений, снятых камерой.
Canon выпускает карты памяти емкостью 128 и 512 Мбайт.
• Интерфейсный кабель IFC-400PCU
Этот кабель служит для подключения камеры к компьютеру, к компактному
фотопринтеру Compact Photo Printer (серия SELPHY) или к струйному принтеру
(см. Руководство пользователя струйного принтера).
• Аудио/видеокабель AVC—DC300
Этот кабель служит для подключения камеры к
телевизору.

Состав системы
31
Начало работы
Принтеры, поддерживающие прямую печать
Компания Canon предлагает для использования с камерой следующие отдельно
продаваемые принтеры. Можно просто и быстро распечатывать фотографии,
подсоединив камеру к принтеру единственным кабелем. Управление осуществляется
кнопками камеры.
• Компактные фотопринтеры Compact Photo Printers (серия SELPHY)
• Струйные принтеры
За дополнительной информацией обращайтесь к ближайшему дилеру Canon.
Рекомендуется использовать оригинальные дополнительные
принадлежности компании Canon.
Данное изделие оптимизировано для работы с оригинальными дополнительными
принадлежностями компании Canon. Компания Canon не несет ответственности
за любые повреждения данного изделия и/или несчастные случаи, такие, как
возгорание и т.п., вызванные неполадками в работе дополнительных принадлеж—
ностей сторонних производителей (например, протечка и/или взрыв аккумулятора).
Обратите
внимание, что гарантия не распространяется на ремонт, связанный
снеправильной работой дополнительных принадлежностей сторонних произ—
водителей, хотя такой ремонт возможен на платной основе.

32
ДЛЯ ЗАМЕТОК
Начало работы
Меры предосторожности
Во избежание травм, ожогов или поражения электрическим током фотографа
и других лиц перед использованием камеры обязательно прочитайте, уясните
приведенные ниже правила техники безопасности и соблюдайте их.
Также обязательно ознакомьтесь с мерами предосторожности, приведен-
ными в Руководстве пользователя камеры в формате PDF.
Предостережения
• Запрещается применять вспышку в непосредственной близости от глаз человека
или животного.
• Оборудование следует хранить в местах, недоступных для детей и подростков.
• Не допускайте падения камеры или сильных ударов по ней. Не касайтесь
вспышки камеры, если она повреждена.
• Немедленно прекратите эксплуатацию оборудования в случае появления дыма
или резкого запаха.
• Запрещается прикасаться к сетевому кабелю влажными руками.
• Не используйте элементы питания, не предназначенные для этой камеры.
• Компактный блок питания предназначен исключительно для данного обору-
дования. Не используйте его с другими изделиями.
ОТПЕЧАТАНО В ЕС © CANON INC. 2008
Оглавление
Аннотации для Цифровой Фотокамеры Canon POWERSHOT A470 в формате PDF
Топ 10 инструкций
Другие инструкции
Выберите категорию материалов поддержки
-
Поиск драйверов последней версии для вашего продукта
-
ПО для удобства использования наших продуктов
-
Полезные руководства для эффективного использования продукта
-
Обзор приложений для вашего продукта
-
Поиск встроенного ПО последней версии для вашего продукта
-
Нужна помощь? Посмотрите раздел часто задаваемых вопросов
-
Посмотрите последние новости о вашем продукте
-
Технические характеристики
Ознакомьтесь с техническими характеристиками вашего продукта
Left Right
Вам также может понадобиться…

Свяжитесь с нами
Свяжитесь со службой поддержки продукции для дома по телефону или электронной почте

Canon ID
Регистрация продукта и управление аккаунтом Canon ID

Ремонт
Поиск центров по ремонту оборудования, полезная информация по процессу ремонта
или

-
Драйверы
14
-
Инструкции по эксплуатации
11
Языки:

Canon PowerShot A470 инструкция по эксплуатации
(218 страниц)
- Языки:Русский
-
Тип:
PDF -
Размер:
23.51 MB -
Описание:
Цифровая фотокамера
Просмотр

Canon PowerShot A470 инструкция по эксплуатации
(182 страницы)
- Языки:Русский
-
Тип:
PDF -
Размер:
4.11 MB -
Описание:
Please use Acrobat Reader v5.0 or less to view these files.
Просмотр

Canon PowerShot A470 инструкция по эксплуатации
(184 страницы)
- Языки:Английский
-
Тип:
PDF -
Размер:
5.07 MB
Просмотр

Canon PowerShot A470 инструкция по эксплуатации
(182 страницы)
- Языки:Словацкий
-
Тип:
PDF -
Размер:
4.24 MB -
Описание:
Please use Acrobat Reader v5.0 or less to view these files.
Просмотр

Canon PowerShot A470 инструкция по эксплуатации
(182 страницы)
- Языки:Португальский
-
Тип:
PDF -
Размер:
4.68 MB -
Описание:
Please use Acrobat Reader v5.0 or less to view these files.
Просмотр

Canon PowerShot A470 инструкция по эксплуатации
(182 страницы)
- Языки:Нидерландский
-
Тип:
PDF -
Размер:
4.57 MB -
Описание:
Please use Acrobat Reader v5.0 or less to view these files.
Просмотр

Canon PowerShot A470 инструкция по эксплуатации
(182 страницы)
- Языки:Итальянский
-
Тип:
PDF -
Размер:
4.53 MB -
Описание:
Please use Acrobat Reader v5.0 or less to view these files.
Просмотр

Canon PowerShot A470 инструкция по эксплуатации
(182 страницы)
- Языки:Французский
-
Тип:
PDF -
Размер:
4.59 MB -
Описание:
Please use Acrobat Reader v5.0 or less to view these files.
Просмотр

Canon PowerShot A470 инструкция по эксплуатации
(182 страницы)
- Языки:Испанский
-
Тип:
PDF -
Размер:
4.55 MB -
Описание:
Please use Acrobat Reader v5.0 or less to view these files.
Просмотр

Canon PowerShot A470 инструкция по эксплуатации
(182 страницы)
- Языки:Немецкий
-
Тип:
PDF -
Размер:
4.26 MB -
Описание:
Please use Acrobat Reader v5.0 or less to view these files.
Просмотр

Canon PowerShot A470 инструкция по эксплуатации
(182 страницы)
- Языки:Чешский
-
Тип:
PDF -
Размер:
4.61 MB -
Описание:
Please use Acrobat Reader v5.0 or less to view these files.
Просмотр
На NoDevice можно скачать инструкцию по эксплуатации для Canon PowerShot A470. Руководство пользователя необходимо для ознакомления с правилами установки и эксплуатации Canon PowerShot A470. Инструкции по использованию помогут правильно настроить Canon PowerShot A470, исправить ошибки и выявить неполадки.

Данная инструкция на русском языке предназначена для фотокамеры
Canon PowerShot A470, описывает принцип работы и основные моменты эксплуатации устройства.
Производитель настойчиво рекомендует перед включением фотокамеры
внимательно изучить настоящую инструкцию.
Инструкция для фотокамеры
представлена в формате PDF. Все современные браузеры уже поддерживают данный формат и сложностей с открытием файла возникнуть не должно.
Но если открыть инструкцию все же не удается, то необходимо установить на компьютер программу для чтения PDF файлов, например, Acrobat Reader. Если у вас возникли сложности с открытием инструкции на смартфоне под управлением Android, нужно установить, например, Adobe Acrobat Reader.
Комментарии (0)
Комментарии про другие Фотокамеры
Другие Фотокамеры Canon
- Manuals
- Brands
- Canon Manuals
- Digital Camera
- PowerShot A470
- User manual
-
Contents
-
Table of Contents
-
Troubleshooting
-
Bookmarks
Quick Links
ENGLISH
Camera User Guide
p. 7
Getting Started
Ensure that you read the Safety Precautions
(pp.
144–149).
Downloaded From camera-usermanual.com Canon Manuals
Related Manuals for Canon PowerShot A470
Summary of Contents for Canon PowerShot A470
-
Page 1
ENGLISH Camera User Guide p. 7 Getting Started Ensure that you read the Safety Precautions (pp. 144–149). Downloaded From camera-usermanual.com Canon Manuals… -
Page 2: Confirming The Package Contents
• Software Starter Guide (Connecting the camera to a computer) Download ZoomBrowser EX/ImageBrowser Software Guide (PDF) from: http://web.canon.jp/imaging/information-e.htm You may not be able to achieve the full performance of this camera with the included memory card. Downloaded From camera-usermanual.com Canon Manuals…
-
Page 3
(If the software fails to install, please find the manuals in the Readme folder on the CD-ROM). Adobe Reader is required to view the PDF manuals. Please download from http://www.adobe.com Downloaded From camera-usermanual.com Canon Manuals… -
Page 4: Table Of Contents
Changing the Recording Pixels (Still Images) … 64 Changing the Compression (Still Images) ….65 Downloaded From camera-usermanual.com Canon Manuals…
-
Page 5: Table Of Contents
Erasing All Images ……. 114 Downloaded From camera-usermanual.com Canon Manuals…
-
Page 6
Specifications……..162 Index Functions Available in Each Shooting Mode Downloaded From camera-usermanual.com Canon Manuals… -
Page 7
Explanations in this guide are based on the camera’s default settings at time of purchase. Specifications are subject to change without prior notice. As a result, the illustrations and screenshots used in this guide may differ from the actual camera. Downloaded From camera-usermanual.com Canon Manuals… -
Page 8: Please Read
Please note that Canon Inc., its subsidiaries and affiliates, and its distributors are not liable for any consequential damages arising from any malfunction of a camera or accessory, including memory cards, that results in the failure of an image to be recorded or to be recorded in a way that is machine readable.
-
Page 9: Getting Started
System Map You can use SD memory cards, SDHC (SD High Capacity) memory cards, MultiMediaCards, MMCplus cards and HC MMCplus cards in this camera. These cards are collectively referred to as memory cards in this guide. Downloaded From camera-usermanual.com Canon Manuals…
-
Page 10
Capture Your Best Memories Capture Your Best Memories Downloaded From camera-usermanual.com Canon Manuals… -
Page 11: Preparations
(b) and opening it up in the direction of the arrow (c). Hold lock open Battery Cover Lock Hold lock open Be sure to hold the battery cover lock open while sliding the entire cover in the direction of the arrow. Downloaded From camera-usermanual.com Canon Manuals…
-
Page 12
Only SD and SDHC memory cards Write Protect Tab Confirm that the write protect tab is unlocked. Front The camera may fail to detect the memory card or malfunction if the memory card is inserted backward by mistake. Downloaded From camera-usermanual.com Canon Manuals… -
Page 13: To Remove The Memory Card
To Remove the Memory Card • Push the memory card with your finger until the memory card clicks and then release it. It is recommended to use the wrist strap to avoid dropping the camera during use. Downloaded From camera-usermanual.com Canon Manuals…
-
Page 14: Setting The Date And Time
Date/Time settings window. 1. Press the MENU button. 2. Use the button to select the (Set up) menu. 3. Use the button to select [Date/Time]. 4. Press the FUNC./SET button. 5. Press the MENU button. Downloaded From camera-usermanual.com Canon Manuals…
-
Page 15: Setting The Display Language
Button Mode Dial Button Buttons Set the mode dial to (Playback). Hold down the FUNC./SET button and press the MENU button once. Use the button to select a language. Press the FUNC./SET button. Downloaded From camera-usermanual.com Canon Manuals…
-
Page 16: Shooting Still Images ( Auto Mode)
Using a tripod is also effective. Press the shutter button lightly (press halfway) to set the focus. • When the camera focuses, it beeps twice and the indicator lights green (orange when the flash fires). Downloaded From camera-usermanual.com Canon Manuals…
-
Page 17: To Shoot Images In Focus
Just pressing fully to set the focus Beep, beep… Shooting Preparations Recording: Complete: lights green blinks green (orange when the flash fires) AF frames will display in green on the LCD monitor at the points of focus. Downloaded From camera-usermanual.com Canon Manuals…
-
Page 18: Viewing Still Images
(Resume Playback). The following actions will display the most recent image regardless of the [Resume] settings. Shooting an image, changing the memory card, or editing an image on the memory card using a computer. Downloaded From camera-usermanual.com Canon Manuals…
-
Page 19: Erasing
Confirm that [Erase] is selected and press the FUNC./ SET button. • To exit instead of erasing, select [Cancel]. Please note that erased images cannot be recovered. Exercise adequate caution before erasing an image. Downloaded From camera-usermanual.com Canon Manuals…
-
Page 20: Printing
• See the printer’s user guide for connection instructions. • Since this camera uses a standard protocol (PictBridge), you can use it with other PictBridge-compliant printers in addition to Canon-brand printers. Please see the Direct Print User Guide for more information. Turn on the printer.
-
Page 21
[Remove] and press the FUNC./SET button. Printing Images in a Print List This explanation is based on the use of a Canon SELPHY ES series or SELPHY CP series printer. Connect the camera to a printer. Number of copies to print Print. -
Page 22: Embedding The Date In The Image Data
Fine (appropriate for printing L-size or postcard-size prints). Power Button Mode Dial Button Button Buttons Press the power button. Set the mode dial to (Auto). • You can also make this setting in mode. Downloaded From camera-usermanual.com Canon Manuals…
-
Page 23
• Connect the camera to a printer and imprint the date. See the Direct Print User Guide. • Insert a memory card into the printer and imprint the date. See your printer user guide. • Use the supplied software. See the Software Starter Guide. Downloaded From camera-usermanual.com Canon Manuals… -
Page 24: Shooting Movies ( Standard Mode)
Aim the camera at the subject. Do not touch the microphone while recording. Do not press any buttons other than the shutter, button. The sound that buttons make will be Microphone recorded in the movie. Downloaded From camera-usermanual.com Canon Manuals…
-
Page 25
• The indicator will blink green and the data will be recorded onto the memory card. • Recording will stop automatically when the maximum recording time elapses, or the built-in memory or memory card become full. Downloaded From camera-usermanual.com Canon Manuals… -
Page 26: Viewing Movies
(Play) and press the FUNC./ SET button. • The movie will start playing. • If you press the FUNC./SET button during playback, you can pause and restart the movie. • You can adjust the playback volume with the button. Downloaded From camera-usermanual.com Canon Manuals…
-
Page 27: Downloading Images To A Computer
Items to Prepare • Camera and computer • Canon Digital Camera Solution Disk supplied with the camera • Interface cable supplied with the camera System Requirements Please install the software on a computer meeting the following minimum requirements.
-
Page 28: Preparing To Download Images
Windows 2000 users must install the software before connecting the camera to the computer. Installing the software. Windows 1. Place the Canon Digital Camera Solution Disk in the computer’s CD-ROM drive. 2. Click [Easy Installation]. Follow the onscreen messages to proceed with the installation.
-
Page 29: Connecting The Camera To A Computer
(Playback) and press the power button. If the Digital Signature Not Found window appears, click [Yes]. The USB driver will automatically finish installing onto the computer when you attach the camera and open a connection. Downloaded From camera-usermanual.com Canon Manuals…
-
Page 30
Displaying the Camera Window. Windows Select [Canon CameraWindow] and click [OK]. If this event dialog does not appear, click the [Start] menu and select [All Programs] or [Programs], followed by [Canon Utilities], [CameraWindow], [CameraWindow] and [CameraWindow]. CameraWindow will display. Macintosh CameraWindow will appear when you establish a connection between the camera and computer. -
Page 31: Direct Transfer
• The button will light blue. • Press the MENU button if the Direct Transfer menu fails to appear. Direct Transfer Menu Press the button. • Images not previously downloaded will download to the computer. Downloaded From camera-usermanual.com Canon Manuals…
-
Page 32
• To cancel the download, press the FUNC./SET button. Select & Transfer/Wallpaper 1. Confirm that the Direct Transfer menu is displayed on the camera’s LCD monitor. 2. Use the button to select and press the (or FUNC./SET) button. Downloaded From camera-usermanual.com Canon Manuals… -
Page 33
CameraWindow and the downloaded images will display on the computer. Windows Macintosh ZoomBrowser EX ImageBrowser By default, images are saved on the computer in folders according to the shooting date. Downloaded From camera-usermanual.com Canon Manuals… -
Page 34: System Map
AA-size NiMH batteries NB-3AH • Compact Power Adapter (×4) CA-PS800 • A separately sold four-cell set of • Power Cord AA-size nickel metal hydride batteries (NB4-300) is also available • Two batteries are used for this camera Downloaded From camera-usermanual.com Canon Manuals…
-
Page 35
*4 See the user guide supplied with the Bubble Jet printer for more information on the printer and interface cables. *5 Not sold in some regions. *6 The Battery and Charger Kit CBK4-200 can also be used. Downloaded From camera-usermanual.com Canon Manuals… -
Page 36: Optional Accessories
Other Accessories • SD Memory Card SD memory cards are used to store images recorded by the camera. Canon brand memory cards are available in 128 MB and 512 MB capacities. • Interface Cable IFC-400PCU Use this cable to connect the camera to a computer, Compact Photo Printer (SELPHY series), or to a Bubble Jet printer (refer to your Bubble Jet printer user guide).
-
Page 37: Direct Print Compatible Printers
System Map Direct Print Compatible Printers Canon offers the following separately sold printers for use with the camera. You can produce photo quality prints quickly and easily by connecting them to the camera with a single cable and operating the camera’s controls.
-
Page 38
Downloaded From camera-usermanual.com Canon Manuals… -
Page 39: Learning More
Learning More Downloaded From camera-usermanual.com Canon Manuals…
-
Page 40: Components Guide
AF-assist Beam (p. 47) Red-Eye Reduction Lamp (pp. 59, 70) Self-Timer Lamp (p. 62) Terminal Cover A/V OUT (Audio/Video output) Terminal (p. 129) DIGITAL Terminal (p. 27) DC IN (Power input) Terminal (p. 156) Lens Downloaded From camera-usermanual.com Canon Manuals…
-
Page 41: Back View
Memory Card Slot / Battery Cover (p. 9) Tripod Socket The LCD monitor may be covered with a thin plastic film for protection against scratches during shipment. If so, remove the film before using the camera. Downloaded From camera-usermanual.com Canon Manuals…
-
Page 42
(p. 41) (Macro)/ (Infinity)/ Button (p. 60) (Telephoto while shooting)/ (Magnify in Playback mode)/ Button (pp. 54, 96) (Flash)/ Button (p. 59) (Wide Angle while shooting)/ (Single Image Erase in Playback mode)/ Button (pp. 17, 54) Downloaded From camera-usermanual.com Canon Manuals… -
Page 43: Indicator
* Camera beeps once if difficult to focus. Never do the following while the indicator blinks green. These actions may corrupt image data. — Shake or jolt the camera — Shut off the power, or open the memory card slot/battery cover Downloaded From camera-usermanual.com Canon Manuals…
-
Page 44: Basic Operations
• After selecting an option, you can press the shutter button to shoot immediately. After shooting, this menu will appear again, allowing you to adjust the settings easily. Press the F F UNC./SET button. Downloaded From camera-usermanual.com Canon Manuals…
-
Page 45
FUNC./SET button to display the next menu. Press the FUNC./SET button again to confirm the setting, then press the MENU button to return to the menu screen. Press the M M ENU button. Downloaded From camera-usermanual.com Canon Manuals… -
Page 46: Information Displayed On The Lcd Monitor And Menus
About the Battery Charge Indicator When the battery charge is low, will blink in red in the LCD monitor. Change the battery as soon as possible if you intend to use the camera for an extended period of time. Downloaded From camera-usermanual.com Canon Manuals…
-
Page 47: Playback Mode
Overexposure Warning In the following cases, overexposed portions of the image blink. — When reviewing an image right after shooting in the LCD monitor (Detailed) — When using the Detailed Display mode of the Playback mode Downloaded From camera-usermanual.com Canon Manuals…
-
Page 48: Histogram Function
81 White Balance p. 86 Drive Mode pp. 62, 69 My Colors p. 89 (when Recording Pixels (Still image) p. 64 Date/Time not set Compression (Still image) pp. 64, 65 Recording Pixels (Movie) p. 74 Downloaded From camera-usermanual.com Canon Manuals…
-
Page 49: Rec. Menu
On/Off* p. 51 Review Off/2*–10 seconds/Hold p. 15 Review Info Off*/Detailed p. 51 Auto Category On*/Off p. 92 Disp. Overlay (Still image) Off*/Grid Lines/3 : 2 Guide/Both p. 91 (Movie) Off*/Grid Lines button p. 93 Downloaded From camera-usermanual.com Canon Manuals…
-
Page 50: Print Menu
Select Image & Qty. single images as you view them. Configures print settings for all p. 115 Select All Images images. Removes all print settings from Clear All Selections images. Print Settings Configures print styles. Downloaded From camera-usermanual.com Canon Manuals…
-
Page 51: Set Up Menu
Start-up Image On*/Off Sets whether or not the Start-up Image appears when the camera is turned Power Saving p. 121 Auto Power On*/Off Down Display Off 10 sec./20 sec./30 sec./1 min.*/2 min./3 min. Date/Time p. 12 Downloaded From camera-usermanual.com Canon Manuals…
-
Page 52
(Widescreen) mode at the full page setting for wide paper using a Canon SELPHY CP750/CP740/CP730/CP720/CP710/ CP510 Compact Photo Printer. Since this setting is saved even when the power is turned off, ensure that you return the setting to [Auto] to print other image sizes. -
Page 53: Using The Lcd Monitor
Rec. menu [Review Info] Off/Detailed reviewed right after shooting) During playback Play menu [Info Disp.] Off/Standard/Detailed (Playback mode) During Shooting (Shooting Mode) During Playback (Playback Mode)/Rec. Review (Reviewing an Image Right After Shooting) Standard Detailed (During playback only) Downloaded From camera-usermanual.com Canon Manuals…
-
Page 54: Review Info
Select [Info Disp.]. 1. Press the MENU button. 2. In the menu, use the button to select [Info Disp.]. Accept the setting. 1. Use the button to switch between options. 2. Press the MENU button. Downloaded From camera-usermanual.com Canon Manuals…
-
Page 55: Night Display
* Although noise may appear and the movement of the subject shown on the LCD monitor may appear somewhat jagged, there is no effect on the recorded image. The brightness of the image displayed in the monitor, and the brightness of the actual image recorded will be different. Downloaded From camera-usermanual.com Canon Manuals…
-
Page 56: Commonly Used Shooting Functions
The zoom can be adjusted from 38 mm – 132 mm (focal length) in 35mm film equivalent terms. Press the button. • Wide Angle: Zooms out from the subject. • Telephoto: Zooms in on the subject. Downloaded From camera-usermanual.com Canon Manuals…
-
Page 57: Using The Digital Zoom/Digital Tele-Converter
[Standard] or [Off]. The digital zoom cannot be used in (Date Stamp), or (Widescreen) modes. The [1.5x] and [1.9x] settings cannot be used in mode. Downloaded From camera-usermanual.com Canon Manuals…
-
Page 58
(not available in Safety Zoom Factor Recording Optical Zoom Digital Zoom pixels 3.4x 4.0x 5.1x 6.5x • Optical Zoom (Zone without deterioration) • Digital Zoom (Zone without deterioration) • Digital Zoom (Zoom with deterioration) Downloaded From camera-usermanual.com Canon Manuals… -
Page 59: Shooting With The Digital Zoom
• The combined digital and optical zoom factor will display in the LCD monitor. • The image may appear coarse depending upon the selected recording pixels (the zoom factor appears in blue). • Press the button to zoom out. Downloaded From camera-usermanual.com Canon Manuals…
-
Page 60
Adjust the angle of view with the button and shoot. • will appear on the LCD monitor. • The image may appear coarse depending upon the selected recording pixels (the icon and the zoom factor appear in blue). Downloaded From camera-usermanual.com Canon Manuals… -
Page 61: Using The Flash
— Slow Synchro, Red-Eye Correction, Red-Eye Lamp • The LCD monitor turns off while the flash charges. You are recommended to shoot with the camera attached to a tripod or other device if the camera shake warning icon appears. Downloaded From camera-usermanual.com Canon Manuals…
-
Page 62: Shooting Close-Ups/Infinity Shots
Press the button. 1. Use the button to select To Cancel the Macro/Infinity Mode Press the button and use the button to select (Normal). Using the flash in Macro mode may cause image edges to darken. Downloaded From camera-usermanual.com Canon Manuals…
-
Page 63
1. Set the mode dial to 2. Press the FUNC./SET button. 3. Use the button to select and choose with the button. 4. Press the FUNC./SET button. In Super Macro mode, the zoom level is fixed at maximum wide angle. Downloaded From camera-usermanual.com Canon Manuals… -
Page 64: Using The Self-Timer
• When you press the shutter button fully, the self-timer lamp will blink.* * When [Red-Eye Lamp] in [Flash Settings] is set to [On], the self-timer lamp will light 2 seconds before the flash fires 70). Downloaded From camera-usermanual.com Canon Manuals…
-
Page 65: Changing The Delay Time And Number Of Shots
— If the flash is used, the interval between shots lengthens because the flash must charge. — The interval between shots may lengthen when the built-in memory of the camera fills. — Shooting will automatically cease if the memory card becomes full. Downloaded From camera-usermanual.com Canon Manuals…
-
Page 66: Changing The Recording Pixels (Still Images)
Printing date-stamped images (p. 20) 1600 x 1200 in L-size (3.5 x 5 in.) or postcard-size pixels (you can check the print area at a 3:2 (Date Stamp) aspect ratio as you shoot). Downloaded From camera-usermanual.com Canon Manuals…
-
Page 67: Changing The Compression (Still Images)
3. Use the button to change the option. 4. Press the FUNC./SET button. Approximate Values for Compression Settings Compression Purpose High Quality Shoot higher quality images Superfine Shoot normal quality images Fine Normal Shoot more images Normal Downloaded From camera-usermanual.com Canon Manuals…
-
Page 68: Various Shooting Methods
Kids&Pets Allows you to capture subjects that move around, such as children and pets, without missing photo opportunities. Downloaded From camera-usermanual.com Canon Manuals…
-
Page 69
Shoots without a blue tinge and without making people appear dark against a snowy background. Beach Shoots without making people appear dark near water or sand where reflected sunlight is strong. Fireworks Captures fireworks in the sky sharply and at optimal exposure. Downloaded From camera-usermanual.com Canon Manuals… -
Page 70: Shooting In Manual Mode
Allows you to select settings yourself, such as the exposure compensation, white balance or my colors. Select Manual mode. 1. Set the mode dial to 2. Press the FUNC./SET button. 3. Use the button to select 4. Press the FUNC./SET button. Downloaded From camera-usermanual.com Canon Manuals…
-
Page 71: Continuous Shooting
(p. 122) is conducted immediately before shooting. • This reflects standard shooting criteria established by Canon. Actual results may vary according to the subject and shooting conditions. • Even if continuous shooting suddenly stops, the memory card may not be full.
-
Page 72: Setting The Flash
In either case, you can correct images with the [Red-Eye Correction] in the menu 105). Select [Flash Settings]. 1. Press the MENU button. 2. In the menu, use the button to select [Flash Settings]. 3. Press the FUNC./SET button. Downloaded From camera-usermanual.com Canon Manuals…
-
Page 73
2. Use the button to select [On] or [Off]. 3. Press the MENU button. • You can also display this menu by pressing the button, followed by the MENU button 59). Press the MENU button. Downloaded From camera-usermanual.com Canon Manuals… -
Page 74: Movie Shooting
Select a shooting mode. 1. Set the mode dial to 2. Press the FUNC./SET button. 3. Use the button to select and the button to change the option. 4. Press the FUNC./SET button. Downloaded From camera-usermanual.com Canon Manuals…
-
Page 75
When the factor displays in blue, the image will deteriorate. Only in in the Standard mode, the digital zoom can be used during shooting. QuickTime is required to play back movies (Data type: AVI/ Compression method: Motion JPEG) on a computer (Only Windows 2000). Downloaded From camera-usermanual.com Canon Manuals… -
Page 76
*2 To give priority to recording length over quality, select the option displaying [LP] (Long Play). For the same file size, you can record approximately twice the length. See Memory Cards and Estimated Capacities 167). See Image Data Sizes (Estimated) 169). Downloaded From camera-usermanual.com Canon Manuals… -
Page 77: Checking The Focus And People’s Expressions
— [Face Detect]: The face detected as the main subject will appear zoomed. — [Center]: The center of the LCD monitor will appear zoomed. If the subject is in focus, press the shutter button all the way to shoot. Downloaded From camera-usermanual.com Canon Manuals…
-
Page 78: Selecting An Af Frame Mode
The camera fixes the AF frame at the center. Center This is recommended when the target subject is at the center of the composition. Select [AF Frame]. 1. Press the MENU button. 2. In the menu, use the button to select [AF Frame]. Downloaded From camera-usermanual.com Canon Manuals…
-
Page 79
In certain cases, faces may not be detected. Examples: — If faces appear extremely small or large, dark or bright, relative to the overall composition. — Faces turned to the side or at a diagonal, or faces with a portion hidden. Downloaded From camera-usermanual.com Canon Manuals… -
Page 80: Selecting The Face To Focus On (Face Select And Track)
Aim the camera at the subject and press the button when the face is detected. • The Face Select mode will activate Face Frame and a green face frame ( ) will display around the main subject. Downloaded From camera-usermanual.com Canon Manuals…
-
Page 81
— Power is turned off and on again or shooting mode is changed — Digital zoom or Digital Tele-converter is used — Menu is displayed — Mode is changed to — Face is no longer detected — When the display is turned off Downloaded From camera-usermanual.com Canon Manuals… -
Page 82: Shooting Hard-To-Focus Subjects (Focus Lock)
AF frame only. When shooting the subjects through glass, try to shoot as close to the glass as possible to reduce the chances of light reflecting back off the glass. Downloaded From camera-usermanual.com Canon Manuals…
-
Page 83: Adjusting The Iso Speed
ISO speed. If the camera is set at , the ISO speed automatically set by the camera will be displayed when pressing shutter button halfway or in playback information. Downloaded From camera-usermanual.com Canon Manuals…
-
Page 84: Adjusting The Exposure Compensation
Adjust the exposure. 1. Press the FUNC./SET button. 2. Use the button to select and the button to adjust the setting. 3. Press the FUNC./SET button. To Cancel the Exposure Compensation Restore the compensation value to [0]. Downloaded From camera-usermanual.com Canon Manuals…
-
Page 85: Switching Between Metering Modes
[Light Metering]. Accept the setting. 1. Use the button to select a metering mode. 2. Press the MENU button. In Long Shutter mode, the metering mode is automatically fixed to [Evaluative]. Downloaded From camera-usermanual.com Canon Manuals…
-
Page 86: Setting A Slow Shutter Speed (Long Shutter Mode)
1.3 seconds or slower to eliminate the noise, thereby producing high-quality images. A certain amount of processing time, however, may be required before the next image can be shot. Downloaded From camera-usermanual.com Canon Manuals…
-
Page 87
Use of the flash may result in an over-exposed image. If this occurs, shoot with the flash set to The following are not available: — Exposure Compensation — Metering — ISO speed: Auto, High ISO Auto — Flash: Auto — Slow Synchro Downloaded From camera-usermanual.com Canon Manuals… -
Page 88: Adjusting The Tone (White Balance)
1. Press the FUNC./SET button. 2. Use the button to select and the button to change the option. 3. Press the FUNC./SET button. The white balance setting cannot be adjusted when is selected for My Colors. Downloaded From camera-usermanual.com Canon Manuals…
-
Page 89: Menu Button
• Ensure that the center frame is completely filled with the white image. Please note that the center frame will not appear when the digital zoom is in use displays. Press the F F UNC./SET button. Downloaded From camera-usermanual.com Canon Manuals…
-
Page 90
, make sure that you also use the flash when you shoot. Recorded white balance data will be retained even when the camera’s power is turned off. Downloaded From camera-usermanual.com Canon Manuals… -
Page 91: Shooting In A My Colors Mode
Select a My Colors setting. 1. Press the FUNC./SET button. 2. Use the button to select and the button to change the option. 3. Press the FUNC./SET button. • Return to the shooting screen and shoot. Downloaded From camera-usermanual.com Canon Manuals…
-
Page 92: Setting The Camera To A Custom Color Mode
• The adjustment results show in the LCD monitor. • Press the MENU button to return to the My Colors mode selection screen. 4. Press the FUNC./SET button. • Return to the shooting screen and shoot. Downloaded From camera-usermanual.com Canon Manuals…
-
Page 93: Setting The Display Overlays
[Off], [Grid Lines], [3:2 Guide] or [Both]. 2. Press the MENU button. modes, only [Grid Lines] can be set. The grid lines and 3:2 guide will not be recorded in the image. Downloaded From camera-usermanual.com Canon Manuals…
-
Page 94: Categorizing Images Automatically (Auto Category)
[Auto Category]. Accept the setting. 1. Use the button to select [On] or [Off]. 2. Press the MENU button. Movies are not automatically categorized, but they can be categorized using the My Category function 98). Downloaded From camera-usermanual.com Canon Manuals…
-
Page 95: Registering Settings To The Print/Share Button
Vert. Shutter shutter button when the camera is p. 95 held vertically For switching between shooting Info Display p. 51 information display modes Display Off For switching off the LCD monitor p. 121 Downloaded From camera-usermanual.com Canon Manuals…
-
Page 96
To Cancel the Shortcut Button Select in Step 2. Downloaded From camera-usermanual.com Canon Manuals… -
Page 97: Using The Button
When the vertical shutter release function is registered to the button, images cannot be added to the print list even when the button is pressed 19). You can also shoot using the shutter button. Downloaded From camera-usermanual.com Canon Manuals…
-
Page 98: Playback/Erasing
Image Advance mode. • Press the FUNC./SET button again to cancel the Image Advance mode. To Cancel the Magnified Display Press the MENU button. Movie frames and index playback images cannot be magnified. Downloaded From camera-usermanual.com Canon Manuals…
-
Page 99: Viewing Images In Sets Of Nine (Index Playback)
• Up to nine images can be viewed at once in index playback. • Use the button to change the image selection. Movie Selected Image You can also switch between single image playback and index playback by holding down the FUNC./SET button. Downloaded From camera-usermanual.com Canon Manuals…
-
Page 100: Organizing Images By Category (My Category)
3. Press the FUNC./SET button. • Pressing the FUNC./SET button again cancels the setting. • Press the MENU button to complete the setting. This also can be set in the Index Playback mode. Downloaded From camera-usermanual.com Canon Manuals…
-
Page 101: Jumping To Images
Jump 100 Images Jumps to the image 100 images ahead. Select [Jump to]. 1. Press the MENU button. 2. In the menu, use the button to select 3. Press the FUNC./SET button. • The camera will switch to Jump Search mode. Downloaded From camera-usermanual.com Canon Manuals…
-
Page 102: Viewing Movies
Movies cannot be played in the Index Playback mode. Display the movie file. 1. Use the button to select a movie. 2. Press the FUNC./SET button. • The movie control panel will display. • Images with a icon are movies. Downloaded From camera-usermanual.com Canon Manuals…
-
Page 103: Operating The Movie Control Panel
Next Frame down. Last Frame Displays the last frame Use the television’s controls to adjust the volume when playing a movie on a TV set 129). The sound cannot be played in slow motion playback. Downloaded From camera-usermanual.com Canon Manuals…
-
Page 104: Rotating Images In The Display
• This also can be set in the Index Playback mode. When images are downloaded to a computer, the orientation of images rotated by the camera will depend upon the software used to download the images. Downloaded From camera-usermanual.com Canon Manuals…
-
Page 105: Playback With Transition Effects
Select [Transition]. 1. Press the MENU button. 2. In the menu, use the button to select Accept the setting. 1. Use the button to select 2. Press the MENU button. Downloaded From camera-usermanual.com Canon Manuals…
-
Page 106: Automated Playback (Slide Show)
FUNC./SET button while you press the button. Please note that if you do this while the last image shot is displayed, the slide show will start from the first image using the same date. Downloaded From camera-usermanual.com Canon Manuals…
-
Page 107: Red-Eye Correction Function
• If red-eye is not automatically detected, select [Add Frame] with button and press FUNC./SET button 108). • To cancel the correction frame, select [Remove Frame] and press the FUNC./SET button 109). Downloaded From camera-usermanual.com Canon Manuals…
-
Page 108
1. Press the MENU button. 2. Use the button to select [Yes]. 3. Press the FUNC./SET button. • Selecting [No] returns to the menu. Red-eye correction cannot be performed on movies. Overwriting cannot be performed on protected images. Downloaded From camera-usermanual.com Canon Manuals… -
Page 109
(Red-Eye Correction) function, use the [Add Frame] option to correct them. The correction frame will not appear automatically on images that have already been corrected with the red-eye correction function. Use the [Add Frame] option if you want to perform further corrections. Downloaded From camera-usermanual.com Canon Manuals… -
Page 110
(refer to the image in Step 2 above): — Adjust the correction frame size so that it only surrounds the red-eye portion to be corrected. — When there are several subjects with red-eye, be sure to add one correction frame per subject. Downloaded From camera-usermanual.com Canon Manuals… -
Page 111
• The selected frame will appear in green. Delete the frame. 1. Press the FUNC./SET button. • The selected frame will disappear. • To continue deleting frames, return to Step 2. • When you finish deleting frames, press the MENU button. Downloaded From camera-usermanual.com Canon Manuals… -
Page 112: Resizing Images
Select the recording pixels. 1. Use the button to select 2. Press the FUNC./SET button. • Some recording pixel settings cannot be selected depending on the available space of the memory card. Downloaded From camera-usermanual.com Canon Manuals…
-
Page 113
Display the saved image. 1. Press the MENU button. 2. Use the button to select [Yes]. 3. Press the FUNC./SET button. • Selecting [No] returns to the menu. Movies and images shot in Widescreen mode cannot be resized. Downloaded From camera-usermanual.com Canon Manuals… -
Page 114: Attaching Sound Memos To Images
Pressing it Sound Memo Panel again resumes recording. Elapsed Time/ • Up to 1 minute of recordings can be Remaining Time added to any one image. Volume (Adjust it with the button) Downloaded From camera-usermanual.com Canon Manuals…
-
Page 115: Protecting Images
2. Press the FUNC./SET button. • The protection icon appears on the lower left of the image. • Pressing the FUNC./SET button Protection Icon again cancels the setting. • You can also protect images in the Index Playback mode. Downloaded From camera-usermanual.com Canon Manuals…
-
Page 116: Erasing All Images
2. Press the FUNC./SET button. • To exit instead of erasing, select [Cancel]. Please format the memory card when you want to erase not only image data but also all the data contained on the memory card 122). Downloaded From camera-usermanual.com Canon Manuals…
-
Page 117: Print Settings/Transfer Settings
Prints the images in both the standard and Both index formats. Date (On/Off*) Adds the date to the print. File No. (On/Off*) Adds the file number to the print. Clears all print settings after the images Clear DPOF data (On*/Off) print. Downloaded From camera-usermanual.com Canon Manuals…
-
Page 118
[Date] setting. As a result, some printers may print the date twice on these images if [Date] is also set to [On]. The date is printed with the date style selected in the [Date/ Time] settings on the menu 12). Downloaded From camera-usermanual.com Canon Manuals… -
Page 119
Index Print Selection 1. Use the button to select the images. 2. Select and deselect with the FUNC./ SET button. 3. Press the MENU button. • You can also select images in the Index Playback mode. Downloaded From camera-usermanual.com Canon Manuals… -
Page 120
At this time, press the button, confirm that [Print] is selected, and when the FUNC./SET button is pressed, printing will begin. You can cancel the print settings for all images by selecting [Clear All Selections] in Step 1. Downloaded From camera-usermanual.com Canon Manuals… -
Page 121: Setting The Dpof Transfer Settings
• Pressing the FUNC./SET button again deselects the setting. • You can also select images in the Index Playback mode. • Press the MENU button several times to complete the setting. The screen will return to the menu. Downloaded From camera-usermanual.com Canon Manuals…
-
Page 122
• Selecting [Reset] cancels all transfer order settings. Select [OK]. 1. Use the button to select [OK]. 2. Press the FUNC./SET button. Images are transferred in order according to the file number. A maximum of 998 images can be selected. Downloaded From camera-usermanual.com Canon Manuals… -
Page 123: Configuring The Camera
[Power Saving]. 4. Press the FUNC./SET button. Accept the setting. 1. Use the button to select [Auto Power Down] or [Display Off]. 2. Use the button to change the settings. 3. Press the MENU button. Downloaded From camera-usermanual.com Canon Manuals…
-
Page 124: Formatting Memory Cards
Low Level Format We recommend you select [Low Level Format] when you think that the recording/reading speed of a memory card has dropped. A low level format may require 2 to 3 minutes with some memory cards. Downloaded From camera-usermanual.com Canon Manuals…
-
Page 125: Resetting The File Number
1. Press the MENU button. 2. Use the button to select the menu. 3. Use the button to select [File Numbering]. Accept the setting. 1. Use the button to select [Continuous] or [Auto Reset]. 2. Press the MENU button. Downloaded From camera-usermanual.com Canon Manuals…
-
Page 126
• Images cannot be played back when the folder numbers are duplicated or image numbers are duplicated within folders. • Please refer to the Software Starter Guide for information regarding folder structures or image types. Downloaded From camera-usermanual.com Canon Manuals… -
Page 127: Creating An Image Destination (Folder)
1. Use the button to check mark [Create New Folder]. 2. Press the MENU button. • will be displayed on the LCD monitor when shooting. The icon will cease to display after the new folder is created. Downloaded From camera-usermanual.com Canon Manuals…
-
Page 128
Up to 2000 images can be saved into one folder. A new folder will automatically be created when you record more than 2000 even if you are not creating new folders. Downloaded From camera-usermanual.com Canon Manuals… -
Page 129: Setting The Auto Rotate Function
Auto Rotate function to [Off]. Even if the Auto Rotate function is set to [On], the orientation of images downloaded to a computer will depend upon the software used to download the images. Downloaded From camera-usermanual.com Canon Manuals…
-
Page 130: Resetting Settings To Their Default Values
The following cannot be reset. — Shooting mode — The [Date/Time], [Language] and [Video System] options in the menu (pp. 49, 50) — White balance data recorded with the custom white balance function Downloaded From camera-usermanual.com Canon Manuals…
-
Page 131: Connecting To A Tv
— NTSC: Japan, U.S.A., Canada, Taiwan and others — PAL: Europe, Asia (excluding Taiwan), Oceania and others If the video system is set incorrectly, the camera output may not display properly. Downloaded From camera-usermanual.com Canon Manuals…
-
Page 132: Troubleshooting
10). Batteries are not the right Use only unused AA-size alkaline type. batteries or Canon AA-size NiMH batteries 150). Battery charge is low and Replace the camera batteries with 2 the camera will not operate. unused or fully charged batteries (“Change the batteries”…
-
Page 133
CCDs and does sunlight or bright light. not constitute a malfunction. This image will not be recorded when shooting still photos, but it will be recorded when shooting movies. Downloaded From camera-usermanual.com Canon Manuals… -
Page 134
Noise displays./Subject’s movements are irregular. Camera automatically There is no effect on the recorded lightened the image image. displayed on the LCD monitor to make it easier to see when shooting in a dark area 53). Downloaded From camera-usermanual.com Canon Manuals… -
Page 135
Format the memory card 122). formatted correctly. If reformatting does not work, the memory card logic circuits may be damaged. Consult the nearest Canon Customer Support Help Desk. SD memory card or SDHC Slide the write protect tab upward memory card is write 152). -
Page 136
Use the spot metering functions 83). Too much light is shining Change the shooting angle. directly into the camera, or is being reflected off the subject. Flash is set to (Flash Set the flash to (Flash off) 59). on). Downloaded From camera-usermanual.com Canon Manuals… -
Page 137
[Flash Settings] to [On], the camera will automatically correct red eyes while shooting and record the image to the memory card 70). You can correct red eyes in images using the [Red-Eye Correction] function in the menu 105). Downloaded From camera-usermanual.com Canon Manuals… -
Page 138
Use a memory card formatted in your in another device. camera 122). Lens will not retract. Memory card slot/battery After closing the memory card slot/ cover was opened with battery cover, turn the power on then power on. back off. Downloaded From camera-usermanual.com Canon Manuals… -
Page 139
Zoom button was pressed Operate the zoom before shooting in while shooting in Movie Movie mode 54). mode. Note that the digital zoom is available while shooting only if selected in the Standard Movie mode. Downloaded From camera-usermanual.com Canon Manuals… -
Page 140
122). TV monitor output Image is distorted or not showing on TV monitor. Incorrect video system Set the video system to the setting. appropriate setting, NTSC or PAL, for your TV 50). Downloaded From camera-usermanual.com Canon Manuals… -
Page 141
Battery terminals are dirty. Wipe the terminals well with a dry cloth before use. Reload the batteries several times. If using Canon AA-size NiMH batteries. As the batteries have not Their charging performance should been used for over a year,… -
Page 142: List Of Messages
However, if this error message appears even when using the supplied memory card, contact your Canon Customer Support Help Desk as there may be a problem with the camera. Memory card full…
-
Page 143
Change the batteries Battery charge is insufficient to operate the camera. Replace both batteries immediately with unused AA-size alkaline batteries or fully charged Canon AA-size NiMH batteries. Check the battery handling instructions in the Handling Precautions section 150). No image. -
Page 144
Too many images have been marked with print settings or transfer settings. Cannot process any more. Cannot complete! Could not save a part of the print or transfer settings. Unselectable image. You attempted to set the print settings for a non-JPEG image. Downloaded From camera-usermanual.com Canon Manuals… -
Page 145
Try turning the power back on, and resume shooting or playback. If this message continues to display, contact your Canon Customer Support Help Desk as there may be a problem with the lens. -
Page 146: Appendix
Accidental damage by a child could result in serious injury. • Wrist strap: Placement of the strap around the child’s neck could result in asphyxiation. • Memory card: It may be swallowed accidentally. If this occurs, contact a doctor immediately. Downloaded From camera-usermanual.com Canon Manuals…
-
Page 147
Please consult your camera distributor or the closest Canon Customer Support Help Desk. Do not use substances containing alcohol, benzine, thinners or other flammable substances to clean or maintain the equipment. -
Page 148
Do not place anything, such as tablecloths, carpets, bedding or cushions, on top of the battery charger while it is charging. Leaving the units plugged in for a long period of time may cause them to overheat and distort, resulting in fire. Downloaded From camera-usermanual.com Canon Manuals… -
Page 149
Battery When recharging the Canon AA-size NiMH batteries, use only a specified battery charger. The compact power adapter is designed for exclusive use with this equipment. Do not use it with other products. There is a risk of overheating and distortion which could result in fire or electrical shock. -
Page 150
When not using the camera for extended periods of time, remove the batteries from the camera or battery charger and store the equipment in a safe place. If the batteries are left inside the camera, damage caused by leakage may occur. Downloaded From camera-usermanual.com Canon Manuals… -
Page 151
The flash may be damaged and emit smoke or noise. The resulting heat build-up could damage the flash. Do not touch the surface of the flash after taking several pictures in rapid succession. Doing so could result in burns. Downloaded From camera-usermanual.com Canon Manuals… -
Page 152: Handling Precautions
When using the camera under low temperature conditions or over long periods, you are recommend to use Canon AA-size NiMH batteries (sold separately). Camera operating time may shorten at low temperatures when alkaline batteries are used.
-
Page 153
The batteries may be short circuited. When not using the camera for long periods, remove the batteries from the camera and store them separately. If the batteries are left inside the camera, the camera may become damaged from battery leakage. Downloaded From camera-usermanual.com Canon Manuals… -
Page 154: Memory Card
Please note that formatting (initializing) a memory card erases all data, including protected images. Downloaded From camera-usermanual.com Canon Manuals…
-
Page 155
• When the camera is malfunctioning, a corrupted memory card might be the cause. Reformatting the memory card may solve the problem. • When a non-Canon brand memory card is malfunctioning, reformatting it may solve the problem. • Memory cards formatted in other cameras, computers, or peripheral devices may not operate correctly in this camera. -
Page 156: Using The Power Kits (Sold Separately)
• The charge indicator blinks while charging, then remains lit when charging is finished. The CB-5AH/CB-5AHE battery charger can only be used to charge Canon AA-size NiMH NB-3AH batteries. Do not mix batteries with different purchase dates or different charge states. When recharging batteries, always recharge both of them at the same time.
-
Page 157
Replace them with new batteries. If you are purchasing new batteries, look for Canon AA-size NiMH batteries. Leaving batteries in the camera or charger may result in damage from battery leakage. When not in use, remove the batteries from the camera or charger and store them in a cool, dry location. -
Page 158
When two batteries are placed on each side of the charger, recharging will take approximately two hours (as determined by testing at Canon facilities). Charge batteries in an environment where the temperature is in the range of 0 to 35°C (32 to 95°F). -
Page 159: Using An Externally Mounted Flash (Sold Separately)
Fasten the attachment screws securely so that they do not loosen. Failure to do so may lead to the dropping of the camera and flash resulting in damage to both. Downloaded From camera-usermanual.com Canon Manuals…
-
Page 160
Non-Use over Extended Periods Leaving batteries in the High-Power Flash could allow the battery fluid to leak, damaging the product. Remove the batteries from the High- Power Flash and store them in a cool, dry place. Downloaded From camera-usermanual.com Canon Manuals… -
Page 161: Replacing The Date Battery
Confirm that the camera is turned off. Slide the battery cover lock and open the cover Hook your nail onto the date battery holder and lightly pull it up. Downloaded From camera-usermanual.com Canon Manuals…
-
Page 162
Date/Time menu will appear, you do not need to replace the date battery. If you ever dispose of your camera, first remove the date battery for recycling according to the recycling system of your country. Downloaded From camera-usermanual.com Canon Manuals… -
Page 163: Camera Care And Maintenance
Never use organic solvents on the camera body or lens. If dirt remains, contact the closest Canon Customer Support Help Desk as listed on the customer support list supplied with your camera.
-
Page 164: Specifications
Specifications All data is based on Canon’s standard testing methods. Subject to change without notice. PowerShot A470 (W): Max. wide angle (T): Max. telephoto Camera Effective Pixels Approx. 7.1 million Image Sensor 1/2.5-inch type CCD (Total number of pixels: Approx. 7.4 million) Lens 6.3 (W) –…
-
Page 165
Activates shutter after an approx. 10-sec./ approx. 2-sec. delay, Custom Timer Recording Media SD memory card, SDHC memory card, MultiMediaCard, MMCplus card, HC MMCplus card File Format Design rule for Camera File System and DPOF compliant Downloaded From camera-usermanual.com Canon Manuals… -
Page 166
Single (histogram displayable), Index (9 images), Magnified (approx. 2-10x), Resume Playback, My Category, Jump, Movie (slow motion playback possible), Rotate, Slide Show, Red- Eye Correction, Resize, Sound memos (recording and playing back possible up to 1min.), Protect. Downloaded From camera-usermanual.com Canon Manuals… -
Page 167
Direct Print PictBridge compliant, Canon Direct Print and Bubble Jet Direct compatible Interface USB (mini-B) Audio/Video output (NTSC or PAL selectable, monaural audio) Communication Settings MTP, PTP Power Source 2 AA-size alkaline batteries 2 AA-size NiMH batteries NB4-300 (sold separately) AC Adapter Kit ACK800 (sold separately) Operating Temperatures 0 –… -
Page 168: Battery Capacity
Power is left off for a sufficient amount of time*, then the power is turned back on and the testing procedure is repeated. • A Canon-brand memory card is used. * Until the battery returns to normal temperature Playback: Normal temperature (23°C ±2°C/73°F ±3.6°F), normal relative humidity (50% ±20%), continuous playback at 3…
-
Page 169
Capable of smooth continuous shooting (p. 69) when the memory card has been formatted with a low level format. • This reflects standard shooting criteria established by Canon. Actual results may vary according to the subject and shooting conditions. Downloaded From camera-usermanual.com Canon Manuals… -
Page 170: 32Mb Sdc-128M Sdc-512Msh
160 x 120 pixels 3 min. 14 min. 29 sec. 55 min. 57 sec. 15 frames/sec. 30 sec. Compact Maximum movie clip length at : 3 min. The figures indicate the • maximum continuous recording time. Downloaded From camera-usermanual.com Canon Manuals…
-
Page 171: 3072 X 2304 Pixels
640 x 480 pixels, 20 frames/sec. 1280 KB/sec. Standard 640 x 480 pixels, 20 frames/sec. LP 640 KB/sec. 320 x 240 pixels, 30 frames/sec. 660 KB/sec. 160 x 120 pixels, 15 frames/sec. 120 KB/sec. Compact Downloaded From camera-usermanual.com Canon Manuals…
-
Page 172
Length: 50.0 mm (1.97 in.) Weight Approx. 30 g (1.06 oz.) U.S.A. and Canada only: The Nickel-Metal Hydride battery that powers the product is recyclable. Please call 1-800-8-BATTERY for information on how to recycle this battery. Downloaded From camera-usermanual.com Canon Manuals… -
Page 173
When connecting to and using a household power outlet, use only AC Adapter Kit ACK800 (rated input: 100-240 V AC 50/60 Hz, rated output: 3.15 V DC). Using anything else can cause fire, overheating, or electrical shock. Downloaded From camera-usermanual.com Canon Manuals… -
Page 174: Index
……. 74 Compression ……65 Computer Connecting ……27 Downloading Images ….25 Grid Lines ……… 91 System Requirements ..25 Continuous Shooting ….69 Create Folder ……125 High-Power Flash HF-DC1 ..157 Histogram ……… 46 Downloaded From camera-usermanual.com Canon Manuals…
-
Page 175
Self-Timer ……… 62 Shooting ……Shooting Info …… Viewing ……24, Shooting Mode ..14, 66, 68, Mute ………. 49 Shutter Button ……40 My Category ……98 Fully ……..15 My Colors ……..89 Halfway ……… 14 Downloaded From camera-usermanual.com Canon Manuals… -
Page 176
….103 Vertical Shutter Release … 95 Video System ……129 Volume ……101, White Balance ……86 Wide Angle …….. 54 Wrist Strap …….. 11 Write Protect Tab ….152 Zoom Digital Zoom ……55 Optical Zoom ……54 Downloaded From camera-usermanual.com Canon Manuals… -
Page 177
MEMO Downloaded From camera-usermanual.com Canon Manuals… -
Page 178
Canon U.S.A., Inc. One Canon Plaza, Lake Success, NY 11042, U.S.A. Tel No. (516) 328-5600 Canadian Radio Interference Regulations This Class B digital apparatus complies with Canadian ICES-003. -
Page 179: Trademark Acknowledgments
• While every effort has been made to ensure that the information contained in this guide is accurate and complete, no liability can be accepted for any errors or omissions. • Canon reserves the right to change the specifications of the hardware and software described herein at anytime without prior notice.
-
Page 180: Functions Available In Each Shooting Mode
(p. 74) 160 x 120, 15 fps – – – – Normal – Shooting Zone Macro – (p. 60) Infinity – – Face Select and Track (p. 78) Auto – – Flash (p. 59) – – Downloaded From camera-usermanual.com Canon Manuals…
-
Page 181
– – – – – – – – – – – – – – – – – – – – – – – – – – – – – – – – – – – Downloaded From camera-usermanual.com Canon Manuals… -
Page 182
– : Not available. *1 Set to optimum value depending on each shooting mode. *2 Date Stamp and Widescreen are not available. *3 Always set to [On]. *4 Only available when the flash is set to [On]. Downloaded From camera-usermanual.com Canon Manuals… -
Page 183
– – – – – – – – – – – – – – – – – – – – – – – – – – – – – – – – – – – Downloaded From camera-usermanual.com Canon Manuals… -
Page 184
CDP-E061-020 © CANON INC. 2008 Downloaded From camera-usermanual.com Canon Manuals…

Руководство по началу работы
РУССКИЙ
Обязательно ознакомьтесь с мерами предосторожности
(внутренняя сторона задней обложки)
CEL-SH5GA200
EC242_GSG_RU_Cover.fm Page 1 Sunday, January 6, 2008 5:13 PM