Время на прочтение
6 мин
Количество просмотров 107K
Начиная знакомство с FreePBX, даже опытные системные администраторы зачастую допускают одни и те же ошибки, которые способны серьезно испортить настроение и отбить всякое желание продолжать освоение этой системы.

В первую очередь, безусловно, это ошибки, связанные с безопасностью станции. Помните, что подключаясь к оператору телефонии вы несете полную финансовую ответственность за звонки, даже если на самом деле вы их не совершали! Давайте посмотрим, что нужно сделать в первую очередь, а чего делать категорически нельзя.
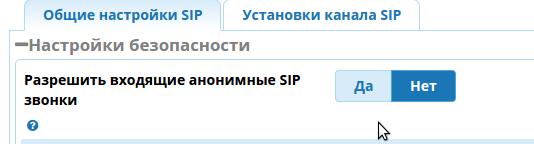
Сразу же после установки системы необходимо отключить возможность приема гостевых и анонимных звонков, если, конечно, вы не собираетесь их использовать. В противном случае, вы фактически предоставляете возможность любому человеку осуществлять звонки через вашу станцию, что может привести к значительным финансовым потерям.
Настройки → Установки Asterisk для SIP → Общие настройки SIP

Настройки → Установки Asterisk для SIP → Установки канала SIP
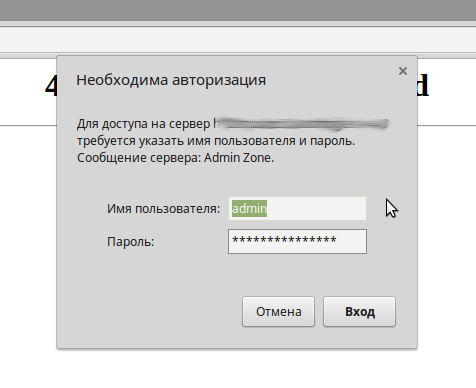
Несмотря на то, что FreePBX постоянно обновляется, и разработчики прикладывают большие усилия к обеспечению безопасности системы, периодически обнаруживаются уязвимости в коде, используя которые злоумышленники могут получить, например, параметры доступа к вашим операторам связи. Несмотря на то, что в таком случае звонки будут поступать не с вашей станции, оператор, скорее всего, потребует оплаты именно с вас. Поэтому не следует забывать о защите веб-интерфейса: если сервер установлен в вашей локальной сети, не стоит пробрасывать 80 порт наружу — для удаленной настройки вы можете использовать vpn, ssh-тоннель или любой другой способ доступа. Если же FreePBX установлен на удаленном сервере или по какой-то другой причине имеет прямой доступ в сеть, можно ограничить возможность подключения по 80 порту на уровне iptables, а также использовать парольную защиту Basic Auth как дополнительное средство обеспечения безопасности.
В случае, если вы установили FreePBX с официального образа, вам нужно будет отредактировать файл
/etc/httpd/conf.d/freepbx.confВ самый конец, перед последней строкой нужно добавить следующее
AuthType Basic
    AuthName "Administrative zone"
    AuthUserFile /.htpasswd
    Require valid-user
Обратите внимание на путь к файлу .htpasswd — вы можете задать любой путь для его хранения. Затем потребуется собственно создать аккаунт. Перейдя в выбранную директорию, выполните
htpasswd -c .htpasswd adminи введите пароль для пользователя admin. Не забудьте перезагрузить apache:
service httpd reloadИ проверьте результат:
Также следует обратиться к вашему оператору связи и ограничить возможность подключения с вашими учетными данными по ip-адресу: в таком случае, даже если злоумышленники получат ваш логин и пароль, воспользоваться ими не получится.
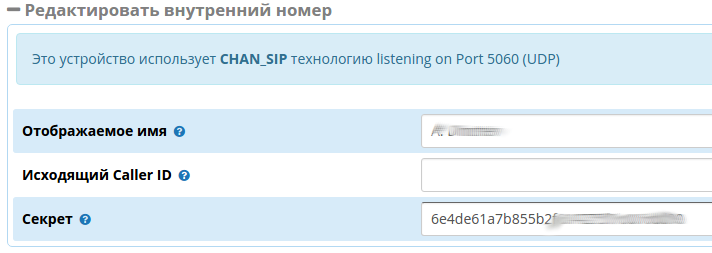
Безусловно, нельзя забывать и о безопасности аккаунтов пользователей на вашей станции. Если возможно (например, все ваши пользователи находятся в локальной сети), обязательно ограничивайте возможность подключения по ip-адресам — даже если пароль определенного пользователя будет скомпрометирован, воспользоваться им извне злоумышленники не смогут.
Приложения → Внутренние номера → Внутренний номер → Расширенный

Бывают ситуации, когда ограничить пользователя по ip не представляется возможным — например, аккаунт используется с мобильного телефона, из разных 3g, 4g, и wifi-сетей. В таком случае, в первую очередь, проверьте надежность ваших паролей. Запомните, даже на “пустой” станции, даже для тестирования, никогда не нужно ставить пароли типа qwerty, ведь забыть впоследствии о таком аккаунте проще простого, как и подобрать такой пароль.
Приложения → Внутренние номера → Внутренний номер → Общие
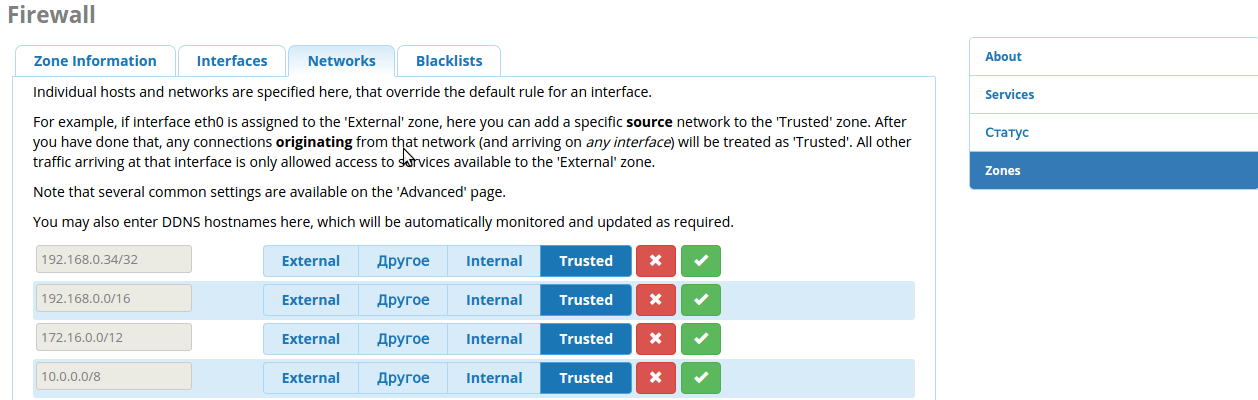
Необходимо задуматься и о переборе паролей. Естественно, если ваш сервер обслуживает клиентов из одной сети и подключается к одному оператору связи, вы можете и даже должны ограничить возможность подключения к sip-порту (обычно, 5060) для всех, кроме известных адресов своих сетей и провайдеров, например, так, если вы устанавливали FreePBX вручную
-A INPUT -s xxx.xxx.xxx.xxx/32 -p udp -m udp --dport 5060 -j ACCEPT
-A INPUT -s yyy.yyy.yyy.yyy/32 -p udp -m udp --dport 5060 -j ACCEPT
-A INPUT -p udp -m udp --dport 5060 -j DROP
Или воспользоваться встроенным модулем веб-интерфейса Firewall, если вы установили систему с официального образа. Вы можете задать доверенные и внешние сети вручную в меню
Подключения → Firewall → Zones → Network
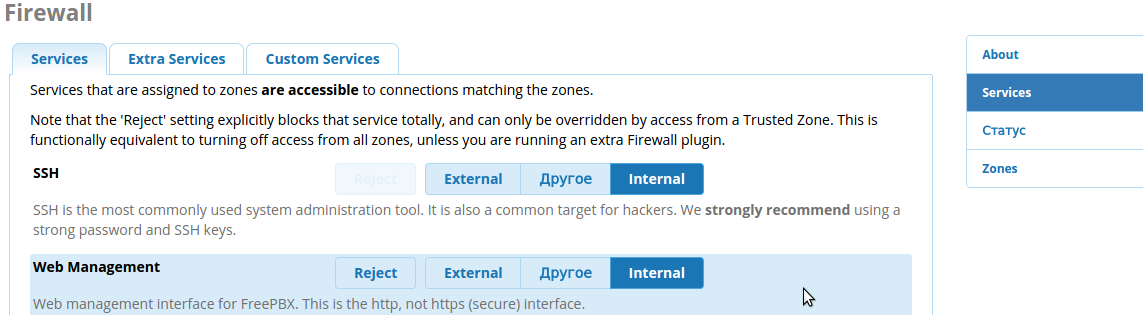
И затем определить, к каким сервисам будет открыт доступ в закладке
Подключения → Firewall → Services
Но не всегда возможно оставить только несколько подсетей для sip-порта. В таком случае крайне рекомендуется поставить fail2ban и настроить его на использование с asterisk. Этот демон, основываясь на логах попыток авторизации, блокирует слишком настойчивых на определенное время после заданного числа попыток авторизации, что позволяет пресекать брутфорс. В последних версиях fail2ban правила для asterisk уже включены в поставку, но рекомендуется проверить его работоспособность — выполнить несколько попыток регистрации с заведомо неверным логином и паролем (только обязательно не с того же ip-адреса, с которого вы подключаетесь к серверу!) и проверить, заблокируется ли этот адрес командой
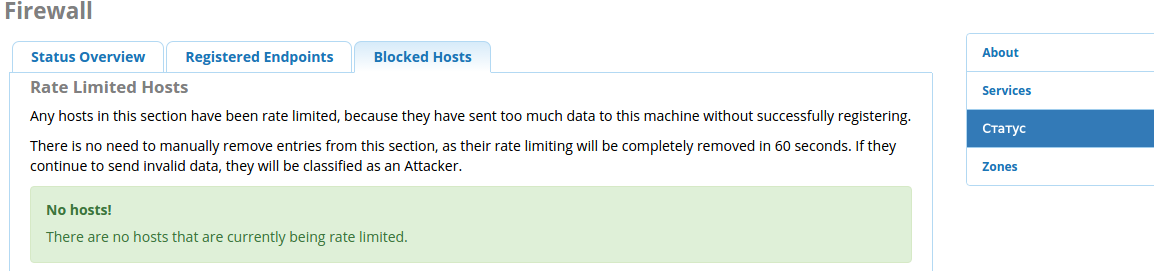
iptables -LВ официальной сборке FreePBX система защиты от перебора паролей уже установлена и настроена. Заблокированные адреса можно найти в закладке
Подключения → Firewall → Статус
Очень часто, особенно в небольших организациях, когда используется только один провайдер, системные администраторы не уделяют внимания грамотной настройке исходящих маршрутов, ограничиваясь шаблоном X., разрешая таким образом всем пользователям звонить на любой номер телефона. Даже если полностью исключить возможность совершения звонков злоумышленниками, нельзя забывать о том, что пользователь может просто ошибиться и позвонить куда-нибудь в Доминиканскую республику, так что ограничивать исходящие звонки нужно в обязательном порядке. Обычно достаточно добавить шаблоны вызова городских и мобильных номеров телефонов, для РФ маршрут может выглядеть так:
Подключения → Исходящая маршрутизация → Маршрут → Правила набора

Здесь мы задаем, что номер должен быть 11-значным, начинаться с 8, и вторая цифра должна быть 3,4,8 или 9, что полностью перекрывает все Российские номера, а также разрешаем звонить через этот маршрут только внутренним номерам 100-199. В случае, если кому-то из сотрудников нужно открыть международные звонки, следует добавить дополнительный маршрут для него перед основным, и обязательно в поле CID указать его номер или шаблон номеров, если таких сотрудников несколько.

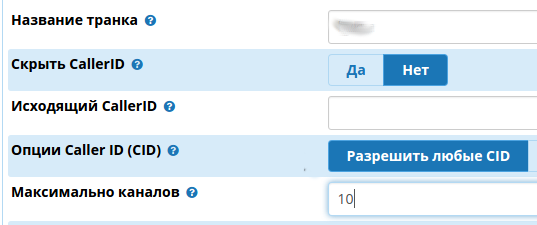
А также стоит всегда указывать количество одновременных исходящих вызовов в настройках транков, особенно в том случае, если они не ограничены на стороне оператора (10 сотрудников никак не смогут сделать 100 исходящих вызовов), а вот в случае несанкционированных звонков взломщики пытаются звонить в максимальное количество потоков.
Подключения → Транки → Настройки Транка → Общие
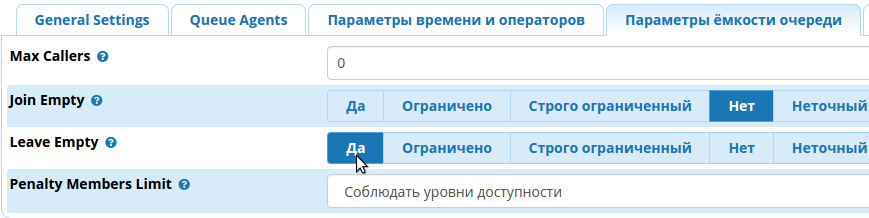
Следующая частая ошибка — создание очереди звонков без ограничения по времени и без условия “покидать пустую очередь”. Особенно опасно такое действие, если вы используете номер 8-800 с оплатой за входящие — определенный отдел может остаться без связи (завис свитч, пропал свет, крысы съели витую пару), а входящие звонки для него будут продолжать поступать на очередь, и особо упорные звонящие могут ждать на линии часами.
Неприятности могут возникнуть и в том случае, если вы не используете 8-800, но оператор связи ограничивает количество одновременных входящих звонков, или используются медные линии или поток. В таком случае ресурс канала будет расходоваться просто на проигрывание музыки вызывающим абонентам, и в итоге может возникнуть ситуация, когда все ваши входящие каналы заняты ожидающими в пустой очереди. Именно поэтому нужно всегда ограничивать время ожидания в очереди и не допускать звонков в пустых очередях.
Приложения → Очереди → Настройки очереди → Параметры времени и операторов

Приложения → Очереди → Настройки очереди → Параметры емкости очереди
Голосовые приветствия и голосовые меню — безусловно, полезные и нужные функции, используемые почти каждой организацией, решившей перейти на FreePBX, но и при их настройке часто допускаются ошибки. Во-первых, модуль Приветствие, то есть просто воспроизведение голосового ролика, который нельзя пропустить (или можно пропустить по нажатию клавиши, о чем обычно забывают уведомить пользователя), стоит использовать только тогда, когда в этом есть насущная необходимость. Мне доводилось видеть как в Приветствие помещают ролик длительностью одна минута, и только после него следует IVR с предложением выбрать нужный отдел. Когда клиент звонит в первый раз, это воспринимается нормально, но когда он перезванивает пятый раз за час, и пятый раз подряд слушает о том, как компания рада его звонку, он начинает сомневаться в этом. Клиент уже точно знает, что ему нужно нажать кнопку 2 и переключиться на нужный отдел, но его раз от раза заставляют прослушать приветствие целиком. По максимуму сократите использование Приветствий, используйте IVR и разрешите прямые наборы — это позволит сократить время ожидания клиента и не раздражать его.
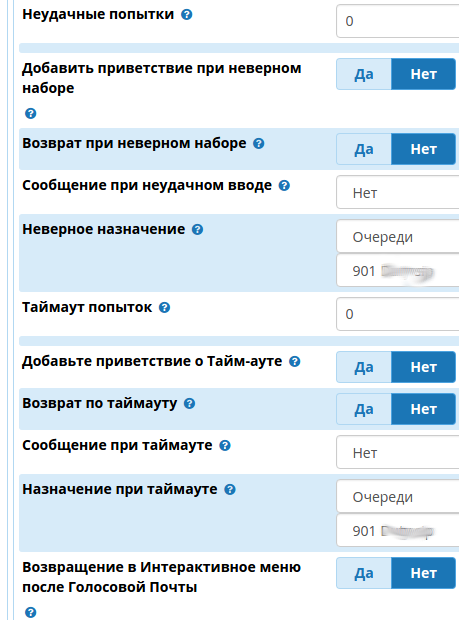
Еще при создании Интерактивного меню IVR часто забывают сменить настройки по умолчанию, касающиеся неверного набора — при нажатии клавиши, которая не описана в правилах, ролик повторяется несколько раз. Такое поведение уместно только в случае, если выбор должен быть сделан обязательно (крайне редкий случай), и совершенно неуместно в первом, приветственном голосовом меню. Отключайте повторы голосового меню и переводите звонок на назначение, используемое по умолчанию: на секретаря, в очередь менеджеров и так далее. То же касается и тайм-аута набора.
Приложения → Интерактивное меню (IVR) → Настройки IVR
Если вы не уверены в том, что на вашем FreePBX исключены эти и другие ошибки, и хотите чувствовать себя в безопасности, обратитесь к нам, и профессионалы с многолетним опытом работы в сфере ip-телефонии проведут аудит системы и исправят все допущенные ошибки.
1. Введение
Настоящая инструкция описывает подробный процесс установки панели управления FreePBX версии 15 для IP-АТС Asterisk версии 16, работающей под управлением ОС CentOS 8, а также выполнение общесистемных настроек для обеспечения безопасности и надежной работы.
Установка Asterisk v16 описана в отдельной статье.
2. Установка и обновление системных пакетов и зависимостей
Установите необходимые системные пакеты, отсутствующие в базовом дистрибутиве.
yum -y groupinstall core base "Development tools"
yum -y install epel-release
yum config-manager --set-enabled PowerTools
yum -y install php php-gd php-mbstring php-mysqlnd php-pear php-pdo php-xml php-json
yum -y install e2fsprogs-devel keyutils-libs-devel krb5-devel libogg libsepol-devel libxml2-devel libtiff-devel gmp unixODBC unixODBC-devel audiofile-devel libogg-devel openssl-devel zlib-devel perl-Date-Manip sox git net-tools psmisc iptables-services fail2ban gcc-c++ make gnutls-devel libxml2-devel ncurses-devel subversion doxygen texinfo curl-devel neon-devel uuid-devel libuuid-devel sqlite-devel sqlite speex-devel gsm-devel libtool libtool-ltdl libtool-ltdl-devel gtk2-devel newt-devel mariadb-server mariadb libedit libedit-devel mailx postfix
yum -y update
reboot
3. Отключение SELinux
Поскольку FreePBX не работает корректно cо службой SELinux, ее следует отключить путем изменения параметра SELINUX в конфигурационном файле /etc/selinux/config на значение disabled:
SELINUX=disabled
SELINUXTYPE=targeted
Обновите и перезагрузите систему:
yum -y update
reboot
Проверьте состояние SELinux
sestatus
Ожидаемый вывод:
SELinux status: disabled
4. Запуск и проверка работы Asterisk
Запустите Asterisk штатным образом и проверьте его состояние:
systemctl start asterisk
ps -ef | grep asterisk
Примерный ожидаемый вывод:
root  5111     1  0 08:57 ?   		00:00:00 /bin/sh /usr/sbin/safe_asterisk
asterisk  5113  5111  0 08:57 ?   	00:00:00 /usr/sbin/asterisk -f -U asterisk -vvvg -c
root  5650  3788  0 09:05 pts/0		00:00:00 grep --color=auto asterisk
Проверьте подключение к консоли управления Asterisk:
rasterisk
Ожидаемый вывод:

5. Подготовка к инсталляции FreePBX
5.1. Запуск и проверка MariaDB
Запустите СУБД Maria DB:
systemctl enable mariadb.service
systemctl start mariadb
Проверка:
ps -ef | grep maria
Примерный ожидаемый вывод:
mysql 7160     1  1 10:44 ?	00:00:00 /usr/libexec/mysqld --basedir=/usr
root  7227  8399  0 10:44 pts/0	00:00:00 grep --color=auto mysql
5.2. Настройка, запуск и проверка Apache
Внесите правки в конфигурационные файлы Apache:
sed -i 's/(^upload_max_filesize = ).*/120M/' /etc/php.ini
sed -i 's/^(User|Group).*/1 asterisk/' /etc/httpd/conf/httpd.conf
sed -i 's/AllowOverride None/AllowOverride All/' /etc/httpd/conf/httpd.conf
sed -i 's/AllowOverride none/AllowOverride All/' /etc/httpd/conf/httpd.conf
Запустите web-сервер Apache:
systemctl enable httpd.service
systemctl start httpd
Проверка:
ps -ef | grep http
Примерный ожидаемый вывод:
root  6674     1  0 09:33 ?	00:00:00 /usr/sbin/httpd -DFOREGROUND
apache 6676  6674  0 09:33 ?	00:00:00 /usr/sbin/httpd -DFOREGROUND
apache 6677  6674  0 09:33 ?	00:00:00 /usr/sbin/httpd -DFOREGROUND
apache 6678  6674  0 09:33 ?	00:00:00 /usr/sbin/httpd -DFOREGROUND
apache 6679  6674  0 09:33 ?	00:00:00 /usr/sbin/httpd -DFOREGROUND
apache 6680  6674  0 09:33 ?	00:00:00 /usr/sbin/httpd -DFOREGROUND
5.3. Установка пакета NodeJS
Загрузите и установите NodeJS:
curl -sL https://rpm.nodesource.com/setup_10.x | bash -
yum -y install nodejs
5.4. Корректировка владельца процессов PHP-FPM
sed -i 's/user = apache/user = asterisk/' /etc/php-fpm.d/www.conf
sed -i 's/user = root/user = asterisk/' /etc/php-fpm.d/www.conf
sed -i 's/group = apache/group = asterisk/' /etc/php-fpm.d/www.conf
sed -i 's/group = root/group = asterisk/' /etc/php-fpm.d/www.conf
5.5. Запуск скрипта безопасной работы MySQL
Запустите скрипт:
mysql_secure_installation
В ходе интерактивной работы скрипта ответьте на вопросы следующим образом:
Enter current password for root (enter for none): <Нажмите Enter>
Set root password? [Y/n] Y
New password: Qwerty123456
Re-enter new password: Qwerty123456
Remove anonymous users? [Y/n] Y
Disallow root login remotely? [Y/n] Y
Remove test database and access to it? [Y/n] Y
Reload privilege tables now? [Y/n] Y
5.6. Замена драйвера ODBC
Драйвер ODBC, входящий в состав дистрибутива Asterisk, некорректно поддерживает кодировку UTF-8, что приводит к неправильному отображению кириллицы в БД CDR. Для исправления данной проблемы необходимо заменить стандартный драйвер (UNICODE) на драйвер ANSI.
Загрузите, установите и активируйте yum-репозиторий MySQL:
cd /usr/src
mkdir mysql-community-release
cd mysql-community-release
wget https://dev.mysql.com/get/mysql80-community-release-el8-1.noarch.rpm
rpm -Uvh mysql80-community-release-el8-1.noarch.rpm
yum config-manager --set-enabled mysql80-community
Установите корректную версию драйвера ODBC из репозитория MySQL community:
yum -y install --enablerepo=mysql80-community mysql-connector-odbc
Отредактируйте файл /etc/yum.repos.d/mysql-community.repo
Найдите в указанном файле секцию [mysql-connectors-community]
Добавьте в конец данной секции следующую строку:
includepkgs=mysql-connector-odbc*
Убедитесь, что для всех остальных секций, присутствующих в файле, установлено значение enabled=0
Данная корректировка позволит избежать нежелательного обновления сервера БД при обновлении системы.

Проверьте наличие строк в файле /etc/odbcinst.ini
[MySQL ODBC X.x ANSI Driver]
Driver=/usr/lib64/libmyodbcXa.so
В случае отсутствия данных строк, следует загрузить библиотеку libmyodbcXa.so и добавить указанные выше строки вручную.
В контексте данного пункта X – номер версии, x – номер подверсии коннектора ODBC.
5.7. Задание директории для записей разговоров
Измените директорию, в которой будут храниться записи разговоров:
rmdir /var/spool/asterisk/monitor
mkdir /home/asterisk/monitor/
ln -s /home/asterisk/monitor/ /var/spool/asterisk/
chown -R asterisk:asterisk /home/asterisk/
5.8. Настройка автоматического удаления записей вызовов
Запустите редактор файла crontab:
crontab -e
Добавьте в файл следующие строки:
31 3 * * * find /home/asterisk/monitor/ -type f -mtime +120 -exec rm -rf {} ;
32 3 * * * find /home/asterisk/monitor/ -type d -exec rmdir -p {} ;
Сохраните изменения:
:wq!
6. Установка и запуск FreePBX
6.1. Загрузка и установка FreePBX
Загрузите, распакуйте и установите FreePBX:
cd /usr/src
mkdir freepbx
cd freepbx
wget http://mirror.freepbx.org/modules/packages/freepbx/freepbx-15.0-latest.tgz
tar zxfv freepbx-15.0-latest.tgz
cd freepbx
./install -n --dbuser root --dbpass Qwerty123456 (пароль должен совпадать с указанным в п. 5.5)
Ожидаемый вывод по завершении установки:
You have successfully installed FreePBX
Перезагрузите сервер:
reboot
6.2. Задание драйвера ODBC для БД CDR
Если указанная ниже секция в файле /etc/odbc.ini отсутствует, добавьте ее. Если присутствует, проверьте параметры на соответствие приведенным ниже и скорректируйте в случае отличия:
[MySQL-asteriskcdrdb]
Description=MySQL connection to 'asteriskcdrdb' database
Trace=Yes
TraceFile=odbc.log
driver=MySQL ODBC X.x ANSI Driver
server=localhost
database=asteriskcdrdb
Port=3306
Socket=/var/lib/mysql/mysql.sock
option=3
Charset=utf8
Значения X, x см. в разделе 5.6
6.3. Загрузка, настройка, обновление системных модулей FreePBX
fwconsole setting PM2USECACHE 0
fwconsole setting PM2USEPROXY 0
fwconsole ma downloadinstall pm2 --edge
fwconsole ma downloadinstall ucp --edge
fwconsole ma upgrade dashboard --edge
6.4. Запуск FreePBX
Зайдите браузером по ссылке http://<IP_ADDRESS>
Создайте учетную запись администратора, перейдите в раздел «FreePBX Administration».
Окно, подобное приведенному ниже, свидетельствует о корректной работе сервиса:

Инструкция по настройке.
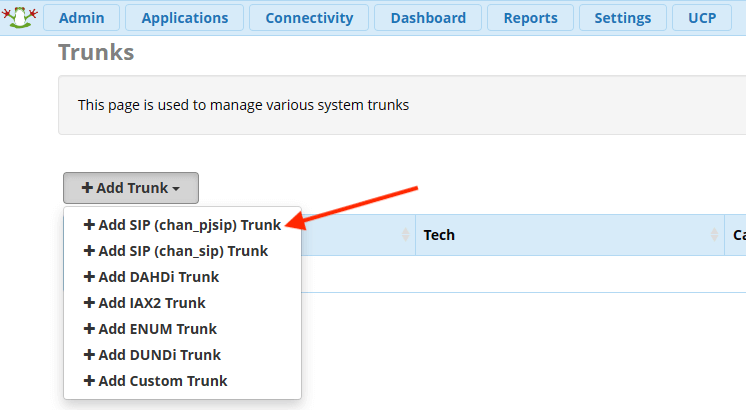
В разделе Connectivity, страница Trunks добавляем SIP(chan_pjsip) Trunk. Указываем имя транка и открываем вкладку pjsip settings.
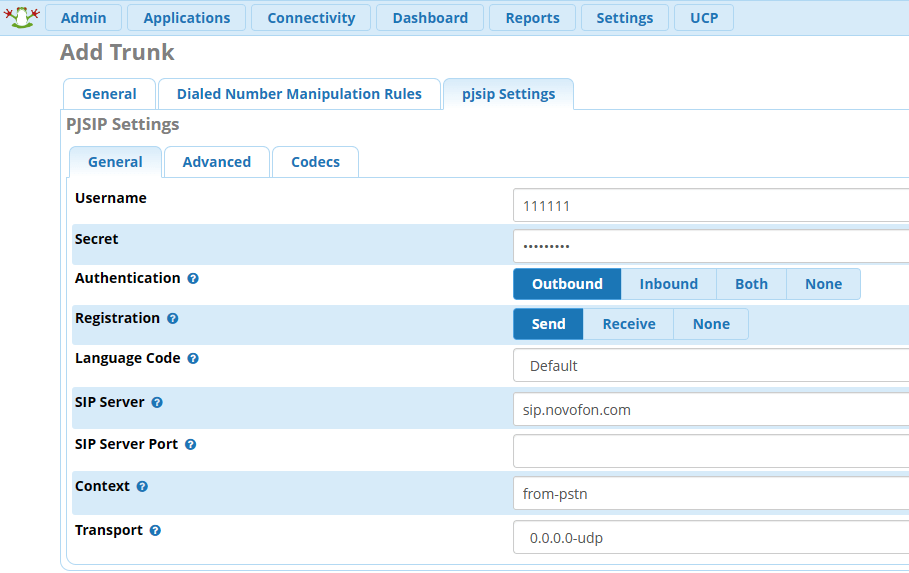
Указываем данные:

SIP-номер, который можно взять в личном кабинете (раздел “Настройки”, страница “Подключение по SIP”). Для примера ниже будет указан номер 111111.
В поле Secret: пароль, который находится на той же странице, чуть ниже. В примерах – password
SIP Server: sip.novofon.com
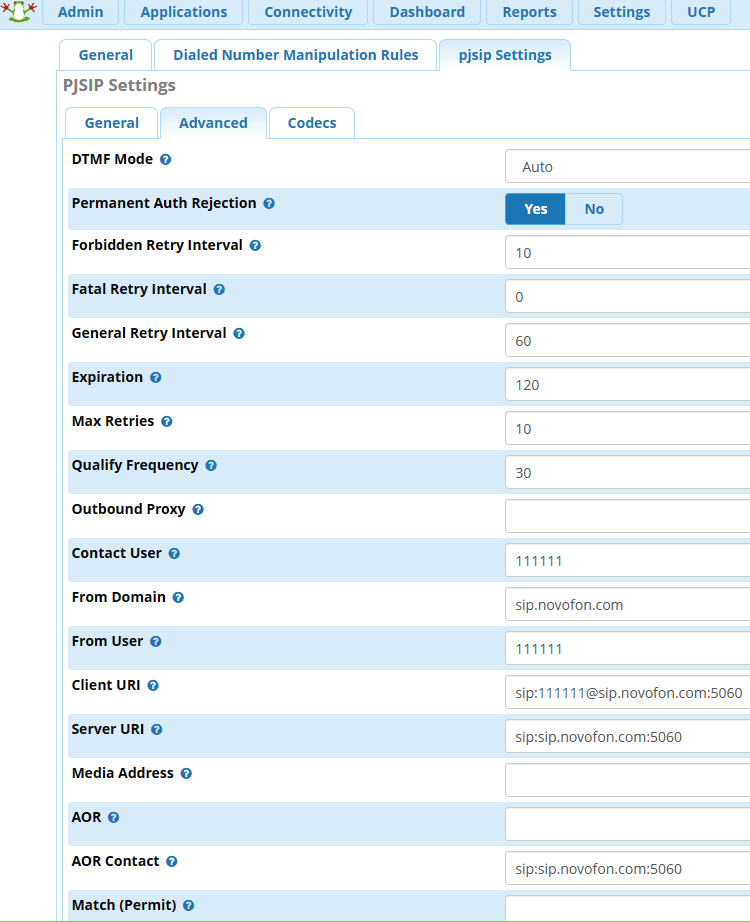
Переходим во вкладку PJSIP Settings, страница Advanced. Указываем следующие параметры:
Contact User: 111111
From Domain: sip.novofon.com
From User: 111111
Client URI: sip:111111@sip.novofon.com:5060
Server URI: sip:sip.novofon.com:5060
AOR Contact: sip:sip.novofon.com:5060
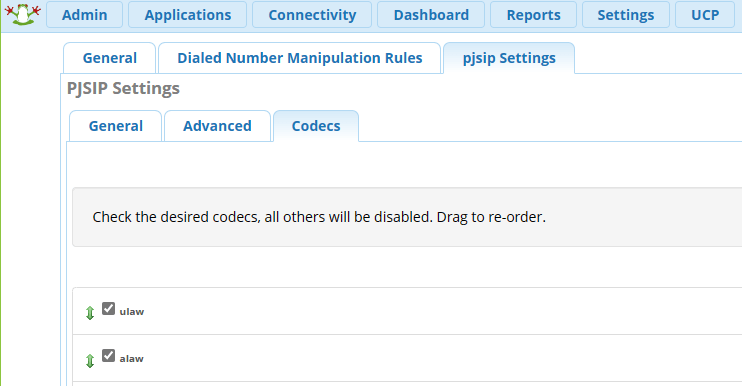
Переходим во вкладку PJSIP Settings, страница Codecs. Оставляем галочки напротив кодеков alaw и ulaw.
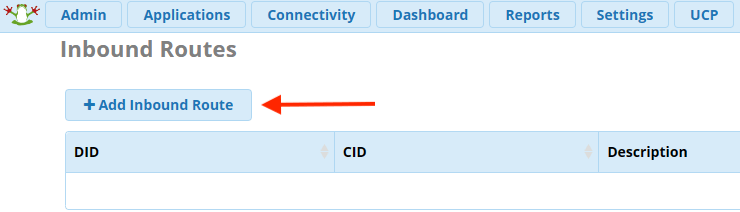
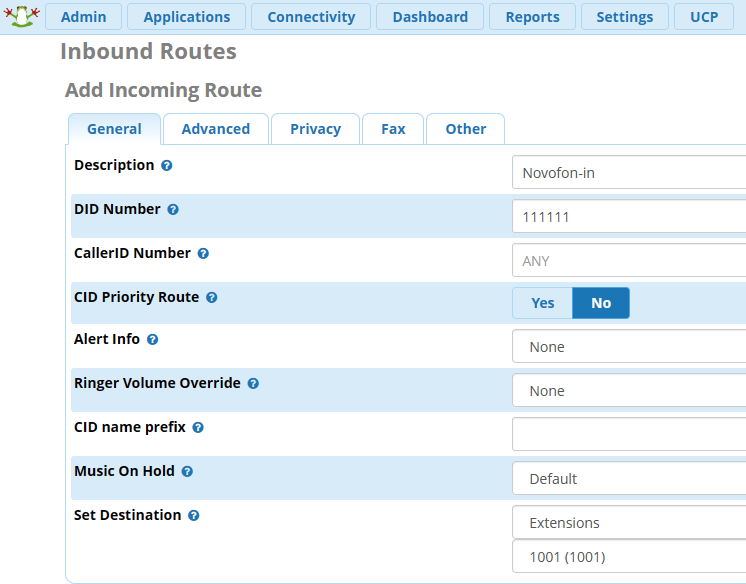
Открываем раздел Connecrivity, страница Inbound Routes. Создаем маршрут входящих звонков.
В поле Description указываем название: Novofon-in;
В поле DID Number: 111111.
В поле Set destination можно указать куда будут направляться входящие звонки: это может быть как внутренний номер FreePBX, IVR, группа внутренних номеров и тому подобное.
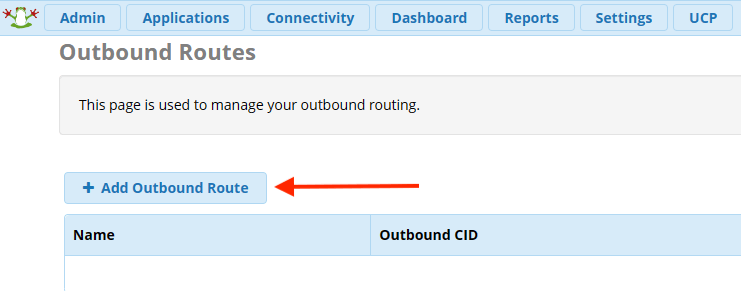
Следом создаем маршрут исходящих звонков. Делается это в разделе Connectivity, страница Outbound Routes. Указываем параметры:
Route Name: Novofon-out
Route CID: 111111
Trunk sequence for matched routes: Novofon
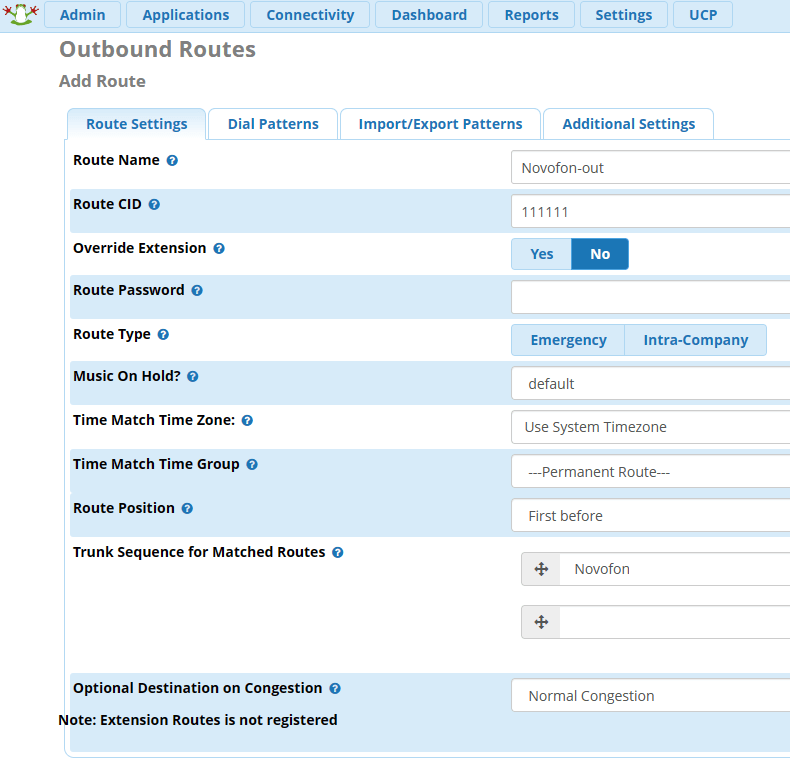
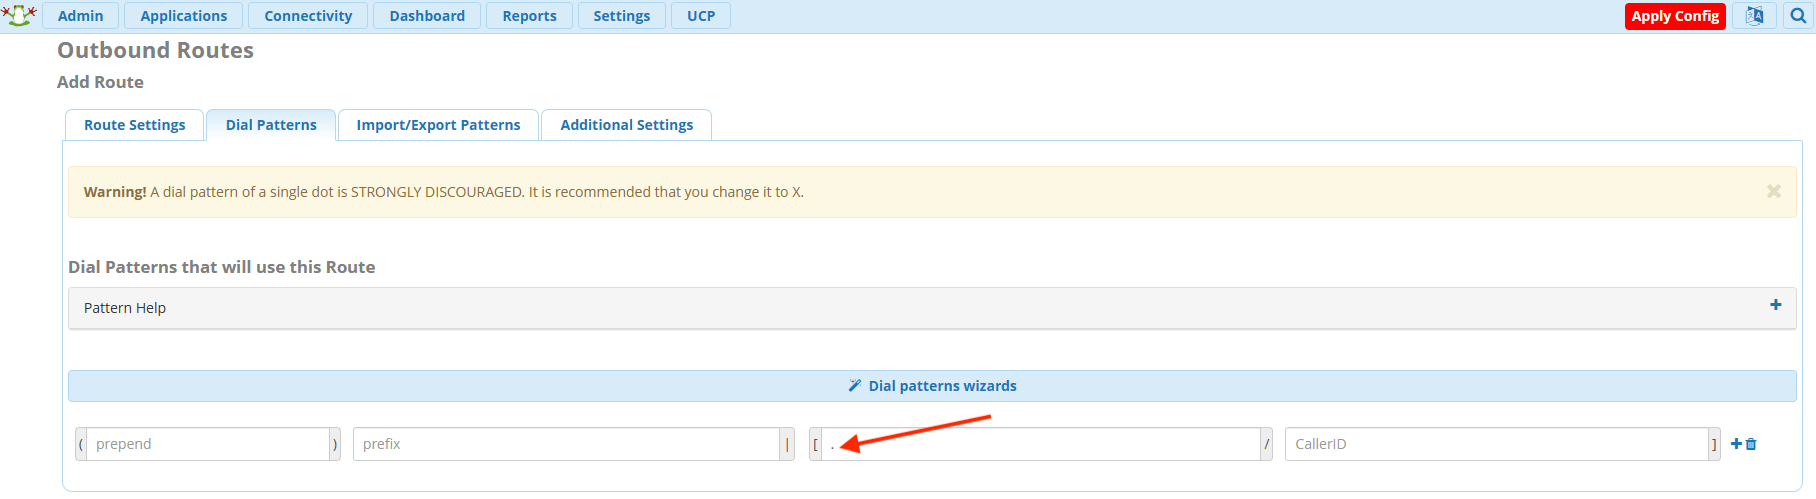
В блоке Dial Patterns в поле “match pattern” поставьте “.” (точку) и создайте маршрут. Если этого не сделать, то вы не сможете совершать исходящие звонки.
На этом настройка завершена.
Включение шифрования.
Перейдите в Settings, затем Asterisk SIP Settings. Откройте вкладку SIP Settings[chan_pjsip] и раздел TLS/SSL/SRTP Settings. Установите следующие параметры:
Certificate Manager значение Default.
SSL Method значение tlsv1_2.
Verify client значение NO.
Verify Server значение NO.
В блоке 0.0.0.0 (tls) в строке Port to Listen On укажите 5061.
Затем переходите в настройки транка и в SIP Server Port укажите 5061, а в Transport выбирайте 0.0.0.0-tls
В расширенных настройках транка также измените порт 5060 на 5061 в Client URI, Server URI и AOR Contact;
В строке Media Encryption измените на SRTP via IN-SDP(recommended).
We are going to walk through a simple and typical setup of FreePBX. It would be impossible to teach you through a single wiki how to configure the over 1000 features of FreePBX, but following should allow a brand-new user to create a basic system setup. Please note, we try to keep these articles as up-to-date as possible, but your system may vary slightly from the procedures and screenshots shown here, based on the versions installed.
This setup assumes you have purchased the (System Building Basic) commercial module bundle to make setting up phones and your PBX much easier. It also assumes you are using SIP trunks. In our example we will use SIPStation for our trunking. The SIPStation module built into FreePBX Administration makes setting up FreePBX a breeze, as it does most of the work for us.
Configuration of the PBX is done using the various FreePBX Modules. The modules are divided into several categories at the top of the GUI. Once you’re at a specific module’s page, you can hover your mouse over the question mark icon![]() near each entry to view more information on what the item does.
near each entry to view more information on what the item does.
For detailed instructions on each module, start here: Standard Modules.
- Login to the PBX Graphical User Interface («GUI»)
- Register your PBX
- Configure Asterisk SIP Settings
- Sysadmin Module Setup
- Set a Static IP Address and Configure DNS
- Configure E-Mail Settings
- Configure Email Server
- Configure E-Mail Alert Destination Addresses
- Setting the Time Zone
- Setting a Hard Drive Failure / Fill-Up Notification E-Mail Address
- Configuring Intrusion Detection
- Creating Extensions
- Configuring a Phone Using EndPoint Manager (EPM)
- Setting the IP Address and Viewing the HTTP Provision Port
- Creating a Template for the Phone
- Setting Up a Line Key for an Extension
- Mapping the Phone to an Extension
- Installing Firmware
- Downloading Configuration Files to the Phone
- Setting Up SIPStation Trunks
- Setting Up a SIPStation Free Trial
- SIPStation Free Trials are Available Through Your PBX GUI
- How to Use the SIPSTATION Module in Your PBX GUI to Sign Up for a Free SIPStation Trial
- Converting Free Trial account to Paid Account
- FAQ on Service not working after Conversion to Paid
- Purchasing SIPStation Trunks and DIDs
- Logging into the SIPStation Store
- Adding Trunks
- Adding Local DIDs
- Choose a Rate Center
- View the Search Results
- How to Filter by Specific Digits
- How to Filter by SMS and/or T38 Capability
- How to Find Consecutive DIDs
- What if There is No Inventory?
- Selecting DIDs
- Adding Toll-Free Numbers
- Choose a Toll-Free Prefix
- View the Search Results
- How to Find «Vanity» Toll-Free Numbers
- What if There is No Inventory?
- Selecting Toll-Free Numbers
- Checkout Process
- Special-Ordering Local DIDs and Toll-Free Numbers
- Manually Adding SIPStation Trunks to FreePBX
- Reviewing your SIPStation Account Services
- Reviewing your E911 Configuration
- Setting Up Inbound Routes
- Setting Up an Inbound Route to an Extension with SIPStation
- Setting Up an Inbound Route to an Extension Manually
- Setting Up Outbound Routes
- Creating a Local & Toll-Free Outbound Route Manually
- Setting Up an International Outbound Route Manually
- Changing the Order of Routes
- Setting Up a Ring Group
- Setting Up a Queue
- Setting Up a Company Directory
- Creating System Recordings
- Creating a System Recording Over the Phone
- Uploading an Audio File from your Computer
- Enabling Users to Re-Record Existing System Recordings Over the Phone
- Setting Up an Interactive Voice Response (IVR) System
- Setting Up a Time Group
- Excluding Specific Time Periods, Such as Holidays
- Setting Up a Time Condition
- Setting Up a BLF for a Time Condition
- Overriding a Time Condition
- Setting a Time Condition as an Inbound Route Destination
- Creating and Managing UCP Users (in User Management)
- Adding a New User and Setting Up UCP Privileges
- Setting Up Conferences
- Direct-Dialing Into a Conference
- Setting up a BLF for a Conference
- Adding a Conference to an IVR
- Giving a User Access to Conferencing in UCP
- Setting Up Paging
- Changing the Auto-Answer Sound
- Paging Pro Features
- Setting up Outbound Route Notification
- Setting Up Parking
- Setting Up a BLF for a Parking Slot
- Setting Up Follow Me
- Configuring Follow Me in UCP
- Setting Up a BLF for Follow Me
- Setting Up Backups
- Creating a Backup
- Running a Backup Manually
- Other Modules
- Consider the Paid Modules
Login to the PBX Graphical User Interface («GUI»)
- Using another machine on your same network, open a web browser and enter the IP address of your PBX.
- If you don’t know the IP address of your PBX, go to the Linux console/command prompt. Login to the Linux console using the username «root» without quotes, and the root password you selected during installation. You will then be shown your IP address.

- If you don’t know the IP address of your PBX, go to the Linux console/command prompt. Login to the Linux console using the username «root» without quotes, and the root password you selected during installation. You will then be shown your IP address.
- You will now be asked to create a user to log into FreePBX GUI. Press Create Account when done.
- On the main landing page select the PBX Administration tab to log into FreePBX
- Login with the username and password you just created.


Note: These passwords do not change the Root password used to login to the Linux command prompt! They are only used for access to the web interface.
Register your PBX
- From here, you’ll be welcomed to your FreePBX and asked if you would like to activate your system. Activation is highly recommended, as it’s required to purchase Commercial Modules, Paid Support and SIPStation Trunking. To activate now, press the “Activate” button.

- Enter in your email address that you use for the FreePBX Portal. Once you’ve entered your address, press the “Check” button.
- If you do not have an account enter the email address you would like to use for logging into the FreePBX Portal and you will be directed to create an account.


- The system will detect this address is tied to an existing Portal account and prompt you to enter your password. Once you have your password filled in, press the “Next” button.
- You can then choose to edit or add your personal Portal information. When finished, press “Next.”
- From here, you’ll be asked if this is a new activation. Since you don’t have an existing Deployment ID, then you’ll be looking at the first option, New Activation. All you need to do is give this deployment a «friendly» name to help you differentiate between your different systems when using the Portal to buy products. Then press the “Activate” button.
- If you have a Deployment ID that is not tied to another PBX you can pick the Existing Deployment Option and provide that Deployment ID


- You’ll notice the activation process is now installing and after about 5-10 seconds this process will be complete.

- You will now be able to take part in special offers. We offer bundles that combine some of our most popular features that will save you money. Click on one of the “Buy” buttons to purchase your bundle of choice or press “Complete” to advance to the System Status screen of your PBX GUI.


Configure Asterisk SIP Settings
- Next, configure the Asterisk SIP Settings Module by following these instructions. The most important section, which you must configure in order to avoid one-way audio problems, is the «IP Configuration» section.
- Make sure you define your external IP and local subnets
Sysadmin Module Setup
Set a Static IP Address and Configure DNS
- When FreePBX is first installed, it is configured to obtain an IP Address using DHCP. You’ll need to assign your PBX a static IP address so that your phones will have a consistent internal IP address to use to contact it. The easiest way to give your PBX a static IP address is to configure your DHCP server to always assign your PBX the same IP address using a DHCP reservation. This ensures that if DHCP settings later change, such as changing DNS server settings, the PBX will get these new settings with all other DHCP clients. If that’s not possible, you will need to configure your PBX to use a static IP and not use DHCP.
- From FreePBX GUI Click Admin, and then System Admin Module — Standard Version on the left hand side of the screen, and then Network Settings, on the right hand side of the screen. You should now see a screen that looks like this:

- Change IP Protocol to «None» and then enter your desired static IP address. Be sure to also set your subnet mask (typically 255.255.255.0) and default gateway (usually 192.168.1.1).
- When you’re done, click save settings.
- To continue, input the new IP address into your web browser. Return to the System Admin Module (follow the instructions described above) and manually set your DNS Servers
- Then go to the DNS section of the System Admin module and click DNS on the right hand side of the screen. You’ll see a screen that looks like this:

The Distro installs DNSMASQ to ensure that your system maintains DNS even when the internet is down, and DNSMASQ won’t work unless 127.0.0.1 is listed as your first DNS Server. The last two are Google’s DNS servers. You can replace those two with your own, if you prefer.
- When you’re done, click «Submit»
Configure E-Mail Settings
Configure Email Server
- View the System Admin Module — Standard Version module guide here to setup and manage your email relay servers.
Configure E-Mail Alert Destination Addresses
FreePBX has a number of components that will send out e-mail alerts on various conditions.
Check the following areas to verify or set the desired e-mail destination address of the phone system administrator who will receive the alerts:
- Admin > System Admin>Notifications Settings
- From Address: Enter the From address the PBX will use for the notifications on this page, e.g. [email protected]
- Storage Notifications: (enter the desired e-mail address)
- Intrusion Detection Notifications: (enter the desired e-mail address)
- Abnormal Call Volume Notifications: (enter the desired e-mail address)
- Submit
- Settings > Advanced Settings
- Backup Module
- Email «From:» Address: Enter the From address the Backup module will use, e.g. [email protected]
- click the green check mark to the right of the field
- Apply Config
- Apply Config
- Backup Module
- Settings > Fax Configuration
- Fax Options > Fax Presentation Options
- Outgoing Email address: Enter the From address the fax module will use when sending received faxes, e.g. [email protected]
- Fax Options > Fax Feature Code Options
- Email address: Enter the default destination e-mail address for received faxes so they can be manually routed by a human being, e.g. [email protected]
- Submit
- Apply Config
- Apply Config
- Fax Options > Fax Presentation Options
- Settings > Voicemail Admin
- Settings
- fromstring: Enter the From address the voicemail module will use when sending out voicemail alerts, e.g. [email protected]
- pagerfromstring: Enter the From address the voicemail module will use when sending out voicemail alerts, e.g. [email protected]
- serveremail: Set the same as «fromstring»; not sure how this is different
- Submit
- Apply Config
- Settings
There is additional configuration needed for some of the above components but the above is just the e-mail From and To configuration.
Setting the Time Zone
-
- Go to Admin→System Admin→Time Zone
-
Use the drop-down menus to select the appropriate time zone and then click Submit. Note the warning stating that you must reboot your system in order to complete the changes.

-
Go to Admin → System Admin → Power Options
-
Be very careful with this section! You will want to reboot, NOT power off.
-
Click the Reboot button
-
You’ll be warned that rebooting will cause call processing to stop. Click OK if you are ready to continue.
-
Just to make sure you’re really ready to reboot, a pop-up will ask you to type «reboot» in the field. Do this, then click OK.
-
Your system will now reboot. Click OK to close the information window, and wait at least 5 minutes before reloading the page.
-
Go to Admin → System Admin → Time Zone again, and you should see your newly chosen timezone displayed.


Setting a Hard Drive Failure / Fill-Up Notification E-Mail Address
-
- Go to Admin -> System Admin -> Storage
-
Enter an e-mail address where you would like to receive hard drive failure / fill-up notifications, and click Submit.


Configuring Intrusion Detection
- Go to Admin -> System Admin -> Intrusion Detection
- We recommend that you keep this service running, in order to detect, block, and notify you of attempts to compromise your system. You may check the status here and adjust your ban time, max retry, and find time if needed.
- Enter an e-mail address where you would like to receive intrusion detection notifications.
- Optionally, enter any IPs that you would like to whitelist.
-
Click Submit. Your settings will be applied when the page reloads.

Creating Extensions
- Go to Applications -> Extensions
- For the fastest, easiest setup, click the Quick Create Extension button.

- Select the desired type of new extension, enter the extension number, and enter the display name. In our example we are creating a new Chan_SIP extension.
- Optional: Enter an e-mail address for the user. This e-mail will be used for services such as voicemail, User Control Panel, and fax.
- Click Next to go to step 2.
-
Optional: If you would like to enable voicemail now, do the following:
-
Click the Yes button next to «Enabled.» This will make the password field available.
-
Enter an initial password (digits only). We recommend initially setting this to the extension number, because the first time the user dials *98, they will be prompted to set up their voicemail box and change this password. Users can also change their passwords later by dialing *97 and changing voicemail settings.
-
-
Click the Finish button.
-
Click the X button (
) in the upper right-hand corner of the window to close the Quick Create window. -
Reload the extensions list page to see your newly created extension in the list.
-
Repeat the process for each extension you would like to add.
-
To manage the extensions you created, go to Applications -> Extensions -> List Extensions. Here you can see a table showing extensions and whether various settings are enabled. You can click the pencil icon (
) to edit, or the trash can icon () to delete.


Please see our Extensions Module wiki for more information.
Configuring a Phone Using EndPoint Manager (EPM)
EndPoint Manager is a commercial module allowing you to configure over 220 devices and change settings on a per-template basis from the GUI. EndPoint Manager helps you quickly and easily configure a phone.
These instructions will walk you through basic configuration, including setting an IP address, creating a phone template, setting up a line key, mapping the phone to an extension, installing firmware, and applying phone config files. Keep in mind that you will always have to download a new config file to the phone in order to see any of your changes.
- Go to Settings → EndPoint Manager
- Click on Global Settings in the menu at the upper right corner of the page.
Setting the IP Address and Viewing the HTTP Provision Port
-
- Enter the IP address of your PBX into the Internal IP Address field. If you will have phones connecting to the PBX on an External IP or FQDN, enter that into the External IP Address field.
- Take note of the HTTP provision port shown, as some phones such as Digium only support HTTP or FTP provisioning.
- Click Save Global when done.

Creating a Template for the Phone
-
- Click Add Brand in the EndPoint menu at the upper right corner of the screen.
- Click on the brand of your phone. You will be taken to a page where you can begin creating a new template.

- Enter a Template Name (no spaces).

- Choose an Internal or External Destination Address.
- Internal: The system will pull the IP address you defined earlier in Global Settings.
- External: You may enter any IP or Fully Qualified Domain Name (FQDN).
- Select the Time Zone for the phone. Choose the time offset from GMT, or select GMT. (Do not adjust for daylight savings time; use the standard time number.)

- Choose a Line Label for line keys on supported phones. This can be name only, extension only, or name and extension.
- For Firmware Version, select Firmware Slot 1 from the drop-down menu. Note: you will need to install firmware by following the instructions given later in this wiki.
- Check your Provision Server Address. It should match the Destination Address set earlier.
- For Provision Server Protocol, click on HTTP, FTP, or TFTP, depending on the options you see available, and which protocol is correct for your phone.
- Click the Save Template button when finished. The page should reload and you should see a list of available phones. Next you’ll configure some buttons on the phone.


Setting Up a Line Key for an Extension
-
-
After you’ve saved your template, you should now see your available phone(s) at the bottom of the page. (To navigate to this page if you are not there already, go to Settings → EndPoint Manager → Brands: [Name of Brand] → Manage: [Name of Template].)
-
Click on the blue button for the phone you’d like to work on.
-
This example shows Digium phones. Your list may vary. We are working with the D70 in our example.

-
-
In the Line Keys section, select Type: Line. The Label and Value fields will disappear. Select Account: Account 1.

-
Click the Save Model button on the left side of the page when finished.
-

Mapping the Phone to an Extension
-
-
Click on Extension Mapping in menu at the right side of the page.
-
Click the Add Extension button. New drop-down menus and fields will be shown.
-

Installing Firmware
- Click Firmware Management in the menu at the right side of the page.
- Your phone’s brand should appear under Firmware. Click the phone brand.
We are using Digium in our example.
-
You should now see a list of Available Firmwares.
- Drag the latest firmware to Firmware Slot 1.

- Click the Submit button. The page will reload.
- Wait a few seconds, then reload the page. (Confirm form submission if prompted.) You should see a green message confirming the firmware has been installed.


Downloading Configuration Files to the Phone
Now we need to point the phone to the IP address and HTTP port of the PBX. The IP address and HTTP port were set up earlier in Global Settings. Setup may vary between phone models. Please refer to your specific phone’s instructions.The following instructions apply to the Digium D70:
-
-
- Press the phone’s Settings button
- Select Fetch Configuration File from URL
- Enter the IP address of your PBX
- Enter the HTTP port for provisioning
- Press Go
- Your phone should reboot, and you should now see the extension line key that was set up earlier.
-
Please see our End Point Manager wiki for more information.
Setting Up SIPStation Trunks
With SIPStation unlimited SIP trunks, you can be making and receiving calls from your PBX in just a few minutes. The FreePBX SIPSTATION module helps you set up SIP trunks easily and automatically. When you set up SIPStation trunks, a few basic inbound and outbound routes are automatically set up for you. We will discuss inbound and outbound routes later.
If you are a new SIPStation customer, our Free Trial program will let you try SIPStation before you buy. The Free Trial includes one trunk and one DID. Setup is quick and easy in the SIPSTATION module within FreePBX.
Setting Up a SIPStation Free Trial
SIPStation 20-day Free Trials are available in the lower 48 U.S. states and Canada (except Territories) for first time SIPStation users to provide a POC or «Try before you buy» experience with our service. You won’t need to give us a credit card, and you can get started immediately, as your trial service is provisioned instantly!
- SIPStation Free Trials are Available Through Your PBX GUI
- How to Use the SIPSTATION Module in Your PBX GUI to Sign Up for a Free SIPStation Trial
- Converting Free Trial account to Paid Account
- FAQ on Service not working after Conversion to Paid
SIPStation Free Trials are Available Through Your PBX GUI
With FreePBX version 12 and above, in just a few clicks we can have you up and running with your PBX connected to our world class services. You just pick a phone number and we’ll do the rest! There is no cost or obligation. You’ll see just how easy it is to connect your phone system to our award-winning platform. There is no risk. After your evaluation, you can convert your account to a regular account (no contract period required), or end the trial and go your own direction. You can keep your Free Trial phone number (DID) when you convert to a regular account.
E911
E911 is not available with SIPStation Free Trial accounts. You will need an alternate means of calling 911 in an emergency.
How to Use the SIPSTATION Module in Your PBX GUI to Sign Up for a Free SIPStation Trial
- Go to Connectivity -> SIPSTATION

- Click on the «SIPSTATION Free Trial» tab.
- You will be taken to this screen:
- Step 1 — Login / Register: You will need to log in with an existing account or register a new one.
- If you already have a SIPStation or FreePBX Portal account:
- Enter your Email Address and Password.
- Click «Next»

- Enter your Email Address and Password.
- If you need to create a new account enter in your email address and the new user screen as seen below:
- Enter your registration information and choose a password.

- Enter your address.
- Fill in the remaining information
- Click «Next» when finished.
- If you already have a SIPStation or FreePBX Portal account:
- Step 2 — Service: Choose a DID (Direct Inward Dial) number.
- Select a country and state/province.
- Select a calling area (exchange).

- Select a DID. You may select one number.
- Click «Next.»
- Select a country and state/province.
- Step 3 — Finish: You will see the products included with your SIPStation Free Trial account. You must agree to the Terms and Conditions in order to continue.
- Check the box next to the Terms and Conditions.
- Click «Finish.» Please wait while the system applies your new settings.

- Check the box next to the Terms and Conditions.
- After your free trial has been set up successfully, you will see new information in your SIPSTATION module. The tabs at the top are now called «Local Settings» and SIPSTATION Store, with no SIPSTATION Free Trial tab. The «Account Key» area has been replaced with instructions about how to cancel your free trial, update account information, or test your firewall. This area also displays the number of days remaining for the free trial.
- Your SIPSTATION System Status is displayed:
- Note that E911 options are greyed-out in trial mode. E911 is not available with SIPStation Free Trial accounts.
- Your SIPStation account settings are shown:
- Your route and trunk configuration is shown:
- Your DID configuration is shown.
The default inbound destination for your new DID is «Sipstation — DID Verification.» In order to receive calls, you will need to change this to a different destination, such as an extension.
Please see the Configuring Your PBX wiki for a complete guide to getting your PBX system up and running. This wiki will help you create various call destinations and configure popular options.


Converting Free Trial account to Paid Account
Once you’ve completed your testing and are ready to convert to a paid account you can follow the following steps.
- Go to Connectivity -> SIPSTATION

Step 1 — Select the “Click to Convert” to start the process.

Step 2 – Select any additional services required and click “Next” It will automatically select your freetrial DID and 2 High Volume trunks which was setup under your freetrial.

Step 3 – Add your credit card information and select “Next”. Be sure to flip the card to add your security code.

Step 4 – Read the Terms and Conditions statement and acknowledge that you agree by selecting the check box. Once you’ve acknowledged our terms you can select “Finish”.

Reloading — Once you’ve selected the “Finish” button it will bring you back to the main SIPStation Module page. You’ll need to select the “Apply Config” button to reload Asterisk.

Once Asterisk reloads it will attempt to Register with our two trunk peers at “trunk1.freepbx.com” and “trunk2.freepbx.com”.

FAQ on Service not working after Conversion to Paid
Q: My SIPStation module is showing “Registered” but I’m not able to dial out, getting “all circuits busy”?
A: This is mostly likely caused by Asterisk not reloading properly. Try restarting Asterisk via CLI which will force it to reload/restart, “core restart now”.

Q: My SIPStation module is showing “Registration Sent” but It’s not able to Register with either trunk server and my inbound/outbound calling isn’t working and longer?
A: The most common issue for this is your local firewall is likley blocking the SIP traffic to/from our “trunk1.freepbx.com” , “trunk2.freepbx.com” servers. When you switch from the Free trial account to a SIPStation Paid account the server IP addresses change. Check your firewall for proper configuration. Many versions of Asterisk also require a restart for the new trunk hostnames to take affect. You can restart Asterisk with the bash command ‘fwconsole restart’ or by simply rebooting the PBX.
Purchasing SIPStation Trunks and DIDs
After you’ve created a SIPStation account at http://www.sipstation.com, it’s easy to purchase new trunks, local DIDs, and toll-free numbers. Simply make your selections, add the items to your shopping cart, and complete the checkout process. Detailed instructions are found below.
- Logging into the SIPStation Store
- Adding Trunks
- Adding Local DIDs
- Choose a Rate Center
- View the Search Results
- How to Filter by Specific Digits
- How to Filter by SMS and/or T38 Capability
- How to Find Consecutive DIDs
- What if There is No Inventory?
- Selecting DIDs
- Adding Toll-Free Numbers
- Choose a Toll-Free Prefix
- View the Search Results
- How to Find «Vanity» Toll-Free Numbers
- What if There is No Inventory?
- Selecting Toll-Free Numbers
- Checkout Process
- Special-Ordering Local DIDs and Toll-Free Numbers
Logging into the SIPStation Store
- Before you can purchase any DIDs, toll-free numbers, or trunks, or make any special orders, you will need a SIPStation account. If you need to create an account, please see our Creating a SIPStation Account wiki for instructions.
- Log into your account at the SIPStation Store.
- If you are already logged in but are not seeing the store section, click Purchase in the green navigation menu to navigate to the store section.

Adding Trunks
- Under «High Volume Voice Trunks,» move the slider to select the number of trunks (concurrent call paths) you want to purchase. Click on the square at the left and drag it along the green bar to change the number of trunks selected.

- The total quantity of new trunks will be displayed in the green box at the upper right, along with the monthly fee for the trunk(s).
- The new trunks will be added to your shopping cart. If you need to remove a product, you can click the small X button.
- At this point you can continue shopping or click the Proceed to Checkout button to proceed to the checkout process, described later in this wiki.


Adding Local DIDs
-
You can search for new local DIDs under the Inbound DID number section.

Choose a Rate Center
- A «rate center» is a geographic area whose numbers are considered to be local to each other instead of long distance. Rate centers vary in size, ranging from one small community to several large cities combined. A rate center may contain several area code-prefix combinations (NPA-NXXs).
- Select a Country (US or Canada)
- Select a State or Province
- Select a Rate Center.
- Select a Country (US or Canada)
Tip
If you are unable to find the city you are looking for, take a look at the list of rate centers to see if your city might be included under a different name. For example, Minneapolis and St. Paul, MN are both part of the «Twin Cities» rate center.
View the Search Results
- Available DIDs will be shown below your selected rate center. In some rate centers, the search results will be divided up into specific areas, which will be listed alphabetically. You can click on the green buttons to jump to the DIDs for these different areas, or you can scroll down within the search results to view all available DIDs. Numbers are listed in ascending numerical order.
- For example, here we ran a search for the Twin Cities rate center and are finding four different areas available within this rate center.

How to Filter by Specific Digits
- Are you looking for specific digits at the beginning, end, or middle of your phone number? If so, you can enter those digits to filter your search results.
- Select the Begins with, Ends with, or Contains button. (Default is Begins with)
- Type your desired digit(s) into the field next to these buttons. Do not enter any special characters such as parenthesis or dashes. Please be patient; the search results will automatically narrow as you type each digit. You do not need to press enter.
- If you need to undo your specific search, you can delete what was entered in the field, and the list should return to its original search results.


How to Filter by SMS and/or T38 Capability
- Do you need SMS (text messaging) and/or T38 (fax) capability with your new DID? If so, check the appropriate boxes to filter your search results.

How to Find Consecutive DIDs
- Since available numbers are listed in sequence, in ascending order, you can browse the list to search for consecutive DIDs. Simply scroll down the list to see if you can find any sequential numbers.
- At this time, the SIPStation Store does not offer a filter that will search for consecutive DIDs.

- There is no special fee for consecutive DIDs when you find them in the SIPStation Store. If you would like us to help you with finding and ordering consecutive DIDs, we can help. You can use the special order process to make this request, and there would be a $2-per-DID setup fee for this service.
What if There is No Inventory?
- If you are seeing the message «No current inventory for the selected rate center,» it means we do not have new numbers immediately available for that area. You can check back again later to see whether new numbers become available. Or, you can use our special-ordering process, and a member of our team will search for and order numbers for you. The special-order process may involve backordering numbers and isn’t guaranteed to be successful, but in many cases, we will be able to fulfill your request.

- If you are seeing the message «No numbers meet your filter criteria for this rate center,» you can try selecting different filter options, for example by changing your search for specific digits, or by removing the filter for SMS and/or T38 capability.

Selecting DIDs
- After you’ve found some available numbers that meet your search criteria, it’s easy to add the numbers to your shopping cart. Simply check the checkbox next to each DID you would like to order. The total quantity and monthly fee will be shown in the green box, and the DIDs will also be shown in your shopping cart.
- You can click the X next to an item in your shopping cart if you need to remove it.
- At this point you can continue shopping or click the Proceed to Checkout button to proceed to the checkout process, described later in this wiki.


Adding Toll-Free Numbers
- Toll-free numbers begin with 800, 844, 855, 866, 877, or 888. When a caller calls your toll-free number, you pay for the call. You can search for new toll-free numbers under the Toll Free number section.

Choose a Toll-Free Prefix
- Select a Toll Free Prefix from the drop-down menu.

View the Search Results
- Available toll-free numbers will be shown below your selected prefix. Numbers are listed in ascending numerical order.

How to Find «Vanity» Toll-Free Numbers
- If you need to undo your specific search, you can delete what was entered in the field, and the list should return to its original search results.
What if There is No Inventory?
- If you are seeing the message «No current inventory for the selected prefix,» it means we do not have new numbers immediately available in that toll-free prefix. You can check back again later to see whether new numbers become available. Please note, we are not able to backorder toll-free numbers. If you use our special order form by clicking the «Click Here» link, we can only help you search our existing inventory.

- If you are seeing the message «No numbers meet your filter criteria for this prefix,» you can try entering different digits or removing digits. Also, since toll-free numbers typically do not support SMS or T38, you can try de-selecting these options.

Selecting Toll-Free Numbers
- After you’ve found some available numbers that meet your search criteria, it’s easy to add the numbers to your shopping cart. Simply check the checkbox next to each toll-free number you would like to order. The total quantity and monthly fee will be shown in the green box, and the numbers will also be shown in your shopping cart.
- You can click the X next to an item in your shopping cart if you need to remove it.
- At this point you can continue shopping or click the Proceed to Checkout button to proceed to the checkout process, described later in this wiki.


Checkout Process
You must continue to the next step and click Proceed to Checkout, or the DID(s) and toll-free number(s) in your shopping cart will not be saved to your account, meaning you will lose the ability to use those numbers if another user selects them before you check out. If you need to remove any items from your shopping cart, you can click on the gray X next to the item.
- Add services such as trunks, local DIDs, and toll-free numbers to your shopping cart using the processes described earlier in this wiki.
- Click on the green Proceed to Checkout button when ready to make your purchase.

-
Review your Order Summary. If needed, click Add / Edit Items to go back to the store, where you can remove items from your cart or select additional items to add.
The section «After Your Order, Your Subscription Will Include» section at the bottom of the page shows what the new monthly subscription fees will be if you make this purchase. Totals do not include taxes and fees, which vary by location. We are required to collect various taxes and fees according to federal, state, and local regulations. Please see our wiki on Taxes and Fees for more information.
- Click on the checkbox to agree to the terms and conditions.

- Select an existing credit card to use for this order, or add a new card. Then click Confirm Order & Charge My Card.
- If your order completes successfully, you should get the following notification:


Special-Ordering Local DIDs and Toll-Free Numbers
Can’t find what you are looking for in the store, or need some additional help with the ordering process? We may be able to help. You can use our special order form to make your request.
For full instructions on special-ordering, please see our wiki Special Ordering Local DIDs and Toll-Free Numbers.
Manually Adding SIPStation Trunks to FreePBX
These instructions assume you have purchased a SIPStation trunk and DID, and you are using a regular SIPStation account (not a Free Trial). If you already have at least one trunk and DID in SIPStation, all you will need to do is find your FreePBX module keycode and paste it into the SIPStation module for the «account key.» Here is how to do that:
-
In FreePBX, go to Connectivity -> SIPSTATION. The SIPSTATION module should show an empty field for Account Key at the top.
-
The SIPSTATION module gives you access to the SIPStation Store without leaving the page. You will use the store to find your account key. In the SIPSTATION module, click on the SIPSTATION Store tab. (Alternatively, you could visit the store separately at http://www.sipstation.com.)
-
Log into your SIPStation account.
-
Note: SIPStation allows you to create multiple locations within the same account. Check the blue bar at the top of the page to ensure you are using the correct location. If not, click on the white triangle to bring up a list of other locations to choose from.

- Click on My Account in the green main menu near the top of the page.
- Provide a valid E911 address if you have not already done so. You are required to set this up in order to use the SIPStation service. It is your responsibility to provide a valid U.S. or Canadian address and verify that E911 is working. You can verify this by dialing 933 as soon as you are able to make outbound calls. Just a reminder: E911 is not available with SIPStation Free Trial accounts.
-
In My Account, scroll down to find the Account Configuration section.


- You should find your FreePBX Module Keycode here. Click the Copy to Clipboard button. This keycode will later help you easily auto-configure trunks and routes in FreePBX.

- In the FreePBX SIPSTATION module, paste your account key into the Account Key field and click Add Key.
- The page should reload. Click the Apply Config button at the top.
- If you scroll down the page, you should see that several settings have been set up for you, including a few basic routes. Your DID(s) will be shown at the bottom with the inbound destination set to Sipstation-DID Verification by default.


Reviewing your SIPStation Account Services
The SIPSTATION module allows you to conveniently check several settings without leaving the module. You can set a global failover number here. Your Asterisk server would send incoming calls to the global failover number in case it is unable to connect to SIPStation. You can also see and change the status of international calling, outbound fax, and SMS services.
The following instructions assume that you have set up SIPStation trunks as described earlier, and that you have navigated to the SIPSTATION module by going to Connectivity -> SIPSTATION.
To edit the global failover number from within the SIPSTATION module:
-
- Click on the Local Settings tab.
- Scroll down to the Account Settings section.
- Enter the desired failover number into the Global Failover Number field.
- Click the Update Account Info button.
- Click on the Local Settings tab.


To enable/disable account services such as international calling, outbound fax, and SMS Support from within the SIPSTATION module:
-
- Within the SIPSTATION module, click the SIPSTATION Store tab.
- Log in if you haven’t already.
- Click on My Account and then scroll down to view your Metered Services.
-
You can turn these services on or off by clicking the ON/OFF switches. Notice that above your Metered Services section, you can also adjust failover settings here.
- Within the SIPSTATION module, click the SIPSTATION Store tab.

Reviewing your E911 Configuration
In the Local Settings tab of the SIPSTATION module, you can see your E911 Master Location settings. Your E911 caller ID number is shown here.
The following instructions assume that you have set up SIPStation trunks as described earlier, and that you have navigated to the SIPSTATION module by going to Connectivity -> SIPSTATION.
Remember, a regular SIPStation account (not Free Trial) will not work unless you set up at least one DID with e911 information. You may optionally set up e911 on additional numbers for an additional monthly fee. Please confirm the accuracy of the information and ensure E911 is working by dialing 933. DO NOT DIAL 911 to test the service. Please view our “Additional e911 Addresses” wiki for more information.
-
- Click on the Local Settings tab.
- Scroll down to the E911 Master Location section.
- You can view and edit the master E911 name and address. If you need to make changes to the Master e911 caller ID, name, and/or address, enter your changes here, click the Update Account Info button, then click the Apply Config button. Please note, there may be up to a 15-minute delay before your settings are actually applied. You can test the accuracy of the information by dialing 933.
- Click on the Local Settings tab.

Please see our SIPStation Trunking wiki for more information.
Configuring Your PBX#top
Setting Up Inbound Routes
When a call comes into your system from the outside, it will usually arrive along with information about the telephone number that was dialed (also known as the «DID») and with the Caller ID of the person who called. The Inbound Routes module works together with most of the other modules in FreePBX. Calls come into your system on trunks that are configured in the Trunks module. The Inbound Routes Module then tells FreePBX/Asterisk where to send these calls. Calls can be sent to a variety of destinations, including Extensions, Ring Groups, Queues, IVRs, Time Conditions, Feature Codes, DISAs, Conferences, etc., all of which are configured in their own modules.
Setting Up an Inbound Route to an Extension with SIPStation
The next steps are for SIPStation users who would like to create an inbound route to an extension. The SIPSTATION module will take care of many settings automatically. If you are not a SIPStation user, you can skip this section and go to the instructions for setting up an inbound route to an extension manually.
If you are not already within the SIPSTATION module, go to Connectivity -> SIPSTATION and check that you are viewing the Local Settings tab.
-
- Scroll to the bottom of the page and you should see a table showing your DID(s).
- In the Description column, enter a description for this route. In our example we are calling it «Main DID.»
- In the Route To column, select Extensions in the top menu, and then choose an extension in the bottom menu.
-
Click the Update DID Configurations button and then click the Apply Config button when finished.
-
Your new route should now show up in the Inbound Routes module. If you go to Connectivity -> Inbound Routes, you should see your new inbound route in the list.


Setting Up an Inbound Route to an Extension Manually
If you are not using SIPStation, you will need to set up inbound routes manually.
-
- Go to Connectivity -> Inbound Routes
- Click the Add Inbound Route button.
- Give the new route a description.
- The PBX allows two specific types of inbound routing: DID & CID Routing. These two routing methods can be used on their own or together. Enter a number in the DID Number and/or CallerID Number fields if desired. Leaving both fields blank will create a route that matches all calls. If you set the CID Priority Route to Yes, CID will only be considered a priority if there is no entry in the DID field.
In our example, we’ve entered a number into the DID field. - You can configure several other options. Please see our Inbound Route User Guide for a description of the options, and/or view the pop-up tooltips.
- At the bottom, choose the destination for this inbound route. You must set this in order for your new inbound route to function properly.
In this example, we have chosen an extension.
- When finished, click «Submit» and then click «Apply Config.»
- You should now see your newly created route in the list at the upper right corner of the Inbound Routes module.


Please see our Inbound Routes Module wiki for more information.
Configuring Your PBX#top
Setting Up Outbound Routes
The Outbound Routes Module is used to tell your FreePBX/Asterisk system which numbers your phones are permitted to call, and which trunk to send the calls to. Without setting up outbound routes, you will not be able to make calls outside your system.
If you are a SIPStation user, a few basic outbound routes are automatically configured for you when you set up SIPStation trunks. You should see these defaults:
You can modify the settings as needed or create new routes. See the examples below for typical configurations.
If you are not a SIPStation user, you can set up outbound routes manually as described in the instructions below.
A typical configuration will include an emergency route for 911 calls and another route for ordinary calls. You might also wish to configure routes for interoffice calls, international calls, and other special circumstances.
The order of your routes is very important. An emergency route needs to be kept first (on top of the list).
Creating an Emergency Outbound Route Manually
An emergency route enforces the use of a device’s emergency Caller ID (CID), if set.
-
-
- Go to Connectivity -> Outbound Routes
- Click the Add Outbound Route button.
- You should be viewing the Route Settings tab.
- Give the route a name. Spaces are not allowed.
In our example, we’ve named this emergency route «E911-Leave-First» to remind ourselves to keep this route at the top of our list. Note, this is also the name that SIPStation uses for an automatically created emergency route.
- Select the Emergency button to define this as an emergency route.
- Check that Time Group is set to Permanent Route. This ensures emergency calls are always allowed.

- Select which trunks this outbound route will use, and in what order. Choose the desired trunk(s) from the drop-down menus next to Trunk Sequence for Matched Routes.
- Check that the Optional Destination on Congestion drop-down menu is set to Normal Congestion. The default behavior for this setting is to play the «all circuits busy» recording or another option configured in the Route Congestion Messages module if installed.
- Click the Dial Patterns tab. Enter the following dial patterns (use the + button to add new lines):
Note: «933» is the e911 address verification service. Dialing 933 will allow us to test the functionality of our emergency route as well as verify our CID and e911 address. We have also added three patterns with prefixes in case someone dials these extra digits when trying to make an emergency call. The system will strip the prefix from the number that is sent to the trunk. - Click the Submit button and then click the Apply Config button.
- IMPORTANT: Verify your emergency route is first in the list. If you create other routes, always double-check that the emergency route remains first. If it is not first, drag it to the top of the outbound routes list.
-


Creating a Local & Toll-Free Outbound Route Manually
In our example we are going to create a single route for local and toll-free numbers, combined.
-
-
- Go to Connectivity -> Outbound Routes.
- Click the Add Outbound Route button.
- You should be viewing the Route Settings tab.
- Give the route a name. Spaces are not allowed.
- For Route Type, leave both buttons de-selected (light blue in color). This is neither an emergency route nor an intra-company route. This route is used for for non-emergency local and toll-free outbound calls.
- For Route Position, select Last after. This will ensure your emergency route remains above this route. You can adjust the position of this new route later if needed, but keep your emergency route as #1 in the list.
- Select which trunks this outbound route will use, and in what order. Choose the desired trunk(s) from the drop-down menus next to Trunk Sequence for Matched Routes.
- Check that the Optional Destination on Congestion drop-down menu is set to Normal Congestion. The default behavior for this setting is to play the «all circuits busy» recording or another option configured in the Route Congestion Messages module if installed.
- Click the Dial Patterns tab.
- Click Dial patterns wizards.
- Enter your local area code (NPA) and exchange (NXX).

- Select the following buttons: Download Local Patterns, 7 Digit Patterns, 10 Digit Patterns, 11 Digit Patterns, and US Toll Free Patterns. De-select the other buttons.
- Click the Generate Routes button. The dial pattern wizard window should close, and the system should create several local and toll-free dial patterns for you.
- Enter any additional dial patterns as desired. One common option is to create dial patterns with «9» as a prefix that will be stripped, to accommodate users who are accustomed to dialing 9 to reach an outside line.
- Click the Submit button and then click the Apply Config button.
-


Setting Up an International Outbound Route Manually
-
-
- Go to Connectivity -> Outbound Routes
- Click the Add Outbound Route button.
- Give the route a name. Spaces are not allowed.
- Optional: If you would like to restrict access to this route, enter a Route Password.
In our example, we want to restrict the ability to make international calls, so we have entered a password. - For Route Type, leave both buttons de-selected (light blue in color). This is neither an emergency route nor an intra-company route.
- For Route Position, select Last after. This will ensure your emergency route remains above this route. You can adjust the position of this new route later if needed, but keep your emergency route as #1 in the list.
- Select which trunks this outbound route will use, and in what order. Choose the desired trunk(s) from the drop-down menus next to Trunk Sequence for Matched Routes.
- Check that the Optional Destination on Congestion drop-down menu is set to Normal Congestion. The default behavior for this setting is to play the «all circuits busy» recording or another option configured in the Route Congestion Messages module if installed.
- Click the Dial Patterns tab.
- Enter the following dial pattern in the match pattern field: «011.» (Include the period.) The period (.) is a wildcard character. When a user dials anything beginning with 011, the number will be recognized as an international number and will use this route.
- Enter any additional dial patterns as desired. For example, you might add a second 011. dial pattern using a «9» as a prefix that will be stripped, in order to accommodate users who are accustomed to dialing 9 to reach an outside line.
- Click the Submit button and then click the Apply Config button.
-


Changing the Order of Routes
When making an outbound call, the system will for the first matching dial pattern by working down the list of routes. The first item on the list will be checked first, then the next, and so on. If the system finds a match, it does not continue to look for a “better” match. Keep this in mind when deciding the order of your routes.
Remember, keep the emergency route above all of the others in the list.
- Go to Connectivity -> Outbound Routes. Your route list is displayed.
- To change the order, click on the arrow button (
 ) and drag the route to a new position.
- Alternatively, if you are not able to use drag-and-drop, you can click on the edit button (
 ) for the route and then select a new position from the Route Position menu. Click Submit after using this method.
- Alternatively, if you are not able to use drag-and-drop, you can click on the edit button (
- After you have made your changes, click the Apply Config button.
Please see our Outbound Routes Module wiki for more information.
Configuring Your PBX#top
Setting Up a Ring Group
A ring group is a list of multiple numbers that you would like to ring when a call is received. This gives several phones the opportunity to answer a call. You can choose from various ring strategies to control the order in which the system rings different phones.
- Go to Applications -> Ring Groups
- Click Add Ring Group.
- Enter a Ring-Group Number. This will be the number a user may dial to ring the phones in the ring group. Be sure it does not match any existing extensions or feature codes. The default is 600.
- Enter a Ring Group Description. This can be a «friendly name» and spaces are acceptable.
- Choose a Ring Strategy. The default is “ringall.” Other options include ringall-prim, hunt, hunt-prim, memoryhunt, memoryhunt-prim, firstavailable, firstnotonphone, and random. Click on the pop-up tooltip question mark icon for a full description of each of these strategies.
- Set the Ring Time, in seconds (default=20, maximum=300 seconds).
- Add extensions and/or outside numbers to the Extension List, one per line. You can include an extension on a remote system, or an external number, by suffixing the number with a “#” symbol. You can use the Agent Quick Select menu to quickly select existing extensions. Your ring group will call the numbers in the extension list.
In our example, we’ve added two internal extensions and an external phone number.


- At the bottom of the page, set a destination to which to route the inbound call in case no one answers. For example, you may wish to route it to a voicemail box.

- Click the Submit button and then click the Apply Config button.
- In order for the ring group to work, you’ll need to give callers the option to dial it (i.e. from a company directory or IVR), or you’ll need to route inbound calls to a DID or extension directly to the ring group. These options are controlled within the Inbound Routes module and elsewhere in other modules.
For example, using the Inbound Routes module, we can set the destination of our DID 9203831234 to be “Ring Groups” and select the ring group we just created. If we click “Submit” and then “Apply Config,” all calls coming into 9203831234 will now ring the numbers in our ring group.

Please see our Ring Groups Module wiki for more information.
Configuring Your PBX#top
Setting Up a Queue
You can set up automatic call distribution with the Queues module. A queue differs from a ring group because it allows advanced call routing options and escalation rules. This wiki gives you a brief overview of some basic settings, but there are many more. To learn more about queue settings, you can use the pop-up tooltips in the module.
- Go to Applications -> Queues
- Click the Add Queue button. You should now be viewing the General Settings tab.
- Enter a Queue Number. This number will be used to dial into the queue or to transfer callers to the queue. Be sure it does not match any existing extensions or feature codes.
- Enter a Queue Name that will help you identify this Queue. This can be a «friendly name,» and spaces are allowed.
- Optionally, set a Queue Password (numbers only). This would require agents to enter a password before being allowed to log into the queue.


- Choose whether to generate device hints, confirm calls, prefix the caller ID, give a wait time prefix, or use Alert Info. See the pop-up tooltips for more info.
- Choose how you would like to handle agent restrictions. If you set Restrict Dynamic Agents to Yes, you can prevent unauthorized users from logging into the queue. Later, you will define a list of users who are allowed to log in. If this is set to No, any user who knows the queue number (and password, if set) would be able to log in as a dynamic agent. Next to Agent Restrictions, choose how you would like the queue to handle Call Forwarding / Follow-Me settings.
- You can configure several more options at the bottom of the General Settings section. These include autofill, skip busy agents, queue weight, music on hold class, join announcement, call recording, and whether to mark calls answered elsewhere.
- At the bottom of the General Settings section, choose a Fail Over Destination. This is where callers will be sent in case the queue is over capacity, the caller reaches wait time limits with no one answering the call, etc.
- Click on the Queue Agents tab. Here, you will create lists of agents who can answer queue calls. The Agent Quick Select menus help you find existing extensions. You can manually enter extensions or outside telephone numbers.
- Static Agents are assumed to always be available to answer queue calls. They do not need to log in or log out of the queue.
- Dynamic Agents are additional agents who can choose to log into or log out of the queue. They are not automatically available. They must log in to the queue in order to participate. To log in, a dynamic agent would dial the queue number plus «*» (for example, 123* if the queue number is 123). To log out, they would dial the queue number plus «**» (for example, 123**).
- Click on the Timing & Agent Options tab to configure several settings related to wait time, timeout, retry, agent pause, and more. The default values are shown below.
- Click on the Capacity Options tab to define how calls are sent into the queue vs. sent to an alternate destination. If you would like to limit the queue to a certain maximum number of callers, you can set that here. («0» means «unlimited.») Join and Leave options control the behavior of the queue when it appears that agents might not be able to take the call.
- Click on the Caller Announcements tab to set up announcements that callers will hear. You can choose whether the system should tell callers their position in line and/or their estimated hold time. You can also give callers an option to use an IVR break out menu or request a queue callback.
- Click the Submit button when finished, then click the Apply Config button.


Please see our Queues Module wiki for more information.
Configuring Your PBX#top
Setting Up a Company Directory
A directory gives the caller the option to dial a person’s first or last name using their phone keypad in order to find and be connected to an extension. It is most commonly used as an IVR option. Your directory is not limited to internal extensions. You can add custom entries such as remote extensions, ring groups, queues, and outside numbers. You can add as many directories as you would like.
- Go to Applications -> Directory
- Click Add Directory
- Enter a Directory Name. This can be a «friendly name,» and spaces are allowed. Enter a Directory Description to help you remember what this directory is for. If you would like a prefix to be added to the incoming caller’s caller ID, you may enter it in the CallerID Name Prefix field.

- Several settings determine how to handle invalid entries made by callers. When a caller enters something into their keypad that cannot be found in the directory, that is considered an invalid entry. For example, the caller begins typing the last name «Thomas» but there is no one with that name in the directory.
- Invalid Retries: How many invalid entries are allowed before a caller is sent to the invalid destination.
- Invalid Retry Recording: Message played to a caller upon an invalid entry, asking them to try again.
- Invalid Recording: Message played to a caller when they have reached the invalid retry limit, before sending them to the invalid destination.
- Invalid Destination: Where to send a caller if they have reached the invalid retry limit.
- Return to IVR: Whether to send a caller back to the parent IVR instead of sending them to an invalid destination. This would only apply if callers have reached the directory by going through an IVR.
- Optional: Enable Announce Extension if you would like the system to tell callers the number of the extension after it is found in the directory. This is useful if you’d like your callers to know the exact extension number so they can direct-dial it in the future without spelling someone’s name.


- At the bottom of the page, create your directory by choosing an option from the drop-down menu. You can select All Users, Custom, or individual extensions. Add new lines by clicking the plus sign icon ().
- Name: The person’s name. Callers will need to begin dialing the person’s name on their keypad, as shown here (i.e. first name first, if that is how it appears here).
- Name Announcement: After a caller begins dialing someone’s name, this announcement will be played to the caller upon a successful match. You can choose from the person’s voicemail greeting (if an internal extension), Text to Speech, Spell Name, or a custom recording.
- Dial: The extension or external number you would like the system to dial when a user selects the directory entry.
Note: If you have chosen an existing internal extension, the name and dial fields are greyed-out because you cannot edit them here. You would need to edit the information in the Extensions module. The info shown here is tied to that module.
- Click the Submit button and then click the Apply Config button when finished making changes.
-
In order for the directory to work, you will need to give callers the option to dial it (i.e. from an IVR), or you will need route inbound calls to a DID or extension to the directory. These options are controlled within the Inbound Routes module and elsewhere in other modules.


Please see our Directory Module wiki for more information.
Configuring Your PBX#top
Creating System Recordings
Modules such as Interactive Voice Response (IVR) are able to use custom system recordings in addition to default recordings. You can use the System Recordings module to create and save custom system recordings.
There are two ways you can create a system recording: by speaking over the phone, or by uploading an audio file from your computer.
After you have created a recording, you can update it by uploading a replacement audio file or by making a new recording over the phone. You can make updates in the System Recordings module and/or enable users to dial a specific feature code that will allow them to re-record over the phone.
Creating a System Recording Over the Phone
-
- Go to Admin -> System Recordings
- Step 1 (a): Enter the extension number of the phone that you want to use to make your recording, and click Go.
- Step 1 (b): The page will reload and display instructions that give you a code to dial. Dial this code from the same extension you entered above. You will hear a beep. Begin speaking after the beep, and press # when finished. You will be prompted to listen to your recording to or re-record it. When you are satisfied with your recording, simply hang up.


-
- Step 2: Now, dial *99 to verify your recording. You will hear the tone play again, followed by your message. You can re-record from here if you would like, or simply hang up again.
- Step 3: When you are satisfied with the recording, enter a name for the recording (no spaces) and click Save.
- The page will reload and you will see a message letting you know your recording has been saved.

Note: There is no Apply Config button in this case. You should see your new recording show up in the list of recordings.
- Step 2: Now, dial *99 to verify your recording. You will hear the tone play again, followed by your message. You can re-record from here if you would like, or simply hang up again.


Uploading an Audio File from your Computer
Enabling Users to Re-Record Existing System Recordings Over the Phone
You can enable a link to a feature code that will allow users to re-record a system recording over the phone. When users dial the specific feature code, they can re-record the message directly from their phone without visiting the System Recordings module. This gives users the opportunity to change recordings without contacting a system administrator.
-
- Go to Admin -> System Recordings
- Click on the name of the desired recording in the list.
- Check the box next to Link to Feature Code. The system will display the feature code that you can use to re-record this particular recording.
In our example, the feature code is *294. A unique feature code will be generated for each of your recordings.

-
- Click Save and then click Apply Config. You will now be able to dial the feature code in order to listen to and re-record the system recording. After dialing the feature code, you will hear a beep followed by a playback of the current recording. You will then be given the option to re-record the message.
Please see our System Recordings Module wiki for more information.
Configuring Your PBX#top
Setting Up an Interactive Voice Response (IVR) System
An Interactive Voice Response (IVR) system gives a caller the option to choose from several destinations. A caller uses a touch-tone (DTMF) telephone to choose from menu options.
Before configuring your IVR, you will need to set up system recordings that will give instructions to the caller. You will also need to set up the destinations you plan to use with the IVR, such as extensions, ring groups, queues, voicemail boxes, directories, other IVRs, etc.
Your IVR system can be simple, with just a few options, or it can be complex with multiple options and even multiple IVRs. As a best practice, we recommend giving callers only a few options at a time, and using multiple IVRs to “nest” or “layer” various menus. For example, a single IVR might lead to three different destinations with #4 being another IVR, which then gives a caller more choices.
Always be sure that your message to callers matches the options that are set up in the IVR. If you change your IVR options, don’t forget to change your recording!
An IVR may contain «hidden» options. In other words, your recorded announcement would not tell a caller that the option exists, but a caller could dial the option. For example, you could set up a «hidden» option for VIP users to receive queue priority or for employees to dial their voicemail from an outside number.
In case the caller does not enter anything, or makes an invalid entry, the IVR can send the caller to an alternate destination (the «invalid destination»). Always set up a destination for the caller to reach in case he/she reaches the maximum number of invalid entries or fails to make an entry.
- Go to Applications -> IVR
- Click the Add IVR button
- Under IVR General Options, enter an IVR Name and IVR Description (both can contain spaces).

- Use the Announcement drop-down menu to choose the system recording you would like to play to callers when they arrive at the IVR. The default option is “None.” A setting of “None” would not be advised, since it would not explain any options to the caller. (Please see visit the System Recordings module at Admin -> System Recordings if you need to set up recordings.)
- Use the Direct Dial drop-down menu to choose whether you would like callers to be able to direct-dial an extension from your IVR. It is disabled by default. Enabling direct-dial saves your callers time if they already know a person’s extension and do not wish to navigate through an IVR. You can enable direct-dialing for all extensions or restrict it to a certain directory.
- Disabled: Users can only dial the options you define in your IVR. Anything else is considered an invalid entry.
- Enabled: Users can dial your IVR options as well as any valid extension on the system.
- Specific Directory (Name of Directory): If you have created a directory, you will see it here in the menu. If you select it, you will limit callers to dialing your IVR options and any extensions included in the directory. Callers will not be able to direct-dial extensions that are not included in the directory.
- Set the number of seconds you want to be considered a Timeout. If no DTMF tones are heard during this time period, the system will take the actions you specify in your timeout settings. Other timeout options are found further down the page.
- Configure your invalid entry settings. If the caller dials something that isn’t one of the choices in your IVR, or tries to dial an extension for which direct dialing is disabled, the system considers it an invalid entry.
- Invalid Retries: Number of chances you give a caller to make a correct entry before sending them to the invalid destination.
- Invalid Retry Recording: Message played to the caller letting them know they have made an invalid entry, and asking them to try again. You can set up custom recordings if desired.
- Append Announcement to Invalid: Whether to replay the main IVR announcement to a caller who makes an invalid entry.
- Return on Invalid: Return to the parent IVR if it was called from an IVR.
- Invalid Recording: Message played to the caller informing them that they have made too many invalid entries and will be sent to an alternate destination.
- Invalid Destination: Where to send callers who have reached the maximum number of invalid retries. You are required to set an Invalid Destination. This is somewhat of an “if all else fails” option for customers who may be having difficulty navigating the system. For example, you may wish to send callers to an operator or a voicemail box.
- Configure your timeout options.
- Timeout Retries: Number of times to retry when no DTMF is heard.
- Timeout Retry Recording: Message to play to a caller when no DTMF is heard, prompting caller to try again.
- Append Announcement on Timeout: Whether to replay the IVR announcement when no DTMF is heard.
- Return on Timeout: Whether to return to a parent IVR if it was called from an IVR.
- Timeout Recording: Message to play to a caller when no DTMF is heard and caller has reached the maximum number of timeout retries.
- Timeout Destination: Where to send a caller who has reached the maximum number of timeout retries.
- Return to IVR after VM: If the caller reaches a voicemail box after being sent to a timeout destination, whether to return the caller to the IVR.
- Set up your IVR entries. These are the options that callers can dial. The Ext field is the number the caller needs to dial in order to reach the specified destination. For example, if your IVR announcement tells callers to «Press 1 for sales,» you would enter «1» in this field. Choose the Destination from the drop-down menu.
- Click the blue plus sign () to add additional entries.
- When done, click the Submit button and then click the Apply Config button.
- There is one final step you must take in order to make your IVR work for you. You will need to either set the IVR as a destination on an inbound route, or set it as a destination in one of your other modules (i.e. Call Flow Control, Time Conditions, etc.). This will enable callers to reach your IVR.


Please see our IVR Module wiki for more information.
Configuring Your PBX#top
Setting Up a Time Group
A Time Group defines periods of time that a module such as Time Conditions or Outbound Routes will use. For example, you might create a time group that defines your open business hours.
Before setting up a time group, be sure you have set the correct system time zone by visiting Admin → System Admin → Time Zone. If you need to adjust your time zone, follow the instructions given earlier in this wiki. Times in the time group are local to your system time zone. They use a 24-hour clock.
- After you have made your time selections, click the Submit button and then click the Apply Config button.
- Your new time group will show up in the time group list.

Excluding Specific Time Periods, Such as Holidays
If you need to define an exception to your time group, such as a holiday, the trick is to leave the “Time to start” and “Time to finish” drop-down menus blank. This tells the system you do not want to include any time period within this particular day, week, month, etc.
For example, here is how you would exclude Christmas Day from your time group:

As another example, if you would like to exclude Thanksgiving, you can set that up with some simple rules. Since Thanksgiving in the U.S. is always the fourth Thursday of November, it can only fall between November 22nd and 28th. You need to define these dates and let the system know that you want to look for a Thursday. You would leave the times blank in order to define this as an exception to your regular time periods.

You can define as may of these types of these all-day “exceptions” as you wish. We have more examples of holidays in our Time Groups and Sample Configurations wiki.
Always click the Submit button to save your settings, followed by the Apply Config button when finished.
Please see our Time Groups Module wiki for more information.
Configuring Your PBX#top
Setting Up a Time Condition
A time condition is a destination that checks the current time against a time group, and then routes calls to one of two destinations based upon the result. You need to create a time group first in order for a time condition to work. Otherwise your time condition wouldn’t have anything to check. Please refer to the instructions earlier in this wiki. When you have defined your time group, now you can configure your time conditions.
A common use of this feature is to direct callers to a different destination during open business hours vs. closed hours. You could also use a time condition to route calls to the front desk during daily lunch periods, for example.
Your time condition will only affect call routing if you define it as a destination within another module, such as inbound routes, extensions, IVR, etc.
Setting Up a BLF for a Time Condition
When you create a Time Condition, the system will generate a feature code for it that will let you manually override the time condition. The feature code can also be used when setting up a BLF for the time condition.
- To view the feature code, go to Admin -> Feature Codes and scroll down to the Timeconditions section. You should find the name of your time condition along with a feature code. Be sure the feature code is Enabled.
In this example it is *274.

- If you would like to change the feature code from the auto-generated code, you can click the Customize button to enable editing the field. Make your edits and be sure the feature code is Enabled. Then click the Submit button followed by Apply Config.
In this example we’ve changed it to *300.
- To set up a line key to monitor the status of a time condition, use the feature code as the Value for a BLF button. Pressing this BLF button will enable a temporary override of the time condition.
For example, here’s how we would configure a line key as a BLF that monitors our Open/Closed for business status, if our feature code is *274:


In our case, with a Digium D70, our line key lights up green whenever our time condition is met (open for business). If we would like it to light up red when we are open instead, we can go back to the Time Conditions module and enable Invert BLF Hint.
Overriding a Time Condition
A temporary override remains in effect until you toggle the time condition again, or until the system reaches the next match in your time group, whichever comes first. A “permanent” override can be thought of as a “sticky” override that stays in place until you manually cancel it. It causes the system to ignore the time group schedule until you cancel the override. Below are instructions on creating or canceling both temporary and permanent overrides.
Temporary overrides can be controlled via feature codes/BLFs or the Time Conditions module. Permanent overrides can only be created from the Time Conditions module, but they can be cancelled either through feature codes/BLFs or the Time Conditions module.
You can temporarily override your time condition in two ways. Either:
A) Dial the feature code for the time condition (or press the BLF button that you’ve set up for the feature code), OR…
B) Visit the Time Condition module and click on the edit button (![]() ) next to the time condition. In the Change Override menu, select a temporary override (temporary matched or temporary unmatched). Click the Submit button and then click the Apply Config button. Your new temporary matched or unmatched state will be shown next to Current.
) next to the time condition. In the Change Override menu, select a temporary override (temporary matched or temporary unmatched). Click the Submit button and then click the Apply Config button. Your new temporary matched or unmatched state will be shown next to Current. 

To undo your temporary override, either:
A) Dial the feature code for the time condition (or press the BLF button that you’ve set up for the feature code), OR…
B) Visit the Time Condition module and click on the edit button (![]() ) next to the time condition. In the Change Override menu, select Reset Override. Click the Submit button and then click the Apply Config button. «No Override» will be shown next to Current.
) next to the time condition. In the Change Override menu, select Reset Override. Click the Submit button and then click the Apply Config button. «No Override» will be shown next to Current.

To create a permanent override:
To cancel a permanent override, either:
A) Dial the feature code for the time condition (or press the BLF button that you’ve set up for the feature code), OR…
B) Visit the Time Condition module and click on the edit button (![]() ) next to the time condition. In the Change Override menu, select Reset Override. Click the Submit button and then click the Apply Config button. «No Override» will be shown next to Current.
) next to the time condition. In the Change Override menu, select Reset Override. Click the Submit button and then click the Apply Config button. «No Override» will be shown next to Current.
To view the override status in the Time Conditions module:
Visit the Time Condition module and click on the edit button (![]() ) next to the time condition. The current override status will be shown next to Current.
) next to the time condition. The current override status will be shown next to Current.
In our example, we’ve temporarily overridden the time condition.
Setting a Time Condition as an Inbound Route Destination
You can route inbound calls to a time condition in order to send them to different destinations based on time of day. First, you must set up a time group and a time condition as described above. Once this is set up, you can route inbound calls to the time condition by doing the following:
Please see our Time Conditions Module wiki for more information.
Configuring Your PBX#top
Creating and Managing UCP Users (in User Management)
The User Management module allows you to control users’ access to FreePBX Administration, Bria Cloud Solutions, Fax, Rest API, and the User Control Panel (UCP). In this wiki, we will focus only on UCP.
UCP is an end user interface where users can manage the PBX and its features. Users can access it from a desktop computer, tablet, or mobile device.
As an administrator, you can decide what UCP permissions to give to a user. Depending on what you’ve enabled, UCP users can manage voicemail, make web-based calls, chat via SMS (SIPStation customers only) or XMPP, view call histories (CDR), listen to recorded calls, participate in conference rooms, send and receive faxes, set up follow-me, adjust the button layout of their phones, and more. You can also give a single user permission to view and manage other accounts.
Note
Unless you use the Extension Quick Create function, the Extensions module will automatically a new UCP user for each new extension by default. If you are not using Quick Create, and do not want a new UCP user to be created along with a new extension, select None next to Link to a Default User. This option is found under the User Manager Settings section in the General tab when creating a new extension. Later, you can link a user to the new extension manually by following the instructions below.
Adding a New User and Setting Up UCP Privileges
These instructions explain how to manually create a new user who has access to the User Control Panel (UCP). If your new user was automatically created when creating a new extension, some of this information will already be generated for you.
-
- Go to Admin → User Management
- Click the Add button. You should be viewing the Login Details tab.

- Enter a Login Name for the user. You can use the extension number as the username, or set it to whatever you wish. This will be the username the user will use to log into UCP.
- Enter a Description to help you identify the user.
- Enter a Password for the user. The user will be able to change their password after logging in.
- Select the Primary Linked Extension. A single UCP user can only be linked to one extension, and an extension can only be linked to a single UCP user.
- Click the User Details tab. Enter as much information for the user as you would like, such as name, title, department, company, e-mail address, and phone numbers.
- Click the UCP tab. You should now be viewing the General tab within the UCP section.
- Set Allow Login to Yes. Below, you will see any active sessions. If this is a new user, there should not be any sessions shown here.
- Click the Miscellaneous tab. If you would like this user to be able to change settings for an extension (including their own), select the extension(s) here. Click inside the field next to Allowed Extension Settings. A menu will appear showing your existing extensions. Choose one, and repeat the process if you would like to select more than one. If you would like the user to be able to make calls from UCP, set Enable Originating Calls to Yes.
- Click the Call History tab. Here, you can control Call Detail Record (CDR) settings. You can choose whether the user can see their call history, play call recordings, and download CDR reports. You can also grant the user access to another user’s call history.
- Click the Call Event Logging tab. Here, you can choose whether to enable Call Event Logging (CEL) and select the extension(s).
- Click the Conferences tab. Here, you can grant the user access to one or more conference rooms that you have set up. The user will be able to see the conference rooms in UCP.
- Click the Presence tab. Here, you can choose whether to allow the user to change their presence state via UCP.
- Click the SIPStation SMS tab. If you would like a user to be able to send and receive SMS (text) messages via UCP, select one or more SMS Assigned DIDs from the list. (Note: for SIPStation customers only.)
- Click the Voicemail tab. If desired, you can set Enable Voicemail Access to Yes in order to allow the UCP user to listen to voicemail messages in UCP. Choose which extension(s) you would like to be Allowed Voicemail extensions for the user.
- Click the WebRTC tab. Here, you can Enable Web RTC Phone and choose a WebRTC Certificate.
- If you would like this user to have access to XMPP chat, click the XMPP tab located near the top of your screen (above the row of UCP-related tabs). Then set Enabled to Yes.
- When finished setting up the user, there are two different options for how to submit the information. You can either click the Submit & Send E-mail to User button or the Submit button, depending on whether you would like the user to receive an e-mail with login instructions. After clicking one of the submit options, click the Apply Config button.


Please see our User Control Panel (UCP) wiki for a detailed guide on the user interface.
Configuring Your PBX#top
Setting Up Conferences
The Conferences module allows you to set up a conference room where multiple callers can join in a conversation. The module will create an extension number for internal callers to dial to join a conference call. Other modules such as inbound routes, time conditions, IVR, etc. can also use your conference as a destination, allowing outside callers to reach the conference room.
Direct-Dialing Into a Conference
External Callers:
If you would like external callers to be able to reach the conference room by dialing a phone number, you can set up the inbound route for one of your DIDs to go directly to the conference.
Internal Callers:
Internal extensions can reach your conference room by dialing the conference room number you have set up.
Setting up a BLF for a Conference
You can set up a Busy Lamp Field (BLF) to monitor the status of a conference room. Pressing the BLF button will allow you to dial into the conference.
- Go to Settings → End Point Manager
- Click on your phone’s brand.
- Under “Manage,” click on the name of your phone template.
- Click on your phone model under “Available Phones.”
- Create a BLF. For the Value, enter your conference number.
- Click Save Model on the left. You should be taken back to your phone template page.
- Click and Rebuild Configs and then reboot your phone. Your BLF will indicate whether the conference room is in use. You can press the button to dial into the conference.

Adding a Conference to an IVR
You can make it easy for your callers to reach the conference room through an IVR. Simply add your conference as a destination in the IVR. These instructions assume you have already created an IVR. If you need to create one, please see our instructions for setting up an IVR earlier in this page.
If you have an IVR set up with the the Enable Direct Dial: Enabled option set up, outside callers would be able to dial the conference number from within the IVR.
You can also configure an IVR option that would allow callers to dial a specific number (such as one digit) to access the conference:
Giving a User Access to Conferencing in UCP
This is a feature of the Conferences Pro module and requires a Conference Pro license for it to be present on your system.
Conferences are not enabled by default in the User Management module. You can visit this module to give a user access to a conference room in UCP.
Please see our Conferences Module wiki for more information.
Configuring Your PBX#top
Setting Up Paging
Paging allows you to dial a group of phones that will auto-answer in speakerphone mode. You can use the Paging module to create a list of phones and configure several settings. You can choose what to do when phones being paged are on another call. Settings are available for two-way communications (duplex mode), outbound notifications, recorded messages, and valet-style paging, and scheduled paging. Some of these features require the Paging Pro commercial module.
Only phones that support auto answer SIP signaling will be able to auto-answer. Most soft phones do not support this. Phones that do not support auto-answer will ring instead of auto-answering.
- Go to Applications → Paging and Intercom
- Click Add Page Group.
- Enter a Paging Extension. This will be the number users can dial to reach the page group. It cannot match any existing extensions or feature codes.

- Enter a Group Description to help you identify the page group.
- Drag the desired devices from the Not Selected bin to the Selected bin.


- Choose how to handle busy phones:
- Skip: Busy extensions will not be paged.
- Force: Busy extensions will be paged even when the phone is in use. This is useful for “emergency” paging.
- Whisper: Busy extensions will receive the page in the earpiece instead of the speakerphone. The remote party will not hear the page. We do not recommend using Whisper mode if Duplex is enabled.

- Choose whether you want to enable duplex mode. This essentially creates an instant conference call where all of the users are able to communicate with each other. Duplex mode does not make much sense if you have “Busy Extensions” set to “Whisper.” If duplex mode is disabled, only the person making the page will be able to speak. Other users would be able to un-mute themselves by pressing *1.
- When finished setting up your page group, click the Submit button and then click the Apply Config button.

Changing the Auto-Answer Sound
By default, a beep is played when a phone auto-answers a page. You can change this to a pre-recorded announcement or turn off this feature.
(If you need to create a new system recording, go to Admin → System Recordings to record audio or upload an audio file.)
- Go to Applications → Paging and Intercom
- Click the Settings tab.
- Change the Auto-answer defaults by choosing a different recording from the drop-down menu.
Default is shown here. - Click the Submit button and then click the Apply Config button.

Paging Pro Features
Paging Pro features, if enabled, are shown below the “Add Paging Group” or “Modify Paging Group” options. Paging Pro lets you choose how to page a group that is already in use, play an announcement, prepend text to the Caller ID, enable RTP multicast, and schedule automatic pages. Scheduled pages could be a replacement for school bell systems or lunch break buzzers, for example.

If you modify these settings, don’t forget to click the Submit button followed by the Apply Config button.
Setting up Outbound Route Notification
Outbound notifications can be set up in order to notify a phone or group of phones when a user dials a specific number. For example, you could set up an outbound notification for 911. If a user dials 911, the linked page group would be notified of the number that was dialed and which user made the call. Everyone in the group would be connected to the call with the ability to listen. Any user in the page group can dial *1 to enable duplex mode (two-way communication), which would allow the user to speak.
If you’ve chosen to set this up for your emergency route, obviously you wouldn’t want to dial 911 in order to test your outbound route notification… Instead, you can dial 933 (the e911 address verification service) to test the functionality of the notification. Be sure 933 is included as a dial pattern in your emergency route.
Please see our Paging & Intercom Module wiki for more information.
Configuring Your PBX#top
Setting Up Parking
The Parking module creates and configures parking lots, sometimes referred to as parking orbits, to which calls can be transferred in order to allow another extension to retrieve the calls. The standard Parking module allows one parking lot to be available to all phones on the system. The Parking Pro module allows multiple parking lots, plus the ability to announce parked calls when combined with the Paging Pro module.
- Go to Applications → Parking
- We will focus on editing the default lot for now. Later, you can create new lots if desired (if using Parking Pro). Click on the edit button () next to the default lot.
- The first item displayed is the Parking Lot Extension. This is the extension to which you will transfer calls in order to park them in the first available slot. Take note of this extension. The default is 70 for the first lot. You can change it, but we recommend that you leave it at its default.
- The Parking Lot Name is «Default Lot,» but you can change it if you would like.
- You can decide how many parking “slots” you would like to set up for your lot. When a call is parked, it is placed into the first available slot. If another call comes in and is parked while the first call is still parked, the second call is placed into the next available slot, and so on, until all slots are filled. If all slots are filled, a parked call will automatically go to the “alternate destination” that we will talk about below. Each slot has a number. The Parking Lot Starting Position will be the first slot number in your sequence. You can define the Number of Slots to make available. The system will number them in sequence. For example, if your starting position is 71, and you want 8 slots, the slots will be numbered 71 through 78. To avoid confusion, the starting position number should be different from the parking lot extension. You can park a call directly into a specific slot by transferring the call to the slot number instead of the general parking lot extension.
- Set the Parking Timeout in seconds. This is the amount of time a call will stay in a parking lot until it times out. The default is 45 seconds. Later, you’ll set the timeout behavior and destination at the bottom of the page.


- You can change the Parked Music Class if desired. This is the music played to parked callers. Note that this setting will be ignored if you set a different music class at a point earlier in the call flow, such as within a queue or ring group.

Setting Up a BLF for a Parking Slot
You can set up Busy Lamp Field (BLF) keys to view and retrieve parked calls. This makes it easy for phone users to see when calls are parked, and to pick them up from their extensions by pressing a button.
- Go to Settings → EndPoint Manager
- Select your phone brand.
- Select the template you would like to edit.
- Select the phone model.
- Set up a BLF key by choosing Type: BLF and using the slot number as the Value.
In our example, we’ve set up soft keys on our phones to monitor two of our parking lot slots, 71 and 72. We’ve labeled them «Slot 71» and «Slot 72» but you can use whatever labels you wish. Note the slot numbers themselves are used as the Values.

- Click Save Model. You should be taken back to the main page for the phone template.
- Click and Rebuild Configs at the bottom of your template page, and then reboot your phone.
Please see our Parking Module wiki for more information.
Configuring Your PBX#top
Setting Up Follow Me
The Follow Me module allows you to redirect an inbound call to another location. This is designed to help an inbound caller reach you when you are not available at your main phone. For example, you could set Follow Me to ring your extension for a certain period of time, then to ring another extension and/or an outside number, such as your mobile phone.
Users may dial the feature code of *21 to toggle Follow Me (enable/disable). You can also set up a BLF button for this purpose. A user can also access this feature in the User Control Panel (UCP).
- Go to Applications → Follow Me
- At a glance, you can see if Follow Me is enabled for an extension by looking for a green check mark in the FMFM column. (FMFM stands for «Find Me Follow Me.») The boxes only display the status; you cannot click them to change the status. Click the edit button () for the extension you wish to edit.
- Click the Find Me/Follow Me tab.
- At the top, you will see Yes/No buttons showing you whether Find Me/Follow Me is enabled. Click Yes to enable Follow Me. This will allow you to edit the settings for Follow Me. Regardless of whether you want Follow Me to be active or not, you will need to temporarily enable it in order to edit and submit the settings. Later, after you apply config, you can come back and disable it if desired.


- Set your Initial Ring Time. This is how long (in seconds) the primary extension will ring before the system proceeds to call the follow-me list. A setting of «0» will bypass the primary extension. This setting does not control how long your follow-me list phones will ring.
- Select a Ring Strategy. See the pop-up tooltips for descriptions of the various options.
- Set the Ring Time in seconds. This is the time that your follow-me list phones will ring. For hunt-style ring strategies, this is the time that each iteration of phones will ring.
- Add at least one number to your Follow-Me List, one per line. (Do not include the primary extension. If you wish to ring the primary extension, set an Initial Ring Time above). You can add extensions and/or external numbers. If you add an external number, place a # after the number. You can also use the Extension Quick Pick menu to quickly select existing extensions.
- Choose an Announcement to play to callers, if desired. Select whether callers will hear ringing, music, or nothing for the Play Music On Hold option.
- Optionally, set a CID Name Prefix to prepend to the caller ID. This can help you identify when a call is coming from Follow Me. You can also set Alert Info, which can create distinctive rings on certain phones.
- The Confirm Calls feature is designed to prevent a caller from reaching an external voicemail box in case no one answers the call. For example, you might want to prevent an unanswered work-related call from reaching a mobile phone’s voicemail. If you set Confirm Calls to Yes, the user would be required to press «1» to accept an incoming follow-me call on an external phone. Remote Announce is the message played to the person answering the call. Too-Late Announce is the message played if someone answers the call after someone else has already pressed «1» to accept the call.
- Set the No Answer destination. This defaults to Follow Me: Normal Extension Behavior.
- Important: Do not go back to the top of the page and disable Follow Me at this point. You will need to submit your information and apply config first, or you will lose the settings you’ve entered. You can disable Follow Me after you submit and apply your settings, if desired.
-
Click the Submit button and then click the Apply Config button. The settings will be applied. If you go back to your extension list, you will see the box under FMFM checked with a green check mark.
Note
Follow Me is now enabled for the extension, and calls will immediately begin flowing to the extension’s follow-me list unless you disable Follow Me. You can stop here if you want Follow Me to remain active.
- If you want to turn off (disable) Follow Me at this time, go back to the Find Me/Follow Me tab for the extension. Next to Enabled, click No. Click the Submit button and then click the Apply Config button. The user’s follow-me list and settings will be saved, but calls will now flow only to the primary extension. The user can enable Follow Me by dialing *21, using a BLF set up for that purpose, or turning it on in User Control Panel (UCP) as described below.


Configuring Follow Me in UCP
Users can adjust their Follow Me settings directly from the User Control Panel (UCP) if they have access to UCP and are allowed to manage the extension settings within UCP. For more information on controlling a user’s UCP permissions, please see the section Adding a New User and Setting Up UCP Privileges section earlier in this wiki.
If a user has access to UCP and is allowed to manage extension settings, they can manage Follow Me by following these steps:
-
- Log into UCP.
- Hover over / click on Settings, then click the extension.
- The current Follow Me status is shown (ON / OFF). If you toggle the ON/OFF switch, settings will be applied immediately. You can edit the follow-me list, announcement, initial ring time, and follow-me list ring time. You can also choose whether to use call confirmation, and choose what announcements to play to the person answering the call. These options are a «lighter» version of what is available in the FreePBX Administration GUI. Some settings, such as ring strategy, cannot be adjusted in UCP. Users can click on the pop-up tooltips () for more information. Changes take effect immediately.
- Log into UCP.


Setting Up a BLF for Follow Me
-
- Go to Settings → EndPoint Manager
- Select your phone brand from the list at the upper right.
- Click on your phone’s template under “Manage.”
- Click on the button for your phone.
- The default feature code to toggle Follow Me is *21. Use *21 followed by your extension number as the “value” for the BLF key. For example, if our extension is 4000, we need to use *214000 to set up the BLF.

Please see our Follow Me Module wiki for more information.
Configuring Your PBX#top
Setting Up Backups
The Backup and Restore module automatically includes a default backup that will run monthly. You can set up custom backups on a schedule of your choice.
Creating a Backup
-
- Go to Admin → Backup and Restore.
- Click New Backup.
- Give the backup a unique name. Optionally, give the backup a description and enter an e-mail address where you’d like to be notified when backups are completed.
-
There are two ways to add items to your backup list:
-
A) Drag and Drop: Drag the desired Templates to the Items section. You will see a “drop here” box. After you drop the template, items will appear in your list.
In this example, we have chosen the «Full Backup,» «System Audio,» and «Voice Mail» templates.
-
B) Plus Sign / Drop-Down Menu: Click the plus sign (
) under Items and make a selection from the drop-down menu. You will then be able to manually enter a Path/DB to back up, and add patterns to exclude.
In this example, we haven’t entered any items yet.
-
-
After you have added items to your backup list, select the desired backup server.
-
Choose your storage server(s) by dragging the available server(s) to the Storage Servers column.
-
Choose an automatic backup schedule, if desired. If set to “Never,” you will need to manually run the backup.
-
Choose how long you’d like to save the backups, if at all. A setting of “0” disables deletion.
-
When finished, click Save. You can then click “and Run” to run the backup immediately.


Running a Backup Manually
See our Backup and Restore wiki for more information.
Configuring Your PBX#top
Other Modules
There are many other modules, and most are self-explanatory. You can find out more about each of them here: Standard Modules.
Consider the Paid Modules
The FreePBX Distro includes all of the modules you need to set-up a first class PBX. There are, however, some additional modules available that you may wish to purchase. You can find out more about the Paid Modules here: http://www.freepbx.org/commercial-modules
10 доводов в пользу Asterisk
Распространяется бесплатно.
Asterisk – программное обеспечение с открытым исходным кодом, распространяется по лицензии GPL. Следовательно, установив один раз Asterisk вам не придется дополнительно платить за новых абонентов, подключение новых транков, расширение функционала и прочие лицензии. Это приближает стоимость владения станцией к нулю.
Безопасен в использовании.
Любое программное обеспечение может стать объектом интереса злоумышленников, в том числе телефонная станция. Однако, сам Asterisk, а также операционная система, на которой он работает, дают множество инструментов защиты от любых атак. При грамотной настройке безопасности у злоумышленников нет никаких шансов попасть на станцию.
Надежен в эксплуатации.
Время работы серверов некоторых наших клиентов исчисляется годами. Это значит, что Asterisk работает несколько лет, ему не требуются никакие перезагрузки или принудительные отключения. А еще это говорит о том, что в районе отличная ситуация с электроэнергией, но это уже не заслуга Asterisk.
Гибкий в настройке.
Зачастую возможности Asterisk ограничивает только фантазия пользователя. Ни один конструктор шаблонов не сравнится с Asterisk по гибкости настройки. Это позволяет решать с помощью Asterisk любые бизнес задачи, даже те, в которых выбор в его пользу не кажется изначально очевидным.
Имеет огромный функционал.
Во многом именно Asterisk показал какой должна быть современная телефонная станция. За многие годы развития функциональность Asterisk расширилась, а все основные возможности по-прежнему доступны бесплатно сразу после установки.
Интегрируется с любыми системами.
То, что Asterisk не умеет сам, он позволяет реализовать за счет интеграции. Это могут быть интеграции с коммерческими телефонными станциями, CRM, ERP системами, биллингом, сервисами колл-трекинга, колл-бэка и модулями статистики и аналитики.
Позволяет телефонизировать офис за считанные часы.
В нашей практике были проекты, реализованные за один рабочий день. Это значит, что утром к нам обращался клиент, а уже через несколько часов он пользовался новой IP-АТС. Безусловно, такая скорость редкость, ведь АТС – инструмент зарабатывания денег для многих компаний и спешка во внедрении не уместна. Но в случае острой необходимости Asterisk готов к быстрому старту.
Отличная масштабируемость.
Очень утомительно постоянно возвращаться к одному и тому же вопросу. Такое часто бывает в случае некачественного исполнения работ или выбора заведомо неподходящего бизнес-решения. С Asterisk точно не будет такой проблемы! Телефонная станция, построенная на Asterisk может быть масштабируема до немыслимых размеров. Главное – правильно подобрать оборудование.
Повышает управляемость бизнеса.
Asterisk дает не просто набор полезных функций, он повышает управляемость организации, качества и комфортности управления, а также увеличивает прозрачность бизнеса для руководства. Достичь этого можно, например, за счет автоматизации отчетов, подключения бота в Telegram, санкционированного доступа к станции из любой точки мира.
Снижает расходы на связь.
Связь между внутренними абонентами IP-АТС бесплатна всегда, независимо от их географического расположения. Также к Asterisk можно подключить любых операторов телефонии, в том числе GSM сим-карты и настроить маршрутизацию вызовов по наиболее выгодному тарифу. Всё это позволяет экономить с первых минут пользования станцией.