Добрый день!
Сегодня будет совсем короткая запись.
В интернете можно часто встретить инструкцию к фристайл либре, но там говорится только об установке сенсора. Я подготовил пакет для пользователей фристайл либре, который поможет Вам лучше контролировать уровень сахара в крови. Это будет:
-
Программа для изменения настроек и просмотра отчетов
-
Полная инструкция на русском языке для фристайл либре
Инструкция, которая прилагается к глюкометру, на немецком языке, на русском, к сожалению, нет. Но я и коллектив магазина Diatovar.ru подготовили перевод полной инструкции к глюкометру фристайл либре. Кстати в инструкции к глюкометру умолчали о профессиональных настройках. Но на нашем сайте в статье “Глюкометр фристайл либре. Настройка” Вы можете узнать код к профессиональным настройкам фристайл либре.
Ну а здесь можно скачать то, что я Вам обещал
фристайл либре полная инструкция на русском языке

Программа для изменения настроек фристайл либре

-
Contents
-
Table of Contents
-
Troubleshooting
-
Bookmarks
Quick Links
User’s Manual
FLASH GLUCOSE MONITORING SYSTEM
CAUTION: Federal law restricts this device
to sale by or on the order of a physician.
Related Manuals for Abbott FreeStyle Libre 2
Summary of Contents for Abbott FreeStyle Libre 2
-
Page 1
User’s Manual FLASH GLUCOSE MONITORING SYSTEM CAUTION: Federal law restricts this device to sale by or on the order of a physician. -
Page 2
Your Name _________________________________________________… -
Page 3
WARNING: Before you use the FreeStyle Libre 2 System, review all the product instructions and the Interactive Tutorial. The Quick Reference Guide and Interactive Tutorial give you quick access to important aspects and limitations of the System. The User’s Manual includes all safety information and instructions for use. -
Page 4
Contents Important Safety Information……1 Indications For Use ……..1 Compatible Devices, Apps, and Software . -
Page 5
Alarms……….56 Setting Alarms . -
Page 6
Living With Your System……. . 99 Maintenance and Disposal ……102 Troubleshooting . -
Page 7
Important Safety Information Indications For Use The FreeStyle Libre 2 Flash Glucose Monitoring System is a continuous glucose monitoring (CGM) device with real time alarms capability indicated for the management of diabetes in persons age 4 and older. It is intended to replace blood glucose testing for diabetes treatment decisions, unless otherwise indicated. -
Page 8
Compatible Devices, Apps, and Software For a list of compatible devices, apps, and software that can be used with the FreeStyle Libre 2 Sensor, please go to: https://freestylelibre.us/support/overview.html Use of the Sensor with devices, apps, and software that are not listed may cause inaccurate glucose readings. -
Page 9
WARNINGS: • Do not ignore symptoms that may be due to low or high blood glucose: If you are experiencing symptoms that are not consistent with your glucose readings, consult your health care professional. • Use your blood glucose meter to make diabetes treatment decisions when you see the symbol during the first 12 hours of wearing a Sensor, if your Sensor glucose reading does not match how you feel,… -
Page 10
• To prevent missed alarms, make sure the Reader has sufficient charge and that sound and/or vibration are turned on. • Alarms you receive do not include your glucose reading so you must scan your Sensor to check your glucose. What to know before using the System: •… -
Page 11
What should you know about wearing a Sensor: • Wash application site on the back of your upper arm using a plain soap, dry, and then clean with an alcohol wipe. This will help remove any oily residue that may prevent the Sensor from sticking properly. Allow site to air dry before proceeding. -
Page 12
performing as intended. Contact Customer Service if you receive a Replace Sensor message before the end of the 14 day wear period. Customer Service is available at 1-855-632-8658 7 Days a Week from 8AM to 8PM Eastern Standard Time. • Some individuals may be sensitive to the adhesive that keeps the Sensor attached to the skin. -
Page 13
• Do not reuse Sensors. The Sensor and Sensor Applicator are designed for single use. Reuse may result in no glucose readings and infection. Not suitable for re-sterilization. Further exposure to irradiation may cause unreliable low results. • If a Sensor breaks inside your body, call your health care professional. How to Store the Sensor Kit: •… -
Page 14
• Do NOT use if Sensor Kit contents are past expiration date. • Do NOT use if the Reader appears to be damaged due to risk of electric shock and/or no results. What to know before you Apply the Sensor: •… -
Page 15
• Clean hands prior to Sensor handling/insertion to help prevent infection. • Change the application site for the next Sensor application to prevent discomfort or skin irritation. • Only apply the Sensor to the back of the upper arm. If placed in other areas, the Sensor may not function properly. -
Page 16
What to know about X-Rays: • The Sensor should be removed prior to exposing it to an X-ray machine. The effect of X-rays on the performance of the System has not been evaluated. The exposure may damage the Sensor and may impact proper function of the device to detect trends and track patterns in glucose values during the wear period. -
Page 17
What to know about the Reader’s Built-in Meter: • The FreeStyle Libre 2 Reader has a built-in blood glucose meter that is designed to be used only with FreeStyle Precision Neo blood glucose test strips and MediSense Glucose and Ketone Control Solution. -
Page 18
Interfering Substances Taking ascorbic acid (vitamin C) supplements while wearing the Sensor may falsely raise Sensor glucose readings. Taking more than 500 mg of ascorbic acid per day may affect the Sensor readings which could cause you to miss a severe low glucose event. Ascorbic acid can be found in supplements including multivitamins. -
Page 19
Reader Symbols Symbol What It Means Active Sensor Direction your glucose is going. See Checking Your Glucose section for more information. Caution View previous/next screen Sound and Vibration ON Sound ON, Vibration OFF Sound OFF, Vibration ON Sound and Vibration OFF Sensor communicating with Reader Sensor not communicating with Reader… -
Page 20
Symbol What It Means When you see this symbol during the first 12 hours of wearing a Sensor, confirm Sensor glucose readings with a blood glucose test before making treatment decisions. Notes Add more information to notes Food note Rapid-acting insulin note Time changed on Reader Blood glucose test Settings… -
Page 21
Getting to Know Your System The FreeStyle Libre 2 System (“System”) has two main parts: a handheld Reader and a disposable Sensor that you wear on your body. You use the Reader to wirelessly scan the Sensor and display your glucose readings. -
Page 22
IMPORTANT: • Before you use your System, review all the product instructions and the Interactive Tutorial. The Quick Reference Guide and Interactive Tutorial give you quick access to important aspects and limitations of the System. The User’s Manual includes all safety information and instructions for use. -
Page 23
To use the built-in meter, you need FreeStyle Precision Neo blood glucose test strips, control solution, a lancing device, and lancets. These items are not included in the Reader kit and must be obtained separately from your FreeStyle Libre 2 System provider (pharmacy or mail order supplier). -
Page 24
Sensor Kit The Sensor Kit includes: • • Sensor Pack Alcohol wipe • • Sensor Applicator Product insert Sensor Pack Sensor Applicator Used with the Sensor Applicator to Applies the Sensor to your body. prepare the Sensor for use. The Sensor measures and stores glucose readings when worn on your body. -
Page 25
The Reader Home Screen provides access to information about your glucose and the System. You can press the Home Button to get to the Home Screen. Home Screen Battery charge remaining Sound/Vibration setting Current time set on the Reader Signal Status Shows if Sensor is communicating with Reader. -
Page 26
The Sensor Glucose Readings screen appears after you use the Reader to scan your Sensor. Your Reading includes your Current Glucose, a Glucose Trend Arrow indicating which way your glucose is going, and a graph of your current and stored glucose readings. Sensor Glucose Readings Message Add Notes… -
Page 27
Sensor glucose readings, blood glucose test results, and other data uploaded from the FreeStyle Libre 2 Flash Glucose Monitoring System, in support of an effective diabetes health management program. FreeStyle Libre software is not intended for the diagnosis of or screening for diabetes mellitus. -
Page 28
Setting up Your Reader for the First Time Before using the System for the first time, the Reader must be set up. Step Action Press the Home Button to turn on the Reader. If prompted, use the touchscreen to select your preferred language for the Reader. -
Page 29
Step Action Set the Current Date using the arrows on the Current Date touchscreen. Touch next to continue. June 2020 back next Set the Current Time. Touch next to continue. Current Time CAUTION: It is very important to set the time and date correctly. -
Page 30
Step Action The Reader now displays important information about key topics to help you use the System: • How to understand the Glucose Trend Arrow included on the Glucose Reading screen. • When to do a blood glucose test. • Where to apply the Sensor. -
Page 31
Using Your Sensor CAUTIONS: • The Sensor Pack and Sensor Applicator FreeStyle Libre Sensor Pack are packaged as a set (separately from the Reader) and have the same Sensor CODE code. Check that the Sensor codes match XXXXXXXXX before using your Sensor Pack and Sensor YYYY-MM-DD Applicator. -
Page 32
Applying Your Sensor Action Step Apply Sensors only on the back of your upper arm. If placed in other areas, the Sensor may not function properly and could give inaccurate readings. Avoid areas with scars, moles, stretch marks, or lumps. Select an area of skin that generally stays flat during your normal daily activities (no bending or folding). -
Page 33
Action Step Open the Sensor Pack by peeling the lid off completely. Unscrew the cap from the Sensor Applicator and set the cap aside. CAUTION: Do NOT use if the Sensor Pack or the Sensor Applicator seem to be damaged or already opened. -
Page 34
Action Step The Sensor Applicator is prepared and ready to apply the Sensor. CAUTION: The Sensor Applicator now contains a needle. Do NOT touch inside the Sensor Applicator or put it back into the Sensor Pack. Place the Sensor Applicator over the prepared site and push down firmly to apply the Sensor to your body. -
Page 35
Action Step Gently pull the Sensor Applicator away from your body. The Sensor should now be attached to your skin. Sensor Note: Applying the Sensor may cause bruising or bleeding. If there is bleeding that does not stop, remove the Sensor and contact your health care professional. -
Page 36
Starting Your Sensor Action Step Press the Home Button to turn on the Reader. Touch Start New Sensor. 10:23pm No Active Sensor Start New Review Sensor History Hold the Reader within 1.5 inches (4 cm) of the Sensor to scan it. This starts your Sensor. If sounds are turned on, the Reader beeps when the Sensor has been successfully activated. -
Page 37
Checking Your Glucose Step Action Turn the Reader on by pressing 10:23pm the Home Button or touch Ends in 14 days Check Glucose from the Home Screen. Check Review Glucose History Hold the Reader within 1.5 inches (4 cm) of your Sensor to scan it. -
Page 38
Step Action The Reader displays your current glucose reading along with your glucose graph and an arrow Glucose Going High indicating the direction your glucose is going. 10am… -
Page 39
Sensor Glucose Readings Glucose Going Glucose Trend Arrow Current Glucose Target Glucose Range Your Target Glucose Range 10pm is not related to your glucose alarm settings. Notes: • The graph displays glucose readings above 350 mg/dL at 350 mg/dL. For sequential readings above 350 mg/dL, a line is displayed at 350 mg/dL. -
Page 40
The Glucose Trend Arrow gives you an indication of the direction your glucose is going. Glucose is rising quickly (more than 2 mg/dL per minute) Glucose is rising (between 1 and 2 mg/dL per minute) Glucose is changing slowly (less than 1 mg/dL per minute) Glucose is falling (between 1 and 2 mg/dL per minute) Glucose is falling quickly… -
Page 41
The following table shows messages you may see with your glucose readings. Display What To Do If LO appears on the Reader, your reading is lower Low Glucose than 40 mg/dL. If HI appears on the Reader, your reading is higher than 400 mg/dL. You can touch the message button for more information. -
Page 42
Display What To Do If your glucose is projected to be higher than Glucose Going 240 mg/dL or lower than 70 mg/dL within 15 minutes, you will see a message on the screen. You can touch the message button for more Glucose Going information and set a reminder to check your High… -
Page 43
Making Treatment Decisions Work with your health care professional to put together a plan for managing your diabetes that includes when to use the System information for making treatment decisions. You should also talk to your health care professional about the best times to scan your Sensor. Consider scanning your Sensor before a period when you will not be monitoring your glucose, such as before driving, exercise or sleeping. -
Page 44
Making Treatment Decisions – Getting Started Before you start using the System for treatment decisions, make sure you have a good understanding of how the System works for your body. Continue to use your blood glucose meter for treatment decisions until you are comfortable with the information you receive from your System. -
Page 45
• Scan your Sensor often to see how carbs, medication, exercise, illness, or stress levels impact your Sensor glucose readings. The information you get can help you figure out why your glucose sometimes goes too high or too low, and how to prevent it from doing so in the future. •… -
Page 46
• Sensor glucose values, which are based on interstitial fluid glucose levels, can be different from blood glucose levels (fingersticks), particularly during times when your blood glucose is changing quickly. If your glucose readings and alarms from the System do not match your symptoms or expectations, use a fingerstick blood glucose value from a blood glucose meter to make diabetes treatment decisions. -
Page 47
When you see the symbol during the first 12 hours of wearing a Sensor During the first 12 hours of Sensor wear the symbol will display, and you cannot use Sensor values to make treatment decisions during this time. Confirm Sensor glucose readings with a blood glucose test before making treatment decisions during the first 12 hours of Sensor wear when you see the symbol. -
Page 48
Symptoms Don’t Match Readings There may be times when your symptoms don’t match your Sensor glucose readings. For example, you are feeling shaky, sweaty, and dizzy– symptoms you generally get when you have low glucose, but your glucose reading is within your target range. When symptoms don’t match readings, do a blood glucose test and treat based on that result. -
Page 49
Using Your Glucose Reading to Make a Treatment Decision After you scan your Sensor, use all of the information on the screen when deciding what to do or what treatment decision to make. Glucose Trend Arrow Direction your glucose is going Current Glucose Arrow What it means… -
Page 50
This table provides some information on how you can factor the Glucose Trend Arrow into your treatment decisions. Remember that you should never make a treatment decision based on the Glucose Trend Arrow alone. Treatment Decision Considerations Glucose Trend Low Glucose Glucose in High Glucose Arrow… -
Page 51
Treatment Decision Considerations Glucose Trend Low Glucose Glucose in High Glucose Arrow (< 70 mg/dL) Target Range (> 240 mg/dL) If you are about to eat, Treat low glucose If you are about to eat, according to your health take insulin to cover take insulin to cover care professional’s your meal. -
Page 52
Treatment Decision Considerations Glucose Trend Low Glucose Glucose in High Glucose Arrow (< 70 mg/dL) Target Range (> 240 mg/dL) Treat low glucose If you are about to eat, If you are about to eat, according to your health take insulin to cover take insulin to cover care professional’s your meal. -
Page 53
Treatment Decision Considerations Glucose Trend Low Glucose Glucose in High Glucose Arrow (< 70 mg/dL) Target Range (> 240 mg/dL) Treat low glucose If you are about to eat, If you are about to eat, according to your health take insulin to cover take insulin to cover care professional’s your meal. -
Page 54
Treatment Decision Considerations Glucose Trend Low Glucose Glucose in High Glucose Arrow (< 70 mg/dL) Target Range (> 240 mg/dL) Treat low glucose If you are about to eat, If you are about to eat, according to your health take insulin to cover take insulin to cover care professional’s your meal. -
Page 55
Example Scenarios Next are some example scenarios to help you understand how to use the information on your screen. Always use all of the information on the screen before deciding what to do or what treatment decision to make. If you are not sure about what to do, consult your health care professional. -
Page 56
What you see What it means Before breakfast: Before breakfast, your current glucose is 115 mg/dL. The graph shows that your glucose 8:06am Ends in 2 days is going up and so does the trend arrow Consider what might be causing your glucose to go up and what you might do to prevent a high glucose. -
Page 57
What you see What it means Before lunch: When you checked your glucose before lunch, it was 90 mg/dL and rising. Before eating lunch, 12:00pm Ends in 3 days you took enough insulin to cover the meal and a little more since your trend arrow was 12pm After lunch: 90 minutes later, your current glucose is… -
Page 58
What you see What it means In the afternoon: Between meals, your current glucose is 72 mg/dL. The Glucose Going Low message Glucose Going tells you that your glucose is projected to be low within 15 minutes. Think about what might be causing your glucose to go low. -
Page 59
What you see What it means Before dinner: Before dinner, your current glucose is 134 mg/dL. The graph shows that your glucose 7:34pm Ends in 7 days is going down and so does the trend arrow Consider what might be causing your glucose to go down and what you might do to prevent a low glucose. -
Page 60
Other considerations Deciding how much rapid-acting insulin to take for different meals and situations can be difficult. Work with your health care professional to discuss different situations and what might work best for you. Here are some questions to consider: Meal dosing •… -
Page 61
Bedtime • How often do you check your glucose before bed? • What do you consider a safe bedtime glucose? • What do you do if your bedtime glucose is high? • What do you do if your bedtime glucose is low? •… -
Page 62
Alarms When in range of the Reader, your Sensor automatically communicates with the Reader to give you Low and High Glucose Alarms. These alarms are on by default. This section explains how to set and use alarms as well as how to turn them off. -
Page 63
IMPORTANT: What to know about glucose alarms • Scan your Sensor often to check your glucose. If you get a Low or High Glucose Alarm, you must obtain a glucose result to determine what to do next. • The Low and High Glucose Alarms should not be used exclusively to detect low or high glucose conditions. -
Page 64
IMPORTANT: How to prevent missed alarms • Alarms must be kept on for you to receive them and you should ensure that your Reader is within 20 feet of you at all times. The Sensor itself will not issue alarms. •… -
Page 65
Setting Alarms Work with your health care professional to determine your alarm settings. Step Action From the Home screen, touch the Settings 10:23pm Ends in 14 days . Touch Alarms. symbol Check Review Settings Glucose History Alarms Sound & Vibration Time &… -
Page 66
Step Action Select the alarm you want to set or turn off. Change Alarm Settings Low Glucose Alarm CAUTION: If alarms are turned off, you will High Glucose Alarm not get a notification when you have low Signal Loss Alarm glucose or high glucose. -
Page 67
Alarm How to Set The Low Glucose Alarm is on by default. Glucose The alarm level is initially set to Low Glucose Alarm Alarm 70 mg/dL. You can use the arrows to change this value between 60 mg/dL and 100 mg/dL. If the mg/dL alarm is on, you will be notified when your glucose falls below the… -
Page 68
Alarm How to Set High The High Glucose Alarm is on by default. Glucose The alarm level is initially set to High Glucose Alarm Alarm 240 mg/dL. You can use the arrows to change this value between 120 mg/dL and 400 mg/dL. If the mg/dL alarm is on, you will be notified when your glucose rises above the… -
Page 69
Action Step When you are finished setting your alarms, Change Alarm touch OK. The Alarms Settings screen now Settings Low Glucose Alarm shows your current alarm settings. Touch OK to return to the main settings menu, or touch High Glucose Alarm Change Alarm Settings to make additional Signal Loss Alarm updates. -
Page 70
Setting Alarm Sounds Step Action From the Home screen, touch the 10:23pm Ends in 14 days . Touch Sound & Settings symbol Vibration to change the alarm sounds. Check Review Settings Glucose History Alarms Sound & Vibration Time & Date 1 / 4 Touch the sound or vibration setting you Sound &… -
Page 71
Using Alarms What you See What it Means The Low Glucose Alarm notifies you if your Low Glucose Alarm glucose drops below the level you set. The alarm does not include your glucose reading, so you need to scan your Sensor to check your glucose. Dismiss Alarm &… -
Page 72
What you See What it Means The Signal Loss Alarm notifies you if your Sensor Signal Loss Alarm has not communicated with the Reader for 20 minutes and you are not receiving Low or High Scan Sensor now? Glucose Alarms. Signal loss could be caused by the Sensor being too far away from the Reader (over 20 feet) or another issue such as an error or problem with your Sensor or Reader. -
Page 73
Adding Notes Notes can be saved with your glucose readings. You can add a note at the time of your glucose reading or within 15 minutes after your reading was obtained. You can track food, insulin, exercise, and any medication you take. -
Page 74
Step Action After you check the box for food and Add Notes insulin notes, the symbol appears Rapid-Acting Insulin to the right of the note. You can touch Long-Acting it to add more specific information to Insulin Enter Rapid-Acting Insulin Food your note. -
Page 75
Reviewing Your History Reviewing and understanding your glucose history can be an important tool for improving your glucose control. The Reader stores about 90 days of information and has several ways to review your past glucose readings, notes, and other information. Step Action Press the Home Button to turn on… -
Page 76
Step Action Use the arrows to view the available options. Review History Logbook Daily Graph Daily Patterns Average Glucose Time In Target 1 / 2 Low Glucose Events Sensor Usage IMPORTANT: Work with your health care professional to understand your glucose history. -
Page 77
The Logbook and Daily Graph show detailed information, while other history options show summaries of information over a number of days. Logbook Entries for each time you scanned your Sensor or Logbook performed a blood glucose test. If you entered 23 Feb 10:23am Notes with a glucose reading, the… -
Page 78
Daily Graph A graph of your Sensor glucose readings by day. Daily Graph (mg/dL) The graph shows your Target Glucose Range and symbols for food or rapid-acting insulin notes you have entered. Notes: • 22 Feb While Sensor glucose readings are gathered in Wednesday the System range of 40-400 mg/dL, the Daily Graph display range is 0-350 mg/dL for ease… -
Page 79
Other History Options Use the arrows to view information about your last 7, 14, 30, or 90 days. Information about the average of your Sensor Average Glucose glucose readings. The overall average for the time Average: mg/dL is displayed above the graph. The average is also shown for four different 6-hour periods of the day. -
Page 80
A graph showing the percentage of time your Time In Target Sensor glucose readings were above, below, or Above within your Target Glucose Range. In Target Below Target Range 80-140 mg/dL Last 7 Days Time In Target Information about the number of low glucose Low Glucose events measured by your Sensor. -
Page 81
Removing Your Sensor Step Action Pull up the edge of the adhesive that keeps your Sensor attached to your skin. Slowly peel away from your skin in one motion. Note: Any remaining adhesive residue on the skin can be removed with warm soapy water or isopropyl alcohol. -
Page 82
Replacing Your Sensor Your Sensor automatically stops working after 14 days of wear and must be replaced. You should also replace your Sensor if you notice any irritation or discomfort at the application site or if the Reader reports a problem with the Sensor currently in use. -
Page 83
Using Reminders You can use Reminders to help you remember things like checking your glucose or taking insulin. You can also set a reminder to remind you to check your alarm settings if you have disabled your alarms temporarily. Step Action From the Home Screen, touch the Settings 10:23pm… -
Page 84
Step Action Touch to select how often you want the reminder to Repeat: Once, Daily, or Timer. Note: You can set the reminders for a specific time (e.g. 8:30 am) or as a timer (e.g. 3 hours from the current time). Set the reminder Time using the arrows on the touchscreen. -
Page 85
Intended Use The FreeStyle Libre 2 Reader’s built-in meter is for use outside the body only (in vitro diagnostic use) in the quantitative measurement of glucose in fresh whole blood for self testing by lay users from the fingers. It is not intended to be used for testing neonatal blood samples or for the diagnosis or screening of diabetes. -
Page 86
IMPORTANT: • Use only FreeStyle Precision Neo test strips. Other test strips may produce inaccurate results. • Read all the instructions in this section. Failure to follow instructions may cause incorrect blood glucose results. Practice the testing procedures before using the Reader’s built-in meter. •… -
Page 87
IMPORTANT: (cont.) • Inaccurate test strip results may occur in severely hypotensive individuals or patients in shock. • Inaccurate test strip results may occur for individuals experiencing a hyperglycemic-hyperosmolar state, with or without ketosis. • Observe caution when using around children. Small parts may constitute a choking hazard. -
Page 88
IMPORTANT: (cont.) • Do not put urine on the test strip. • Do not use expired test strips as they may cause inaccurate results. • Do not use at altitudes higher than 10,000 feet above sea level. • Do not use a wet, bent, scratched, or damaged test strip. •… -
Page 89
Blood Glucose Testing You can use the built-in meter to check your blood glucose, whether you are wearing a Sensor or not. Be sure to read the test strip instructions for use prior to using the built-in meter. Step Action CAUTION: Test on your fingers in accordance with the Intended Use in this section. -
Page 90
Step Action Check the test strip expiration date. Do not use expired test strips as they may give inaccurate results. Open the foil test strip packet at the notch and tear down to remove the test strip. Use the test strip immediately after removing from the foil packet. -
Page 91
Step Action Use your lancing device to obtain a blood drop Apply Blood and apply blood to the white area at the end of the test strip. Refer to your lancing device instructions for use if you need help using your lancing device. -
Page 92
Step Action Note: (cont.) • E-3 means the blood drop is too small, or incorrect test procedure, or there may be a problem with the test strip. • E-4 means the blood glucose level may be too high to be read by the system or there may be a problem with the test strip. -
Page 93
IMPORTANT: The built-in meter displays results from 20 — 500 mg/dL. Low or high blood glucose results can indicate a potentially serious medical condition. The normal glucose level for a non-diabetic adult is below 100 mg/dL when fasting, and less than 140 mg/dL within two hours of a meal. Consult your health care professional to determine the range that is appropriate for you. -
Page 94
Display What To Do If your glucose is higher than 240 mg/dL or lower Low Glucose than 70 mg/dL, you will see a message on the screen. You can touch the message button for more information and set a reminder to check High Glucose your glucose. -
Page 95
Accuracy of the Reader’s built-in meter Results from the Reader’s built-in meter may vary slightly from your actual blood glucose value. This may be due to slight differences in technique and natural variation in test technology. The table below shows the results of a study where 119 typical users used the built-in meter to check their blood glucose level. -
Page 96
Replace the cap securely on the bottle immediately after use. • Do NOT add water or other liquid to the control solution. • Contact your FreeStyle Libre 2 System provider (pharmacy or mail order supplier) for how to obtain control solution. -
Page 97
Action Step From the Home Screen, touch the Settings 10:23pm Ends in 14 days symbol . Scroll down using the arrow and touch Control Solution Test. Check Review Glucose History Reminders Control Solution Test Language 2 / 4 Check the test strip expiration date. Open the foil test strip packet at the notch and tear down to remove the test strip. -
Page 98
Action Step Insert the test strip with the three black lines facing up. Push the strip until it stops. Note: The Reader’s built-in meter turns off after 2 minutes of inactivity. Shake the control solution bottle to mix the Apply Control Solution solution. -
Page 99
Action Step You will see a butterfly on the screen while you wait for the result. Do not remove the test strip (cont.) while the butterfly is on the screen. If sounds are turned on, the Reader beeps once when the result is ready. -
Page 100
Control Solution Results 10:23pm Compare the control solution result to the range printed on the test strip instructions for use. The result on your screen should be in this range. Control solution results are marked on the results screen and in the Logbook with a Control Solution Test symbol. -
Page 101
Charging the Reader A fully charged Reader battery should last up to 4 days. Your battery life may vary depending on your usage. A Low Battery message Low Battery accompanies your result when you have enough charge remaining for about one day of use. Please charge the Reader to continue using it. -
Page 102
Changing the Reader Settings You can go to the Settings menu to change many settings on the Reader, like alarm settings, sound & vibration, time & date, and target range. The Settings menu is also where you go to do a Control Solution Test or to check the System Status. -
Page 103
Action Step Touch the setting you want to change: Alarms – See Alarms section for information on setting alarms Sound & Vibration – Set Reader sound and vibration. These also apply to alarms Time & Date – Change the Time or Date Reminders –… -
Page 104
Action Step • View Event Logs: A list of events recorded by the Reader, which may be used by Customer Service to help (cont.) troubleshoot your System • Perform a Reader Test: The Reader Test will perform internal diagnostics and allow you to check that the Display is showing all pixels, sounds and vibrations are working, and the Touchscreen is responding when touched Report Settings –… -
Page 105
Living With Your System Your System can be used during a wide variety of activities. Activity What You Need To Know Bathing, The Reader is not water-resistant and should Showering, and NEVER be submerged in water or other liquid. Swimming Your Sensor is water-resistant and can be worn while bathing, showering, or swimming. -
Page 106
Activity What You Need To Know Traveling by Air You may use your System while on an aircraft, following any requests from the flight crew. • The Reader is classed as a Medical-Portable Electronic Device (M-PED) that meets all required M-PED emission standards for safe use onboard an aircraft: RTCA/DO160, Section 21, Category M. -
Page 107
Activity What You Need To Know Traveling by Air • The System can be exposed to common electrostatic (ESD) and electromagnetic (cont.) interference (EMI), including airport metal detectors. You can keep your Reader on while going through these. Note: If you are changing time zones, you can change the time and date settings on the Reader by touching the Settings symbol from the… -
Page 108
Maintenance and Disposal Cleaning and Disinfecting the Reader Cleaning and disinfecting your Reader is important to prevent the spread of infectious diseases. The Reader has a mean use life of 3 years and has been validated for 156 cleaning and disinfection cycles (the equivalent of 1 cycle per week for 3 years). -
Page 109
This device is not intended for use with multiple patients in health care or assisted-use settings such as hospitals, physician offices, or long-term care facilities because it has not been cleared by FDA for use in these settings, including for routine assisted testing or as part of glycemic control procedures. -
Page 110
To clean and disinfect your Reader, you will need Clorox Healthcare Bleach Germicidal Wipes, EPA Reg. #67619-12. These disinfectant wipes contain a 0.55% Sodium Hypochlorite (NaOCl) solution and have been shown to be safe for use with the Reader. They may be purchased at major online retailers, such as Walmart.com, Amazon.com, and OfficeDepot.com. -
Page 111
Step Action For disinfection, use a second bleach wipe to wipe all outside surfaces of the Reader until they are wet. Make sure liquid does not get into the test strip and USB ports. Allow the Reader surfaces to remain wet for 60 seconds. Dry with clean paper towel to remove any residual moisture. -
Page 112
IMPORTANT: If you require assistance or if you notice any signs of deterioration on the Reader (such as clouding or crazing on the display of the Reader, corroding or eroding of the plastic housing, or cracking of plastic housing or display) or if the Reader does not turn on, discontinue use of the Reader and contact Customer Service at 1-855-632-8658. -
Page 113
Troubleshooting This section lists problems or observations that you may have, the possible cause(s), and recommended actions. If the Reader experiences an error, a message will appear on the screen with directions to resolve the error. Reader Does Not Power On Problem What It May Mean What To Do… -
Page 114
Problems at the Sensor Application Site Problem What It May Mean What To Do The Sensor is The site is not free 1. Remove the Sensor. 2. Clean the site with a plain not sticking of dirt, oil, hair, or soap and water and then to your skin. -
Page 115
Problems Starting Your Sensor or Receiving Sensor Readings Display What It May Mean What To Do New Sensor Sensor is not ready Wait until the 60 minute Sensor Starting Up to read glucose. start-up period has completed. Scan The Reader is not Hold the Reader within Timeout held close enough… -
Page 116
Display What It May Mean What To Do Signal Loss Sensor has not Make sure the Reader is within Alarm automatically 20 feet of the Sensor. Try communicated with scanning the Sensor to get a the Reader in the glucose reading. If the Signal last 20 minutes. -
Page 117
Display What It May Mean What To Do Sensor Error The System is Scan again after the duration unable to provide a specified in the message. glucose reading. Note: If you receive this error during your first 12 hours of wearing a Sensor, it may mean that your body is still adjusting to the Sensor. -
Page 118
Display What It May Mean What To Do Sensor The Sensor was Your Reader can only be used Already in started by another with a Sensor that it started. device. Scan the Sensor again with the device that started it. Or, apply and start a new Sensor. -
Page 119
Problems Receiving Glucose Alarms Problem What It May Mean What To Do You are not You have turned Touch the Settings symbol and then select Alarms. receiving alarms off. glucose alarms. The Sensor is not The Sensor must be within range (20 feet) of the Reader for you to communicating with receive alarms. -
Page 120
Problem What It May Mean What To Do You are not You may have set an Confirm your alarm settings are receiving alarm level that is appropriate. glucose higher or lower than alarms. you intended. (cont.) You have already You will receive another alarm dismissed this type of when a new low or high glucose alarm. -
Page 121
Blood Glucose Error Messages Error What It May Mean What To Do Message The temperature is 1. Move the Reader and test too hot or too cold strips to a location where the for the Reader to temperature is within the test work correctly. -
Page 122
Error What It May Mean What To Do Message Blood drop is too 1. Review the testing small. instructions. 2. Repeat the test using a new test strip. Incorrect test 3. If the error reappears, contact procedure. Customer Service. There may be a problem with the test strip. -
Page 123
Error What It May Mean What To Do Message Blood was applied 1. Review the testing to the test strip too instructions. soon. 2. Repeat the test using a new test strip. 3. If the error reappears, contact Customer Service. The test strip may not 1. -
Page 124
Error What It May Mean What To Do Message Test strip may be 1. Check that you are using damaged, used, or the correct test strip for the Reader does not the Reader. (See test strip recognize it. instructions for use to verify your strip is compatible with the Reader). -
Page 125
Problems Checking Your Blood Glucose Problem What It May Mean What To Do The Reader Test strip is not 1. With the 3 black lines facing does not inserted correctly up, insert the test strip into start a or not inserted fully the strip port until it stops. -
Page 126
Problem What It May Mean What To Do The test Blood sample is too 1. See test strip instructions does not small. for use for re-application start after instructions. applying 2. Repeat the test using a new the blood test strip. sample. -
Page 127
Perform a Reader Test If you think the Reader is not working properly, you System Status can check the Reader by performing a Reader Test. System Info Touch the Settings symbol from the Home Reader Test Screen, select System Status and then select Reader Test. -
Page 128
System Specifications See test strip and control solution instructions for use for additional specifications. Sensor Specifications Sensor glucose assay Amperometric electrochemical sensor method Sensor glucose reading 40 to 400 mg/dL range Sensor size 5 mm height and 35 mm diameter Sensor weight 5 grams Sensor power source… -
Page 129
Sensor data Up to 14 days 8 hours (glucose readings stored every Sensor memory 15 minutes) Sensor transmission 20 feet (6 meters) unobstructed range Operating temperature 50 °F to 113 °F Sensor Applicator and Sensor Pack storage 36 °F to 82 °F temperature Operating and storage 10-90%, non-condensing… -
Page 130
Reader Specifications Blood glucose assay 20 to 500 mg/dL range Reader size 95 mm x 60 mm x 16 mm Reader weight 65 grams Reader power source One lithium-ion rechargeable battery Reader battery life 4 days of typical use Reader memory 90 days of typical use Reader operating 50 °F to 113 °F… -
Page 131
Reader moisture Keep dry protection Operating and storage -1,250 ft (-381 meters) to 10,000 ft altitude (3,048 meters) 60 seconds (120 seconds when test Reader display timeout strip is inserted) Near Field Communication (13.56 MHz RFID); ASK Modulation; 124 dBuV/m; Radio Frequency 1.5 inch communication range 2.402-2.480 GHz BLE;… -
Page 132
Reader that activated the Sensor. Quality of Service (QoS): QoS for the FreeStyle Libre 2 Reader and Sensor wireless communications using NFC is assured within the effective range of 4 cm between the Sensor and Reader that is specified to occur within 15 seconds. -
Page 133
20 minutes, the Reader alarms the user if the alarm is turned on. If connection is lost between the Sensor and the Reader, up to 8 hours of glucose results can be retrieved by performing a scan with the Reader. The Reader is designed to only accept radio frequency (RF) communications from recognized and paired Sensors. -
Page 134
Labeling Symbols Consult instructions for Use-by date Temperature limit Catalog number Manufacturer Serial number Batch code Keep dry Type BF applied part Non-ionizing radiation Sensor code Caution CODE Sterilized using Do not re-use irradiation MR unsafe Humidity limitation FCC Declaration of Do not use if package Conformity mark is damaged… -
Page 135
Not made with natural rubber latex CAUTION: Federal law restricts this device to sale by or on the order of a physician. This product contains electronic equipment, batteries, sharps and materials that may contact bodily fluids during use. Dispose of product in accordance with all applicable local regulations. -
Page 136
Two studies were conducted in the United States (US) to evaluate the performance, safety, effectiveness, and precision of the FreeStyle Libre 2 Flash Glucose Monitoring System (System). One study included adults (Adult study) and the other study included children (Pediatric study). -
Page 137
manipulated per the study protocol to raise or lower glucose. This was done to assess performance of the System over the range that the System measures glucose (40 – 400 mg/dL). 48 subjects were analyzed during the beginning of the Sensor wear period (day 1 or 2), 50 subjects were analyzed during the early middle period (day 7 or 8), 51 subjects were analyzed during the late middle period (day 9 or 12), and 51 subjects were analyzed during the end period (day 13 or 14). -
Page 138
Table 1a: Overall Accuracy to YSI Percent Percent Number of Percent Within Within Subject CGM- Number of Within ±20% / ±20% / MARD (%) Group Reference Subjects ±20% / ±20 mg/dL ±20 mg/dL Pairs ±20 mg/dL in first on Day 1 12 hours Adults 18735… -
Page 139
Table 1b: Accuracy to YSI within CGM Glucose Ranges (Adult; n=144) Number Percent Percent Percent Percent Percent Percent Mean Glucose of CGM- MARD Within Within Within Within Within Within bias † Level Reference ±15 mg/dL ±20 mg/dL ±40 mg/dL ±15% ±20% ±40% (mg/dL) -
Page 140
Table 1c: Accuracy to YSI within CGM Glucose Ranges (Pediatric*; n=129) Number Percent Percent Percent Percent Percent Percent Mean Glucose of CGM- MARD Within Within Within Within Within Within bias † Level Reference ±15 mg/dL ±20 mg/dL ±40 mg/dL ±15% ±20% ±40% (mg/dL) -
Page 141
Table 1d: Accuracy to YSI within YSI Glucose Ranges (Adult; n=144) Number Percent Percent Percent Percent Percent Percent Mean Glucose of CGM- MARD Within Within Within Within Within Within bias Level Reference ±15 mg/dL ±20 mg/dL ±40 mg/dL ±15% ±20% ±40% (mg/dL) (mg/dL) -
Page 142
Table 1e: Accuracy to YSI within YSI Glucose Ranges (Pediatric*; n=129) Number Percent Percent Percent Percent Percent Percent Mean Glucose of CGM- MARD Within Within Within Within Within Within bias Level Reference ±15 mg/dL ±20 mg/dL ±40 mg/dL ±15% ±20% ±40% (mg/dL) (mg/dL) -
Page 143
Agreement with ‘LO’ and ‘HI’ CGM Reading against YSI Reference The System reports glucose concentrations between 40 and 400 mg/dL. When the System determines that glucose level is below 40 mg/dL, it will report as ‘LO’ . When the System determines that glucose level is above 400 mg/dL, it will report as ‘HI’… -
Page 144
Tables 2c and 2d display the concurrence between the CGM and YSI reference glucose when CGM reads ‘HI’ . In the Adult study, when CGM reading was ‘HI’ , YSI glucose values were above 350 mg/dL 97.5% of the time, above 300 mg/dL 100.0% of the time, above 250 mg/dL 100.0 % of the time, and less than or equal to 250 mg/dL 0.0% of the time. -
Page 145
Concurrence of System and Reference (CGM vs. YSI) The percentage of concurring glucose values (CGM vs. YSI) in each glucose reference range is presented for each CGM range in Tables 3a and 3b and for each YSI range in Tables 3c and 3d. For example, in the Adult study, when the System glucose readings were within the 81 to 120 mg/dL range, actual blood glucose values were between 40 and 60 mg/dL 0.2% of the time, between 61 and 80 mg/dL 11.0% of the time, between 81 and 120 mg/dL 70.1% of the time,… -
Page 146
Table 3a: Concurrence Analysis by CGM Glucose Level (Adult; n=144) YSI Glucose Level (mg/dL) CGM Glucose Level 121- 161- 201- 251- 301- 351- <40 40-60 61-80 81-120 >400 (mg/dL) † <40 20.0 20.0 40.0 20.0 40-60 52.9 43.3 1889 61-80 18.9 62.7 18.1 3090 81-120… -
Page 147
Table 3b: Concurrence Analysis by CGM Glucose Level (Pediatric*; n=129) YSI Glucose Level (mg/dL) CGM Glucose Level 121- 161- 201- 251- 301- 351- <40 40-60 61-80 81-120 >400 (mg/dL) † <40 50.0 50.0 40-60 48.6 42.5 61-80 12.1 61.9 24.3 81-120 11.2 69.0 18.2 1006… -
Page 148
Table 3c: Concurrence Analysis by YSI Glucose Level (Adult; n=144) CGM Glucose Level (mg/dL) YSI Glucose Level 121- 161- 201- 251- 301- 351- † † <40 40-60 61-80 81-120 >400 (mg/dL) <40 12.5 87.5 40-60 62.9 36.6 1591 61-80 26.4 62.6 10.8 3093 81-120 18.8 71.7… -
Page 149
Table 3d: Concurrence Analysis by YSI Glucose Level (Pediatric*; n=129) CGM Glucose Level (mg/dL) YSI Glucose Level 121- 161- 201- 251- 301- 351- † † <40 40-60 61-80 81-120 >400 (mg/dL) <40 100.0 40-60 69.2 30.0 61-80 24.8 62.6 12.5 81-120 21.0 65.7 1057… -
Page 150
Glucose Rate of Change Accuracy The System’s glucose rate of change accuracy, as assessed by concurrence analysis, is presented in Tables 4a and 4b. For example, in the Adult study, when the Sensor glucose trend arrow indicated that glucose was changing slowly downward (-1 to 0 mg/dL/min ( )), actual glucose levels in the body were falling quickly (<-2 mg/dL/min) 1.2% of the time, falling (-2 to -1 mg/dL/min) 8.3% of the time, changing slowly downward (-1 to 0 mg/dL/min ) 67.1% of the time, changing slowly… -
Page 151
Table 4b: Concurrence Analysis by Glucose Rate of Change (Pediatric*; n=129) YSI (mg/dL/min) (mg/dL/min) <-2 [-2, -1) [-1, 0) [0, 1] (1, 2] >2 <-2 (i) 44.1 44.7 -2 to -1 (m) 11.4 49.5 32.8 -1 to 0 (g) 11.2 60.0 20.8 2587… -
Page 152
False Alarm Rate Tells you: Did you get a low glucose alarm that you shouldn’t have? Definition: Percentage of time the alarm issued and blood glucose was not below the alarm level within 15 minutes before or after the alarm. Detection Rate Tells you: When you were low, did you get a low glucose alarm? Definition: Percentage of time blood glucose was below the alarm level and the alarm issued within… -
Page 153
Table 5a: Low Glucose Alarm Performance (Adult; n=144) Alarm Rate Detection Rate Low Glucose Alarm level Correct Missed Number of True Alarm False Alarm Number of (mg/dL) Detection Detection Events (n) Rate (%) Rate (%) Events (n) Rate (%) Rate (%) 72.6 27.4 75.7… -
Page 154
High Glucose Alarm Performance Tables 5c and 5d display the percentages for these parameters: True Alarm Rate Tells you: When you got a high glucose alarm, were you actually high? Definition: Percentage of time the alarm issued and blood glucose was above the alarm level within 15 minutes before or after the alarm. -
Page 155
For example, the Adult study found that for a High Glucose alarm level set to 200 mg/dL: 99.2% of the time a high glucose alarm was received when blood glucose was indeed above the alarm level but 0.8% of the time a high glucose alarm was received when blood glucose wasn’t actually above the alarm level. -
Page 156
Table 5d: High Glucose Alarm Performance (Pediatric*; n=129) Alarm Rate Detection Rate High Glucose Alarm level True Alarm False Alarm Correct Missed Number of Number of (mg/dL) Rate Rate Detection Detection Events (n) Events (n) Rate (%) Rate (%) 34176 98.8 4441 98.2… -
Page 157
Table 6a: Sensor Accuracy Relative to YSI over the wear duration (Adult; n=144) Number of Wear Within ±15% / Within ±20% / Within ±40% / CGM-reference MARD (%) Period ±15 mg/dL ±20 mg/dL ±40 mg/dL pairs Beginning 6955 83.4 90.4 99.3 Early Middle 4522… -
Page 158
Sensor Wear Duration The Sensor can be worn for up to 14 days. To estimate how long a Sensor will work over the wear duration, 146 Sensors were evaluated in the Adult study and 139 Sensors were evaluated in the Pediatric study to determine how many days of readings each Sensor provided. -
Page 159
Table 7a: Sensor Survival Rate Over Wear Duration (Adult; n=146) Day of Wear Number of Sensors Survival Rate (%) 99.3 97.3 95.9 93.8 91.8 91.1 90.4 87.0 84.9 82.2 77.3 76.6 71.8 71.1… -
Page 160
Table 7b: Sensor Survival Rate Over Wear Duration (Pediatric; n=139) Day of Wear Number of Sensors Survival Rate (%) 98.6 97.8 97.1 96.4 96.4 96.4 96.4 94.9 91.3 89.9 88.4 87.0 83.4 78.1… -
Page 161
Glucose Reading Availability The System is designed to show a Sensor glucose reading after each scan that is performed throughout the wear period after the start-up time. Tables 8a and 8b show the glucose reading capture rate for each day of the wear duration. Table 8a: Glucose Reading Capture Rate Over Wear Duration (Adult;… -
Page 162
Table 8b: Glucose Reading Capture Rate Over Wear Duration (Pediatric; n=139) Day of Wear Number of Sensors Capture Rate (%) 94.6 94.9 95.2 95.3 95.5 95.6 96.0 95.9 95.7 95.6 95.6 95.8 95.9 95.8… -
Page 163
Precision Precision of the System was evaluated by comparing the results from two separate Sensors worn on the same subject at the same time. Table 9a provides data from 146 subjects in the Adult study; Table 9b provides data from 137 subjects in the Pediatric study. For adults, the paired absolute relative difference (PARD) between the two Sensors was 8.1% with coefficient of variation (CV) of 5.7%. -
Page 164
Adverse Events No device related serious adverse events occurred during the studies. In the Adult study, mild skin irritations, such as erythema, bruising, bleeding, and scabbing were reported around the insertion site and adhesive area by a small number of subjects (10 out of 146 or 6.8%). Pain was mostly reported as none with only one instance of mild pain. -
Page 165
EMC information provided in this manual. • Portable and mobile RF communications equipment can affect the System. • The use of accessories, transducers and cables other than those specified by Abbott Diabetes Care may result in increased EMISSIONS or decreased IMMUNITY of the System. -
Page 166
Guidance and manufacturer’s declaration – electromagnetic emissions The System is intended for use in the electromagnetic environment specified below. The customer or the user of the System should assure that it is used in such an environment. Electromagnetic Emissions test Compliance environment –… -
Page 167
Guidance and manufacturer’s declaration – electromagnetic immunity The System is intended for use in the electromagnetic environment specified below. The customer or the user of the System should assure that it is used in such an environment. IMMUNITY IEC 60601 Compliance Electromagnetic test… -
Page 168
IMMUNITY IEC 60601 Compliance Electromagnetic test test level Level environment – guidance Surge ±1 kV ±1 kV Mains power quality should be that differential differential of a typical domestic, commercial, IEC 61000-4-5 mode mode or hospital environment. ±2 kV common ±2 kV common mode mode… -
Page 169
IMMUNITY IEC 60601 Compliance Electromagnetic test test level Level environment – guidance Power frequency 30 A/m 30 A/m Power frequency magnetic fields (50/60 Hz) should be at levels characteristic magnetic field of a typical location in a typical domestic, commercial, or hospital IEC 61000-4-8 environment. -
Page 170
IMMUNITY IEC 60601 Compliance Electromagnetic test test level Level environment – guidance Conducted RF 6 Vrms 6 Vrms Portable and mobile RF communications equipment should IEC 61000-4-6 150 kHz to be used no closer to any part of the 80 MHz System, including cables, than the recommended separation distance calculated from the equation… -
Page 171
IMMUNITY IEC 60601 Compliance Electromagnetic test test level Level environment – guidance Recommended separation Radiated RF 10 V/m 10 V/m distance IEC 61000-4-3 80 MHz to 2.7 GHz 80 MHz to 800 MHz 800 MHz to 2.5 GHz P is the maximum output power rating of the transmitter in watts (W) according to the transmitter manufacturer and d is the recommended separation distance in meters (m). -
Page 172
Field strengths from fixed transmitters, such as base stations for radio (cellular/cordless) telephones and land mobile radios, amateur radio, AM and FM radio broadcast and TV broadcast cannot be predicted theoretically with accuracy. To assess the electromagnetic environment due to fixed RF transmitters, an electromagnetic site survey should be considered. If the measured field strength in the location in which the System is used exceeds the applicable RF compliance level above, the System should be observed to verify normal operation. -
Page 173
Recommended separation distances between portable and mobile RF communications equipment and the System The System is intended for use in an electromagnetic environment in which radiated RF disturbances are controlled. The customer or the user of the System can help prevent electromagnetic interference by maintaining a minimum distance between portable and mobile RF communications equipment (transmitters) and the System as recommended below, according to the maximum output power of the communications equipment. -
Page 174
Font License ©2013 Abbott Licensed under the Apache License, Version 2.0 (the “License”); you may not use this file except in compliance with the License. You may obtain a copy of the License at: http://www.apache.org/licenses/LICENSE-2.0 Unless required by applicable law or agreed to in writing, software distributed under the License is distributed on an “AS IS”… -
Page 175
PREAMBLE The goals of the Open Font License (OFL) are to stimulate worldwide development of collaborative font projects, to support the font creation efforts of academic and linguistic communities, and to provide a free and open framework in which fonts may be shared and improved in partnership with others. The OFL allows the licensed fonts to be used, studied, modified and redistributed freely as long as they are not sold by themselves. -
Page 176
2) Original or Modified Versions of the Font Software may be bundled, redistributed and/or sold with any software, provided that each copy contains the above copyright notice and this license. These can be included either as stand-alone text files, human-readable headers or in the appropriate machine-readable metadata fields within text or binary files as long as those fields can be easily viewed by the user. -
Page 177
Limited Warranty We hope that you are happy with your FreeStyle Libre 2 system. Please refer to the User’s Manual before using your Reader for the first time. Abbott Diabetes Care (“Abbott”) warrants that the FreeStyle Libre 2 reader (“Reader”) -
Page 178
PURPOSE. ABBOTT DOES NOT WARRANT THAT OPERATION OF THE READER WILL BE UNINTERRUPTED OR ERROR FREE AND ABBOTT WILL NOT BE LIABLE FOR ANY LOST PROFITS, LOST SAVINGS OR OTHER SPECIAL, PUNITIVE, INCIDENTAL OR CONSEQUENTIAL DAMAGES RESULTING DIRECTLY OR INDIRECTLY FROM PURCHASE, OPERATION OR USE OF THE READER OR FAILURE OF THE READER TO PERFORM IN ACCORDANCE WITH SPECIFICATIONS. -
Page 179
References: “FDA Public Health Notification: Use of Fingerstick Devices on More than One Person Poses Risk for Transmitting Bloodborne Pathogens: Initial Communication” (2010) http://www.fda.gov/MedicalDevices/Safety/AlertsandNotices/ucm224025. “CDC Clinical Reminder: Use of Fingerstick Devices on More than One Person Poses Risk for Transmitting Bloodborne Pathogens” (2010) http://www.cdc.gov/injectionsafety/Fingerstick-DevicesBGM.html American Diabetes Association, 2019. -
Page 180
7 Days a Week from 8AM to 8PM Eastern Standard Time www.FreeStyleLibre.com The shape of the circle sensor unit, FreeStyle, Libre, and related brand marks are owned by Abbott. Other trademarks are the property of their respective owners. Patent: https://www.abbott.com/patents Manufacturer…

Сканер системы FreeStyle Libre представляет данные в форме различных отчетов, которые помогут вам эффективно контролировать сахарный диабет независимо от того, где вы находитесь. Мы приводим несколько советов, которые помогут вам расшифровать эти отчеты и оценить результаты измерений уровня глюкозы как общую тенденции, а не как обособленные во времени значения.

Что происходит в вашем организме прямо сейчас?
В любое время дня вы можете посмотреть данные за последние восемь часов, которые включают в себя не только текущий уровень глюкозы, но также тенденции и характер её изменения.
Что происходит с вашим организмом в течение дня?
График, представляющий динамику и вариабельность результатов измерения уровня глюкозы датчиком в течение обычного дня. На этом графике также показан целевой диапазон глюкозы и линия, отражающая медианное значение глюкозы.


Постоянство на протяжении недели и более
Если вы любите задачи посложнее, можете воспользоваться отчетом «Время в целевом диапазоне». Диаграмма, показывающая процентную долю времени, в течение которого измеренные датчиком показатели глюкозы были выше, ниже или в пределах вашего целевого диапазона.
Выявление тенденций
В любой момент вы можете узнать средний уровень глюкозы для каждого периода времени суток с помощью отчета «Глюкоза средн.». Этот отчет поможет выявить закономерности или тенденции, о которых вы могли не знать.
Например, если вас беспокоит низкий уровень глюкозы, вы можете выбрать отчет «Гипогликемические явления». В нем отображается количество эпизодов низкого уровня глюкозы, зарегистрированное датчиком. Этот отчет поможет вам определить время суток, требующее повышенного внимания.

Модели глюкометра Freestyle Libre (Фристайл Либре)
Информация носит справочный характер. Не занимайтесь самодиагностикой и самолечением. Обращайтесь ко врачу.
 Больной диабетом должен постоянно контролировать уровень сахара в крови, чтобы предотвратить наступление гликемии.
Для оценки состояния необходимы точные показания глюкометров. Компания Abbott разработала альтернативу традиционным приборам для постоянного мониторинга сахара в крови.
Содержание статьи
- Обзор моделей глюкометра
- Freestyle Libre Flash
- Freestyle Optium
- Инструкция по применению
- Преимущества и недостатки Фристайл Либре
- Мнения потребителей
Обзор моделей глюкометра
 Глюкометры Freestyle производятся известной компанией Abbott. Продукция представлена моделями Freestyle Optium и Freestyle Libre Flash с сенсором Freestyle Libre.
Приборы отличаются высокой точностью и не нуждаются в перепроверке.
Глюкометр Фристайл Либре Флэш предназначен для постоянного мониторинга сахара в крови. Устройство имеет небольшие размеры, удобно в использовании. Фристайл Либре Оптиум делает замер традиционно — с помощью тест-полосок.
Оба прибора проверяют показатели, которые важны для больных сахарным диабетом – уровень глюкозы и b-кетонов.
Линия глюкометров Фристайл от компании Abbott отличается надежностью и позволяет выбрать прибор, который будет обладать нужными конкретному пациенту характеристиками и удобством в использовании.
Freestyle Libre Flash
Фристайл Либре Флеш – инновационный прибор, который беспрерывно измеряет уровень сахара малоинвазивным методом.
В стартовый набор глюкометра входит:
- ридер с широким дисплеем;
- два водонепроницаемых датчика-сенсора;
- зарядное устройство;
- механизм для установки датчика.
 Ридер – небольшой сканирующий монитор, который считывает результаты с датчика. Его габариты: вес – 0.065 кг, размеры — 95x60x16 мм. Для считывания данных необходимо близко поднести прибор к датчику, предварительно закрепленному в зоне предплечья.
На экране через секунду отображается уровень сахара и динамика его движения за сутки. Гликемия автоматически измеряется каждую минуту, данные остаются в памяти в течение трех месяцев. Необходимую информацию можно хранить на компьютере или электронном носителе. С помощью таких технологий контроль состояния пациента становится эффективнее.
Freestyle Libre Sensor – специальный водонепроницаемый датчик-сенсор, который располагают в зоне предплечья. Датчик имеет пятиграммовый вес, его диаметр – 35 мм, высота 5 мм. Благодаря небольшим размерам датчик безболезненно крепится к телу и в течение срока службы не ощущается.
Игла располагается в межклеточной жидкости и за счет небольших размеров не ощущается. Срок службы одного сенсора составляет 14 дней. Работает вместе с ридером, с помощью которого можно получить результаты.
Видео-обзор глюкометра Freestyle Libre Sensor:
Freestyle Optium
Фристайл Оптиум – современная модель глюкометра, которая использует тест-полоски. Прибор имеет уникальную технологию измерения b-кетонов, дополнительные функции и объем памяти на 450 измерений. Предназначен для измерения сахара и кетоновых тел с применением двух разновидностей тест-полосок.
В комплект глюкометра входят:
- прибор Freestyle Optium;
- 10 ланцетов и 10 тест-полос;
- чехол;
- инструмент для прокалывания;
- инструкция на русском языке.
Результаты отображаются без нажатия кнопок. Имеет большой и удобный экран с подсветкой и встроенный динамик, который предназначен для людей с плохим зрением. Его габариты: 53x43x16 мм, вес 50 г. Глюкометр соединяется с ПК.
Результаты уровня сахара получают через 5 с, а кетонов – через 10 секунд. С помощью устройства можно взять кровь из альтернативных участков: запястья, предплечья. Спустя минуту после процедуры происходит автоотключение.
Инструкция по применению
Устройство работает при температуре от 0 до 45 градусов при влажности 10-90 %. Измеряет показатели в моль/л или в мг/дл.
Для определения уровня глюкозы неинвазивно с помощью Freestyle Libre Flash нужно действовать согласно инструкции:
- Выбрать место для датчика в зоне предплечья и обработать спиртовым раствором.
- Подготовить аппликатор датчика.
- Приложить датчик, плотно прижать и аккуратно отстранить аппликатор.
- На считывающем устройстве нажать «старт».
- Если датчик запускается первый раз, необходимо кликнуть «запуск», подождать 60 минут и после проводить тест.
- Поднести ридер к датчику на расстояние не дальше 4 см.
- При необходимости просмотра истории замеров кликнуть «история замеров» и выбрать нужную опцию.
Для измерения сахара с помощью Freestyle Optium необходимо придерживаться следующей инструкции:
- Обработать поверхность спиртовым раствором.
- Вставить полоску в прибор до упора, включение происходит автоматически.
- Сделать прокол, поднести палец к полоске, держать до звукового сигнала.
- После выведения данных извлечь полоску.
- Прибор выключится автоматически или с помощью нажатия кнопки.
Короткий видео-обзор глюкометра Фристайл Оптиум:
Преимущества и недостатки Фристайл Либре
Высокая точность показателей замеров, небольшой вес и габариты, гарантия качества глюкометров от официального представителя – все это относится к достоинствами Freestyle Libre.
К преимуществам модели Фристайл Оптиум относят:
- необходимо меньше крови для исследования;
- возможность брать материал из других участков (предплечья, запястья);
- двойное предназначение – измерение кетонов и сахара;
- точность и скорость результатов.
Преимущества модели Фристайл Либре Флеш:
- непрерывный мониторинг;
- возможность использования вместо считывающего устройства смартфон;
- простота пользования глюкометром;
- неинвазивный метод исследования;
- водонепроницаемость сенсора.
Среди недостатков Freestyle Libre Flash – это высокая цена на модель и короткий срок службы датчиков – их приходится периодически подкупать.

Мнения потребителей
Из отзывов пациентов, пользующихся Freestyle Libre, можно сделать вывод, что приборы достаточно точны и удобны в использовании, однако отмечаются высокие цены на расходники и неудобство крепления сенсора.
Давно была наслышана о неинвазивном приборе Фристайл Либре Флеш и вскоре купила. Технически он очень простой в использовании, а устойчивость сенсора на теле довольно неплохая. Но чтобы доносить его 14 дней необходимо меньше мочить или подклеивать. Что касается показателей, то у меня два датчика завышали их на 1 ммоль. Пока есть финансовая возможность, буду покупать для оценки сахара сенсоры – очень удобно и нетравматично.
Татьяна, 39 лет
Пользуюсь Либрой уже полгода. Установил приложение на телефоне LibreLinkUp – оно недоступно в России, но при желании можно обойти блокировку. Практически все сенсоры отработали заявленный срок, один даже прослужил дольше. При нормальных показателях глюкозы расхождение на 0.2, а на высоком сахаре – на единицу. Постепенно приспособился к прибору.
Аркадий, 27 лет
Средняя стоимость Freestyle Optium – 1200 рублей. Цена набора тест-полосок для оценки глюкозы (50 шт.) составляет 1200 р., набора для оценки кетонов (10 шт.) – 900 р.
Стартовый комплект Freestyle Libre Flash (2 датчика и ридер) стоит 14500 р. Freestyle Libre Сенсор около 5000 рублей.
Купить устройство можно на официальном сайте и через посредника. Каждая компания предоставляет свои условия доставки и цены.

01.09.2022
САМАЯ ПОДРОБНАЯ ИНФОРМАЦИЯ О FreeStyle Libre
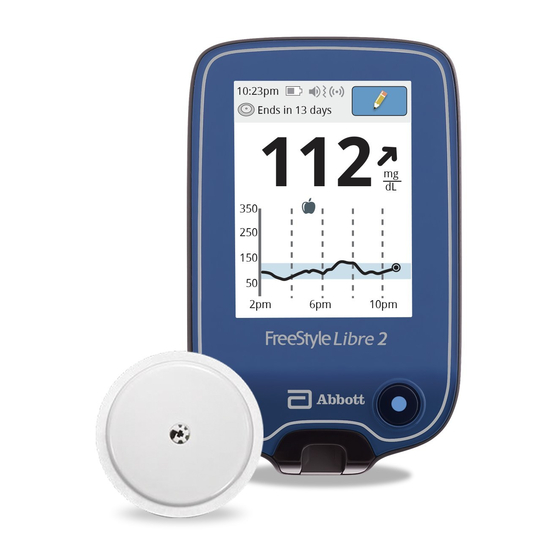
Сенсор FreeStyle Libre это непрерывный автоматический мониторинг глюкозы. Вместо многократных ежедневных проколов, достаточно всего один раз установить датчик. Сенсор измеряет показания днем и ночью, а также имеет сигнал тревоги о низком и высоком сахаре, помогая предотвратить гипо или гипергликемию, а также автоматически сохраняет данные о ваших сахарах.


Сам сенсор похож на маленький белый диск, который крепится к задней части плеча с помощью простого одноразового аппликатора всего одним нажатием. Датчик фиксируется на теле с помощью небольшой клейкой фольги.
Также вы можете дополнительно приобрести нательный клей для подклейки сенсора (ссылка: https://apteka24.me/apteka/freestyle-libre2/kley-dlya-tela/ ).
Срок службы одного датчика составляет 14 дней с момента его установки.
Сенсор FreeStyle Libre является водоупорным устройством и вы можете принимать душ или ванну, не думая о датчике. Для обеспечения дополнительной безопасности сенсора при контакте с водой, вам может помочь эластичная защитная непромокаемая повязка (ссылка: https://apteka24.me/apteka/freestyle-libre2/elastichnaya-zashchitnaya-nepromokaemaya-povyazka-/ ).

Датчики FreeStyle Libre представлены на нашем сайте в соответствующих по названию разделах в трёх поколениях (в чем отличия разных поколений — см. по ссылке: https://apteka24.me/blogi/det/14653/ ). Также подробная информация о сенсорах представлена в карточке товара на сайте.
Данные об уровне глюкозы считываются с сенсора специальным сканером (ридером) или с помощью бесплатного мобильного приложения на смартфоне по Bluetooth.
Ссылка на подробную пошаговую инструкцию по установке мобильного приложения на телефон для систем IOS и Android
https://drive.google.com/drive/u/6/folders/1KnuyHgnmlPDfbWjwqhQKGEKnhKikWvJy
С мобильным приложением у вас есть ключ к обмену показаниями уровня глюкозы с семьей, врачом и друзьями.
Чтобы использовать мобильное приложение, ваш смартфон должен соответствовать следующим требованиям:
Android: ОС: Android 8.0 и выше. Аппаратное обеспечение: с поддержкой NFC.
iPhone: ОС: iOS 12.1 и выше. Аппаратное обеспечение: iPhone 7 и новее.
Если вы не знаете технических характеристик своего телефона или не уверены, вы можете скачать приложение в Google Play или App Store. Если приложение не загружается, возможно, оно несовместимо с вашим смартфоном.
Выбор места установки сенсора FreeStyle Libre
Сенсор является основным элементом для получения полной картины изменения уровня глюкозы, поэтому не забывайте выбирать правильное место установки сенсора, а установку проводите с осторожностью:
✅ Обычно сенсор располагается на тыльной стороне плеча. Выберите на коже область, которая обычно остается ровной (без изгибов и складок) при нормальной повседневной активности.
✅ Не прикрепляйте сенсор к областям кожи с рубцами, родимыми пятнами, растяжками или припухлостями.
✅ Выберите место, отстоящее не менее чем на 2,5 см от места инъекции инсулина.
✅ Во избежание неприятных ощущений и раздражения кожи не устанавливайте следующий сенсор на то же место, что и предыдущий.
Установка сенсора FreeStyle Libre
Перед установкой сенсора не наносите на выбранное место лосьоны и крема. Поверхность кожи должна оставаться чистой и не увлажненной, продезинфицируйте область спиртовой салфеткой и дайте коже высохнуть для лучшего крепления сенсора к телу.
✅ Сенсор и аппликатор для установки упакованы в один комплект.
✅ Полностью снимите гибкую крышку с футляра сенсора. Отвинтите колпачок с аппликатора и отложите колпачок в сторону.
✅ Совместите темную метку на аппликаторе сенсора с темной меткой на футляре сенсора. Поставьте футляр датчика на твердую поверхность и с усилием, до упора вдавите в него аппликатор.
✅ Извлеките аппликатор из футляра датчика. Аппликатор готов к установке датчика на кожу.
✅ Чтобы установить сенсор, приложите аппликатор сенсора к подготовленному участку тела и сильно прижмите его к коже. При прикреплении датчика к телу под кожу вводится тонкая гибкая стерильная канюля.
✅ Осторожно отведите аппликатор датчика от кожи. Сенсор должен остаться прикрепленным к коже. После установки датчика убедитесь в его надежной фиксации.
Меры предосторожности при носке сенсора FreeStyle Libre
✅ Избегайте столкновения с предметами, которые могут спровоцировать отсоединение сенсора от тела.
✅ Сенсор водостоек, однако во время водных процедур и вытирании полотенцем следите за тем, чтобы случайно не зацепить и не отсоединить его. Не погружайте сенсор в воду на глубину более 1 метра и не держите его в воде более 30 минут.
✅ Старайтесь не касаться сенсора, не давить на него и не оттягивать его. Также старайтесь не прикасаться к клейкой ленте сенсора, не царапать и не отсоединять ее.
✅ При надевании одежды следите за тем, чтобы случайно не сдвинуть сенсор и не зацепить его.
✅ Старайтесь не заниматься контактными видами спорта и не выполнять интенсивных физических упражнений, во время которых сенсор может отсоединиться.
Для наилучшего крепления датчика, воспользуйтесь дополнительными средствами защиты, представленными на нашем сайте:
✅ пластыри https://apteka24.me/apteka/leykoplastyri/
✅ защитные повязки https://apteka24.me/apteka/povyazki-na-ruku/
✅ нательный клей для подклейки сенсора https://apteka24.me/apteka/freestyle-libre2/kley-dlya-tela/

Как работает OOP2
Был создан метод, который облегчает процесс запуска датчика FreeStyle Libre 2 с официальной или даже исправленной версией приложения LibreLink, таким образом, чтобы xDrip+ мог создавать соединение Bluetooth и получать зашифрованные исходные значения уровня глюкозы в крови с датчика Libre 2. Это достигается с помощью сканирования NFC для инициализации датчика Libre 2 через официальную или исправленную версию приложения LibreLink. После завершения «периода прогрева», через 60 мин после запуска сенсора, другое сканирование NFC с использованием xDrip+ запустит процесс инициализации датчика в xDrip+. Выбор “Start Sensor” в меню xDrip+, а затем выполнение другого сканирования NFC примерно через 60 секунд — создаст общий ключ, который будет использоваться для расшифровки зашифрованных показаний Bluetooth Libre2.
На телефоне установлено второе приложение под названием OOP2 (Out of Process algorithm). Его цель — получать зашифрованные необработанные значения, которые собираются подключением xDrip+ bluetooth к датчику Libre2, а затем расшифровывать эти значения в программной версии с закрытым исходным кодом точного алгоритма, который существует в аппаратном обеспечении самого датчика Libre 2.
Как только OOP2 расшифрует исходные значения, они возвращаются в xDrip+ для калибровки и ввода в таблицу уровня глюкозы в крови, отображаясь на Главном экране xDrip+. На этом этапе это значение уровня глюкозы в крови можно использовать (как и любое другое значение BG с других устройств или приложений) с помощью внутренних калибровок xDrip + (если вы хотите, но это не требуется), транслировать в другие приложения (например, AAP).
ПРИМЕЧАНИЕ: Если вы планируете использовать считыватель FreeStyle Libre в этом решении, СНАЧАЛА НЕОБХОДИМО ЗАПУСТИТЬ датчик с помощью СЧИТЫВАТЕЛЯ. Если вы этого не сделаете, вы не сможете использовать считыватель для сбора показаний с активированного датчика. После прогрева датчика вы можете снимать показания с помощью приложения LibreLink или xDrip+.
LibreLink
Стабильная версия хDrip+
Прежде чем начать
Я настоятельно рекомендую, чтобы этот процесс выполнялся с новым датчиком. Хотя сообщалось, что соединение может быть установлено с помощью работающего датчика, вероятность того, что приложение LibreLink или считывающее устройство создадут новый закрытый общий ключ для связи во время подключения, весьма вероятна. Это означает, что после подключения xDrip + не знает о новом ключе и не сможет взаимодействовать с датчиком. Попытайтесь установить соединение с работающим датчиком на свой страх и риск, желательно ближе к концу срока службы датчика.
Сначала загрузите и установите приложения, приведенные ниже
oop2.apk
-
xDrip + — последнюю версию можно найти по адресу:
xdrip.apk
Что делать, если мой датчик уже запущен? Могу ли я по-прежнему получать чтение в xDrip +? ДА!
Многие люди спрашивали, можно ли использовать этот метод с уже активным датчиком, и я могу сказать с громким ДА, вы можете запустить активно работающий датчик.
-
СНАЧАЛА убедитесь, что вы внесли изменения в конфигурацию и настройки в xDrip +, а также установили и настроили OOP2, как показано ниже.
-
ЗАТЕМ перейдите к шагу 5 и УБЕДИТЕСЬ, что вы принудительно закрыли LibreLink, прежде чем начать. Затем следуйте процессу до завершения.
ПРИМЕЧАНИЕ: Вы не сможете использовать активированный датчик FreeStyle Libre 2 с устройством чтения FreeStyle Libre, если он не был запущен с помощью устройства чтения FreeStyle Libre. Если сначала он был запущен с помощью FreeStyle Libre Reader, вы сможете сканировать датчик и получать показания КАК с датчика, так и с приложений, таких как LibreLink и xDrip+.
Как запустить датчик FreeStyle Libre 2 в встроенном режиме Bluetooth с помощью LibreLink и xDrip+
Шаг 1: Установка и настройка приложения
Установите и настройте OOP2 и убедитесь, что он работает, просто открыв приложение.

Установите последнюю версию xDrip+ (ссылка выше). Функциональность OOP2 существует в xDrip+, начиная с 13.12.2020. (Не забудьте сделать резервную копию своих настроек и базы данных и сначала удалить старую версию).
Шаг 2: Настройка параметров xDrip +
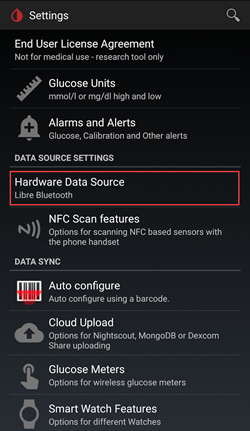
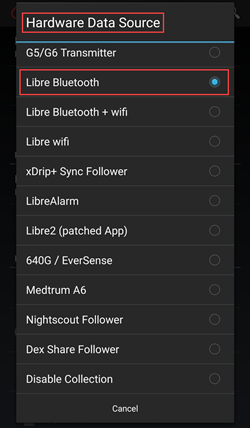
Источник аппаратных данных: Libre Bluetooth
Функции сканирования NFC: предполагается, что не указанные настройки отключены. Это также относится к настройке “более быстрый мультиблок”. Не включайте это, так как сканирование NFC НЕ будет работать.
-
Используйте функцию NFC: вкл.
-
Запуск bluetooth-соединения с датчиком libre 2: всегда подключайтесь к датчикам libre2
-
Возраст или срок действия датчика: включен
-
Сканирование, когда не в xDrip +: включено
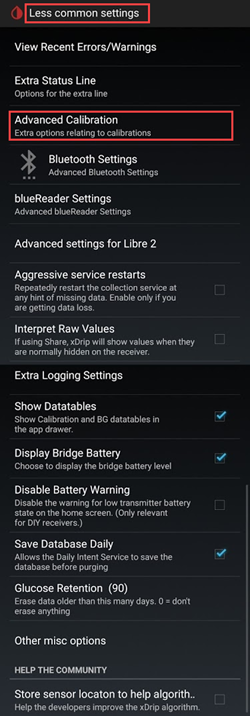
Менее распространенные настройки -> Настройки Bluetooth (они важны и могут меняться в зависимости от вашего телефона / настроек)
-
Включить Bluetooth: вкл.
-
Доверенное автоматическое подключение: включено
-
Использовать фоновое сканирование: вкл.
-
Всегда обнаруживайте службы: вкл.
-
Разрешить отключение bluecon: вкл.


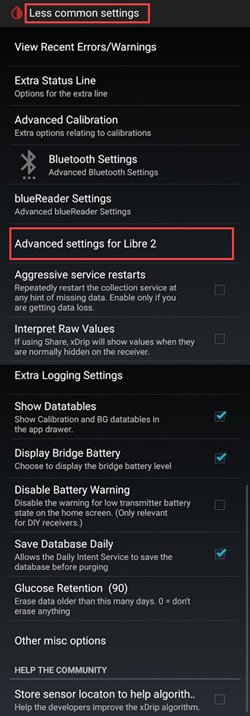
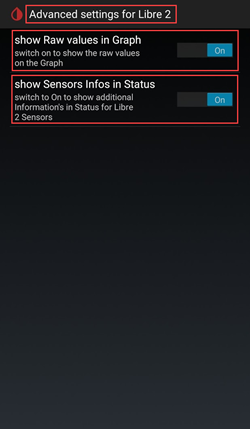
Дополнительные настройки для Libre 2 (необязательно, но полезно)
-
показать необработанные значения на графике: вкл.
-
отображение информации о датчиках в состоянии: включено
Дополнительные настройки ведения журнала (необходимы для отладки, если они не работают правильно)
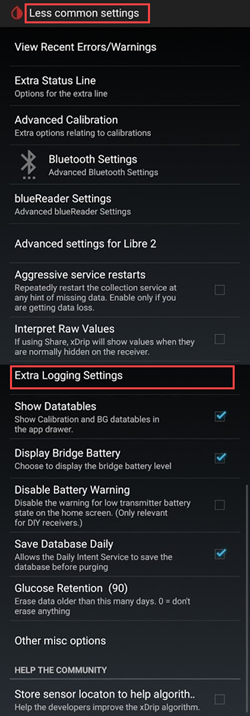
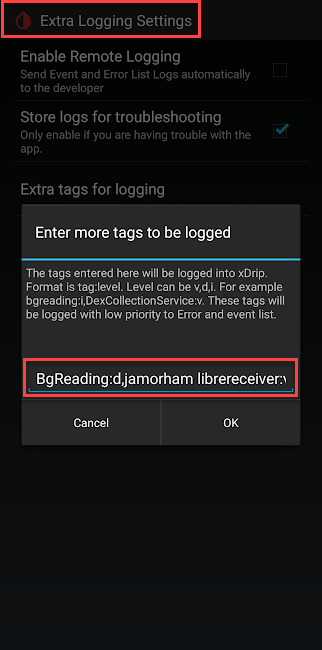
Менее распространенные настройки -> Другие разные параметры
-
Плавные данные Libre: вкл.
-
Извлечение истории Libre: вкл.
-
Калибровка алгоритма ООП: ОТОБРАЖАЕТСЯ СЕРЫМ ЦВЕТОМ И НЕ МОЖЕТ БЫТЬ ПРОВЕРЕНА, ЭТО НОРМАЛЬНОЕ ПОВЕДЕНИЕ
Шаг 3: Установите датчик FreeStyle Libre 2

Шаг 4. Запустите приложение LibreLink и запустите sensor с помощью самого первого сканирования NFC
Запустите приложение LibreLink, затем просканируйте только что установленный датчик, затем закройте и отключите или удалите приложение LibreLink. Вам все равно нужно подождать, пока датчик прогреется в течение полных 60 минут, прежде чем продолжить и запустить датчик в xDrip+. Его можно запустить уже через 20 минут, но я бы не рекомендовал этого делать, поскольку датчик все еще проходит внутреннюю калибровку, и значения сильно различаются.
ПРИМЕЧАНИЕ: приложение LL требуется только для САМОГО ПЕРВОГО сканирования NFC после установки датчика. Он служит для отправки сигнала инициализации прогрева, после чего приложение ДОЛЖНО быть отключено (настройки приложения-> принудительное закрытие) или удалено. Вы можете использовать исправленное приложение 2.3, официальную версию 2.4.2 или официальную версию 2.5.3, это не имеет значения. Главное, чтобы приложение LibreLink не запускалось, когда xDrip+ пытается запустить процесс соединения BT с датчиком, поскольку приложение LL вмешивается в процесс повторного подключения Bluetooth, прерывая связь.


Шаг 5: откройте xDrip+ и выполните сканирование датчика Libre 2 по протоколу NFC
(Напоминание! Убедитесь, что LibreLink отключен (местоположение отключено) или удален, и вы ждали 60 минут, пока датчик прогреется) NFC СКАНИРУЙТЕ датчик Libre 2. Посылаемый сигнал на датчик для включения сопряжения по Bluetooth, чтобы начать процесс соединения. В нижней части обзорного экрана xDrip+ на короткое время появится небольшое уведомление со сканированием текста, за которым последует уведомление Сканировано ОК! после успешного сканирования NFC датчика Libre2.

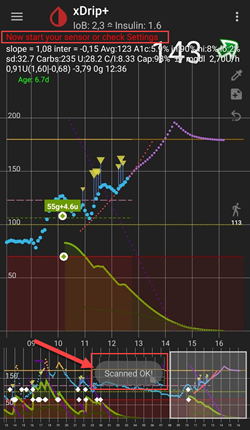
Шаг 6. Запустите новый датчик в xDrip+
На Главном экране xDrip + нажмите меню настроек в верхнем левом углу. Затем выберите Start Sensor.
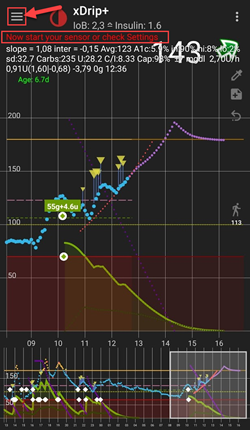
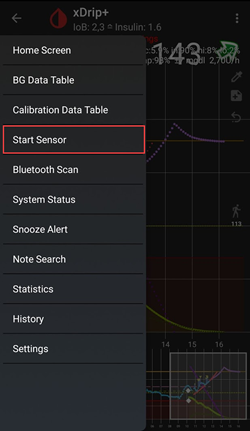
На экране Start New Sensor нажмите Start Sensor. Появится запрос, вы устаногвили его сегодня? Ответьте, нажав НЕ СЕГОДНЯ.
ПРИМЕЧАНИЕ: Если вы случайно нажали «ДА, СЕГОДНЯ», вам нужно будет «остановить датчик» из главного меню xDrip +, а затем «запустить датчик», снова перейдя к шагу 5.
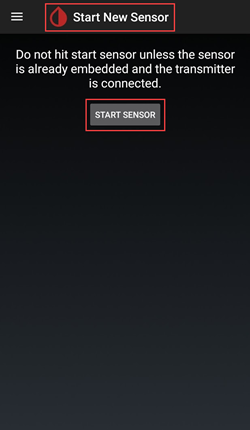
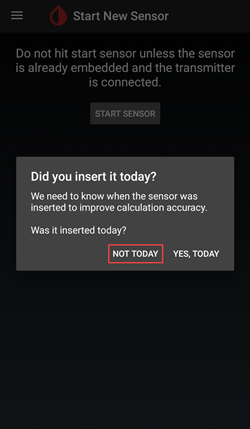
Шаг 7: подождите 60 секунд, и NFC снова просканирует датчик
Второе сканирование NFC необходимо для ДОБАВЛЕНИЯ датчика в качестве устройства Bluetooth, с которого xDrip + будет получать показания. После завершения вы увидите уведомление о запуске НОВОГО ДАТЧИКА. Появится диалоговое окно сбора начальных показаний, в котором отображаются выполненные и выполняемые шаги, а также оценки времени для завершения.
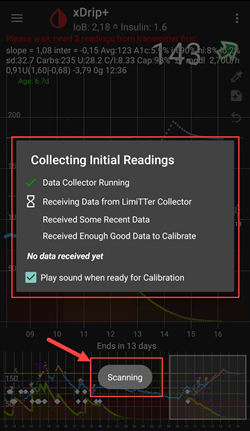
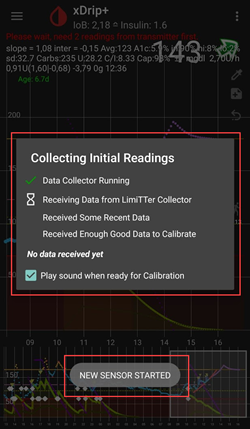
Период ожидания составляет 60 секунд, поскольку во время этого процесса датчик не может сканироваться чаще одного раза в минуту. Если датчик сканируется слишком рано, на обзорном экране xDrip отображается предупреждение «Не так быстро, подождите 60 секунд«.
Шаг 8: сбор данных от 3 до 15 минут
От 3 до 15 минут собирается достаточно данных (3 полных считывания) и калибруется датчик. Появится запрос на ввод начальной калибровки. Нажмите Калибровать, чтобы продолжить начальный процесс калибровки. Если вы все еще не получаете показания в это время, иногда помогает перезагрузить телефон.
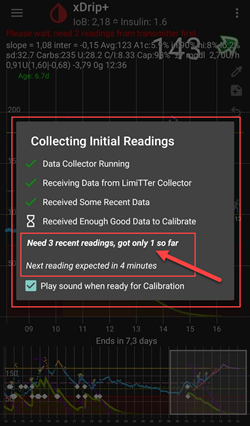
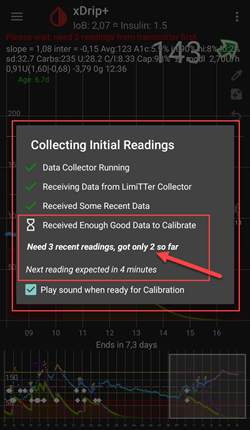
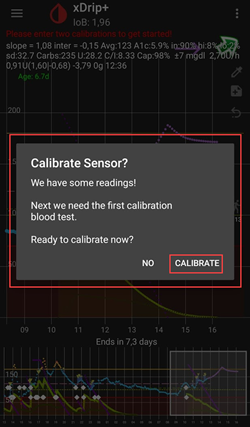
Шаг 9: Калибровка
Когда будет собрано достаточно данных для создания 3 полных показаний, вам будет предложено ввести начальную калибровку. Вы должны выполнить калибровку по фактическим показаниям уровня глюкозы в крови с помощью выбранного вами глюкометра. Если в xDrip+ включена опция двойной калибровки, необходимо будет снять 2 показания уровня глюкозы в крови. Введите каждый результат измерения уровня глюкозы в крови и нажмите ГОТОВО, когда закончите.
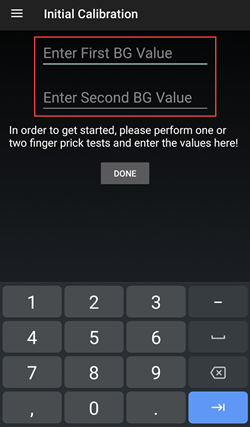
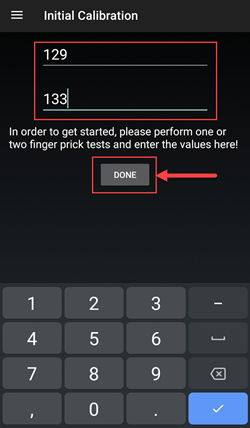
После ввода показаний ваш датчик Libre 2 теперь подключен к xDrip+ в качестве устройства Bluetooth и будет активно передавать показания с интервалом в 5 минут.
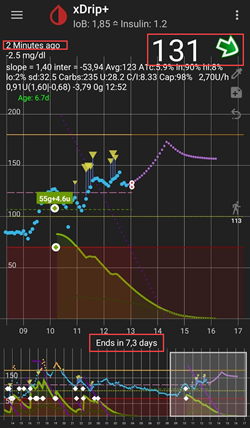
Данные активно собираются каждую минуту, и вы можете просмотреть их, нажав меню с 3 точками в правом верхнем углу экрана обзора xDrip + и выбрав Просмотр журнала событий.
Шаг 10: Убедитесь, что датчик подключен и передает данные
Нажмите Меню Настроек в левом верхнем углу экрана xDrip+ и выберите Состояние системы. На экране состояния системы в поле активное устройство Bluetooth: должно отображаться: Bluetooth Device: ABBOTTXXXXXXXXXXX, где XXX представляют серийный номер датчика. В поле Статус подключения отображается Подключено, а в поле Запуск датчика: отображается время запуска датчика.
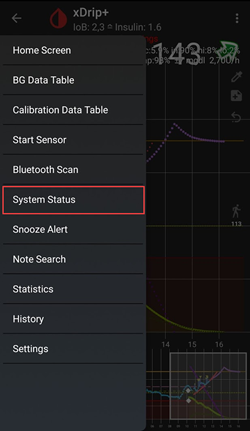
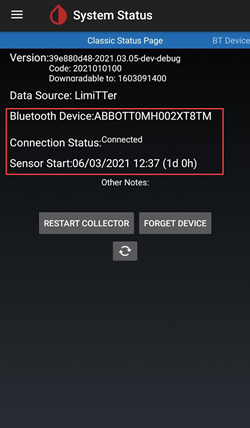
На экране устройства BT (проведите пальцем влево) вы можете проверить дополнительные сведения о подключении датчика, а также использовать этот экран для устранения неполадок в соединениях. Ниже приведен список полей и их назначение для помощи в устранении неполадок при подключении.
ПРИМЕЧАНИЕ: НЕ нажимайте на сопряжение по Bluetooth в этом окне, поскольку ваш датчик уже подключен или находится в процессе сопряжения и соединения. При этом будет предпринята попытка прямого сопряжения, и вам придется начинать процесс с шага 5 заново.
-
Настройки оптимизации заряда батареи: убедитесь, что вы ИСКЛЮЧИЛИ эти приложения из настроек оптимизации заряда батареи вашего телефона
-
xDrip+
-
ООР2
-
LibreLink
-
AndroidAPS (если вы его используете)
Недостатки
Вы не можете запускать LibreLink и xDrip + параллельно для чтения данных Bluetooth. LibreLink всегда будет пытаться «украсть» Bluetooth-соединение с датчиком и подключением. Если это произойдет, вы застряли с LibreLink до конца срока службы датчика.
Источник: https://www.minimallooper.com/