В представленном списке руководства для конкретной модели Фритюрницы — Tefal FR 4002 Magiclean 1000. Вы можете скачать инструкции к себе на компьютер или просмотреть онлайн на страницах сайта бесплатно или распечатать.
В случае если инструкция на русском не полная или нужна дополнительная информация по этому устройству, если вам нужны
дополнительные файлы: драйвера, дополнительное руководство пользователя (производители зачастую для каждого
продукта делают несколько различных документов технической помощи и руководств), свежая версия прошивки, то
вы можете задать вопрос администраторам или всем пользователям сайта, все постараются оперативно отреагировать
на ваш запрос и как можно быстрее помочь. Ваше устройство имеет характеристики:Объем масла: 2 л, Вместимость картофельных ломтиков: 1 кг, Съемная чаша: есть, Мощность: 1800 Вт, Управление: индикатор работы/нагрева, Таймер: есть, полные характеристики смотрите в следующей вкладке.
Для многих товаров, для работы с Tefal FR 4002 Magiclean 1000 могут понадобиться различные дополнительные файлы: драйвера, патчи, обновления, программы установки. Вы можете скачать онлайн эти файлы для конкретнй модели Tefal FR 4002 Magiclean 1000 или добавить свои для бесплатного скачивания другим посетителями.
Если вы не нашли файлов и документов для этой модели то можете посмотреть интсрукции для похожих товаров и моделей, так как они зачастую отличаются небольшим изменениями и взаимодополняемы.
Обязательно напишите несколько слов о преобретенном вами товаре, чтобы каждый мог ознакомиться с вашим отзывом или вопросом. Проявляйте активность что как можно бльше людей смогли узнать мнение настоящих людей которые уже пользовались Tefal FR 4002 Magiclean 1000.

Denis ᅠ
2018-10-07 15:34:19
Фритюрница Tefal Magiclean FR4002 уже два с половиной года живет на моей кухне. Это чудо отличный помощник, или даже палочка выручалочка, когда нужно быстро и много!
Светлана
2020-10-08 11:03:34
Пользуюсь фритюрницей Tefal Magiclean FR4002 недавно, очень нравится.Картошка фри, крылышки, бёдрышки получаются очень вкусными. Вместительная съёмная чаша, Удобно мыть, можно даже в посудомоечной машине.
Основные и самые важные характеристики модели собраны из надежных источников и по характеристикам можно найти похожие модели.
| Технические характеристики | |
| Объем масла | 2 л |
| Вместимость картофельных ломтиков | 1 кг |
| Съемная чаша | есть |
| Мощность | 1800 Вт |
| Управление | индикатор работы/нагрева |
| Таймер | есть |
| Фильтр против запаха | есть |
| Особенности | |
| Ненагревающийся корпус | есть |
| «Холодное дно» | нет |
| Смотровое окно | есть |
| Блокировка крышки | есть |
| Материал корпуса | пластик |
| Отсек для сетевого шнура | есть |
Здесь представлен список самых частых и распространенных поломок и неисправностей у Фритюрниц. Если у вас такая поломка то вам повезло, это типовая неисправность для Tefal FR 4002 Magiclean 1000 и вы можете задать вопрос о том как ее устранить и вам быстро ответят или же прочитайте в вопросах и ответах ниже.
| Название поломки | Описание поломки | Действие |
|---|---|---|
| Продукты Не Поджариваются До Нужного Состояния | ||
| Не Нагревается Масло | ||
| Температура Не Регулируется | ||
| Сломанная Кнопка Включения | ||
| Не Реагирует На Включение | ||
| Перегревается И Выключается | Фритюрница Перегревается,Хотя Температура Стоит Не Максимальная,И Защита Перегрева Постоянно Его Выключает До Тех Пор Пока Он Не Остынет |
В нашей базе сейчас зарегестрированно 18 353 сервиса в 513 города России, Беларусии, Казахстана и Украины.

РАДИО СЕРВИС
⭐
⭐
⭐
⭐
⭐
Адресс:
Ореховый бульвар, д. 111
Телефон:
74953918659
Сайт:
n/a
Время работы
Будни: с 1000 до 1900
Суббота: выходной
Воскресенье: выходной
RITMIX-SERVICE
⭐
⭐
⭐
⭐
⭐
Адресс:
Студеный проезд д. 12
Телефон:
74955450608
Сайт:
n/a
Время работы
Будни: с 1000 до 2000
Суббота: с 1100 до 1800
Воскресенье: с 1100 до 1800
PHILIPS
⭐
⭐
⭐
⭐
⭐
Адресс:
Люблинская, д.165
Телефон:
74999630148
Сайт:
n/a
Время работы
Время работы не указано
МУЛЬТИСЕРВИС
⭐
⭐
⭐
⭐
⭐
Адресс:
Переведеновский переулок д4 стр1
Телефон:
74992614839
Сайт:
n/a
Время работы
Будни: с 1000 до 1900
Суббота: выходной
Воскресенье: выходной
СЕРВИС СЛАИР
⭐
⭐
⭐
⭐
⭐
Адресс:
маршала федоренко д.7
Телефон:
79778029960
Сайт:
n/a
Время работы
Будни: с 1000 до 1800
Суббота: с 1000 до 1500
Воскресенье: выходной
- Manuals
- Brands
- TEFAL Manuals
- Fryer
- MAGICLEAN
- Manual
-
Contents
-
Table of Contents
-
Bookmarks
Quick Links
S.A. SEB SELONGEY CEDEX • RC. DIJON B 302 412 226 • REF. 5064552
Related Manuals for TEFAL MAGICLEAN
Summary of Contents for TEFAL MAGICLEAN
-
Page 1
S.A. SEB SELONGEY CEDEX • RC. DIJON B 302 412 226 • REF. 5064552… -
Page 2
www.groupeseb.com… -
Page 3: Table Of Contents
….. . .12 Helpline ……9 At the end of cooking time .
-
Page 5: Francais
• Avant la mise au rebut de votre friteuse, la pile de la minuterie doit être retirée par un Centre de Service Agréé. • Les centres services agrées reprendront vos appareils usagés afin de procéder à leur destruction dans le respect des règles de l’environnement.
-
Page 6: Avant La Première Utilisation
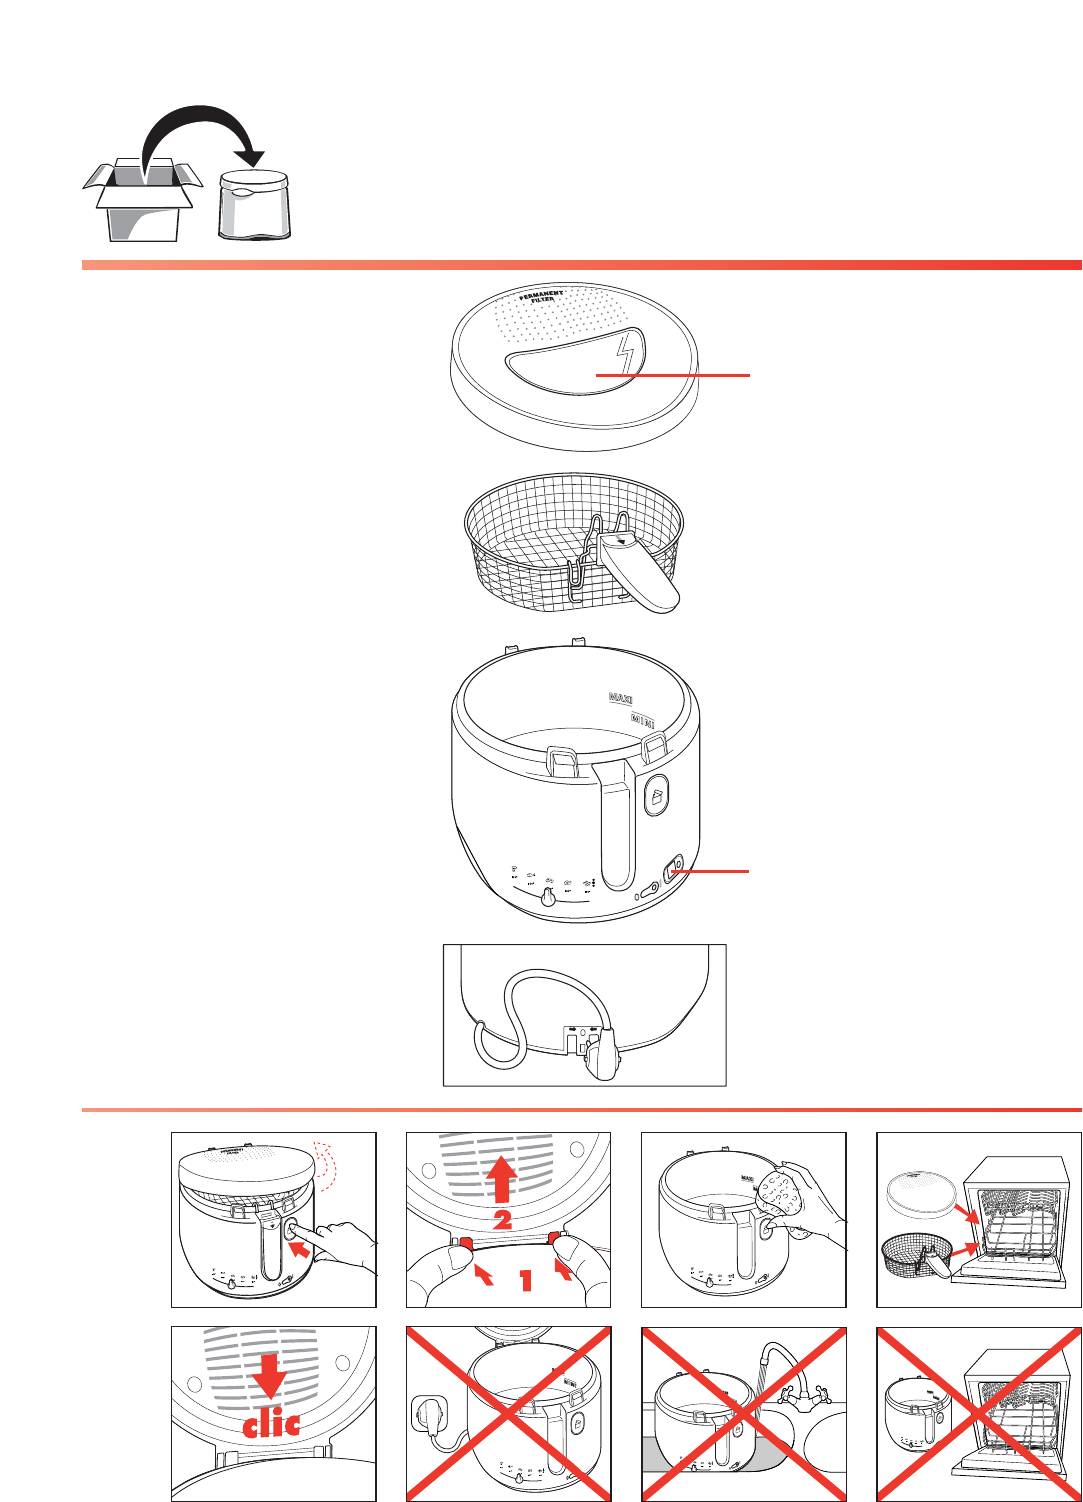
® , la cuve et le panier au lave-vaisselle • Nettoyez le corps avec une éponge et de l’eau savonneuse. Ne plongez jamais le corps de l’appareil dans l’eau. Replacez la cuve amovible et le couvercle • Positionnez la cuve, marquage mini/maxi ( ) vers l’arrière…
-
Page 7: Remplissez La Cuve
• Si vous utilisez une matière grasse solide : — Coupez-la en morceaux et faites-la fondre à part pour ensuite la verser dans la cuve (ne la faites jamais fondre dans le panier, ni dans la cuve). Ne mélangez pas différentes sortes de matières grasses.
-
Page 8: Préparez Le Panier
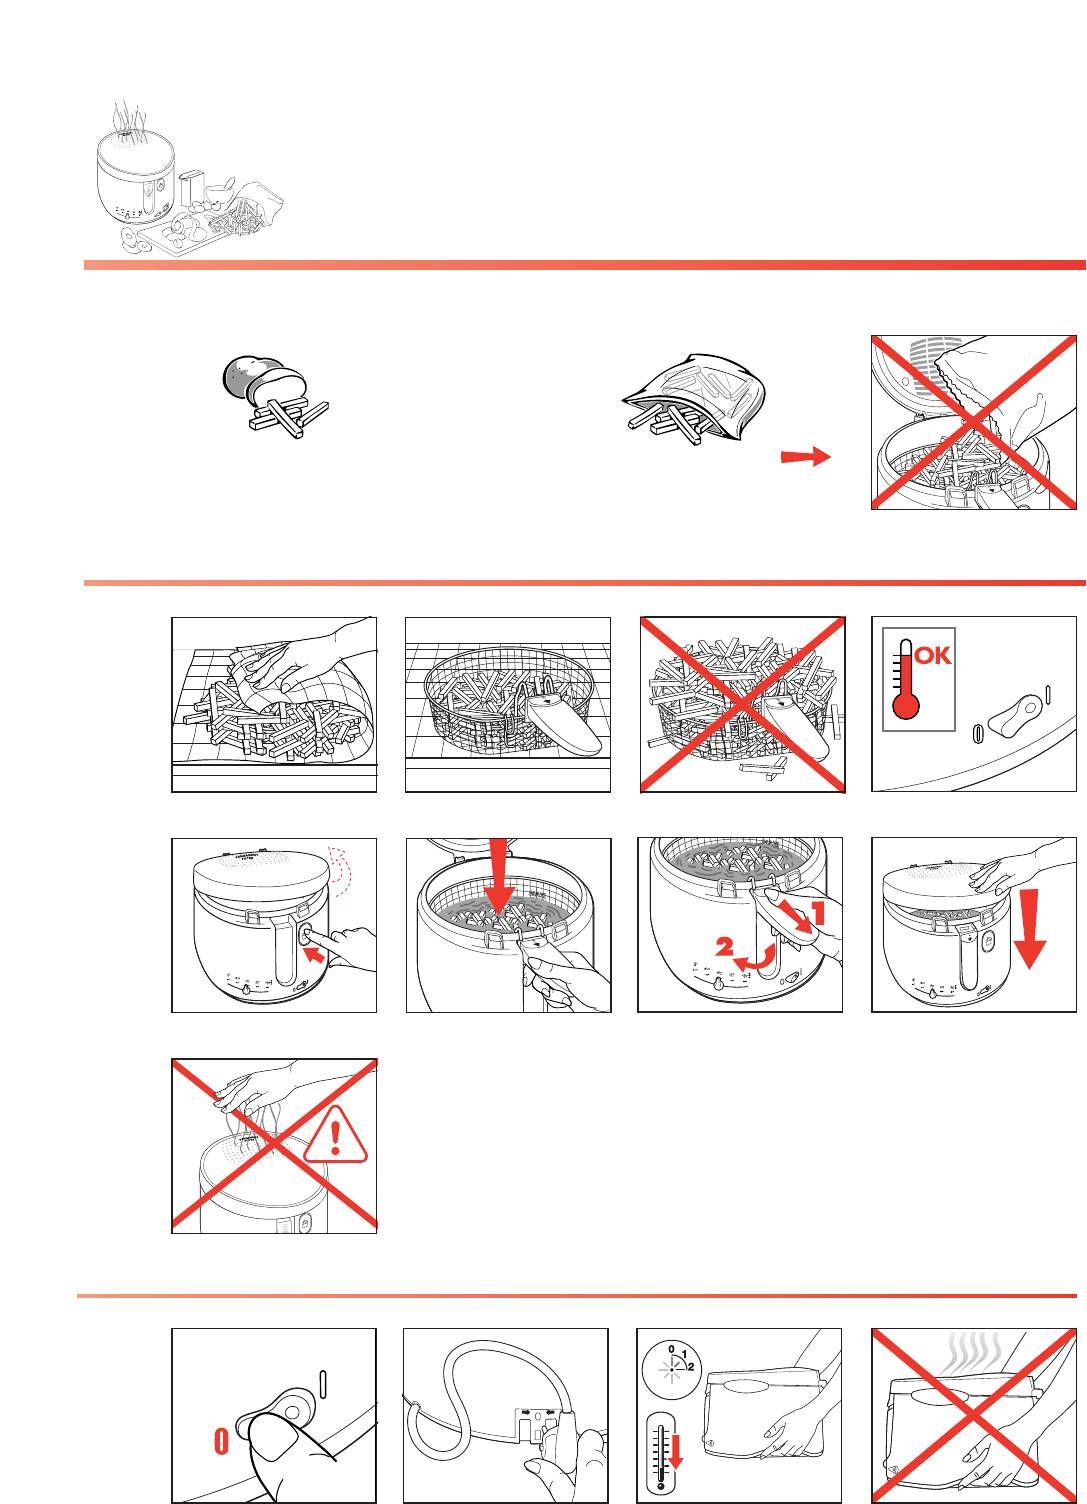
550 g 400 g Plongez le panier et réglez le minuteur • Mettez le panier rempli en place sur le bord de cuve et fermez le couvercle. • 15 minutes après la mise en marche, la matière grasse est chaude : appuyez sur le bouton de déverrouillage de la poignée et repliez-la doucement pour faire descendre…
-
Page 9: Tableaux De Cuisson
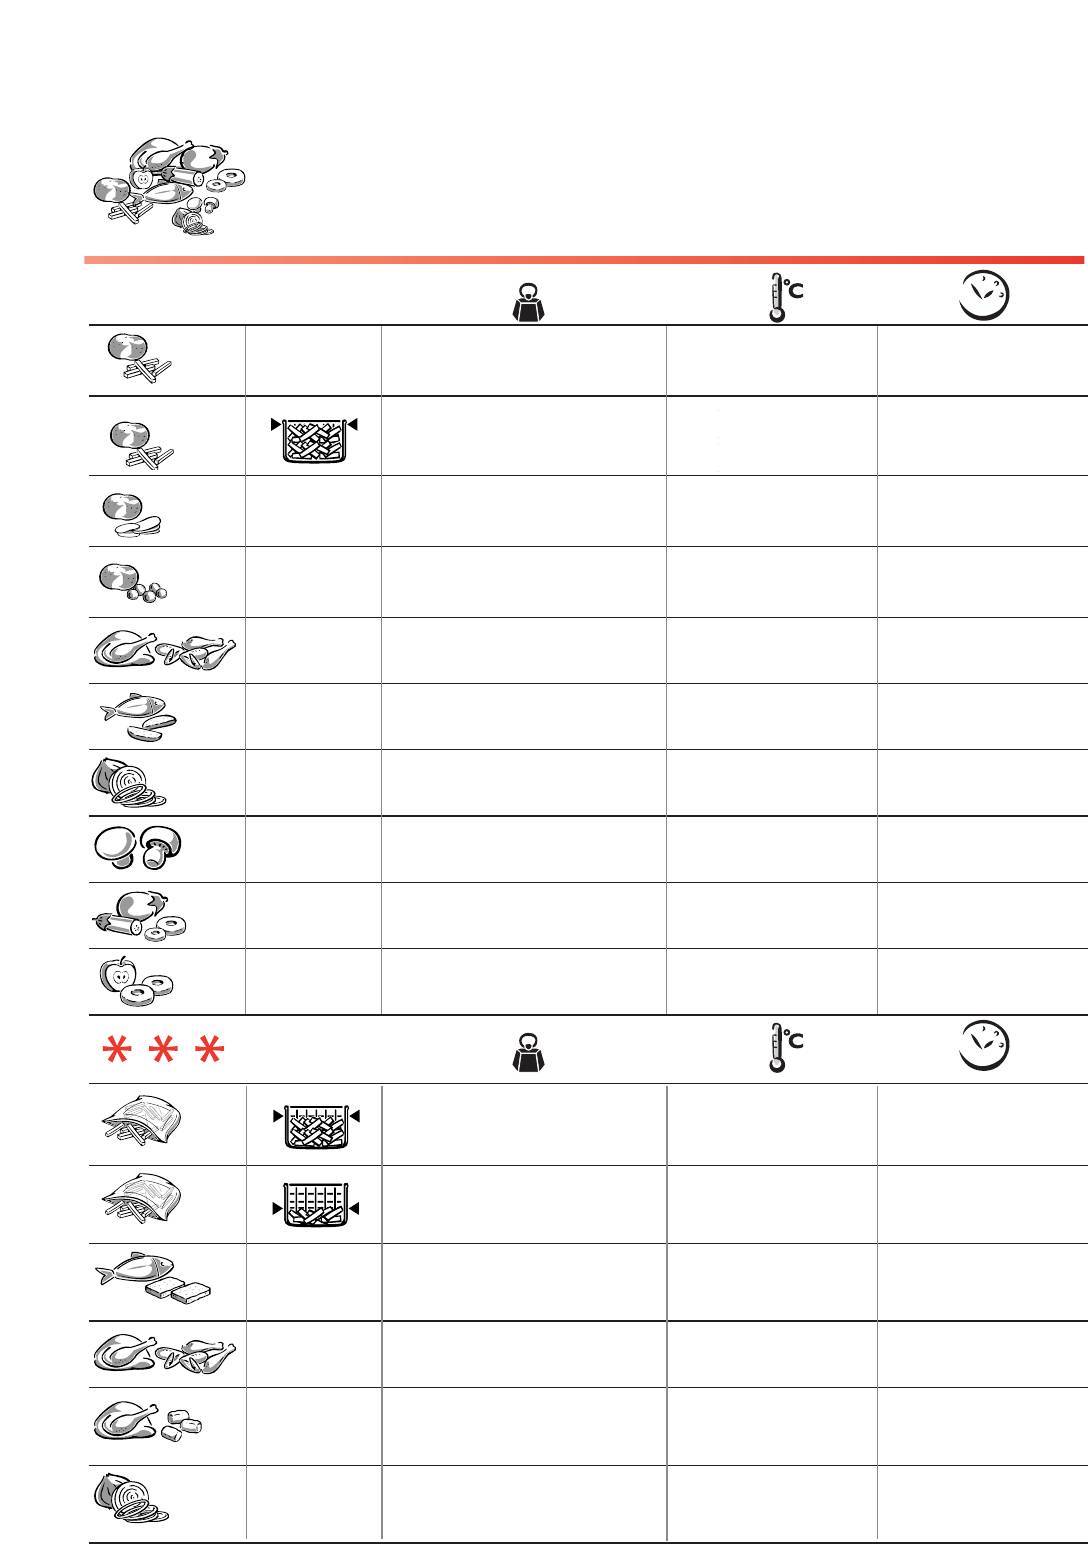
170°C +/- 3-4 min. +/- 3-4 min. Surveillez la cuisson et ne laissez pas brûler les aliments. Ne mangez pas les débris qui se détachent des aliments. Nous vous recommandons une alimentation variée et équilibrée, riche en légumes et fruits.
-
Page 10: Arrêtez L’appareil
à l’eau savonneuse. • Séchez-les bien avant de les remettre en place. • Nettoyez le corps de la friteuse avec une éponge humide et de l’eau savonneuse. Séchez soigneusement. Ne plongez jamais le corps de l’appareil dans l’eau, ne le passez pas sous le robinet.
-
Page 11: Problèmes Et Causes Possibles
• Faites-la changer au Centre de Service Agréé. • La pile est usagée. Si le problème persiste, consultez votre revendeur ou un Centre de Service Agréé. Toute intervention doit être effectuée uniquement par un Centre de Service Agréé avec des pièces détachées d’origine.
-
Page 12: English
• Your appliance has been designed to work for many years. However, when finally you decide to replace your deep fryer, do not forget to think of what you can do to help to protect the environment by disposing of it at your local waste disposal centre.
-
Page 13: Before Using For The First Time
You should never immerse the appliance in water. Replacing the removable bowl and the lid • When the lid, the bowl and the basket are thoroughly dry, place them back on the deep fryer. • Put the bowl with the Min/Max ( ) markers to the rear of the appliance.
-
Page 14: Filling The Bowl
• If you use solid vegetable fat: Cut it into pieces and melt it in a separate pan then pour it inside the fryer (do not let it melt in the basket , nor in the bowl). Do not mix different types of oil or fat.
-
Page 15: Loading The Basket
• For models with a timer: press the button to set the time, minute by minute. Release the button. The time displayed is selected and the countdown begins.
-
Page 16: Table Of Cooking Times
Cooks tip: When cooking battered foods or doughnuts, remove the wire basket to prevent food sticking to it. Take great care when handling the food and use tongs. Gradually place the food in the hot oil, submerging it an inch at a time to prevent it from sinking straight away.
-
Page 17: Switching Off The Deep Fryer
80 uses. For a maximum efficiency, remove the filter from the lid every ref. 983850 / 983863 3 to 4 uses, wash it with soapy water. Rinse and let it dry thoroughly before putting it back into place.
-
Page 18: Problem And Possible Causes
The timer no longer works (depending on model) • The battery is spent. If the problem remains, please call our Helpline below Any repairs must only be carried out by an approved Servicing Centre with the manufacturer’s own replacement parts. HELPLINE :…
-
Page 19: Nederlands
Bescherming van het milieu • Dit apparaat is ontworpen om vele jaren mee te gaan. Denk op het moment dat u een nieuw apparaat overweegt aan te schaffen aan de bijdrage die u kunt leveren aan een schoner milieu en gooi het oude apparaat nooit zomaar weg.
-
Page 20: Vóór Het Eerste Gebruik
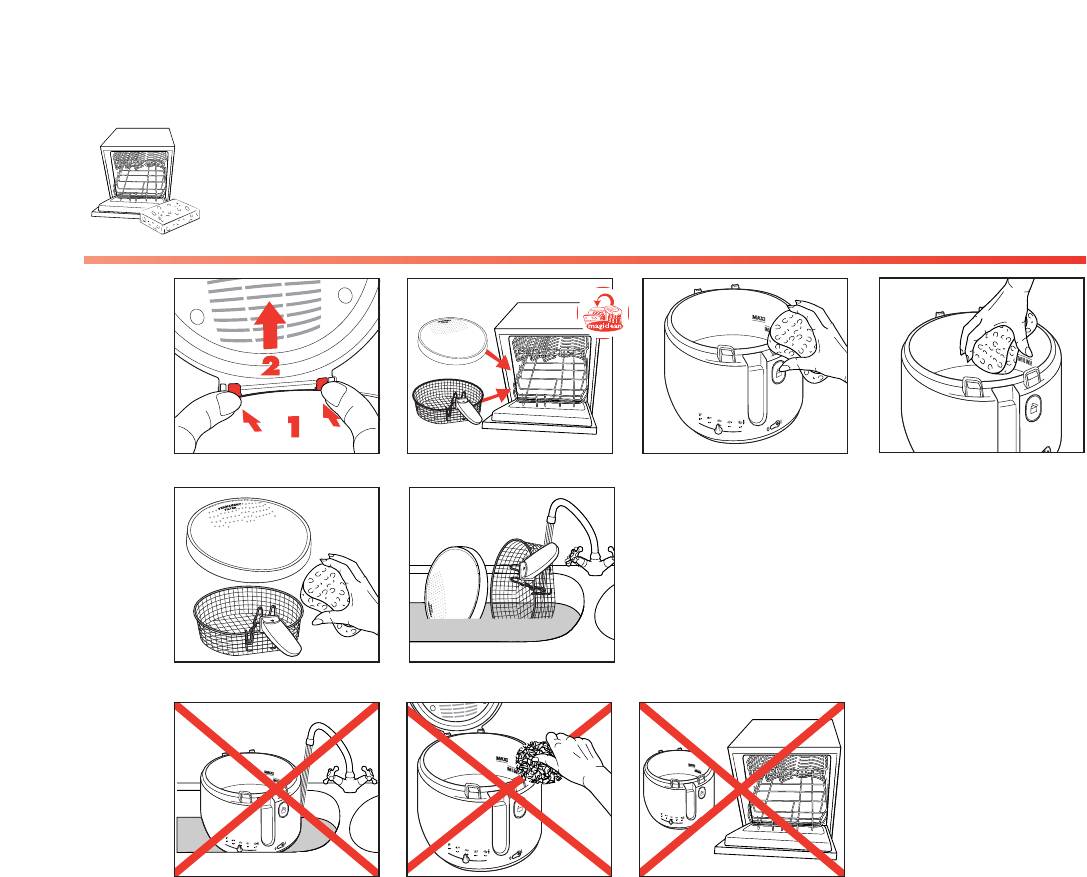
• Zet de deksel verticaal omhoog en haal hem eraf. • Maak het deksel met het carbonfilter, de binnenpan en het frituurmandje schoon in de vaatwasmachine. • Maak de behuizing van de friteuse schoon met een vochtige doek met afwasmiddel.
-
Page 21: Vullen Van De Binnenpan
(van dezelfde soort) nodig is. • Gebruikt u blokken frituurvet: — Snij deze dan vóór gebruik in kleinere stukken en plaats ze op de bodem van de binnenpan (nooit in het mandje). Nog veiliger is het om het vet apart in een steelpannetje te laten smelten.
-
Page 22: Vullen Van Het Frituurmandje
• Druk de toets in om de tijd per minuut in te stellen. Laat de toets los als de gewenste tijd in het venster verschijnt, de frituurtijd gaat nu in.
-
Page 23: Frituurtabellen
+/- 3-4 min. +/- 3-4 min. Eet de kruimels die van het voedsel zijn afgebroken niet op. Let tijdens het bakken op uw bereiding en laat het voedsel niet verbranden. Eet gezond en gevarieerd voedsel. Dit houdt in: veel groente en fruit!
-
Page 24: De Friteuse Uitzetten
De friteuse nooit verplaatsen met open deksel. Filteren van het frituurvet • U kunt de olie of het vet in de friteuse bewaren of in een daarvoor bestemde filterkan (art.nr. 982775). Losse onderdelen zijn direct te bestellen bij de afdeling onderdelen van het dichtstbijzijnde servicecentrum.
-
Page 25: Problemen En Mogelijke Oorzaken
• Laat de batterij vervangen bij een service dienst of technische dienst van de fabrikant. Mocht het probleem hiermee niet opgelost zijn, neem dan contact op met de consumentenservice. Reparaties mogen uitsluitend uitgevoerd worden door de technische dienst van de fabrikant met gebruikmaking van originele onderdelen.
-
Page 26: Deutsch
• Ihr Gerät wurde auf eine lange Haltbarkeit hin konzipiert. Sollten Sie dennoch Ihre Fritteuse ersetzen wollen, denken Sie daran, etwas zum Umweltschutz beizutragen. • Bevor Sie Ihre Fritteuse entsorgen, entfernen Sie bitte die Batterie des Timers (je nach Modell) oder beauftragen Sie eines unserer Vertrags-Service-Center damit.
-
Page 27: Vor Dem Ersten Gebrauch
Vor dem ersten Gebrauch • Öffnen Sie den Deckel durch Druck auf eine der beiden Öffnungstasten. • Heben Sie den Deckel an, um ihn zu entfernen. • Geben Sie den Deckel mit dem Waterclean ® anti-odour Filter, den Frittierbehälter und den Frittierkorb in die Spülmaschine •…
-
Page 28: Füllen Sie Den Frittierbehälter
Fettsorte auf. • Falls Sie feste Fette benutzen : — Schneiden Sie das Fett in kleine Stücke und schmelzen Sie es in einer separaten Pfanne. Geben Sie es danach in den Frittierbehälter (auf keinen Fall in dem Frittierbehälter oder in dem Frittierkorb das Fett schmelzen lassen).
-
Page 29: Vorbereitung Des Frittierkorbes
• Nach 15 min hat das Öl die gewünschte Temperatur erreicht: senken Sie den Frittierkorb. Hierzu drücken Sie den Entriegelungsknopf am Griff. • Klappen Sie langsam den Griff herunter bis er sich ganz in seinem Gehäuse befindet. Achtung : Halten Sie Ihre Hände nicht über die Filterkammer oder das Sichtfenster.
-
Page 30: Frittiertabelle
+/- 4-5 min. +/- 4-5 min. Zwiebelringe 170°C +/- 3-4 min. +/- 3-4 min. Essen Sie keine Stücke, die von dem Frittiergut abgebrochen sind. Überwachen Sie den Frittiervorgang und lassen Sie keine Nahrung anbrennen. Essen Sie zu Frittiertem viel Obst und Gemüse.
-
Page 31: Abschalten Des Gerätes
Fettmasse. Bewegen Sie die Fritteuse nicht, wenn der Deckel geöffnet ist. Filtern des Frittierfettes • Bewahren Sie das Fett entweder in der Fritteuse oder in einem separaten Gefäß im Kühlschrank auf (wird empfohlen, wenn Sie die Fritteuse selten benutzen).
-
Page 32: Probleme Und Mögliche Ursachen
• Lassen Sie sie in der Kundendienst-Werkstatt • Die Batterie ist verbraucht. auswechseln. Sollte das Problem bestehen bleiben, setzen Sie sich mit Ihrem Verkäufer oder dem Tefal- Kundendienst in Verbindung. Jede Reparatur darf nur von einem Tefal Vertrags-Kundendienst mit den Original-Ersatzteilen…
*
*
*
selon modèle, depending on model, je nach Modell, niet op alle modellen aanwezig, a seconda del modello, según modelo, conforme
o modelo, bazı modellerde, afhængig af model, beroende på modell, kun på noen modeller, mallista riippuen,
·Ó¿ÏÔÁ· Ì ÙÔ ÌÔÓÙ¤ÏÔ, в
зависимости от модели
, w zale˝noÊci od modelu, podle modelu, podl’a modelu, modelltŒl függŒen,
спорeд модeла
,
•ºV «∞Luœ¥q
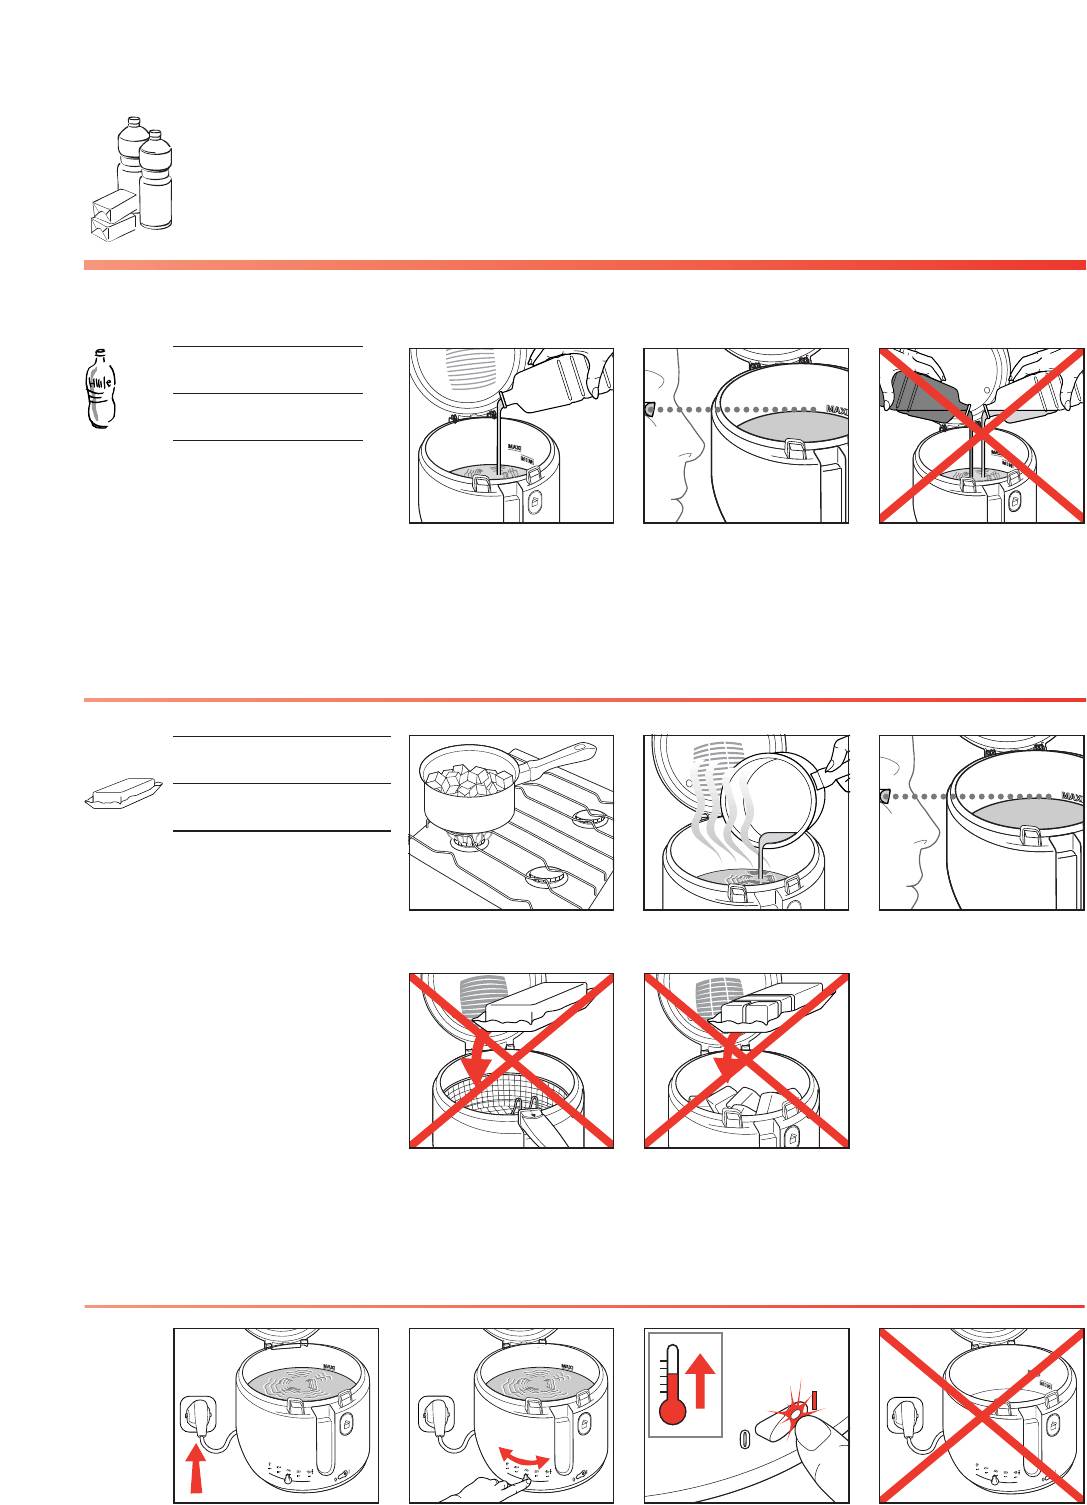
Min. 1.9 l
Max.2,1 l
Min. 1660 g
Max.1910 g
+/- 1000 / 1200 g
+/- 450 / 900 g
www.groupeseb.com
S.A. SEB SELONGEY CEDEX • RC. DIJON B 302 412 226 • REF. 5065061
GRINGOS PRODUCTION 3020
Nb
1000 g 190°C +/- 11 — 16 min.
1
170°C +/- 11 — 13 min.
1200 g
2
190°C +/- 8 — 10 min.
350/400 g 190°C +/- 6 — 7 min.
8 — 10 190°C +/- 9 — 10 min.
2 180°C +/- 14 — 16 min.
1 — 2 170°C +/- 6 — 8 min.
6 170°C +/- 3 — 4 min.
200 g
MINI +/- 5 — 7 min.
10 — 12 180°C +/- 11 — 13 min.
4 180°C +/- 5 — 6 min.
Nb
900 g 190°C +/- 12 — 14 min.
450 g 170°C +/- 9 — 13 min.
2 300 g 190°C +/- 5 — 7 min.
2 190°C +/- 14 — 15 min.
16 275 g 190°C +/- 4 — 5 min.
12 180 g 190°C +/- 3 — 4 min.

STEAM CUISINE 700 TURBO DIFFUSION
STEAM CUISINE 1000 TURBO DIFFUSION
GEBRUIKSAANWIJZING • INSTRUCTIONS FOR USE • BRUGSANVISNING
ANVÄNDNING • BRUKSANVISNING
INHOUDSOPGAVE
Beschrijving van het apparaat blz. 4
Onderhoud en schoonmaken blz. 7
Vóór het eerste gebruik
blz. 4
Stoomtijdentabellen
blz. 8
Gebruiksaanwijzing
blz. 4
Veiligheidsvoorschriften
blz. 11
CONTENTS
Description of the appliance P. 12
Cleaning and maintenance
P. 15
Before use
P. 12
Table of cooking times
P. 16
Instructions for use
P. 12
Safety instructions
P. 19
INDHOLDSFORTEGNELSE
Dampkogerens opbygning
s. 20
Inden du tager dampkogeren
i brug første gang
s. 20
Brugsanvisning
s. 20
Rengøring og vedligeholdelse s. 23
Oversigt over kogetider
s. 24
Sikkerhedsadvarsler
s. 27
INNEHÅLL
Ångkokarens olika delar
s. 28
Rengöring och underhåll
s. 31
Innan användning
s. 28
Tillagningstider
s. 32
Användning
s. 28
Säkerhetsföreskrifter
s. 35
INDHOLDSFORTEGNELSE
Beskrivelse av apparatet
s. 36
Rengjøring og vedlikehold
s. 39
Før første gangs bruk
s. 36
Tebell med koketider
s. 41
Brukerveiledning
s. 36
Sikkerhetsinstruksjoner
s. 44
STEAM CUSINE 700 TURBO DIFFUSION
STEAM CUSINE 1000 TURBO DIFFUSION
1
2
4
3
5
7
6
8
9
10
12
13
11
16
14
15
Your steam cooker
can be used to prepare excellent food,
with ease. It is ideal
for families who wish
to eat a healthy diet,
and can be used to
cook nutritious dishes
without any added
fats. This reduces the
calories and preserves
the vitamins. It may
be used to cook all
types of food : vegetables, fruit, fish,
meat, rice, etc.
Description of the appliance
1 Lid
2 Rice bowl
8 Juice collector with integral egg
holder
3 Separator (depending on model)
9 Openings for filling with water
4 Clip-on handle
10 Removable turbo ring
5 Large steam bowl (4 L) and removable grids with integral egg holder
(models 6162 and 6163)
11 Base / water reservoir (capacity
1 litre, lasts 1 hour)
6 Separator / juice tray
(depending on model)
13 Heating element
7 Small steam bowl (3 L) and removable grids with integral egg holder
(1 with model 6162 and 2 with model
6163)
15 Timer
12 Maximum level for filling
14 On indicator
16 Water level indicator
Before use
Read the instructions for use and follow
them carefully.
Unpacking the appliance.
• Remove the appliance from its packaging and unpack all the accessories.
Wash the lid, rice bowl, steam cooking
Instructions for use
1
▲
2
▲
▲
3
bowls, removable grids, Clip-on
handle, juice collector and separator /
juice tray (depending on the model)
with warm soapy water.
• Rinse and dry. Wash the water reservoir in the same way.
Operation
• Place the base of the appliance on a
stable surface, away from any objects
which could be damaged by steam.
• Put the turbo ring in position around the
heating element - Fig. 1
Filling the water reservoir
To fill the water reservoir, there are two
possible methods:
• Method 1: pour cold water into the
water reservoir through the filling openings until the maximum level is reached - Fig. 2
• Method 2: pour cold water directly into
the water reservoir and heating element
housing until the maximum level is reached - Fig. 3
Caution: never put any seasoning or liquid other than water into the water reservoir.
• Place the juice collector on the base
and check that it is level.
Caution: make sure you check that there
is water in the reservoir before switching on.
ENGLISH
▲
4
▲
5
▲
▲
6
7
Use of the various elements
Single bowl model
• Place the food in the bowl.
• If you wish to cook different types of
food at the same time, you can use the
food separator (depending on model).
Place it in the centre of the bowl - Fig. 4
Put the food into each compartment.
• Place the bowl onto the juice collector.
Model with more than one bowl.
The bowls and grids can be assembled in
any order.
• Place the food in the bowls. We recommend that you put the largest pieces of
food, requiring the longest cooking
time, in the lowest bowl.
• Place the bowls onto the juice collector.
Use of several steam bowls at the same
time
• It is possible to put different food items
in each bowl, but make sure that their
flavours complement each other.
• It is also possible (depending on
model) to put the juice tray / separator
between the bowls. This avoids mixing
the cooking juices from each bowl. In
this way you can cook different items
of food whilst conserving their flavour.
• If you are cooking food with different
cooking times, start cooking in the
lower bowl with the food requiring a
longer cooking time. When the timer
reaches the setting for cooking the food
which requires a shorter cooking time,
remove the lid using a cloth, and put
the higher bowl in position. Close and
continue cooking.
Use of removable grids - Fig. 5
• The bowls are fitted with removable
grids which increase the volume of the
cooking area and can be used to cook
large items of food (whole chickens,
kebabs, artichokes, lobsters, etc.
To put the grids in position - Fig. 6
• Take the grid the right way up (clip facing downwards).
• Place the grid in the bowl.
• Press in the clip area to clip-on onto the
bowl.
To remove the grids - Fig. 7
• To unclip the grid, press on the top from
the outside.
Caution: the bowl placed on the juice
collector must always have its grid fitted.
▲
8
▲
Use of the Clip-on handle.
The Clip-on handle has been specially designed so that food can easily be removed
from the bowl without damaging it. This
preserves the appearance of the food, for
better presentation (fish, asparagus, etc.).
• Place the grid right side up (with the
hooks underneath).
• Pick up the handle with the rounded
side uppermost.
• Grip the end of the handle - Fig. 8
• Insert the end into the cross on the grid
and release
• Repeat the operation on the other side.
Caution: The Clip-on handle can be
equally used in the bowls. However, the
bowl using a clip-on handle must necessarily be equipped with a lid.
Use of the rice bowl
• Place a bowl on the juice collector.
• Put one volume of rice and one and a
half volumes of water into the rice bowl
(maximum 300 grams of rice).
• Put the rice bowl into the steam bowl
- Fig. 9
• Place the lid on top.
Instructions for using your steamer
Thanks to its removable grid, your steamer adapts to every recipe. A pictogram
will help you assemble the different bowls
in the best way.
9
2 steaming bowls with grid
+ rice bowl
1 steaming bowl without grid
+ 1 steaming bowl with grid
1 steaming bowl with grid
1 steaming bowl with grid
+ rice bowl
Clip-it handle
Remember, however, that for all recipes
you will need:
10
2 steaming bowls with grid
the base with the juice collector
and the lid
▲
11
▲
Cooking eggs
To cook up to 6 eggs - Fig. 10
• Place the eggs directly into the juice
collector using the specially shaped
holders provided for this purpose.
• Place the lid on top.
To cook more than 6 eggs
• Use the steam bowls as well as the
juice collector.
• Put the eggs on the grids using the specially shaped holders provided for this
purpose.
• Place the lid on top.
Switching on
Caution: make sure that the appliance is
correctly assembled before use. Use
only the special containers designed for
the appliance.
• Plug in.
• Set the timer to the recommended cooking time.
• The on indicator lights up, and steam
cooking begins - Fig. 11
Caution: the appliance must be plugged
in before setting the timer, since the
timer operates even when the appliance
is not plugged in.
• When the cooking time is up, the timer
rings and the light goes out.
ENGLISH
▲
12
During cooking
• The water level indicator is used to
check on the level of water during cooking - Fig. 12
• The openings for filling have been designed so that the water can be topped
up at any time during cooking without
having to move the bowls.
Caution: for food which releases a lot of
water during cooking (e.g. frozen vegetables, asparagus, etc.) it may be necessary to empty the juice collector(s) during the cooking time.
When cooking is finished
• Remove the lid carefully. Avoid placing
face in direct contact with escaping
steam.
• To avoid food becoming overcooked,
remove the steam bowl using a cloth
and place it on a plate.
• If you used the rice bowl, remove it carefully by the handles.
• If you used the Clip-on handle, remove
the Clip-on handle and removable grid
carefully, using an oven glove.
Caution: before removing the juice collector, check that the whole appliance
has cooled down sufficiently.
• After use, unplug the appliance and
leave it to cool down completely before
putting it away.
Cleaning and maintenance
• Do not use abrasive cleaning products
or solvents.
Cleaning the base / water reservoir
• Do not immerse the base of the product
in water.
• Use a damp cloth.
• Wash the water reservoir with soapy
water.
• Clean the turbo ring, and the notch
which lets the water through, regularly.
• Empty the reservoir and refill the appliance with fresh water before each
use.
Cleaning the plastic accessories
• The steam bowls are easily cleaned,
thanks to their removable base.
• Do not clean the plastic bowls with the
scourer side of a sponge.
• Plastic accessories can be washed in
the dishwasher.
Descaling
After using the appliance 7 to 10 times,
scale may form on the heating element, depending on the hardness of the water used.
It is recommended to descale the appliance regularly, so that steam formation is not impeded, and also to prolong
the life of your appliance.
• Fill the water reservoir and the heating
element housing with a solution of half
water and half white vinegar to the
maximum level mark. Do not use other
descaling products.
• Plug in. The juice collector, juice tray /
separator (depending on model), turbo
Some recommendations
• If you so wish you can reduce cooking
times significantly by filling the reservoir with warm water, but note that cooking times given in the recipes are for
use with cold water.
• Do not pack food too tightly in the
steam bowls or rice bowl. Leave some
space for steam to circulate as much
as possible.
• The times indicated may vary depending on the size of pieces of food, the
space left between items, the quality of
food used and individual taste. Once
•
•
•
•
ring, steam bowls, lid and rice bowl are
not used during this operation.
Set the timer to 20-25 minutes. If the
vinegar solution boils over, stop the
timer and unplug the appliance.
When the timer rings, unplug the appliance and wait for it to cool down before emptying out the vinegar solution.
Rinse the reservoir with clear water several times.
Check that water flows correctly between the reservoir and the heating element housing.
you are familiar with the appliance, you
will be able to adjust these times. For
best results, use pieces of food of approximately the same size. If the pieces
are of different sizes, and need to be
put in layers, put the smallest pieces on
top.
• If you are steaming large quantities of
food, remove the lid halfway through
the cooking time, stir the food and put
the lid back on. Avoid placing face in direct contact with the steam.
• Use the juice collected in the juice accessory to make soups, sauces, etc.
Table of cooking times
Fish • Seafood
Food
CAUTION
When using the juice
tray separator, it is recommended to add
1 to 3 minutes to the
times shown.
Type
Quantity
Cooking
time
Recommendations
Shellfish
Fresh
250/400 g
8-10 min.
Cooking is finished
when the shells are
open
Prawns
Fresh
400 g
6 min.
Stir halfway through
cooking
Mussels
Fresh
400 g
8-10 min.
Stir halfway through
cooking
Saint-Jacques
Fresh
Flesh
400 g
10 min.
Stir halfway through
cooking
Lobster (tail)
Frozen
2 pieces,
400 g each
20-22 min.
Fish fillets
Frozen
Fresh
250 g
250 g
10-12 min.
6-8 min.
Tuna
Salmon
250/400 g
250/400 g
10-12 min.
12-14 min.
Fish steak
ENGLISH
Meat • Poultry
Food
Chicken
Sausages
Type
Quantity
Cooking
time
Boneless
fillets
Joints
250 g
12 - 15 min.
450 g
30 - 35 min.
Knackwurst
Frankfurters
400 g
400 g
10 min.
15 min.
Recommendations
Prick before cooking
Vegetables
Times are given as an
indication only. They
can be varied to suit
quantities used and
individual tastes.
Food
Type
Quantity
Cooking
time
Recommendations
Artichokes
Fresh
Asparagus
Fresh
Frozen
(green)
400 g
400 g
13-15 min. Cross over the asparagus
16-18 min. stalks to let the steam through
Broccoli
Fresh
Frozen
400 g
400 g
16-18 min.
15-18 min.
Cabbage (quarters) Fresh
400 g
40-45 min.
Carrots (sliced)
Fresh
400 g
20-22 min.
Cauliflower
Fresh
Frozen
400 g
400 g
16-18 min. Stir half-way through
18-20 min. cooking time
Brussels Sprouts
Frozen
400 g
20-22 min.
Mushrooms
Fresh
200 g
12-15 min.
Stir half-way through
cooking time
Courgettes
(sliced)
Fresh
400 g
16-18 min.
Stir half-way through
cooking time
Spinach
Fresh
Frozen
250 g
400 g
8-10 min. Stir half-way through
18-20 min. cooking time
French beans
Fresh
Frozen
400 g
400 g
35-40 min. Cross beans over to let
25-28 min. steam through
Haricot beans
Partly dried
400 g
45-50 min.
Peas
Fresh;
(podded)
Frozen
400 g
10-12 min. Stir half-way through
cooking time
15-18 min.
Potatoes
Fresh
3 medium
400 g
10-12 small
45-50 min. Cut off the base
20-22 min.
Stir half-way through
cooking time
Stir half-way through
cooking time
Rice • Cereals • Pasta
Food
Type
White
Rice
Brown
Quantity
(glass)
Quantity
of water
Cooking
time
200 g/2 pers.
300 g/3 pers.
200 g/2 pers.
300 ml
450 ml
300 ml
25 min.
35 min.
35 min.
Couscous
grains
Medium
grains
150 g/2 pers.
300 ml
5-6 min.
Pasta
Spaghetti
120 g/ 2 pers.
500 ml
18-20 min.
Others foods
Food
NOTE
Place the food in the
rice bowl. To avoid
the food getting too
moist, cover the top
of the rice bowl with
a sheet of aluminium
foil, so that moisture
from the lid goes into
the steam bowl and
not into the rice bowl.
Type
Eggs
Hard-boiled
Soft-boiled
Apples / Pears
Fresh
Quantity
Cooking
time
6
18 min.
10 min.
4 medium
15-18 min.
Recommendations
Reheating
Food
Meat
Type
Pieces
Quantity
Reheating
time
10-20 min.
Pasta
10-20 min.
Vegetables
5-15 min.
Recommendations
ENGLISH
Protect the environment
This appliance complies with current safety regulations and
conditions, and with
directives:
Electro-magnetic directive 89/336/EC
modified by Directive
93/68/EC
- Low Voltage
Directive 72/23/EC
modified by Directive
93/68/EC
Your appliance is designed for many years
use. However, when you decide to replace
your appliance, do not forget that you can
contribute towards protecting the environ-
ment. The approved service centres will
take your worn appliances so as to destroy them in accordance with the environmental rules.
Safety Instructions
• The safety of this appliance complies
with technical regulations and standards in force.
In these cases, the appliance must be
sent to the nearest approved after-sales
Service Centre, since special tools are
needed to carry out all repairs.
• Check that the voltage of the power
supply corresponds to that shown on • If the power supply cable is damaged,
it must be replaced by the manufactuthe appliance (alternating current only).
rer, approved service centre or a simi• Taking into account the diversity of
larly qualified person to avoid any danstandards in force, if the appliance is
ger.
used in a country other than that in
which it is purchased, get it checked by • Burns may be caused by touching the
hot surface of the appliance, the hot
an approved service agent.
water, steam or food.
• Do not place the appliance near a
source of heat: it could be badly dama- • Do not place the appliance near a wall
or cupboard. The steam produced may
ged. Do not put it into a hot oven.
cause damage.
• Use a stable work surface, away from
• To avoid burns, remove the lid gently,
keeping away from the inside of the lid
Never leave the appliance in use wiand letting the steam escape gradually.
thout supervision. Keep the appliance
• Do not touch the appliance when it is
out of the reach of children.
producing steam. Use a cloth to reDo not leave the cord hanging down.
move the lid, rice bowl and steam bowl.
Always plug the appliance into an ear• Do not touch food inside the steam cothed socket.
oker directly.
Do not unplug the appliance by pulling
• Do not move the appliance with hot lion the cord.
quid or food inside.
Always unplug the appliance:
• This appliance is designed for domes- immediately after use
tic use only. In the case of professional
- to move it
use, inappropriate use or failure to
- before cleaning or maintenance.
comply with the instructions, the maNever immerse the appliance in water !
nufacturer takes no responsibility and
Do not use the appliance if:
the guarantee does not apply.
- the appliance or the cord is damaged
- the appliance has been dropped or
fallen and appears damaged or does
not work properly.
water splashes.
•
•
•
•
•
•
•
S.A. SEB SELONGEY CEDEX • RC. DIJON B 302 412 226 • REF. 5060382
CONCEPTION GRAPHIQUE : AVANT PREMIÈRE / RÉALISATION : [email protected]
Страницы и текст этой инструкции
 Инструкция фритюрницы Tefal FF1000
 Информация отображена на картинке
 Информация отображена на картинке
 Информация отображена на картинке
 Информация отображена на картинке
Как использовать наш сайт инструкций OnlineManuals.ru
Наша цель состоит в том, чтобы предоставить вам быстрый доступ к содержанию инструкции для фритюрницы Tefal FF1000.
С помощью онлайн просмотра, Вы можете быстро просмотреть содержимое инструкции и найти решение проблемы с фритюрницы Tefal FF1000.
Для Вашего удобства
Если листать руководство пользователя фритюрницы Tefal FF1000 прямо на сайте, не очень удобно для Вас, есть два возможных решения:
• Просмотр в полноэкранном режиме — легко просмотреть руководство пользователя (без загрузки его на свой компьютер), Вы можете использовать режим полноэкранного просмотра.
Для просмотра инструкции пользователя фритюрницы Tefal FF1000 на полном экране, используйте кнопку «Открыть в Pdf-viewer».
• Загрузка на компьютер — Вы можете также скачать Инструкция фритюрницы Tefal FF1000 на свой компьютер и сохранить его в файлах.
Многие люди предпочитают читать документы не на экране, а в печатной версии.
Возможность печати руководства пользователя также была предусмотрена на нашем сайте,
и вы можете использовать ее, нажав на иконку «печать» в Pdf-viewer.
Нет необходимости печатать все руководство фритюрницы Tefal FF1000, можно выбрать только нужные страницы инструкции.