Beginners Guide + FAQ (work in progress)[]
Keys[]
— tab switches camera mode (First person = mode 1, moving camera = mode 2, fixed 3rd person camera = mode 3)
— b enters/exits the build mode
When in normal mode:[]
Keyboard:
— w/a/s/d moves your character in mode 1 and 3, and moves the camera in mode 2. The camera sticks on the relative position to your character when you switch from mode 2 to 3.
— space lets you jump. Keep it pressed to fly/hover your character.
— q lets you interact with different blocks when standing near and facing them, or let´s you switch between Land/water/flying mode of your vehicle when standing on a vehicle, but not near a usable block.
— t,g,z/y,h,u,j,i,k,l,o, move your vehicle (please look at the display, all buttons are listed there). Pressing the acceleration and deceleration button at the same time stops your vehicle.
— v opens a display with different information about your vehicle. Here you can also change various setups of your vehicle.
— y/z opens skill menu and inventory. Here you can add different weapons to your character and use skill points (which have no effect at the moment)
— m opens the map
— c opens the AI menu. Here you can switch the AI on your ships on and off.
— x opens the spawn menu for enemies (only in vehicle designer)
-o/p controlls spin/turn blocks and harpoons (winch them) under certain circumstances (not implemented fully yet)
mouse:
— first mouse button: Use item in your skillbar (press 1-9 to select the item after placing them in the item menu)
— second mouse button: use mellee attack (does 25 kinetic dmg)
— third mouse button: fires mounted guns which are in the selected fire group and can face where you are aiming (press caps lock to make the camera follow the last fired projectile /missile)
— mouse wheel selects firing group (default is «ALL»)
When in build mode:[]
(vehicle control is still in effect as in normal mode)
Keyboard:
— w/a/s/d moves the block marker relative to the direction you are facing
— space moves the marker up/ alt moves it down
— b exits the build mode
— e lets you open the block inventory. Select which block to built here.
— r replaces the currently selected block with the block your marker is resting on (useful for fast switching between two kinds of blocks)
— holding shift lets you replace an already placed block with the kind of block you have currently selected (instead of deleting that block)
— f starts autofill. To use this feature you have to first build a closed shape and then place the marker inside of that shape so that the marker is right beside one of the marginal(surrounding) blocks. THen press f. If this doesn´t work move the camera a bit as you have to look «inside» your shape.
— n places a symetric marker. Everything you build/erase on one side of the marker gets mirrored on the other side (does not work with spinning blocks, turrets or auto fill)
Mouse:
(this is for the standard building mode which cna be switched in the menu)
— First mouse button: places/removes a block at the position of the marker and moves the marker forward by one block (depending on where you look)
— second mouse button: places/removes a block at the position of the marker and moves the marker back by one block (depending on where you look)
-mouse wheel lets you zoom in and out from the marker (useful for building inside closed rooms)
Core mechanics/building your first vehicle[]
A simple raft[]
For your first steps use the vehicle designer. Here you have infinite resources to test the different game mechanics.
First of all you´ll have to create vehicle. To do that press B to enter the building mode, then E to open the inventory. Now click on the «constructables» tap on the left and select «vehicle». Now just move the marker somewhere with enough space and click. Congrats, you have just spawned your first vehicle.
But it is only a simple wood block now. We´re going to change that. Open the inventory again (E) and go to the «Blocks» tap and select the wood-block. Now move the marker next to the existing wood block (it should turn green) and click to add the block (or hold the mouse button to place a line of blocks). Try to create a platform that is 5 blocks wide and 10 blocks long. Notice that the arrow in your marker shows towards the front of your vehicle. This is important so the AI knows in which direction the propulsion should work. You can make the platform more stable by making it wider.
To make things faster you can press N with the marker over where the middle of your ship is supposed to be. This will place a small «wall» of particles. Everything you place on one side of the wall gets mirrored on the other side, making it easier to create symmetric ships. Another trick is the flood fill: Draw a closed shape with blocks in
any of the three planes, move the marker inside it and press F. The game will flood fill the shape with the selected block. Good for creating huge walls or floors.
Now that you have a good basis for your ship it´s time to add blocks with a function to it. Most of these will use energy, so first thing you should build is an engine which provides energy for the whole ship and all of its systems. To do that first place an engine block from the «engines» tab somewhere in the middle of our raft. This is the core of all engines. Next, place a «crank shaft» block right in front of it. These will connect the engine to the cylinders. Now place a cylinder next to the crank shaft and a carburettor next to the cylinder. Lastly place a «engines own full tank» next to the carburettor. Alternatively you can place a «fuel storage tank» from the resources tab anywhere on the ship. This is however less effective and will cause your engine to use more fuel. If you’ve done everything right the energy bar in the HUD (lower left corner, with a lightning bolt) should be filled and red instead of grey.
You can add further blocks to your engine to make it stronger and/or more fuel effective. For further instructions on how the blocks interact with each other read the tooltips in the building menu.
Now the boat need some kind of propulsion. For that select the «boat propeller» block from the «water» tab and place it at the end of your vehicle. Next place a boat rudder uner your ship. Place it at the end or it will be less effective. If you place it at the front your left/right controls will be reversed. Now place a vehicle controller from the «control» tab and you´re good to go! switch back to normal mode (press B) and move your avatar next to the controller. Make sure you are in boat control mode (press q till a sailing boat appears in the upper right corner of the HUD). Now you can control you ship using U/J/H/K. As you accelerate the energy bar should go down as your propeller is using energy created by the engine. If you have used a fuel storage (the kind you can place anywhere) instead of an engines fuel storage you can also see how much fuel you have left.
Important: Press ESC and click «Save vehicle». Once saved you can spawn the vehicle endlessly in designer mode by using «load vehicle» (vehicle will spawn in front of the current camera position). This is important so you can continue you work later.
Now experiment with different kinds of engines and propulsions and come back when you are ready for more. Next up will be weapons and turrets.
Weapons and turrets:[]
I won´t be discussing simple weapons here since I think everyone should be able to figure them out by themself. If a lot of people should be having problems with them I´ll add a guide for them but I don´t think that would be necessary.
Missiles:[]
First I´ll start with custom missiles since those are the easiest to set up. Note that I only will tell you how to get a simple one starting, not explain all parts in detail. All parts can be found under the Missiles/Torpedoes/Mines section of the building menu
First of all you´ll need a missile controller and a missile lauchpad. The launchpad should be facing the direction you want the missiles to fire. Notice that you can either place them directly next to each other or connect them with «Missile 6 way connector» blocks. Any add-ons are connected to these connector blocks, too (for example the «staggered fire addon»).
Then add «missile blocks» directly in front of the lauchpad. You can decide how big the missile is by placing a different number of these blocks. Each block has enough space for two missile components. When this is set up face the missile and press q (while outside build mode).
If you´ve done everything correctly a new menu should pop up with the missiles «body» appearing on the left and a list of components on the right. A working missile needs to have at least the following three components:
— thruster (rotor for torpedoes) (to make go anywhere)
— fuel tank (without it the thruster won´t work)
— a warhead (or it won´t do anything on impact)
A guided missile needs fins and a guiding system in addition to that.
To swap a component first select a component place on the left menu (the top ones are near the end of the missle while the button ones are the nose, so a guidance system needs to go into the most bottom one), then select the desired component on the right and click swap (you can also double click the component). If everything is set up correctly should should be able to fire the missile in the normal game now.
Frequently Asked Questions[]
Q. Are repair tentacles always on?
A. Yes, but you can set them to not repair other constructables in the «V» menu where you can tick it to stop repairing other constructables
Подробное руководство о том, как убедиться, что ваш автомобиль не ведет себя как камень.
Для начинающих и экспертов.
Введение
В игре есть 3 типа объектов:
— структуры, которые не двигаются, поэтому мы не рассматриваем их в этом руководстве
– крепости
— транспортные средства
Давайте избавимся от крепостей во вступлении: их единственный «двигатель» — турбина крепости. Вы используете либо ИИ с маневром крепости, либо контроллер крепости. Вам не нужно ничего настраивать. Крепостные турбины используют мощность двигателя. Чем дальше крепость от уровня моря, тем больше энергии они требуют. Чем больше масса, тем больше мощности требуется. Чем больше крепость турбин, тем они эффективнее. Если турбины вашей крепости разрядятся, крепость начнет получать урон.
Так что держите свою крепость на уровне моря и соизмеряйте мощность двигателя и количество турбин крепости с массой вашей крепости. Это все о крепостях, спасибо, что пришли на мой TED-выступление.
Остальная часть руководства посвящена транспортным средствам.
Основы
Центр масс.
Центр массы — это то место, где в среднем находится масса вашего автомобиля (это барицентр). Вы можете легко найти его в режиме сборки, это синяя матрица с надписью «Центр массы».
С этого момента вы можете абстрагировать свое транспортное средство как сферу с центром масс в ее центре.
Возможны 6 движений: 3 оси вращения и 3 оси тяги.
– вперед/назад (ось тяги), когда ваш автомобиль движется вперед и назад. Он создается тягой, совпадающей с центром масс позади или впереди него.
– Стрейф вправо и влево (ось тяги), когда ваш автомобиль движется вправо и влево. Он создается тягой, совпадающей с центром масс справа или слева от него.
— зависание вверх и вниз (ось тяги), когда ваш автомобиль движется вверх и вниз. Он создается тягой, совпадающей с центром массы ниже или выше него.
– рыскание вправо и влево (ось вращения), когда ваш автомобиль поворачивает вправо и влево. Он создается тягой, перпендикулярной центру масс в горизонтальной плоскости.
– наклон вверх и вниз (ось вращения), когда ваш автомобиль смотрит вверх и вниз. Он создается тягой, перпендикулярной центру масс в вертикальной плоскости (той, что делит аппарат на левую и правую).
– крен вправо и влево (ось вращения), когда ваш автомобиль наклоняется вправо и влево. Он создается тягой, перпендикулярной центру масс в вертикальной плоскости (той, что делит аппарат на переднюю и заднюю части).
Весь смысл движения в том, чтобы контролировать эти 6 осей, решать, что вы хотите с ними делать и как.
Толкать:
Тяга — это сила. Применительно к транспортному средству он создает ускорение. Ускорение = Тяга/Ма*с. Транспортному средству в два раза тяжелее потребуется в два раза больше тяги, чтобы иметь такое же ускорение. Итак, вот уже урок о том, как построить транспортное средство: уменьшение массы транспортного средства делает его более маневренным.
Гравитация: в FtD гравитация направлена вниз. Он останавливается на высоте около 1200 м и снова появляется на высоте 1800 м.
Плавучесть: плавучесть — это направленная вверх сила, приложенная к каждому подводному блоку. Это разница между весом блока и весом того же объема в воде. Он также работает с гелиевым насосом, но с воздухом.
Перетаскивание: это пока первая вещь, которую нужно немного уловить, так что будьте внимательны. Скорость вашего транспортного средства разделена на 3 компонента: компонент вперед/назад, компонент стрейфа и компонент зависания.
Сопротивление — это сила, приложенная к каждому из этих компонентов в отдельности, и вот как это работает: это сила, пропорциональная скорости этой оси И пропорциональная коэффициенту лобового сопротивления этого компонента. Коэффициент аэродинамического сопротивления определяет аэродинамическую форму вашего автомобиля и определяется блок за блоком. Некоторым блокам требуется зазор, чтобы применить их коэффициент сопротивления, иначе они будут применять полное сопротивление. Я называю лобовым сопротивлением лицо вашего автомобиля, которое попадает прямо в сопротивление. Но вот в чем тонкость: есть еще и боковое сопротивление, строго пропорциональное сечению бортов.
Что это означает: очень узкий, но очень длинный самолет будет испытывать сильное боковое сопротивление при движении вперед, а это означает, что ваш автомобиль также должен быть относительно коротким. Таким образом, вы должны соблюдать баланс между поперечным сечением вашего автомобиля и его длиной, чтобы максимально уменьшить его сопротивление.
Максимальная скорость:
Поскольку сопротивление пропорционально скорости, это означает, что максимальная скорость достигается, когда тяга больше не превышает сопротивления. Таким образом, максимальная скорость достигается, когда Thrust = Drag. Таким образом, чтобы увеличить максимальную скорость, вы должны либо увеличить тягу, либо уменьшить сопротивление, и оба они найдут новый баланс на более высокой скорости.
Максимальная скорость: Большинство движителей имеют значение максимальной скорости. Максимальная скорость — это скорость, после которой движитель теряет тягу. Таким образом, можно подняться выше этой максимальной скорости, но блок будет становиться все менее и менее мощным. Осторожно: это относится ко всем движителям, поэтому, если вы будете двигаться очень быстро и управлять осями вращения с помощью движителей, вы можете потерять контроль над этими осями (потому что блоки становятся слишком слабыми).
Силовые блоки
В этом разделе мы рассмотрим все различные блоки
Все двигательные блоки имеют ось прослушивания в своем меню. Не забывайте про их настройку, подробнее о них мы поговорим в разделе AI.
Дедиблейды/Гелиблейды:
Если поставить спинблок (установленный в непрерывном режиме) и поставить на него вертолетные лопасти, он называется ротором. Dediblade — это блоки, предназначенные для простого изготовления роторов, но отчасти они работают таким же образом. Чем длиннее лезвие, тем оно эффективнее. Dediblade/heliblades не требуют мощности двигателя для работы, но вы можете дать им немного мощности двигателя, чтобы сделать их сильнее. Существует настройка, при которой прилагаемое усилие всегда направлено вверх независимо от тангажа/крена автомобиля.
Паруса:
Ветер постоянен и зависит только от мира, в который вы загрузились. Квадратные паруса должны быть перпендикулярны ветру, а треугольные должны быть параллельны. Чем больше парус выровнен по ветру, тем прочнее парус. Паруса создают тягу только в том направлении, в котором они смотрят. Вы можете контролировать поверхность паруса, поместив блок лебедки на край паруса.
Паровые струи:
Паровые струи забирают пар из своей паровой системы и превращают его в тягу. Очень неэффективно. У них есть настройки шага / рыскания, чтобы настроить их.
Паровые пропеллеры:
Паровые пропеллеры получают кинетическую энергию от вала, к которому они подключены. Вы можете использовать блоки трансмиссии для повышения эффективности вала с поршневым приводом или использовать коленчатый вал, чтобы использовать мощность двигателя для приведения в действие парового гребного винта. Работает только в воде.
Заказные реактивные двигатели (CJE):
CJE и малые CJE работают одинаково. Они используют топливо и превращают его в тягу. Конструкция КРД изменяет его КПД и плотность тяги. Требовать, чтобы выхлоп был над водой.
Воздушные, гелиевые насосы и воздушные шары:
Да, насосы можно рассматривать как двигательные установки. Чем больше свободного объема вокруг них, тем они прочнее. Однако они прилагают свою силу только вверх за счет плавучести (поэтому работают только в воде и воздухе). Они не требуют никакой силы. Воздушные шары по сути такие же, но снаружи.
Крылья:
Крылья генерируют направленную вверх силу, пропорциональную скорости, с которой они движутся. У них есть настройка для снижения коэффициента силы.
Лопатки:
Они гребут. Я мало знаю о том, как именно они работают, но их можно использовать либо для перемещения корабля в стиле 19-го века, либо для изготовления подводных «реактивных» колес.
Стандартные пропеллеры, реактивные двигатели и ионные двигатели:
Все они потребляют мощность двигателя для работы. Пропеллеры работают только в воде, реактивные двигатели — в воздухе, а ионные двигатели — повсюду. У них есть настройки шага / рыскания, чтобы настроить их.
У этих силовых установок есть дополнительная особенность: их масштабный коэффициент увеличивается до х4 вместо х1. При х1 требуемая мощность масштабируется в х1. Но при x4 требуемая мощность масштабируется в x6 (что означает меньшую энергоэффективность). Значение по умолчанию — х4.
Поверхности управления
Эти блоки не могут генерировать тягу, но могут заставить ваш автомобиль вращаться.
Стандартные рули:
Вставьте сюда мем «Ты недооцениваешь мою силу». Большинство блоков хорошо воспитаны. Они либо имеют потолок, линейно масштабируются в зависимости от объема, предназначенного для них, либо масштабируются в зависимости от скорости транспортного средства. Ничего подобного со стандартными рулями. Они масштабируются линейно с массой транспортного средства, к которому они прикреплены. Ага. И, как объяснялось ранее, ускорение делится на ma*s. Это означает, что 3 руля на 25-миллионном материальном корабле будут иметь тот же эффект, что и 3 стандартных руля на вашем каноэ. Стандартные рули испорчены. Я бы посоветовал держать своих детей подальше от них, если вы хотите, чтобы ваши дети стали честными гражданами.
Пользовательские рули:
Пользовательские рули являются пассивными блоками. Вам нужно поместить их на блок вращения (повернуть на угол) и управлять этим блоком вращения с помощью оси прослушивания. Они не так эффективны, но выглядят лучше, чем стандартные рули.
Стандартные воздушные рули (элероны):
Вы ставите их, их эффект увеличивается со скоростью. Не забудьте правильно настроить их ось прослушивания и протестировать их.
Пользовательские поверхности управления воздушным движением:
Для каждой управляющей поверхности используется только 1 точка опоры, тогда все пассивные блоки прикрепляются к опоре.
Реактивные колеса:
К каждому объекту, который прикладывает силу к чему-либо, прилагается противоположная сила. Это работает с силами вращения. Таким образом, спинблок, который ускоряется влево, заставит транспортное средство ускоряться вправо. В FtD реактивные колеса упрощены: они прикладывают вращательную силу, пропорциональную их скорости вращения и массе (а не их ускорению, как это должно быть в реальной жизни). Таким образом, вы можете контролировать крен / тангаж / рыскание с помощью спинблоков с опережением. Поскольку они являются спинблоками, вы можете посвятить им мощность двигателя.
Огромным преимуществом является то, что реактивные колеса не требуют, чтобы ваш автомобиль двигался для работы.
Ранее я говорил о лопастях на реакционном колесе: если ваше лопастное реактивное колесо осесимметрично и полностью находится под водой, то оно будет создавать не тягу, а вращательное ускорение.
Управление и ИИ
Управление игроком:
Стулья позволяют вам телепортироваться к транспортному средству, поэтому используйте их.
Тогда вам нужен контроллер автомобиля. Что касается движения, то остальные контроллеры устарели.
Контроллеры транспортных средств имеют либо режим корабля, либо режим самолета, но это просто для удобства и не имеет значения с точки зрения механики.
Контроллер позволяет управлять осью прослушивания:
— первичный привод
– дополнительный диск (если включена настройка дополнительных дисков)
– третий диск (если включена настройка дополнительных дисков)
– разные оси A, B, C, D и E (если включена настройка разных осей)
— оси крена, рыскания и тангажа
— Стрейф и наведение оси
Контроллер не позволяет управлять осью вперед/назад!
3 диска — это значения, которыми вы можете управлять в диапазоне от -1 (-100%) до 1 (100%) и оставаться на этом уровне.
Однако, когда вы нажимаете клавишу, это отправляет либо -1, либо +1 на ось прослушивания. Поэтому, когда задействован контроль игрока, это либо -1, либо 0, либо +1.
— наведите курсор вверх и вниз: вниз -1 и вверх +1
— Стрейф вправо и влево: слева -1 и справа +1
— бросьте вправо и влево: слева -1 и справа +1
— шаг вверх и вниз: вниз -1 и вверх +1
— рыскание вправо и влево: влево -1 и вправо +1
Кроме того, вперед соответствует +1, а назад -1 по оси прослушивания вперед/назад.
Затем вы можете настроить подруливающие устройства/поверхности управления так, чтобы они реагировали на эти оси прослушивания. Поверхность двигателя/управления может реагировать на столько осей прослушивания, сколько вы хотите, но остерегайтесь быть когерентными. Например, направленное вверх подруливающее устройство в передней левой части вашего автомобиля может реагировать как на крен, так и на тангаж и зависание. И я действительно советую вам сделать это. Обратитесь к разделу «Основы», чтобы понять, как положение вашего подруливающего устройства говорит вам о том, что оно делает.
PID управления:
Наконец, чтобы помочь вам управлять своим кораблем, вы можете использовать Control PID. PID — это математические инструменты, которые принимают входное значение, сравнивают его с желаемым значением, а затем выводят значение, и они делают это сверхурочно. Это означает, что они могут выводить любое желаемое значение от -1 до 1, что дает им гораздо больше контроля и стабильности.
Например, вы можете указать управляющему PID проверить высоту над уровнем моря, сообщить ему, что вы хотите, чтобы это значение было равно 100 метрам, и дать ему управление осью прослушивания зависания. Он начнет контролировать систему.
Скорее всего, вы столкнетесь с колебаниями: циклами в движениях. Чтобы их исправить, у вас есть 3 настройки: усиление (насколько сильной вы хотите, чтобы была реакция ФИД), производная ошибка (насколько вы хотите, чтобы ФИД предвосхищал) и интегральное время (насколько глупой вы хотите, чтобы ваша система была). Всегда устанавливайте время интегрирования на 250 («Выкл»), время производной близко к длительности колебаний и, наконец, уменьшайте усиление до тех пор, пока колебания не прекратятся (в идеале между 0.01 и 0.1).
Почему я так категорически против интегрального времени: целочисленное целочисленное время вычисляет всю ошибку с момента появления вашего автомобиля. Это имеет смысл для промышленной машины, которая делает одно и то же 24/7. Это ничего не значит для машины, которая участвует в бою и в разное время может совершать самые разные действия.
ПИД-регуляторы действуют независимо от чего бы то ни было и могут быть отключены только вручную или с помощью автоматических выключателей.
AI:
Внутри ИИ есть два важных ИИ: поведение (какая тактика вашего автомобиля) и маневр (как движется ваш автомобиль). Здесь важен маневренный ИИ:
— танк/корабли: управляет только вперед/назад и осью рыскания, может управлять тангажем, если вы скажете это сделать в настройках
— Самолет: управление вперед/назад, рыскание, тангаж и крен. Разница между двумя ИИ заключается в том, что один использует крен для поворота, как самолеты IRL, а другой использует только ось прослушивания рыскания.
— крепость: уже покрыта
— наведение: контролирует все 6 осей по умолчанию
— 6-осевой: также контролирует все 6 осей по умолчанию, но я никогда не видел, чтобы это было лучше, чем наведение, поэтому вместо этого используйте наведение (если вы не знаете больше, чем я).
Эти ИИ не говорят вам, что делать, и вы должны видеть в них механику, а не «личность» автомобиля. Например, вы, вероятно, захотите использовать ИИ кораблей/танков на дирижабле, и позволить PID-управлению обрабатывать «Hover». Это позволит вам взять на себя ручное управление дирижаблем, не разбив дирижабль о воду.
Подводные лодки используют либо самолет, либо искусственный интеллект с зависанием.
У ИИ есть слабость: они могут выводить только -1 и +1, как контроллеры. Чтобы это исправить, вы можете дать им AI PID. Не забудьте их активировать и настроить.
Теперь, со всем, что я здесь объяснил, вы должны быть в состоянии заставить двигаться все, что хотите, так, как хотите. В последнем разделе мы рассмотрим более совершенные двигательные установки.
Спинблоки:
Если хотите, можете поставить двигатели на спинблоки. Игроки называют их либо «азиподами» для пропеллеров (как на миниатюре), либо «тент-роторами» для дедиблейдов. Это означает, что вы можете контролировать направление, в котором они смотрят (или даже их местоположение в машине, если вы безумны, как я). Чтобы управлять этими вращающимися блоками, вы можете использовать оси прослушивания. Или лучше, вы можете использовать макетные платы. Или, что еще лучше, вы можете использовать LUA.
Макеты:
Макеты могут делать много вещей и могут иметь свое собственное руководство и, вероятно, иметь какое-то, но здесь мы рассмотрим их только для продвижения и создадим базовое руководство.
Во входах вы можете выбрать силовую установку. Этот блок дает вам выбор между 6 основными осями прослушивания, 3 приводами и 5 разными осями. Поместите Inputs слева от экрана макета.
Затем посередине можно поставить операторов. Двумя наиболее важными, на мой взгляд, являются оператор PID и математический оператор (тот, который позволяет вам вводить любую формулу, вы можете делать с ним все, что хотите).
Затем слева можно поставить Outputs, в нашем случае Propulsion. Остерегайтесь, поля Input и Output Propulsion не совпадают, поэтому используйте правильный.
Затем соедините все коробки между собой по мере необходимости.
При этом вы можете создавать свои собственные ИИ. Вы можете управлять Spinblocks с помощью осей прослушивания движения.
ЛУА:
Поле LUA — это блок, который позволяет вводить код LUA. LUA — это простой язык программирования, поэтому поищите в Интернете, как программировать на нем. Вместе с ним идет библиотека функций, связанных с FtD. Многие устарели из-за обновлений.
Тем не менее, с помощью нескольких трюков можно управлять двигателем и блоками вращения с помощью блока LUA, и это позволяет делать довольно безумные вещи. LUA может считывать имена отдельных блоков, а это значит, что LUA может делать со спин-блоками и двигательными блоками все, что угодно, без ограничений по количеству.
LUA, который автоматически настраивает все ваши двигатели (не мной): https://steamcommunity.com/sharedfiles/filedetails/?id=2429730986 – [steamcommunity.com]
Мой мод двигательных установок (полные 3D реактивные колеса, система с 4 двигателями, подобная дронам, и уникальная система с 2 двигателями): https://steamcommunity.com/sharedfiles/filedetails/?id=2499162748 – [steamcommunity.com]
Это все о From The Depths — Fundamental Guide + LUA Protocol; Надеюсь, вам понравится читать Руководство! Если вы считаете, что мы должны добавить больше информации или мы забываем/ошибаемся, сообщите нам об этом в комментариях ниже, и спасибо! До скорой встречи!
Рекомендуется для вас:
- Все Из глубины Список сообщений

This guide will be focused on helping you to maximize the potential of your particle cannons. We will be covering how to optimize each of the settings and how to best build the cannon for different applications. I will be covering the ranged component of PACs and not the melee mode.
Contents
- Particle Accelerator Cannon In-depth Breakdown
- PAC Ups and Downs
- Usage
- Tips For Building
- Damage Types
- Horizontal -> Vertical focus
- Field of Fire
- Damage & Inaccuracy
- Damage and Attenuation
- Efficient -> Overclock
- Charge Time
Particle Accelerator Cannon In-depth Breakdown
PAC Ups and Downs
PACs are one of the most under-appreciated weapon types in From The Depths.
Particle Cannons feature:
- Hit Scan Projectile types.
- No ammo cost.
- Immense damage potential.
- Excellent EMP.
- Impact damage.
- Easy changes in dmg type.
- No dmg or speed loss in water.
Unfortunately, PACs also:
- Have limited dmg potential at long range.
- Use an unbelievable amount of energy.
- Can be awkward to build.
- Can be bulky.
- Can be hard to protect.
Usage
Do you have to hit something underwater? Are you underwater? Are you super close to a target that needs to be ripped in half? Is your target moving super fast? Do you want to put a small hole in something 5k away? Do you have more energy than you know what to do with? If you answered yes to any of these questions a PAC may be right for you!
Due to PACs not be affected by water they are the best alternative to missile systems for submarines. Also due to this PACs can be very effective for killing subs.

Particle Cannons can be the most powerful weapons in the game provided that you are close enough due to both accuracy and attenuation which we will cover more below.
This was one shot from a cannon consisting of 13 pieces!
Finally, due to the hitscan nature of PACs they can be even better than lasers, missiles, and AA guns at taking out fast erratic targets such as small aircraft.
The PAC’s main aperture can be rather accurate piercing typically doesn’t require as much power making this a viable sniper.
Despite the potential targets it’s important to note that PACs can usually only be used on large purpose-built ships due to the obscene energy cost to fire.

Tips For Building
Particle cannons are relatively straight forward to build. There is an in-game guide for that but I will be talking about a few things to make building them easier and optimize their damage potential.
Building
- To start off you should plan the exact size and shape of the cannon such as a circle or rectangle.
- You should often try to get some rotational symmetry as it will make your life much easier and you can copy part and rotate it.
- snaking back and forth in layers can also be helpful for larger designs.
Optimizing
- Every pipe added will increase damage, size, and energy usage as well as efficiency.
- Ex. A cannon with one pipe can do up to 20000 dmg for 20000 energy but a cannon with 2 pipes can also do 20000 dmg but for only 10000 energy.
There are three types of pipes:
- Two way.
- Returning.
- Secondary firing piece.
Returning pipes almost double the essential pipe length when compared to two-way pipes and since more pipe length is always better you should try to always use returning pipes instead of two-way.
Secondary firing piece arms will do half the damage for half the energy of a two-way pipe of the same length. Ex. a two-way arm of length 7 can do 140000 damage for 140000 energy while a secondary firing arm of length 7 can do 70000 damage (despite the UI saying 35000) for 70000 energy.
Summary
Use returning pipes and rotational symmetry whenever possible.
Damage Types
Piercing
Piercing will put a 1 block wide hole through the entirety of a ship.
This option normally isn’t super helpful but it can be ok at long ranges and it can be a very low power option compared to the others.
Explosive Shock
Essentially this option is where a very powerful 5m explosion will take place on the surface of the ship and can be very powerful and damaging but is weakened due to armor stacking and spaced armor.
EMP
PACs can have the most powerful emp blast in the game often gutting smaller ships in one shot. This is also a very good option for taking out aircraft or capturing a nearby vessel without having to go and find and kill the AI yourself.
Impact
This option is typically my goto since it can create a massive hole in an enemy. Impact ignores armor stacking but is weaker against alloy, metal, and heavy armor due to impact only having an AP value of 15.
Horizontal -> Vertical focus
The Horizontal -> Vertical focus setting allows you to turn your circular dispersion pattern into an oval.
A value of 0 will result in a tall and skinny oval.
A value of 1 will result in a long and short oval. This can be good when fighting surface ships because in a broadside a horizontal miss is more likely to hit then a vertical one.
Field of Fire
- This setting will prevent the gun from firing at large angles but otherwise has no effect.
- This can be useful because when firing at large angles the gun losses accuracy.
- If your cannon is on a 2-axis turret use a 3-degree FOF.
- If your cannon is on a 1 axis turret determine how high a target will be from the axis of rotation and use that.
- Lastly, if your cannon is spinal mounted determine your cannon’s angle relative to the target in a broadside then maybe add a few degrees and use that.
Damage & Inaccuracy
The concept of this setting is pretty self-explanatory.
If you have a charge time of 0.25 seconds and a Damage & Inaccuracy of 0.25 you will start to see some spread around 250m. There is a linear relationship between damage and distance before spread and Damage & Inaccuracy, thus if you bring Damage & Inaccuracy up to 0.5 you will double your damage but the spread will start around 125m.
Now this leaves us with some options. If the target is close we could set the Damage & Inaccuracy high the maximize the damage or we could set it low to hit certain parts of the ship but with less power.
Something to also note is that dispersion and accuracy are far worse on secondary firing arms.
This is the overall shape of the beam:

Damage and Attenuation
This one is all numbers. Low Damage and Attenuation means low damage but low fall off while high Damage and Attenuation means high damage and quick fall off.
What this looks like:

- r is the range set to 1600m.
- d is the potential damage set to 1000.
- The y-axis is damage and the x-axis is damage and attenuation.
- The green line shows the initial damage for every damage and attenuation.
- The red line shows the damage at the specified range for every damage and attenuation.
- And the black line is the derivative of the red line showing the slope of the red line and the maximum when it reaches 0.
Lastly, the point where the black line reaches 0 is calculated by 1000/r. Thus at 1km or less use a Damage and Attenuation of 1 and for more than a km use 1000/r.
- Here is the link to the graphs.
Efficient -> Overclock
This is also pretty straight forward where smaller numbers mean smaller damage and smaller energy usage. This is used so that you can still have a very powerful gun without having to make it bigger than your ship. What this does is it lets you balance size vs energy.
Charge Time
This won’t affect your DPS or energy use but it will affect your fire rate and accuracy.
I recommend normally setting this to 10 because it will drastically improve your accuracy and allow you to do more damage at the start of the battle. Sometimes setting it lower can be good against multiple or small targets or fast targets so you don’t waste energy.
A comprehensive look at the basics of waterborne shipbuilding, covering such topics as: hull design, propulsion techniques, weight distribution, stabilization techniques, and completing a basic ship.
The Most Important Piece of Advice
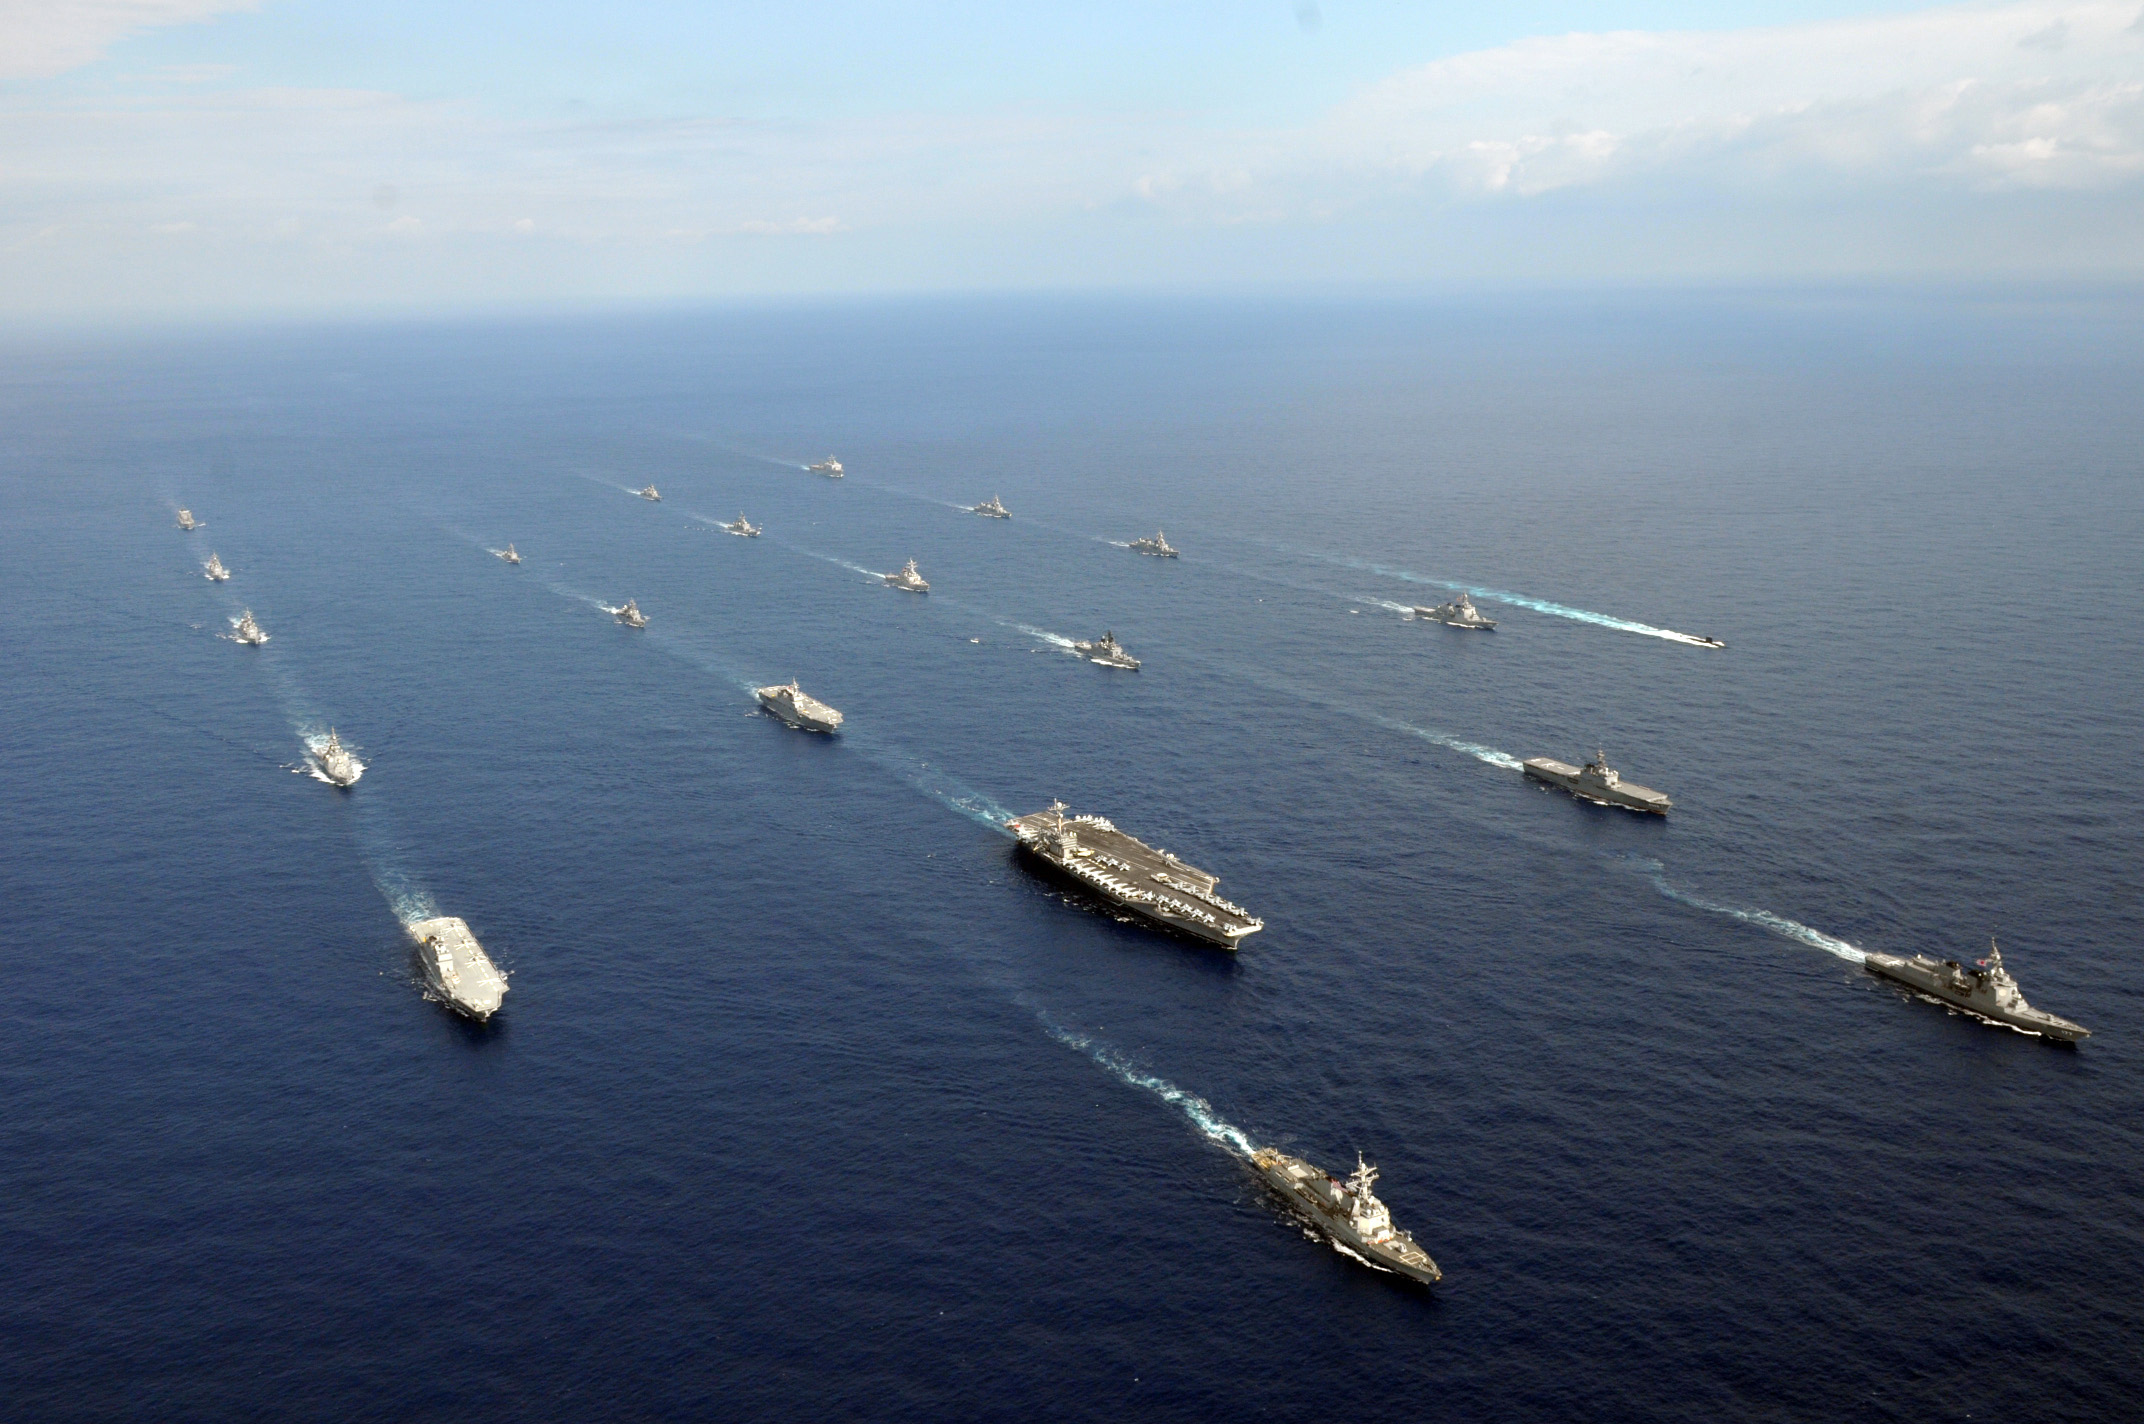
Left: Megawatt-Class stock vessel of the Lightning Hoods faction.
Above all else, the most critical thing to remember when playing From the Depths is to have fun. A handful of players will scoff at the wackier designs that couldn’t possibly work in real life; another handful will yawn at the designs that attempt to painstakingly replicate reality. The only person who needs to be amazed by the vehicle you’ve created is yourself. Take every technical and aesthetic detail I offer with a pinch of salt, understanding that I learned this game doing things one way, and you could very well do things another with just as much – if not more – success. The main purpose of this guide is to provide building-block techniques and adequate comprehension of ship design.
This guide will, in some places, get far too technical and specific for the average player’s patience. If you feel you would have more fun experimenting and failing until you get it right, I recommend you do so. One of the greatest parts of the game is being horrible at it, but slowly becoming better because of your own efforts. If you are struggling or don’t know where to start, or you are an experienced player looking for a refresher, this is the place for you. Basics will be covered, aesthetic design choices may be suggested, but you should by no means lock yourself in to whatever this guide teaches you.
If you have any questions, please feel free to comment and I’d be more than happy to help out.
Ship Functionality and Requirements
In From the Depths, ships can serve a vaguely large number of functions. All vessels must pass a few observational tests in order to be correctly classified as a ship for the purposes of this guide:
- Waterborne. The ship is destined to rule the waves – not the skies, not the depths of the seas, but the surface of the water. A ship explicitly lacks aerial [plane / airship / thrustercraft / helicopter / airborne installation] and submersible [submarine] capabilities.
- Mobile. The ship has its own fuel, engine, and / or other means of propulsion. If mobility is not met, the ship is a floating fortress [waterborne installation], subject to the whims of the waves and other ships which happen to bump into it.
- Maneuverable. The ship is capable of completing turns, rather than simply moving forward and backward. This can be achieved with the use of a rudder, means of lateral thrust [sideways-facing propellers], or clever paddle maneuvering.
- Capable. The waterborne ship is not only mobile and maneuverable, but is capable in these ways. This means that, when stationary, when at any speed achievable by the ship’s propulsion systems, and when undergoing any extremity of turns made possible by the ship’s maneuver systems, the ship retains its composure on the waves, meaning it doesn’t capsize or otherwise become incapable of passing the first three tests as a result of any of these conditions.
In effect, we can therefore define a ship in From the Depths as a waterborne, mobile, maneuverable vessel, capable of these basic functionalities under any normal conditions.
Fun fact: One of these is a ship, and one of these is not a ship.
While these conditions seem straightforward and obvious, it is often difficult for new and experienced players alike to keep their shitp together when trying to achieve these basic requirements. Designing the cannon that will spearhead your main battlefleet’s flagship is perhaps more glamorous than counterbalancing a back-heavy frigate, but that cannon will have no platform from which to fire if there isn’t a ship in your fleet that can carry it.
Purposes of Ships
DISLCAIMER – This section will not help you become better at building a ship. Why is it in the Beginner’s Guide to Shipbuilding? To many players, this kind of information is both immersive and useful for a deeper understanding, which can provide the motivation to build, but not necessarily the means. Enjoy!
Purposes
In most cases, there is more to a ship than simply meeting its functionality. The purpose of a ship is defined by its intended role – a need that is to be met by the presence of this ship. There are a variety of divisible ship purposes:
- Combat: The most common role that a ship will fill, especially in the earlier stages of a campaign is that of combat. This is both the most basic and the most centric role; a ship whose purpose is that of combat is designed to destroy hostile constructs as well as to defend allied territory from those hostile constructs. Without combat capabilities, a fleet is, for obvious reasons, screwed.
- Command: The flagship of a fleet, typically capable of filling a combat role, serves as the command ship of the fleet. In From the Depths, the distinction between the Flagship and the rest of the fleet is usually ambiguous [and, in reality, it doesn’t make that much of a difference to know which ship is the Flagship], but it is usually characterized as being the ship with the player on it [in a solo campaign], the ship with the most firepower, or the largest ship. The purpose of a flagship varies from fleet to fleet; often times, all that is needed is a big gun. Other times, the flagship will serve unconventional roles to service the fleet.
- Reconnaissance: Serving the purpose of identifying hostile forces in the wake of battle [or perhaps in the hopes to avoid it], reconnaissance ships are broken up into two subcategories: scouting and vanguard. A scout is designed to be as fast and as agile as possible, usually sacrificing armaments, armor, and size for the sake of speed. Scouts often venture far ahead of the main battlegroup, identifying hostile forces before beating a hasty retreat with the information secured. A vanguard serves the same role as a scout, but is more well armored and armed such that it could defend itself [at least for a little while] if it were caught.
- Combat Support: Combat support ships fit into an unconventional combat role, such as providing long-range artillery fire, an obscene amount of anti-air capabilities, missile-interception capabilities [so as to protect less well-protected ships in the fleet], or anti-submarine capabilities. Combat support ships don’t tend to become necessary until later on in a campaign where you are exposed to a variety of highly specialized constructs. In multiplayer, one can imagine the highly specified and lethally efficient designs of other players, where combat support ships fill an important role.
- Utility: In longer operations, often overlooked issues such as fuel, ammunition, and spare parts can become crippling to the fleet. Utility ships mitigate this issue, serving as huge reserve banks of critical supplies. These ships also often carry means to repair other ships in order to speed up the regenerative process. In order to maximize the amount of supplies and equipment a utility ship can carry, it is commonplace to forego armor and armaments. Due to this, utility ships are often placed far back in the fleet, only being called up to do their work when the area is made secure. In some cases, Combat Utility ships [armor and / or armaments now included] are used in the heat of battle to provide emergency repairs and supplies to ships in need.
Imagine the possibilities…
Types and Classes of Ships
DISCLAIMER – This section, like the previous, also offers no technical insight into how to build a ship in From the Depths. However, just like with the previous section, an understanding of this section may offer a great motivation and idea of what you want your ship to be. It also will help you name your ship and identify it in a larger library of ships if you wish to be professional about it.
The type of a ship is a technical remark to a variety of physical characteristics of the ship, including its weight, size, speed, maneuverability, or firepower. Many types of ships exists, as you might imagine, especially throughout the ages of history. Because there are so many unique types, we will offer a few with regards to gunpowder fleets and beyond.
Ship Types and Subtypes
U.S.S. Iowa, an Iowa-Class Battleship
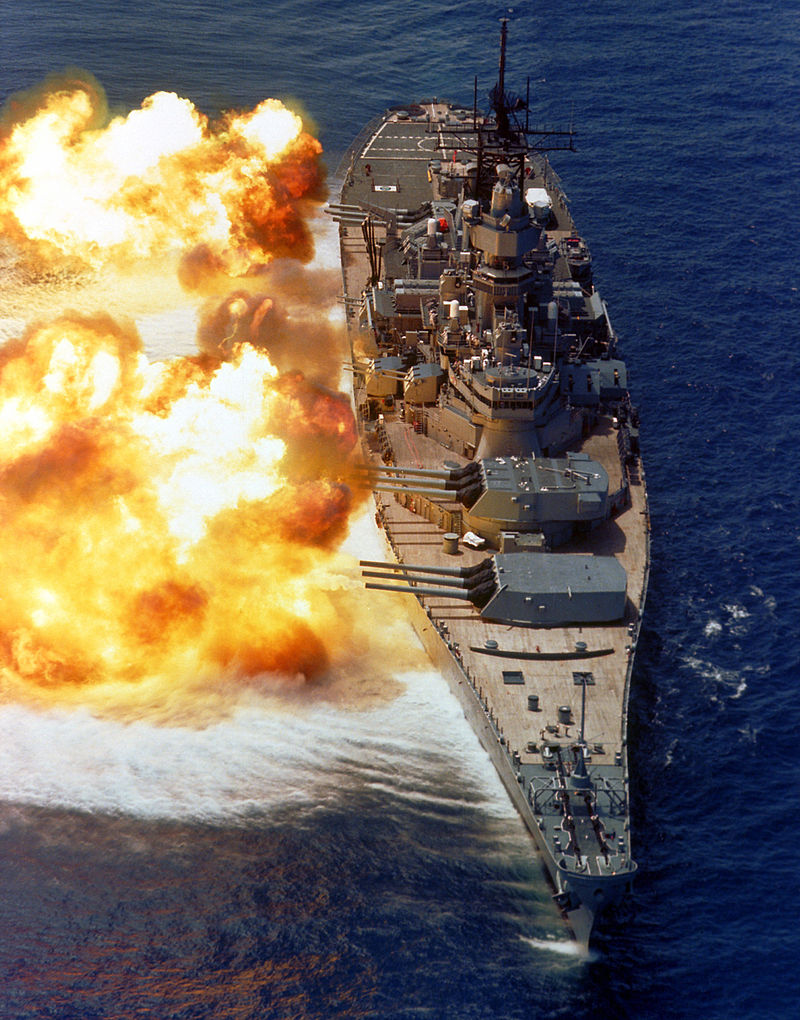
Battleship – Hulking and mighty, a battleship is characterized by excessive firepower, mainly in the form of huge cannons. Because of the enormity of their weaponry, battleships often lack the ability to tackle the smaller problems without it being an annoyance, while they are wonderfully adept at destroying the larger, slower moving vessels.
Extended battleship titles are given to battleships which fit their role extremely well, or fit some other modified role. These include: dreadnought [extremely large cannons; most battleships can interchangably be deemed dreadnoughts], super-dreadnoughts [can the cannons get any bigger?], and fast battleships [big cannons AND big engines!]
U.S.S. Boxer, a Wasp Class Amphibious Assault Ship / Helicopter Carrier
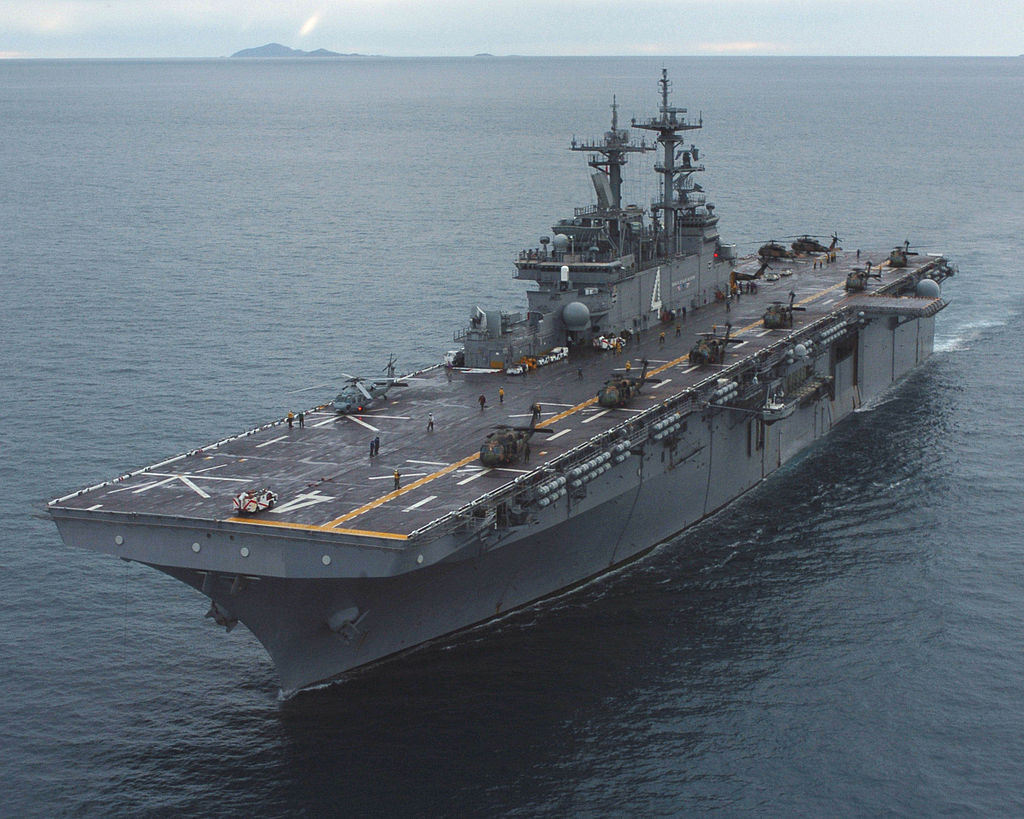
Carrier – Characterized by its ability to carry and deploy subvehicles (AI or player-controlled constructs), carriers act as waterborne hornet nests, deploying intimidating aircraft or naval vessels to accomplish its task. A carrier’s main strength is that it can remain out of harm’s way in the face of, say, a battleship, which would otherwise make for a terrifying adversary, by deploying its subvehicles and allowing them to do the up-close damage.
Swedish Visby-Class Stealth Corvette
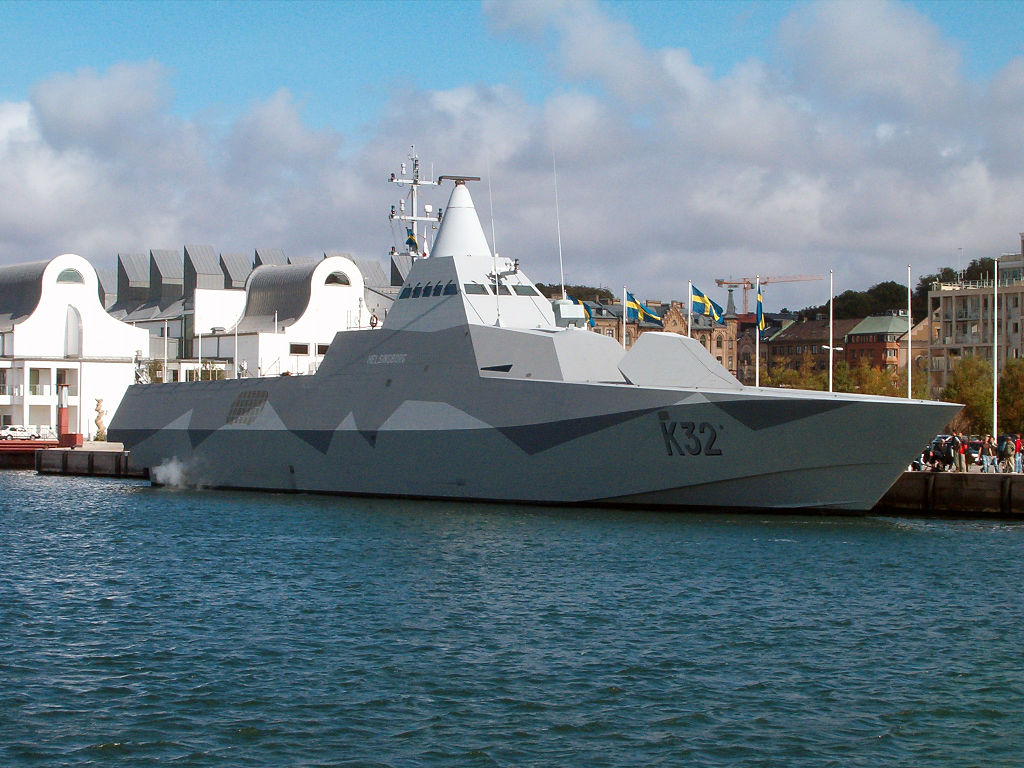
Corvette – Extremely small and quick, corvettes typically serve as reconnaissance-scouts or reconnaissance-vanguards, but also may serve as combat support. Because of their size and light armor, corvettes often lend themselves to these purposes, including deploying depth charges to destroy submarines or laying mines to prevent hostile movement.
Russian Slava-Class Cruiser

Cruiser – The mid-ground between a destroyer and a battleship, a cruiser serves as a self-sufficient all-rounder, capable of tackling both small and large, slow and fast ships. Their weakness lies within their jack-of-all-trades, ace-of-none nature, though in a smaller or solo fleet, a cruiser may be the best option when resources are limited. Specialty cruisers exist to serve more specific roles and abandon some of their all-roundedness: missile cruisers, battlecruisers, and light cruisers, namely.
U.S.S. Winston S. Churchill, an Arleigh Burke-Class Guided Missile Destroyer
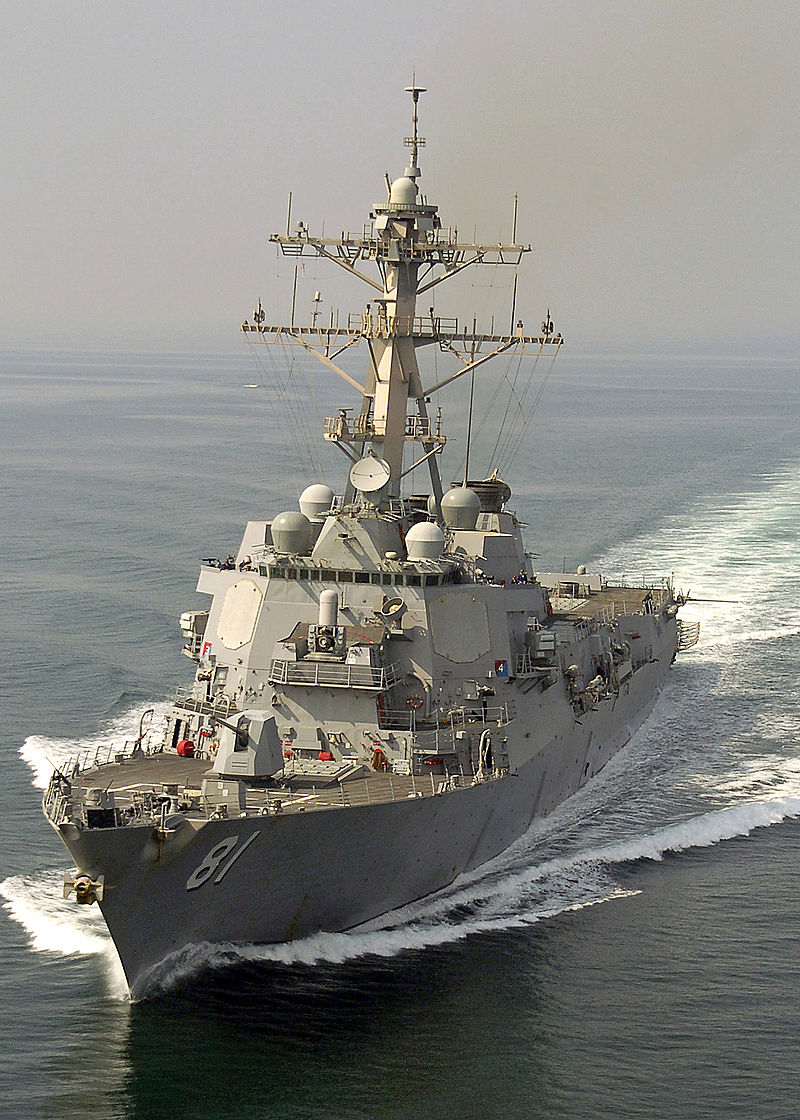
The antithesis of a battleship – fast, nimble, and usually lightly armored. Destroyers, while not capable of the consistent onslaught that a cruiser or battleship might offer, are effective in close-range, fast-paced attacks, serving to a fleet the same shock-troop purpose cavalry served to the antique military. They also may specalize, as strange as it sounds, in destroying other[/b] destroyers, preventing and countering a close-range attack via short-range torpedoes, mines, or other devestating short-range attacks.
HNLMS Eversten, a Dutch De Zeven Provinciën-Class Frigate
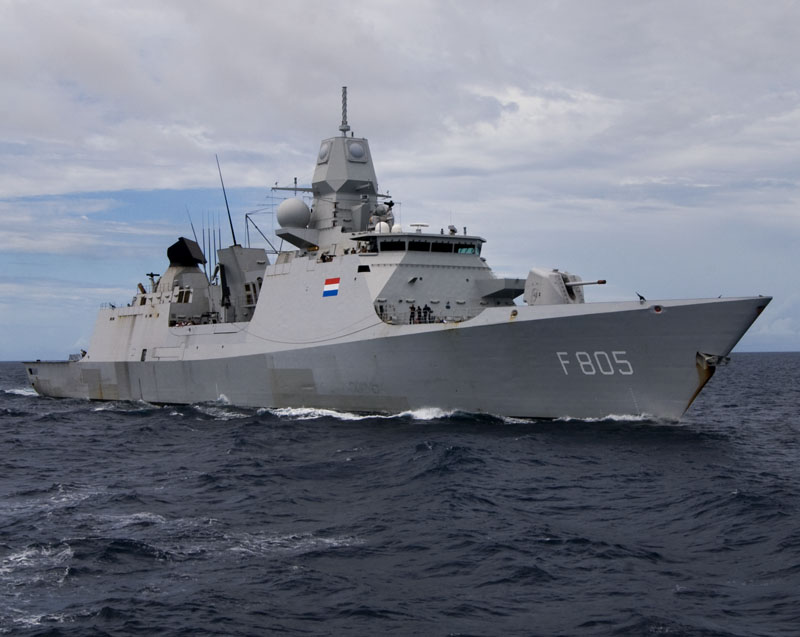
Frigate – A step above a corvette in terms of size and firepower, frigates often serve as escorts that bring utility ships closer to the main fleet. In the earlier stages of a campaign, most new players strive to have a frigate spearhead their fleet.
United Kingdom Severn-Class Lifeboat
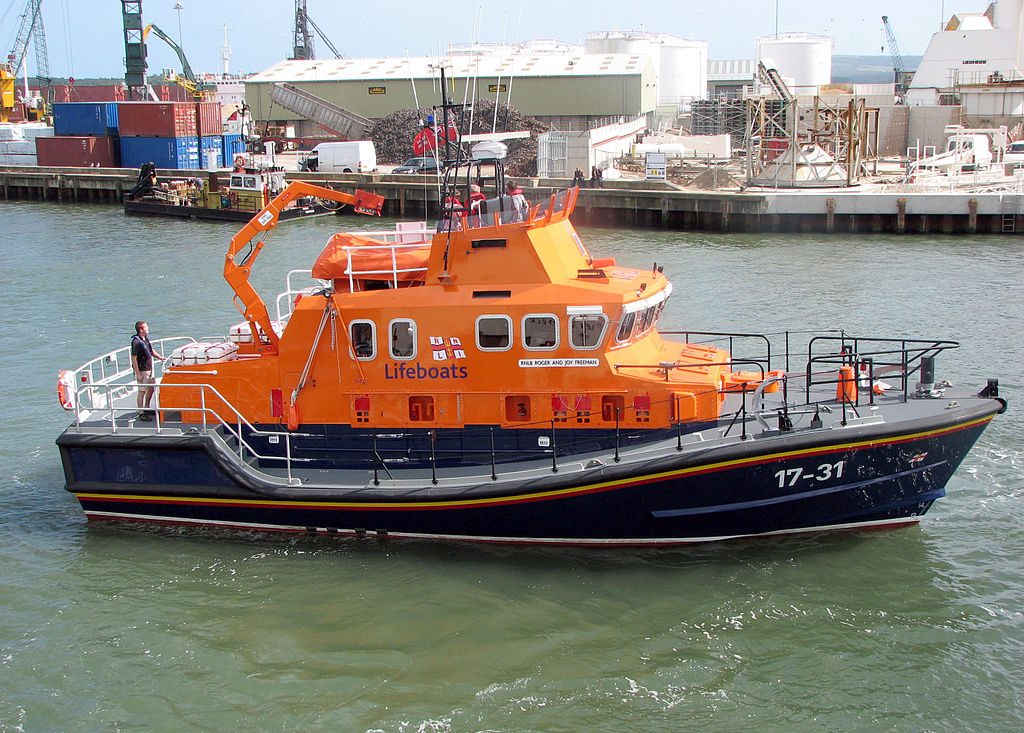
Boat – Too small to fit into even the corvette type, a boat is usually a wooden vessel comparable to the starting vessel in the campaign. The well-read will seldom consider a boat to be a type of ship, but how much more specific do I need to be? We classify, for the sake of this guide, a boat to be a very small ship.
Deepwater Guard Paddlegun-Class Battlecruiser
The class of a ship is usually the name given to the ship’s hull type.
The Deepwater Guard’s “Paddlegun”, due to its formidable defenses, heavy cannon armaments, and missile capabilities, is best classified by the type Battlecruiser. If one were to produce multiple of these ships, you could name them, say, “Harbinger”, “Peacekeeper”, and “Clyde”, all of which are Paddlegun-Class Battlecruisers. Sometimes, slight ship modifcations are made between different named ships of the same class. The U.S.S. Missouri, for example, is an Iowa-Class battleship, which bears an obvious resemblance to the U.S.S. Iowa, but has been modified with improved top-deck armor, protected ammo caches, and slightly improved armaments.
Does any of this teach you how to actually build a ship? No. But with a better understanding, you might find yourself more immersed in what you’re eventually going to do [if this damned guide ever gets to the important stuff!]. It does sound cool to be able to upgrade from saying, “I’m going to build a big boat with huge cannons, but also have it be pretty fast”, to saying “I’m going to build a fast battlecruiser.” A little quicker, too.
Hull Concepts and Staying Afloat
DISCLAIMER – This guide assumes you’ve already become acquainted with the controls of the game. If not, starting up the vehicle designer will provide some basic directions on the lefthand side of your screen. Other tutorials for this sort of thing exist as well.
Building Materials
The most basic thing that literally and figuratively holds a ship together is its hull. The hull must, in most cases, be comprised of a buyoant [that is, on a single block-by-block basis, capable of floating in water on its own] material such as wood or lightweight metal alloy. Constructing a boat completely of metal requires an extensive use of water-tight air compartments within the hull of the ship, which limits carrying capacity, and means that any holes in the ship will easily aid in its sinking. To put it briefly:
- Wood is vulnerable to pretty much everything, floats well and is dirt cheap. It makes up a majority of beginner ships as well as the internals or decks of some larger ships.
- Stone is for structures. The clever among us will recognize that stone can serve as a cheap alternative to lead, filling the same niche as for keeling, but behaving a bit differently underwater due to differences in density.
- Metal is highly durable, is a midground of cost between wood and lightweight metal alloy, and sinks on its own. Guess what you should armor plate your ships with?*
- Lightweight Metal Alloy is a midground of armor and health between wood and metal, but is lighter than wood, and more expensive than metal. In later stages of the game, it is often used as the main building block of larger ships destined to carry hilarious amounts of weaponry and equipment.
- Glass is, big surprise, a transparent, extremely vulnerable material. Use it for windows when you want closed, secured control platforms. Technically speaking, it is lighter than lightweight metal alloy. You could, if you dare, create a literal glass cannon. Hilariously, the glass cannon hull would be light enough to support a huge armament, as the name implies.
- Lead is hardy but easy to penetrate with anything above your typical cannonball. It should never be used for armor because it is more expensive, heavier, and less durable than metal. It’s main [arguably only] function is to serve as keeling for a ship that needs it.
*Rhetorical question: metal, thick walls of wood, and lightweight metal alloy can all serve as good armor in certain situations.
Designing a Basic Hull
For the first ship, we will take the starting raft and warp it to our selfish desires. But first, let’s examine the basic principles at work here.
The bow and stern of the ship are the front and back, respectively. Port and starboard are the left and right of the ship, respectively. These directions are determined by the path of forward motion of the boat.
Underneath a ship, one will often find a keel, which is a heavy weight, usually lead, that exists to keep the ship oriented the proper direction. Despite how crazy and absurd the game can get at times [take one look at a DWG Paddlegun or their Atlas Airship, and tell me you’ve never dreamed of such insanity as a child], there is some very real math at work here.
Pressing “” will display force visualization; that is, all forces, be them thrust or gravity, will be displayed. For the time being, all we see is a pinpoint that displays the center of mass [C.O.M.], which cleanly divides the wooden top deck from its lead keel on the starter raft. Please note that the COM does not imply that everything above it will float above water and everything below it will float below water; a block of lead has a COM in its dead center, but it by itself certainly does not float. There are two main reasons we look at the COM:
1. Capsizing – Capsizing is when a ship flips over and goes “belly up.” This is caused by the center of mass being too high on the ship. In simpler terms, the top is heavier than the bottom, and so the top and bottom want to switch places. This commonly happens with new players excited to install a huge cannon on their little frigate, only to discover that the cannon seems to work much better as a substitute keel.
If we overload the top of the raft with lead, we see that this lead pillar shifts the center of mass dramatically upward, meaning that when it hits the water, it’s going to capsize with ease. If we simply flip the original design of the starting raft over, declaring the lead block to be the desired “top” of the boat, we see that it doesn’t capsize, and the COM is perfectly between the two rows of blocks. Due to this strange balancing act, though, if forces acted upon the raft such that the raft were to capsize, it would be perfectly happy in its original configuration with the lead block on the bottom of the ship. Adding a second lead block to the original configuration makes for a heavier keel, that being the weight deliberately placed on the lower half of the COM of the ship to prevent it from capsizing, usually lead.
2. Flipping or diving – We define this to be a little bit different than capsizing. Flipping occurs when the center of mass is pushed to the back of the boat or when the center of thrust is below the center of mass, causing the bow of the boat to shoot up into the sky. Diving [unintentional, not to be confused with the intentional diving of submarines] occurs when the center of mass is pushed to the front of the boat or when the center of thrust is above the center of mass. Any of these imbalances can, in the calmest cases, result in a little instability or reduce top speed due to unnecessary torque placed on the vessel. In the most extreme cases, having imbalances in the centers of thrust and mass can have your boat attempting to plummet to the depths of the ocean, soar to the skies like the Flying Dutchman itself, or spin around in circles endlessly.
A properly balanced hull – notice the center of mass not being too far forward nor too far backward, nor to either side. Notice also that the center of thrust [coming from the single propeller] is placed inline with the center of mass. Also notice the centrality of both the rudder and the propeller.
ON THE LEFT – the center of thrust is placed off-center, meaning that when the propeller pushes the ship forward, it will also turn the ship to the right. ON THE RIGHT – the center of mass is too far back, meaning that when the propeller pushes the ship forward, the front of the ship will arc upward.
Ensuring that propulsion systems and the COM are properly aligned is, as you can imagine, critically important, especially on larger or faster ships. Do not attempt to toy around with keeling and weighing things down until the ship is fully finished; the addition of engines, guns, etc. will all contribute to the final mass of the ship.
Buoyancy Systems
Buoyancy Systems & Preventing the Ship from Rolling
There are three major ways in which ships stay afloat and uncapsized. The first and most obvious of these ways is to construct the ship out of mostly buoyant material, except for the keel of course. This will be especially important once non-buoyant things like cannons and armor are added.
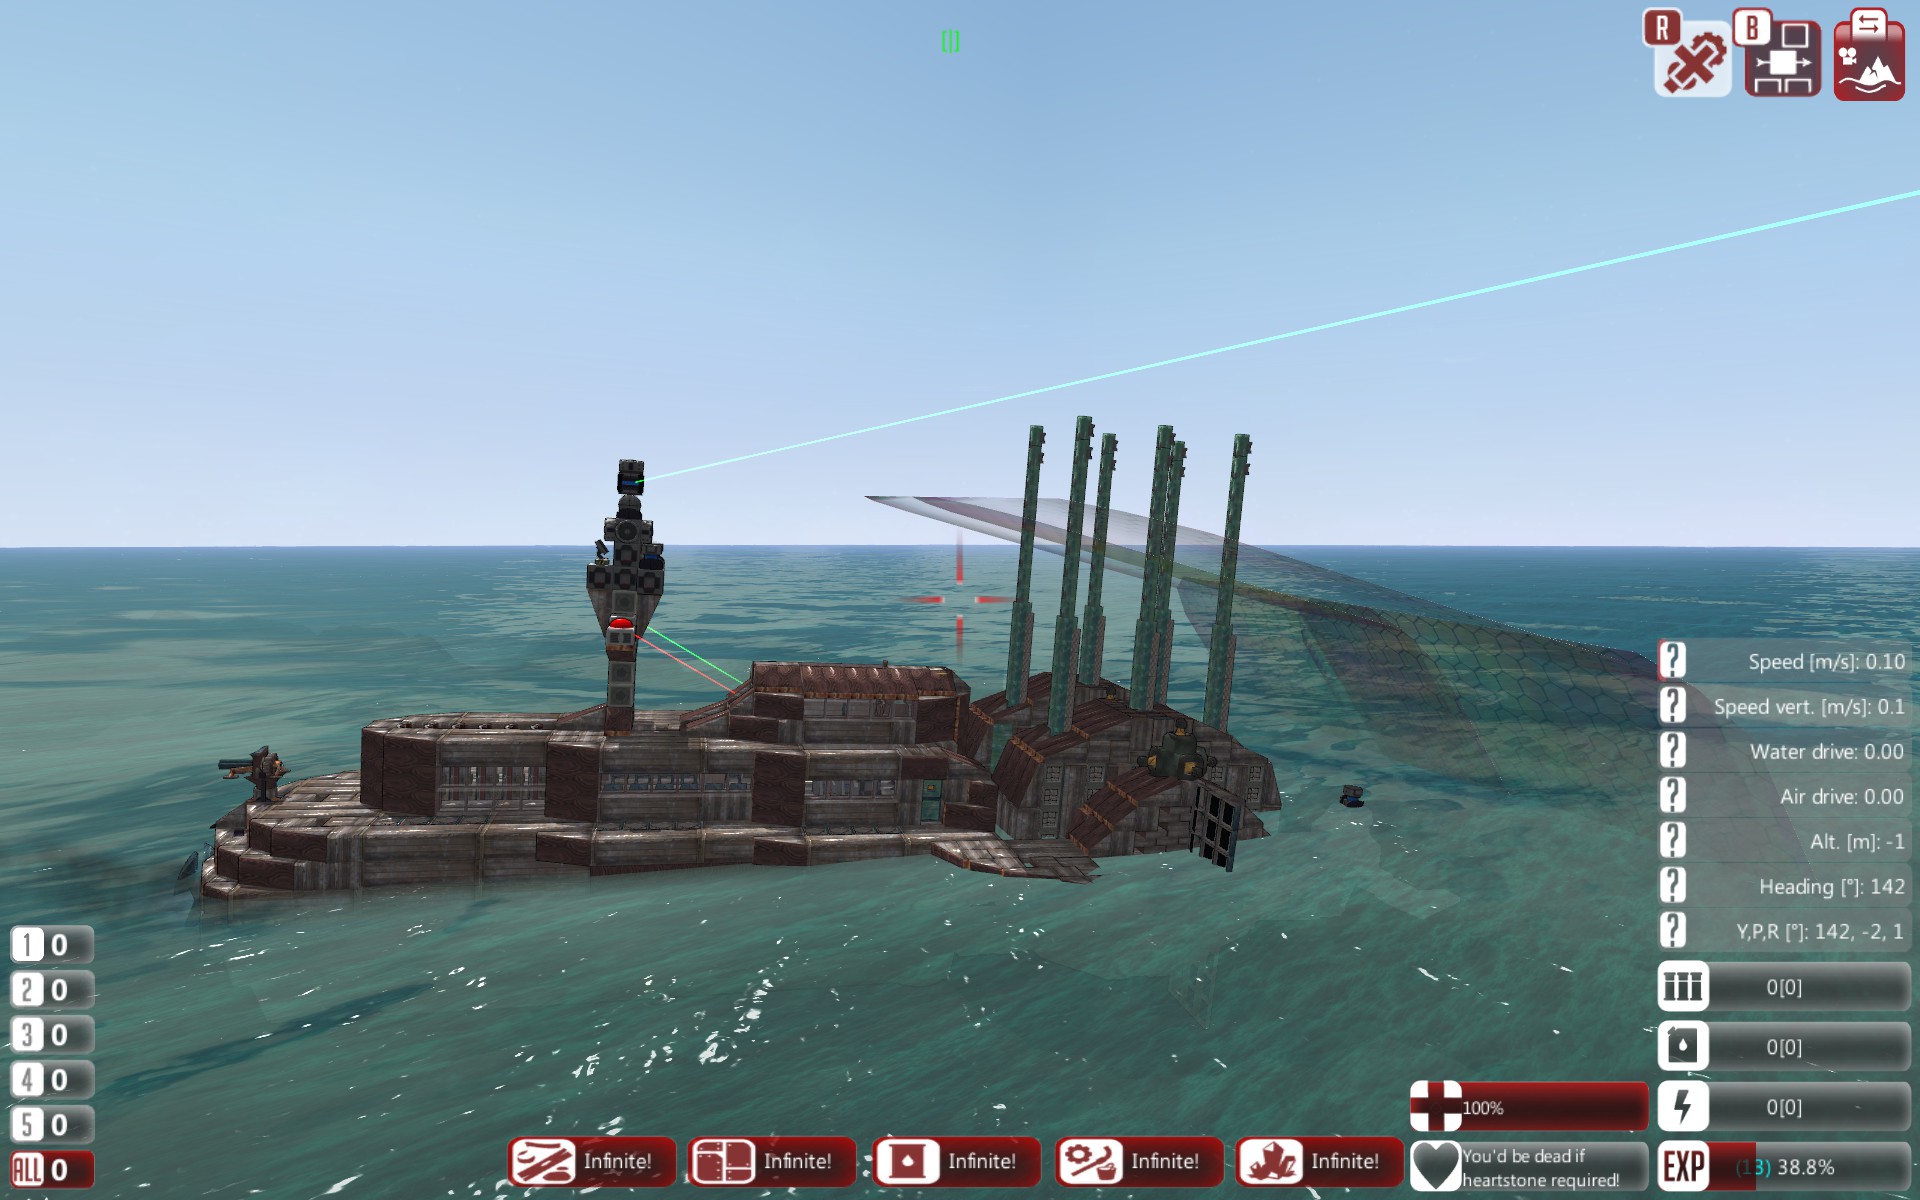
It’s no surprise how this “ship” will be balanced in the water.
Air and Compartments
The second way is the utilization of air pockets within the ship, usually up on higher levels so as to not counteract the purpose of the keel and to further prevent capsizing. Using the water pump device in the Water section of the vehicle designer pumps out water in all air spaces connected to it, adding this incredibly buoyant effect. Just make sure it’s water-tight!
It’s also a good idea to section off the hull of the ship (you can see this sectioning-off represented by the glass dividers between the chambers). This will slightly reduce the total amount of cubic meters made buoyant by the water pumps in each chamber, but will protect you from a ship-wide flooding catastrophe if a single hole in the hull were to be placed. If one compartment floods, in this way, there is always another to take its place while you make your repairs.
Nifty little cross-section picture just for fun!
Additionally, it is worth noting that buyonacy hulls that are above the waterline will not do anything. Think of it like a lifevest; when you are out of the water, it doesn’t do anything. It doesn’t make you feel lighter. When you’re waist-deep in the water and the vest still isn’t submerged, it still isn’t doing anything. Only when the vest finally touches the water does its buyoant factor become important. Thus, buoyancy hulls that are placed above the waterline will not help keep the ship afloat; however, if the ship begins to sink, those buyoancy hulls that now begin to touch the waterline will now do their job and potentially keep the ship from sinking.
Pontoons
The third way to prevent critical vessel failure is to affix pontoons onto the ship. Pontoons are usually found on smaller rafts like canoes, and serve as lateral projects from the main ship hull, composed of a light material and / or filled with air. They prevent lateral rollover on sharp turns, capsizing, and sinking in general.
They’re often not pretty, especially on a smaller ship as From the Depths lacks small enough parts to sculpt it nicely. Additionally, smaller ships which would more readily accept a pontoon find it hardest to install them, as it is difficult to make a sturdy structure that contains a water pump (or even just the sturdy wooden structure itself).
Many other ways exist to help keep ships afloat, which should come as no surprise, as keeping the ship where it should be is the most important part. These are three of the most common and effective ways.Propulsion Techniques: PropellersThere are two main types of propulsion techniques that this guide will briefly examine: propellers and sails. You should be made aware that there are other types of propulsion as well; jet engines and paddles in particular can make for extremely fast ships, though we are only looking to cover the basic, conventional forms here, which still, of course, all can prove very useful.
Important Note: You would be at a tremendous loss to not do the two Deepwater Guard storyline missions, as they unlock the Huge Propeller and Square Sail parts, which are incredibly helpful in creating larger, faster ships. They are both do-able with the vehicles they provide you.
Powered by your choice of engine, propellers are a consistent, simple system that are the go-to propulsion type for most ships.
Advantages: Creates potential for extremely fast ships; is difficult for enemies to disable, especially on larger ships where the propellers are deeper down and harder to see; consistent, reliable power.
Disadvantages: Requires proper balancing with the center of mass; requires fuel and an engine, which both weigh down the ship and create more liabilities within your hull.
Building a Propeller-Driven Ship
As you probably could have guessed, building a propeller-driven ship isn’t the easiest thing in the world. Most problems arise in balancing and counterbalancing weight, as well as designing a hull that is destined for good balance. For example, in the pictured ship above (a 3rd Series Hunter-Class Corvette), a goal was proposed such that the boat would be resistant to torpedo fire, which meant that not only did the ship have to bear a small, thin underwater profile, but the important parts of the ship (ammo and fuel caches, the engine room, etc) had to placed high up near the top deck so that underwater attacks would not damage critical parts (save, of course, the propellers). In doing so, the top-heavy ship needed intricate keel work and precision balancing to allow it to pass all maneuverability stress tests.
Comparing the Centers of Forward-Backward Thrust and Mass
Proper balancing is important. As mentioned before, the Hunter-Class Corvette suffers from a top-heaviness issue which, while resolved by the extensive keel-work on the bow and stern, still leaves for thrust dilemmas. Most notably, observe how the lower main propeller is considerably below the true center of mass, even when including the front keel. Nonetheless, the ship floats just fine, reaching a (stable) top speed of 16.0m/s. This is an example of where it is far too easy to overthink a simple design; if you simply read this guide and followed instructions for thrust and mass placement to the detail, you might’ve spent hours slaving over how to balance the lower main propeller, when in practice, the ship works as it should anyway. Always be certain to test-drive your ship even when you know it isn’t balanced or finished. It will help you understand the forces at work on your ship and also perhaps save you from painstaking hours of needless balancing.
Comparing the Centers of Lateral Thrust and Mass
Lateral propeller balancing works a little differently than main propeller balancing. In order to achieve proper side-to-side balance with the center of mass, it is assumed that you mirror whatever propellers you place on one side of the ship to the other. This becomes trick when designing assymetric ships; just know that improper or strange lateral propeller placement does far less harm than improper main propeller placement, so feel free to do whatever strange things help your ship move.
Notice how the upper lateral propeller (Huge Propeller that appears to be toward the front of the ship) is placed directly in-line both vertically and horizontally with the center of mass when looking at it stern-to-bow. Due to the mirroring of this propeller on the other side, this lateral thrust system is also inherently port-to-starboard in-line. This means that, on its own, in theory, these propellers will simply push the ship to the left or right without changing its direction. What this means for the ship when it combines it with forward thrust is that turns will be extremely efficient and produce little-to-no rolling effect.
The lower lateral propellers complement the lower main propeller; just as was the case with the lower main propeller, these propellers are theoretically placed in a strange place. However, test-driving the ship will demonstrate that these propellers help keep the ship under control during turns and produce little rolling effect. Additionally, placement any further up tended to have the propellers exposed out of the water, so they were nestled in wherever they would do the most work.
The Rudder
Of course, the rudder should be as far back and as central as possible, but what about having multiple rudders? So long as the rudders are placed with identical distance between them and the center of mass, they will behave in much the same way as a single rudder does. Some ships (especially larger ones) enjoy multiple rudders due to the enhanced control over turns they offer. Be advised, though, that if one of the side-placed rudders gets destroyed, you will be experienced very strange maneuver behavior.
Most ships of larger size also sport larger rudders, though currently, no such part exists in From the Depths. To substitute this effect on larger ships, most players complement their rudder with large lateral propeller systems. The desired effect is thereby easily achieved. Technically speaking, Hydrofoils placed vertically (such that their “up” and “down” controls actually act “left” and “right”) achieve a large rudder effect, but the effect isn’t as simple to achieve as simply using propellers and regular rudders.Propulsion Techniques: SailsIf the ship is to be very small or lightweight, a sail may be your best option.
Advantages: Doesn’t require the same attention to detail as proper propeller or paddle placement does; far more practical on a ship whose hull structure doesn’t lend itself to a big engine being stuffed inside it; can allow light ships to go very fast; doesn’t require fuel, which means there’s one less “explode-everything-on-the-ship” chamber in your hull.
Disadvantages: Fragile – one stray cannon shell to the mast and the entire superstructure comes crashing down; subject to the whims of the wind; not as fast or reliable as propellers or paddles in some instances.
Sailing With the Wind
Despite their simplistic structure, sailing vessels in From the Depths can be difficult to get right. Most important to most sailing vessels is the presence of a mainsail, which runs along the length of the ship, catching crosswinds to translate it into forward movement. The presence of the square-rigged main mast helps magnify this effect, but can be harmful when sailing directly into wind. Notice that, as we sail with the wind, our job is rather simple; keep the main mast aligned as best as we can with the wind and sail in our preferred direction. Placing the entire mast on a spin block structure allows us to control how much energy we collect from the wind without having to turn the ship, meaning we can travel in directions somewhat close to the direction of the wind and still receive a great deal of forward thrust. The mainsail helps catch crosswinds and translate this into forward thrust as well (you can see the three green arrows representing forward thrust). When the mast structure is perfectly aligned with the wind, we notice that the mainsail doesn’t produce much a wind or thrust vector.
Sailing Against the Wind
The true challenge in sailing comes with the attempt to sail against the wind instead of with it. There is an obvious difficulty in this; the main mast will be of no help and actually propel the ship backward into the wind. At full sails, it is nearly impossible to get the ship to align against the wind. Lowering the sails to a certain (perhaps full) extent is required.
While the total thrust produced by the main mast overpowers the work done by the mainsail, we notice an incredible and integral aspect of sailing – headsails. These sails catch wind against the grain and translate it into forward thrust.
Unfortunately, there is currently no way to control which sails you raise and lower individually. This means that you have to be careful with how large you make your masts and sails. With an incorrectly designed sail, it could be downright impossible to sail against the wind. Hopefully, there is work being done to negotiate this issue, but in the meantime, the above picture offers two solutions.Your First ShipIn From the Depths, you can either believe that form follows function, or that function follows form. Both are true in many cases, but it’s up to you to decide which line of thinking you want to follow.
In order to compare the two, we’re going to create a ship with a few simple parameters, and see how the design and final form might change depending upon how you approach the problem. The conditions are as follows:
- The ship must pass all four of the basic conditions for being a ship outlined in the first section.
- The ship must use a diesel engine with a maximum power output rating of at least 30.
- The ship must be capable of a top speed of 4.0m/s.
- The ship must take on and defeat a Deepwater Guard Sea Viper in pitched combat.
- The ship must cost no more than 15,000 RP.
In effect, what we will be left with is a decent starting ship capable of taking on some early Deepwater Guard threats.
Designing the Hull
Until you are familiar with how ship components should sit within your hull, it is usually easier to design the necessary components first and then covering everything up with your fancy hull once you know the ship, functionally speaking, is complete. This has the benefit of ensuring your ship has its necessary parts and resources while also giving some meaning and engineer’s logic behind, for example, the aesthetically-wrapped armor plating you chose to install on the stern of the ship.
In any event, let’s begin.
Given what’s being asked of the ship, we aren’t going to need something very large. Sea Vipers are armed with a few Large Cannons, but nothing much more intimidating. On a small ship, however, it becomes especially important to properly place the delicate internals, as there is less armor to protect these parts. As such, we’ll be entertaining a simple engine design that pumps out about 33 units of power. Each Small Propeller will use 5 units of power at its peak usage, so this is more than enough.
Since this is a small ship, we’re going to completely close off the engine room from the rest of the ship. Localizing its armor prevents damage to the rest of the ship from harming the engine itself. Completely sealing it off, we’ll begin adding an ammo cache to the front of the boat. Again, we’re going to give the ammo cache its own separate compartment, mainly to prevent an explosion in this chamber from damaging the rest of the ship. While not perfect, the armor will prevent a detonation from most shots from damaging the engine.
After sealing off the ammo cache, we’ll add the buoyancy deck to the ship. Most ships don’t necessarily need a buyoancy deck (especially those made of wood), but it has the effect of keeping the top deck of the ship off of the water, which makes it easier to aim weapons. This higher profile, however, does make the ship an easier target, but we’ll manage. You’ll have to constantly weigh these advantages and disadvantages.
Adding the top deck, ship’s wheel, chair, rudder, and main propellers, we now technically have a functional ship. It’s worth dropping it in the water before doing anything else just to see how it rests.
Horrible. The center of mass seems a bit high, so while the ship seems to stay right-side up as we’d expect, it’s not far off from capsizing. We’ll have to add a lead keel and see how the ship handles then.
The lead keel evenly distributes bottomweight across the ship, and the buoyancy deck prevents the ship from sinking much further into the water. One problem though: we can see that the propellers we initially placed are a bit higher than the center of mass. This means that when they’re used, it’ll not only push the boat’s bow down into the water (as pictured above), but on this small ship, the propellers are too high up anyway and are kicking out of the water, providing inconsistent thrust. Since the engine has a maximum power output of 33 and we don’t plan on adding any other power-demanding systems to this ship, we’ll simply add 3 more Small Propellers to in a row beneath the existing ones. This will double the thrust, but more importantly, provide consistent thrust, as it is unlikely that these propellers will ever raise above sea level.
Much better. It isn’t required, but to improve handling, we’ll add a small weight to the bow of the ship. This counterweight improves handling in rough waters; as you’ll notice if you try to pilot this ship yourself, it is very open to the whims of the waves, as most small ships are. Only so much of this can be controlled for; too much keeling will slow the ship down but add control in waves; too little keeling will risk a capsize, or keep the propellers skipping out of the water.
Now time to name the ship and test it in open combat against the Sea Viper!
Bow-to-stern, the ship is 16m long (with a 4m extension for the rudder), and is 5m wide. It reaches top speeds of about 5m/s (7m/s in lucky waves). It has four main armaments in the form of four Small Cannons, which do decent close-range damage. It’s up to you what you call the ship. We’ll call this little guy “Explorer”, a Boat type of the class Lancer.
Ah, the Sea Viper always finds a way to capsize. Two minutes into the fight, enough damage was sustained by the Sea Viper to create this wonderful attack opportunity. After a couple of minutes more of constant barrage fire, we secured victory. Let’s analyze how the Explorer held up:
- Well-armored engine room and ammunition cache. Very little main hull penetration.
- Typical speed, but wonderful turn radius that makes for easy broadside attacks (which we took advantage of when concerning ourselves with placing side-facing cannons).
- The rudder structure is susceptible to a quick decapitation from a stray cannonball. It doesn’t take long to repair due to the simplicity of the parts, but nonetheless, it could make for a big problem in the heat of battle.
- As is the case with most small ships, has difficulty handling itself in rough waters, and tends to pitch its bow upward during top speed travel.
It is important to be able to know the strengths and weaknesses of your designs so that you can improve. Don’t lie to yourself in believing that a failed model works, and don’t be upset if an ugly design works well. There are things to be learned from every situation.Aesthetics – Putting a Front and Back on Your ShipBuilding a functional ship will eventually become relatively straightforward (unless you impose your own challenges, such as building a ship that has at maximum XYZ dimensions, building a ship that costs less than 10000 total resources, etc.). We’ll take a look at the demonstration vessel we used in the Buoyancy Systems section to see if we can’t polish it up.
Fronting and Backing Your Ship
Often times, the most confusing and frustrating parts of the ship to make look attractive are the bow and stern. Most ships, even modern ones, are characterized by a slightly-to-much longer bow that thins out and is designed to cut the water. More modern ships tend to simplify their sterns with flat backs, but some older warships, especially wooden ones, have very well-crafted, rounded designs.
Please note: This is not the only aesthetic way to front or back a ship; each ship might look nicer or worse depending on how you front and back it. Some more aggressive, long-sloping designs may look ridiculous on a small vessel, while some flatter ones may look chubby on a large ship.
For your viewing convenience, the bow of the ship is colored white, while the stern is colored black.
The Front
Keep in mind that, if you’re going for a realistic look, the front of the ship is designed to cut through the water efficiently, meaning there is a narrow front profile with some type of slope approaching the waterline. The actual steepness of this slope can vary tremendously; some ships cut through the water with a straight up-and-down bow, others have a very flat nose that skims across the surface of the water.
Starting with some sloped wooden blocks, we fill out the bow of the ship layer-by-layer. Please bear in mind that it’s much better to leave the bow-piece hollowed out; you never know what extra things you may want to stuff in this new extension to the ship.
Now we just keep adding layers; rinse and repeat. There are a variety of ways to approach this; it could either gradually increase in slope or decrease in slope depending on the look you want for the ship. A consistent slope is easier to design, has more total volume, and can look better on certain types of ships (futuristic ships especially). It all depends on you, the “engineer”!
The Back
The back’s design varies in real ships far more than the front does; while the front is designed to cut through the water efficiently, the back can be as narrow as the front or as wide as the body of the ship depending on your tastes. Slower moving, less agile ships often have wider, curving backs such that they could place rear-facing cannons or strategic viewing rooms on the stern, for example.
On this ship, we wanted to provide a shallow, rounded-off stern to give it an old-time frigate feel.
This demonstration vessel was particularly narrow, so we didn’t have much width to make a fascinating curve with. Nonetheless, we’re now left with a decent looking front and back for our ship.
Dydrodynamics – Drag, And the Centers of Thrust and Mass
Centers of Mass and Thrust
Forgive me: In this section’s diagrams, the words “weight” and “mass” are used interchangeably. For our purposes, we are technically interested in observing mass, as weight has more direct implications with gravity, which is something we don’t concern ourselves with here (assuming your ship isn’t denser than water!) Weight has been improperly mentioned at certain times. I apologize in advance, though I do believe most, if not all, will be able to see past these inaccuracies.
Hydrodynamics is something From the Depths players are painfully familiar with. It’s something we’ve been talking about all along, but would like to formalize it here. Let’s look at an example ship to quickly brush up on some concepts we spoke of in the Propellers section.
We know from previous discussion that the center of mass and center of thrust need to be in proper balance. Can we look at a more clear, perhaps less From-The-Depths-y, more abstract-y diagram, to get a clearer picture? Of course we can.
This serves as a good review of some of the things already talked about, but also introduces some other very important concepts. It is also serves as a go-to diagram to help you troubleshoot some basic, yet persistent, hydrodynamics issues.
What is new and perhaps most important to take from this diagram is the concept of drag. Drag is a force that acts opposite to the relative motion of an object moving through a fluid. Basically, it’s what slows a flat-faced ship down but helps a pointy one glide through the water. Let’s look at two different cases where we put our example ship to some speed trials to see how much drag truly effects us.
Scenario 1: Small Drag Arms
In this case, we see that there is a 7.27% decrease in top speed when we introduce this new horrendous drag surface. What happens if we make the drag surface even more dramatic?
Scenario 2: Large Drag Arms
Please bear in mind: this is the same amount of wood as used in the previous example, meaning the mass doesn’t change, only the total area of the drag surface.
Comparing the two side-by-side sheds even more light. The second scenario slows the ship’s top speed down by about 25.45%, holding mass of the ship constant between the two experiments. A fun experiment to try at home: see how orienting these same 15 blocks on each side in different ways produces different, sometimes wider, sometimes thinner, drag surfaces, and how each of them handle in the water. A few spoilers of the experiments you can try:
Scenario 1 has the most mild of the effects; turns are slower, the ship leans in the water slightly less on turns, and the ship is slightly slower overall. However, it also does not pitch up and down in the water at high speeds as much, as the top-down drag continually acts against the ship trying to bob up and down in the water.
Scenario 2 has extreme slow-down effects on both turns and top speed, and the ship leans in the water much less, but it doesn’t very much affect nose-pitch orientation in the water (that is, if the nose of this ship is prone to pointing up out of the water, this design didn’t do much to stop that).
We can relate this back to our discussion on pontoons: while they add great stability and can keep even the strangest ships from losing their balance, they come at the cost of adding drag.
In general, ships (as you intuitively probably know) are designed to be streamlined so that they can sail easily through the water. A well-streamlined, 20,000RP wooden Galleon will require much less total thrust (and therefore, less fuel or less sails) to glide through the water than a flat-faced wooden cube of comparable RP, which would require tremendous amounts of thrust to push it through the water at the same speed as the Galleon.
Even ships that aren’t designed for high speeds are typically streamlined since, as stated above, no matter how fast the ship is destined to go, requiring less energy to “go” is always a good thing. Keep the total forward area which is exposed to water at a minimum to ensure the highest possible speed.
Post Views: 3,074
Overview
All the info you need to understand the game, make informed decisions in your builds, along with examples and pictures and, eventually, videos.
Introduction
tl;dr
This guide will have a lot of tl;dr’s because the game is so deep. It will also have cringy puns because a man’s gotta have fun. Also, you won’t auto-magically become awesome at the game, but hopefully it will help you along the learning curve.
Long version
There is probably something to be learned in here for most people. The goal of this guide is to help you make informed decisions when building your vehicles. The long versions will usually contain more detailed information like maths, practical implications of the game’s mechanics and such.
Table of Contents
Due to the sheer amount of information, on top of Steam’s content formatting, I have added tags to specific sections which you may search for them.
Use control + F and copy/paste the contents in brackets to jump to a particular section.
- Introduction [INTR]
- Common Abbreviations [ABBR]
- Relevant Physics made Simple [PHYS] Partial
- Drag and speed [DRAG]
- Surface area vs space [VOLU]
- Center of mass [FULC]
- Center of mass [BUOY]
- Block Stats [BLOS]
- Block Functions [BLOF]
- Propulsion Editor (Q menu) [PROP]
- Automated Control Blocks [ACBS]
- PID (General Purpose) [GPID]
- How to tune PIDs [TPID]
- Breadboard [BRED]
- Replacing PIDs [BPID]
- Game Mechanics: Damage [GAME] Partial
- Kinetic damage [KIND]
- Thump/Impact damage [THIM]
- Explosive Damage [EXPD]
- EMP Damage [EMPD]
- Laser damage [LAZD]
- HEAT [HEAT]
- HESH [HESH]
- Game Mechanics: Defense
- ERA Armour [ERAA]
- Spall liners [SPAL]
- Armour stacking [ARMS]
- Smoke [SMOK]
- Game Mechanics: Other
- Ammo [AMMO]
- Detection [DTEC]
- Tweaking detection systems [DTC2]
- Propulsion [PROP]
- Golden Rules of Vehicle Design [GRVD]
- Engine Breakdown [PBRD]
- Weapons Breakdown [WBRD]
- Propulsion Breakdown [MBRD]
- Up to date video tutorials [VIDT]
- Useful blueprints [UBPS]
Common Abbreviations [ABBR]
Conveniently organised in alphabetical order for your wordy needs. If you can’t find it in here, there’s a good chance you can find it on the urban dictionary. If not, comment below so I can add it.
0q, 1q, 2q, 3q 4q = Number of Q-Switches on a laser coupler
AC = Armour Class, aka Armour value on block, often including stacking bonus
ACB = Automated Control Block
AOTE or AotE = Ashes of the Empire, a different campaign in the game
AP = Amour Piercing, aka value on shells, lasers, missiles, etc.
APN = Augmented Proportional Navigation, a missile component that helps guidance
APS = Advanced Projectile System, aka Advanced Cannons
BB = Sometimes used to refer to battleships, refers to Base Bleeders when discussing shells
CC = Usually refers to custom campaigns
CIWS = Close In Weapons System, usually refers to guns that target missiles using anti-missile cannon controllers
CoB = Center of Buoyancy
CoL = Center of Lift
CoM = Center of Mass
CoT = Center of Thrust
DC = Not the comics, refers to shells using Disruptor Conduits
DIF or DF = Direct (Input) Feed, refers to APS which get their ammo loaded through input feeders on the firing piece
DWG = Deep Water Guard faction, sometimes their AotE counterpart, the Dust Wing ♥♥♥♥♥♥♥
FTD or FtD = From the Depths
GPPID = General Purpose PID
GP = Gun Powder, usually when discussing APS shells
GT = Gray Talons, an ingame faction
HE = High Explosive, a type of damage
HEAT = refers to shells using shaped charges
HESH = refers to shells using squash heads
HP = Hollow Point, a shell cap for APS :^)
LAMS = Laser Munition Defence systems, aka defensive lasers
LH = Lightning Hoods, an ingame faction
LWC = Local Weapon Controller, a block generally required to make weapons work
m/s = meters per second, a measurement of speed
OW = Onyx Watch, an ingame faction
PAC = Particle Accelerator Cannon
PPM= Power per material for engines
PPV= Power per volume for engines
RTG = Radioisotope Thermoelectric Generator, a kind of nuclear power (real)
SD = Scarlet Dawn, an ingame faction
SS = Steel Striders, an ingame faction
TG = Twin Guard, an ingame faction
tl;dr = Too Long; Didn’t Read
TPG = Target Prediction Guidance, a missile component that helps guidance
WF = White Flayers, an ingame faction
WIP = Work In Progress
Relevant Physics made Simple [PHYS]
Drag and speed [DRAG]
tl;dr
Pointy things go vroom in the direction they point. Pointy is good, but smaller is even better. Lighter vehicles do not go vroom more than heavier ones in FtD. The game only takes mass into account to calculate how buoyant you are, how much force gravity applies, and how fast you can accelerate to your maximum speed. It just takes less time for lighter vehicles to get to speed and they drift a bit less.
Long version
Drag is essentially pushing back against the front of your vehicle and whatever else is in the flow of air or water. The faster you go, the more drag you experience.
I’m not an expert and you do not need to be an expert to make good vehicles. Do note that asymmetrical drag can cause your vehicle to turn or pitch constantly. The faster your vehicle is, the worse the effect. This is especially noticeable in planes.
Surface area vs volume [VOLU]
tl;dr
The more like a cube or sphere your vehicle is, the more space inside you will have. The bigger you make it, the more space you have inside to play with. Sounds like “duh?” Well, this means for the exact same shape, but twice the size, you actually get four times the room internally. So bigger actually means shields and armour actually protect more blocks, proportionally.
Also, building thin or “gluing” weird shapes together tends to increase surface area, which can be useful or detrimental depending on your goal for your vehicle. For instance, if you want a lot of small turrets, you will probably need a lot of surface areas whereas a few big and powerful weapons will likely require a lot of squishy internals to protect.
Long version
Why, you masochist?! There really isn’t all that much more to explain. This all has to do with surface being m^2 and volume being m^3. Just Google that stuff if you must.
Center of mass [FULC]
tl;dr
Vehicles turn around their center of mass. The further away from the center of mass you place your thrust, the more of an effect it has on turning though drag will apply on the relevant axis. This is why your vehicles can spin out of control sometimes when damaged/built wrong. Finally, center of mass below the center of buoyancy or lift helps stability, the opposite makes your vehicle want to flip.
Long version
This could easily devolve into way more information than needed. It’s the concept of lever and fulcrum, where the center of mass of your vehicle (which is identified visibly as such, though it may be obscured by blocks) functions as a fulcrum, the distance from center of mass at which you place propulsion components functions as a lever, and the components themselves apply the force.
If the average of the force applied over an axis is offset from the center of mass, some of the force is turned into torque. In other words, unbalanced thrust will cause pitching, yawing, or rolling, depending on which direction the thrust is applied from. If you goal is to do just that, then great. If your goal is to strafe, hover, or accelerate forwards or backwards, then torque is essentially wasted thrust.
Granted, you don’t *need* to have perfectly balanced propulsion for your vehicle to function. You can compensate in different ways, but you should be mindful about how unbalanced the thrust is because it does lead to loss of efficiency.
As far as wanting the center of mass to be below the center of buoyancy or lift, the idea is that lift and buoyancy are really just different ways to apply force or thrust on your vehicle. Lift and buoyancy pull up on their respective centers (also visually shown in game when applicable) while center of mass is where gravity pulls down on your vehicle.
So, here’s a concrete example to make this much easier to understand: if you attach a piece of string to an object and lift it using the string, the heavier part ends up at the bottom (depending on how you attach it, I know, don’t be like that), right? It’s the same for your vehicles, the center of lift or buoyancy is a string attached to your vehicle and if the heavy part (center of mass) is above it, it will want to flip if given the chance. If you do the opposite, it will self-stabilize in its upright position.
Buoyancy [BUOY]
tl;dr
Air or helium pumps in enclosed spaces help with buoyancy. Holes in those compartments will make you lose buoyancy more or less quickly. Blocks also have a buoyancy rating based on real physics. If they touch the water, those blocks will provide positive or negative buoyancy based on their weight.
Long version
There isn’t really much more to say that is practical for the game. Basically, buoyancy depends on how much water you displace. If the weight of the displaced water is greater than the weight of the object, then that object will float. That is how real world ships can be built of metal that would normally sink. Because those ships are not solid bricks of metal, there comes a point where the shape of the boat combined with a more or less empty hull moves more water in terms of weight than the weight of the ship itself.
Block Stats [BLOS]
HP: If it takes that much damage or more, it gets darker and falls off the vehicle.
Armour: Acts as a damage multiplier for most damage types. Higher values are better. Important exception is EMP.
Weight: How fat it is. This aspect is important for physics.
Material cost: Fairly obvious.
EMP susceptibility: If an EMP discharge travels across this block, it will drain up to that percentage of the discharge and take damage. It stops draining if the damage exceeds the block’s HP. If this stat is zero or missing, you can safely assume that EMP can travel through this block but will deal no damage.
Protective drainage: Similar to armour, but works only against EMP. Whether or not this block takes damage from EMP, a discharge going through a block with protective drainage will lose that much damage.
Damage reduction: Only available on surge protectors. This works like protective drainage, but it is a percentage instead of a flat number.
Buoyancy: Positive numbers make things float, negative numbers make things sink.
Drag factor: Certain blocks have less drag due to their shape. This aspect is important for physics, especially for vehicle speed.
Repair cost: Certain blocks such as ERA armour do not cost the full material cost to repair. This only applies if the block is destroyed in combat.
Block Functions [BLOF]
Here, I will list blocks per categories from the build menu:
Blocks
They mostly exist to connect things together and absorb damage. A few blocks like ERA armour have specific uses which are addressed in the relevant mechanics’ section.
Water, Air, Land
These sections contain all kinds of propulsion components and are sorted based on the environment they work in.
Control
Very diverse section, although you will realistically only use a couple of blocks from this tab.
Vehicle controller blocks let you manually control your vehicles and fire control computers let you manually fire your vehicles’ weapons.
Chairs allow you to anchor yourself on a vehicle and serve as a spawn point if you choose to spawn in vehicle chair or warp to a vehicle from the map.
Automated Control Blocks
…have their own section.
LUA Box
A box where you can either type text for people to read or use to program complex behaviour.
Bread Board
…have their own section too.
Resources
Contains most blocks that store things needed for other blocks, including:
– Material gatherers to grab precious shinies from resource zones
– Material storage for building more vehicles, repairs, fuelling steam engines
– Refineries convert materials into commodoties
– Fuel storage for running fuel engines and custom jet engines
– Ammunition storage for your dakka needs
– RTGs to generate electricity for free for a very high upfront cost and large space requirement
– Batteries to power electric engines OR some of your pew pew’s (PACs and Railguns)
– Electric engines to convert electric power into engine power; note that the maximum amount of power an electric engine can produce depends on the size of the battery they are connected to.
AI
This means Artificial Intelligence, but none of those blocks are actually smart enough to do anything on their own.
Contains sensors and blocks that control vehicles and other blocks. Most of those deserve their own section.
Fuel Engines
Parts needed to build some of the most versatile engines in the game. It’s usually a choice of between a large, efficient, and lower power engine; or a small, inefficient, and high power engine. You can, of course, scale as much as you want. Building those from scratch can be quite the science if you want the most bang for your buck. Consider checking out the useful blueprint section for a link to some very good prefabs.
Every fuel engine needs a fuel engine generator. It possible to attach cylinders directly to the generator, but they are generally attached to a crank shaft connected to the fuel generator.
Then, it’s usually a choice between low-efficiency but high power injectors OR higher-efficiency but lower power carburettor and turbochargers.
Exhaust should be routed to eventually exit the vehicle for cooling, otherwise your engine may overheat and stop working for a while. Radiators are quite good, but are also quite heavy.
Superchargers are generally ignored, since they help at low RPMs. In other words, they only help when not using the majority of your engine’s power. Generally-speaking, it’s better to use a smaller engine if you don’t need the power anyway hence why superchargers are rarely ever used.
Note that fuel engines can be used to generate electricity, which can be automated and modified using ACBs.
This section may eventually be expanded with more information. Look in the video tutorials and blueprint section for good examples of well-built fuel engines.
Steam engines
Parts needed to construct the fairly high power engines that consume more or less resources depending on the setup. Steam engines are very powerful, but do not adapt well to changes in demand. This means that a steam engine will waste materials if not turned off when it is not needed or if your power needs vary a lot.
Note that they can also be used to run custom boat propellers to achieve greater speeds with fewer propellers at the cost of having to physically connect the crankshaft to your propellers using shafts and such.
Building them requires you to build chains of boilers. Each boiler chain needs a steam control attached to it in order to function. You must then pipe the steam into pistons or turbines.
Pistons assemblies must be connected to cranks. The cranks can then be connected to a gearbox to generate engine power or power propellers. They can also be connected to a wheel to run a generate and create electricity. You can also route the exhaust of pistons (top pipe connection) to more pistons to increase the material efficiency of the engine at the cost of power density.
Turbines produce electricity which must be stored in batteries to do anything, but they do not slow down under load.
The ingame tutorial provides basic information on how to assemble them. This section may be updated with a more in-depth tutorial.
Spinblocks and turrets
Contains turrets, spinblocks, and pistons. Those are considered subobjects and can be saved as subassemblies using the Subobjects mode.
Simple weapons
Contains all the weapons that do not need to be assembled to function, and very forgettable drills.
Place those down, make sure there is an LWC controlling it that is also connected to the AI, and it should all work.
Some of the more recent simple weapons use advanced cannon shells to fire. Input the gauge listed in the menu for the simple weapon into the customiser and do not exceed the listed length and your weapon will work with your custom shell.
Missiles, CRAM Cannons, Advanced Cannons, Lasers, and Particle Cannons
These sections contain all the parts needed to assemble multi-block weapons. These deserve their own section.
Defenses
Contains almost everything that is used for defense that isn’t armour.
Decorations
Blocks used to make your vehicles feel pretty.
Misc
Contains a variety of blocks which do not fit under other categories. Namely, you will find blocks to repair your vehicles, docking stations (tractor beams to hold other vehicles you own in place), vehicle spawners, and heart stone modules (mostly used in adventure mode).
Prefab/Subobject Mode
Allows you to copy and save blocks, including their settings. You can them place the exact same arrangement on the same or other vehicles without having to do anything else.
Propulsion Editor (Q menu) [PROP]
With the 2.4 update came a new interface for propulsion components and although the same could be said out of most ingame menus, it can be a little hard to figure out.
tl;dr here is a screenshot with a basic explanation of what each button does:
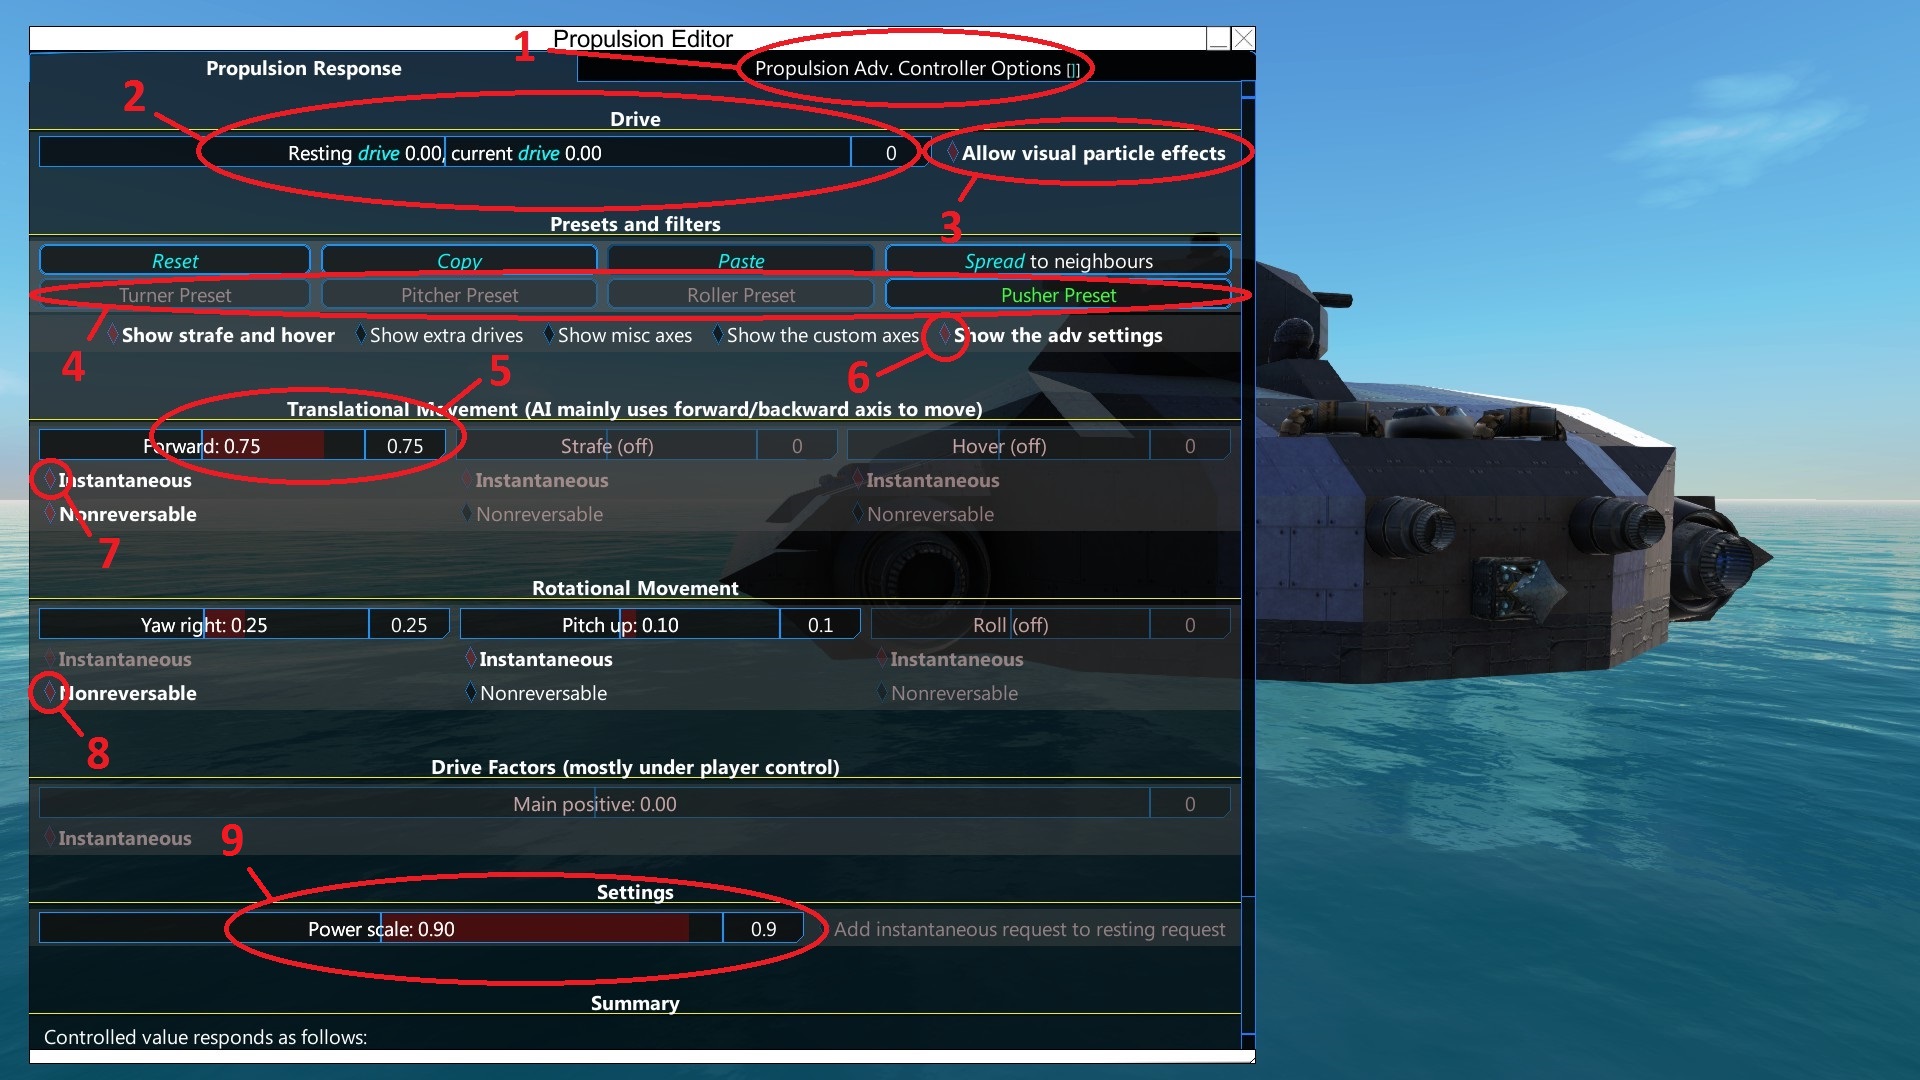
(1) is the the tab for complex controller options. This feature still works, but it has been explored and explained quite well before. I may come back to this later for the sake of completion, but in terms of functionality this feature is now entirely redundant and more limited than the alternatives.
(2) reports the current usage of the propulsion block. You can also set a resting drive using this slider, in other words, you can make this block thrust permanently to varying degrees.
Very important note 1: similar to many other UIs in the game, the game represents a fraction or a percentage using numbers between 0 and 1. 0 is, unsurprisingly, no thrust. 1 is maximum thrust.
Very important note 2: negative numbers do not mean negative thrust, really (except for water propellers). It’s a way to track the same axis, but in opposite directions. For example, -0.25 on the yaw for that picture would mean that the jet would fire up to 25% of its maximum thrust when directed to turn left instead of during a right turn.
(3) fairly self explanatory. If you deselect this option, this block will show nothing even if it’s firing at maximum thrust.
(4) are the preset buttons. This may seem obvious, but there is more to these buttons than it seems. While forward thrusters do not allow the “turner” preset, every other thruster will only show presets for directions they can affect. Hitting the preset key also resets any tweaks you may have done, but it will automatically figure out whether you need a positive or negative value on your thruster for normal function. This is extremely handy if you’re not sure.
(5) the actual sliders for each axis. Note that you can type more precise values in the square on the right.
(6) activates the checkboxes for (7) and (8). The other buttons in this row mostly add sliders for more customisation, but they are often not needed for most functions unless you’re getting creative. The exception would be “show strafe and hover,” for rather obvious reasons.
(7) switches this axis to an instant response instead of increasing or decreasing thrust over time. I can’t see many practical applications to making propulsion not instant, especially since AIs and PIDs can somewhat throttle your thrust as part of their basic function. Leave alone unless you know what you’re doing.
(8) is probably the most confusing part of the UI, but also a fairly important one. This setting does apply to every form of thrust, even if you cannot actually fire it in reverse. The way this works is that the game tracks every command (forward, yaw, pitch, roll, etc.) for every component. While a demand above 100% or below 0 will not result in the thruster being magically more powerful or able to reverse, the game will still do math as to how much thrust should be produced.
If you take the example above in consideration, this means that the thruster will only fire at 75% maximum if the only thing the vehicle is trying to do is go forward. It will fire at 100% if trying to go right and forward. It will fire at 75% if trying to go left. If nonreversable was unchecked it would fire at 50% when trying to go forward and left. If trying to go forward and pitch down, it will fire at 65% as per the picture. Hopefully this makes sense. See the long version below for more information on why this may be important for your vehicle.
(9) is a global multiplier. It means this thruster will never fire at more than 90% of its maximum thrust ever, and every slider is multiplied by that much. This value can be modified using ACBs and it is a prime way to modify everything on your vehicle without having to tweak individual settings which makes it a great way to make testing propulsion much, much less aggravating.
Automated Control Blocks [ACBS]
These deserve their own section. They allow complex controls over vehicles using a relatively simple IF, THEN logic. Basically, when you press Q you will first be presented with the conditions’ tab. If the parameters of the condition you set are true, then the selected action will be undertaken automatically.
Common uses include:
- IF enemy range (whatever), Shield projectors set type (reflect) along with another one to turn shields to type (none) when there are no enemies to save fuel. You can use the same condition with steam boilers set burn rate (higher or lower) to save resources outside of combat.
- IF enemy range (whatever) or target enemy bearing (whatever), Complex controls activate (something) in conjunction with propulsion or other control blocks set to respond to complex controls. This is often used to stabilise a vehicle or override the AI’s movement for specific behaviour such as maintaining range and so on.
- The possibilities are huge and mostly limited by your creativity and how much space you need for the actual control blocks.
Note that if you have one block directly next to another and one of those blocks only has a condition, then it requires the condition for both blocks to be true to activate whatever action. The same is true with blocks with only an action and no condition can let you have two actions for multiple conditions though this is rarer and can be achieved more easily using other options.
Another important feature on the target and actions’ tab is at the bottom: filter affected components and search patterns. Search patterns allows you to modify other control blocks if you have named them by entering either their full name or part of it in that field. You can also use this feature with any other blocks if you use the block naming function (shift+n). This allows you, for example, to rename your flares and fire them from an ACB anywhere on your vehicle without firing other weapons.
The affect range is based on distance of the control block and whatever it is affecting and this is how you can control, for example, the firing of missile countermeasures without firing every weapon on board. This means that placement of automated control blocks matters sometimes.
General Purpose PIDs [GPID]
A block that tends to scare people or automagically do things. General purpose PIDs are independent from the AI and work even if the AI is turned off. Also, because their variables are not controlled by the AI, they allow for complex behaviour, especially when used in conjunction with automated control blocks.
On their own, they are usually most useful to control altitude and the stability of a vehicle. Note that they are not magic and rely on propulsion components to do anything, meaning they can only do so much if your propulsion is not setup properly, damaged, or insufficient.
Here is how to set them up:
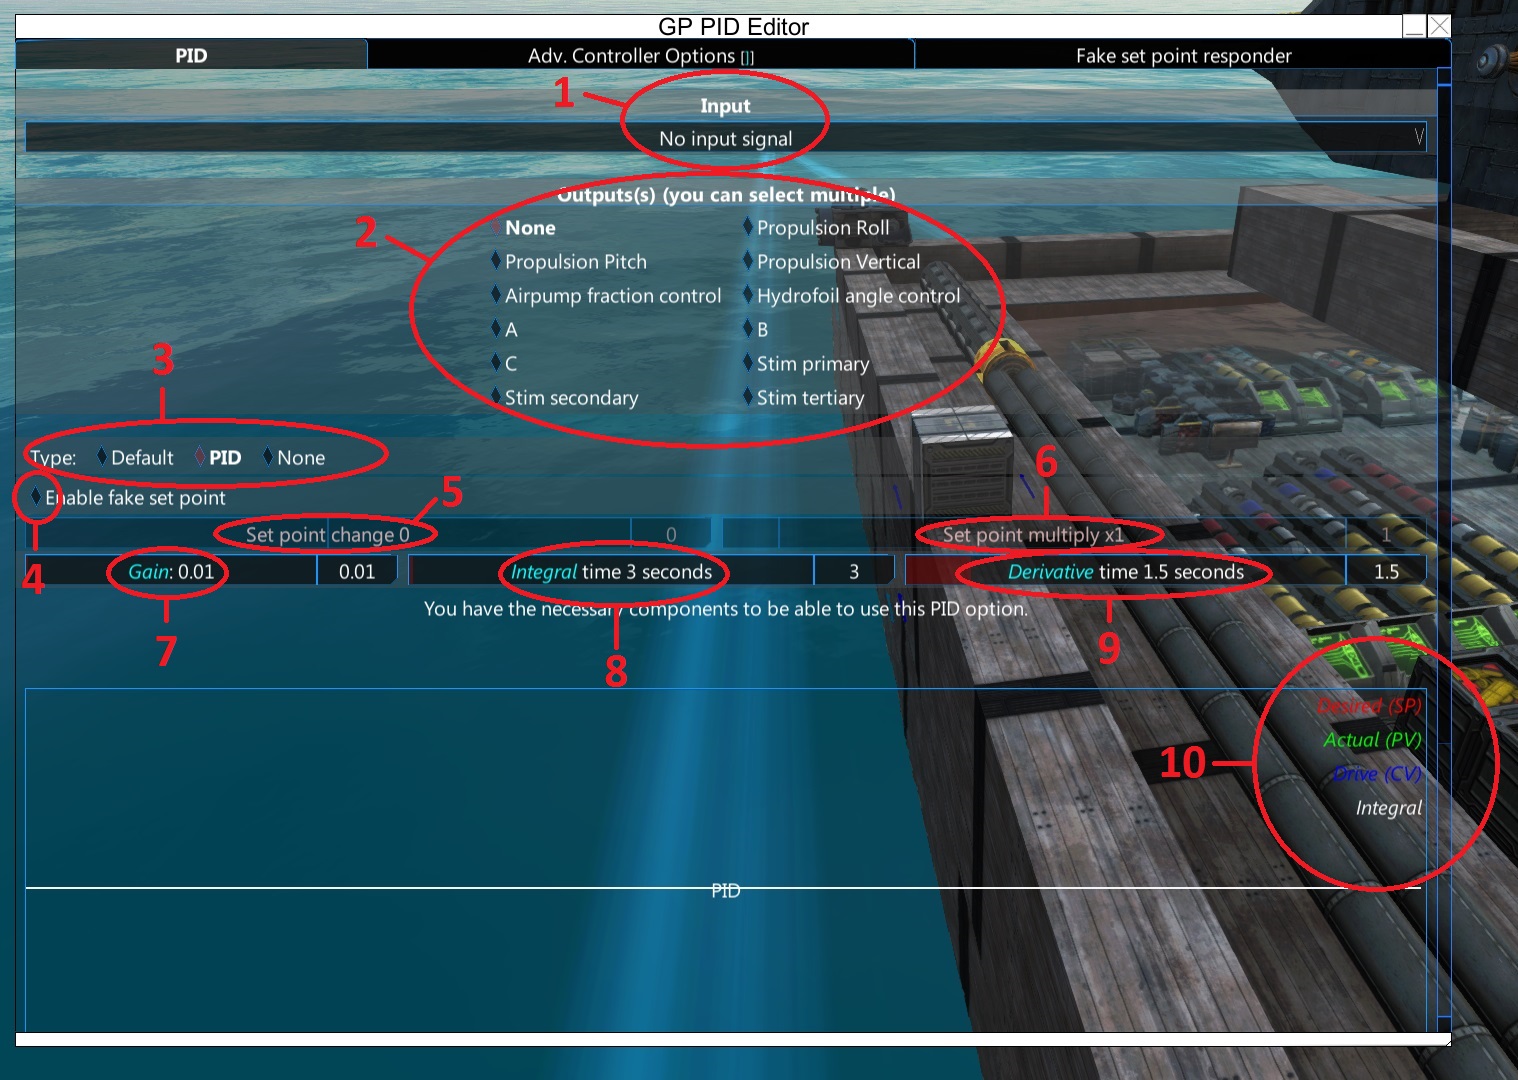
First off, input(1) is the variable your PID will monitor. PIDs will only watch one at a time so you will need multiple PIDs to control multiple aspects of a vehicle.
Next is the ouput(2). Unless you’re getting very creative, you will usually want a PID with an input set to roll to output to propulsion roll. It’s typically quite obvious which goes with which. Altitude goes with propulsion vertical, pitch with pitch, etc.
Type(3) should typically be set to PID. Note that setting the AI PIDs to none means the AI will completely forfeit control over that axis which can be useful if you want to control it externally, like with a general purpose PID. Default tries to autocompute the variables using voodoo.
Enable fake set point(4) allows you to set non-zero target values. This is especially useful for altitude.
Set point change(5) is a number that will get added or subtracted from the fake set point, allowing for constant adjustments even if the fake set point changes. I can’t see many practical applications, but it’s an option.
Set point multiplier is the same as above(6), except it’s a multiplier instead of a flat value.
Gain(7) is how much of the thrust available to it a PID will use. If you set Integral to max (ignore), this is as much thrust as it will ever use. If you do use integral, gain is like the basic unit which will be multiplied over time by integral. In other words, a high gain loses fine control, but may be required if the available thrust is low.
Integral(8) acts as a multiplier for gain, unless you set it to max which essentially ignores integral entirely. Basically, depending on how long your vehicle has been off the fake set point, integral will multiply the gain slower or faster. Lower values mean faster increase of the gain, meaning your PID will respond faster and with increasing strength if the vehicle is off.
Derivative(9) allows your PID to “predict” instability based on recent data. A higher number means it will attempt to balance based on a longer “history” which can be useful to compensate for recoil of slow firing guns. Though, typically, higher values tend to be undesirable and can result in more instability. A value of zero means it has zero ability to predict, which will usually result in your PID overcorrecting. Good values are usually between 0 and 1 second.
How to tune PIDs:
[TPID]
The easy (Sith) way:
– Set Integral to 250
– Set Derivative to 0.5
– Set Gain to 0 and increase it until your vehicle is able to maintain the
desired altitude, roll, or pitch.
The proper (Jedi) way:
– Set everything to 0
– Increase Gain until the blue lines start going up and down above and below
the target (green and red lines, they should overlap or be very close)
– Set the Gain to about half of the previous value
– Start increasing Integral slowly until the vehicle is almost perfectly
stable
– Add a little Derivative to smooth things out
Tuning PIDs can seem daunting, but here’s a few tricks which are in order of how you’d typically want to go to set up a PID:
– Just set the derivative between 0.5 and 1 second and leave it
– The more unstable or the more “dangerous” it is for your vehicle to be unstable, the lower the integral should be set. 1 second is usually extremely responsive, 3 seconds is a good average and results in smoother controls.
– Finally, let the craft go and look at the graph(10). If the dark blue line is going crazy, lower the gain slowly until it smooths. If the blue line is either at the top or bottom, you probably need to add thrusters.
Troubleshooting:
– Output Saturated:
You likely do not have enough thrust and/or it is wildly unbalanced across the center of mass.
– The vehicle is wobbling really fast:
Your Gain is likely too high.
– My vehicle does not react fast enough to losing control:
Start by increasing Gain and rebalance the Integral with the new Gain settings. Alternatively, set Integral to 250 and rebalance Gain.
– My vehicle falls apart the moment it takes damage:
This can be a consequence of using an Integral of 250 since there will be no incremental change over time. Try using a higher Gain and balancing Integral again. IMPORTANT: Balancing for damage may require that you live with some wobble when at full health due to shifts in
maximum thrust available.
Possible fix for OCD people: Use two PIDs. Use ACBs with affect range to set
PID TYPE to NONE on the stronger Gain PID based on VEHICLE HEALTH. Use more ACBs
to deactivate the weaker Gain PID when the vehicle is at lower health and activate
the stronger Gain PID. Voilà! Your PIDs now adapt to damage. Consider having more
thrusters or protecting them more for maximum stability in your vehicles. Do keep
in mind that there’s a limit to how much damage you can sustain and remain stable.
Breadboard [BRED]
Note: I now have video tutorials explaining the basics and giving examples of uses of breadboards. You may find them in the useful video section.
Contrary to popular belief, this block contains no carbs. Do note that this is a work in progress block in terms of game development.
What the breadboard excels at is compact solutions to things that normally require several blocks. Mostly, in their current iteration, they can replace physical PIDs, some ACBs, and, as outlined above, switch AI stuff within a singular mainframe.
They are also useful to do things similar to what an ACB would, but with numbers that are constantly recalculated rather than predetermined.
Very important note 1: There is almost no reason to use the regular breadboard over the AI breadboard as those have more options and can do everything the other version can do with the only requirement being a connection to the right AI mainframe.
Very important note 2: Most of the breadboard stuff has tooltips. Mouse over stuff, sometimes they even describe the logic of the components with the actual numbers you put in. Perhaps the most important information is what each “connector” prong thing does; they’re small but hovering over them with your mouse will give you more information.
Due to how obscure they are to use, here are some actual examples of how to set breadboards up.
Replacing PIDs:
[BPID]

In this picture, the top circle (1) contains your sources of information about your vehicle or your target which can then be used with the bottom components (2) to affect PIDs, drives, propulsion, or select behaviours and manoeuvres.
You will need the following components to make a PID:
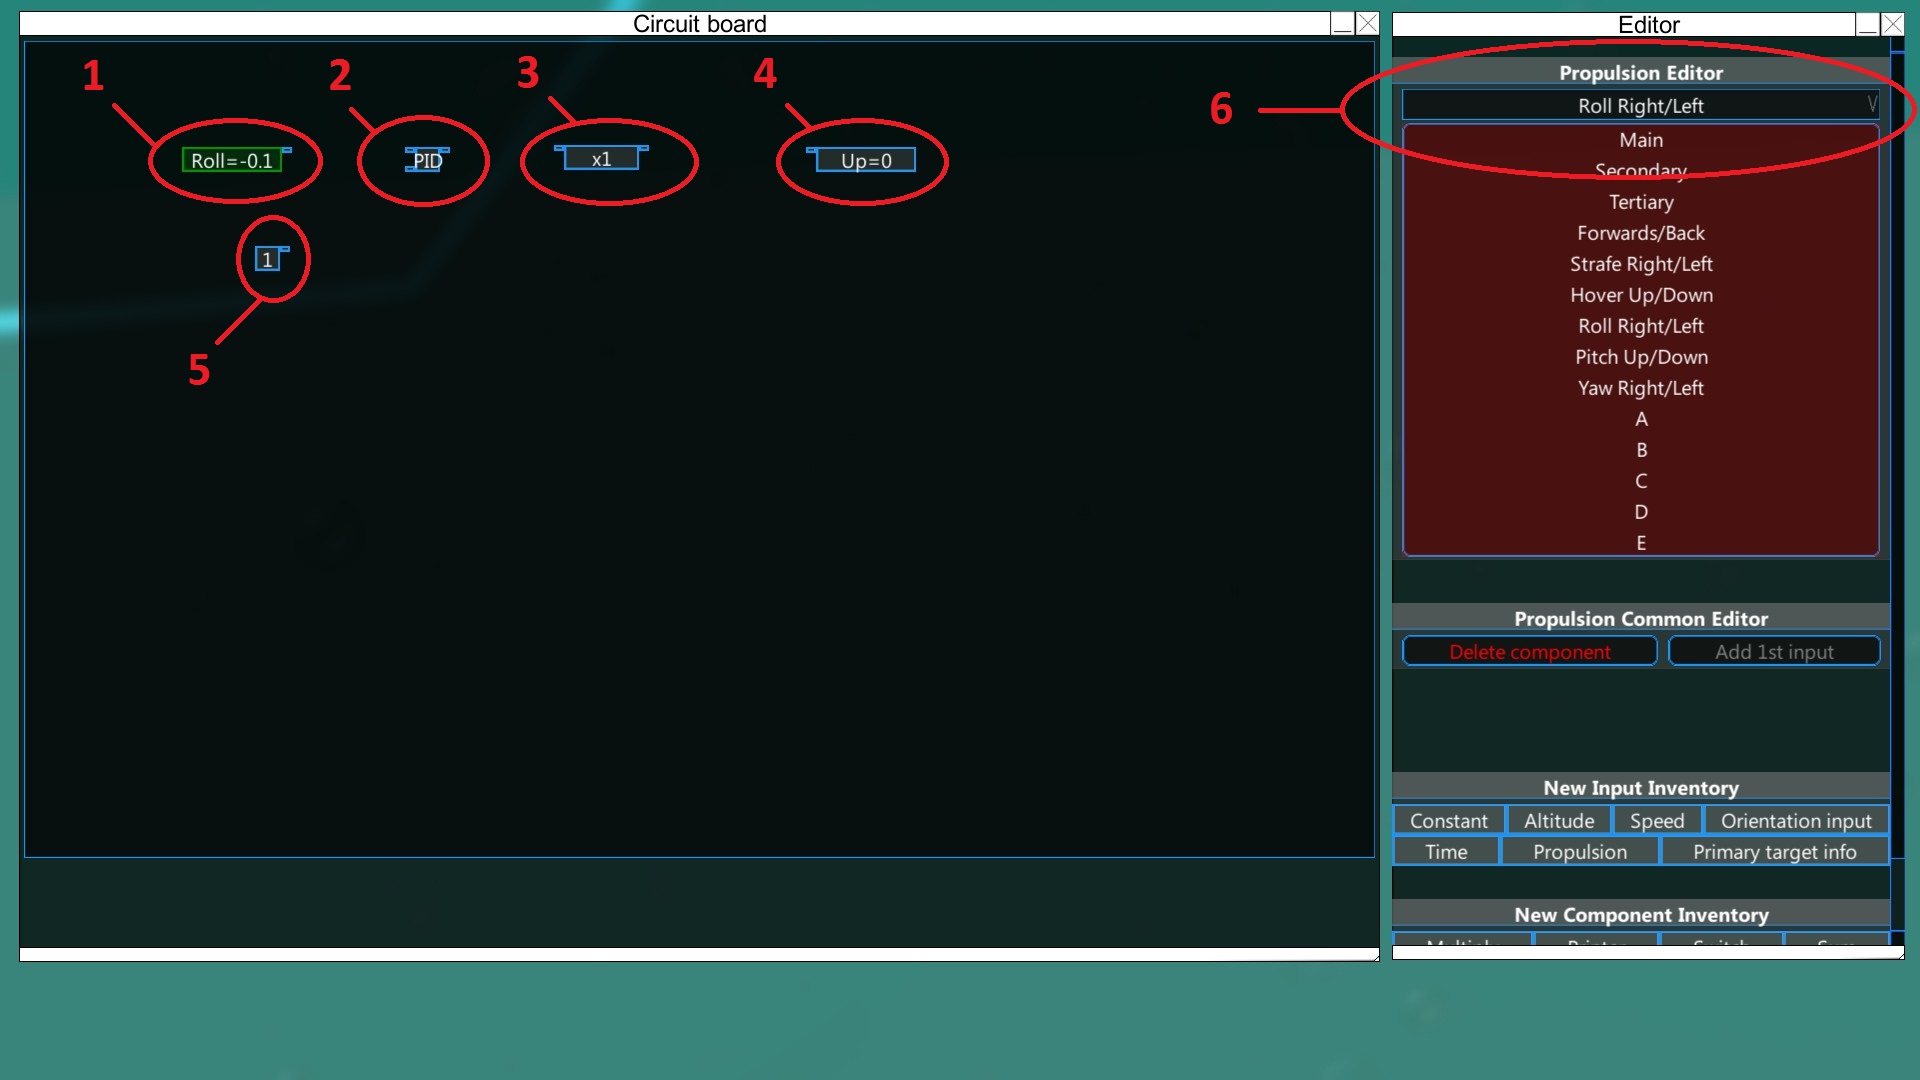
(1) is an orientation input component from the top input category in the menu. Note the (6) dropdown menu to choose the specific input you need. Other breadboard components have dropdown menus.
(2) is a PID component. Note that you still have to tweak gain, integral, and derivative and that some other PID options are missing. Do look at the PID subsection for more information on tweaking these settings.
(3) is a simple multiply component. I will explain why you need one of those just a little further.
(4) is the component inventory propulsion in the lower part of the UI.
(5) is a constant.
Here is what it should look like when done to replace a simple PID:

From left to right, you need to connect theorientation input to the top left connector the PID component. This is how the PID gets its information about the vehicle. Make sure you select pitch, roll, and such on the input to choose which axis to control.
The number component under the propulsion thing is a constant and must be connected to the bottom left of the PID in order to establish the set point for the PID. This is the value the PID tries to match. There are fancy ways to make this dynamic which will probably part of a video I will make.
Next is the PID component whose top right connector (the ouput) needs to be connected into the the top left connector of the multiply component. The multiply component itself needs to be set to -1 to invert everything coming out of the PID. This step may become unnecessary as I’ve suggested on the From the Depths tracker that this should be done automatically by the PID component, but for now it just needs to be done for pretty much every PID.
Note: altitude PIDs do not need to be inverted via this step.
Finally, you need to grab the top right connector from the multiply component and connect it to the top left connector of the component inventory propulsion thing. Don’t forget to set this last component to be same axis as your PID is monitoring (pitch, roll, etc.). In my example, I left it as “up” instead of “roll” like the input. I’m dumb. Don’t be like me.
There you go! You can now replace most PIDs with this and save both space and resources. Some creative setups may not be currently possible on breadboards simply due to the variables that are available to work with as of June 2019.
Here are some more examples. This picture has example A and B, which both control altitude. Example B makes the vehicle go up and down every 5 seconds to make it more difficult to hit. More information below the picture.
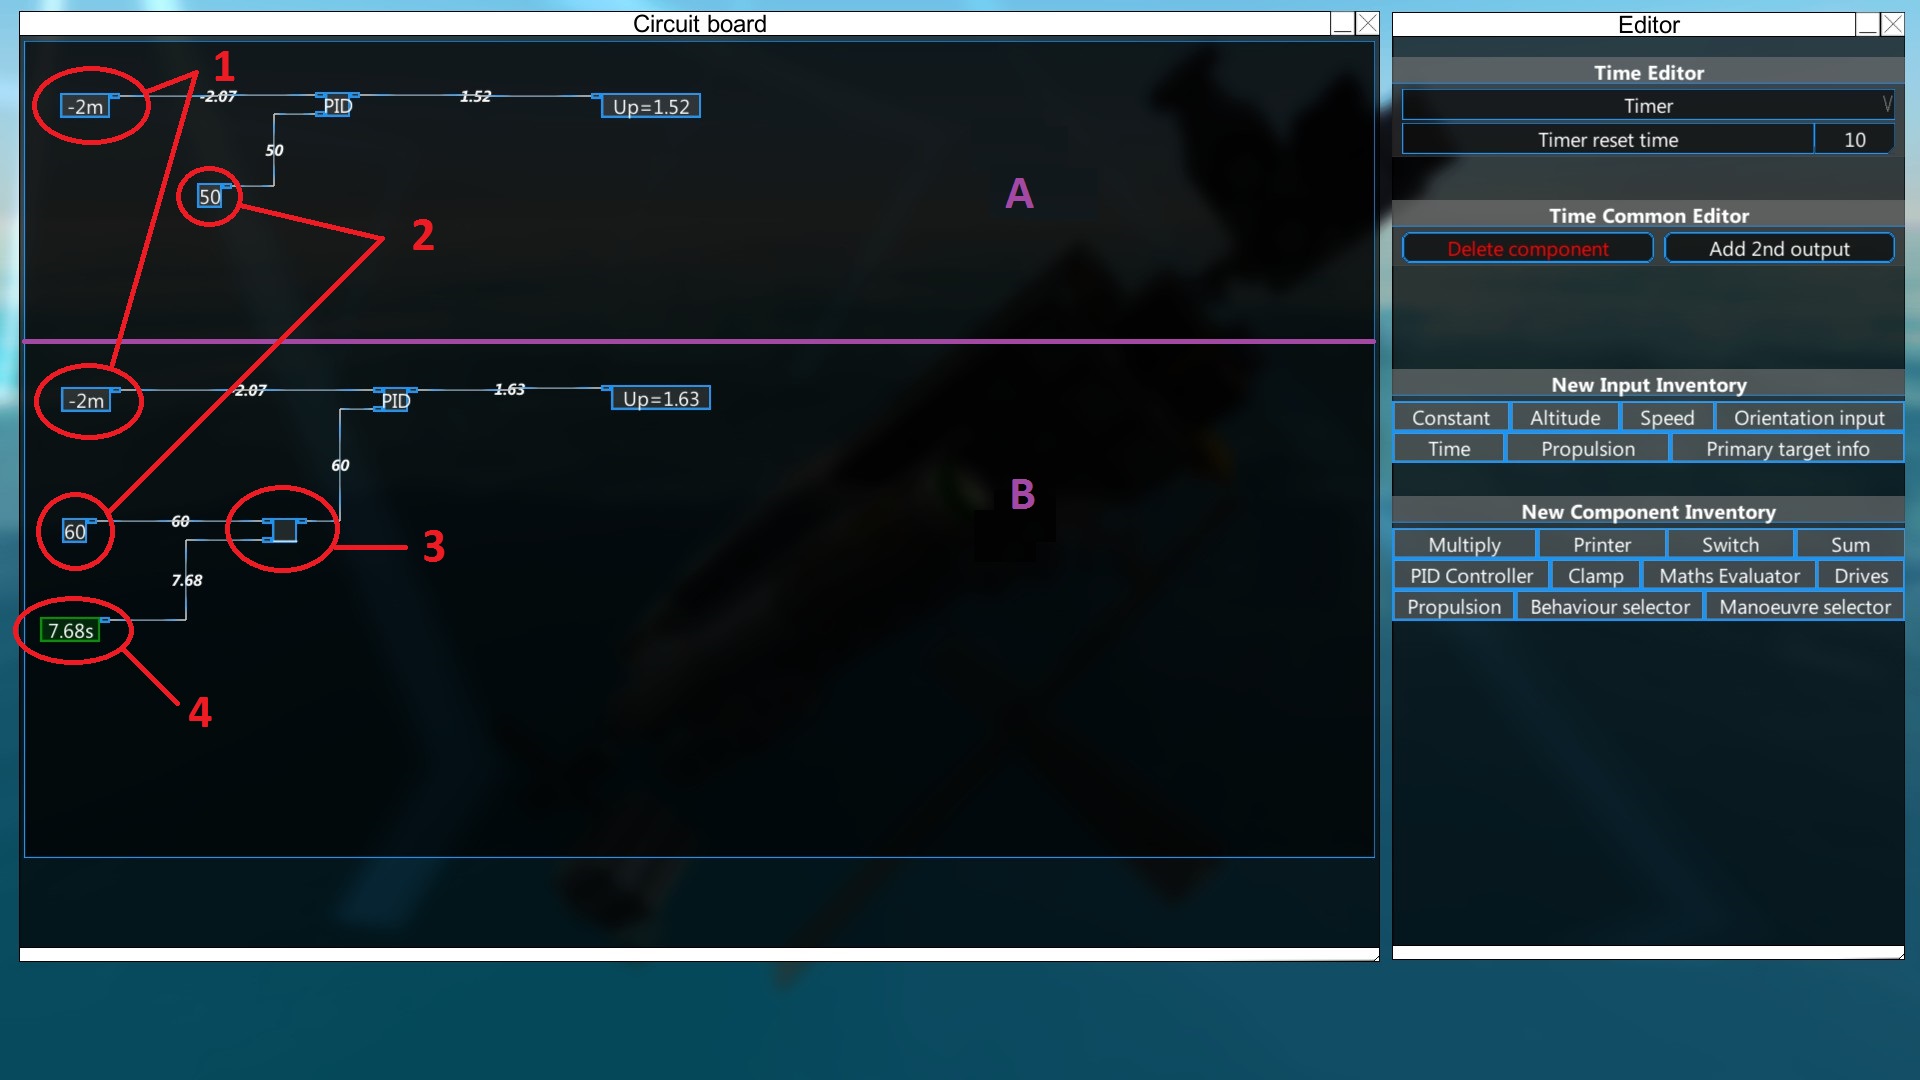
(1) are both altitude input components.
(2) are constants and define the target altitude for example A and one of the two target altitudes in example B.
(3) is a switch component with a threshold set to 5 and its open value set to 50. The threshold is what makes it go up for 5 seconds and down for 5 seconds. The open value is the second possible target altitude for the PID component.
(4) is an input timer component set to 10 seconds.
Can you figure it out?
Here is another example, thanks to Blarint from BorderWise’s community for thinking and sharing this one. This makes your vehicle point directly at its target. (1) is a primary target info component using the bottom right connector which refers to target bearing.

Game Mechanics: Damage [GAME]
Kinetic damage [KIND]
This section applies to all APS shells without a hollow point head or non-kinetic warheads (such as HE; EXCEPTION: Pendepth fuse), CRAM shells with non-kinetic filler unless they have a pendepth fuse, piercing particle accelerator cannons, simple weapons other than lasers. Fragments, regardless of the source, also behave like kinetic projectiles.
tl;dr
You need as much Armour Piercing (AP) as armour (AC) to deal full damage to a block. Having more AP than the AC does nothing to increase kinetic damage. AP vs Armour scales linearly, i.e. if it has half the AP as AC then it deals a half the damage, etc. Each block destroyed takes kinetic damage away from the projectile. The projectile keeps going until it runs out of kinetic damage or sails through.
Long version
How kinetic damage is applied is as follows, upon impact with a block the armour is calculated for any applicable stacking bonus (look at the section on armour for more info). Kinetic damage is multiplied linearly according to the following formula: kinetic * AP (Armour Piercing) / (Armour) = effective kinetic damage. If the resulting kinetic damage is greater than the HP of the block being hit, then the block is destroyed, the projectile weakens by that much and damage keeps being rolled for subsequent blocks until there is either no more kinetic damage or the projectile goes all the way through.
Note that angle of impact matters because it increases the effective distance a shell has to travel through a block. This results in a multiplier for armour for most hull blocks. The multiplier is COS(ANGLE).
On top of that, having more AP vs a block’s armour does not help damage. This may not matter when hitting heavily armoured targets, but can mean that a high AP shell may be weaker against a lightly armoured target compared to a shell with more raw kinetic damage.
IMPORTANT NOTE: Shells with a mix of kinetic and other damage types that lack a pendepth fuse may overpenetrate a target. Also, if the kinetic damage and AP are too low, there is a risk of ricochets without the payload detonating. You may use an inertial fuse to trigger the payload even if the shell bounces on the armour.
Thump/Impact damage [THIM]
This section applies to impact particle accelerator cannons, missile impact damage, HESH thump component, and hollow point shells.
tl;dr
Thump damage ignores armour stacking bonuses, angle of impact, and spreads laterally akin to an explosion instead of penetrating targets.
Long version
Thump damage still has an armour piercing value like regular kinetic damage, but it does not take armour stacking into account which makes it consistent in terms of damage no matter how thick a target is. The formula for damage is otherwise the same as kinetic.
The other difference is that instead of allowing the projectile to sail through, it detonates and any kinetic damage remaining after destroying the first block (if it did destroy the block) is transferred to the blocks on the sides of the point of impact instead of those behind. This means that thump damage can create large holes but cannot truly penetrate a target.
Explosive Damage [EXPD]
This section applies to flak, HE, and particle accelerator cannon explosive damage.
tl;dr
Explosive damage hits everything in its range for the displayed damage, with an exponential decrease the further away from the center of the explosion a block is. Armour decreases damage exponentially as well, meaning that at the same range, a block with 10 armour will take more than twice the amount of damage that a block with 20 armour would.
Long version
The way explosions deal with corners and holes has changed a few times over the years. Currently, little to no damage will be applied if the explosion has to wrap around a corner or dig into a hole in the hull depending on where the explosion was set off.
EMP Damage [EMPD]
This section applies to… EMP.
tl;dr
EMP can be weird. Typically it travels through low resistance blocks towards the nearest susceptible block. In some cases it can dissipate without really being drained. Surge protectors have additional priority when it comes to EMP, which will draw EMP to them first though it can break other susceptible blocks on the way there so be mindful. EMP will travel through stone, wood, and other similar blocks if it has no other path to a susceptible block.
Long version
EMP will travel along metal and alloy blocks generally speaking. The rest applies as above. Disruptors were reworked and now apply a debuff to any shields they go through. If a disruptor hits or goes through a shield, it will lower that shield’s chance to reflect projectiles for a certain amount. The debuff fades off gradually over time.
Laser damage [LAZD]
On the surface, lasers operate similar to kinetic damage in terms of how damage is calculated. Basically, if you have the same armour piercing value as the armour of the block being hit, you will deal full damage. This applies to defensive lasers as well, though projectiles typically have 20 armour, so you will usually do full damage as long as there is no smoke or water in the way.
Lasers also ignore armour stacking so armour piercing values above 60 are useless in theory since the highest armour value in the game for a single block is 60 for heavy armour. Do keep in mind that, as of the update of July 26th, laser shields and smoke reduces AP on lasers which means that higher values can serve a purpose in getting around laser defenses.
Damage Cont’d
HEAT [HEAT]
There are three options to use HEAT. You can either use a shaped charge head or a shaped charge secondary both of which only exist for use with APS. The third option is the shaped charge missile component which can only be put in the front.
A secondary shaped charge will only achieve 80% of the effects for the same amount of HE compared to a a shaped charge head. HE warheads placed behind a shaped charge will empower the HEAT effect. This can be increased or decreased by manipulating the “special factor” slider on the HE modules. 1 means 100% of the HE will go into the shaped charge and 0 means none of the warhead will go towards HEAT. Placing a module a different module between the shaped charge and HE will break the chain and any HE modules placed past that point will behave like regular HE.
HEAT, when triggered (triggered automatically by impact or fuses) will pass through armour in a straight line while dealing minimal damage to the blocks it passes through. Whether or not the heat jet projectile passes through depends entirely on the penetration metric shown on the shell (square root of the armour it has to go through). HEAT does not care about armour stacking, but will transform into fragments if it hits an air gap after entering an armour block. It will also transform into fragments if it hits a block not labelled as structural (e.g., applique) and functional blocks such as an AI component, engine component, etc.
HEAT fragments behave like kinetic projectiles, the number and damage of each depends on the shell or missile and have 4 AP. They spread from the airgap or structural block in a rather tight 20 degree cone.
The penetration metric works in a simple way. If there is enough penetration metric, the projectile keeps going. If not, the projectile is destroyed and no other effect takes place. To know if the projectile can penetrate you simply subtract the square root of the armour of the block it is travelling through for every meter of material it is going through. For instance, a single meter of metal has an AC of 40, the square root of which is 6.3. Therefore, a 32 penetration HEAT shell will pass through approximately 5 meters of metal.
HESH [HESH]
The only way to use HESH is with an APS shell using a squash head module.
HESH is similar to HEAT in that it creates fragments behind the armour that it hits based on its spalling metric. However, HESH also deal a small amount of thump damage and the damage of the fragments it creates depends on how much and what kind of armour was hit whereas HEAT deals a set amount of damage if it has sufficient penetration.
The fragments created by HESH also behave like standard kinetic projectiles and their damage and number depends on the HESH’s spalling metric. The damage shown in the customiser is divided by the square root of the armour it has to penetrate and then spread across a certain number of fragments. The AP of the fragments is the average of all the materials it had to penetrate and the last material counts for 3 times as much. For example, 3m metal and 1m wood would be (3*40 + 3*8) /6 = 24. This generally means that HESH fragments are more effective against heavily armoured targets.
Game Mechanics: Defense
ERA Armour [ERAA]
The ingame description for this block is quite good. If a hesh shell, heat shell or jet hits a block of ERA, then both the block and the damage/shell are simply deleted, regardless of how much damage if could have done otherwise. This also applies to fragments.
Kinetic and HE projectiles are a bit different. Instead of just negating the damage, it reduces it by a significant fraction and the block is also destroyed.
The block is single use and is vulnerable to splash damage triggering/destroying more than one block but its ability to reduce/negate damage is quite unique and useful against slow-firing, high-damage shells.
Spall liners [SPAL]
Due to the mechanics involved in HEAT and HESH shells, spall liners are a valid form of defense in FtD. There are two ways to create a spall liner:
– Leave a 1-meter gap in your armour and place some armour behind it. This causes both HESH and HEAT fragments to spawn and hit the next blocks of armour. Ideally, the last layer of armour from the outside should be wood (i.e. the last “inside” layer), since it is the lowest AC material and also the cheapest material that will stack with other materials. This will cause HESH fragments to have a much lower AP (check the section on HESH) which will significantly reduce the damage of the fragments if your next layer of armour is made of a better material than wood.
– Use slopes to create an air gap in your armour stack. This mostly works as above for the rest. Do note that using wooden slopes will work against HESH, though slopes have reduced HP, which means they may break and suddenly you have metal fragments with an AP of 40 bouncing around, doing significantly more damage. Note that poles placed parallel to your inner wall will also work and have a lot more HP.
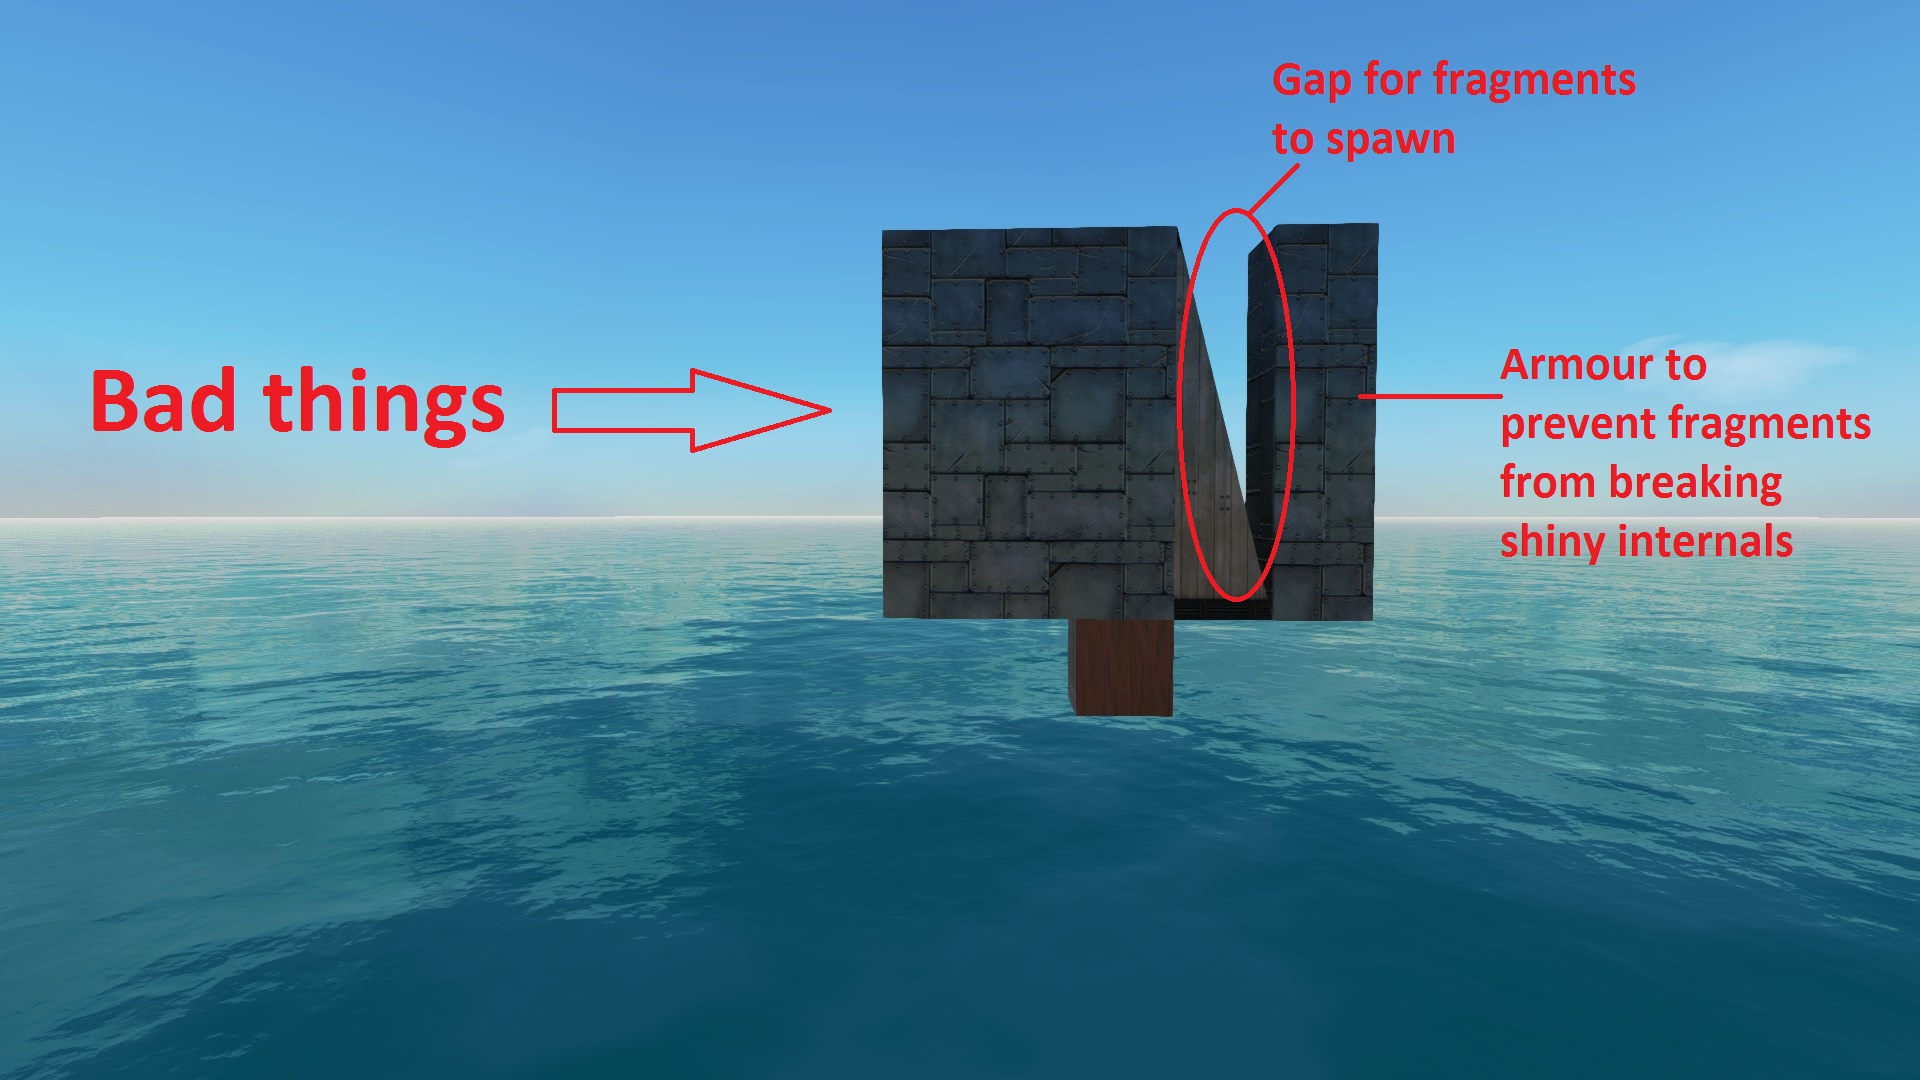
Armour Stacking [ARMS]
When most damage effects (refer to the appropriate section on damage to make sure it applies) hit stacked armour blocks, a fraction of the armour of the material behind is added to the armour of the first block. Note that hitting a block along their lengths, such as hitting the base of a 4 meter beam, also gives those blocks their own armour stacking bonus.
The bonus is 20% of the armour of the backing material, assuming there is a full meter of material. If you use slopes as a backing material and there isn’t a full meter of material based on the angle of impact, then you only get a fraction of the bonus. For instance, if there is only half a meter of armour, you would only get half of the 20%.
This bonus applies based on the material directly behind each block being hit. So, if you have 3 meters of metal with no gaps for example, the first layer would have 40 + 20% armour (48), the second layer would also have 48, and the final layer would have 40.
You can check if your armour is stacked properly and how much AC it gets in the vehicle designer by equipping and selecting the Health/AC tool and looking at blocks from the direction where damage would come from.
Smoke [SMOK]
Not all of the smoke effects in this game affect physics. The only sources of smoke that are useful are from advanced cannon shells (200mm minimum gauge) and smoke dispensers.
Smoke affects visual and laser detection components. It will make the laser ranger finder, cameras, and coincidence rangefinders less accurate if they are covered in smoke themselves or if the target is. Missiles using laser guidance also become less accurate depending on the amount of smoke (though beam riders are unaffected) and any lasers are significantly weakened if the beam goes through smoke (reduced AP). More smoke weakens it further. The counter to this is to use more frequency doublers than needed.
Note that although PAC’s are considered energy weapons, they do not care about smoke at all.
Smoke serves no other purpose.
The formula for smoke’s AP reduction for lasers is as follows:
3 / (STRENGTH ^ 0.333)
Strength is the sum of all smoke effects covering the blocks or projectiles being hit by lasers. Laser shields are treated simple as additional smoke strength. This formula is applied only once, meaning that different sources of smoke strength do not stack multiplicatively (1000 + 1000 + 1000 does not reduce AP to 2.7%, but only to 20%).
Note that speed reduces the effectiveness of smoke. You can mouse over dispensers while moving to see the effect.
Shields [SHIL]
Ring shields increase the armour of the outermost layer of blocks on your vehicle. They only affect one axis based on the shield’s placement. This means you need at least 3 ring shields to affect every surface of your vehicle. The amount of armour provided depends on the surface area of the axis being buffed compared to the size of the ring shield.
If the ring takes damage, it will behave like a broken PAC tube when firing and break blocks in a straight line out of the tube.
Regular shields, also sometimes called planar shields or shield projectors, cannot function at the same time as a ring shield on the same vehicle. If you want to use both, you will need to switch one type of shield off before using the other.
Planar shields will reduce the AP of any lasers firing through them and also reflect shells (APS and CRAM). The chance to reflect shells depends on the angle at which the projectile hits the shield. A shell coming in perfectly perpendicular to the shield will have the best chance to pass through whereas the closer you get to a parallel flight path, the more likely it will be that the shell will bounce. The other factor for reflection is simply the strength of the shield.
Note that shells now roll for reflection only once and only the strongest shield is taken into account for laser defense, meaning multiple planar shields set to reflect will not increase your chance of reflection unless the angle of impact is more favourable to reflection. Stacking planar shields effectively is therefore extremely difficult and of questionable value.
Game Mechanics: Other
Ammo [AMMO]
Ammo boxes hold materials like other storage boxes, but weapons that require ammunition can only use materials stored in ammo boxes. Ammo boxes refill at a given rate (V menu shows the number based on your number of boxes) which will effectively choke your weapons’ output if you do not have enough.
Detection [DTEC]
tl;dr
Sorry, no such thing here. Here’s a few golden rules for your trouble:
– 360 radars actually provide decent range readings on their own against everything but submarines and smaller vehicles with extremely low radar signature.
– 360 cameras will usually serve the same purpose except they are extremely inaccurate on all accounts, though stealth is unlikely to be an issue with those. Submarines are still ignored.
– If smoke is involved, laser range finder trackers, camera gimbal trackers and telescope gimbal trackers become quite inaccurate, making 360 and 90 degree components your best bet.
– Against slower enemies, the bigger coincidence rangefinders are extremely versatile. They do suffer a bit in terms of range measurements, but they are the most accurate visual detection for range, bar the retroreflection sensor (which requires your target to have cameras pointed at you).
– Non-IR gimbal cameras will do most of the work for bearing. Camera 90 is acceptable but subpar.
– Note that vehicles close to the surface have a reduced radar signature.
Long version
In order to shoot other vehicles, you will more often than not need detection systems. Do note that most campaigns have a small amount of default detection which means that nothing can really be completely invisible nor blinded, just extremely inaccurate.
Note that all the components labelled as trackers are unable to detect enemy vehicles on their own and need other components to provide a first detection before they can function. They are, however, the most accurate detection systems.
Passive radar as well as retroreflection sensors need the target vehicle to have either radar, or visual detection components pointed at you to work. They usually suck, except the retroreflection sensor which has good range accuracy.
Passive sonar detects either other sonars or active propellers under water. This allows them to detect any kind of torpedo or submarine if they are moving.
Speaking of accuracy, all detection components have three important stats for accuracy: bearing, range, and detections per second. Bearing is the direction the target is relative to your own position. Bearing is by far the most important aspect of detection when it comes to fast projectiles (such as advanced cannon kinetic rounds, railguns, lasers and particle accelerators) because a flat trajectory will impact a target quite reliably no matter how innacurate your range detection is. Range detection becomes increasingly more important the slower your projectiles are. Finally, detections per second is the number of readings your components get. This is useful because more readings provide more data to average from, which leads to more accurate detections overall. This is not incredibly important when firing at slower vehicles though, but can make or break accuracy against fast and unpredictable targets.
Detection works on different spectrums:
– Visual: usually extremely reliable, even against smaller vehicles, though it is blocked by water, making submarines invisible to visual detection components. Great for bearing accuracy, but poor for range. Note: is affected by time of day, being less efficient at night. It’s also less efficient in stormy weathers.
Includes: all the non-IR cameras, telescope gimbal trackers, coincidence rangefinders, and retroreflection sensors.
– IR: similar to visual, but relies on the heat signature of the target or how hot it is. Fuel engines, jet thrusters, RTGs, and shields are the main sources of heat. This tends to be quite hit or miss, as heat is averaged over the size of the vehicle for each axis. Thus, the heat signature can be quite low even if there are hot parts on a vehicle if the vehicle is big enough. Does not work underwater. Good for bearing, bad for range, typically inferior in accuracy to the regular camera counterparts but makes up for it in number of detections per second and processing cost.
Includes: all the IR cameras.
– Radar: relies on radar signature, which is lowered by certain materials on the outside of a target vehicle (mainly alloy and rubber) and slopes. A flat surface has a higher radar signature than a sloped one. Does not work underwater. Provides accurate range measurements but is bad for bearing. Radar signature is also decreased for being close to the surface.
Includes: all the components with the word radar in it.
-Sonar: radar, but underwater for most part. Does not work out of water. Sonar is average at both bearing accuracy and range and has low detections per second, making it overall bad but practically the only way to detect submarines.
Includes: all the components with the word sonar in it.
– Laser rangefinder: very good at finding range, surprisingly. It struggles with smoke just like any other laser and has poor bearing accuracy.
– Wireless snooper: provides extremely inaccurate detections based on the number and of transmitters and receivers on a target vehicle as well as the distance between them. Quite reliable to provide a first detection and point trackers at larger vehicles, but otherwise too inaccurate to be of much use on its own.
Tweaking detection systems [DTC2]
If some of your detection components are made less accurate because of smoke and other effects, the game will automatically adjust the weight of each reading accordingly on the fly, so more detection is always going to be more accurate than less detection.
Golden Rules of Vehicle Design [GRVD]
– Building better in general: have a plan, consider how much engine power you’ll need, how much ammo, what weapons you want on board and as many details as you can before building the actual vehicle. Build some of the subsystems first and pre-fab them to have an idea of what size the vehicle will be and how you can arrange the internals.
– Powering vehicles: [PBRD]
RTGs are very inefficient, but can be the ideal choice for a small vehicle that does not need much power. It will wink at you and make sexy poses by providing free power. It’s a trap, more often than not.
Electric engines are required with steam turbines and RTG to convert the power into actual engine power. Do note that they become more efficient when their maximum load is restricted. This means that if you can afford the space for more batteries, you can improve the efficiency of your steam turbines and RTGs. This last part was removed in a recent update, this may or may not be permanent.
Fuel engines are typically the most cost-efficient engines for non-injector setups. They are extremely versatile with tweakable battery charge settings or straight up engine power. You can trade space-efficiency for cost-efficiency quite handily with turbocharger engines.
Steam is very powerful, but does not like fluctuations in demand.
– Ammunition management: you don’t always need to have perfect sustainability for your ammo. For larger vehicles, you can even disconnect some weapons using ACBs to turn off wireless receivers on your local weapon controllers if ammo gets low.
– Increasing vehicle survivability: repair bots are not meant to be a form of defense and will, by far, cost you more resources to keep a vehicle alive than real defenses. Armour has come a long way since older updates and offers significant protection. Do keep in mind that extra armour can slow your vehicle through added drag, makes you a slightly bigger target, and can make it more difficult to float or fly. Smoke, missile interceptors, CIWS, LAMS systems, shields and even speed and unpredictable movements should be considered first. Do ask yourself if you’re going to use certain vehicles at greater ranges and with larger friendly vehicles that may draw fire away from squishy targets.
– Weapon breakdown: [WBRD]
Missiles are nice and compact, but are one of the most easily countered weapon type. Spamming missiles can overwhelm defenses, but it is expensive. They are best on smaller vehicles or as a supplement on vehicles with other forms of offense.
Cram cannons are quite powerful, but struggle against faster vehicles. They can also be countered by LAMS. They are, however, one of the more cost-effective options to fight large ships.
Advanced cannons are quite versatile in theory, but these weapons should be designed with a specific purpose in mind to be truly effective. Different shell types have different requirements, strengths and weaknesses which will require different characteristics for the firing piece.
Lasers are possibly the strongest weapon in the game, though they have rather effective counters unless you go into astronomical running costs and use an over-the-top amount of doublers.
Particle accelerator cannons are actually often overestimated because they cannot really be defended against in a meaningful way. Armour is the only form of defense here for this weapon besides range, but it is not particularly cost-efficient for the damage it deals.
– Propulsion breakdown: [MBRD]
Custom jets are one of the most space-efficient block in terms of sheer power and require no engine power to run. However, they drink fuel and do not work in space or water.
Dedicated heliblade spinners are practically equivalent to custom jets, but they are far more versatile in the sense that they can work in 2 directions instead of only one. They can also be used without engine power if motor drive is set to zero, though this is far less space-efficient. The main drawback is that they require a lot of small delicate parts which are easily destroyed if exposed to damage. They work in water but not in space.
Jet engines are similar to custom jets, but require engine power instead of running off fuel directly. They are quite space-efficient but do not work in space or water.
Ion engines are worse than regular jet engines in both cost-efficiency and space-efficiency, but they work in water and, more importantly perhaps, in space as well.
Water propellers are extremely efficient, but work only in water.
Steam propellers are decent in terms of space efficiency and allow greater speeds in water with fewer propellers, but are more complicated to set up and create more potential points of failure since they will stop working if disconnected from their engine or if their engine is damaged..
Up to date video tutorials [VIDT]
Unfortunately, there are very few videos I can recommend at this time since a lot was made obsolete during the game’s development.
My own Youtube tutorials
I have a growing collection of up-to-date tutorials.
https://www.youtube.com/channel/UCXjzJXurqJJWQB9fNll2W_w
Useful blueprints [UBPS]
Guaibee’s useful fuel engines platform:
Prefab parts of or complete engines for use in your vehicles because who has time to design good engines these days??
PARTIALLY OUTDATED BUT STILL USEFUL KINDA SORTA
[link]
Scott’s Engine Platform
Up-to-date engine platform with some good turbo designs among other things.
[link]
Compact Extendable Fuel Engine Platform
Up-to-date engine platform with a variety of compact designs.
[link]
Fancy Control Platform:
One of my own creations to provide concrete examples of stuff you can do with ACBs and AI mainframes. Needs to be updated with breadboard stuff.
[link]
Special Thanks
– Awellner, for being generally knowledgeable, helpful, and providing detailed information on armour and APS shells.
– BorderWise and his community, for being helpful, making tutorials, and more.
– Blarint from BorderWise’s community for providing examples and information for the breadboard section.
Version History
No longer planning major updates.
– April 11: Tweaked some numbers; remove the campaign section
– November 5th: revised most of the guide for release; deleted outdated sections
– March 25th: revised most of the guide for the new devtest; made corrections to the HE section, added my videos about breadboards, and corrected several typos
– January 7th: revised most of the guide for changes to the game since July up to the current devtest
– July 26th: quick update to sections mentioning lasers in light of new information and laser update
– June 27th: tiny update to the campaign section to account for the new main menu
– June 26th: added section about the propulsion editor and a few screenshots, corrected information regarding the interaction between smoke and detection
– June 20th: major update to the breadboard section and the PID section, & more
– June 8th: formatting, HEAT and HESH subsections, screenshots, campaign, breadboard stuff
– April 24th: first draft